1
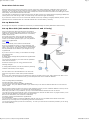
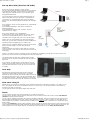
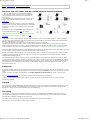
Spare home hub as a switch
Page 1
| Home | Homehub Index | Wireless repeater connection |
Use your spare BT Home Hub as a wired ethernet switch and WAP!
This will add wireless to a non-wireless modem, or
extend wireless access to a room such as a basement,
using a spare BT Home Hub and an ethernet cable or
Home Plugs.
If you have difficulty following the article there is also a
"jargon free" verbose version for Version 1 hubs only
(Click here)
This has been tested on Version 1 slave hubs (left hand
picture) on all firmwares, BT and Speedtouch. Also tested
on version 1.5 hubs but they should only be used on BT
firmwares.
Also tested using slave V2.0 hubs (Right hand picture)
using standard firmware. See here for versions.
Note: This is a multi-page webpage. If it does not page
properly when printed, it is also available as a pdf
document.
ADSL router modems using standard ethernet protocols and can usually have another router (or "switch") plugged
into one of the ethernet ports to extend the network through solid walls or over longer distances to extend wireless
access to difficult areas - like a cellar!.
Any router can behave as a switch if the DHCP IP address server is switched off.
The diagrams show the end product. When it is fully set up the slave hub will simply be connected to the mains
power supply and can be put in an attic, garage or wherever an ethernet cable will pass so that you can extend the
wireless range through walls that are opaque to wireless signals. The slave is NOT connected to the phone line!!
Using two hubs wired together allows use of WPA/WPA2 encryption and I would strongly recommend setting the slave
hub (and master hub if it has Wi-Fi) to WPA because WEP is easily crackable.
Another advantage of having two wifi hubs wired together is that you can connect wirelessly to the master to make
changes to wireless settings on the slave, and vice versa. So you can connect by wireless and still alter wireless
settings without getting cut off!
The significant thing is that the master hub has no special settings and therefore the master hub can be any make
with an ethernet port in order to connect to the slave hub. I have a friend who moved to Sky broadband but used his
Home Hub V2.0 as a slave because Sky did not supply a wireless-n router. However you will need to know the range
of IP addresses that the master hub will accept. The IP address settings in this article assume the master is a BT
Home Hub of some sort.
Telephony
I originally thought that the hub phones would not function on the slave home hub, however recent postings on TheScream.co.uk and filesaveas.co.uk show that it can be done by fooling a version 1 slave hub to think that it is on the
web.
Version 1.5 hubs you might coax into action, but forget telephony on Version 2.0 slave hubs - can't be done.
See my Repeaterhub Phone page for details of how to use hub phones on V1 repeaters.
I have it on good authority that functions which rely only on ethernet, such as BT Vision, do work on the slave
without any changes.
Caution
The Home Hub is unpredictable! Whereas the following should work, getting the hub to connect to a wifi PC can be a
pain at the best of times. The following worked for me but if you are not prepared to experiment and repeat the
process til it works you may be disappointed. See Troubleshooting.
The setup
The sequence is important!! If you want to go your own way, or go back into a standalone slave with no master
connected after switching off the DHCP you are advised to fix the IP addresses in the PC to 192.168.1.100, subnet
255.255.255.0, Gateway and DNS of 192.168.1.254
The master hub is powered up and connected to the ADSL filter and the phone socket.
The slave hub is not connected to anything at this stage.
http://www.jarviser.co.uk/jarviser/repeaterhubswired.html
04/02/2009 10:26:26
Spare home hub as a switch
Page 2
Reset slave hub to start
Reset the slave hub by doing a "hard reset". This will remove any DHCP restrictions if FON was used on the hub at
any time. On the original V1 hub (shown) do this by holding in the wireless association button on the back for 15
seconds or so, until all lights come on and a click is heard, then release the button and wait for the data light to come
back steady. The wireless should also come back.
You may have to reboot the PC to regain access to the hub after a reset. N.B. Despite some web postings, NEVER turn
off the power to the hub during a reset, or indeed at any time whilst the lights are flashing!
If you have one of the V1.5 or the V2.0 hubs with buttons on the side, resetting is a slightly different process - push a
paperclip into the recessed button for 3 seconds and wait for it to settle down (5 minutes).
Set up Master hub
No changes are required in the Master Hub. However you should change the admin password as basic security.
Set up Slave Hub (this section Versions 1 and 1.5 only)
Plug in the Slave Hub which should not be connected to
anything else at this stage. When booted, connect PC to the
slave hub by ethernet and then Boot the PC. If necessary
disable wifi on the PC.
Go to http://192.168.1.254 to get into hub manager
On later firmwares you will be asked to enter the serial
number or the default password, plus your new password
(twice) e.g. mypassword2.
(see here)
Click on “advanced”, then “Continue to Advanced”
On 6.2.2.6 firmware or earlier you will be asked for user
name and password - User Name is admin and Password is
admin, but if you are on later firmwares the user is admin
but the password will be whatever you changed it to e.g.
mypassword2
If you are on 6.2.2.6 or older, you are advised to change
the password now.
go to System
In Admin Access change admin password to mypassword2
(for example).
You will then be asked for your name and new password enter these to continue
Whichever firmware you are using, proceed with the
following changes...
In Configuration/Firewall, turn off the firewall by selecting
"Disable" radio button, and hit “apply”
We now need to set a fixed IP address in the slave hub
within the range of the master hub's private IP address
pool.
IF you are using a BT home hub for the master the range is 192.168.1.64 thru 237, and I suggest 192.168.1.175 in
the text below. If you use a different make, you should replace this with a suitable IP address!
Click on Configuration/.IP addresses
Uncheck DHCP box, and hit "Apply"
You will see two blank boxes for adding IP addresses.
Type 192.168.1.175 (or an address suited to your master hub) in the first box and 255.255.255.0 in the next box
and hit “Add”
Now we need to access the slave hub using its new IP address. Unless you have a static IP address in the PC, do not
switch off the PC at this stage or you will lose the DHCP assignment.
Enter http://192.168.1.175 (or whatever you set) in the browser address bar and hit enter or click Go
You may get a screen saying that the hub is not connected to the internet. Do NOT hit the "Try Again" button, but reenter the slave IP address to get the slave hub's Home Page.
Now click on “advanced”, then “Continue to Advanced”
User Name is admin and Password is mypassword2
Go to IP Addresses.
You will now have a stack of 4 static IP addresses with the new one you just added at the bottom of the stack.
Delete the top 3 working from the top deleting 192.168.1.254 last of all.
You will get a warning that you will lose connectivity - hit “OK” (You will not lose connectivity because you are using
the new IP address!)
http://www.jarviser.co.uk/jarviser/repeaterhubswired.html
04/02/2009 10:26:26
Spare home hub as a switch
Page 3
Set up Slave Hub (Version 2.0 hubs)
On the V2.0 hubs the process is a little simpler.
The V2 hub should be powered up without being connected
to anything at this stage. Connect to the PC by ethernet
cable (any port) and boot the PC. In your browser go to
http://bthomehub.home
You will be asked to enter the default password from the
label on the back of the hub, plus type in a password of
your choice, e.g. mypassword2, twice in the two boxes,
then click on the "Change password and open hub manager"
button
Go to "Settings" (enter the new password e.g. mypassword2
if requested )
Go to "Advanced Settings", and confirm "Continue to
advanced settings".
Go to "Application Sharing" then "Firewall". Click on
"Disable" then hit "Apply".
Go to "Home Network" then "IP Addresses"
In DHCP server Click on the enabled "No" and hit "Apply"
Then on the Hub IP Address above it, where it says
192.168.1.254, overtype "254" with "175" and hit "Apply".
(Note if you are using a master hub other than another
home hub, you will have to change the whole IP address to
something that is acceptable by your master hub)
Unless you have a static IP address in the PC, do not switch
off the PC at this stage or you will lose the DHCP
assignment.
Close the browser, then open it again and put in the URL
"http://192.168.1.175" and you will return to the slave hub
home page.
That's it, you have a V2 slave hub which will give you draft-n wi-fi capability, though you can never use the hub
phones on it as the firmware is uncrackable at the time of writing this.
This photo shows My setup of V1 master and V2.0 slave.
The wifi in the V1 has been switched off. Note the lights on
both hubs.
If you want to use powersave or access controls you will
need to go into System and set the time server to manual
and enter date and time as it will not sync to time servers
as a slave.
Last step
Disconnect the ethernet cable from the slave hub and
connect an ethernet cable (or Homeplugs - see below)
between one of the ethernet ports on the master and one of
the ethernet ports in the slave. The slave should then have
just two lights showing - Wireless and Data. You may have
to reboot one or both hubs to get the connection to activate.
Now start using it!
Reboot the PC you wish to be connected to the repeater and connect to “slavehub” wirelessly, or by cable, as you
wish. The master hub will issue the IP address to your PC via the slave. You can also connect to the master by
wireless or by cable, as you wish.
You can get into either hub's admin pages from either hub.
Notes
You can connect to either hub either wirelessly or by cable as convenient.
You can use any wireless channel and they don't have to be the same on both hubs. In fact I would use different
channels to reduce possible conflicts.
You can use any SSID and encryption key and can use WEP or WPA-PSK, and the encryption keys do not have to be
the same when wired together like this (unlike linking the hubs wirelessly ). Bear in mind if you have WEP on the
slave and WPA on the master, if someone hacks the WEP key the whole system is accessible, so I recommend using
WPA on both!
You can use Homeplugs (various makes available) which plug into the nearest mains socket to each hub and use the
house 13amp wiring to transmit data instead of the ethernet cable. That way you can use the house wiring to link the
hubs together over a much larger distance, provided both mains sockets are on the same electricity meter.
http://www.jarviser.co.uk/jarviser/repeaterhubswired.html
04/02/2009 10:26:26
Spare home hub as a switch
Page 4
Using two home hubs may mean that each has 192.168.1.253 assigned to their USB-A socket and you may not be
able to successfully mount a drive on the USB-A without more work, because the PC may be confused as to which is
which. Using Speedtouch firmware on a V1 slave will get round this problem.
I suggest using different admin passwords for both hubs, as it's easy to lose track of which hub you are logged into.
If you have Firefox or similar,I suggest bookmarking the two hub addresses on the Bookmarks Toolbar.
Finally: If you need to connect directly to the slave after switching off DHCP you may have to set a fixed IP on the PC,
but if connecting to the slave via the master, the master should issue an IP address to the PC as normal.
Roaming
Once you have got the setup working, you can experiment with Roaming. That is by using the same SSID on both
hubs the PC should automatically connect to the strongest signal and should change to the strongest signal if the
first gets weaker. As this is a feature of your PC wireless management I will let you experiment, but I have had one
person (thanks Iain) write to me to tell me it does work.
IP addresses
I have recommended 192.168.1.175 as the slave IP address. I changed this from my previous suggestion of .75 as it
was a bit too near the working range fo people with more than 10 network devices (and that is not unusual if you
have webcams, network hard drives, vision boxes etc.
It has been further suggested to use an IP outside the hub's DHCP range and I know that 192.168.1.60 works fine
with no danger of it interfering with the hub's assignment range of 192.168.1.64 to .237
I think it really means use an address either below the private range, or near the top end of the private range, but
any IP in that subnet will probably work just fine.
Troubleshooting
You may have to reboot one or both of the hubs to activate the ethernet link.
If you can't connect using Wi-Fi to one of the hubs, it will be nothing to do with this change, but try the following.
Try different channel,
If you are on 6.2.6.B/C/E, get the latest firmware.
Make sure you don't try to connect with Wifi and Ethernet at the same time.
Try to use Windows to manage your Wifi rather than BT (I never use any BT software from the CD)
Try fixed IP on the PCs in the range 192.168.1.76 upwards.
Try a different firmware version .
Vista - when using Vista to connect wirelessly, it can take one or two minutes to complete the connection, starting
with "Local Access Only", before getting an internet connection. Just leave it til the Notification Area icon gets its little
blue ball.
Don't write to me - experiment!
Acknowledgements
Lots of help came from contributors on Home Hub Forum and especially the contributors "nbridge" and "Bramshot".
Citations
"We subscribed to BT Broadband for a couple of years but never used the Version 1 HomeHub that we were sent,
preferring not to replace the D-Link wireless router that I already had set up. I have recently subscribed to the O2
Broadband service, and have installed their O2 Wireless Box to replace the D-Link. This is connected to a 20" iMac by
ethernet, and a G4 Powerbook, MacBook Pro, two Airport Express base stations and an iPhone connect to the wireless
network. Our cottage has a thick stone wall running through the middle of it which means that the wireless signal is
strong on the side where the O2 box is sited, but weak and variable on the other side. To improve the signal, I have
used your guidance to connect the HomeHub to the O2 box by an ethernet cable running through the wall, giving me
a good wireless signal on both sides. " Roger G. Nov 08 by email.
"Ages ago I was trying to set up my home hub as a slave hub to my college's master network. Pleased to say after
lots of jigging settings etc, it worked...The set-up was pretty much exactly as your article says, only changing the ip
address as the college range is an odd one."
(Danatoakhill, Filesaveas Home Hub Forum)
| Home | Homehub Index | Wireless repeater connection |
http://www.jarviser.co.uk/jarviser/repeaterhubswired.html
04/02/2009 10:26:26