1
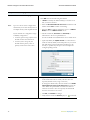
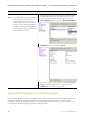
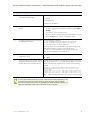
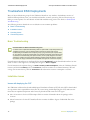
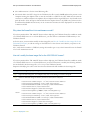
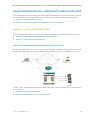
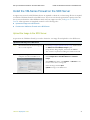
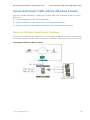
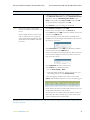
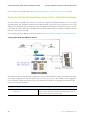
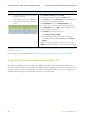
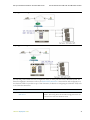
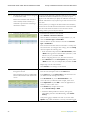
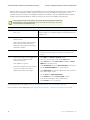
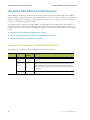
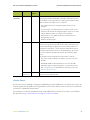
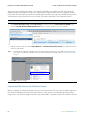
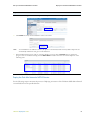
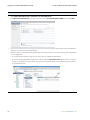
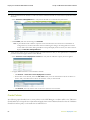
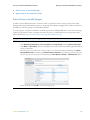
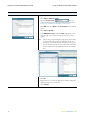
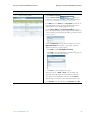
Secure North-South Traffic with the VM-Series Firewall
Set Up a VM-Series Firewall on the Citrix SDX Server
Set up the VM-Series Firewall Before the NetScaler VPX with Virtual Wire Interfaces (Continued)
Step 2
Re-cable the client-side interface assigned If you have already deployed a NetScaler VPX and are now adding
the VM-Series firewall on the SDX server, you have two ports
to the NetScaler VPX.
assigned to the VPX. When you deploy the VM-Series firewall, the
Because the NetScaler VPX will reboot
NetScaler VPX will now only require one port that connects it to the
when recabled, evaluate whether you
server farm.
would like to perform this task during a
Therefore, before you configure the data interfaces the VM-Series,
maintenance window.
you must remove the cable from the interface that connects the VPX
to the client-side traffic and attach it to the firewall so that all
incoming traffic is processed by the firewall.
Step 3
Configure the data interfaces.
1.
Launch the web interface of the firewall.
2.
Select Network > Interfaces> Ethernet.
3.
Click the link for an interface, for example ethernet 1/1, and
select the Interface Type as Virtual Wire.
4.
Click the link for the other interface and select the Interface
Type as Virtual Wire.
5.
Each virtual wire interface must be connected to a security zone
and a virtual wire. To configure these settings, select the Config
tab and complete the following tasks:
a. In the Virtual wire drop-down click New Virtual Wire, define
a Name and assign the two data interfaces (ethernet 1/1 and
ethernet 1/2) to it, and then click OK.
When configuring ethernet 1/2, select this virtual wire.
b. Select New Zone from the Security Zone drop-down, define
a Name for new zone, for example client, and then click OK.
Step 4
Create a basic policy rule to allow traffic
through the firewall.
6.
Repeat step 5 for the other interface.
7.
Click Commit to save changes to the firewall.
1.
Select Policies > Security, and click Add.
2.
Give the rule a descriptive name in the General tab.
This example shows how to enable traffic 3.
between the NetScaler VPX and the web
servers.
4.
5.
6.
In the Source tab, set the Source Zone to the client-side zone
you defined. In this example, select client.
In the Destination tab, set the Destination Zone to the
server-side zone you defined. In this example, select server.
In the Application tab, click Add to select the applications to
which you want to allow access.
In the Actions tab, complete these tasks:
a. Set the Action Setting to Allow.
b. Attach the default profiles for antivirus, anti-spyware,
vulnerability protection and URL filtering, under Profile
Setting.
7.
Verify that logging is enabled at the end of a session under
Options. Only traffic that matches a security rule will be logged.
40
VM-Series Deployment Guide