1
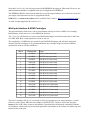
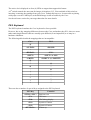
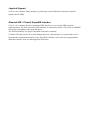
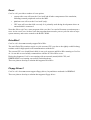
CooCoo v0.1
Tandy Color Computer 1 & 2
FPGA Implementation
User Reference Manual
Document Revision 0.9
Table of Contents
Introduction..........................................................................................................................................3
What is CooCoo?.............................................................................................................................3
The Short Version........................................................................................................................3
The Long Version........................................................................................................................3
Seriously, you're calling it 'CooCoo'?..............................................................................................3
Credits...................................................................................................................................................4
Features.................................................................................................................................................5
In Depth................................................................................................................................................6
6847 VDG........................................................................................................................................6
Color Basic......................................................................................................................................6
Extended Color Basic......................................................................................................................6
Disk Extended Color Basic..............................................................................................................6
HDBDOS.........................................................................................................................................6
Multi-pak Interface & ROM Cartridges..........................................................................................7
PS/2 Keyboard.................................................................................................................................8
Video Output....................................................................................................................................9
Colour Artifacting............................................................................................................................9
Cassette I/O......................................................................................................................................9
Bit-Bang Serial Port.........................................................................................................................9
Joystick Support.............................................................................................................................10
Glenside IDE / Cloud-9 SuperIDE Interface.................................................................................10
Reset...............................................................................................................................................11
DriveWire?.....................................................................................................................................11
Floppy Drives?...............................................................................................................................11
Target Reference.................................................................................................................................12
TerASIC DE1.................................................................................................................................12
Getting Started..........................................................................................................................12
Keys & Switches.......................................................................................................................12
LEDs.........................................................................................................................................13
HDBDOS & IDE images..........................................................................................................13
Introduction
What is CooCoo?
The Short Version
CooCoo v0.1 is an FPGA implementation of the Tandy Color Computer 1 and 2.
The Long Version
CooCoo v0.1 is the just first phase of a long term project aimed at enhancing the experience of
Tandy Color Computer (CoCo) enthusiasts.
The CooCoo project is designed to ultimately offer a muti-faceted emulation of the whole CoCo
line – and more. Whilst striving to achieve 100% emulation accuracy in all aspects of the legacy
Coco computers, it also provides enhanced performance & features and enables the integration of
modern hardware for added convenience, all the while preserving the original retro experience.
Additionally, compatibility with the original peripherals, as far as possible, is also a priority.
CooCoo v0.1 is an FPGA implementation of the Tandy Color Computer 1 and 2. The initial release
is targeted to the TerASIC DE1 FPGA development board, and its capabilites are based on the
hardware on this target. However, requests for ports to other targets will be considered.
As mentioned, CooCoo v0.1 is just the intial stage; a proof-of-concept or experimental phase, and is
not purported to meet all of the goals of the ultimate CooCoo project.
Please also note that specifications of the greater CooCoo project are not publicly available at this
time.
Seriously, you're calling it 'CooCoo'?
Coco enthusiasts have been around for over a quarter of a century now, and pretty much every
moniker even remotely related to 'CoCo' has been used and abused. Newsletters, magazines, user
groups and more lately web sites & emulators have exhausted anything I could come up with.
And Gary Becker has taken the obvious.
My colleague has always been somewhat bemused by the interest I have taken in the Coco, and by
the lengths to which myself and other Coco enthusiasts have taken this hobby. Quite frankly, he
insists we're all mad, and when I finally convinced him to help out with this project, he christened it
'CooCoo'. And it has stuck.
Credits
The CooCoo project leverages off work undertaken by a number of people and/or groups, without
whom the development would have been a lot more difficult and taken a lot longer.
In no particular order, credit goes to:
•
John Kent, designer of the CPU09 (6809) and PIA6821 cores.
•
Richard Herveille, author of the Opencores IDE Controller (OCIDEC-1)
•
Peter Wendrich, author of FPGA64 (C64 emulator)
•
Daniel Wallner, author of PS/2 serial (input) port
•
Boisy Pitre & Mark Marlette from Cloud-9, suppliers of HDBDOS
•
Gary Becker, author of Coco3FPGA
In addition, there's always people on hand only too happy to provide answers, advice and even
equipment, including:
•
John Kent, Boisy Pitre, Mark Marlette & Gary Becker as mentioned above
•
Bob Devries, occasional donator of retro equipment, including Coco stuff
•
Heaps of other helpful people on the Coco Mailing List, too numerous to mention
Apologies to anyone I've forgotten.
Features
CooCoo v0.1 emulates the Tandy Color Computer 1 & 2, with the following features/options:
•
6809 running at 0.89MHz
•
6847 or 6847-T1 VDG
•
PAL/NTSC video output
•
64KiB RAM
•
Color Basic v1.0/1.1/1.2
•
Extended Color Basic (ECB) v1.0/1.1
•
Disk Extended Color Basic (DECB) - any version
•
Multi-pak Interface & ROM cartridges
•
HDBDOS - any version (LBA mode)
The FPGA implementation has the following features/options:
•
PS/2 keyboard input
•
15kHz or 30kHz RGB video (VGA) output
•
Rudimentary color artifacting emulation
•
Cassette input/output via line-in/line-out connectors
•
Bit-bang serial port
•
Support for up to sixteen 16KiB ROM cartridges programmed into on-board flash
•
Joystick support via Nintendo Gamecube Controller
•
Glenside IDE / Cloud9 SuperIDE Interface support via CF/SD card
Other features/options to be considered for implementation include:
•
Floppy disk support/emulation
•
Support for high-speed operation
•
Mouse support
•
High Resolution Joystick support
•
Deluxe RS-232 support
•
Orchestra-90 support
In Depth
6847 VDG
The Color Computer 1 used the original MC6847 VDG. The Color Computer 2 used the enhanced
MC6847T1 VDG, which had lower case characters and the ability to change the text screen border.
In addition, each variant has a PAL & NTSC version of the device and character ROM.
The PAL version outputs an extra 25 lines at the top and bottom of the display, to give a 50Hz
screen refresh rate. Note that the PAL option is not suitable for most VGA monitors.
Selection of the VDG and font are build-time options.
By default, CooCoo v0.1 is built with the NTSC T1 variant.
Color Basic
The Color Basic ROM resides in the FPGA image bitstream. As such it is a build-time option.
By default, CooCoo v0.1 is built with the v1.1 Color Basic ROM.
Extended Color Basic
The Extended Color Basic (ECB) ROM resides in the FPGA image bitstream. As such it is a buildtime option.
By default, CooCoo v0.1 is built with the v1.1 ECB ROM.
Disk Extended Color Basic
The Disk Extended Color Basic ROM is read from the flash device on the target hardware (see
reference section for your target for instructions on how to program the flash). As such it is not
supplied with CooCoo v0.1.
Note that CooCoo v0.1 does not provide emulation of floppy drives. Thus the DECB ROM by itself
is of little utility atm.
CooCoo v0.1 has been developed with the v1.1 DECB ROM.
HDBDOS
HDBDOS enables you to use a CF/SD card to emulate up to 256 floppy drives, and at the same
time use it as a hard drive for use with OS-9/NitrOS-9. It is the most powerful & convenient means
for running Coco software on CooCoo v0.1.
It is beyond the scope of this manual to detail the operation of HDBDOS. Suffice it to say that the
format of the CF/SD card used on CooCoo is 100% compatible with that used on the Glenside IDE
or Cloud-9 SuperIDE Interface on a real Coco; you can switch between platforms at will, provided
you are using compatible patches of HDBDOS.
Note that CooCoo v0.1 has only been tested with HDBDOS operating in LBA mode. However, the
implementation should be compatible with any configuration of HDBDOS.
The HDBDOS ROM is read from the flash device on the target hardware (see reference section for
your target for instructions on how to program the flash).
HDBDOS is a commercial product and is available from Cloud-9 <http://www.cloud9tech.com>.
As such it is not supplied with CooCoo v0.1.
Multi-pak Interface & ROM Cartridges
The target hardware flash device can be programmed with up to sixteen 16KiB Coco cartridge
ROM images, which acts as a 16-slot Multi-pak Interface.
The 1st two (2) 16KiB slots are reserved for DOS ROM images and will not auto-start. Unlike the
real MPI, Disk Basic is not required to reside in slot #4.
The remaining 14 16KiB slots are meant for non-DOS ROM images and will auto-start when
'inserted' into the emulation. It is recommended that any cartridge images less than 16KiB be
replicated in order to fill the 16KiB slot.
Slot #
Flash Addr
Notes
0
0x00000
DOS #1 (non auto-start)
1
0x04000
DOS #2 (non auto-start)
2
0x08000
Non-DOS #1 (auto-start)
3
0x0C000
Non-DOS #2 (auto-start)
4
0x10000
Non-DOS #3 (auto-start)
5
0x14000
Non-DOS #4 (auto-start)
6
0x18000
Non-DOS #5 (auto-start)
7
0x1C000
Non-DOS #6 (auto-start)
8
0x20000
Non-DOS #7 (auto-start)
9
0x24000
Non-DOS #8 (auto-start)
10
0x28000
Non-DOS #9 (auto-start)
11
0x2C000
Non-DOS #10 (auto-start)
12
0x30000
Non-DOS #11 (auto-start)
13
0x34000
Non-DOS #12 (auto-start)
14
0x38000
Non-DOS #13 (auto-start)
15
0x3C000
Non-DOS #14 (auto-start)
The active cartridge slot (0-15) is selected via four (4) switches on your target hardware, or from
software via the legacy MPI slot-select address (65407/$FF7F). The port is selected using the
bottom 4 bits of the value written to this address. Note that this is backwards-compatible with the
real hardware, which only had 4 slots but required the slot number to be written to both the top and
bottom 4 bits of the port.
The active slot is displayed on four (4) LEDs on targets that support this feature.
A 5th switch controls the auto-start for images in locations 2-15. You can think of this switch as
inserting / removing the cartridge from your Coco. Technically however, it's more akin to placing
sticky-tape over the CART# pin, as the ROM image is still accessible by the Coco.
See the reference section for your target harwdare for more details.
PS/2 Keyboard
The PS/2 keyboard emulates the Coco keyboard as far as possible.
However, due to key mapping differences between the Coco and modern-day PC's, there are some
rather annoying differences that are actually quite difficult (if not impossible) to re-map in a
hardware emulation.
The following table details the mappings that are incompatible:
Coco
PS/2
@
`
<CLEAR>
<HOME>
:
'
<BREAK>
<INS>
<LEFT>
<LEFT> or <BS>
<SHIFT>
<LSHIFT> or <RSHIFT>
@
`
"
@
&
^
'
&
(
*
)
(
=
_
+
:
*
"
There are also a number of special keys assigned to the PS/2 keyboard:
PS/2 Key
<CTRL><ESC>
Function
Platform reset
<F3>
CPU reset
<F10>
VDG debug display
<F11>
Joystick #1 button
<F12>
Joystick #2 button
<KEYPAD+>
Volume up
PS/2 Key
<KEYPAD->
Function
Volume down
Video Output
CooCoo v0.1 can output either 15kHz or 30kHz RGB video.
15kHz is suitable only for RGB monitors that scan at this rate, such as the Tandy CM8 or
Commodore 1084(S) series and clones. Alternatively, on target hardware with composite video
output, it may be connected to a suitable TV or composite monitor.
30kHz is suitable for modern-day VGA monitors.
This is a build-time option.
By default, CooCoo v0.1 is built with the 30kHz (VGA) option.
Colour Artifacting
CooCoo v0.1 has a very crude colour artifacting implementation.
The algorithm simply chooses one of four (4) colours from two adjacent pixels in 2-colour graphics
mode only, and replaces both pixels with that colour.
This feature is experimental and there is no claim that this emulation is either accurate or useful.
Cassette I/O
CooCoo v0.1 emulates cassette I/O via line-in / line-out connectors on the target hardware (if
applicable).
Since the sound output is also on the line-out connector, there is a switch on the target hardware that
selects between cassette or sound (audio) output.
Note that line-level audio is not compatible with the Coco cassette signal levels.
The Coco is expecting +/-5V on the audio input, where-as line-level audio is only 1Vp-p.
Connecting the CooCoo cassette output to the CoCo cassette input port will require some
amplification.
[Input TBD]
Bit-Bang Serial Port
CooCoo v0.1 emulates the bit-bang serial port via the RS232 connector on the target hardware (if
applicable).
Note that some timing-critical serial port code will not run correctly on CooCoo v0.1 as the softcore 6809 is not cycle-accurate.
Joystick Support
CooCoo v0.1 emulates Tandy analogue joystick input via the Nintendo Gamecube controller.
[further details TBD]
Glenside IDE / Cloud-9 SuperIDE Interface
CooCoo v0.1 emulates the above-mentioned IDE interfaces via an on-chip IDE controller
implementation. The back-end of the IDE controller is connected to either a CF socket or SD/MMC
card socket, depending on the target hardware.
The IDE functionality is register-compatible with either controller.
CF and/or SD cards can be freely interchanged between a functioning Coco system and CooCoo.
Note that the extended functionality of the SuperIDE controller, such as the user-programmable
flash and real-time clock, are not supported at this time.
Reset
CooCoo v0.1 provides a number of reset options.
•
system-wide reset will reset the Coco itself and all other components of the emulation,
including external peripherals such as the MPI.
•
platform reset will reset the Coco itself (only).
•
CPU reset will reset the 6809 core only. It is primarily used during development where an
external 6809 is connected.
Note that, like a real Coco, some programs 'take over' the Coco and will resume execution upon a
reset. As on a real Coco, in these cases the target hardware must be power-cycled in order to wipe
system memory and restore control to the BASIC ROM.
DriveWire?
CooCoo v0.1 does not currently support DriveWire.
The stock DriveWire routines require a cycle-accurate CPU core due to the tightly-coded bit-bang
routines used for high-speed serial communcations with the PC.
The current CPU core (Jonh Kent's 6809) is not cycle-accurate and DriveWire running on CooCoo
v0.1 is not able to successfully communicate with the PC DriveWire server.
During development, CooCoo was running with an external (actual) 6809 CPU, and
HDBDOSDW3 was running successfully on this hardware.
There are plans to develop a solution that supports DriveWire.
Floppy Drives?
CooCoo v0.1 does not current support floppy drives, beyond those emulated via HDBDOS.
There are plans to develop a solution that supports floppy drives.
Target Reference
TerASIC DE1
The TerASIC DE1 is the de-facto standard target hardware for CooCoo v0.1.
Getting Started
Detailed instructions regarding the set-up and configuration of your DE1 are beyond the scope of
this manual. You may need to consult your DE1 documentation.
To run the base CooCoo design you will need:
•
DE1 hardware
•
VGA monitor
•
PS/2 keyboard
•
DE1 control panel software and USB cable
After setting up your DE1 and connecting the programming cable:
•
ensure all switches are in the OFF position
•
program the CooCoo SOF file into your DE1
You should now see the CoCo ECB screen.
Keys & Switches
The following table details the key functions for CooCoo v0.1 on the DE1:
Button
Function
KEY0
System-wide reset; including external peripherals
KEY1
Platform reset; reset all hardware physically inside a real Coco
KEY2
CPU reset
KEY3
(not assigned)
The following table details the switch function for CooCoo v0.1 on the DE1:
Switch
SW3:0
Function
Cartridge image select (0-15)
SW4
CART# (insert/remove cartridge)
SW5
Cassette output to speaker
SW6
Enable video artifacting in 2-colour mode
SW7
Swap joystick left/right
SW8
(not assigned)
Switch
SW9
Function
(not assigned)
LEDs
The following table details the values assigned to the LEDs on the DE1:
LED
Function
L3:0
Active cartridge slot (0-15)
L9:4
(not assigned)
HDBDOS & IDE images
The SD/MMC slot on the DE1 enables you to use an SD card as an IDE device for use with
HDBDOS.
The SD card contains a straight sector-dump of an CF card image prepared either on a real Coco or
with the VCC (Coco emulator) SIDEUTIL program, for example. The latter utility provides a very
quick and convenient method for copying a number of floppy disk emulator (.DSK) images directly
onto the SD card. See the VCC Coco emulator site for details.
Once you have configured HDBDOS for your target media (note that only LBA mode has been
tested at this point), program the DOS image into the flash at either of the 1st two locations using the
DE1 control panel software. Select the HDBDOS image using the DE1 switches as detailed above.
Insert the SD card into the DE1, power-on the DE1 and program the SOF image. You should be
able to access the virtual floppy drives from HDBDOS as per usual.