1
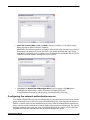
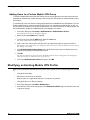
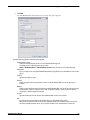
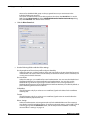
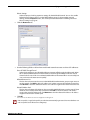
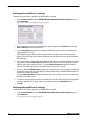
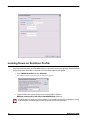
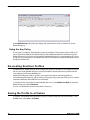
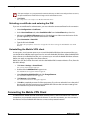
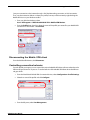
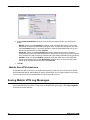
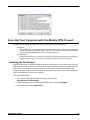
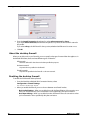
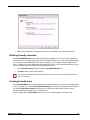
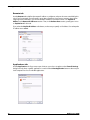
WatchGuard®Mobile VPN with
IPSec Administrator Guide
WatchGuard Mobile VPN v10.0
Revised: November 28, 2007
Notice to Users
Information in this guide is subject to change without notice. Companies, names, and data used in examples herein are
fictitious unless otherwise noted. No part of this guide may be reproduced or transmitted in any form or by any means,
electronic or mechanical, for any purpose, without the express written permission of WatchGuard Technologies, Inc.
Copyright, Trademark, and Patent Information
Copyright© 1998 - 2007 WatchGuard Technologies, Inc. All rights reserved.
Complete copyright, trademark, patent, and licensing
information can be found in the WatchGuard System
Manager User Guide. You can find it online at:
http://www.watchguard.com/help/documentation/
All trademarks or trade names mentioned herein, if any, are the property of their respective owners.
Client Software: Mobile VPN with IPSec v10.0
Management Software: WSM 9.1 and Edge v 8.6.x
Appliance Software: Fireware 9.1 and Edge v8.6.x
ADDRESS:
ABOUT WATCHGUARD
WatchGuard is a leading provider of network security solutions for small- to midsized enterprises worldwide, delivering integrated products and services that are
robust as well as easy to buy, deploy and manage. The company’s Firebox X family of
expandable integrated security appliances is designed to be fully upgradeable as an
SUPPORT:
organization grows and to deliver the industry’s best combination of security,
www.watchguard.com/support
U.S. and Canada +877.232.3531
performance, intuitive interface and value. WatchGuard Intelligent Layered Security
All Other Countries +1.206.521.3575 architecture protects against emerging threats effectively and efficiently and provides
the flexibility to integrate additional security functionality and services offered
SALES:
through WatchGuard. Every WatchGuard product comes with an initial LiveSecurity
U.S. and Canada +1.800.734.9905
All Other Countries +1.206.613.0895 Service subscription to help customers stay on top of the security landscape with
vulnerability alerts, software updates, expert security instruction and superior
customer care. For more information, please call (206) 613-6600 or visit
www.watchguard.com.
505 Fifth Avenue South
Suite 500
Seattle, WA 98104
ii
Mobile User VPN
1
Configure the Firebox X Edge to use
Mobile VPN with IPSec
The WatchGuard® Mobile VPN with IPSec client is a software application that is installed on a remote
computer. The client makes a secure connection from the remote computer to your protected network
through an unsecured network. The Mobile VPN client uses Internet Protocol Security (IPSec) to secure
the connection.
This document gives basic configuration instructions on how to configure a Mobile VPN tunnel
between the WatchGuard Mobile VPN with IPSec client and a Firebox® X Edge device.
Before You Begin
Before you begin, make sure you understand:
•
You can install the Mobile VPN with IPSec client software on any computer running Windows
2000 Professional, Windows XP (32-bit) or Windows Vista (32-bit and 64-bit). Before you install
the client software, make sure the remote computer does not have any other IPSec mobile user
VPN client software installed. You must also uninstall any desktop firewall software (other than
Microsoft firewall software) from each remote computer.
•
If the Mobile VPN with IPsec client software is installed on a computer with Windows Vista and
the Windows Vista Firewall is in use, you must add a firewall exception (Control Panel > Security >
Windows Firewall > Change Settings > Exceptions) for UDP port 4500. This will enable Mobile
VPN keep-alive packets from the Firebox® to reach your client and keep the VPN tunnel up.
About Mobile VPN Client Configuration Files
With Mobile VPN with IPSec, the Firebox® X Edge administrator controls end-user profiles. You use the
Edge web configuration interface to set the name of the end user and create a client configuration file,
or profile, with the file extension .wgx. The .wgx file contains the shared key, user identification, IP
addresses, and settings that are used to create a secure tunnel between the remote computer and the
Edge. This file is encrypted with a key that is eight characters or greater in length. This key must be
known to the administrator and the remote user. When the remote client imports the .wgx file, this key
is used to decrypt the file for use in the client software.
Administrator Guide
1
Enabling Mobile VPN for a Firebox User Account
The Firebox X Edge creates a .wgx file for a user when a Firebox user’s account is configured for Mobile
VPN, as described in this chapter.
If you want to lock the profiles for mobile users by making them read-only, see “Configuring Global
Mobile VPN Client Settings” on page 3.
Enabling Mobile VPN for a Firebox User Account
1
To connect to the Edge System Status page, type https:// in the browser address bar, and the IP
address of the Firebox® X Edge trusted interface.
The default URL is: https://192.168.111.1
2
To add a new Firebox user, select Firebox Users > New User.
You can also edit the properties of an existing user. Go to the main Firebox User page and find the
name of the user account you want to edit.
3
On the Settings tab, type an Account Name for the user. Type the password for the user. This is
different from the shared secret you type in step 7 below.
The Full Name and Description fields are optional.
2
4
Select the Allow access to VPN check box.
5
Click the MUVPN tab.
6
Select the Enable MUVPN for this account check box.
7
Type a shared key in the related field.
The .wgx file is encrypted with this shared key. Do not give the shared key to any user that is not
authorized to use this Firebox user account.
8
Type the virtual IP address in the related field.
The virtual IP address must be an address on the Firebox X Edge trusted or optional network that
is not used and is not included within any range of DHCP addresses assigned by the Edge. This
address is used by the remote computer to connect to the Firebox X Edge.
9
Change the Authentication Algorithm or Encryption Algorithm settings if want to. You can
find more information about these settings in the Firebox X Edge User Guide.
Mobile User VPN
Configuring Global Mobile VPN Client Settings
10 Set MUVPN key expiration in kilobytes and/or hours. The default values are 8192 KB and 24
hours.
To remove a size and/or time expiration, set the value to zero (0).
11 Make sure the VPN Client Type drop-down list is set to Mobile User. This is true whether you use
a Windows desktop, laptop, or handheld PC.
12 Select the All traffic uses tunnel (0.0.0.0/0 IP Subnet) check box if the remote client sends all
its traffic (including usual web traffic) through the VPN tunnel to the Firebox X Edge. This can also
let the Mobile VPN client connect with other networks that the Edge connects to.
If you do not select this check box, the remote user can connect with the Firebox X Edge trusted
network only. You must select this check box for the remote user to be able to connect to:
- Networks on the other side of a Branch Office VPN tunnel that the Edge has connected.
- Computers on the Edge’s optional network.
- Networks that are behind a static route on the trusted or optional interface.
13 Click Submit.
Get the user’s .wgx file
The Firebox X Edge makes an encrypted Mobile VPN with IPSec client configuration (.wgx) file for every
Firebox User that you give access to. To download a user’s .wgx file:
1
To connect to the System Status page, type https:// in the browser address bar, and the IP
address of the Firebox X Edge trusted interface.
The default URL is: https://192.168.111.1
2
From the navigation bar, select Firebox Users.
3
Below Secure MUVPN Client Configuration Files, select the .wgx file to download by clicking
on the link username.wgx where username is the Firebox user’s name.
4
At the prompt, save the .wgx file to your computer.
Configuring Global Mobile VPN Client Settings
Some MUVPN client settings apply to all Firebox® X Edge Mobile VPN connections. Select
VPN > Mobile User to set these options.
Administrator Guide
3
Distributing the Software and Profiles
1
You can choose to make the .wgx file read-only so that the user cannot change the security
policy file. To do this, select the Make the MUVPN client security policy read-only check box.
2
Mobile VPN clients use shared Windows Internet Naming Service (WINS) and Domain Name
System (DNS) server addresses. DNS changes host names into IP addresses, while WINS changes
NetBIOS names to IP addresses. The trusted interface of the Edge must have access to these
servers. Type a DNS server and WINS server IP address in the text boxes near the bottom of the
Mobile User page.
Because the Mobile VPN client always uses a virtual adapter, you should not change the virtual adapter
settings on this dialog box.This setting applies only to Mobile User VPN versions prior to 10.0. For version
10.0 and later, it does not matter what you use for this setting because the Mobile VPN with IPSec software
version 10.0 and later always uses a virtual adapter. See the Mobile User VPN Administrator's Guide for information
about how this setting affects earlier versions of the Mobile User software.
Distributing the Software and Profiles
WatchGuard® recommends distributing end-user profiles by encrypted email or with some other
secure method. Each client computer must have:
•
4
Software installation package
The packages are located on the WatchGuard LiveSecurity® Service web site at:
http://www.watchguard.com/support
Log in to the site using your LiveSecurity Service user name and password. Click the Latest
Software link, click Add-ons/Upgrades on the left side, and then click the link for Mobile VPN
with IPSec.
Mobile User VPN
Distributing the Software and Profiles
•
The end-user profile
This file contains the user name, shared key, and settings that enable a remote computer to
connect securely over the Internet to a protected, private computer network. For information on
how to get the profile from the Edge, see “Get the user’s .wgx file” on page 3.
•
User documentation
Documentation to help the remote user install the Mobile VPN client and import their Mobile
VPN configuration file can be found in the “Mobile VPN Client Installation and Connection”
chapter in this user guide.
•
Shared key
To import the end-user profile, the user is requested to type a shared key. This key decrypts the
file and imports the security policy into the Mobile VPN client. The key is set when you enable the
Firebox User account to use Mobile VPN with IPSec.
The shared key, user name, and password are highly sensitive information. For security reasons, we
recommend that you do not provide this information by email message. Because email is not
secure, an unauthorized user can get the information and gain access to your internal network.
Give the user the information by telling it to the user, or by some other method that does not allow an
unauthorized person to intercept it.
Administrator Guide
5
Distributing the Software and Profiles
6
Mobile User VPN
2
Using Fireware Policy Manager to
Configure Mobile VPN with IPSec
The WatchGuard® Mobile VPN with IPSec client is a software application that is installed on a remote
computer. The client makes a secure connection from the remote computer to your protected network
through an unsecured network. The Mobile VPN client uses Internet Protocol Security (IPSec) to secure
the connection.
This document gives basic configuration instructions on how to configure a Mobile VPN tunnel
between the WatchGuard Mobile VPN with IPSec client and a Firebox® X Core or Peak device running
Fireware®.
Before You Begin
Before you begin, make sure you understand:
•
Because strict export restrictions are put on exported high encryption software, WatchGuard®
System Manager is available with two encryption levels. You must make sure you download and
use WatchGuard System Manager with strong encryption when you use Mobile VPN with IPSec,
because the IPSec standard requires 56-bit (medium) encryption at a minimum.
•
You can install the Mobile VPN with IPSec client software on any computer running Windows
2000 Professional, Windows XP (32-bit) or Windows Vista (32-bit and 64-bit). Before you install
the client software, make sure the remote computer does not have any other IPSec mobile user
VPN client software installed. You must also uninstall any desktop firewall software (other than
Microsoft firewall software) from each remote computer.
•
If the Mobile VPN with IPsec client software is installed on a computer with Windows Vista and
the Windows Vista Firewall is in use, you must add a firewall exception
(Control Panel > Security > Windows Firewall > Change Settings > Exceptions) for UDP port
4500. This will allow Mobile VPN keep-alive packets from the Firebox® to reach your client and
keep the VPN tunnel up.
Administrator Guide
7
About Mobile VPN Client Configuration Files
About Mobile VPN Client Configuration Files
With Mobile VPN with IPSec, the network security administrator controls end-user profiles. Policy Manager is used to set the name of the end user and create a client configuration file, or profile, with the file
extension .wgx. The .wgx file contains the shared key, user identification, IP addresses, and settings that
are used to create a secure tunnel between the remote computer and the Firebox®. This file is
encrypted with a key that is eight characters or greater in length. This key must be known to the
administrator and the remote user. When the .wgx file is imported on the remote client, this key is used
to decrypt the file for the client software to use.
After you use the Add Mobile User VPN wizard, you can create or re-create a .wgx file at any time.
If you want to lock the profiles for mobile users by making them read-only, see “Locking Down an EndUser Profile” on page 18.
Configuring the Firebox for Mobile VPN
Use this procedure to enable Mobile VPN for an existing group of users or a new group you want to create. The users that are part of the group can authenticate to the local Firebox® authentication server, or
to a third-party authentication server configured in your Firebox configuration. If you use Firebox
authentication, use the instructions in “Adding Users to a Firebox Mobile VPN Group” on page 12 to
add users to your group. If you use a third-party authentication server, use the instructions provided in
that vendor’s documentation.
1
From Policy Manager, select VPN > Remote Users.
The Remote User VPN configuration dialog box appears.
2
Click Add.
The Add Mobile User VPN Wizard appears.
8
Mobile User VPN
Configuring the Firebox for Mobile VPN
3
Use the instructions provided here to go through each screen of the wizard. Click Next after each
step.
4
Select a user authentication server
Select an authentication server from the Authentication Server drop-down list. You can
authenticate users with the internal Firebox database (Firebox-DB) or with a RADIUS, SecurID,
LDAP, or Active Directory server. Make sure that this method of authentication is enabled in
Policy Manager (select Setup > Authentication > Authentication Servers).
Type a group name in the Group Name field. You can type the name of an existing Mobile VPN
group, or enter a group name for a new Mobile VPN group. Make sure the name is unique among
VPN group names as well as all interface and tunnel names.
See the Authentication chapter in the WatchGuard® System Manager User Guide for more
information.
5
Select a tunnel authentication method: Select Use this passphrase. Type and confirm a
passphrase.
When your remote users import their Mobile VPN connection profile, they will need this
passphrase. In the Mobile VPN Configuration Assistant, this passphrase is known as the “preshared key” or “shared secret.”
Administrator Guide
9
Configuring the Firebox for Mobile VPN
10
6
Direct the flow of Internet traffic: Select an option for Internet traffic. You can allow all Internet
traffic between the Mobile VPN client and the Internet to use the ISP of the client, or you can
make all Internet traffic use the VPN tunnel. If you choose to force all Internet traffic to go
through the tunnel, more processing power and bandwidth on the Firebox is used. However, the
configuration is more secure.
7
Identify the resources accessible through the tunnel: Enter the IP addresses that the Mobile
VPN users need access to. Click Add to add a host IP address or a network IP address. Type an
address and click OK in the Add Address dialog box. Do this step again to add more resources.
Mobile User VPN
Configuring the Firebox for Mobile VPN
8
Create the virtual IP address pool: Click Add to add one IP address or an IP address range.
Repeat this step to add more virtual IP addresses.
Mobile VPN users will be assigned one of these IP addresses when they connect to your network.
The number of IP addresses should be the same as the number of Mobile VPN users. If High
Availability is configured, you must add two virtual IP addresses for each Mobile VPN user. The IP
addresses cannot be used for anything else on your network.
9
Click Finish. The Remote User VPN Configuration dialog box appears. Click OK to close.
The Mobile VPN client profile is saved in Documents and Settings\All Users\
Shared WatchGuard\muvpn\ip_address\config_name\wgx\config_name.wgx.
Configuring the external authentication server
If you create a Mobile VPN user group that authenticates to a third-party server, make sure you create a
group on the server that has the same name as the Mobile VPN group name entered in the wizard. For
RADIUS or SecurID, make sure that the RADIUS server sends a Filter-Id attribute (RADIUS attribute #11)
when a user successfully authenticates, to tell the Firebox what group the user belongs to. The value for
the Filter-Id attribute must match the name of the Mobile VPN group as it appears in Policy Manager.
All Mobile VPN users that authenticate to the server must belong to this group.
Administrator Guide
11
Modifying an Existing Mobile VPN Profile
Adding Users to a Firebox Mobile VPN Group
To create an Mobile VPN tunnel with the Firebox, remote users type their user name and password to
authenticate. WatchGuard® System Manager software uses this information to authenticate the user to
the Firebox®.
To authenticate, users must be part of the group entered in the Add Mobile User VPN Wizard. If you use
Firebox authentication, use the instructions below. If you use a third-party authentication server, use
the instructions provided in your vendor documentation. For more information on Firebox groups, see
the Authentication chapter in the WatchGuard System Manager User Guide.
1
From Policy Manager, select Setup > Authentication > Authentication Servers.
The Authentication Servers dialog box appears.
2
Make sure that the Firebox tab is selected.
3
To add a new user, click the Add button below the Users list.
The Setup Firebox User dialog box appears.
4
Type a user name and passphrase for the new user. Type the passphrase again to confirm it.
Description is not required. Do not change the values for Session Timeout and Idle Timeout unless
the change is necessary.
5
In the Firebox Authentication Groups area use the horizontal arrows to make the new user a
member of the group you created in the wizard.
6
Click OK.
The new user appears in the Users list in the Authentication Servers dialog box. The dialog box
stays open for you to add more users if you choose.
7
To close the Authentication Servers dialog box, click OK.
Modifying an Existing Mobile VPN Profile
After you use the Mobile User VPN wizard to create a new .wgx file, you can make changes to the profile
to:
12
•
Change the shared key
•
Add access to more hosts or networks
•
Restrict access to a single destination port, source port, or protocol
•
Change the Phase 1 or Phase 2 settings.
1
From Policy Manager, select VPN > Remote Users.
2
From the list of user names and groups on the Remote User VPN dialog box, click the user name
or group to change.
Mobile User VPN
Modifying an Existing Mobile VPN Profile
3
Click Edit.
The Edit MUVPN Extended Authentication Group dialog box appears.
Use the following fields to edit the group profile:
Authentication Server
Select the authentication server to use for this Mobile VPN group.
To configure your authentication server, select
Setup > Authentication > Authentication Servers from the menu bar in Policy Manager.
Passphrase
Type a passphrase to encrypt the Mobile VPN profile (.wgx file) that you distribute to users in this
group.
Confirm
Type the passphrase again.
Primary
Select or type the primary external IP address to which Mobile VPN users in this group can
connect.
Backup
Select or type a backup external IP address to which Mobile VPN users in this group can connect.
This backup IP address is optional. If you add a backup IP address, make sure it an IP address
assigned to a Firebox external interface.
Session
Type the maximum time in minutes that a Mobile VPN session can be active.
Idle
Type the time in minutes before the Firebox closes an idle Mobile VPN session.
The session and idle timeout values are the default timeouts if the authentication server does
not return specific timeout values. If you use the Firebox as the authentication server, the
Administrator Guide
13
Modifying an Existing Mobile VPN Profile
timeouts for the Mobile VPN group are always ignored because you set timeouts in the
individual Firebox user accounts.
The session and idle timeouts cannot be longer than the value in the SA Life field. To set this
field, from the IPSec Tunnel tab of the Edit MUVPN Extended Authentication Group dialog
box, click Advanced. The default value is 8 hours.
4
Click the IPSec Tunnel tab.
5
Use the following fields to edit the IPSec settings:
Use the passphrase of the end-user profile as the pre-shared key
Select this setting to use the passphrase of the end-user profile as the pre-shared key for tunnel
authentication. You must use the same shared key on the remote device, and this shared key can
use only standard ASCII characters.
Use a certificate
Select this setting to use a certificate for tunnel authentication. You must start the WatchGuard
Certificate Authority if you select certificate-based authentication. You must also use the
WatchGuard Log Server for log messages and the Firebox must be a managed client of a
WatchGuard Management Server.The WatchGuard Certificate Authority is installed by default as
part of the Management Server installation.
CA IP address
(This field appears only if you select to use a certificate) Type the IP address for the certificate
authority (CA).
Timeout
(This field appears only if you select to use a certificate) Type the time in seconds before the
certificate authority request times out.
Phase1 Settings
Select the authentication and encryption methods for the Mobile VPN tunnel. These settings
must be the same for both VPN endpoints. To configure advanced settings, such as NAT Traversal
or the key group, click the Advanced button, and see the procedure described in “Defining
advanced Phase 1 settings” on page 16.
14
Mobile User VPN
Modifying an Existing Mobile VPN Profile
Phase2 Settings
Select the proposal and key expiration settings for the Mobile VPN tunnel. You can also enable
Perfect Forward Secrecy (PFS) or set the Diffie-Hellman group. To change other proposal
settings, click the Proposal button, and see the procedure described in “Defining advanced
Phase 2 settings” on page 16.
6
Click the Resources tab.
7
Use the following fields to add and remove allowed network resources and virtual IP addresses:
Force All Traffic Through Tunnel
Select this check box to send all Mobile VPN user Internet traffic through the VPN tunnel. When
this is selected, Mobile VPN user Internet traffic is sent through the VPN, but web sites can be
slower for those users. If this is not selected, Mobile VPN user Internet traffic is not sent safely, but
users can browse the Internet more quickly.
Allowed Resources list
This list shows the resources that users in the Mobile VPN authentication group can get access to
on the network. Click Add to add an IP address or IP address range to the network resources list.
Click Remove to clear the selected IP address or IP address range from the network resources list.
Virtual IP Address Pool
This list shows the internal IP addresses that are used by Mobile VPN users over the tunnel. These
addresses are used only when they are needed. Click Add to add an IP address or IP address
range to the virtual IP address pool. Click Remove to clear the selected IP address or IP address
range from the virtual IP address pool.
8
Click OK.
You return to the Remote Users Configuration dialog box.
End-user profiles (*.wgx) for the profile you edited are automatically regenerated. You must distribute new
end-user profiles to the affected users and groups.
Administrator Guide
15
Modifying an Existing Mobile VPN Profile
Defining advanced Phase 1 settings
To define advanced Phase 1 settings for an Mobile VPN user profile:
1
From the IPSec Tunnel tab of the Edit MUVPN Extended Authentication Group dialog box,
select Advanced.
The Phase1 Advanced Settings dialog box appears.
2
To change the SA (security association) lifetime, type a number in the SA Life field, and select
Hour or Minute from the drop-down list
3
From the Key Group drop-down list, select the Diffie-Hellman group you want. WatchGuard
supports groups 1, 2, and 5.
Diffie-Hellman groups determine the strength of the master key used in the key exchange
process. The higher the group number, the greater the security but the more time is required to
make the keys.
4
If you want to build an Mobile VPN tunnel between the Firebox and another device that is behind
a NAT device, select the NAT Traversal check box. NAT Traversal, or UDP Encapsulation, allows
traffic to get to the correct destinations. To set the Keep-alive interval, type the number of
seconds or use the value control to select the number of seconds you want.
5
You must select the IKE Keep-alive check box to have the Firebox send messages to its IKE peer
to keep the tunnel open. If you disable the IKE Keep-alive feature, the Mobile VPN client will not
be able to connect to the Firebox.
To set the Message interval, type the number of seconds or use the value control to select the
number of seconds you want.
6
To set the maximum number of times the Firebox tries to send an IKE keep-alive message before
it tries to negotiate Phase 1 again, type the number you want in the Max failures box.
7
Click OK.
Defining advanced Phase 2 settings
To define advanced Phase 2 settings for an Mobile VPN user profile:
1
From the IPSec Tunnel tab of the Edit MUVPN Extended Authentication Group dialog box,
select Proposal.
The Phase2 Proposal dialog box appears.
16
Mobile User VPN
Configuring WINS and DNS Servers
2
From the Type drop-down list, select ESP or AH as the proposal method. Only ESP is supported
at this time.
3
From the Authentication drop-down list, select SHA1 or MD5 for the authentication method.
4
From the Encryption drop-down list, select the encryption method.
The options are None, DES, 3DES, and AES 128, 192, or 256 bit, which appear in the list from the
most simple and least secure to most complex and most secure.
5
To make the gateway endpoints generate and exchange new keys after a quantity of time or
amount of traffic passes, select the Force Key Expiration check box. In the fields below, enter a
quantity of time and a number of bytes after which the key expires.
If Force Key Expiration is disabled, or if it is enabled and both the time and kBytes are set to zero,
the Firebox tries to use the key expiration time set for the peer. If this is also disabled or zero, the
Firebox uses a key expiration time of 8 hours.
You can set the time up to one year.
6
Click OK.
Allowing Internet access through Mobile VPN tunnels
You can give remote users access to the Internet through a Mobile VPN tunnel when you use the
MUVPN wizard and select the Yes, force all Internet traffic to flow through the tunnel radio button
on the “Direct the flow of Internet traffic” screen.
This option adds Any-External as an allowed resource, which means that traffic destined to go out any
external interface is allowed.
Configuring WINS and DNS Servers
RUVPN and Mobile VPN clients rely on shared Windows Internet Name Server (WINS) and Domain
Name System (DNS) server addresses. DNS translates host names into IP addresses. WINS resolves
NetBIOS names to IP addresses. These servers must be accessible from the Firebox® trusted interface.
Make sure you use only an internal DNS server. Do not use external DNS servers.
1
From Policy Manager, select Network > Configuration. Click the WINS/DNS tab.
The information for the WINS and DNS servers appears.
2
Type a domain name for the DNS server.
3
In the DNS Servers and WINS Servers text boxes, type the addresses for the WINS and DNS
servers.
Administrator Guide
17
Locking Down an End-User Profile
Locking Down an End-User Profile
You can use the advanced settings to lock down the end-user profile so that users can see some settings but not change them, and hide other settings so that users cannot change them. We recommend
that you lock down all profiles so that users cannot make changes to their profile.
1
On the Mobile User VPN tab, click Advanced.
The Advanced Export File Preferences dialog box appears.
2
To give mobile users only read-only access to their profiles, select the
Make the security policy read-only in the MUVPN Client check box.
The Mobile VPN client always uses a virtual adapter, so you should not change the virtual adapter settings
on this dialog box. The Mobile VPN client does not operate without a virtual adapter.
18
Mobile User VPN
Configuring Policies to Filter Mobile VPN Traffic
Configuring Policies to Filter Mobile VPN Traffic
In a default configuration, Mobile VPN with IPSec users have full access privileges through a Firebox®,
with the Any policy. To put limits on Mobile VPN users, you must add policies to the MUVPN tab in
Policy Manager.
Add individual policies
1
In Policy Manager, click the MUVPN tab.
2
From the Show drop-down list, select the name of the Mobile VPN group for which you are
adding a policy. You must select a group before you add a policy.
3
Add, edit, and delete policies as described in the Policies chapter in the WatchGuard® System
Manager User Guide. Make sure you save your configuration file to the Firebox after you make
these changes.
Seeing details on an Mobile VPN policy
To see more information on a Mobile VPN policy in Policy Manager, select View > Details.
Administrator Guide
19
Re-creating End-User Profiles
Under MUVPN Group, Policy Manager displays the authentication server, in parentheses, for the
Mobile VPN group.
Using the Any Policy
The Any policy is added to all Mobile VPN user groups by default. The Any policy allows traffic on all
ports and protocols between the Mobile VPN user and the Remote Networks available through the
Mobile VPN tunnel. If you want to restrict traffic for Mobile VPN users to a more limited group or ports
and protocols, the Any policy on the Mobile User VPN can be deleted and replaced with policies specified by the administrator.
Re-creating End-User Profiles
The WatchGuard® Mobile VPN with IPSec configuration gives you the ability to re-create end-user profiles for your existing Mobile VPN users. Use this procedure to create new end-user profiles with the
same settings for the current MUVPN users.
Mobile VPN configuration files, or profiles, are located in Documents and Settings\All Users\
Shared Watchguard\muvpn\ip_address\config_name\wgx\config_name.wgx. If the tunnel is authenticated with certificates, the certificates are also created.
To create new end-user profiles for current Mobile VPN users, on the Mobile User VPN tab, select the
Mobile VPN group and click Generate.
You can now distribute these end-user profiles as necessary.
Saving the Profile to a Firebox
To activate a new Mobile VPN user profile, you must save the configuration file to the Firebox®. From
the File menu, select Save > To Firebox.
20
Mobile User VPN
Distributing the Software and Profiles
Distributing the Software and Profiles
WatchGuard® recommends distributing end-user profiles by encrypted email or with some other
secure method. Each client computer must have:
•
Software installation package
The packages are located on the WatchGuard LiveSecurity® Service web site at:
http://www.watchguard.com/support
Log in to the site using your LiveSecurity Service user name and password. Click the
Latest Software link, click Add-ons/Upgrades on the left side, and then click the link for Mobile
VPN with IPSec.
•
The end-user profile
This file contains the group name, shared key, and settings that enable a remote computer to
connect securely over the Internet to a protected, private computer network. The end-user
profile has the file name groupname.wgx.
•
Two certificate files—if you are authenticating with certificates
These are the .p12 file, which is an encrypted file containing the certificate; and cacert.pem,
which contains the root (CA) certificate.
•
User documentation
Documentation to help the remote user install the Mobile VPN client and import their Mobile
VPN configuration file can be found in the “Mobile VPN Client Installation and Connection”
chapter in this user guide.
•
Shared key
To import the end-user profile, the user is requested to type a shared key. This key decrypts the
file and imports the security policy into the MUVPN client. The key is set during the creation of
the file in Policy Manager.
The shared key, user name, and password are highly sensitive information. For security reasons, we
recommend that you do not provide this information by email message. Because email is not
secure, an unauthorized user can get the information and gain access to your internal network.
Give the user the information by telling it to the user, or by some other method that does not allow an
unauthorized person to intercept it.
Additional Mobile VPN Topics
This section describes special topics for Mobile VPN with IPSec.
Making outbound IPSec connections from behind a Firebox
A user might have to make IPSec connections to a Firebox® from behind another Firebox. For example,
if a mobile employee travels to a customer site that has a Firebox, that user can make IPSec connections
to their network using IPSec. For the local Firebox to correctly handle the outgoing IPSec connection,
you must set up an IPSec policy that includes the IPSec packet filter. For information on enabling policies, see the Policies chapter in the WatchGuard® System Manager User Guide.
Because the IPSec policy enables a tunnel to the IPSec server and does not do any security checks at
the firewall, add to this policy only the users that you trust.
Administrator Guide
21
Additional Mobile VPN Topics
Terminating IPSec connections
To fully stop VPN connections, the Firebox must be restarted. Removing the IPSec policy does not stop
current connections.
Global VPN settings
Global VPN settings on your Firebox apply to all manual BOVPN tunnels, managed tunnels, and Mobile
VPN tunnels. You can use these settings to:
•
Enable IPSec pass-through.
•
Clear or maintain the settings of packets with Type of Service (TOS) bits set.
•
Use an LDAP server to verify certificates.
To change these settings, from Policy Manager, select VPN > VPN Settings. For more information on
these settings, see the Basic Configuration Setup chapter in the WatchGuard System Manager User
Guide.
Seeing the number of Mobile VPN licenses
To see the number of Mobile VPN licenses that are installed, from Policy Manager, select
Setup > Feature Keys. From the Firebox Feature Keys dialog box, click Active Features. Scroll down
to the value MUVPN_USERS and look at the number in the Capacity column. This is the number of
installed Mobile VPN licenses.
Purchasing additional Mobile VPN licenses
WatchGuard Mobile VPN with IPSec is an optional feature. Each Firebox X device includes a number of
Mobile VPN licenses. You can purchase more licenses for Mobile VPN.
Licenses are available through your local reseller or at:
http://www.watchguard.com/sales
Adding feature keys
For information on adding feature keys, see “Working with Feature Keys” in the WatchGuard System
Manager User Guide.
Mobile VPN and VPN failover
You can configure VPN tunnels to fail over to a backup endpoint if the primary endpoint becomes
unavailable. For more information on VPN failover, see the WatchGuard System Manager User Guide.
If VPN failover is configured and failover occurs, Mobile VPN sessions do not continue. You must
authenticate your Mobile VPN client again to make a new Mobile VPN tunnel.
To configure VPN failover for Mobile VPN tunnels, on the General tab of the Edit MUVPN Extended
Authentication Group dialog box, enter a backup WAN interface in the Backup field in the Firebox IP
box. You can specify only one backup interface for tunnels to fail over to, even if you have additional
WAN interfaces.
22
Mobile User VPN
3
Mobile VPN Client Installation and
Connection
The WatchGuard® Mobile VPN with IPSec client is installed on an employee computer, whether the
employee travels or works from home. The employee uses a standard Internet connection and activates the Mobile VPN client.
The Mobile VPN client then creates an encrypted tunnel to your trusted and optional networks, which
are protected by a WatchGuard Firebox®. The Mobile VPN client allows you to supply remote access to
your internal networks and not compromise your security.
You must configure your Firebox to work with Mobile VPN with IPsec. If you have not, see the previous
chapters that describe how to configure your Firebox to use Mobile VPN.
You can find a PDF version of these client installation and connection instructions on the support web
site to give endusers who must install the client software. Go to:
www.watchguard.com/support/faqs/common/mobile_vpn_client_guide.pdf
Before You Begin
Before you begin, make sure you understand these requirements and recommendations:
•
You can install the Mobile VPN with IPSec client software on any computer running Windows
2000 Professional, Windows XP (32-bit), or Windows Vista (32-bit and 64-bit). Before you install
the client software, make sure the remote computer does not have any other IPSec mobile user
VPN client software installed. You must also uninstall any desktop firewall software (other than
Microsoft firewall software) from each remote computer.
•
If the client computer is running Windows XP, you must log on using an account that has
administrator rights to install the Mobile VPN client software and to import the .wgx
configuration file. Administrator rights are not required to connect after the client has been
installed and configured.
•
If the client computer is running Windows Vista, you must log on using an account that has
administrator rights to install the Mobile VPN client software. Administrator rights are not
required to import a .wgx file or to connect after the client has been installed.
•
If the Mobile VPN with IPSec client software is installed on a computer with Windows Vista and
the Windows Vista Firewall is in use, you must add a firewall exception (Control Panel > Security
Administrator Guide
23
Installing the Mobile VPN with IPSec Client
> Windows Firewall > Change Settings > Exceptions) for UDP port 4500. This will enable
Mobile VPN keep-alive packets from the Firebox® to reach your client and keep the VPN tunnel
up.
•
We recommend that you check to make sure all available service packs are installed before you
install the Mobile VPN client software.
•
WINS and DNS settings for the Mobile VPN client are obtained in the client profile you import
when you set up your Mobile VPN client.
•
We recommend that you do not change the configuration of any Mobile VPN client setting not
explicitly described in this documentation.
Installing the Mobile VPN with IPSec Client
The installation process consists of two parts: installing the client software on the remote computer
and importing the end-user profile into the client. Before you start the installation, make sure you have
the following installation components, which you should get from your network administrator:
•
The Mobile VPN installation file
•
An end-user profile, with a file extension of .wgx
•
Shared Key
•
A .p12 certificate file (if you are connecting to a Firebox® X Core or Peak and use certificates to
authenticate)
•
User name and password (if you are connecting to a Firebox X Core or Peak and use Extended
Authentication)
Write the shared key down and keep it in a secure location. You must use it during the final steps of the
installation procedure.
To install the client:
1
Copy the Mobile VPN .zip file to the remote computer and extract the contents of the file.
2
Copy the end-user profile (the .wgx file) to the root directory on the remote (client or employee)
computer.
If you use certificates to authenticate, copy the .p12 file to the root directory as well.
3
Run the Mobile VPN executable file by double-clicking the .exe file you extracted in step 1. This
starts the WatchGuard Mobile VPN Installation wizard.
You must restart your computer when the installation wizard completes.
24
Mobile User VPN
Installing the Mobile VPN with IPSec Client
Importing the end-user profile
When the computer restarts, the WatchGuard Mobile VPN Connection Monitor dialog box opens.
When the software starts for the first time after you install it, you get this message:
There is no profile for the VPN dial-up!
Do you want to use the Configuration Assistant for generating a profile now?
Click No. See the next section for instructions on how to import a client profile.
To turn off the Connection Monitor auto-start functionality, select
Window > AutoStart > No Autostart.
To import a Mobile VPN configuration .wgx file:
1
Select Configuration > Profile Import.
The Profile Import Wizard starts.
2
On the Select User Profile screen, browse to the location of the .wgx configuration file supplied
by your network administrator. Click Next.
3
On the Decrypt User Profile screen, type the shared key or passphrase supplied by your
network administrator. The shared key is case-sensitive. Click Next.
4
On the Overwrite or add Profile screen, you can select to overwrite a profile of the same name.
This is useful if your network administrator gives you a new .wgx file and you must reimport it.
Click Next.
5
If you connect to a Firebox X Edge, click Finish.
If you connect to a Firebox running Fireware appliance software, click Next.
6
On the Authentication screen, you can select whether to type the user name and password that
you use to authenticate the VPN tunnel. If you keep these fields clear, you are prompted to enter
your user name and password each time you connect to the VPN.
If you type your user name and password here, the Firebox stores it and you do not have to enter
this information each time you connect. However, this is a security risk. Optionally, you can type
just your user name and keep the Password field clear. This can minimize the amount of data
required for the VPN connection.
Click Next.
Administrator Guide
25
Connecting the Mobile VPN Client
If the password you use is your password on an Active Directory or LDAP server and you choose to store it,
the password becomes invalid when it changes on the authentication server.
7
Click Finish.
The computer is now ready to use Mobile VPN with IPSec.
Selecting a certificate and entering the PIN
If you are use certificates for authentication, you must select the correct certificate for the connection.
1
Select Configuration > Certificates.
2
On the User Certificate tab, select from PKS#12 file from the Certificate drop-down list.
3
Adjacent to the PKS#12 Filename text box, click the button and browse to the location of the
.p12 file supplied by your network administrator. Click OK.
4
Select Connection > Enter PIN.
5
Type the PIN and click OK.
The PIN is the passphrase entered to encrypt the file when running the Add Mobile User VPN
Wizard.
Uninstalling the Mobile VPN client
At some point, it can become necessary to uninstall the Mobile VPN client. We recommend that you
use the Windows Add/Remove Programs tool to uninstall the Mobile VPN client. After the Mobile VPN
client software is installed the first time, it is not necessary to uninstall the Mobile VPN client software
before you apply any upgrades to the client software.
Before you start, disconnect all tunnels and close the Mobile VPN Connection Monitor. Then, from the
Windows desktop:
1
Click Start > Settings > Control Panel.
The Control Panel window appears.
2
Double-click the Add/Remove Programs icon.
The Add/Remove Programs window appears.
3
Select WatchGuard Mobile VPN and click Change/Remove.
The InstallShield Wizard window appears.
4
Click Remove and click Next.
The Confirm File Deletion dialog box appears.
5
Click OK to completely remove all of the components. If you do not select this box at the end of
the uninstall, then the next time you install Mobile VPN software the connection settings from
this installation stay for the next installation.
Connecting the Mobile VPN Client
The WatchGuard® Mobile VPN with IPSec client software makes a secure connection from a remote
computer to your protected network over the Internet. To start this connection, you must connect to
the Internet and use the Mobile VPN client to connect to the protected network.
26
Mobile User VPN
Connecting the Mobile VPN Client
Start your connection to the Internet through a Dial-Up Networking connection or LAN connection.
Then, use the instructions below or select your profile, connect, and disconnect by right-clicking the
Mobile VPN icon on your Windows toolbar.
1
From your Windows desktop, select
Start > All Programs > WatchGuard Mobile VPN > Mobile VPN Monitor.
2
From the Profile drop-down list, select the name of the profile you created for your Mobile VPN
connections to the Firebox. Click Connect
Disconnecting the Mobile VPN client
From the Mobile VPN Monitor, click Disconnect.
Controlling connection behavior
For each profile you import, you can control the action the Mobile VPN client software takes when the
VPN tunnel goes down for any reason. To set the behavior of the Mobile VPN client when the VPN tunnel goes down:
1
From the WatchGuard Mobile VPN Connection Monitor, select Configuration > Profile Settings.
2
Select the name of the profile and click Configure.
3
From the left pane, select Line Management.
Administrator Guide
27
Seeing Mobile VPN Log Messages
4
Use the Connection Mode drop-down list to set the connection behavior you want for this
profile.
- Manual - When you select manual connection mode, the client does not try to restart the
VPN tunnel automatically if the VPN tunnel goes down. To restart the VPN tunnel, you must
click the Connect button in Connection Monitor or right-click the Mobile VPN icon on your
Windows desktop toolbar and click Connect.
- Automatic - When you select automatic connection mode, the client tries to start the
connection when your computer sends traffic to a destination that you can reach through the
VPN. The client also tries to restart the VPN tunnel automatically if the VPN tunnel goes down.
- Variable - When you select variable connection mode, the client tries to restart the VPN
tunnel automatically until you click Disconnect. The client does not try to restart the VPN
tunnel again until after the next time you click Connect.
5
Click OK.
Mobile User VPN client icon
The Mobile User VPN icon, which is in the Windows desktop system tray, shows the status of the full
featured desktop firewall, the link firewall, and the VPN network. You can right-click the icon to easily
connect and disconnect your Mobile VPN and see which profile is in use.
Seeing Mobile VPN Log Messages
You can use the Mobile VPN client log file to troubleshoot problems with the negotiations that occur
during the VPN client connection. To get access to Mobile VPN log messages, select Log > Logbook
from the Connection Monitor.
28
Mobile User VPN
Securing Your Computer with the Mobile VPN Firewall
Securing Your Computer with the Mobile VPN Firewall
The WatchGuard® Mobile VPN with IPSec client includes two firewall components:
Link firewall
The link firewall is not enabled by default. When the link firewall is enabled, your computer will
discard any packets received from other computers. You can choose to enable the link firewall
only when a Mobile VPN tunnel is active, or enable it all the time.
Desktop firewall
This full-featured firewall can control connections to and from your computer. You can define
friendly networks and set access rules separately for friendly and unknown networks.
Enabling the link firewall
When the link firewall is enabled, the Mobile VPN client software drops any packets sent to your computer from other hosts. It allows only packets sent to your computer in response to packets your computer sends. For example, if you send a request to an HTTP server through the tunnel from your
computer, the reply traffic from the HTTP server is allowed. If a host tries to send an HTTP request to
your computer through the tunnel, it is denied.
To enable the link firewall:
1
From the WatchGuard Mobile VPN Connection Monitor, select
Configuration > Profile Settings.
2
Select the profile you want to enable the link firewall for and select Configure.
3
From the left pane, select Link Firewall.
Administrator Guide
29
Securing Your Computer with the Mobile VPN Firewall
4
From the Stateful Inspection drop-down list, select when connected or always.
If you select when connected, the link firewall operates only when the VPN tunnel is active for
this profile.
If you select always, the link firewall is always active, whether the VPN tunnel is active or not.
5
Click OK.
About the desktop firewall
When you enable a rule in your firewalls, you must specify what type of network the rule applies to. In
the Mobile VPN client, there are three different types of networks:
VPN networks
Networks defined for the client in the client profile they import.
Unknown networks
Any network not specified in the firewall.
Friendly networks
Any network specified in the firewall as a known network.
Enabling the desktop firewall
To enable the full-featured desktop firewall:
1
From the WatchGuard Mobile VPN Connection Monitor, select
Configuration > Firewall Settings.
The firewall is disabled by default.
2
When you enable the firewall, you must choose between two firewall modes:
- Basic Locked Settings - When you enable this mode, the firewall denies all connections to or
from your computer unless you have created a rule to specifically allow the connection.
- Basic Open Settings - When you enable this mode, the firewall allows all connections unless
you have created a rule to specifically deny the connection.
30
Mobile User VPN
Securing Your Computer with the Mobile VPN Firewall
3
Define friendly networks and create firewall rules as described in the subsequent sections.
Defining friendly networks
Use the Friendly Networks tab to define specific known networks for which you want to generate a
firewall rule set. For example, if you want to use the Mobile VPN client on a local network where you do
not want your computer firewalled from other computers, you can add the network address of that
LAN as a friendly network to differentiate the firewall rules for that LAN from the firewall rules you create for connections to the Internet and to remote VPN networks.
1
On the Firewall Settings dialog box, click the Friendly Networks tab.
2
Click New to add a new friendly network.
The Automatic Friendly Network detection feature does not work in this release of the Mobile VPN with
IPSec client software.
Creating firewall rules
Use the Firewall Rules tab to create exceptions to the firewall mode you set when you enabled the firewall. For example, if you selected Basic Locked Settings, then the rules you create here allow traffic. If
you selected Basic Open Settings, then the rules you create here deny traffic. Firewall rules can
include multiple port numbers from a single protocol.
The check boxes below View Settings allow you to show or hide categories of firewall rules.
Administrator Guide
31
Securing Your Computer with the Mobile VPN Firewall
To create a rule, click New. Use the four tabs in the Firewall Rule Entry dialog box to define the traffic
you want to control. Each tab is described below.
General tab
On the General tab, you define the basic properties of your rule.
Rule Name
Type a descriptive name for this rule. For example, you might create a rule called “Web surfing”
that includes traffic on TCP ports 80 (HTTP), 8080 (alternate HTTP), and 443 (HTTPS).
State
To make a rule inactive, select Disabled. New rules are enabled by default.
Direction
To apply the rule to traffic that comes from your computer, select outgoing.
To apply the rule to traffic that is sent to your computer, select incoming.
To apply the rule to all traffic, select bidirectional.
Assign rule to
Select the check boxes adjacent to the network types that this rule applies to.
Protocol
Use this drop-down list to select the type of network traffic you want to control.
32
Mobile User VPN
Securing Your Computer with the Mobile VPN Firewall
Local tab
Use the Local tab to define the local IP address and ports that are controlled by this rule, if any. We recommend that, in any rule, you configure the Local IP Addresses setting to enable the Any IP address
radio button. If you are configuring an incoming policy, you can add the ports to control with this policy in the Local Ports settings. If you want to control more than one port in the same policy, select
Several Ports or Ranges. Click New to add each port.
If you select the Explicit IP Address radio button, make sure you specify an IP address. Do not keep the
IP address set to 0.0.0.0.
Administrator Guide
33
Securing Your Computer with the Mobile VPN Firewall
Remote tab
Use the Remote tab to define the remote IP address or addresses and ports that are controlled by this
rule, if any. For example, if your firewall is set to deny all traffic and you want to create a rule to allow
outgoing POP3 connections, you would add the IP address of your POP3 server as an Explicit IP
Address in the Remote IP Addresses section. Then, in the Remote Ports section, specify port 110 as
an Explicit Port for this rule.
If you select the Explicit IP Address radio button, make sure you specify an IP address. Do not keep the
IP address set to 0.0.0.0.
Applications tab
Use the Applications tab if you want to put a limit on your rule so it applies on the Firewall Settings
dialog box only when a specific application is used. Use the Select Application button to browse your
local computer for a list of available applications.
34
Mobile User VPN
Securing Your Computer with the Mobile VPN Firewall
Administrator Guide
35
Securing Your Computer with the Mobile VPN Firewall
36
Mobile User VPN