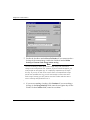
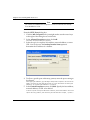
1
WatchGuard
Firebox System
User Guide
®
®
WatchGuard Firebox System
Notice to Users
Information in this guide is subject to change without notice. Companies, names, and data used in examples herein are
fictitious unless otherwise noted. No part of this guide may be reproduced or transmitted in any form or by any means,
electronic or mechanical, for any purpose, without the express written permission of WatchGuard Technologies, Inc.
Copyright, Trademark, and Patent Information
Copyright© 1998 - 2003 WatchGuard Technologies, Inc. All rights reserved.
AppLock, AppLock/Web, Designing peace of mind, Firebox, Firebox 1000, Firebox 2500, Firebox 4500, Firebox II,
Firebox II Plus, Firebox II FastVPN, Firebox III, Firebox SOHO, Firebox SOHO 6, Firebox SOHO 6tc, Firebox
SOHO|tc, Firebox V100, Firebox V80, Firebox V60, Firebox V10, LiveSecurity, LockSolid, RapidStream, RapidCore,
ServerLock, WatchGuard, WatchGuard Technologies, Inc., DVCP technology, Enforcer/MUVPN, FireChip,
HackAdmin, HostWatch, Make Security Your Strength, RapidCare, SchoolMate, ServiceWatch, Smart Security.
Simply Done., Vcontroller, VPNforce, The W-G logo are either registered trademarks or trademarks of WatchGuard
Technologies, Inc. in the United States and/or other courtries.
© Hi/fn, Inc. 1993, including one or more U.S. Patents: 4701745, 5016009, 5126739, and 5146221 and other
patents pending.
Microsoft®, Internet Explorer®, Windows® 95, Windows® 98, Windows NT® and Windows® 2000 are either
registered trademarks or trademarks of Microsoft Corporation in the United States and/or other countries.
Netscape and Netscape Navigator are registered trademarks of Netscape Communications Corporation in the United
States and other countries.
RC2 Symmetric Block Cipher, RC4 Symmetric Stream Cipher, RC5 Symmetric Block Cipher, BSAFE, TIPEM, RSA
Public Key Cryptosystem, MD, MD2, MD4, and MD5 are either trademarks or registered trademarks of RSA Data
Security, Inc. Certain materials herein are Copyright © 1992-1999 RSA Data Security, Inc. All rights reserved.
RealNetworks, RealAudio, and RealVideo are either a registered trademark or trademark of RealNetworks, Inc. in the
United States and/or other countries.
Java and all Jave-based marks are trademarks or registered trademarks of Sun Microsystems, Inc. in the United
States and other countries. All right reserved.
© 1995-1998 Eric Young (eay@cryptsoft). All rights reserved.
© 1998-2000 The OpenSSL Project. All rights reserved. Redistribution and use in source and binary forms, with or
without modification, are permitted provided that the following conditions are met:
1. Redistributions of source code must retain the above copyright notice, this list of conditions and the following
disclaimer.
2. Redistributions in binary form must reproduce the above copyright notice, this list of conditions and the following
disclaimer in the documentation and/or other materials provided with the distribution.
3. All advertising materials mentioning features or use of this software must display the following acknowledgment:
"This product includes software developed by the OpenSSL Project for use in the OpenSSL Toolkit. (http://
www.openssl.org/)"
4. The names "OpenSSL Toolkit" and "OpenSSL Project" must not be used to endorse or promote products derived from
this software without prior written permission. For written permission, please contact [email protected].
5. Products derived from this software may not be called "OpenSSL" nor may "OpenSSL" appear in their names without
prior written permission of the OpenSSL Project.
6. Redistributions of any form whatsoever must retain the following acknowledgment: "This product includes software
developed by the OpenSSL Project for use in the OpenSSL Toolkit (http://www.openssl.org/)"
THIS SOFTWARE IS PROVIDED BY THE OpenSSL PROJECT ``AS IS'' AND ANY EXPRESSED OR IMPLIED
WARRANTIES, INCLUDING, BUT NOT LIMITED TO, THE IMPLIED WARRANTIES OF MERCHANTABILITY
AND FITNESS FOR A PARTICULAR PURPOSE ARE DISCLAIMED. IN NO EVENT SHALL THE OpenSSL
PROJECT OR ITS CONTRIBUTORS BE LIABLE FOR ANY DIRECT, INDIRECT, INCIDENTAL, SPECIAL,
EXEMPLARY, OR CONSEQUENTIAL DAMAGES (INCLUDING, BUT NOT LIMITED TO, PROCUREMENT OF
SUBSTITUTE GOODS OR SERVICES; LOSS OF USE, DATA, OR PROFITS; OR BUSINESS INTERRUPTION)
HOWEVER CAUSED AND ON ANY THEORY OF LIABILITY, WHETHER IN CONTRACT, STRICT LIABILITY, OR
TORT (INCLUDING NEGLIGENCE OR OTHERWISE) ARISING IN ANY WAY OUT OF THE USE OF THIS
SOFTWARE, EVEN IF ADVISED OF THE POSSIBILITY OF SUCH DAMAGE.
This product includes cryptographic software written by Eric Young
([email protected]). This product includes software written by Tim
ii
WatchGuard Firebox System
Hudson ([email protected]).
© 1995-1998 Eric Young ([email protected])
All rights reserved.
This package is an SSL implementation written by Eric Young ([email protected]).
The implementation was written so as to conform with Netscapes SSL.
This library is free for commercial and non-commercial use as long as the following conditions are aheared to. The
following conditions apply to all code found in this distribution, be it the RC4, RSA, lhash, DES, etc., code; not just the
SSL code. The SSL documentation included with this distribution is covered by the same copyright terms except that
the holder is Tim Hudson ([email protected]).
Copyright remains Eric Young's, and as such any Copyright notices in the code are not to be removed. If this package is
used in a product, Eric Young should be given attribution as the author of the parts of the library used. This can be in
the form of a textual message at program startup or in documentation (online or textual) provided with the package.
Redistribution and use in source and binary forms, with or without modification, are permitted provided that the
following conditions are met:
1. Redistributions of source code must retain the copyright notice, this list of conditions and the following disclaimer.
2. Redistributions in binary form must reproduce the above copyright notice, this list of conditions and the following
disclaimer in the documentation and/or other materials provided with the distribution.
3. All advertising materials mentioning features or use of this software must display the following acknowledgement:
"This product includes cryptographic software written by Eric Young ([email protected])" The word 'cryptographic'
can be left out if the routines from the library being used are not cryptographic related :-).
4. If you include any Windows specific code (or a derivative thereof) from the apps directory (application code) you
must include an acknowledgement: "This product includes software written by Tim Hudson ([email protected])"
THIS SOFTWARE IS PROVIDED BY ERIC YOUNG ``AS IS'' AND ANY EXPRESS OR IMPLIED WARRANTIES,
INCLUDING, BUT NOT LIMITED TO, THE IMPLIED WARRANTIES OF MERCHANTABILITY AND FITNESS
FOR A PARTICULAR PURPOSE ARE DISCLAIMED. IN NO EVENT SHALL THE AUTHOR OR CONTRIBUTORS
BE LIABLE FOR ANY DIRECT, INDIRECT, INCIDENTAL, SPECIAL, EXEMPLARY, OR CONSEQUENTIAL
DAMAGES (INCLUDING, BUT NOT LIMITED TO, PROCUREMENT OF SUBSTITUTE GOODS OR SERVICES;
LOSS OF USE, DATA, OR PROFITS; OR BUSINESS INTERRUPTION) HOWEVER CAUSED AND ON ANY
THEORY OF LIABILITY, WHETHER IN CONTRACT, STRICT LIABILITY, OR TORT (INCLUDING NEGLIGENCE
OR OTHERWISE) ARISING IN ANY WAY OUT OF THE USE OF THIS SOFTWARE, EVEN IF ADVISED OF THE
POSSIBILITY OF SUCH DAMAGE.
The licence and distribution terms for any publicly available version or derivative of this code cannot be changed. i.e.
this code cannot simply be copied and put under another distribution licence [including the GNU Public Licence.]
The mod_ssl package falls under the Open-Source Software label because it's distributed under a BSD-style license. The
detailed license information follows.
Copyright (c) 1998-2001 Ralf S. Engelschall. All rights reserved.
Redistribution and use in source and binary forms, with or without modification, are permitted provided that the
following conditions are met:
1. Redistributions of source code must retain the above copyright notice, this list of conditions and the following
disclaimer.
2. Redistributions in binary form must reproduce the above copyright notice, this list of conditions and the following
disclaimer in the documentation and/or other materials provided with the distribution.
3. All advertising materials mentioning features or use of this software must display the following acknowledgment:
"This product includes software developed by Ralf S. Engelschall <[email protected]> for use in the mod_ssl
project (http://www.modssl.org/)."
4. The names "mod_ssl" must not be used to endorse or promote products derived from this software without prior
written permission. For written permission, please contact [email protected].
5. Products derived from this software may not be called "mod_ssl" nor may "mod_ssl" appear in their names without
prior written permission of Ralf S. Engelschall.
6. Redistributions of any form whatsoever must retain the following acknowledgment: "This product includes software
developed by Ralf S. Engelschall <[email protected]> for use in the mod_ssl project (http://www.modssl.org/)."
THIS SOFTWARE IS PROVIDED BY RALF S. ENGELSCHALL ``AS IS'' AND ANY EXPRESSED OR IMPLIED
WARRANTIES, INCLUDING, BUT NOT LIMITED TO, THE IMPLIED WARRANTIES OF MERCHANTABILITY
AND FITNESS FOR A PARTICULAR PURPOSE ARE DISCLAIMED. IN NO EVENT SHALL RALF S.
ENGELSCHALL OR HIS CONTRIBUTORS BE LIABLE FOR ANY DIRECT, INDIRECT, INCIDENTAL, SPECIAL,
EXEMPLARY, OR CONSEQUENTIAL DAMAGES (INCLUDING, BUT NOT LIMITED TO, PROCUREMENT OF
SUBSTITUTE GOODS OR SERVICES; LOSS OF USE, DATA, OR PROFITS; OR BUSINESS INTERRUPTION)
HOWEVER CAUSED AND ON ANY THEORY OF LIABILITY, WHETHER IN CONTRACT, STRICT LIABILITY, OR
User Guide
iii
TORT (INCLUDING NEGLIGENCE OR OTHERWISE) ARISING IN ANY WAY OUT OF THE USE OF THIS
SOFTWARE, EVEN IF ADVISED OF THE POSSIBILITY OF SUCH DAMAGE.
The Apache Software License, Version 1.1
Copyright (c) 2000 The Apache Software Foundation. All rights reserved.
Redistribution and use in source and binary forms, with or without modification, are permitted provided that the
following conditions are met:
1. Redistributions of source code must retain the above copyright notice, this list of conditions and the following
disclaimer.
2. Redistributions in binary form must reproduce the above copyright notice, this list of conditions and the following
disclaimer in the documentation and/or other materials provided with the distribution.
3. The end-user documentation included with the redistribution, if any, must include the following acknowledgment:
"This product includes software developed by the Apache Software Foundation (http://www.apache.org/)." Alternately,
this acknowledgment may appear in the software itself, if and wherever such third-party acknowledgments normally
appear.
4. The names "Apache" and "Apache Software Foundation" must not be used to endorse or promote products derived
from this software without prior written permission. For written permission, please contact [email protected].
5. Products derived from this software may not be called "Apache", nor may "Apache" appear in their name, without
prior written permission of the Apache Software Foundation.
THIS SOFTWARE IS PROVIDED ``AS IS'' AND ANY EXPRESSED OR IMPLIED WARRANTIES, INCLUDING,
BUT NOT LIMITED TO, THE IMPLIED WARRANTIES OF MERCHANTABILITY AND FITNESS FOR A
PARTICULAR PURPOSE ARE DISCLAIMED. IN NO EVENT SHALL THE APACHE SOFTWARE FOUNDATION
OR ITS CONTRIBUTORS BE LIABLE FOR ANY DIRECT, INDIRECT, INCIDENTAL, SPECIAL, EXEMPLARY,
OR CONSEQUENTIAL DAMAGES (INCLUDING, BUT NOT LIMITED TO, PROCUREMENT OF SUBSTITUTE
GOODS OR SERVICES; LOSS OF USE, DATA, OR PROFITS; OR BUSINESS INTERRUPTION) HOWEVER
CAUSED AND ON ANY THEORY OF LIABILITY, WHETHER IN CONTRACT, STRICT LIABILITY, OR TORT
(INCLUDING NEGLIGENCE OR OTHERWISE) ARISING IN ANY WAY OUT OF THE USE OF THIS SOFTWARE,
EVEN IF ADVISED OF THE POSSIBILITY OF SUCH DAMAGE.
This software consists of voluntary contributions made by many individuals on behalf of the Apache Software
Foundation. For more information on the Apache Software Foundation, please see <http://www.apache.org/>.
Portions of this software are based upon public domain software originally written at the National Center for
Supercomputing Applications, University of Illinois, Urbana-Champaign.
All other trademarks or trade names mentioned herein, if any, are the property of their respective owners.
Part No: 1200016
Software Version: 6.2
WatchGuard Technologies, Inc.
Firebox System Software
End-User License Agreement
IMPORTANT - READ CAREFULLY BEFORE ACCESSING WATCHGUARD SOFTWARE:
This WFS End-User License Agreement ("AGREEMENT") is a legal agreement between you (either an individual or a
single entity) and WatchGuard Technologies, Inc. ("WATCHGUARD") for the WATCHGUARD WFS software product,
which includes computer software components (whether installed separately on a computer workstation or on the
WATCHGUARD hardware product or included on the WATCHGUARD hardware product) and may include associated
media, printed materials, and on-line or electronic documentation, and any updates or modifications thereto, including
those received through the WatchGuard LiveSecurity Service (or its equivalent), (the "SOFTWARE PRODUCT").
WATCHGUARD is willing to license the SOFTWARE PRODUCT to you only on the condition that you accept all of the
terms contained in this Agreement. Please read this Agreement carefully. By installing or using the SOFTWARE
PRODUCT you agree to be bound by the terms of this Agreement. If you do not agree to the terms of this
AGREEMENT, WATCHGUARD will not license the SOFTWARE PRODUCT to you, and you will not have any rights in
the SOFTWARE PRODUCT. In that case, promptly return the SOFTWARE PRODUCT, along with proof of payment,
to the authorized dealer from whom you obtained the SOFTWARE PRODUCT for a full refund of the price you paid.
The WATCHGUARD hardware product is subject to a separate agreement and limited hardware warranty included
with the WATCHGUARD hardware product packaging and/or in the associated user documentation.
iv
WatchGuard Firebox System
1.
Ownership and License. The SOFTWARE PRODUCT is protected by copyright laws and international copyright
treaties, as well as other intellectual property laws and treaties. This is a license agreement and NOT an agreement for
sale. All title and copyrights in and to the SOFTWARE PRODUCT (including but not limited to any images,
photographs, animations, video, audio, music, text, and applets incorporated into the SOFTWARE PRODUCT), the
accompanying printed materials, and any copies of the SOFTWARE PRODUCT are owned by WATCHGUARD or its
licensors. Your rights to use the SOFTWARE PRODUCT are as specified in this AGREEMENT, and WATCHGUARD
retains all rights not expressly granted to you in this AGREEMENT. Nothing in this AGREEMENT constitutes a
waiver of our rights under U.S. copyright law or any other law or treaty.
2.
Permitted Uses. You are granted the following rights to the SOFTWARE PRODUCT:
(A) You may install and use the SOFTWARE PRODUCT on any single WATCHGUARD hardware product at any
single location and may install and use the SOFTWARE PRODUCT on multiple workstation computers.
(B) To use the SOFTWARE PRODUCT on more than one WATCHGUARD hardware product at once, you must
purchase an additional copy of the SOFTWARE PRODUCT for each additional WATCHGUARD hardware product on
which you want to use it. To the extent that you install copies of the SOFTWARE PRODUCT on additional
WATCHGUARD hardware products in accordance with the prior sentence without installing the additional copies of
the SOFTWARE PRODUCT included with such WATCHGUARD hardware products, you agree that use of any software
provided with or included on the additional WATCHGUARD hardware products that does not require installation will
be subject to the terms and conditions of this AGREEMENT. You must also maintain a current subscription to the
WatchGuard LiveSecurity Service (or its equivalent) for each additional WATCHGUARD hardware product on which
you will use a copy of an updated or modified version of the SOFTWARE PRODUCT received through the WatchGuard
LiveSecurity Service (or its equivalent).
(C)
In addition to the copies described in Section 2(A), you may make a single copy of the SOFTWARE PRODUCT
for backup or archival purposes only.
3.
Prohibited Uses. You may not, without express written permission from WATCHGUARD:
(A) Use, copy, modify, merge or transfer copies of the SOFTWARE PRODUCT or printed materials except as
provided in this AGREEMENT;
(B) Use any backup or archival copy of the SOFTWARE PRODUCT (or allow someone else to use such a copy) for
any purpose other than to replace the original copy in the event it is destroyed or becomes defective;
(C)
Sublicense, lend, lease or rent the SOFTWARE PRODUCT;
(D) Transfer this license to another party unless
(i) the transfer is permanent,
(ii) the third party recipient agrees to the terms of this AGREEMENT, and
(iii) you do not retain any copies of the SOFTWARE PRODUCT; or
(E) Reverse engineer, disassemble or decompile the SOFTWARE PRODUCT.
4. Limited Warranty. WATCHGUARD makes the following limited warranties for a period of ninety (90) days from
the date you obtained the SOFTWARE PRODUCT from WATCHGUARD or an authorized dealer:
(A) Media. The disks and documentation will be free from defects in materials and workmanship under normal use. If
the disks or documentation fail to conform to this warranty, you may, as your sole and exclusive remedy, obtain a
replacement free of charge if you return the defective disk or documentation to WATCHGUARD with a dated proof of
purchase.
(B) SOFTWARE PRODUCT. The SOFTWARE PRODUCT will materially conform to the documentation that
accompanies it. If the SOFTWARE PRODUCT fails to operate in accordance with this warranty, you may, as your sole
and exclusive remedy, return all of the SOFTWARE PRODUCT and the documentation to the authorized dealer from
whom you obtained it, along with a dated proof of purchase, specifying the problems, and they will provide you with a
new version of the SOFTWARE PRODUCT or a full refund, at their election.
Disclaimer and Release. THE WARRANTIES, OBLIGATIONS AND LIABILITIES OF WATCHGUARD, AND YOUR
REMEDIES, SET FORTH IN PARAGRAPHS 4, 4(A) AND 4(B) ABOVE ARE EXCLUSIVE AND IN
SUBSTITUTION FOR, AND YOU HEREBY WAIVE, DISCLAIM AND RELEASE ANY AND ALL OTHER
WARRANTIES, OBLIGATIONS AND LIABILITIES OF WATCHGUARD AND ITS LICENSORS AND ALL OTHER
RIGHTS, CLAIMS AND REMEDIES YOU MAY HAVE AGAINST WATCHGUARD AND ITS LICENSORS,
EXPRESS OR IMPLIED, ARISING BY LAW OR OTHERWISE, WITH RESPECT TO ANY NONCONFORMANCE
OR DEFECT IN THE SOFTWARE PRODUCT (INCLUDING, BUT NOT LIMITED TO, ANY IMPLIED WARRANTY
OF MERCHANTABILITY OR FITNESS FOR A PARTICULAR PURPOSE, ANY IMPLIED WARRANTY ARISING
FROM COURSE OF PERFORMANCE, COURSE OF DEALING, OR USAGE OF TRADE, ANY WARRANTY OF
NONINFRINGEMENT, ANY WARRANTY THAT THE SOFTWARE PRODUCT WILL MEET YOUR
REQUIREMENTS, ANY WARRANTY OF UNINTERRUPTED OR ERROR-FREE OPERATION, ANY OBLIGATION,
LIABILITY, RIGHT, CLAIM OR REMEDY IN TORT, WHETHER OR NOT ARISING FROM THE NEGLIGENCE
(WHETHER ACTIVE, PASSIVE OR IMPUTED) OR FAULT OF WATCHGUARD AND ITS LICENSORS AND ANY
User Guide
v
OBLIGATION, LIABILITY, RIGHT, CLAIM OR REMEDY FOR LOSS OR DAMAGE TO, OR CAUSED BY OR
CONTRIBUTED TO BY, THE SOFTWARE PRODUCT).
Limitation of Liability. WATCHGUARD'S LIABILITY (WHETHER IN CONTRACT, TORT, OR OTHERWISE; AND
NOTWITHSTANDING ANY FAULT, NEGLIGENCE, STRICT LIABILITY OR PRODUCT LIABILITY) WITH
REGARD TO THE SOFTWARE PRODUCT WILL IN NO EVENT EXCEED THE PURCHASE PRICE PAID BY YOU
FOR SUCH PRODUCT. THIS SHALL BE TRUE EVEN IN THE EVENT OF THE FAILURE OF AN AGREED
REMEDY. IN NO EVENT WILL WATCHGUARD BE LIABLE TO YOU OR ANY THIRD PARTY, WHETHER
ARISING IN CONTRACT (INCLUDING WARRANTY), TORT (INCLUDING ACTIVE, PASSIVE OR IMPUTED
NEGLIGENCE AND STRICT LIABILITY AND FAULT), FOR ANY INDIRECT, SPECIAL, INCIDENTAL, OR
CONSEQUENTIAL DAMAGES (INCLUDING WITHOUT LIMITATION LOSS OF BUSINESS PROFITS,
BUSINESS INTERRUPTION, OR LOSS OF BUSINESS INFORMATION) ARISING OUT OF OR IN CONNECTION
WITH THIS WARRANTY OR THE USE OF OR INABILITY TO USE THE SOFTWARE PRODUCT, EVEN IF
WATCHGUARD HAS BEEN ADVISED OF THE POSSIBILITY OF SUCH DAMAGES. THIS SHALL BE TRUE
EVEN IN THE EVENT OF THE FAILURE OF AN AGREED REMEDY.
5.United States Government Restricted Rights. The SOFTWARE PRODUCT is provided with Restricted Rights. Use,
duplication or disclosure by the U.S. Government or any agency or instrumentality thereof is subject to restrictions as
set forth in subdivision (c)(1)(ii) of the Rights in Technical Data and Computer Software clause at DFARS 252.2277013, or in subdivision (c)(1) and (2) of the Commercial Computer Software -- Restricted Rights Clause at 48 C.F.R.
52.227-19, as applicable. Manufacturer is WatchGuard Technologies, Inc., 505 5th Ave. South, Suite 500, Seattle,
WA 98104.
6.Export Controls. You agree not to directly or indirectly transfer the SOFTWARE PRODUCT or documentation to
any country to which such transfer would be prohibited by the U.S. Export Administration Act and the regulations
issued thereunder.
7.Termination. This license and your right to use the SOFTWARE PRODUCT will automatically terminate if you fail
to comply with any provisions of this AGREEMENT, destroy all copies of the SOFTWARE PRODUCT in your
possession, or voluntarily return the SOFTWARE PRODUCT to WATCHGUARD. Upon termination you will destroy
all copies of the SOFTWARE PRODUCT and documentation remaining in your control or possession.
8.Miscellaneous Provisions. This AGREEMENT will be governed by and construed in accordance with the substantive
laws of Washington excluding the 1980 United National Convention on Contracts for the International Sale of Goods,
as amended. This is the entire AGREEMENT between us relating to the SOFTWARE PRODUCT, and supersedes any
prior purchase order, communications, advertising or representations concerning the SOFTWARE PRODUCT AND BY
USING THE SOFTWARE PRODUCT YOU AGREE TO THESE TERMS. IF THE SOFTWARE PRODUCT IS BEING
USED BY AN ENTITY, THE INDIVIDUAL INDICATING AGREEMENT TO THESE TERMS REPRESENTS AND
WARRANTS THAT (A) SUCH INDIVIDUAL IS DULY AUTHORIZED TO ACCEPT THIS AGREEMENT ON
BEHALF OF THE ENTITY AND TO BIND THE ENTITY TO THE TERMS OF THIS AGREEMENT; (B) THE
ENTITY HAS THE FULL POWER, CORPORATE OR OTHERWISE, TO ENTER INTO THIS AGREEMENT AND
PERFORM ITS OBLIGATIONS UNDER THIS AGREEMENT AND; (C) THIS AGREEMENT AND THE
PERFORMANCE OF THE ENTITY’S OBLIGATIONS UNDER THIS AGREEMENT DO NOT VIOLATE ANY THIRDPARTY AGREEMENT TO WHICH THE ENTITY IS A PARTY. No change or modification of this AGREEMENT will
be valid unless it is in writing and is signed by WATCHGUARD.
vi
WatchGuard Firebox System
Contents
CHAPTER 1 Introduction ................................................ 1
Welcome to WatchGuard® .............................................. 1
WatchGuard Firebox System Components ........................ 2
WatchGuard Firebox .....................................................
WatchGuard Control Center ............................................
WatchGuard security applications ....................................
WatchGuard LiveSecurity® Service ...................................
2
2
3
3
Minimum Requirements ................................................... 3
Software requirements ................................................... 3
Web browser requirements ............................................. 4
Hardware requirements .................................................. 4
WatchGuard Options ....................................................... 5
VPN Manager .............................................................. 5
High Availability ........................................................... 6
Mobile User VPN .......................................................... 6
SpamScreen ................................................................ 6
Obtaining WatchGuard Options ...................................... 7
About this Guide ............................................................. 7
CHAPTER 2 Service and Support .................................. 9
Benefits of LiveSecurity® Service ...................................... 9
LiveSecurity® Broadcasts ............................................... 10
User Guide
vii
............................... 11
LiveSecurity® Self Help Tools .......................................... 12
WatchGuard Users Forum ............................................... 14
Online Help .................................................................. 14
Starting WatchGuard Online Help .................................. 15
Searching for topics ..................................................... 15
Copying the Help system to additional platforms .............. 15
Online Help system requirements ................................... 16
Context-sensitive Help ................................................. 16
Product Documentation ................................................. 17
Assisted Support ............................................................ 17
LiveSecurity® Program ................................................. 17
LiveSecurity® Gold Program ......................................... 18
Firebox Installation Services .......................................... 18
VPN Installation Services ............................................... 19
Training and Certification ................................................ 19
Activating the LiveSecurity® Service
CHAPTER 3 Getting Started ........................................ 21
Gathering Network Information ...................................... 22
Selecting a Firewall Configuration Mode ......................... 25
Routed configuration ................................................... 26
Drop-in configuration ................................................... 27
Choosing a Firebox configuration ................................... 29
Adding secondary networks to your configuration ............. 29
Dynamic IP support on the External interface .................... 31
............................... 32
............................................ 33
Cabling the Firebox ....................................................... 33
Using a serial cable ...................................................... 33
Using TCP/IP .............................................................. 35
Running the QuickSetup Wizard ...................................... 35
Testing the connection ................................................. 37
Entering IP addresses ................................................... 38
Deploying the Firebox into Your Network ........................ 39
What’s Next ................................................................... 39
Setting Up the Management Station
Software encryption levels
viii
WatchGuard Firebox System
Customizing your security policy ....................................
What to expect from LiveSecurity® Service ......................
39
40
CHAPTER 4 Firebox Basics .......................................... 41
What is a Firebox? ......................................................... 41
Opening a Configuration File ......................................... 43
Opening a configuration from the Firebox .......................
Opening a configuration from a local hard disk ................
44
44
Saving a Configuration File ............................................ 45
Saving a configuration to the Firebox .............................. 45
Saving a configuration to the Management Station’s
local drive ..........................................................
47
Resetting Firebox Passphrases ........................................ 47
Setting the Firebox Model .............................................. 48
Setting the Time Zone ................................................... 49
Setting a Firebox Friendly Name ..................................... 49
CHAPTER 5 Using Policy Manager to Configure
Your Network
.......................................... 51
Starting a New Configuration File ................................... 52
Setting the Firebox Configuration Mode ......................... 52
Setting IP Addresses of Firebox Interfaces ...................... 52
Setting addresses in drop-in mode ................................. 53
Setting addresses in routed mode .................................. 54
Setting DHCP or PPPoE Support on the External Interface 54
Configuring DHCP or PPPoE support .............................. 54
Enabling static PPPoE .................................................. 55
Configuring Drop-in Mode ............................................. 56
Defining External IP Aliases ............................................ 56
Adding Secondary Networks .......................................... 57
Entering WINS and DNS Server Addresses ...................... 58
Configuring Out-of-Band Management ........................... 58
Defining a Firebox as a DHCP Server .............................. 59
Adding a new subnet .................................................. 60
Modifying an existing subnet ........................................ 60
Removing a subnet ..................................................... 61
User Guide
ix
Adding Basic Services to Policy Manager ......................... 61
Configuring Routes ........................................................ 62
Defining a Network Route ............................................. 62
Defining a Host Route .................................................. 63
CHAPTER 6 Using the WatchGuard Control Center .. 65
Starting Control Center and Connecting to a Firebox ....... 65
Control Center Components ........................................... 66
QuickGuide ............................................................... 67
Front panel ................................................................ 68
Firebox and VPN tunnel status ....................................... 69
Traffic Monitor ............................................................ 72
Working with Control Center
.......................................... 73
Running the QuickSetup Wizard ..................................... 73
Opening Firebox System applications ............................. 73
Flushing the ARP cache ................................................ 74
Connecting to a Firebox ............................................... 74
Changing the polling rate ............................................. 75
Setting the maximum number of log entries ..................... 75
Displaying Traffic Monitor entries in color ......................... 75
Viewing different components of Control Center ............... 76
Specifying Always on Top ............................................. 76
Getting Help on the Web ............................................. 76
Manipulating Traffic Monitor ........................................... 77
Using Control Center Applications .................................. 78
Launching Policy Manager ............................................ 78
Launching Firebox Monitors .......................................... 79
Launching LogViewer ................................................... 79
Launching HostWatch .................................................. 79
Launching Historical Reports ......................................... 79
Opening the WSEP user interface ................................... 80
CHAPTER 7 Configuring Network Address
Translation
............................................... 81
Dynamic NAT ................................................................ 82
Using Simple Dynamic NAT ............................................ 83
x
WatchGuard Firebox System
Enabling simple dynamic NAT .......................................
Adding simple dynamic NAT entries ...............................
Reordering simple dynamic NAT entries ..........................
Specifying simple dynamic NAT exceptions .....................
83
84
85
85
Using Service-Based Dynamic NAT ................................. 86
Enabling service-based dynamic NAT ............................. 86
Configuring service-based dynamic NAT ......................... 86
Configuring a Service for Incoming Static NAT ................. 87
Adding external IP addresses ........................................ 87
Setting static NAT for a service ...................................... 88
Using 1-to-1 NAT ........................................................... 89
Proxies and NAT ......................................................... 91
CHAPTER 8 Configuring Filtered Services ................. 93
Selecting Services for your Security Policy Objectives ....... 94
.......................................... 94
......................................... 95
Adding and Configuring Services ................................... 95
Configurable parameters for services .............................. 97
Adding a service ......................................................... 97
Creating a new service ............................................... 100
Deleting a service ..................................................... 102
Defining Service Properties .......................................... 103
Accessing a service’s Properties dialog box .................... 103
Adding service properties .......................................... 104
Adding addresses or users to service properties ............. 104
Working with wg_icons .............................................. 105
Customizing logging and notification ............................ 105
Service Precedence ..................................................... 107
Incoming service guidelines
Outgoing service guidelines
CHAPTER 9 Configuring Proxied Services ............... 111
Configuring an SMTP Proxy Service .............................. 112
.......................... 112
......................... 117
Configuring an FTP Proxy Service .................................. 119
Selecting an HTTP Service ............................................ 120
Configuring the Incoming SMTP Proxy
Configuring the Outgoing SMTP Proxy
User Guide
xi
Adding a proxy service for HTTP .................................. 121
Configuring a caching proxy server ............................... 122
............................... 123
..................................... 124
Configuring the DNS Proxy Service
Adding the DNS Proxy Service
CHAPTER 10 Creating Aliases and Implementing
Authentication ....................................... 127
............................................................... 128
Adding an alias ......................................................... 128
How User Authentication Works .................................... 130
Authentication Server Types ......................................... 131
Defining Firebox Users and Groups for Authentication .... 132
Configuring Windows NT Server Authentication ............. 134
Configuring RADIUS Server Authentication .................... 135
Configuring CRYPTOCard Server Authentication ............ 137
Configuring SecurID Authentication .............................. 139
Using Aliases
CHAPTER 11 Protecting Your Network From
Attacks
................................................... 141
............................................... 142
Blocking spoofing attacks ........................................... 142
Blocking port space and address space attacks ............... 143
Stopping IP options attacks ......................................... 144
Stopping SYN Flood attacks ........................................ 144
Changing SYN flood settings ....................................... 145
Integrating Intrusion Detection ..................................... 146
Using the fbidsmate command-line utility ...................... 147
Blocking Sites .............................................................. 149
Blocking a site permanently ........................................ 150
Creating exceptions to the Blocked Sites list ................... 152
Changing the auto-block duration ................................ 152
Logging and notification for blocked sites ...................... 152
Blocking Ports .............................................................. 153
Avoiding problems with legitimate users ........................ 155
Blocking a port permanently ....................................... 155
Auto-blocking sites that try to use blocked ports ............. 156
Default Packet Handling
xii
WatchGuard Firebox System
........... 156
Blocking Sites Temporarily with Service Settings ............ 157
Configuring a service to temporarily block sites .............. 157
Viewing the Blocked Sites list ...................................... 157
Setting logging and notification for blocked ports
CHAPTER 12 Monitoring Firebox Activity ................. 159
Firebox Monitors ......................................................... 159
Starting Firebox Monitors and connecting to a Firebox .....
Setting Firebox Monitors view properties ......................
BandwidthMeter .......................................................
ServiceWatch ...........................................................
Status Report ...........................................................
Authentication list .....................................................
Blocked Site list ........................................................
160
160
161
161
162
167
167
HostWatch .................................................................. 167
Connecting HostWatch to a Firebox: ............................ 169
Replaying a log file in HostWatch ................................. 169
Controlling the HostWatch display ............................... 170
Modifying HostWatch view properties ........................... 170
CHAPTER 13 Setting Up Logging and Notification .. 171
Developing Logging and Notification Policies ............... 172
Logging policy .........................................................
Notification policy .....................................................
172
173
Failover Logging ......................................................... 174
WatchGuard Logging Architecture ................................ 174
Designating Log Hosts for a Firebox ............................. 175
Adding a log host ..................................................... 175
Enabling Syslog logging ............................................ 176
Changing the log encryption key ................................. 177
Removing a log host ................................................. 177
Reordering log hosts ................................................. 177
Synchronizing log hosts .............................................. 177
Setting up the WatchGuard Security Event Processor ..... 178
Running the WSEP application on Windows NT,
Windows 2000, or Windows XP ............................
User Guide
178
xiii
Viewing the WSEP application ..................................... 180
Starting and stopping the WSEP .................................. 181
Setting the log encryption key ..................................... 181
...... 182
Log file size and rollover frequency ............................... 182
Setting the interval for log rollover ................................ 183
Scheduling log reports ............................................... 184
Controlling notification ............................................... 184
Setting a Firebox friendly name for log files .................... 185
Setting Global Logging and Notification Preferences
Customizing Logging and Notification by Service or
Option ............................................................... 185
Setting Launch Interval and Repeat Count ...................... 187
Setting logging and notification for a service .................. 188
Setting logging and notification for default packet-handling
options ............................................................ 188
Setting logging and notification for blocked sites and ports 189
CHAPTER 14 Reviewing and Working with Log Files 191
Log File Names and Locations ...................................... 191
Viewing Files with LogViewer ........................................ 192
Starting LogViewer and opening a log file ...................... 192
Setting LogViewer preferences .................................... 192
Searching for specific entries ....................................... 193
Copying and exporting LogViewer data ......................... 193
Displaying and Hiding Fields ........................................ 195
Working with Log Files ................................................. 197
Consolidating logs from multiple locations ..................... 198
Copying log files ....................................................... 198
Forcing the rollover of log files ..................................... 198
Saving log files to a new location ................................. 199
Setting log encryption keys ......................................... 199
Sending logs to a log host at another location ................ 200
CHAPTER 15 Generating Reports of Network
Activity
................................................... 203
........................................ 204
Starting a new report ................................................. 204
Creating and Editing Reports
xiv
WatchGuard Firebox System
Editing an existing report ...........................................
Deleting a report ......................................................
Viewing the reports list ..............................................
205
205
205
Specifying a Report Time Span ..................................... 205
Specifying Report Sections ........................................... 206
Consolidating Report Sections ..................................... 206
Setting Report Properties ............................................. 207
Exporting Reports ........................................................ 207
Exporting reports to HTML format ............................... 208
Exporting a report to WebTrends for Firewalls and VPNs .. 208
Exporting a report to a text file .................................... 209
Using Report Filters ..................................................... 209
Creating a new report filter ......................................... 210
Editing a report filter ................................................. 210
Deleting a report filter ............................................... 211
Applying a report filter ............................................... 211
Scheduling and Running Reports .................................. 211
Scheduling a report ................................................... 211
Manually running a report ........................................... 212
Report Sections and Consolidated Sections ................... 212
Report sections ........................................................ 212
Consolidated sections ............................................... 215
CHAPTER 16 Controlling Web Site Access ............... 217
Getting Started with WebBlocker .................................. 217
Installing the WebBlocker server ..................................
Downloading the database using WebBlocker Utility .......
Configuring the WatchGuard service icon ......................
Add an HTTP service .................................................
Configuring logging ..................................................
217
218
219
219
219
Configuring the WebBlocker Service ............................ 220
Activating WebBlocker ............................................... 220
Allowing WebBlocker server bypass ............................. 221
Configuring the WebBlocker message .......................... 221
Scheduling operational and non-operational hours ........ 222
User Guide
xv
Setting privileges ...................................................... 223
Creating WebBlocker exceptions .................................. 223
Managing the WebBlocker Server ................................. 225
Installing Multiple WebBlocker Servers .......................... 225
Automating WebBlocker Database Downloads .............. 225
Installing Scheduled Tasks
........................................... 226
CHAPTER 17 Connecting with Out-of-Band
Management
.......................................... 229
Connecting a Firebox with OOB Management ............... 229
Enabling the Management Station ................................ 230
Preparing a Windows NT Management Station for OOB ... 230
Preparing a Windows 2000 Management Station for OOB 230
Preparing a Windows XP Management Station for OOB ... 231
Configuring the Firebox for OOB
Establishing an OOB Connection
.................................. 232
.................................. 232
APPENDIX A Troubleshooting Firebox Connectivity
227
Method 1: Ethernet Dongle Method ............................. 227
Method 2: The Flash Disk Management Utility ............... 229
Method 3: Using the Reset Button - Firebox
Models 500, 700, 1000, 2500, 4500 ...................... 231
Method 4: Serial Dongle (Firebox II only) ...................... 232
Index
xvi
..................................................................... 235
WatchGuard Firebox System
CHAPTER 1
Introduction
Welcome to WatchGuard®
In the past, a connected enterprise needed a complex set of tools, systems,
and personnel for access control, authentication, virtual private
networking, network management, and security analysis. These costly
systems were difficult to integrate and not easy to update. Today, the
WatchGuard Firebox System delivers a complete network security
solution to meet these modern security challenges:
• Keeping network defenses current
• Protecting every office connected to the Internet
• Encrypting communications to remote offices and traveling users
• Managing the security system from a single site
The WatchGuard Firebox System is a reliable, flexible, scalable, and
inexpensive network security solution. Its setup and maintenance costs
are small, and it supports a rich feature set. When properly configured
and administered, the Firebox System reliably defends any network
against external threats.
User Guide
1
Chapter 1: Introduction
WatchGuard Firebox System Components
The WatchGuard Firebox System has all of the components needed to
conduct electronic business safely. It is made up of the following:
• Firebox–a plug-and-play network appliance
• Control Center–a suite of management and security software tools
• A collection of advanced security applications
•
LiveSecurity® Service–a security-related broadcast service
WatchGuard Firebox
The Firebox family of products is specially designed and optimized.
These machines are small, efficient, and reliable. The Firebox is a lowprofile component with an indicator display panel in front and physical
interfaces in back.
For detailed Firebox III specifications, see the Firebox III Hardware Guide.
WatchGuard Control Center
WatchGuard Control Center is a toolkit of applications run from a single
location, enabling you to configure, manage, and monitor your network
security policy. Control Center includes:
Policy Manager
Used to design, configure, and manage the electronic portion of a
network security policy.
Firebox Monitors
Combines the WatchGuard set of monitoring tools into a single
user interface.
LogViewer
Displays a static view of the log data, which you can filter by type,
search for keywords and fields, and print and save to a separate
file.
HostWatch
Displays active connections occurring on a Firebox in real time or
represents the connections listed in a log file.
2
WatchGuard Firebox System
Minimum Requirements
Historical Reports
Creates HTML reports that display session types, most active
hosts, most used services, URLs, and other data useful in
monitoring and troubleshooting your network.
WatchGuard security applications
In addition to basic security policy configuration, the Firebox System
includes a suite of advanced software features. These include:
• User authentication
• Network address translation
• Remote user virtual private networking
• Branch office virtual private networking
• Selective Web site blocking
WatchGuard LiveSecurity® Service
The innovative LiveSecurity Service makes it easy to maintain the security
of an organization’s network. WatchGuard’s team of security experts
publish alerts and software updates, which are broadcast to your email
client.
Minimum Requirements
This section describes the minimum hardware and software requirements
necessary to successfully install, run, and administer version 6.0 of the
WatchGuard Firebox System.
Software requirements
WatchGuard Firebox System software version 6.0 can run on Microsoft
Windows 98, Windows NT 4.0, Windows 2000, or Windows XP as
specified below:
Windows 98 requirements
•
User Guide
Microsoft Windows 98
3
Chapter 1: Introduction
Windows NT requirements
•
•
Microsoft Windows NT 4.0
Microsoft Service Pack 4, Service Pack 5, or Service Pack 6a for
Windows NT 4.0
Windows 2000 requirements
•
Microsoft Windows 2000 Professional or Windows 2000 Server
Windows XP requirements
•
Microsoft Windows XP
Web browser requirements
You must have Microsoft Internet Explorer 4.0 or later to run the
installation from the CD. The following HTML-based browsers are
recommended to view WatchGuard Online Help:
• Netscape Communicator 4.7 or later
• Microsoft Internet Explorer 5.01 or later
Hardware requirements
Minimum hardware requirements are the same as those for the operating
system on which the WatchGuard Firebox System 6.0 runs. The
recommended hardware ranges are listed on the following table:
4
WatchGuard Firebox System
WatchGuard Options
.
Hardware
feature
Minimum requirement
CPU
Pentium II
Memory
Same as for operating system.
Recommended:
64 MB for Windows 98
128 MB for Windows NT 4.0
128 MB for Windows 2000 Professional
256 MB for Windows 2000 Server
128 MB for Windows XP
Hard disk space
25 MB to install all WatchGuard modules
15 MB minimum for log file
Additional space as required for log files
Additional space as required for multiple
configuration files
CD-ROM drive
(optional)
One CD-ROM drive to install WatchGuard
software from its CD-ROM distribution disk.
(You can also download the software from the
LiveSecurity Service Web site.)
WatchGuard Options
The WatchGuard Firebox System is enhanced by optional features
designed to accommodate the needs of different customer environments
and security requirements.
The following options are currently available for the WatchGuard Firebox
System.
VPN Manager
WatchGuard VPN Manager is a centralized module for creating and
managing the network security of an organization that uses the Internet to
conduct business. It turns the complex task of setting up multi-site virtual
private networks (VPNs) into a simple three-step process. VPN Manager
sets a new standard for Internet security by automating the setup,
management, and monitoring of multi-site IPSec VPN tunnels between an
organization’s headquarters, branch offices, telecommuters, and remote
users.
User Guide
5
Chapter 1: Introduction
VPN Manager is bundled with the WFS software, but it is available for
use only if you enable the VPN Manager checkbox when installing WFS
and enter your license key.
NOTE
The Firebox model 700 does not support VPN Manager.
High Availability
WatchGuard High Availability software lets you install a second, standby
Firebox on your network. If your primary Firebox fails, the second
Firebox automatically takes over to give your customers, business
partners, and employees virtually uninterrupted access to your protected
network.
High Availability is bundled with the WFS software, but it is available for
use only if you enable the High Availability checkbox when installing
WFS and enter your license key.
Mobile User VPN
Mobile User VPN is the WatchGuard IPSec implementation of remote
user virtual private networking. Mobile User VPN connects an employee
on the road or working from home to trusted and optional networks
behind a Firebox using a standard Internet connection, without
compromising security. WatchGuard Mobile User VPN software easily
integrates into your Firebox System, allowing your mobile users to
securely connect to your network. VPN traffic is encrypted using DES or
3DES-CBC, and authenticated through MD5 or SHA-1.
SpamScreen
SpamScreen helps to control “spam”–email sent to you or your end users
without permission. Spam consumes valuable bandwidth on your
Internet connection and on the hard disk space and CPU time of your
mail server. If allowed to enter your network unchecked, spam consumes
workers’ time to read and remove. WatchGuard SpamScreen identifies
spam as it comes through the Firebox. You can choose to either block the
spam at the Firebox or tag it for easy identification and sorting.
6
WatchGuard Firebox System
About this Guide
SpamScreen is bundled with the WFS software, but it is available for use
only if you enable the SpamScreen checkbox when installing WFS and
enter your license key.
Obtaining WatchGuard Options
WatchGuard options are available from your local reseller. For more
information about purchasing WatchGuard products, go to:
http://www.watchguard.com/sales/
About this Guide
The purpose of this guide is to help users of the WatchGuard Firebox
System set up and configure a basic network security system and
maintain, administer, and enhance the configuration of their network
security.
The audience for this guide represents a wide range of experience and
expertise in network management and security. The end user of the
WatchGuard Firebox System is generally a network administrator for a
company that can range from a small branch office to a large enterprise
with multiple offices around the world.
References to FAQs, on the online support pages, are included
throughout this guide. To access the FAQs, you must have a current
subscription to the LiveSecurity Service.
The following conventions are used in this guide:
• Within procedures, visual elements of the user interface, such as
buttons, menu items, dialog boxes, fields, and tabs, appear in
boldface.
• Menu items separated by arrows (=>) are selected in sequence from
subsequent menus. For example, File => Open => Configuration File
means to select Open from the File menu, and then Configuration
File from the Open menu.
• URLs and email addresses appear in sans serif font; for example, [email protected]
User Guide
7
Chapter 1: Introduction
•
•
•
8
Code, messages, and file names appear in monospace font; for
example: .wgl and .idx files
In command syntax, variables appear in italics; for example: fbidsmate
import_passphrase
Optional command parameters appear in square brackets.
WatchGuard Firebox System
CHAPTER 2
Service and Support
No Internet security solution is complete without systematic updates and
security intelligence. From the latest hacker techniques to the most
recently discovered operating system bug, the daily barrage of new
threats poses a perpetual challenge to any network security solution.
LiveSecurity® Service keeps your security system up-to-date by providing
solutions directly to you.
In addition, the WatchGuard Technical Support team and Training
department offer a wide variety of methods to answer your questions and
assist you with improving the security of your network.
Benefits of LiveSecurity® Service
As the frequency of new attacks and security advisories continues to
surge, the task of ensuring that your network is secure becomes an even
greater challenge. The WatchGuard Rapid Response Team, a dedicated
group of network security experts, helps absorb this burden by
monitoring the Internet security landscape for you in order to identify
new threats as they emerge.
User Guide
9
Chapter 2: Service and Support
Threat alerts and expert advice
After a new threat is identified, you’ll receive a LiveSecurity broadcast by
way of an email message from our Rapid Response Team that alerts you
to the threat. Each alert includes a complete description of the nature and
severity of the threat, the risks it poses, and what steps you should take to
make sure your network remains continuously protected.
Easy software updates
Your WatchGuard LiveSecurity Service subscription saves you time by
providing the latest software to keep your WatchGuard Firebox System
up-to-date. You receive installation wizards and release notes with each
software update for easy installation. These ongoing updates ensure that
your WatchGuard Firebox System remains state-of-the-art, without you
having to take time to track new releases.
Access to technical support and training
When you have questions about your WatchGuard system, you can
quickly find answers using our extensive online support resources, or by
talking directly to one of our support representatives. In addition, you can
access WatchGuard courseware online to learn about WatchGuard system
features.
LiveSecurity® Broadcasts
The WatchGuard LiveSecurity Rapid Response Team periodically sends
broadcasts and software information directly to your desktop by way of
email. Broadcasts are divided into channels to help you immediately
recognize and process incoming information.
Information Alert
Information Alerts provide timely analysis of breaking news and
current issues in Internet security combined with the proper
system configuration recommendations necessary to protect your
network.
10
WatchGuard Firebox System
LiveSecurity® Broadcasts
Threat Response
After a newly discovered threat is identified, the Rapid Response
Team transmits an update specifically addressing this threat to
make sure your network is protected.
Software Update
You receive functional software enhancements on an ongoing
basis that cover your entire WatchGuard Firebox System.
Editorial
Leading security experts join the WatchGuard Rapid Response
Team in contributing useful editorials to provide a source of
continuing education on this rapidly changing subject.
Foundations
Articles specifically written for novice security administrators,
non-technical co-workers, and executives.
Loopback
A monthly index of LiveSecurity Service broadcasts.
Support Flash
These technical tutorials provide tips for managing the
WatchGuard Firebox System. Support Flashes supplement other
resources such as Online Help, FAQs, and Known Issues pages on
the Technical Support Web site.
Virus Alert
In cooperation with McAfee, WatchGuard issues weekly
broadcasts that provide the latest information on new computer
viruses.
New from WatchGuard
To keep you abreast of new features, product upgrades, and
upcoming programs, WatchGuard first announces their
availability to our existing customers.
Activating the LiveSecurity® Service
The LiveSecurity Service can be activated through the setup wizard on the
CD-ROM or through the activation section of the WatchGuard
LiveSecurity Web pages. The setup wizard is detailed thoroughly in the
QuickStart Guide and in the “Getting Started” chapter of this book.
User Guide
11
Chapter 2: Service and Support
To activate the LiveSecurity Service through the Web:
1
Be sure that you have the LiveSecurity license key and the Firebox
serial number handy. You will need these during the activation
process.
- The Firebox serial number is displayed in two locations: a small
silver sticker on the outside of the shipping box, and a sticker on
the back of the Firebox just below the UPC bar code
- The license key number is located on the WatchGuard
LiveSecurity Agreement License Key Certificate. Enter the
number in the exact form shown on the key, including the
hyphens.
2
Using your Web browser, go to:
http:\\www.watchguard.com/account/register.asp
The Account page appears.
NOTE
You must have JavaScript enabled on your browser to be able to activate
the LiveSecurity Service.
3
Complete the LiveSecurity Activation form. Move through the fields
on the form using either the TAB key or the mouse.
All of the fields are required for successful registration. The profile information
helps WatchGuard target information and updates to your needs.
4
Verify that your email address is correct. You will receive your
activation confirmation mail and all of your LiveSecurity broadcasts
at this address.
5
Click Register.
LiveSecurity® Self Help Tools
Online support services help you get the most out of your WatchGuard
products.
12
WatchGuard Firebox System
LiveSecurity® Self Help Tools
NOTE
You must register for LiveSecurity Service before you can access the
online support services.
Advanced FAQs (frequently asked questions)
Detailed information about configuration options and
interoperability.
Basic FAQs
General questions about the WatchGuard Firebox System.
Known Issues
Confirmed issues and fixes for current software.
WatchGuard Users Forum
A moderated Web board about WatchGuard products.
Online Training
Information on product training, certification, and a broad
spectrum of publications about network security and
WatchGuard products. These courses are designed to guide users
through all components of WatchGuard products. These courses
are modular in design, allowing you to use them in a manner
most suitable to your learning objectives. For more information,
go to:
www.watchguard.com/training/courses_online.asp
Learn About
A listing of all resources available for specific products and
features.
Online Help
Current Help system for WatchGuard products.
Product Documentation
A listing of current product documentation from which you can
open .pdf files.
General SOHO Resources
Access to the resources you need and updated information to help
you install and use the SOHO.
User Guide
13
Chapter 2: Service and Support
To access the online support services:
1
From your Web browser, go to http://www.watchguard.com/ and select
Support.
2
Log in to LiveSecurity Service.
WatchGuard Users Forum
The WatchGuard users forum is an online group in which the users of the
WatchGuard Firebox System exchange ideas, questions, and tips
regarding all aspects of the product, including configuration,
compatibility, and networking. This forum is categorized and searchable,
and is moderated, during regular business hours, by WatchGuard
engineers and Technical Support personnel. However, this forum should
not be used for reporting support issues to WatchGuard Technical
Support. Instead, contact WatchGuard Technical Support directly by way
of the Web interface or telephone.
Joining the WatchGuard users forum
To join the WatchGuard users forum:
1
Go to www.watchguard.com. Click Support. Log into the LiveSecurity
Service.
2
3
4
Under Self-Help Tools, click Interactive Support Forum.
Click Create a user forum account.
Enter the required information in the form. Click Create.
The username and password should be of your own choosing. They should not be the
same as that of your LiveSecurity Service.
Online Help
WatchGuard Online Help is a Web-based system with cross-platform
functionality that enables you to install a copy on virtually any computer.
A static version of the Online Help system is installed automatically with
the Firebox System software in a subdirectory of the installation directory
14
WatchGuard Firebox System
Online Help
called Help. In addition, a “live,” continually updated version of Online
Help is available at:
http://help.watchguard.com/lss/60
You may need to log into the LiveSecurity Service to access the Online
Help system.
Starting WatchGuard Online Help
WatchGuard Online Help can be started either from the WatchGuard
Management Station or directly from a browser.
• In the Management Station software, press F1.
• On any platform, browse to the directory containing WatchGuard
Online Help. Open LSSHelp.html. The default help directory is
C:\Program Files\WatchGuard\Help.
Searching for topics
You can search for topics in WatchGuard Online Help three ways:
Contents
The Contents tab displays a list of topics within the Help system.
Double-click a book to expand a category. Click a page title to
view topic contents.
Index
The index provides a list of keywords found within Help. Begin
typing the keyword, and the index list will automatically scroll to
entries beginning with those letters. Click a page title to view
topic contents.
Search
The Search feature offers a full-text search of the entire Help
system. Enter a keyword. Press ENTER to display a list of topics
containing the word. The Search feature does not support Boolean
searches.
Copying the Help system to additional platforms
WatchGuard Online Help can be copied from the Management Station to
additional workstations and platforms. When doing so, copy the entire
User Guide
15
Chapter 2: Service and Support
Help directory from the WatchGuard installation directory on the
Management Station. It is important to include all subdirectories exactly
as they appear in the original installation.
Online Help system requirements
Web browser
•
•
Internet Explorer 4.0 or higher
Netscape Navigator 4.7 or higher
Operating system
•
•
•
Windows NT 4.0, Windows 2000, or Windows XP
Sun Solaris
Linux
Context-sensitive Help
In addition to the regular online Help system, context-sensitive or What’s
This? Help is also available. What’s This? Help provides a definition and
useful information on fields and buttons in the dialog boxes. To access
What’s This? Help:
1
2
Right-click any field or button.
3
To print or save the Help box as a separate file, right-click the Help
field.
Click What’s This? when it appears.
A box appears with the field name on the top and information about the field
beneath it.
A menu offering Copy or Print appears.
4
5
Select the menu item you want.
When you are done, click anywhere outside the box to dismiss it.
You can also look up the meaning of fields and buttons using the “Field
Definitions” chapter in the Reference Guide.
16
WatchGuard Firebox System
Product Documentation
Product Documentation
WatchGuard products are fully documented on our Web site at:
http://help.watchguard.com/documentation/default.asp
Assisted Support
WatchGuard offers a variety of technical support services for your
WatchGuard products. Several support programs, described throughout
this section, are available through WatchGuard Technical Support. For a
summary of the current technical support services offered by
WatchGuard Technical Support, please refer to the WatchGuard Web site
at:
http://support.watchguard.com/aboutsupport.asp
NOTE
You must register for LiveSecurity Service before you can receive
technical support.
LiveSecurity® Program
WatchGuard LiveSecurity Technical Support is included with every new
Firebox. This support program is designed to assist you in maintaining
your enterprise security system involving our Firebox, SOHO,
ServerLock, AppLock, and VPN products.
Hours
WatchGuard LiveSecurity Technical Support business hours are
4:00 AM to 7:00 PM Pacific Time (GMT - 7), Monday through
Friday.
The SOHO Program business hours are 24 hours a day, 7 days a
week
Phone Contact
877.232.3531 in U.S. and Canada
+1.360.482.1083 all other countries
User Guide
17
Chapter 2: Service and Support
Web Contact
http://www.watchguard.com/support
Response Time
Four (4) business hours maximum target
Type of Service
Technical assistance for specific issues concerning the installation
and ongoing maintenance of Firebox, SOHO, and ServerLock
enterprise systems
Single Incident Priority Response Upgrade (SIPRU) and Single Incident
After-hours Upgrade (SIAU) are available. For more information, please
refer to the WatchGuard Web site at:
http://support.watchguard.com/lssupport.asp
LiveSecurity® Gold Program
This premium program is designed to meet the aggressive support needs
of companies that are heavily dependent upon the Internet for Web-based
commerce or VPN tunnels.
WatchGuard Gold LiveSecurity Technical Support offers support
coverage 24 hours a day, seven days a week. Our Priority Support Team
staffs our support center continuously from 7 PM Sunday to 7 PM Friday
Pacific Time (GMT — 7), and can help you with any technical issues you
might have during these hours.
We target a one-hour maximum response time for all new incoming cases.
If a technician is not immediately available to help you, a support
administrator will log your call in our case response system and issue a
support incident number.
Firebox Installation Services
WatchGuard Remote Firebox Installation Services are designed to provide
you with comprehensive assistance for basic Firebox installation. You can
schedule a dedicated two-hour time slot with one of our WatchGuard
technicians to help you review your network and security policy, install
the LiveSecurity software and Firebox hardware, and build a
configuration in accordance with your company security policy. VPN
setup is not included as part of this service.
18
WatchGuard Firebox System
Training and Certification
VPN Installation Services
WatchGuard Remote VPN Installation Services are designed to provide
you with comprehensive assistance for basic VPN installation. You can
schedule a dedicated two-hour time slot with one of our WatchGuard
technicians to review your VPN policy, help you configure your VPN
tunnels, and test your VPN configuration. This service assumes you have
already properly installed and configured your Fireboxes.
Training and Certification
WatchGuard offers product training, certification, and a broad spectrum
of publications to customers and partners who want to learn more about
network security and WatchGuard products. Designed to quickly bring
you up to speed on network security issues and our award-winning
product line, you will learn exactly what you need to do to protect
valuable information assets and make the most of your WatchGuard
products. No matter where you are located or which products you own,
we have a training solution for you.
WatchGuard classroom training is available worldwide through an
extensive network of WatchGuard Certified Training Partners (WCTPs).
WCTPs strengthen our relationships with our partners and customers by
providing top-notch instructor-led training in a local setting.
WatchGuard offers product and sales certification, focusing on
acknowledging the skills necessary to configure, deploy, and manage
enterprise security solutions.
User Guide
19
Chapter 2: Service and Support
20
WatchGuard Firebox System
CHAPTER 3
Getting Started
The WatchGuard Firebox System acts as a barrier between your networks
and the public Internet, protecting them from security threats. This
chapter explains how to install the WatchGuard Firebox System into your
network. You must complete the following steps in the installation
process:
• Gathering network information
• Selecting a firewall configuration model
• Setting up the Management Station
• Cabling the Firebox
• Running the QuickSetup Wizard
• Deploying the Firebox into your network
For a quick summary of this information, see the WatchGuard Firebox
QuickStart Guide included with your Firebox.
NOTE
This chapter is intended for new WatchGuard Firebox System installations
only. If you have an existing configuration, open it with Policy Manager.
You will be prompted to convert to the new version.
User Guide
21
Chapter 3: Getting Started
Before installing the WatchGuard Firebox System, check the package
contents to make sure you have the following items:
• WatchGuard Firebox security appliance
• QuickStart Guide
• User documentation
• WatchGuard Firebox System CD-ROM
• A serial cable (blue)
• Three crossover ethernet cables (red)
• Three straight ethernet cables (green)
• Power cable
•
LiveSecurity® Service license key
Gathering Network Information
We encourage you to fill in the following tables in preparation for
completing the rest of the installation process.
License Keys
Collect your license key certificates. Your WatchGuard Firebox System
comes with a LiveSecurity Service key that activates your one-year
subscription to the LiveSecurity Service. For more information on this
service, see Chapter 2, “Service and Support.” High Availability and
SpamScreen are optional products, and you receive those license keys
upon purchase. For more information on optional products, see Chapter 1,
“Introduction.”
22
WatchGuard Firebox System
Gathering Network Information
Network addresses
One good way to set up your network is to create two worksheets: the
first worksheet represents your network now–before deploying the
Firebox–and the second represents your network after the Firebox is
deployed. Fill in the IP addresses in the worksheets below.
User Guide
23
Chapter 3: Getting Started
An example of a network before the Firebox is installed appears in the
following figure. In this example, the Internet router performs network
address translation (NAT) for the internal network. The router has a
public IP address of 208.15.15.1, and the private network has an address of
192.168.10.0/24. This network also has three public servers with the
addresses 208.15.15.10, 208.15.15.15, and 208.15.15.17.
.
The following figure shows the same example network with a Firebox
deployed. The IP address of the Internet router in the previous figure
becomes the IP address of the Firebox’s default gateway. This network
uses drop-in configuration because the public servers will maintain their
own IP addresses. Drop-in configuration simplifies the setup of these
devices. For more information on this type of configuration, see “Drop-in
configuration” on page 27.
By configuring the Optional Interface on the example network, the public
servers can be connected directly to the Firebox (because they are on the
same subnet as the Firebox).
24
WatchGuard Firebox System
Selecting a Firewall Configuration Mode
In the example, the secondary network represents the local LAN. Because
the Trusted Interface is being configured with the public IP address, a
secondary network is added with an unassigned private IP address from
the local LAN: 192.168.10.1/24. This IP address then becomes the default
gateway for devices on the local LAN.
Selecting a Firewall Configuration Mode
Before installing the WatchGuard Firebox System, you must decide how
to incorporate the Firebox into your network. This decision determines
how you will set up the three Firebox interfaces–External, Trusted, and
Optional.
User Guide
25
Chapter 3: Getting Started
External Interface
Connects to the external network (typically the Internet) that
presents the security threat.
Trusted Interface
Connects to the private LAN or internal network that you want
protected.
Optional Interface
Connects to the DMZ (Demilitarized Zone) or mixed trust area of
your network. Computers on the Optional interface contain
content you do not mind sharing with the rest of the world.
Common applications housed on this interface are Web, email,
and FTP servers.
To decide how to incorporate the Firebox into your network, select the
configuration mode that most closely reflects your existing network. You
must select one of two possible modes: routed or drop-in configuration.
Routed configuration
In a routed configuration, the Firebox is put in place with separate logical
networks and separate network addresses on its interfaces. Routed
configuration is used primarily when the number of public IP addresses is
limited or when you have dynamic IP addressing on the External
interface. For more information on dynamic IP addressing on the External
interface, see “Dynamic IP support on the External interface” on page 31.
Public servers behind the Firebox use private addresses, and traffic is
routed using network address translation (NAT).
26
WatchGuard Firebox System
Selecting a Firewall Configuration Mode
Characteristics of a routed configuration:
• All interfaces of the Firebox must be on different networks. The
minimum setup involves the External and Trusted interfaces.
• The Trusted and Optional interfaces must be on separate networks
and all machines behind the Trusted and Optional interfaces must be
configured with an IP address from that network.
The benefit of a routed configuration is that the networks are well defined
and easier to manage, especially regarding VPNs.
Drop-in configuration
In a drop-in configuration, the Firebox is put in place with the same
network address on all Firebox interfaces. All three Firebox interfaces
must be configured. Because this configuration mode distributes the
network’s logical address space across the Firebox interfaces, you can
“drop” the Firebox between the router and the LAN without
reconfiguring any local machines. Public servers behind the Firebox use
public addresses, and traffic is routed through the Firebox with no
network address translation.
User Guide
27
Chapter 3: Getting Started
Characteristics of a drop-in configuration:
• A single network that is not subdivided into smaller networks or
subnetted.
• The Firebox performs proxy ARP, a technique in which one host
answers Address Resolution Protocol requests for machines behind
that Firebox that cannot hear the broadcasts. The Trusted interface
ARP address replaces the router’s ARP address.
• The Firebox can be placed in a network without changing default
gateways on the Trusted hosts. This is because the Firebox answers
for the router, even though the router cannot hear the Trusted host’s
ARP requests.
• All Trusted computers must have their ARP caches flushed.
• The majority of a LAN resides on the Trusted interface by creating a
secondary network for the LAN.
The benefit of a drop-in configuration is that you don’t have to
reconfigure machines already on a public network with private IP
addresses. The drawback is that it is generally harder to manage and is
more prone to network problems.
28
WatchGuard Firebox System
Selecting a Firewall Configuration Mode
Choosing a Firebox configuration
The decision between routed and drop-in mode is based on your current
network. Many networks are best served by routed mode. However,
drop-in mode is recommended if you have a large number of public IP
addresses, you have a static external IP address, or you are not willing or
able to reconfigure machines on your LAN. The following table
summarizes the criteria for choosing a Firebox configuration. (For
illustrative purposes, it is assumed that the drop-in IP address is a public
address.)
Routed Configuration
Drop-in Configuration
Criterion 1
All interfaces of the
Firebox are on different
networks. Minimum
configured are External
and Trusted.
All interfaces of the
Firebox are on the same
network and have the same
IP address (Proxy ARP).
Criterion 2
Trusted and Optional
interfaces must be on
separate networks and
must use IP addresses
drawn from those
networks. Both interfaces
must be configured with an
IP address on the same
network.
Machines on the Trusted or
Optional interfaces can be
configured with a public IP
address.
Criterion 3
Use static NAT to map any
public addresses to private
addresses behind the
Trusted or Optional
interfaces.
Because machines that are
publicly accessible have
public IP addresses, no
static NAT is necessary.
Adding secondary networks to your configuration
Whether you have chosen routed or drop-in, your configuration may
require that you add secondary networks to any of the three Firebox
interfaces. A secondary network is a separate network connected to a
Firebox interface by a switch or hub.
User Guide
29
Chapter 3: Getting Started
When you add a secondary network, you map an IP address from the
secondary network to the IP address of the Firebox interface. This is
known as creating (or adding) an IP alias to the network interface. This IP
alias becomes the default gateway for all the machines on the secondary
network. The presence of a secondary network also tells the Firebox that
another network resides on the Firebox interface wire.
You add secondary networks in the following two ways:
• The QuickSetup Wizard, which is part of the installation process, asks
you to enable the checkbox if you have “an additional private
network behind the Firebox” when you are entering the IP addresses
for the Firebox interfaces. The additional private network you specify
becomes the secondary network on the Trusted interface. For more
information on the QuickSetup Wizard, see “Running the QuickSetup
Wizard” on page 35.
• After you have finished with the installation, you can add secondary
networks to any interface using Policy Manager, as described in
“Adding Secondary Networks” on page 57.
30
WatchGuard Firebox System
Selecting a Firewall Configuration Mode
Dynamic IP support on the External interface
If you are supporting dynamic IP addressing, you must choose routed
configuration.
If you choose the Dynamic Host Configuration Protocol (DHCP) option,
the Firebox will request its IP address, gateway, and netmask from a
DHCP server managed by your Internet Service Provider (ISP). This
server can also provide WINS and DNS server information for your
Firebox. If it does not, you must add it manually to your configuration, as
described in “Entering WINS and DNS Server Addresses” on page 58.
You can also change the WINS and DNS values provided by your ISP, if
necessary.
Point-to-Point Protocol over Ethernet (PPPoE) is also supported. As with
DHCP, the Firebox initiates a PPPoE protocol connection to your ISP’s
PPPoE server, which automatically configures your IP address, gateway,
and netmask. However, PPPoE does not propagate DNS and WINS server
information as DHCP does.
If you are using PPPoE on the External interface, you will need the PPP
user name and password when you set up your network. Both username
and password each have a 256-byte capacity.
When the Firebox is configured such that it obtains its IP addresses
dynamically, the following functionality (which requires a static IP
address) is not supported unless you are certain that the dynamic IP
settings sent by your ISP will not change:
• High Availability (not supported on Firebox 500)
• Drop-in mode
• 1-to-1 NAT
• Enabling the Firebox as a DVCP server
• BOVPN using Basic DVCP (not supported on factory default Firebox
500)
• MUVPN
• RUVPN with PPTP
Regardless of whether the IP settings are stable, 1-to-1 NAT and external
aliases are not supported when the Firebox is a PPPoE client, and manual
IPSec tunnels are not supported when the Firebox is a DHCP or PPPoE
client.
User Guide
31
Chapter 3: Getting Started
Setting Up the Management Station
The Management Station runs the Control Center software, which
displays a real-time monitor of traffic through the firewall, connection
status, and tunnel status. In addition, the WatchGuard Security Event
Processor (WSEP) receives and stores log messages and issues
notifications based on information it receives from the Management
Station.
You can designate any computer on your network as the Management
Station. On the computer you have chosen, install the management
software as follows:
1
Insert the WatchGuard Firebox System CD-ROM. If the installation
wizard does not appear automatically, double-click install.exe in
the root directory of the CD.
2
Click Download Latest Software on the Firebox System Installation
screen. This launches your Web browser and connects you to the
WatchGuard Web site.
If you do not have an Internet connection, you can install directly from the CDROM. However, you will not be eligible for support until you activate the
LiveSecurity Service.
3
Follow the instructions on the screen to activate your LiveSecurity
Service subscription.
4
Download the WatchGuard Firebox System software. Download time
will vary depending on your connection speed.
Make sure you write down the name and path of the file as you save it to your hard
drive!
5
Execute the file you downloaded and follow the screens to guide you
through the installation.
The Setup program includes a screen in which you select software components or
upgrades to be installed. Certain components require a separate license.
For more information on the WebBlocker Server option, see Chapter 16,
“Controlling Web Site Access.” For more information on other components or
upgrades, see the WatchGuard Web site.
6
32
At the end of the installation wizard, a checkbox appears asking if you
want to launch the QuickSetup Wizard. You must first cable the
Firebox before launching the QuickSetup Wizard.
Another checkbox asks if you want to download a new WebBlocker
database. You can download the database either now or later. For
WatchGuard Firebox System
Cabling the Firebox
more information on the WebBlocker databasem see Chapter 16,
“Controlling Web Site Access.”
Software encryption levels
The Management software is available in three encryption levels.
Base
Uses 40-bit encryption
Medium
Uses 56-bit DES encryption
Strong
Uses 128-bit 3DES encryption
The IPSec standard requires at least a 56-bit encryption. If you want to use
virtual private networking with IPSec, you must download the medium
or strong encryption software.
High encryption software is governed by strict export restrictions and
may not be available for download. For more information, see the online
support resources at:
https://support.watchguard.com/advancedfaqs/bovpn_ipsecgrey.asp
Cabling the Firebox
Cable the Firebox to the Management Station using a serial cable or over
a network using TCP/IP. The recommended way is using a serial
cable.
Using a serial cable
Refer to the Firebox Rear Panel and Cabling for Provisioning images on
the next page when cabling the Firebox.
• Use the blue serial cable to connect the Firebox Serial Port
(CONSOLE) to the Management Station COM port.
• Use the red crossover cable to connect the Firebox Trusted interface to
the Management Station Ethernet port.
User Guide
33
Chapter 3: Getting Started
•
34
Plug the power cord into the Firebox power input and into a power
source.
WatchGuard Firebox System
Running the QuickSetup Wizard
Using TCP/IP
Refer to Firebox Rear Panel image on the previous page.
• Use the red (crossover) cable to connect the Firebox Trusted interface
to the Management Station Ethernet port.
• Plug the power cord into the Firebox power input and into a power
source.
Running the QuickSetup Wizard
After you finish setting up the Management Station and cabling the
Firebox, use the QuickSetup Wizard to create a basic configuration file.
The Firebox loads this primary configuration file when it boots. This
enables the Firebox to function as a simple but immediately effective
firewall.
The QuickSetup Wizard also writes a basic configuration file called
wizard.cfg to the hard disk of the Management Station. If you later
want to expand or change the basic Firebox configuration using Policy
User Guide
35
Chapter 3: Getting Started
Manager, use wizard.cfg as the base file to which you make changes.
For more information on changing a configuration file, see Chapter 5,
“Using Policy Manager to Configure Your Network.” You can also run the
QuickSetup Wizard again at any time to a create new, basic configuration
file.
NOTE
Rerunning the QuickSetup Wizard completely replaces the configuration file,
writing over any prior version. To make a backup copy of the configuration file
on the flash disk, see the Firebox System Area chapter in the Reference
Guide.
If the QuickSetup Wizard is not already launched, launch it from the
Windows desktop by selecting Start => Programs => WatchGuard =>
QuickSetup Wizard.
Provide the information as prompted by the QuickSetup Wizard,
referring to the tables and network diagrams in “Gathering Network
Information” on page 22.
The QuickSetup Wizard takes you through the following steps:
Select a configuration mode
Specify whether you want a routed or a drop-in configuration
mode. If you have High Availability installed, it is recommended
that you set this up using Policy Manager instead of the
QuickSetup Wizard. For more information on routed or drop-in,
see “Selecting a Firewall Configuration Mode” on page 25. For
information on High Availability, see the High Availability Guide.
External interface configuration
(Routed configuration only.) Specify static, DHCP, or PPPoE, as
explained in “Dynamic IP support on the External interface” on
page 31.
Enter the Firebox interface IP address or addresses
Based on whether you specified routed or drop-in mode, enter the
IP address or addresses for the Firebox interfaces. You can also
add a secondary network to your Trusted interface by selecting
the additional private network behind the Firebox checkbox.
36
WatchGuard Firebox System
Running the QuickSetup Wizard
Enter the Firebox Default Gateway
(Not applicable if using DHCP or PPPoE on the External
interface.) Enter the IP address of the default gateway, which is
usually the IP address of your Internet router. This IP address
must be on the same network as the Firebox External interface. If
the IP address is not on the same network, the QuickSetup Wizard
will warn you and ask whether you want to continue.
Configure Public Servers
(Not applicable if using DHCP or PPPoE on External interface.)
Select the checkbox and enter the IP address of any public servers
on your network.
Firebox Name
(DHCP or PPPoE only.) Specify the name used for logging and
identification of a dynamic Firebox. All characters are allowed
except blank spaces and forward or back slashes (/ or \). This
name does not have to be a DNS or host name.
Create Passphrase
Passphrases are case-sensitive and must be at least seven
characters long. They can be any combination of letters, numbers,
and special characters. You will create two passphrases. The status
passphrase is used to establish a read-only connection to the
Firebox. The configuration passphrase is used to establish a read/
write connection to the Firebox.
Select Connection Method
Select the cabling method used and enter a temporary IP address
for the Firebox so that the Management Station can communicate
with it to finish the installation process. This must be an unused IP
address on the same network as the Management Station.
Testing the connection
After you have completed the QuickSetup Wizard, test the connection to
the Firebox through the Management Station. The Firebox temporary IP
address needs to be on the same network as the Management Station. If
not, the Management Station and Firebox cannot communicate, and you
will not be able to use the Management Station software to view the
Firebox activity.
User Guide
37
Chapter 3: Getting Started
You can remove the blue serial cable from the Management Station and
Firebox after the QuickSetup Wizard is completed.
Entering IP addresses
You generally enter IP addresses into fields that resemble the one below.
When typing IP addresses, type the digits and periods in sequence. Do
not use the TAB key, arrow key, spacebar, or mouse to jump past the
periods. For example, if you are typing the address 172.16.1.10, do not
type a space after you type “16” or try to position your cursor past the
next period to begin typing “1.” Instead, type a period right after “16,”
and then type “1.10.”
If your address has a network mask, use slash notation to enter it. In slash
notation, a single number indicates how many bits of the IP address
identify the network that the host is on. A netmask of 255.255.255.0 has a
slash equivalent of 8+8+8=24. For example, writing 192.168.42.23/24 is the
same as specifying an IP address of 192.168.42.23 with a corresponding
netmask of 255.255.255.0. The following table shows network masks and
slash equivalents.
38
Network mask
Slash equivalent
255.0.0.0
/8
255.255.0.0
/16
255.255.255.0
/24
255.255.255.128
/25
255.255.255.192
/26
255.255.255.224
/27
255.255.255.240
/28
255.255.255.248
/29
255.255.255.252
/30
WatchGuard Firebox System
Deploying the Firebox into Your Network
Deploying the Firebox into Your Network
Congratulations! You have completed the installation of your Firebox. The
Firebox can now be used as a basic firewall with the following properties:
• All outgoing traffic is allowed.
• All incoming traffic is blocked except ping on the External interface.
• Logs are sent to the WatchGuard Security Event Processor on the
Management Station.
Complete the following steps to deploy the Firebox into your network:
• Place the Firebox in its permanent physical location.
• Connect the Firebox to your network.
• If using a routed configuration, change the default gateway setting on
all desktops to the Firebox Trusted IP address.
What’s Next
You have successfully installed, configured, and deployed your new
Firebox System on your network. Here are some things to remember as a
new customer.
Customizing your security policy
Your organization’s security policy defines who can get into your
network, where they can go, and who can get out. The security policy is
enacted by your Firebox’s configuration file.
The configuration file you created using the QuickSetup Wizard is only a
basic configuration. You should now create a configuration file that meets
the requirements of your security policy. You do this by adding filtered
and proxied services, in addition to the basic ones described in the
previous section, that expand what you allow in and out of your firewall.
Every service brings trade-offs between network security and
accessibility. When selecting services, balance the needs of your
organization with the requirement that computer assets be protected from
attack. Some common services that organizations typically add, in
User Guide
39
Chapter 3: Getting Started
addition to the ones listed in the previous section, are HTTP (Internet
service) and SMTP (email service).
For more information on services, see Chapter 8, “Configuring Filtered
Services”, and Chapter 9, “Configuring Proxied Services.”
What to expect from LiveSecurity® Service
Your Firebox includes a subscription to our award-winning LiveSecurity
Service. Your subscription today:
• Ensures up-to-date network protection with the latest software
upgrades.
• Solves problems with comprehensive technical support resources.
• Prevents downtime with alerts and configuration tips to combat the
newest threats and vulnerabilities.
• Develops your expertise with detailed interactive training resources.
• Extends your network security with bundled software, utilities, and
special offers.
40
WatchGuard Firebox System
CHAPTER 4
Firebox Basics
This chapter describes the basic tasks you perform to set up and maintain
a Firebox:
• Opening a configuration file
• Saving a configuration file to a local computer or the Firebox
• Resetting Firebox passphrases
• Setting the Firebox time zone
• Setting a Firebox friendly name
What is a Firebox?
A WatchGuard Firebox is a specially designed and optimized security
appliance. Three independent network interfaces allow you to separate
your protected office network from the Internet while providing an
optional public interface for hosting Web, email, or FTP servers. Each
network interface is independently monitored and visually displayed on
the front of the Firebox.
User Guide
41
Chapter 4: Firebox Basics
NOTE
There are no user-serviceable parts within the Firebox. If a user opens a
Firebox case, it voids the limited hardware warranty.
The most common and effective location for a Firebox is directly behind
the Internet router, as pictured below:
Other parts of the network are as follows:
Management Station
The computer on which you install and run the WatchGuard
Control Center software.
WatchGuard Security Event Processor
The computer that receives and stores log messages and sends
alerts and notifications. You can configure the Management
Station to also serve as the event processor.
42
WatchGuard Firebox System
Opening a Configuration File
Trusted network
The network behind the firewall that must be protected from the
security challenge.
External network
The network presenting the security challenge, typically the
Internet.
Optional network
A network protected by the firewall but still accessible from the
trusted and the external networks. Typically, the optional network
is used for public servers such as an FTP or Web server.
Opening a Configuration File
Policy Manager is a comprehensive software tool for creating, modifying,
and saving configuration files. A configuration file, with the extension
.cfg, contains all the settings, options, addresses, and other information
that constitute your Firebox security policy. When you view the settings
in Policy Manager, you are seeing a “user friendly” version of your
configuration file.
This section describes how to open a configuration file after one has been
created. This assumes you have already run the QuickSetup Wizard and
have a basic configuration file saved either on the Firebox or on your local
hard drive. If you have not run the QuickSetup Wizard, see Chapter 5,
“Using Policy Manager to Configure Your Network” for information on
how to create a basic configuration from scratch.
1
2
3
4
Select Start => Programs => WatchGuard => Control Center.
If you are prompted to run the QuickSetup Wizard, click Continue.
If you are prompted to connect to the Firebox, click Cancel.
From the WatchGuard Control Center, click the Policy
Manager icon (shown at right).
You can now either open a configuration from the Firebox or from
the local hard disk, as explained in the next two sections.
User Guide
43
Chapter 4: Firebox Basics
Opening a configuration from the Firebox
1
Select File => Open => Firebox.
2
Use the Firebox drop list to select a Firebox.
3
In the Passphrase text box, type the Firebox status (read-only)
passphrase. Click OK.
The Firebox drop list, as shown in the following figure, appears.
You can also type in the IP address or host name.
Do not use the configuration passphrase to connect to the Firebox.
4
If you want, enter a value in the Timeout field to specify the duration
in seconds that the Management Station waits for a response from the
Firebox before returning a message indicating that the device is
unreachable.
Opening a configuration from a local hard disk
1
2
3
Select File => Open => Configuration File.
Locate and select the configuration file to open. Click Open.
From the New Firebox Configuration dialog box, select the model of
Firebox you are connected to.
The new configuration file contains defaults for the model of Firebox
specified.
44
WatchGuard Firebox System
Saving a Configuration File
Saving a Configuration File
After making changes to a configuration file, you can either save it
directly to the Firebox or to a local hard disk. When you save a new
configuration directly to the Firebox, Policy Manager might prompt you
to reboot the Firebox so that it will use the new configuration. If the
Firebox does need to be rebooted, the new policy is not active until the
rebooting process completes.
Saving a configuration to the Firebox
From Policy Manager:
1
Select File => Save => To Firebox.
2
Use the Firebox drop list to select a Firebox.
3
Enter the configuration (read/write) passphrase. Click OK.
4
If you entered the IP address of a different Firebox, you are asked to
confirm your choice. Click Yes.
You can also use the shortcut Ctrl+T.
You can also type the IP address or DNS name of the Firebox. When typing IP
addresses, type the digits and periods in sequence. Do not use the TAB or arrow key
to jump past the periods. For more information on entering IP addresses, see
“Entering IP addresses” on page 38.
The configuration file is saved first to the local hard disk and then to the primary
area of the Firebox flash disk.
The Firebox Flash Disk dialog box, as shown in the following figure, appears.
User Guide
45
Chapter 4: Firebox Basics
5
Enable the checkbox marked Save To Firebox. If you want to make a
backup of the current image, enable the checkbox marked Make
Backup of Current Flash Image before saving.
NOTE
It is not necessary to back up the flash image every time you make a
change to the configuration file. However, if you do choose this option, you
must provide an encryption key. It is especially important not to forget
this key. If you rely on this file to recover from a corrupted flash image
and do not remember the key, you will not be able to restore the entire
flash image. Instead, you will need to reset the Firebox and then save a
new or existing configuration file to it.
6
46
If you are not making a backup, click Continue. If you are making a
backup, in the Encryption Key field, enter the encryption key for the
Firebox. In the Confirm field, reenter it to confirm.
WatchGuard Firebox System
Resetting Firebox Passphrases
7
If you are making a backup, in the Backup Image field, enter the path
where you want to save the backup of the current flash image. Click
Continue.
Instead of entering the path, you can click Browse to specify the location of the
backup.
8
Enter and confirm the status (read-only) and configuration (read/
write) passphrases. Click OK.
The new image is saved to the Firebox.
NOTE
Making routine changes to a configuration file does not require a new
flash image. Choosing the option marked Save Configuration File Only is
normally sufficient.
Saving a configuration to the Management Station’s local
drive
From Policy Manager:
1
Select File => SaveAs => File.
2
Enter the name of the file.
3
Click Save.
You can also use the shortcut Ctrl+S.
The Save dialog box appears.
The default is to save the file to the WatchGuard directory.
The configuration file is saved to the local hard disk.
Resetting Firebox Passphrases
WatchGuard recommends that you periodically change the Firebox
passphrases for optimum security. To do this, you must have the current
configuration passphrase. From Policy Manager:
User Guide
1
Open the configuration file running on the Firebox.
2
Select File => Save => To Firebox.
For more information, see “Opening a configuration from the Firebox” on
page 44.
47
Chapter 4: Firebox Basics
3
Use the Firebox drop list to select a Firebox or enter the Firebox IP
address. Enter the configuration passphrase. Click OK.
The Firebox Flash Disk dialog box appears.
4
Enable the checkbox marked Save To Firebox and the radio button
marked Save Configuration File and New Flash Image. Disable the
checkbox marked Make Backup of Current Flash Image. Click
Continue.
5
Enter and confirm the new status (read-only) and configuration
(read/write) passphrases. The status and configuration passphrases
must be different from one another. Click OK.
The new image, including the new passphrases, is saved to the Firebox, and the
Firebox automatically restarts.
Tips for creating secure passphrases
Although a persistent attacker can crack any passphrase eventually, you
can toughen your passphrases using the following tips:
• Don’t use words in standard dictionaries, even if you use them
backward or in a foreign language. Create your own acronyms
instead.
• Don’t use proper names, especially company names or those of
famous people.
• Use a combination of uppercase and lowercase characters, numerals,
and special characters (such as Im4e@tiN9).
Setting the Firebox Model
Although you choose the Firebox model when you start a new
configuration file or open an existing one, you can change the Firebox
model at any time:
48
1
From the Setup menu, select Firebox Model.
2
Select the model of the Firebox you are connecting to.
The New Firebox Configuration dialog box appears.
The model of the Firebox entered appears at the bottom of the Policy Manager
window.
WatchGuard Firebox System
Setting the Time Zone
Setting the Time Zone
The Firebox time zone determines the date and time stamp that appear on
logs and that are displayed by services such as LogViewer, Historical
Reports, and WebBlocker. The default time zone is Greenwich Mean Time
(Coordinated Universal Time).
From Policy Manager:
1
2
Select Setup => Time Zone.
Use the drop list to select a time zone. Click OK.
WatchGuard provides a comprehensive list of time zones to accommodate areas in
the same general time zone that follow different rules regarding the observance
and/or onset and rollback of Daylight Saving Time, and other timekeeping details.
Setting a Firebox Friendly Name
You can give the Firebox a friendly name to be used in log files and
reports. If you do not specify a name, the Firebox’s IP address is used.
From Policy Manager:
User Guide
1
Select Setup => Name.
2
Enter the friendly name of the Firebox. Click OK.
The Firebox Name dialog box appears.
All characters are allowed except blank spaces and forward or back slashes (/ or \).
49
Chapter 4: Firebox Basics
50
WatchGuard Firebox System
CHAPTER 5
Using Policy Manager to
Configure Your Network
Normally, you incorporate the Firebox into your network when you run
the QuickSetup Wizard, as described in “Running the QuickSetup
Wizard” on page 35. However, you can also create a basic configuration
file from scratch using several functions in Policy Manager.
Each of the procedures in this section can also be used to override any
settings you made using the QuickSetup Wizard. It is recommended that
you follow these steps in the following order to make sure that all
necessary information is provided (although not all steps are required in
all installations).
• Starting a New Configuration File
• Setting up Firebox interfaces
• Adding secondary networks
• Setting up DNS and WINS servers
• Setting up the Firebox as a DHCP server
• Adding the four basic services to Policy Manager
• Configuring routes
User Guide
51
Chapter 5: Using Policy Manager to Configure Your Network
Starting a New Configuration File
To start a new configuration file:
1
From Control Center, click the Policy Manager button,
shown at right.
The Policy Manager appears.
2
3
From Policy Manager, select File => New.
From the New Firebox Configuration dialog box, select
the model of Firebox you are connected to.
The new configuration file contains defaults for the model of Firebox
specified.
Setting the Firebox Configuration Mode
For information on routed and drop-in configurations, see “Selecting a
Firewall Configuration Mode” on page 25.
You must decide upon your configuration mode before setting IP
addresses for the Firebox interfaces. If you specify an incorrect IP address,
you may run into problems later.
Setting IP Addresses of Firebox Interfaces
The way you set the IP addresses for the Firebox interfaces depends on
the configuration mode you have chosen.
52
WatchGuard Firebox System
Setting IP Addresses of Firebox Interfaces
Setting addresses in drop-in mode
If you are using drop-in mode, all interfaces use the same IP address:
1
Select Network => Configuration.
2
Enable the checkbox marked Configure interfaces in Drop-In mode,
located at the bottom of the dialog box.
3
Enter the IP address and default gateway for the Firebox interfaces.
4
User Guide
The Network Configuration dialog box appears, as shown in the following
figure.
When typing IP addresses, type the digits and periods in sequence. Do not use
the TAB or arrow key to jump past the periods. For more information on
entering IP addresses, see “Entering IP addresses” on page 38.
If you are using static PPPoE on your External interface, you also need to enter
your PPP user name and password. For more information on PPPoE support, see
“Dynamic IP support on the External interface” on page 31.
Select the method for obtaining an IP address: Static, DHCP, or
PPPoE.
53
Chapter 5: Using Policy Manager to Configure Your Network
Setting addresses in routed mode
If you are using routed mode, the interfaces must use different IP
addresses. At least two interfaces must have IP addresses configured.
1
Select Network => Configuration.
2
For each interface, in the IP Address text box, type the address in
slash notation.
The Network Configuration dialog box appears.
When typing IP addresses, type the digits and periods in sequence. Do not use
the TAB or arrow key to jump past the periods. For more information on
entering IP addresses, see “Entering IP addresses” on page 38.
3
For the External interface, enter the default gateway.
Setting DHCP or PPPoE Support on the External Interface
For information on the DHCP and PPPoE options, see “Dynamic IP
support on the External interface” on page 31.
1
Select Network => Configuration.
2
3
Select either DHCP or PPPoE from the Configuration drop list.
The Network Configuration dialog box appears.
If you enabled PPPoE support, enter the PPP user name and password
in the fields provided.
Configuring DHCP or PPPoE support
If you enable DHCP or PPPoE on the External interface, you can set
several optional properties:
1
54
From the Network Configuration dialog box, click Properties.
The Advanced dialog box appears, showing the DHCP or PPPoE tab, as shown in
the following figures.
WatchGuard Firebox System
Setting DHCP or PPPoE Support on the External Interface
2
Configure the properties in the dialog box.
For a description of each control, right-click it and then select What’s This?.
NOTE
PPPoE debugging generates large amounts of data. Do not enable PPPoE
debugging unless you are having connection problems and need help from
Technical Support.
Enabling static PPPoE
Although an IP address is generally obtained automatically when using
PPPoE, static PPPoE is also supported. To enable static PPPoE, select the
button marked Use the following IP address, and then enter the IP
address and default gateway.
User Guide
55
Chapter 5: Using Policy Manager to Configure Your Network
Configuring Drop-in Mode
If you selected drop-in mode, you can set several optional properties:
1
From the Network Configuration dialog box, click Properties.
2
Configure the properties in the dialog box.
The Advanced dialog box appears, showing the Drop-In tab, as shown in the
following figure.
For a description of each control, right-click it and then select What’s This?.
Defining External IP Aliases
You use the Aliases button on the Network Configuration dialog box
when you are using static NAT. For more information, see “Adding
external IP addresses” on page 87.
56
WatchGuard Firebox System
Adding Secondary Networks
Adding Secondary Networks
Your configuration may require that you add secondary networks to any
of the Firebox interfaces. For more information on secondary networks,
see “Adding secondary networks to your configuration” on page 29.
1
Select Network => Configuration.
2
Click the Secondary Networks tab.
3
Use the drop list in the lower-right portion of the dialog box to select
the interface to which you want to add a secondary network.
4
Use the field in the lower-left portion of the dialog box to type an
unused IP address from the secondary network.
The Network Configuration dialog box appears.
The Secondary Networks tab appears, as shown in the following figure.
When typing IP addresses, type the digits and periods in sequence. Do not use the
TAB or arrow key to jump past the periods. For more information on entering IP
addresses, see “Entering IP addresses” on page 38.
NOTE
Check secondary network addresses carefully. Policy Manager does not
verify that you have entered the correct address. WatchGuard strongly
recommends that you do not enter a subnet on one interface that is part of
a larger network on another interface.
User Guide
57
Chapter 5: Using Policy Manager to Configure Your Network
Entering WINS and DNS Server Addresses
Several advanced features of the Firebox, such as DHCP and Remote User
VPN, rely on shared Windows Internet Name Server (WINS) and Domain
Name System (DNS) server addresses. These servers must be accessible
from the Firebox Trusted interface.
Make sure you use only an internal DNS server for DHCP and Remote
User VPN. Do not use external DNS servers.
From Policy Manager:
1 Select Network => Configuration. Click the WINS/DNS tab.
The WINS/DNS tab appears, as shown in the following figure.
2
Enter primary and secondary addresses for the WINS and DNS
servers. Enter a domain name for the DNS server.
Configuring Out-of-Band Management
You use the OOB tab on the Network Configuration dialog box to enable
the Management Station to communicate with a Firebox by way of a
modem (not provided with the Firebox) and telephone line. For
information on configuring out-of-band management, see Chapter 17,
“Connecting with Out-of-Band Management.”
58
WatchGuard Firebox System
Defining a Firebox as a DHCP Server
Defining a Firebox as a DHCP Server
Dynamic Host Configuration Protocol (DHCP) is an Internet protocol that
simplifies the task of administering a large network. A device defined as a
DHCP server automatically assigns IP addresses to network computers
from a defined pool of numbers. You can define the Firebox as a DHCP
server for the customer network behind the firewall.
One parameter that you define for a DHCP server is lease times. This is
the amount of time a DHCP client can use an IP address that it receives
from the DHCP server. When the time is close to expiring, the client
contacts the DHCP server to renew the lease.
From Policy Manager:
User Guide
1
Select Network => DHCP Server.
2
3
Enable the checkbox marked Enable DHCP Server.
4
Enter the maximum lease time.
The DHCP Server dialog box appears, as shown in the following figure.
Enter the default lease time for the server.
The default lease time is provided to clients that do not specifically request times.
The maximum lease time is the longest time the server will provide for a client. If a
client requests a longer time, the request is denied and the maximum lease time is
provided.
59
Chapter 5: Using Policy Manager to Configure Your Network
Adding a new subnet
To make available (private) IP addresses accessible to DHCP clients, add a
subnet. To add a new subnet, you specify a range of IP addresses to be
assigned to clients on the network. For example, you could define the
address range from 10.1.1.10 to 10.1.1.19 to give clients a pool of 10
addresses. From Policy Manager:
1
2
Select Network =>DHCP Server.
3
In the Subnet box, type the subnet’s IP address; for example, 10.1.1.0/
24.
4
5
Define the address pool by entering values for Start and End fields.
Click Add.
The DHCP Subnet Properties dialog box appears, as shown in the following figure.
Click OK.
Modifying an existing subnet
You can modify an existing subnet; however, you should be aware that
doing so can cause problems. If you modify the subnet and then reboot
the client, the Firebox may return an IP address that does not work with
certain devices or services. From Policy Manager:
1
2
3
4
60
Select Network => DHCP Server.
Click the subnet to review or modify. Click Edit.
The DHCP Subnet Properties dialog box appears.
When you have finished reviewing or modifying the subnet, click
OK.
WatchGuard Firebox System
Adding Basic Services to Policy Manager
Removing a subnet
You can remove an existing subnet; however, you should be aware that
doing so can cause problems. If you remove the subnet and then reboot
the client, the Firebox may return an IP address that does not work with
certain devices or services. From Policy Manager:
1
2
3
Select Network => DHCP Server.
Click the subnet to remove it. Click Remove.
Click OK.
Adding Basic Services to Policy Manager
After you have set up IP addressing, add the following services to Policy
Manager to give your Firebox some basic functionality.
NOTE
The WatchGuard service is particularly important. If you omit it from
your configuration or misconfigure it, you will lock yourself out of the
Firebox.
1
On the Policy Manager toolbar, click the Add Services
icon (shown at right).
2
Click the plus (+) sign to the left of the Packet Filters
and Proxies folder to expand them.
A list of pre-configured filters or proxies appears.
3
4
5
6
7
Under Packet Filters, click WatchGuard.
Click the Add button at the bottom of the dialog box.
Click OK in the Add Service dialog box.
Click OK to close the Properties dialog box.
Repeat steps 3—7 for the Ping, FTP, and Outgoing services.
At this stage, do not change the default settings for any of these basic
services. The default settings allow all traffic outbound and deny all
traffic inbound. Later, you can go back and modify the services in Policy
Manger to best fit your security needs.
User Guide
61
Chapter 5: Using Policy Manager to Configure Your Network
If you need more detailed information on how to add services, see
“Adding a service” on page 97.
Configuring Routes
A route is the sequence of devices that network traffic takes from its
source to its destination. A router is a device within a route that
determines the next point to which traffic should be forwarded toward its
destination. Each router is connected to at least two networks. A packet
may travel through a number of network points with routers before
arriving at its destination.
The Firebox supports the creation of static routes in order to pass traffic
from any of its three interfaces to a router. The router can then pass traffic
to the appropriate destination according to its specific routing policies.
For more information on routing issues, see the following FAQ:
http://support.watchguard.com/advancedfaqs/general_routers.asp
The WatchGuard user’s forum is also a good source of information on
routing information. Log in to your LiveSecurity account for more details.
Defining a Network Route
Define a network route if you have an entire network behind the router.
Enter the network IP address, including slash notation. From Policy
Manager:
62
1
Select Network => Routes.
2
Click Add.
The Setup Routes dialog box appears.
The Add Route dialog box appears, as shown in the following figure.
WatchGuard Firebox System
Configuring Routes
3
4
5
Click the Net option.
6
Click OK.
7
Click OK.
Enter the network IP address.
In the Gateway text box, enter the IP address of the router.
Be sure to specify an IP address that is on one of the same networks as the Firebox.
The Setup Routes dialog box lists the newly configured network route.
The route data is written to the configuration file.
Defining a Host Route
Define a host route if there is only one host behind the router. Enter the IP
address of that single, specific host, without slash notation. From Policy
Manager:
User Guide
1
Select Network => Routes.
2
Click Add.
3
4
5
Click the Host option.
6
Click OK.
7
Click OK.
The Setup Routes dialog box appears.
The Add Route dialog box appears.
Enter the host IP address.
In the Gateway text box, enter the IP address of the router.
Be sure to specify an IP address that is on one of the same networks as the Firebox.
The Setup Routes dialog box lists the newly configured host route.
The route data is written to the configuration file.
63
Chapter 5: Using Policy Manager to Configure Your Network
64
WatchGuard Firebox System
Using the WatchGuard
Control Center
CHAPTER 6
The WatchGuard Control Center combines access to WatchGuard Firebox
System applications and tools in one intuitive interface. Control Center
also displays a real-time monitor of traffic through the firewall,
connection status, tunnel status, and recent log activity.
Starting Control Center and Connecting to a Firebox
From the Windows Desktop:
1
2
Select Start => Programs => WatchGuard => Control Center.
If you have not yet configured your Firebox, click QuickSetup to start
the QuickSetup Wizard, as explained in the QuickStart Guide included
with your Firebox. Otherwise, click Continue.
The Connect to Firebox dialog box appears. You can connect to a Firebox at this
point, or you can cancel the Connect to Firebox dialog box and connect to a
Firebox later.
User Guide
3
Use the Firebox drop list to select a Firebox.
4
Enter the Firebox status (read-only) passphrase.
You can also type the IP address or DNS name of the Firebox. When typing IP
addresses, type the digits and periods in sequence. Do not use the TAB or arrow key
to jump past the periods. For more information on entering IP addresses, see
“Entering IP addresses” on page 38.
65
Chapter 6: Using the WatchGuard Control Center
5
Click OK.
Control Center Components
Control Center consists of:
• A QuickGuide toolbar to invoke configuring, monitoring, and report
programs
• A duplication of the Firebox front panel that graphically displays
traffic flow and rejected packets
• Firebox and VPN tunnel status
• A real-time display of log messages (Traffic Monitor) generated by the
Firebox
The figure on the following page shows the full Control Center display.
66
WatchGuard Firebox System
Control Center Components
QuickGuide
Front Panel
Firebox & VPN
Status
Traffic Monitor
QuickGuide
The top part of the display just below the title bar is the QuickGuide. It
contains buttons to:
Open the WatchGuard Control Center menu. (This is also referred
to as the Main Menu button.)
User Guide
67
Chapter 6: Using the WatchGuard Control Center
Pause the display (appears only when connected to Firebox)
Connect to Firebox (appears only when not connected to Firebox)
Launch Policy Manager
Launch Firebox Monitors
Launch LogViewer
Launch HostWatch
Create Historical Reports
Show and hide the Firebox and Tunnel Status windows
Front panel
Under the toolbar is a representation of the front panel of the Firebox,
shown on the following figure, including the Security Triangle Display,
Traffic Volume Indicator, Processor Load Indicator, and basic status
information.
The lights on the display represent those found on the front panel of the
Firebox. The triangle shows the predominant flows of traffic among the
Trusted, External, and Optional interfaces. A red corner of the triangle
illuminates when that interface is blocking packets. The two bar graphs
indicate traffic volume and the proportion of Firebox capacity being used.
For more information on the front panel, see the following FAQ:
https://support.watchguard.com/advancedfaqs/fbhw_lights.asp
68
WatchGuard Firebox System
Control Center Components
Firebox and VPN tunnel status
The section in Control Center directly below the front panel shows the
current status of the Firebox and of branch office and remote user VPN
tunnels.
Firebox Status
The following information is displayed under Firebox Status, as shown in
the following figure:
• Status of the High Availability option. When properly configured and
operational, the IP address of the standby box appears. If High
Availability is installed but the secondary Firebox is not responding,
the display indicates “Not Responding.”
• The IP address of each Firebox interface, and the configuration mode
of the External interface.
• Status of the CA (root) certificate and the IPSec (client) certificate.
If you expand the entries under Firebox Status, as shown in the following
figure, you can view:
• IP address of the default gateway and netmask
User Guide
69
Chapter 6: Using the WatchGuard Control Center
•
•
•
MAC (Media Access Control) address of each interface
Number of packets sent and received since the Firebox rebooted
Expiration date and time of root and IPSec certificates
Branch Office VPN Tunnels
Beneath Firebox Status is a section on BOVPN tunnels, in which two
categories of these types of tunnels appear: IPSec and DVCP.
The figure below shows an expanded entry for a BOVPN tunnel. The
information displayed, from top to bottom, is:
• The name assigned to the tunnel during its creation, along with the IP
address of the destination IPSec device (such as another Firebox,
SOHO, or SOHO|tc), and the tunnel type (IPSec or DVCP). If the
tunnel is DVCP, the IP address refers to the entire remote network
address rather than that of the Firebox or equivalent IPSec device.
70
WatchGuard Firebox System
Control Center Components
•
•
•
•
The amount of data sent and received on the tunnel in both bytes and
packets.
The time at which the key expires and the tunnel is renegotiated.
Expiration can be expressed as a time deadline or in bytes passed.
DVCP tunnels that have been configured for both traffic and time
deadline expiration thresholds display both; this type of tunnel
expires when either event occurs first (time runs out or bytes are
passed).
Authentication and encryption levels set for the tunnel.
Routing policies for the tunnel.
Remote VPN Tunnels
Following the branch office VPN tunnels is an entry for remote VPN
tunnels, which includes Mobile User VPN (with IPSec) or RUVPN with
PPTP tunnels.
If the tunnel is Mobile User VPN, the branch displays the same statistics
as for the DVCP or IPSec Branch Office VPN described previously: the
tunnel name, followed by the destination IP address, followed by the
tunnel type. Below are the packet statistics, followed by the key
expiration, authentication, and encryption specifications.
If the tunnel is RUVPN with PPTP, the display shows only the quantity of
sent and received packets. Byte count and total byte count are not
applicable to PPTP tunnel types.
Expanding and collapsing the display
To expand a branch of the display, click the plus sign (+) next to the entry,
or double-click the name of the entry. To collapse a branch, click the
minus sign (—) next to the entry. A lack of either a plus or minus sign
indicates that no further information about the entry is available.
Red exclamation point
A red exclamation point appearing next to any item indicates that
something within its branch is not functioning properly. For example, a
red exclamation point next to the Firebox entry indicates that a Firebox is
not communicating with either the WatchGuard Security Event Processor
User Guide
71
Chapter 6: Using the WatchGuard Control Center
(WSEP) or Management Station. A red exclamation point next to a tunnel
listing indicates a tunnel is down.
When you expand an entry that has a red exclamation point, another
exclamation point appears next to the specific device or tunnel with the
problem. Use this feature to rapidly identify and locate problems in your
VPN network.
Traffic Monitor
Traffic Monitor shows, in real time, log messages generated
by the Firebox. You can display information in different
colors, as described in “Displaying Traffic Monitor entries
in color” on page 75. For more information about messages
displayed, see the following collection of FAQs:
https://support.watchguard.com/advancedfaqs/log_main.asp
To display Traffic Monitor, click the main menu button (shown above
right). Select Show =>Traffic Monitor.
Copying messages to another application
To copy a log message so you can paste it into another application such as
email or Notepad, right-click the message and select Copy Selection. You
can then open up the other application and paste in the message.
Copying or analyzing deny messages
You can use several tools to copy and analyze deny messages in Traffic
Monitor:
• To copy a deny message and paste it into an application, use the
procedure in the previous section.
• To copy the source or destination IP address of a deny message so you
can paste it into another application, right-click the message, select
Source IP => Copy or Destination IP => Copy.
• To issue the ping command to a source or destination IP address of a
deny message, right-click the message and select Source IP => Ping or
Destination IP => Ping. (When you issue this command, you are
prompted to enter the configuration passphrase.)
72
WatchGuard Firebox System
Working with Control Center
•
To issue a traceroute command to a source or destination IP address
of a deny message, right-click the message and select Source IP =>
Trace Route or Destination IP => Trace Route. (When you issue this
command, you are prompted to enter the configuration passphrase.)
Working with Control Center
The basic tasks you perform with Control Center are connecting to a
Firebox, changing the interval at which the Firebox is queried for status
information, and opening other Firebox System applications.
Running the QuickSetup Wizard
Normally, you will run the QuickSetup Wizard when you first install
your Firebox. However, you can run it from Control Center as well.
1
Click the Control Center Main Menu button (shown below right),
which is located on the upper-left corner of Control Center.
2
Select QuickSetup Wizard.
The QuickSetup Wizard begins. For more information on running
the QuickSetup Wizard, see the QuickStart Guide included with
your Firebox.
Opening Firebox System applications
To open Firebox System applications, click the Control Center Main Menu
button. Click Tools.
You can open any of the following applications from this menu:
Policy Manager
Firebox Monitors
LogViewer
HostWatch
Historical Reports
For more information on launching Firebox System applications, see
“Using Control Center Applications” on page 78.
You can also perform the following from this menu:
User Guide
73
Chapter 6: Using the WatchGuard Control Center
Open the WatchGuard Security Event Processor interface. (See
“Opening the WSEP user interface” on page 80.)
Copy or merge log files
Open the Flash Disk Management tool
Flushing the ARP cache
The ARP (Address Resolution Protocol) cache on the Firebox stores
hardware (MAC) addresses of TCP/IP hosts. This cache is checked for
hardware address mapping before an ARP broadcast is initiated. Flushing
the ARP cache is important when your network has a drop-in
configuration: all Trusted computers must have their ARP caches flushed.
To flush out-of-date cache entries:
1
Click the Control Center Main Menu button (shown at
right). Select Management =>Flush ARP Cache.
2
Enter the Firebox configuration (read/write)
passphrase.
The out-of-date cache entries are flushed.
Connecting to a Firebox
When launched, Control Center automatically prompts you to connect to
the last Firebox with which it established a connection. You can connect to
that Firebox or you can specify a different one. From Control Center:
1
Click the Control Center Main Menu button (shown at
right), which is located on the upper-left corner of
Control Center. Select Connect.
The Connect to Firebox dialog box appears.
74
2
Use the Firebox drop list to select a Firebox.
3
4
Enter the Firebox status passphrase.
You can also type the IP address or DNS name of the Firebox. When typing IP
addresses, type the digits and periods in sequence. Do not use the TAB or arrow key
to jump past the periods. For more information on entering IP addresses, see
“Entering IP addresses” on page 38.
Click OK.
Control Center connects to the Firebox and displays its real-time status.
WatchGuard Firebox System
Working with Control Center
Changing the polling rate
You can change the interval of time (in seconds) at which Control Center
polls the Firebox and updates the Front Panel and the Firebox and Tunnel
Status displays. There is, however, a trade-off between polling frequency
and demand on the Firebox. The shorter the interval, the more accurate
the display, but also the more demand made of the Firebox. From Control
Center:
1
2
Click the Control Center Main Menu button. Click Settings.
Type or use the scroll control to change the polling rate. Click OK.
Setting the maximum number of log entries
You can change the maximum number of log entries that are stored and
viewable in Traffic Monitor. After the maximum is reached, the earliest
logs are removed as more come in. A high value in this field places a large
demand on your system if you have a slow processor or a limited amount
of RAM. LogViewer is a much more appropriate tool for tracking logs
than Traffic Monitor.
1
2
Click the Control Center Main Menu button. Click Settings.
Type or use the scroll control to change the Max Log Entries field.
Click OK.
The value entered represents the number of logs in thousands. If you enter zero (0)
in this field, the maximum number of logs (100,000) is permitted.
Displaying Traffic Monitor entries in color
You can specify that Traffic Monitor use different colors to display
different types of information.
1
Click the Control Center Main Menu button. Click Settings. Click the
Syslog Color tab.
2
To enable displaying entries in color, enable the checkbox marked
Display Logs in Color. You can also enable and disable color by
right-clicking any entry in Traffic Monitor and selecting Colorize.
3
On the Allow, Deny, or Message tab, click the field you want to
colorize.
The Text Color field to the right of the tabs shows the current color defined for the
field.
User Guide
75
Chapter 6: Using the WatchGuard Control Center
4
To change the color, click the arrow next to Text Color. Click one of
the 20 colors on the palette.
The information contained in this field will appear in the new color on Traffic
Monitor. A sample of how Traffic Monitor will look appears on the bottom of the
dialog box.
5
You can also choose a background color for Traffic Monitor. Click the
arrow next to Background Color. Click one of the 20 colors on the
palette.
6
To cancel the changes you have made in this dialog box since opening
it, click Reset to Defaults.
Viewing different components of Control Center
You can look at various combinations of the four components of Control
Center:
• To view the QuickGuide only, click the Control Center Main Menu
button. Select Show => QuickGuide Only.
• To view both the QuickGuide and the Front Panel, click the Control
Center Main Menu button. Select Show => QuickGuide and Front
Panel.
• To view the QuickGuide, the Front Panel, and the Firebox and VPN
Tunnel Status, click the Control Center Main Menu button. Select
Show => Full Display.
• To display Traffic Monitor, click the Control Center Main Menu
button. Select Show => Traffic Monitor.
• To display the title bar, click the Control Center Main Menu button.
Select Show => Title Bar.
Specifying Always on Top
If you want Control Center to always appear on top of other windows on
your desktop, click the Control Center Main Menu button. Click Always
on Top.
Getting Help on the Web
You can access additional information about the WatchGuard Firebox
System from Control Center. Click the Control Center Main Menu button.
Click On the Web. The menu has the following options:
76
WatchGuard Firebox System
Manipulating Traffic Monitor
Home Page
Select to bring up the WatchGuard home page at:
http://www.watchguard.com
Product Support
Select to bring up the technical support logon page on the
WatchGuard Web site.
Frequently Asked Questions
Frequently Asked Questions (FAQs) are documents that explain
and clarify issues that typically generate support calls from
customers. Select to access the In-Depth FAQs available in the
WatchGuard Knowledge Base.
LiveSecurity Service Logon
Select to log in to the LiveSecurity Service. For more information
on this service, see Chapter 2, “Service and Support.”
Activate LiveSecurity Service
Select to activate LiveSecurity Service. For more information on
this service, see Chapter 2, “Service and Support.”
Manipulating Traffic Monitor
You can move and manipulate Traffic Monitor on the desktop
independently of the rest of Control Center:
Tear Off
Point to the Traffic Monitor title bar. Drag Traffic Monitor to a
new location on the desktop. To reattach Traffic Monitor to
Control Center, drag Traffic Monitor to the immediate vicinity of
the Control Center display. The Traffic Monitor window
automatically snaps back onto Control Center.
Expand
Point to an edge of the Traffic Monitor window. The cursor
changes to a double-headed arrow. Drag the edge outward to
expand the window or inward to shrink it.
User Guide
77
Chapter 6: Using the WatchGuard Control Center
Maximize
Double-click the Traffic Monitor title bar to maximize the
window. Double-click the title bar again to restore the window to
the previous size.
Scroll
Use the scroll control of the Traffic Monitor window to scroll
chronologically up and down through log records. While
scrolling, Traffic Monitor temporarily ceases to jump to the most
recent records. Page down to the bottom of the Traffic Monitor
window to restart the rolling display.
Copy and Paste
Use Click/Ctrl-Click or Click/Shift-Click to select multiple
records. Right-click the selected records, and select Copy. Paste
the selected records into another application such as email, word
processing, or a spreadsheet.
Using Control Center Applications
You launch the following applications from Control Center:
Policy Manager
Firebox Monitors
LogViewer
HostWatch
Historical Reports
WatchGuard Security Event Processor
Launching Policy Manager
Use the WatchGuard Policy Manager tool to design,
configure, and manage the network security policy. Within
Policy Manager, you can configure networks and services,
set up virtual private networking, regulate incoming and
outgoing access, and control logging and notification. To
open Policy Manager, click the Policy Manager button (shown at left) on
the Control Center QuickGuide.
78
WatchGuard Firebox System
Using Control Center Applications
Launching Firebox Monitors
Firebox Monitors combines an extensive set of WatchGuard
monitoring tools into a single user interface accessible from
Control Center. To open Firebox Monitors, click the Firebox
Monitors button (shown at left) on the Control Center
QuickGuide. For more information, see “Monitoring Firebox Activity” on
page 159.
Launching LogViewer
The LogViewer application displays a static view of a log
file. You can filter by type, search for keywords and fields,
and print and save log data to a separate file. To launch
LogViewer, click the LogViewer button (shown at left) on the
Control Center QuickGuide. For more information, see “Reviewing and
Working with Log Files” on page 191.
Launching HostWatch
The HostWatch application displays active connections
occurring on a Firebox in real time. It can also graphically
represent the connections listed in a log file, either playing
back a previous file for review or displaying connections as
they are added to the current log file. To open HostWatch,
click the HostWatch button (shown at left) on the Control Center
QuickGuide. For more information, see “HostWatch” on page 167.
Launching Historical Reports
Historical Reports is a report-building tool that creates
HTML reports displaying session types, most active hosts,
most used services, URLs, and other data useful in
monitoring and troubleshooting your network. To open
Historical Reports, click the Historical Reports button
(shown at left) on the Control Center QuickGuide. For more information,
see “Generating Reports of Network Activity” on page 203.
User Guide
79
Chapter 6: Using the WatchGuard Control Center
Opening the WSEP user interface
The WatchGuard Security Event Processor (WSEP) controls
logging, report schedules, and notification. It also provides
timing services for the Firebox. The WSEP automatically
runs when you start the machine on which it is installed.
Unlike other Firebox System applications, the WSEP button does not
appear in Control Center. To open the WSEP, right-click the WatchGuard
Security Event Processor icon (shown above) in the Windows Desktop
tray. Click WSEP Status/Configuration. For more information, see
“Setting up the WatchGuard Security Event Processor” on page 178.
If the WSEP icon is not displayed in the Windows desktop tray, click the
Main Menu button. Select Tools => Logging => Event Processor Interface.
80
WatchGuard Firebox System
CHAPTER 7
Configuring Network
Address Translation
Network address translation (NAT) protects your network by hiding its
internal structure. It also provides an effective way to conserve public IP
addresses when the number of addresses is limited.
At its most basic level, NAT translates the address of a packet from one
value to another. The “type” of NAT performed refers to the method of
translation:
Dynamic NAT
Also called IP masquerading or port address translation. The
Firebox either globally, or on a service-by-service basis, applies its
public IP address to outgoing packets instead of using the IP
address of the session behind the Firebox.
Static NAT
Also called port forwarding. Static NAT works on a port-to-host
basis. Incoming packets from the External network destined for a
specific public address and port are remapped to an address and
port behind the firewall. You must configure each service
separately for static NAT. Typically, static NAT is used for public
services that do not require authentication such as Web sites and
email.
User Guide
81
Chapter 7: Configuring Network Address Translation
1-to-1 NAT
The Firebox uses private and public IP ranges that you specify,
rather than the ranges assigned to the Firebox interfaces during
configuration.
Choosing which type of NAT to perform depends on the underlying
problem being solved, such as those regarding address security or
preservation of public IP addresses. For more information on NAT, see the
following collection of FAQs:
https://support.watchguard.com/advancedfaqs/nat_main.asp
Dynamic NAT
Dynamic NAT is the most commonly used form of NAT. It works by
translating the source IP address of outbound sessions (those originating
on the internal side of the Firebox) to the one public IP address of the
Firebox. Hosts elsewhere only see outgoing packets from the Firebox
itself.
This type of NAT is most commonly used to conserve IP addresses. It
allows multiple computers to access the Internet by sharing one public IP
address. Even if the number of public IP addresses is not a concern,
dynamic NAT provides extra security for internal hosts that use the
Internet by allowing them to use non-routable addresses.
The WatchGuard Firebox System implements two forms of outgoing
dynamic NAT:
Simple dynamic NAT
Using host aliases or host and network IP addresses, the Firebox
globally applies network address translation to every outgoing
packet.
Service-based dynamic NAT
Each service is configured individually for outgoing dynamic
NAT.
82
WatchGuard Firebox System
Using Simple Dynamic NAT
NOTE
Machines making incoming requests over a VPN connection are allowed
to access masqueraded hosts by their actual private addresses.
Using Simple Dynamic NAT
In the majority of networks, the preferred security policy is to globally
apply network address translation to all outgoing packets. Simple
dynamic NAT provides a quick method to set a NAT policy for your
entire network. For more information on this type of NAT, see the
following FAQ:
https://support.watchguard.com/advancedfaqs/nat_howdynamicnat.asp
Enabling simple dynamic NAT
The default configuration of simple dynamic NAT enables it from all nonroutable addresses to the External network. From Policy Manager:
1
Select Setup => NAT.
2
Enable the checkbox marked Enable Dynamic NAT.
The NAT Setup dialog box appears, as shown in the following figure.
The default dynamic entries are:
• 192.168.0.0/16 - External
• 172.16.0.0/12 - External
• 10.0.0.0/8 - External
User Guide
83
Chapter 7: Configuring Network Address Translation
Adding simple dynamic NAT entries
Using built-in host aliases, you can quickly configure the Firebox to
masquerade addresses from your Trusted and Optional networks. If
Trusted hosts are already covered by the default, non-routable ranges, no
additional entries are needed:
• From: Trusted
• To: External
The default dynamic entries are listed in the previous section.
Larger or more sophisticated networks may require additional entries in
the From or To lists of hosts or host aliases. The Firebox applies dynamic
NAT rules in the order in which they appear in the Dynamic NAT Entries
list. WatchGuard recommends prioritizing entries based on the volume of
traffic that each represents. From the NAT Setup dialog box:
1
2
Click Add.
3
4
Use the To drop list to select the destination of outgoing packets.
Use the From drop list to select the origin of the outgoing packets.
For example, use the trusted host alias to globally enable network address
translation from the Trusted network. For a definition of built-in Firebox aliases,
see “Using Aliases” on page 128. For more information on how to add a userdefined host alias, see “Adding an alias” on page 128.
To add either a host or network IP address, click the ... button. Use the
drop list to select the address type. Enter the IP address or range.
Network addresses must be entered in slash notation.
When typing IP addresses, type the digits and periods in sequence. Do not use the
TAB or arrow key to jump past the periods. For information on entering IP
addresses, see “Entering IP addresses” on page 38.
84
WatchGuard Firebox System
Using Simple Dynamic NAT
5
Click OK.
The new entry appears in the Dynamic NAT Entries list.
Reordering simple dynamic NAT entries
To reorder dynamic NAT entries, select the entry and click either Up or
Down. There is no method to modify a dynamic NAT entry. Instead, use
the Remove button to remove existing entries and the Add button to add
new entries.
Specifying simple dynamic NAT exceptions
You can set up ranges of addresses in dynamic NAT so that each address
in that range is a part of the NAT policy. By using the dynamic NAT
exceptions option you can exclude certain addresses from that policy.
From Policy Manager:
1
Select Setup => NAT.
2
Click Advanced.
3
4
Click the Dynamic NAT Exceptions tab.
5
In the From and To boxes, select Trusted, Optional, dvcp_nets, or
dvcp_local_nets.
The NAT Setup dialog box appears.
The Advanced NAT Settings dialog box appears.
Click Add.
The Add Exception dialog box appears.
The latter two choices are aliases for VPN Manager and appear if your Firebox is
configured as a DVCP client. dvcp_nets refers to networks behind the DVCP client
and dvcp_local_nets refers to networks behind the DVCP server. Under normal
circumstances, you should not make dynamic NAT exceptions for these networks.
6
Click the button next to the From box and enter the value of the host
IP address, network IP address, or host range. Click OK.
7
Click OK to close the Advanced NAT Settings dialog box.
NOTE
Dynamic NAT exceptions allow the configuration of exceptions to both
forms of dynamic NAT. You will need to make dynamic NAT exceptions for
any 1-to-1 NAT address that would otherwise be subject to dynamic NAT.
User Guide
85
Chapter 7: Configuring Network Address Translation
Using Service-Based Dynamic NAT
Using service-based dynamic NAT, you can set outgoing dynamic NAT
policy on a service-by-service basis. Service-based NAT is most frequently
used to make exceptions to a globally applied simple dynamic NAT entry.
For example, use service-based NAT on a network with simple NAT
enabled from the Trusted to the Optional network with a Web server on
the Optional network that should not be masqueraded to the actual
Trusted network. Add a service icon allowing Web access from the
Trusted to the Optional Web server, and disable NAT. In this
configuration, all Web access from the Trusted network to the Web server
is made with the true source IP, and all other traffic from Trusted to
Optional is masqueraded.
You can also use service-based NAT instead of simple dynamic NAT.
Rather than applying NAT rules globally to all outgoing packets, you can
start from the premise that no masquerading takes place and then
selectively masquerade a few individual services.
Enabling service-based dynamic NAT
Service-based NAT is not dependent on enabling simple dynamic NAT.
From Policy Manager:
1
2
3
Select Setup => NAT. Click Advanced.
Select the checkbox marked Enable Service-Based NAT.
Click OK to close the Advanced NAT Settings dialog box. Click OK
to close the NAT Setup dialog box.
Configuring service-based dynamic NAT
By default, services take on whatever dynamic NAT properties you have
set for simple NAT. However, you can override this setting in the service’s
Properties dialog box. You have three options:
Use Default (Simple NAT)
Service-based NAT is not enabled for the service. The service uses
the simple dynamic NAT rules configured in the Dynamic NAT
Entries list, as explained in “Adding simple dynamic NAT
entries” on page 84.
86
WatchGuard Firebox System
Configuring a Service for Incoming Static NAT
Disable NAT
Disables dynamic NAT for outgoing packets using this service.
Use this setting to create service-by-service exceptions to outgoing
NAT.
Enable NAT
Enables service-based dynamic NAT for outgoing packets using
this service regardless of how the simple dynamic NAT settings
are configured.
From Policy Manager:
1
2
Double-click the service icon. Click Outgoing.
Use the Choose Dynamic NAT Setup drop list to select either the
default (simple dynamic NAT), disable, or enable setting. Click OK.
Configuring a Service for Incoming Static NAT
For more information on static NAT, see the following FAQs:
https://support.watchguard.com/advancedfaqs/nat_whenstatic.asp
https://support.watchguard.com/advancedfaqs/nat_outin.asp
Adding external IP addresses
Static NAT converts a Firebox public IP and port into specific destinations
on the Trusted or Optional networks. If you want to use an address other
than that of the External interface itself, you must designate a new public
IP address using the Add External IP dialog box. From Policy Manager:
User Guide
1
Select Network => Configuration. Click the Aliases button.
2
At the bottom of the dialog box, enter the public IP address. Click
Add.
3
Repeat until all external public IP addresses are added. Click OK.
The Add External IP dialog box appears.
87
Chapter 7: Configuring Network Address Translation
Setting static NAT for a service
Static NAT, like service-based NAT, is configured on a service-by-service
basis. Because of the way static NAT functions, it is available only for
services based upon TCP or UDP, which use a specific port. A service
containing any other protocol cannot use incoming static NAT, and the
NAT button in the service’s Properties dialog box is disabled. Static NAT
also cannot be used with the Any service. See the following FAQ before
configuring static NAT for a service:
https://support.watchguard.com/advancedfaqs/nat_outin.asp
1
Double-click the service icon in the Services Arena.
2
Use the Incoming drop list to select Enabled and Allowed.
3
Under the To list, click Add.
4
Click NAT.
5
Use the External IP Address drop list to select the “public” address to
be used for this service.
The service’s Properties dialog box appears displaying the Incoming tab.
To use static NAT, the service must allow incoming traffic.
The Add Address dialog box appears.
The Add Static NAT dialog box appears, as shown in the following figure.
If the public address does not appear in the drop list, click Edit to open the Add
External IP dialog box and add the public address.
6
Enter the internal IP address.
7
If appropriate, enable the checkbox marked Set internal port to
different port than service.
The internal IP address is the final destination on the Trusted network.
This feature is rarely required. It enables you to redirect packets not only to a
specific internal host but also to an alternative port. If you enable the checkbox,
enter the alternative port number in the Internal Port field.
8
88
Click OK to close the Add Static NAT dialog box.
The static NAT route appears in the Members and Addresses list.
WatchGuard Firebox System
Using 1-to-1 NAT
9
Click OK to close the Add Address dialog box. Click OK to close the
services’s Properties dialog box.
Using 1-to-1 NAT
1-to-1 NAT uses a global NAT policy that rewrites and redirects packets
sent to one range of addresses to a completely different range of
addresses. This address conversion works in both directions. You can
configure any number of 1-to-1 NAT addresses.
A common reason to use 1-to-1 NAT is to map public IP addresses to
internal servers without needing to renumber those servers. 1-to-1 NAT is
also used for VPNs in which the remote network’s IP addressing scheme
conflicts with the local scheme. By translating the local network to a range
that is not in conflict with the other end, both sides can communicate. For
more information on 1-to-1 NAT, see the following FAQ:
https://support.watchguard.com/advancedfaqs/nat_onetoone.asp
Each NAT policy contains four configurable pieces of information:
• The interface (External, Trusted, Optional, IPSec)
• The public IP address
• The internal IP address
• The number of hosts to remap
The NAT base plus the range defines the NAT region while the real base
plus the range defines the hidden or forwarded region.
For instance, the following policy:
210.199.6.0–192.168.69.0:255 (NAT base to real base range)
means that all traffic addressed to hosts between 210.199.6.0 and
210.199.6.255 is forwarded to the corresponding IP address between
192.168.69.0 and 192.168.69.255.
A one-to-one mapping exists between each NAT address and the
forwarded (real) IP address: 210.199.6.0 becomes 192.168.69.0.
From Policy Manager:
1
User Guide
Select Setup => NAT.
The NAT Setup dialog box appears.
89
Chapter 7: Configuring Network Address Translation
2
Click Advanced.
3
4
5
Click the 1-to-1 NAT Setup tab.
6
7
8
Select the appropriate interface (External, Trusted, Optional, or IPSec).
The Advanced NAT Settings dialog box appears.
Enable the checkbox marked Enable 1-1 NAT.
Click Add.
The 1-1 Mapping dialog box appears, as shown in the following figure.
Enter the number of hosts to be translated.
In the NAT base field, enter the base address for the exposed NAT
range.
This will generally be the public IP address that will appear outside the Firebox.
9
In the Real base field, enter the base address for the real IP address
range. Click OK.
This will generally be the private IP address directly assigned to the server or
client.
10 Click the Dynamic NAT Exceptions tab.
You must make dynamic NAT exceptions for any internal address being used for 1to-1 NAT; otherwise, the address will be translated using dynamic NAT instead of
1-to-1 NAT.
11 Click Add.
The Add Exception dialog box appears.
12 In the To box, select the appropriate interface. In most cases, you will
choose External.
The dvcp_ choices are aliases for VPN Manager and appear if your Firebox is
configured as a DVCP client. dvcp_nets refers to networks behind the DVCP client
and dvcp_local_nets refers to networks behind the DVCP server.
13 Click the button next to the From box and enter the value of the real IP
address range, as entered in step 9. Click OK.
14 Click OK to close the Advanced NAT Settings dialog box. Click OK
to close the NAT Setup dialog box.
90
WatchGuard Firebox System
Using 1-to-1 NAT
Proxies and NAT
This table identifies each proxy and what types of NAT it supports.
User Guide
Simple
dynamic
Static
Servicebased
1-to-1
HTTP
yes
yes
yes
yes
SMTP
yes
yes
yes
yes
FTP
yes
yes
yes
yes
DCE-RPC
yes
no
no
no
H323
no
no
no
no
RTSP
yes
yes
no
no
RealNetworks
no
no
no
no
StreamWorks
no
no
no
no
VDOLive
no
no
no
no
91
Chapter 7: Configuring Network Address Translation
92
WatchGuard Firebox System
CHAPTER 8
Configuring Filtered Services
You add filtered services–in addition to proxied services–to control and
monitor the flow of IP packets through the Firebox. Services can be
configured for outgoing and incoming traffic, and they can be active or
inactive. When you configure a service, you set the allowable traffic end
points and determine the filter rules and policies for each of these
services. You can also create services to customize rule sets, destinations,
protocols, ports used, and other parameters. With both packet filters and
proxies, you can determine which hosts within your LAN and on the
Internet can communicate with each other through that protocol, which
events to log (such as rejected incoming packets), and which series of
events should initiate a notification of the network administrator.
For information on the different types of services available, see Chapter 3,
“Types of Services,” in the Reference Guide. For information specifically on
proxied services, see Chapter 9, “Configuring Proxied Services,” in this
manual. See also the Services FAQ on the WatchGuard Web site:
https://support.watchguard.com/advancedfaqs/svc_main.asp
User Guide
93
Chapter 8: Configuring Filtered Services
Selecting Services for your Security Policy Objectives
The WatchGuard Firebox System, like most commercial firewalls,
discards all packets that are not explicitly allowed, often stated as “that
which is not explicitly allowed is denied.”
This stance protects against attacks based on new, unfamiliar, or obscure
IP services. It also provides a safety net regarding unknown services and
configuration errors which could otherwise threaten network security.
This also means that for the Firebox to pass any traffic, it must be
configured to do so. You must actively select the services and protocols
allowable, configure each one as to which hosts can send and receive
them, and set other properties individual to the service.
Every service brings tradeoffs between network security and accessibility.
When selecting services, balance the needs of your organization with the
requirement that computer assets be protected from attack.
Incoming service guidelines
Enabling incoming services creates a conduit into your network. The
following are some guidelines for assessing security risks as you add
incoming services to a Firebox configuration:
• A network is only as secure as the least secure service allowed into it.
• Services you do not understand should not be trusted.
• Services with no built-in authentication and those not designed for
use on the Internet are risky.
• Services that send passwords in the clear (FTP, telnet, POP) are very
risky.
• Services with built-in strong authentication (such as ssh) are
reasonably safe. If the service does not have built-in authentication,
you can mitigate the risk by using user authentication with that
service.
• Services such as DNS, SMTP, anonymous FTP, and HTTP are safe only
if they are used in their intended manner.
• Allowing a service to access only a single internal host is safer than
allowing the service to access several or all hosts.
• Allowing a service from a restricted set of hosts is somewhat safer
than allowing the service from anywhere.
94
WatchGuard Firebox System
Adding and Configuring Services
•
•
Allowing a service to the optional network is safer than allowing it to
the trusted network.
Allowing incoming services from a virtual private network (VPN),
where the organization at the other end is known and authenticated,
is generally safer than allowing incoming services from the Internet at
large.
Each safety precaution you implement makes your network significantly
safer. Following three or four precautions is much safer than following
one or none.
Outgoing service guidelines
In general, the greatest risks come from incoming services, not outgoing
services. There are, however, some security risks with outgoing services
as well. Control of outgoing services helps to protect your network from
hostile acts within your organization. For example, when configuring the
outgoing FTP service, you can make it read-only and/or restrict the
destination hosts that can receive such a transmission. This prevents
insiders from using FTP to transmit corporate secrets to a home computer
or to a rival organization.
As another example, passwords used for some services (FTP, telnet, POP)
are sent in the clear. If the passwords are the same as those used
internally, a hacker can hijack that password and use it to gain access to
your network.
Adding and Configuring Services
You add and configure services using Policy Manager. The Services Arena
of Policy Manager contains icons that represent the services (filtered and
proxied) currently configured on the Firebox, as shown in the following
figure. You can choose from many filtered and proxied services. These
services are configurable for outgoing or incoming traffic, and they can
also be made active or inactive. When configuring a service, you set the
allowable traffic sources and destinations, as well as determine the filter
rules and policies for the service. You can create services to customize rule
sets, destinations, protocols, ports used, and other parameters.
User Guide
95
Chapter 8: Configuring Filtered Services
You can also add unique or custom services. However, if you do, take
steps to permit only the traffic flow in that service that is absolutely
essential.
Normal View of the Services Arena
To display the detailed view of the Services Arena, select
the Details icon (shown at right). The detailed view
appears, as shown in the following figure.
Detailed View of the Services Arena
To return to the normal view of the Services Arena, select
the Large Icons button (shown at right).
96
WatchGuard Firebox System
Adding and Configuring Services
Configurable parameters for services
Several service parameters can be configured:
Sources and Destinations
You use separate controls for configuring incoming and outgoing
traffic. The outgoing controls (sources) define entries in the From
lists while incoming controls (destinations) define entries in the
To lists.
Logging and Notification
Each service has controls that enable you to select which events
for that service are logged, and whether you want to be notified of
these events.
Adding a service
You use Policy Manager to add existing, preconfigured filtering and
proxied services to your configuration file.
To add a new service to your firewall policy:
1
On the Policy Manager toolbar, click the Add Services
icon (shown at right).
You can also select, from the menu bar, Edit => Add Service. The
Services dialog box appears, as shown in the following figure. You
use this dialog box to add, modify, and remove the filtered and
proxed services you want.
User Guide
97
Chapter 8: Configuring Filtered Services
2
Expand either the Packet Filters or Proxies folder by clicking the plus
(+) sign to the left of the folder.
A list of pre-configured filters or proxies appears.
98
3
Click the name of the service you want to add.
4
Click Add.
When you click a service, the service icon appears in the area below the New, Edit,
and Remove buttons. Also, the Details box displays basic information about the
service.
The Add Service dialog box appears, as shown in the following figure.
WatchGuard Firebox System
Adding and Configuring Services
5
(Optional) You can customize both the name and the comments that
appear when the service is being configured. Click in the Name or
Comment box and type the name or comment you want.
6
Click OK.
7
Click OK to close the Properties dialog box.
8
Click Close.
The service’s Properties dialog box appears. For information on configuring
service properties see, “Defining Service Properties” on page 103.
You can add more than one service while the Services dialog box is open.
The new service appears in Policy Manager Services Arena.
Adding multiple services of the same type
In developing a security policy for your network, you might want to add
the same service more than once. For example, you might need to restrict
Web access for the majority of your users while allowing complete Web
access to your executive team. To do this, you would create two separate
HTTP services with different properties for the outgoing rule.
1
Add the first service, as described in steps 1 — 4 in “Adding a service”
on page 97.
2
Modify the name of the service to reflect its role within your security
policy and add any relevent comments.
Using the example of separate HTTP services described previously, you might call
the first HTTP service “restricted_web_access.”
3
Click OK to bring up the service’s Properties dialog box and define
outgoing properties, as described in “Adding service properties” on
page 104.
Using the previous example, you might add an alias called “staff,” which includes
a range of IP addresses or group of authenticated users. For more information on
aliases, see “Using Aliases” on page 128.
4
Add the second HTTP service.
5
Click OK to bring up the service’s Properties dialog box and define
outgoing properties, as described in “Adding service properties” on
page 104.
Using the previous example, you might call this second HTTP service
“full_web_access.”
Using the previous example, you might add an alias called “executives.”
User Guide
99
Chapter 8: Configuring Filtered Services
Creating a new service
In addition to built-in filtered services provided by WatchGuard, you can
create a new service or customize an existing service. You might need to
do this when a new product appears on the market that you would like to
run behind your firewall. Remember, however, that every new service
you configure and add to your firewall potentially increases your
vulnerability to hackers.
From Policy Manager:
1
On the Policy Manager toolbar, click the Add Services
icon (shown at right).
The Services dialog box appears.
2
Click New.
3
In the Name text box, type the name of the service.
4
In the Description text box, type a description of the service.
5
To begin setting the port used for this service, click Add.
6
From the Protocol drop list, select the protocol used for this new
service. The following options are available:
The New Service dialog box appears.
This name must be unique and not already listed in the Services dialog box.
This description appears in the Details section of the New Services dialog box when
you select the service.
The Add Port dialog box appears.
TCP
TCP-based services
UDP
UDP-based services
HTTP
Services examined by the HTTP proxy
IP
Filter a service using something other than TCP (IP protocol 6) or
UDP (IP protocol 17) for the next-level protocol. Select IP to create
a protocol number service.
7
100
In the Client Port text box, select an option from the drop list. Note
that you can select a range of port numbers. The following options are
available:
WatchGuard Firebox System
Adding and Configuring Services
Ignore
Source port can be any number (0—65565). (If you are not sure
which port setting to use, choose this option.)
Secure
Source port can range from 0—1024.
Port
Source port must be identical to the destination port, as listed in
the Port number field of the destination service’s Properties
dialog box, Properties tab (shown below).
Client
Source port can range from 1025—65565.
8
In the Port field, enter the port number. If you are entering a range,
enter the lowest number of the range.
9
In the To field, enter the highest number of the range. (If you are not
entering a range, leave this field blank.)
10 Click OK.
Policy Manager adds the port configuration to the New Service dialog box. An
example of how this dialog box might look appears in the following figure. Verify
that the name, description, and configuration of this service are correct. If
necessary, click Add to configure an additional port for this service. Repeat the
process until all ports for the service are configured.
User Guide
101
Chapter 8: Configuring Filtered Services
11 Click OK.
The Services dialog box appears with the new service displayed under the User
Filters folder. You can now add the custom service to the Services Arena just as you
would an existing service.
12 In the Services dialog box, expand the User Filter folder, and then
click the name of the service. Click Add and then click OK to close the
Add Service dialog box. Click OK to close the Properties dialog box.
Click Close to close the Services dialog box.
The icon of the new service appears in the Services Arena.
Deleting a service
From Policy Manager:
1
2
In the Services Arena, click the icon of the service you want to delete.
On the toolbar, click the Delete Service icon (shown at
right).
You can also select Edit => Delete or right-click the icon and select
Delete.
102
3
When asked to confirm, click Yes.
4
Save the configuration to the Firebox and reboot the Firebox. To do
this, select File => Save => To Firebox. Enter the configuration
passphrase when prompted. In the dialog box that appears, enable the
checkbox marked Save to Firebox.
The service is removed from the Services Arena.
WatchGuard Firebox System
Defining Service Properties
Defining Service Properties
You use the service’s Properties dialog box to configure the incoming and
outgoing access rules for a given service.
The Incoming tab defines:
• The sources on the External network that use this service to initiate
sessions with your protected users, hosts, and networks.
• The destinations behind the Firebox to which incoming traffic for this
service can be bound.
The Outgoing tab defines:
• The sources behind the Firebox that use this service to initiate sessions
with an outside destination.
• The destinations on the External network to which outgoing traffic for
this service can be bound.
In a given direction, a service can be in one of three states:
Disabled
The traffic is handled by any other rules that might apply to it. If
none exists, the packets are denied by default packet handling and
logged as such. You can make any service a one-directional filter
by selecting Disabled on either the Incoming or Outgoing tab.
Enabled and Denied
No traffic is allowed through this service, and packets for this
service will be blocked. The service logs the attempts to connect to
it.
Enabled and Allowed
Traffic is allowed through this service in the selected direction
according to the From and To properties.
Accessing a service’s Properties dialog box
When you add a service, the service’s Properties dialog box
automatically appears. You can bring up an existing
service’s Properties dialog box either by double-clicking the
service icon in the Services Arena or by selecting the
services icon and clicking the Edit Service icon (shown at
right).
User Guide
103
Chapter 8: Configuring Filtered Services
Adding service properties
The method used to add incoming and outgoing service properties is
identical. Select the tab, click the Add button for either the From or the To
member list, and then define the members for the category. The direction
of traffic determines how you select members of the From and To lists.
Tab
Member
List
Defines
Incoming
From
External users or hosts that the service will allow in
Incoming
To
Destinations within the trusted network that can
receive packets through the service
Outgoing
From
Users and hosts on the trusted network that can send
packets out through the service
Outgoing
To
Destinations on the external network to which traffic
for this service can be found
Adding addresses or users to service properties
Both the Incoming and Outgoing properties include From and To address
lists. Use the Add Address dialog box to add a network, IP address, or
specific user to a given service.
1
In the Properties dialog box, use the Incoming service Connections
Are drop list to select Enabled and Allowed.
2
Click either the Incoming tab or Outgoing tab. Click the Add button
underneath the From or the To list.
The Add Address dialog box appears.
3
Click Add Other.
4
From the Choose Type drop list, click the type of address, range, host
name, or user you want to add.
5
In the Value text box, type the actual address, range, or name. Click
OK.
The Add Member dialog box appears.
The member or address appears in the Selected Members and Addresses list.
6
104
Click OK.
The new selection appears in either the Incoming or Outgoing tab under the
appropriate From or To box.
WatchGuard Firebox System
Defining Service Properties
Working with wg_icons
Service icons beginning with “wg_” are created automatically when you
enable features such as PPTP and authentication. Because the wg_ service
icons rarely require modification, WatchGuard recommends leaving wg_
icons in their default settings.
The following wg_ services are available:
wg_authentication
Added when you enable authentication.
wg_dhcp_server
Added when you enable the DHCP server.
wg_pptp
Added when you enable PPTP.
wg_dvcp
Added when the device has been inserted into VPN Manager.
wg_sohomgt
Added when you enable the DVCP server.
wg_ca
Added when you enable the DVCP server, which also configures
the Firebox as a certificate authority.
The wg_ icons appear in the Services Arena when you select View =>
Hidden Services such that a checkmark appears next to the menu option.
To hide the wg_ icons, select View =>Hidden Services again such that the
checkmark disappears.
Customizing logging and notification
The WatchGuard Firebox System allows you to create custom logging and
notification properties for each filtered service, proxied service, and
blocking option. This level of flexibility allows you to fine-tune your
security policies, logging only those events that require your attention
and limiting notification to truly high-priority events.
You use the Logging and Notification dialog box to configure the
services, blocking categories, and packet handling options you want.
Consequently, once you master the controls for one type of service, the
remainder are easy to configure.
User Guide
105
Chapter 8: Configuring Filtered Services
From the Properties dialog box:
1
2
Click the Incoming tab.
3
Enable the options you want, as described below.
Click Logging.
The Logging and Notification dialog box appears, as shown in the following figure.
The Logging and Notification dialog box contains the following controls:
Category
The list of event types that can be logged by the service or option.
This list changes depending on the service or option you’ve
selected. You click the event name to display and set its
properties.
Enter it in the log
When you enable this checkbox, an entry appears in the log file
each time someone on the external network uses the service
incorrectly. For example, if someone attempts to send a packet to
an address other than the host IP address you specified when
defining service properties, the packet is denied and an entry
made in the log file.
Send notification
When you enable this checkbox, a notification is sent every time
packets are denied. You set notification criteria using the
WatchGuard Security Event Processor (WSEP). For more
information, see “Customizing Logging and Notification by
Service or Option” on page 185.
106
WatchGuard Firebox System
Service Precedence
The remaining controls are active when you select the Send notification
checkbox:
Email
Triggers an email message when the event occurs. Set the email
recipient in the Notification tab of the WatchGuard Security
Event Processor (WSEP) user interface.
Pager
Triggers an electronic page when the event occurs. The Firebox
must have a PCMCIA modem and be connected to a phone
service to make outgoing calls. (If the pager is accessible by email,
you can enable notification by email and then enter the email
address of the pager in the appropriate field.)
Popup window
Brings up a window when the event occurs.
Custom program
Runs a program when the event occurs. Enter the path of the
executable file in the box provided, or browse to specify a path.
Launch interval and repeat count work in conjunction to control
notification timing. For more information on this setting, see “Setting
Launch Interval and Repeat Count” on page 187.
Service Precedence
Precedence is generally given to the most specific service and descends to
the most general service. However, exceptions exist. There are three
different precedence groups for services:
• The “Any” service (see the Reference Guide for more information about
the “Any” filtered service). This group has the highest precedence.
• IP and ICMP services and all TCP/UDP services that have a port
number specified. This group has the second highest precedence and
is the largest of the three.
• “Outgoing” services that do not specify a port number (they apply to
any port). This group includes Outgoing TCP, Outgoing UDP, and
Proxy.
User Guide
107
Chapter 8: Configuring Filtered Services
“Multiservices” can contain subservices of more than one precedence
group. “Filtered-HTTP” and “Proxied-HTTP,” for example, contain both a
port-specific TCP subservice for port 80 as well as a nonport subservice
that covers all other TCP connections. When precedence is being
determined, individual subservices are given precedence according to
their group (described previously) independent of the other subservices
contained in the multiservice.
Precedence is determined by group first. As shown in the following
diagram, services from a higher precedence group always have higher
precedence than the services of a lower precedence group, regardless of
their individual settings. For example, because the “Any” service is in the
highest precedence group, all incidences of the “Any” service will take
precedence over the highest precedence Telnet service.
The precedences of services that are in the same precedence group are
ordered from the most specific services (based on source and destination
targets) to the least specific service. The method used to sort services is
108
WatchGuard Firebox System
Service Precedence
based on the specificity of targets, from most specific to least specific. The
following order is used:
From
To
Rank
IP
IP
0
List
IP
1
IP
List
2
List
List
3
Any
IP
4
IP
Any
5
Any
List
6
List
Any
7
Any
Any
8
IP refers to exactly one host IP address
List refers to multiple host IP addresses, a network address, or an alias
Any refers to the special “Any” target (not “Any” services)
When two icons are representing the same service (for example, two
Telnet icons or two Any icons), they are sorted using the above tables. The
most specific one will always be checked first for a match. If a match is not
made, the next specific service will be checked, and so on, until either a
match is made or no services are left to check. In the latter case, the packet
is denied. For example, if there are two Telnet icons, telnet_1 allowing
from A to B and telnet_2 allowing from C to D, a Telnet attempt from C to
E will first check telnet_1, and then telnet_2. Because no match is found,
the rest of the rules are considered. If an outgoing service allows from C to
E, it will do so.
When only one icon is representing a service in a precedence category,
only that service is checked for a match. If the packet matches the service
and both targets, the service rule applies. If the packet matches the service
but fails to match either target, the packet is denied. For example, if one
Telnet icon allows from A to B, a Telnet attempt from A to C will be
blocked without considering any services further down the precedence
chain, including outgoing services.
For more information on outgoing services, see the following FAQ:
https://support.watchguard.com/advancedfaqs/svc_outgoing.asp
User Guide
109
Chapter 8: Configuring Filtered Services
110
WatchGuard Firebox System
CHAPTER 9
Configuring Proxied Services
Proxy filtering goes a step beyond packet filtering by examining a
packet’s content, not just the packet’s header. Consequently, the proxy
determines whether a forbidden content type is hidden or embedded in
the data payload. For example, an email proxy examines all SMTP packets
to determine whether they contain forbidden content types, such as
executable programs or items written in scripting languages. Such items
are common methods of transmitting computer viruses. The SMTP proxy
knows these content types are not allowed, while a packet filter would not
detect the unauthorized content in the packet’s data payload.
Proxies work at the application level, while packet filters work at the
network and transport protocol level. In other words, each packet
processed by a proxy is stripped of all network wrapping, analyzed,
rewrapped, and forwarded to the intended destination. This adds several
layers of complexity and processing beyond the packet filtering process.
What this means, of course, is that proxies use more processing
bandwidth than packet filters. On the other hand, they catch dangerous
content types in ways that packet filters cannot.
To add or configure a proxied service, use the procedures for filtered
services in the previous chapter, “Configuring Filtered Services.” For
more information on proxies, see the following collection of FAQs:
https://support.watchguard.com/advancedfaqs/proxy_main.asp
User Guide
111
Chapter 9: Configuring Proxied Services
Configuring an SMTP Proxy Service
The SMTP proxy limits several potentially harmful aspects of email. The
proxy scans the content type and content disposition headers, and then
compares them against a user-defined list of known hostile signatures.
Email messages containing suspect attachments are stripped of their
attachments and then sent to the intended recipient.
The proxy can limit message size and limit the number of message
recipients. For example, if the message exceeds preset limits for message
size or number of recipients, the Firebox refuses the mail. The SMTP
proxy also automatically disables non-standard commands such as
DEBUG.
The following SMTP keywords are supported:
DATA
EXPN
RCPT
HELP
MAIL
RSET
QUIT
ONEX
HELO
NOOP
VRFY
QSND
The following ESMTP keywords are supported:
AUTH
CHUNKING
BDAT
EHLO
BINARYMIME
ETRN
8BITMIME
SIZE
For more information on the SMTP proxy, see the following FAQ:
https://support.watchguard.com/advancedfaqs/proxy_smtp.asp
Configuring the Incoming SMTP Proxy
Use the Incoming SMTP Proxy dialog box to set the incoming parameters
of the SMTP proxy. You must already have an SMTP Proxy service icon in
112
WatchGuard Firebox System
Configuring an SMTP Proxy Service
the Services Arena. (For information on how to add a service, see the
previous chapter.) From the Services Arena:
1
Double-click the SMTP Proxy icon to open the SMTP Properties
dialog box.
2
3
Click the Properties tab.
4
Modify properties on the General tab according to your preferences.
Click Incoming.
The Incoming SMTP Proxy dialog box appears, displaying the General tab.
For a description of each control, right-click it, and then select What’s This?. You
can also refer to the “Field Definitions” chapter in the Reference Guide.
Configuring ESMTP
ESMTP (Extended Simple Mail Transfer Protocol) provides extensions to
SMTP for sending email that supports graphics, audio and video files,
and text in various foreign languages. You use the ESMTP tab on the
Incoming SMTP Proxy dialog box to specify support for ESMTP
extensions (keywords) and for entering AUTH types, which specify
various ways of authenticating to the SMTP server.
From the Incoming SMTP Proxy Properties dialog box:
User Guide
1
Click the ESMTP tab.
2
Enable the extensions (keywords) you want by selecting their
associated checkboxes.
3
Use the text box provided to enter AUTH types. Click Add.
The ESTMP information appears, as shown in the following figure.
All AUTH types are supported; DIGEST-MD5, CRAM-MD5, PLAIN, and LOGIN
are provided as defaults.
113
Chapter 9: Configuring Proxied Services
Blocking email content types
MIME stands for Multipurpose Internet Mail Extensions, a specification
about how to pass audio, video, and graphics content by way of email or
HTML. The MIME format attaches a header to content. The header
describes the type of multimedia content contained within an email or on
a Web site. For instance, a MIME type of "application/zip" in an email
message indicates that the email contains a Zip file attachment. By
reading the MIME headers contained in an incoming email message, the
Firebox can strip certain MIME types and admit only the types you want.
You define which types of attachments are admitted and which are
denied by using the Firebox’s HTTP and SMTP proxies.
From the Incoming SMTP Proxy Properties dialog box:
1
Click the Content Types tab. Specify whether you want to block
certain file-name patterns in email attachments by enabling the
checkbox marked Allow only safe content types and block file
patterns.
2
If you want to specify file patterns to block, click the upper Add
button in the dialog box.
The Select MIME Type dialog box appears as shown in the following figure.
3
4
Select a MIME type. Click OK.
To create a new MIME type, click New Type. Enter the MIME type
and description. Click OK.
The new type appears at the bottom of the Content Types drop list. Repeat this
process for each content type. For a list of MIME content types, see the Reference
Guide.
The syntax used on the Content Types tab is as follows:
114
WatchGuard Firebox System
Configuring an SMTP Proxy Service
•
•
•
A string is a wildcard pattern if it contains a question mark (?), an
asterisk (*), or a right parenthesis (().
A question mark (?) matches any single character.
An asterisk (*) matches any string, including an empty string.
Denying attachments based on file name patterns
The Content Types tab includes a list of file-name patterns denied by the
Firebox if they appear in email attachments. To add a file-name pattern to
the list, enter a new pattern in the text box to the left of the Add button.
Click Add.
Specifying a deny message
In the Content Types tab, you can enter a message to be shown when a
content type is denied–this message is shown to the recipient only and
not the sender. A default message is provided. Use the variable %t to add
the content type to the message. Use the variable %f to add the file name
pattern to the message.
Adding address patterns
Adding address patterns can be useful for reducing spam content. From
the Incoming SMTP Proxy Properties dialog box:
1
2
3
4
Click the Address Patterns tab.
Use the Category drop list to select a category.
Type the address pattern in the text box to the left of the Add button.
Click Add.
The address pattern appears at the bottom of the pattern list.
Protecting mail servers against relaying
Hackers and spammers may attempt to use an open relay to send mail
from your servers. To prevent this, disable open relay on your mail
servers by restricting the destination to only your own domain.
To further increase protection from mail relaying, modify the SMTP Proxy
settings to allow addresses only from your domain. From the Incoming
SMTP Proxy Properties dialog box:
1
User Guide
Click the Address Patterns tab.
115
Chapter 9: Configuring Proxied Services
2
3
4
5
Select Allowed To from the Category drop list.
In the text box to the left of the Add button, enter your own domain.
Click Add.
Save the new configuration to the Firebox.
Select headers to allow
The Firebox allows certain headers by default. These are listed on the
Headers tab of the Incoming SMTP Proxy Properties dialog box. You can
add more headers to this list, or remove headers from the list. From the
Incoming SMTP Proxy Properties dialog box:
1
Click the Headers tab.
2
To add a new header, type the header name in the text box to the left
of the Add button. Click Add.
The headers information appears, as shown in the following figure.
The new header appears at the bottom of the header list.
3
To remove a header, select the header name in the header list. Click
Remove.
The header is removed from the header list.
Specifying logging for the SMTP proxy
Click the Logging tab to specify whether to log the following:
• Unknown headers that are filtered by the proxy.
• Unknown ESMTP extensions that are filtered by the proxy.
116
WatchGuard Firebox System
Configuring an SMTP Proxy Service
•
Accounting and auditing information.
Configuring the Outgoing SMTP Proxy
Use the Outgoing SMTP Proxy dialog box to set the parameters for traffic
going from the Trusted and Optional networks to the world. You must
already have an SMTP Proxy service icon in the Services Arena to use this
functionality. Double-click the icon to open the service’s Properties dialog
box:
1
2
Click the Properties tab.
3
To add a new header pattern, type the pattern name in the text box to
the left of the Add button. Click Add.
4
To remove a header from the pattern list, click the header pattern.
Click Remove.
5
6
In the Idle field, set a time-out value in seconds.
Click Outgoing.
The Outgoing SMTP Proxy dialog box appears, displaying the General tab, as
shown in the following figure.
To modify logging properties, click the Logging tab and set the
options you want.
Add masquerading options
SMTP masquerading converts an address pattern behind the firewall into
an anonymous, public address. For example, the internal address pattern
User Guide
117
Chapter 9: Configuring Proxied Services
might be inside.salesdept.bigcompany.com, which would become the public
address bigcompany.com.
1
Click the Masquerading tab.
2
Enter the official domain name.
3
In the Substitute the above for these address patterns text box (to the
left of the Add button), type the address patterns that are behind your
firewall that you want replaced by the official domain name. Click
Add.
The SMTP masquerading information appears, as shown in the following figure.
This is the name you want visible to the outside world.
All patterns entered here appear as the official domain name outside the Firebox.
118
4
In the Don’t Substitute for these address patterns text box (to the left
of the Add button), type the address patterns that you want to appear
“as is” outside the firewall. Click Add.
5
Enable the checkbox marked Masquerade Message IDs to specify
that message IDs in the Message-ID and Resent-Message-ID header
fields are converted to a new ID composed of an encoded version of
the original ID, a time stamp, and the host name entered in the
domain name field described in step 2.
6
Enable the checkbox marked Masquerade MIME boundary strings to
specify that the firewall converts MIME boundary strings in messages
and attachments to a string that does not reveal internal host names or
other identifying information.
WatchGuard Firebox System
Configuring an FTP Proxy Service
Configuring an FTP Proxy Service
The FTP proxy service enables you to access another computer (on a
separate network) for the purposes of browsing directories and copying
files. Consequently, FTP is inherently dangerous. If configured
incorrectly, the FTP service allows intruders to access your network and
important information such as passwords and configuration files. FTP is
also potentially dangerous outbound because it enables users on your
network to copy virtually anything from outside the network to a location
behind their firewall.
Therefore, it is important to make the FTP service as restrictive as
possible. Ideally, try to isolate the inbound FTP servers to a single host (or
hosts) on your Optional network. Make sure you protect your Trusted
network from FTP requests from the host or hosts on the Optional
network as well. Like SMTP, the FTP proxy includes customized features
that provide more complete control over the traffic that passes through
your firewall.
For detailed information about the FTP proxy, see the following FAQ:
https://support.watchguard.com/advancedfaqs/proxy_ftp.asp
For troubleshooting information for the FTP proxy, see the following FAQ:
https://support.watchguard.com/advancedfaqs/proxy_ftptrouble.asp
From Policy Manager:
1
If you have not done so already, use the Add Service button to add
the FTP proxy service. Expand the Proxies tree and double-click the
FTP service icon.
2
Click the Properties tab. Click Settings.
3
Enable FTP proxy properties according to your security policy
preferences.
The Settings information appears as shown in the following figure.
For a description of each control, right-click it, and then select What’s This?. You
can also refer to the “Field Definitions” chapter in the Reference Guide.
4
User Guide
Click OK.
119
Chapter 9: Configuring Proxied Services
Selecting an HTTP Service
Because of the extensive security implications of HTTP traffic, it is
important to restrict the incoming service as much as possible. Many
administrators set up public Web servers only on their Optional interface.
They restrict incoming HTTP traffic to the Optional interface and prohibit
incoming HTTP traffic from traveling from the Optional interface to the
Trusted interface. Outgoing traffic is generally less restrictive. For
example, many companies open outgoing HTTP traffic from Any to Any.
WatchGuard Firebox System offers three different types of HTTP services.
Choose the HTTP service that best meets your needs:
• Proxied-HTTP is a multiservice that combines configuration options
for HTTP on port 80 with a rule that allows (by default) all outgoing
TCP connections. In other words, the Proxied-HTTP is not bilateral
incoming and outgoing; this service controls incoming TCP traffic
only on port 80, but allows outgoing TCP traffic on all ports. The
Proxied-HTTP service includes a variety of custom options including
specialized logging features, definition of safe content types, and
WebBlocker.
• HTTP is a proxy service that functions very much like Proxied-HTTP,
except that it controls both incoming and outgoing access only on port
80.
120
WatchGuard Firebox System
Selecting an HTTP Service
NOTE
The WatchGuard service called “HTTP” is not to be confused with an
HTTP caching proxy. An HTTP caching proxy refers to a separate
machine that performs caching of Web data.
•
Filtered-HTTP is a multiservice that combines configuration options
for HTTP on port 80 with a rule allowing (by default) all outgoing
TCP connections. As a filtered service, Filtered-HTTP is considerably
faster than Proxied-HTTP or HTTP, but does not provide protection
that is as thorough or as effective. In addition, none of the custom
options, including WebBlocker, are available for Filtered-HTTP.
Adding a proxy service for HTTP
Most network administrators use the HTTP proxy service when
configuring Web traffic. Many administrators combine their HTTP service
with an outgoing proxy service configured Any to Any to keep the HTTP
service both easy to understand and control. In the following procedure,
you define the content allowed to pass through the firewall.
1
In Policy Manager, click the Add Service icon. Expand the Proxies
folder, double-click HTTP, and then click OK.
The HTTP Properties dialog box appears. The default stance is to deny incoming
traffic and to allow outgoing traffic from Any to Any.
2
Use the Incoming HTTP connections are drop list to select Enabled
and Allowed.
3
Configure the service as you want. For example, to configure the
HTTP proxy to allow incoming traffic from Any to the optional
network, click Add beneath the To list. In the Add Address dialog
box, add the optional Firebox group. Click OK.
4
5
Click the Properties tab. Click Settings.
6
On the Settings tab, enable HTTP proxy properties according to your
security policy preferences.
If you are using the HTTP proxy service because you want to use
WebBlocker, see Chapter 16, “Controlling Web Site Access.”
For a description of each control, right-click it, and then select What’s This?. Or,
refer to the Field Definitions chapter in the Reference Guide.
User Guide
121
Chapter 9: Configuring Proxied Services
For detailed information about the HTTP proxy, see the online support
resources at http://support.watchguard.com.
Restricting content types for the HTTP proxy
You can configure the HTTP proxy to allow only those MIME types you
decide are acceptable security risks. On the Safe Content tab:
1
To specify that you want to restrict content types that can pass
through the HTTP proxy, enable the checkbox marked Allow only
safe content types.
2
If you want to specify content types to allow, click the upper Add
button in the dialog box.
The Select MIME Type dialog box appears.
3
4
Select a MIME type. Click OK.
To create a new MIME type, click New Type. Enter the MIME type
and description. Click OK.
The new type appears at the bottom of the Content Types drop list. Repeat this
process for each content type. For a list of MIME content types, see the Reference
Guide.
5
If you want to specify unsafe path patterns to block, enter a path
pattern next to the left of the Add button. Click Add.
Only the path and not the host name are filtered. For example, with the Web site
www.testsite.com/login/here/index.html, only the elements /login/ and
/here/ can be added to the unsafe path patterns box, not *testsite*.
If you want to disable content type filtering, click the Settings tab. Disable
the checkbox marked Require Content Type.
NOTE
Zip files are denied when you deny Java or ActiveX applets, because Zip
files often contain these applets.
Configuring a caching proxy server
Because the Firebox’s HTTP proxy does no content caching, the Firebox
has been designed to work with caching proxy servers. Because company
employees often visit the same Web sites, this greatly speeds operations
and reduces the load on external Internet connections. All Firebox proxy
and WebBlocker rules that are in place still have the same effect.
122
WatchGuard Firebox System
Configuring the DNS Proxy Service
The Firebox communicates with proxy servers exactly the same way that
clients normally do. Instead of a GET request from the Firebox to the
Internet looking like this:
GET / HTTP/1.1
It ends up looking like this, and the request is sent to the configured
caching proxy server instead:
GET www.mydomain.com / HTTP/1.1
The proxy server then forwards this request to the Web server mentioned
in the GET request.
To set up an external caching proxy server:
1
Configure an external proxy server, such as Microsoft Proxy Server
2.0.
2
3
Open Policy Manager with your current configuration.
4
5
6
Click the Properties tab. Click the Settings button.
7
Save this configuration to the Firebox.
Double-click the icon for your HTTP proxy service.
This can be either Proxy, HTTP, or Proxied-HTTP.
Enable the checkbox marked Use Caching Proxy Server.
In the fields below the checkbox, enter the IP address and TCP port of
the caching proxy server. Click OK.
Configuring the DNS Proxy Service
Internet domain names (such as WatchGuard.com) are located and
translated into IP addresses by the domain name system (DNS). DNS lets
users navigate the Internet with easy-to-remember “dot-com” names by
seamlessly translating the domain name into an IP address that servers,
routers, and individual computers understand. Rather than try to
maintain a centralized list of domain names and corresponding IP
addresses, smaller lists are distributed across the Internet.
The Berkeley Internet Name Domain (BIND) is a widely used
implementation of DNS. Some versions of BIND can be vulnerable to
User Guide
123
Chapter 9: Configuring Proxied Services
attacks that cause a buffer overflow, which crash the targeted server and
enable the attacker to gain unauthorized access to your network.
One attack uses a flaw in the transaction signature (TSIG) handling code.
When BIND encounters a request with a valid transaction signature but
no valid key, processing steps that initialize important variables (notably
the required buffer size) are skipped. Subsequent function calls make
invalid assumptions about the size of the request buffer, which can cause
requests with legitimate transaction signatures and keys to trigger a
buffer overflow. Used in conjunction with other attack tools, this type of
attack results in a server crash and the attacker gaining unauthorized
access to your root shell through an outbound TCP connection. Using this
connection, the attacker can execute arbitrary code on your network.
Some versions of BIND are also vulnerable to another type of buffer
overflow attack that exploits how NXT (or next) records are processed.
Attackers can set the value of a key variable such that the server crashes
and the attacker gains unauthorized access. The DNS proxy protects your
DNS servers from both the TSIG and NXT attacks, along with a number of
other types of DNS attacks. For more information on the DNS proxy, see
the DNS Proxy section of the following collection of FAQs:
https://support.watchguard.com/advancedfaqs/proxy_main.asp
Adding the DNS Proxy Service
When you add the DNS proxy, you can best protect your network by
applying the proxy to both inbound and outbound traffic. You can also
set up the DNS proxy so that any denied packets (inbound or outbound)
generate log records. You can use LogViewer to check your log files for
records that indicate DNS attacks, which in turn lets you see how often
and from where you were attacked.
124
1
2
On the toolbar, click the Add Services icon.
3
Click DNS-Proxy. Click Add.
4
Click OK to close the Add Service dialog box.
Expand the Proxies folder.
A list of pre-configured proxies appears.
The Add Service dialog box appears. You can change the name assigned to the
DNS proxy or change the comment associated with the proxy.
The DNS-Proxy Properties dialog box appears.
WatchGuard Firebox System
Configuring the DNS Proxy Service
5
Click the Incoming tab. Use the Incoming DNS-Proxy connections
are drop list to select Enabled and Allowed.
6
Click the Outgoing tab. Use the Outgoing DNS-Proxy connections
are drop list to select Enabled and Allowed.
7
8
Click OK to close the DNS-Proxy Properties dialog box.
Click Close.
The Services dialog box closes. The DNS-Proxy icon appears in the Services Arena.
DNS file descriptor limit
The DNS proxy has only 256 file descriptors available for its use, which
limits the number of DNS connections in a NAT environment. Every UDP
request that uses dynamic NAT uses a file descriptor for the duration of
the UDP timeout. Every TCP session that uses dynamic, static, or 1-to-1
NAT uses a file descriptor for the duration of the session.
The file descriptor limit is rarely a problem, but an occasional site may
experience slow name resolution and many instances of the following log
message:
dns-proxy[xx] dns_setup_connect_udp: Unable to create UDP socket
for port: Invalid argument
You can work around this problem in two ways (the first method is the
most secure):
• Avoid using dynamic NAT between your clients and your DNS
server.
• Disable the outgoing portion of the DNS proxied service and replace
it with a filtered DNS service.
User Guide
125
Chapter 9: Configuring Proxied Services
126
WatchGuard Firebox System
CHAPTER 10
Creating Aliases and
Implementing Authentication
Aliases are shortcuts used to identify groups of hosts, networks, or users.
The use of aliases simplifies service configuration.
User authentication allows the tracking of connections based on name
rather than IP address. With authentication, it does not matter which IP
address is used or from which machine a person chooses to work. To gain
access to Internet services (such as outgoing HTTP or outgoing FTP), the
user provides authenticating data in the form of a username and
password. For the duration of the authentication, the session name is tied
to connections originating from the IP address from which the individual
authenticated. This makes it possible to track not only the machines from
which connections are originating, but the user as well.
NOTE
Because usernames are bound to IP addresses, user authentication is not
recommended for use in an environment with shared multiuser machines
(such as Unix, Citrix, or NT terminal servers), because only one user per
shared server can be authenticated at any one time.
The Firebox allows you to define permissions and groups using user
names rather than IP addresses. This system allows for situations where
users may use more than one computer or IP address. Tracking activities
by user rather than IP is especially useful on networks using DHCP where
User Guide
127
Chapter 10: Creating Aliases and Implementing Authentication
a user workstation may have several different IP addresses over the
course of a week. Authentication by user is also useful in education
environments, such as classrooms and college computer centers where
many different people might use the same IP address over the course of
the day. For more information on authentication, see the following
collection of FAQs:
https://support.watchguard.com/advancedfaqs/auth_main.asp
Using Aliases
Aliases provide a simple way to remember host IP addresses, host ranges,
and network IP addresses. They function in a similar fashion to email
distribution lists–combining addresses and names into easily
recognizable groups. Use aliases to quickly build service filter rules.
Aliases cannot, however, be used to configure the network itself.
WatchGuard automatically adds six aliases to the basic configuration:
Group
Function
firebox
Addresses assigned to the three Firebox interfaces and any
related networks or device aliases
trusted
Any host or network routed through the physical Trusted
interface
optional
Any host or network routed through the physical Optional
interface
external
Any host or network routed through the physical External
interface; in most cases, the Internet
dvcp_nets
Any network behind the DVCP client
dvcp_local_nets
Any network behind the DVCP server
A host alias takes precedence over a Windows NT or RADIUS group with
the same name.
Adding an alias
From Policy Manager:
1
128
Select Setup => Aliases.
The Aliases dialog box appears, as shown in the following figure.
WatchGuard Firebox System
Using Aliases
2
3
User Guide
Click Add.
In the Host Alias Name text box, enter the name used to identify the
alias when configuring services and authentication.
4
Click Add.
5
Define the alias by adding members. To add an existing member, click
the name in the Members list. Click Add.
6
To configure a new member, click Add Other.
7
Use the Choose Type drop list to select a category. In the Value text
box, enter the address, range, or host name. Click OK.
The Add Address dialog box appears, as shown in the following figure.
The Add Member dialog box appears.
129
Chapter 10: Creating Aliases and Implementing Authentication
8
When you finish adding members, click OK.
The Host Alias dialog box appears listing the new alias. Click the alias to view its
members.
To modify an alias, select it, click Edit, and then add or delete members.
To remove an alias, select it, click Remove, and then remove the alias
from Properties box of any services configured to use the alias. For more
information, see “Defining Service Properties” on page 103.
How User Authentication Works
A specialized HTTP server runs on the Firebox. To authenticate, clients
must connect to the authentication server using a Java-enabled Web
browser pointed to:
http://IP address of any Firebox interface:4100/
A Java applet loads a prompt for a username and password that it then
passes to the authentication server using a challenge-response protocol.
Once successfully authenticated, users minimize the Java applet and
browser window and begin using allowed network services.
As long as the Java window remains active (it can be minimized but not
closed) and the Firebox does not reboot, users remain authenticated until
the session times out. To prevent an account from authenticating, disable
the account on the authentication server.
Using external authentication
Although the authentication applet is primarily used for outbound traffic,
it can be used for inbound traffic as well. Authentication can be used
outside the Firebox as long as you have an account on that Firebox. For
example, if you are working at home, you can point your browser to:
http://public IP address of any Firebox interface:4100/
The authentication applet appears to prompt you for your login
credentials. This can provide you access through various services such as
FTP and Telnet, if you have preconfigured your Firebox to allow this.
130
WatchGuard Firebox System
Authentication Server Types
Enabling remote authentication
Use this procedure to allow remote users to authenticate from the
External interface, which gives them access to services through the
Firebox.
1
In the Services Arena in Policy Manager, double-click the
wg_authentication service icon.
2
3
4
On the Incoming tab, select Enabled and Allowed.
Under the From box, click Add.
Click Add Under and add the IP addresses of the remote users you
are allowing to authenticate externally.
Authentication Server Types
The WatchGuard Firebox System can authenticate users against any of
five authentication server types:
• A built-in authentication server on the Firebox
• NT primary domain controllers
• RADIUS-compliant authentication servers
• CRYPTOCard authentication servers
• SecurID authentication servers
The differences among the various authentication schemes are essentially
transparent to the user; the user performs many or all of the same tasks to
authenticate against any of the five types of authentication.
The difference for the Firebox administrator is that for built-in
authentication, the database of usernames, passwords, and groups are
stored on the Firebox itself. In all other cases, the usernames, passwords,
and groups are stored on the server performing the authentication.
When the Firebox is not the authentication server, you must set up the
authentication server according to the manufacturer’s instructions and
place it on the network in a location accessible to the Firebox. It is best
placed on the Trusted side for security reasons.
User Guide
131
Chapter 10: Creating Aliases and Implementing Authentication
To specify authentication type:
1
From Policy Manager, select Setup => Firewall Authentication.
2
In the Authentication Enabled Via box, select the authentication
server you want you use.
3
In Logon Time-out, select how many seconds are allowed for an
attempted logon before the time-out shuts down the connection.
4
In Session Time-out, set how many hours a session can remain open
before the time-out shuts down the connection.
The Firewall Authentication dialog box appears, as shown in the following figure.
Defining Firebox Users and Groups for Authentication
In the absence of a third-party authentication server, you can divide your
company into groups and users for authentication. Assign employees or
members to groups based on factors such as common tasks and functions,
access needs, and trustworthiness. For example, you might have a group
for accounting, another for marketing, and a third for research and
development. You also might create a probationary group with high
restrictions for new employees.
Within groups, you define users according to factors such as the method
they use to authenticate, the type of system they use, or the information
they need to access. Users can be either networks or individual
132
WatchGuard Firebox System
Defining Firebox Users and Groups for Authentication
computers. As your organization changes, you can add or remove users
or systems from groups.
NOTE
You can define only a limited number of Firebox users. If you have more
than approximately 100 users to authenticate, WatchGuard recommends
that you use a third-party authentication server.
WatchGuard automatically adds two groups–intended for remote
users–to the basic configuration file:
ipsec_users
Add the names of authorized users of MUVPN.
pptp_users
Add the names of authorized users of RUVPN with PPTP.
You can use Policy Manager to add, edit, or delete other groups to the
configuration file or to add or modify the users within a group.
From Policy Manager:
User Guide
1
Select Setup => Authentication Servers.
2
To add a new group, click the Add button beneath the Groups list.
3
Type the name of the group. Click OK.
The Authentication Servers dialog box appears, as shown in the following figure.
The Add Firebox Group dialog box appears.
133
Chapter 10: Creating Aliases and Implementing Authentication
4
To add a new user, click the Add button beneath the Users list.
5
6
Enter the username and password.
7
When you finish adding the user to groups, click Add.
8
To close the Setup Firebox User dialog box, click Close.
9
When you finish adding users and groups, click OK.
The Setup Firebox User dialog box appears, as shown in the following figure.
To add the user to a group, select the group name in the Not Member
Of list. Click the left-pointing arrow to move the name to the Member
Of list.
The user is added to the User list. The Setup Firebox User dialog box remains open
and cleared for entry of another user.
The Firebox Users tab appears with a list of the newly configured users.
The users and groups can now be used to configure services and authentication.
Configuring Windows NT Server Authentication
Windows NT Server authentication is based on Windows NT Server
Users and Groups. It uses the Users and Groups database already in place
on your Windows NT network. Only end users are allowed to
authenticate; the default Windows NT groups Administrators and
Replicators will not authenticate using this feature. From Policy Manager:
1
134
Select Setup => Authentication Servers.
The Authentication Servers dialog box appears.
WatchGuard Firebox System
Configuring RADIUS Server Authentication
2
Click the NT Server tab.
3
To identify the host, enter both the host name and the IP address of
the Windows NT network. If you don’t know the IP address of the
host, click Find IP. The IP address is automatically entered.
The information appears as shown in the following figure.
When typing IP addresses, type the digits and periods in sequence. Do not use the
TAB or arrow key to jump past the periods. For more information on entering IP
addresses, see “Entering IP addresses” on page 38.
4
If you want, enable the checkbox to use local groups.
5
Click OK.
Windows NT defines two types of groups: global and local. A local group is local to
the security system in which it is created. Global groups contain user accounts from
one domain grouped together as one group name. A global group cannot contain
another global group or a local group.
Configuring RADIUS Server Authentication
The Remote Authentication Dial-In User Service (RADIUS) provides
remote users with secure access to corporate networks. RADIUS is a
client-server system that stores authentication information for users,
remote access servers, and VPN gateways in a central user database that
is available to all clients. Authentication for the entire network occurs
from one location.
RADIUS prevents hackers from intercepting and responding to
authentication requests because authentication requests transmit an
User Guide
135
Chapter 10: Creating Aliases and Implementing Authentication
authentication key that identifies it to the RADIUS server. Note that it is
the key that is transmitted, and not a password. The key resides on the
client and server simultaneously, which is why it is often called a “shared
secret.”
To add or remove services accessible by RADIUS authenticated users, add
the RADIUS user or group in the individual service properties dialog box
and the IP address of the Firebox on the RADIUS authentication server.
Although WatchGuard supports both CHAP and PAP authentication,
CHAP is considered more secure.
From Policy Manager:
1
Select Setup => Authentication Servers.
2
Click the RADIUS Server tab.
3
4
Enter the IP address of the RADIUS server.
5
Enter the value of the secret shared between the Firebox and the
RADIUS server.
The Authentication Servers dialog box appears.
The RADIUS information appears, as shown in the following figure.
Enter or verify the port number used for RADIUS authentication.
The default is 1645. RFC 2138 states the port number as 1812, but many
RADIUS servers still use port number 1645.
The shared secret is case-sensitive and must be identical on the Firebox and the
RADIUS server.
6
136
Enter the IP address and port of the backup RADIUS server. The
RADIUS servers’ secret must be shared between both the primary and
backup servers.
WatchGuard Firebox System
Configuring CRYPTOCard Server Authentication
7
8
Click OK.
Gather the IP address of the Firebox and the user or group aliases you
want to authenticate using RADIUS. The aliases appear in the From
and To listboxes for the individual services.
To configure the RADIUS server
1
Add the IP address of the Firebox where appropriate according to the
RADIUS server vendor.
Some RADIUS vendors may not require this. To determine if this is required for
your implementation, check the RADIUS server vendor documentation.
2
Take the user or group aliases gathered from the Add Address dialog
box from each service (double-click the service icon, select Incoming
and Allowed on the Incoming tab, and click Add) and add them to
the defined Filter-IDs in the RADIUS configuration file. For more
information, consult the RADIUS server documentation.
For example, to add the groups Sales, Marketing, and Engineering enter:
Filter-Id=”Sales”
Filter-Id=”Marketing”
Filter-Id=”Engineering”
NOTE
The filter rules for RADIUS user filter-IDs are case sensitive.
Configuring CRYPTOCard Server Authentication
CRYPTOCard is a hardware-based authentication system that allows
users to authenticate by way of the CRYPTOCard challenge response
system which includes off-line hashing of passwords. It enables you to
authenticate individuals independent of the hosts they are on.
Configuring WatchGuard CRYPTOCard server authentication assumes
that you have acquired and installed a CRYPTOCard server according to
the manufacturer’s instructions, and that the server is accessible for
authentications to the Firebox.
To add or remove services accessible by CRYPTOCard authenticated
users, add the CRYPTOCard user or group in the individual service’s
User Guide
137
Chapter 10: Creating Aliases and Implementing Authentication
Properties dialog box, and the IP address of the Firebox on the
CRYPTOCard authentication server.
From Policy Manager:
1
Select Setup => Authentication Servers.
2
Click the CRYPTOCard Server tab.
3
4
Enter the IP address of the CRYPTOCard server.
The Authentication Servers dialog box appears.
You might need to use the arrow buttons in the upper-right corner of the dialog box
to bring this tab into view.
Enter or verify the port number used for CRYPTOCard
authentication.
The standard is 624.
5
Enter the administrator password.
6
Enter or accept the time-out in seconds.
7
Enter the value of the shared secret between the Firebox and the
CRYPTOCard server.
This is the administrator password in the passwd file on the CRYPTOCard server.
The time-out period is the maximum amount of time, in seconds, a user can wait
for the CRYPTOCard server to respond to a request for authentication. Sixty
seconds is CRYPTOCard’s recommended time-out length.
This is the key or client key in the “Peers” file on the CRYPTOCard server. This
key is case-sensitive and must be identical on the Firebox and the CRYPTOCard
server for CRYPTOCard authentication to work.
8
9
138
Click OK.
Gather the IP address of the Firebox and the user or group aliases to
be authenticated by way of CRYPTOCard. The aliases appear in the
From and To listboxes in the individual services’ Properties dialog
boxes.
WatchGuard Firebox System
Configuring SecurID Authentication
On the CRYPTOCard server:
1
Add the IP address of the Firebox where appropriate according to
CRYPTOCard’s instructions.
2
Take the user or group aliases from the service properties listboxes
and add them to the group information in the CRYPTOCard
configuration file. Only one group can be associated with each user.
For more information, consult the CRYPTOCard server documentation.
Configuring SecurID Authentication
For SecurID authentication to work, the RADIUS and ACE/Server servers
must first be correctly configured. In addition, users must have a valid
SecurID token and PIN number. Please see the relevant documentation
for these products.
NOTE
WatchGuard does not support the third-party program Steel Belted
RADIUS for use with SecurID. You should use the RADIUS program
bundled with the RSA SecurID software.
From Policy Manager:
User Guide
1
Select Setup => Authentication Servers.
2
Click the SecurID Server tab.
The Authentication Servers dialog box appears.
You might need to use the arrow buttons in the upper-right corner of the dialog box
to bring this tab into view.
139
Chapter 10: Creating Aliases and Implementing Authentication
3
4
Enter the IP address of the SecurID server.
5
Enter the value of the secret shared between the Firebox and the
SecurID server.
Enter or verify the port number used for SecurID authentication.
The default is 1645.
The shared secret is case-sensitive and must be identical on the Firebox and the
SecurID server.
6
If you are using a backup server, enable the Specify backup SecurID
server checkbox. Enter the IP address and port number for the backup
server.
7
Click OK.
To set up the RADIUS server, see “To configure the RADIUS server” on
page 137.
140
WatchGuard Firebox System
CHAPTER 11
Protecting Your Network
From Attacks
The WatchGuard Firebox System can protect your network from many
types of attacks. In addition to the protection provided through filtered
and proxied services, the Firebox also gives you the tools to stop attacks–
such as the ones listed below–that services are not designed to defeat.
Spoofing attacks
Hackers alter packets to create a false identity for the purpose of
gaining access to your network.
Port space probes
Hackers attack port numbers sequentially in search of security
holes they can exploit.
Address space probes
Hackers attack IP addresses sequentially in search of security
holes they can exploit.
IP options attacks
Hackers use IP options to gain access to your network.
SYN flood attacks
Hackers try to deny service to legitimate users by overloading
your network with illegitimate TCP connection attempts.
The WatchGuard Firebox System provides default packet handling
options to automatically block hosts that originate probes and attacks.
User Guide
141
Chapter 11: Protecting Your Network From Attacks
Logging options help you identify sites that exhibit suspicious behavior
such as spoofing. You can use the information gathered to manually and
permanently block an offending site. In addition, you can block ports (by
port number) to protect ports with known vulnerabilities from any
incoming traffic. For more information on log messages, see the following
collection of FAQs:
https://support.watchguard.com/advancedfaqs/log_main.asp
Default Packet Handling
The Firebox System examines and handles packets according to default
packet-handling options that you set. The firewall examines the source of
the packet and its intended destination by IP address and port number. It
also watches for patterns in successive packets that indicate unauthorized
attempts to access the network.
The default packet-handling configuration determines whether and how
the firewall handles incoming communications that appear to be attacks
on a network. Packet handling can:
• Reject potentially threatening packets
• Automatically block all communication from a source site
• Add an event to the log
• Send notification of potential security threats
Blocking spoofing attacks
One method that attackers use to gain access to your network involves
creating an electronic “false identity.” With this method, called “IP
spoofing,” the attacker creates a TCP/IP packet that uses someone else’s
IP address. Because routers use a packet’s destination address to forward
the packet toward its destination, the packet’s source address is not
validated until the packet reaches its destination. In conjunction with the
false identity, the attacker may route the packet so that it appears to
originate from a host that the targeted system trusts.
If the destination system performs session authentication based on a
connection’s IP address, the destination system may allow the packet with
the spoofed address through your firewall. The destination system “sees”
142
WatchGuard Firebox System
Default Packet Handling
that the packet apparently originated from a host that is trusted, and
therefore doesn’t require validation or a password.
When you enable spoofing defense, the Firebox prevents packets with a
false identity from passing through to your network. When such a packet
attempts to establish a connection, the Firebox generates two log records.
One log record shows that the attacker’s packet was blocked; the other
shows that the attacker’s site has been added to the Blocked Sites list, a
compilation of all sites blocked by the Firebox.
You can block spoofing attacks using the Default Packet
Handling dialog box. From Policy Manager:
1
On the toolbar, click the Default Packet Handling icon,
shown at right.
You can also, from Policy Manager, select Setup => Default.
The Default Packet Handling dialog box appears, as shown in the
following figure.
2
Enable the checkbox marked Block Spoofing Attacks.
Blocking port space and address space attacks
Other methods that attackers use to gain access to networks and hosts are
known as probes. Port space probes are used to scan a host to find what
services are running on it. Address space probes scan a network to see
User Guide
143
Chapter 11: Protecting Your Network From Attacks
which services are running on the hosts inside that network. From Policy
Manager:
1
On the toolbar, click the Default Packet Handling icon.
2
3
Enable the checkbox marked Block Port Space Probes.
You can also, from Policy Manager, select Setup => Default.
The Default Packet Handling dialog box appears.
Enable the checkbox marked Block Address Space Probes.
Stopping IP options attacks
Another type of attack that can be used to disrupt your network involves
IP options in the packet header. IP options are extensions of the Internet
Protocol that are usually used for debugging or for special applications.
For example, if you allow IP options, the attacker can use the options to
specify a route that helps him or her gain access to your network.
Although there is some gain to leaving IP options enabled, the risk
generally outweighs the benefit.
From Policy Manager:
1
On the toolbar, click the Default Packet Handling icon.
2
Enable the checkbox marked Block IP Options.
You can also, from Policy Manager, select Setup =>Default.
The Default Packet Handling dialog box appears.
Stopping SYN Flood attacks
A SYN Flood attack is a type of Denial of Service (DoS) attack that seeks to
prevent your public services (such as email and Web servers) from being
accessible to users on the Internet.
To understand how SYN Flood works, consider a normal TCP connection.
A user tries to connect by way of a Web browser to your server by
sending what is called a SYN segment. Your Web server acknowledges
the browser by sending what is called a SYN+ACK segment. When the
browser sees the SYN+ACK, it sends an ACK segment. The server is
ready to accept the URL request from the browser when it sees the ACK
statement. However, until the ACK segment has been received, the server
is “stuck”; it knows the browser wants to communicate, but the
connection is not yet established. Many servers in use today can handle
only a finite number of these half-way completed connections at a time.
144
WatchGuard Firebox System
Default Packet Handling
They are stored in a backlog until they are completed or time out. When
the server’s backlog is full, no new connections can be accepted.
A SYN Flood attack attempts to fill up the victim server’s backlog by
sending a flood of SYN segments without ever sending an ACK. When
the backlog fills up, the server will be unavailable to users.
The WatchGuard Firebox System can help defend your servers against a
SYN Flood attack by tracking the number of SYNs that are sent without a
following ACK. If this number exceeds the threshold you define, the SYN
Flood protection feature will self-activate. Once active, further connection
attempts from the external side of the Firebox must be verified before
being allowed to reach your servers. Connections that cannot be verified
are not allowed through, thus protecting your server from having a full
backlog.
The SYN Flood protection feature will self-deactivate when it senses the
attack is over.
From Policy Manager:
1
On the toolbar, click the Default Packet Handling icon.
2
Enable the checkbox marked Block SYN Flood Attacks.
You can also, from Policy Manager, select Setup => Default.
The Default Packet Handling dialog box appears.
Changing SYN flood settings
Active SYN flood defenses can occasionally prevent legitimate connection
attempts from being completed. If you find that too many legitimate
connection attempts fail when your SYN flood defense is active, you can
change SYN flood settings to minimize this problem.
You can set the maximum number of incomplete TCP connections the
Firebox allows before the SYN flood defense is activated. The default
setting of 60 means that when the number of TCP connections waiting to
be validated climbs to 61 or above, SYN flood defense is activated.
Conversely, when the number of connections waiting for validation drops
to 59 or less, SYN flood defense is deactivated. You might need to adjust
this setting to custom-fit the SYN Flood protection feature for your
network. Every time the feature self-activates, a log message will be
recorded stating SYN Validation: activated. When the feature selfdeactivates, the log message SYN Validation: deactivated will be
User Guide
145
Chapter 11: Protecting Your Network From Attacks
recorded. If these messages occur frequently when your server is not
under attack, the Maximum Incomplete Connections setting may be too
low. If the SYN Flood protection feature is not preventing attacks from
affecting your server, the setting may be too high. Consult your server’s
documentation for help choosing a new value, or experiment by adjusting
the setting until the problems disappear.
The validation timeout controls how long the Firebox “remembers”
clients that pass the validation test. The default setting of 120 seconds
means that a client that drops a legitimate connection has a two-minute
window to reconnect without being challenged. Setting the validation
timeout to zero seconds means that legitimate connections are “forgotten”
when dropped, so every connection attempt is challenged.
From Policy Manager:
1
On the toolbar, click the Default Packet Handling icon.
2
Use the SYN Validation Timeout box to set how long the Firebox
“remembers” a validated connection after that connection is dropped.
3
Use the Maximum Incomplete Connections box to set the number of
connections awaiting validation that are allowed to queue before the
Firebox automatically activates SYN flood defense.
You can also, from Policy Manager, select Setup => Default.
The Default Packet Handling dialog box appears.
Integrating Intrusion Detection
Intrusion detection is an important component of a defense-in-depth
security policy. A good intrusion detection system (IDS) examines over
time the source, destination, and type of traffic directed at your network
and compares it against known patterns of attack. When a match occurs, it
tells you the nature of the attack and recommends possible courses of
action.
The WatchGuard Firebox System default packet handling options provide
a basic intrusion detection system by blocking common and readily
recognizable attacks such as IP address spoofing and linear port space
probes. The intrusion detection capabilities of the Firebox, however, are
necessarily limited. The primary function of your firewall is to examine
146
WatchGuard Firebox System
Integrating Intrusion Detection
and either allow or deny packets. Little extra bandwidth is available to
conduct sophisticated analysis of traffic patterns.
LiveSecurity Service subscribers can download a command-line utility
called the Firebox System Intrusion Detection System Mate (fbidsmate)
that integrates the Firebox with most commercial and shareware IDS
applications. You use the fbidsmate utility to configure your IDS to run
scripts that query the Firebox for information. Because versions are
available for Win32 (Windows NT, Windows 2000, and Windows XP),
SunOS, and Linux operating systems, you can select whatever IDS
application best suits your security policy and network environments.
Working with an external IDS application, the Firebox can automatically
add sites to the Blocked Sites list. Timeouts and blocked site exceptions
work exactly as they do for sites blocked using default packet handling
options. Sites added to the Blocked Sites list appear in the Firebox
Monitors Blocked Sites tab. In addition, you can use the utility to add
explanatory log messages to the log file which can subsequently be used
for reports.
Because the fbidsmate utility is external to the Firebox, no changes in the
configuration file are required, nor is there anything additional to
configure using Policy Manager.
To obtain a copy of the fbidsmate command-line utility that matches the
operating system on which your IDS application is running, log in to your
LiveSecurity Service account at:
https://www.watchguard.com/support
Using the fbidsmate command-line utility
The fbidsmate utility works from the command line. Although you can
execute the commands directly against the Firebox, the tool is used most
frequently in the context of an IDS application script. The command
syntax is:
fbidsmate firebox_address [rwpassphrase | -f rwpassphrase_file]
[add_hostile hostile_address] | [add_log_message priority(0-7) "message"]
fbidsmate import_passphrase rwpassphrase rwpassphrase_filename
User Guide
147
Chapter 11: Protecting Your Network From Attacks
add_hostile
This command adds a site to the Auto-Blocked Site list, with the
duration set by the administrator in Policy Manager’s Blocked
Sites dialog box. It effectively extends your control of the AutoBlock mechanism inside the Firebox.
add_log_message
This command causes a message to be added to the log stream
emitted by the Firebox. Because the priority is used by the Firebox
to construct syslog messages, its range is the standard syslog
0=Emergency to 7=Debug. There is no limit on message length;
the message is automatically broken into multiple messages if
necessary.
import_passphrase
You can store the Firebox configuration passphrase in encrypted
form to avoid putting it in clear text in your IDS scripts. This
command stores the passphrase in the designated file using 3DES
encryption. Rather than using the configuration passphrase, use
the file name in your scripts. If you are managing multiple
Fireboxes, you need one passphrase file per Firebox.
Return value
The return value of fbidsmate is zero if the command executed
successfully; otherwise it is non-zero. This value should be checked upon
return if calling fbidsmate from a shell script or through some other
interface.
Examples
In the following examples, the IP address of the Firebox is 10.0.0.1 with a
configuration passphrase of “secure1”.
Example 1
The IDS detects a port scan from 209.54.94.99 and asks the Firebox
to block that site:
fbidsmate 10.0.0.1 secure1 add_hostile 209.54.94.99
The 209.54.94.99 site appears on the auto-blocked sites list and
remains there for the duration set in Policy Manager. In addition,
the following message appears in the log file:
Temporarily blocking host 209.54.94.99
148
WatchGuard Firebox System
Blocking Sites
Example 2
The IDS adds a message to the Firebox’s log stream:
fbidsmate 10.0.0.1 secure1 add_log_message 3 "IDS
system temp. blocked 209.54.94.99"
With the IDS running on host 10.0.0.2, the following message
appears in the Firebox log file:
msg from 10.0.0.2: IDS system temp. blocked
209.54.94.99
Example 3
Because you are running your IDS application outside the firewall
perimeter, you decide to encrypt the configuration passphrase
used in your IDS scripts. Note that even with encryption, you
should lock down the IDS host as tightly as possible. First, you
must import the passphrase “secure1” to an encrypted file on the
IDS host:
fbidsmate import_passphrase secure1 /etc/
fbidsmate.passphrase
Then you could rewrite the previous examples as:
fbidsmate 10.0.0.1 -f /etc/fbidsmate.passphrase
add_hostile 209.54.94.99
fbidsmate 10.0.0.1 -f /etc/fbidsmate.passphrase
add_log_message 3 "IDS system temp. blocked
209.54.94.99"
Blocking Sites
The Blocked Sites feature of the Firebox helps you prevent unwanted
contact from known or suspected hostile systems. After you identify an
intruder, you can block all attempted connections from them. You can
also configure logging to record all access attempts from these sources so
you can collect clues as to what services they are attempting to attack.
A blocked site is an IP address outside the Firebox that is prevented from
connecting to hosts behind the Firebox. If any packet comes from a host
that is blocked, it does not get past the Firebox.
There are two kinds of blocked sites:
User Guide
149
Chapter 11: Protecting Your Network From Attacks
•
•
Permanently blocked sites–which are listed in the configuration file
and change only if you manually change them.
Auto-blocked sites–which are sites the Firebox adds or deletes
dynamically based on default packet handling rules and service-byservice rules for denied packets. For example, you can configure the
Firebox to block sites that attempt to connect to forbidden ports. Sites
are temporarily blocked until the auto-blocking mechanism times out.
Firebox System auto-blocking and logging mechanisms can help you
decide which sites to block. For example, when you find a site that spoofs
your network, you can add the offending site’s IP address to the list of
permanently blocked sites.
Note that site blocking can be imposed only to traffic on the Firebox’s
External interface. Connections between the Trusted and Optional
interfaces are not subject to the Blocked Sites feature.
Blocking a site permanently
You may know of hosts on the Internet that pose constant dangers, such
as a university computer that has been used more than once by student
hackers who try to invade your network.
Use Policy Manager to block a site permanently. The default
configuration blocks three network addresses–10.0.0.0/8, 172.16.0.0/12,
and 192.168.0.0/16. These are the private (“unconnected”) network
addresses. Because they are for private use, backbone routers should
never pass traffic with these addresses in the source or destination field of
an IP packet. Traffic from one of these addresses is almost certainly a
spoofed or otherwise suspect address. RFCs 1918, 1627, and 1597 cover
the use of these addresses.
NOTE
The Blocked Sites list applies only to traffic on the External interface.
Connections between the Trusted and Optional interfaces are not subject
to the Blocked Sites list.
150
WatchGuard Firebox System
Blocking Sites
From Policy Manager:
1
On the toolbar, click the Blocked Sites icon (shown at
right).
You can also select Setup => Blocked Sites. The Blocked Sites
dialog box appears, as shown in the following figure.
2
3
Click Add.
4
Enter the member value.
5
Click OK.
Use the Choose Type drop list to select a member type. The options
are Host IP Address, Network IP Address, or Host Range.
Depending on the member type, this can be an IP address or a range of IP
addresses. When typing IP addresses, type the digits and periods in sequence. Do
not use the TAB or arrow key to jump past the periods. For more information on
entering IP addresses, see “Entering IP addresses” on page 38.
The Blocked Sites dialog box appears displaying the new site in the Blocked Sites
list.
Using an external list of blocked sites
You can create a list of blocked sites in an external file. This file must be a
.txt file. To load an external file into your blocked sites list:
1
2
User Guide
In the Blocked Sites dialog box, click Import.
Browse to locate the file. Double-click it, or select it and click Open.
The contents of the file are loaded into the Blocked Sites list.
151
Chapter 11: Protecting Your Network From Attacks
Creating exceptions to the Blocked Sites list
A blocked site exception is a host that is not added to the list of
automatically blocked sites regardless of whether it fulfills criteria that
would otherwise add it to the list. The site can still be blocked according
to the Firebox configuration, but it will not be automatically blocked for
any reason.
From Policy Manager:
1
Select Setup => Blocked Sites Exceptions.
2
3
Click Add.
4
Click OK to close the Blocked Sites Exceptions dialog box.
The Blocked Sites Exceptions dialog box appears.
Enter the IP address of the site for which you want to create an
exception. Click OK.
To remove an exception, select the IP address of the site to remove. Click
Remove.
Changing the auto-block duration
From the Blocked Sites dialog box, either type or use the scroll control to
change the duration, in minutes, that the firewall automatically blocks
suspect sites. Duration can range from 1 to 32,000 minutes (about 22
days).
Logging and notification for blocked sites
From the Blocked Sites dialog box:
1
Click Logging.
2
3
In the Category list, click Blocked Sites.
The Logging and Notification dialog box appears.
Modify the logging and notification parameters according to your
security policy preferences.
For detailed instructions, see “Customizing Logging and Notification by Service or
Option” on page 185.
152
WatchGuard Firebox System
Blocking Ports
Blocking Ports
You can block ports to explicitly disable external network services from
accessing ports that are vulnerable as entry points to your network. A
blocked port setting takes precedence over any of the individual service
configuration settings.
Like the Blocked Sites feature, the Blocked Ports feature blocks only
packets that enter your network through the External interface.
Connections between the Optional and Trusted interfaces are not subject
to the Blocked Ports list.
You should consider blocking ports for several reasons:
• Blocked ports provide an independent check for protecting your most
sensitive services, even when another part of the firewall is not
configured correctly.
• Probes made against particularly sensitive services can be logged
independently.
• Some TCP/IP services that use port numbers above 1024 are
vulnerable to attack if the attacker originates the connection from an
allowed well-known service with a port number below 1024. These
connections can be attacked by appearing to be an allowed connection
in the opposite direction. You can prevent this type of attack by
blocking the port numbers of services whose port numbers are under
1024.
By default, the Firebox blocks several destination ports. This measure
provides convenient defaults which do not normally require changing.
Typically, the following services should be blocked:
X Window System (ports 6000-6063)
The X Window System (or X-Windows) has several distinct
security problems that make it a liability on the Internet. Although
several authentication schemes are available at the X server level,
the most common ones are easily defeated by a knowledgeable
attacker. If an attacker can connect to an X server, he or she can
easily record all keystrokes typed at the workstation, collecting
passwords and other sensitive information. Worse, such
User Guide
153
Chapter 11: Protecting Your Network From Attacks
intrusions can be difficult or impossible to detect by all but the
most knowledgeable users.
The first X Window server is always on port 6000. If you have an
X server with multiple displays, each new display uses an
additional port number after 6000, up to 6063 for a maximum of
64 displays on a given host.
X Font Server (port 7100)
Many versions of X-Windows support font servers. Font servers
are complex programs that run as the super-user on some hosts.
As such, it is best to explicitly disable access to X font servers.
NFS (port 2049)
NFS (Network File System) is a popular TCP/IP service for
providing shared file systems over a network. However, current
versions have serious authentication and security problems which
make providing NFS service over the Internet very dangerous.
NOTE
Port 2049 is not assigned to NFS; however, in practice, this is the most
common port used for NFS. The port assigned for NFS is assigned by the
portmapper. If you’re using NFS, it would be a good idea to verify that
NFS is using port 2049 on all your systems.
OpenWindows (port 2000)
OpenWindows is a windowing system from Sun Microsystems
that has similar security risks to X Window.
rlogin, rsh, rcp (ports 513, 514)
These services provide remote access to other computers and are
somewhat insecure on the Internet. Because many attackers probe
for these services, it is a good idea to block them.
RPC portmapper (port 111)
RPC Services use port 111 to determine which ports are actually
used by a given RPC server. Because RPC services themselves are
very vulnerable to attack over the Internet, the first step in
attacking RPC services is to contact the portmapper to find out
which services are available.
154
WatchGuard Firebox System
Blocking Ports
port 0
Port 0 is reserved by IANA, but many programs that scan ports
start their search on port 0.
port 1
Port 1 is for the rarely used TCPmux service. Blocking it is another
way to confuse port scanning programs.
Novell IPX over IP (port 213).
If you use Novell IPX over IP internally, you might want to
explicitly block port 213.
NetBIOS services (ports 137 through 139)
You should block these ports if you use NetBIOS internally.
Although such services are blocked implicitly by default packet
handling, blocking them here provides additional security.
Avoiding problems with legitimate users
It is possible for legitimate users to have problems because of blocked
ports. In particular, some clients might temporarily fail because of
blocked ports.
You should be very careful about blocking port numbers between 1000
through 1999, as these numbers are particularly likely to be used as client
ports.
NOTE
Solaris uses ports greater than 32768 for clients.
Blocking a port permanently
From Policy Manager:
1
On the toolbar, click the Blocked Ports icon, shown at
right.
You can also select Setup => Blocked Ports. The Blocked Ports
dialog box appears, as shown in the following figure.
2
In the text box to the left of the Add button, type the
port number. Click Add.
The new port number appears in the Blocked Ports list.
User Guide
155
Chapter 11: Protecting Your Network From Attacks
To remove a blocked port, select the port to remove. Click Remove.
Auto-blocking sites that try to use blocked ports
You can configure the Firebox such that when an outside host attempts to
access a blocked port, that host is temporarily auto-blocked:
In the Blocked Ports dialog box, enable the checkbox marked Auto-block
sites that attempt to use blocked ports.
Setting logging and notification for blocked ports
You can also adjust your event logs and notification to accommodate
attempts to access blocked ports. You can configure the Firebox to log all
attempts to use blocked ports, or notify a network administrator when
someone attempts to access a blocked port.
From the Blocked Ports dialog box:
1
Click Logging.
2
3
In the Category list, click Blocked Ports.
The Logging and Notification dialog box appears.
Modify the logging and notification parameters according to your
security policy preferences.
For detailed instructions, see “Customizing Logging and Notification by Service or
Option” on page 185.
156
WatchGuard Firebox System
Blocking Sites Temporarily with Service Settings
Blocking Sites Temporarily with Service Settings
Use service properties to automatically and temporarily block sites when
incoming traffic attempts to use a denied service. You can use this feature
to individually log, block, and monitor sites that attempt access to
restricted ports on your network.
Configuring a service to temporarily block sites
Configure the service to automatically block sites that attempt to connect
using a denied service. From Policy Manager:
1
Double-click the service icon in the Services Arena.
2
Use the Incoming service Connections Are drop list to select Enabled
and Denied.
3
Enable the checkbox marked Auto-block sites that attempt to connect
via service, located at the bottom of the dialog box.
The Properties dialog box appears.
Viewing the Blocked Sites list
The Blocked Sites list is a compilation of all sites currently blocked by the
Firebox. Use Firebox Monitors to view sites that are automatically blocked
according to a service’s property configuration. From Control Center:
1
On the toolbar, click the Firebox Monitors icon (shown
at right).
2
Click the Blocked Site List tab at the bottom of the
graph.
You might need to use the arrows to access this tab. The Blocked
Sites list appears.
User Guide
157
Chapter 11: Protecting Your Network From Attacks
158
WatchGuard Firebox System
CHAPTER 12
Monitoring Firebox Activity
An important part of an effective network security policy is the
monitoring of network events. Monitoring enables you to recognize
patterns, identify potential attacks, and take appropriate action. If an
attack occurs, the records kept by the WatchGuard Firebox System will
help you reconstruct what happened.
The extensive logging provided with the Firebox System can also be
useful in debugging network services, solving routing problems, and
identifying other network configuration issues. For more information on
logging, see the following collection of FAQs:
https://support.watchguard.com/advancedfaqs/log_main.asp
Firebox Monitors and HostWatch are two tools for monitoring traffic
through the Firebox.
Firebox Monitors
Firebox Monitors is a user interface providing several real-time displays
of activity through the Firebox.
User Guide
159
Chapter 12: Monitoring Firebox Activity
Starting Firebox Monitors and connecting to a Firebox
From Control Center:
1
On the QuickGuide, click the Firebox Monitors button
(shown at upper right).
Firebox Monitors opens and displays the BandwidthMeter tab.
There is no active connection to a Firebox.
2
Select File => Connect.
3
Enter a Firebox name or IP address, or use the Firebox
drop list to select a Firebox. Enter the status (read-only)
passphrase. Click OK.
Or, on the Firebox Monitors toolbar, click the Connect icon (shown
at lower right).
Firebox Monitors displays traffic patterns on the selected Firebox.
Setting Firebox Monitors view properties
You can configure Firebox Monitors to display traffic at different speeds,
intervals, and amplitude. From Firebox Monitors:
1
Select View => Properties.
2
Modify display properties on each of the tabs according to your
preferences.
The View Properties dialog box appears, as shown in the following figure.
For a description of each control, right-click it and then click What’s This?.
160
WatchGuard Firebox System
Firebox Monitors
BandwidthMeter
The BandwidthMeter tab on the Firebox Monitors display, shown in the
following figure, shows real-time bandwidth usage for one Firebox
interface at a time.
ServiceWatch
The ServiceWatch tab on the Firebox Monitors display, shown in the
following figure, graphs the number of connections by service, providing
a service-centric view of network activity. The y axis shows the number of
connections and the x axis shows time. Firebox Monitors differentiates by
color each service being graphed.
User Guide
161
Chapter 12: Monitoring Firebox Activity
Adding services to ServiceWatch
By default, ServiceWatch graphs the SMTP, FTP, and HTTP services, but
you can track other services as well. From Firebox Monitors:
1
2
Select View => Properties. Click the ServiceWatch tab.
3
Enter the service name and port number.
4
5
Pick the line color to represent the service on the graph.
Click Add.
The Add Displayed Service dialog box appears.
For a list of well-known service port numbers, see the Reference Guide.
Click OK to close the Add Displayed Service dialog box. Click OK to
close the View Properties dialog box.
ServiceWatch adds the new service to the display and draws a new line in the color
specified.
Status Report
The Status Report tab on the Firebox Monitors display provides a number
of statistics on Firebox activity.
Firebox uptime and version information
The time range on the statistics, the Firebox uptime, and the WatchGuard
Firebox System software version.
Current UTC time (GMT): Thu Sep 20 17:03:44 2001
+----- Time Statistics (in GMT) ---------------------| Statistics from Thu Sep 20 17:03:02 2001 to Thu Sep 20 17:03:44 2001
| Up since Tue Sep 11 17:54:34 2001 (8 days, 23:09)
| Last network change Tue Sep 11 17:54:32 2001
+----------------------------------------------------WatchGuard, Copyright (C) 1996-2000 WGTI
Firebox Release: mainline_dev
Driver version: 5.0.B769
Daemon version: 5.0.B769
Sys_B Version: 4.61.B730
BIOS Version: 59b96cb13a2be4f4257197add3413ab5 Sicily
Serial Number: 103100033
Product Type: FBIII 1000 300Mhz 64MB
Product Options: hifn
Packet counts
The number of packets allowed, denied, and rejected between
status queries. Rejected packets are denied packets for which the
Firebox sends an ICMP error message.
Allowed:
Denied:
Rejects:
162
5832
175
30
WatchGuard Firebox System
Firebox Monitors
Log hosts
The IP addresses of the log host or hosts.
Log host(s):
206.148.32.16
Network configuration
Statistics about the network cards detected within the Firebox,
including the interface name, its hardware and software
addresses, and its netmask. In addition, the display includes local
routing information and IP aliases.
Network Configuration:
lo local 127.0.0.1 network 127.0.0.0 netmask 255.0.0.0
eth0 local 192.168.49.4 network 192.168.49.0 netmask 255.255.255.0
outside (set)
eth1 local 192.168.253.1 network 192.168.253.0 netmask 255.255.255.0
Blocked Sites list
The current manually blocked sites, if any. Temporarily blocked
site entries appear on the Blocked Sites tab.
Blocked
network
network
network
list
10.0.0.0/8 permanent
172.16.0.0/12 permanent
192.168.0.0/16 permanent
Spoofing information
The IP addresses of blocked hosts and networks. If “none” is
listed, the Firebox rejects these packets on all of its interfaces.
Spoofing info
Block Host 255.255.255.255 none
Block Network 0.0.0.0/8 none
Block Host 123.152.24.17 none
Logging options
Logging options configured with either the QuickSetup Wizard or
by adding and configuring services from Policy Manager.
Logging options
Outgoing traceroute
Incoming traceroute logged(warning) notifies(traceroute) hostile
Outgoing ping
Incoming ping
Authentication host information
The types of authentication being used and the IP address of the
authentication server.
Authentication
Using local authentication for Remote User VPN.
Using radius authentication from 103.123.94.22:1645.
User Guide
163
Chapter 12: Monitoring Firebox Activity
Memory
Statistics on the memory usage of the currently running Firebox.
Numbers shown are bytes of memory.
Memory:
Mem:
total:
used:
free:
65032192 25477120 39555072
shared: buffers: cached:
9383936 9703424 362905
Load average
The number of jobs in the run queue averaged over 1, 5, and 15
minutes. The fourth number pair is the number of active processes
per number of total processes running, and the last number is the
next process ID number.
Load Average:
0.04 0.06 0.09 2/21 6282
Processes
The process ID, the name of the process, and the status of the
process, as shown in the figure on the next page. (These codes
appear under the column marked “S.”)
•R – Running
•S – Sleeping
•Z – Zombie
The other fields are as follows:
•RSS – Actual amount of RAM, the process is using.
•SHARE – Amount of memory that can be shared by more than
one process.
•TIME – Total CPU time used.
•(CPU) – Percentage of CPU time used.
•PRI – Priority of process.
•(SCHED) – The way the process is scheduled.
PID NAME
RSS SHARE
TIME (CPU) PRI (SCHED)
S
1136
564
148:41.84 ( 0)
2 kflushd
S
0
0
0:00.02 ( 0)
3 kswapd
S
0
0
0:00.00 ( 0)
55 nvstd
S
800
412
1:27.76 ( 0)
98 (round robin)
92 dvcpsv
S
1284
628
3:33.43 ( 0)
2 (round robin)
S
1364
744
3:08.55 ( 0)
3 (round robin)
71 fbr_mapper
S
256
176
0:00.16 ( 0)
98 (round robin)
75 sslsrvd
S
1648
976
0:00.37 ( 0)
4287 iked
164
S
1 init
99 (round robin)
0 (nice)
0 (fifo)
0 (nice)
WatchGuard Firebox System
Firebox Monitors
73 fblightd
S
464
308
3927:05.75 ( 5)
74 /bin/logger
S
1372
592
1:29.72 ( 0)
94 ppp-ttyS2
S
804
456
0:00.74 ( 0)
78 firewalld
R
2076
1248
307:29.75 ( 0)
0 (nice)
99 (round robin)
0 (nice)
98 (round robin)
79 liedentd
S
708
356
0:00.03 ( 0)
80 dvcpd
S
1152
576
57:00.26 ( 0)
0 (nice)
82 fwcheck
S
860
408
0:01.82 ( 0)
99 (round robin)
95 /opt/bin/rbcast
S
784
372
0:39.47 ( 0)
3 (round robin)
86 authentication
S
1112
496
0:02.21 ( 0)
3 (round robin)
90 pswatch
S
904
376
0:00.10 ( 0)
0 (nice)
91 netdbg
S
828
372
0:00.05 ( 0)
0 (nice)
96 /opt/bin/dns-proxy
S
800
400
0:00.72 ( 0)
0 (nice)
0 (nice)
Interfaces
Each network interface is displayed in this section, along with
detailed information regarding its status and packet count:
Interfaces:
lo
Link encap:Local Loopback
inet addr:127.0.0.1 Bcast:127.255.255.255 Mask:255.0.0.0
UP BROADCAST LOOPBACK RUNNING MTU:3584 Metric:0
RX packets:0 errors:0 dropped:0 overruns:0 frame:0
TX packets:0 errors:0 dropped:0 overruns:0 carrier:0
Collisions:0
eth0
Link encap:Ethernet HWaddr 00:90:7F:1E:79:84
inet addr:192.168.49.4 Bcast:192.168.49.255 Mask:255.255.255.0
UP BROADCAST RUNNING MULTICAST MTU:1500 Metric:1
RX packets:3254358 errors:0 dropped:0 overruns:0 frame:0
TX packets:1662288 errors:0 dropped:0 overruns:0 carrier:0
Collisions:193
Interrupt:11 Base address:0xf000
eth0:0 Link encap:Ethernet HWaddr 00:90:7F:1E:79:84
inet addr:192.168.49.5 Bcast:192.168.49.255 Mask:255.255.255.0
UP BROADCAST RUNNING MULTICAST MTU:1500 Metric:1
RX packets:3254358 errors:0 dropped:0 overruns:0 frame:0
TX packets:1662288 errors:0 dropped:0 overruns:0 carrier:0
Collisions:193
eth1
Link encap:Ethernet HWaddr 00:90:7F:1E:79:85
inet addr:192.168.253.1 Bcast:192.168.253.255 Mask:255.255.255.0
UP BROADCAST RUNNING MULTICAST MTU:1500 Metric:2
RX packets:6305057 errors:0 dropped:0 overruns:0 frame:0
TX packets:7091295 errors:0 dropped:0 overruns:0 carrier:0
Collisions:0
Interrupt:10 Base address:0xec00
ipsec0 Link encap:UNSPEC HWaddr 00-90-7F-1E-79-84-00-10-00-00-00-00-00-00-00-00
inet addr:192.168.49.4 Bcast:192.168.49.255 Mask:255.255.255.0
UP BROADCAST RUNNING NOARP MULTICAST MTU:1400 Metric:5
RX packets:0 errors:0 dropped:0 overruns:0 frame:0
TX packets:0 errors:0 dropped:0 overruns:0 carrier:0
Collisions:0
User Guide
165
Chapter 12: Monitoring Firebox Activity
The interfaces used in this section are as follows:
eth0 - External (public) interface
eth1 - Trusted (internal) interface
eth2 - Optional (DMZ) interface
ipsec0 - IPSec virtual interface
eth0:0 - Interface alias
fbd0 - Virtual interface used for DVCP VPN tunnel negotiation
pptp0, 1, 2, etc - PPTP virtual VPN interfaces
lo - loopback interface
wgd0 - External (public) IP address when the Firebox is set up for
PPPoE support. (Because all traffic passing over this interface is
PPPoE- specific, the IP address that appears is a placeholder value
only and can be ignored.)
Routes
The Firebox kernel routing table. These routes are used to
determine which interface the Firebox uses for each destination
address.
Routes
Kernel IP routing table
Destination
Gateway
207.54.9.16
*
207.54.9.48
*
198.148.32.0
*
127.0.0.0
*
default
207.54.9.30
Genmask
Flags MSS
Window Use Iface
255.255.255.240 U
1500
0
58 eth0
255.255.255.240 U
1500
0
19 eth1
255.255.255.0
U
1500
0
129 eth1:0
255.0.0.0
U
3584
0
9 lo
*
UG
1500
0
95 eth0
ARP table
A snapshot of the ARP table on the running Firebox. The ARP
table is used to map IP addresses to hardware addresses.
ARP Table
Address
207.23.8.32
207.23.8.52
207.23.8.21
201.148.32.54
201.148.32.26
207.23.8.30
HWtype
ether
ether
ether
ether
ether
ether
HWaddress
00:20:AF:B6:FA:29
00:A0:24:2B:C3:E6
00:80:AD:19:1F:80
00:A0:24:4B:95:67
00:A0:24:4B:98:7F
00:A0:24:79:96:42
Flags
C
C
C
C
C
C
Mask
*
*
*
*
*
*
Iface
eth1
eth1
eth0
eth1:0
eth1:0
eth0
For more information on the status report page, see the following FAQ:
https://support.watchguard.com/advancedfaqs/log_statusall.asp
166
WatchGuard Firebox System
HostWatch
Authentication list
The Authentication List tab displays the host IP addresses and user
names of everyone currently authenticated to the Firebox. If you are using
DHCP, the IP address—to—user name mapping may change whenever
machines restart.
Blocked Site list
The Blocked Site List tab lists the IP addresses (in slash notation) of any
external sites that are temporarily blocked by port space probes, spoofing
attempts, address space probes, or another event configured to trigger an
auto-block.
Next to each blocked site is the expiration time on the temporary autoblock. You can adjust the auto-blocking value from the Blocked Sites
dialog box available through Policy Manager.
You can selectively remove sites from this blocked list either
by selecting the site and clicking the X toolbar button or by
double-clicking a site. If the display is in continuous refresh
mode (that is, if the Continue button–shown at right–on
the toolbar is active), selecting a site on the list or clicking the X button
stops the refresh mode.
If you opened the Firebox with the status (read-only) passphrase, Firebox
Monitors prompts you to enter the configuration (read/write) passphrase
before removing a site from the list.
HostWatch
HostWatch is a real-time display of active connections occurring on a
Firebox. It can also graphically represent the connections listed in a log
file, either playing back a previous file for review or displaying
connections as they are logged into the current log file. HostWatch
provides graphical feedback on network connections between the trusted
and external networks as well as detailed information about users,
connections, and network address translation.
User Guide
167
Chapter 12: Monitoring Firebox Activity
The HostWatch display uses the logging settings configured with Policy
Manager. For instance, to see all denied incoming Telnet attempts in
HostWatch, configure the Firebox to log incoming denied Telnet
attempts.
The line connecting the source host and destination host is color-coded to
display the type of connection being made. These colors can be changed.
The defaults are:
• Red – The connection is being denied.
• Blue – The connection is being proxied.
• Green – The connection is using network address translation (NAT).
• Black – The connection falls into none of the first three categories.
Representative icons appear next to the server entries for HTTP, Telnet,
SMTP, and FTP.
Name resolution might not occur immediately when you first start
HostWatch. As names are resolved, HostWatch replaces IP addresses
with host or usernames, depending on the display settings. Some
machines might never resolve and the IP addresses remain in the
HostWatch window.
To start HostWatch, click the HostWatch icon (shown at left) on
the Control Center QuickGuide.
HostWatch display
As shown in the following figure, the upper pane of the HostWatch
display is split into two sides, Inside and Outside. Double-click an item on
either side to produce a pop-up window displaying detailed information
about current connections for the item, such as IP addresses, port number,
connection type, and direction.
The lower pane displays the same information in tabular form, in
addition to ports and the time the connection was established.
168
WatchGuard Firebox System
HostWatch
Connecting HostWatch to a Firebox:
From HostWatch:
1
Select File => Connect.
2
Use the Firebox drop list to select a Firebox.
3
Enter the Firebox status passphrase. Click OK.
Or, on the Hostwatch toolbar, click the Connect icon (shown at
right).
You can also type the Firebox name or IP address.
Replaying a log file in HostWatch
You can replay a log file in HostWatch in order to troubleshoot and
retrace a suspected break-in. From HostWatch:
User Guide
1
Select File => Open.
2
To pause the display, click Pause (shown at right).
Browse to locate and select the log file.
By default, log files are stored in the WatchGuard installation
directory at C:\Program Files\WatchGuard\logs with the extension
.wgl. HostWatch loads the log file and begins to replay the activity.
169
Chapter 12: Monitoring Firebox Activity
3
4
To restart the display, click Continue (shown at right).
To step through the display one entry at a time, click the
Pause icon. Click the right arrow to step forward
through the log. Click the left arrow to step backward
through the log.
Controlling the HostWatch display
You can selectively control the HostWatch display. This feature can be
useful for monitoring the activities of specific hosts, ports, or users. From
HostWatch:
1
2
Select View => Filters.
According to what you want to monitor, click the Inside Hosts,
Outside Hosts, Ports, or Authenticated Users tab.
3
Clear the checkbox marked Display All Hosts, Display All Ports, or
Display All Authenticated Users.
4
Enter the IP address, port number, or user ID you want to monitor.
Click Add.
Repeat for each entity that HostWatch should monitor.
5
Click OK.
Modifying HostWatch view properties
You can change how HostWatch displays information. For example,
HostWatch can display host names rather than IP addresses. From
HostWatch:
170
1
2
Select View => Properties.
3
Use the Line Color tab to choose colors for lines drawn between
denied, dynamic NAT, proxy, and normal connections.
4
Use the Misc. tab to control the refresh rate of the real-time display
and the maximum number of connections displayed.
Use the Host Display tab to modify host display and text options.
For a description of each control, right-click it and then select What’s This?.
WatchGuard Firebox System
CHAPTER 13
Setting Up Logging and
Notification
An event is any single activity that occurs at the Firebox, such as denying a
packet from passing through the Firebox. Logging is the recording of these
events to a log host. A notification is a message sent to the administrator by
the Firebox when an event occurs that indicates a security threat.
Notification can be in the form of email, a popup window on the
WatchGuard Security Event Processor (WSEP), a call to a pager, or the
execution of a custom program.
For example, WatchGuard recommends that you configure default packet
handling to issue a notification when the Firebox detects a port space
probe. When the Firebox detects one, the log host sends notification to the
network security administrator about the rejected packets. At this point,
the network security administrator can examine the logs and decide what
to do to further secure the organization’s network. Some possible courses
of action would be to:
• Block the ports on which the probe was attempted
• Block the IP address that is sending the packets
• Contact the ISP through which the packets are being sent
Logging and notification are crucial to an effective network security
policy. Together, they make it possible to monitor your network security,
identify both attacks and attackers, and take action to address security
threats and challenges. WatchGuard logging and notification features are
User Guide
171
Chapter 13: Setting Up Logging and Notification
both flexible and powerful. You can configure your firewall to log and
notify a wide variety of events, including specific events that occur at the
level of individual services. For more information on logging, see the
following collection of FAQs:
https://support.watchguard.com/advancedfaqs/log_main.asp
Developing Logging and Notification Policies
When creating a logging policy, you spell out what gets logged and when
an event or series of events warrants sending out a notification to the onduty administrator. Developing these policies simplifies the setup of
individual services in the WatchGuard Firebox System. If you have fully
mapped out a policy, you can more easily delegate configuration duties
and ensure that individual efforts do not contradict the overall security
stance or logging and notification policies.
Logging policy
Specifically, the logging policy delineates:
• Which events to log
• Which service events to log
• Which servers are allocated as log hosts
• How large a log file is allowed to become and how often a new log file
is created
In general, you want to log only the events that might indicate a potential
security threat, and ignore events that would waste bandwidth and server
storage space. This generally translates into logging spoofs, IP options,
probes, and denied packets, and not logging allowed packets. Allowed
packets should not be indicative of a security threat. Furthermore,
allowed traffic usually far exceeds the volume of denied traffic and would
slow response times as well as causing the log file to grow and turn over
too quickly.
WatchGuard provides the option to log allowed events primarily for
diagnostic purposes when setting up or troubleshooting an installation.
Or, you might have a situation such as a very specialized service that uses
an obscure, very high port number, and the service is intended for use
172
WatchGuard Firebox System
Developing Logging and Notification Policies
only by a small number of people in an organization. In that case you
might want to log all traffic for that service so you can monitor or review
that service activity.
Not all denied events need to be logged. For example, if incoming FTP
denies all incoming traffic from any source outside to any destination
inside, there is little point in logging incoming denied packets. All traffic
for that service in that direction is blocked.
Notification policy
The most important events that should trigger notification are IP options,
port space probes, address space probes, and spoofing attacks. These are
configurable in the Default Packet Handling dialog box, described in
“Default Packet Handling” on page 142.
Other notifications depend on your Firebox configuration and how much
time is available for interacting with it. For example, if you set up a simple
configuration that enables only a few services and denies most or all
incoming traffic, only a few circumstances warrant notification. On the
other hand, if you have a large configuration with many services; with
many allowed hosts or networks for incoming traffic; popular protocols to
specific, obscure ports; and several filtered services added of your own
design; you will need to set up a large, complex notification scheme. This
type of configuration is more vulnerable to attack. Not only are there
many more services that require a notification policy, the high number of
routes through the Firebox increases the likelihood that the log host will
issue frequent notifications. If you set up a very accommodating firewall,
be prepared to spend a large amount of time interacting with your
security system or fixing security breaches.
To formulate a notification policy, look at the number and nature of the
services enabled for the Firebox, and how open or limited each service is.
In general, for the high-traffic proxies such as SMTP and FTP, you might
activate a repeat notification if the service rejects five to ten packets within
30 seconds. If you have set up a specialized service limited to traffic
between two or three hosts using a high port number, you might want to
activate notification on this service whenever it denies or passes a packet.
User Guide
173
Chapter 13: Setting Up Logging and Notification
Failover Logging
WatchGuard uses failover logging to minimize the possibility of missing
log events. With failover logging, you configure a list of log hosts to
accept logs in the event of a failure of the primary log host. By default, the
Firebox sends log messages to the primary log host. If for any reason the
Firebox cannot establish communication with the primary log host, it
automatically sends log messages to the second log host. It continues
through the list until it finds a log host capable of recording events.
Multiple log hosts operate in failover mode, not redundancy mode–that
is, events are not logged to multiple log hosts simultaneously; they are
logged only to the primary log host unless that host becomes unavailable.
The logs are then passed on to the next available log host according to the
order of priority.
Except where Syslog is used, the WatchGuard Security Event Processor
software must be installed on each log host. For more information, see
“Setting up the WatchGuard Security Event Processor” on page 178.
WatchGuard Logging Architecture
By default, Policy Manager and the log and notification application–the
WatchGuard Security Event Processor–are installed on the same
computer. You can, however, install the event processor software on
multiple computers.
You must complete the following tasks to configure the firewall for
logging and notification:
Policy Manager
- Add log hosts
- Customize preferences for services and packet handling options
- Save the configuration file with logging properties to the Firebox
WatchGuard Security Event Processor (WSEP)
- Install the WSEP software on each log host
- Set global logging and notification preferences for the host
174
WatchGuard Firebox System
Designating Log Hosts for a Firebox
- Set the log encryption key on each log host identical to the key
set in Policy Manager
Designating Log Hosts for a Firebox
You should have at least one log host to run the WatchGuard Firebox
System. The default primary log host is the Management Station that is set
when you run the QuickSetup Wizard. You can specify a different
primary log host as well as multiple backup log hosts. The typical
medium-sized operation has two or three high-capacity log hosts.
Multiple log hosts operate in failover, not redundant mode. The primary
log host handles the bulk of the logging duties; others are called in as
needed when the highest-ranking log host is unavailable to receive logs.
Before setting up a log host, you need to have the following information:
• IP address of each log host
• Encryption key to secure the connection between the Firebox and log
hosts
• Priority order of primary and backup log hosts
For log host troubleshooting information, see the following FAQ:
https://support.watchguard.com/advancedfaqs/log_troubleshootinghost.asp
Adding a log host
From Policy Manager:
User Guide
1
Select Setup => Logging.
2
Click Add.
The Logging Setup dialog box appears.
The Add IP Address dialog box appears, as shown in the following figure.
175
Chapter 13: Setting Up Logging and Notification
3
Enter the IP address to be used by the log host.
4
Enter the encryption key that secures the connection between the
Firebox and the log host.
When typing IP addresses, type the digits and periods in sequence. Do not use the
TAB or arrow key to jump past the periods. For more information on entering IP
addresses, see “Entering IP addresses” on page 38.
The default encryption key is the status passphrase set in the QuickSetup Wizard.
You must use the same log encryption key for both the Firebox and the
WatchGuard Security Event Processor.
5
Click OK.
Repeat until all primary and backup log hosts appear in the WatchGuard Security
Event Processors list.
Enabling Syslog logging
Note that Syslog logging is not encrypted; therefore, do not set the Syslog
server to a host on the External interface. From Policy Manager:
1
Select Setup => Logging.
2
Click the Syslog tab.
3
4
5
Enable the checkbox marked Enable Syslog Logging.
6
Click OK.
The Logging Setup dialog box appears.
The Syslog tab information appears as shown in the following figure.
Enter the IP address of the Syslog server.
Select a Syslog facility from the drop list. You can select a facility from
LOG_LOCAL_0 through LOG_LOCAL_7.
For more information on Syslog logging, see the following FAQ:
https://support.watchguard.com/advancedfaqs/log_syslog.asp
176
WatchGuard Firebox System
Designating Log Hosts for a Firebox
Changing the log encryption key
Edit a log host entry to change the log encryption key. From Policy
Manager:
1
Select Setup => Logging.
2
3
Click the host name. Click Edit.
The Logging Setup dialog box appears.
Type in the new log encryption key. Click OK.
You must use the same log encryption key for both the Firebox and the
WatchGuard Security Event Processor. To change the log encryption key on the
WSEP application, see “Setting the log encryption key” on page 181.
Removing a log host
Remove a log host when you no longer want to use it for any logging
purpose. From Policy Manager:
1
Select Setup => Logging.
2
3
Click the host name. Click Remove.
The Logging Setup dialog box appears.
Click OK.
The Logging Setup dialog box closes and removes the log host entry from the
configuration file.
Reordering log hosts
Log host priority is determined by the order in which the hosts appear in
the WatchGuard Security Event Processor list. The host that is listed first
receives log messages.
Use the Up and Down buttons to change the order of the log hosts. From
the Logging Setup dialog box:
• To move a host down, click the host name. Click Down.
• To move a host up, click the host name. Click Up.
Synchronizing log hosts
Synchronizing log hosts involves setting the clocks of all your log hosts to
a single common time source. This keeps logs orderly and prevents time
discrepancies in the log file if failovers occur.
User Guide
177
Chapter 13: Setting Up Logging and Notification
The Firebox sets its clock to the current log host. If the Firebox and the log
host times are different, the Firebox time drifts toward the new time,
which often results in a brief interruption in the log file. Rebooting the
Firebox resets the Firebox time to that of the primary log host. Therefore,
you should set all log hosts’ clocks to a single source. In a local installation
where all log hosts are on the same domain, set each log host to the
common domain controller.
For Windows NT log hosts
1
Go to each log host. Open an MS-DOS Command Prompt window.
Type the following command:
net time /domain:domainName /set
where domainName is the domain in which the log hosts operate.
The system returns a message naming the domain controller.
2
Type Y.
The time of the local host is set to that of the domain controller.
Another method to set the log host (and domain controller) clocks is to
use an independent source such as the atomic clock—based servers
available on the Internet. One place to access this service is:
http://www.bldrdoc.gov/timefreq
Setting up the WatchGuard Security Event Processor
The WatchGuard Security Event Processor application is available both as
a command-line utility and, on a Windows NT or Windows 2000 host, as
a service. It is, by default, installed on the Management Station when you
install the WatchGuard Firebox System. However, you must manually
install the WSEP on all log hosts.
Running the WSEP application on Windows NT, Windows
2000, or Windows XP
If the WSEP application is to run on a Windows NT, 2000, or XP operating
system, you can choose between two methods: interactive mode from a
DOS window or as a Windows service. The default method is for the
WSEP application to run as a Windows service.
178
WatchGuard Firebox System
Setting up the WatchGuard Security Event Processor
By default, the WSEP application is installed to run as a Windows service,
starting automatically every time the host computer restarts.
1
To start the WatchGuard Security Event Processor service:
- In Windows NT, go to Start => Settings => Control Panel =>
Services.
- In Windows 2000, go to Start => Settings => Control Panel =>
Administrative Tools => Services.
- In Windows XP, go to Start => Control Panel => Performance
Maintenance => Administrative Tools => Services.
2
Double-click or right-click WG Security Event Processor. Click Start.
- Or, right-click on the WSEP icon in the system tray and select
Start.
- You can also restart your computer. The service starts
automatically every time the host reboots.
In addition, if the WSEP application is running as a service and you are
using pop-up notifications, make sure the service can interact with the
Desktop.
1
Verify that the WatchGuard Security Event Processor service is
enabled to interact with the desktop:
- In Windows NT, go to Start => Settings => Control Panel =>
Services.
- In Windows 2000, go to Start => Settings => Control Panel =>
Administrative Tools => Services.
- In Windows XP, go to Start => Control Panel => Performance
Maintenance => Administrative Tools => Services.
2
3
Double-click WG Security Event Processor. Click the Log On tab.
4
User Guide
Verify that the Allow service to interact with desktop checkbox is
enabled.
If the WSEP application was running, restart it after saving the
changes.
179
Chapter 13: Setting Up Logging and Notification
As a service, using the Command Prompt
If the WSEP application was not installed by the WatchGuard Firebox
System installation wizard, this must be done from the Command Prompt
DOS window.
1
Select Start => Run and type: command.
2
Change directories to the WatchGuard installation directory.
3
At the command line, type:
A Command prompt window appears.
The default installation directory is C:\Program Files\WatchGuard.
controld -nt-install
You can perform other commands for the WSEP application from the
Command Prompt:
• To start the WSEP application, at the command line, type:
- controld -nt-start
• To stop the WSEP application, at the command line, type:
- controld -nt-stop
• To remove the WSEP application, at the command line, type:
- controld -nt-remove
Interactive mode from a Command Prompt
The WSEP application can also run in interactive mode from a Command
Prompt window. To so this, type: controld –NT –interactive
NOTE
You can minimize the Command Prompt window. However, do not close
it. Closing the Command Prompt window halts the WSEP application.
Viewing the WSEP application
While the WatchGuard Security Event Processor is running,
a Firebox-and-traffic icon (shown at left) appears in the
Windows Desktop tray. To view the WSEP application,
right-click the tray icon and select WSEP Status/
Configuration. The status and configuration information appears as
shown in the following figure.
180
WatchGuard Firebox System
Setting up the WatchGuard Security Event Processor
If the WatchGuard Security Event Processor icon is not in the tray, in
Control Center, select Tools => Logging => Event Processor Interface. To
start the Event Processor interface when you log in to the system, add a
shortcut to the Startup folder in the Start menu. The WatchGuard
installation program does this automatically if you set up logging.
Starting and stopping the WSEP
The WSEP starts automatically when you start the host on which it
resides. However, it is possible to stop or restart the WSEP from its
interface at any time. Open the WatchGuard Security Event Processor
interface:
• To start the WSEP application, select File => Start Service.
• To stop the WSEP application, select File => Stop Service.
Setting the log encryption key
The log connection (but not the log file) between the Firebox and a log
host is encrypted for security purposes. Both the Management Station and
the WSEP application must have the same encryption key.
NOTE
You must enter an encryption key for the log host to receive logs from the
Firebox. It must be the same key used when adding a WSEP application
to the Management Station.
User Guide
181
Chapter 13: Setting Up Logging and Notification
From the WatchGuard Security Event Processor user interface:
1
2
Select File => Set Log Encryption Key.
Enter the log encryption key in both text boxes. Click OK.
Setting Global Logging and Notification Preferences
The WatchGuard Security Event Processor lists the connected Firebox and
displays its status. It has three control areas, which are used as follows:
Log Files tab
Specify the maximum number of records stored in the log file.
Reports tab
Schedule regular reports of log activity.
Notification tab
Control to whom and how notification takes place.
Together, these controls set the general parameters for most global event
processing and notification properties.
Log file size and rollover frequency
You can set the maximum size of the log file by number of log entries or
by time (such as daily, weekly, or monthly). When the log file reaches the
maximum according to your settings, the log host creates a new file or
overwrites the old file. Log rollover is the frequency at which log files
begin overwriting.
For example, suppose you have set your log file maximum to 100,000
entries. Operation of your Firebox begins on July 21. By July 26, the log
file has 100,000 entries. At this point, the log host starts writing July 27 log
entries to a new file and the other file becomes the old file.
The ideal maximum log file size is highly individual: It will be based on
the storage space available, how many days of log entries you want on
hand at any time, and how long a log file is practical to keep, open, and
view. How quickly a file hits its maximum size and is overwritten is also
determined by how many event types are logged and how much traffic
the Firebox processes. For example, a small operation might not see 10,000
182
WatchGuard Firebox System
Setting Global Logging and Notification Preferences
entries in two weeks, whereas a large one with many services enabled
might easily log 100,000 entries in a day.
When considering your ideal maximum log file, consider how often you
plan to issue reports of the Firebox activity. WatchGuard Historical
Reports uses a log file as its source to build reports. If you issue weekly
reports to management, you would want a log file large enough to hold a
typical eight or nine days’ worth of events. Watch your initial log file
configuration to see how many days’ events it collects before turning
over, and then adjust the size to your reporting needs.
Setting the interval for log rollover
You can control when the WSEP application rolls over using the Log Files
tab in the WatchGuard Security Event Processor. The WSEP application
can be configured to roll over by time interval, number of entries, or both.
From the WatchGuard Security Event Processor interface:
1
Click the Log Files tab.
2
For a time interval, enable the Roll Log Files By Time Interval
checkbox. Select the frequency. Use the Next Log Roll is Scheduled
For drop list to select a date. Use the scroll control or enter the first
time of day.
3
For a record size, enable the Roll Log Files By Number of Entries
checkbox. Use the scroll control or enter a number of log record
entries.
The Log Files tab information appears, as shown in the following figure.
The Approximate Size field changes to display the approximate file size of the final
log file. For a detailed description of each control, right-click it, and then select
What’s This?. You can also refer to the “Field Definitions” chapter in the
Reference Guide.
4
User Guide
Click OK.
The WSEP interface closes and saves your entries. New settings take effect
immediately.
183
Chapter 13: Setting Up Logging and Notification
Scheduling log reports
You can use the WSEP application to schedule the automatic generation
of network activity reports. For more information, see “Scheduling a
report” on page 211.
Controlling notification
Notification occurs when the Firebox sends an email message, pops up a
window on the log host, dials a pager, or executes a program to notify an
administrator that the Firebox has detected a triggering event. Use the
WSEP application to control when and to whom such notifications are
sent. From the WatchGuard Security Event Processor interface:
184
1
Click the Notification tab.
2
Modify the settings according to your security policy preferences.
The Notification tab information appears, as shown in the following figure.
For more information on individual settings, right-click the setting, and then select
What’s This?. You can also refer to the “Field Definitions” chapter in the
Reference Guide.
WatchGuard Firebox System
Customizing Logging and Notification by Service or Option
Setting a Firebox friendly name for log files
You can give the Firebox a friendly name to be used in log files. If you do
not specify a name, the Firebox’s IP address is used. From Policy
Manager:
1
Select Setup => Name.
2
Enter the friendly name of the Firebox. Click OK.
The Firebox Name dialog box appears.
All characters are allowed except blank spaces and forward or back slashes (/ or \).
For more information on the log file names used by WFS, see the
following FAQ:
https://support.watchguard.com/advancedfaqs/log_filename.asp
Customizing Logging and Notification by Service or Option
The WatchGuard Firebox System allows you to create custom logging and
notification properties for each service and blocking option. You can finetune your security policy, logging only those events that require your
attention and limiting notification to those of truly high priority.
To make logging and notification configuration easier, services, blocking
categories, and packet-handling options share an identical dialog box, as
shown in the following figure. Therefore, once you learn the controls for
one type of service, you can easily configure the remainder.
You can define the following:
User Guide
185
Chapter 13: Setting Up Logging and Notification
Category
The event types that can be logged by the service or option. This
list changes depending on the service or option. Click the event
name to display and set its properties.
Enter it in the log
Enable this checkbox to log the event type; clear it to disable
logging for the event type. Because the Firebox must perform
domain name resolution, there may be a time lag before logs
appear in the log file. All denied packets are logged by default.
Send Notification
Enable this checkbox to enable notification for the event type;
clear it to disable notification for the event type.
The remaining controls are active when you enable the Send Notification
checkbox:
Email
Sends an email message when the event occurs. Set the email
recipient in the Notification tab of the WSEP user interface.
Pager
Triggers an electronic page when the event occurs. Set the pager
number in the Notification tab of the WSEP user interface.
If the pager is accessible by email, select the Email option, and
then enter the email address of the pager in the Notification tab of
the WSEP user interface.
Popup Window
Makes a pop-up window appear on the log host when the event
occurs.
Custom Program
Triggers execution of a custom program when the event occurs. A
custom batch file or program enables you to trigger multiple types
of notification. Type the full path to the program in the
accompanying field, or use Browse to locate and select the
program.
186
WatchGuard Firebox System
Customizing Logging and Notification by Service or Option
NOTE
WatchGuard allows only one notification type per event.
Setting Launch Interval and Repeat Count
Two parameters work in conjunction with the Event Processor Repeat
Interval to control notification timing:
Launch Interval
The minimum time (in minutes) between separate launches of a
notifier. Set this parameter to prevent the launch of several
notifiers in response to similar events that take place in a short
amount of time.
Repeat Count
The threshold for how often an event can repeat before the
Firebox activates the special repeat notifier. The repeat notifier
creates a log entry stating that the notifier in question is repeating.
Notification repeats only after this number of events occurs.
As an example of how these two values interact, suppose you have set up
notification with these values:
• Launch interval = 5 minutes
• Repeat count = 4
A port space probe begins at 10:00 a.m. and continues once per minute,
triggering the logging and notification mechanisms. Here is the time line
of activities that would result from this event with the above timing and
repeating setup:
1
2
3
4
5
10:00–Initial port space probe (first event)
10:01–First notification launched (one event)
10:06–Second notification launched (reports five events)
10:11–Third notification launched (reports five events)
10:16–Fourth notification launched (reports five events)
The time intervals between activities 1, 2, 3, 4, and 5 are controlled by the
launch interval, which was set to 5 minutes.
User Guide
187
Chapter 13: Setting Up Logging and Notification
The repeat count multiplied by the launch interval equals the amount of
time an event must continuously happen before it is handled as a repeat
notifier.
Setting logging and notification for a service
For each service added to the Services Arena, you can control logging and
notification of the following events:
• Incoming packets that are allowed
• Incoming packets that are denied
• Outgoing packets that are allowed
• Outgoing packets that are denied
From Policy Manager:
1
Double-click a service in the Services Arena.
2
Click Logging.
3
Modify logging and notification properties according to your security
policy preferences. Click OK.
The Properties dialog box appears.
The Logging and Notification dialog box appears. The options for each service are
identical; the main difference is based on whether the service in question is for
incoming, outgoing, or bidirectional communication.
Setting logging and notification for default packethandling options
When this option is enabled, you can control logging and notification
properties for the following default packet-handling options:
• Spoofing attacks
• IP options
• Port probes
• Address space probes
• Incoming packets not handled
• Outgoing packets not handled
From Policy Manager:
1
188
Select Setup => Default Packet Handling.
The Default Packet Handling dialog box appears.
WatchGuard Firebox System
Customizing Logging and Notification by Service or Option
2
3
Click Logging.
Modify logging and notification properties according to your security
policy preferences. Click OK.
Setting logging and notification for blocked sites and
ports
You can control logging and notification properties for both blocked sites
and blocked ports. The process is identical for both operations. The
procedure below is for blocked sites.
From Policy Manager:
User Guide
1
Select Setup => Blocked Sites.
2
3
Click Logging.
The Blocked Sites dialog box appears.
Modify logging and notification properties according to your security
policy preferences. Click OK.
189
Chapter 13: Setting Up Logging and Notification
190
WatchGuard Firebox System
CHAPTER 14
Reviewing and Working with
Log Files
Log files are a valuable tool for monitoring your network, identifying
potential attacks, and taking action to address security threats and
challenges. This chapter describes the procedures you use to work with
log files, including viewing log files, searching for entries in them, and
consolidating and copying logs.
The WatchGuard Security Event Processor (WSEP) controls logging,
report schedules, and notification. It also provides timekeeping services
for the Firebox. For more information about the WatchGuard Security
Event Processor and configuring logging, see Chapter 13, “Setting Up
Logging and Notification.”
For more information on specific log messages, see the following
collection of FAQs:
https://support.watchguard.com/advancedfaqs/log_main.asp
Log File Names and Locations
Log entries are stored on the primary and backup WatchGuard Security
Event Processor (WSEP). By default, log files are placed in the
WatchGuard installation directory in a subdirectory called \logs.
User Guide
191
Chapter 14: Reviewing and Working with Log Files
The log file to which the WSEP is currently writing records can be named
in two ways. If the Firebox has a friendly name, the log files are named
FireboxName timestamp.wgl. (You can give your Firebox a friendly name
using the Setup => Name option in Policy Manager.) If the Firebox does
not have a friendly name, the log files are named FireboxIP timestamp.wgl.
In addition, the WSEP creates an index file using the same name as the log
file, but with the extension .idx1. This file is located in the same directory
as the log file. Both the .wgl and .idx1 files are necessary if you want to
use any monitoring or log display tool. For more information on the log
file names, see the following FAQ:
https://support.watchguard.com/advancedfaqs/log_filename.asp
Viewing Files with LogViewer
The WatchGuard Firebox System utility called LogViewer provides a
display of log file data. You can view all log data page by page, or search
and display by keyphrases or specific log fields.
Starting LogViewer and opening a log file
From Control Center:
1
Click the LogViewer icon (shown at right).
2
Browse to select a log file. Click Open.
LogViewer opens and the Load File dialog box appears.
By default, logs are stored in a subdirectory of the WatchGuard
installation directory called \logs. LogViewer opens and displays
the selected log file.
Setting LogViewer preferences
You can adjust the content and format of the display. From LogViewer:
1
2
192
Select View => Preferences.
Configure LogViewer display preferences as you choose.
For a description of each control on the General tab, right-click it and then click
What’s This?. You can also refer to the “Field Definitions” chapter in the
Reference Guide.
For information on the Filter Data tab, see “Displaying and Hiding Fields” on
page 195.
WatchGuard Firebox System
Viewing Files with LogViewer
Searching for specific entries
LogViewer has a search tool to enable you to find specific transactions
quickly by keyphrase or field. From LogViewer:
By keyphrase
1
2
Select Edit => Search => by Keyphrase.
Enter an alphanumeric string. Click Find.
LogViewer searches the entire log file and displays the results as either marked
records in the main window or a separate filter window based on your selection.
By field
1
2
Select Edit => Search => By Fields.
Click directly under the Field column. Use the drop list that appears
to select a field name.
3
Click the Value column. Either a text field or a drop list will appear,
depending on the field you chose in step 2. Use the drop list to select a
value, or type in a specific value.
4
Click Search.
LogViewer searches the entire log file and displays the results as either marked
records in the main window or a separate filter window based on your selection.
Copying and exporting LogViewer data
You can transfer log file data from LogViewer into another application.
The data you choose to transfer is converted to a text file (.txt).
If you want to transfer specific log entries to another application, use the
copy function. Use the export function if you want to transfer entire log
files, or a filtered set of records (see next paragraph), to another
application.
You can copy log entries to an interim window, called the LogViewer
filter window, prior to exporting them. Within the filter window (shown
on top of the LogViewer window in the figure on the next page) you can
perform the same search functions as described in “Searching for specific
entries” on page 193.
User Guide
193
Chapter 14: Reviewing and Working with Log Files
Copying log data
1
Select the log entries you want to copy.
2
To copy the entries for pasting into another application, select Edit =>
Copy to clipboard.
To copy the entries to the filter window prior to exporting them, select
Edit => Copy to Filter Window.
Use the SHIFT key to select a block of entries. Use the CTRL key to select
multiple, non-adjacent entries.
Exporting log data
You can export log records from either the main window (all records) or
the filter window.
194
1
Select File => Export.
2
Select a location. Enter a file name. Click Save.
The Save Main Window dialog box appears.
LogViewer saves the contents of the selected window to a text file.
WatchGuard Firebox System
Displaying and Hiding Fields
Displaying and Hiding Fields
The following figure shows an example of the type of display you
normally see in LogViewer. Log entries sent to the WatchGuard log state
the time stamp, host name, process name, and the process ID before the
log summary. Use the Preferences dialog box to show or hide columns
displayed in LogViewer. From LogViewer:
1
2
Select View => Preferences. Click the Filter Data tab.
Enable the checkboxes of the fields you would like to display. Disable
the checkboxes of those columns you would like to hide.
The following describes each column and whether the default is for the
field to appear (Show) or not appear (Hide):
Number
The sequence number in the file. Default = Hide
Date
The date the record entered the log file. Default = Show
User Guide
195
Chapter 14: Reviewing and Working with Log Files
Time
The time the record entered the log file. Default = Show
The Firebox receives the time from the log host. If the time noted
in the log seems later or earlier than it should be, it is usually
because the time zone is not set properly on either the log host or
the Firebox. Because some installations contain Fireboxes in
multiple time zones with a single log host, the Firebox uses
Greenwich Mean time received from the log host by way of the
logging channel (controld). The local time for the log files is then
computed on the log host based on the Firebox’s time zone
setting. To change the Firebox time zone, see “Setting the Time
Zone” on page 49.
The rest of the columns vary according to the type of event displayed. The
events of most frequency and interest, however, are packet events, which
display data as shown below:
deny in eth0 339 udp 20 128 192.168.49.40
255.255.255.255 67 68 (bootpc)
The packet event fields are described here in order, from left to right.
Disposition
Default = Show. The disposition can be as follows:
- Allow – Packet was permitted by the current set of filter rules.
- Deny – Packet was dropped by the current set of filter rules.
Direction
Determines whether the packet was logged when it was received
by the interface (“in”) or when it was about to be transmitted by
the Firebox (“out”). Default = Hide
Interface
The name of the network interface associated with the packet.
Default = Show
Total packet length
The total length of the packet in octets. Default = Hide
Protocol
Protocol name, or a number from 0 to 255. Default = Show
196
WatchGuard Firebox System
Working with Log Files
IP header length
Length, in octets, of the IP header for this packet. A header length
that is not equal to 20 indicates that IP options were present.
Default = Hide
TTL (time to live)
The value of the TTL field in the logged packet. Default = Hide
Source address
The source IP address of the logged packet. Default = Show
Destination address
The destination IP address of the logged packet. Default = Show
Source port
The source port of the logged packet, UDP or TCP only.
Default = Show
Destination port
The destination port of the logged packet, UDP or TCP only.
Default = Show
Details
Additional information appears after the previously described
fields, including data about IP fragmentation, TCP flag bits, IP
options, and source file and line number when in trace mode. If
WatchGuard logging is in debug or verbose mode, additional
information is reported. In addition, the type of connection may
be displayed in parentheses. Default = Show
Working with Log Files
The Firebox continually writes messages to log files on the WatchGuard
Security Event Processor (WSEP). Because current log files are always
open, they cannot be copied, moved, or merged using traditional copy
tools; you should use WSEP utilities to work with active log files.
Unlike other Firebox System utilities, you cannot access the WatchGuard
Security Event Processor user interface from Control Center. To open the
WSEP Status/Configuration user interface:
User Guide
197
Chapter 14: Reviewing and Working with Log Files
•
Right-click the WSEP icon (shown at right) in the
Windows system tray and select WSEP Status/
Configuration. If the WSEP icon does not appear in the
system tray, you can launch the WSEP from Control
Center by selecting Tools => Logging => Event Processor Interface.
Consolidating logs from multiple locations
You can merge two or more log files into a single file. This merged file can
then be used with Historical Reports, LogViewer, HostWatch, or some
other utility to examine log data covering an extended period of time.
From the WSEP Status/Configuration user interface:
1
2
3
Select File => Copy or Merge log files.
4
5
Enter the destination for the files in the Copy to This Directory box.
Click Merge all files to one file. Enter the name of the merged file.
Enter the files to merge in the Files to Copy box.
You can also use the Browse button to specify the files.
Click Merge.
The log files are merged and saved to the new file in the designated directory.
Copying log files
You can copy a single log file from one location to another, and you can
copy the current, active log file. From the WSEP Status/Configuration
user interface:
1
2
3
4
5
Select File => Copy or Merge Log Files.
Click Copy each file individually.
Enter the file to copy in the Files to Copy box.
Enter the destination for the file in the Copy to This Directory box.
Click Copy.
The log file is copied to the new directory with the same file name.
Forcing the rollover of log files
Log rollover refers to new log files being created while old ones are
deleted or archived. In general, log files roll over based on WSEP Status/
Configuration settings. For more information, see “Setting the interval for
198
WatchGuard Firebox System
Working with Log Files
log rollover” on page 183. However, you may occasionally want to force
the rollover of a log file.
• From the WSEP Status/Configuration user interface, select File =>
Roll Current Log File.
The old log file is saved as Firebox IP Time Stamp.wgl or Firebox Name Time
Stamp.wgl. The Event Processor continues writing new records to Firebox IP.wgl
or Firebox Name.wgl.
Saving log files to a new location
Although log files are, by default, stored in a subdirectory of the
WatchGuard installation directory called /logs, you can change this
destination by using a text editor to edit the controld.wgc file.
1
2
Open a text editor, such as Microsoft Wordpad.
Use the text editor to open the controld.wgc file in the WatchGuard
installation directory.
The default location is C:\Program Files\WatchGuard\controld.wgc.
3
Look for a line reading logdir: logs. Change logs to the complete
or relative path name of the new destination.
For example, to change the destination to an archive directory with the
subdirectory WGLogs on the D: drive, the syntax is logdir: D:\Archive\WGLogs.
4
5
Save your changes and exit the text editor.
Start and restart the WatchGuard Security Event Processor. Rightclick the WatchGuard Security Event Processor in the Windows
desktop tray. Select Stop Service. Right-click the icon again and select
Start Service.
New log files will be created in the specified directory. You can also move any
existing log files from the old location to the new one to avoid confusion.
Setting log encryption keys
The log connection (but not the log file) between the Firebox and an event
processor is encrypted for security purposes. Both the Management
Station and the WatchGuard Security Event Processor must have the
same encryption key. From the WSEP Status/Configuration user
interface:
User Guide
1
Select File => Set Log Encryption Key.
2
Enter the log encryption key in the first box. Enter the same key in the
box beneath it to confirm.
The Set Log Encryption Key dialog box appears.
199
Chapter 14: Reviewing and Working with Log Files
Sending logs to a log host at another location
Because they are encrypted by the Firebox, you can send log files over the
Internet to a log host at another office. You can even send this traffic over
the Internet from the Firebox at one office to the log host behind a second
Firebox at a remote office. One application of this feature might involve
configuring the Firebox at a remote office to store its logs on a log host
behind the Firebox at the main office. To do this, you must configure the
Firebox at the remote office such that it knows where and how to send the
log files. The main office Firebox must be configured to allow the log
messages through the firewall to the log host.
On the main office Firebox:
1
2
Open Policy Manager with the current configuration file.
On the toolbar, click the Add Service icon (shown at
right).
You can also select Edit => Add Service. The Services dialog box
appears.
3
4
5
6
7
Expand Packet Filters.
8
Click OK to close the Add Static NAT dialog box. Click OK to close
the Add Address dialog box. Click OK to close the WatchGuardLogging Properties dialog box.
9
Save the new configuration to the main office Firebox.
Select WatchGuard-Logging. Click Add. Click OK.
On the Incoming tab, select Enabled and Allowed.
Under the To list, click Add.
Click NAT. Enter the external IP address of the main office Firebox in
the External IP Address box. Enter the IP address of the log host
behind the main office Firebox in the Internal IP Address box.
On the remote office Firebox:
200
1
2
3
Open Policy Manager with the current configuration file.
4
Click OK to close the Add IP Address dialog box. Click OK again to
close the Logging Setup dialog box.
Select Setup => Logging. Click Add.
Enter the external IP address of the main office Firebox and log
encryption key of the log host on the network protected by the main
office Firebox.
WatchGuard Firebox System
Working with Log Files
5
Save the new configuration to the remote office Firebox.
On the log host:
You must use the same log encryption key on the remote office Firebox as
is configured on the log host protected by the main office Firebox. To
modify the log encryption key on the log host, see “Setting log encryption
keys” on page 199.
You should see the IP address for the remote office Firebox in the list as
soon as it connects. However, it will not appear until the remote office
Firebox has been properly configured.
User Guide
201
Chapter 14: Reviewing and Working with Log Files
202
WatchGuard Firebox System
CHAPTER 15
Generating Reports of
Network Activity
Accounting for Internet usage can be a challenging network
administration task. One of the best ways to provide hard data for
accounting and management purposes is to generate detailed reports
showing how the Internet connection is being used and by whom.
A good report generation facility should be able to identify and
summarize key issues such as:
• When do I need a wider bandwidth connection to the Internet and
why?
• What usage patterns are users developing and how do those patterns
relate to the security of the network and the goals of the corporation?
• How do current user patterns reflect the values and concerns of the
corporation in regard to creating a productive workplace?
Historical Reports is a reporting tool that creates summaries and reports
of Firebox log activity. It generates these reports using the log files created
by and stored on the WatchGuard Security Event Processor (WSEP).
You can customize reports to include exactly the information you need in
a form that is most useful to you. Using the advanced features of
Historical Reports, you can define a precise time period for a report,
consolidate report sections to show activity across a group of Fireboxes,
and set properties to display the report data according to your
preferences.
User Guide
203
Chapter 15: Generating Reports of Network Activity
Creating and Editing Reports
To start Historical Reports, from Control Center, click the
Historical Reports icon (shown at right). You can also start
Historical Reports from the installation directory. The file
name is WGReports.exe.
Starting a new report
From Historical Reports:
1
Click Add.
2
Enter the report name.
3
Use the Log Directory text box to define the location of log files.
4
Use the Output Directory text box to define the location of the output
files.
The Report Properties dialog box appears.
The report name will appear in Historical Reports, the WatchGuard Security Event
Processor, and the title of the output.
The default location for log files is the \logs subdirectory of the WatchGuard
installation directory.
The default location for output files is the \reports subdirectory of the WatchGuard
installation directory.
5
Select the output type: HTML Report, WebTrends Export, or Text
Export.
For more information on output types, see “Exporting Reports” on page 207.
6
Select the filter.
7
If you selected the HTML output type and you want to see the main
page of the report upon completion, enable the checkbox marked
Execute Browser Upon Completion.
8
9
Click the Firebox tab.
For more information on filters, see “Using Report Filters” on page 209.
Enter the Firebox IP address or a unique name. Click Add.
When typing IP addresses, type the digits and periods in sequence. Do not use the
TAB or arrow key to jump past the periods. For more information on entering IP
addresses, see “Entering IP addresses” on page 38.
10 Specify report preferences as explained in the remaining sections in
this chapter.
11 When you are done defining report properties, click OK.
The name of the report appears in the Reports list.
204
WatchGuard Firebox System
Specifying a Report Time Span
Editing an existing report
At any time, you can modify the properties of an existing report. From
Historical Reports:
1
Select the report to modify. Click Edit.
2
Modify report properties according to your preferences.
The Report Properties dialog box appears.
For a description of each property, right-click it, and then click What’s This?. You
can also refer to the “Field Definitions” chapter in the Reference Guide.
Deleting a report
To remove a report from the list of available reports, highlight the report.
Click Remove. This command removes the .rep file from the reports
directory.
Viewing the reports list
To view all reports generated, click Reports Page. This launches your
default browser with the HTML file containing the main report list. You
can navigate through all the reports in the list.
Specifying a Report Time Span
When running Historical Reports, the default is to run the report across
the entire log file. You can use the drop list on the Time Filters dialog box
to select from a group of pre-set time periods, such as “yesterday” and
“today.” You can also manually configure the start and end times so the
report covers only the specific time frame you want to examine.
1
2
From the Report Properties dialog box, click the Time Filters tab.
3
From the Time Span drop list, select the time you want the report to
cover.
Select the time stamp option that will appear on your report: Local
Time or GMT.
If you chose anything but Specify Time Filters, click OK.
If you chose Specify Time Filters, click the Start and End drop lists and select a
start time and end time, respectively.
4
User Guide
Click OK.
205
Chapter 15: Generating Reports of Network Activity
Specifying Report Sections
Use the Sections tab on the Report Properties dialog box to specify the
type of information you want to be included in reports. From Historical
Reports:
1
2
Click the Sections tab.
3
To run authentication resolution on IP addresses, enable the checkbox
marked Authentication Resolution on IP addresses.
Enable the checkboxes for sections to be included in the report.
For a description of each section, see “Report Sections and Consolidated Sections”
on page 212.
If user authentication is not enabled, you will not have the information in your logs
to perform authentication resolution on IP addresses. However, generating a
report when resolution is enabled will take considerably more time.
4
To run DNS resolution on IP addresses, enable the checkbox marked
DNS Resolution on IP addresses.
Consolidating Report Sections
The Sections tab defines the types of information to be included in a
report on each of a group of Fireboxes: a vertical look at the data. You can
also specify parameters that consolidate information for a group of
Fireboxes: a horizontal (cumulative) view of data. To consolidate report
sections:
1
From the Report Properties dialog box, select the Consolidated
Sections tab.
The tab contains a list of report sections that can be consolidated. Brief definitions
of the contents of these sections are available in “Report Sections and
Consolidated Sections” at the end of this chapter.
206
2
Click the boxes next to the items you want to include in the
consolidated report or click a checked box to clear it.
3
Click OK.
WatchGuard Firebox System
Setting Report Properties
Setting Report Properties
Reports contain either Summary sections or Detail sections. Each can be
presented in different ways to better focus on the specific information you
want to view. Detail sections are reported only as text files with a userdesignated number of records per page. Summary sections can also be
presented as graphs whose elements are user-defined. To set report
properties:
1
2
From the Report Properties dialog box, select the Preferences tab.
3
Enter the number of elements to rank in the table.
4
5
Select the style of graph to use in the report.
6
Enter the number of records to display per page for the detailed
sections.
Enter the number of elements to graph in the report.
The default is 10.
The default is 100.
Select the manner in which you want the proxied summary reports
sorted: bandwidth or connections.
The default is 1,000 records. A larger number than this might crash the browser or
cause the file to take a long time to load.
7
Click OK.
Setting a Firebox friendly name for reports
You can give the Firebox a friendly name to be used in reports. If you do
not specify a name, the Firebox’s IP address is used. From Policy
Manager:
1
Select Setup => Name.
2
Enter the friendly name of the Firebox. Click OK.
The Firebox Name dialog box appears.
Exporting Reports
Reports can be exported to three formats: HTML, WebTrends, and text.
All reports are stored in the path drive:\WatchGuard Install
Directory\Reports. Under the Reports directory are subdirectories that
User Guide
207
Chapter 15: Generating Reports of Network Activity
include the name and time of the report. Each report is filed in one of
these subdirectories.
Exporting reports to HTML format
When you select HTML Report from the Setup tab on the Report
Properties dialog box, the report output is created as HTML files. A
JavaScript menu is used to easily navigate the different report sections.
(JavaScript must be enabled on the browser so you can review the report
menu.)
The following figure shows how the report might appear in the browser.
Exporting a report to WebTrends for Firewalls and VPNs
Historical Reports can export the log file into a format that can be
imported into WebTrends for Firewalls and VPNs.
WebTrends for Firewalls and VPNs calculates information differently
than WatchGuard Historical Reports. While Historical Reports counts the
number of transactions that occur on Port 80, WebTrends for Firewalls
and VPNs calculates the number of URL requests. These numbers vary
because multiple URL requests may go over the same Port 80 connection.
208
WatchGuard Firebox System
Using Report Filters
NOTE
WatchGuard HTTP proxy logging must be turned on to supply
WebTrends the logging information required for its reports.
When you select WebTrends Export from the Setup tab on the Reports
Properties dialog box, the report output is created as a WebTrends
Enhanced Log Format (WELF) file. The report appears as a .wts file in
the following path:
drive:\WatchGuard Install Directory\Reports
Exporting a report to a text file
When you select Text Export from the Setup tab on the Report Properties
dialog box, the report output is created as a comma-delimited format file,
which you can then use in other programs such as databases and
spreadsheets. The report appears as a .txt file in the following path:
drive:\WatchGuard Install Directory\Reports\Report Directory
Using Report Filters
By default, a report displays information on the entire content of a log file.
At times, however, you may want to view information only about specific
hosts, services, or users. Use report filters to narrow the range of data
reported.
Filters can be one of two types:
Include
Creates a report that includes only those records that meet the
criteria set in the Host, Service, or User Report Filters tabs.
Exclude
Creates a report that excludes all records that meet the criteria set
in the Host, Service, or User Report Filter tabs.
You can filter an Include or Exclude report based on three criteria:
User Guide
209
Chapter 15: Generating Reports of Network Activity
Host
Filter a report based on host IP address.
Port
Filter a report based on service name or port number.
User
Filter a report based on authenticated username.
Creating a new report filter
Use Historical Reports to create a new report filter. Filters are stored in the
WatchGuard installation directory, in the subdirectory report-defs
with the file extension .ftr.
From Historical Reports:
1
2
Click Filters. Click Add.
Enter the name of the filter as it will appear in the Filter drop list in
the Report Properties Setup tab. This name should easily identify the
filter.
3
Select the filter type.
4
Complete the Filter tabs according to your report preferences.
5
When you are finished modifying filter properties, click OK.
An Include filter displays only those records meeting the criteria set on the Host,
Service and User tabs. An Exclude filter displays all records except those meeting
the criteria set on the Host, Service, and User tabs.
For a description of each control, right-click it, and then click What’s This?. You
can also refer to the “Field Definitions” chapter in the Reference Guide.
The name of the filter appears in the Filters list. The Filter Name.ftr file is created
in the report-defs directory.
Editing a report filter
At any time, you can modify the properties of an existing filter. From the
Filters dialog box in Historical Reports:
210
1
Highlight the filter to modify. Click Edit.
2
Modify filter properties according to your preferences.
The Report Filter dialog box appears.
For a description of each property, right-click it, and then click What’s This?. You
can also refer to the “Field Definitions” chapter in the Reference Guide.
WatchGuard Firebox System
Scheduling and Running Reports
Deleting a report filter
To remove a filter from the list of available filters, highlight the filter.
Click Delete. This command removes the .ftr file from the \reportdefs directory.
Applying a report filter
Each report can use only one filter. To apply a filter, open the report
properties. From Historical Reports:
1
2
Select the report for which you would like to apply a filter. Click Edit.
3
Click OK.
Use the Filter drop list to select a filter.
Only filters created using the Filters dialog box appear in the Filter drop list. For
more information, see “Creating a new report filter” on page 210.
The new report properties are saved to the ReportName.rep file in the report-defs
directory. The filter will be applied the next time the report is run.
Scheduling and Running Reports
WatchGuard offers two methods to run reports: manually at any time or
scheduled automatically using the WatchGuard Security Event Processor
(WSEP).
Scheduling a report
You can schedule the WSEP to automatically generate reports about
network activity. To schedule reports:
User Guide
1
Right-click the WSEP desktop tray icon. Select WSEP Status/
Configuration.
2
3
4
Click the Reports tab.
5
Select the first date and time the report should run.
Select a report to schedule.
Select a time interval.
For a custom interval, select Custom and then enter the interval in hours.
The report will run automatically at the time selected and then at each selected
interval thereafter.
211
Chapter 15: Generating Reports of Network Activity
6
Click OK.
Manually running a report
At any time, you can run one or more reports using Historical Reports.
From Historical Reports:
1
2
Enable the checkbox next to each report you would like to generate.
Click Run.
Report Sections and Consolidated Sections
You can use Historical Reports to build a report that includes one or more
sections. Each section represents a discrete type of information or network
activity.
You can consolidate certain sections to summarize particular types of
information. Consolidated sections summarize the activity of all devices
being monitored as a group as opposed to individual devices.
Report sections
Report sections can be divided into two basic types:
• Summary – Sections that rank information by bandwidth or
connections.
• Detailed – Sections that display all activity with no summary graphs
or ranking.
The following is a listing of the different types of report sections and
consolidated sections.
Firebox Statistics
A summary of statistics on one or more log files for a single
Firebox.
Authentication Detail
A detailed list of authenticated users sorted by connection time.
Fields include: authenticated user, host, start date of authenticated
session, start time of authenticated session, end time of
authenticated session, and duration of session.
212
WatchGuard Firebox System
Report Sections and Consolidated Sections
Time Summary – Packet Filtered
A table, and optionally a graph, of all accepted connections
distributed along user-defined intervals and sorted by time. If you
choose the entire log file or specific time parameters, the default
time interval is daily. Otherwise, the time interval is based on
your selection.
Host Summary – Packet Filtered
A table, and optionally a graph, of internal and external hosts
passing packet-filtered traffic through the Firebox sorted either by
bytes transferred or number of connections.
Service Summary
A table, and optionally a graph, of traffic for each service sorted
by connection count.
Session Summary – Packet Filtered
A table, and optionally a graph, of the top incoming and outgoing
sessions, sorted either by byte count or number of connections.
The format of the session is: client -> server : service. If the
connection is proxied, the service is represented in all capital
letters. If the connection is packet filtered, Historical Reports
attempts to resolve the server port to a table to represent the
service name. If resolution fails, Historical Reports displays the
port number.
Time Summary – Proxied Traffic
A table, and optionally a graph, of all accepted connections
distributed along user-defined intervals and sorted by time. If you
choose the entire log file or specific time parameters, the default
time interval is daily. Otherwise, the time interval is based on
your selection.
Host Summary – Proxied Traffic
A table, and optionally a graph, of internal and external hosts
passing proxied traffic through the Firebox, sorted either by bytes
transferred or number of connections.
Proxy Summary
Proxies ranked by bandwidth or connections.
User Guide
213
Chapter 15: Generating Reports of Network Activity
Session Summary – Proxied Traffic
A table, and optionally a graph, of the top incoming and outgoing
sessions, sorted either by byte count or number of connections.
The format of the session is: client -> server : service. If the
connection is proxied, the service is represented in all capital
letters. If the connection is packet filtered, Historical Reports
attempts to resolve the server port to a table to represent the
service name. If resolution fails, Historical Reports displays the
port number.
HTTP Summary
Tables, and optionally a graph, of the most popular external
domains and hosts accessed using the HTTP proxy, sorted by byte
count or number of connections.
HTTP Detail
Tables for incoming and outgoing HTTP traffic, sorted by time
stamp. The fields are Date, Time, Client, URL Request, and Bytes
Transferred.
SMTP Summary
A table, and optionally a graph, of the most popular incoming and
outgoing email addresses, sorted by byte count or number of
connections.
SMTP Detail
A table of incoming and outgoing SMTP proxy traffic, sorted by
time stamp. The fields are: Date, Time, Sender, Recipient(s), and
Bytes Transferred.
FTP Detail
Tables for incoming and outgoing FTP traffic, sorted by time
stamp. The fields are Date, Time, Client, Server, FTP Request, and
Bandwidth.
Denied Outgoing Packet Detail
A list of denied outgoing packets, sorted by time. The fields are
Date, Time, Type, Client, Client Port, Server, Server Port, Protocol,
and Duration.
214
WatchGuard Firebox System
Report Sections and Consolidated Sections
Denied Incoming Packet Detail
A list of denied incoming packets, sorted by time. The fields are
Date, Time, Type, Client, Client Port, Server, Server Port, Protocol,
and Duration.
Denied Packet Summary
Multiple tables, each representing data on a particular host
originating denied packets. Each table includes time of first and
last attempt, type, server, port, protocol, and number of attempts.
If only one attempt is reported, the last field is blank.
Denied Service Detail
A list of times a service was attempted to be used but was denied.
The list does not differentiate between Incoming and Outgoing.
WebBlocker Detail
A list of URLs denied due to WebBlocker implementation, sorted
by time. The fields are Date, Time, User, Web Site, Type, and
Category.
Denied Authentication Detail
A detailed list of failures to authenticate, sorted by time. The
fields are Date, Time, Host, and User.
Consolidated sections
Network Statistics
A summary of statistics on one or more log files for all devices
being monitored.
Time Summary – Packet Filtered
A table, and optionally a graph, of all accepted connections
distributed along user-defined intervals and sorted by time. If you
choose the entire log file or specific time parameters, the default
time interval is daily. Otherwise, the time interval is based on
your selection.
Host Summary – Packet Filtered
A table, and optionally a graph, of internal and external hosts
passing packet-filtered traffic, sorted either by bytes transferred or
number of connections.
User Guide
215
Chapter 15: Generating Reports of Network Activity
Service Summary
A table, and optionally a graph, of traffic for all services sorted by
connection count.
Session Summary – Packet Filtered
A table, and optionally a graph, of the top incoming and outgoing
sessions, sorted either by byte count or number of connections.
The format of the session is: client -> server : service. If the
connection is proxied, the service is represented in all capital
letters. If the connection is packet filtered, Historical Reports
attempts to resolve the server port to a table to represent the
service name. If resolution fails, Historical Reports displays the
port number.
Time Summary – Proxied Traffic
A table, and optionally a graph, of all accepted proxied
connections distributed along user-defined intervals and sorted
by time. If you choose the entire log file or specific time
parameters, the default time interval is daily. Otherwise, the time
interval is based on your selection.
Host Summary – Proxied Traffic
A table, and optionally a graph, of internal and external hosts
passing proxied traffic, sorted either by bytes transferred or
number of connections.
Proxy Summary
Proxies ranked by bandwidth or connections.
Session Summary – Proxied Traffic
A table, and optionally a graph, of the top incoming and outgoing
sessions sorted either by byte count or number of connections.
The format of the session is: client -> server : service. If proxied,
connections show the service in all capital letters. If resolution
fails, Historical Reports displays the port number.
HTTP Summary
Tables, and optionally graphs, of the most frequented external
domains and hosts accessed using the HTTP proxy, sorted by byte
count or number of connections.
216
WatchGuard Firebox System
CHAPTER 16
Controlling Web Site Access
WebBlocker is a feature of the WatchGuard Firebox System that works in
conjunction with the HTTP proxy to provide Web site filtering
capabilities. It enables you to exert fine control over the Web surfing in
your organization. You can designate which hours in the day users are
free to access the Web and which categories of Web sites they are
restricted from visiting. For more information on WebBlocker, see the
following collection of FAQs:
https://support.watchguard.com/advancedfaqs/web_main.asp
Getting Started with WebBlocker
You must complete several tasks before you can configure the Firebox to
use WebBlocker.
Installing the WebBlocker server
You install the WebBlocker server when you first run the setup program
for the WatchGuard Firebox System, as described in “Setting Up the
Management Station” on page 32. By default, the setup program installs
the WebBlocker server on the same server as the WatchGuard Security
Event Processor. However, to preserve performance if you are running
User Guide
217
Chapter 16: Controlling Web Site Access
WFS under high load conditions, consider installing the WebBlocker
server on a dedicated server running Windows NT 4.0. or Windows 2000.
To install the WebBlocker server on a dedicated platform, rerun the setup
program on the dedicated server and–on the Select Components
screen–unselect all components except the WebBlocker server.
You must start the WebBlocker server for WebBlocker requests from the
Firebox to be processed.
Downloading the database using WebBlocker Utility
After you install the WebBlocker server, you are asked whether you want
to run the WebBlocker utility. Click Yes. The WebBlocker Utility dialog
box appears, as shown in the following figure. Select Download Database
to download the current database.
NOTE
The WebBlocker database is over 60 MB in size and may take 30 minutes
or more to download.
You can run the WebBlocker utility at any time to:
• Download a new version of the database.
• View the current database status
• Upload the database
• View the current WebBlocker server status
218
WatchGuard Firebox System
Getting Started with WebBlocker
•
•
Install or remove the server
Start or stop the server
To run the WebBlocker utility, select Start => Programs => WatchGuard =>
WebBlocker Utility.
Configuring the WatchGuard service icon
Because WebBlocker relies on copying updated versions of the
WebBlocker database to the event processor, you must configure the
WatchGuard service setting Allow Outgoing to Any. It is possible to
narrow this setting and use the IP address of webblocker.watchguard.com.
However, this address may change without notice.
Add an HTTP service
To use WebBlocker, add the Proxied-HTTP, Proxy, or HTTP service.
WatchGuard recommends using Proxied-HTTP, which provides filtering
on all ports. (HTTP without the Proxy service manages only port 80.)
WebBlocker takes precedence over other settings in the HTTP or Proxy
services. If the HTTP service allows outgoing from Any to Any but
WebBlocker settings are set to “Block All URLs,” all Web access is
blocked. For information on adding an HTTP proxy service, see “Adding
a proxy service for HTTP” on page 121.
Configuring logging
Because WebBlocker works in conjunction with logging, you must
configure logging as described in Chapter 13, “Setting up Logging and
Notification.” WebBlocker logs attempts to access sites blocked by
WebBlocker. The log entry that is generated displays information about
the source and destination address as well as the blocked URL and the
category that caused the denial.
WebBlocker also generates a log entry showing the results of any
attempted database retrieval including whether or not it was successful
and, if not successful, why.
User Guide
219
Chapter 16: Controlling Web Site Access
Configuring the WebBlocker Service
WebBlocker is a built-in feature of several services, including HTTP,
Proxied HTTP, and Proxy. When WebBlocker is installed, five tabs appear
in the service’s Properties dialog box:
• WebBlocker Controls
• WB: Schedule
• WB: Operational Privileges
• WB: Non-operational Privileges
• WB: Exceptions
Activating WebBlocker
To start using WebBlocker, you must activate the feature. From Policy
Manager:
1
Double-click the service icon you are using for HTTP. Click the
Properties tab. Click Settings.
The service’s dialog box appears.
220
2
Click the WebBlocker Controls tab.
3
Enable the checkbox marked Activate WebBlocker.
The tab appears, as shown in the following figure.
WatchGuard Firebox System
Configuring the WebBlocker Service
4
5
Next to the WebBlocker Servers box, click Add.
In the dialog box that appears, type the IP address of the server in the
Value field. Click OK.
If you want to add additional WebBlocker servers, see “Installing Multiple
WebBlocker Servers” on page 225.
Allowing WebBlocker server bypass
By default, if the WebBlocker server does not respond, HTTP traffic
(Outbound) is denied. To change this such that all outbound HTTP traffic
is allowed if a WebBlocker server is not recognized, on the WebBlocker
Controls tab, select Allow WebBlocker Server Bypass.
The Allow WebBlocker Server Bypass option is global. If you set it in one
HTTP service, it applies to all other HTTP proxy services you might have.
Configuring the WebBlocker message
Use the field marked Message for blocked user to define the text string
displayed in end users’ browsers when they attempt to open a blocked
Web site. The text string must be plain text and cannot contain HTML or
the greater than (>) or less than (<) characters. The following
metacharacters are permitted:
%u
The full URL of the denied request.
%s
Block status, or the reason the request was blocked. The possible
statuses are: host, host/directory, all web access blocked, denied,
database not loaded.
%r
The WebBlocker category or categories causing the denial.
For example, the following entry in the field will display the URL, the
status, and the category:
Request for URL %u denied by WebBlocker: %s blocked
for %r.
With this entry in the Message for blocked user field, the following string
might appear in a user’s browser:
User Guide
221
Chapter 16: Controlling Web Site Access
Request for URL www.badsite.com denied by WebBlocker:
host blocked for violence/profanity.
Scheduling operational and non-operational hours
WebBlocker provides two separately configurable time blocks–
operational hours and non-operational hours. Typically, operational
hours are an organization’s normal hours of operation and nonoperational hours are when an organization is not conducting its normal
business. Use these time blocks to build rules about when different types
of sites are to be blocked. For example, you might block sports sites
during business hours, but allow access at lunch time, evenings, and
weekends.
From the proxy’s dialog box:
1
Click the WB: Schedule tab.
2
Click hour blocks to toggle from Operational to Non-operational.
The tab appears, as shown in the following figure.
NOTE
The operational and non-operational hours schedule is dependent on the
time zone settings. WebBlocker defaults to GMT unless you have set a
Firebox time zone. For information on setting the Firebox time zone, see
“Setting the Time Zone” on page 49.
222
WatchGuard Firebox System
Configuring the WebBlocker Service
Setting privileges
WebBlocker differentiates URLs based on their content. Select the types of
content accessible during operational and non-operational hours using
the Privileges tabs. The options are identical for Operational and Nonoperational. From the proxy’s dialog box:
1
Click the WB: Operational Privileges tab or the WB: Non-operational
Privileges tab.
2
Enable the content type checkboxes for the categories you would like
to block.
For more information on WebBlocker categories, see the Reference Guide.
Creating WebBlocker exceptions
WebBlocker provides an exceptions control to override any of the
WebBlocker settings. Exceptions take precedence over all other
WebBlocker rules; you can add sites that you want to be allowed or
denied above and beyond all other settings. Sites listed as exceptions
apply only to HTTP traffic and are not related to the Blocked Sites list.
The exceptions option maintains a list of IP addresses that you want to
either specifically allow or deny, regardless of other WebBlocker settings.
You can specify exceptions by domain name, network address, or host IP
address. You can also fine-tune your exceptions by specifying a port
number, path name, or string which is to be blocked for a particular Web
site. For example, if you wanted to block only www.sharedspace.com/
~dave, because Dave’s site contains nude pictures, you would enter
“~dave” to block that directory of sharedspace.com. This would still allow
users to have access to www.sharedspace.com/~julia, which contains a
helpful article on increasing productivity.
If you wanted to block any sexually explicit content that might be on
sharedspace.com, you might enter *sex, to block a Web page such as
www.sharedspace.com/~george/sexy.htm. By placing an asterisk (*) in front
of the string you want to match, it will be matched if that string appears
anywhere in the location part of the URL. However, you cannot enter
*sex in the pattern section, and expect to block all URLs that contain the
word “sex.” The * option can be used only to modify the exceptions
within a specific URL. For example, you can block www.sharedspace.com/
*sex and expect that www.sharedspace/sexsite.html will be blocked.
User Guide
223
Chapter 16: Controlling Web Site Access
NOTE
You cannot use WebBlocker exceptions to make an internal host exempt
from WebBlocker rules.
From the HTTP Proxy dialog box:
1
Click the WB: Exceptions tab (you might need to use the arrow keys
at the right of the dialog box to see this tab).
2
In the Allowed Exceptions section, click Add.
3
Select the type of exception: host address, network address, or enter
URL. You can also use the Lookup Domain Name option to
determine the IP address of a domain.
4
To allow a specific port or directory pattern, enter the port or string to
be allowed.
The Define Exceptions dialog box appears.
When typing IP addresses, type the digits and periods in sequence. Do not use the
TAB or arrow key to jump past the periods. For more information on entering IP
addresses, see “Entering IP addresses” on page 38.
5
In the Denied Exceptions section, click Add. Specify the host address,
network address, or URL to be denied.
To block a specific string to be denied for a domain, select Host Address. To block a
specific directory pattern, enter the string to be blocked (for example, “*poker”).
224
WatchGuard Firebox System
Managing the WebBlocker Server
6
To remove an item from either the Allow or the Deny list, select the
address. Click the corresponding Remove button.
Managing the WebBlocker Server
The WebBlocker server is installed as a Windows Service and can be
started or stopped from the Services application located in the Windows
Control Panel Program Group.
Installing Multiple WebBlocker Servers
You can install two or more WebBlocker servers in a failover
configuration. If the primary WebBlocker server fails, the Firebox
automatically fails over to the first server in the WebBlocker Servers box,
as shown in “Activating WebBlocker” on page 220.
To add additional WebBlocker servers:
1
On the WebBlocker Controls tab in the HTTP Proxy dialog box, click
Add.
2
In the dialog box that appears, type the IP address of the server in the
Value field. Click OK.
You can use the Up and Down buttons to change the position of the
servers in the list.
When operating two or more WebBlocker servers in a failover mode, the
time between failovers may take up to two minutes.
Automating WebBlocker Database Downloads
The most effective way to routinely download and update your
WebBlocker database is to use Windows Task Scheduler. To do this, add a
User Guide
225
Chapter 16: Controlling Web Site Access
process called WebDBdownload.bat, which appears in your WatchGuard
directory under the WBServer folder:
1
Open Control Panel and select Scheduled Tasks. (If it is not listed, see
“Installing Scheduled Tasks,” in the following section.)
2
3
4
Select Add Scheduled Task.
5
Navigate to your WatchGuard directory and then into WBServer.
Select WebDBdownload.bat.
6
Specify how often you want to perform this task. WatchGuard
suggests you update your database every day, although you can do it
less often if you have bandwidth concerns. Click Next.
7
Enter a start time for the process. Because these downloads are close
to 60 megabytes, choose a time outside normal work hours.
8
Select the frequency you want for this task. WatchGuard recommends
you perform updates on weekdays, because the database is not
updated on weekends.
The Scheduled Tasks wizard launches. Click Next.
On the next screen, which shows a list of programs to select from,
select Browse.
9 Select a suitable start date. Click Next.
10 Enter the user name and passwords that this process requires to run.
Make sure this user has access to the proper files. Click Next.
11 Review your entries. Click Finish.
Installing Scheduled Tasks
If you are running Windows NT 4.0, you might need to manually install
Scheduled Tasks:
1
2
3
4
226
Open Control Panel and select Add/Remove Programs.
From the list, select Microsoft Internet Explorer.
When prompted, select Add a component.
A list of software appears (this may take a few minutes). If you’re
using Internet Explorer 4.0, under Additional Explorer
Enhancements, select Task Scheduler. If you’re using Internet
Explorer 5.0 or later, select Offline Browsing Pack.
WatchGuard Firebox System
Automating WebBlocker Database Downloads
If the message “cannot find Windows Update Files on this computer”
appears, open Internet Explorer, go to the Tools menu, and select
Windows Update. This takes you to the Microsoft Web site, where you
can download and install the appropriate software.
After installation, Scheduled Tasks appears under My Computer.
User Guide
227
Chapter 16: Controlling Web Site Access
228
WatchGuard Firebox System
CHAPTER 17
Connecting with Out-of-Band
Management
The WatchGuard Firebox System out-of-band (OOB) management feature
enables the Management Station to communicate with a Firebox by way
of a modem (not provided with the Firebox) and telephone line. OOB is
useful for remotely configuring a Firebox when access through the
Ethernet interfaces is unavailable.
Connecting a Firebox with OOB Management
To connect to the Firebox using OOB management, you must:
• Connect the Management Station to a modem – Connect a modem
between the serial port on the Management Station and an analog
telephone line.
• Connect the Firebox modem – Connect an external or PCMCIA (also
known as PC card) modem to the Firebox. External modems must be
attached to the CONSOLE port of the Firebox.
• Enable the Management Station for dial-up networking connections.
• Set Firebox network configuration properties.
User Guide
229
Chapter 17: Connecting with Out-of-Band Management
Enabling the Management Station
For a dial-up PPP connection to work between a Management Station and
a Firebox, you must configure the Management Station to use a PPP
connection. There are separate procedures for configuring a PPP
connection on the Windows NT, Windows 2000, and Windows XP
platforms.
Preparing a Windows NT Management Station for OOB
Install the Microsoft Remote Access Server (RAS) on the Management
Station.
1
Attach a modem to your computer according to the manufacturer’s
instructions.
2
From the Windows NT Desktop, select Start => Settings => Control
Panel.
3
4
Double-click Network.
5
Click Remote Access Server. Click OK.
Click Add.
The Select Network Service dialog box appears.
Follow the rest of the prompts to complete the installation. If Dial-Up Networking
is not already installed, you will be prompted to install it.
Preparing a Windows 2000 Management Station for OOB
Before configuring the Management Station, you must first install the
modem. If the modem is already installed, go to the instructions for
configuring the dial-up connection.
Install the modem
230
1
From the Desktop, click Start => Settings => Control Panel => Phone
and Modem Options.
2
3
4
Click the Modems tab.
5
Click Finish to complete the modem installation.
Click Add. The Add/Remove Hardware Wizard appears.
Follow the wizard through, completing the information requested.
You will need to know the name and model of the Firebox modem and the modem
speed.
WatchGuard Firebox System
Enabling the Management Station
Configure the dial-up connection
1
From the Desktop, click My Network Places => Network and Dial-up
Connections => Make New Connection.
The Network Connection wizard appears.
2
3
Click Next. Select Dial up to Private Network. Click Next.
4
5
Choose the proper designation for your connection. Click Next.
6
7
Click Finish.
Enter the telephone number of the line connected to the modem in the
Firebox. Click Next.
Enter a name for your connection.
This can be anything that reminds you of the icon’s purpose—OOB Connection, for
example.
Click either Dial or Cancel.
A new icon is now in the Network and Dial-Up Connections folder. To
use this dial-up connection, double-click the icon in the folder.
Preparing a Windows XP Management Station for OOB
Before configuring the Management Station, you must first install the
modem. If the modem is already installed, go to the instructions for
configuring the dial-up connection.
Install the modem
1
2
3
4
Click Start => Control Panel => Phone and Modem Options.
5
Click Finish to complete the modem installation.
Click the Modems tab.
Click Add. The Add Hardware Wizard appears.
Follow the wizard through, completing the information requested.
You will need to know the name and model of the Firebox modem and the modem
speed.
Configure the dial-up connection
1
Click Start => Control Panel. Click Network Connections. Click New
Connection Wizard.
The New Connection Wizard appears.
User Guide
231
Chapter 17: Connecting with Out-of-Band Management
2
Click Next. Select Connect to the network at my workplace. Click
Next.
3
4
Click Dialup connection. Click Next.
5
Enter the telephone number of the line connected to the modem in the
Firebox. Click Next.
6
7
Click Finish.
Enter a name for your connection.
This can be anything that reminds you of the icon’s purpose—OOB Connection, for
example.
Click either Dial or Cancel.
A new icon is now in the Network Connections folder. To use this dial-up
connection, double-click the icon in the folder.
Configuring the Firebox for OOB
OOB management features are configured in Policy Manager using the
Network Configuration dialog box, OOB tab. The OOB tab is divided
into two identical halves: the top half controls the settings of any external
modem attached; the lower half configures any PCMCIA modem if one is
present.
The OOB management features are enabled by default on the Firebox.
When trying to connect to a Firebox by way of OOB for the first time, the
Firebox first tries to do so with the default settings. From Policy Manager:
1
2
Select Network => Configuration. Click the OOB tab.
Modify OOB properties according to your security policy preferences.
Click OK.
For a description of each control, right-click it, and then select What’s This?. You
can also refer to the “Field Definitions” chapter in the Reference Guide.
Establishing an OOB Connection
From the Management Station, command your dial-up networking
software to call the Firebox modem. After the modems connect, the
Firebox negotiates a PPP connection with the calling host, and IP traffic
232
WatchGuard Firebox System
Establishing an OOB Connection
can pass. After the connection is established, you can use Control Center
and by specifying the dial-up PPP address of the Firebox. The default
address is 192.168.254.1.
Configuring PPP for connecting to a Firebox
In its default configuration, Firebox PPP accepts connections from any
standard client. The settings you use on your Management Station are the
same as if you were dialing into a typical Internet service provider, except
that you need not specify a username or password; leave these fields
blank.
OOB time-out disconnects
The Firebox starts the PPP session and waits for a valid connection from
Policy Manager on your Management Station. If none is received within
the default period of 90 seconds, the Firebox terminates the PPP session.
User Guide
233
Chapter 17: Connecting with Out-of-Band Management
234
WatchGuard Firebox System
Troubleshooting Firebox
Connectivity
APPENDIX A
This chapter provides four ways of connecting to your Firebox should
you lose connectivity. These procedures assume that you have already
created a configuration file and will be restoring the Firebox with that file.
If you have not yet created a configuration file, use the QuickSetup
Wizard to create one, as described in Chapter 3, “Getting Started.”
Loss of connection to the Firebox can occur because you lost or forgot
your passphrases, you received a new Firebox as a replacement unit, or
other reasons. But regardless of the reason you lost connectivity, you can
use any of these methods to reconnect to your Firebox (although methods
3 and 4 are specific to certain Firebox models).
Method 1: Ethernet Dongle Method
This method involves using a single crossover cable.
1
User Guide
Make sure the Firebox and the Management Station are disconnected
from the network.
227
Appendix A: Troubleshooting Firebox Connectivity
2
Connect one end of the crossover cable to the Optional Interface and
the other end to the External Interface, creating a loop. Power-cycle
the Firebox.
This cabling should produce the following light sequence on the front of the
Firebox:
Armed light: steady
Sys A light: flickering
(Do not be concerned with the lights on the Security Triangle Display indicating
traffic between interfaces.)
3
Disconnect the crossover cable from the Optional and External
Interfaces. Now, connect one end to the Trusted interface and the
other end to the Management Station. Do not turn off the Firebox.
4
Make sure the Management Station has a static IP address. If it
doesn't, change the TCP/IP settings to a static IP address. The
computer designated as the Management Station should be on the
same network as the configuration file, preferably the Trusted
network, so you do not need to reassign an IP address to your
computer after the configuration file has been uploaded.
The following is an example of a typical IP address scheme:
Management Station: 192.168.0.5
Subnet mask: 255.255.255.0
Default gateway: 192.168.0.1
Trusted Network: 192.168.0.1 (from the configuration file)
228
5
It is recommended that you double-check the IP address of the
Management Station. To do this, open a DOS prompt and type
ipconfig /all.
6
Use the Ping command to assign the Firebox a temporary IP address
so your Management Station can communicate with the Firebox. At
the DOS prompt, type ping 192.168.0.1 (this is the default
gateway of your computer). You will then see a request timeout. Ping
again. You should get four replies.
7
Open Policy Manager from Control Center. Do not connect to the
Firebox at this time.
8
In Policy Manager, select File => Open => Configuration File. Select
the configuration file you want to load onto the Firebox and load it
into Policy Manager.
9
In Policy Manager, select File => Save => To Firebox. You are then
prompted for the IP address of the Firebox and the Firebox
configuration passphrase. Use the address you used to ping the
Firebox and wg for the passphrase.
WatchGuard Firebox System
Method 2: The Flash Disk Management Utility
10 When the Firebox Flash Disk dialog box appears, as shown in the
following figure, select the button marked Save Configuration File
and New Flash Image. Make sure the checkbox marked Make
Backup of current flash image before saving is not selected.
After the configuration has been uploaded and the Firebox has been
rebooted, the Firebox light sequence should look like this:
Armed light: Steady
Sys A light: Steady
You should be able to ping the Firebox again with the same IP address
you used earlier. At this point, you should be able to connect back to the
Firebox through Control Center and reinstall the Firebox back into the
network.
Method 2: The Flash Disk Management Utility
Like the first procedure, this method requires that you disconnect your
Management Station and Firebox from the network.
1
User Guide
Make sure the Management Station has a static IP address. If it
doesn’t, change the TCP/IP settings to a static IP address. The
computer designated as the Management Station should be on the
229
Appendix A: Troubleshooting Firebox Connectivity
same network as the configuration file, preferably the Trusted
network, so you do not need to reassign an IP address to your
computer after the configuration file has been uploaded.
The following is an example of a typical IP address scheme:
Management Station: 192.168.0.5
Subnet mask: 255.255.255.0
Default gateway: 192.168.0.1
Trusted Interface: 192.168.0.1 (from the configuration file)
2
Connect the blue serial cable to the Console port of the Firebox and
the other end to the open COM port of the Management Station.
3
Connect the crossover cable from the Trusted interface on the Firebox
to the Management Station.
4
Access the Flash Disk Management utility: in Control
Center, click the main menu button (shown at right).
Select Tools => Advanced => Flash Disk Managament.
5
From the first screen in the Flash Disk Management
tool, select Boot from the System Area (Factory
Default). Click Continue.
6
When prompted to enter an IP address, it is recommended that you
use the address that is currently configured as the default gateway on
your Management Station. Click OK.
7
Choose the COM port that is open on the Management Station. Click
OK.
This completes the Flash Disk Management utility.
8
Power-cycle the Firebox and wait until the operation has been
completed.
The Firebox light sequence should look like this:
Armed light: Steady
Sys B light: Steady (Some Fireboxes may flicker but most will be steady.)
(Do not be concerned with the lights on the Security Triangle Display indicating
traffic between interfaces.)
9
Open a DOS prompt and ping the IP address that you used for the
temporary IP.
Replies should follow, which means the Firebox is now ready for uploading a
configuration.
10 In Policy Manager, select File => Open => Configuration File. Select
the configuration file you want to load onto the Firebox and load it
into Policy Manager.
11 In Policy Manager, select File => Save => To Firebox. You are then
prompted for the IP address of the Firebox and the Firebox
230
WatchGuard Firebox System
Method 3: Using the Reset Button - Firebox Models 500, 700, 1000, 2500, 4500
configuration passphrase. Use the address you used as the temporary
IP address during the flash disk management process and wg as the
passphrase.
12 When the Firebox Flash Disk dialog box appears, select the button
marked Save Configuration File and New Flash Image.
After the configuration has been uploaded and the Firebox has been
rebooted, the Firebox light sequence should now look like this:
Armed light: Steady
Sys A light: Steady
You should be able to ping the Firebox again with the same IP address
you used earlier. At this point, you should be able to connect back to the
Firebox through Control Center and reinstall the Firebox into the
network.
Method 3: Using the Reset Button - Firebox Models 500,
700, 1000, 2500, 4500
You can use the Reset button method only on the Firebox models 500, 700,
1000, 2500, and 4500. Before you start, assign the IP address of your
Management Station to be on the 192.168.253.0 network. Do not use the
192.168.253.1 address, which is being held by the Firebox as a default. The
subnet is 255.255.255.0.
It is recommended that you give your computer’s default gateway an IP
address of 192.168.253.1.
1
2
Disconnect the Firebox from the network.
Start with the Firebox turned off. Hold down the Reset button on the
back of the Firebox and turn on the Firebox power switch. Do not let
go of the Reset button until you see this light sequence on the front of
the Firebox:
External light on Triangle: Blinks
Trusted => Optional Traffic (Activity): Flashing lights
Sys B: Flickering
Armed: Steady
3
User Guide
Connect a crossover cable to the Management Station and into the
Firebox Trusted Interface.
231
Appendix A: Troubleshooting Firebox Connectivity
4
Open a DOS prompt, and ping the Firebox with 192.168.253.1. You
should get a reply.
5
In Policy Manager, select File => Open => Configuration File. Select
the configuration file you want to load onto the Firebox and load it
into Policy Manager.
6
In Policy Manager, select File => Save => To Firebox. When you are
asked for the IP address of the Firebox, use 192.168.253.1 with wg as
the passphrase.
7
When the Firebox Flash Disk dialog box appears, select the button
marked Save Configuration File and New Flash Image.
8
After the file has been restored on the Firebox, you will have to
reassign the IP address of your Management Station such that it is on
the same network as the Trusted Interface from configuration file that
you just used. This will enable you to reconnect to the Firebox.
After the configuration has been uploaded and the Firebox has been
rebooted, the Firebox light sequence should now look like this:
Armed light: steady
Sys A light: steady
Method 4: Serial Dongle (Firebox II only)
This option requires you to use a serial cable and a crossover cable. As
with the previous procedures, you need to disconnect your Management
Station and Firebox from the network.
Make sure that the Management Station is configured to be on the same
network as 192.168.253.0. Do not use the 192.168.253.1 address, which is
being held by the Firebox as a default.
232
1
Connect one end of the serial cable to the serial port of the Firebox and
the other end to the console port of the Firebox. Place the crossover
cable into the Trusted Interface and into the Management Station.
2
Power-cycle the Firebox. The light sequence should look like this:
Armed light: Steady
Sys B: Steady (On some Fireboxes, the Sys B light may flicker.)
(Do not be concerned with the lights on the Security Triangle Display indicating
traffic between interfaces.)
WatchGuard Firebox System
Method 4: Serial Dongle (Firebox II only)
3
Take out one end of the serial cable from the Firebox to break the loop
effect.
4
On the Management Station, open a DOS prompt. Ping the Firebox
with a 192.168.253.1.
You should get a reply.
User Guide
5
In Policy Manager, select File => Open => Configuration File. Select
the configuration file you want to load onto the Firebox and load it
into Policy Manager.
6
In Policy Manager, select File => Save => To Firebox. When you are
prompted for an IP address, use 192.168.253.1 with wg as the
passphrase.
7
When the Firebox Flash Disk dialog box appears, select the button
marked Save Configuration File and New Flash Image.
8
After the file has been restored on the Firebox, you will have to
reassign the IP address of your Management Station such that it is on
the same network as the Trusted Interface from the configuration file
that you just used. This will enable you to reconnect to the Firebox
with the Trusted IP address that is listed in the configuration file and
your status passphrase.
233
Appendix A: Troubleshooting Firebox Connectivity
234
WatchGuard Firebox System
Index
.cfg files 43
.ftr files 210
.idx files 192
.rep files 205
.wgl files 192
.wts files 209
1-1 Mapping dialog box 90
1-to-1 NAT. See NAT, 1-to-1
A
active connections on Firebox, viewing 167
ActiveX applets 122
Add Address dialog box 88, 104, 129
Add Displayed Service dialog box 162
Add Exception dialog box 85, 90
Add External IP Address dialog box 88
Add External IP dialog box 87
Add Firebox Group dialog box 133
Add IP Address dialog box 175
Add Member dialog box 104, 129
Add Port dialog box 100
Add Route dialog box 62, 63
Add Static NAT dialog box 88
address space probes
blocking 143
described 141
Advanced dialog box 54, 56
Advanced NAT Settings dialog box 85, 90
aliases
adding 128
deleting 130
described 127, 128
dvcp_local_nets 128
dvcp_nets 128
external 128
firebox 128
host 128
modifying 130
optional 128
trusted 128
Aliases dialog box 128
anonymous FTP 94
Any service, precedence 107
User Guide
ARP cache, flushing 74
ARP table, viewing 166
attacks, spoofing. See spoofing attacks.
attacks, types of 141
AUTH types for ESMTP 113
authentication
CRYPTOCard server 137
defining groups for 132
described 127, 130
for VPNs, viewing 71
from External interface 131
from outside Firebox 130
Java applet for 130
specifying server type 132
viewing types used 163
authentication servers
CRYPTOCard 138
network location for 131
RADIUS 135
SecurID on RADIUS server 139
types 131
viewing IP addresses of 163
Windows NT 134
Authentication Servers dialog box 133, 134, 136,
138, 139
auto-block duration, changing 152
B
Berkeley Internet Name Domain (BIND) 123
blocked ports
auto-blocking sites that attempt to use 156
avoiding problems with legitimate users 155
default 153
described 153
logging activity 156
permanent 155
reasons for 153
setting logging and notification for 189
Blocked Ports dialog box 155, 156
Blocked Ports list 155
blocked services
NetBIOS 155
Novel IPX over IP 155
OpenWindows 154
rcp 154
rlogin 154
RPC portmapper 154
rsh 154
X Font server 154
X Window 153
blocked sites
235
and Firebox interfaces 150
and IDS applications 147
auto-block duration 152
auto-blocked 150
blocking with service settings 157
changing auto block duration 152
described 150
dynamic 157
exceptions to 152
in Firebox Monitors 163
logging and notification 152
permanent 149, 150
removing 152, 156
storing in external file 151
temporary 157
viewing list of 157
Blocked Sites dialog box 151, 152, 189
Blocked Sites Exceptions dialog box 152
Blocked Sites list
described 143, 157
exceptions to 152
viewing 157, 167
C
cables
connecting to Firebox 33
included with Firebox 22
certificate authority, Firebox as 105
certificates
viewing expiration date and time of 70
viewing status of 69
CHAP authentication 136
configuration file
and Policy Manager 43
basic 35
customizing 39
opening 43
opening from Firebox 44
opening from local drive 44
rebooting Firebox after saving 45
saving 45
saving to Firebox 45
saving to local drive 47
starting new 52
configuration modes
choosing 29, 36
setting using Policy Manager 52
Connect to Firebox dialog box 65, 74
context-sensitive help 16
Control Center
Always on Top 76
236
changing polling rate 75
components of 66
described 2, 65
front panel 68
monitoring tunnels in 70
QuickGuide 67
running QuickSetup Wizard from 73
starting 65
viewing different components of 76
Control Center Main Menu button 73, 74
controld 196
controld.wgc 199
CRYPTOCard server authentication 137, 138
custom program, as notification 107, 186
D
Daylight Saving Time 49
DCE 91
DCE-RPC, and NAT 91
default gateways
entering 37
for Firebox interfaces 53
setting 54
viewing IP address of 69
default packet handling
and intrusion detection 146
blocking address space probes 143
blocking IP options attacks 144
blocking port space probes 143
blocking spoofing attacks 142
blocking SYN Flood attacks 144
described 142
logging and notification for 188
Default Packet Handling dialog box 143, 144,
145, 188
Define Exceptions dialog box 224
deny messages
copying 72
issuing ping or traceroute command for 72
SMTP proxy 114
DHCP 59
DHCP server
adding subnets 60
default lease time for 59
described 59
enabling 105
lease times 59
maximum lease time for 59
modifying subnets 60
removing subnets 61
WatchGuard Firebox System
setting up 59
DHCP Server dialog box 59
DHCP Subnet Properties dialog box 60
DHCP support on External interface 31, 36, 54
dialog boxes
1-1 Mapping 90
Add Address 88, 104, 129
Add Displayed Service 162
Add Exception 85, 90
Add External IP 87
Add External IP Address 88
Add Firebox Group 133
Add Member 104, 129
Add Port 100
Advanced 54, 56
Advanced NAT Settings 85, 90
Aliases 128
Authentication Servers 133, 134, 136, 138,
139
Blocked Ports 156
Blocked Sites 151, 152, 189
Blocked Sites Exceptions 152
Connect to Firebox 65, 74
Default Packet Handling 143, 144, 145, 188
default packet handling 143
Define Exceptions 224
DNS-Proxy Properties 124
Firebox Authentication 132
Firebox Flash Disk 48
Firebox Name 49
Host Alias 130
HTTP Properties 121
HTTP Proxy 224
Incoming SMTP Proxy 112
Incoming SMTP Proxy Properties 116
Logging and Notification 105, 152, 188
Logging Setup 176, 177
NAT Setup 85, 89
Network Configuration 53, 57
New Firebox Configuration 44, 48
New Service 100
Outgoing SMTP Proxy 117
Report Properties 205, 206, 207
service Properties 97, 99, 103, 157
Services 97, 100
Set Log Encryption Key 199
Setup Firebox User 134
Setup Routes 62
SMTP Proxy Properties 113, 114
Time Filters 205
WebBlocker Utility 218
dial-up connection, for out-of-band
management 231
DMZ (Demilitarized Zone) 26
User Guide
DNS proxy
adding 124
and file descriptor limit 125
and NAT 125
and security policy 94
described 123
DNS server addresses 58
DNS-Proxy Properties dialog box 124
drop-in configuration
benefits and drawbacks of 28
characteristics 28
described 27
setting IP addresses in 53
setting optional properties 56
DVCP server, creating 105
dvcp_local_nets 85, 90, 128
dvcp_nets 85, 90, 128
dynamic IP support. See DHCP support, PPPoE
support
dynamic NAT. See NAT, dynamic
dynamically blocked sites 157
E
electronic page, as notification 107
email
as notification 107
blocking address patterns 115
blocking file-name patterns 115
blocking MIME types 114
denying attachments 115
protecting against relaying 115
screening with SMTP proxy 112
selecting headers to allow 116
sent after triggering event 184
encryption 33
encryption for VPNs, viewing 71
encryption key
entering 46
when saving configuration file 46
ESMTP
AUTH types 113
configuring 113
keywords supported 112
eth1, eth 2 166
Ethernet dongle method for troubleshooting 227
event processor. See WatchGuard Security Event
Processor or log host
event, described 171
external alias 128
external caching proxy servers, configuring 122
237
External interface
described 26
dynamic addressing on 54
external network 26, 43
F
failover 6
failover logging 174
FAQs 7, 13, 77
fbd0 166
fbidsmate utility
described 147
using 147, 148
filter window in LogViewer 193
filtered services. See services.
Filtered-HTTP 121
firebox alias 128
Firebox Authentication dialog box 132
Firebox Flash Disk dialog box 48
Firebox Installation Services 18
Firebox interfaces
adding secondary networks to 29
described 25
setting IP addresses of 52
viewing IP addresses of 69
Firebox Monitors
ARP table 166
authentication host information 163
authentication list 167
BandwidthMeter 161
Blocked Sites list 167
blocked sites list 163
described 2, 79, 159
Firebox uptime 162
interfaces 165
load average 164
log and notification hosts 163
logging options 163
memory 164
network configuration 163
opening 79
packet counts 162
processes 164
routes 166
ServiceWatch 161
setting view properties 160
spoofing information 163
starting 160
Status Report 162
version information 162
238
Firebox Name dialog box 49, 185
Firebox passphrases. See passphrases
Firebox System
components of 2
described 1
hardware requirements 4
introduction 2
requirements 3
software requirements 3
Web browser requirements 4
Firebox System applications, launching 73, 78
Fireboxes
and IDS applications 147
as certificate authority 105
cables included with 22
changing interface IP address 54
changing polling rate 75
choosing a configuration 29
configuration modes 25
configuring for logging 174
configuring for out-of-band 232
connecting cables 33
connecting to 65, 74
connecting via out-of-band 229
defining as a DHCP server 59
described 41
designating log hosts 175
entering encryption key for 46
friendly names in log files, reports 49, 185
gateways for interfaces 53
interfaces. See Firebox interfaces
location in network 42
log messages generated by 72
model 44, 48
monitoring traffic through. See monitoring.
network cards in 163
obtaining IP addresses dynamically 31
opening configuration file 43
opening configuration file from 44
package contents 22
reasons for loss of connection 227
resetting pass phrase 47
saving configuration file to 45
setting clock to log host’s 178
setting time zone for 49
specifying model of 44, 48
timeout value 44
traffic sent through 69
troubleshooting connectivity 227
using out-of-band 229
using Reset button 231
viewing active connections on 167
viewing everyone authenticated to 167
viewing memory usage of 164
WatchGuard Firebox System
viewing uptime and version 162
Flash Disk management tool 229
FTP
and Optional network 43
and security policy 94
FTP proxy
and NAT 91
configuring 119
described 119
hazards of 119
G
gateways. See default gateways
groups
assigning users to 134
for authentication 132
in Windows NT 135
ipsec_users 133
pptp_users 133
H
H323, and NAT 91
hardware requirements 4
hidden services, viewing 105
High Availability 6, 22, 69
Historical Reports
applying a filter 211
creating report filter 210
deleting a filter 211
described 3, 79
editing a filter 210
editing existing reports 205
manually running a report 212
opening 79
starting 204
starting new reports 204
time spans for 205
time zone 49
Historical Reports. See also reports
Host Alias dialog box 130
host aliases 128
host routes, configuring 63
hosts
viewing blocked 163
viewing in HostWatch 170
hosts, log. See log hosts
HostWatch
choosing colors for display 170
User Guide
connecting to a Firebox 169
described 2, 79, 167
display 168
modifying view properties 170
opening 79
replaying a log file 169
setting display properties 170
starting 168
viewing authenticated users 170
viewing hosts 170
viewing ports 170
HTTP Properties dialog box 121
HTTP proxy
and NAT 91
restricting MIME types for 122
HTTP Proxy dialog box 224
HTTP services
adding 121
and security policy 94
and WebBlocker 219
described 120
Filtered-HTTP 121
HTTP 120
Proxied-HTTP 120
I
incoming services
see entries under services
Incoming SMTP Proxy dialog box 112
Incoming SMTP Proxy Properties dialog
box 116
Incoming tab 106
installation
adding basic services after 61
QuickSetup Wizard 35
via serial cable 33
via TCP/IP 35
interfaces, monitoring 165
internal network 26
Internet Explorer 4
intrusion detection system (IDS)
and fbidsmate utility 147
described 146
IP addresses
adding to services 104
and drop-in configuration 27
and routed configuration 27
and static NAT 87
changing 54
default gateways 69
239
entering 38
in example network 23
netmask 69
of authentication servers 163
of Firebox interfaces 52
of log hosts 163
typing 74
WINS/DNS servers 58
IP alias 30
IP options attacks
blocking 144
described 141
IPSec tunnels, and DHCP/PPPoE 31
ipsec_users 133
ipsec0 166
J
Java applets
and Zip files 122
for authentication 130
K
known issues 13
L
launch interval, setting 187
license key certificates 22
LiveSecurity Gold Program 18
LiveSecurity Service
activating 11
benefits of 9
broadcasts 10
described 3, 40
Rapid Response Team 10
lo (loopback interface) 166
local drive, opening configuration file from 44
log encryption key, setting 181, 199
log files
consolidating 198
copying 198
copying entries 194
copying log entries 194
default location of 191
described 191
displaying and hiding fields 195
240
exporting records 194
forcing rollover 198
names of 192
opening 192
packet event fields 196
replaying in HostWatch 169
saving to a new location 199
searching 193
searching by field 193
searing by keyphrase 193
sending to another office 200
setting Firebox names used in 49
viewing with LogViewer 191
working with 197
log hosts
adding 175
as Windows 2000 service 179
as Windows NT service 179
as Windows XP service 179
changing priority 177
designating for Firebox 175
editing settings 177
primary 174
removing 177
reordering 177
running on Windows 2000 178
running on Windows NT 178
running on Windows XP 178
scheduling reports 184
secondary 174
setting clocks 177
setting rollover interval 183
starting 181
stopping 181
synchronizing 177
synchronizing NT 178
viewing 180
viewing IP addresses of 163
log messages
copying deny messages 72
issuing ping or traceroute on deny
messages 72
log rollover 182
logging
architecture 174
blocked port activity 156
described 171
developing policies for 172
enabling Syslog 176
failover 174
for blocked ports 156
for blocked sites 152
setting rollover interval 183
specifying for SMTP proxy 116
WatchGuard Firebox System
synchronizing NT log hosts 178
logging and notification
configuring Firebox for 174
customizing by blocking option 185
customizing by service 185
default packet handling 188
defining for services 105
described 171
designating log hosts 175
for blocked sites and ports 189
global preferences 182
setting for a service 188
Logging and Notification dialog box 105, 152,
156, 188
logging options, viewing 163
Logging Setup dialog box 175, 176, 177
LogViewer
consolidating logs 198
copying log data 193
described 2, 79
displaying and hiding fields 195
exporting log file data 193
filter window 193
opening 79
searching by field 193
searching by keyphrase 192, 193
searching for entries 193
setting preferences 192
starting 192
time zone 49
viewing files with 191
working with log files 197
M
MAC address of interfaces, viewing 69
mail servers, protecting against relaying 115
main menu button 67
Make Backup of Current Flash Image
checkbox 46
Management Station
connecting with out-of-band 232
described 32, 42
enabling for out-of-band 230
setting up 32
manual IPSec tunnels, and DHCP/PPPoE 31
masquerading, for SMTP proxy 117
Maximum Incomplete Connections setting 146
messages, deny. See deny messages
MIME types
creating new 114, 122
User Guide
described 114
restricting for HTTP proxy 122
minimum requirements 3
Mobile User VPN
and WINS/DNS server addresses 58
described 6
monitoring tunnels 71
modems, installing for out-of-band
management 230, 231
monitoring
active connections on Firebox 167
ARP table 166
described 159
Firebox activity 162
load average 164
network interfaces 165
processes 164
routes 166
MUVPN
and WINS/DNS server addresses 58
described 6
monitoring tunnels 71
N
name resolution, fixing slow 125
NAT
1-to-1
and dynamic NAT exceptions 85
and PPPoE support 31
described 82, 89
using 89
and DNS proxy 125
described 81
dynamic
described 81, 82
service-based dynamic
configuring exceptions 86
described 82
disabling 87
enabling 86, 87
using 86
simple dynamic
adding entries 84
defining exceptions 85
described 82
enabling 83
reordering entries 85
using 83
static
adding external IP addresses 87
configuring a service for 81, 87
241
described 81
setting for a service 88
typically used for 81
types of 81
types supported by proxies 91
NAT Setup dialog box 83, 85, 89
NetBIOS services 155
netmask, viewing address of 69
Netscape Communicator 4
network address translation. See NAT
network addresses, unconnected 150
network cards in Firebox 163
Network Configuration dialog box 53, 54, 57
network configurations
choosing 29
diagram 26
drop-in 27
routed 26
Network File System 154
network interfaces, monitoring 165
network routes, configuring 62
networks
external 26
internal 26
viewing blocked 163
networks, secondary. See secondary networks
New Firebox Configuration dialog box 44, 48
New Service dialog box 100
notation, slash 38
notification
blocked port activity 156
bringing up popup window as 107
described 171
developing policies for 172, 173
example policy 173
for blocked ports 156
for blocked sites 152
running custom program as 107
sending email as 107
setting launch interval 187
setting repeat count 187
settings for 184
triggering electronic page as 107
Novel IPX over IP 155
NXT attacks 124
O
Online Help 13, 14, 15
online support services
accessing 14
242
described 12
OOB. See out-of band management
OpenWindows 154
optional alias 128
Optional interface 26
Optional network
and FTP 43
described 43
Web server 43
optional products
described 5
High Availability 6
Mobile User VPN 6
purchasing 7
SpamScreen 6
VPN Manager 5
outgoing services
see entries under services
Outgoing SMTP Proxy dialog box 117
out-of-band management
and PPP connection 230
configuring dial-up connection for 231
configuring Firebox for 232
configuring PPP 233
connecting Firebox using 229
described 229
enabling Management Station for 230
establishing connection 232
installing modem 230, 231
preparing NT Management Station for 230
preparing Windows 2000 Management
Station for 230
preparing Windows XP Management Station
for 231
timeout disconnects 233
P
packet filters, described 93
packet handling, default. See default packet
handling
packet-handling services. See services
packets
viewing number allowed, denied, rejected 162
viewing number sent and received 69
pager, as notification 107, 184
PAP authentication 136
passphrases
configuration 37
described 37
resetting for Firebox 47
WatchGuard Firebox System
status 37
tips for creating 48
permanently blocked sites 150
ping command for source of deny messages 72
Policy Manager
as view of configuration file 43
described 2, 43, 78
opening 78
opening a configuration file 43
Services Arena 78
services displayed in 95
using to create configuration file 51
polling rate, changing 75
POP, and security policy 94
popup window, as notification 107, 186
port space probes 171
and default packet handling 146
blocking 143
described 141
ports
0 155
1 155
1000-1999 155
111 154
137 through 139 155
2000 154
213 155
513 154
514 154
viewing in HostWatch 170
ports, blocked. See blocked ports.
PPP connection, and out-of-band
management 230, 233
PPP user name and password 31, 53
PPPoE support on External interface 31, 36, 54
PPPoE, static 55
pptp_users 133
private LAN 26
processes, viewing 164
Processor Load Indicator 68
program, as notification 107
Proxied-HTTP 120, 219
proxies
described 93
types of NAT supported 91
proxy ARP 28
proxy servers, setting up 123
Proxy service 219
proxy services
described 111
DNS 123
FTP 119
User Guide
HTTP 120
SMTP 112
public servers, configuring 37
Q
QuickSetup Wizard
described 35
launching 36
rerunning 36
running from Control Center 73
steps 36
R
RADIUS server authentication 135
Rapid Response Team 9, 10
rcp service 154
RealNetworks, and NAT 91
red exclamation point, in VPN Monitor 71
repeat count, setting 187
Report Properties dialog box 205, 206, 207
reports
applying a filter 211
authentication details 212
authentication resolution on IP addresses 206
consolidated sections 215
consolidating sections 206, 212
creating filters 210
customizing 203
deleting 205
deleting a filter 211
denied incoming/outgoing packet detail 214
denied packet summary 215
denied service detail 215
detail sections 207
DNS resolution on IP addresses 206
editing 205, 206
editing filters 210
exporting to HTML 208
exporting to text file 209
exporting to WebTrends 208
Firebox statistics 212
FTP detail 214
host summary 213
HTTP detail 214
HTTP summary 214, 216
key issues 203
location of 207
network statistics 215
243
proxy summary 213
reasons for generating 203
running manually 212
scheduling 211
sections in 206, 212
service summary 213
session summary 213, 214
setting Firebox names used in 49, 207
SMTP summary 214
specifying sections for 206
starting new 204
summary sections 207
time spans for 205
time summary 213, 216
using filters 209
viewing list of 205
WebBlocker detail 215
requirements
hardware 4
software 3
Reset button 231
rlogin service 154
routed configuration
benefits and drawbacks of 27
characteristics of 27
described 26
setting IP addresses in 54
routes
configuring 62
described 62
host 63
monitoring 166
network 62
RPC portmapper 154
rsh service 154
RTSP, and NAT 91
RUVPN with PPTP
and WINS/DNS server addresses 58
monitoring tunnels 71
S
Save dialog box 47
Save Main Window dialog box 194
Scheduled Tasks, installing 226
secondary networks
adding 30, 36, 57
described 29
SecurID authentication 139
security applications 3
security policy
244
and DNS 94
and FTP 94, 119
and HTTP 94
and POP 94
and services 94
and SMTP 94
and telnet 94
customizing 39
described 39
guidelines for services 94
opening configuration file 43
Security Triangle Display 68
Select MIME Type dialog box 114
serial dongle method for troubleshooting 232
service Properties dialog box 97, 99, 103, 157
service properties, using to block sites 157
service-based dynamic NAT. See NAT, servicebased dynamic
services
adding 97
adding addresses 104
adding several of same type 99
and your security policy 39, 94
basic 61
blocked. See blocked services.
commonly added 39
configurable parameters for 97
configuring for incoming static NAT 81
configuring for Static NAT 87
creating new 100
custom 96
customizing logging and notification 105
customizing logging for 185
defining properties of 103
deleting 102
described 93
disabled 103
displayed in Policy Manager 95
enabled and allowed 103
enabled and denied 103
guidelines for incoming 94
guidelines for outgoing 95
hidden 105
HTTP 120
icons for 95
Novel IPX over IP 155
OpenWindows 154
overriding NAT setting 87
precedence 107
proxied-HTTP 219
Proxy 219
rcp 154
rlogin 154
RPC portmapper 154
WatchGuard Firebox System
rsh 154
setting logging and notification for 188
setting static NAT for 88
viewing number of connections by 161
wg_ 105
X Font service 154
X Window 153
Services Arena
described 78, 95
displaying detailed view 96
Services dialog box 97, 100
ServiceWatch
adding services to 162
described 161
Set Log Encryption Key dialog box 199
Setup Firebox User dialog box 134
Setup Routes dialog box 62, 63
shared secret 136
sites, blocked. See blocked sites.
slash notation 38
SMTP proxy
adding address patterns 115
adding content types 114
adding masquerading options 117
allowing headers 116
and MIME types 114
and NAT 91
and security policy 94
blocking file-name patterns 115
blocking MIME types 114
configuring 112
configuring outgoing 117
denying attachments 115
described 112
email relaying 115
keywords supported 112
selecting headers to allow 116
specifying logging for 116
SMTP Proxy Properties dialog box 113, 114
SMTP, extended. See ESMTP
software requirements 3
SpamScreen 6, 22
spoofing attacks
and Firebox Monitors 163
blocking 143
described 141, 142
static PPPoE 55
Steel Belted RADIUS 139
StreamWorks, and NAT 91
subnets
adding to DHCP server 60
modifying 60
User Guide
removing 61
SYN flood attacks
blocking 144
changing settings 145
described 141, 144
preventing false alarms 145
SYN Validation Timeout setting 146
Syslog color 75
Syslog logging
enabling 176
facilities 176
system requirements 3
T
TCP/IP, cabling for 35
TCPmux service 155
Technical Support
assisted support 17
described 9
Firebox Installation Services 18
frequently asked questions 9
LiveSecurity Gold Program 18
LiveSecurity Program 17
users forum 14
VPN Installation Services 19
telnet, and security policy 94
third-party authentication server. See
authentication or name of third-party server
Time Filters dialog box 205
time zone for Firebox, setting 49
timeout duration for Firebox 44
traceroute command for source of deny
messages 73
Traffic Monitor
copying deny messages in 72
described 72
displaying entries in color 75
issuing ping and traceroute command in 72
limiting messages 75
manipulating 77
Traffic Volume Indicator 68
troubleshooting Firebox connectivity 227
trusted alias 128
Trusted interface 26
trusted network 43
TSIG attacks 124
tunnels
Mobile User VPN 71
monitoring 70
RUVPN with PPTP 71
245
viewing status of 69
U
unconnected network addresses 150
user authentication. See authentication
users, viewing in HostWatch 170
V
VDOLive, and NAT 91
View Properties dialog box 160, 162
virus alerts 11
VPN Installation Services 19
VPN Manager
and wg_dvcp service 105
described 5
VPNs
allowing incoming services from 95
and 1-to-1 NAT 89
in routed configurations 27
W
WatchGuard Certified Training Partners
(WCTPs) 19
WatchGuard Control Center. See Control Center
WatchGuard Firebox System
additional information on 76
described 1
documentation 17
introduction 2
Online Help 14
options 5
package contents 22
WatchGuard installation directory, and log
files 199
WatchGuard security applications 3
WatchGuard Security Event Processor
accessing user interface 197
and log files 191
and notification 171
and reports 203
described 42, 80
failover logging 174
installing 178
opening user interface 80
running reports 211
246
starting 181
stopping 181
user interface 181
WatchGuard service 219
WatchGuard users forum 14
described 14
Web browser, requirements for Firebox System 4
Web server, and Optional Network 43
Web sites, filtering 217
WebBlocker
activating 220
automatically downloading database 225
configuring 220
configuring message for 221
creating exceptions for 223
described 217
manually downloading database 227
prerequisites 217
required services 219
scheduling hours 222
setting privileges 223
time zone 49
WebBlocker server
and setup program 32
installing 217–218
installing multiple 225
managing 225
viewing status of 218
WebBlocker Server Bypass 221
WebBlocker utility 218
WebBlocker Utility dialog box 218
WebTrends Enhanced Log Format (WELF)
file 209
WebTrends for Firewalls and VPNs 208
wg_ services
described 105
viewing 105
wg_authentication 105
wg_ca 105
wg_dhcp_server 105
wg_dvcp 105
wg_pptp 105
wg_sohomgt 105
WGReports.exe 204
What’s This? help 16
Windows 2000
and Firebox System requirements 4
preparing Management Station for out-ofband management 230
running log host on 178
Windows 98
and Firebox System requirements 3
Windows NT
WatchGuard Firebox System
and Firebox System requirements 4
local and global groups 135
preparing Management Station for out-ofband management 230
running log host on 178
Windows NT Server authentication 134
Windows XP
and Firebox System requirements 4
preparing Management Station for out-ofband management 231
running log host on 178
WINS server addresses 58
wizard.cfg 35
WSEP. See WatchGuard Security Event
Processor
X
X Font server 154
X Window 153
Z
Zip files 122
User Guide
247