1
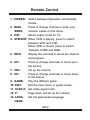
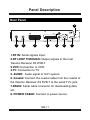
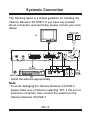
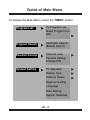
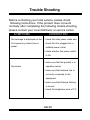
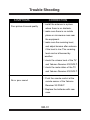
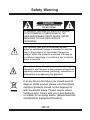
Handbuch
Manual
D
GB
F
E
Yakumo Receiver XS DVB-T
Digitaler TV-Receiver
Safety Precautions
WARNING: • TO REDUCE FIRE OR SHOCK HAZARD,
DO NOT EXPOSE THIS YAKUMO
RECEIVER XS DVB-T TO RAIN OR
MOISTURE.
• TO REDUCE THE RISK OF ELECTRIC
SHOCK, DO NOT REMOVE COVER OR
BACK PANEL. THERE ARE NO USERSERVICEABLE PARTS INSIDE. PLEASE
REFER TO QUALIFIED SERVICE PERSONNEL.
CAUTION:• Do not stack electronic components or
other objects on top of the Yakumo Receiver
XS DVB-T. The slots on top of the Yakumo
Receiver XS DVB-T must be left uncovered
to allow airflow to the unit. Blocking the air
flow to the unit could impair performance or
damage your Yakumo Receiver XS DVB-T
and other components.
• Do not stack the Yakumo Receiver XS
DVB-T on top of a “hot component” such
as an audio power amplifier.
GB-1
Safety Precautions
• Keep a clear space around the Yakumo
Receiver XS DVB-T to allow for sufficient
ventilation.
• Use of cloth and mild solution of washingup liquid to clean the casing only when the
yakumo receiver xs DVB-T is disconnected
from the main power supply.
• Do not connect / disconnect or modify
cables when the Yakumo Receiver XS
DVB-T is plugged in.
• Do not cover the Yakumo Receiver XS
DVB-T or place it on a unit that emits heat.
• Avoid exposing the Yakumo Receiver XS
DVB-T to direct sunlight.
• Ensure that children do not poke objects
into the ventilation slots.
GB-2
Safety Information
CAUTION: Use of controls or adjustments or performance of procedures other than those specified herein may result in hazardous radiation exposure.
Please carefully study this manual and always keep it
available. There are some installation and operation
precautions which you should be aware of.
1.Cleaning - Unplug this product from the wall outlet
before cleaning. Do not use liquid cleaners or aerosol
cleaners. Use a damp cloth for cleaning.
2.Water and Moisture - Do not use this product near water
for example, near a bath tub, wash bowl, kitchen sink, or
laundry tub; in a wet basement; or near a swimming
pool; and the like.
3.A product and cart combination should be moved with
care. Quick stops, excessive force, and uneven surfaces
may cause the product and cart combination to overturn.
4.Damage Requiring Service - Unplug this product from
the wall outlet and refer servicing to qualified service
personnel under the following conditions:
a. When the power-supply cord or plug is damaged.
b. If liquid has been spilled, or objects have fallen into
the product.
GB-3
Safety Information
c. If the product has been exposed to rain or water.
d. If the product does not operate normally by following
the operating instructions. Adjust only those controls
that are covered by the operating instructions as an
improper adjustment of other controls may result in
damage and will often require extensive work by a
qualified technician to restore the product to its normal operation.
e. When the product exhibits a distinct change in performance - this indicates a need for service.
5. Do not connect or modify cables when the Yakumo
Receiver XS DVB-T is plugged in.
6. Safety Check - Upon completion of any service or
repairs to this product, ask the service technician to per
form saftey checks to determine that the product is in
proper operating condition.
GB-4
General Information
Thank you for purchasing the Yakumo Receiver XS DVB-T.
You have just purchased a fully DVB compliant digital terrestrial receiver.
All functions can be carried out using the buttons on the
remote control, and some of the functions can also be carried out using the buttons on the front panel.
Please note that the actual controls and components, menu
items, etc. of your Yakumo Receiver XS DVB-T may look
somewhat different from those shown in theinstruction
manual.
Please be aware that new software may change the functionality of the Yakumo Receiver XS DVB-T.
Should you experience any difficulties with the operation of
your Yakumo Receiver XS DVB-T, please consult the relevant section of this manual or alternatively call your dealer
or a customer service adviser.
GB-5
Table of Contents
Safety Precautions...........................................................1
Safety Information............................................................3
General Information.........................................................5
Table of Contents.............................................................6
Remote Control................................................................7
Panel Description...........................................................10
Systemic Connection.....................................................12
Basic Operation..............................................................13
Guide of Main Menu.......................................................14
Trouble Shooting............................................................30
Safety Warning...............................................................32
Service and Warranty.....................................................33
GB-6
Remote Control
THE INSTRUCTIONS IN THIS MANUAL DESCRIBE
THE FUNCTIONS ON THE REMOTE CONTROL.
1. POWER
2. NUMBERS
3. P/N
4. STB/VCR
5. INFO
6. CH+
7. VOL8. CH9. GAME
10. EXIT
11. 16:9/4:3
12. P13. LANGUAGE
14. MUTE
15. R/L
16. TV/RADIO
17. VOL+
18. OK
19. EPG
20. TELETEXT
21. MENU
22. P+
1
14
5
2
3
15
4
16
19
6
7
17
10
18
21
20
8
11
12
9
22
13
GB-7
Remote Control
1. POWER: Switch between Operation and Standby
modes.
Press to change channel or enter your
2. NUMnumeric values on the menu.
BERS:
Select output mode for TV.
3. P/N:
4. STB/VCR: When VCR is playing, press to switch
between VCR and STB;
When VCR is closed, press to switch
between CVBS and RGB.
Display the information about the channel
5. INFO:
and program.
+
Press to change channels or move up in
6. CH :
the menus.
Let up the volume.
7. VOL-:
Press to change channels or move down
8. CH-:
in the menus.
Play the different game.
9. GAME:
Exit the main menu or guide screen.
10. EXIT:
11. 16:9/4:3: Set video aspect ratio.
Page down and let up the volume.
12. P-:
Set the appropriate language
13. LANGUAGE:
GB-8
Remote Control
14. MUTE:
15. R/L:
16. TV/RADIO:
17. VOL+:
18. OK:
19. EPG:
20. TELETXT:
21. MENU:
22. P+:
Press to mute/un-mute audio volume.
Setup right or left channel.
Press to switch between TV and RADIO.
Advance the volume.
Press to confirm choices.
Display Electronic Program Guide menu.
The servicer provided with text message
transmitted to TV has Teletext decoder.
The default setting is “OFF”, press /
and / button enter the Teletext or
Teletext Subtitle.
Display the main menu.
Page up and advance the volume.
Note:
Please take out of isolated plastic piece under battery,
before you use the remove control for the first time.
GB-9
Panel Description
Front Panel
1
2
3
4
1. LED: Red light refers to the Yakumo Receiver XS
DVB-T is in standby mode; Green light refers to the
Yakumo Receiver XS DVB-T is on; Orange light refers to
the VCR send the program to TV.
2. Channel up: Press to change channels or move up
in the menus.
3. Channel down: Press to change channels or move
down in the menus.
4. Standby button: Press to be (off) in standby mode.
GB-10
Panel Description
Rear Panel
8
1
2
3
4
5
6
7
1.RF IN: Aerial signals input.
2.RF LOOP THROUGH: Output signals to the next
Yakumo Receiver XS DVB-T.
3.VCR: Connection to VCR.
4.TV: Connection to TV.
5. AUDIO: Audio signal to Hi-Fi system.
6. Coaxial: Connect the coaxial cable from the coaxial of
the Yakumo Receiver XS DVB-T to the wired TV’s jack.
7.RS232: Serial cable connector for downloading data,
etc.
8. POWER CABLE: Connect to power source.
GB-11
Systemic Connection
The following figure is a simple guideline for installing the
Yakumo Receiver XS DVB-T. If you have any problem
about connection and need help, please contact your local
dealer.
• Install the antenna appropriately.
Note:
• To avoid damaging the Yakumo Receiver XS DVB-T,
please make sure of antenna selecting “Off”, if the sort of
antenna is uncertain; then connect the antenna to the
Yakumo Receiver XS DVB-T.
GB-12
Basic Operation
Switching Channel
When the Yakumo Receiver XS DVB-T is turned on, the
default setting is the TV program status.
You can switch the current channel using one of the following methods.
• Enter your desired channel numeric using the “NUMERICAL(0~9)” buttons to move the channel directly.
• Press the “TV/RADIO” button to switch between TV
channel and Radio channel.
• Press the “OK” button to display Channel list, use the
“CH+/CH-” and the “OK” button to select channel.
Volume Control
• Press the “V-/V+”or “P+/P-” button to adjust the audio
volume.
GB-13
Guide of Main Menu
To display the Main Menu, press the “MENU” button.
Program List
Program Search
TV Program List
Music Program List
Sort
Automatic Search
Manual Search
Parental Control
Channel Lock
Parental Setting
Change PIN
System Setting
TV Standard
Display Type
Antenna Power
Regional Setting
Language
Time Setting
System Schedule
GB-14
Guide of Main Menu
Game
Mine
Tetris
GomoKu
Calendar
Accessory
System Information
Factory Default
System Update
Personal Style
Menu Color
Transparency Level
Border Pattern
Entry Animation
Use the /
button to move up or down from one item to
another. The corresponding sub menu will be displayed on
the TV screen as long as the “OK” button is pressed on
the selected item.To escape the menu system at anytime,
press “EXIT” or “MENU” button on the remote control.
NOTE: If you use the Yakumo Receiver XS DVB-T for the
first time, you will see the dialog on the TV screen as follows.
GB-15
Guide of Main Menu
First Time Installation
First Time Installation
Do you want to start first time Installation Wizard?
YES
NO
The default setting is “YES”, press either the “EXIT” or
“MENU” button on the remote control to exit the dialog.
When you press “OK” button on the remote control to
select “YES”, and then enter the “First Time Installation(1)”
dialog.
First Time Installation (1)
Country
Language
Time Zone
Antenna Power
BACK
Deutschland
Deutsch
GMT+00:00
OFF
NEXT
Press / button to select item desired.
Select “NEXT” button to enter “First Time Installation
(2)”dialog.
GB-16
Guide of Main Menu
First Time Installation (2)
Do you want to start Auto search?
Previous channel list will be replaced.
BACK
YES
NO
BACK: return to the upper menu.
YES: start auto search.
NO: cancel auto search, and enter the mail menu.
Automatic Search
Progress
50%
Channel No
20
Frequency
546MHz
TV List:
000
Music List 000
GB-17
Guide of Main Menu
Program List
TV Program List
Under the main menu, moving / button of remote control to highlight the program list menu, then press the“OK”
button to enter the TV Program List, and then will display
the following list:
No.
Program edit table
Program Name
Favor
Move
Del
The default highlight menu bar is the one on the first line
or the one operated lastly. Moving / button of remote
control to change the setting.
GB-18
Guide of Main Menu
Music Program List
Under the main menu, moving / button of remote control to highlight the program list menu, then press the
“OK” button to enter the Music Program List, and then will
display the following list:
No.
Program edit table
Program Name
Favor
Move
Del
The default highlight menu bar is the one on the first line
or the one operated lastly. Moving / button of remote
control to change the setting.
GB-19
Guide of Main Menu
Sort
Under the main menu, moving / button of remote control to highlight the program list menu, then press the “OK”
button to enter the Sort item, a sub-menu will appear on
the TV screen.
By Name
By Service ID
By Channel No.
To select the desired in the program list, you should firstly
display the Program list by directly pressing “OK” button
on the remote control at the non-menu mode. When you
use / button to switch from one channel to another, the
video from the selected channel will be displayed on the
screen. In order to make it convenient to find your required
program in the list, press “OK” button on the remote control to sort all the programs in name, service ID, channel
number. Switching between TV and radio programs is as
easy as pressing “TV/RADIO” button on the remote control. The program list will disappear after pressing “EXIT”
or “MENU” button.
GB-20
Guide of Main Menu
Program Search
Under the main menu, moving / button of remote control to highlight the Program Search menu, then press the
“OK” button to enter the sub-menu.
For beginners, Auto Search is the best choice. First use
/ button to select Auto item in the program search
menu and then press “OK” button to display Auto Search
menu. Before here, you should select right country and
default by using / button. If country is selected, the
UHF band and VHF band used in your local will be
scanned during searching. After finishing your settings,
move cursor to the last item and press “OK” button to start
the auto search. In this mode all the TPs will be searched
one after another. New searched programs are automatically sorted into two different categories: TV and Radio.
After one and a half minutes, auto search is complete and
any programs found are loaded into the receiver’s memory. Press “EXIT”or “MENU” button to exit from the
Searching window.
GB-21
Guide of Main Menu
Automatic Search
Progress
50%
Channel No
20
Frequency
546MHz
TV List:
000
Music List: 000
You can set parameters in Manual Search if you are familiar with relevant parameters. In this mode, only one TP,
whose necessary parameters are set in Manual Search
menu by hand, can be searched.
Manual Search
Channel No
21
Frequency
474.0 MHz
Bandwidth
8
OK
Strength
54%
Quality
85%
GB-22
MHz
Guide of Main Menu
Parental Control
Use parental lock to restrict the viewing of violent and
adult oriented scenes by children. You can set the parental
lock level in steps as desired.
Under the main menu, moving / button of remote control to highlight the Parental Control menu, then press the
“OK” button, and then will display the following list:
Yes
No
Channel Lock
Parental Setting
Change PIN
Select “Channel Lock” item, then select “Yes” and press
“OK” button to enter password dialog, The default password is 9999.
Move / button to select “Parental Setting” item, and
then will display the following program list:
No.
Parental setting
Program Name
Lock
GB-23
Guide of Main Menu
If you want to know to change Parental PIN , please go to
the “Change PIN” item to configure new PIN.
Press “OK” button, then a box will appear on the TV
screen.
Change Parental PIN
Old PIN
****
New PIN
****
Confirm New PIN
****
OK
Enter the PIN code by using the numeric buttons on your
remote control.
GB-24
Guide of Main Menu
System Setting
Under the main menu, moving / button of remote control to highlight the System Setting menu, then press the
“OK” button to enter System Setting, and then press /
button to change country, language etc. Press “OK” button
to save your settings. Otherwise, press “EXIT” or “MENU”
button to exit the system setting menu without saving.
System Setting
TV standard
PAL/NTSC/AUTO
Display Type
4:3 PS/4:3 LB/16:9
Antenna Power
OFF/ON
Regional Setting
Country
Deutschland
OSD Language
Deutsch
Time Zone
GMT +00:00
Language
OSD language
Deutsch
1st Audio language
Deutsch
2nd Audio language
Deutsch
DVB Subtitle
Deutsch
GB-25
Guide of Main Menu
Time Setting
GMT Usage
Date
Time
System Schedule
Schedule
Task1 Active
Task2 inactive
Task3 inactive
Task4 inactive
Task5 inactive
Task6 inactive
Off/On
2004/01/01
00:42
Detail
Mode once(Daily/Weekly/Stop)
Start Date
2001/01/01
Start Time
00:00
End Time
00:00
Channel Type TV
Channe No. 0001
Note:
. GMT is referred to the standard time of Greenwich. If you
set date and time manually with numeric buttons on your
remote control, the ”GMT usage” item must be set “Off”.
. If EPG is available on programs, you will see the detailed
description of the programs, start/end time and channel
type etc.
. Set the wanted program and the time at which the
Yakumo Receiver XS DVB-T will record automatically.
. Select “DVB Subtitle” in “language”, use / button to
off/change subtitle language.
GB-26
Guide of Main Menu
Game
The system provides four games for user’s entertainment.
They are Mine, Tetris, GomoKu and Calendar. According
to the instruction displayed on the screen, you can enjoy
the game using / / / /MENU/OK button.
Game
Mine
Tetris
GomoKu
Calendar
January 2004
Sun Mon Tue Wed Thu
1
4
5
6
7
8
11 12 13
14
15
18 19 20
21
22
25 26 27
28
29
Fri
2
9
16
23
30
Sat
3
10
17
24
31
Using / button to change month; using / button to
change year.
GB-27
Guide of Main Menu
Accessory
Under the main menu, moving / button of remote control to highlight the Accessory menu, then press the “OK”
button to enter a pop-up drop-down parental rating accessory list.
System
Factory
System
System
Accessory
Information System Version: 1.08
Default
No/Yes
Update
update status time out retry 004
Transmission
Burn
000%
000%
(progress bar)
(progress bar)
Note:
This function of System Update is only provided for the
Yakumo Receiver XS DVB-T manufacturer.
GB-28
Guide of Main Menu
Personal Style
Under the main menu, moving / button of remote control to highlight the Personal Style menu, then press the
“OK” button to enter a pop-up drop-down parental rating
personal style list.
Personal Style
Menu color
Transparency level
Border Pattern
Entry Animation
Blue
(RED/Yellow/Orange
/Grey/Green)
4(1/2/3/5/6/7/8)
Round(Rectangle)
Right(Right Down
/Blind Right/Blind down
/Down)
GB-29
Trouble Shooting
Before contacting your local service, please check
following instructions. If the product does not work
normally after completing the following trouble shooting,
please contact your local distributor or service center.
SYMPTOMS
No message is displayed on the
CORRECTION
•
front panel or product has no
check the main power cable and
check that it is plugged into a
power.
suitable power outlet.
•
check whether the power switch
is On.
•
No picture
make sure that the product is in
operation mode.
•
make sure that Antenna line is
correctly connected to the
equipment.
•
make sure that Antenna Setting
•
check the brightness level of TV.
is correct.
GB-30
Trouble Shooting
SYMPTOMS
Poor picture & sound quality
CORRECTION
•
install the antenna in a place
•
make sure there is no mobile
where there is no obstacle.
phone or microwave oven near
the equipment.
•
make sure the receiving level,
and adjust komma after antenna
if the level is low. The receiving
level can be influenced by
weather.
•
check the volume level of the TV
•
check the mute status of the TV
and Yakumo Receiver XS DVB-T.
and Yakumo Receiver XS DVB-T.
•
No or poor sound
Point the remote control at the
remote sensor of the Yakumo
Receiver XS DVB-T.
•
Replace the batteries with new
ones.
GB-31
Safety Warning
CAUTION
RISK OF ELECTRIC SHOCK
DO NOT OPEN
TO REDUCE THE RISK OF ELECTRIC SHOCK,
DO NOT REMOVE COVER(OR BACK). NO
USER-SERVICEABLE PARTS INSIDE. REFER
SERVICING TO QUALIFIED SERVICE
PERSONNEL.
The lightning flash with an arrowhead symbol
within an equilateral triangle is intended to alert the
user to the presence of uninsulated "dangerous
voltage" within the product's enclosure that may be
of sufficient magnitude to constitute a risk of electric
shock to persons.
The exclamation point within an equilateraltriangle is
intended to alert the user to the presence of important
operating andmaintenance (servicing) instructions in
theliterature accompanying the appliance.
If at any time in the future you should need to
dispose of this product please note that Waste
electrical products should not be disposed of
with household waste. Please recycle where
facilityes exist. Check with your Local Authority
or retailer for recycling advice. (Waste Electrical
and Electrinic Equipment Directive)
GB-32
Service and Warranty
Service
In case of technical problems with your Yakumo product,
contact our hotline on 00 800 / 92 58 66 00.
Warranty
If you think that you need to make a claim on your
Yakumo product under the warranty, call the hotline on 00
800 / 92 58 66 00. Experienced staff will advise you and
arrange how you should proceed. Please do not send any
goods to the Yakumo service centre without obtaining an
RMA number from the hotline first, as otherwise the goods
will be returned unrepaired or refused.
Yakumo grants you a 2-year warranty from the invoice
date. In case of defects, the buyer only has a right to subsequent performance. This subsequent performance will
include either repair or the delivery of a replacement product. Exchanged units or parts will be the property of
Yakumo.
Evidence of the warranty must be provided in the form of
proper proof of purchase (sales receipt or invoice).
Damage caused by improper handling, operation storage
or by force majeure or other external influences is not covered by the warranty. The same applies to wearing parts,
e.g. rechargeable batteries (6 months).
In case of technical queries, go to the Yakumo homepage
at www.yakumo.com or send an e-mail to:
[email protected].
GB-33
www.yakumo.com