1
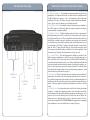
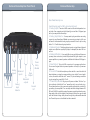
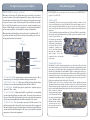
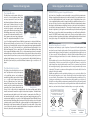
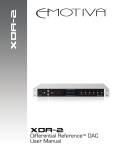
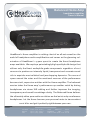
Balanced Home Amp
headphone amplifier
Owner’s Manual
HeadRoom’s Home amplifier is nothing short of an all-out assault on the
world of headphone audio amplification and serves as the gleaming culmination of HeadRoom’s 13-year quest to create the finest headphone
amps available. We employ a painstakingly high-quality build design that
utilizes only the finest audiophile-grade components regardless of cost
concerns to produce an intensely liquid, transparent and accurate sound
rich in exquisite musical detail and jaw-dropping dynamics. The sense of
space around the notes and the emotional nuances of the performance
become vivid, expressive entities with the Home amplifier. The balanced
version takes the Home amp’s performance up another notch by driving
headphones via stereo XLR cabling and further improves the imaging,
transparency and overall soundstage clarity. The Balanced Home delivers
the ultimately refine pure audio resolution we feel exists only on reference
headphones. Let the Home become your personal route to transcendent
sonic bliss and get it perfectly right between your ears.
Toll Free:
Phone:
Fax:
800-828-8184
406-587-9466
406-587-9484
2020
Gilkerson
Drive
Bozeman,
MT
59715
www.headphone.com
1
The Balanced Home Amp
Balanced Home Amp Front Panel Descriptions
1. Headphone Ouputs: The headphone outputs are where you plug in your
4.
crossfeed
switch
1.
headphone
outputs
3.
brightness
switch
2.
rear
output
switch
2
6.
volume
control
5.
gain
switch
headphones. The Balanced Home amp can drive either two headphones with
double-XLR balanced connectors or up to four headphones with single-ended
unbalanced 1/4” plugs. The Home can power all these headphones simultaneously -- just in case you’re having a groovy headphone party!
2. Rear Output Switch: If you want to use your Home amp as a pre-amplifier, a
set of RCA connectors on the rear faceplate act as analog outputs for hooking up
a power amplifier or powered speakers.
3. Brightness Switch: The filter/brightness switch is used to compensate for
the slight warming action of the crossfeed circuit. In the center position, there is
no filter present in the circuit. This is generally the preferred setting. But if you
feel that the crossfeed is causing too much bass response in the source material
or a faint blurring of the central soundstage image, a mild high frequency boost
can be turned on. The “filter 1” setting accentuates the highs at around 3kHz;
with the “filter 2” setting, the filter starts an octave earlier and catches some
of the upper mids while providing an additional boost in the amplitude of the
frequency range. The best setting is whatever sounds good to you!
4. Crossfeed Switch: This switch engages the HeadRoom crossfeed circuit.
Audio imaging on headphones is often not very good; typically the image is a
blob on the left, a blob on the right, and a blob in the middle. The HeadRoom
crossfeed provides the natural acoustic cross-feed normally heard at the left and
right ear as heard from the left and right speaker. Restoring the normally occurring cross-feed signal gives your brain enough information to build the stable
and natural audio image needed to have a quality listening experience. Read
more about the crossfeed switch on page 13.
5. Gain Switch: The 3-position Gain Switch accomodates various headphones’
power needs. For instance, the Low Gain setting would be used for in-ear monitors, allowing a larger range on the volume control pot. Experimenting with your
headphones and the gain switch may help you to determine which setting you
prefer. If have any questions regarding your headphones, feel free to call and
ask us.
6. Volume Control: As you turn the volume control knob clockwise, the volume
increases. You never know where the volume control should be set as different headphones often have widely different impedances and efficiencies, so use
your ears to choose your listening level, not the level on the dial. (We recommend you choose a moderate level so as not to blow out your ears.) You also
need to turn the amp OFF or ALL THE WAY DOWN before plugging in or unplugging
your headphones to avoid a potential short-circuiting of the amp.
3
Balanced Home Amp Rear Panel Panel
Balanced Home Amp
Rear Panel Descriptions
(see following page for DAC option descriptions)
1. Analog Inputs: Two sets of RCA connectors allow for independent con-
(DAC Option)
8.
9.
11.
12.
10.
4
1.
Analog
Inputs
3.
Balanced
inputs
2.
Analog
Input
Selector
5.
Rear
Output
4.
Balanced
outputs
7.
Power
Entry
Module
6.
Ground
Lift
nectivity of two separate non-digital (analog) sources like a CD player, tape
deck or pre-amp into the Home amp.
2. Analog Input Selector: You may want to plug more than one analog
source into your Home Amp. Whether you are using one input or both, you
will need to indicate which analog inputs you want to listen to by choosing
either ‘1’ or ‘2’ with the analog input selector.
3. Balanced Inputs: The balanced input accepts a signal from a balanced
output source (like from a quality CD player, for example) via stereo XLR connectors.
4. Balanced Outputs: If you would like to use your Balanced Home as a
pre-amp, these connectors provide fully balanced left/right outputs to your
power amplifier or powered speakers outfitted with balanced XLR-type inputs.
5. Rear Output: This set of RCA connectors is for pre-amp applications.
You can send a signal either to powered speakers or directly to a power amplifier unit.
6. Ground Lift: Use this handy two-position switch to cancel out electrical
hum interference coming from ungrounded or noisy outlets. For most applications, the switch should be set to “normal.” If you are hearing some buzzing, try moving the ground lift to “float”.
7. Power Entry Module: Plug in your AC power cord here. The “zero” position indicates off while the “one” means the unit is on and ready to go.
The red window box on the power entry module indicates the current voltage setting of your amplifier. You can easily switch the voltage between 115
VAC and 230 VAC by carefully opening the power receptacle window housing,
then simply slide out the receptacle and reinsert it facing the opposite way
until the desired voltage clearly shows through the power module window
box. The whole process should take less than a minute!
5
The Digital-Analog Converter Option
What is a Digital to Analog Converter?
When music is stored on a CD, digital audio tape, or hard drive, it is stored as
a series of numbers. Each number represents the voltage of the audio signal
at a particular point in time. String 44,000 voltage points together and you get
one second of music signal. (The audio geeks in the crowd will point out that
96,000 and 192,000 numbers per second are also common sampling rates.)
The job of a DAC (digital to analog converter) is to convert the string of numbers
into an analog signal that can be amplified to drive your headphones.
When purchasing the Home Amp, you have the option of including a DAC. If
you did not purchase the DAC option with your amp initially, you can have
this upgrade performed at a later date.
10.
USB input
9.
digital input selector
8.
coaxial input
12.
optical input
11.
source selector
8. Coaxial Input The coaxial input is your typical coaxial connector. We rec-
6
ommend using a 75 ohm digital cable when using the coaxial input.
9. Digital Input Selector When using the DAC, the digital input selector
allows you to choose which digital input you would like to listen to.
10. USB Input The USB input gets its signal from a computer: laptop or
desktop; PC, Mac, or Unix.
11. Source Selector When using the DAC, you will need to choose whether
you are using a digital input or an analog input. The source selector switch allows you to have both digital and analog sources connected at the same time,
and you may change between the two with a simple flip of this switch.
12. Optical Input The optical input is your typical Toslink connector. You
get this input signal from the optical output of your player. Not so many portable audio players have optical outputs anymore, but many portable DVD players and some hard disk drive players do. Of course, you can get this signal from
many pieces of home audio equipment.
Home DAC & Upgrades
Upon purchase of your Home amp, You can choose the Home DAC Module or
upgrade to the Max DAC.
The Home DAC
The Home DAC starts to become a very serious digital to analog converter: not only
does it use the flagship Cirrus Logic CS4398 DAC, it also uses the spendy---but oh so
sweet sounding---Burr-Brown OPA627 op-amps in class “A” bias as the output devices. The result is the kind of liquid clarity found in multi-thousand dollar high-end
CD players.
To go along with the previously mentioned class “A” biased OPA627s, only metal thin
film resistors and polyphenylenesulfide (poly film) capacitors are used in the audio
circuits. Three low-noise, ultra-low dropout power supply
regulators isolate the various
digital, analog, and mixed signal circuits. This DAC is also
available in a balanced version for the Balanced Home
Amp with two complete converter sections, one for the
normal and one for the inverted
Home DAC
audio signal.
The Max DAC Upgrade
The Max DAC is a work of digital upsampling art in gold and black. These four layer
gold coated, double copper circuit boards are covered edge to edge with the best parts
money can buy, and right in the middle of it an Analog Devices AD1896 192 kHz Stereo
Asynchronous Sample Rate Converter. WHAT!? Simply a screaming gizmo that upconverts any digital signal into an ultra high speed, high resolution digital signal without
relying on the incoming clock, and then down converts it into the slower 192 kHz word
stream while interpolating (to get rid of the “digital” haze) and reclocking (to get rid of
jitter) before sending the data off to the DACs. The result?
This DAC is good. Sure, a $10,000 CD player is better, but just. Tweaky ground plane
adjustments are made for stability and speed on that gold coated circuit board we
mentioned earlier. Quality components don’t end there, though, only metal thin film
resistors and polyphenylenesulfide (poly film) capacitors are used in the audio circuits.
Three low-noise, ultra-low
dropout power supply regulators isolate the various digital, analog, and mixed signal
circuits. The Balanced Max
DAC features two complete
converter sections, one for
the normal and one for the
inverted audio signal.
Max DAC
7
Hooking Up Your Home Amp via DAC
Balanced Cabling & Hook Up via Analog
It is a good idea to turn your units off while connecting equipment.
ALWAYS make sure the volume all the way down before plugging and unplugging
your headphones from the jacks.
Custom cabling your headphones for balanced drive
For the Sennheiser HD580/ HD600/ HD650 models, Cardas
Audio offers very highly upgraded balanced cabling which
can be easily installed by the consumer via the quick-detach, two-prong clips at the bottom of the headphone’s
earcups; So simply tug out the stock Sennheiser cable,
pop in the new Cardas Audio cable and, BLAM, you are
ready to jam balanced-style. We can also do balanced
re-cabling for the AKG701, and the beyerdynamic DT880
-- both of which are hard-wired and must be done here
at HeadRoom. All warranties are still valid. Please contact us at 1-800-828-8184 for further info regarding recabling your headphones to a fully balanced set-up.
...Using the Digital-to-Analog Converter Option
USB Input
1. Select ‘digital’ on the digital/analog selector switch on the back of the unit
2. Select ‘USB’ on the digital selector
switch on the back of the unit
3. plug your USB cable into the back of the
amplifier
4. plug the other end of your USB cable into
any USB jack on your computer or player.
Amplifier DAC,
USB
In order to operate a headphone amplifier in balanced mode, you must have a balanced
source and balanced headphones. Please contact us for more details or recommendations of a balanced player.
Computer, USB
...Using the Balanced Analog Inputs
Analog Input
Optical Input
1. Select ‘digital’ on the digital/analog selector switch on the back of the unit
2. Select ‘optical’ on the digital selector
switch on the back of the unit
3. plug your optical cable into the back of
the amplifier.
4. plug the other end of your optical cable
into the optical output of your player.
Amplifier DAC,
optical input
CD player
optical
output
You will need a balanced XLR cable with right
and left terminations on both ends.
1. Select ‘analog’ on the digital/analog selector switch on the back of the unit.
2. Plug your XLR cables into the back of the
amplifier using the balanced XLR input set, labeled for right(R) and left(L).
3. Plug the other end of your XLR cable into the
Balanced analog output of your CD player.
4. Make sure that the mode switch on the amp
is switched to balanced mode.
XLR analog
inputs
CD player analog
outputs
...Using the Unbalanced Analog Inputs
When in unbalanced mode, balanced headphones will not operate. Unbalanced Headphones must be used.
Coaxial Input
Analog Input
1. Select ‘digital’ on the digital/analog
selector switch on the back of the unit
2. Select ‘coaxial’ on the digital selector
switch on the back of the unit
3. plug your coaxial able into the back of
the amplifier.
4. plug the other end of your coaxial cable
into the coaxial output of your player.
You will need an RCA cable with right and
left terminations on both ends.
1. Select ‘analog’ on the digital/analog selector switch on the back of the unit
2. plug your RCA cables into the back of the
amplifier using analog input set ‘1’ or ‘2’.
3. Select the corresponding set number of
the analog input select switch
4. plug the other end of your RCA cable into
the analog output of your CD player.
8
Amplifier DAC,
coaxial input
CD player,
coaxial output
Amplifier RCA
analog inputs
CD player, analog
outputs
9
The Science of Balance
It’s All About Balance
Headphones share a common connection on the non-driven side of the driver
elements. You can see this by looking at a headphone plug; the left channel
connection is at the tip, the right channel connection is the ring, and the common connection were talking about is the remainder of the plug shaft, called
the sleeve. The problem is that the summed left and right channel return current will develop a signal across the series resistance of the common return
path, which muddies the stereo presentation on headphones with cross-talk.
It is this headphone connector found on all headphones that makes it impossible to drive the return side of the headphone coils with the separate left and
right inverted signals of a fully balanced amplifier. HeadRoom has overcome
this problem with the Balanced Home and Balanced Max Headphone Amplifiers, along with Cardas custom headphone cables.
Driving headphones in balanced mode effectively delivers twice the slew rate,
half the amplifier output impedance, and rids the headphones of significant
cross talk due to the common return connection from the drivers. It really is
another headphone listening experience.
For you scientifically inclined folks out there, here’s the techspeak about balanced amps: Any time an electrical signal passes through a cable, outside
(electrical) noise interference can be induced, even when using shielded cables. In an unbalanced system, both the positive and negative halves of the
waveform travel together down the positive and negative signal leads and can
be influenced by the outside noise. In a balanced system, the positive and
negative halves of the waveform are separate; when these separate halves
pickup the same outside electrical noise interference, the noise components
on one half are out-of-phase with the noise components on the other half (almost like a mirror image). When the negative and positive halves of the signal
are combined in the balanced amplifier, the out-of-phase noise components
on the two halves cancel each other out as they are combined, leaving only
the original, clean output signal... Translation: superb sound!
Ground wire resistance of common signal return develops
inter-channel cross-talk distortion
Using the Balanced Home as a PreAmp
How about another helpful feature: The Balanced Home amp can double as a
very superb sounding, fully balanced preamp. Make sure the Processor and
Filter switches are in the OFF position when listening through speakers to
avoid goofing up your imaging and frequency response. Because the Home is
a fully balanced unit, it is a good idea to study the details of how to hook up
the Home to your source or call us if you have further questions.
All driver terminals driven with discrete signals.
No common signal paths to muddy audio
10
11
Module Info & Upgrades
The Home Module
This little blue module contains all the electronics for a Home Headphone Amp. There
are two 4-layer circuit boards (one each for
the left and right channel) that are connected
with a series of header pins used to solder
the module to the main circuit board. This
module is designed to sound great without
going up the ridiculously steep part of the
diminishing returns curve. It uses OPA2134
op-amps for the internal input buffer, crossfeed, summer, and power amp voltage gain
Home Module
stage. The output current amplifier is our version of the highly regarded Diamond Buffer discrete transistor design by Walt Jung.
All these active circuits are forced in to class “A” bias with constant current sources.
Resistors are 1% metal thin film, and caps in the signal chain are polyphenylenesulfide
(poly film). The sound of this module is not only well balanced and punchy, it’s also
liquid and integrated. This is a sweet listen. The Home Amp and Balanced Home Amp
can be upgraded with Max modules. This is a tricky maneuver and must be executed
with exceeding care. Only those with the trickest of gear should bother as these babies
are pricy almost beyond reason; every one else should just enjoy the lovely sound of
getting it right between your ears in a less spendy module. But the Max Modules are
the real deal, and easily let you tell the difference between a $3000 and $12000 CD
player.
The Max Module Upgrade
This little gold and black module is the real
deal. Tiny chips that cost $15 bucks apiece,
0.1% metal film resistors, and polyphenylenesulfide (poly film) caps are silver soldered
to 2 oz. gold coated copper traces which
blur in a glittering haze over black solder
masked four layer circuit board. Speaking of
circuit board, this is the first time we have inMax Module
creased the sized of our module circuit board.
Fear not, for it is still pin for pin compatible with older Home and Max units. But the
circuit boards must be mounted on edge for better heat dissipation. The Max Module
uses what many audiophiles insist is the best audio op-amp made, the OPA627, for
the internal input buffer, crossfeed, summer, and power amp voltage gain stage. The
output current amplifier is our version of the highly regarded Diamond Buffer discrete
transistor design by Walt Jung. All active stages are forced heavily into class-A bias with
coinstant current sources. Writing this copy we realized the benefit statement of the
Max module is the features statement. The quality of the entire build of this module
is out of this world, and when coupled with the finest of headphones and the finest of
front ends, the results are transcendent bliss.
12
Volume Upgrades & HeadRoom rossfeed info
Volume Control Upgrade- Stepped Attenuator
Our Home Line of amplifiers come standard with a very good Nobel potentiometer.
Putting a signal through the wipers and conductive element of a potentiometer, however, does slightly degrade the sound. One way to get rid of degradation from a pot is
to use a stepped attenuator, which is simply a multi-pole switch that allows you to select one of a series of resistors to adjust the volume. We built a shunt attenuator where
the voltage is divided between a single fixed resistor on the circuit board and the resistor selected by the stepped attenuator. This meethod keeps the number of contacts
the audio signal has to go through to a minimum. We use parts from the well regarded
Elma Type 04, 24-position switch, but we manufacture our own Electroless Nickel/Immersion Gold (ENIG) switch contact circuit boards. These boards are highly corrosion
resistant, and have a very heavy gold plating---significantly heavier than normal circuit
board gold coatings. This is important to the increased lifetime of the switch.
About the HeadRoom Crossfeed
Imagine you are listening to a pair of speakers. If you turn off the left speaker, both
ears hear the sound from the right speaker. But because the left ear is slight farther
away than the right ear, it hears the speaker’s sound slightly after the right ear; about
300 microseconds. This time difference is called the “inter-aural time difference” and
it is the main thing your brain listens for in order to tell where to place sound left-toright.
But in headphones if you turn off the left channel, only the right ear hears the sound.
In headphones, if there is any sound that is only in the left channel, or only in the
right channel, then only that ear hears the sound. This is not natural, and you brain
becomes fatigued trying to figure out where sound is coming from when only one ear
is hearing it. This tends to create an audio image that is a blob on the left, blob on the
right and a blob in the middle.
HeadRoom amplifiers cure the problem by allowing you to cross-feed a little of the
left and right channels across to each other through a short time delay using the
processor switch. The usefulness of the circuit varies depending on what type of recording you are listening to; mono and binaural recordings need no processor at all.
Old studio recordings that have instruments panned hard left or right, benefit greatly
from the processor. Live and classical recordings miked from a distance benefit somewhat less, and can often be listened to without the processor quite comfortably.
The crossfeed switch in HeadRoom amplifiers allow you to cross-feed a little of the
left and right channels across to eachother through a short time delay.
Plain
Headphones
With
HeadRoom
30 degrees
off axis
Far ear hears
slight delay.
Near ear hears
sound first.
13
Exchanges, Returns, & Repairs
HeadRoom 30 Day Guaranty
Equipment Exchanges
If you would like to exchange your purchase for another item, you have two
options. You can simply purchase the item you want, and send the item you
don’t want back for refund within 30 days of the original purchase (don’t forget to fill out the back of the Return & Exchange card and include it with your
return). We will refund your credit card after we receive the item. Or, you can
send your product back as an exchange, and indicate the product you would
like on the Return card. We will adjust your credit card accordingly and ship
you the new item. Replacement products are shipped to you as soon as possible, typically within 3-5 days provided the replacement item is in stock.
Defective Equipment Exchanges
In the uncommon event of receiving a defective product, contact us and we
will ship out a replacement product to you at no cost as soon as possible,
typically within 3-5 days provided the replacement item is in stock. You will
receive the replacement item along with a return shipping label and a card
to include with the defective item to return to HeadRoom. Important: Fill in
your name and original invoice number of your order on the card and return
the item to HeadRoom within 2 weeks. If we have not received the product
after 2 weeks (allowing shipping time) we will charge your credit card the
amount of the defective item. Please understand that we enforce this policy
as an incentive for customers to get defective equipment back to us as soon
as possible.
Shipping Products back to HeadRoom
Please ship products back in the original shipping box (or another that is
comparable); please don’t send headphones back in JUST the headphone
box, as it’s a sure bet that they will no longer be in “as-new” condition when
we receive them! We HIGHLY recommend that you ship returns using an insured and “signature required” delivery method—we can’t be responsible
for lost or damaged packages. Finally, don’t forget to include the completed
Return & Exchange card and WRITE YOUR NAME on the outside of the box!
Return Products to:
HeadRoom
Attn: Returns
2020 Gilkerson Drive
Bozeman, MT 59715
14
Balanced Home Amp Warranty
Contact Us:
www.headphone.com
Toll Free: 800-828-8184
Phone: 406-587-9466
Fax: 406-586-9484
Unless specifically stated otherwise, all HeadRoom purchases come with a
30-day satisfaction guaranty in order to give you the opportunity to evaluate
your purchases. We’re happy to provide you with the opportunity to refund
or exchange your product, but to keep costs down we do have a few conditions.
Products must be returned to us within 30 days of the date you receive the
product. So make sure you try your purchase out right away! Products must
be in “as-new” condition. This means that they’re in pristine cosmetic condition, functioning perfectly, and include ALL materials (plastic bags, warranty
cards, tie wraps, etc). In other words, please send products back exactly as
you received them. If a product is returned within the 30-day return period,
but is not in “as-new” condition, we will charge you a 15% restocking fee plus
any labor and materials required to return the product to “as-new” condition.
Sorry, but after your 30 day trial, products are no longer exchangeable or
refundable.
If you’re having trouble with a headphone amp or system, please contact us
first to troubleshoot the problem. You can email Sales, (sales@headphone.
com) or call 800.828.8184. If we can fix it while you’ve still got the product,
everyone’s happy!
Balanced Home Amp Warranty:
The Balanced Home Amp is warrantied for two years. If anytime within the
first two years of your purchase you have a problem with your Balanced Home
Amp, you can return it for repairs under the terms of our Warranty. Visit our
website for details about warranting your Balanced Home Amp, or give us a
call at 800.828.8184, and we will trouble shoot the problem, and if necessary
authorize a repair.
HeadRoom is the only authorized service center for HeadRoom products, either in or out of warranty. If a unit is under warranty, there is no cost for the
repair labor, parts, or shipping from HeadRoom back to you (i.e., You’re responsible for paying the shipping charges to get the product to us).
Out of Warranty Repairs
Non warranty repairs are assessed at an hourly rate of $50 per hour plus
parts, and are only conducted on HeadRoom products. If the cost of the repair is over $100, we will call you with an estimate. When we receive the
equipment, we will initiate repairs and upgrades within 1-2 weeks and return
the unit to you. The customer pays for shipping to HeadRoom and we pay for
return shipping.
15
A Word About
Your Hearing
People have a natural tendency to listen to music at much louder levels with
headphones than they would with speakers. To avoid permanent hearing
damage, it’s important to be careful not to listen at extremely loud levels (or
to listen for too long at moderately loud levels). Because HeadRoom amps
need to be able to drive even the most inefficient dynamic headphones to
satisfactory listening levels, they are also able to drive headphones of average or higher efficiencies to extremely high levels. As a result, even though
the volume control on your HeadRoom amp may appear to be set to a low
level, you may not be listening at a safe level. Generally speaking, when listening to headphones you should only turn up the volume to the point at
which the sound isn’t too quiet.
As a general rule, sound pressure levels under 80 decibels will not damage
hearing, even if experienced continually. On the other hand, anything over
100 decibels may cause permanent damage very quickly. Sustained exposure to sound pressure levels anywhere in between can also be damaging
—the louder the sound, the shorter the time required to cause permanent
damage.
Just to drive this message home, here’s a bit of information about hearing
damage. The most common type of damage caused by prolonged or excessively loud sound is called tinnitus. It manifests itself as a sustained buzzing
and/or ringing in the ears, and can become a permanent condition.
If you find that your ears are ringing or that there is a sensation of pressure or
fatigue, your body is trying to tell you that your ears need a break. Give them
a rest for a few days (or until they feel fresh). If you ignore these symptoms,
you’re risking permanent hearing damage.
In addition, don’t fool yourself into thinking that you either have full-blown
tinnitus or you don’t have it at all—there are different degrees of hearing
damage. For example, you might have a mild case where you only notice ringing in your ears in the quiet of your bedroom at night. However, once you
have a slight case of tinnitus, your ears are much more susceptible to further
damage. So if you do experience mild symptoms, it’s important to be much
more careful about your exposure to loud sounds.
Sorry to sound so sobering, but a lifetime of musical enjoyment requires ears
in tiptop shape. Now that we’ve told you to be careful, don’t blame us if you
blow it. If you have any more questions about hearing damage, call a doctor.
Contacting HeadRoom
16
Toll Free:
Phone:
Fax:
800-828-8184
406-587-9466
406-587-9484
2020
Gilkerson
Drive
Bozeman,
MT
59715
www.headphone.com