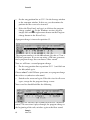
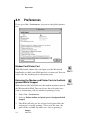
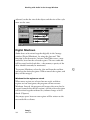
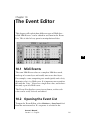
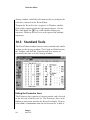
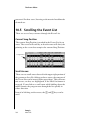
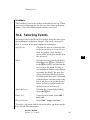
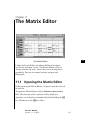
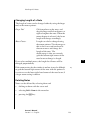
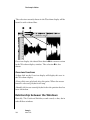
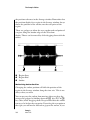
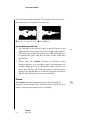
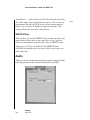
1
Owner’s Manual for Adat Edit Version 1.0 February 1999 – English - E Soft- und Hardware GmbH Important! Please read this licence agreement before opening the disk seal! Copyright This manual and software described herein are copyrighted © 1992–1999 by Emagic Soft- und Hardware GmbH (Emagic) with all rights reserved. Under copyright laws this manual, protection-key and software may not be duplicated in whole or in part without the written consent of Emagic, except in the normal use of the software or to make a back-up copy of the original disk. Limited Warranty Except to the extent prohibited by applicable law, all implied warranties made by Emagic in connection with this manual and software are limited in duration to ninety (90) days or minimum guarantee period in your state or country from the date of original purchase, and no warranties, whether express or implied, shall apply to this product after said period. This warranty is not transferable – it applies only to the original purchaser of the software. Emagic makes no warranty, either express or implied, with respect to this software, its quality, performance, merchantability or fitness for a particular purpose. As a result, this software is sold »as is«, and you, the purchaser, are assuming the entire risk as to quality and performance. In no event will Emagic be liable for direct, indirect, special, incidental or consequential damages resulting from any defect in the software or documentation. Some states do not allow the exclusion or limitation of implied warranties or liability for incidental or consequential damages, so the above limitation or exclusion may not apply to you. Licence Agreement Carefully read all the terms and conditions of this licence agreement prior to using this package. Use of all or any portion of this package indicates your agreement to the following terms and conditions. Emagic grants you, the purchaser, a non-exclusive license to use the software in this package (the »software«), under the terms and conditions stated in this agreement. You may: 1. use the software on a single machine. 2. make one copy of the software solely for back-up purposes. You may not: 1. make copies of the user manual or the software in whole or in part except as expressly provided for in this agreement. 2. make alterations or modifications to the software or any copy, or otherwise attempt to discover the source code of the software. 3. sub-license, lease, lend, rent or grant other rights in all or any copy to others. 4. make verbal or media translation of the user manual. 5. make telecommunication data transmission of the software. Term This agreement is effective until terminated. You may terminate it at any time by destroying the software together with all copies in any form. It will also terminate if you fail to comply with any term or condition in this agreement. Owner’s Manual Authors: Peter Gorges, Jan-Friedrich Conrad, Ronald Bias, Thorsten Adam Translation: Bernie Hurst, Matt Bell, Ruthven Martinus Editing: Jeff Bohnhoff, Robert Hunt, Joel Heppting, David Dvorin, David Freeman Layout: Fabian Schmid, Ronald Bias, Thorsten Adam, Uwe Senkler © 1999 by E Address: Emagic Inc. 13348 Grass Valley Ave. Building C, Suite 100 Grass Valley, CA 95945 USA Tel: +530 477 1051 Fax: +530 477 1052 Net: http://www.emagic.de eMail: [email protected] All Rights Reserved. All Trademarks are the property of their respective owners. Table of Contents Chapter 1 Features 1 Chapter 2 Getting Started 2 Chapter 3 Tutorial 3 Chapter 4 Operation 4 Chapter 5 Transport Functions 5 Chapter 6 Arrange Window 6 Chapter 7 Audio Basics 7 Chapter 8 Working with Audio in the Arrange Window 8 Chapter 9 The Mixer 9 Chapter 10 The Event Editor 10 Chapter 11 The Matrix Editor 11 Chapter 12 The Score Editor 12 Chapter 13 The Sample Editor 13 Chapter 14 Synchronization, Video and Midi Files 14 Chapter 15 Reference: Key Commands and Use of Mouse 15 Chapter 16 Menu Reference 16 Chapter 17 Audio Recording Tips 17 18 Glossary Gl Index Ix C Owner’s Manual Version 1.0 – English - Table of Contents Emagic Adat Edit Chapter 1 1.1 1.2 1.3 1.4 1.5 1.7 1.8 Chapter 2 2.1 2.2 2.3 1 Features Adat Edit is… . . . . . . . . . . . . . . . . . . . . . . . . . .23 Multitrack Recorder . . . . . . . . . . . . . . . . . . . . .25 Flexible Input . . . . . . . . . . . . . . . . . . . . . . . . . .26 Automatic Notation . . . . . . . . . . . . . . . . . . . . .26 GM Supported . . . . . . . . . . . . . . . . . . . . . . . . .27 Graphical Interface . . . . . . . . . . . . . . . . . . . . . .28 About this Manual . . . . . . . . . . . . . . . . . . . . . .29 The Tutorial Chapter . . . . . . . . . . . . . . . . .29 2 Getting Started 7 Windows . . . . . . . . . . . . . . . . . . . . . . . . . . . . .31 Getting Started With Adat Edit . . . . . . . . . . . .31 Selecting the Midi Out Port in the Program 31 Testing the Midi Connection . . . . . . . . . . .32 Test the Midi Out . . . . . . . . . . . . . . . . . . .32 Adat Edit and Multitasking . . . . . . . . . . . .33 Launching Adat Edit . . . . . . . . . . . . . . . . .33 Launch Adat Edit Automatically . . . . . . . . .34 Macintosh . . . . . . . . . . . . . . . . . . . . . . . . . . . .34 Launching Adat Edit . . . . . . . . . . . . . . . . .34 Choose Midi Connection . . . . . . . . . . . . . .35 Midi Time Piece . . . . . . . . . . . . . . . . . . . . .36 Testing the Midi Connection . . . . . . . . . . .36 Test the Midi-Out . . . . . . . . . . . . . . . . . . .37 Autoload Song . . . . . . . . . . . . . . . . . . . . .37 Start Adat Edit automatically . . . . . . . . . . .38 MacOs/Win: Differences . . . . . . . . . . . . . . . . . .38 Keyboard and Mouse . . . . . . . . . . . . . . . .39 Key Commands . . . . . . . . . . . . . . . . . . . . .40 Exchanging Songs Between Mac and PC . .40 Main Menu Bar . . . . . . . . . . . . . . . . . . . . .41 8 3 4 5 6 9 10 11 12 13 14 15 16 17 18 Gl Chapter 3 3.1 Tutorial Ix Adapting the Tutorial Song . . . . . . . . . . . . . . .43 Load the Tutorial Song . . . . . . . . . . . . . . .43 General Midi Tone Generator . . . . . . . . . .44 Non GM, Multi-Timbral Tone Generators .45 Owner’s Manual Version 1.0 – English - B C 9 3.2 3.3 3.4 3.5 3.6 3.7 3.8 3.9 3.10 10 Sounds and Midi Channels . . . . . . . . . . . .45 Drum Kit . . . . . . . . . . . . . . . . . . . . . . . . . .46 Starting the Song . . . . . . . . . . . . . . . . . . . . . . .47 Overview . . . . . . . . . . . . . . . . . . . . . . . . . . . . .48 Tracks and Sequences . . . . . . . . . . . . . . . . . . .49 Information Track and Instruments . . . . . . . . . .50 Transport Functions . . . . . . . . . . . . . . . . . . . . .50 Start Song Positions . . . . . . . . . . . . . . . . .51 Display Current Song Position . . . . . . . . . .52 Zoom a Window Excerpt . . . . . . . . . . . . . .52 Cycle Mode . . . . . . . . . . . . . . . . . . . . . . . .52 Solo and Selection . . . . . . . . . . . . . . . . . . .53 Quantize . . . . . . . . . . . . . . . . . . . . . . . . . .55 Loops . . . . . . . . . . . . . . . . . . . . . . . . . . . .56 The Toolbox . . . . . . . . . . . . . . . . . . . . . . .57 Mouse Arrow . . . . . . . . . . . . . . . . . . . . . .57 Undo . . . . . . . . . . . . . . . . . . . . . . . . . . . .58 Copies of Sequences . . . . . . . . . . . . . . . . .58 Scissors . . . . . . . . . . . . . . . . . . . . . . . . . . .59 Transposition . . . . . . . . . . . . . . . . . . . . . .59 Your First Recording . . . . . . . . . . . . . . . . .60 Song Settings . . . . . . . . . . . . . . . . . . . . . .61 Let’s Record! . . . . . . . . . . . . . . . . . . . . . . .62 Saving the Song . . . . . . . . . . . . . . . . . . . .64 Event List . . . . . . . . . . . . . . . . . . . . . . . . . . . . .65 Matrix Editor . . . . . . . . . . . . . . . . . . . . . . . . . .67 Score Editor . . . . . . . . . . . . . . . . . . . . . . . . . . .69 Display Parameter Box . . . . . . . . . . . . . . . .70 Style . . . . . . . . . . . . . . . . . . . . . . . . . . . . .70 Key Signature . . . . . . . . . . . . . . . . . . . . . .71 Text . . . . . . . . . . . . . . . . . . . . . . . . . . . . .71 Page Edit View . . . . . . . . . . . . . . . . . . . . .71 Arrange-Level . . . . . . . . . . . . . . . . . . . . . .72 Track Filter . . . . . . . . . . . . . . . . . . . . . . . .73 Print . . . . . . . . . . . . . . . . . . . . . . . . . . . . .75 Audio Tracks . . . . . . . . . . . . . . . . . . . . . . . . . .75 Create Audio tracks . . . . . . . . . . . . . . . . .75 Mixer with Audio Channels . . . . . . . . . . . .76 Importing Audio File . . . . . . . . . . . . . . . . .77 Sample Editor . . . . . . . . . . . . . . . . . . . . . .78 Internal Audio Effects in the Mixer . . . . . .80 Emagic Adat Edit 1 Now It's Your Turn … . . . . . . . . . . . . . . . .81 2 Chapter 4 4.1 4.2 4.3 4.4 4.5 4.6 4.7 4.8 4.9 4.10 Operation 3 Mouse . . . . . . . . . . . . . . . . . . . . . . . . . . . . . . .83 Key Commands . . . . . . . . . . . . . . . . . . . . . . . .85 Operating the Windows . . . . . . . . . . . . . . . . . .87 Standard Elements of Operation . . . . . . . .88 Selecting Objects . . . . . . . . . . . . . . . . . . . . . . .94 Undoing a Selection . . . . . . . . . . . . . . . . .96 Selecting all Following Objects . . . . . . . . .96 Working withTools . . . . . . . . . . . . . . . . . . . . . .98 Tools: Area of Influence . . . . . . . . . . . . . .99 The Edit Menu . . . . . . . . . . . . . . . . . . . . . . . .104 Undo . . . . . . . . . . . . . . . . . . . . . . . . . . .104 File Menu . . . . . . . . . . . . . . . . . . . . . . . . . . . .105 Song Settings . . . . . . . . . . . . . . . . . . . . .107 1.Quick Launch of Recent Songs . . . . . . .107 Windows Menu . . . . . . . . . . . . . . . . . . . . . . .108 Open Event List . . . . . . . . . . . . . . . . . . . .108 Open Mixer . . . . . . . . . . . . . . . . . . . . . . .109 Preferences . . . . . . . . . . . . . . . . . . . . . . . . . .110 Wide Song Position Line . . . . . . . . . . . . .111 Single Click closes Window . . . . . . . . . . .111 Song Settings . . . . . . . . . . . . . . . . . . . . . . . . .112 Bank Select . . . . . . . . . . . . . . . . . . . . . . .115 4 5 6 7 8 9 10 11 12 13 14 15 Chapter 5 5.1 Transport Functions 16 Transport Window . . . . . . . . . . . . . . . . . . . . .119 Display Options . . . . . . . . . . . . . . . . . . . .119 Indicator Options . . . . . . . . . . . . . . . . . .119 Position Slider . . . . . . . . . . . . . . . . . . . . .120 Smaller/Larger . . . . . . . . . . . . . . . . . . . . .120 Parameter Fields and Indicators . . . . . . . .121 Position Indicators . . . . . . . . . . . . . . . . . .121 Position Markers (Locators) . . . . . . . . . . .121 Tempo . . . . . . . . . . . . . . . . . . . . . . . . . .122 Free Memory . . . . . . . . . . . . . . . . . . . . . .122 End of Song . . . . . . . . . . . . . . . . . . . . . .124 17 Owner’s Manual Version 1.0 – English - 18 Gl Ix B C 11 5.2 5.3 5.4 5.5 5.6 5.7 5.8 Chapter 6 6.1 6.2 6.3 6.4 6.5 6.6 12 Transport Functions . . . . . . . . . . . . . . . . . . . .124 Mode-Buttons . . . . . . . . . . . . . . . . . . . . . . . .125 Cycle (Repeat Mode) . . . . . . . . . . . . . . . .125 Record Replace . . . . . . . . . . . . . . . . . . . .126 Solo . . . . . . . . . . . . . . . . . . . . . . . . . . . .126 Bar Ruler . . . . . . . . . . . . . . . . . . . . . . . . . . . .129 Cycle Mode . . . . . . . . . . . . . . . . . . . . . . . . . .132 Cycle Bars . . . . . . . . . . . . . . . . . . . . . . . .132 Autodrop . . . . . . . . . . . . . . . . . . . . . . . . . . . .133 Combining Cycle and Autodrop . . . . . . . . . . .134 Tempo List . . . . . . . . . . . . . . . . . . . . . . . . . . .135 Arrange Window Structure of the Arrange Window . . . . . . . . .137 Tools . . . . . . . . . . . . . . . . . . . . . . . . . . . . . . .138 Tracks . . . . . . . . . . . . . . . . . . . . . . . . . . . . . .138 Arranging Sequences . . . . . . . . . . . . . . . . . . .143 What is a Sequence? . . . . . . . . . . . . . . . .143 Creating an Empty Sequence . . . . . . . . .143 Shifting Sequences in Time . . . . . . . . . . .143 Copying Sequences . . . . . . . . . . . . . . . . .143 Moving/Copying onto another Track . . . .144 Changing the Length of a Sequence . . . .144 Setting Cycle Length by Sequence Length 144 Selecting within the Cycle Locators . . . . .145 Automatically Adjusting the Length . . . . .145 Setting Locators by Objects . . . . . . . . . . .145 Optimizing Size of Objects . . . . . . . . . . .145 Snap Objects . . . . . . . . . . . . . . . . . . . . . .146 Remove Overlaps . . . . . . . . . . . . . . . . . .146 Tying Objects . . . . . . . . . . . . . . . . . . . . .147 Erase Duplicated Events . . . . . . . . . . . . . .147 Information Track . . . . . . . . . . . . . . . . . . . . . .147 Sequence Parameters . . . . . . . . . . . . . . . . . . .148 Quantize . . . . . . . . . . . . . . . . . . . . . . . . .149 Loop . . . . . . . . . . . . . . . . . . . . . . . . . . . .149 Stopping Loops . . . . . . . . . . . . . . . . . . . .150 Turning Loops into real Copies . . . . . . . .151 Transpose . . . . . . . . . . . . . . . . . . . . . . . .151 Velocity . . . . . . . . . . . . . . . . . . . . . . . . . .152 Emagic Adat Edit 6.7 6.8 6.9 6.10 Chapter 7 7.1 7.2 1 Delay . . . . . . . . . . . . . . . . . . . . . . . . . . .152 Normalizing Sequence Parameters . . . . . .152 Demix by Event Channel . . . . . . . . . . . . . . . .153 Quantization . . . . . . . . . . . . . . . . . . . . . . . . .154 Setting the Quantization Value . . . . . . . .154 Quantization: Operation . . . . . . . . . . . . .154 Fixing the Quantization . . . . . . . . . . . . . .155 The Different Types of Quantization . . . .155 No Quantizing . . . . . . . . . . . . . . . . . . . . .155 Standard Quantization . . . . . . . . . . . . . .156 Quantization to Odd Tuplets . . . . . . . . . .156 Swing Quantization . . . . . . . . . . . . . . . . .156 Mixed Quantization . . . . . . . . . . . . . . . . .157 Pre-quantization . . . . . . . . . . . . . . . . . . .157 View . . . . . . . . . . . . . . . . . . . . . . . . . . . . . . .158 Color Sequences . . . . . . . . . . . . . . . . . . .158 Hide/Show Transport Field . . . . . . . . . . . .158 Hide/Show Parameters . . . . . . . . . . . . . .159 Grid . . . . . . . . . . . . . . . . . . . . . . . . . . . .159 White Background . . . . . . . . . . . . . . . . .159 Options . . . . . . . . . . . . . . . . . . . . . . . . . . . . .160 Send Midi Commands... . . . . . . . . . . . . . . . . .160 Maximum Volume . . . . . . . . . . . . . . . . . .160 2 3 4 5 6 7 8 9 10 11 12 13 Audio Basics 14 What You Need to Know . . . . . . . . . . . . . . . .161 Basic Principles and Terminology . . . . . . . . . .161 Audio File . . . . . . . . . . . . . . . . . . . . . . . . . . .161 Regions . . . . . . . . . . . . . . . . . . . . . . . . . . . . .162 Anchor . . . . . . . . . . . . . . . . . . . . . . . . . . . . .163 Audio Track . . . . . . . . . . . . . . . . . . . . . . . . . .163 Audio Object . . . . . . . . . . . . . . . . . . . . . . . . .164 Sample Editor . . . . . . . . . . . . . . . . . . . . . . . .164 Production . . . . . . . . . . . . . . . . . . . . . . . . . . .165 Starting a Recording . . . . . . . . . . . . . . . . . . .165 Setting a Path . . . . . . . . . . . . . . . . . . . . .165 Selecting the Audio Track . . . . . . . . . . . .165 Arming Tracks . . . . . . . . . . . . . . . . . . . . .166 Stereo Recording . . . . . . . . . . . . . . . . . . .166 Levels . . . . . . . . . . . . . . . . . . . . . . . . . . .166 15 Owner’s Manual Version 1.0 – English - 16 17 18 Gl Ix B C 13 7.3 Chapter 8 8.1 8.2 14 Starting to Record . . . . . . . . . . . . . . . . . .167 Basic Operation . . . . . . . . . . . . . . . . . . . . . . .167 Sample Editor . . . . . . . . . . . . . . . . . . . . .168 Automation of Audio . . . . . . . . . . . . . . .168 Summary . . . . . . . . . . . . . . . . . . . . . . . .168 In General . . . . . . . . . . . . . . . . . . . . . . . . . . .169 Tempo and Timeline . . . . . . . . . . . . . . . . . . .169 Adjusting Tempo to fit an Audio Recording . . . . . . . . . . . . . . . . . . . . . . . .169 Data Formats . . . . . . . . . . . . . . . . . . . . . . . . .170 Audio files and their Formats . . . . . . . . . .170 Sample Rate and Bit Depth . . . . . . . . . . .170 Stereo File Formats . . . . . . . . . . . . . . . . . . . . .170 Working with Audio in the Arrange Window Regions . . . . . . . . . . . . . . . . . . . . . . . . . . . . .173 Generating Regions . . . . . . . . . . . . . . . . . . . .173 Dividing Regions . . . . . . . . . . . . . . . . . . .174 Deleting Regions . . . . . . . . . . . . . . . . . . .174 Deleting a Recording . . . . . . . . . . . . . . . .174 Copying Regions . . . . . . . . . . . . . . . . . . . . . .175 Creating A New Region . . . . . . . . . . . . . .175 Multiple Use of an Existing Region (Alias) 175 Looping Regions . . . . . . . . . . . . . . . . . . .175 Moving Regions . . . . . . . . . . . . . . . . . . . . . . .176 Fine Movements . . . . . . . . . . . . . . . . . . .176 Using the Event List to edit Regions . . . . .176 Changing Borders . . . . . . . . . . . . . . . . . . . . .177 Region Parameter Box . . . . . . . . . . . . . . . . . .177 Name . . . . . . . . . . . . . . . . . . . . . . . . . . .177 Loop . . . . . . . . . . . . . . . . . . . . . . . . . . . .178 Delay . . . . . . . . . . . . . . . . . . . . . . . . . . .178 Region Anchor . . . . . . . . . . . . . . . . . . . . . . . .178 Recording . . . . . . . . . . . . . . . . . . . . . . . . . . .179 Setting Tracks to Record Audio . . . . . . . . . . .179 Recording Modes . . . . . . . . . . . . . . . . . . . . . .180 Standard Recording with Count-in . . . . .180 Manual Drop Recording . . . . . . . . . . . . .180 Pre-Programmed Drop Recording . . . . . .181 Emagic Adat Edit 8.3 Chapter 9 9.1 9.2 9.3 9.4 1 Recording in Cycle Mode . . . . . . . . . . . .182 After Recording, Please Note… . . . . . . . .182 Functions . . . . . . . . . . . . . . . . . . . . . . . . . . . .182 Adjusting Tempo Automatically . . . . . . . . . . .182 Digital Mixdown . . . . . . . . . . . . . . . . . . . . . .184 Bounce to Disk . . . . . . . . . . . . . . . . . . . . . . . .185 2 3 4 5 The Mixer 6 Integrating Midi and Audio . . . . . . . . . . . . . .187 Opening the Mixer . . . . . . . . . . . . . . . . . . . . .187 Midi Objects . . . . . . . . . . . . . . . . . . . . . . . . .187 General Midi . . . . . . . . . . . . . . . . . . . . . . . . .187 Bank Select . . . . . . . . . . . . . . . . . . . . . . .189 Mute . . . . . . . . . . . . . . . . . . . . . . . . . . . .190 Pan . . . . . . . . . . . . . . . . . . . . . . . . . . . . .190 Controller . . . . . . . . . . . . . . . . . . . . . . . .190 Other Control Options . . . . . . . . . . . . . .191 Audio Objects . . . . . . . . . . . . . . . . . . . . . . . .191 Display Features . . . . . . . . . . . . . . . . . . . . . . .191 The Level Meter . . . . . . . . . . . . . . . . . . .191 Volume Level Control . . . . . . . . . . . . . . .192 Mute . . . . . . . . . . . . . . . . . . . . . . . . . . . .192 Solo for Audio Tracks . . . . . . . . . . . . . . .192 Pan/Balance . . . . . . . . . . . . . . . . . . . . . .193 Equalizer (EQ) . . . . . . . . . . . . . . . . . . . . .193 Bus Sends . . . . . . . . . . . . . . . . . . . . . . . .193 Arming Tracks . . . . . . . . . . . . . . . . . . . . .193 Stereo Objects . . . . . . . . . . . . . . . . . . . . . . . .194 Configuring a Stereo Object . . . . . . . . . .194 Real-Time Effects . . . . . . . . . . . . . . . . . . . . . .195 Introduction . . . . . . . . . . . . . . . . . . . . . . . . . .195 Direct Insertion of Effects . . . . . . . . . . . .195 Bus Effects . . . . . . . . . . . . . . . . . . . . . . .195 Overview of Bus Effects . . . . . . . . . . . . . . . . .196 Delay . . . . . . . . . . . . . . . . . . . . . . . . . . .196 Plug-In Window Functions . . . . . . . . . . . . . . .199 7 8 9 10 11 12 13 14 15 16 17 18 Gl Ix B C Owner’s Manual Version 1.0 – English - 15 9.5 Mixer Automation . . . . . . . . . . . . . . . . . . . . .199 Chapter 10 The Event Editor 10.1 10.2 10.3 Midi Events . . . . . . . . . . . . . . . . . . . . . . . . . .201 Opening the Event List . . . . . . . . . . . . . . . . . .201 Standard Tools . . . . . . . . . . . . . . . . . . . . . . . .202 Hiding the Parameter Area . . . . . . . . . . .202 10.4 Event List Display . . . . . . . . . . . . . . . . . . . . . .203 Midi Out . . . . . . . . . . . . . . . . . . . . . . . . .203 10.5 Scrolling the Event List . . . . . . . . . . . . . . . . . .204 Current Song Position . . . . . . . . . . . . . . .204 Scroll Arrows . . . . . . . . . . . . . . . . . . . . . .204 Scrollbars . . . . . . . . . . . . . . . . . . . . . . . .205 10.6 Selecting Events . . . . . . . . . . . . . . . . . . . . . . .205 10.7 Structure of the List . . . . . . . . . . . . . . . . . . . .206 Position . . . . . . . . . . . . . . . . . . . . . . . . . .206 Status . . . . . . . . . . . . . . . . . . . . . . . . . . .206 Channel . . . . . . . . . . . . . . . . . . . . . . . . .207 Num (1. Data Value) . . . . . . . . . . . . . . . .207 Val (2. Data Value) . . . . . . . . . . . . . . . . .207 Length/Info . . . . . . . . . . . . . . . . . . . . . . .207 Display of Length . . . . . . . . . . . . . . . . . .208 10.8 Event Type Buttons . . . . . . . . . . . . . . . . . . . . .208 View Filter . . . . . . . . . . . . . . . . . . . . . . . .208 Inserting Events . . . . . . . . . . . . . . . . . . . .209 10.9 Event Types . . . . . . . . . . . . . . . . . . . . . . . . . .209 Note . . . . . . . . . . . . . . . . . . . . . . . . . . . .209 Program Change . . . . . . . . . . . . . . . . . . .210 Pitch Bend . . . . . . . . . . . . . . . . . . . . . . . .210 Control Change . . . . . . . . . . . . . . . . . . .211 Aftertouch . . . . . . . . . . . . . . . . . . . . . . .212 Polyphonic Aftertouch . . . . . . . . . . . . . . .212 SysEx Data . . . . . . . . . . . . . . . . . . . . . . .212 10.10 Editing Events . . . . . . . . . . . . . . . . . . . . . . . .213 Moving Events . . . . . . . . . . . . . . . . . . . .213 Changing Values . . . . . . . . . . . . . . . . . . .214 Copying Events . . . . . . . . . . . . . . . . . . . .215 Deleting Events . . . . . . . . . . . . . . . . . . . .215 10.11 Arrange Level Display . . . . . . . . . . . . . . . . . . .215 Naming Sequences . . . . . . . . . . . . . . . . .216 16 Emagic Adat Edit 1 Soloing Sequences . . . . . . . . . . . . . . . . .217 Muting Sequences . . . . . . . . . . . . . . . . .217 10.12 Quantizing Events . . . . . . . . . . . . . . . . . . . . .217 10.13 Moving and Copying Segments . . . . . . . . . . .219 Locators . . . . . . . . . . . . . . . . . . . . . . . . .219 Destination . . . . . . . . . . . . . . . . . . . . . . .220 Number of Copies . . . . . . . . . . . . . . . . . .220 Mode . . . . . . . . . . . . . . . . . . . . . . . . . . .220 10.14 Practicing . . . . . . . . . . . . . . . . . . . . . . . . . . . .221 Copying a Segment of the Flute Solo . . .221 2 3 4 5 6 7 Chapter 11 The Matrix Editor 11.1 11.2 11.3 11.4 11.5 8 Opening the Matrix Editor . . . . . . . . . . . . . . .225 Standard Matrix Editor Tools . . . . . . . . . . . . .226 Transport Field and Parameter Dialog Box . . . .226 Event Display . . . . . . . . . . . . . . . . . . . . . . . . .226 Working with Notes . . . . . . . . . . . . . . . . . . . .228 Moving Notes . . . . . . . . . . . . . . . . . . . . .228 Copying Notes . . . . . . . . . . . . . . . . . . . .228 Inserting Notes . . . . . . . . . . . . . . . . . . . .228 Changing Length of a Note . . . . . . . . . . .229 Deleting Notes . . . . . . . . . . . . . . . . . . . .229 Working With Velocity Value . . . . . . . . . .230 9 10 11 12 13 14 Chapter 12 The Score Editor 12.1 12.2 12.3 12.4 12.5 15 Opening the Score Editor . . . . . . . . . . . . . . . .231 Standard Tools . . . . . . . . . . . . . . . . . . . . . . . .232 Hide and Show the Parameter Area . . . . .232 Setting the Display Size . . . . . . . . . . . . . . . . .232 Adjusting the Display . . . . . . . . . . . . . . . . . . .233 Style . . . . . . . . . . . . . . . . . . . . . . . . . . . .233 Autostyle . . . . . . . . . . . . . . . . . . . . . . . .234 Display Quantization . . . . . . . . . . . . . . . .234 Editing Notes . . . . . . . . . . . . . . . . . . . . . . . . .235 Selecting Notes . . . . . . . . . . . . . . . . . . . .235 Information Line . . . . . . . . . . . . . . . . . . .235 Note Parameters . . . . . . . . . . . . . . . . . . .235 Moving and Transposing . . . . . . . . . . . . .236 Owner’s Manual Version 1.0 – English - 16 17 18 Gl Ix B C 17 12.6 12.7 12.8 12.9 12.10 12.11 12.12 12.13 12.14 12.15 12.16 18 Copy . . . . . . . . . . . . . . . . . . . . . . . . . . . .236 Insert . . . . . . . . . . . . . . . . . . . . . . . . . . .236 Insert Defaults . . . . . . . . . . . . . . . . . . . . . . . .237 Diatonic Insert . . . . . . . . . . . . . . . . . . . . . . . .237 Getting Ready to Arrange . . . . . . . . . . . . . . .238 Parameter Area . . . . . . . . . . . . . . . . . . . . . . .238 Switching Levels . . . . . . . . . . . . . . . . . . . . . . .239 Sequence Level . . . . . . . . . . . . . . . . . . . .239 Arrange Level . . . . . . . . . . . . . . . . . . . . .239 Track Filter . . . . . . . . . . . . . . . . . . . . . . . . . . .241 Inserting Symbols . . . . . . . . . . . . . . . . . . . . . .241 Insert Symbols . . . . . . . . . . . . . . . . . . . . .242 Applying Symbols to Multiple Notes . . . .242 Selecting Symbol Groups . . . . . . . . . . . . .242 Notes . . . . . . . . . . . . . . . . . . . . . . . . . . .243 Pedal . . . . . . . . . . . . . . . . . . . . . . . . . . . .243 Clefs . . . . . . . . . . . . . . . . . . . . . . . . . . . .243 Dynamic Symbols . . . . . . . . . . . . . . . . . .244 Note Heads . . . . . . . . . . . . . . . . . . . . . . .244 Articulation . . . . . . . . . . . . . . . . . . . . . . .244 Legato Marks and Accent Marks . . . . . . .244 Key Signature . . . . . . . . . . . . . . . . . . . . .244 Time Signature . . . . . . . . . . . . . . . . . . . .245 Repeat and End Signs . . . . . . . . . . . . . . .245 Trill . . . . . . . . . . . . . . . . . . . . . . . . . . . . .246 Text . . . . . . . . . . . . . . . . . . . . . . . . . . . .246 Symbols in the Event Editor . . . . . . . . . . . . . .246 Preparing for Printing . . . . . . . . . . . . . . . . . . .246 Enharmonic Shift . . . . . . . . . . . . . . . . . . .246 Stem Direction . . . . . . . . . . . . . . . . . . . .247 Beaming . . . . . . . . . . . . . . . . . . . . . . . . .248 Adjusting the Position of a Staff . . . . . . .248 Multiple Staffs . . . . . . . . . . . . . . . . . . . . .249 Text . . . . . . . . . . . . . . . . . . . . . . . . . . . . . . . .249 Insert Text . . . . . . . . . . . . . . . . . . . . . . . .250 Text Position . . . . . . . . . . . . . . . . . . . . . .251 Lyrics . . . . . . . . . . . . . . . . . . . . . . . . . . . .251 Page Edit View . . . . . . . . . . . . . . . . . . . . . . . .252 Switching Page Edit and Normal View . . .253 Printer and Page Edit View . . . . . . . . . . .253 Emagic Adat Edit 1 12.17 Printing a Score on the PC . . . . . . . . . . . . . . .253 Print Menu . . . . . . . . . . . . . . . . . . . . . . .254 Configuring the System for Adat Edit . . . . . . . . . . . . . . . . . . . . . . . . .254 RAM . . . . . . . . . . . . . . . . . . . . . . . . . . . .254 Resolution . . . . . . . . . . . . . . . . . . . . . . . .254 12.18 Printing a Score on the Macintosh . . . . . . . . .255 Selecting the Font . . . . . . . . . . . . . . . . . .255 Set Pages and Print . . . . . . . . . . . . . . . . .255 2 3 4 5 6 Chapter 13 The Sample Editor 13.1 13.2 13.3 13.4 13.5 13.6 7 The Sample Editor . . . . . . . . . . . . . . . . . . . . .257 Layout of the Sample Editor . . . . . . . . . . . . . .258 Display . . . . . . . . . . . . . . . . . . . . . . . . . . . . . .259 Overview . . . . . . . . . . . . . . . . . . . . . . . . . . . .259 Overview Functions . . . . . . . . . . . . . . . . .260 Relationship between the Windows . . . . . . . .260 Catch Mode . . . . . . . . . . . . . . . . . . . . . .261 Link Mode . . . . . . . . . . . . . . . . . . . . . . . .261 Waveform Display . . . . . . . . . . . . . . . . . . . . .261 Scaling the Display . . . . . . . . . . . . . . . . .261 The Amplitude Axis and Time Axis . . . . . .262 Using the Sample Editor . . . . . . . . . . . . . . . . .263 Controlling Playback . . . . . . . . . . . . . . . . . . .263 Playing from the Overview Display . . . . . .263 Playing the Entire Audio File . . . . . . . . . .264 Playing the Current Selection . . . . . . . . .264 Playing After a Specified Point . . . . . . . . .264 Cycle Playback . . . . . . . . . . . . . . . . . . . .264 Selection Commands . . . . . . . . . . . . . . . . . . .264 Selecting All Audio Files . . . . . . . . . . . . .264 Manual Selection . . . . . . . . . . . . . . . . . .264 The Selection Parameter Field . . . . . . . . .265 Working with Regions in the Sample Editor . .265 Edit Commands . . . . . . . . . . . . . . . . . . . . . . .267 Managing Files . . . . . . . . . . . . . . . . . . . . . . . .268 Backup Copies . . . . . . . . . . . . . . . . . . . . . . . .268 Functions . . . . . . . . . . . . . . . . . . . . . . . . . . . .269 Normalize . . . . . . . . . . . . . . . . . . . . . . . .269 Change Gain . . . . . . . . . . . . . . . . . . . . . .270 Owner’s Manual Version 1.0 – English - 8 9 10 11 12 13 14 15 16 17 18 Gl Ix B C 19 13.7 Fade In . . . . . . . . . . . . . . . . . . . . . . . . . .271 Fade Out . . . . . . . . . . . . . . . . . . . . . . . . .271 Silence . . . . . . . . . . . . . . . . . . . . . . . . . .272 Invert . . . . . . . . . . . . . . . . . . . . . . . . . . .273 Reverse . . . . . . . . . . . . . . . . . . . . . . . . . .274 Trim . . . . . . . . . . . . . . . . . . . . . . . . . . . .274 Remove DC Offset . . . . . . . . . . . . . . . . .275 Sample Rate Conversion . . . . . . . . . . . . . . . .275 Open the Sample Rate Converter . . . . . .275 Parameters . . . . . . . . . . . . . . . . . . . . . . .276 The Digital Factory . . . . . . . . . . . . . . . . . . . . .276 Time Machine . . . . . . . . . . . . . . . . . . . . . . . .276 Opening the Time Machine . . . . . . . . . . .277 Parameters . . . . . . . . . . . . . . . . . . . . . . .277 Free Transposition . . . . . . . . . . . . . . . . . .278 Classic (correlated) Transposition . . . . . . .278 Using the graphic display . . . . . . . . . . . .279 The Technology of the Time Machine . . .279 Audio Energizer . . . . . . . . . . . . . . . . . . . . . . .280 Opening the Audio Energizer . . . . . . . . .281 Parameters . . . . . . . . . . . . . . . . . . . . . . .281 Chapter 14 Synchronization, Video and Midi Files 14.1 14.2 20 Synchronization Window . . . . . . . . . . . . . . . .283 General . . . . . . . . . . . . . . . . . . . . . . . . . . . . .283 Sync Mode . . . . . . . . . . . . . . . . . . . . . . .283 External Stop ends Record Mode . . . . . . .284 Auto Detect Format of MTC . . . . . . . . . .285 SMPTE Offset . . . . . . . . . . . . . . . . . . . . .286 Audio . . . . . . . . . . . . . . . . . . . . . . . . . . . . . .286 Nominal Sample Rate . . . . . . . . . . . . . . .287 Sync Mode . . . . . . . . . . . . . . . . . . . . . . .287 Allow Song Position Pointer while playing . . . . . . . . . . . . . . . . . . . . . .288 Send MMC (MIDI Machine Control) . . . .289 Special Functions . . . . . . . . . . . . . . . . . . . . . .289 Switching on external sync . . . . . . . . . . . . . . .289 Recording with external synchronization . . . . . . . . . . . . . . . . . . . .290 Incoming Midi Time Code Display . . . . . .290 Emagic Adat Edit 14.3 14.4 14.5 1 MTC Interpretation . . . . . . . . . . . . . . . . .290 Receiving Midi Clock/SPP . . . . . . . . . . . . .291 Midi Machine Control (MMC) . . . . . . . . . . . .291 Switching on MMC . . . . . . . . . . . . . . . . .292 The Basics . . . . . . . . . . . . . . . . . . . . . . . . . . .292 Summary . . . . . . . . . . . . . . . . . . . . . . . . . . . .292 Timecode and Clock synchronization . . . . . . .292 Bar-Referenced synchronization . . . . . . .293 Time-Referenced synchronization . . . . . .295 Synchronizers . . . . . . . . . . . . . . . . . . . . .298 synchronization Procedure . . . . . . . . . . .298 Audio synchronization . . . . . . . . . . . . . . . . . .300 If you have Sync Problems . . . . . . . . . . . . . . .301 Midi Files . . . . . . . . . . . . . . . . . . . . . . . . . . . .302 Preparing a Song for Midi File Conversion 302 Saving the Song as a Midi File . . . . . . . . .303 Saving Individual Sequences as a Midi File 303 Saving Songs as SMF Format 0 . . . . . . . .303 Importing Midi Files . . . . . . . . . . . . . . . . .304 Transfer Songs onto other Devices or Computers . . . . . . . . . . . . . . . . . . . . . . . . . . .304 2 3 4 5 6 7 8 9 10 11 12 13 Chapter 15 Reference: Key Commands and Use of Mouse 15.1 15.2 15.3 14 Keyboard Command Symbols . . . . . . . . . . . .307 Key Commands . . . . . . . . . . . . . . . . . . . . . . .308 Using the Mouse . . . . . . . . . . . . . . . . . . . . . .313 15 16 17 Chapter 16 Menu Reference 16.1 Main Menu Bar . . . . . . . . . . . . . . . . . . . . . . .315 -Menu . . . . . . . . . . . . . . . . . . . . . . . . .315 File Menu . . . . . . . . . . . . . . . . . . . . . . . .315 Edit Menu (Mac Only) . . . . . . . . . . . . . . .316 Windows Menu . . . . . . . . . . . . . . . . . . .316 Video (Windows Only) . . . . . . . . . . . . . . .317 Help Menu . . . . . . . . . . . . . . . . . . . . . . .317 18 Gl Ix B C Owner’s Manual Version 1.0 – English - 21 16.2 16.3 16.4 16.5 16.6 Edit (All Windows) . . . . . . . . . . . . . . . . . . . . .318 Menus in the Arrange Window . . . . . . . . . . .318 Track . . . . . . . . . . . . . . . . . . . . . . . . . . . .318 Functions . . . . . . . . . . . . . . . . . . . . . . . .319 View . . . . . . . . . . . . . . . . . . . . . . . . . . . .320 Options . . . . . . . . . . . . . . . . . . . . . . . . . .320 Menus in the Event Editor . . . . . . . . . . . . . . .321 Functions . . . . . . . . . . . . . . . . . . . . . . . .321 View . . . . . . . . . . . . . . . . . . . . . . . . . . . .322 Menus in the Matrix Editor . . . . . . . . . . . . . . .322 Functions . . . . . . . . . . . . . . . . . . . . . . . .322 View . . . . . . . . . . . . . . . . . . . . . . . . . . . .323 Menus in the Score Editor . . . . . . . . . . . . . . .323 Functions . . . . . . . . . . . . . . . . . . . . . . . .323 Attributes . . . . . . . . . . . . . . . . . . . . . . . .323 View . . . . . . . . . . . . . . . . . . . . . . . . . . . .325 Options . . . . . . . . . . . . . . . . . . . . . . . . . .326 Chapter 17 Audio Recording Tips 17.1 Digital Recording . . . . . . . . . . . . . . . . . . . . . .327 Setting Levels . . . . . . . . . . . . . . . . . . . . . . . . .327 Clipping . . . . . . . . . . . . . . . . . . . . . . . . . . . . .327 Sampling rate . . . . . . . . . . . . . . . . . . . . . . . .328 Fragmentation . . . . . . . . . . . . . . . . . . . . . . . .328 Defragmentation . . . . . . . . . . . . . . . . . . . . . .329 Dealing Economically with the Hard Disk .330 Glossary .....................................................331 Index ...........................................................341 22 Emagic Adat Edit Chapter 1 1 Features 2 3 1.1 4 Adat Edit is… 5 6 7 8 9 10 11 12 13 14 15 • an audio-recording system, a Midi sequencer, and a notation system that is easy to learn and operate. • Adat Edit transforms your computer into a recording studio. It allows you to record audio using your Alesis PCR card. • • 16 17 18 Gl For playback only, other MME hardware may additionally be used, as long as the PCR card is present. Ix You can use the audio inputs and outputs of the PCR card to record up to 8 tracks of audio simultaneously. B C Owner’s Manual Version 1.0 – English - 23 Features • The resulting tracks can be output via any of the 8 channels available on the PCR’s lightpipe output connector or on additional MME hardware. • There are additional signal processing functions supplied by the Digital Factory in the Sample Edit window. • Adat Edit also offers a sophisticated set of synchronization features, allowing you to sync your computer with an ADAT, or digital mixer. • You can create songs and arrange them on your computer screen, and then print out musical notation. • By integrating audio recording and real-time effects, you can even combine acoustic instruments, or vocals with your songs. Audio is just as easy to edit as Midi tracks are. Adat Edit thus combines all the functions that you would expect from a modern, powerful audio sequencer, with an intuitive and clearly arranged user interface. 24 The screenshots used in this manual will sometimes show the Macintosh version of Adat Edit, and sometimes the Windows version. Also, most of the screenshots are from Adat Edit, which the PCR version is based on. In cases where there is a functional difference between the versions, then screenshots from Adat Edit will be shown. Emagic Adat Edit Multitrack Recorder 1.2 1 Multitrack Recorder 2 3 4 5 6 7 8 9 10 Track plan with transport field and note editor, here on a Macintosh 11 12 One of the main components of Adat Edit is the multitrack recorder. You record ecord multiple tracks, as though you were in a professional studio, and as you record the next one, listen to the tracks that you just recorded. This special version of Adat Edit only works with the Alesis PCR card. It offers 8 digital inputs, and 8 digital outputs, through a lightpipe connection to your ADAT or digital mixer. 13 14 15 16 Adat Edit offers you many ways to alter and refine your recorded material at a later time. You can move the tracks around in the Arrange window, give the Midi tracks a different sound, or divide them into blocks (sequences). You can cut, copy, move, transpose, or correct (quantize) rhythmically. 17 18 Gl The three editor windows give you complete control of your recordings. Whether you are changing the length, or dynamic strength of a single note in the Event editor, or entering entire scores in the Score editor – it’s all easy and fast with Adat Edit. Ix B C Owner’s Manual Version 1.0 – English - 25 Features 1.3 Flexible Input There are several ways of entering notes into Adat Edit. Everything is available, from real-time recording to manual note entry; the possibilities are endless. You can use Adat Edit simply to record real-time audio or Midi performances, or as a conventional notation system by inputting your scores on the screen with the mouse. Adat Edit offers you every possibility; you decide which ones to use. You may control the program either with the mouse or the computer keyboard; all functions can be carried out using the mouse, and the majority can be adapted to meet your needs via keyboard commands, which can be programmed as desired. 1.4 Automatic Notation Page layout of a piano track If you prefer working in musical notation to piano roll, or event list editing, you can edit your songs in the Score editor. There, you can view your sequences as conventional musical notation. You can insert, move, or transpose notes easily using the mouse. 26 Emagic Adat Edit GM Supported 1 Adat Edit offers a range of functions with which you can adapt the appearance of the score to your liking, from the notes themselves, to the size of your windows. 2 Of course you can also print out your songs. Adat Edit offers an efficient page-layout function, with which you can create attractive and legible scores, which can then be printed on a connected printer. 3 You can also create a PostScript file, and continue to edit the scores which were created in Adat Edit, with word-processing or layout programs. 6 1.5 4 5 7 8 GM Supported 9 10 11 12 13 14 15 16 17 If you use a GM-compatible tone generator connected to your computer, you can control its functions remotely from the Mixer window. Selecting sounds, controlling the volume, or adding chorus or reverb etc. is as easy as can be. Adat Edit also supports the GS- (Roland), or the XG standard (Yamaha). With these devices, more sound and effect parameters can be remote-controlled, for example, the filter frequency. 18 Gl Ix B C Owner’s Manual Version 1.0 – English - 27 Features The Mixer thus becomes your virtual mixing console on screen, allowing you to automate your GM device from Adat Edit. 1.6 Multimedia Adat Edit can load and play digital videos in AVI format for Windows, or QuickTime format for Macintosh. The picture runs synchronously with Adat Edit’s song position. You can add music to commercials, or videos of your vacation, without using a video recorder. Sounds or jingles start concurrently with the frame. 1.7 Graphical Interface Adat Edit features a clearly structured graphical user interface. All operations can be done quickly and directly, using the mouse. You can open the windows, and place them anywhere on the screen. You can adjust all elements in the windows as you like; the windows can be enlarged or reduced. To make the most of your screen, you can open as many windows simultaneously as you want. Next to the track list in the Arrange window, for example, you can simultaneously open an Event list and Score editor for the same material. As Adat Edit plays the song for you, the notes e.g. are displayed in the Score Window. Whatever you hear, you see at the same time. If there is a wrong note, just fix it, while Adat Edit continues to run. It does not get any easier than this. Adat Edit's menus are well organized. Local menus in each window make sure that you only see the functions that you may need. This way, the main menu lists remain orderly, and you can find whatever function you need faster. 28 Emagic Adat Edit About this Manual 1.8 1 About this Manual The headings in this manual are arranged according to the names of the functions in the program. This way, you can quickly find specific functions in the table of contents. 2 • Located in the appendix of this manual is an index, in which you can look up keywords. 4 • The Menu List, found in the appendix, offers an overview of all menu items. • The glossary explains the meaning of specialized terms. If you do not find a term there, you can look it up in the index, and read about it in the corresponding section of the manual. • 3 5 6 7 8 9 The Tutorial Chapter 10 If you want to familiarize yourself quickly with a specific topic (e.g., Arrange window, Event editor, note editing), we recommend that you work through the corresponding section in chapter 3, Chapter 3 Tutorial on page 43. The tutorial is arranged by self-contained topics. You will find the appropriate Tutorial Song on Adat Edit’s program disk. It takes less than half an hour to work through each section. You can then work through the corresponding pages of that chapter, to familiarize yourself with the details. 11 12 13 14 15 16 17 18 Gl Ix B C Owner’s Manual Version 1.0 – English - 29 Features 30 Emagic Adat Edit Chapter 2 1 Getting Started 2 3 2.1 4 Windows 5 Getting Started With Adat Edit 6 Before launching Adat Edit, be sure you have installed the PCR card, and its driver. Double-click the Adat Edit icon, or select Adat Edit from Start > Programs > Emagic > Adat Edit, in the Start Menu, to launch the program. Your Midi interfaces and your PCR cards are recognized at startup, and all internal connections and settings are automatically established. If you have installed several Midi cards in your computer, you can use any of them. 7 8 9 10 11 Each time Adat Edit starts up, it searches for installed Midi interfaces so that a new card is automatically available the next time Adat Edit starts up. Tip 12 13 After a short time, you will see an empty Arrange window, and the main menu bar.Selecting the Midi out port in the Program 14 15 Selecting the Midi Out Port in the Program 16 You can select the Midi port for each track separately. To do so, select the desired track, and go to the Instrument parameter box, located just below the Toolbox, on the left side of the Arrange window. Click-hold in the field just below the “Channel” assignment field. You will see a flip menu listing all the Midi out ports available on your system. Select the one you want, and release the mouse button. 17 18 Gl Ix B C Owner’s Manual Version 1.0 – English - 31 Getting Started Testing the Midi Connection You should then test to make sure that the connections between Adat Edit and your Midi system are working smoothly. First, test to see if your Midi keyboard transmits. • Open the Transport Window by choosing “Open Transport Window” in the window menu or press “F11”. • You can see the Midi monitor in the upper right-hand corner of the Transport window. • If there is no activity, the display will show “No In/ No Out”. • Now play a couple of notes on your Midi keyboard. • In place of “No In”, the received events should now be displayed. • If this is not the case, test the following: • Is the Midi-Out connection of the keyboard connected correctly with the Midi-In of your computer? • Is the cable working properly? Test the Midi Out Now test to see if Adat Edit is sending Midi events to your tone generators. • Call up File> Open, and select the Tutorial Song (TUTORIAL.LSO) from the file selection box. • Set the Midi out port for each of the tracks, as described above. • Click on the PLAY button in the Transport Window or press 0 on the numeric keypad of the computer. 32 Emagic Adat Edit Windows • 1 The Tutorial Song will run, and the second line of the Midi indicator should show the sent events. • If this is not the case, test • whether you are using a good Midi cable. • whether you connected the Midi-In of your tone generator to the Midi-Out of the interface. 2 3 4 5 6 File Extensions 7 Adat Edit can load or save files in both its own native file format, or as Standard Midi files, for use with other programs. You can recognize the type of file from the following extensions: Type of File Exten- Description sion Created from Song .LSO Song File Adat Edit when the menu field “Save” is called up in the file menu Standard Midi File .MID Song file in the external sequencers can standard Midi be imported into Adat file format Edit or from Adat Edit with Export 8 9 10 11 12 13 14 15 Adat Edit and Multitasking 16 Adat Edit can be operated in conjunction with other Midi programs. If you switch over to another program, Adat Edit continues to run in the background. For this to work, your Midi interface must use a multi client driver. If you have any questions about this, contact the manufacturer of your interface for information. 17 18 Gl Ix Launching Adat Edit B The installation program automatically creates a program group “Adat Edit” under Programs > Emagic, in the Start Menu. Owner’s Manual Version 1.0 – English - C 33 Getting Started Here you will find Adat Edit itself, and the de-installation program. You may launch Adat Edit by simply highlighting the program icon in this menu. Launch Adat Edit Automatically If you add Adat Edit to the program group “Startup” from the Start Menu, then Adat Edit starts up automatically when Windows is launched. Create a shortcut to Adat Edit in this folder by dragging the “Adat Edit 3.5.exe” icon from the “C:\ Program Files\emagic\Adat Edit 3.5” folder to the “C:\ Windows\Start Menu\Startup” folder. This will not move, or copy the program file, but will create a “shortcut” to it in the new location. You may also drag the prgram to the Desktop instead, if you prefer to launch from there. You have now correctly installed Adat Edit, and have set it up to connect with your Midi system. Everything is now ready for you to work through the tutorial. This series of exercises will help you to become acquainted with Adat Edit. 2.2 Macintosh Launching Adat Edit This is how you usually start up Adat Edit: 1. Double-click the program's icon, or 2. Click on the program's icon and choose File> Open, or press Co. As long as you are working through the manual, we recommend that you start Adat Edit directly with the Tutorial Song. 3. Double-click the Tutorial Song icon. Adat Edit will launch with the Tutorial Song loaded. The main screen now looks something like this: 34 Emagic Adat Edit Macintosh 1 )XOO6FUHHQ 2 3 4 5 6 7 8 Main screen with tutorial song 9 Choose Midi Connection 10 First, let Adat Edit know which serial port of your Macintosh is connected to your Midi interface. 11 • 12 In the Option Menu, call up “Midi Interface Communication.” 13 The Global Preferences dialog box appears. 14 6HULDO3UHIV 15 16 17 18 Parameter for the serial ports Gl You can activate one of the two Midi ports here: • Ix Click the modem port or the printer port so that a small cross appears in the small checkbox. B C Owner’s Manual Version 1.0 – English - 35 Getting Started When you have chosen one port, Adat Edit automatically turns off the other port. Adat Edit tests automatically to see whether a Midi interface is connected to the specified port and is operable. If no Midi interface is recognized, a dialog box appears. Starting up without Midi interface: If you want to test Adat Edit “dry”—that is without Midi interface and tone generator— simply disable the modem port as well as the printer port in the File>Preferences>Midi/Global window. Midi Time Piece Adat Edit directly supports the “Midi Time Piece” (MTP) interface from the manufacturer “Mark Of The Unicorn”, as well as MTP-compatible interfaces: • Enable the options “Check For MTP” and “Fast Speed” in Global Preferences. Unlike Logic, Adat Edit cannot separately address the different Midi Outputs of MTP compatible interfaces. The “Fast Speed” mode can be switched off—for instance with longer SySex transmissions, if you have any problems with Midi Communications. Testing the Midi Connection You should now make sure that the connection between Adat Edit and your Midi system is working properly. 1. Launch Adat Edit. First, test to see if your Midi keyboard transmits. 2. Open the Transport Window by selecting Open Transport in the window menu, or press C7 You can see the Midi indicator in the upper right-hand corner of the Transport Window. 36 Emagic Adat Edit Important! Macintosh If there is no activity, the display will show “No In/ No Out”. 1 3. Now play a couple of notes on your Midi keyboard. 2 In place of “No In”, the received events should now be displayed. 3 If this is not the case, test the following: 4 4. Is the Midi-Out connection of the keyboard connected correctly with the Midi-In of your computer? 5 • Is the cable working properly? • Did you choose the correct port in Global Preferences? 6 7 8 Test the Midi-Out 9 Now test to see if Adat Edit is sending Midi events to your tone generators. 1. 10 Choose File > Open, and select the tutorial song in the fileselection box. 11 It is loaded and displayed on the screen. 12 2. 13 Click on the PLAY button in the Transport Window, or press 0 on the computer's numeric keypad. 14 The tutorial will run, and the second line of the Midi indicator should show the sent events. 15 If this is not the case, see if you have enabled the modem port or the printer port in Global Preferences. If you have not, enable the port to which your Midi interface is connected. 16 17 18 Autoload Song You can select a song with which Adat Edit is automatically loaded. This song can contain your own preferred song settings and window layouts. Gl Proceed as follows: B 1. C Ix Create a new song. Owner’s Manual Version 1.0 – English - 37 Getting Started 2. Adjust the song settings according to your preferences. 3. Save the song with the file name “Autoload” (quotes excluded). To save the song, select “Save” in the file menu and enter “Autoload” in the dialog box. You can also create an alias for any song, and start Adat Edit directly by double-clicking the alias. Start Adat Edit automatically You can have Adat Edit open automatically every time your Macintosh starts up. If you want, you can also have a song start automatically. Proceed as follows: 1. Create an alias of Adat Edit, or the desired song. 2. Drag the alias with your mouse into the folder “Startup Items”, in the system folder. Adat Edit will be started up automatically the next time you turn your system on. Adat Edit is now properly installed and configured for your system. 2.3 MacOs/Win: Differences Adat Edit for Macintosh and for Windows is basically the same. The controls for both versions are practically identical. However, because of some differences between the operating systems, there are some slight variations in Adat Edit between the two platforms. When you first look at it, you will notice that we have used two symbols to identify the Macintosh and Windows versions: 38 Emagic Adat Edit Tip MacOs/Win: Differences • 1 This symbol identifies a function that is only on Windows. 2 3 • This symbol characterizes a function that is only on Macintosh. 4 5 6 If you own a Macintosh, you can skip over the following sections and continue with the tutorial chapter. 7 Most illustrations in this book are screenshots from the Macintosh version. 8 9 Keyboard and Mouse 10 Unlike the Macintosh mouse, a Windows mouse has a right mouse button. Also, the position of some special keys is slightly different between the systems. 11 There is a table with explanations for the symbols used in this book for hot keys. This is located in the section, Hot Key Symbols starting on page 307. 13 12 14 15 16 17 18 Gl Ix B C Owner’s Manual Version 1.0 – English - 39 Getting Started Look at the table and note which keys and/or mouse functions for Windows are replaced and how. Function Adat Edit Windows Multiple selection S click Mouse copy functions ç hold down Using tools right mouse button Specific mouse functions ‚ mouse ç mouse A mouse Adat Edit Macintosh S click O hold down C and mouse S mouse C mouse O mouse Key Commands On a Macintosh, the permanent function codes for menu items are, as usual, displayed directly behind the menu item. In addition, you can define your own function codes for almost all of the Adat Edit functions. These are not displayed in the menus. Exchanging Songs Between Mac and PC Unlike Windows, Macintosh does not use file extensions. You can, however, transfer songs back and forth between Macintosh and Windows versions without any problem. When you are transferring a song from a Macintosh to a Windows version, it is important that you add the file extensions, which are discussed above in the section named File Extensions. You can do this either on the Macintosh or on the PC, when you are finished. Songs created with Adat Edit for Windows can be opened in Adat Edit for Macintosh under “Import”. Main Menu Bar The main menu bars of Adat Edit for Windows and Adat Edit for Macintosh are similar. While the Macintosh version has an edit menu in the main menu bar, there is not a window menu 40 Emagic Adat Edit Tip MacOs/Win: Differences 1 video. The functions are also arranged differently. You can find details in chapter 17.1 Main Menu Bar. 2 3 4 5 6 7 8 9 10 11 12 13 14 15 16 17 18 Gl Ix B C Owner’s Manual Version 1.0 – English - 41 Getting Started 42 Emagic Adat Edit Chapter 3 1 Tutorial 2 3 4 This chapter introduces you to the features of Adat Edit by using examples. It touches upon all of Adat Edit’s important functions. You will learn, for instance, how to arrange a song, record a sequence, insert audio sequences, or prepare your arrangement for printing. 5 6 7 In order to follow the examples you should: • install the PCR card • install Adat Edit • have a General Midi tone generator or an equivalent multitimbral device connected to your computer’s Midi interface. 8 9 10 11 12 3.1 13 Adapting the Tutorial Song As you work through this chapter and the next, use the provided tutorial song. This song is configured for general Midi tone generators. Of course, you will not have any problems using the song with tone generators that do not follow the GM specification. The only difference when using a non-GM device, is that you will have to set the sounds and the Midi channels manually the first time you run the song, and you may have to transpose some tracks. If this is necessary, be sure to save your changes, so that you don’t have to redo your edits. 14 Load the Tutorial Song Ix As you may already know, data files can launch Windows programs, if the appropriate connections have been preset. You can start the Tutorial Song by B Owner’s Manual Version 1.0 – English - 15 16 17 18 Gl C 43 Tutorial • double-clicking the “Tutorial.lso” icon in the Adat Edit folder, or • double-clicking the file “Tutorial.lso” in Windows Explorer, or • starting Adat Edit, call up File > Open, and choose “Tutorial.lso”. With a Macintosh, simply double-click the song file in the finder. You should now be looking at the following screen: Arrangement window with tutorial song General Midi Tone Generator The program change, volume, and pan settings for this song are optimized for GM tone generators, and are transmitted to your device via Midi. This happens automatically, if you play the song from the beginning. These settings are found in a separate sequence at the beginning of the song. Since delays can occur with some synthesizers when they receive program change data, you should then mute this sequence. To mute the program changes, select the mute tool from the toolbox, and use it to click on the sequence named “GM Set- 44 Emagic Adat Edit Adapting the Tutorial Song 1 Up”. The sequence is now shown reversed, and a small circle is now in front of the name. 2 3 4 5 Muting the GM sequence 6 Non GM, Multi-Timbral Tone Generators 7 If you do not have a , you need to consider the following points: One prerequisite is, for example, that the sounds listed in the table are available. If necessary, find similar sounds in your own device.In addition, the drum kit's note assignemt needs to match that of the GM drum map(previously Roland drum map), otherwise, the percussion passages will be reproduced with the wrong drum sounds. Adjust the appropriate reception channels in your multi-timbral synthesizer, and assign the listed sounds specified in the table. If you need to rearrange your Drum kit, consider the percussion instruments listed in the table, as well. 8 9 10 11 12 13 14 Sounds and Midi Channels MIDI Cha. Function Sound Possible Name Vol Pan 15 1 chord combination piano/E piano Electric Grand, LA Grand 110 0 16 normal E bass Pick Bass, Rock Bass, E Bass 127 2 bass 17 Gl 3 accents muted E guitar Mute Guitar, Slap Guitar 127 R 4 melody long dying away melodic sound 100 0 Owner’s Manual Version 1.0 – English - Synthbell 18 0 Ix B C 45 Tutorial MIDI Cha. Function Sound Possible Name Vol Pan 5 carpet string section Slow Strings, Pad 90 0 6 accents wind section Brass Section 80 L 7 solo flute-like solo sound Stream, div. “Solo” 120 0 10 drums GM-compatible drum set GM Kit 110 0 Drum Kit Here is a list of percussion instruments used by the tutorial song, and their locations. (C3 = No. 60) Note Instrument C1 Kick D1 Snare (normal) E1 Snare (hi) F1 Tom lo F#1 HHT closed G1 Tom mid G#1 HHT closed short A1 Tom hi A#1 HHT open C#2 Crash D#2 Ride E2 Ride Bell Since transposition and relative volume are only automatically correct with GM sounds, you should let the song run through a couple of times, and see how it sounds with your instrument, after you have assigned compatible sounds. Go ahead and try opening Window > Mixer and use the faders to set the volume, if needed. 46 Emagic Adat Edit Tip Starting the Song 3.2 1 Starting the Song 2 You probably want to listen to the Tutorial Song first. Just push on the numeric keyboard. To jump back to the beginning of the song, push ‰, on the numeric keypad, twice. 3 4 5 6 7 8 9 10 11 12 13 14 15 16 17 18 Gl Ix B C Owner’s Manual Version 1.0 – English - 47 Tutorial 3.3 Overview After you open the tutorial song, you will see the following components on the screen. This example is on a Macintosh: 1 2 4 3 5 !≠ 9 7 8 6 1 Transport field This is where you control the operation of Adat Edit. You can turn on Cycle, set drop in/out points for recording, set the synchronization, and many other things.. Main menu bar This is where you find global functions, e.g. for saving and loading songs or for opening various windows. Bar ruler The bar ruler displays Adat Edit’s time axis for you; here you can set markers with the mouse, or jump to any desired place in a song. Arrange area, with sequences A track may contain any number of sequences. Sequences contain the actual data, such as notes, controller data, etc. The data can be edited in a variety of ways. Zoom buttons If you click on the telescope buttons, you can alter the magnification factor of the window’s contents and thus adapt to your screen. Transport window The transport window performs the same functions as the transport field, but can be located at any 2 3 4 5 6 48 Emagic Adat Edit desired point of the screen and is variable in size. A “slider” permits rapid approach from far removed song positions. Track column It is in the track column that you determine the Midi channel for each track. It is likewise here that you can swap tracks, insert them or delete them. Toolbox You can select a particular tool from this box in order to be able to edit sequences, notes or other data in a variety of ways. Sequence parameter box The sequence parameter box is where quantization, transposition and other aspects of the playback for a sequence can be non-destructively edited. Local menu bar In every window there is a separate menu bar that provides important functions for the particular window. 7 8 9 !≠ Tracks and Sequences 3.4 1 Tracks and Sequences 2 To start with, Adat Edit offers the usual elements found in a Windows or Macintosh program—the main menu bar, and various windows that you can open and close, move and adjust to size. After you load a song, you should see the Arrange window, as seen above. This is where you record and arrange your songs. Like a multitrack tape machine, Adat Edit also works on the basis of tracks. You can see and access the tracks in the Arrange window. 3 4 5 6 7 Narrow objects known as “sequences” are found on the tracks. A sequence represents an individual recording, or “take”. Each time you record, a sequence will be created in the track you recorded to. The sequence is like a container, so to speak, which contains the actual Midi data. This data can be notes as well as control data, program changes, or even sysex for your Midi tone generators. 8 9 10 11 12 13 14 15 16 17 Tracks with sequences 18 You can see that with Adat Edit, there are many more possibilities than with a traditional tape machine. Gl Ix B C Owner’s Manual Version 1.0 – English - 49 Tutorial 3.5 Information Track and Instruments Take a closer look at the “track plan”. On track 1, you can see the sequences “A intro”, “B groove”, and subsequent entries. “No Output” is displayed in the track column of track 1. This is a “ dummy track “, which does not contain any notes. The sequences on this track are only markers for the various song parts and, for the time being, are empty. As you continue to work through this section, you will learn about other advantages to using an information track in your own songs.. Instruments for the tutorial song are found on the remainder of the tracks: piano on track 2, bass on track 3, guitar on track 4, and so forth. The Midi channel for each track is visible in the track column. In addition, an icon is displayed there for each track. This shows which instrument is in use. 3.6 Transport Functions The second, smaller window, which Adat Edit shows after loading the song, is the Floating Transport window. It is laid out like the control surface of a tape machine, and is used for operating the Play and Record functions. In addition, you can change the tempo settings and engage operations such as solo, synchronization, or cycle. Let's start the song. Instead of clicking the Play button, you can also press = on your numeric keypad. You can hear that the song is not completely arranged, and still contains some inconsistencies. As you continue to work 50 Emagic Adat Edit Transport Functions 1 through this chapter, you will finish arranging the song, add a few details, and correct any mistakes. At the end, the song will be completed by adding some audio files. 2 3 In this section, you will learn to start and limit passages, and listen to places in the song—in short, to “navigate” in the song. • 4 Try out the buttons in the upper row of the transport field. You already are familiar with functions from tape machines or cassette recorders. 5 6 Start Song Positions 7 There are several ways to jump to specific song positions. 8 In the upper field of the Arrange window, you can see the bar ruler. 9 • • 10 Click at various places in the lower field of this ruler; you immediately jump to that position. At the same time, a gray line appears. This is the song position line (SPL)—in the most generalsense, it is comparable with the position of the tape on a traditional recording device. 11 12 13 Engage Play. Now click on the bar ruler, and hold the left mouse button. You can move to any position, and listen by moving the song position line. 14 15 If you know to which location you would like to go, you can enter this position directly with the “locators”. To the right and next to the transport buttons, Adat Edit shows the current song position, in both absolute time and as musical measures. • 16 17 Click on the song position indicator, and hold the mouse button. Place the song position at “17 1 1 1” and start playback. Adat Edit now plays starting at measure 17. 18 Gl Ix B C Owner’s Manual Version 1.0 – English - 51 Tutorial Display Current Song Position If you manually enter song positions, the window view that you see will not necessarily correspond to what you hear. You can, however, guarantee that these two things will always match. • Click on the catch button on the upper left in the transport field, and the window excerpt follows the song position line again. The window viewwill update, as soon as the song position line leaves the visible field, only if the catch function has been enabled: Zoom a Window Excerpt You can view the entire song in the window by using the two telescope buttons on the upper right edge of the window: Click on the left half of the horizontal zoom button until you can see all of the sequences in the window: Cycle Mode In cycle mode, you can cause a section of the song to repeat for as long as Play is engaged, in order to edit a sequence, for instance, or record new tracks in a specific section of the song. Two “locators” can be used for this. These are position markers 52 Emagic Adat Edit Transport Functions 1 that mark the left and right boundary of a loop. They are found directly to the right of the bottom row of transport control buttons. 2 3 First, turn on the cycle mode. To do this, click on the cycle button in the Transport window. It is now displayed blue. 4 For the next experiments, mark part “C” as cycle zone. • • 5 Use the horizontal scroll bar at the bottom of the Arrange window to move the window view, until you can see the sequence “C” in the information track. 6 7 Click on this. It is displayed inverted and is thus selected. 8 9 10 Sequence C 11 You will see another menu bar in the Arrange window, a “local menu “. Local menus contain specific functions for the current window. In the “Functions” menu, choose the menu item “Set Locators by Objects”. The cycle loop is now sized and positioned automatically to this sequence. Pay attention to the cycle bars in the measure ruler: 12 13 14 15 16 You can move this by grabbing it in the middle. The right and left boarders can be changed bygrabbing one of the bottom corners of the bar, and moving it. When Cycle is engaged, pressing Stop twice will take the SPL to the beginning of the cycle zone, rather than the beginning of the song.. 17 18 Gl Solo and Selection Ix Let's listen to the individual tracks in section “C “once, to become more familiar with the selection options. In order to edit objects in Adat Edit—be it sequences or notes—we have B Owner’s Manual Version 1.0 – English - C 53 Tutorial to first select them. All functions and operations are carried out only on those items that are highlighted or “selected”. • First, turn on the solo function, by clicking on the solo button in the Transport window. The button is now displayed yellow. *UDSKLN Make sure that—as in the illustration above—that “Cycle” mode is also enabled, and the Cycle zone covers measures 25 through 33. • Start playback, and click on the sequence “Piano C”. The sequence will highlight, indicating it is selected. You will only hear the piano part, because when solo is on, only selected sequences will play. • Click on the other sequences of section C one one after another, to listen to them “solo”. Let's go one step further; by playing several selected sequences solo. • Select “Piano C” once more. Hold S down, and click on the sequence “Bass C”. This is additionally selected and played. Click “Groove Real-time”. You should now hear piano, bass, and percussion. • While pressing the S button, click on the gray area beneath “Grove Real-time”, keep the mouse button pressed and drag a “lasso” over all sequences of section C. • The selection is now reversed—you hear all sequences except for piano, bass and percussion. 54 Emagic Adat Edit Transport Functions 1 Try out the selection functions with other sequences. You are now familiar with the most essential Adat Edit techniques. In 4.4 Selecting Objects, you can learn more about the selection functions. 2 3 4 Quantize 5 Quantizing is the rhythmic correction of notes, by means of a grid. Adat Edit thereby moves all of the notes exactly to their correct grid positions. We will test this by using the “Groove Real-time” sequence as an example. The timing in this sequence is slightly off, so you will use quantization to correct it. 6 7 8 You can hear this most clearly by enabling the Metronome . • 9 To do this, click on the metronome button in the Transport window. It is on the lower right. This is how to enable the metronome. 10 11 Adat Edit now sends a metronome note on channel 10 to your GM tone generator. Solo the drum sequence, as described above. You can now hear that the groove is not completely clean. • • 12 13 14 In the Sequence parameter box, click-hold in the line Qua . From the resulting flip menu, select the setting 16D Swing, and release the mouse button. The quantizesetting is now displayed in the Sequence parameter box. If you play the sequence now, it sounds rhythmically perfect. 15 16 17 Go ahead and try out other quantize values, for example 16, 24, or 7-tuplet, in order to hear the effects of quantizing 18 Look at the quantize settings of the various song parts. You will notice that the swing factors—characterized by the alphabetic character—are chosen differently. The groove factor can therefore be varied so that choruses sound like they have more swing in them than verses do, for example. Gl Ix B C Owner’s Manual Version 1.0 – English - 55 Tutorial Loops Loops are automatic repetitions of a sequence. The loop function enables you to repeat a passage as many times as you wish, without having to copy it. Let's add a cabasa to the tutorial song. This cabasa is only in the chorus and in section C, but is no longer in the grove section. A sequence by the name of cabasa is already on track 10; however, it is still muted. • Click on the sequence with the mute tool. The sequence is unmuted, and selected. Now turn the loop in the Sequence Parameter box to ON. You should now see the following screen: This sequence will now be repeated until the end of the song. Of course, we want to stop it before then. This is how it works: a loop is repeated until it comes across another sequence on this track. To “turn off” the cabasa at the desired place, place an empty sequence at the beginning of section C. Select the pencil tool, click in the cabasa track at position 25 1 1 1. Adat Edit inserts a new, empty sequence. The screen should now look like this: The cabasa will stp playing at measure 25. Finally, we will copy the new cabasa part to the groove section. While pressing the S key, click on the cabasa sequence, and the “stop” sequence. They have now both been selected. 56 Emagic Adat Edit Transport Functions 1 In the Windows version, press the ç key. In the Mac version press the O key. Click on the cabasa sequence, and drag the entire section to measure 33, while keeping the modifier key pressed.: 2 3 4 The entire passage, including the stop sequence, will be copied, and you're done. 5 The Toolbox 7 In the toolbox, you may select the desired editing tool, by clicking on it with the mouse. In the Windows version, you may select a second tool with the right mouse button. 8 6 9 Mouse Arrow 10 Using the mouse arrow—the standard tool—you can move sequences onto other tracks, or to other positions in the Arrange window. 11 Let’s insert a B part in front of the groove section of the Tutorial song. Half way through the section, we will transpose the B section by a semitone. To do this, the groove part must first be moved back eight measures: 13 • 12 14 15 Press the mouse button and rubber band select all of the groove section sequences. Grab them, and drag them eight measures to the right. The position display in front of the information line serves as a reference point. The information line should read “41 1 1 1” when you release the mouse button. 16 17 18 Gl Ix B C Owner’s Manual Version 1.0 – English - 57 Tutorial The arrange area should look something like this: Undo Did you make a mistake, like not selecting all of the sequences, or did you move them to the wrong place? If so, this is a good time to become acquainted with one of the most important functions in Adat Edit:“undo”. With the “undo” function, you can always undo the last editing step. • Select Edit > Undo. The sequences will be reset to their original positions. You can now put them where you want. Copies of Sequences We will now copy the section “B theme” to the empty area created when we moved the “groove” section.. Rubber band select the sequences of the “B groove” section. Press ç and click-hold on one of the selected sequences. Move the mouse to the right. A copy of all of the selected sequences is now dragged with the mouse pointer. Set these to measure “33 1 1 1”, where they will fill the space left by moving the “groove” section. The newly created sequences will have the names of the originals, with the text “*copied” appended to the end of the name. You decide whether or not this extension should appear in the sequence's name by going to the File > Preferences > Midi/Global window. Place an X in fthe checkbox to the left of the line “Add ’Last Edit Function’ to 58 Emagic Adat Edit Transport Functions 1 Sequence Name”, if you want a description of edit operations to edited sequences. If not, remove the X from the box. 2 Scissors 3 Now, let’s cut the sequence we just copied in half, using the scissors tool. By doing this, we will then be able to transpose the second half of the section, while leaving the first half in the original key. 4 • Rubber band select the sequences that were just copied. • Select the Scissors tool by clicking the scissors symbol in the toolbox. The mouse pointer is now displayed as ascissors within the Arrange area. 5 6 7 8 9 Click on one of the selected sequences, and hold the mouse button down. If you hold the mouse button down, and move the mouse left or right, you can adjust the exact edit position by means of the information line. Choose the position “37 1 1 1”, which is measure number 37. When you release the mouse button, the sequences are cut. Enlarge the horizontal view by using the zoom buttons until it looks like this: 10 11 12 13 14 15 16 Now, you can transpose the second half of the section. Rubber band select measures 33 to 49, to select the corresponding passages. 17 Transposition Gl Look at the parameter Transpose in the Sequence Parameter box. Itcontains an aserisk (*). This means that the selected sequences already show different transposition values. Don't worry, the sequence parameters always work relatively; therefore, the transposition differences are maintained. Ix Owner’s Manual Version 1.0 – English - 18 B C 59 Tutorial • Grab the asterisk in the transpose line, and move the mouse upward until the value “+ 2” is displayed. • Release the mouse button. The passage has now been transposed up a whole tone. Place the song position line to measure 37 and listen to the result. It does not sound particularly good, we still need to do some fine-tuning. The percussion sounds somewhat strange at first. This is because you unknowingly transposed the percussion sequences, causing the drum note placement to shift. You will have to undo the transposition for the percussion tracks. To do so, selected the drum sequnces, and drag the “+2” transpose setting down, until the line is empty. This indicates no transposition. Also, the bass in the copied B-section is only a loop that was not transposed, because it is merely a pointer on the real sequence, which was not affected by the edit. Therefore, we will have to change the loop into a real sequence: Select the sequence “Bass themecopied”. Choose Functions > Turn Loops to Real Copies. A new sequence now now will replace the gray loop. Transpose this up two semitones, from “-12” to “-10”; the end of the song is now perfect. Your First Recording The final exercise in the Arrange window is to make your first recording. To make it fun, you can play a solo over the Csection. There is already a flute solo there, this, however can certainly be replaced by a better solo. Since you may not play the solo perfectly on the first try, we’ll set Adat Edit so that you can record several “takes” from which you may select your favorite. 60 Emagic Adat Edit Transport Functions Step One: Delete the old solo. 1 • 2 Select the eraser from the toolbox and click on the sequence “Flute”. It will be deleted. 3 Now you can preset the cycle and record parameters. You willprobably want a bit of lead in, before the solo starts, to get ready to play. You therefore need to extend the cycle to be longer than the actual recording, that is from 23 1 1 1 to 33 1 1 1. This gives you two extra measures before section C, which starts at measure 25. 4 5 6 7 You probably do not want to manually enter and exit recording with every cycle. This is not necessary because Adat Edit offers the Autodrop function which engages and disengages record automatically at predefined points (often called “Punch In/ Out”). • 8 9 10 Click on the Autodrop button; this is in the Transport window, just to the right of the Cycle button. The bar ruler will divide into two sections. You can now see the Autodrop bar, which will appear below the cycle zone.. 11 12 13 14 • Set this to positions 25 through 33, as shown above. 15 Song Settings 16 For the next step, we will make a few settings. 17 • 18 Open the File > Song Settings window. Gl Ix B C Owner’s Manual Version 1.0 – English - 61 Tutorial • Check the box, Auto Mute in Cycle Record. This setting will cause each previous take to be automatically muted when the cycle repeats. This way, you can record one passage after another, without being distracted by your previous takes. If you would like to hear the metronome via Midi, you should enable Midi click now. The metronome is sent on channel 10— the drum channel. • Confirm by clicking OK. Let’s Record! • Click in the track list on track 8—the one with the small flute icon. This selects it as the recording track. You can now play the flute sound from your Midi keyboard. • You can select other tracks to try them out—Adat Edit automatically addresses the right instrument (MidiTHRU). Finally, switch back to track 8. Your Arrange window should now look something like this: 62 Emagic Adat Edit Transport Functions 1 2 3 4 5 6 7 • • 8 For practice, you can now simply start play by pressing 0 on the numeric keypad, or by clicking on Play. If the solo in E major is difficult for you, transpose the “MIDITHRU” simply by transposing -4 to C major. “MIDITHRU” always appears in place of a sequence name in the Sequence parameter box, when you click on an empty space in the Arrange window. Any settings you make to the Sequence parameter box now will be applied to any subsequently recorded sequences. 9 10 11 12 13 When you are confident enough to record the solo, begin the recording by clicking * on the numeric keypad, or by pressing Record. 14 15 The count-in of one measure, starts, then the cycle zone will play repeatedly. You can play over the first two measures of the cycle zone, until Adat Edit reaches the left Autodrop point (measure 25) in the song. Anything you play from measure 25 onwards will be recorded. At measure 33, recording will automatically stop, and a sequence will be created in the track. • 16 17 18 Gl Let Adat Edit continue running. After reaching the right cycle point (measure 33), the SPL will jump back to the left cycle point (measure 23). At measure 25, the next recording begins. Ix B C Owner’s Manual Version 1.0 – English - 63 Tutorial Repeat the entire sequence until you feel that you have one or two good versions recorded. Your Arrange window will now look somewhat like this: Adat Edit creates a new track automatically, for every cycle, and moves the previous tracks down the list. • By using the mute tool, you can now listen to the individual takes. • After you have decided which version to use, delete the unwanted takes by clicking the corresponding track(s) in the track column, and in the local menu call up Track > Delete Track. Repeat this process, until you have deleted all the unwanted tracks. Saving the Song Here’s how to save the tutorial song, with your new solo: • Choose File > Save As…, and enter a new name for the song to be saved as, for instance, “Tutsolo”. When using Windows, Adat Edit automatically assigns the extension “. LSO”. Load the initial tutorial song for further excercises. 64 Emagic Adat Edit Event List 3.7 1 Event List 2 In the event list, you can see all Midi events of a sequence displayed as an alphanumeric list. • 3 Open the Event List for the sequence, “flute”, by doubleclicking with the right mouse button (Windows), or by holding O down (Macintosh), on the sequence. 4 5 6 7 8 9 10 11 The status column displays what type of event it is. Besides the notes, the sequence contains other types of events. You can view only certain types of events by using the filter buttons for various types of events. 12 13 Click on each of the buttons, except for the one showing a slider at the bottom of its range, so that they are displayed in dark gray. 14 All that is left in the event list is the control change events. 16 • 15 When finished, enable the view for all of the types of events again. As you click on each button, the events of that type will re-appear in the list. 17 18 We will now insert two program changes in the solo, in order to change from a flute sound for the solo in the first half,to a synthesizer sound for the second half.. Gl Ix The solo begins at measure 25. First, we place the program change for the flute at measure 25. B C Owner’s Manual Version 1.0 – English - 65 Tutorial • Set the song position line to 25 1 1 1 in the Arrange window or the transport window. In this way, you determine the position for the event to be inserted. • Select the Pencil tool, and use it to click on the program change symbol. (In the Windows version, you may simply click with the right mouse button on the Program change button in the Event List). A program change is inserted at position 25. The program number is in the VAL column. Set this to 73 on a GM tone generator. If you are not using a GM tone generator, find a program change that can choose a flute sound. Now, we will inset a second program change: • Put the song position line to position 29 1 1 1, and click on the 88 symbol again. Choose value 87 with GM tone generators, or a program change that selects a synthesizer solo sound. • Switch to the arrow tool again. Filter the view for all event types, except for the program change events. Your event list should look like the following: *UDSKLN If you play the solo now, the second half will have a different sound. The next time it plays through, the program change at the beginning of the solo, switches again to the flute sound. 66 Emagic Adat Edit Matrix Editor 3.8 1 Matrix Editor 2 The Matrix editor can be compared to an Arrange window for notes. Unlike the Arrange w indow, notes in the form of bars are shown, instead of sequences. 3 4 5 6 7 8 9 10 This picture shows the Matrix window for the sequence “Strings C”. • 11 Open the Matrix editor by holding the ç button, and double-clicking the sequence “Strings C”. 12 13 You can see a keyboard along the left edge of the Matrix window. By using this keyboard, you can see the pitch of the notes in the display. A chord is represented by a group of overlapping bars. You can easily recognize that the note lengths of the second chord are unequal. Also, there is a wrong note in the 4th chord.. 14 15 16 17 Look at this sequence in the Event List as well, by choosing Window > Open Event List. These inconsistencies are not so easily recognizable. Close the event list window again. 18 Gl Ix B C Owner’s Manual Version 1.0 – English - 67 Tutorial • Selectnotes from the first chord by rubber band selecting it. • Now, grab the lower right corner one of the selected notes, and drag it to measure 26, so that the end of the bar connects with the beginning of the next chord. . Any edit to the length of one note, will affect all other selected notes equally in the Matrix editor. • Repeat the process, to lengthen each chord so that it comes up to the beginning of the next. This will create a legato effect on playback. Choose a larger zoom level to better be able to edit the events. *UDSKLN The wrong note should now be deleted. • 68 Select the eraser from the toolbox, and use it to click the short note at position 28 1 1 1. The note will disappear. Emagic Adat Edit Score Editor 1 2 3 4 5 You are now done editing the strings sequence. Practically every sequence in the tutorial song contains slight incongruities, which you can easily repair in the Matrix editor. Select one or two more sequences and edit them as you did with the String part. 6 You will probably notice a big difference when optimizing the lengths of bass sequences. 9 3.9 7 8 Tip 11 Score Editor 12 Note events can be represented as notation, and can be edited in the Score editor. You can simply use the Score editor, as well as the other editors, to correct Midi events. The possibilities that the Score editor provides, however, are much more comprehensive—allowing you to control the page layout with many functions to help in the printing of music. • 10 13 14 15 16 Open the Score editor for the sequence “Bass theme”, by double-clicking on it. 17 18 Gl Ix B C Owner’s Manual Version 1.0 – English - 69 Tutorial The representation of notes is indeed “mathematically correct“, however, it’s currently barely readable—transposition, key, and a lot more must be edited. Let's go ahead and shape this sequence so that it is ready to print. Display Parameter Box Click the check box in the left parameter area next to the term “Bass theme”. This opens the Display Parameter Box. Style The Display Parameter Box contains several functions that you can use very effectively to correct the representation of notes. One of these is the style. There are 21 preset styles for the most commonly used instruments, transposition of display, and number of systems. From the Flip menu “Style” select the style “Bass 8”. The score looks better immediately: Now, enable Interpretation. This should clean up the display, by automatically “rounding up” the durations of the notes, so that they are represented in a more readable way: 70 Emagic Adat Edit Score Editor 1 You can see that the notes are now much more cleanly displayed, without all the short notes and rests. This way, staccatto passgaes can still be notated correctly. 2 3 Key Signature 4 Enter the correct key. The tutorial song is in E major. • 5 Enlarge the window , until the part box is visible. Click on the field with the key icon, as shown to the right. 6 Under the field, a box with all of the keys opens up. • 7 Hold down the mouse button and drag the letter “E” to the beginning of the score display. The correct key signature (4 sharps) will now be shown in the stave. Sharps for diatonic notes will no longer be displayed. 8 9 10 Text 11 For printing purposes, you may want to name the note system. Of course Adat Edit allows you to input text in the Score editor. • 12 Select the text tool from the toolbox and click onto the field above the clef. A text input box opens. Type “Bass” here, and press R. The text will appear above the notation system; you can move the text in small increments with the mouse. 13 Yoiu can change the appearance of the text by using Options > Score Font. 16 Page Edit View 18 14 15 17 The page edit view in Adat Edit is very practical for editing longer passages, or editing the look of the score for printing. In this mode, you can see a complete sheet of music on the screen before printing it. Gl Ix B Suppose that you want to be able to see and edit the entire bass track on the screen. Owner’s Manual Version 1.0 – English - C 71 Tutorial • First, switch to full-page view by clicking the “Page Edit” button in the Score editor. The buttonwill displayed light gra,y and you will see two lines of notes: These are the contents of the selected bass sequence. Arrange-Level Often, you will want to see the whole track. To do this, you need to switch to the song-level in which all tracks of the song are represented simultaneously in the Score editor. Doubleclick on an empty space in the window, and Adat Edit will switch to the song-level display. 72 Emagic Adat Edit Score Editor 1 Because it has not been edited at all, the score display is still not perfect. The piano, for example, (middle system) is not represented as a piano system. We will not worry about that yet; let's first concentrate on the bass track. 2 3 4 Track Filter To hide all other tracks, we are going to use the track filter. It is the upper flip menu in the Score editor; at first it displays ALL TRACKS. 5 Open the flip menu by clicking and then holding the mouse button, then select CHA2—the bass track: 7 6 8 You can select and edit individual sequences at the song-level. • • • 9 Click on different places of the bass notation, and look at the sequence name, which is shown in the Display Parameter box. 10 11 Double-click on a place in a system —Adat Edit changes again to the sequence level. 12 Click in the sequence level on an empty spot; you are in the song level again. 13 14 The score display shows the entire bass track when you are at the Arrange level. Except for the small portion you have already edited, this track still needs to be cleaned up. You can do that relatively quickly, by editing all the bass sequences at once. 15 16 In the Score editor, select Edit > Select All. All sequences will be selected, and will now be flashing. Set the display parameters as follows: 17 If you now enter the key of Emajor, as you did before for the single bass sequence, all the selected sequences will now be set to the key of Emajor. The whole piece almost looks ready to print—at least ready enough to try. Gl 18 Ix B C Owner’s Manual Version 1.0 – English - 73 Tutorial Print If you have connected and installed a printer onto your computer, then you can immediately print the displayed page: Windows In the local Print menu, choose the menu option Parameter, and set “Last Page 1”. Then, select “Start”. Macintosh In the File menu, choose the menu option Print, and confirm by clicking OK. In a few minutes, you should be holding a printout of the page in your hands. 3.10 Audio Tracks With Adat Edit, you can make and play audio recordings. As with the Midi tracks, audio recordings are displayed in the Arrange window. Because we are not working with Midi events, but rather audio files, the editing options of the audio tracks are not the same in every way with those of the Midi tracks. Reload the initial Tutorial Song for more exercises. Create Audio tracks We will now create an audio track in the Arrange window, so that we can insert a drum loop onto this track. • Select the piano track in the track list, and create an audio track in the Arrange window by choosing Track > Create Audio Track. In the Arrange window, a new track called “Audio” willappear below the piano track. You can name this audio track by doubleclicking on “Audio”. For example, you can call this track “Audio1”, because this is your first audio track. It would probably make more sense if you were to name it “Drums”, so that you can better identify the corresponding channel in the mixer. 74 Emagic Adat Edit Audio Tracks 1 In the Track Parameter box, use the Cha flip menu, to select which of the available audio channels the track should be set to. 2 3 4 5 6 7 The newly created audio tracks always appear below the currently chosen track in the Arrange window, and must be defined in the parameter box, so that they can be displayed in the mixer. 8 9 10 Mixer with Audio Channels 11 Anaudio track can be controlled from the Mixer window, just as with the Midi tracks. • 12 In the main menu, choose Window > Open Mixer. 13 You now see a new channel strip in the upper portion of the mixer; this strip is named “Audio 1” or “Drums” (depending on what you named the track). The number of the corresponding track in the Arrange window is shown below. Also, two more channels (” Bus 1” and “Bus 2”) appear to the right of the created track. These two channels are for looping internal effects. There is also a stereo fader fwhich acts as a master volume control for all the audio tracks (“Out 1-2”). This audio section appears in the mixer as soon as an audio track has been created in the Arrange window, and defined in the Track Parameter box. • 14 15 16 17 18 Gl Ix Change the audio channel from mono to stereo operation by clicking the button on the lower left corner of the B C Owner’s Manual Version 1.0 – English - 75 Tutorial channel strip. This is necessary, because we are going to import a stereo file. • Switch back to the Arrange window by closing the mixer window. Importing Audio File Now, let’s import an audio recording of a drum loop into the tutorial song from the Adat Edit CD. • Select the pencil tool, and click at measure 5. Adat Edit will now ask where you want to get the audio file from. • Find the drive and folder that contains the tutorial drum Loop “Atmo-Drums.AIFF” (Macintosh) or “AtmoDrums.wav” (Windows). The file will be found in the same folder that contains your Adat Edit program. • Double-click this file. It appears in the Arrange window. If you enlarge the display with the “Zoom” buttons, you will see a waveform display in the audio sequence that was just imported. The audio file name is displayed over this. After the 76 Emagic Adat Edit Audio Tracks 1 name, a symbol indicating whether the file is mono or stereo will be shown. 2 3 4 5 If you switch to playback after measure 5, you should be able to monitor this audio file via the audio output of your computer or sound card. You will notice that the speed of the tutorial song does not fit the imported audio file. We can fix this by adjusting the speed of the song. 6 7 8 Sample Editor • 9 Open the sample editor by double-clicking on the drum loop. 10 In this view, you can best edit the audio file. Look at the starting point of the sequence; you will notice that the starting point of the drum loop is not exactly on the “one” of measure 5. 11 • Enlarge the display so that you can see the starting point precisely. 13 • Move the left starting point so that it is exactly at the beginning of the waveform. 12 14 15 16 17 18 Gl Ix B C Owner’s Manual Version 1.0 – English - 77 Tutorial • Now press the button with the loudspeaker symbol, to listen to the audio file. The starting point should now be correct, but the end point must still be corrected. It is currently too far back, and must be moved forward until the drum part loops smoothly. The best way to check this is by engaging “cycle” mode in the Sample editor. Do so by pressing the button. • Go to the end of the drum loop and move the end point back until there are exactly two measures between the start and end points. Optimize the beginning and end points in the cycle mode until the loop actually cycles smoothly. Listen to the loop a couple of times. This is important, because this length will be used to adapt the tempo of the song.to the audio file. • In the transport window, set the locator points to measures 5 1 1 1 and 7 1 1 1. • Click in the Arrange window, and select Functions > Adjust Tempo using object length & Locators. At this point, you will be asked whether the tempo for the entire song (global) should be changed to match the audio file, or whether a tempo change should be inserted at the left cycle 78 Emagic Adat Edit Audio Tracks 1 point, 5.1.1.1. If you select global, then your arrangement in the drum loop should look something like this: 2 3 4 5 6 7 The song speed is adapted precisely to the drum loop, which we just defined using the locator points. The drum loop corresponds to the length of two measures. The length and position of the audio sequence now corresponds exactly to the settings that we changed in the sample editor. 8 9 10 You can move, cut, and copy the audio sequence in the Arrange window, just like you are used to doing with Midi sequences. Of course, the Matrix editor, the Score editor, and other Midi specific functions are unavailable for audio sequences. 11 12 13 Internal Audio Effects in the Mixer 14 The internal audio effects of Adat Edit are inserted into “Buses” 1 and 2 by selecting the desired effect with the “Insert” button. 15 16 17 18 Highlight the effect you want in the flip menu, and then release the mouse button. The insert appears green, with the name of Gl Ix B C Owner’s Manual Version 1.0 – English - 79 Tutorial effect displayed on the button. You can edit the effect parameters by double-clicking on the button. The “Tutorial Song Audio/1” file is an example of a combined Midi /audio arrangement, based upon the original tutorial song. The delay and quantizing parameter of the Midi tracks were changed, because the initial swing groove does not work well with the drum loop. Effects from the Mixer were added to the drum loop and rap sequence. There is a stereo file named “Audio Tutorial (2 Track)” on the Adat Edit CD. This is the outcome of editing the audio portion of the tutorial. This is the master of the Adat Edit song “ TUTORIAL Song.Audio/1”. Now It's Your Turn … If you have worked through the tutorial up to this point, then you know the most important functions of Adat Edit, and already have a good overview of its operation, and wide range of functions. The tutorial song contains useful output material for your own experiments, h which you can build on. We recommend that you take some time to work in depth with the tutorial song. • Record more tracks (e.g. percussion). • Replace existing tracks with your own recordings, e.g. piano, bass, drums. • Create more audio tracks, and insert additional audio files. 80 Emagic Adat Edit Audio Tracks • • • • 1 In the Sample editor, try out various audio sequences in the menu options of the “Functions” menu and listen to the results directly in sample editor. 2 3 In the mixer window with the bus inserts, place delay and reverb effects on the audio tracks; set these effects differently. 4 5 Look for mistakes in the sequences, and remove them by using the various editors. 6 Use the Score editor to printout smaller sections of the song.. 7 8 9 10 11 12 13 14 15 16 17 18 Gl Ix B C Owner’s Manual Version 1.0 – English - 81 Tutorial 82 Emagic Adat Edit Chapter 4 1 Operation 2 3 4 In this chapter you will learn how to use the mouse, keyboard, menus, toolbox and other elements in Adat Edit. 5 6 4.1 Mouse 7 The user interface of Adat Edit is graphically oriented. You can control all of Adat Edit’s functions with the mouse. This section will give you an overview of how you can put the mouse to use. 8 9 10 Open up the Tutorial Song and its Arrange window, if you would like to directly try out the operations described below. 11 12 Mouse Techniques The terms that we will use in this manual to describe mouse techniques will certainly already be familiar to you from other applications. These terms are: 13 Point Move the mouse arrow to the object that you want to work on. 15 Click Point with the mouse arrow to an object and then briefly press down once on the (left) mouse button. Generally, for the Windows version, unless the right button is specified, you can assume that the left mouse button will always be meant. With this technique you are able to select objects, activate on/off switches, or select options. 14 16 17 18 Gl Ix B C Owner’s Manual Version 1.0 – English - 83 Operation Double Click Point to an object and tap on the mouse button twice. With this, you can open windows in Adat Edit. Click-hold Click on an object and hold the mouse button down. Dragging Click-hold an object, and then drag the object in the desired direction. This way, you can move an object to another position. If you are still not familiar with using the mouse, you can practice with the help of the Windows Learning Program. You can find the tutorial in the help menu of the Program Manager. You can change the mouse settings for your computer under System Tools > Mouse (Windows) or under the Apple Menu > Control Panels > Mouse (Macintosh) respectively. Flip Menus Menus in Adat Edit can be operated just as they would be in other applications you are used to. There is one exception, however, and that is the flip menus. These are menus that pop up to display different selection options, when you click-hold the menu. Practice In the Arrange window, click-hold on an “icon” symbol in a track’s parameter box. A flip menu with more icons will open, from which you may select a different icon. Use this to practice using flip menus. You may use a flip menu in the following ways: • Select an entry from the menu, and release the mouse button. That entry will be chosen. • In order to choose entries which are not in the visible section of the flip menu, scroll up or down the flip menu, by moving the mouse over the upper or lower edge of the 84 Emagic Adat Edit Key Commands 1 window. The farther you move the mouse over and away from the edge of the window, the faster you will scroll. • • 2 If you open the menu with the right mouse button, it will remain open after releasing the button. Now you can move down the flip menu, using the scroll bar on the right. To select a menu item, click on it with the left mouse button. The flip menu will then close. 3 4 5 On the Macintosh, the procedure is a little bit different: Open the flip menu, press S while holding down the mouse button, and then let go of the mouse button. The flip menu will remain open, and you can use the scroll bar to move up and down in the menu. Click on the desired selection. Now release the S key. The selection is chosen, and the flip menu closes automatically. 6 7 8 9 10 4.2 Key Commands 11 Adat Edit is designed so that you can carry out a large variety of functions with either the mouse, or the computer keyboard, depending on your personal preference. 12 Adat Edit uses key commands for calling up functions and menu items, using the computer keyboard,. Many of these are already assigned, others are not preset. You may customize any of these to suit your own working style (see also Chapter 15 Reference: Key Commands and Use of Mouse on page 307). 14 13 15 16 A key command may either be a single key, or a combination of one or more “modifier” keys (S, A, ç, C, O) with a “normal” key, in order to carry out a particular function. Furthermore, function keys (@ to ˚ or Ì with Macintosh), are recognized as key commands. Tip You can define the assignment of key commands and functions in the Key Commands window. To do this, call up Windows > Key Commands in the Main Menu. Tip 17 18 Gl Ix B C Owner’s Manual Version 1.0 – English - 85 Operation .(<&20%037LS Key Commands Window A list of key commands and their functions will now open. The functions are divided into subject areas. In the left column, you can see the defined key, and in the right column, the function assigned to it. As you can see, most of the functions are already sensibly predefined. You can, however, change these definitions and give key combinations to unassigned functions. We recommend that you do not change the pre-defined key combinations, especially if you work together with other Adat Edit, MicroLogic or Logic users, or frequently change your computer. That way, it is guaranteed that you can always fall back upon the familiar key commands. Defining the Key Commands Click the Learn button. The button will turn light gray. Click the desired function with the mouse. It will highlight. Press the desired key combination; it will be shown right away. You can enter as many key combinations as you want in this fashion. Deactivate the Learn button when you have finished asigning commands. 86 Emagic Adat Edit Tip Operating the Windows Hiding Key Commands 1 You can filter the view in the Key Commands window, by either hiding all the keys which already have a function assigned to them, or all keys which do not have a function assigned to them. That way, you can tell at a glance which functions do not already have a key command assigned to them. 2 1. Click on Hide Unusedto hide all functions which are not already occupied. 5 2. Click on Hide Used to filter out all functions already defined. 3 4 6 7 8 Find Key Command 9 It is also possible to find a key command quickly, even if you only know a part of its name. 10 Simply click on the white field to the right of Find, and enter the text you are looking for. The key command window will now just show those key commands which have that combination of characters. 11 12 The key command window remains completely functional in the find mode. You can hide unused or used key commands, or make assignments. 13 The find function does not distinguish between upper and lower case. 15 14 16 Click the Find switch again to turn off the find mode, when you are finished. 17 18 4.3 Operating the Windows Gl The program windows in Adat Edit can be operated in much the same way as they would in the computer’s operating system. However, there are some extra functions which give you an improved overview, and make Adat Edit even easier to Owner’s Manual Version 1.0 – English - Ix B C 87 Operation use. This section will explain the effective operation of windows in Adat Edit. Standard Elements of Operation The standard window elements are probably already familiar to you from other programs, and your computer’s operating system. :,1'2:%03 Adat Edit-Windows in the Windows version With each window you are able to: • close individual windows; windows in Adat Edit can be closed by just a simple click; • change the window size; • minimize any window to an icon on the task bar, and then reset it to its original size and position by clicking on the icon. If you are not familiar with these functions, please review your computer manual. Telescope Tools In the Arrange window, the Score window and the Matrix edit window you will find one or two telescope tools. These can be found in the upper right-hand corner, underneath the title line. They are used to control the zoom setting of the window. With 88 Emagic Adat Edit Operating the Windows 1 these telescope tools, you can change the magnification factor of the window section being viewed. In the Arrange window, the size of the sequences and fonts are affected; in the Score editor, on the other hand, the size of the notes is determined by the zoom settings. 2 3 4 A small arrow within the telescope tool shows the zoom direction (horizontal or vertical). • • 5 Clicking on the left half of a telescope tool reduces the magnification, whereas clicking on the right half enlarges it. 6 You can also hold down the mouse button, until the desired zoom factor has been reached. 8 7 9 Practice 10 Return the Arrange window to its normal size, and use scroll bars and Telescope tools to set the following views: • Just measures 7 to 11 • The entire song • Track 1 to 4, with the Sequence parameter box displayed • All tracks 11 12 13 14 Another way to set the magnification factor is the zoom tool, in the Arrange and Matrix windows. See section Zoom Tool on page 103. Tip 15 16 17 Scroll Bars 18 The scroll bars that you will find to the right of and underneath every window are the same as in other applications. The scroll bars in Adat Edit offer an additional function, however. The scroll box in it varies not only in its position, but also in its size proportional to the visible window section. Therefore you can see at any time the propor- Gl Ix B C Owner’s Manual Version 1.0 – English - 89 Operation tional relationship between the visible section, and the entire contents of the window. Example In the Arrange window, you can tell by the bottom scroll box, which part of the entire song you are seeing at that moment. Clicking on one of the arrows at the end of every scroll bar will scroll one step further. Clicking in the empty space within the scroll bar allows you to scroll the window one page in the corresponding direction. If all the contents of the window fit into the visible section of window, then the scroll bar appears in its entirety, and the small arrows disappear. x/y-Movement Elements In the lower left-hand corner, you will find the x/y movement elements. These allow you to move the window section both horizontally and vertically at the same time. Click-hold the small gray box, and hold down the left mouse button. The mouse’s arrow changes into a crosshairs tool. The visible section of the window will now move in proportion to the movement of the mouse. On the other hand, if you hold down the right button on the mouse, the window section will continue moving automatically in the direction that you are moving the mouse. In this case, the mouse’s movement determines the scrolling speed. Catch Mode The Catch mode is controlled by the button in the upper left corner of each window that shows a “walking man” . When the catch mode is activated, the contents of the window move in correlation with the current song position. In short: what you see on the screen will actually be what you hear at that moment. This is practical if you want to, for example, 90 Emagic Adat Edit Operating the Windows 1 listen to a track and simultaneously check it in the Score window. You should turn off the catch mode if you want to listen to the song,, but edit onlya particular part of it. 2 If you use the horizontal scroll bar to manually move a window section, then the catch function will deactivate itself. Otherwise, the window would always jump back to the song position. Tip 3 4 5 Link Mode 6 The link button, with a stylized chain-link symbol, can be found next to the catch function in every window, except for the Arrange window . 7 8 If this is activated in a window, then that window will automatically show the contents of a selected sequence. So if you have opened the Score editor, and then click on a sequence in the Arrange window, its contents will automatically be shown in the Score editor. If you subsequently click on another sequence, then the contents of the Score editor will change. 9 10 11 12 Practice Open the Score editor in the Tutorial-Song, and activate the link function. Now click on a few sequences of the piano, bass, and melody tracks one after the other. Try the same with the Matrix editor and the Event list. 13 Local Menus in Adat Edit 16 In Adat Edit, menu items whose functions are only valid for a certain window are not located in the main menu bar, but rather in a local menu in the corresponding window. This way, the main menu bar remains clearly arranged and neat. 17 14 15 18 Gl The available menu items vary, depending on the window. Ix Only the functions of the Edit menu remain for the most part the same. You’ll remember this menu from the sections “Object Selection” and “Cutting, Copying, Pasting, and Deleting of Objects.” Owner’s Manual Version 1.0 – English - B C 91 Operation Arranging Windows on the Screen In Adat Edit, you can open many windows at once. For example, you can place two Arrange windows with higher and lower zoom levels next to each other, with an Event list underneath, and perhaps a Score editor, etc. The functions of the command menu – window menu in Macintosh – manage these windows, and allow you to call up certain windows or to switch from window to window. When you save a Adat Edit song, the window configuration is also saved, and is established again the next time you open the song. Therefore, it is guaranteed that you will have the optimal arrangement, size and zoom factor on hand for every song. Tip Last Window This menu item brings the window that was used last to the foreground. This is especially practical if you accidentally click on another window, covering up your present work window. You can call it up again with Window > Last Window in the main menu, or the ˚ key. Next/Previous Window Adat Edit keeps track of the order in which you have opened windows. You can activate the next window in the series with Window > Next Window (·). Previous Window (˜) opens the previous one. As a rule these two functions help you find a certain window more quickly than by blindly clicking on partially hidden windows. Toggle Transport This menu item toggles the floating Transport window from normal view to an icon. This way, you can temporarily hide the Transport, when you need the space for other things. Instead of the menu item, you can also use the Í key. 92 Emagic Adat Edit Tip Operating the Windows Main Window 1 The main window in Adat Edit provides the framework for all other windows, and holds the main menu items. You can call up this window at any time, if by changing to another application or Adat Edit window it becomes covered. To do this, you have to change to Adat Edit (under Windows via A†) and, once there, press the ¯ key. The ¯ key calls up the main menu within Adat Edit, too, if another window is activated. 2 3 4 5 You can make the main window smaller and place it on the title bar by using the “change size” button, which is the middle of the three buttons in the upper right-hand corner of the main window. This way, the windows of other applications are also visible. Tip 6 7 8 9 Working in Background Windows 10 In Adat Edit you can also work in windows which are opened in the background (unhighlighted title bar) without having to move the window to the foreground. That way you can, for example, move objects in the Arrange window, without having to move the Score editor to the background. 11 12 13 Normally, just clicking briefly on a window will bring that window to the foreground. Here’s how you copy or move an object without moving the window up to the foreground: 14 1. Click on a sequence in a background window, and hold the mouse button down. 16 2. Move or copy the sequence as usual. 17 3. Release the mouse button. 18 15 The sequence is moved, while the window remains in the background. Gl If you click briefly on the window, it will be called up to the foreground. Ix B C Owner’s Manual Version 1.0 – English - 93 Operation Closing Windows You can close a window in Adat Edit by clicking on the close button, in the upper right-hand corner. Alternatively, the A and window, under Windows. 4.4 £ key will also close the active Selecting Objects Using the mouse and the local edit menus in the Adat Edit windows, you have several possibilities for selecting desired objects (sequences, notes, events) in a window. Example In the Arrange window, you may wish to select: • a sequence, • all sequences of a track, • all sequences inside of certain limits (ex. measures 11 to 17), • all sequences that still have not been selected In order to edit a sequence or group of sequences, they must first be selected. The same holds true for notes or note groups in the Score editor, groups of events in the Event list editor, or notes in the Matrix editor. So that you do not have to laboriously click on these objects one at a time, Adat Edit offers you a wide variety of selection options, which will be described in this section. These selection functions are identical in all Adat Edit windows. Try out the different selection options in the Tutorial Song. Selecting Individual Objects You can select individual items by clicking on them. Selected objects or events will display highlighted, except for notes in 94 Emagic Adat Edit Tip Selecting Objects 1 the Score window, which blink when selected. To deselect them again, click on a free area in the window. 2 Example 3 If you click on a sequence in the Arrange window, it will be selected. 4 5 6 Selecting a Block 7 In order to select a block of adjacent objects, click-hold a free area near the objects and, while holding down the mouse button, rubber band select around them. 8 9 Example 10 Here’s how you select sequences which are next to each other. 11 12 13 14 If, while rubber band selecting, you move the mouse over the edge of the window, the visible window section will be moved as well. This way, you can select objects which had been out of the visible range of the window. 15 16 17 Selecting Several Scattered Objects 18 In order to select a non contiguous group of objects, hold the S down and click on the desired objects. Gl Ix B C Owner’s Manual Version 1.0 – English - 95 Operation Example Undoing a Selection You can undo the selection of all objects or a group of objects. Call up Edit > Toggle Selection to deselect recently selected objects. A second possibility is to hold down the S key and rubber band around the objects. The selection will be undone for all objects that the rubber band reaches. If, however, you want to select all objects except for one, it is easier to select this object and call up Edit > Toggle Selection. Selecting all Following Objects You can select all objects after the current song position, if you place the song position line at the desired location, and select Edit > Select all Following. 96 Emagic Adat Edit Tip Selecting Objects 1 2 3 4 5 6 Select all following 7 Selecting Objects within the Locator Positions 8 Adat Edit selects all objects within the left and right locator points when you select Edit > Select Inside Locators. As the diagram below shows, objects are also selected which are only partially within the locator limits. 9 10 11 12 13 14 15 Select Inside Locators 16 17 Example If you want to select all the sequences from the first chorus to the third verse, set the locator value accordingly and select this menu item. 18 If you want to move objects over a long distance, select a smaller zoom factor, so that you can see the start and destination positions in the Arrange window simultaneously. Ix Gl B C Owner’s Manual Version 1.0 – English - 97 Operation 4.5 Working withTools In Adat Edit you do not need to enter any number columns or click on any values with the mouse when you want to move, cut, delete or paste sequences or notes. You just have to choose the proper tool from the tool box, in order to carry out the operation. Through the tools’ symbols, you can immediately recognize what each is for. For cutting, there are scissors, an eraser for deleting, a glue tube for merging. So that you always have the right tool accessible, Adat Edit allows you to change tools at any time, assign two different tools to the mouse buttons (under Windows), or call up the toolbox at any time with the touch of a button. Here is an overview of the tools available to you. The widest selection of tools can be found in the Arrange window; we will use these tools to explain general tool use. In each of the editor windows you will find toolboxes with a smaller selection of tools. The tools remain the same, only the material to be edited changes: sequences in the Arrange window, notes in the Score editor, bars representing notes in the Matrix editor. 7RROER[ 1 2 3 4 5 6 7 8 9 1 Arrow 2 Pencil 3 Eraser 4 Text 5 Scissors 6 Glue 7 Solo 8 Mute 9 Zoom Toolbox in the Arrange window 98 Emagic Adat Edit Working withTools Tools: Area of Influence 1 Each tool functions only in the work area of its respective window. Example: If you select a tool in the Arrange window, you can edit only sequences with it, not notes in the Score window etc. If you have multiple windows open, the pointer will change to the currently selected tool for each window, as you move it over each window. Working with the tools always affects all the selected objects. So if you select three sequences stacked on top of each other and click in the middle of one of them with the scissors, then all three will be cut (see diagram). 2 3 4 5 6 7 If you move the tool outside the work area, it will automatically change into an arrow. That way you are able, for example, to move the song position line in the bar ruler (see section Bar Ruler on page 129) even if you have the eraser, or any other tool selected. 8 9 10 11 12 The same holds true for all other tools. That way you can, for example, delete, move or copy many objects with one single operation, even if they are scattered around the window. 13 Please note this especially when working with the eraser. Before you delete a sequence, for example, make sure that other sequences are not selected outside the visible range of the window, or they could accidntally be deleted as well. Tip 14 15 16 All tool operations can be undone with Edit > Undo. Tip 17 Assigning a Tool to the (Left) Mouse Button 18 Select a tool by clicking on it in the toolbox. The mouse’s pointer will then take on the form of that tool. Gl Ix In order to edit an object with the tool, you generally have to point and click on the object. The result will depend on which tool is selected. The operation of each tool is described below. B C Owner’s Manual Version 1.0 – English - 99 Operation Assigning a Tool to the Right Mouse Button You can assign a second tool to the right mouse button by just clicking on that tool with the right mouse button. This way, you always have two different tools available to you, without having to reach into the toolbox. Because double-clicking with the right mouse button is used to call up the event list, and could be easily pressed, instead of the left button, by mistake, we recommend that you avoid assigning the eraser to the right mouse button. Otherwise, you could accidentally delete sequences or notes. Important! Opening the Toolbox at the Mouse Position If you press ™, the toolbox will open up at the position of the mouse. This way, you can choose a new tool, even if the current window’s toolbox is not visible. Information Line While holding down the mouse button to perform an operation, an information line will replace the normal local menu items in the window where the edit is being performed. This informs you exactly of what type of change you are making and where that change is taking place. Arrow The arrow is the standard mouse tool, as is typical of other applications. It is used for every action in which you use the mouse to select, move or copy something. Here are the most important arrow functions: Select 100 Click on the object. Emagic Adat Edit Tip Working withTools Move 1 Click-hold the middle of the object with the mouse’s pointer and drag it to the desired position. Copy 2 3 Click-hold the object while holding ç (Windows) or O (Mac), and drag the copy to the desired position. Change length 4 5 Click-hold the object (sequences in the Arrange window, notes in the Matrix editor) on the lower righthand corner and pull it to the desired length. 6 7 8 9 Pencil With the pencil, you can create and insert new objects. To do so, just click with the pencil at the desired position. 10 Eraser 12 11 The eraser deletes objects, when you click on them. It’s best if you switch to another tool after using the eraser, so that you can avoid accidental deletions. If you accidentally delete an object, you can undo the edit immediately afterwards. 13 14 15 Text 16 This tool is used to enter text. With this you can name sequences in the Arrange window, or enter text into the Score editor. Click the object that you wish to name. A text field will open in which you can type text with the computer keyboard. You close the field by pushing R. 17 18 Gl Ix Text field for Sequences B C Owner’s Manual Version 1.0 – English - 101 Operation Scissors With the scissors you can divide sequences in the Arrange window. With this you can cut out unneeded parts of a sequence, or divide a longer passage into verses, bridges, and refrains. Here’s how to use the scissors: • Select the scissors, and place the tool at the position where you want the sequence to be cut. • Click-hold the mouse button. The information line will tell you exactly where the scissors are cutting. Position the scissors precisely. When you release the mouse button, the sequences will be cut at the selected position. Glue Tool The glue tool has the opposite function as the scissors. With the glue tool you can merge together all selected objects. This causes the sequences to be combined into one, which will contain all events from the selected sequences. Select the sequences that you want to merge together. Click on one of the selected sequences with the glue tool. This resulting sequence will have the name of the first original sequence. Solo With the solo tool, you can isolate and listen to individual sequences. Click the sequence that you want to hear with the 102 Emagic Adat Edit Working withTools 1 solo tool. If you move the mouse over the sequence while holding the mouse button down, the events that are scrubbed over by the solo tool will be played. Every object you click with the solo tool will be run. If you hold down ç, then you will be able to hear several individual sequences played back simultaneously. 2 3 4 Adat Edit offers still another solo function. Read more about it in the section Solo, pp. 5–108 ff. 5 6 Mute 7 By clicking on a sequence with the mute tool you can mute the sound of that sequence. By clicking on it again, you can turn the mute off. Muted sequences can be recognized by an “” or a period (Mac) by its name. 8 9 10 11 12 Zoom Tool 13 The zoom tool allows you to magnify a selected section to window size. 14 You can find this tool in the Arrange window, as well as in the Score and Matrix editors. 15 16 Here’s how to use the zoom tool: • • 17 Choose the tool (Magnifying-glass symbol) from the toolbox. 18 While holding down the mouse button, “rubber band” the section that you want enlarged, and then release the mouse button. Gl The desired section will be enlarged so that it fills the window. B You can keep enlarging pieces of this section until you reach the highest zoom factor. C Owner’s Manual Version 1.0 – English - Ix 103 Operation You can jump back to the previous zoom setting by clicking briefly in an empty area of the window with the magnifying glass tool. You can also switch directly to the zoom tool by pressing A (Windows) or ç (Mac). In this case, you first have to click on an empty space in the window – not on an object – and then “rubber band” the area to be zoomed in on. 4.6 The Edit Menu In addition to the selection functions described above, the edit menu has the usual cut/copy/paste functions, that you are already used to from other programs. With these you can cut or copy objects (sequences, Midi events), and paste them to another position. With copying and cutting, the object is transferred tothe clipboard, from which it can be pasted to other positions as often as you want. When you use the cut or copy commands again, you will write over the contents of the clipboard. Undo In Adat Edit you can always undo your last edit. This is especially useful if you accidentally delete something, or make some other mistake. Simply go to Edit > Undo, and your last edit will be undone. You can decide in the global preferences (see below) whether or not a warning box should appear before an undo operation. Cut Select the object or objects and select Cut. The selected items will be removed, and placed in the clipboard. 104 Emagic Adat Edit Tip File Menu Copy 1 As opposed to Cut, Copy puts the selected items in the clipboard, but also leaves them in place in the current window. 2 3 An even more convenient way to copy than via the menu is to drag the selected objects, while holding the ç- (Windows) or O-key (Macintosh) to another position. With this method, the objects are not transferred to the clipboard. 4 5 6 Paste 7 This menu item is only available if you have previously cut or copied an object. When you select Paste, the contents of the clipboard will be inserted into the active window, at the current song position. 8 9 The contents of the clipboard remain in place, even after the close of a song. That way you can exchange sequences or other objects between different songs. Each time you cut or copy data, the previous contents of the clipboard will be discarded. Tip 10 11 12 Clear 13 You can delete the selected objects by going to Edit > Clear in the local menu, or by pushing B. In Windows, ∂ works as well. 14 4.7 15 16 File Menu 17 In the file menu you can create a new song; open, close, or save an existing song; save a Adat Edit song in Midi file format, and exit Adat Edit. 18 Gl New Ix creates a new song, with an empty Arrange window, with the file name Untitled. Select this when you want to create a song from scratch. B Owner’s Manual Version 1.0 – English - C 105 Operation Generally speaking, it is more practical to begin with an auto load song, which will have your preferred song settings. Tip Open opens an existing song from a floppy disk, or the hard disk. When you choose this menu item, a file selector box will appear, from which you can choose a Adat Edit song. In Windows, all files with the file extension “.LSO” will be shown. If you select Open while another song is open, a dialog box will appear prompting you to save the previously opened song. Using the Open command, you can also load songs in the standard Midi file format. To do so, select the option Midi Files in the file formatline on the lower left-hand edge of the file dialog box. The file dialog box will now automatically display files with the file extension “.MID”. Close closes the current song, along with all of its windows. If anything has changed since opening the song, you will automatically be asked if you want to save the changes. When you save, the old version of the song will be written over. If you want to save the changed version under another name, then you have to select Save As, before you close the song. Caution! Revert to Saved replaces the currently loaded file with the saved version on the disk. All changes that you have undertaken since the previous backup are thereby lost. 106 Emagic Adat Edit Caution! File Menu Save 1 Saves the song to a floppy disk, or the hard disk. If this is a new song, you will be prompted to name the song. 2 Save as 4 saves the song under another name, or to another path. Use this option when you do not want to overwrite an existing song with a new version. 5 Export Selection as Midi File 7 saves the selected sequences or the entire song in Standard Midi-file format, which can be read by almost all of today’s sequencers. Before you can call up this menu item, you have to have selected at least one sequence. 8 3 6 9 10 More to this in the section: Midi Files, pp. 15–285 ff. 11 Song Settings 12 For every song Adat Edit saves a group of settings. More to this is the Song Settings section, pp. 4–91 ff. 13 14 Preferences 15 A second group of settings, the Preferences, affect all songs, and are not saved in each song individually, but rather just once in Adat Edit. The section: Preferences, pp. 4–88 ff., goes into this in more detail. The Preferences are saved in the Windows folder (Windows), and in the System Folder’s Preferences Folder (Macintosh), and are automatically loaded at program start. 16 17 18 Gl 1.Quick Launch of Recent Songs Ix Below the Preferences is a list of the four songs you have most recently loaded. By choosing the appropriate entries, you can quickly load one of these songs again. B C Owner’s Manual Version 1.0 – English - 107 Operation Exit closes Adat Edit. In case you still have unsaved changes in your song, a dialog box will appear asking if you want to save these changes. 4.8 Windows Menu The Windows menu item in the main menu allows you to open the Adat Edit windows. Here is a brief description of each window: Open Arrange opens the Arrange window, the main view of Adat Edit. Open Event List opens the Event List editor, which allows you to edit all types of MIDI events in precise detail. The event list is especially suited for editing events like control change, pitch bend, or aftertouch, which, unlike notes, are inaccessible in the other editor windows. Open Score In the Score window, the note events are shown in musical notation and can be printed if desired. Besides the editing of the notes themselves, you may also insert dynamic markings, accent symbols and other items for the printing of a full score of your musical composition. Open Transport The Transport window is a “floating” window that is always in the foreground, and is used to control playback, recording and other sequencer functions. 108 Emagic Adat Edit Windows Menu Open Matrix 1 In the Matrix editor, the notes are represented as horizontal bars. The pitch is represented by a vertical keyboard. In the Matrix editor, it is especially easy to edit the length of the notes. In addition, because of the graphic selection possibilities, it is well suited for drum notes, where every instrument has a defined MIDI note. 2 Open Mixer 6 The mixer controls both the audio and Midi tracks. The switches and controllers of the Midi tracks’ channels remotely control the parameters belonging to the tone generator. For this, the mixer produces controller events, which cannot be recorded. The mixer indicates the program, volume, and pan settings in the instrument parameter box (left, next to the track column) and controller events in the tracks, as well. 7 3 4 5 8 9 10 11 Open Key Commands 12 In this window, you can assign a key command to most of the functions and options in Adat Edit. This way you are able to control many functions from the computer keyboard. More about this can be found in the section: Key Commands, pp. 4–63 ff. 13 14 15 16 17 18 Gl Ix B C Owner’s Manual Version 1.0 – English - 109 Operation 4.9 Preferences If you go to File > Preferences, you can set the global parameters. Modem Port/Printer Port With Macintosh, choose the serial port (see the Macintosh handbook) to which your Midi-interface is connected. You can select either the modem port or the printer port. Releasing the Modem and Printer Ports in the Background While Stopped Midi software like Adat Edit uses the modem or printer port of the Macintosh for Midi. You can release these for other uses, such as transmitting a file by modem or printing a letter. 1. Select File > Preferences. 2. Activate Release modem and printer ports in background while stopped. 3. Adat Edit will only use the selected serial port while the sequencer is actually running. The rest of the time, the port will be available for other uses, such as printing a 110 Emagic Adat Edit Preferences 1 score etc. 2 Wide Song Position Line 3 You can widen the song position line to make it easier to grab with the mouse. In addition, a wide SPL is more visible, especially against the stone background. 4 5 Single Click closes Window 6 This function determines whether it is necessary to click once or double-click on the close field in the upper left-hand corner to close windows. 7 8 9 Activate “Catch” when the Sequencer Starts The catch function analizes every sequence up to the current song position and looks for the state of pitch bend and controller events. That way it makes sure that Midi events, such as volume, pan or pitch bend are not left hanging if you stop in the middle of a sequence, but rather are set back to their proper value at the next start. 10 Color Graphics 14 Switches the color graphics on and off. When you deactivate the color graphics, the colors are represented by a gray-scale, or black and white grid. 15 11 12 13 16 If you are using Adat Edit on a notebook computer without gray scale or color display, you should disable color graphics. Tip 17 18 Add Last Edit Function to Sequence Name Gl If activated, an appropriate indication will be appended to the sequence name after a copy, or other type of operation is carried out. Example: If you copy the sequence “Piano,” then the result will be called “Piano*copied.” This way, you can easily tell if a sequence has been changed during editing. Owner’s Manual Version 1.0 – English - Ix B C 111 Operation Disable Safety Alert for Undo If this box is not checked, a dialog box will appear when you select Undo. In this box you must confirm that Adat Edit should undo the last operation. If you want to be completely safe – especially at first – you should leave this option unchecked. 4.10 Song Settings The following settings are components of the song, and are saved with it. In principle, if you want to use the same song settings, we recommend that you work with an Autoload song, which holds your settings in the song. For this, you just need to save a song under the name “Autoload.” If the song is in the same folder as the Macintosh version of Adat Edit program file, then it will automatically be opened when Adat Edit is started. For the Windows version, you should create a shortcut that opens Adat Edit, with your Autoload song as the target. 112 Emagic Adat Edit Tip Song Settings 1 Recording Options 2 Merge New Recording with Selected Sequence 3 A new recording is combined with selected sequences to make a new sequence. 4 Example 5 If, in cycle mode, you produce a drum sequence and play in a bass drum, snare and HiHat in different passes, the result will still be a single sequence. 6 7 8 Merge only new Sequences in Cycle Record 9 Only those sequences which were created after activating the record mode are combined in the cycle mode. Old recordings remain preserved. 10 Adat Edit allows for practical combinations of the first four options. 11 Auto Mute in Cycle Mode 13 12 While recording, you can repeat a section of the song over and over (cycle record), and keep recording until you find a version you like. Adat Edit lays down a new sequence with every pass. If the “Auto Mute” option is activated, then at the start of a new cycle, the sequence produced in the previous pass will be muted. This way you can record as many passes as you want, without the previous passes being played back at the same time. 14 15 16 17 18 Auto Create Tracks in Cycle Record Gl Activate this option if you want to generate a new track with each cycle iteration. The advantage is that every take is placed on its own track, and therefore, can be more easily selected and edited. Ix B C Owner’s Manual Version 1.0 – English - 113 Operation Reasonable combinations of the first four song-setting parameters are possible. Send used Instr. Midi settings after Loading This option is described in the section Send Midi Parameters when opening a Song, pp. 4–96 ff. Metronome Settings With these settings you can determine whether and when Adat Edit plays the metronome, and in what form. Adat Edit sends the metronome in quarter beats, with the first beat of each measure accented. Click while Recording Determines whether or not the metronome clicks during recording. This is normally activated, unless you would like to make a recording without reference to a particular tempo, and without quantizing. Click while Playing When activated, the metronome will also be active during play. Normally, the metronome distracts from the playback of the song. In some cases, however, it can be practical. For example, if you want to check the timing of a recording that was not quantized. MIDI Click When activated, the metronome is transmitted via Midi. In accordance with the general Midi standard, Adat Edit sends the click on channel 10 (drum channel). If you own a GM tone generator and use this in conjunction with Adat Edit, “Hi Wood Block” (Midi-Note 76, E4) will sound on the one beat and “Low Wood Block” (77, F4) on the other beats. Otherwise, we recommend you set up channel 10 of your tone generator with 114 Emagic Adat Edit Tip Song Settings 1 a drum kit – just as in the Tutorial Song– and choose appropriate drum sounds for the notes E4 and F4. 2 Speaker Click 3 With this, you can set the metronome to trigger the built-in loudspeakers of your computer. If possible, you should use the Midi click, however, as this is generally more easily controlled. 4 5 6 Count-In Normally Adat Edit’s count-n before recording is one measure. 7 With the Count-In flip menu (below), you can set the count-in to match your personal preferences: 8 9 No Count-In 10 The recording starts without count-in. 11 1-4 Measure Count-In 12 The count-in will be the number of measures you select here. 13 MIDI Settings 14 Transmit MIDI Clock 15 When activated, Adat Edit sends Midi clock data during recording and playback, to synchronize external devices. If you do not want to synchronize external sequencers, tape machines (via synchronizers) or other devices, you can switch this option off, to reduce the amount of data on the Midi line. 16 17 18 Gl Bank Select Ix With this flip menu, you can choose between different bank select formats. B Bank-change commands are for switching between different sound banks (each with 128 sounds) in the tone generator. Owner’s Manual Version 1.0 – English - C 115 Operation These commands are always sent together with program change events, when you set the number of the desired bank instead of the "8" sign. This is shown as a smaller number in front of the program number in the information box on the left edge of the arrangement window – here bank number 1. You can also set bank numbers in the GM mixer. You must remember two things when using bank select commands: • As a rule, many tone generators do not understand bank select commands, • There are almost as many formats for this as there are types of devices. If your device is not listed among the menu choices, try using the first entry: Control 32. This is what the Midi standard recommends. The meaning of the remaining settings: Control 32 Controllers 0 and 32 are sent; Controller 32’s value contains the bank number. Control 0 Controllers 0 and 32 are sent; Controller 0’s value contains the bank number. Control 32 without MSB Only controller 32 is sent. Control 0 without LSB Only controller 0 is sent. Ensoniq VFX, SD-1 Two device-specific Program Change Events are sent. 116 Emagic Adat Edit Song Settings Yamaha TG 500 1 Controller 32 is sent; 32 is added to the bank number. 2 Roland JV 80/880 3 Controller 0 is sent; 80 is added to the bank number. 4 Kurzweil K1000/K1200 5 Two device-specific Program Change Events are sent. 6 Yamaha TG 77 7 Two device-specific Program Change Events are sent. 8 Oberheim Matrix 1000 9 Device-specific. 10 Roland JV-90/JV-1000 and Roland JV-1080 Device-specific. 11 Yamaha CS1x (XG) 12 13 Device-specific. The special banks as well as the sound effect programs are likewise supported. 14 Roland JV-2080 15 Device-specific. 16 Send Used Instr. MIDI Settings after loading 17 LQVWUXPEPS 18 Gl Ix B The program parameter box allows you to set three Midi parameters for every track: Owner’s Manual Version 1.0 – English - C 117 Operation Prg Sound bank and Sound program Vol Volume (Volume value) between 0 and 127 Pan PanValue from 0 (left) to 64 (middle) to 127 (right). If you like, you can have these settings sent directly to the tone generator at the opening of the song. Adat Edit sends the events after the opening of the song, thereby pre-setting the correct sound, volume and pan values for the song. Here’s how to activate this option: 1. Open the Song Settings window in the file menu. 2. There, activate the Send Used Midi Settings after loading option. 3. For each track that you would like to have settings sent, activate the parameter(s) that you want to send after loading. 4. Save the song. When you open the song next, all the parameter values that were checked will be sent automatically. 118 Emagic Adat Edit Chapter 5 1 Transport Functions 2 3 5.1 4 Transport Window 5 6 7 8 The Transport window is a small, floating window in Adat Edit which contains the controls for operating the playback, cycle, and other transport functions. The transport window is called a “floating window", because it cannot be obscured by other windows, it is always on top. 9 10 11 Display Options 12 You can open the transport window, if it was completely closed, by calling up Windows > Open Transport. 13 Í Windows: If you just want to hide the transport window temporarily, press . The transport window will then be displayed as a symbol on the lower left-hand edge again, the transport window will return of the screen. If you click this or press to its normal size. 14 Í 15 16 Indicator Options In the Mac version, if you touch on the small down arrow on the lower right-hand side of the transport window, a flip menu will appear, allowing you to change the layout of the transport window. A similar flip menu appears in the Windows version, when you click on the hatched button next to the close button, which is located at top left. (See the diagram to the right). 17 18 click here Gl Ix B C Owner’s Manual Version 1.0 – English - 119 Transport Functions Legend Here, you can switch on a description of the buttons and display fields. We recommend that you take advantage of this, especially in the beginning. This way, you will be able to learn the ropes more quickly, and avoid errors. Position Slider You use this option to activate the “position-slider” on the bottom edge of the transport window. The position slider represents the entire length of the song. With this you can jump to any position in the song almost immediately, albeit not very accurately. Click on the slider and hold down the mouse button. When you move the mouse horizontally, the slider will move accordingly. The gray bar tells you where you are in the song, relative to the entire song length. The position indicators and the song position line (see below) are also influenced by this. Smaller/Larger The Transport window can be displayed in different sizes, which you select using smaller/larger. When you start Adat Edit, the transport field will be opened in its smallest display size. 120 Emagic Adat Edit Transport Window 1 Parameter Fields and Indicators 2 Position Indicators 3 The position indicators in the Transport window show you the current song position in two different formats. 4 The upper portion displays SMPTE-Time, i.e. hours, minutes, seconds, frames, and bits. The SMPTE format is the current format used in synchronizing music in film. Although using SMPTE for synchronization is only supported by Logic and not by Adat Edit, this version does shows you this format, so that youcan always keep an eye on the song length, in absolute time, instead of just measures and beats. 5 The lower portion displays Measure Position, in measures, beats, diplay format units and clock ticks. How it is divided depends on the time signature, and the Display Format value, which you can also set in the Transport window (see below). Normally, the four fields would be (from left to right): measure, quarter notes, sixteenth notes, ticks. 9 6 7 8 10 11 12 A tick is the smallest possible subdivision of a measure in which a sequencer can break up its time axis. In Adat Edit a tick carries 1⁄3840 of a note. Tip 13 14 Clicking the small gray square to the right of the indicators sets these to zero. 15 16 Position Markers (Locators) 17 Adat Edit allows you to define two locator points. This is analogous to the locator points that can be found on some tape recorders. They make it possible to automatically go to, or play certain passages. The locatorpoints on the left, below the position display, are the cycle locators. With these you can define a part of the song to be constantly repeated by Adat Edit in cycle mode. The locator points to the right, below the tempo display, are the autodrop locators. With these, you can define the points where Adat Edit automatically punches in and out of Owner’s Manual Version 1.0 – English - 18 Gl Ix B C 121 Transport Functions recording. More on this can be found in the section Cycle Mode on page 132 and in the section Autodrop on page 133. The autodrop locators are only visible when both cycle and autodrop are activated. Tempo The song tempo in Adat Edit is shown in beats per minute (bpm). You can set the tempo in increments of 1/10000th of a beat, anywhere from 0.5 to 9999 bpm. The song tempo is then set for the entire song. You can make changes to the tempo during the song (ritardando, accelerando), using the tempo list. This is described in section Tempo List on page 135. Free Memory This indicator informs you of remaining storage space, measured in events. If Adat Edit warns that there is too little memory for a certain operation, you can have the storage space automatically optimized. Double-click the Free Memory Field. A dialog box will appear asking if you want to reorganize the memory. If you confirm this, your computer’s RAM will be reconfigured, creating additional space for data. Time Signature and Display Format Here you can set the time signature for your song by grabbing the numnerator or denominator, and sliding the mouse to set the desired value. The time signature change will take effect at the current song position. This way, you can insert time signature changes in your songs, by simply moving the SPL to the desired position, and changing the time signatire display in 122 Emagic Adat Edit Transport Window 1 the transport. The new time signature will appear in the bar ruler, and will remain in effect until you insert another at a later point. 2 3 Beneath the time signature field, you will find another subdivision, which gives the Display Format value for the song. 4 Adat Edit uses this Display Format value: • 5 as the third field in the position display for the locators and the event list. 6 • for subdividing the bar ruler (see below). 7 • as a Midi-metronome division value. 8 • as step size for the moving of notes in the Score editor. 9 Midi-Indicator 10 The Midi indicator field gives you a real time diaplay of Midi events Adat Edit is currently receiving or sending. This is useful to test the connections between Adat Edit and your Midi equipment. 11 12 13 This field also allows you to send a Midi reset command. 14 Midi Reset 15 With the Midi Reset, you can switch off stuck notes. • Click in the Midi indicator field in the Transport window. • Adat Edit will send a simple Midi Reset. If this does not help, try a “Full Panic”: • 16 17 18 Double-click the Midi Indicator. Gl The field shows “Full Panic,” and Adat Edit sends a Note-Off Event for every single note of the sixteen Midi channels. Ix B C Owner’s Manual Version 1.0 – English - 123 Transport Functions End of Song The small field on the lower right-hand edge of the transport field shows the End of Song. Among others, the scale of the vertical scroll bar and that of the song bar orientate themselves to this. In order to change the End of Song, click-hold on the current value, and scrub the mouse up or down. You can also set the End of Song in the bar ruler with the mouse (see below). 5.2 Transport Functions The following functions serve to control Adat Edit’s movement and status, and are similar to the transport functions of a tape machine. In this sense, you can operate Adat Edit exactly as you would a cassette deck, or a studio tape machine – but more easily, of course, and without waiting for the tape to rewind. Instead of using the buttons, you can also use the keys of the numeric keypad, described below. This is especially practical if you want to playa Midi keyboard at the same time. Record Click this button to start recording from the current position. The recording will begin after the count-in (see the section Song Settings on page 107). key: * Pause/Continue stops the recording or playback until you click on the button again. key: ; Play starts playback at the current song position. 124 Emagic Adat Edit Mode-Buttons 1 key: = 2 Stop 3 stops the playback. To continue from the same place, use the play function again. When you press the stop button twice, Adat Edit jumps to the beginning of the song. 4 5 key: ‰ 6 Fast Forward and Rewind 7 With these two buttons you can move forward or backwards in the song. This works either while stopped, or during playback. You can influence the shuttle speed with the mouse. Click on the fast-forward button, and hold down the mouse button, and Adat Edit shuttles at a faster speed. The further you move the mouse to the right, the faster the Adat Edit will shuttle. The rewind function works in a similar manner, except, of course that you would move the mouse to the left, to increase the shuttle speed. 8 9 10 11 12 13 5.3 Mode-Buttons 14 The mode-buttons, unlike the transport buttons, do not trigger any actions, but rather put Adat Edit into a certain mode. Clicking on one of these activates it, and it remains activated until you click on it again. 15 16 17 Cycle (Repeat Mode) 18 You can repeat a section of your song by using the cycle function (repeat mode). This is discussed in more detail in the section Cycle Mode on page 132. Gl Ix B C Owner’s Manual Version 1.0 – English - 125 Transport Functions Record Replace Unlike tape decks, you can choose to mix newly recorded material with any that may already be in the track. Normally, new recordings are added to existing data in the track. If you would rather replace the existing material, click on the replace button. Solo If you activate Solo, only highlighted sequences will play. When the Solo function is activated, you can select and deselect as many new sequences as you want. Hear track solo Click on the track number to select a track, and then activate Solo. Hear sequence solo Click on the sequence and activate solo. Several Sequences/Tracks solo Hold down S and click on the sequences or tracks, or drag a rubber band over the sequences, while holding down the mouse button. Activate Solo. During Solo playback, you can select or deselect any objects you want. The effect on playback will be immediately noticeable. 126 Emagic Adat Edit Mode-Buttons If you want to hear all objects solo, except for the selected ones, proceed as above, but select Edit > Toggle Selection in the local menu of the Arrange window. Tip 1 2 3 Sync 4 The sync button makes possible the synchronization of Adat Edit through an external Midi clock source. This way, you can control the sequencer externally, from another sequencer, a drum machine, or a synchronizer. When sync is activated, Adat Edit folows Midi Clock and Song Position Pointer , and runs in sync with the incoming clock. More about this can be found in the Chapter 14 Synchronization, Video and Midi Files on page 283. 5 6 7 8 9 Metronome 10 This button allows you to turn the metronome on and off separately for playback and record. The play or record status is remembered when you activate the metronome. 1. 11 12 Click briefly on the button to turn the metronome on or off. 13 You can also access the recording and metronome settings directly from the metronome button: 2. 14 15 Click-hold on the metronome button. A flip menu will open. 16 3. 17 From here, select the option you want. 18 Setting the Midi Metronome Gl You can select which note numbers and Midi channels the Midi metronome will use. By default, the instruments “Hi Wood Block” (note number 76, Note E4) and “Low Wood Block” (note number 77, Note F4) are set in the general Midi Drum kit. Ix B C Here’s how you set the Midi Click: Owner’s Manual Version 1.0 – English - 127 Transport Functions 1. Choose File > Song Settings, and activate the option Midi Click. 2. Call up Options > Midi-Metronome-Click in the local menu of the Arrange window. The Midi Click window will open up. In the Windows version, select the Port you wish the metronime to send to. Click-hold the Port parameter, to open a flip menu. For both versions, under Bar, set the parameters for the note that the metronome will send on beat one of each measure. You may also set a velocity for the note. Under Beat, set the note and velocity you want for the other beats in each measure. 3. Click on the measureand beat buttons to activate them. 4. Click on the record button in the transport window or press * on the numeric keypad. Adat Edit will begin recording. You will hear the metronome clicks on your Midi sound module. 5. Set the parameters to correspond to your sound module. To be set are: Cha Midi channel. Note Note and, with it, the drum instrument (e.g. Cowbell, Woodblock). Vel Velocity value. Usually, you will set the velocity for the Bar a bit higher than the Beat, to accent the downbeat of each measure. 128 Emagic Adat Edit Bar Ruler 5.4 1 Bar Ruler 2 3 4 You will find the bar ruler in all Adat Edit windows, except for the Event list. The bar ruler helps you visually locate the position of sequences (Arrange window), note bars (Matrix editor) and notes (Score editor). 5 6 The bar ruler is not read-only, however. You can carry out the following functions with the mouse: 7 • Song - Set the start and end measures; 8 • Move to different positions in the Song (Song Position Line); 9 • Set points for Cycle and Autodrop Locators. 10 11 The subdivision of the ruler is displayed according to the time signature values in the Transport window. When you change these, Adat Edit reacts immediately by changing the settings in the bar ruler. 12 13 14 Example Set the time signature in the Tutorial-Song to 2⁄4 or 8⁄4, and note the changes in the bar ruler. When finished, set the value back to what it was. 15 As with other displayed elements, the bar ruler is influenced by the horizontal zoom factor. If you set locators, or want to change the song beginning or end, you can set the scale of the ruler as needed. 17 16 18 Gl Ix B C Owner’s Manual Version 1.0 – English - 129 Transport Functions Setting the Song Beginning and End AS with sequences, the song also has defined beginning and end points. These two markers are represented in the bar ruler by two rectangles, can be moved with the mouse. Song markers Beginning of Song Normally the song will begin at position “1 1 1 1.” You can, however, alter this, perhaps to insert a program change, or an upbeat before the beginning of the song. Grab the start of song marker with your mouse, and drag it to the left. The bar ruler will move correspondingly to the right, and the information line will show you the new beginning of the song. Release the mouse button at the desired position. End of Song An Adat Edit song can be practically limitless in length. Normally Adat Edit sets the song length to 200 measures. This is automaticallyextended, however, as soon as an object goes past this position. You can manually set the end of song to any position you like. Bring the end marker into view, by either moving the horizontal scroll bar to the right, or making the horizontal zoom factor smaller, until the marker is visible. Grab the marker, and drag it to the desired position. If possible, set the song end marker to the actual end of the song. That way the horizontal scroll bar will be scaled accordingly, and its range limited to the length of the song. 130 Emagic Adat Edit Tip Bar Ruler Song-Position Line Song-Position Line 1 2 The song position line is a vertical line inside the window (Arrange window, Matrix and Score editors), which displays the current position of the song. You can move to any position in the song with the song position line and even over the events (scrub function). The lower third of the bar ruler is reserved for this. 3 4 5 The song position line in Adat Edit is somewhat similar to the recording head of a tape machine. 6 7 Jump to a Certain Position 8 Click on the position you want in the lower third of the measure ruler, to move the song position line to that point. 9 10 Shuttling 11 Holding down the mouse button in the lower third portion of the measure ruler allows you to move the song position line back and forth in the song. If, in doing so, you move the song position line past the visible section of the window, the view will shift. 12 13 14 Scrub Function 15 Start the playback and click in the lower third of the measure ruler. Hold the mouse button down. Now you can move the song position line around and hear tyhe section of the song that you scrub over. If you release the mouse, playback will return to normal. 16 17 18 Start and Stop Gl By double-clicking in the lower third of the bar ruler, you can start or stop the playback from that position. Ix B C Owner’s Manual Version 1.0 – English - 131 Transport Functions You can also choose between a thin or wide song position line. More to this can be found in the section Wide Song Position Line on page 111. 5.5 Cycle Mode In the cycle mode, you can isolate a passage of the song to be repeated. You may want to have a passage played repeatedly so that you can: • edit events within the cycle zone • practice a section for recording • Record multiple takes. This way you can select the best take, or edit together pieces from several takes. You can activate the cycle mode (repeat function) by: • clicking on the cycle button in the Transport • configuring a cycle bar in the bar ruler, by clicking in the upper portion of the bar ruler Setting Cycle Locators The area to be played in cycle mode is defined by the cycle locators. Their values are shown in the Transport window, and can be set there. See th section Position Indicators on page 121. Cycle Bars When the cycle button is activated, you will see not only the cycle locators in the Transport window, but also a black bar in the bar ruler, that encompasses the cycle zone. You can move the bar by grabbing it in the middle. To change the bar’s borders, grab the bar on the lower left or right corner, 132 Emagic Adat Edit Tip Autodrop 1 and drag the border to the desired position. This way, the left position can even overlap the right, or vice versa. By holding down the S key, you can set both borders as you wish by clicking. This way you can also move the visible window section to produce especially long bars. 2 3 4 You can delete the cycle bar by moving one of the bar’s borders to meet the other. This will deactivate cycle mode. 5 Recording in Cycle Mode 6 When recording with cycle on, there are several ways you can configure Adat Edit to treat the new recordings, anmd their relationship to any existing recordings on the target track: 7 • If you want to replace texisting sequenceswith the new recording, activate the Replace button. 9 • If you want to add each new take to the old one, deactivate the Replace button, go to File > Song Settings, and select the option Merge Only New Sequences in Cycle Record. 8 10 11 12 If you want to keep all of the takes and later decide which ones are the best, then deactivate Merge Only New Sequences in Cycle Record. 13 14 Further options can be found in the section Song Settings on page 107. 15 16 5.6 Autodrop 17 Autodrop causes an automatic punch in/out between the preset autodrop points. This way, you can have both hands free while recording, and concentrate on your performance. Besides this, autodrop makes it easy to fix small sections, where a manual punch might be difficult. 18 Gl Ix If you activate the autodrop button, the cycle area of the measure ruler will be subdivided. A thinner line for the autodropzone will be added below the cycle bar, which will Owner’s Manual Version 1.0 – English - B C 133 Transport Functions now be thinner. You will see another set of locator points for the autodrop zone, to the right of the cycle points in the Transport window. The positioning of the locators, and that of the autodrop bar correspond to the operation of the cycle functions. Recording with Autodrop Set a song position a bit in front of the marked autodrop zone. Start Adat Edit by clicking on the record button or * on the numeric keypad. The song will play from the given song position. As soon as the song position line reaches the left autodrop marker, recording will begin. At the right autodrop point, Adat Edit will return to playback mode. Of course, you can play along before and after the punch-in point, without having to worry about deleting existing events. 5.7 Combining Cycle and Autodrop If you want to fix an especially difficult piece that would normally take you several attempts, then it is recommended that you combine cycle and autodrop. You can choose a larger cycle zone, giving you a good lead-in, so that you have some time to prepare to play. Example Let’s assume that you would like to fix measures 13 to 21, but that you want to hear sixteen entire measures. In this case, you could set the cycle locators to 9.1.1.1 to 25.1.1.1 and the autodrop locators to 13.1.1.1 to 21.1.1.1, as shown in the diagram below. 134 Emagic Adat Edit Tempo List 1 2 3 4 5.8 Tempo List 5 In the tempo list, you can insert and edit changes in tempo. 6 7 8 9 10 11 Tempo Editor in Adat Edit 12 You can enter a tempo event at anyposition. The tempo list controls the song tempo, and the current tempo is always displayed in the transport window. 13 14 Here’s how to open the tempo list: • Select Options>Tempo Arrange window. List 15 from the local menu in the 16 Here’s how you insert a new tempo event: 1. Set the song position (SPL or transport window) at which you want to insert the event. 2. Click on the Create button in the tempo list window, or click on an existing tempo event with the pencil. 17 18 Gl Ix Tempo events in the tempo list can be edited or deleted, just as they would in the event list. B C Owner’s Manual Version 1.0 – English - 135 Transport Functions 136 Emagic Adat Edit Chapter 6 1 Arrange Window 2 3 6.1 4 Structure of the Arrange Window 3 5 6 4 1 2 5 6 7 7 8 9 10 11 8 12 1 Local menu bar with the menu items "Edit," Track," "Functions" and "Options." Transport field The transport field located in the Arrange window is arranged in almost the same way as the transport window itself, and can replace it, if you wish. How much of this is visible can be set flexibly. Bar ruler The bar ruler displays your song’s length and time signature. This is where you place the locator points for the cycle zone(, as well as the Autodrop zone; you can use the Song Position Line to move back and forth within the song Arrangement field On this surface you arrange the sequences of your songs. Track column In the track column, you define the Midi channel for the track, assign an icon to it, and select tracks for editing or recording. 2 3 4 5 6 13 Sequence parameters The sequence parameters influence the playback of Midi events in real time, and can be defined separately for each sequence. Sequence parameters do not alter the data, and can be reset at any time. Example: Transposition of a sequence. Toolbox As in all the other Adat Edit windows, the toolbox is found in the Arrange window. The individual tools serve for the editing of sequences, and for solo and mute functions.. Track Parameter box Besides allowing you to assign the track an icon, the Track Parameter box has control s to set the sound (program), the volume and the pan, separately for each Midi channel. 14 15 7 16 17 8 18 Gl Ix B C Owner’s Manual Version 1.0 – English - 137 Arrange Window 6.2 Tools Like other windows the Arrange window also provides a toolbox for you to use. Please refer to the section Working withTools on page 98. Changing the Size of the Transport Field You can hide the transport field in the Arrange window, or you can make only certain sections of it visible. To do this, grab the lower right-hand corner of the transport field in the Arrange window, and move this until the desired section is set. You can also completely hide the transport field in the Arrange window. To do, select View > Transport from the local menu in the Arrange window. This will toggle the transport field. All of the functions in the transport field are identical to the ones you will find in the floating Transport window. The transport field only lacks the autodrop locator display, and the Midi monitor. If necessary, read up on this in the section Transport Window on page 119. 6.3 Tracks $VDUHPLQGHU A song is composed of any number of tracks, to each of which one of the sixteen available Midi or audio channels can be assigned. On every track there can be any number of sequences, which are played on the track’s Midi or audio channel. Track List Every Midi track in Adat Edit has the following characteristics: • A track number, with the top track assigned as track 1 • an icon for the visual identification of each Midi channel • a Midi Channel, used for all sequences on this track. 138 Emagic Adat Edit Tracks 1 You can move the sequences, delete them, or move them to another track. Tracks, and sequences on tracks can be freely moved around, making this, which is much more flexible than working with a tape recorder. 2 3 Tracks can also be created, deleted or rearranged. 4 These functions will be described in more detail, in the following sections. 5 6 Assigning a Midi Channel 7 For every track you can set whichever of the 16 Midi channels you want . All of the sequences (and their contents) on the track will be sent on the set channel. The track setting for channel will override the individual channel settings for the Midi events within the track. 8 9 10 Here’s how it works: Click on the channel column of the track and hold down the mouse button. A flip menu will appear from which you can select the desired Midi channel. In addition to the sixteen Midi channels, there are two special settings: No Output All 11 12 The Midi events of the track in question are not sent; the entire track is muted. You can use the “No Output” option to temporarily put a track on the back burner. 13 In this case, the track does not have a particular Midi channel setting. Instead, each event is sent on its recorded Midi channel. Use this possibility when, for example, events with different Midi channels (such as . drums, piano, bass) are combined on one track. 16 You can easily change the Midi channel of an event in the event list. 14 15 17 18 Gl Ix Tip B C Owner’s Manual Version 1.0 – English - 139 Arrange Window Selecting an Icon Every Midi channel can be assigned an icon of your choice. Normally you will call up a particular sound for each Midi channel. In this case, use an icon that represents the sound or the “instrument”. Although the icon has no direct effect on what you will hear, it will help you keep track of the sounds you are using for each track of your song. Example If you assign a drum icon to Midi channel 10, then you can tell at a glance which tracks have drum sounds. To select an icon, click-hold on the current one . A flip menu will appear, from which you may select another icon. Paging through the Icon Flip Menu Due to the length of the icon flip menu, it can be tedious to scroll through all the entries one at a time. Here is a better method: • Open the flip menu with the right mouse button; it will remain open, even after you release the button. Now, using the right mouse button, you can comfortably scroll up and down with the scroll bar provided. When you have found the desired icon, click that icon with the left mouse button. The icon will be chosen, and the flip menu will automatically close. • With Macintosh the procedure is a little bit different. First, open the flip menu. Then, while click-holding, press the S key, and then release the mouse button again. The flip menu will remain open, and you can use the scroll bar to move up and down through the menu. When you have found the icon you want, click on it and then release the S key. The desired icon is chosen, and the flip menu will automatically close. 140 Emagic Adat Edit Tracks 1 Most of the icons represent particular musical instruments. You can see how the appropriate icons have been used in the Tutorial-Song. 2 3 Creating a track 4 To create a new track, click on the track number you want and, in the local menu of the Arrange window, choose Track > Create Midi Track. Adat Edit produces an empty track at the position you have selected and pushes the following tracks down accordingly. 5 6 7 Appending a New Track 8 You can append a new track to the end of the track list by double clicking on the free space directly below the track list. 9 10 Moving a Track 11 A track can be moved to any other position in the track column. Just grab the track number, and drag it to the position you want. Adat Edit will automatically reorganize the tracks, and move the following tracks accordingly. Two neighboring tracks can be switched in this way. 12 13 Tip 14 15 Deleting a Track 16 To delete a track, select the track in the track column and choose Track > Delete Track in the local menu of the Arrange window. If there are sequences on this track, Adat Edit will ask you via dialogue box if these should be deleted, as well. 17 18 *UDSKLN Gl Ix B C Owner’s Manual Version 1.0 – English - 141 Arrange Window Selecting all Sequences in a Track If the cycle mode is not active, then click on the track you want in the track column. All sequences of this track will be selected, and are available for further operations. Selecting Sequences within the Cycle Locator Use the cycle function if you want to select sequences which are only within a certain span of time. To do this, mark the appropriate cycle area in the bar ruler, and click on the track you want in the track column. Now, only those sequences within the cycle area on the track are selected. Deleting the Contentsof a Track If you choose a track and press ∂ (Windows) or D (Macintosh), all the sequences on this track will be deleted. The track itself, however, will remain. You can also delete sequences within a certain section of time by marking it off with the cycle locators (see above). Muting Tracks 3. 142 In Adat Edit you can mute tracks completely, without first having to select all of the objects in the track.The Mute Button can be found, just to the right of the track number. Press this button, and the track will be muted. The button will light with a pale blue "M" to indicate the mute status of the track. Click the button again, to unmute the track. Emagic Adat Edit Arranging Sequences 6.4 1 Arranging Sequences 2 What is a Sequence? 3 A sequence is basically a container that holds Midi data, such as note events or controller messages. A segment of music contained in a sequence can be manipulated as a whole. In the Arrange window, a sequence is represented as a horizontal bar in a track. 4 5 6 7 Creating an Empty Sequence 8 To create an empty sequence – perhaps to manually insert notes in the Score or Event List editors with the mouse, click on the position you want, in the Arrange window with the pencil tool(see below). 9 10 Shifting Sequences in Time 11 To shift a sequence or sequences in time, grab it somewhere in the middle, and drag it to the position you want. If you go past the currently visible section of the Arrange window, Adat Edit will automatically scroll to the window section you want. 12 13 14 Instead of this, you can also move sequences to the clipboard using Edit > Cut, and then move them to another position with Edit > Paste. 15 16 The paste position is determined by the placement of the song position line. 17 18 Copying Sequences Gl To copy a sequence, move it (see above) while holding down the ç (Windows) or the O (Macintosh) key. This will create a copy at the new location, while leaving the original at its starting position. Ix B C Owner’s Manual Version 1.0 – English - 143 Arrange Window Instead of this, you can also copy sequences to the clipboard using Edit > Copy, and then move them into another position with Edit > Paste. Make sure you set the song position line to the target position first, and then highlight the target track. The sequences will be inserted into the track, starting at the song position. Moving/Copying onto another Track Sequences cannot just be moved in time, but also to other tracks. Grab the sequence, and move it onto the track you want. To do this, use the help line that appears in the local menu bar while moving, to make sure that the position in time does not change. Of course, you can use the described cut, copy and paste functions to move or copy sequences to another track. Changing the Length of a Sequence You can adjust the start and end points of a sequence, thereby also changing its length. To do this, grab the lower right-hand or left-hand corner with the mouse, and move the mouse in the direction you want. Be aware that the start point of a sequence can’t be later than the first Midi event of the sequence. If you do not need certain events at the beginning of the sequence anymore, then remove this piece with the scissors. The end point can be moved as far as you want to the left, as long as it is not before the song start and the first Midi event. Setting Cycle Length by Sequence Length If you want to set a cycle for a sequence which is exactly the same length as the sequence, then call up in the local menu Functions > Set Locators by Objects. Adat Edit will set the cycle locator points to the borders of the selected sequences. 144 Emagic Adat Edit Arranging Sequences Selecting within the Cycle Locators 1 All objects that are completely or partially within the cycle locators are set by calling up Edit > Select Inside Locators. 2 Automatically Adjusting the Length 4 In the functions menu, functions that allow you to automatically optimize the lengths of sequences. 5 3 In each of the example diagrams, you will see the starting situation at the top, and the result at the bottom. Tip 6 7 Setting Locators by Objects 8 You can assign the time span of selected sequences to the cycle and autodrop locators. 9 10 Example 11 If you want to edit the part “B Theme” in the Tutorial-Song, you just need to select the sequence in the information track with the same name and choose Functions > Set Locators by Objects. The cycle bar will be set to the length of the sequence. 1. 12 13 14 Activate the mode, whose locators should be set (cycle or autodrop). 2. Select the sequences to which the zone should be set. 3. Call up Functions > Set Locators by Objects in the local menu of the Arrange window. 15 16 17 The cycle zone will be set from the beginning of the first sequence to the end of the last sequence of the selected group. 18 Gl Optimizing Size of Objects Ix This function sets the size of the sequence to the length of the events within it, removing any empty space at the end. B 1. C Select the sequences that should be optimized. Owner’s Manual Version 1.0 – English - 145 Arrange Window 2. Select Functions > Set Optimal Object Sizes. All selected sequences will be optimized. Example A sequence that is sixteen measures long, but only has events in the first eight measures, will be shortened to the length of these first eight measures. Snap Objects With Functions > Snap Objects, you can set sequences to pints on a predefined grid. This grid is defined by the denominator of the time signature. If you have moved a sequence slightly and it now is out of position, you do not need to push it back into place manually with the mouse. You can simply let Adat Edit fix it. 1. Set the measure denominator’s value, to match the value you want for the grid. 2. Select the sequences you want to adjust. 3. Select Functions > Snap Objects. The selected sequences will be pushed back to the closest grid position. Remove Overlaps This function shortens a sequence so that it just reaches the start of the next sequence, if the two overlap. The overlap is then removed, although the events in the overlapping section remain intact. 146 Emagic Adat Edit Information Track 1. Select the sequences that overlap. 1 2. Select Functions > Remove Overlaps. 2 The lengths of the sequences will be shortened so that the overlaps are removed. 3 4 Tying Objects 5 This function lengthens a sequence, until it reaches the sequence that follows. This removes gaps between the sequences, and avoids uneven sequence lengths. 1. Select the sequences that should be lengthened. 2. Choose Functions > Tie Objects in the local menu of the Arrange window. 6 7 8 9 All selected sequences will be lengthened to the next sequence. 10 11 Erase Duplicated Events 12 Doubled notes, whichwill cause a "phased" sound on playback, can be easily deleted in Adat Edit with this function: 1. Select the sequences to be checked for duplicates. 2. Select Functions > Erase Duplicated Events. 13 14 15 Adat Edit finds duplicates and deletes them. Identical notes on different Midi channels are not deleted, however. 16 17 6.5 Information Track 18 It is recommended - as it is demonstrated in the Tutorial Song –that you reserve one track as an information track not to be used for Midi events. Gl Insert empty sequences into this track, and name the sequences to identify sections of the song (intro, verse, etc.). In this way, you can also easily and quickly set cycle markers: B Owner’s Manual Version 1.0 – English - Ix C 147 Arrange Window Example Let’s assume you want to record the tracks for a verse. You will want to set the cycle zone to match the length of the verse. Just select the sequence “verse” in the information track and call up Functions > Set Locators by Objects in the local menu. With Edit > Select Inside Locators in the local menu, you can select all the sequences of this verse. Select Inside Locators: The sequences within the cycle bar will be selected 6.6 Sequence Parameters The Sequence Parameter box displays the parameters Quantize, Loop, Transposie, Velocity and Delay for the currently selected sequences. If you select several sequences which have different play parameters, then the corresponding parameter(s) will be marked with a * You can preset parameters for newly recorded sequences, by clicking on the background of the Arrange window. The Sequence parameter box will display the label Midi THRU, instead of a sequence name. Any settings now made in the parameter box will affect incoming data in real time, and will be applied to all subsequent recordings. 148 Emagic Adat Edit Sequence Parameters 1 An example: Let’s assume you want to play in the entire rhythm accompaniment, including: drums, bass, piano, and guitar for a refrain. You already know that all the sequences you will record will have the quantize value “16C Swing”, and the transpose value “ 3”. Also, the velocity will be raised by a value of 10. Click on a free space in the arrangement field, so that no more sequences are selected. 2 3 4 5 In the Sequence Parameter box, you will now find the entry Midi THRU, instead of a sequence name. Now set the values as shown above, and record something. All of the newly recorded sequences will have these settings, and the settings will be heard in real time, as you record. 6 7 8 9 Quantize Here you can select a quantization grid for individual sequences, and use it to correct the timing of your Midi recordings. 10 More on this can be found in the section Quantization on page 154. 12 11 13 Loop 14 With the loop function, a sequence can be continuously repeated. The frequency of the repetition corresponds to the sequence length, so a sequence that is two measures long, will repeat every two measures. 15 16 17 You can activate the loop function for selected sequences by setting the parameter for Loop to On. 18 Gl Ix The repetitions are graphically shown as gray boxes. B Use the loop function when certain passages are to be repeated exactly. Loops do not require any memory. C Owner’s Manual Version 1.0 – English - 149 Arrange Window Another advantage is that any changes made to the original sequence automatically affecrt all its loops. Please be careful not to confuse “Loop” with “Cycle”. “Cycle” repeats an entire piece of a song, including corresponding jumps in position. “Loop”, on the other hand, continuously repeats individual sequences. The song plays from beginning to end. Stopping Loops Normally the loop will repeat until the end of the song. However, you can stop the loop at any time by placing another sequence in the track at the position where you wish to stop the loop. To do this, simply insert an empty sequence at the spot where the loop should be stopped. You may also copy or record a sequence at the point where the loop is to be stopped. 150 Emagic Adat Edit Important! Sequence Parameters Turning Loops into real Copies 1 It is sometimes helpful to transform the loops into real sequences. When you do so, Adat Edit automatically creates as many copies as there were original loops. As these copies contain their own data, you can now make changes in each copy, without influencing the other repetitions. 2 To transform a series of loops into real sequences, select Functions > Turn Loops to Real Copies. 5 3 4 6 7 8 9 Transpose 10 With the Transpose sequence parameter, you can transpose sequences in half tone increments. The possible range is ( 99. 11 12 The value-12 corresponds to a transposition of one octave lower. If you want to transpose an entire section of song, select all of the sequences for the section, and transpose these to the desired value. This procedure is very practical, if you want to try out different pitches in order to match the vocal range of a singer. You can transpose the entire song by selecting Edit > Select All, and then changing the transposition value for every sequence in one operation. 13 14 15 Tip 17 If no sequence has been selected, then Transpose will influence the Midi THRU settings, which will affect all subsequent recordings, and what you hear when you play into Adat Edit. With drum tracks, transposing influences the triggered drum notes, usually causing the wrong sounds to be triggered. For this reason, you should leave out the drum tracks when transposing an entire section of a song. 16 18 Gl Tip Ix B C Owner’s Manual Version 1.0 – English - 151 Arrange Window Velocity With the Velocity paramete,r you can increase or decrease the velocity value of selected sequences. The value range goes from -99 to +99. Please note that you cannot go above or below the possible values of 0-127, as defined in Midi. If, for example, the notes in a sequence have velocity values between 100 and 120, then the setting +60 will only have the effect of raising everything to the possible maximum of 127. If no sequence is selected, Velocity will influence the -Midi THRUsetting. Delay With the Delay parameter, you can move selected sequences by small increments, forward or backward in time. The measuring units here are clock ticks, which represent a 3840th fraction of a measure in Adat Edit. If you set a negative value, the affected sequence will be moved ahead, a positive value will cause the sequence to play later. You can use the Delay parameter to correct the timing of sounds that have a slow attack, such as string sounds. A negative delay will move the sequence forward, so that the peak of the sound occurs at the correct position. It is recommended you avoid larger values for delay. Remember that the sequences can also be directly moved in smaller increments (ex. sixteenth). Normalizing Sequence Parameters The sequence parameters are real time filters that are used during the playback of Midi events. Since the settings have no effect on the underlying data, the audible changes from the sequence parameters are not shown in the Event editor. That’s why it’s possible for a note to be shown as C3, but sound like D3, if the sequence was transposed a whole tone higher with the Sequence Parameter Transpose. 152 Emagic Adat Edit Tip Demix by Event Channel 1 You can have Adat Edit overwrite the Midi data in the sequences, making the sequence parameter settings permanent. This way, the setings will be visible in the Event List editor. The disadvantage is that you can no longer reset them in the sequence parameter box. To permanently write the sequence parameters to your selected sequence(s), select Functions > Normalize Sequence Parameters in the local menu. All changes will become visible in the Event list and the Score editor, and the sequence parameters will automatically be reset to zero. 2 3 4 5 6 7 6.7 Demix by Event Channel 8 9 When events with different Midi channels are combined in a sequence, you can separate them to different tracks, based on their channel settings. With this function you can store every system on a separate track. Before doing this, make sure there is a track (empty, if possible) for every Midi channel in the sequence you intend to separate. 10 11 12 Select the sequence that is to be separated, and call up Track > Demix by Event Channel. Adat Edit will create a new sequence for each channel found in the original sequence, and will place the new sequences on appropriate tracks.. 13 14 15 16 17 18 Gl Midi-File (left), demixed by Midi-Channels (right) Ix B C Owner’s Manual Version 1.0 – English - 153 Arrange Window 6.8 Quantization Quantization is the automatic correction of rhythmic positions, using a grid. Quantizing realigns the normal variations in realtime recordings into perfectly aligned note positions. Quantizing is especially important when playing several tracks together, because otherwise, the variations can conflict with one another, and make the feel of the song unsteady, or ragged. Quantizing pushes every note to the next closest grid value. Example You are playing a passage, with which the eighth notes are the smallest note values. If you choose the setting “1⁄8-Note “ as the quantize value, all of the notes will be moved to precise eighth note positions. Even with quantization, a certain level of precision while recording is necessary. The maximum rhythmic error for a note cannot be greater than half the quantize value chosen. Otherwise, the note will be moved to the wrong position. This means, for example, that with a quantization of 1⁄16, the variance must be smaller than 1⁄32. Setting the Quantization Value To select the quantization factor you want, click-hold the sequence parameter Qua. A flip menu will open, with the various quantization values. Select the desired value, and release the mouse.The value will be displayed in the parameter box. Quantization: Operation Any quantization value can be replaced with another, at any time. To switch off quantization altogether, select the off (3840) setting. Your original data will remain as you recorded it, even after you quantize, as long as you do not use the Fix Quantize 154 Emagic Adat Edit Quantization 1 function(see the section Quantization on page 154). Because, like all the other sewquence parameters, quantization is a non destructive. real time parameter, you can experiment as much as you like, without any fear of losing the feel of your original performance.. 2 3 4 Adat Edit quantizes notes exclusively. Controller events like sustain pedal, mod wheel, etc will remain unquantized. 5 As with the other sequence parameters, quantizing only affects the selected sequences. If you want different quantization values for a sequence,perhaps because even and triplet note values occur equally – cut the sequence into different pieces, which you can quantize separately. Another way would be to quantize the events in the Event list. 6 7 8 9 Fixing the Quantization 10 If you want to permanently set the quantize values of your sequences to the recorded data, select Functions > Fix Quantize, in the local menu. The event positions will be recalculated according to the chosen quantization value, and Qua will be reset to off (3840). Normally, the only time you would do this is when preparing a song to be exported as a standard Midi file, for use in another sequencer. Other than this, it is usually best to avoid using the Fix Quantize function, because once you use it, your original performance is overwritten. 11 12 13 14 15 16 The Different Types of Quantization 17 Adat Edit provides various types of quantization. These will be described in greater detail in the next section. 18 Gl No Quantizing Ix With the setting off (3840), you choose the finest degree of timing resolution in Adat Edit. Your sequences will be played back exactly as you performed them. Owner’s Manual Version 1.0 – English - B C 155 Arrange Window Standard Quantization With the settings 1⁄1-note to 1⁄96-note you select quantization with a regular grid. The denominator of the fraction describes the value as the number of notes in a 4/4 measure. If this value is divisible by 3, then it is triplet quantization. A few examples of this: ⁄4-Note divides the measure into four parts; this is quarter note quantization. 1 ⁄12-Note divides the measure into twelve parts; these are three notes per quarter, so eighth note triplets. 1 ⁄32-Note divides the measure into thirty-two parts; eight per quarter note which is thrty-second note quantization. 1 Quantization to Odd Tuplets This type of quantization subdivides the note value into an odd number of parts. Strictly speaking, a triplet is already such an uneven subdivision. The additional settings of 5, 7, and 9 are available. These settings are seldom needed for conventional music. Swing Quantization A swing feel is produced when the even numbered sub divisions of the beat are played a little bit late. Adat Edit provides quantization options that will produce a swing feel. With an even eight-part rhythm every second beat is on 50% of the range of a quarter, a triplet at 66%, a sixteenth at 75%. With swing rhythms, these borders are fluid; all values between 50% and 75% are possible. This is commonly known as the swing factor. Adat Edit offers six swing gradations, which experience shows are optimal, for both eight and sixteen part grooves. The settings are 8A to 8F or 16A to 16F. 156 Emagic Adat Edit Quantization 1 Practice Select all of the sequences in the “B groove” part in the Tutorial-Song. These are currently quantized with 16C swing. Now choose the settings 16A, 16B, 16C, 16D, 16E, and 16F one after the other. Each subsequent setting will make the sequnce play with an increasingly stronger swing factor. The higher settings, like 16F, may be too strong. You will learn through experience. 2 3 4 5 6 Mixed Quantization 7 Adat Edit has three different mixed quantizing settings. These contain a combination of even and triplet values. 16 & 24 Sixteenths with sixteen-note triplets 16 & 12 Sixteenths with eight-note triplets 8 & 12 8 9 10 Eighths with eight-note triplets 11 These quantization settings require a much higher degree of accuracy in the original performance. In some cases, it may be easier to quantize individual sections in the Event list (see the Chapter 10 The Event Editor on page 201). 12 13 14 Pre-quantization 15 Here is another use for the Fix Quantize function. A somewhat imprecise performance quantizes well with a setting of 1⁄16, but the setting 16D, does not quantize well, because some notes are moved to the wrong positions.. Try this: Choose 1⁄16 as your quantization factor and select Functions > Fix Quantize. Now select the quantization value 16D, in the sequence parameter box. The results should now be satisfactory, because the underlying data used by the 16D quantization is now even sixteenth notes. 16 17 18 Gl Ix B C Owner’s Manual Version 1.0 – English - 157 Arrange Window 6.9 View View in the Arrange window offers you a variety of possibilities to set the display to your liking. Color Sequences Every sequence in the Arrange window can be assigned a different color: 1. Select View > Object Colors.... 2. Select one or any combination of sequences. 3. Click on the color you want from the color palette. Clicking on the black field in the upper left-hand corner of the palette removes your color assignment. The color palette is a floating window. You can keep it open, and color objects any time you want, just by clicking on a color. Color markings allow you to, for example, make the drums visually stand out from the rest, or mark sequences that still need to be edited. Tip If do not want to use color – perhaps to speed up screen redraws– simply switch off the option Colour Graphics under File > Preferences... Tip Hide/Show Transport Field You can display the transport window’s controls for playback, record, pause, rewind and fast forward in the upper left-hand corner of the Arrange window. This is especially practical, if your floating Transport window is not open. To do so, select View > Transport in the local menu. Calling up this menu point again will hide this transport field once more. 158 Emagic Adat Edit View Hide/Show Parameters 1 With View > Parameters you can hide the entire parameter area on the left side of the Arrange window. This is useful if you no longer need to change the sequence or track parameters, but need a more space for the arranging of sequences. Selecting this menu item again, shows the parameter boxes once more. 2 3 4 5 *UDSKLN 6 7 8 9 10 11 Grid 12 With View > Grid, you can show a grid in the arrangement field, whose resolution corresponds to the display format value in the Transport window. This may make it easier to move or copy sequences to particular positions. 13 14 15 White Background 16 With View > White Background, you switch between the stone gray background, and a white background for the arrangement field. 17 18 Gl Ix B C Owner’s Manual Version 1.0 – English - 159 Arrange Window 6.10 Options Send Midi Commands... Maximum Volume If you select Options > Send to Midi > Maximum Volume, Adat Edit will send a controller 7 message, with a maximum value of 127, on all Midi channels. This function is useful for switching all Midi instruments back to their maximum volume at any time. Regulating the volume with the Controller 7 should not be confused with a conventional volume change. Here – independent from your amplifier and mixer – the internal volume, controlled through Midi is set to its maximum value. Resetting the Controllers With Options > Send to Midi > Reset Controllers, “neutral” controller data is sent to all sound modules. Use this when a controller is stuck, or left in the wrong state, causing the tone generator to sound differently than it should.. This can happen when, for example, you push pause in the middle of a song and then start up again at another spot, or when you make the song position line jump to another position by clicking on it in the bar ruler. 160 Emagic Adat Edit Tip Chapter 7 1 Audio Basics 2 3 4 In this chapter you will get to know the basic structure of Adat Edit’s audio functions. 5 6 What You Need to Know 7 This introduction assumes that you are familiar with the basics of Adat Edit, and how this manual works. If that is not the case, please refer back to the Chapter 3 Tutorial on page 43. 8 9 For newcomers to Adat Edit, it is recommended that you get familiar with the Midi features of the program. After all, the main advantage of working with an integrated Midi/audio recording system like Adat Edit, is that you can manipulate Midi and audio recordings in the same way. After you become familiar with operating the Midi sequences, you will be prepared to intuitively handle most of the steps involved with working with regions in the Arrange window. 10 11 12 13 14 In this section, when we speak of recordings, we are referring to audio recordings (not Midi recordings). 7.1 15 16 Basic Principles and Terminology 17 18 Audio File Gl When you record any kind of audio signal with Adat Edit, this recording is saved on the hard disk as an audio file Ix B C Owner’s Manual Version 1.0 – English - 161 Audio Basics Because standard audio file types are used, you can also import already existing audio files into Adat Edit, or edit Adat Edit recordings in other programs. An audio file usually remains unchanged on the hard disk, even if you choose to edit small excerpts from the file for playback in Adat Edit. This is non destructive, “region based” editing. As a recording medium the hard disk has an advantage over magnetic tape, because you never have to rewind or fastforward it. As a result, you are able to move from one area of work on the hard disk to another, almost instantly. You can simultaneously use audio files which are located at different places on the recording medium. Most edits of audio recordings only affect the way in which Adat Edit plays back the files, without actually affecting the stored data on the disk(s) – an actual cut or deletion does not take place. Thus, every edit of any audio recording performed in the Arrange window can be undone at anytime later. This is what is known as nondestructive editing. Programmable CD players operate on a similar principle. If you want to listen to the songs on your CD in the reverse order from the way they appear on the CD, your CD player does not actually change the data on the CD. That would be destructive. The program only plays the songs in the reverse order – non-destructively. Regions With non-destructive editing you do not change the audio file itself, but rather the so-called “ regions”. By regions, we mean excerpts of the audio file. The audio file itself is unaffected when the regions are defined. When you record an audio file with Adat Edit, a region is automatically created which encompasses the entire length of the audio file. Regions can be defined in the Sample editor. They are also created, when you edit recordings in the Arrange window. 162 Emagic Adat Edit Basic Principles and Terminology 1 As many regions as you like can be defined from each audio file. 2 Anchor 3 Besides the start and end points of a region, there is one more important feature: the anchor. 4 The anchor is a fixed point in a region, with which you can mark a certain musical beat or a characteristic noise in a recording. This point serves as a reference point,so regions can be musically arranged, or synchronized within a song. 5 6 7 When positioning a region in the Arrange window, it is always the anchor (and not the beginning of a region) that is aligned with the start position displayed for the region. For example, if you are placing a sound with a long attack, you might wish to move the anchor for that region to the peak of the waveform, so that as you place the region on a beat, the peak lines up, rather than the very beginning of the region. 8 9 10 11 In the Sample editor, the anchor is shown as a triangle under the waveform. You can change the position of the anchor by moving the triangle. To begin with, the starting point of a region is always set as the anchor point. 12 13 14 The position indicator of a region in the Event list (or when moving in the info line of the Arrange window) always shows the position of the anchor. 15 16 Audio Track 17 Midi sequences are played by means of an instrument, which has been set in the Track list in the Arrange window. 18 You can play back the regions in the Arrange window in almost the same way. You just choose an audio object as the “track instrument.” Gl Any track can play back regions in the Arrange window, if an audio object has been assigned to it in the track list. B Owner’s Manual Version 1.0 – English - Ix C 163 Audio Basics Audio Object An audio object represents a single playback track for Adat Edit. Imagine an audio playback track, also known as a physical track, as being similar to a single track on a multi-track tape recorder. You can lay down as many audio tracks in the arrange window as you want, regardless of the number of physical tracks. These tracks are also sometimes called “virtual tracks.” If the same audio object is assigned to different audio tracks, then only one of the regions in the Arrange window can be played back at a time. By the way, if you create a new song (çn in Windows, and Cn in Mac respectively), Adat Edit will automatically give you an audio object for every physical track. The level meter, balance, volume control, and the effects are set on the audio object. All of these parameters can be automated in Adat Edit, using standard Midi controllers. Sample Editor In the Sample editor you can precisely set the boundaries and the anchor position for each region. Also, you can select areas of the audio files to form new regions, or perfrom destructive edits of selected portions of regions. For editing purposes, you have a variety of functions at your disposal: from simple reversing or normalization (which allows you to adjust volume to maximum without clipping), to sample rate conversion. For all destructive editing, which actually does change the audio file, you also have an undo function available. Also, before starting any destructive operations, you can make automatic back-ups. 164 Emagic Adat Edit Important Production 7.2 1 Production 2 This section will explain the basic steps for making an audio recording in Adat Edit. 3 Starting a Recording 4 First, connect the sound source (a mixer, CD player, or microphone, for example) to the audio input(s) of your system. 5 Setting a Path 7 Click-hold on the record button of the Transport window, and select the menu option Set Audio Record Path... 8 6 9 10 11 12 13 Click on Set, and in the dialogue box that appears, set the name and path for your recording (audio files). 14 You do not need to repeat this procedure before every recording. Subsequent recordings will be given the same name, with a number appended to the end of the file name. 15 16 The record path will be saved in the Preferences, and will still be active at the next program start. It is recommended, however, that you desciptively name each of your audio files. When you start a new song, create a folder on your hard drive for it, and set the path to that folder when working on the song. This will help you manage the many audio files that you will no doubt create, as you work with Adat Edit. 17 18 Gl Ix Selecting the Audio Track B Select an audio track in the Arrange window by clicking on it. C Owner’s Manual Version 1.0 – English - 165 Audio Basics To create a new audio track, select Track>Create Audio Track from the local Arrange window menu bar. A new audio track will be inserted in the track list, just below the currently highlighted track. Arming Tracks Unlike Midi tracks, audio tracks must be “armed” before they can be recorded to, just as the tracks on a tape recorder must be first armed. There is a switch marked with an R. to the left of the icon for each audio track in the track list. Simply clicking on this R prepares the audio object for recording. The R button will light red, indicating that the track is armed. You can also click on the REC button on an audio channel in the Track mixer, in order to arm the appropriate audio object. Stereo Recording In order to make a stereo recording, you must configure the selected track as stereo in the Adat Edit mixer. Go to an audio object, and click on the symbol to the left of the record switch. This will toggle the track between stereo and mono. The symbol on the button will indicate the current setting. A simple circle indicates mono, a pair of interlocked circles indicates stereo. Levels As soon as you arm an audio track, you will hear any signal being sent to the audio inputs of your system. With the audio object’s fader on the mixer you can control the level of the monitored signal. The fader always controls the playback level, and not the recording level. You have to set the recording levels externally, for example on the sub group fader of your mixer, or at the original sound source. 166 Emagic Adat Edit Production Starting to Record 1 Start recording using the record button in the transport window, or by using the appropriate keyboard command (*). 2 3 You will notice during the recording, how the waveform is drawn in real time in the Arrange window. 4 Keep an eye on the level meter in the audio objects. In the event that the clip indicator (top, red LED) lights up, you will need to record again, using a lower level. So you do not have to watch the level meter constantly; the overload indicator remains lit until you click on it. 5 Please do not forget to disarm the track(s) after you are done recording. Do this by clicking on the red R button which will then unlight. If you do not first disarm, you will not be able to listen to the audio recorded on this track. 8 6 7 9 10 Basic Operation 11 You can work with the recorded regions in the Arrange window almost as you would Midi-sequences: 12 - 13 they can be moved around by click-holding and dragging them 14 - they can be edited with the editing tools 15 - they can be copied in exactly the same way as Midi sequences 16 - delay and loop parameters are available in the sequence parameter box. 17 18 By copying a region in the Arrange window normally, you are automatically creating a new region. You can then change the borders of the new region in the Arrange window, without affecting the original region. Gl Ix B C Owner’s Manual Version 1.0 – English - 167 Audio Basics Sample Editor If you want to edit the regions precisely, it is recommended that you use the Sample editor, which is opened by double-clicking a region in the Arrange window. Edits in the Samle editor always affect the selected area of the audio file. When you open this editor by double-clicking on a region, the area of the file deined by the selected region is automatically highlighted. Selections are made by clicking and dragging the mouse. Existing selection parameters can be moved by using S-click and dragging. Automation of Audio To automate the volume or pan settings for audio tracks, open the Track Mixer, and put the sequencer into record. As you move the faders or knobs of the audio objects, corresponding Midi controllers will be recorded to the audio tracks. Upon playback,the Midi data will be sent back to the faders, thereby automating them. Summary Here is a short summary of operation: 168 - set the path and name for the audio file. A long click on the record button in the Transport window opens the dialog box. - Select an audio track in the Arrange window; if one is not already available, create an audio track. - Arm the track. Click R next to the audio object in the track column, or on the REC button of the audio object in the Adat Edit mixer. - Start the recording with RECORD, as with Midi recordings. Emagic Adat Edit In General 1 Audio regions are displayed and can be edited nondestructively in the Arrange window. More precise nondestructive edits, and destructive edits are possible in the Sample editor. 7.3 2 3 4 In General 5 6 Tempo and Timeline 7 Digital audio recordings differ from Midi sequences in a very important respect. Changing the tempo of your song will not change the rate of playback of an audio recording, as it would a Midi sequence. If you do change the tempo of the song after recording audio, the starting bar positions of the regions will change, but they will play for exactly the same amount of time as they did when originally recorded. This is because the rate of playback is determined by the sample rate of the audio hardware, not the internal clock in the computer. 8 9 10 11 12 For this reason, you should carefully choose the tempo when you start to make an audio recording. A change is not easy to make after the fact. 13 Adjusting Tempo to fit an Audio Recording 15 Adat Edit allows you to adjust the song tempo to an audio recording. To do so, you just need to edit the recording so that it cycles smoothly, and tell Adat Edit how long in bars and beats the musical piece should be when the function is complete. 16 14 17 18 More about this in the Chapter 3 Tutorial on page 43. Gl Ix B C Owner’s Manual Version 1.0 – English - 169 Audio Basics Data Formats Audio files and their Formats Audio files are saved on the Macintosh in the SDII format (SDII stands for SoundDesigner II, a standard format from Digidesign for digital audio files). For PCs the standard WAV format is used. Both platforms support AIFF files (Audio Interchange File Format). Sample Rate and Bit Depth As with all comparable multi-track HD systems, Adat Edit can only play back audio files with a single sampling rate. If you want to integrate files with different sample rates into a project, you can make the changes in the sample editor with Factory > Sample Rate Convert. All files used should be 16 bit. Stereo File Formats Any of Adat Edit’s 12 available tracks may be set to mono or stereo, but there are some things you need to be aware of before you start working with audio files in the stereo format: 170 - Adat Edit can import stereo files that are made up of two phase locked mono files (split stereo), or files in which both channels of the stereo recording are contained in one file (interleaved stereo). - In Adat Edit, the stereo files are indicated by two interlocking rings after the region name. You will see the same symbol on the mono/stereo button of a mixer channel. - Stereo files recorded directly into Adat Edit are automatically written as interleaved stereo files. - When importing stereo files (regardless of whether split stereo or interleaved), you should make sure that Emagic Adat Edit In General 1 the track object in the mixer that is playing them is also set to stereo. If you play back the stereo file over a mono channel on the mixer, the information from both stereo sides will be summed together, and played back as mono. This can lead to unwanted dropouts or clipping. 2 3 4 5 6 7 8 9 10 11 12 13 14 15 16 17 18 Gl Ix B C Owner’s Manual Version 1.0 – English - 171 Audio Basics 172 Emagic Adat Edit Chapter 8 1 Working with Audio in the Arrange Window 2 3 4 5 6 8.1 7 Regions 8 9 Generating Regions 10 A region is to an audio track what a sequence is to a Midi track, so a region could be referred to as an “Audio Sequence.” The Adat Edit concept allows regions to be manipulated in the Arrange window in the same way as Midi sequences . Nonetheless, there are unavoidable differences between the two, by their very nature. A sequence contains Midi data, and a region refers to audio data on the hard drive. 11 12 13 14 When you record audio, a region based on the recording is automatically created in the Arrange window. 15 Audio files from other songs or other programs can be imported into a Adat Edit song. Simply click at the desired location for the imported file in the audio track, with the pencil tool, while holding down the S key. Select the desired audio file from the File Selector dialog box, and the process is complete. 16 17 18 To play an audio file at a specific Song Position,it must be set as a region in the Arrange window. Gl Ix Important: Remember that the tracks that contain regions should be assigned as audio tracks. More information can be found in the section Arming Tracks on page 193. B C Owner’s Manual Version 1.0 – English - 173 Working with Audio in the Arrange Window Dividing Regions The Scissors tool used to divide Midi sequences can also be used for regions. When a region is cut, two new regions will be generated. The new regions will then be numbered consecutively. Important: When you click on a region with the Scissors tool, you can precisely position the Scissors while click-holding the mouse button. If a finer resolution is needed, click-hold the region with the Scissors tool and press ç (Mac) or A (PC). To obtain maximum resolution (ticks), hold down S while holding down the modifier key. The cut will be made when you release the mouse button. Deleting Regions Regions can be deleted the same way as Midi sequences. Select the region, and press the B key, or click on the region with the Eraser tool. Deleting a Recording If a region from a new recording is deleted, (any recording made since the song was opened for the current session), Adat Edit will ask if the corresponding audio file should also be deleted. By allowing you to completely delete unwanted takes, space on the hard drive is saved. If you delete regions from files recorded in previous sessions, then this question will not be asked. This prevents any valuable recorded material from being accidentally deleted. If you want to delete any of these older files from the drive, first remove the regions from Adat Edit Song, and go through the computer’s operating system to delete the files. 174 Emagic Adat Edit Regions 1 Copying Regions 2 Creating A New Region 3 Regions can be copied and moved in the same way as Midi sequences. To move a region, simply grab and drag it. To copy a region, press the O key (Mac) or the ç key (PC), while dragging the original. The new region will have the same name as the original region, and will be numbered consecutively. 4 5 6 The booundaries of the copied region can be changed, independent of the original. This can be compared to a real copy of a Midi sequence, created in the same way. 7 Multiple Use of an Existing Region (Alias) 9 8 It is also possible to generate an alias of a region in the Arrange window. In order to create an alias, press the O key (Mac) or the ç key (PC), and the S key simultaneously, while dragging the original. 10 11 12 If you edit one of these aliases, then all the other regions that were created from that same region will also be changed accordingly. This is comparable to an Alias of a Midi sequence, generated in the same way. 13 14 15 Looping Regions 16 As with Midi sequences, the loop parameter causes the region to play repeatedly within the track (see section Loop on page 178). It is important to note that the repetitions are guided by the region’s precise length. This means that even if the song tempo matches exactly, after a time, the repetitions may drift out of sync. 17 18 Gl Ix B C Owner’s Manual Version 1.0 – English - 175 Working with Audio in the Arrange Window Moving Regions Just like Midi sequences, regions can be moved with the mouse in the Arrange window. When dragging a region, it will move in quarter note steps. By pressing ç (Mac) or A (PC), regions can be moved in display format steps (e.g., sixteenths). By pressing çS (Mac) or AS (PC), the regions can be moved by single clock ticks. The delay parameter in the sequencer parameter dialog box can also be used (see section Delay on page 178). Fine Movements Usually, a resolution of one tick will be enough. If not, you can edit audio regions even more precisely in the Sample edit window. Edits accurate to a resoultion of a single sample word can be achieved by moving the anchor in in the Sample Edit window. Using the Event List to edit Regions The Event list can be used to move regions numerically. Highlight the region, and then select Windows > Open Event List from the main menu bar. Using the position column, regions can be positioned, tick by tick. 176 Emagic Adat Edit Regions 1 2 1 3 4 5 2 6 7 8 9 10 Even audio files in Arrangement window 2 can be displayed alphanumerically in Event List 1. Fine movement of regions is especially easy in the Event List. 11 12 Changing Borders 13 Regions can be lengthened or shortened by dragging the lower right corner. However, it is impossible to lengthen a region beyond the limits of the underlying audio file. 14 15 The same process, dragging the lower left corner, is used to adjust the start point of a region. The Sample Editor can change the region boundaries more precisely. The Sample Editor can be opened by double clicking on a region. 16 Tip 17 18 Gl Region Parameter Box Ix Name B The name of the region is displayed in the top line of the parameter box, (as with Midi sequences). Several selected C Owner’s Manual Version 1.0 – English - 177 Working with Audio in the Arrange Window regions can be named at the same time, and a number at the end of the name will be appended to the sequences, to discriminate between them. Loop The Loop Parameter causes a region to repeat within the track, (as can Midi sequences). The region will continue to repeat until it encounters another region in the same track, or the end of the song. Delay Regions can be advanced or delayed with the Delay parameter. The delay is calibrated in increments of clock ticks. Region Anchor The anchor is a positioning reference point in the region. When a region is moved, the display will show the anchor point in the information line, instead of the start point, as with Midi sequences. To guarantee perfect synchronisation with the sequencer, the anchor may need to be positioned within the region, and this position should be a peak, in most cases. Especially with drun recordings, this will allow you to move sections in the Arrange window so that the peaks fall on rhythmically logical points. 178 Emagic Adat Edit Recording 1 Some functions and parameters that are used for Midi events, can not be used for audio recordings. 2 Adjusting the anchor and destructive processing of audiofiles can only be done in the Sample Edit window. 3 4 Many important functions are the same for both audio and Midi, such as automatic naming of sequences, ability to change position and length, mute, solo playback, delay, loop etc. 5 6 8.2 Recording 7 8 Setting Tracks to Record Audio 9 1. In the Arrange window: 10 Click on the round “Record Enable” button (R) of a PCR track in the track list in the Arrange window. This shows the status of the REC button on the audio track. 11 12 2. In the Mixer: • • 13 Open the mixer with the audio objects by selecting Windows > Open Mixer. Click on the REC button of the PCR audio objects you wish to record to. 14 15 Audio will be recorded only on tracks that are armed, regardless of which track the cursor happens to be on in the Arrange window. 16 • If a Midi track is selected, Midi will be recorded. 18 • If an audio track is selected, audio will be recorded on the PCR tracks that are activated as Record Enabled (armed). Gl • Midi tracks and other PCR audio tracks can be recorded simultaneously by clicking on the Midi track, and then the audio track while pressing S. B Owner’s Manual Version 1.0 – English - 17 Ix C 179 Working with Audio in the Arrange Window If more tracks in the Arrange window are assigned the same armed audio instrument (e.g., “Audio 1”), then the new audio file (or audio region) is recorded to the selected PCR track. Disarming all Tracks If many tracks are armed, clicking on the blinking REC button while pressing O (Mac) or the ç (Windows), will disable Record Ready for all tracks. Recording Modes Adat Edit offers several ways to start audio recording at a particular song position. Standard Recording with Count-in Recording can be started at any song position. Place the Song Position line to the desired spot, arm the audio track, set your input level, and click on Record. Depending on the number of tracks that must be played back, there may be a small pause between clicking on the record button, and the start of audio recording. Adat Edit automatically creates a region, based on the new recording. As audio is recorded, the waveform will be drawn into the Arrrange window in real time. You can also get an idea of the input levels in meters to the left of the track icon. Manual Drop Recording During playback, it is possible to jump into record mode. Start playback, and at the desired point, press the V key (this is the pre-set Key Command for Record Toggle). Audio recording then will start, and can be stopped by pressing the V key (in which case the sequencer continues to run), or by clicking on 180 Emagic Adat Edit X Recording 1 Stop. Keep in mind that an audio track must be armed, for audio recording to take place. 1 2 2 3 4 5 6 7 Enter and exit recording during playback by pressing the V key each time. 8 Pre-Programmed Drop Recording 9 LOGIC’s Autodrop is easy to activate for audio tracks. The Autodrop mode can be turned on by clicking on the Autodrop button in the Transport window. 10 11 $XGLR'URS ❶ The Autodrop button bar must be activated. 12 ❷ The Autodrop locators allow for numerical input in the Transport window. 13 14 ❸ The Autodrop area will be marked by a black bar in the bar ruler. 15 ❹ The recording takes place within the Autodrop zone. 16 The beginning and end of an Autodrop zone can be set in the bar ruler, as well by using the locators in the Transport window. Remember that the Autodrop locator points in the Transport window are located ton the right side of the Cycle locator points. 17 18 Gl Start recording by clicking on “Record”. Adat Edit will start a the recording one measure before the Punch-in point. After this a region will be created, that corresponds to the exact length of the Autodrop zone. The advantage of this is that the start of the region can be altered later, so that any audio Ix B C Owner’s Manual Version 1.0 – English - 181 Working with Audio in the Arrange Window recorded during the count-in can be heard. This doesn’t change the position of the recording relative to the time axis. Tip: A smaller Autodrop zone can also be defined within a larger Cycle zone. This works very well when a musician must replay a difficult passage in the middle of the song, and many takes are necessary. Recording in Cycle Mode Audio can be recorded if Cycle Mode is turned on. For each cycle, Adat Edit creates a new track object of the same type, so that for 10 cycles there will be 10 audio tracks of the same type, with 10 regions. You may then select the best take, and delete the others. After Recording, Please Note… After audio has been recorded, it is not a good idea to change the tempo. The Tempo should be determined before the first audio recording. Audio recordings have a constant playback rate, and it is very difficult to adapt them to a new tempo. Time Compression or Expansion Algorithms in other programs may affect the sound quality of the audio files negatively. It is not generally recommended to move the anchors of regions recorded into a pre-existing Midi arrangement. (The Delay parameter can be used for fine movements of regions.) 8.3 Functions Adjusting Tempo Automatically Adat Edit provides a function for adjusting the tempo of your song to a pre recorded audio file. For this to work properly, the audio file must be a steady tempo, and must be a known number of measures long. This command is called up from the Functions > Adjust Tempo using Object Length & Locators menu. 182 Emagic Adat Edit Tip Functions 1 A practical application of this function can be shown using a drum loop with a steady tempo: 2 Let’s say you have recorded a drum groove, either from a sampling CD, or by recording a live drummer. The first thing you will need to do is “trim” the drum recording, so that it cycles smoothly. Open the Sample Edit window, and turn on cycle. Play the region within the window, and adjust the start point so that it begins right on the downbeat, and the end point so that when the region cycles back to the start, there are no glitches or hesitations. 3 4 5 6 7 Place the region in the Arrange window. When doing this, it is important that the start of the region is at the beginning of a measure. 8 9 Next, set a cycle zone in the Arrange window bar ruler. The length of the cycle should correspond to the c musical length of the region. If the groove sounds one measure long, then a one measure cycle zone should be set.. 10 11 12 13 1 14 2 15 3 16 17 The musical “target length” for the region is set above it, In the bar ruler. X By selecting Functions > Adjust Tempo using object length & Locators from the menu, the tempo of the song will be 18 Gl Ix B C Owner’s Manual Version 1.0 – English - 183 Working with Audio in the Arrange Window adjusted, so that the size of the object and the size of the cycle zone are the same. 1 2 3 Digital Mixdown Audio data can be mixed together digitally in the Arrange window (Digital Mixdown), by using the glue tool. This function is not destructive, because Adat Edit creates a new audio file, based on the selected regions. The new audio file will be stored on the hard drive – the memory capacity of the drive should constantly be monitored. To execute Mixdown, select the glue tool from the tool box, and select the desired regions. Click on one of the regions, and they will be merged. Mixdown for the regions on a track When many regions are selected on one track, and these regions are not contiguous, the program will not execute Mixdown. Instead, the program will request that new data be created (named after the first region), and the selected regions will be mixed together without any volume change or level check (Clipscan). Any empty space between two regions will be written to the new audio file as silence. 184 Emagic Adat Edit X Functions 1 Real Mixdown with Clipscan If audio data from two or more tracks is combined, the mixerl settings for pan and volume on each track will determine the pan and volume levels in the new audio file. If both sides of a stereo audio file are to be merged to mono, set the pan position for both channels either completely to the left, or completely to the right. Automated changes in level or pan will not be recorded by Digital Mixdown. To achieve this, the Bounce function should be used, instead. This is explained later in this section. 2 3 4 5 6 7 Mixdown can be executed during song playback. 8 After the digital Clipscan and Mixdown are complete, Adat Edit will replace the region that is currently selected with a region generated from the newly merged audio file. With the Undo function, the original audio regions can be brought back, and the program will ask if the newly created audio file should be saved (keep), or erased (delete). 9 10 11 During Mixdown, Adat Edit automatically maintains the highest possible level – without clipping – and processing is done with 32 bit resolution. 12 13 14 Bounce to Disk In many cases, the Bounce to Disk function is better for accomplishing digital mixdowns. Automation, and effects are reflected in the audio material resulting from a bounce. 15 A Bounce button on the Output object of the Mixer (Master) will execute this function. A window will open, where you may name the bounced file, and set a destination for it on the hard drive. 17 16 18 Gl Tip: When only dealing with a few regions or tracks (or only a certain area), the regions or tracks affected should be switched to solo, or the locators should be set to the respective area. This will limit the bounce to just the part ofd the song yopu wish to mix. Ix B C Owner’s Manual Version 1.0 – English - 185 Working with Audio in the Arrange Window You may save bounced files in either interleaved or split stereo format. 186 Emagic Adat Edit Chapter 9 1 The Mixer 2 3 9.1 4 Integrating Midi and Audio 5 An essential characteristic of the new version of Adat Edit is the adaptive mixer – which configures itself automatically to reflect your track list, and displays Midi and audio channels in the same way. The mixer has a three-band equalizer for audio channels, and two auxiliary sends for internal effects. Any Midi object can be mixed using the standard GM (General Midi) controllers. 6 7 8 9 10 Opening the Mixer 11 In order to open the integrated Adat Edit mixer, select Windows > Open Mixer, or use a Key Command for this function. 12 13 9.2 14 Midi Objects Besides offering control for audio objects, the mixer has easyto-use options for controlling Midi tone generators directly in Adat Edit. The control options for accessing a GM device (general Midi tone generator) are particularly flexible. 15 General Midi 18 General Midi is an extension of standard Midi, which prescribes certain requirements for tone generators. Gl • Simultaneously receives 16 Midi channels • 128 pre-set patch locations for GM standard sounds • Bank select commands Owner’s Manual Version 1.0 – English - 16 17 Ix B C 187 The Mixer • Pan and volume controlled by Midi for each channel • 3 more freely selectable controller options per channel All these functions are found on the Midi channel strips of the Adat Edit mixer. Except for Program names, Chorus and Reverb, all Midi control functions can also be used for a tone generator that does not support the GM standard. Tip Try the following: • Open the Tutorial Song and start playback. A piano can be heard on Channel 1. • Move Fader 1 (click and drag the mouse). The piano will become either softer or louder as the Fader is moved. • Click on one of the buttons for Channel 1, and move the mouse back and forth. The value changes according to the vertical position of the mouse. Technically, “Control Change” produces Midi events. These are processed by all Midi tone generators, but only GM tone generators are guaranteed to react to these Midi events in the way intended, if at all. How a tone generator (not supported by the GM standard) responds to the GM mixer will depend on the Midi tonegenerator. Most Midi devices, whether GM or not, use standard controller assignments, such as CC#7 for volume, etc. The main discrepancy with most non GM devices is in program sounds. Non GM devices will not store sounds in the same order. For example, a non GM device may store an Organ sound in the first program location, rather than a Piano sound, as defined by GM. 188 Emagic Adat Edit Tip Midi Objects Bank Select 1 If your tone generator contains more than one bank of sounds, and if it responds to Bank select messages, then you can send a command from Adat Edit to switch from bank to bank on a per channel basis. 2 3 4 You can set the Bank select format that Adat Edit will send to your tone generator in the Song Settings. Check the documentation for the tone generator to determine which format is appropriate for that device. (see section Bank Select on page 115). 5 6 7 A bank is a group of 128 sounds. Within each bank, sounds can be chosen from the program’s pull-down menu. 8 9 GM Mixer Program 10 A sound can be chosen by name from the GM tone generator in the pull-down menu, located along the upper edge of the channel strip. Every channel has its own pull-down menu. 11 Here’s how to select a sound for a Midi channel: 12 1. 13 Click-hold on the Program name flip menu. A pull-down menu with all GM sound names will open up. 14 2. Select the desired sound from the menu, and release the mouse button. 15 Adat Edit will select the sound from the GM tone generator. 16 17 Volume The Volume Fader controls the volume for each channel. 18 • Gl Click on the Fader, and drag the mouse. Ix Mute B The Mute button switches the channel volume from zero back to the preset fader position. This means that when the button is Owner’s Manual Version 1.0 – English - C 189 The Mixer “pressed”, channel volume is muted. When Mute is turned off, the previous fader position is recalled. How to mute a channel: 1. Click the Mute button for the appropriate Midi channel. 2. Click the button once more to unmute the channel. Pan The Pan button regulates the pan position of the sound. 1. Click-hold on the Pan button. 2. Drag the mouse up and down. The knob will move to the right as the mouse is dragged up, and to the left as the mouse is dragged down. Controller Optional control data can be sent by using the three upper rows of buttons. A description of the pre-set Controller definitions follows. Portamento This knob turns on Portamento (one tone slides smoothly onto another), and controls the Portamento time. The further the knob is turned up, the longer the Portamento time. The minimum setting turns Portamento off. Chorus This knob controls the depth of the chorus effect. The further the knob is turned, the stronger the effect. Reverb This knob controls reverberation. The further the knob is turned, the louder the effect. 190 Emagic Adat Edit Audio Objects Other Control Options 1 In the parameter area on the left side of the mixer, there are flip menus where you may define the two controllers. 2 3 4 5 6 Click-hold on hte flip menu to the left of the row of knobs you wish to define. A list of all the available control options will open. Select the one you want by highlighting it, and then releasing the mouse. 7 8 All options are listed by name. These names represent a specific function defined by the Midi standard. Control numbers from 1 to 120 can be accessed. 9 10 You can reset any control instantly to its neutral position by clicking on it, while holding down the ç key (Windows) or the O key (Mac). Tip 11 12 13 9.3 Audio Objects 14 15 Display Features 16 The audio objects offer several display features, to help you keep track of the recording process. 17 The Level Meter 18 Audio objects have a Level Meter that depicts the input, or monitor level. Gl Ix When a track armed, the Level Meter displays the input level. B The input level is also displayed less precisely, in the Arrange Window, to the left of the track number. Owner’s Manual Version 1.0 – English - C 191 The Mixer Peak Hold The meter holds the peak level for a few seconds, in order to guarantee a better reading. Clip Detector When an input signal is strong enough to cause clipping , the top element will remain lit (“LED” lights up red). This Clip Detector can be reset, by clicking anywhere on the Level Meter. Volume Level Control The fader on an audio object determines the pl;ayback level . If the track is armed, the fader controls monitor level. Midi controller #7 is used to control the fader, for instance when automating.. Moving the fader will generate CC#7 messages, as well. Mute An Audio object can be muted with the M-switch. Clicking on the button again will return it to the original level. Solo for Audio Tracks The Solo button allows you to solo any audio track. This is the S button on each audio channel strip. When engaged, any other audio objects will be muted, but Midi tracks can still be heard. The Solo function in the Arrange window affects both audio and Midi sequences, and should be used when you want to solo an audio track so that other Midi and audio tracks are muted. Pan/Balance Mono objects are controlled by a pan knob, and this sets the position of the track in the stereo field. 192 Emagic Adat Edit Audio Objects 1 Stereo objects have a balance knob, instead. The difference between a balance control and a pan control is this: Pan sets the position of a single channel in the stereo field, whereas Balance controls the relative levels of two channels with respect to one another. When you move a mono track’s pan control all the way to the left, all of the signal is sent to the left channel. When you do the same with a balance control, only the left side of the stereo file is heard, while the right side will be silent. 2 3 4 5 6 Equalizer (EQ) 7 Adat Edit provides a three-band equalizer to shape the sound of audio files played on the track. This raises or lowers the frequency of the signal. The three bands can regulate bass (B), midrange (M) and high frequencies(H). 8 9 10 Bus Sends For each track object, there are two Bus Sends, which send signal to the bus objects. The bus objects function as auxiliary returns, and are where you insert effects to process audio. 11 Example: You can insert a Reverb on the insert of Bus Object 1. You can insert a Delay on Bus 2. You can use the send from each audio track to mix some signal from that track into each effect. 13 Basic information on this topic can be found in the section RealTime Effects on page 194. 15 Arming Tracks 17 The REC button arms a PCR track for recording. As soon as the track is armed, the button begins blinking red. During the actual recording, the button remains lit. 18 The REC button is only found on PCR track objects, not on the two bus objects or the output (Out 1-2). Ix 12 14 16 Gl B C Owner’s Manual Version 1.0 – English - 193 The Mixer Stereo Objects Any of the 12 available track objects can be configured as mono, or stereo. All tracks can play simultaneously. It is possible to configure 12 mono tracks, 12 stereo tracks, or any combination; but no more than 12 audio objects are available. Both channels of a stereo recording are always dealt with together. If a Sample editor is opened for a stereo recording, then both sides will be displayed and processed at the same time. Configuring a Stereo Object To do this, click on the mono symbol to the left of the REC button. Track 1 then becomes a stereo object. One click on the stereo symbol, to the left of the REC button changes the stereo object back into an independent mono object. 9.4 Real-Time Effects One of the new features in Adat Edit is that the CPU (Central Processing Unit) of the computer can generate effects in realtime, and these effects can be used on the audio tracks. 194 Emagic Adat Edit Real-Time Effects Introduction 1 Here are a few basics about signal flow in the mixer. This section can be skipped if you feel confident enough about the topic, or have a basic understanding of mixers. 2 There are two ways to deal with effects – with an Insert or with a Bus (this can also be called an Auxilliary Return). 4 Direct Insertion of Effects 6 A signal is fully processed when effects are inserted in the signal path. This means that 100% of the signal flows through the effect. This is practical for equalizers or dynamic effects (like compressors). This is also true for pan knobs and volume faders: they is only useful if the entire signal can flow through the effect. 7 3 5 8 9 10 Effect 11 12 Bus Effects 13 With this technique, a portion of the signal is sent to an Auxilliary Return. This is especially useful when working with Reverbs, Delays, and other time based effects, because you have control over the balance of “wet” (effected) and “dry” (non effected) signal. Ch1 Sends 14 15 16 Ch2 17 Bus1 18 Effect Gl + Ix In Adat Edit, the effects are inserted on the Bus objects. The Bus Send knobs for each channel control how much of the track’s signal is sent to the effects. The signal sent is processed Owner’s Manual Version 1.0 – English - B C 195 The Mixer by the selcted effect, and then mixed to the audio output of the sound card, along with the original track signal. Another advantage to this method is thast you can set up one effect, and use it to process as many tracks as you like. In Adat Edit, Equalizers (EQs) are always inserted in the signal path of the individual tracks (audio objects), while delay and reverb can be inserted as bus effects. Overview of Bus Effects All real-time effects can be inserted with a long click on the Insert slot in one of the two bus objects. Double-clicking on the activated insert slot will open the corresponding plug-in window. Here is where parameters for realtime effects can be set. Delay Delay creates echo effects. Time Time determines the delay time in milliseconds. Very small values (up to 10 ms) lead to a comb filter effect, larger values (10 to 100 ms) result in a doubling effect, and even larger values lead to an echo effect. Feedback Feedback sends the delayed signal back to the input. This is how the number or repetitions is controlled. 196 Emagic Adat Edit Tip Real-Time Effects Reverb 1 The reverberation effect is usually used to simulate a natural space. 2 3 Room size 4 Room size determines the size of the simulated room. Smaller 5 rooms have reverberations that follow more close after one another, larger rooms exhibit more time betwween reflections. 6 Decay 7 This is the time it takes for the reverb to fade out. Please note that absolute reverberation (RT60) is controlled from outside the room size parameter. 8 9 Density 10 Density is used to simulate the reflectivity of the surfaces in the room. Higher densities simulate more reflective surfaces. Setting the density too high can make the reverb sound artificial. 11 12 The surface geometry can be controlled with a combination of density and Room size to simulate the sound of various rooms. 13 14 High-Frequency Damping 15 These parameters determine high frequency content as reverberation fades away. In a natural room, reverberation is dependent on the frequency: high frequencies fade more quickly than low frequencies. Increasing the High-Frequency Damping can make your reverb sound smoother, and more natural 16 17 18 Gl Using “HighFreqDamp,” room simulation can control the virtual surfaces: metal has a small value, wood has a middle value, and carpeting and curtains have high values. Ix B C Owner’s Manual Version 1.0 – English - 197 The Mixer Pre Delay Pre Delay determines the time between the initial signal, and the onset of the reverb. Pre delay can help define the reverb in your mix. Usually, ideal values run between 5 and 50 ms. Very small values sound better on solo tracks, but when mixed with other tracks, these may cause the reverberation to wash the signal out. Larger values can allow you to put substantial amounts of reverb on a track, without washing it out. For instance, if you pre-delay the reverb on a snare drum, you will hear a nive solid attack, followed by the reverb. Because the attack is fairly dry, the snare will be up front in the mix, but the decay will be nicely reverberated. 198 Emagic Adat Edit Mixer Automation Plug-In Window Functions Tip 1 2 There is a row of buttons at the top of every plug-in window, and these correspond to the plug-in functions. 3 4 Link 5 If the Link button is not activated , more than one plug-in window can be open at one time. 6 7 If the Link button is activated, the plug-in window will update to show the currently selected plug-in. Anything doubleclicked after this point will be displayed. 8 9 Bypass 10 The bypass button removes the effect from the signal flow. The input signal of the effect remains unchanged, and is sent to the output. 11 12 Selecting the Audio Object 13 You can use this button to quickly compare the settings for the effect inserted on each bus. 14 9.5 15 Mixer Automation 16 The term “Mixer Automation” implies the capability of recording and playing back movements of the faders, knobs, and buttons. 17 18 Fader movements—just as with Midi events—are recorded on a track. This track will consist of a sequence with corresponding Midi events from the respective fader or knob. After being recorded, these events can be edited, just like any other Midi sequence. Gl Ix B The different channel tracks in the mixer create events with different Midi channels. When automation data is recorded Owner’s Manual Version 1.0 – English - C 199 The Mixer from the adaptive mixer, the automation data is recorded to the corresponding track in the Arrange window. Example Let’s say you have three tracks: a bass track, a piano track (both Midi tracks), and an audio drum loop on an audio track in the Arrange window. Click on the Record button in the Transport window, and then move any fader or knob on the mixer, and automation data will be recorded. If the fader for the piano channel on the mixer is moved, Adat Edit automatically creates a new sequence on the piano track in the Arrange window. Move the volume fader for the drum loop, and a new sequence is written to the corresponding track in the Arrange window. During the recording process, it is possible to jump back and forth between the mixer channels. The mixer assigns automation data to the correct track automatically. Mixer Automation: - Select Windows > Open Mixer in the main menu bar. - Click on “Record” in the Transport window. Move the the faders, knobs, or buttons on the mixer. 200 Emagic Adat Edit Chapter 10 1 The Event Editor 2 3 4 This chapter will explain how different types of Midi data – called Midi Events - can be edited in text form in the Event List. This is ideal of very porecise manipulation of data. 5 6 7 8 9 10 11 12 10.1 Midi Events 13 The term Midi Event refers to a complete Midi data word, made up of a status byte and usually one or two data bytes. 14 15 For example, a note,comprising note number(pitch) and velocity (dynamic value), is a Midi event. It is important not to confuse this with the “byte.” A byte has a single data value, and is therefore only a part of a Midi event. 16 17 The Event List displays events in text format, so that each value can be easily viewed, and edited. 18 Gl Ix 10.2 Opening the Event List B To open the Event Editor, select Windows > Open Event List from the main menu bar. If a sequence is selected in the Owner’s Manual Version 1.0 – English - C 201 The Event Editor Arrange window, Adat Edit will automatically try to display the selection’s contents in the Event Editor. To open the Event List for a sequence in Windows, doubleclick on the sequence with the right mouse button . On the Mac, hold down the O key, while double-clicking the sequence. Different Event Lists can be opened for multiple sequences. 10.3 Standard Tools The Event Editor window contains some standard tools similar to those in the Arrange window: The Catch and Link buttons, the Toolbox, and the Edit, Function,and View menus are essentially the same as in the Arrange window. Hiding the Parameter Area The Parameter Area consists of various controls, and is located on the left side of the Event List. The Parameter Area can be hidden to make more room for the Event List display. To do so, select View > Parameters from the local menu bar, to hide it. 202 Emagic Adat Edit Event List Display 1 Repeating the operation will toggle the Parameter Area back into view. 2 3 10.4 Event List Display 4 The text display of Midi events is advantageous because the various parameters of a Midi event can be manipulated quite easily. Also, only the Event Editor is the only place in Adat Edit where non note events, such as controllers and pitch bend, can be edited. 5 6 7 8 9 10 11 12 Different Types of Events 13 The Event List is a table with six columns. As has already been explained, Adat Edit not only saves event data, but also the position and length of the data, which is displayed in the list. 14 Every Event List starts with the line “Start of List” and ends with “End of List.” These two lines serve simply as guides, and cannot be changed. 16 15 17 18 Midi Out Gl Engaging the Midi Out button causes events that are clicked on in the list to be sent to the tone generator.As you change values in the list, you will hear the effect on the data as you go. Ix Sometimes it may be easier to turn off the Midi Out button, e.g., when Pitch Bend or Control Change events are being Owner’s Manual Version 1.0 – English - Tip B C 203 The Event Editor processed. In these cases, listening to the material would not be of much use. 10.5 Scrolling the Event List There are several ways to move through the Event List. Current Song Position The current Song Position is marked in the Event List by an arrow. The events will scroll by, so that the arrow will always be pointing to the event that occupies the current Song Position. Song Position Scroll Arrows There are two scroll arrows located in the upper right portion of the parameter Area. By clicking on these arrows, the contents of the Event List can be moved either up or down. This will transmit events, ans they are highlighted, if the Midi Out button is engaged. If you click on a scroll arrow while holding down the mouse button, the program runs through the list quickly in either direction. Instead of clicking on the arrows, the I and M keys can be used. 204 Emagic Adat Edit Selecting Events Scrollbars 1 The scrollbars can also be used to scroll through the list. When you navigate therough the list this way, the events will not be output, even if the Midi Output button is activated. 2 3 4 10.6 Selecting Events 5 Selecting events in the Event List is done using the same selection techniques outlined in Chapter 4 Operation on page 83. Here is a review of the most important techniques: 6 Single Event 8 7 Click on any part of a particular line in the list to select an event. If you click on another event, the first event will be deselcted, and the new one selected. Block 9 10 Click on the first event in the block. Hold down the ç key (Windows) or the O key(Mac), and click on the last event in the block. As long as you hold down the key, you can keep extending the block. You may also select contiguous blocks of events by rubber band selection. Click-hold with the mouse just above and to the left of the first event in the desired block, and drag a rubber band over all the events to be selected. 11 Scattered Events Click on the events while holding down the S key. 18 Entire List From the local menu, select Edit > Select All. Reverse Selection 12 13 14 15 16 17 Gl Ix Select Edit > Toggle Selection. B To cancel a selection, click in the small white gap between the List, and the Parameter areas: Owner’s Manual Version 1.0 – English - C 205 The Event Editor Click here to cancel the selection 10.7 Structure of the List The order of parameters in the List is the same for all events, and is displayed along the top line of the Event List, just underneath the local menu bar. Position This refers to the starting position of an event in a song. This is displayed in the same four digit numerical format used elsewhere in Adat Edit. Status This column indicates the type of event. This is sometimes rerred to as the “Status Byte”. It might be a Note, Controller, Aftertouch event, etc. More information about this can be found in the section Event Types on page 209. 206 Emagic Adat Edit Structure of the List Channel 1 This is the Midi channel of the event. All events that Adat Edit shows in the Event Editor l have defined Midi channels. Normally, this will be the channel that the Midi controller that transmitted the events was set to. No matter what channels the individual events in a sequence are set to, they will be “forced” out on the channel of the track instrument during playback, so you usually don’t need to worry much about the channels of the individual events. If the track channel is set to All, then each event will be sent on its own channel. 2 3 4 5 6 7 One way that the individual event channels are commonly used, is to control polyphonic voice assignment in the Score editor (see Chapter 12 The Score Editor on page 231). 8 9 Num (1. Data Value) 10 This is the first data byte in the Midi event. Its significance is dependent on the type of event. For example, with a note event, this byte represents the Pitch of the note. More about this can be found in the section Event Types on page 209. 11 12 13 Val (2. Data Value) 14 As has already been mentioned, this is where the second data byte is assigned. For a note event, this byte represents the Velocity. More about this can be found in the section Event Types on page 209. 15 16 17 Length/Info 18 For note events, the duration (length of the note is displayed in this column. A text description of controllers is displayed in this column, as appropriate. This is explained in more detail under section Event Types on page 209. Gl Ix B C Owner’s Manual Version 1.0 – English - 207 The Event Editor Display of Length In the Length/Info column, you may display note lengths in one of two ways. The typical way is to show length as duration from the beginning of the note.The length shown has no relationship to where in the song the note ends, just how long it is relative to the start of the note.The other option is to display the length as an absolute position in the song. This is the point along the timeline of the song that the note will end. To activate this mode, select View > Length as absolute Position from the local menu. Example: The diagram above shows length as duration from the start of the note. Below, the same event, showing Length as absolute Position: 10.8 Event Type Buttons There is a row of buttons in the Parameter Area to the left of the Event List. These serve two functions: • as a way to filter the view of various event types. • for inserting events. How these buttons behave, depends on which tools you use to click on them.. View Filter The View Filter hides certain event types in the List Display. This is particularly useful when you want to work only with a particular type of event. Hidden events are still present in the sequence, and they will be sent if you engage playback with the 208 Emagic Adat Edit Event Types 1 view filter on, they are simply hidden from view for ease of editing. 2 Click on the corresponding symbol with the arrow tool in order to show or hide the respective event types. 3 4 The selection commands in the Event Editor only operate on the events that are visible in the Editor. For example, to easily select and delete all controlller events,, turn off all event types except for Control Change, select Edit > Select All, and then press the ∂ key (also see the section Practicing on page 221). 5 6 7 Inserting Events 8 To insert an event into the sequence, click on the appropriate button with the pencil tool. The event will appear in the list, at the current song position. In the Windows version, you may also insert events by clicking on an Event Type button with the right mouse button. 9 10 11 12 10.9 Event Types 13 14 Note 15 A note event is made up of the following data, (besides Midi channel information): 16 NUM 17 VAL Midi note number, or pitch. The Midi sound range reaches from C - 2(0) to G8 (127), note number 60 is C3. 18 Gl Velocity value from 0 to 127, which represents the force with which the key was struck. Ix B C Owner’s Manual Version 1.0 – English - 209 The Event Editor Length/Info Note length. Midi makes a distinction between the Note On and Note Off commands. Adat Edit displays them as single note event. The format of this display depends on several factors, including the View setting, and the Display Format setting. Program Change Program Change commands call up sounds or programs in Midi devices, such as synthesizers, samplers, or effects units.. NUM Bank Selectcommand. Most newer devices have multiple banks of sounds, each of which may contain up to 128 programs. If you don’t set a value for this field, only sounds within the currently selected bank of the Midi device will be accessible. VAL A program number between 0 and 127. This number calls up a specific memory location within the current bank of the Midi device. In the Tutorial Song, the program changes for GM sound modules are configured in the “GM Setup” sequence. Pitch Bend “Pitch Bend” eventswill vary the pitch of any notes playing on the same channel. Most synthesizers have a PitchBend wheel, or other controller for generating these events. 210 Emagic Adat Edit Tip Event Types 1 The diagram above depicts a “neutral” pitch bend event. The pitch is not affected in this example. NUM 2 A fine breakdown of the NUM value is only used by certain synthesizers, and has no practical importance when working with the Event List. VAL 3 4 5 This affects the pitch value. Values below 64 will bend the pitch downward, values above 64 will bend it upward. 6 7 8 Control Change 9 All Midi controller messages, such as modulation, volume control, or sustain pedal are variations of this type of event. 10 The Midi specification differentiates between continuous controllers, and on/off switches. Controller numbers 0 to 63 are for continuous controllers, and the rest are reserved for switches. 12 11 13 For continuous controllers, the value range varies from 0 to 127. For switches or buttons usually 0 = off, and any value from 1 to 127 = on. 14 NUM Controller Number. The controller number represents the type of controller, for example, the modulation wheel or the sustain pedal. The Length/Info column in the Event List displays the type of controller as text. 16 Controller value, which determines how much effect the controller will have. For example, a Controller #7 (Volume) with a value of 127, will set Ix VALUE Owner’s Manual Version 1.0 – English - 15 17 18 Gl B C 211 The Event Editor the device on its channel to full volume, whereas the same controller with a value of 0, will turn the volume off on that channel. Aftertouch Aftertouch or Channel Pressure shows the finger pressure on the keyboard. As the hand actually plays, sound quality can be controlled. Aftertouch affects all the notes on a Midi channel. Aftertouch messages have no Num byte. VAL Aftertouch intensity. Polyphonic Aftertouch Polyphonic Aftertouch is an enhanced type of Aftertouch, and is also called “Key Pressure.” Finger pressure on each key is measured and processed. Only a few sound modules respond to this controller, and even fewer Midi keyboards have the capacity to transmit polyphonic aftertouch. NUM Midi note number. VAL Key Pressure intensity value for the displayed note. SysEx Data Sound data from a synthesiser in the form of system-exclusive dumps can be recorded in Adat Edit. SysEx data is depicted in the Event List, and can be deleted, copied or moved like other events, but it cannot be edited. 212 Emagic Adat Edit Editing Events 1 10.10 Editing Events 2 In the Event Editor, events can be edited in a variety of different ways. For this purpose there is a toolbox, with a special selection of tools. 3 4 All the typical selection functions can be used in the Event List editor, and operations can be applied to muktiple selected events simultaneously. Changes to selected events will be applied proportionally, based on their starting values. 5 6 Example 7 before 8 9 10 11 <50 12 after 13 14 15 In the above set of diagrams, the velocity is decreased by 50 points. Notice that the relative velocities are maintained after the edit, each is decreased by 50 points. 16 Moving Events 18 An event can be moved anywhere within the sequence, simply by using the arrow tool, clicking in the Position column, and changing the value of one of the four fields in the position indicator, by moving the mouse up or down. The four numbers, from left to right, indicate measure number, beat number, display format value, and clock tick. When you alter an event’s position, Gl Owner’s Manual Version 1.0 – English - 17 Ix B C 213 The Event Editor the Event List will immediately rearrange the displayed order of events, to reflect the change. *UDSKLN before after In this example, note C#2 is moved from position 9 1 1 1 to 10 3 1 1. More than one event can be selected and moved at the same time. Changing Values Changing a value is done by click-holding on the respective event column (e.g., NUM), and moving the mouse . Every parameter in a line can be edited, except for the status byte. For position and length indicators, each field must be changed separately. If multiple events are selected, then the values will be changed relatively. If one of the values reaches its maximum or minimum, then no further changes will be possible. 214 Emagic Adat Edit Arrange Level Display 1 Example Many note events with a velocity value of 70, and one with a value of 99 are selected. When the latter note reaches a value of 127, the other notes will remain at 98, and cannot be set any higher, unless you deselect the note with a velocity of 127. 2 3 4 Practice 5 In the Tutorial Song, open the sequence “Mute Guitar” to an Event Editor, and move all notes listed after 10 3 2 4 1 a quarter note earlier. 6 7 Inserting Events 8 An event can be inserted into the list by clicking the pencil tool on the button, corresponding to the desired event type. The event will be inserted at the current song position. 9 10 Copying Events 11 An existing event can be copied by clicking with the pencil tool on the event’s status description. Adat Edit creates a duplicate, under the original event. 12 13 14 15 Deleting Events 16 To delete selected events, click on an event with the eraser tool. 17 18 Gl 10.11 Arrange Level Display Ix Normally, the Event List can be opened by double-clicking on a sequence with the right mouse button. The the Event List will list the contentsof the sequenceyou double clicked. B C Owner’s Manual Version 1.0 – English - 215 The Event Editor Another type of Event List is an Arrange level display. It’s easy to switch from the Contents to the Arrange Level display. This is done by double-clicking on the white background within an Event List. The Arrange Level in the Event List In Arrange Level, the Event List does not depict any Midi events, instead it shows the sequences of the song. The following take the place of the Status, Num and Val columns: Name Sequence name. Track Track that sequence is located on. Length Sequence Length. Basically, the song can be arranged here in the same way as in the Arrange window. Sequences can be created, moved, lengthened, or shortened. Sequences allow for other tracks to be assigned to them. The Text and Mute tools from the Event List can be used in the Arrange Level. It is easy to find a sequence quickly in the Arrange Level. Switch to the Arrange Level, locate a sequence, and by doubleclicking on it, switch to an Event list display of its Contents. Naming Sequences Sequences can be named in the Arrange Level by clicking on the name of the sequence with the text tool. An edit field will open up, and the name can be typed in. 216 Emagic Adat Edit Tip Quantizing Events Soloing Sequences 1 Clicking on the name of a sequence with the solo tool causes playback from the beginning of the sequence. Playback will only continue while the mouse button is pressed. Only the selected sequences will be played back, similar to the function in the Arrange window. 2 3 4 5 Muting Sequences 6 By clicking with the mute tool, sequences in the Event List in the Arrange Level will be muted. 7 8 10.12 Quantizing Events 9 In the Event Editor, there is a separate Quantization function which can be used on any number of selected events. Event Quantization directly affects the stored position of the events, unlike Play Quantizing in the Arrange window. The advantage is that you can select particular events for quantization, without affecting other adjacent events within the sequence.. All types of events can be quantized, as opposed to the quantization in the Arrange window, where only notes can be quantized. 10 11 12 13 14 You can achieve different quantizations for different groups of events, by applying the operation in steps. 15 Here’s how: First, select the events you wish to quantize. Next, click-hold on the Q button, found just below the Event List Tool box. A flip menu will open, from which you may select a quantization factor. As soon as you select a quantization value, by highlighting it, and releasing the mouse; the selected events will be moved to new positions, based on the value selected. After using the Q button, the last value that has been set can be carried over to other events, just by selecting the event(s), and briefly clicking on the Q button. 16 17 18 Gl Ix B C Owner’s Manual Version 1.0 – English - 217 The Event Editor Example In the example, the selected note s above are not perfectly aligned with downbeats. Below, after quantization, the selected notes all fall right on the nearest beat, and the unselected events remain in their original positions: In order to quickly repeat the previously used quantization factor, highlight the desired events, and select Functions > Quantize again from the local menu bar. 218 Emagic Adat Edit Moving and Copying Segments 1 10.13 Moving and Copying Segments 2 3 The standard edit commands, such as cut, copy, and paste can also be used in the Event Editor. The Copy Midi Events function can be used to copy or move a particular excerpt from a sequence to another location. This can create many copies at once, or move all events that lie within the target area to another place. This useful feature allows multiple copies to be arranged one after the other, in one operation. 4 5 6 7 Example 8 Lengthening a drum pattern from two measures to eight measures. 9 Select Functions > Copy Midi Events from the local menu bar. 10 11 12 13 14 15 16 17 A window will open, showing all the parameters for copying. 18 Locators Gl First, the start and end point from which events are to be copied must be defined. The Cycle Locator points that were used last will automatically be used in the Copy Events window. Here’s a tip: First set the Locators in the bar ruler or Transport window, and then open the Copy Events window. Owner’s Manual Version 1.0 – English - Ix Tip B C 219 The Event Editor Destination The Destination defines the position where the copy will be inserted. The Destination point is identical with the current song position, so that choosing the Destination is as easy as moving the song position line. However, you may change the position in the Copy Events window, if you like. The SPL will move to the newly selected position. Number of Copies Any number of copies can be generated. Adat Edit copies the segments successively. This option is not available in the Swap Mode (s. u.). Mode Clicking on the Mode field acivates a flip menu with a list of options. Copy Options 220 Emagic Adat Edit Practicing 1 The Copy Mode determines how Adat Edit will manage the source and destination data: Mode 2 Result 3 Copy Merge The copied data will be merged with any data at the destination position. Copy Replace 4 The copied data replaces any data at the destination position. 5 Copy Insert The copied data is placed at the destination position, and any existing data is moved to a later position to make room. 6 7 MoveMerge Like Copy Merge, but the source data is moved, instead of copied. Move Replace 8 Like Copy Replace, but the source data is moved, instead of copied. 9 Move Insert Like Copy Insert, but the source data is moved, instead of copied. 10 Rotate 11 The source data is moved to the destination position, and the destination data, and all data following it will be shifted. 12 Direct Swap Source and destination data exchange positions. Remove 13 The source data is deleted. 14 15 10.14 Practicing 16 The Tutorial Song will serve as the raw material for the practice exercises. 17 Copying a Segment of the Flute Solo 18 This exercise uses the Copy Midi Events function. Gl We double the length of the flute solo, which currently runs from measure 33 to 41, by making two copies of the first half of the solo. The measure ruler will be used to set the Source of the copy. Ix Owner’s Manual Version 1.0 – English - B C 221 The Event Editor • Set the Cycle Locators from 25 to 29. The bar ruler should look like this: The Cycle Locators are set from 25 1 1 1 to 29 1 1 1, and the song position line is set at measure 33. • Open the Event List for the “flute” sequence, and bring up the Copy window. Under Number of Copies, enter the number 2. The Copy Events window should look like this: 222 Emagic Adat Edit Practicing 1 Now click Do It. This is the result in the Arrange window: 2 3 4 The flute solo sequence now extends another 4 measures, into the “groove” section of the song. 5 6 7 8 9 10 11 12 13 14 15 16 17 18 Gl Ix B C Owner’s Manual Version 1.0 – English - 223 The Event Editor 224 Emagic Adat Edit Chapter 11 1 The Matrix Editor 2 3 4 5 6 7 8 9 10 11 The Matrix Editor 12 Unlike the Event Editor, the Matrix Editor deals almost exclusively with note events. The Matrix Editor is like an Arrange window for notes, where they can be manipulated graphically. You can also control volume and pan with Hyperdraw. 13 14 15 11.1 Opening the Matrix Editor 16 Before opening the Matrix Editor, a sequence must be selected to work on. 17 18 To open the Matrix Editor, click on Windows>Open Matrix Edit. The contents of the sequence will be displayed. Gl A quicker way to do this is to double click while holding the ç key (Windows) or the O key (Mac). Ix B C Owner’s Manual Version 1.0 – English - 225 The Matrix Editor Practice Open the Matrix Editor for the “drum groove” sequence, in the Tutorial Song, and using this sequence, try the Matrix Editor functions described below. 11.2 Standard Matrix Editor Tools The Matrix Editor contains many of standard tools that you are already familiar with: Transport Field, Midi Out button, a tool box and 2 zoom controls. The bar ruler and song position line are provided to make it easier to isolate and edit portions of a sequence that need to be worked on. The Edit and Option menus are conceptually the same as in the Arrange window and the Event Editor. When an item is edited, an information line will appear in the local menu bar. 11.3 Transport Field and Parameter Dialog Box The Parameter Display and the Transport Field can be toggled on and off by using the choices given in the View pull-down menu. The size of the Transport Field can also be changed by moving the window elements with the mouse, just as in the Arrange window. 11.4 Event Display In the Matrix Editor, every note is depicted as a horizontal beam. The horizontal position and length of the beam represents – as with a sequence in the Arrange window – the duration (length) of the note. The vertical position of the beam represents the note number or pitch. A vertical keyboard at the left edge of the Matrix Window serves to display the pitch. A distinct advantage to 226 Emagic Adat Edit Event Display 1 working with the Matrix Editor instead of the Event List or Score Editors, is that it is much easier manipulate the note length with the mouse. 2 It is also easy to transpose and delete notes. 3 The Matrix Editor is especially practical for working with drum parts, because all the notes for each drum sound (kick, snare, HHT) are displayed on the same horizontal level, and can be easily selected with the mouse. To make it easier to manipulate specific events, the Matrix Editor display can be limited to a specific pitch or span of time, by using the Zoom controls. 4 5 6 7 8 9 10 11 12 13 14 15 16 17 View of an entire track (above), detailed view (below) 18 Gl Ix B C Owner’s Manual Version 1.0 – English - 227 The Matrix Editor 11.5 Working with Notes Notes can be moved in the Matrix Editor, and their length can be altered, or they can be copied and deleted. The selection functions are the same as in other windows. These are described in more detail in the following sections. Moving Notes To move a note, or a selected group of notes, click somewhere in the middle with the mouse pointer, and move it to the desired position. Moving the note vertically will transpose it, and moving the note horizontally will move the position of the note along the time axis. Copying Notes The quickest and easiest way to copy notes is to select the note, and then press the ç key (Windows) or the O key (Mac), while dragging it to the desired position. This can also be done by using the Copy function, and pasting the note at another spot. Inserting Notes New notes can be created with the pencil tool, or created by copying existing notes. To create a note, select the pencil tool from the toolbox, and simply click at the desired position. Adat Edit will insert a new sixteenth note. The length of the note can be changed afterwards. 228 Emagic Adat Edit Working with Notes Changing Length of a Note 1 The length of a note can be changed either by using the finger tool, or the mouse pointer. 2 Finger Tool 3 Click anywhere on the note, and drag the finger tool left to shorten, or right to lengthen the note. When the mouse button is released, the beam length will change accordingly. Mouse Pointer 4 5 6 Length can also be changed using the mouse pointer. The advantage to this is that a new tool need not be chosen to move and change the length of the note. The disadvantage is that you can only grab the bottom right corner of the note beam to change its length. 7 8 9 10 11 If you select multiple notes, the length for all notes will be changed proportionally. If the zoom setting for the window is too low, it may be difficult to grab the bottom right corner of the note with the pointer. It is easier to see the lower right hand corner of the note beam, if a larger zoom setting is chosen. 12 Tip 13 14 15 Deleting Notes 16 Notes can be deleted by selecting them and • clicking on them with the eraser tool 17 • selecting Edit > Clear in the menu bar 18 • pressing the ∂ key. Gl Ix B C Owner’s Manual Version 1.0 – English - 229 The Matrix Editor Working With Velocity Value The V tool (V = Velocity) manipulates the velocity value of the notes in the Matrix Editor, either for individual notes, or a selected group of notes. How to use the V tool: 1. Select the V tool in the toolbox. 2. Click-hold with the tool on any selected note. 3. The Information Line in the local menu bar of the widow will nowdisplay (as shown above) the velocity value. 4. To change the value, move the mouse either up or down, and then release the mouse button. 230 Emagic Adat Edit Chapter 12 1 The Score Editor 2 3 4 This chapter will show how sequences in Adat Edit can be edited, using the Score editor. Although there are editing functions for notes (velocity, note length) in the Event List and the Matrix Editor, it is sometimes easier to view and edit pitch and rhythm on a “sheet of music”. Many musicians are already familiar with this type of display, and can orient themselves more quickly to it, than to other types of editors. 5 6 7 8 This chapter will concentrate on the Score editor’s most important editing functions, with an emphasis on those features used to manipulate the playback of your music. 9 10 11 12.1 Opening the Score Editor 12 13 14 15 16 17 Score editor 18 The Score Editor opens automatically by double-clicking on a sequence with the (left) mouse button. This can also be done by highlighting a sequence and selecting Windows > Open Score from the menu bar. Gl Ix B C Owner’s Manual Version 1.0 – English - 231 The Score Editor Practice Open the Score editor for the “Piano Theme 1” sequence in the Tutorial Song, and use this sequence to try out the functions described below. 12.2 Standard Tools Hide and Show the Parameter Area In the menu bar of the Score editor, click on View > Parameters, in order to hide or show the parameter area in the left part of the window. This is especially useful with smaller monitors, because this space can be used for the note display. 12.3 Setting the Display Size There are three zoom settings in the Score editor, with which the viewable portion of the window can be enlarged or reduced. The zoom (telescope) control should be used for this purpose. Zoom Settings for the Notes When the Score editor is opened, the zoom will default to the medium setting. Click on the small (left) side of the telescope 232 Emagic Adat Edit Adjusting the Display 1 reduce the zoom, click on the large (right) side of the telescope to enlarge the display. 2 3 12.4 Adjusting the Display 4 Adat Edit’s default score display is usually good enough for editing, the idea being to work with the material effectively and quickly, rather than to have a perfect print-ready display. During editing, it is important to conform to some of the display parameters of the music material itself. 5 6 7 In the Parameter Area, there is a box, with several display parameters. The box will display the currently selected sequence name. Click on the triangle, to the left of the name to open the box, and display its contents. 8 9 10 11 12 13 These settings are basic to the Adat Edit note display. 14 Style 15 The Score Style controls the basic layout of the Score display for the selected sequence. It sets the clef used, the octave of the display, and display transposition for non C instruments. It also determines how many staves will be used for polyphonic instruments, such as piano. Below, you can see how changing the style for the “bass theme” sequence in the Tutorial Song, makes it much easier to read. 16 17 18 Gl Ix B C Owner’s Manual Version 1.0 – English - 233 The Score Editor Changing Style for better readability (right) Autostyle For new recordings, Adat Edit automatically aasigns a style appropriate for the range of notes found in the new sequence. Bass notes will be displayed with the bass clef, and higher notes will be displayed with the treble clef. If needed, a piano style may be assigned to accomodate notes with a wide range of pitch. Display Quantization Thye display can be quantized, independently of the sequence quantization in the Arrange window. This is very useful for making expressively played, or syncopated parts still read well in the Score editor. Thus, a freely input and unquantized track can still be displayed in sixteenth notes. The quantization value should be set at the smallest note value that occurs in the sequence. For a sequence where sixteenth notes are the smallest, select the 1⁄16 note setting, not 1⁄96. Otherwise, notes that were played with a staccatto feel will be displayed as very short notes, followed by rests, and thus be less readable. Quantization Display set too high 234 Emagic Adat Edit Editing Notes 1 The Default setting uses the display format value from the Transport window as the quantization display. 2 The quantization display has no effect on the playback of notes, only on the way they are displayed in the Score window. This function should not be confused with the quantization in the Arrange and the Event windows. 3 4 5 12.5 Editing Notes 6 7 Selecting Notes 8 Individual notes can be selected with a mouse click. A group of notes (like a chord) can be selected using the rubberband selection technique. Scattered notes can be selected by clicking on them while holding down the S key. Please note that selected events in the Score window blink, instead of highlighting, as they do in other edit windows. 9 10 11 12 Information Line 13 As in other windows, the Information Line is used in the Score editor when material is edited (copy, move) with the mouse button. 14 15 Note Parameters 16 Pitch, velocity and length parameters can be changed for one or multiple selected notes in the Score editor. When one or more notes has been selected, the data value will be shown in the note parameter window between the Display parameter box, and the Tool box. If the parameter box is closed, you can open it, by clicking on the triangle, its left side. 17 18 Gl Ix The Event parameter box works in much the same way as the Event Editor. When multiple notes with different parameter settings are selected, an asterisk will appear in the value field of the relevant parameter(s). Changing any of these parameters Owner’s Manual Version 1.0 – English - B C 235 The Score Editor will have a relative effect on all the notes that have been selected. Example When selecting a chord, an asterisk appears next to Pitch. By clicking on the asterisk and dragging the mouse, all notes in the chord (e.g., an octave) will be transposed by the same amount. If you want to edit all the notes in a sequence, you can easily select them all by calling up Edit > Select All. Moving and Transposing To move notes, select the note and drag it to the desired position. As this is done, the Information Line will depict any changes in pitch or position. As the note is moved, the “snap” value is defined by the Display Format value in the Transport window. Copy Select the notes and copy them, by dragging the mouse to the target position while holding down the ç key (Windows), or the O key (Mac). This can also be done by selecting Edit > Copy from the local menu bar. This will place the selected notes on the clipbpord. You may then place them at the desired position by moving the SPL to the position, and selecting Edit > Paste from the local menu. Insert You can use the Pencil tool to insert notes directly into the Score. Simply click with the tool on the desired position. Hold the mouse button, while checking the Information Line, which displays the pitch and position. Move the mouse until the correct pitch and position are displayed. When the mouse button is released, Adat Edit will insert a new note, the length of which is determined by the display format value. After 236 Emagic Adat Edit Tip Insert Defaults 1 insertion, the length of the note can be changed in the Event Parameter box. 2 3 12.6 Insert Defaults 4 By clicking on an empty space in the Score window, the Event Parameter box will be set to Insert Defaults. When the box is in this mode, any settings you make to its parameters will become the default settings for notes that you insert. This way, you can preset the basic parameters for the notes to be inserted, saving time editing later. Channel 5 6 7 8 This is the Midi channel that will be assigned to inserted notes. The event channel usually has no bearing on the Midi output, since this is controlled by the Track instrument in the Arrange window. However, in the Score window, the event channel is sometimes used to determine which staff a note will be assigned to in a polyphonic style, such as “Piano 1/3” or any of the Organ styles. Velocity Thism determines the velocityvalue for newly inserted notes. Lyrics Inserted text will be treated as lyrics, and syllables will be tied to particular notes.. 9 10 11 12 13 14 15 16 17 18 12.7 Diatonic Insert Gl The Diatonic Insert feature forces inserted notes to the key of the song. This makes it easier to insert notes of the correct pitch, if the song does not have many accidentals. To activate the feature, select Options > Diatonic Insert in the local menu bar. Ix Owner’s Manual Version 1.0 – English - B C 237 The Score Editor Deleting Notes To delete notes, select them and do one of the following: • click them with the Eraser tool • select Edit > Clear from the local menu bar • press the ∂ key. 12.8 Getting Ready to Arrange It is recommended that for sequencing and printing scores, that two separate versions of the song be used. This way, the Midi events can be changed for the score display, without changing the sound of playback. Example You may find that you need to alter the actual length of some notes in order to get them to display the way you want to in the Score. If you have a second version of the song specifically for scoring, you can make these changes, without having to worry about ruining the playback of the file. 12.9 Parameter Area The Parameter Area is found along the left side of the Score window. The following tools can be found there, in order, from top to bottom: • Track filter. • Display Parameter box. • Event Parameter box. • Toolbox. • Part Box. 238 Emagic Adat Edit Switching Levels 1 The Display Parameter box, Event Parameter box, and Toolbox were covered in the previous section. The new tools are relevant for forming notes for the printout. 2 3 12.10 Switching Levels 4 Just as in the Event List, the Score Editor offers two display levels: the Sequence display level, and the Arrange display level. 5 Sequence Level 7 When the Score editor is opened, a single sequence will be displayed. This makes it easy edit the notes in that sequence. 8 6 *UDSKLN 9 10 11 12 Sequence Level 13 Arrange Level 14 For editing a score for printout, it is better to be able to view more than one track at a time. To do this, switch from the Sequence level to the Arrange level. 15 16 To go from the Sequence to the Arrange level, click on the Level button, which is the small black square just above the “Catch” (walking man) button, in the Score editor window. You can also switch to Arrange level by double-clicking on any empty space in the Score editor. 17 18 Gl Ix B C Owner’s Manual Version 1.0 – English - 239 The Score Editor *UDSKLN Arrange Level The Arrange level should be used to view and edit the staves the full score. This makes it easy to visually check whether a bass note is in time with a bass drum beat, and so on. Notes that play at the same time will be verically aligned with each other. To switch from the Song level to the Sequenceevel in the Note window, do one of the following: • double click on a staff in the Score window • if the Link Mode is active in the Arrange window, click on a sequence. This is also possible in the Event Editor if it is displaying in Arrange level . A complete song in score display takes up a great deal of memory. In case there is not enough RAM, a warning will appear, and eventually the Score window will close automatically. 240 Emagic Adat Edit Tip Track Filter 1 12.11 Track Filter 2 The display in the Arrange level can be limited to only one track. When used in combination with the Page Edit option, you can create a continuous score display of all the sequences within the selected track, for a clean printout of just that part. If you are in Sequnce level, the Track Filter button will display (single seq.), and will not open. To use the filter, switch to Arrange level display, by double clicking an empty space in the Score Window. Now, if you click-hold on the Track Filter button, a flip menu, with a list of all tracks in the song, will open. Highlight the track you want to view, and release the mouse. This makes it easy to switch between tracks that are being edited, without changing levels. 3 4 5 6 7 8 9 The Track Filter also affects the printout. It is possible to print out the display of a single instrument from the full score. 10 11 12.12 Inserting Symbols 12 There are many notation symbols used in a typical score, that cannot be simply inferred from recorded or inserted Midi events. These might include articulation symbols, dynamic markings, slurs, rests, clefs, and many others. Adat Edit allows these symbolsto be inserted manually, with the mouse. 13 14 15 These symbols only affect the score display, not the playback of Midi events. 16 17 All of these symbols are available in the Part Box, from which they can be dragged to the score display. 18 If the Part Box is hidden, select View > Parameters from the local menu bar, to toggle on the Parameter Area. The size of the Part Box can be manipulated, by clicking on the vertical dividing line between the Parameter Area and the Note Display, and dragging the mouse either to the left or to the right. Gl Ix B C Owner’s Manual Version 1.0 – English - 241 The Score Editor The symbol fields in the Part Box are displayed according to the width of the Parameter Area. Thus the Part Box can be adjusted to fit the window. The Part Box is divided into two fields: The upper field is made up of symbol groups. Symbols displayed in the lower field will be from the group selected in the upper field, such as clefs, dynamic markings, or notes. Insert Symbols Symbols from the Part Box can be inserted like notes. They can be inserted using the Pencil tool (Windows: right mouse button), deleted with the Eraser tool, and moved or copied with the arrow tool (for copy, press the ç key or the O key while dragging). A symbol can also be inserted by clicking on it with the mouse, and dragging it to the desired point. When the mouse button is released, the symbol will be inserted. Applying Symbols to Multiple Notes In order to apply the a symbol, like a staccato mark, to multiple notes, first select the notes in the Score editor. Drag the symbol from the Part Box onto one of the selected notes. The symbol will automatically be applied to all notes that are selected. Selecting Symbol Groups 242 Emagic Adat Edit Inserting Symbols 1 Here is an overview of the various symbol groups with an explanation of each: 2 Notes 3 Here you may select a note value for inserted notes. All binary, triplet, and dotted values are available, from a whole note to a 1 ⁄32 triplet. 4 To build chords, it is easier to insert the first note of the chord from the Part Box, and copy/drag the rest of the notes by using the O key (Mac) or the ç key (PC). 5 Tip 6 7 8 Pedal 9 This symbol represents the Hold or Sustain Pedal. When the Pedal symbol is inserrted in the Score, the corresponding Midi event (controller 64) is inserted as well, which does influence playback. 10 Clefs 12 There are three types of clefs in Adat Edit: Treble, Bass, and CClef. 13 11 14 Adat Edit differentiates between the original clef, as determined by the Score Style, and inserted clefs. The original clef is depicted in the first measure or at the start of the staff. 15 16 A clef that used from the Part Box is interpreted as a clef change. Clef changes may be inserted at any point, even within a measure. 17 18 Gl Ix Clef Changes can occur at any point B C Owner’s Manual Version 1.0 – English - 243 The Score Editor Dynamic Symbols The dynamic symbols have no influence on the actual soundof the Midi event (velocity, volume), but only serves as a graphic symbol to note the dynamics for a printout. Note Heads These are special note heads for drum notation, and these can be assigned manually to the notes. Select one or more notes, select the note head, and click on one of the selected notes. All of the selected notes will now be have the same note head. Articulation Articulation marks are tied to notes, and display at a relative position to the note head. If you move a note that has an articulation symbol attached to it, the symbol will move, as well As with other symbols, you can apply an articulation symbol to multiple selections of notes, in a single operation. Legato Marks and Accent Marks These markings can be positioned and shaped at will. When you insert or select a legato mark, editing handles will appear at each end. These can be moved with the mouse to change the shape, or size of the marking. To move the entire symbol, drag from between these two points. Key Signature Key signatures can be inserted at any point in the song. These affect all staves. Staves using a Score Style with a Disply Transposition for a non C instrument, will be transposed proportionally. For example, if you insert a signature for the key of G into the song, any sequences set to the “Alto Sax” score style (Eb instrument) will display this as the key of E. 244 Emagic Adat Edit Inserting Symbols 1 To insert, drag the key signature from the Partbox to the point where you want the key cahnge to occur.. 2 If needed, any naturals needed to indicate the change in key, will be displayed at the point where the change occurs. 3 Existing key signatures can be edited easily. Double click on the key signature display, at the beginning of the staff line, and a pop-up window will open. This is where the new key can be chosen. You may select either a major, or a parallel minor key. You may also edit an existing key signature by dragging the symbol for the new key from the part box, to the same location.. 4 A key signature can be deleted by clicking it with the Eraser tool. 8 5 6 7 9 Time Signature 10 Adat Edit allows you to insert time signature change at the beginning of any measure. The original time is determined by the time signature setting in the Transport window. Time signature changes do not affect the playback. Time changes apply to all systems, and are automatically displayed. 11 12 13 The time signature influences the following characteristics in the program: 14 • Format in the Transport window. 15 • Format of position display in all editor windows. 16 • Bar ruler. 17 • Metronome Click and Count-in. 18 Repeat and End Signs Gl This group includes double lines, end of song symbols, repeat signs, and double repeat signs. These symbols may be inserted anywhere in the song, but there must be notes in the sequence for these symbols to insert. Ix B C Owner’s Manual Version 1.0 – English - 245 The Score Editor These symbols appear in all sequences at the point where they are inserted. They can be deleted by clicking on them with the Eraser tool. Trill This is a palette of trill symbols, that can be inserted anywhere in the composition Text You may insert either normal text, or lyrics from this group. Lyrics are tied to particular notes, normal text can be positioned independently.. 12.13 Symbols in the Event Editor A symbol, as long as it has nothing to do with a Midi event (note, pedal), is termed a “Meta Event” in Adat Edit. This is reflected in the Information Line, when inserting them . Meta events are displayed, and can be edited in the Event List, but it’s usually easier to do in the Score editor. 12.14 Preparing for Printing The following functions are exclusively for the score display, and do not affect the playback of events. These help you edit the score, so that it is more readable. Enharmonic Shift Adat Edit displays sharps and flats according to the key signature. Sometimes, an enharmonic changemay make certain 246 Emagic Adat Edit Preparing for Printing 1 passages more readable. You can change a note to its enharmonic equivelent. 2 To change the enharmonic notation of a note, or a selected group of notes,go to the local menu bar and select Attributes > Accidentals > : • enharmonic shift # – this changes a flat to a sharp. • enharmonic shift b – this changes a sharp to a flat. • default accidentals 3 4 5 6 – the selected note(s) are reset to the default enharmonic spelling. 7 8 9 Enharmonic Shift 10 If you apply the “Enharmonic shift #” to a note already spelled as a sharp, then it will display as a double sharp, and so on. 11 12 Stem Direction 13 14 15 16 Adat Edit automatically sets the direction of note stems, based on pitch, but the direction can be changed for individual notes. Select the note or group of notes, and from the local menu select Attributes > Stems > : 17 18 Gl Up Stem points up Down Stem points down Ix Default Return to the automatic stem setting B C Owner’s Manual Version 1.0 – English - 247 The Score Editor Beaming Adat Edit also automatically beams groups of notes. The grouping can also be changed. The figure shows an example with automatic (top) and manually entered beams. Beam To manually beam a group of notes, select the notes and select Attributes > Beaming > Beam Selected from the local menu bar. To clear a beam that Adat Edit has automatically set, select the group of notes and select Attributes > Beaming > UnBeam Selected from the local menu bar. If you wish to reverse a manual beaming operation you have applied , highlight the notes, and select Attributes > Beaming > Default from the local menu bar. As with all other functions in Adat Edit, only selected notes will be affected. To undo all the changes for a sequence, select the entire sequence. Adjusting the Position of a Staff The position of each staff can be moved vertically. Click-hold near the original clef, in the empty area between the lines of the staff. The lines will turn gray and “Move Staff” will appear in the Information Line. Move the note system in the desired direction. 248 Emagic Adat Edit Text Multiple Staffs 1 With multiple staffs, the entire structure can be moved, and even the distance between the each staff can be changed. 2 • To move the staffs, click on the upper staff. • To change the distance between staffs, click on the lower staff. This will not affect the position of the entire score. 3 4 5 6 7 8 9 Enlarging the distance between staffs (right) 10 12.15 Text 11 Text can be inserted in the score display, to label a staff, enter the title of the song, or the name of the composer. Text is listed as a meta event in the Event List. 12 13 14 Selecting the Font 15 Any font that is already installed in the computer’s operating system can be used in Adat Edit, providing it will display text on the screen, and print it out. Adat Edit works better with truetype fonts, which can be displayed in any size on the screen. These are recognized by the TT symbol depicted before the name of each type of font in the Font pull-down menu. To select a font in Adat Edit, go to the local menu bar, and select Options > Score Font. A dialog box will open, where the type of font, size, and style can be defined. 16 17 18 Gl Ix The font selected will be used for all text within the song. If the font is changed later, all text that has already been inserted will be reformatted with the new font. It is recommended that you Owner’s Manual Version 1.0 – English - Tip B C 249 The Score Editor choose the font before inserting text, because changing fonts can shift the layout, especially if you change the size of the font. Font options for Score Text – Windows Insert Text Select the Text tool from the tool box, and click in the Score window where the text is to be inserted. A text insert field, and an Information Line will appear. Enter the text, and close the insert field by pressing the R key. The text is selected, and it will be flashing. Use the Arrow to place the text exactly where you want it. Clicking on an empty field will deselect the text. To edit the text, click on it with the Text tool, or double-click it with the left mouse button. 250 Emagic Adat Edit Text Text Position 1 Like all other events, text can be moved with the mouse. This method is recommended. Anotherway is to numerically edit the vertical and horizontal position of the text in the Event Parameter box. You can also change the staff that the text is associated with in the Event Parameter box. 2 Stave 5 vert. pos hor. pos 3 4 This shows the number of the stave that the text is associated with. The position display will always calculate position relative to this stave. You can easily change the stave number that the text is associated with by changing this value. If you set this number to a value higher than the total number of staves in the song, the text will disappear. 6 7 8 9 10 This is the vertical position of the lower text corner relative to the uppermost line of the stave. 11 This is the horizontal position of the left edge of the text, relative to the first note in the stave. 13 12 14 15 Lyrics 16 Lyrics are different than normal text, in that they are tied to notes: • Syllables will be directly assigned to notes, and will move with the notes, as they are moved. • Distance between the notes will adjust, to accomodate the length of lyric syllables tied to them. 17 18 Gl Ix Here’s how to insert lyrics: 1. First, choose the “A” symbol in the Part Box. 2. Select Lyric, and while holding the mouse button down, Owner’s Manual Version 1.0 – English - B C 251 The Score Editor drag the pointer under the first noteon which you would like to enter lyrics. The cursor and the Information Line will begin flashing. 3. Enter the text for the first note. 4. Press T to jump to the next note. 5. End lyric input by clicking on R. Lyrics can be edited, copied or moved just like normal text. 12.16 Page Edit View 252 Emagic Adat Edit Printing a Score on the PC 1 Full Page View of a Score 2 The Page Edit View is probably familiar to you from word processing or graphics programs. Adat Edit provides a full page view of the entire score, and displays this on the screen as it will look on printout (WYSISYG). In the Page Edit View, notes can be edited, just as in the normal view. 3 4 5 Switching Page Edit and Normal View 6 Clicking on the “Page Edit” button, next to the Midi Out button, will toggle between normal and Page Edit view. 7 Page Edit view is not only useful for displaying the entirescore, but it is also helpful for working with longer passages. More measures can be shown in the same amount of screen space in the Page Edit view, than in the normal view. 8 9 10 Scrolling through Page Edit View 11 Scroll with the vertical scrollbar, and the page number will appear in the top left-hand corner of the page. 12 13 Printer and Page Edit View 14 The Page Edit view conforms to the page layout settings for your printer. It takes such things as paper size into account, when calculating the display. Therefore, your printer must be installed, and configured, before Page Edit view can really work as it should. The position of notes, and text displayed on the screen wiill match the printout. 15 16 17 18 12.17 Printing a Score on the PC Gl The parameters for printout under Windows are relatively simple, because Adat Edit uses the system printer settings. Because of this, Adat Edit will work with any graphics capable printer installed in the system under “Printers.” Ix Owner’s Manual Version 1.0 – English - B C 253 The Score Editor Print Menu To set the page range to be printed, go to the ilocal menu bar, and select Print > Parameter. There will be a field for the first page, and another for the last. To start printing, select Print > Start Printing. Configuring the System for Adat Edit Normally, the printer need not be configured especially for Adat Edit, but when the printout is not optimal, or if an error message appears, the problem may be one of the following: RAM In order to print, Adat Edit requires a great deal of RAM. If the computer only has 4 MB of RAM, problems can occur when printing out larger documents. If this occurs, • reduce reserved memory on the RAM disk or in Smartdrive-- neither are used by Adat Edit • close all other programs • print the document out in segments • add more RAM to the computer. Resolution Theoretically, Adat Edit can work with any resolution that the printer offers. It is important to be aware that the values for vertical and horizontal resolution should be identical, and when not set properly, the printout may be distorted. Select a resolution where the horizontal and vertical values are as close to the same as possible. Tip 254 Emagic Adat Edit Printing a Score on the Macintosh 1 12.18 Printing a Score on the Macintosh 2 3 The type and printing options are assigned differently with the Macintosh than in the Windows version: 4 Selecting the Font 5 Here is how to select the font in the Macintosh version: 6 1. Open the Score editor, either by double-clicking a sequence, or by pressing C3. 7 2. In the local menu bar, select Options > Score Font. 8 9 The Score Font window will open, where the font, point size, and style can be chosen. 10 11 12 13 Set Pages and Print 14 Here is how page parameters such as paper size and orientation are set: 15 In the main menu select File > Page Setup. 16 The Page Setup window for the printer will appear. 17 2. 18 1. Set the options as needed. To print a Score: • Gl In the main menu select File > Print, or press Cp. Ix Now, you can set the page range to be printed, and start the print job. B C Owner’s Manual Version 1.0 – English - 255 The Score Editor 256 Emagic Adat Edit Chapter 13 1 The Sample Editor 2 3 4 13.1 The Sample Editor 5 The Sample editor offers tools that alow you to make changes to the audio files you have recorded or imported into your song. These edits are “destructive” in that the actual audio data is affected by the functions. This is in contrast to the non destructive editing described in earlier chapters, where working with audio in the Arrange window was stressed. The Sample Editor provides a detailed display of the audio waveform, and provides tools used for manipulating the data directly. The Sample editor is opened by double clicking on a region in the Arrange window. If the underlying audio file is longer than the region selected, only the portion of the file encompassed by the region will be highlighted when the Sample editor opens– this is practical, because then all changes made will only affect this selection. 6 7 8 9 10 11 12 13 It’s a good idea to make backup copies of your files before doing any sample editing. This way, if you make an unwise edit, you can recover your original recording. 14 How to create a backup copy of the audio files: 16 - Select any operation from Functions, in the menu bar of the Sample Editor. - A dialog box will appear, asking if you would like to make a backup of the file. Click the button labeled Yes. 15 17 18 Gl The Functions menu offers many tools for manipulating audio files. For example, Normalize raises the level of an audio file to the maximum possible level, without clipping. With Change Gain, you can increase or decrease the output level of the file by a percentage. Fade In and Fade Out create smooth fades over Owner’s Manual Version 1.0 – English - Ix B C 257 The Sample Editor the selected span of the file. Silence replaces the selected data with digital silence. Invert reverses the phase of audio files. Reverse swaps the start and end, causing the file to play backwards.Trim removes the selected section of the file from the hard drive. Remove DC offset centers the waveform on the zero amplitude axis, correcting for errors induced by the audio hardware. To set the ruler in the Sample Edit window to display the waveform position relative to bars and beats in the song, select View > Bars/Beats... in the local menu bar. 13.2 Layout of the Sample Editor 1 The overview displays the entire audio file. 2 In the selection parameter field, the starting point and the length of the selected area are displayed. 3 Catch (“walking man”) will cause the waveform display to update to the current position, when the Play Position Line reaches the right edge of the window. 4 Amplitude scale (by percentage or 16 bit decimals). 5 Overview of the currently visible segment in the Waveform Display. 6 Detailed Waveform Display. 258 Emagic Adat Edit Display 1 7 Play Position line (can also be seen in the overview). 8 Telescope control sets the zoom level of the Waveform Display. 9 In the upper left hand corner of the horizontal time line, the name of the region and then the name of the audio file !≠ The start point, anchor, and end point of the region (from left to right). These can be moved with the mouse. 2 3 4 5 6 13.3 Display 7 Overview 8 The “Overview Display” appears between the title list and the measure ruler in the Sample Edit window. This will always show the complete length of the actual audio file, not affected by the zoom setting (Telescope symbol). It is important to note that a proportion of the time axle will not be provided here: in the Overview Display, a 0.3 second-long kickdrum takes up the same area as a song passage that lasts 15 minutes. 9 10 11 12 During playback, the actual position is shown by a line that moves in real time – in the Overview as well as in the Waveform Display. 13 The actual selection will also be depicted in the Overview. 15 14 16 17 18 Gl Ix B C Owner’s Manual Version 1.0 – English - 259 The Sample Editor The selection currently shown in the Waveform display will be boxed in with a dotted line. 1 2 Overview display: the dotted lines box in 1 the current section in the Waveform display window. The selection 2 is also shown. Overview Functions A short click on the Overview display will display this area in the Waveform display. A long click starts playback after this point. When the mouse button is released, playback will stop. A double click starts control playback after the position that has been clicked on. Relationship between the Windows Basically, The Catch and Link keys work exactly as they do in other Editor windows. 260 Emagic Adat Edit Display Catch Mode 1 The Catch mode will depict the actual play position area (for song or control playback) in the Sample Editor. Catch can be turned on or off by clicking on the button with the runner or using the keyboard commands. 2 Link Mode 5 The Link mode will depict one of the regions selected in the Arrangement window, within the Arrangement window of the Sample Editor. Clicking on the button with the chain symbol or using the keyboard commands can turn this on and off. 6 If the Link mode is used frequently, the following can be done: open the Sample Editor and turn the Link mode on, then close the window. Adat Edit has now permanently recorded this activated Link mode. 3 4 7 Tip 8 9 10 Double clicking on any chosen window in the Arrangewindow, will automatically produce a display that is temporarily coupled together. 11 12 13 Waveform Display 14 Scaling the Display 15 Zoom Telescope 16 The left-hand zoom telescope controls the vertical zoom factor of the Waveform display. Clicking on the small end of the telescope reduces the zoom factor, clicking on the large end increases it. 17 18 Gl The right-hand telescope controls the horizontal zoom factor of the Waveform display. Clicking on the small end of the telescope reduces the zoom factor, clicking on the large end increases it. Ix B There are key commands for both of these button functions. Owner’s Manual Version 1.0 – English - C 261 The Sample Editor On the Macintosh, pressing the C key while operating the telescope buttons, will scale the vertical and horizontal zoom factor at the same time. Zoom Tool As in the other windows, there is a Zoom tool in the Toolbox (magnifying glass symbol). By click-hold dragging with this tool will enlarge the area dragged over. This operation can be repeated over areas already zoomed.A brief click with the tool on an area will return it to the previous zoom setting. Pressing the ç key (Mac) or the A key (PC) will turn the arrow directly into the Zoom tool. The Amplitude Axis and Time Axis On the left side of the y axis, a vertical measuring scale shows the amplitude percentage. The x axis (time line) shows the position of the audio file. By clicking on View in the menu bar, different units of measurement can be chosen. Note that that the view format determines the way entries in the information line, and the selection parameter field are displayed: View > Samples Displays position as the number of samples fromeither the start of the song, or from the start of the audio file. Length is displayed as total number of samples. View > Min:Sec:Ms Calibrates the display to : minutes : seconds:milliseconds from the start of the song or audio file. 262 Emagic Adat Edit Using the Sample Editor 1 View > SMPTE Time Displays time in the SMPTE format of hours : minutes : seconds : frames.Position is displayed from either the beginning of the song, or from the start of the audio file. 2 3 4 View > Bars/Beats The display shows position and length in units of bars, beats, display format units and clock ticks, from either the start of the song, or from the start of the audio file. Position is displyed relative to a start point of “1 1 1 1”, whereas length is displayed relative to a start point of “0 0 0 0”. 5 To display the position of a region relative to the start of the song, select the region in the Arrange window. This wis indicated by the word “ARRANGE” to the left of the name of the region at the beginning of the ruler. If the region is not selected in the Arrange window, then position within the display will be shown relative to the start of the audio file. 8 6 7 9 10 11 12 13.4 Using the Sample Editor 13 Controlling Playback 14 There are many ways to play back regions in the Sample Editor. Here, playback is used to test edits made to audio files. If you want to hear the file in contexct with the rest of the song, the normal sequencer transport controls should be used. 15 Playing from the Overview Display 18 If you click-hold at a point on the Overview display, playback will start from that point, and continue until the mouse button is released. Double clicking on a point in the Overview display will start playback from that point. Gl 16 17 Ix B C Owner’s Manual Version 1.0 – English - 263 The Sample Editor Playing the Entire Audio File The keycommand Play/Stop All will play the entire audio file, regardless of the current selection. X Playing the Current Selection To play the current section, click on the button with the small loudspeaker icon. This can also be done using the key command Play/Stop Selection. Playing After a Specified Point By double clicking on the time line, the audio file will play from the click point to the end of the selection. Double clicking beyond the current selection will play the audio file to the end. Cycle Playback The Cycle button is located on the left side of the Sample Edit window, above the loudspeaker button. Activating this will cause the selected section to be repeated continuously in play mode. Selection Commands Selecting All Audio Files Selecting Edit > Select All(Ca with the Mac, and ça with the PC), selects the entire audio file. Manual Selection To select any section of the audio file with the mouse, clickhold at the beginning or end of the desired area, and move the mouse to the right or to the left. 264 Emagic Adat Edit X Using the Sample Editor 1 Changing Selection Borders The left or right border of an existing selection can be changed by holding down the S key, and briefly clicking at the desired point. Whether the start or end point is changed, depends on whether the point clicked was closer to the beginning, or end of the selection. 2 3 4 5 Shifting the Selected Area By holding down the O key (Mac) or the ç key (PC) while dragging, the selected are can be shifted left or right, without chaging its length. 6 7 8 The Selection Parameter Field 9 The Section Parameter fiels (2) displays the position and length of the current selection numerically. The units of display are dependent on the View setting for the Sample editor. 10 11 1 12 2 13 14 15 16 3 17 18 Working with Regions in the Sample Editor Gl When precision is important, the borders of regions should be manipulated in the Sample Editor. Ix Region borders can be edited with to the precision of a single sample word, if a high enough zoom setting is used. You can also position the anchor, to change the part of the region used as Owner’s Manual Version 1.0 – English - B C 265 The Sample Editor the position reference in the Arrange window. Remember that the position display for a region in the Arrange window always shows the position of the anchor, not the start point of the region. There are gadgets to adjust the start, anchor and end points of a region, along the bottom edge of the Waveform display.Therse can be moved by click-dragging them with the mouse. 1 3 2 1 Region Start 2 Region End 3 Anchor Maintaining Anchor Position Changing the anchor position will shift the position of the region in the Arrange window along the time axis. This is not always what you want. You can prevent the anchor from moving when you drag the start or end gadgets by holding down the ç key (PC) or O key (Mac) while dragging them. Keep in mind that the anchor can never be before the start point. If you drag the start point to the right, you will not be allowed to go past the anchor, if you 266 Emagic Adat Edit Using the Sample Editor 1 use the modifier key to protect the anchor’s position. If you release the key, then both the start point and the anchor can be dragged to the right together. 2 3 Edit Commands 4 The usual edit commands are available in the Sample Editor menu bar under Edit: Cut, Copy, Paste, Clear, and Undo, or these can be executed by using the corresponding keycommands. 5 6 7 Please note that these edit commands, with the exception of Copy, are destructive, and will change the data in the audio file.. Such changes can be reversed, using the Undo command, as long as no subsequent edits have been performed. 8 9 Cut (Cx/çx) 10 This cuts a selected passage from the audio file, and puts it in the clipboard. The the following sections of the file are moved up, to fill the space left by the cut. 11 12 Copy (Cc/çc) 13 This copies a selection to the clipboard, leaving the selection in place. 14 15 Paste (Cv/çv) 16 This will insert the contents of the clipboard to the cursor position, i.e., the beginning of the current selection. If there is no selection, the cursor will serve as the insert point, and be displayed as a thin line. If there is audio data after the insert position, this will be shifted to the right, to make room for the inserted data. Any data selected when the Paste command is executed be deleted, and replaced by the new material that is being inserted. 17 18 Gl Ix B C Owner’s Manual Version 1.0 – English - 267 The Sample Editor Clear (B) This deletes the selection without placing it in the clipboard. Audio data beyond the will be shifted to the left, to fill the space left by the deletion. Undo By pressing Cz (Mac) or çz (PC), the last destructive operation can be reversed. This can also be used to reverse the destructive editing commands that are described in the section Functions on page 269. The Undo command in the Sample editor is independent of Undo in other windows. This allows you to test edits made in the Sample editor in context with the entire arrangement. When you close the Sample editor, after making a destructive edit, a dialog box will ask you whether you want to keep the edit, or undo it. 13.5 Managing Files Backup Copies Before any destructive changes are made to the audio file in the Sample editor, Adat Edit will ask if a backup copy of the file should be made - if one doesn’t already exist. You may disable this dialog box in the File > Preferences > Audio window. Uncheck the box labeled Warning before process function in Sample Edit(Menu). This will cause the dialog to appear only after the first edit. The dialog box offers the following choices: Process The file is immediately processed, without a backup being made. The dialog box will not appear when calling up susequent functions. 268 Emagic Adat Edit Tip Functions Cancel 1 This cancels the function. 2 Preferences 3 Opens the Preferences window, where you may re-eanble the dialog box, in the Audio window.. 4 5 13.6 Functions 6 Following are the Sample editor functions, which can be used to polish your audio recordings. 7 Each command operates on the currently selected portion of the file. The Select All function should be used if yoiu want to process the entire audio file. 8 Warning 9 10 All the following operations are destructive, which means that they will change the file on the hard drive. The Undo command can only be used to reverse the very last destructive edit. Changing the selected area does not affect the operation of Undo. on the Macintosh, pressing the C: keys while a funtion is operating on the file, will cancel the function. The file will then remain unchanged. 11 12 13 Tip 15 16 Normalize The Normalize function brings a digital audio signal to the highest possible level without clipping . 14 X 17 18 The selected area of the file is analyzed, and the highest peak is located. The entire selection is then raised by an equal amount, Gl Ix B C Owner’s Manual Version 1.0 – English - 269 The Sample Editor so that the peak is just at 0db. This increases the overall level of the selection, without changing its dynamic range. 1 2 Example of the Normalization function. 1 Before. 2 After. It’s a good idea to set the start and end points of the area to be normalized so that they lie in an area of silence. Otherwise, audible, sudden jumps in level within the file may be evident.. Tip Change Gain In the menu bar, select Functions > Change Gain. This will raise or lower the level of the selection by a percentage. 270 Emagic Adat Edit X Functions 1 You set the percentage of gain change in the Change relative field. 2 You can analyze the file with the Search Maximum button.The peak level in the file will be located, and shown to the right of the button, as a percentage of the maximum possible level., 3 The results in absolute field shows the percentage of maximum level that would result from the Change relative value. 5 4 This function can be executed by clicking on Change (or the R key). 6 Fade In 8 To create a Fade-in, select Functions > Fade In from the local menu bar.This function creates a smooth fade-in, by setting the beginning of the selected area to a level of zero, and then increasing the level of the selection gradually, until the level reaches its original value at the end of the selection. The length of the fade is determined by the length of the selection. 7 X 9 10 11 12 13 14 1 2 15 16 Exampleof the Fade-In Function. 1 Before, 2 After. 17 18 Fade Out Select Functions > Fade-Out, in the local menu bar, to create a smooth fade-out from the beginning of the selection to the end. The level starts at its original value, and is gradually brought to X Gl Ix B C Owner’s Manual Version 1.0 – English - 271 The Sample Editor zero at the end of the selection. The length of the fade-out is determined by the length of the selection. 1 Example of the Fade-Out function. 2 1. Before, 2. After. Tips for Working with Fade 1: For fade-outs at the end of a song, it may be better to use Mixer automation to lower the faders on the audio objects.. The advantage is that this simple uses Midi (controller #7) to control the fader, and has no effct on the audio files themselves. Tip 2: When using the Silence function to eliminate noise between phrases in a recording, there will sometimes be audible jumps in level at the borders where silence was used. You can use the Fade functions to smooth these glitches out. You do thuis by selecting very short sections of the file, and fading them in or out as needed. Silence The Silence function completely mutes the selection, by setting its level to digital zero. This function is usually used to remove noise between phrases in a recording. 272 Emagic Adat Edit X Functions 1 1 2 2 3 4 5 Example of the Silence function. 6 1 Before, 2 After. 7 Invert The Invert function completely reverses the phase of the audio material in the selection. Negative amplitude values will become positive, and vice versa. This can sometimes solve phase errors that become a problem when stereo recordings are summed to mono. The result depends on the audio material. X 8 9 10 11 12 1 13 14 15 2 16 17 Example of the Invert function 18 1 Before, 2 After. Gl Ix B C Owner’s Manual Version 1.0 – English - 273 The Sample Editor Reverse The Reverse function swpas the beginning and end of the selection, creating the classic “backwards tape” effect. 1 X 2 Example of the Reverse function. 1 Before, 2 After. Trim The Trim function deletes all areas of the audio file that are not currently selected, removing them from the file. Please note, that unlike the other functions, the area affected is not the current selection, but rather, everything else. This function is useful for removing unneeded slince from the beginning and end of an audio file. 1 2 Example of the Trim function. 1 Before, 2 After. Be sure beforehand that areas to be deleted contain no regions that may be needed. Regions that lie completely outside the selection will be lost. If such regions are in use in the Arrange window, a dialog box will appear that offers the option to cancel the trim process. 274 Emagic Adat Edit X Functions Remove DC Offset 1 If the audio hardware used for recording is not properly grounded, or is of poor quality, the waveform may be offset from the amplitude axis. This is known as “DC offset”. 2 3 4 5 2 1 Wave with the DC voltage, 6 1., and after “DC offset” 7 8 2. 9 The Remove DC offset function removes the DC voltage from the recording, and centers the waveform properly on the amplitude axis. 10 11 Sample Rate Conversion 12 Adat Edit suports audio with a sample rate of 44.1Khz. If you wish to work with pre-recorded audio files that are at a different sample rate, then you must convert them to 44.1Khz, before they will play properly in Adat Edit. 13 14 15 Open the Sample Rate Converter 16 Normally, the entire audio file should be converted. To do this, select the entire audio file in the Sample Editor (Ca/ça). X Select Factory > Sample Rate Convert in the local menu bar.The function can then be executed using the Convert button. 17 18 Gl Ix B C Owner’s Manual Version 1.0 – English - 275 The Sample Editor Parameters Source (HZ) This is where the current sample rate will be displayed for the audio file. This value can be changed, to compensate for sample rate errors in the source file, or to create special effects, but normally you should leave this parameter alone. Destination (Hz) This is the sample rate that the file will be set to be the conversion process. This should be set to 44100. In the professional audio field, a 44.1kHz sample rate is used exclusively. It is the sample rate of all CDs, and thus, files recorded at this rate can be used with CD recorders. 13.7 The Digital Factory The top section of the Factory menu contains all the functions for altering audio data within a file. Time Machine The Time Machine allows you to radically alter the time structure of audio files, including time compression/expansion, and pitch transposition. Overview of the features of the Time Machine: • Time compression or expansion without transposition, • Pitch transposition with or without altering the length and tempo, • Any combination of these functions. • Consider the Time Machine to be a universal tool for the control of pitch and tempo of digital recordings. Each of these parameters can be addressed independently. The current settings are visually represented by the position of a 276 Emagic Adat Edit Tip The Digital Factory 1 ball in a 2-dimensional graphic where the axes are timeand pitch 2 3 Opening the Time Machine X To open the Time Machine, select Factory > Time & Pitch Machine. 4 5 6 7 8 Parameters 9 Most of the parameters are mutually dependent; you don’t need to enter them all to get a good result. We suggest that you don’t adjust a parameter, unless you know what the value should be. 10 11 12 On the left side under Original you can see the present value, and on the right under Destination enter the desired target value for the edit. 13 14 Tempo Change (%) 15 Tempo alteration in percent. (There is no original value here). 16 17 Tempo Tempo in bpm (beats per minute). Make sure you set the right length in bars, otherwise the correct original tempo will not appear here on the left! 18 Gl Length (Samples) Ix Length in samples. B C Owner’s Manual Version 1.0 – English - 277 The Sample Editor Length (SMPTE) Length in SMPTE time. Length (Bars) Length in bars. If you have already adjusted the song tempo to the region which you are about to edit, the original value will automatically be set correctly. Otherwise, you have to enter the original length manually here. Transpose (Cent) Transposition of the sound material in 1/100 semitone units (cents). Free Transposition Next to the transposition parameter you will see the description Free. This will probably be the most common setting when you use the Time Machine. It means that the program carries out "free" compression/expansion or transposition. In this situation, the pitch and tempo of the audio material to be edited are completely independent of one another. Classic (correlated) Transposition Here you can switch, via a flip menu from Free to Classic. The Classic mode is for situations where you want to transpose a selected region, and also affect its tempo. This produces an effect which you are probably familiar with, as it simulates the sound of changing the speed of a tape. In this case, the pitch, sonic character, and playback speed change together. On the left of the Time Machine’s dialog window, you can see a graphic representation of the current settings. You can grab the ball within the graphic, and freely move it to adjust the compression/expansion and pitch shift. The further the ball deviates from the center position, the harder the algorithm has to work, and the lower the expected sound quality will be. 278 Emagic Adat Edit The Digital Factory 1 Remember also, that the quality of the result depends greatly on the source material used. 2 Don’t let this keep you from experimenting. Feel free to try extreme settings for compression/expansion or transposition. In such cases, the result may not always be what you expect, but it might be just the “effect” you’re looking for. 3 4 5 Using the graphic display 6 You can move the ball in the 2 dimensional display with the mouse. The position of the ball directly effects the numerical values, and vice versa. 7 8 You can reset the ball and all numerical values to center (neutral) positions by double clicking in the graphic display. 9 10 The Technology of the Time Machine 11 The Time Machine analyzes the spectral components and dynamics of the digital audio material, and then processes the result. The high-grade algorithm endeavors to retain as much spectral and dynamic information as possible, and minimizes phase variations. In stereo files, the phase relation between the left and right channels is fixed and not altered. Doubled sound events are kept to a minimum. All this produces a high quality result, which despite the speed of the process is less grainy than what you’re probably used to hearing from other products. 12 13 14 15 16 However, you should bear in mind that apart from resampling (transposition) the Time Machine has to achieve the “physically impossible”: when a sample is lengthened information has to be “invented”. This should be as realistic as possible, and conversely when a sample is shortened information has to be cut out, which should be as unimportant to the overall character of the sound, as possible. Lengthening is more difficult than shortening, and if you have a choice it is better to speed up a drum loop that is too slow than vice versa. 17 18 Gl Ix B C Owner’s Manual Version 1.0 – English - 279 The Sample Editor There is always a small deviation between the set stretch or compression factor, and the actual result. This is because the algorithm needs a bit of freedom to optimize the spectral and dynamic integrity (the sound quality). The deviation from the set value is only a few milliseconds (or fractions of a bpm). This shouldn’t present a problem, since the absolute deviation is independent of the length of the processed section, meaning the deviation is no greater in longer files. Audio Energizer The purpose of the Audio Energizer function is to increase the perceived volume of the audio material, while altering the sound as little as possible and without causing clipping. Digital distortion (which would be the inevitable result of simply increasing the level, and which sounds very unpleasant) is avoided using this algorithm. You could compare the effect to that of an analog tape which is saturated by a high recording level. However, the distortion factor and effect on the audio material by the audio energizer is much lower. Here’s an example of the effect. If an already normalized audio file (audio data which is already at the maximum le dynamic range) is edited, the effect is as follows: a VU meter will show a higher level, indicating increased average energy in the signal. However, a peak display will show the same level as before, since the maximum signal level has not been exceeded. 280 Emagic Adat Edit Note The Digital Factory 1 Opening the Audio Energizer 2 3 4 X Select Factory > Audio Energizer in the Sample Editor. The function is executed by clicking the Energize button. 8 The main parameter is Factor. This is where you choose the amount of average level boost. 0% means no alteration, while higher values produce an increase in energy. The setting you make here will depend on the audio material, situation and personal taste. Begin by trying values in the 40-100% range. Values below 10% will hardly have any effect, values over 100% can lead to undesirable alterations in the sound, depending on the material. Values over 200% are not recommended with normalized files because they will have detrimental effects on the sound and dynamics. They can also greatly increase the required computation time. On non-normalized audio data even high values can be effective because initially the overall level is increased to the maximum without affecting the dynamic range. 9 10 11 12 13 14 15 16 The Attack and Release parameters affect the algorithm for controlling the steepness of the filter. You can try increasing these values to double or four times the default, if the result sounds too ›digital‹ or ›raw‹. This can happen if small elements previously hidden among the ›main events‹ in the original are boosted. For example, the reverb sometimes gets louder. Owner’s Manual Version 1.0 – English - 6 7 Parameters The perceived loudness of the overall audio material is increased. If the material contains anomalies such as noise, these will also be increased, and sometimes becomes audible. If necessary, you can edit the result using the noise reduction function (Silencer) on a low setting. 5 17 18 Gl Note Ix B C 281 The Sample Editor 282 Emagic Adat Edit Chapter 14 1 Synchronization, Video and Midi Files 2 3 4 5 This chapter begins by describing the ›synchronization‹ window. This is where all MicroLogic PCR’s synchronization settings are made. 6 The remaining sections deal with other functions in the realm of synchronization , synchronizing a digitized film stored as a file , the basics of synchronization in general, and finally possible problems and their solutions. 8 7 9 10 11 14.1 Synchronization Window You can open this window from the Arrange window via Options > Tempo and Synchronisation > Synchronisation… or via a long click on the Sync button in the Transport window. X 12 13 14 At the top edge you can switch pages: General, Audio, MIDI. 15 General 16 This page of the synchronization window contains the major synchronization parameters for running MicroLogic PCR as a slave. 17 Sync Mode Gl This parameter defines the master to which MicroLogic PCR is to be synchronized: Ix 18 B C Owner’s Manual Version 1.0 – English - 283 Synchronization, Video and Midi Files Internal MicroLogic PCR’s internal timer. MicroLogic PCR is the master. External devices can be synchronized via Midi Clock or MTC (the relevant settings are made on the ›MIDI‹ page). MTC ›Midi Time Code‹. MicroLogic PCR runs as a slave. The Midi Time Code can either arrive at a Midi In port, or be generated by a Midi interface from ›translated‹ incoming SMPTE code. Midi Clock Midi Clock and Song Position Pointer. MicroLogic PCR runs as a slave. Clock and SPP can be received at any Midi input. External Stop ends Record Mode This option means that during external synchronization, recording stops whenever the time code ceases. 284 Emagic Adat Edit Synchronization Window 1 If the option is switched off, MicroLogic PCR stops, but remains in record mode (Record + Pause). 2 Frame Rate 3 This is where you set the frame rate (in ›fps‹, frames per second). This frame rate applies to both transmitted and received timecode. 4 5 Frame rate Typical applications 24 Film 6 25 Audio (Europe) and PAL Video 7 (30 d) 30 29,97 d 29,97 Unusable (not real-time) 8 Audio (USA) and NTSC Video (s/w) 9 Audio (USA) and NTSC Video (color) Extremely rare (not real-time) 10 ›d‹ stands for ›drop frame‹. In ›drop frame‹ formats, certain frames are left out according to a regular pattern. To distinguish between them, formats without drop frame are sometimes referred to as ›nd‹ or ›non drop‹. 11 12 Auto Detect Format of MTC 13 With this option the incoming timecode is analyzed and the correct frame rate is set automatically. In general you should leave this option switched on. 14 Please note that it is not possible to automatically distinguish between MTC frame rates 29.97 and 30, because; 16 1. the MTC standard does not allow a distinction, and 17 2. a measured rate of 30 fps could also be 29.97 fps timecode running too fast, and vice versa. 18 15 Gl MicroLogic PCR automatically interprets frame rates with ›approx. 30 fps‹ as either 29.97 df or 30 nd, depending on whether or not the drop frame format is used. This interpretation will usually be correct, because only these two formats are actually used as a standard. Ix B C Owner’s Manual Version 1.0 – English - 285 Synchronization, Video and Midi Files ›Auto Detect…‹ only switches to 29.97 df or 30 nd if, previously one of the other conventional formats was set. If you want to synchronize MicroLogic PCR to one of the unconventional frame rates, you have to define the format manually. This setting will not be altered by ›Auto Detect…‹. SMPTE Offset This is where you set the SMPTE offset for the song. Because songs do not always have to start precisely at bar 1 you can select any bar position to be played at the set SMPTE time. The preset is 1/1/1/1 at 1:00:00:00. The SMPTE offset 1:00:00:00 is normally used, because it allows you to pre-run some timecode. Audio This page of the synchronization dialog window contains all the relevant parameters for synchronizing Audio and Midi. 286 Emagic Adat Edit Note Synchronization Window Nominal Sample Rate 1 This is where the selected nominal sample rate is shown. The Alesis PCR card supports sample rates of 44100 and 48000 Hz. 2 3 4 Sync Mode 5 This is where you define how the PCR card should be synchronised to an external timecode master. 6 MTC Trigger 7 8 Audio regions are started in sync, but are then played with a constant sample rate, regardless of any variations in the timecode master. MicroLogic PCR Audio always uses the set nominal sample rate (44.1 or 48 kHz). 9 10 If the speed of the timecode master deviates from the nominal value, you have to split long regions into shorter sections. 11 12 External/Free MicroLogic PCR has no influence on the sample rate. The PCR card has to ensure that the position and sample rate of the audio regions match. 13 14 15 Digital Similar to ›External/Free‹, but in addition, the hardware is set up to synchronize to the sample rate of the incoming digital signal. 16 MIDI. 18 This page is where you monitor all the settings sent by MicroLogic PCR via Midi when the sequencer is running. This enables you to synchronize an ADAT or digital mixer as a slave to MicroLogic PCR, which acts as the master. Gl 17 Ix B C Owner’s Manual Version 1.0 – English - 287 Synchronization, Video and Midi Files Please note that the ADAT has no built-in MIDI capability. For MMC and MTC support, you will need extra hardware, such as an Alesis BRC, or a JL Cooper DataMasterTransmit MIDI Clock The switch on the right activates transmission of Midi Clock. Every time you start, ›Song Position Pointer‹ (SPP) is also sent. Because not all devices can process SPP the real-time message ›Continue‹ is also sent. The exception to this is when you start at position 1/1/1/1. In this case, the real-time message ›Start‹ is sent, instead of ›Continue‹. Allow Song Position Pointer while playing According to the Midi Standard, Song Position Pointer is normally only sent when you start. This option means that SPP can also be sent while the sequencer is running. The advantage is that external devices can also follow MicroLogic PCR in Cycle mode. 288 Emagic Adat Edit Special Functions 1 If the external devices cannot process SPP, you should switch off this option. This improves the timing when cycling. 2 3 Send MMC (MIDI Machine Control) 4 This is where you can switch on transmission of Midi Machine Control. These commands are then always sent whenever you operate MicroLogic PCR’s transport functions (Start, Stop, Rewind, etc.). 5 7 6 MMC is normally used when MicroLogic PCR is running as a slave to an external master (e.g. ADAT), where you want to control the ADAT’s transport functions from within MicroLogic PCR. MicroLogic PCR therefore acts as MMC master, and MTC slave simultaneously. If you want to use the ADAT’s transport functions you don’t need MMC. In this case MicroLogic PCR as the slave, will follow the MTC master. You can also use MMC to put tracks from the MMC slave device into record-enabled status. 8 9 Note 10 11 12 14.2 Special Functions 13 14 Switching on external sync 15 Switching on the sync button on the Transport causes MicroLogic PCR to synchronize to the sync source you’ve chosen. 16 17 You can use the Sync button to turn off the external sync at any time, without changing your selected sync source. This allows you to remove MicroLogic PCR temporarily from the sync master’s time axis. This could prove useful if, for example, you need to quickly edit a sequence while the external sync source (ADAT) is still running. 18 Gl Ix B C Owner’s Manual Version 1.0 – English - 289 Synchronization, Video and Midi Files Recording with external synchronization When ›Record‹ is pressed during external sync, MicroLogic PCR goes into Midi Record mode, but does not start until it encounters external time code. Incoming Midi Time Code Display The flashing dot on the transport window’s sync button indicates that MicroLogic PCR is receiving error-free Midi time code. If the dot ›sticks‹, an error has occurred. Although MicroLogic PCR is capable of dealing with many MTC errors itself, you should nevertheless check the quality of your SMPTE signal, as well as other potential sources of error. MTC Interpretation Because the Midi standard only supports four of the possible six time code formats (the 30 fps and 29.97 fps formats cannot be differentiated), MicroLogic PCR has to decide which format is ›intended‹, when it encounters incoming time code: incoming MTC format is interpreted as 24 fps 24 fps 25 fps 25 fps 30 drop fps 29,97 drop fps 30 fps 30 fps In other words, the much more commonly used 29.97 fps and 30 drop fps formats are used in preference to the uncommon 30 fps and the virtually—unheard—of 29.97 drop fps formats. 290 Emagic Adat Edit Special Functions 1 However, you can manually set the format from the Tempo List editor to whatever you like: for example to convert material to 30 fps for black and white TV transmission in the NTSC format. 2 3 4 Receiving Midi Clock/SPP 5 Sync via Midi Clock/SPP is the most accurate method, if MicroLogic PCR is being synchronized to a bar-referenced master. 6 Midi Clock has a resolution of 24 PPQN (pulses per quarter note), while MicroLogic PCR has an internal resolution of 960 PPQN (some 40 times more accurate!). For this reason, MicroLogic PCR has to interpolate the 39 steps between two incoming clock impulses itself. 7 8 Tip If you are bothered by small variations in timing between master and slave, you can improve the relationship when in external sync, by entering the expected tempo changes from the master into Logic’s internal tempo list as well. 9 10 11 Even if you don’t take this step, the sync should hold up fairly well, as long as you avoid large deviations, such as an internal setting of 200 bpm , with an external tempo of 40 bpm. 12 13 Continue Event 14 When a Midi Continue Event is received, MicroLogic PCR doesn’t leap to the last valid position received via Midi Clock. Instead, playback recommences from the current song position. This allows you to change the song position manually while the sequencer is halted, and restart from the new position, with a Midi Continue command. 15 16 17 18 Midi Machine Control (MMC) Gl MMC is a set of Midi commands, which MicroLogic PCR uses to control the transport functions of any MMC-capable tape machine. The recording process can also be controlled and automated from MicroLogic PCR via MMC. This tape machine, then provides the SMPTE signal to which MicroLogic PCR sync’s as a slave. Owner’s Manual Version 1.0 – English - Ix B C 291 Synchronization, Video and Midi Files You can control connected devices from MicroLogic PCR via the normal ›transport‹ functions (including direct positioning and cycle jumps). Don’t forget that MicroLogic PCR has to wait for the connected device to finish rewinding or forwarding. Switching on MMC Activate Midi Machine Control from the sync button’s pulldown menu. You can also temporarily switch the function off from here to allow you to carry out any necessary quick edits. This option can also be accessed by selecting File > Song Settings > Midi Options. 14.3 The Basics Summary If you want to synchronize MicroLogic PCR to a second sequencer system (workstation, drum machine) please use Midi Clock/SPP. For all other situations where you use external synchronization (tape machine, stand-alone hard disk recorder, video recorder) use MTC. To synchronize MicroLogic PCR to a SMPTE signal you need a ›synchronizer‹, which converts SMPTE into MTC. This can be done by nearly all interfaces with multiple Midi ports. Timecode and Clock synchronization synchronization involves ensuring that several devices run absolutely in time with each other. This doesn’t just mean that the devices start at the same point, and run at the same speed. To set exactly the same speed would require infinite precision (even with digital devices). Instead, synchronization means that while the devices are running, every point along the time axis of all the devices must be linked. 292 Emagic Adat Edit The Basics 1 This requires that the devices to be constantly ›connected‹ to each other. This is only possible if one of the devices acts as the ›master‹, defining the current position, while the all other devices act as ›slaves‹ and constantly try to follow this position as closely as possible. 2 3 4 There are two different ways of doing this, depending on the type of devices being used: 5 1. With devices like sequencers or drum machines, the positional information shared is expressed in bar positions — in other words, they use ›bar-referenced synchronization‹. 6 2. Devices like tape machines or hard disk recorders usually use ›time-referenced synchronization‹— the positional information shared by these devices is time information, in the form of so-called time code. Devices that use time-referenced sync include tape machines for video signals, like VTRs (video tape recorders) and VCRs (video cassette recorders). With time-referenced sync, the tape speed or sampling rate is not dependent on the musical tempo of the recorded song. 8 10 13 7 9 11 12 Bar-referenced synchronization is only appropriate if you are using devices from the first category. As far as devices from the second category are concerned, time-referenced sync really ought to be used. A single tape machine could theoretically control several devices from the first category, by playing recorded bar-referenced time code. However, for various reasons, most professionals would work using time-referenced code. For one thing, this is the only way to sync additional machines up to the tape later. 14 15 16 A sequencer synchronized to tape has to calculate the bar position from the time position, using its tempo track. 17 18 Bar-Referenced synchronization Gl First, a quick trip down memory lane... Ix Pulse Clock and FSK (historical) B The original method of synchronizing analog sequencers, or drum machines to each other was by transferring electrical impulses (clock signals) at specific intervals. The norm was 24 ppqn (pulses per quarter note), which is equiva- Owner’s Manual Version 1.0 – English - C 293 Synchronization, Video and Midi Files lent to a resolution of 1/96 note. However, some companies used 48 (Korg, Linn), 64 (PPG), 96 (Oberheim) or 384 ppqn (Fairlight). By way of comparison, MicroLogic PCR has a resolution of 960 ppqn). By encoding these impulses as the ›shift between two pitches‹ (FSK code, frequency shift keying), it was possible to record this kind of code onto tape. It was mainly used to synchronize drum machines to tape machines. There were plenty of disadvantages to it, however • FSK code laid down a fixed tempo. • It was impossible to program intros/outros later. Both Pulse Clock and FSK had two further disadvantages: • If any impulses were lost through signal dropouts, the synchronized devices would run constantly out of sync from that point onwards. • Because there was no position indicator, you always had to start the song from the beginning (FSK 2 or Smart FSK overcame this by encoding the song position as well). These disadvantages eventually killed off clock and FSK, neither is now used professionally. Midi Clock / SPP With the advent of the Midi Standard, an equivalent to clock impulses was incorporated into the command protocol: Midi Clock. Midi Clock events are transmitted by the master 24 times per quarter note. To avoid having to start songs from the beginning every time, a further Midi command is also transferred: song position pointer. This transmits 1/16 notes from the beginning of the song. Because two data bytes are available for encoding (14 bit), it is possible to distinguish a maximum of 16384 different 1/16 notes or 1024 bars. The slave recognizes the current song position within this region, and synchronizes to it. Modern devices always use a combination of Midi Clock and song position pointer. If a sequencing program has a higher timing resolution than 1/ 96 note, the positions between must be interpolated. The resolution of MicroLogic PCR is 1/3840 notes. 294 Emagic Adat Edit The Basics Time-Referenced synchronization 1 Time-referenced synchronization originates from the field of film synchronization, but nowadays it is also used for audio work. This is why it divides a second not into tenths and hundredths, but into frames. One frame was originally the time it took for a single frame of film (i.e. one image) to pass through a film camera, or projector. 2 3 4 5 Unfortunately, the number of frames used per second varies according to country, norm and usage. For film, the international norm is 24 frames per second (fps). American black and white television uses 30 fps. With the introduction of color television, the frame rate of the NTSC norm, used in America and Canada had to be reduced to 29.97 fps for technical reasons. In Europe, a lower frame rate of 25 fps was used from the start, and with the introduction of color television this was adopted by the European PAL TV standard, as used in Europe today. 10 11 6 7 8 9 The original reason for the differing film rates, incidentally, derives from the different rates of alternating current used on the different continents (USA: 60Hz, Europe: 50 Hz), which corresponds to the number of half-frames of film passing through a camera/projector per second. 12 13 SMPTE/EBU 14 It was the American Society of Motion Picture and Television Engineers (SMPTE) which first laid down a norm for encoding the individual frames. This designates exactly 80 bits per frame for encoding the hour (0-23), minute, second, and frame (frame number within the second). Some of the surplus bits are used to indicate the frame rate, i.e. the number of frames per second. This encoded data stream of 80 bits per frame is known as SMPTE time code. Because the individual bits themselves have a definite time spacing, they are also used as a further subdivision of a frame, called a ›subframe‹. 15 16 17 18 Gl Ix This code was adopted without alteration by the European Broadcasting Union (EBU), for use with the European frame rates, and renamed ›EBU Time Code‹. In practice this time B C Owner’s Manual Version 1.0 – English - 295 Synchronization, Video and Midi Files code is usually referred to as SMPTE time code, or just SMPTE (pronounced: ›simptee‹). Drop Frame (df) One technical problem was the frame rate of 29.97 fps. Only whole frames can be counted, but counting up to the 30th frame in every second would cause a deviation between the time code time, and the actual time (a difference of about 5.4 seconds for a typical feature film). So, the following trick was employed: in every minute 2 frames are left out (›dropped‹), except in minutes that can be divided by 10. This may sound complicated, but is actually simpler than ›one leap-year every 4 years except in years divisible by 100, apart from those also divisible by 400‹! To describe this method, ›drop‹ or ›df‹ is added after the frame rate. Because it is used so often with 30 fps, it is more common to indicate non-usage by adding ›non drop‹, ›nd‹ or ›ndf‹ to avoid confusion. The 29.97 nd format is seldom used (just like the pointless 30 df), because the timecode time ›drifts‹ from ›real‹ time. Frame Rates The SMPTE frame rate must be set the same for all connected devices; you can’t have different frame rates in one system. The diagram below shows the various frame rates with the respective duration of a frame, or subframe: Frame Rate [fps] Frame [ms] Bit [+s] Source 24 41,67 520,8 Film 25 40 500 PAL 29,97 drop 33,37 417,1 - 29,97 33,37 417,1 NTSC color 30 drop 33,33 416,7 - 30 33,33 416,7 NTSC S/W 296 Emagic Adat Edit Note The Basics 1 In Europe 25 fps is used both in the audio field and for synchronizing television or video productions. 2 American audio productions use mainly 30 fps, but with video the frame rate is nearly always 29.97 df. 3 International audio productions are recorded with 25 fps, and 30 fps on different tracks. 4 LTC / VITC 6 5 The 80 bits per frame of the SMPTE time code can be stored in two different forms: 7 • As a sound signal on a sound track. This is called longitudinal time code (LTC). 8 9 • As a signal in the scanning gap of the video picture. (The complete picture information is transferred slightly quicker than the duration of a frame. There is a short gap, while the electronic beam of the cathode ray tube travels from the end of the bottom line, back to the beginning of the top line. Because the beam is temporarily switched off, time code transferred during this gap does not interfere with the picture.) This is called vertical interval time code (VITC). 10 11 12 13 LTC is used for all audio productions, and often for video synchronization as well. Tape duplication plants can record LTC onto one of the audio tracks, usually track 2. The SMPTE time can also be written onto the picture. Because of the almost universal use of LTC for audio work, the term ›SMPTE‹ is used synonymously with it. 14 With video synchronization LTC can only be output during playback at normal speed. VITC (pronounced ›vitzi‹) has the advantage that it can be output while fast-forwarding, or rewinding. This is very useful when creating frame-synchronized sound effects, or musical phrases. 18 15 16 17 Gl Ix B Emagic’s networkable 8x8 Midi interface ›Unitor8‹ has a synchronizer that can read and write both LTC and VITC. C Owner’s Manual Version 1.0 – English - 297 Synchronization, Video and Midi Files Midi Time Code (MTC) MTC is a ›translation‹ of the SMPTE bits into the Midi Standard, and contains the time and frame rate information. This requires one status byte and eight data bytes. MTC defines only 24, 25, 30 df and 30 ndf. Synchronizers A professional synchronizer is a device which can write and read SMPTE signals. It is connected to a master, and one or more slave tape machines, and can also control their transport functions. In computer Midi interfaces, built-in synchronizers generally have just a SMPTE input and output. SMPTE signals arriving at the input are automatically passed on to the computer by the interface, in the form of MTC. Which device should be the Master, and which the Slave? As a general rule, the slowest machine should be used as the master, to reduce waiting times for the slaves when rewinding or forwarding. Since a sequencer naturally ›winds‹ much faster than even the quickest tape machine, it always acts as the slave. synchronization Procedure The following steps apply to external equipment, rather than MicroLogic PCR. Recording SMPTE If you want to synchronize a computer-based sequencer to a tape machine, the first thing to do is record a SMPTE signal onto one of the outside tracks (the outside tracks on analog tape machines are of a marginally lower quality, because of the (very slight) ›fluttering‹ of the tape, but they are perfectly adequate for time code). Connect the SMPTE out of the interface with the input of the tape machine (or the input of the mixing desk, if you want to route the time code, and set a level). It is custom- 298 Emagic Adat Edit The Basics 1 ary to use the track with the highest number. Set the level of the time code to -10 VU. Avoid recording stationary time code by starting the time code generator before the recording. For several reasons — for example to avoid drop-outs which can lead to gaps or jumps in the time code, and to give you the option of extending a song later,— it is a good idea to record the time code throughout the whole tape (this is known as ›striping‹ the tape). It is also customary to set a SMPTE code start time of just under one hour (01:00:00:00). The first song on a tape then always begins at exactly one hour. Other tapes of the same project can be given SMPTE times with consecutive hours, which means the SMPTE time can be used to clearly identify a tape, if the tape boxes get mixed up. 2 3 4 5 6 7 8 9 Synchronizing Sequencers to Tape Connect the output of the time code track to the SMPTE input of the computer. To minimize crosstalk, it is better to make a direct connection rather than routing the signal via the mixing desk. The computer does not have to begin bar 1 at a SMPTE time of 0 hours, 0 minutes, 0 seconds and 0 frames (00:00:00:00), you can set an ›offset‹, to make the sequencer wait for the correct SMPTE position, before it starts the song. If the second song on tape begins at (say) 01:04:50:00, you need to set the SMPTE offset to match. Make a note of the SMPTE offset on the track sheet for the song, or next to the song title on the tape box. 10 11 12 13 14 15 16 The bar position which is reached at a specific SMPTE time position depends on the tempo of the sequencer. If you have begun to record onto tape, you won’t be able to alter the tempo without disrupting the synchronization. You should, therefore, also make a note of the precise tempo on the track sheet. 17 18 Gl The SMPTE offset and tempo settings are saved with the song, but it is not unheard of for the song file and the tape to be separated. Ix B C Owner’s Manual Version 1.0 – English - 299 Synchronization, Video and Midi Files Synchronizing Several Sequencers If you want to synchronize several sequencer programs with a tape machine acting as the master, you should try at all costs to synchronize just one sequencer via SMPTE or MTC. You can then synchronize the other sequencers to this one, via Midi Clock/SPP. When synchronizing several sequencers (with no tape machine) you should only use Midi clock/SPP. This avoids deviations in the bar position, since otherwise, each sequencer has to calculate this independently, from the time information using its own tempo track. Click Track It is common practice to record a click track, i.e. a metronome sound, to run throughout any song at the correct tempo, in addition to the time code. This is partly due to possible deviations in the positional calculation of different sequencers from the recorded SMPTE code. It also allows overdubs in studios without Midi equipment, although nowadays, such studios are few and far between. When recording a click track or other signal onto the track next to the SMPTE code, it is better to set a fairly low record level. Crosstalk from a high-level signal onto the SMPTE track can corrupt the SMPTE track, and interfere with smooth synchronization. Audio synchronization The most common problem with external synchronization and digital audio is the problem of having two clock sources: the timecode master, and audio wordclock. In every system with several time references, there is room for drift. In the analog world this well-known problem is held in check because the tape speed is constantly monitored to minimize deviation between the slave machine timecode and the master timecode. 300 Emagic Adat Edit The Basics 1 There is no equivelent to altering the speed of the "tape" with the PCR card, so other strtegies must be used to compensate for variations in incoming MTC. 2 3 If you have Sync Problems 4 … you may find some useful advice here … 5 Faulty Digital synchronization 6 If MicroLogic PCR is synchronized to an external wordclock (Audio Sync Mode: External /free), you must ensure that a valid digital signal is always available. If you are getting error messages like ›Sample Rate 13,x kHz recognized‹ it may be that the ADAT recorder (or whatever clock source you have connected to your PCR’s lightpipe input) has been switched off. make sure that it is always on, when you are in this audio sync mode. 7 8 9 10 11 Faulty synchronization to an ADAT 12 Create a new song, make a new recording and see if that does the trick. Why? If an old recording on tape was not properly synchronized to timecode you will not be able to use it. One basic rule: the playback situation must be identical to the recording situation. 13 14 15 If everything is working fine with the new recording, this means the present setup is o.k. Next, check whether anything has changed in your global setup. Has the frame rate changed? Has the ADAT sample rate changed? If you have changed a 30 fps setting, try variations such as 30 drop or 29.97. 16 17 18 If Midi and Audio are not synchronized Gl Try cutting extremely long regions into shorter sections. Ix B C Owner’s Manual Version 1.0 – English - 301 Synchronization, Video and Midi Files If Midi and SMPTE are not synchronized Check all the frame rate settings. The frame rate of all connected devices must be identical, including the timecode on the ADAT, the synchronizer, and in MicroLogic PCR itself. Some synchronizers encode the wrong frame rate in MTC. In this case open the Tempo Editor, switch off the Detect option, and set the correct frame rate manually. Note for America: try out the different kinds of 30 fps (30 drop, 29.97 fps). In Europe, a frame rate of 25 fps is almost always used. 14.4 Midi Files Adat Edit can save songs or parts thereof, in standard Midi file format (SMF). Songs in this format can be loaded and played by almost all current sequencers, and by the Windows accessory “Media Player.” Preparing a Song for Midi File Conversion This section describes the steps for converting Adat Edit sequences into the Midi file format, using the Tutorial Song as an example. The Midi File format does not recognize Adat Edit sequences or playback parameters, but only continuous tracks. In order to be able to save the Tutorial Song as a Midi file you must: • neutralize all playback parameters through normalization, • convert loops into data using “Turn Loops to Real Copies”, • write the quantization to the Midi events, using “Fix Quantize”, 302 Emagic Adat Edit Midi Files • 1 merge the sequences on each track into one continuous sequence,using the Glue tool. 2 When you have prepared the Tutorial Song for Midi file conversion, it will look something like this: 3 4 5 6 7 8 9 10 Saving the Song as a Midi File 11 To save a song as a Midi file, go to the local menu of Arrange window; and select Edit > Select All. Next, select File > Export Selection as a Midi File.... 12 13 Saving Individual Sequences as a Midi File 14 You can save individual sequence, or any groups of sequences as Midi files, by selecting only the sequence(s) you wish to include before executing the “Export Selection...” command. 15 16 Saving Songs as SMF Format 0 17 Standard Midi Files may be saved in either of two formats, Format 0, or format 1. The typical Format is 1, where the file contains multiple tracks. Format 0 files store all data on one track. 18 Gl Ix It is necessary to save songs in Format 0, if you want to create songs for equipment that does not support Format 1. B Adat Edit creates Format 1 files by default, unless you make the following setting: Owner’s Manual Version 1.0 – English - C 303 Synchronization, Video and Midi Files 1. In the main menu bar, select File > Preferences > Midi/ Global. 2. As shown, enable ' Export Midi File...' saves single sequences as Format 0. Adat Edit can only create a Format 0 Midi file from individual sequences. If you want to create a Format 0 file from multi track songs, you must first merge the sequences into one sequence, with the Glue tool. Importing Midi Files With Adat Edit, you can load Midi files, play them, edit them, print them out as a score, save them again as a Midi file, or save them as an Adat Edit song. To load a Midi file, select File > Open, and specify Midi files in the Files of Type window at the lower left area of the file selection box. Midi files are now displayed. Select one. It is then imported, and shown in the Arrange window. If you load a Format 0 file, you can create multiple tracks for the individual Midi channels with the Track > Demix by Event Channel command. 14.5 Transfer Songs onto other Devices or Computers Windows, Macintosh and Atari computers can read DOSformatted floppy disks. This also applies to some Midi workstations. You must bear the following in mind: 304 Emagic Adat Edit Tip Transfer Songs onto other Devices or Computers • • 1 Many Atari computers and Midi workstations do not accept high-density floppy disks; they only accept double-density floppy disks, with 720 KB storage capacity. Format the floppy disk on your Windows PC. 2 3 Macintosh computers with older operating systems can only read DOS floppy disks with the aid of additional software.Either use the system extension that comes with System 7.5 or higher, “PC Exchange”, which is available separately for older systems – or a utility such as “DosMounter”, or “AccessPC”. 4 5 6 7 8 9 10 11 12 13 14 15 16 17 18 Gl Ix B C Owner’s Manual Version 1.0 – English - 305 Synchronization, Video and Midi Files 306 Emagic Adat Edit Chapter 15 1 Reference: Key Commands and Use of Mouse 2 3 4 5 6 7 15.1 Keyboard Command Symbols Explanation Windows 8 9 10 Macintosh Control ç ç Command key – C 11 Alternate/Option key A O 12 Shift S S Cursor keys IMJK IMJK 13 Return (on the alphanumeric keyboard) R R Enter (on the numeric keypad) ‰ E Spacebar V V 16 Escape ™ ™ 17 Backspace/deletes to the left D D Delete/deletes to the right ∂ L Tab T T Gl Insert ⁄ – Ix Pos1 (beginning of line) Û – End (end of line) ˙ – B Page up U U C Owner’s Manual Version 1.0 – English - 14 15 18 307 Reference: Key Commands and Use of Mouse Explanation Windows Macintosh Page down N N Num Lock › › Pause ∏ – Function keys @–˚ @–Ì Keys on the numeric keypad ≠*_‰, ≠*_E, =–) =–) Normal keys 0 – 9, a – z, 0 – 9, a – z, ,.–+# etc. ,.–+# etc. 15.2 Key Commands The preset key commands are listed in the following table. You can program your own key commands in the Key Commands window for all Adat Edit functions except for certain “fixed, global” commands (see the section Key Commands on page 85). Num Lock must be on for the key commands to work correctly. (nk) refers to a key on the numeric keypad. Windows Explanation M1 M2 Fixed, global Commands Close window A Macintosh Key M1 M2 Key £ Symbol fi Normal screen Å – Whole screen \ – Previous window ˜ Next window · Main window ¯ Menu selection in the main window ¯ 308 Emagic Adat Edit Important! Key Commands Windows Explanation M1 M2 Key Transport toggle Í Last active window ˚ Undo ç 1 Macintosh z M1 M2 2 Key – C 3 4 z 5 Global Commands Record Record Repeat S * (nk) * (nk) S * (nk) * (nk) 6 Record Toggle V V 7 Play Pause = (nk) , (nk) = (nk) , (nk) 8 Stop Input (nk) Input (nk) 9 Fast Forward § (nk) C K Rewind ! (nk) C J Fast Fast Forward & (nk) S C K 11 Fast Rewind $ (nk) S C J 12 Scrub Fast Forward ) (nk) O K Scrub Rewind / (nk) 13 O J Set Locators by Objects S o Set rounded Locators by Objects S r 10 14 15 16 Set rounded Locators & Play 17 Cycle Drop ç Solo ç Send Reset Controllers (Panic) O c d O d S s O s Ix S c Help B 18 Gl C Owner’s Manual Version 1.0 – English - 309 Reference: Key Commands and Use of Mouse Windows Explanation M1 M2 Macintosh Key M1 M2 Key Send discrete Note Offs (Full Panic) S Help Send Maximum Volume O v Recording Options O t Various Windows Show tools ™ Zoom Horizontal Out N ctrl J Zoom Horizontal In U ctrl K ™ Zoom Vertical Out ç N ctrl I Zoom Vertical In ç U ctrl M + O h O a O w Midi Out Toggle O o Mute Sequences O m Hide/Show Parameters Catch Clock Position Link Window ç l Page Up ª Page Down ... Page Left C ª Page Right C ... Top Page U Bottom Page ... Page Left-most C U Page Right-most C ... Arrange and Various Sequence Editors Cut ç x C 310 Emagic Adat Edit x Key Commands Windows Explanation M1 Copy Paste M2 1 Macintosh Key M1 M2 ç c C c ç v C v D, ∂ Clear 2 Key 3 D, ∂ 4 5 Select All C a Undo selection C a Toggle Selection ctrl t 6 Select All Following ctrl f 7 Select inside Locators ctrl i 8 9 Arrange Window Select Previous Track I I Select Next Track M M Select Previous Object J J Select Next Object K K 10 11 12 Normalize S n 13 Fix Quantize S q 14 Toggle Loop S l Turn Loops to Real Copies S ctrl c Erase Duplicated Events S ctrl x O p Insert program change 15 16 17 18 Gl Score Window Page Layout ctrl p Ix Next Event K Previous Event J B Next Staff I C Owner’s Manual Version 1.0 – English - 311 Reference: Key Commands and Use of Mouse Windows Explanation M1 M2 Macintosh Key M1 M2 Previous Staff Key M Stems: default ctrl s Stems: up ctrl u Stems: down ctrl d Beam Selected Notes ctrl b Unbeam Selected Notes ctrl v ctrl b ctrl a Default Beams S Default Accidentals Enharmonic Shift: # S # Enharmonic Shift: b S b Event Window Scroll to Previous Event I I Scroll to Next Event M M 312 Emagic Adat Edit Using the Mouse 1 15.3 Using the Mouse 2 The described mouse operations apply to all Adat Edit windows, with the exception to the Transport window. 3 Windows Macintosh Explanation Mouse Mouse Rubber band: Selects objects within the rubber band Click outside of Click outside of an object + drag an object + drag Selects scattered objects S-click S click 6 Moves selected objects Drag Drag 7 Copies selected objects ç drag O drag The menu remains open until Right click on a you select a menu item. menu 4 5 8 Double-click on a menu 9 Opens the Score editor for the Left button dou- Double-click on a sequence. ble-click on a sequence sequence (depending on setting in Preferences) Opens the Event List for the sequence. Opens the Matrix editor for this sequence. tools Right button double-click to the right on a sequence 10 11 12 Double-click on a sequence (depending on setting in Preferences) 13 14 Double-click on a click on a sequen- sequence cet (depending on setting in Preferences) 15 ™ and mouse 18 ç left double- 16 17 ™ and mouse Gl Ix B C Owner’s Manual Version 1.0 – English - 313 Reference: Key Commands and Use of Mouse 314 Emagic Adat Edit Chapter 16 1 Menu Reference 2 3 4 16.1 Main Menu Bar 5 6 -Menu About Adat Edit Opens the information box containing information on the program version and authors. 7 8 9 File Menu New Creates a new, blank song and opens an Arrange window. 10 Open Opens a song from the hard disk, or floppy disk. 11 Close Closes current song, after prompting to save. 12 13 Revert to Saved 14 Replaces the loaded song with the last saved version. 15 Save Saves the song to the hard disk or floppy disk. 16 Save As Saves the song with another name, and/or to another location. 17 Import Loads a standard Midi file. 18 Gl Export Selection as a Midi File Saves the song in standard Midi file format (Windows extension: *.MID). Preferences Ix B Opens the Preferences window. Owner’s Manual Version 1.0 – English - C 315 Menu Reference Song Settings Opens the Song Settings window. Edit Menu (Mac Only) Undo Reverses the last command. Cut Removes the selection from the active window, and places it in the Clipboard Copy Copies the selection to the Clipboard. Paste Places the contents of the Clipboard at the insertion point. Clear Deletes the selection from the active window. Select All Selects all objects in the active window. Windows Menu Previous Window Opens the previous window. Next Window Opens the next window. Last window Opens the last window. Toggle Transport Opens and closes the transport window. Open Arrange Opens the Arrange window of the active song. Open Event List Opens the Event Editor for the selected object. Open Score Opens the Score Editor for the selected object. Open Matrix Edit Opens the Matrix Editor. Open Transport Opens the floating Transport window. 316 Emagic Adat Edit Main Menu Bar Open Key Commands Opens the window to define key commands. Open Mixer Opens the Track Mixer. Next Window Brings the next window into the foreground. 1 2 3 4 Set Window Size Sets the maximum size of the active windows to fit the screen. 5 Close Window Closes active window. 6 Tile Windows Vertically Arranges opened windows side by side. 7 8 Tile Windows Horizontally Stacks opened windows. 9 Video (Windows Only) 10 Open Video 11 Opens a video. Close Video & Save Settings Closes the video, storing information about window position. 12 Help Menu 14 Explanations On Explanations can be displayed for most of the objects on the screen. Help Contents Opens the table of contents for online help. Search Help Searches for subjects or terms in the online help. About Adat Edit 13 15 16 17 18 Opens the information box containing information on the program version and authors. Gl Ix B C Owner’s Manual Version 1.0 – English - 317 Menu Reference 16.2 Edit (All Windows) Undo Reverses the last command. Cut Removes selection and places it on the Clipboard so that it can be inserted elsewhere. Copy Copies selections to the Clipboard. Paste Inserts selection from the Clipboard. Clear deletes. Select All Selects all objects in a window. Select All Following Selects all objects past the current Song Position. Select Inside Locators Selects all objects that are completely or partially within the cycle locators. Toggle Selection Reverses the selection (deselects selected objects and vice versa). 16.3 Menus in the Arrange Window Track Create Midi Track Inserts new Midi track below the selected track. Create Audio Track Inserts new audio track below the selected track. Delete Track Deletes the selected track. Demix by Event Channel A sequence containing events on different Midi channels can be 318 Emagic Adat Edit Menus in the Arrange Window 1 separated into multiple sequences, based on the event Midi channel. All events on channel 1 will be placed on a track, events on channel 2 to another, and so on. This is very useful when importing Format 0 Midi files, which contain all channels on one track. You can easily divide them up into separate tracks, with this command. 2 3 4 5 6 7 Functions Adjust Tempo using object length & Locators The tempo of the song is set according to the length of the selected object, and the number of measures defined by the Locators. 8 9 10 11 Set Locators by Objects Sets cycle locators to the left and right borders of the current selection. 12 13 Set Optimal Object Sizes Sets the size of selected sequences according to their contents. 14 Snap Objects Places the sequence boundaries onto format grids. 15 Remove Overlaps Eliminates overlapping between sequences. Tie Objects 16 17 Fills gaps between sequences by extending each selected sequence to meet the next. 18 Normalize Sequence Parameters Applies sequence parameter directly to event data. Ix Fix Quantize C Gl B Repositions Midi notes to match playback quantization settings. Owner’s Manual Version 1.0 – English - 319 Menu Reference Turn Loops to Real Copies Converts loops into sequences. Erase Duplicated Events Deletes duplicate events. Copy Midi Events Copies events between the locator points and places them at an adjustable target position. View Transport Places a fixed transport field in the upper left corner of the Arrange window. Parameters Hides/Shows the Parameter Area. Hiding it can creats more room for the Arrangement field. Grid Shows a grid on which it is easier to read measure positions White Background Displays a white background instead of the gray one. Object Colors Opens a selection box to assign objects colors. Options Recording Options Opens Song Settings window, which includes the recording settings. Midi Interface Communication Opens the menu option Midi/Global in the Preferences. Midi Metronome Click Opens a window used to configure the Midi metronome. System Performance Opens the display showing the load on the computer's CPU and Disk I/ O. 320 Emagic Adat Edit Menus in the Event Editor Open Keyboard 1 Opens a virtual keyboard, which can trigger Midi events with mouse clicks. 2 Tempo List Opens the Tempo List. 3 Wave Player Opens the Wave Player, which can be used as a monophonic Sample Player for WAV files. 4 Movie Opens a dialog window for importing QuickTime movies. 6 Movie as Float Opens a dialog window for importing a QuickTime movie to be opened as a floating window, which cannot be covered by other windows. 5 7 8 9 10 Send to Midi… Maximum Volume Sends controller 7 with a value of to all Midi channels. Reset Controllers Resets all controllers to neutral positions (zero modulation, releases the sustain pedal, zero Pitch Bend, etc.). 11 12 13 14 15 16 16.4 Menus in the Event Editor 17 Functions 18 Set Locators by Objects Quantize again Sets cycle locators to the left and right borders of the current selection. Gl Apply quantization to selected events in the Event List. B Ix C Owner’s Manual Version 1.0 – English - 321 Menu Reference De-quantize Removes quantization from selected events. Copy Midi Events… Copies segments between the Locator Positions to other positions. View Length as Absolute Position Switches the length parameter of notes in the Event List to display the absolute position of the end of the note in the song, as opposed to its duration from the Note-on. Parameter Shows/Hides the parameter and Tool Box in the Event Editor. Scroll to Selection Displays the next selected event, provided that this had previously been outside of the visible area. 16.5 Menus in the Matrix Editor Functions Set Locators by Objects Sets cycle locators to the left and right borders of the current selection. Quantize again Apply quantization to selected events in the Event List. De-quantize Removes quantization from selected events. Copy Midi Events… Copies segments between the Locator Positions to other positions. 322 Emagic Adat Edit Menus in the Score Editor 1 View Disk Drive Keys Opens a separate transport field in the upper-left corner of the Matrix Editor. 2 Parameter Shows/Hides the Parameter and Tool Box in the Event Editor. 4 White Background Toggles the background color of the Matrix Editor between white and gray. 5 Displays the next selected event, provided that this had previously been outside of the visible area. 7 Scroll to Selection 3 6 8 9 16.6 Menus in the Score Editor 10 11 Functions 12 Set Locators by Objects Sets cycle locators to the left and right borders of the current selection. 13 Quantize again Apply quantization to selected events in the Event List. 15 De-quantize Removes quantization from selected events. 16 14 17 Attributes 18 Accidentals… Gl Default-Accidental Resets the default accidental assignment for selected notes. Ix B Enharmonic Shift #: Enharmonically spells selected notes as sharps (#). Owner’s Manual Version 1.0 – English - C 323 Menu Reference Enharmonic Confusion: b Enharmonically spells selected notes as flats (b). Stems… Default Resets the stems for selected notes to their default direction. Up Forces stems of selected notes upwards. Down Forces stems of selected notes downwards. Beaming… Default Resets beaming for selected notes to their defaults. Beam Selected Forces beaming for selected notes. Unbeam Selected Removes beaming for selected notes. Syncopation… Default Syncopation is controlled by the setting in the Display Parmeter box. Force Selected note’s rhythms are displayed syncopated, even if Syncopation is not engaged in the Display Parameter box. Defeat Overrides the Syncopation setting in the Display Parameter box for selected notes. Interpretation… Default 324 Follows the interpretation setting in the Display Parameter box. If Interpretation is on, then note Emagic Adat Edit Menus in the Score Editor 1 durations are rounded up in the Score display, to eliminate short rests between notes. Force 2 3 Rounds up the display duration of selected notes, even if Interpretation is off in the Display Parameter box. Defeat 4 5 Turns off Interpretation for selected notes, even if Interpretation is on in the Display Parameter box. These notes will be displayed precisely according to their actual durations, with no rounding up of the duration. Reset all Attributes 6 7 8 9 Resets all attributes of selected notes back to their defaults. 10 11 View Page Edit Toggles the view of the Score from PageEdit to normal display. Using normal display can allow fro quicker screen redraws, Page Edit is a WYSIWYG view. 12 Toolbox Toggles the Tool Box display on and off. 15 Parameters Toggles the Parameter Box display on and off. 16 White Background Changes the background color from gray to white. HyperDraw Activates HyperDraw in the Score Window (requires a sufficient vertical zoom level). 13 14 17 18 Gl Ix B C Owner’s Manual Version 1.0 – English - 325 Menu Reference Options Diatonic Insert Inserted notes are automatically forced to pitches within the current key. Score Font Opens the window to select the font for text in the Score window. 326 Emagic Adat Edit Chapter 17 1 Audio Recording Tips 2 3 4 17.1 Digital Recording 5 This section contains general references, which you should consider when using digital recording media. 6 7 Setting Levels 8 In order to achieve the best recording quality, you should record at the highest possible level. This insures that you are taking advantage of the full 16 bit depth possible, and that your audio material is as far above the system noise floor can be achieved. 9 10 11 Although the “Normalize” function permits subsequent adjustment to the highest possible level, you achieve the best possible dynamic range only if you do a good job of setting levels from the beginning. The normalize function raises the level of everything in the file; so background noise, and digital quantization noise as the bit depth decreases for low level amplitudes, will be increased by normalization. 12 13 14 15 Clipping 16 If the level exceeds the limit of 0 decibels, digital distortion results, which will manifest as harsh noise in the recording, as the peaks of the waveform are cut off sharply (“clipping”) when the maximum level is exceeded. Visually, clipping can be difficult to distinguish from the level peaks of a bass or a snare drum, for example, as long as playback occurs at original pitch. Unlike analog tape saturation, which can impart a warm, compressed sound to a recording, digital clipping is rarely desirable. Unlike analog recording media, digital systems have 17 Owner’s Manual Version 1.0 – English - 18 Gl Ix B C 327 Audio Recording Tips no “headroom” above 0 decibels – clipping is immediately apparent as harsh distortion. Pay particularly close attention, therefore, to the clip hold display on the recording level meter. Compressors and/or limiters can help to avoid digital clipping, while helping to maintain a high average signal level. Sampling rate In Adat Edit you can record with a sampling rate of 44.1 kHz. As you know, you must maintain this rate for all audio files used in the song. When you master your audio and Midi songs to DAT, you should set the recorder to 44.1 kHz. This is the standard for professional audio production. If you need to import files recorded at a different sample rate into your songs, you can convert the file's sample rate in the Sample Edit window with Factory > Sample Rate Convert. Fragmentation During normal use, files on a hard drive can become fragmented. If a file is deleted, the place that it occupied on the hard disk is then freed. The next time a file is saved, this free space may be used to store it. If the file is larger than the free space, part of the file will be stored at a completely differen t location on the drive.Over the course of time, the available free blocks may be scattered all over the drive. When files are stored, pieces may be scattered accross dozens of locations. The read/write heads of the hard disk must, therefore, move a lot more than on a hard disk that contains files that are hardly fragmented. As a result, the transfer rate of data from the hard disk is reduced, and the reading of files (in the case of Adat Edit, the playback of audio tracks) can be disrupted. This 328 Emagic Adat Edit Digital Recording 1 illustration represents files of a highly fragmented hard disk, of which merely the lower quarter remains free for larger files. 2 3 4 5 6 When writing data, Adat Edit attempts to locate sufficient contiguous space. Apart from that, data is stored wherever possible. 7 8 Especially with stereo recordings, you should not enter too large of a value in when setting the Maximum Recording Time (long click on the recording button in the Transport window > Set Audio Record Path). This parameter sets the size of a prerecord file that is created each time record is engaged. If this value is set high, and you then make much shorter recordings, the hard drive will inevitably become fragmented. 10 Defragmentation 13 You can help Adat Edit work efficiently, by periodically defragmenting the hard disk (also known as “optimizing”). 14 9 11 12 15 On the Macintosh, use defragmentation programs like Norton's “Speed Disk”, AlSoft’s “DiskExpress II”, or La Cie’s “Silverlining”. Ask your computer dealer which software is best for your hard disk. 16 17 18 For Windows95, use the included defragmentation program that can be reached via Start > Programs > Accessories > System Tools > Disk Defragmenter, or other programs (such as Norton’s “Speed Disk”). Gl Ix The operating principle of these programs is simple; the files are completely resorted so that they occupy contiguous sectors B C Owner’s Manual Version 1.0 – English - 329 Audio Recording Tips on the hard drive. The following illustration displays the state of a defragmented hard disk. Never defragment a hard disk without first making a backup copy of all data. Remember, practically all data on the hard disk is deleted and rewritten by the defragmentation process. There are many back-up options now available, including CD-R, CDRW, zip disks, Jaz or Syquest disks, or tape backup. Be wary of any backup procedure that compresses the data being copied, audio files can be severely degraded by standard file compression methods. Dealing Economically with the Hard Disk When you complete a production, it is best to save only those audio files which are actually used in the song. Superfluous audio files should be deleted. 330 Emagic Adat Edit Warning 1 Glossary 2 3 4 After Touch 5 A type of Midi data generated by pressure applied to the keyboard after the initial depression of a key. This can control the vibrato or tone quality of the sound. 6 7 Arrange Window 8 Window in Adat Edit where tracks and sequences are displayed and edited. 9 Audio File 10 A file that contains audio data in a specific format, stored on a hard drive. 11 12 Autodrop 13 Automatic punch in/punch out of recording at preprogrammed locator positions 14 Bar Ruler 15 Ruler in Adat Edit windows, that displays the time axis– subdivided into measures.This is also where the Cycle and Autodrop zones are graphically displayed. Use the mouse to control different functions in M.L. (ALocators, ASong Position Line). 16 17 18 Catch Function Gl A mode that keeps the visible section of a window updated with the current song position. Ix Click B Another term for the metronome of a sequencer. C Owner’s Manual Version 1.0 – English - 331 Control Change Various types of Midi data that add expressiveness to recorded music by controlling standard parameters such as volume, pan, portamento, etc. Count In Programmable number of beats before recording actually starts. Cycle Mode Mode in which Adat Edit repeats the passage between the left and the right ALocator Position. Delay Setting that allows a track to be slipped forward or backward in timeATick Steps. Display Format Value Subdivision of quarter notes in Adat Edit’s edit displays. This determines the layout of position displays, and the display quantization in the Score window, among other things. Event Midi Event Event List Editor window in Adat Edit in which events can be displayed as text, and edited. Flip Menu Also known as a Pop-Up or a Pull-down Menu. This is a list of entries that can be opened by clicking and holding the mouse button. 332 Emagic Adat Edit 1 Font File on the system that determines the shape and size of text characters. You can choose any font from the system when working with text in the Score Editor. 2 3 4 General Midi Standard for Midi tone generators, which among other things, prescribes the minimum requirements for sounds, including patch location, drum kits, and hardware requirements. GMcompatible songs - like the Tutorial Song - can be played on any GM tone generator, without having to adjust any of the settings. 5 Interpretation Mode 9 6 7 8 Mode in the Score window that “rounds up” the durations of notes in the Score display, eliminating the short rests that would otherwise e displayed between staccatto notes. 10 11 Key Command 12 Computer key, or combination of keys, used to control a function in Adat Edit. 13 14 Link Mode When engaged in an editor window, Link Mode assures that this window continually displays the contents of whatever sequence is currently selected. 15 16 Locator 17 Position markers in the song that enclose a section (Cycle, Autodrop) 18 Gl Local Menu Ix Menu within a window, whose influence is limited to that specific window. B C Owner’s Manual Version 1.0 – English - 333 Loop Repetition of a sequence within a track. Matrix Editor Editor window in Adat Edit, which displays notes as horizontal bars. Pitch is determined by the vertical position of the note, duration by its length. Merge In Adat Edit, the merge function is carried out via the Glue tool, which merges all of the selected sequences together. Meta Events A type of event found in the Event List, which represents nonMidi events (text, symbols in the Note Editor). Midi-Clock A Midi synchronization event, which is sent from a generator every 1/96 note and advances any slave devices correspondingly. Midi Driver Software drivers that control communication between the computer and Midi Interface. Midi Event A complete Midi Event consists of a status bytes and, if needed, one or two data bytes. Midi Interface Device that transfers data between the computer and attached Midi instruments. Mixed Quantization A form of quantization, which combines binary and triplet values–such as a 1/16 and a 1/24 note. 334 Emagic Adat Edit Normalize (Midi) 1 This function applies the settings of the APlay Parameters to the Midi events and nullifies the Play Parameter. 2 3 Normalize (Audio) 4 A digital processing function that increases the peak amplitude of a sound file to just under 0 decibels. The level of the entire file is raised by a constant amount. 5 6 Note Overlap Correction 7 A function that shortens selected, notes, so that they don’t overlap one another. 8 9 Page Edit View Displays The Score in WYSIWYG view. Page and line breaks are shown, allowing the Score to be tailored for printing. 10 11 Path Folder on a hard drive where a file is stored. 12 Pitch Bend 13 Midi Event type that varies the pitch of notes on a channel.Synthesizers typically generate Pitch Bend using a wheel or joystick. 14 15 16 Play Parameter Track parameter that influences the output of the AMIDI Events during playback, but does not destructively affect the data. 17 18 Preferences Gl Settings that are “global”, affecting all songs. Ix Punch In/Out B Autodrop C Owner’s Manual Version 1.0 – English - 335 Quantization Rhythmic correction of notes in Adat Edit. The time positions of the notes are recalculated according to a selectable grid. As a result, the timing is perfected. Replace Function New recording replaces existing data in the same position in the track, when this function is enabled. Score Editor An Adat Edit window, in which the events, sequences, and songs can be displayed as notation, edited, and printed. Scroll Bar Bars on the side of a window (in Windows) with a small box (Scroll box). To move to another part of the window, drag the scroll box with the mouse, or click in the Scroll bar. Scrub Function Back and forth movement of the “recording head”. In this case, use the mouse to move the ASong Position Line to listen to the Midi events. Select Selected objects are displayed in reverse color. Sequence Container for Midi events in Adat Edit that are be displayed as horizontal bars in the Arrange window. Solo Function Enables the user to listen to an individual track or sequence. Song Position Line Vertical line in the Arrange window, Sample editor, Matrix Editor andScore editor that displays the current Song Position, 336 Emagic Adat Edit 1 and can be dragged with the mouse to change position in the song. 2 Song Position Pointer 3 This is a Midi event that indicates the current position in the song, calculated from the beginning of the song in sixteenth note increments. Song Position Pointer is used along with Midi Clock for synchronization. 4 5 6 Standard Midi File 7 A standard file format that allows Midi songs to be loaded into almost any Midi program, on any computer platform.. 8 Status 9 The first byte in a Midi event, displayed in the S column of the Event List. 10 Style 11 12 Setting in the Score window that sets the basic score display for a sequence, including clef, display transposition, number of staves etc. 13 14 Swing 15 Quantization setting that delays the even numbered sub divisions of the beat by a small amount, to give the music a swing feel. 16 17 Synchronization Means by which several devices can be run together “in sync”. One device acts as the “Clock Master” sending a sync signal, such as Midi Clock, to the other “Slave” devices, which follow the clock signal. 18 Gl Ix B C Owner’s Manual Version 1.0 – English - 337 Synchronizer Device used to convert various synchronization formats; it monitors and manages the synchronization of various devices centrally. Toggle Computer jargon for switching back and forth. Transport Window Independent window in Adat Edit that contains the transport functions and the keys for the sequence modes (e.g. Cycle, Autodrop, Solo). TrueType Fonts Freely scaleable fonts that can be installed into your system and can be used in Adat Edit for the Score Text. These have the advantage that they will be displayed the same on the computer screen as they will print. User Interface All control elements and functions of a piece of softwar, or of a device Velocity The force with which a note is struck on a keyboard, or controller. It is represented by the second data byte (Val) in the Event List. Velocity may have a range of 0-127. Virtual Memory Storage space on the hard disk, which is used by Windows as a “swap file” to enlarge RAM capacity. WAV Files File format for sound files on a Windows PC. WAV files can be recorded in various formats (8bit, 16bit, Stereo/Mono,) and various sample rates, such as 22 kHz or 44.1 kHz. 338 Emagic Adat Edit Wave Player 1 Feature that allows sound files in the computer to be triggered with Midi Notes. 2 3 Windows 4 Commonly used operating system for PC compatible computers. It offers a graphical user interface. 5 6 WYSIWYG Acronym for “What You See Is What You Get”. A program's ability to show a accurate display on the screen of what a document will look like when printed. The Page Edit View in the Score editor is a WYSIWYG display. 7 8 9 Zoom 10 Optional magnification or reduction of the contents in an Adat Edit window. 11 12 13 14 15 16 17 18 Gl Ix B C Owner’s Manual Version 1.0 – English - 339 340 Emagic Adat Edit Index A About Adat Edit . . . . . . . . . . . . . . . . . . . 23 About This Manual . . . . . . . . . . . . . . . . 29 Add last edit function to sequncer name . . . . . . . . . . . . . . . . . . . . . . . 111 Adjust Tempo using Object Length & Locators . . . . . . . . . . . . . . . . . . . . 182 Adjusting the Sound card . . . . . . . . . . . . 31 All channel track . . . . . . . . . . . . . . . . . . 139 Amplitude axis in the Sample editor . . . . . . . . . . 262 Anchor definition of . . . . . . . . . . . . . . . . . 163 location in Sample editor . . . . . . 163 maintaining position of in the Waveform display . . . . . . . 266 positioning reference point for region . . . . . . . . . . . . . . . . . 178 Appending a new track . . . . . . . . . . . . . 141 Apple menu . . . . . . . . . . . . . . . . . . . . . . 315 Arming an audio track in the Arrange window . . . . . . . . . . . . . . . . 166 audio tracks from the Mixer . . . . 179 audio tracks in Arrange window . 179 on audio objects . . . . . . . . . . . . . . 193 Arrange level display in the Event List . . . . . . . . . . . . . 215 Arrange window arming audio tracks to record . . . 179 Audio track . . . . . . . . . . . . . . . . . 163 changing the background . . . . . . 159 configuring the Transport field . 138 creating a track in . . . . . . . . . . . . 141 deleting a track in . . . . . . . . . . . . 141 hiding/showing parameters . . . . 159 hiding/showing the Grid . . . . . . . 159 layout of . . . . . . . . . . . . . . . . . . . . 137 moving a track in . . . . . . . . . . . . . 141 mute button . . . . . . . . . . . . . . . . . 142 opening from the Windows menu . . . . . . . . . . . . . . . . . . 108 opening the Sample editor from 257 send maximum volume . . . . . . . 160 send Rest controllers . . . . . . . . . . 160 tools . . . . . . . . . . . . . . . . . . . . . . . 138 Track List . . . . . . . . . . . . . . . . . . . 138 view settings . . . . . . . . . . . . . . . . 158 working with regions . . . . . . . . . . 167 Arrange window functions 341 Owner’s Manual Version 1.0 – English - Adjust Tempo using Object Length & Locators . . . . . . . . . . . . . 182 Erase Duplicated Events . . . . . . 147 Fix Quantize . . . . . . . . . . . . . . . . 155 Normalize Sequence Parameters 153 Remove overlaps . . . . . . . . . . . . . 146 Select Inside Locators . . . . . . . . 145 Set Locators by Object . . . . . . . . 144 Set Locators by Objects . . . . . . . 145 Set Optimal Object Sizes . . . . . . 145 Snap objects . . . . . . . . . . . . . . . . . 146 Tie Objects . . . . . . . . . . . . . . . . . 147 Turn Loops to Real Copies . . . . 151 Arrow tool . . . . . . . . . . . . . . . . . . . . . . . 100 Atari floppy disk formats recognized by . . . . . . . . . . . . . . . . . . . . 304 Audio arming tracks from the Mixer . . . 179 automation of . . . . . . . . . . . . . . . . 168 manual drop recording . . . . . . . . 180 real time effects . . . . . . . . . . . . . . 195 recording in Cycle mode . . . . . . . 182 recording in stereo . . . . . . . . . . . . 166 recording tips . . . . . . . . . . . . . . . . 327 recording with standard count-in 180 setting the Record Path . . . . . . . 165 setting tracks to record . . . . . . . . 179 Audio Energizer . . . . . . . . . . . . . . . . . . 280 Audio file anchor in region . . . . . . . . . . . . . . 163 basic definition of . . . . . . . . . . . . 161 digital mixdown of . . . . . . . . . . . 184 formats of . . . . . . . . . . . . . . . . . . . 170 importing into Adat Edit . . . . . . 173 making a backup copy of . . . . . . 257 making backup copies before destructive edits in the Sample editor . . . . . . . . . . . 268 playing entire file in Sample editor . . . . . . . . . . . . . . . . . 264 region . . . . . . . . . . . . . . . . . . . . . . 162 sample rate . . . . . . . . . . . . . . . . . . 170 stereo file formats . . . . . . . . . . . . 170 Audio object arming . . . . . . . . . . . . . . . . . . . . . 193 bus send controls on . . . . . . . . . . 193 clip detector . . . . . . . . . . . . . . . . . 192 display of levels . . . . . . . . . . . . . . 166 EQ control on . . . . . . . . . . . . . . . 193 on the Mixer . . . . . . . . . . . . . . . . 191 1 2 3 4 5 6 7 8 9 10 11 12 13 14 15 16 17 18 Gl Ix B C pan/balance control . . . . . . . . . . . 193 Peak Hold display . . . . . . . . . . . . 192 representation of audio playback channel on Mixer . . . . . . . . 164 stereo configuration . . . . . . . . . . . 194 volume control on . . . . . . . . . . . . 192 Audio recording . . . . . . . . . . . . . . . . . . . . 75 getting started . . . . . . . . . . . . . . . 165 tutorial . . . . . . . . . . . . . . . . . . . . . . 75 Audio region definition of . . . . . . . . . . . . . . . . . 162 generating . . . . . . . . . . . . . . . . . . 173 Audio track arming . . . . . . . . . . . . . . . . . . . . . 166 creating . . . . . . . . . . . . . . . . . . . . . 166 definition of . . . . . . . . . . . . . . . . . 163 disarming all simultaneously . . . 180 selection of . . . . . . . . . . . . . . . . . . 165 solo button . . . . . . . . . . . . . . . . . . 192 Audio tracks arming to record in Arrange window . . . . . . . . . . . . . . . . 179 Auto Create Tracks in Cycle Record . . 113 Auto Mute in Cycle Record . . . . . 62 113 Autodrop . . . . . . . . . . . . . . . . . . . . . . . . 181 recording with . . . . . . . . . . 133 134 Autodrop zone methods of setting . . . . . . . . . . . . 181 setting on the Bar Ruler . . . . . . . 129 Autoload song . . . . . . . . . . . . . . . . . . . . . 37 saving with desired Song Settings . . . . . . . . . . . . . . . . 112 Automation of audio . . . . . . . . . . . . . . . . . . . . . 168 B Bank select . . . . . . . . . . . . . . . . . . . . . . 115 on the Mixer . . . . . . . . . . . . . . . . 189 Bar Ruler cycle diplayed in . . . . . . . . . . . . . 132 jump to a position . . . . . . . . . . . . 131 scrubbing . . . . . . . . . . . . . . . . . . . 131 setting Autodrop zone on . . . . . . 129 setting Cycle zone on . . . . . . . . . 129 setting the start and end point of the song on . . . . . . . . . . . 129 130 shuttling on . . . . . . . . . . . . . . . . . 131 Song Position Line . . . . . . . . . . . 131 start or stop from . . . . . . . . . . . . . 131 Emagic Adat Edit Bounce to Disk . . . . . . . . . . . . . . . . . . . 185 Bus Effects . . . . . . . . . . . . . . . . . . . . . . 195 overview of . . . . . . . . . . . . . . . . . . 196 Bus Sends on audio object . . . . . . . . . . . . . . 193 C Catch activate Catch when the sequencer starts . . . . . . . . . . . . . . . . . . 111 Catch mode . . . . . . . . . . . . . . . . . . . 52 90 in the Sample editor . . . . . . . . . . 261 Change background in Arrange window . . . . . . . . . . . 159 Change Gain . . . . . . . . . . . . . . . . . . . . . 270 Changing the Length of a Note in the Matrix editor . . . . . . . . . . . 229 Changing values in the Event List . . . . . . . . . . . . . 214 Channel display of in Event List . . . . . . . 207 Check for MTP . . . . . . . . . . . . . . . . . . . . 36 Chorus control of from Mixer . . . . . . . . . 190 Clear . . . . . . . . . . . . . . . . . . . . . . . . . . . . 105 Click while Playing . . . . . . . . . . . . . . . . 114 Click while Recording . . . . . . . . . . . . . 114 Clip Detector on audio object . . . . . . . . . . . . . . 192 Clipping definition of . . . . . . . . . . . . . . . . . 327 Clock tick . . . . . . . . . . . . . . . . . . . . . . . . 121 Clock/SPP interpolation . . . . . . . . . . . . . . . . 291 Close song . . . . . . . . . . . . . . . . . . . . . . . 106 Color . . . . . . . . . . . . . . . . . . . . . . . . . . . . 111 assigning to sequences . . . . . . . . 158 Color Graphics . . . . . . . . . . . . . . . . . . . . 111 Color palette using in the Arrange window . . . 158 Colour Graphics switching on and off in Preferences . . . . . . . . . . . . . 158 Continue . . . . . . . . . . . . . . . . . . . . . . . . 124 Copy . . . . . . . . . . . . . . . . . . . . . . . . . . . . 105 Copy Midi Events function in the Event List . . . . . . . . . . . . . 219 Copying ~ Sequences . . . . . . . . . . . . . . . . . 143 342 Index Copying events in the Event List . . . . . . . . . . . . . 215 Copying notes in the Matrix editor . . . . . . . . . . . 228 Count in . . . . . . . . . . . . . . . . . . . . . . . . . 115 Count-in recording audio with . . . . . . . . . . 180 Current song position display in Event List . . . . . . . . . 204 Cut . . . . . . . . . . . . . . . . . . . . . . . . . . . . . 104 Cycle setting by sequence length . . . . 144 setting locators . . . . . . . . . . . . . . . 132 setting on the Transport window 121 tutorial . . . . . . . . . . . . . . . . . . . . . . 52 zone displayed in Bar Ruler . . . . 132 Cycle button in the Sample editor . . . . . . . . . . 264 Cycle mode . . . . . . . . . . . . . . . . . . . . . . 125 activation of . . . . . . . . . . . . . . . . . 132 configuration of and uses for . . . 132 recording audio in . . . . . . . . . . . . 182 recording in . . . . . . . . . . . . . . . . . 133 Cycle playback in the Sample editor . . . . . . . . . . 264 Cycle zone selecting all sequences within . . 142 setting on the Bar Ruler . . . . . . . 129 E Defragmentation tools for . . . . . . . . . . . . . . . . . . . . 329 Delay . . . . . . . . . . . . . . . . . . . . . . . . . . . 152 real-time effects . . . . . . . . . . . . . . 196 regions . . . . . . . . . . . . . . . . . . . . . 178 Delete . . . . . . . . . . . . . . . . . . . . . . . . . . 105 Deleting events in the Event List . . . . . . . . . . . . . 215 Deleting notes in the Matrix editor . . . . . . . . . . . 229 Demix by Event Channel using to process imported Midi files 304 Destructive editing definition of . . . . . . . . . . . . . . . . . 162 Digital Compression . . . . . . . . . . . . . . . 280 Digital mixdown of audio files . . . . . . . . . . . . . . . . . 184 Direct Insertion of Effects . . . . . . . . . . 195 Owner’s Manual Version 1.0 – English - 1 2 3 4 EBU . . . . . . . . . . . . . . . . . . . . . . . . . . . . 295 Edit Clear . . . . . . . . . . . . . . . . . . . . . . . 105 Copy . . . . . . . . . . . . . . . . . . . . . . . 105 Cut . . . . . . . . . . . . . . . . . . . . . . . . 104 Paste . . . . . . . . . . . . . . . . . . . . . . . 105 Undo . . . . . . . . . . . . . . . . . . . . . . . 104 Edit commands in the Sample editor . . . . . . . . . . 267 Edit Menu . . . . . . . . . . . . . . . . . . . . . . . 104 Editing events in the Event List . . . . . . . . . . . . . 213 Enable Catch when Sequencer starts . 111 End of song setting on the Bar Ruler . . 129 130 End of song marker on Transport window . . . . . . . . . 124 Equalizer on audio object . . . . . . . . . . . . . . 193 Erase Duplicated Events . . . . . . . . . . . 147 Eraser tool . . . . . . . . . . . . . . . . . . . . . . . 101 Event List Arrange level display in . . . . . . . 215 changing values in . . . . . . . . . . . . 214 copying events in . . . . . . . . . . . . 215 deleting events in . . . . . . . . . . . . 215 display of current song position . 204 display of event channel in . . . . . 207 display of Event position . . . . . . 206 display of event status in . . . . . . 206 display of first data byte in . . . . . 207 display of note length in . . . . . . . 207 display of second data byte in . . 207 editing events in . . . . . . . . . . . . . 213 hide/show parameters in . . . . . . . 202 inserting events in . . . . . . . 209 215 inserting Program Changes . . . . . 66 layout of the display . . . . . . . . . . 203 Midi Out button . . . . . . . . . . . . . 203 moving events in . . . . . . . . . . . . . 213 muting sequences in the Arrange 7 8 9 11 6 10 5 D 343 Disable safety alert for undo . . . . . . . . 112 Disk fragmentation definition of . . . . . . . . . . . . . . . . . 328 Display Format value setting on Transport window . . . 121 displayed on the Transport window . . 122 12 13 14 15 16 17 18 Gl Ix B C level display . . . . . . . . . . . . 217 naming sequences in the Arrange level display . . . . . . . . . . . . 216 open . . . . . . . . . . . . . . . . . . . . . . . 108 opening . . . . . . . . . . . . . . . . . . . . 201 opening from Windows Menu . . 108 overview of event types . . . . . . . 209 Q button . . . . . . . . . . . . . . . . . . . . 217 quantization of events . . . . . . . . . 217 quantize again . . . . . . . . . . . . . . . 218 scrolling . . . . . . . . . . . . . . . . . . . . 204 selection of events in . . . . . . . . . 205 soloing sequences in the Arrange level display . . . . . . . . . . . . 217 standard tools . . . . . . . . . . . . . . . . 202 structure of the list . . . . . . . . . . . 206 using to edit regions . . . . . . . . . . 176 view filter . . . . . . . . . . . . . . . . . . . 208 Event List functions Copy Midi events . . . . . . . . . . . . 219 Event status display of in Event List . . . . . . . 206 Event types overview of in the Event List . . 209 Exchanging songs between a Mac and a PC . . . . . . . . . . . . . . . . . . . . . . . . . . . . . 40 External Synchronization enabling . . . . . . . . . . . . . . . . . . . . 289 External/Free . . . . . . . . . . . . . . . . . . . . 287 Preferences . . . . . . . . . . . . 107 110 Revert to Saved . . . . . . . . . . . . . . 106 Save . . . . . . . . . . . . . . . . . . . . . . . 107 Song Settings . . . . . . . . . . . . . . . . 107 Find . . . . . . . . . . . . . . . . . . . . . . . . . . . . . 87 First data byte display of in Event List . . . . . . . 207 Fix Quantize . . . . . . . . . . . . . . . . . . . . . 155 Flip Menu . . . . . . . . . . . . . . . . . . . . . . . . 84 Flip menu icon selection in Track list . . . . . 140 Formats of audio files . . . . . . . . . . . . . . 170 Fragmentation . . . . . . . . . . . . . . . . . . . . 328 definition of . . . . . . . . . . . . . . . . . 328 setting maximum record time to avoid . . . . . . . . . . . . . . . . . . 329 tools for disk defragmentation . . 329 Frame Rate . . . . . . . . . . . . . . . . . . . . . . 296 Free Memory displayed on the Transport window . . . . . . . . . . . . . . . . 122 reorganizing on Transport window . . . . . . . . . . . . . . . . 122 Full Panic activated from Transport window . . . . . . . . . . . . . . . . 123 Functions in the Sample editor . . . . . . . . . . 269 Menu reference . . . . . . . . . . . . . . 319 F G Fade In . . . . . . . . . . . . . . . . . . . . . . . . . 271 Fade Out . . . . . . . . . . . . . . . . . . . . . . . . 271 Fast Forward . . . . . . . . . . . . . . . . . . . . . 125 File Extensions . . . . . . . . . . . . . . . . . . . . 33 types of files recognized by Adat Edit . . . . . . . . . . . . . . . 33 File format selecting when opening a song . 106 File Management Extensions . . . . . . . . . . . . . . . . . . . 33 File Menu . . . . . . . . . . . . . . . . . . . . . . . 105 Close . . . . . . . . . . . . . . . . . . . . . . . 106 Exit . . . . . . . . . . . . . . . . . . . . . . . . 108 Export Selection as Midi File . . 107 launching recently used songs from . . . . . . . . . . . . . . . . . . 107 New . . . . . . . . . . . . . . . . . . . . . . . 105 Open . . . . . . . . . . . . . . . . . . . . . . . 106 Emagic Adat Edit General Midi definition of . . . . . . . . . . . . . . . . . 187 supported on the Mixer . . . . . . . 187 Tone Generator . . . . . . . . . . . . . . . 43 Global Preferences . . . . . . . . . . . . . . . . . 35 Glossary . . . . . . . . . . . . . . . . . . . . . . . . . 331 Glue tool . . . . . . . . . . . . . . . . . . . . . . . . 102 Graphics color graphics . . . . . . . . . . . . . . . . 111 Grid . . . . . . . . . . . . . . . . . . . . . . . . . . . . 159 hiding/showing in Arrange window . . . . . . . . . . . . . . . . 159 GS Standard . . . . . . . . . . . . . . . . . . . . . . . 27 H Hard disk as recording medium for audio . . 162 344 Index Hide/Show Grid . . . . . . . . . . . . . . . . . . 159 Hide/Show Parameters . . . . . . . . . . . . . 159 Hide/show parameters in the Event List . . . . . . . . . . . . . 202 Hide/Show Transport field in Arrange window . . . . . . . . . . . . . . . . . . . . . 158 Icon K Key Commands . . . . . . . . . . . . . . . 85 109 defining . . . . . . . . . . . . . . . . . . . . . 86 defining your own . . . . . . . . . . . . . 40 find key . . . . . . . . . . . . . . . . . . . . . 87 hiding . . . . . . . . . . . . . . . . . . . . . . . 87 reference list . . . . . . . . . . . . . . . . 307 Key Commands window opening from the Windows menu . . . . . . . . . . . . . . . . . . 109 Keyboard Macintosh . . . . . . . . . . . . . . . . . . . 39 L Launching Adat Edit in Windows . . . . . . . . . . . . . . . . . . 31 in Windows automatically . . . . . . 34 in Windows from a shortcut . . . . . 34 in Windows from the Start button 33 on the Macintosh . . . . . . . . . . . . . . 34 on the Macintosh automatically . . 38 on the Macintosh with an Autoload Song . . . . . . . . . . . . . . . . . . . 37 Layout . . . . . . . . . . . . . . . . . . . . . . . . . . 283 Level Owner’s Manual Version 1.0 – English - 1 2 3 4 5 6 7 8 9 10 M Macintosh floppy disk formats recognized by . . . . . . . . . . . . . . . . . . . . 304 keyboard tips . . . . . . . . . . . . . . . . . 39 using the mouse . . . . . . . . . . . . . . 39 Main Menu bar . . . . . . . . . . . . . . . . . . . . 41 File Menu . . . . . . . . . . . . . . . . . . 105 Windows Menu . . . . . . . . . . . . . . 108 Main Window . . . . . . . . . . . . . . . . . . . . . 93 Manual drop recording . . . . . . . . . . . . . 180 Matrix editor basic description of . . . . . . . . . . . 225 changing the length of a note in 229 copying notes in . . . . . . . . . . . . . 228 deleting notes in . . . . . . . . . . . . . 229 editing velocity . . . . . . . . . . . . . . 230 event display . . . . . . . . . . . . . . . . 226 hiding showing parameters . . . . . 226 hiding/showing the Transport field . . . . . . . . . . . . . . . . . . . 226 inserting notes in . . . . . . . . . . . . . 228 moving notes in . . . . . . . . . . . . . . 228 opening . . . . . . . . . . . . . . . 109 225 opening from the Windows menu . . . . . . . . . . . . . . . . . . 109 tools used in . . . . . . . . . . . . . . . . . 226 using the V Tool in . . . . . . . . . . . 230 Maximum recording time assigning to a track . . . . . . . . . . . 140 Icon flip menu . . . . . . . . . . . . . . . . . . . . 140 Importing audio files . . . . . . . . . . . . . . . . . . . 173 Information line . . . . . . . . . . . . . . . . . . 100 Inserting events in the Event List . . . . . . . . 209 215 Inserting notes in the Matrix editor . . . . . . . . . . . 228 Installation . . . . . . . . . . . . . . . . . . . . . . . . 31 Invert . . . . . . . . . . . . . . . . . . . . . . . . . . . 273 I 345 display of on audio object . . . . . . 166 setting for audio recording . . . . . 327 Level meters on audio objects . . . . . . . . . . . . . . 191 Link mode . . . . . . . . . . . . . . . . . . . . . . . . 91 in the Sample editor . . . . . . . . . . 261 Local menus . . . . . . . . . . . . . . . . . . 28 91 Locators . . . . . . . . . . . . . . . . . . . . . . . . . 121 selecting all sequences inside . . 142 setting cycle zone . . . . . . . . . . . . 132 setting on the Transport window 121 Looping audio regions . . . . . . . . . . . . . . . . 175 regions . . . . . . . . . . . . . . . . . . . . . 178 Loops . . . . . . . . . . . . . . . . . . . . . . . . . . . 149 stopping loops . . . . . . . . . . . . . . . 150 Turning to real copies . . . . . . . . . 151 LSO files . . . . . . . . . . . . . . . . . . . . . . . . . 33 LTC . . . . . . . . . . . . . . . . . . . . . . . . . . . . 297 11 12 13 14 15 16 17 18 Gl Ix B C setting to low value to avoid fragmentation . . . . . . . . . . . 329 Maximum volume sending from Arrange window . . 160 Measure position display of on Transport window . 121 Memory reconfigure . . . . . . . . . . . . . . . 122 Menu Edit . . . . . . . . . . . . . . . . . . . . . . . . 104 File . . . . . . . . . . . . . . . . . . . . . . . . 105 Open Window . . . . . . . . . . . . . . . 108 Merge new recording with selected sequence . . . . . . . . . . . . . . . . . . . 113 Merge only new Sequences in Cycle Record . . . . . . . . . . . . . . . . . . . . . 113 Metronome . . . . . . . . . . . . . . . . . . . . . . 127 Click while Playing . . . . . . . . . . . 114 Click while Recording . . . . . . . . 114 Count in . . . . . . . . . . . . . . . . . . . . 115 Midi Click . . . . . . . . . . . . . . . . . . 114 setting Midi parameters . . . . . . . 127 Speaker click . . . . . . . . . . . . . . . . 115 MID files . . . . . . . . . . . . . . . . . . . . . . . . . 33 Midi Check For MTP . . . . . . . . . . . . . . 36 Click . . . . . . . . . . . . . . . . . . . . . . . 127 Clock out . . . . . . . . . . . . . . . . . . . 115 connection on a Macintosh . . . . . . 35 file Standard . . . . . . . . . . . . . . . . . . 33 indicator in Transport . . . . . . . . . . 32 Interface Communication window (Macintosh) . . . . . . . . . . . . . 35 interface with multi client driver . 33 Midi File Conversion . . . . . . . . . 302 Midi Time Piece support of . . . . . 36 Midi-Out testing (Macintosh) . . . . . . . 37 Out port selection . . . . . . . . . . . . . 31 testing connections . . . . . . . . . . . . 32 testing the connection on the Macintosh . . . . . . . . . . . . . . . 36 testing the output in Windows . . . 32 time code (see MTC) . . . . . . . . . 298 transmit Clock . . . . . . . . . . . . . . . 115 Midi and Audio integration of on the Mixer . . . . 187 Midi channel assigning to a track . . . . . . . . . . . 139 Midi Click . . . . . . . . . . . . . . . . . . . . . . . 114 Midi Clock . . . . . . . . . . . . . . . . . . . . . . . 294 send . . . . . . . . . . . . . . . . . . . . . . . 288 Emagic Adat Edit Midi Clock sync . . . . . . . . . . . . . . . . . . 127 Midi Event definition of . . . . . . . . . . . . . . . . . 201 status byte . . . . . . . . . . . . . . . . . . 201 Midi File . . . . . . . . . . . . . . . . . . . . . . . . 302 Midi indicator on Transport window . . . . . . . . . 123 Midi Interface Selection of . . . . . . . . . . . . . . . . . . 31 Midi Machine Control . . . . . . . . . . . . . 289 transmitting . . . . . . . . . . . . . . . . . 292 Midi Machine Control (MMC) . . . . . . 291 Midi Metronome settings . . . . . . . . . . . . . . . . . . . . . 127 Midi Metronome Click . . . . . . . . . . . . . 128 Midi objects on the Mixer . . . . . . . . . . . . . . . . 187 Midi Out button in the Event List . . . . . . . . . . . . . 203 Midi Port . . . . . . . . . . . . . . . . . . . . . . . . . 36 Midi recording . . . . . . . . . . . . . . . . . . . . . 60 Midi Reset from Transport window . . . . . . . . 123 Full Panic . . . . . . . . . . . . . . . . . . . 123 Midi Settings . . . . . . . . . . . . . . . . . . . . . 115 Send Used Instr. Midi Settings after loading . . . . . . . . . . . . . . . . 117 Midi settings Bank select . . . . . . . . . . . . . . . . . . 115 Midi-File saving . . . . . . . . . . . . . . . . . . . . . . 107 Mixed quantization . . . . . . . . . . . . . . . . 157 Mixer audio objects on . . . . . . . . . . . . . . 191 Bank select . . . . . . . . . . . . . . . . . . 189 control of chorus from . . . . . . . . . 190 control of Midi volume . . . . . . . . 189 control of pan from . . . . . . . . . . . 190 control of portamento . . . . . . . . . 190 control of reverb . . . . . . . . . . . . . 191 Midi objects . . . . . . . . . . . . . . . . . 187 mute button . . . . . . . . . . . . . . . . . 190 opening . . . . . . . . . . . . . . . 109 187 other control options . . . . . . . . . . 191 selection of program changes from . . . . . . . . . . . . . . . . . . . 189 Mixer automation basic expalnation of . . . . . . . . . . . 199 how to automate a mix . . . . . . . . 200 Mode Buttons on Transport window . . . . . . . . . 125 346 Index Modem Port . . . . . . . . . . . . . . . . . . . . . 110 Modem port selecting for Midi . . . . . . . . . . . . . 36 Modem port/Printer port selecting in Preferences . . . . . . . 110 Mouse click-holding with . . . . . . . . . . . . . 84 clicking with . . . . . . . . . . . . . . . . . 83 double-clicking with . . . . . . . . . . . 84 dragging objects with . . . . . . . . . . 84 pointing with . . . . . . . . . . . . . . . . . 83 techniques . . . . . . . . . . . . . . . . . . . 83 Moving events in the Event List . . . . . . . . . . . . . 213 Moving notes in the Matrix editor . . . . . . . . . . . 228 MTC . . . . . . . . . . . . . . . . . . . . . . . . . . . 298 interpreting the format . . . . . . . . 290 MTC Trigger . . . . . . . . . . . . . . . . . . . . . 287 Multi Client Midi drivers . . . . . . . . . . . . 33 Multimedia . . . . . . . . . . . . . . . . . . . . . . . 28 Multitasking with other programs . . . . . 33 Mute button on Mixer . . . . . . . . . . . . . . . . . . . . 190 Mute tool . . . . . . . . . . . . . . . . . . . . . . . . 103 Muting of sequences . . . . . . . . . . . . . . 103 Muting of Tracks . . . . . . . . . . . . . . . . . . 142 Muting sequences in the Event List Arrange level display . . . . . . . . . . . . . . . . 217 N Naming sequences in the Event List Arrange level display . . . . . . . . . . . . . . . . 216 New song . . . . . . . . . . . . . . . . . . . . . . . . 105 No Output track . . . . . . . . . . . . . . . . . . 139 non-destructive editing definition of . . . . . . . . . . . . . . . . . 162 Normalize . . . . . . . . . . . . . . . . . . . . . . . 152 audio files . . . . . . . . . . . . . . . . . . . 269 sequence parameters . . . . . . . . . 152 Note length display of in Event List . . . . . . . 207 O Owner’s Manual Version 1.0 – English - 1 2 3 4 5 6 7 8 9 P Page Edit view . . . . . . . . . . . . . . . . . . . . 71 Pan control of from Mixer . . . . . . . . . 190 Pan/Balance explanation of difference . . . . . . 193 Panic Function . . . . . . . . . . . . . . . . . . . 123 Parameters hide/show in Arrange window . . 159 hide/show in the Matrix editor . . 226 Paste . . . . . . . . . . . . . . . . . . . . . . . . . . . . 105 Path setting for audio recording . . . . . 165 Pause . . . . . . . . . . . . . . . . . . . . . . . . . . . 124 Peak Hold display on audio object . . . . . . . . . . . . . . 192 Pencil tool . . . . . . . . . . . . . . . . . . . . . . . 101 Perceived volume increasing . . . . . . . . . . . . . . . . . . . 280 Play . . . . . . . . . . . . . . . . . . . . . . . . . . . . . 124 Play/Stop Selection in the Sample editor . . . . . . . . . . 264 Plug-In Window Functions . . . . . . . . . 199 Portamento control of from Mixer . . . . . . . . . 190 Position display of in the Event List . . . . 206 jump to on the Bar Ruler . . . . . . 131 Position Indicators on Transport window . . . . . . . . . 121 Position Markers . . . . . . . . . . . . . . . . . . 121 Object colors . . . . . . . . . . . . . . . . . . . . . 158 Objects 347 selecting a block of . . . . . . . . . . . . 95 selection of all following . . . . . . . . 96 selection of individual . . . . . . . . . . 94 selection of scattered . . . . . . . . . . 95 selection of within the Locator Positions . . . . . . . . . . . . . . . . 97 Odd tuplets quantizing to . . . . . . . . . . . . . . . . 156 Open song . . . . . . . . . . . . . . . . . . . . . . . 106 Open Window Menu Menu reference . . . . . . . . . . . . . . 316 Options Menu reference . . . . . . . . . . . . . . 323 Overview display in the Sample editor . . . . . . . . . . 259 playing from in the Sample editor . . . . . . . . . . . . . . . . . 263 10 11 12 13 14 15 16 17 18 Gl Ix B C Position Slider . . . . . . . . . . . . . . . . . . . . 120 Preferences add last edit function to sequncer name . . . . . . . . . . . . . . . . . . 111 color graphics . . . . . . . . . . . . . . . . 111 description of . . . . . . . . . . . . . . . . 107 Disable safety alert for undo . . . 112 Enable Catch when Sequencer starts . . . . . . . . . . . . . . . . . . 111 Modem/Printer Port . . . . . . . . . . 110 opening from File Menu . . . . . . 110 releasing modem or printer port in background . . . . . . . . . . . . 110 selecting the serial port . . . . . . . . 110 switching on and off Color Graphics . . . . . . . . . . . . . . . 158 Pre-quantization . . . . . . . . . . . . . . . . . . 157 Print tutorial . . . . . . . . . . . . . . . . . . . . . . 75 Printer port . . . . . . . . . . . . . . . . . . . . . . 110 selecting for Midi . . . . . . . . . . . . . 36 Problem solving Synchronization . . . . . . . . . . . . . . 301 Program change selection from the Mixer . . . . . . 189 Punch-in/punch-out recording . . . . . . . 181 R Real-Time effects . . . . . . . . . . . . . . . . . 195 Real-time effects Bus Effects . . . . . . . . . . . . . . . . . . 195 delay . . . . . . . . . . . . . . . . . . . . . . . 196 Direct Insertion of Effects . . . . . 195 reverb . . . . . . . . . . . . . . . . . . . . . . 197 Record button . . . . . . . . . . . . . . . . . . . . 124 Record Toggle Key command for . . . . . . . . . . . . 180 Recording audio . . . . . . . . . . . . . . . . . . . . . . . 165 audio in Cycle mode . . . . . . . . . . 182 audio with standard count-in . . . 180 Auto Mute in Cycle Record . . . . . 62 Autodrop mode . . . . . . . . . 133 134 creating stereo audio files . . . . . . 166 deleting a new audio recording from the hard drive . . . . . . . . . . . 174 from current position . . . . . . . . . . 124 getting started . . . . . . . . . . . . . . . 165 in Cycle mode . . . . . . . . . . . . . . . 133 manual drop recording . . . . . . . . 180 Replace mode . . . . . . . . . . . . . . . 126 setting an audio record path . . . . 165 setting audio record levels . . . . . 327 setting tracks to record audio . . . 179 tutorial . . . . . . . . . . . . . . . . . . . . . . 60 with autodrop . . . . . . . . . . . . . . . . 181 Recording options Auto Create Tracks in Cycle Record . . . . . . . . . . . . . . . . 113 Auto Mute in Cycle Record . . . . 113 Merge new recording with selected sequence . . . . . . . . . . . . . . . 113 Merge only new Sequences in Cycle Record . . . . . . . . . . . . . . . . 113 Metronome Click while Playing . . . . . . 114 Click while Recording . . . . 114 Count in . . . . . . . . . . . . . . . 115 Midi Click . . . . . . . . . . . . . 114 Speaker click . . . . . . . . . . . 115 part of Song Settings . . . . . . . . . . 113 Send Used Instr. Midi Settings after loading . . . . . . . . . . . . . . . . 114 Region adjusting borders of . . . . . . . . . . . 177 Anchor . . . . . . . . . . . . . . . . . . . . . 178 comparison to Midi sequence . . 173 definition of . . . . . . . . . . . . . . . . . 162 Q button in the Event List . . . . . . . . . . . . . 217 Quantization explanation of . . . . . . . . . . . . . . . 154 Fix Quantize . . . . . . . . . . . . . . . . 155 mixed quantization . . . . . . . . . . . 157 operation of . . . . . . . . . . . . . . . . . 154 Pre-quantization . . . . . . . . . . . . . 157 quantization to odd tuplets . . . . . 156 sequence parameters . . . . . . . . . . 149 setting the value of . . . . . . . . . . . 154 standard quantization . . . . . . . . . 156 Swing Quantization . . . . . . . . . . . 156 Quantization of events in the Event List . . . . . . . . . . . . . 217 Quantize again in the Event List . . . . . . . . . . . . . 218 Quitting the song . . . . . . . . . . . . . . . . . 108 Emagic Adat Edit Q 348 Index delay . . . . . . . . . . . . . . . . . . . . . . . 178 deleting . . . . . . . . . . . . . . . . . . . . 174 dividing . . . . . . . . . . . . . . . . . . . . 174 editing with the Event List . . . . 176 generating . . . . . . . . . . . . . . . . . . 173 looping . . . . . . . . . . . . . . . . 175 178 moving . . . . . . . . . . . . . . . . . . . . . 176 moving with higher precision in the Sample editor . . . . . . . . . . . 176 multiple use of existing . . . . . . . 175 naming . . . . . . . . . . . . . . . . . . . . . 177 parameter box . . . . . . . . . . . . . . . 177 relationship to audio file . . . . . . . 162 working with in the Arrange window . . . . . . . . . . . . . . . . . . . . . . . 167 working with in the Sample editor . . . . . . . . . . . . . . . . . 265 working with ion the Sample editor . . . . . . . . . . . . . . . . . 168 Release modem and printer ports in background if stopped . . . . . . . . 110 Remove DC offset . . . . . . . . . . . . . . . . 275 Remove overlaps . . . . . . . . . . . . . . . . . . 146 Replace mode . . . . . . . . . . . . . . . . . . . . 126 Reset controllers sending from the Arrange window . . . . . . . . . . . . . . . . 160 Reverb control of from Mixer . . . . . . . . . 191 real-time effects . . . . . . . . . . . . . . 197 Reverse . . . . . . . . . . . . . . . . . . . . . . . . . 274 Revert to saved version of song on disk . . . . . . . . . . . . . . . . . . . . . . . . 106 Rewind . . . . . . . . . . . . . . . . . . . . . . . . . 125 S Sample editor amplitude axis in the Waveform display . . . . . . . . . . . . . . . . 262 Catch mode in . . . . . . . . . . . . . . . 261 changing selection borders in . . . 265 Cycle button in . . . . . . . . . . . . . . 264 cycle playback in . . . . . . . . . . . . . 264 description of . . . . . . . . . . . . . . . . 257 display of anchor . . . . . . . . . . . . . 163 edit commands in . . . . . . . . . . . . 267 editing regions with . . . . . . . . . . 176 functions available in . . . . . . . . . 269 layout of . . . . . . . . . . . . . . . . . . . . 258 349 Owner’s Manual Version 1.0 – English - Link mode in . . . . . . . . . . . . . . . . 261 maintaining anchor position in the Waveform display . . . . . . . 266 making audio file backups before destructive edits . . . . . . . . 268 making backup copies of audio files in . . . . . . . . . . . . . . . . . . . . . 257 manual selection in . . . . . . . . . . . 264 opening from the Arrange window . . . . . . . . . . . . . . . . 257 Overview display in . . . . . . . . . . 259 overview of functions available in . . . . . . . . . . . . . . . . . . . . . 257 playing an entire audio file in . . . 264 playing from a specified point in 264 playing from the Overview display . . . . . . . . . . . . . . . . 263 playing the current selection in . 264 sample rate conversion parameters . . . . . . . . . . . . . 276 selection commands in . . . . . . . . 264 Selection Parameter field in . . . . 265 shifting the selected area in . . . . 265 time axis in the Waveform display . . . . . . . . . . . . . . . . 262 view settings in . . . . . . . . . . . . . . 262 working with regions in . . 168 265 Zoom tool . . . . . . . . . . . . . . . . . . . 262 Sample editor functions change gain . . . . . . . . . . . . . . . . . 270 fade in . . . . . . . . . . . . . . . . . . . . . 271 fade out . . . . . . . . . . . . . . . . . . . . 271 invert . . . . . . . . . . . . . . . . . . . . . . 273 normalize . . . . . . . . . . . . . . . . . . . 269 remove DC offset . . . . . . . . . . . . 275 reverse . . . . . . . . . . . . . . . . . . . . . 274 sample rate conversion . . . . . . . . 275 silence . . . . . . . . . . . . . . . . . . . . . 272 trim . . . . . . . . . . . . . . . . . . . . . . . . 274 Sample Rate converting to fit song . . . . . . . . . . 170 Sample rate conversion . . . . . . . . 275 328 parameters of . . . . . . . . . . . . . . . . 276 Sampling rate rate supported by Adat Edit . . . . . . . . . . . . . . 328 Save . . . . . . . . . . . . . . . . . . . . . . . . . . . . 106 Save As . . . . . . . . . . . . . . . . . . . . . . . . . . 107 Save as_… . . . . . . . . . . . . . . . . . . . . . . . 107 Saving a Midi File . . . . . . . . . . . . . . . . . . 107 5 3 4 2 1 6 7 8 9 10 11 12 13 14 15 16 17 18 Gl Ix B C a song . . . . . . . . . . . . . . . . . . . . . . 107 Tutorial song . . . . . . . . . . . . . . . . . 64 Scissors tool . . . . . . . . . . . . . . . . . . . . . . 102 Score Page Edit view . . . . . . . . . . . . . . . 71 Score editor Arrange level display . . . . . . . . . . . 72 Display Parameter box . . . . . . . . . 70 Interpretation . . . . . . . . . . . . . . . . 70 opening from the Windows menu. . . . . . . . . . . . . . . . . . 108 Page Edit view . . . . . . . . . . . . . . . 71 Score style . . . . . . . . . . . . . . . . . . . 70 track filter . . . . . . . . . . . . . . . . . . . . 73 Scroll Bars using to change view of windows . 89 x/y-Movement Elements . . . . . . . 90 Scrolling through the Event List . . . . . . . . 204 Scrubbing with the SPL in the Bar Ruler . . 131 Second data byte display of in Event List . . . . . . . 207 Select all following . . . . . . . . . . . . . . . . . 96 Select inside Locators . . . . . . . . . . 97 145 Selection assigning an icon to a track . . . . . 140 commands in the Sample editor 264 of a block of objects . . . . . . . . . . . 95 of all objects following . . . . . . . . . 96 of audio track . . . . . . . . . . . . . . . . 165 of events in the Event List . . . . . 205 of individual objects . . . . . . . . . . . 94 of objects within the locator positions . . . . . . . . . . . . . . . . 97 of scattered objects . . . . . . . . . . . . 95 tutorial . . . . . . . . . . . . . . . . . . . . . . 53 Selection Parameter field in the Sample editor . . . . . . . . . . 265 Send Used Instr. Midi Settings after loading . . . . . . . . . . . . . . . . 114 117 Sequence ~ hear solo . . . . . . . . . . . . . . . . . . 126 assigning color to . . . . . . . . . . . . . 158 Change dynamics of ~s . . . . . . . . 152 changing the length of . . . . . . . . 144 copying . . . . . . . . . . . . . . . . . . . . . 143 creating an empty sequence . . . . 143 definition of . . . . . . . . . . . . . . . . . 143 Lengthen~ up to the next one . . 147 looping . . . . . . . . . . . . . . . . . . . . . 149 Emagic Adat Edit moving along the time axis . . . . . 143 mute . . . . . . . . . . . . . . . . . . . . . . . 103 Optimize length of a ~ . . . . . . . . 145 saving as a Midi file . . . . . . . . . . . 303 selecting all in a track . . . . . . . . . 142 selecting inside Locators . . . . . . 142 setting Cycle by length of . . . . . . 144 Sequence Parameter box MidiTHRU . . . . . . . . . . . . . . . . . . 63 Sequence parameters delay . . . . . . . . . . . . . . . . . . . . . . . 152 loop . . . . . . . . . . . . . . . . . . . . . . . . 149 Midi THRU . . . . . . . . . . . . . . . . . 148 normalizing parameters . . . . . . . . 152 quantize . . . . . . . . . . . . . . . . . . . . 149 transpose . . . . . . . . . . . . . . . . . . . 151 Sequences transposition of . . . . . . . . . . . . . . 151 Serial ports (Mac) releasing in background . . . . . . . 110 Set Audio Record Path . . . . . . . . . . . . . 165 Set Locators by Objects . . . . . . . 144 145 Set Optimal Object Sizes . . . . . . . . . . . 145 Shortcut creating to Adat Edit program . . . 34 Shuttling on the Bar Ruler . . . . . . . . . . . . . 131 Silence . . . . . . . . . . . . . . . . . . . . . . . . . . 272 SMF . . . . . . . . . . . . . . . . . . . . . . . . . . . . 302 SMPTE LTC/VITC . . . . . . . . . . . . . . . . . . 297 recording time code . . . . . . . . . . . 298 SMPTE Offset . . . . . . . . . . . . . . . . . . . 286 SMPTE time display of on Transport window . 121 SMPTE/EBU . . . . . . . . . . . . . . . . . . . . 295 drop frame . . . . . . . . . . . . . . . . . . 296 frame rate . . . . . . . . . . . . . . . . . . . 296 Snap objects . . . . . . . . . . . . . . . . . . . . . . 146 Solo tutorial . . . . . . . . . . . . . . . . . . . . . . 53 Solo button on audio objects . . . . . . . . . . . . . . 192 Solo mode . . . . . . . . . . . . . . . . . . . . . . . 126 Solo tool . . . . . . . . . . . . . . . . . . . . . . . . . 102 Soloing sequences in the Event List Arrange level display . . . . . . . . . . . . . . . . . 217 Song close . . . . . . . . . . . . . . . . . . . . . . . 106 loading Adat Edit songs on other 350 Index systems . . . . . . . . . . . . . . . . 304 open . . . . . . . . . . . . . . . . . . . . . . . 106 preparing a song for Midi file conversion . . . . . . . . . . . . . 302 revert to saved . . . . . . . . . . . . . . . 106 save . . . . . . . . . . . . . . . . . . . . . . . . 107 Save as . . . . . . . . . . . . . . . . . . . . . 107 saving as a Format 0 Midi file . . 303 saving as a Midi file . . . . . . . . . . . 303 Song position tutorial . . . . . . . . . . . . . . . . . . . . . . 52 Song Position Line on Bar Ruler . . . . . . . . . . . . . . . . . 131 Wide Song Position Line . . . . . . 111 widen . . . . . . . . . . . . . . . . . . . . . . 111 Song Position Pointer (SPP) . . . . . . . . 294 Song Settings Midi Settings . . . . . . . . . . . . . . . . 115 Recording options . . . . . . . . . . . . 113 saving in Autoload song . . . . . . . 112 Song Settings window . . . . . . . . . . . . . 107 Speaker click . . . . . . . . . . . . . . . . . . . . . 115 Split stereo files . . . . . . . . . . . . . . . . . . . 170 Standard Midi file . . . . . . . . . . . . . . . . . . 33 file extension of . . . . . . . . . . . . . . . 33 Format 0 . . . . . . . . . . . . . . . . . . . . 303 importing . . . . . . . . . . . . . . . . . . . 304 overview of . . . . . . . . . . . . . . . . . 302 preparing a Adat Edit song to be converted to . . . . . . . . . . . . 302 saving a single sequence as . . . . 303 saving a song as . . . . . . . . . . . . . . 303 Start of song setting on the Bar Ruler . . 129 130 Start or stop from the Bar Ruler . . . . . . . . . . . 131 Starting up on the Macintosh . . . . . . . . . . . . . . 34 Status byte of Midi event . . . . . . . . . . . . . . . . 201 Stereo audio objects . . . . . . . . . . . . . . . . 194 Stereo file formats of files recorded directly into Adat Edit . . . . . . . . . . . . . . . . . . . 170 split stereo . . . . . . . . . . . . . . . . . . 170 types supported by Adat Edit . . . . . . . . . . . . . . 170 Stereo recording setting audio object for stereo recording . . . . . . . . . . . . . . 166 351 Owner’s Manual Version 1.0 – English - Stop . . . . . . . . . . . . . . . . . . . . . . . . . . . . 125 Style tutorial . . . . . . . . . . . . . . . . . . . . . . 70 Swing quantization . . . . . . . . . . . . . . . . 156 Sychronization Midi Clock . . . . . . . . . . . . . . . . . . 127 Sync Mode . . . . . . . . . . . . . . . . . . . . . . . 287 Sync mode . . . . . . . . . . . . . . . . . . . . . . . 127 Synchronisation Midi . . . . . . . . . . . . . . . . . . . . . . . 287 Synchronization . . . . . . . . . . . . . . . . . . . 283 bar-referenced . . . . . . . . . . . . . . . 293 basics of . . . . . . . . . . . . . . . . . . . . 292 click track . . . . . . . . . . . . . . . . . . . 300 Midi Clock . . . . . . . . . . . . . . . . . . 294 of audio . . . . . . . . . . . . . . . . . . . . 300 of sequencers to tape . . . . . . . . . 299 of several sequencers at once . . . 300 procedure . . . . . . . . . . . . . . . . . . . 298 Pulse Clock and FSK . . . . . . . . . 293 SMPTE/EBU . . . . . . . . . . . . . . . 295 song position pointer . . . . . . . . . . 294 time-referenced . . . . . . . . . . . . . . 295 Synchronizers . . . . . . . . . . . . . . . . . . . . 298 1 2 3 4 5 6 7 8 9 10 11 12 T Tempo setting on the Transport window 122 Tempo and Timeline changing tempo after recording audio not a good idea . . . . . . . . . . 169 Tempo event inserting in the Tempo List . . . . 135 Tempo List . . . . . . . . . . . . . . . . . . . . . . 135 inserting a tempo event . . . . . . . 135 opening . . . . . . . . . . . . . . . . . . . . 135 Text tool . . . . . . . . . . . . . . . . . . . . . . . . . 101 Tie Objects . . . . . . . . . . . . . . . . . . . . . . 147 Time axis in the sample editor . . . . . . . . . . 262 Time Code (TC) . . . . . . . . . . . . . . . . . . 295 Time Machine . . . . . . . . . . . . . . . . . . . . 276 Time signature setting on the Transport window 122 Toggle Selection . . . . . . . . . . . . . . . . . . . 96 ~ with Solo-Function . . . . . . . . . 127 Toggle Transport . . . . . . . . . . . . . . . . . . . 92 Toolbox opening at current pointer 13 14 15 16 17 18 Gl Ix B C position . . . . . . . . . . . . . . . . 100 tutorial . . . . . . . . . . . . . . . . . . . . . . 57 Tools area of influence . . . . . . . . . . . . . . 99 Arrow tool . . . . . . . . . . . . . . . . . . . 100 assigning to the left mouse button . . . . . . . . . . . . . . . . . . 99 assigning to the right mouse button . . . . . . . . . . . . . . . . . 100 Eraser tool . . . . . . . . . . . . . . . . . . 101 Glue tool . . . . . . . . . . . . . . . . . . . 102 in Arrange window . . . . . . . . . . . 138 in the Matrix editor . . . . . . . . . . . 226 Mute tool . . . . . . . . . . . . . . . . . . . 103 Pencil tool . . . . . . . . . . . . . . . . . . 101 Scissors tool . . . . . . . . . . . . . . . . . 102 Solo tool . . . . . . . . . . . . . . . . . . . . 102 Text tool . . . . . . . . . . . . . . . . . . . . 101 undoing operations of . . . . . . . . . . 99 used in the Event List . . . . . . . . 202 working with . . . . . . . . . . . . . . . . . 98 Zoom tool . . . . . . . . . . . . . . . . . . . 103 Zoom tool in the Sample editor . 262 Track "All" channel track . . . . . . . . . . . . 139 "No Output" track . . . . . . . . . . . . 139 appending to end of list . . . . . . . 141 assigning a Midi channel . . . . . . 139 Assigning an Icon . . . . . . . . . . . . 140 Audio track . . . . . . . . . . . . . . . . . . 163 creating . . . . . . . . . . . . . . . . . . . . . 141 deleting . . . . . . . . . . . . . . . . . . . . 141 deleting contents of . . . . . . . . . . 142 Midi-Channel . . . . . . . . . . . . . . . 139 moving . . . . . . . . . . . . . . . . . . . . . 141 muting . . . . . . . . . . . . . . . . . . . . . 142 selecting all sequences in . . . . . . 142 Track List in Arrange window . . . . . . . . . . . 138 Track Mixer arming audio tracks from . . . . . . 179 opening from the Windows menu . . . . . . . . . . . . . . . . . . 109 Transport Midi monitor . . . . . . . . . . . . . . . . . 32 Transport field configuring in Arrange window . 138 hide/show in Arrange window . . 158 hide/show in the Matrix editor . . 226 Transport window . . . . . . . . . . . . . . . . . 119 autodrop button . . . . . . . . . . . . . . . 61 Emagic Adat Edit Cycle button . . . . . . . . . . . . . . . . 125 cycle button . . . . . . . . . . . . . . . . . . 53 display of free memory on . . . . . 122 display of free memoryFree memory . . . . . . . . . . . . . . . . 122 display of measure position . . . . 121 display of SMPTE time . . . . . . . 121 display options . . . . . . . . . . . . . . . 119 End of song marker . . . . . . . . . . . 124 Fast Forward . . . . . . . . . . . . . . . . 125 floating window . . . . . . . . . . . . . . 119 layout of . . . . . . . . . . . . . . . . . . . . 119 Metronome button . . . . . . . . . . . 127 Midi Indicator . . . . . . . . . . . . . . . 123 Midi reset . . . . . . . . . . . . . . . . . . . 123 Mode buttons . . . . . . . . . . . . . . . 125 opening . . . . . . . . . . . . . . . . . . . . 108 opening (Macintosh) . . . . . . . . . . . 36 Pause . . . . . . . . . . . . . . . . . . . . . . 124 Play . . . . . . . . . . . . . . . . . . . . . . . . 124 position fields and indicators . . . 121 position indicators . . . . . . . . . . . . 121 position slider . . . . . . . . . . . . . . . 120 Record button . . . . . . . . . . . . . . . 124 reorganizing free memory . . . . . . 122 Replace button . . . . . . . . . . . . . . 126 Rewind . . . . . . . . . . . . . . . . . . . . . 125 setting Display Format value on 121 setting the Cycle zone on . . . . . . 121 setting the Locators on . . . . . . . . 121 setting the size of . . . . . . . . . . . . 120 setting the tempo on . . . . . . . . . . 122 setting the time signature on . . . 122 Solo button . . . . . . . . . . . . . . . . . . 126 solo button . . . . . . . . . . . . . . . . . . . 54 Stop . . . . . . . . . . . . . . . . . . . . . . . 125 Sync button . . . . . . . . . . . . . . . . . 127 Transpose . . . . . . . . . . . . . . . . . . . . . . . . 151 Transposing . . . . . . . . . . . . . . . . . . . . . . 151 sequences . . . . . . . . . . . . . . . . . . . 151 Transposition corellated (classic) . . . . . . . . . . . . 278 free . . . . . . . . . . . . . . . . . . . . . . . . 278 tutorial . . . . . . . . . . . . . . . . . . . . . . 59 Trim . . . . . . . . . . . . . . . . . . . . . . . . . . . . 274 Turn Loops to Real Copies . . . . . . . . . 151 Tutorial Song . . . . . . . . . . . . . . . . . . . . . . 43 Arrange level display in Score . . . 72 Arrange window . . . . . . . . . . . . . . . 49 audio recordings . . . . . . . . . . . . . . 75 autodrop . . . . . . . . . . . . . . . . . . . . . 61 352 Index copies of sequences . . . . . . . . . . . . 58 copying sequences . . . . . . . . . . . . 58 creating audio tracks . . . . . . . . . . . 75 cycle mode . . . . . . . . . . . . . . . . . . . 52 dividing sequences . . . . . . . . . . . . 59 entering text in Score . . . . . . . . . . 71 GM tone generators . . . . . . . . . . . 44 importing audio files . . . . . . . . . . . 77 inserting Program Changes in the Event List . . . . . . . . . . . . . . 66 internal audio effects in the Mixer . . . . . . . . . . . . . . . . . . 80 key signature in Score . . . . . . . . . . 71 launching in Windows . . . . . . . . . 43 launching on the Macintosh . . . . . 44 loops . . . . . . . . . . . . . . . . . . . . . . . . 56 loops (sequences) . . . . . . . . . . . . . 56 Midi THRU . . . . . . . . . . . . . . . . . 63 Mixer . . . . . . . . . . . . . . . . . . . . . . . 76 mute program change control sequence . . . . . . . . . . . . . . . 44 Non GM tone generators configuring for . . . . . . . . . . . 45 Page Edit view in Score editor . . . 71 print . . . . . . . . . . . . . . . . . . . . . . . . 75 printing the Score . . . . . . . . . . . . . 75 quantization . . . . . . . . . . . . . . . . . . 55 quantizing . . . . . . . . . . . . . . . . . . . 55 recording Midi . . . . . . . . . . . . . . . . 60 Sample editor . . . . . . . . . . . . . . . . 78 Saving the song . . . . . . . . . . . . . . . 64 selection . . . . . . . . . . . . . . . . . . . . . 53 Sequence parameter box . . . . . . . 55 solo . . . . . . . . . . . . . . . . . . . . . . . . . 53 song position . . . . . . . . . . . . . . . . . 52 Song Settings window . . . . . . . . . . 61 sounds and Midi channels used in . . . . . . . . . . . . . . . . . . . . . . 45 start song position . . . . . . . . . . . . . 51 starting the song . . . . . . . . . . . . . . 47 Text input . . . . . . . . . . . . . . . . . . . 71 toolbox . . . . . . . . . . . . . . . . . . . . . . 57 transposition of sequences . . . . . . 59 Turn Loops to Real Copies . . . . . 60 undo . . . . . . . . . . . . . . . . . . . . . . . . 58 Tutorial song track filter in Score editor . . . . . . . 73 1 U Undo . . . . . . . . . . . . . . . . . . . . . . . 58 104 tutorial . . . . . . . . . . . . . . . . . . . . . . 58 Use . . . . . . . . . . . . . . . . . . . . . . . . . . . . . . 28 user interface . . . . . . . . . . . . . . . . . . . . . . 28 Owner’s Manual Version 1.0 – English - 3 4 V V tool in the Matrix window . . . . . . . . . 230 Velocity . . . . . . . . . . . . . . . . . . . . . . . . . 152 editing in the Matrix editor . . . . 230 Velocity offset . . . . . . . . . . . . . . . . . . . . 152 Sequence parameters . . . . . . . . . 152 View in Arrange window . . . . . . . . . . . 158 View filter in Event List . . . . . . . . . . . . . . . . 208 View settings in the Sample editor . . . . . . . . . . 262 VITC . . . . . . . . . . . . . . . . . . . . . . . . . . . 297 Volume control of from Mixer . . . . . . . . . 189 control on audio object . . . . . . . . 192 5 6 7 8 9 10 11 12 W Waveform display amplitude axis in . . . . . . . . . . . . . 262 maintaining the position of the anchor in . . . . . . . . . . . . . . . 266 setting the zoom factor in . . . . . . 261 time axis in . . . . . . . . . . . . . . . . . . 262 Window . . . . . . . . . . . . . . . . . . . . . . . . . . 28 Windows arranging on the screen . . . . . . . . . 92 closing . . . . . . . . . . . . . . . . . . . . . . 94 floating windows . . . . . . . . . . . . . 119 last window . . . . . . . . . . . . . . . . . . 92 next window . . . . . . . . . . . . . . . . . 92 previous window . . . . . . . . . . . . . . 92 working in background windows . 93 Windows Menu opening Event List from . . . . . . 108 opening Key Commands window from . . . . . . . . . . . . . . . . . . 109 opening the Arrange window . . . 108 opening the Matrix window from . . . . . . . . . . . . . . . . . . 109 353 2 13 14 15 16 17 18 Gl Ix B C opening the Score editor from . . 108 opening the Track Mixer from . . 109 X Z Zoom telescope tools . . . . . . . . . . . . . . . . 88 Zoom tool . . . . . . . . . . . . . . . . . . . . . . . . 103 in the Sample editor . . . . . . . . . . 262 XG Standard . . . . . . . . . . . . . . . . . . . . . . 27 Emagic Adat Edit 354