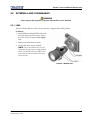
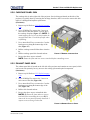
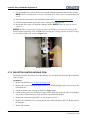
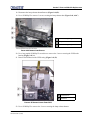
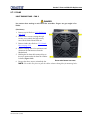
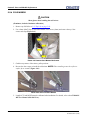
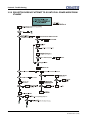
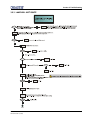
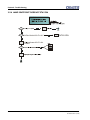
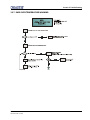
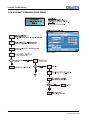
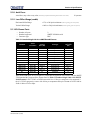
1
CP2000-M/MR Service Booklet 020-100220-02 China RoHS Compliance Information 关于中国《电子信息产品污染控制管理办法》的说明 • Environmentally Friendly Use Period 环保使用期限 The year number in the centre of the label indicates the Environmentally Friendly Use Period, which is required to mark on the electronic information product sold in China according to the China RoHS regulations. 本标志中表示的年数是根据《电子信息产品污染控制管理办法》(2006 年 2 月 28 日)以及《电子信息产品污染控制标识要求》(2006 年 11 月 6 日)制 定的、适用于在中华人民共和国境内销售的电子信息产品的环保使用期限。 • Material Concentration Values Table 有毒有害物质含量表 Part Name 部件名称 铅 (Pb) X 汞 (Hg) O Material Concentration (有毒有害物质或元素) 镉 六价铬 (Cd) (Cr 6+) O O 多溴联苯 (PBB) O 多溴二联苯醚 (PBDE) O Low voltage power 低压电源 supply X O O O O O Breaker/Switch 开关 X O O O O X Ballast 镇流器 X O O O O X Line filter 滤波器 X O O O O O AC relay 继电器 X O O O O X Ignitor 点火器 X O O O O O Harness/cable 连接电线/缆 X O O O O O AC terminal block 接线板 X O O O O O Enhanced formatter 增强型格式化板 interface board X O O O O O 接口板 Interface board X O O O O O 主板 Motherboard PCB X O O O O O Processor board 处理板 X O O O O O Stepper driver board 步进驱动板 X O O O O O Processor control 处理控制模块 module PCB X O O O O O Projector control module 投影机控制模块 PCB O O O O O O Liquid cooling system 液体冷却系统 X O O O O O Control panel display 显示控制面板 O O O O O O Blower/Fan 吹风机/风扇 O O O O O O Sensor 传感器 X O X O O O Illumination optics 照明光学系统 system X O X O O O Projection lens 投影镜头 X O X O O O Auxiliary optics 辅助光学器件 X O O O O O Mechanical enclosure* 机械附件 X O O O O O Lamp 灯泡 X O O O O O 马达驱动镜头架 Motorized auxiliary lens mount (optional) (备选件) Note: O : indicates that the concentration value of the particular hazardous substance contained in all the homogeneous materials for this part, according to EIP-A, EIP-B, EIP-C, is below the stipulated levels in China SJ/T11363-2006. 表示该有毒有害物质在该部件所有均质材料中的含量均在 SJ/T11363-2006 规定的限量要求以下。 X: indicates that the concentration value of the particular hazardous substance contained in all the homogeneous materials for this part, according to EIP-A, EIP-B, EIP-C, may be above the stipulated levels in China SJ/T11363-2006. 表示该有毒有害物质至少在该部件的某一均质材料中的含量可能超出 SJ/T11363-2006 规定的限量要求。 * This part uses metallic alloys, which may contain Lead. 因该部件使用金属合金材料,故可能含有铅。 TABLE OF CONTENTS 1 Introduction 1.1 Using this Manual ............................................................................................................1-2 1.1.1 Labels and Marking .................................................................................................1-2 1.1.2 Typographical Notations..........................................................................................1-2 1.2 Projector Description .......................................................................................................1-3 1.3 How the Projector Works ................................................................................................1-3 1.3.1 Keypad Control ........................................................................................................1-3 2 Parts and Module Replacement 2.1 Ordering Parts ..................................................................................................................2-2 2.2 Index of Parts and Modules .............................................................................................2-3 2.3 Safety Warnings and Guidelines......................................................................................2-5 2.4 Replacement Procedures..................................................................................................2-6 2.4.1 Tools Required.........................................................................................................2-6 2.4.2 Servicing Guidelines ................................................................................................2-6 2.5 Externals and Consumables .............................................................................................2-7 2.5.1 Lens ..........................................................................................................................2-7 2.5.2 Lens Flags ................................................................................................................2-8 2.5.3 Air Filter Cover ........................................................................................................2-9 2.5.4 Intake Air Filter........................................................................................................2-9 2.5.5 Top Lid.....................................................................................................................2-10 2.5.6 Rear Lamp Door.......................................................................................................2-11 2.5.7 Control Display Panel (CDP)...................................................................................2-12 2.5.8 Cardcage Panel Skin ................................................................................................2-13 2.5.9 Exhaust Panel Skin...................................................................................................2-13 2.5.10 Front Face Skin .....................................................................................................2-14 2.5.11 Lamp Door Frame Skin.........................................................................................2-14 2.5.12 Intake Duct ............................................................................................................2-15 2.5.13 Liquid Cooling Air Filter ......................................................................................2-17 2.5.14 Remove Lamp .......................................................................................................2-18 Installing a New Lamp ..............................................................................................2-19 2.6 Lamp Compartment .........................................................................................................2-19 2.6.1 Safety Shield ............................................................................................................2-19 2.6.2 Main Blower Assembly ...........................................................................................2-20 2.6.3 Lamp Adjuster Assembly.........................................................................................2-21 2.6.4 Reflector Assembly (Including Heat Dump) ...........................................................2-22 2.6.5 Projector Feet ...........................................................................................................2-23 2.6.6 UV Filter ..................................................................................................................2-24 2.6.7 Lamp Door Interlock................................................................................................2-25 2.6.8 Lamp Ballast ............................................................................................................2-25 2.6.9 Lamp Ballast - Fans 1 and 2.....................................................................................2-27 2.6.10 AC Line Filters......................................................................................................2-28 110V AC Line Filter .................................................................................................2-28 220V AC Line Filter .................................................................................................2-28 CP2000-M/MR Service Booklet 020-100220-02 Rev. 1 (07/08) i-i TABLE OF CONTENTS A/C Selector Switch ..................................................................................................2-29 2.7 Cardcage and LVPS Compartment .................................................................................2-29 2.7.1 Cardcage Module .....................................................................................................2-29 2.7.2 Projector Control Module (PCM) ............................................................................2-30 2.7.3 Interface Board.........................................................................................................2-31 2.7.4 Processor Board .......................................................................................................2-33 2.7.5 FPGA Formatter Interface Board (FFIB).................................................................2-33 2.7.6 Motherboard.............................................................................................................2-33 2.7.7 Stepper Driver Board (SDB)....................................................................................2-34 2.7.8 Low Voltage Power Supply (LVPS) - Phase I.........................................................2-35 2.7.9 Low Voltage Power Supply (LVPS) - Phase II .......................................................2-37 2.7.10 LVPS Rail Adjustment..........................................................................................2-41 Rail Adjustment via CDP (Preferred Method) .........................................................2-41 Rail Adjustment via Multimeter (Alternative Method) ............................................2-42 2.7.11 Fans .......................................................................................................................2-43 Light Engine Fans - Fan 8 .........................................................................................2-43 Intake - Fans 7, 8, 10 and 11 .....................................................................................2-44 2.8 Front Engine Compartment .............................................................................................2-45 2.8.1 Primary Lens Mount ................................................................................................2-45 2.8.2 Liquid Cooling Assembly ........................................................................................2-46 2.8.3 Integrator Assembly .................................................................................................2-47 2.8.4 Contrast Aperture .....................................................................................................2-49 2.8.5 Light Sensor Module................................................................................................2-49 2.8.6 Cold Mirror ..............................................................................................................2-50 2.8.7 Fold Mirror 1............................................................................................................2-51 2.8.8 Yellow Notch Filter (YNF)......................................................................................2-52 2.8.9 Shutter Assembly .....................................................................................................2-53 2.8.10 Light Engine..........................................................................................................2-54 2.8.11 LVDS Connector Cable Insertion .........................................................................2-55 2.8.12 Cooling Heat Sinks and Hoses..............................................................................2-56 2.8.13 Illumination Optic System (IOS) ..........................................................................2-57 2.8.14 Fold Mirror 2.........................................................................................................2-58 3 Troubleshooting 3.1 Overview..........................................................................................................................3-2 3.2 Troubleshooting Trees .....................................................................................................3-3 3.2.1 CDP No Activity/No Response................................................................................3-3 3.2.2 Projector Does Not Attempt to go into Full Power Mode from Standby ................3-4 3.2.3 Lamp Will Not Ignite ...............................................................................................3-5 3.2.4 Lamp Ignites But Does Not Stay ON.......................................................................3-6 3.2.5 LampLOC™ Not Working ......................................................................................3-7 3.2.6 LiteLOC™ Not Working .........................................................................................3-8 3.2.7 DMD Over-temperature Warning ............................................................................3-9 3.2.8 Ethernet Communication Error ................................................................................3-10 3.2.9 DLP Communications Error ....................................................................................3-11 CP2000-M/MR Service Booklet 020-100220-02 Rev. 1 (07/08) i-ii TABLE OF CONTENTS 3.2.10 Ballast Communication Failure ............................................................................3-12 3.2.11 ILS Has Lost Focus, Offset and/or Zoom .............................................................3-13 4 Serial Communications 5 Specifications 5.1 Display .............................................................................................................................5-2 5.1.1 Panel Resolution and Refresh Rate ..........................................................................5-2 5.1.2 Achievable Brightness (measured at screen center/2000W)....................................5-2 5.1.3 Minimum Contrast Ratio .........................................................................................5-2 5.1.4 Luminance Uniformity.............................................................................................5-2 5.1.5 Color and Gray Scale ...............................................................................................5-2 5.1.6 White Point ..............................................................................................................5-2 5.1.7 Gamma .....................................................................................................................5-2 5.1.8 Axial Focus ..............................................................................................................5-3 5.1.9 Lens Offset Range (usable)......................................................................................5-3 5.1.10 D-Cinema Ports.....................................................................................................5-3 5.1.11 Graphic Ports.........................................................................................................5-4 5.2 Control Signal Compatibility...........................................................................................5-4 5.2.1 Ethernet Management Port.......................................................................................5-4 5.2.2 Ethernet Auxiliary Port ............................................................................................5-4 5.2.3 RS232-A Port (TI Light Engine) .............................................................................5-4 5.2.4 RS232-B Port (PCM) ...............................................................................................5-5 5.2.5 GPIO Port.................................................................................................................5-5 5.2.6 Simple Contact Closure Interface (SCCI) Port ........................................................5-5 5.3 Control Display Panel (CDP) ..........................................................................................5-5 5.4 Power Requirements ........................................................................................................5-6 5.4.1 Standard Mode (uses line cord provided) ................................................................5-6 5.4.2 UPS (Uninterruptible Power Supply) Mode ............................................................5-6 5.5 Lamp ................................................................................................................................5-6 5.6 Physical Specifications ....................................................................................................5-7 5.7 Regulatory........................................................................................................................5-7 5.8 Environment.....................................................................................................................5-8 5.9 Standard and Optional Components ................................................................................5-8 5.9.1 Standard ...................................................................................................................5-8 5.9.2 Optional Components ..............................................................................................5-8 6 Interconnections Appendix A Block Diagram Appendix B Shutter Override B.1 Shutter Manual Override.................................................................................................B-2 CP2000-M/MR Service Booklet 020-100220-02 Rev. 1 (07/08) i-iii 1 Introduction This manual provides technical information for assisting qualified Christie service technicians in the servicing and repair of all CP2000-M/MR projectors • 1.1 Using this Manual • 1.2 Projector Description • 1.3 How the Projector Works CP2000-M/MR Service Booklet 020-100220-02 Rev. 1 (07/08) 1-1 Section 1: Introduction 1.1 USING THIS MANUAL This manual provides technical information for assisting qualified Christie service technicians in the servicing and repair of the CP2000-M/MR projector models. The manual is updated as required please check the Christie website at www.christiedigital.com for available updates. Only qualified Christie trained service technicians knowledgeable about all potential hazards associated with high voltage, ultraviolet exposure and high temperatures generated by the lamp and associated circuits are authorized to 1) assemble/install the projector and 2) perform service functions inside the projector. NOTE: Only personnel trained specifically by Christie on lamp replacement and lamp safety may handle the lamp. Disclaimer: Every effort has been made to ensure the information in this document is accurate and reliable. However, due to constant research, the information in this document is subject to change without notice. Christie Digital Systems assumes no responsibility for omissions or inaccuracies. Updates to this document are published regularly, as required. Please contact Christie Digital Systems for availability. 1.1.1 LABELS AND MARKING This symbol indicates there are important operating and maintenance (servicing) instructions in the literature accompanying the projector. This symbol indicates non-insulated “dangerous voltage” within the projector’s enclosure that may be of sufficient magnitude to constitute a risk of electric shock. This symbol warns of exposure to UV light. This symbol warns of high temperatures/hot surfaces. This symbol warns of high pressures resulting in explosion. 1.1.2 Typographical Notations The following notations are used throughout this manual: • Keypad commands and PC keystrokes appear in bold small caps, such as POWER, INPUT, ENTER etc. • References to specific areas of the document appear italicized and underlined. When viewed online the text appears in blue indicating a direct link to that section. For example, Section 2 Parts and Module Replacement. • References to other documents appear italicized and bold, such as Service Manual. • References to software menus and available options appear bold, such as Main menu, Preferences. • User input or messages that appear on screen, in status display units or other control modules appear in Courier font. For example. “No Signal Present”, Login: christiedigital. • Error codes, LED status appear in bold, e.g. LP, A1 etc. • Operational states of modules appear capitalized, such as power ON/OFF. 1-2 CP2000-M/MR Service Booklet 020-100220-02 Rev. 1 (07/08) Section 1: Introduction 1.2 PROJECTOR DESCRIPTION The CP2000-M/MR (119-001101-xx & 119-002103-xx) is a professional quality, easy-to-use DMD projector utilizing DLP Cinema® technology from Texas Instruments. It’s allin-one design integrates all components in a sleek projection head that can be table-top mounted or used with the optional rack stand. Integrating smoothly into traditional projection environments, such as theatres and other wide screen exhibitor venues, the CP2000-M/MR offers stunning wide screen high-resolution cinema images that remain flawless from first release to final show. CP2000-M/MR interfaces with local networks typical in theatres throughout the world and can be expanded even further by connecting non-cinema DVI source material for multimedia presentations from a variety of formats. 1.3 FIGURE 1-1 CP2000-M/MR HOW THE PROJECTOR WORKS The projector accepts data/graphics and video input signals for projection onto front or rear flat screens. High brightness light is generated by an internal bubble lamp then modulated by 3 Digital Micro-mirror Device (DMD) panels that provide digitized red, green or blue color information. Light from the "on" pixels of each panel is reflected, converged and then projected to the screen through the front lens, where all pixels are perfectly superimposed as a sharp full-color image. 1.3.1 KEYPAD CONTROL Sophisticated processor-based logic and control circuitry provide many of the automatic features present in these projectors. This circuitry interfaces with the keypad and optical system to provide simple control of most projector functions, such as: • • • • • • Turning the projector ON and OFF Switching from 1 input source to another Adjusting display settings such as contrast, brightness and resizing Correcting undesirable display effects and input noise Accessing on-line help and projector status screens Accessing user and service menus CP2000-M/MR Service Booklet 020-100220-02 Rev. 1 (07/08) 1-3 2 Parts and Module Replacement This section includes all parts and module replacement procedures for the CP2000-M/MR. Refer to 2.2 Index of Parts and Modules for a list of available replacement parts and the page number on which the procedure begins. • • • • • • • • 2.1 Ordering Parts 2.2 Index of Parts and Modules 2.3 Safety Warnings and Guidelines 2.4 Replacement Procedures 2.5 Externals and Consumables 2.6 Lamp Compartment 2.7 Cardcage and LVPS Compartment 2.8 Front Engine Compartment CP2000-M/MR Service Booklet 020-100220-02 Rev. 1 (07/08) 2-1 Section 5: Parts and Module Replacement 2.1 ORDERING PARTS When ordering replacement parts provide the following information found on the product license label: • Projector Model • Projector Serial Number • Manufacture Date Table 2.1 Technical Support Contact Information AMERICAS Canada Toll Free: 1-800-221-8025 Tel: 519-744-8005 Fax: 519-749-2776 USA Chile Toll Free: 1-800-221-8025 Tel: 519-744-8005 Fax: 519-749-3302 Toll Free: 1-800-221-8025 Tel: 519-744-8005 Fax: 519-749-3302 EUROPE, MIDDLE EAST AND AFRICA United Kingdom Germany France Support/Service Centre Tel: +44 (0) 118 977 8111 Fax: +44 (0) 118 977 8112 Support Tel: +49 (0) 1749 9834 95 Fax: +49 (0) 2161 6645 46 Support Tel: +33 (0) 1 47 48 28 06 Fax: +33 (0) 1 47 48 26 06 Italy Service Centre Tel: +49 (0) 2161 56620 22 Fax: +49 (0) 2161 6645 46 Service Centre Tel: +33 (0) 1 47 48 28 88 Fax: +33 (0) 1 47 48 26 06 Spain Hungary & Russia Marcus Fernandez Christie Spain c/o Esher Tel: +34 91 633 9990 Fax: +34 91 633 9991 Mobile: +34 667 447 707 Support/Service Centre Tel: +44 (0) 118 977 8111 Fax: +44 (0) 118 977 8112 eHome Italia Service Tel: +39 (0) 2 9902 1161 Fax: +39 (0) 2 9902 2641 Middle East & Africa Support/Service Centre Tel: +44 (0) 118 977 8111 Fax: +44 (0) 118 977 8112 Eastern Europe Support/Service Centre Tel: +44 (0) 118 977 8111 Fax: +44 (0) 118 977 8112 ASIA-PACIFIC Singapore China - Beijing China - Shanghai Tel: +65 877 8737 Fax: +65 877 8747 Tel: +86 21 6278 7708 Fax: +86 21 6278 7707 (Shanghai Office) Tel: +86 21 6278 7708 Fax: +86 21 6278 7707 Japan - Tokyo South Korea Tel: +81 3 3599 7481 Fax: +81 3 3599 7482 Tel: +82 2 702 1601 Fax: +82 2 702 1602 * For the most current listings, refer to the website at www.christiedigital.com AVAILABILITY: Not all parts identified in this booklet are available separately. Some parts are stocked as inventory and are available only until the current supply lasts. 2-2 CP2000-M/MR Service Booklet 020-100220-02 Rev. 1 (07/08) Section 5: Parts and Module Replacement 2.2 INDEX OF PARTS AND MODULES All replacement parts and accessories for the CP2000-M/MR projector can be found in Table 2.2 and Table 2.3. Each table contains a description of the part, the service kit part number and the page on which its replacement procedure begins, if any. Table 2.2 CP2000-M/MR Service Parts List PART NAME/DESCRIPTION AC Line Filter 15A AC Line Filter 20A AC Selector Switch Air Filter Ballast Cold Mirror Control Display Panel (including harness) Fan 12V 0.5A 4-wire 92mm (Fans 6,7,10,11) Fan 12V 0.6A 4-wire 92mm (Fan 8) Fan 12V 0.5A 4-wire 120mm (Fan 5) Feet (4x adjustable) FFIB Fold Mirror #1 Fold Mirror #2 Harness CDP External Heatsinks with filled hoses Integrator Assembly (includes holder & rod/frame and cover are separate) Interlock Switch IOS (does not include integrator & LiteLOC™) Key - High Security Lamp CDXL-20SD Lamp Cooling LampLOC™ Lens Mount Lens Mount Lockdown Handle Light Engine Light Sensor for PCB & LiteLOC (includes housing & cover) Liquid Cooling Assembly (entire assembly, filled) LVDS Harness LVPS Power Supply Motherboard PCB PCB Interface Board PCB PCM PCM CP2000-M/MR Service Booklet 020-100220-02 Rev. 1 (07/08) CHRISTIE SERVICE KIT PART # 003-002136-xx 003-002038-xx 003-110864-xx 003-002311-xx 003-100252-xx 003-001978-xx 003-110791-xx 003-100730-xx 003-110827-xx 003-100742-xx 003-002146-xx 003-100637-xx 003-001979-xx 003-001980-xx 003-100726-xx 003-100791-xx 003-100929-xx 003-001559-xx 003-100951-xx 003-001526-xx 003-001976-xx 003-100790-xx 003-100663-xx 003-100665-xx 003-002141-xx 003-100664-xx 003-100229-xx 003-100668-xx 003-002142-xx 003-001194-xx 003-100636-xx 003-120119-xx 003-001196-xx 003-100536-xx PROCEDURE BEGINS ON PAGE... 2-28 2-28 2-29 2-9 2-25 2-50 2-12 2-44 2-43 / 2-23 2-33 2-51 2-58 / 2-56 2-47 2-25 2-57 / 2-18 2-56 / 2-45 / 2-54 2-49 2-46 2-55 2-34 2-33 2-31 2-31 2-30 2-3 Section 5: Parts and Module Replacement PART NAME/DESCRIPTION Processor PCB Reflector/Lamp Housing (includes sheet metal housing & lint free gloves) Shutter Stepper Driver Board (SDB) Temperature Sensor (1 per DMD on light engine) UV Filter Yellow Notch Filter (1 filter & disposable nitril gloves) CHRISTIE SERVICE KIT PART # 003-000847-xx 003-100765-xx 003-100792-xx 003-110242-xx 003-100618-xx 003-002145-xx 003-001982-xx PROCEDURE BEGINS ON PAGE... 2-33 2-22 2-53 2-34 / 2-24 2-52 Table 2.3 Other Parts/Options PART NAME/DESCRIPTION Lenses Prime Lenses 1.03:1 mDC2K Fixed Lens 1.3 - 1.7:1 mDC2K Zoom Lens 1.39 - 1 1.9:1 mDC2K Zoom Lens 1.5 - 2.2:1 mDC2K Zoom Lens 1.7 - 2.4:1 mDC2K Zoom Lens 1.9 - 3.0:1 mDC2K Zoom Lens 2.4 - 3.9:1 mDC2K Zoom Lens 3.9 - 6.52:1 mDC2K Zoom Lens Auxiliary Lenses 1.25x Anamorphic (requires optional CP2000-M Motorized Auxiliary Lens Mount) 1.26x Wide Converter Lens (requires optional CP2000-M Motorized Auxiliary Lens Mount) Miscellaneous Components / Options CDP extension harness Hex Key Holder on Lamp Door Hex Key 5mm High Security Lock and Key CP2000-M Motorized Auxiliary Lens Mount: M-MALM (optional) Protective Clothing Safety Kit (Kevlar gloves, flack jacket, face shield) Rack Stand Rack Stand Panel Kit Foot Brackets Exhaust duct 2-4 CHRISTIE SERVICE KIT PART # 108-319104-xx 108-320106-xx 108-327103-xx 108-329105-xx 108-321107-xx 108-328104-xx 108-322108-xx 108-323109-xx 38-809054-xx 108-281101-xx 003-100726-xx 011-101833-xx 012-101265-xx 003-001526-xx 108-111101-xx 108-111102-xx 59-8900-095 108-272101-xx 108-273101-xx 119-100101-xx 119-103105-xx CP2000-M/MR Service Booklet 020-100220-02 Rev. 1 (07/08) Section 5: Parts and Module Replacement 2.3 SAFETY WARNINGS AND GUIDELINES WARNINGS Always power down and disconnect power sources prior to servicing. HIGH VOLTAGES MAY BE EXPOSED Always unplug the projector prior to disassembly. QUALIFIED SERVICE TECHNICIANS REQUIRED All module replacement procedures must be performed by qualified service technicians. NON-INSULATED DANGEROUS VOLTAGES MAY BE EXPOSED Always disconnect from AC prior to disassembly. OBSERVE ALL ELECTROSTATIC PRECAUTIONS Use a grounded wrist strap when handling electronic assemblies. ALLOW LAMP AND PROJECTOR TO COOL DOWN Once the projector is powered down, allow the cooling fans to automatically turn OFF before disconnecting from AC and opening the projector. This takes approximately 15 minutes. CP2000-M/MR Service Booklet 020-100220-02 Rev. 1 (07/08) 2-5 Section 5: Parts and Module Replacement 2.4 REPLACEMENT PROCEDURES 2.4.1 TOOLS REQUIRED • • • • • • • Low and high security keys Phillips™ screwdrivers - #1, #2 and #3 long stems Allen™ keys Hex keys - 1.5mm, 2mm, 2.5mm, 3mm and 5mm Nut drivers - 8mm, 17mm, 3/16” and 9/16” Electrostatic protective strap and pad Disposable Nitrile gloves (included with optical components) 2.4.2 SERVICING GUIDELINES • • • • • 2-6 Always power down and disconnect power sources prior to servicing. Follow all service safety guidelines. Refer to Table 2.2 to locate each module within the projector. When re-installing a module, follow “removal” instructions in reverse unless otherwise indicated. Refer to Section 6 Interconnections when re-connecting harnesses. CP2000-M/MR Service Booklet 020-100220-02 Rev. 1 (07/08) Section 5: Parts and Module Replacement 2.5 EXTERNALS AND CONSUMABLES WARNING Never operate the projector or the fans without all the covers installed. 2.5.1 LENS The lens is held in place by 2 hex screws (optional), 3 magnets and a locking clamp. (2 minutes) 1. Position the lens clamp OPEN to unlock the lens from the mount. If necessary, remove the 2 hex screws from the mounts (Figure 2-1). 2. Pull the lens out of the lens mount. 3. Reverse the above steps to reinstall. NOTE: Use of the optional hex screws is required if the projector is ceiling mounted where it is possible the lens could become loose from constant vibrations and cause physical injury. FIGURE 2-1 REMOVE LENS CP2000-M/MR Service Booklet 020-100220-02 Rev. 1 (07/08) 2-7 Section 5: Parts and Module Replacement 2.5.2 LENS FLAGS 1. Remove the lens. Refer to 2.5.1 Lens, on page 2-7. 2. Use a #1 Phillips™ screwdriver to remove the 2 M2 x 4mm screws and lock washers securing the lens flag to the lens. 3. Position the replacement flag (#012-101504-xx) so it is centered between the 2 mounting positions (Figure 2-2). 4. Use a #1 Phillips™ screwdriver to install the supplied M2 x 4mm screws (#012-100031-xx) to secure the flag to the lens. 5. Manually rotate the lens to ensure there is no interference. If the lens does not rotate easily the lens itself or the motors may be damaged. 6. Reinstall the lens. Refer to 2.5.1 Lens, on page 2-7. 7. Perform lens calibration using either the CDP or web ui. For details, refer to the CP2000-M/MR User Manual (020-100123-xx). NOTES: 1) All lens types use the same lens flag for both zoom and focus (#021-101504-xx). 2) All lenses have a zoom and focus lens flag, except for the 1.05:1 lens, which only has 1 flag for focus. FIGURE 2-2 REPLACING LENS FLAGS 2-8 CP2000-M/MR Service Booklet 020-100220-02 Rev. 1 (07/08) Section 5: Parts and Module Replacement 2.5.3 AIR FILTER COVER (2 minutes) 1. Use a #2 Phillips™ to loosen the 2 captive screws at the bottom of the filter (Figure 2-3). 2. To remove, pull the cover up and out from the projector housing. 3. To reinstall, align the bottom tabs and reverse the above steps. Refer to 2.5.4 Intake Air Filter, on how to replace the air filter. FIGURE 2-3 REMOVE AIR FILTER COVER 2.5.4 INTAKE AIR FILTER CAUTION When installing the intake filter ensure the indicator arrow is pointing in the direction of the airflow. (3 minutes) 1. Remove the air filter cover. Refer to 2.5.3 Air Filter Cover. 2. Pull the air filter out of the air filter cover. 3. When installing a new filter align the top tabs and push into the filter cover. Ensure the arrow indicator on the filter is facing in the direction of the airflow. CP2000-M/MR Service Booklet 020-100220-02 Rev. 1 (07/08) 2-9 Section 5: Parts and Module Replacement 2.5.5 TOP LID DANGER UV HAZARD: When servicing the projector with the top lid removed anyone within the immediate vicinity must wear safety glasses with side shields. (3 minutes) 1. Use a #2 Phillips to loosen the 7 captive screws securing the top lid to the projector housing (Figure 2-4). 2. Unlock the rear lamp door using the low security key. 3. Lift the lid up from the rear of the projector and pull it away from the 2 tabs on the front skin. 4. When reinstalling, align the front 2 tabs and reverse the above steps. FIGURE 2-4 REMOVE TOP LID 2-10 CP2000-M/MR Service Booklet 020-100220-02 Rev. 1 (07/08) Section 5: Parts and Module Replacement 2.5.6 REAR LAMP DOOR DANGER UV HAZARD: Wear authorized protective clothing whenever the lamp door is opened. Located on the inside of the rear door is a duct for transporting air from the blower to the lamp compartment and a 5mm Allen® key to tighten/loosen the lamp cathode clamp. Mounted on the outside of the door is the CDP. NOTE: Use caution when opening the rear lamp door - the 180° opening radius of the door could damage the CDP. (20 minutes) 1. Remove the CDP from the rear door mount. Refer to 2.5.7 Control Display Panel (CDP), on page 2-12. 2. Unlock the rear door using the low security key. 3. Remove the e-clip from the right-side hinge of the rear door (Figure 2-5, B). 4. Slide the pivot rod out from the left-side (Figure 2-5, A). A Pivot Rod B E-Clip FIGURE 2-5 REMOVE REAR DOOR 5. Reverse the above steps to reinstall. NOTE: When replacing the rear door ensure the airflow duct, Allen key holder and CDP are removed and installed onto the replacement door. CP2000-M/MR Service Booklet 020-100220-02 Rev. 1 (07/08) 2-11 Section 5: Parts and Module Replacement 2.5.7 CONTROL DISPLAY PANEL (CDP) The CDP is mounted to the rear lamp door. It can be removed from the mount and used as a wired remote or remain seated in the mount. The mount itself can be removed from the rear lamp door and mounted to another location within the area. (2 minutes) 1. Push the CDP to 1 side to create a small gap between it and the locking pin holding it to the mount. Release this corner of the CDP first, then do the same for the other side. Pull the CDP module forward to remove it from the mount. 2. Disconnect the CDP from the User I/O panel on the operator side of the projector. 3. Remove the 2 screws attaching the CDP mount to the rear door (Figure 2-6, B). Use the designated mounting positions on the wall plate to mount the CDP to another location within the projection room (Figure 2-6, A). NOTE: The CDP comes equipped with an 8ft. extension cord. 4. Reverse the above steps to reinstall. A Mounting Positions B Screw (1 of 2) FIGURE 2-6 CDP MOUNT 2-12 CP2000-M/MR Service Booklet 020-100220-02 Rev. 1 (07/08) Section 5: Parts and Module Replacement 2.5.8 CARDCAGE PANEL SKIN The cardcage skin is on the right-side of the projector. Service being performed on this side of the projector, is typically done by removing the cardcage; therefore, there is no need to remove this skin unless it is damaged and requires replacement. (25 minutes) 1. Remove top lid. Refer to 2.5.5 Top Lid, on page 2-10. 2. Use a #2 Phillips™ to remove the 2 screws at each corner of the skin and the 2 screws above the cardcage faceplate (Figure 2-7). NOTE: To avoid stripping the 2 screws on the faceplate do not apply more than 1.5 inch-lbs of torque when re-fastening. 3. Use a 4mm Allen™ key to remove the 5 socket head capscrews along the bottom edge of the skin (Figure 2-7). 4. Pull the cardcage out and lift the skin to clear the lip. 5. Pull the cardcage panel skin forward and out. FIGURE 2-7 REMOVE CARDCAGE SKIN 6. Reverse the above steps to reinstall. NOTE: Ensure the front and rear corners interlock before reinstalling screws. 2.5.9 EXHAUST PANEL SKIN The exhaust panel skin is located on the left-side of the projector and contains an access panel, which can be removed separately for easy access to the cooling system and optical components. (30 minutes) 1. Remove top lid. Refer to 2.5.5 Top Lid, on page 2-10. 2. Use a #2 Phillips™ to remove the 2 screws at each corner of the skin (Figure 2-8). 3. Use a 4mm Allen™ key to remove the 5 socket head capscrews along the bottom edge of the skin (Figure 2-8). 4. Pull the skin forward and out. 5. Reverse the above steps to reinstall the skin. NOTES: 1) Ensure the front and rear corners interlock before reinstalling the screws. 2) To remove the access panel separately loosen the 2 captive screws securing it to the skin. FIGURE 2-8 REMOVE EXHAUST PANEL CP2000-M/MR Service Booklet 020-100220-02 Rev. 1 (07/08) 2-13 Section 5: Parts and Module Replacement 2.5.10 FRONT FACE SKIN The front face skin is fastened to the projector housing by 2 tabs that interlock with the side skins, 1 screw that attaches to a standoff inside the housing and 5 screws from the bottom of the housing. (30 minutes) 1. Remove top lid. Refer to 2.5.5 Top Lid, on page 2-10. 2. Remove exhaust panel skin. Refer to 2.5.9 Exhaust Panel Skin, on page 2-13. NOTE: This skin must be removed in order to access the security standoff screw securing the front face skin to the projector base. 3. Use a #2 Phillips™ to remove the security standoff screw, inside the housing. 4. Use a 4mm Allen™ key to remove the 5 socket head capscrews along the bottom edge of the skin (Figure 2-9). 5. Remove the 2 screws securing the cooling reservoir to the front face support (Figure 2-9). 6. Use a #1 Phillips to remove the 6 screws securing the lens boot (not shown). FIGURE 2-9 REMOVE FRONT SKIN 7. Pull the skin forward and out. 8. Reverse the above steps to reinstall. 2.5.11 LAMP DOOR FRAME SKIN The lamp door frame interlocks with the side skins. This skin should never be removed unless it is damaged and requires replacement. (30 minutes) 1. Remove top lid. Refer to 2.5.5 Top Lid, on page 2-10. 2. Remove the exhaust panel skin. Refer to 2.5.9 Exhaust Panel Skin, on page 2-13. 3. Use a 4mm Allen™ key to remove the 5 socket head capscrews along the bottom edge of the skin (Figure 2-10). 4. Use a #2 Phillips™ to remove the security screw on the right-bottom corner inside the unit. 2-14 FIGURE 2-10 REMOVE LAMP DOOR SKIN CP2000-M/MR Service Booklet 020-100220-02 Rev. 1 (07/08) Section 5: Parts and Module Replacement 5. Use a #2 Phillips™ to remove the 2 screws from the AC receptacle (Figure 2-11). 6. Pull the skin forward and out. 7. Reverse the above steps to reinstall. 2.5.12 INTAKE DUCT (5 minutes) 1. Remove top lid. Refer to 2.5.5 Top Lid, on page 2-10. 2. Use a #2 Phillips™ to remove the 6 screws securing the high security cover, unlock the high security access lock, lift the lid and slide out (Figure 2-12). FIGURE 2-11 AC RECEPTACLE FIGURE 2-12 REMOVE SECURITY COVER 3. Use a #2 Phillips™ to remove the 3 screws from the corners of the intact duct (Figure 2-13). 4. Remove the duct by pulling it up and out. FIGURE 2-13 REMOVE DUCT CP2000-M/MR Service Booklet 020-100220-02 Rev. 1 (07/08) 2-15 Section 5: Parts and Module Replacement 5. Reverse the above steps to install. NOTE: When reinstalling tilt the duct on an angle to clear the mounting pads (Figure 2-14). FIGURE 2-14 INSTALL INTAKE DUCT 2-16 CP2000-M/MR Service Booklet 020-100220-02 Rev. 1 (07/08) Section 5: Parts and Module Replacement 2.5.13 LIQUID COOLING AIR FILTER CAUTION When installing the liquid cooling filter ensure the tab on the filter is facing up. The liquid cooling air filter is located behind the radiator on the liquid cooling assembly. It ensures the cool air traveling through the radiator is clean as it enters the system. (15 minutes) 1. Remove the exhaust panel. Refer to 2.5.9 Exhaust Panel Skin, on page 2-13. 2. Manually loosen the thumbscrew securing the liquid cooling air filter door (Figure 2-15). 3. To remove, pull the filter up and out. 4. Reverse the above steps to install the filter. NOTE: Ensure the tab on the filter is at the top when installing. FIGURE 2-15 LIQUID COOLING AIR FILTER CP2000-M/MR Service Booklet 020-100220-02 Rev. 1 (07/08) 2-17 Section 5: Parts and Module Replacement 2.5.14 REMOVE LAMP DANGER Always wear protective safety clothing and a face shield when handling the lamp. Never attempt to remove the lamp when it is hot. The lamp is pressurized and may explode, causing personal injury or death, and/or property damage. Allow the lamp to cool completely before handling. WARNING Improper installation of the lamp can cause serious damage to the projector. (20 minutes; includes 10 minute LampLOC™ alignment) 1. Ensure power to the projector is disabled. Allow the fans to automatically turn OFF before disconnecting the AC power cord and opening the projector. This takes approximately 15 minutes. 2. Open the lamp door skin. 3. Use a #1 Phillips™ to remove the 2 captive screws securing the lamp access door. 4. Remove the cathode clamp from the lamp (Figure 2-16, F). 5. Using the Allen™ key, provided on the rear door, loosen the nut on the cathode end of the lamp (Figure 2-16, E). 6. Use a #3 Phillips™ to loosen the nut securing the anode wire (Figure 2-16, D). A Reflector B Anode Wire C Captive Screws x2 D Anode Nut E Cathode Nut F Cathode Clamp G Cathode Wire FIGURE 2-16 LAMP ASSEMBLY 7. Remove the Ballast Terminal Insulator by unscrewing the 2 black captive screws (#2 Phillips™) and pulling it straight out (Figure 2-16, C). 8. Hold the lamp from the anode end and carefully slide out ensuring not to make contact with the reflector (Figure 2-16, A). Using your other hand guide the cathode end out of the reflector, on an angle. 2-18 CP2000-M/MR Service Booklet 020-100220-02 Rev. 1 (07/08) Section 5: Parts and Module Replacement 9. Before the old lamp is put into its case ensure the cathode nut is placed back onto the lamp. Follow all local safety standards for proper disposal. INSTALLING A NEW LAMP • Remove the cathode clamp from the lamp before removing it from its case. • Hold the anode end of the lamp in your left hand and angle it up through the hole in the back of the reflector assembly. Insert your right index and middle finger through the back front of the reflector and guide the lamp onto the cathode holder. Be careful not to hit the lamp against the reflector. • Hand-tighten the cathode clamp onto the cathode end of the lamp. • Tighten the cathode nut. • Align the ring terminal on the anode wire with the mounting position, ensuring the crimped side of the wire is facing out (Figure 2-17). Tighten the anode nut. • Ensure LampLOC™ is adjusted 2.6 FIGURE 2-17 ANODE WIRE LAMP COMPARTMENT 2.6.1 SAFETY SHIELD The safety shield is positioned above the lamp reflector and is used to block UV light. (5 minutes) 1. Open the rear lamp door via the low security key. 2. Use a #1 Phillips™ to loosen the 3 thumbscrews (Figure 2-18). 3. Remove the safety shield. 4. To reinstall, reverse the above steps. FIGURE 2-18 SAFETY SHIELD CP2000-M/MR Service Booklet 020-100220-02 Rev. 1 (07/08) 2-19 Section 5: Parts and Module Replacement 2.6.2 MAIN BLOWER ASSEMBLY DANGER UV HAZARD: Wear authorized protective clothing when servicing the main blower assembly. Always wear protective safety clothing and a face shield when performing service with the safety shield removed. The main blower assembly is located at the back of the projector beside the lamp adjust module. (15 minutes) 1. Open the rear lamp door. 2. Remove top lid. Refer to 2.5.5 Top Lid, on page 2-10. 3. Remove the safety shield. Refer to 2.6.1 Safety Shield, on page 2-19. 4. Disconnect the 2 lamp blower harnesses. Refer to the Interconnection Drawing. When disconnecting ensure the center tab on the harness is pressed down before pulling out. Improperly disconnecting could cause the actual harness connectors to come loose. If this occurs insert the connector on an angle, use a slotted screwdriver to force the opposite edge into the structure and manually push it into the center structure (Figure 2-20). FIGURE 2-19 REMOVE BLOWER ASSEMBLY FIGURE 2-20 RE-INSTALLING HARNESS CONNECTORS 5. Use a #2 Phillips™ to loosen the 2 captive screws on the top of the unit (Figure 2-19) and 1 on the bottom near the lamp adjuster assembly (not shown). 6. Lift the assembly out of the projector housing. 7. To reinstall, reverse the above steps. 2-20 CP2000-M/MR Service Booklet 020-100220-02 Rev. 1 (07/08) Section 5: Parts and Module Replacement 2.6.3 LAMP ADJUSTER ASSEMBLY DANGER UV HAZARD: Wear authorized protective clothing when servicing the main blower assembly. The lamp adjuster assembly is located directly between the reflector assembly and the lamp blower module, at the back of the CP2000-M/MR. (60 minutes; includes 10 minute LampLOC™ alignment) 1. Open the rear lamp door. 2. Remove top lid. Refer to 2.5.5 Top Lid, on page 2-10. 3. Remove the safety shield. Refer to 2.6.1 Safety Shield, on page 2-19. 4. Remove lamp. Refer to 2.5.14 Remove Lamp, on page 2-18. 5. Remove blower assembly. Refer to 2.6.2 Main Blower Assembly, on page 2-20. 6. Unlock the 2 P-clips to free the lamp adjuster harnesses (Figure 2-21, C). A Ground Strap C P-Clips B Hex Screws (1 of 2) D Ballast Wire Nut FIGURE 2-21 UNLOCK HARNESSES 7. Use a #1 Phillips™ to remove the 8 screws securing the cardcage faceplate and pull the cardcage forward a few centimeters to gain access to the stepper driver board (SDB). 8. Remove the 6 screws securing the high security cover, unlock the high security access lock, lift the lid and slide out. 9. Reach behind the cardcage to disconnect the motor harnesses from the SDB. Refer to the Interconnection Drawing. 10. Use a #1 Phillips™ to loosen the ground strap (Figure 2-21, A). CP2000-M/MR Service Booklet 020-100220-02 Rev. 1 (07/08) 2-21 Section 5: Parts and Module Replacement 11. Remove the 2 hex screws (5mm) securing the assembly to the IOS (1 of 2 shown in Figure 2-21, B). 12. Use a #3 Phillips™ to unscrew the ballast wire nut (Figure 2-21, D). 13. Carefully remove the entire lamp adjuster assembly. 14. To reinstall, reverse the above steps. 15. Perform LampLOC™ alignment. For details, refer to the CP2000-M/MR User Manual (020100123-xx). 2.6.4 REFLECTOR ASSEMBLY (INCLUDING HEAT DUMP) (40 minutes; includes 10 minute LampLOC™ Alignment) 1. Open the rear lamp door. 2. Remove top lid. Refer to 2.5.5 Top Lid, on page 2-10. 3. Remove lamp. Refer to 2.5.14 Remove Lamp, on page 2-18. 4. Remove the 4 hex screws (5mm) from the reflector assembly bracket mount. Three of these screws are located on the bracket outside the reflector. (Figure 2-22, A). The 4th screw is located inside the casing below the reflector (Figure 2-22, B). FIGURE 2-22 REMOVING REFLECTOR ASSEMBLY 5. Carefully lift the reflector assembly straight up and out of the unit, being careful not to touch the UV filter glass. 2-22 CP2000-M/MR Service Booklet 020-100220-02 Rev. 1 (07/08) Section 5: Parts and Module Replacement 6. Use a #2 Phillips™ to remove the 13 screws securing the front lamp cover and lamp shield to the reflector assembly (Figure 2-23). FIGURE 2-23 FRONT LAMP COVER & LAMP SHIELD 7. Reverse the above steps to reinstall the lamp cover, shield and reflector assembly. 8. Perform LampLOC™ alignment. For details, refer to the CP2000M-MR User Manual (020100123-xx). 2.6.5 PROJECTOR FEET (15 minutes for 1 foot + 5 minutes per additional foot + 30 minutes to tweak masking) 1. Remove top lid. Refer to 2.5.5 Top Lid, on page 2-10. 2. Prop up the appropriate end of the projector or shift the projector off the table/pedestal to achieve proper clearance. 3. To remove the front feet, 15 centimeters (6“) of clearance is required. To remove the rear feet, 23 centimeters (9”) is required. 4. Use a 17mm socket to remove the locking nut on the foot. 5. Use a 19mm wrench to remove the entire foot. 6. Reverse the above steps to reinstall the feet. 7. Tweak masking. For details, refer to the CP2000-M/MR User Manual (020-100123-xx). CP2000-M/MR Service Booklet 020-100220-02 Rev. 1 (07/08) 2-23 Section 5: Parts and Module Replacement 2.6.6 UV FILTER CAUTION Handle the UV filter by its edges while wearing clean, lint free gloves. The UV filter is secured to the end of the light tube. In the instance that a lamp explosion occurs the UV filter will need to be replaced. (60 minutes; includes 10 minute LampLOC™ alignment) 1. Open the lamp door frame skin. 2. Remove top lid. Refer to 2.5.5 Top Lid, on page 2-10. 3. Remove the lamp. Refer to 2.5.14 Remove Lamp, on page 2-18. 4. Remove the reflector assembly. Refer to 2.6.4 Reflector Assembly (Including Heat Dump), on page 2-22. 5. Use a #1 Phillips™ to remove the top 2 screws and attached clamps (Figure 2-24, A). A Top Screws - Remove B Bottom Screw - Loosen FIGURE 2-24 REMOVE UV FILTER 6. Slowly loosen the 3rd screw until the glass can be removed (Figure 2-24, B). 7. Reverse the above steps to reinstall. Ensure the filter is installed with the arrow indicator on the edge of the filter pointing towards the lamp (Figure 2-25). 8. Perform LampLOC™ adjustment. For details, refer to the CP2000M-MR User Manual (020-100123-xx). FIGURE 2-25 ORIENTATION 2-24 CP2000-M/MR Service Booklet 020-100220-02 Rev. 1 (07/08) Section 5: Parts and Module Replacement 2.6.7 LAMP DOOR INTERLOCK The lamp door interlock is located on the lamp door skin, mounted to the lamp door support bar. (20 minutes) 1. Open the rear lamp door. 2. Remove top lid. Refer to 2.5.5 Top Lid, on page 2-10. 3. Disconnect the red and black leads from the lamp door interlock (Figure 2-26, A). 4. Use a #1 Phillips™ to remove the 2 screws and nuts securing the switch to the bracket (Figure 226, B). 5. Reverse the above steps to reinstall. FIGURE 2-26 LAMP DOOR INTERLOCK 2.6.8 LAMP BALLAST The lamp ballast comes with the lamp igniter built in and is located at the rear of the projector, attached to the base plate. (60 minutes; includes 10 minute LampLOC™ alignment) 1. Open the rear lamp door skin. 2. Remove top lid. Refer to 2.5.5 Top Lid, on page 2-10. 3. Remove the lamp. Refer to 2.5.14 Remove Lamp, on page 2-18. 4. Remove the lamp blower assembly. Refer to 2.6.2 Main Blower Assembly, on page 2-20. 5. Disconnect the AC power harness by pushing in on the clip (Figure 2-27). FIGURE 2-27 AC POWER HARNESS CP2000-M/MR Service Booklet 020-100220-02 Rev. 1 (07/08) 2-25 Section 5: Parts and Module Replacement 6. Disconnect the Ballast Communications harness by removing the 2 retaining screws and pulling up (Figure 2-28). 7. Use a #3 Phillips™ to remove the 5 captive screws securing the ballast to the housing. Three screws are located along the front edge of the ballast (Figure 2-29), another in the back-left corner and the front-right corner. NOTE: To access the screws on the left-side close the lamp access door. 8. Lift the front end of the ballast up and out, being careful not to catch anything as it is removed. FIGURE 2-28 BALLAST COMMUNICATION HARNESS 9. Reverse the above steps to reinstall the lamp ballast. 10. Perform LampLOC™ adjustment. Refer to the CP2000-M/MR User Manual (020-100123-xx). FIGURE 2-29 REMOVE BALLAST 2-26 CP2000-M/MR Service Booklet 020-100220-02 Rev. 1 (07/08) Section 5: Parts and Module Replacement 2.6.9 LAMP BALLAST - FANS 1 AND 2 There are 2 fans on the lamp ballast. NOTES: 1) If 1 fan fails both must be replaced. 2) The fans can be replaced without having to replace the ballast. (35 minutes; includes 10 minute LampLOC™ alignment) 1. Remove lamp ballast. Refer to 2.6.8 Lamp Ballast, on page 2-25. 2. Holding the fan from the bottom pull up on the top to unmount the fan from the 4 rubber isolators (Figure 2-30). 3. Disconnect the fan harnesses from the ballast. 4. Reverse the above steps to reinstall the lamp ballast. 5. Disconnect the fan from the lamp ballast. 6. Reverse the above steps to reinstall. NOTE: Use needle nose pliers to pull the rubber isolators through the fan mounting holes. FIGURE 2-30 BALLAST FAN CP2000-M/MR Service Booklet 020-100220-02 Rev. 1 (07/08) 2-27 Section 5: Parts and Module Replacement 2.6.10 AC LINE FILTERS The AC line filters and A/C selector switch are located at the rear-left corner of the projector. The 110V filter is for the optional UPS hookup, which enables the projector’s electronics to stay powered ON in the event of a power loss. This enables the lamp to be struck as soon as full power is reapplied without having to wait for the electronics to boot up. The 220V filter is required to power the ballast and strike the lamp. The A/C selector switch is used to select between the 110V and 220V power source. (40 minutes) A A/C Selector Switch B 110V Filter C 220V Filter FIGURE 2-31 AC LINE FILTERS & A/C SELECTOR SWITCH 110V AC LINE FILTER 1. Disconnect the AC power cord. 2. Unlock the rear lamp door. 3. Remove top lid. Refer to 2.5.5 Top Lid, on page 2-10. 4. Remove lamp door frame skin. Refer to 2.5.11 Lamp Door Frame Skin, on page 2-14. 5. Disconnect the 2 harnesses from the 110V AC line filter (Figure 2-31, B). 6. Use a #2 Phillips™ to remove the 2 screws securing the AC line filter to the rear skin frame. 7. Reverse the above steps to install the 110V AC line filter. 220V AC LINE FILTER 1. Disconnect the AC power cord. 2. Unlock the rear lamp door. 3. Remove top lid. Refer to 2.5.5 Top Lid, on page 2-10. 4. Remove lamp door frame skin. Refer to 2.5.11 Lamp Door Frame Skin, on page 2-14. 5. Disconnect the 4 harnesses from the 220V AC line filter (Figure 2-31, C). 6. Use a #1 Phillips™ to remove the 2 screws securing the AC line filter to the rear skin frame. 2-28 CP2000-M/MR Service Booklet 020-100220-02 Rev. 1 (07/08) Section 5: Parts and Module Replacement 7. Reverse the above steps to install the 220V AC line filter. A/C SELECTOR SWITCH 1. Disconnect the AC power cord. 2. Unlock the rear lamp door. 3. Remove top lid. Refer to 2.5.5 Top Lid, on page 2-10. 4. Remove lamp door frame skin. Refer to 2.5.11 Lamp Door Frame Skin, on page 2-14. 5. Disconnect the 6 harnesses from the AC selector switch (Figure 2-31, A). 6. Use a #1 Phillips™ to remove the 2 screws securing the AC selector switch to the rear skin frame. 7. Reverse the above steps to install the AC selector switch. 2.7 CARDCAGE AND LVPS COMPARTMENT DANGER Always wear protective safety clothing and a face shield when performing service with the service safety shield removed (i.e., LVPS rail adjustment). 2.7.1 CARDCAGE MODULE The cardcage module consists of a split faceplate. When the screws are loosened the top plate can be flipped up allowing access to all the boards except the PCM. (30 minutes) 1. Remove top lid. Refer to 2.5.5 Top Lid, on page 2-10. 2. Remove the 6 screws securing the high security cover, unlock the high security access lock, lift the lid and slide out. 3. Remove the intake duct. Refer to 2.5.12 Intake Duct, on page 2-15. 4. Use a #2 Phillips™ to loosen the 2 thumbscrews on the top of the cardcage. 5. Unclip the harness clips securing the harnesses (Figure 2-32). 6. Disconnect the 6 light engine communication and 3 power harnesses from the FFIB. Refer to the Interconnect Drawing. FIGURE 2-32 HARNESS CLIPS 7. Use a #1 Phillips™ to remove the 6 screws securing the split faceplate to the cage (2 on each side and 4 along bottom). 8. To access the Motherboard connections push from the back of the cardcage and pull on the handles to move it out a few centimeters. CP2000-M/MR Service Booklet 020-100220-02 Rev. 1 (07/08) 2-29 Section 5: Parts and Module Replacement 9. Use a #2 Phillips™ to remove the 8 screws from the cardcage faceplate to unsecure the top half. NOTE: When reinstalling the 8 screws use a maximum of 1.5 in/lbs of force to avoid damaging the screws. 10. Disconnect the 20 harnesses from the Motherboard. Refer to Section 6 Interconnections. 11. Grip the faceplate handles and pull the entire cardcage out of the projector. 12. Reverse the above steps to reinstall the cardcage module. NOTE: Ensure the harness clips are replaced. NOTES: 1) When reconnecting the harnesses support the FFIB to prevent excessive flexing of the board and potential damage to the PCB. 2) When installing the cardcage push the fan pack in to align the tab with the PEM on the cardcage (Figure 2-33). FIGURE 2-33 ALIGN TAB 2.7.2 PROJECTOR CONTROL MODULE (PCM) The PCM is located in the bottom slot of the cardcage. It is the only board attached to the bottom half of the faceplate. (40 minutes) 1. Remove top lid. Refer to 2.5.5 Top Lid, on page 2-10. 2. Remove the 6 screws securing the high security cover, unlock the high security access lock, lift the lid and slide out. 3. Unclip the harness clips securing the harnesses (Figure 2-32). 4. Pull the cardcage out a few centimeters, being careful to apply force to the top edges of the handles only. Failure to distribute force evenly across the top will bend the handles. 5. Remove the 2 nuts securing the BNC’s to the faceplate (2x 9/16”). 6. Remove the 6 standoffs (3/16”) securing the DVI-D A, DVI-D B and the ‘RS-232’ B connectors to the faceplate. 7. Remove the faceplate. 2-30 CP2000-M/MR Service Booklet 020-100220-02 Rev. 1 (07/08) Section 5: Parts and Module Replacement 8. Slide the interface PCB out by pulling on the quick release tabs. 9. Reverse the above steps to reinstall the PCM. NOTE: Ensure the harness clips are replaced. 2.7.3 INTERFACE BOARD The interface board, located above the PCM, stores all the source, screen, MCGD and TCGD information, and the projector’s IP address. A software upgrade may be necessary when installing an new interface board; therefore, backup all information before replacing the module and load it onto the new board. NOTE: The IP address should never need to be set on a replacement board because the PCM automatically resets it. If the PCM is unable to communicate with the interface board, then the PCM sets the interface board's IP address using the serial connection. After the IP address is changed, communication is established between the PCM and interface board. (1 hour & 10 minutes; includes 15 minutes backing up and restoring data and 30 minutes adjusting 5.1V and 3.35V rails) 1. Backup data. a. Connect to the DLP Cinema Control Program (Figure 2-34) either through Ethernet or serial. FIGURE 2-34 DLP CINEMA CONTROL PROGRAM b. Click Login to bring up the Login Projector window. Login as Service. CP2000-M/MR Service Booklet 020-100220-02 Rev. 1 (07/08) 2-31 Section 5: Parts and Module Replacement c. Select the File-Sys tab. d. From the Directory Type Selection drop-down menu select the file type to backup. NOTE: Any filenames with RS listed in the Attributes section cannot be modified. e. Once the file to backup has been selected click Get File. FIGURE 2-35 f. From the windows explorer screen that appears specify the directory to save the file to. g. Repeat the above steps for all files that are applicable to your application. 2. Remove top lid. Refer to 2.5.5 Top Lid, on page 2-10. 3. Remove the 6 screws securing the high security cover, unlock the high security access lock, lift the lid and slide out. 4. Pull the cardcage module out a few centimeters and flip the top half of the faceplate up. 5. Slide the interface PCB out by pulling on the quick release tabs. 6. Reverse the above steps to reinstall the interface board. 7. Adjust LVPS. For details, refer to 2.7.10 LVPS Rail Adjustment, on page 2-41. 8. Load backup files. a. b. c. d. Connect to the DLP Cinema Control Program either through Ethernet or serial. Click Login to bring up the Login Projector window. Login as Service. Select the File-Sys tab. From the Directory Type Selection drop-down menu select the file type to backup. NOTE: Any filenames with RS listed in the Attributes section cannot be modified. e. Once the file to backup has been selected click Put File. f. From the windows explorer screen that appears navigate to the file and click Open. g. Repeat the above steps for all applicable files. NOTE: It may also be necessary to re-configure the IP address of the new interface board. This may require connecting via RS232 with DCP Librarian. 2-32 CP2000-M/MR Service Booklet 020-100220-02 Rev. 1 (07/08) Section 5: Parts and Module Replacement 2.7.4 PROCESSOR BOARD The processor board is located above the interface board in the cardcage. NOTE: It may be necessary to upgrade software after a new board is installed. For details, refer to the DCP and CP Main Software Upgrade Instruction Sheet (#020-100021-xx). (1 hour; includes 30 minutes to adjust 5.1V and 3.35V rails) 1. Remove top lid. Refer to 2.5.5 Top Lid, on page 2-10. 2. Remove the 6 screws securing the high security cover, unlock the high security access lock, lift the lid and slide out. 3. Unclip the harness clips securing the harnesses to the top of the cardcage. 4. Pull the cardcage module out a few centimeters and flip the top half of the face plate up. 5. Slide the processor board out by pulling on the quick release tabs. 6. Reverse the above steps to reinstall. NOTE: Ensure the harness clips are replaced. 2.7.5 FPGA FORMATTER INTERFACE BOARD (FFIB) The FFIB is located in the top slot of the cardcage. It can be accessed from the top of the projector to check the light engine cable connections, but otherwise it follows the same procedure as the other PCBs in the cardcage. NOTE: It may be necessary to upgrade software after a new board is installed. For details, refer to the DCP and CP Main Software Upgrade Instruction Sheet (#020-100021-xx). (1 hour & 5 minutes; includes 30 minutes to adjust 5.1V and 3.35V rails) 1. Remove top lid. Refer to 2.5.5 Top Lid, on page 2-10. 2. Remove the 6 screws securing the high security cover, unlock the high security access lock, lift the lid and slide out. 3. Unclip the harness clips securing the harnesses to the top of the cardcage. 4. Disconnect the light engine harnesses. Refer to the Interconnect Drawing. 5. Flip up the top half of the faceplate. 6. Slide the FFIB out by pulling on the quick release tabs. 7. Reverse the above steps to reinstall. 2.7.6 MOTHERBOARD The Motherboard is located at the back of the cardcage. The PCM, FFIB, interface and processor boards all connect directly to the Motherboard. (1 hour/30 minutes; includes 30 minutes to adjust 5.1V and 3.35V rails) 1. Remove top lid. Refer to 2.5.5 Top Lid, on page 2-10. 2. Remove the 6 screws securing the high security cover, unlock the high security access lock, lift the lid and slide out. 3. Remove cardcage module. Refer to 2.7.1 Cardcage Module, on page 2-29. 4. Remove the PCM. Refer to 2.7.2 Projector Control Module (PCM), on page 2-30. 5. Remove the interface board. Refer to 2.7.3 Interface Board, on page 2-31. CP2000-M/MR Service Booklet 020-100220-02 Rev. 1 (07/08) 2-33 Section 5: Parts and Module Replacement 6. Remove the processor board. Refer to 2.7.4 Processor Board, on page 2-33. 7. Remove the FFIB. Refer to 2.7.5 FPGA Formatter Interface Board (FFIB), on page 2-33. 8. Use a #2 Phillips™ to remove the 18 screws securing the Motherboard to the cardcage. 9. Slide the Motherboard out of the cardcage. 10. Reverse the above steps to reinstall. NOTE: When reconnecting the harnesses reference the label on the security cover. 2.7.7 STEPPER DRIVER BOARD (SDB) The SDB is located behind the cardcage. All lamp adjuster harnesses are routed to the board through a small opening on the side of the cardcage. To access the bottom 2 harnesses the cardcage must be pulled out slightly. (30 minutes; includes 10 minute LampLOC™ adjustment) 1. Remove top lid. Refer to 2.5.5 Top Lid, on page 2-10. 2. Remove the 6 screws securing the high security cover, unlock the high security access lock, lift the lid and slide out. 3. Unclip the harness clips securing the harnesses to the top of the cardcage. 4. Pull the cardcage out a few centimeters. 5. Disconnect the 6 harnesses from the SDB. 6. Use a #2 Phillips™ to remove the 4 screws securing the SDB to the firewall (Figure 2-36). 7. Pull the SDB straight up and out of the projector. 8. Reverse the above steps to install. NOTE: When reconnecting the harnesses to the SDB refer to the label on the high security cover. A SDB Screws (2 of 4 shown) FIGURE 2-36 REMOVE SDB 2-34 CP2000-M/MR Service Booklet 020-100220-02 Rev. 1 (07/08) Section 5: Parts and Module Replacement 2.7.8 LOW VOLTAGE POWER SUPPLY (LVPS) - PHASE I Follow this procedure if the LVPS module for your projector is identical to what is outlined in this section. (35 minutes) 1. Remove top lid. Refer to 2.5.5 Top Lid, on page 2-10. 2. Unlock and open the rear door using the low security key. 3. Remove exhaust panel skin. Refer to 2.5.9 Exhaust Panel Skin, on page 2-13. 4. Manually disconnect the 2 center channels (brown SW 1/blue SW 2) from the AC selector switch (Figure 2-37). A Blue SW 2 Center Channel B Brown SW 1 Center Channel FIGURE 2-37 AC CENTER CHANNELS 5. Remove the 3mm nut from the GRN terminal (Figure 2-38). FIGURE 2-38 GRN TERMINAL 6. Unlock the high security access lock and remove the 6 screws securing the high security cover. Lift the lid and slide out. 7. Use a #2 Phillips™ screwdriver to loosen the 2 thumbscrews on top of the cardcage. CP2000-M/MR Service Booklet 020-100220-02 Rev. 1 (07/08) 2-35 Section 5: Parts and Module Replacement 8. If present remove all harness clips securing the harnesses to the top of the cardcage. 9. Disconnect all harnesses from the cardcage. NOTE: Ensure the fire alarm connector on the User I/O faceplate is disconnected. 10. Remove the intake duct. Refer to 2.5.12 Intake Duct, on page 2-15. 11. Use a #1 Phillips™ screwdriver to remove the 6 hex screws from the front cardcage plate (Figure 2-41). 12. Pull the cardcage out a few centimeters in order to access the harnesses in the back. 13. Disconnect the M-MALM harness from the SDB. NOTE: DO NOT disconnect the SCCI, CDP harness, RS232 and GPIO from the SDB. 14. Ensure all connectors are disconnected from the Motherboard. 15. Completely remove the cardcage. 16. Use a #2 Phillips™ screwdriver to remove the 2 screws securing the LVPS retaining bracket (Figure 2-39). To remove pull the right-side of the plate forward and tilt. A Blue SW 2 Center Channel FIGURE 2-39 REMOVE LVPS RETAINING BRACKET 17. Untangle the harnesses before pulling the LVPS out. When removing tilt the LVPS up slightly to clear the tabs underneath. 18. Reverse the above steps to reinstall the LVPS. NOTE: Feed the AC harness through the grommeted hole in the housing (Figure 2-40). FIGURE 2-40 FEEDING HARNESSES 2-36 CP2000-M/MR Service Booklet 020-100220-02 Rev. 1 (07/08) Section 5: Parts and Module Replacement 2.7.9 LOW VOLTAGE POWER SUPPLY (LVPS) - PHASE II Follow this procedure if the LVPS module for your projector is identical to what is outlined in this section. (35 minutes) DANGER UV HAZARD: Wear authorized protective clothing whenever the lamp door is opened. 1. Open the rear lamp door. 2. Remove top lid. Refer to 2.5.5 Top Lid, on page 2-10. 3. Remove exhaust panel skin. Refer to 2.5.9 Exhaust Panel Skin, on page 2-13. 4. Unlock the high security access lock and remove the 6 screws securing the high security cover. Lift the lid and slide out. 5. Unclip the 4 harness clips securing the harnesses to the top of the cardcage. 6. Disconnect the power harnesses from the FFIB (i.e., J7, J8 and J9). 7. Disconnect the LVDS satellite board harnesses. NOTE: Carefully pull these harnesses straight up and out to avoid bending/damaging the pins. 8. Disconnect the CDP power harness from the User I/O faceplate. 9. Remove the intake duct. Refer to 2.5.12 Intake Duct, on page 2-15. 10. Use a #2 Phillips™ screwdriver to loosen the 2 thumbscrews on top of the cardcage. 11. Use a #1 Phillips™ screwdriver to remove the 6 hex screws from the front cardcage plate (Figure 2-41). FIGURE 2-41 REMOVE CARDCAGE FRONT PLATE 12. Pull the cardcage out a few centimeters. Tighten 1 of the thumbscrews, loosened in Step 9 to prevent the cardcage from sliding out. CP2000-M/MR Service Booklet 020-100220-02 Rev. 1 (07/08) 2-37 Section 5: Parts and Module Replacement 13. Disconnect the LVPS power harness from the Motherboard. Refer to the label on the high security cover. The LVPS power harness is noted on the label as, Power P1. 14. Disconnect the LVPS power harness form the Motherboard. Refer to the label on the high security cover. The LVPS power harness is noted on the label as, Power CTRL P35. 15. Use a 12-14” #2 Phillips™ screwdriver to loosen the 2 thumbscrews on each side of the LVPS (behind the cardcage). 16. Manually disconnect the 2 center channels (brown SW 1/blue SW 2) from the AC selector switch (Figure 2-42). A Blue SW 2 Center Channel B Brown SW 1 Center Channel FIGURE 2-42 AC CENTER CHANNELS 17. Remove the 3mm nut from the GRN terminal (Figure 2-43). FIGURE 2-43 GRN TERMINAL 2-38 CP2000-M/MR Service Booklet 020-100220-02 Rev. 1 (07/08) Section 5: Parts and Module Replacement 18. Disconnect the lamp exhaust thermal harness (Figure 2-44, B). 19. Use a #2 Phillips™ to remove 3 screws securing the lamp exhaust duct (Figure 2-44, A&C). A Screw Securing Lamp Exhaust Duct B Lamp Exhaust Harness C Screw Securing Lamp Exhaust Duct FIGURE 2-44 REMOVE LAMP EXHAUST 20. Use a long angled #2 Phillips™ screwdriver to remove the 2 screws securing the LVPS to the housing (Figure 2-45, A). 21. Remove the PEM nut on the LVPS casing (Figure 2-36, B). A LVPS Screws B PEM Nut FIGURE 2-45 REMOVE SCREWS FROM LVPS 22. Use a #2 Phillips™ to remove the 2 screws securing the lamp exhaust harness. CP2000-M/MR Service Booklet 020-100220-02 Rev. 1 (07/08) 2-39 Section 5: Parts and Module Replacement 23. Use a #2 Phillips™ screwdriver to remove the 2 screws securing the liquid cooling air filter. 24. Loosen the thumbscrew on the liquid cooling air filter. Tilt the entire unit forward and pull out slightly. For details, refer to 2.5.13 Liquid Cooling Air Filter, on page 2-17. 25. As you pull the LVPS unit out of the LVPS compartment, ensure the harnesses do not get caught. Feed the harnesses through the other side before pulling the module out. 26. Use a #2 Phillips™ screwdriver to remove the 4 screws from the LVPS cover (Figure 2-46, B). 27. Remove the harnesses and transfer to the replacement LVPS (Figure 2-46, A&C). 28. Reverse the above steps to install. A Harnesses (Remove) B 2 of 4 Screws C Harnesses (Remove) FIGURE 2-46 LVPS COVER AND HARNESSES 2-40 CP2000-M/MR Service Booklet 020-100220-02 Rev. 1 (07/08) Section 5: Parts and Module Replacement 2.7.10 LVPS RAIL ADJUSTMENT The following procedure must be performed when the LVPS is replaced or when voltage rail alerts are generated and displayed on the CDP or web ui. RAIL ADJUSTMENT VIA CDP (PREFERRED METHOD) (30 minutes) 1. Ensure the projector is in FULL POWER mode, not in STANDBY mode. Ensure the lamp is powered down and cool before continuing. DANGER EXPLOSION HAZARD: Wear authorized protective clothing whenever the lamp door is opened. 2. Unlock the rear lamp door using the low security key. 3. Remove the top lid. Refer to 2.5.5 Top Lid, on page 2-10. 4. Use a #2 Phillips™ screwdriver to loosen the 3 thumbscrews on the safety shield (Figure 247). 5. From the CDP access the Configuration>Administrator>Adj LVPS Rail menu. Select either 3.3V Rail or 5V Rail depending on which rail is being adjusted. FIGURE 2-47 REMOVE LAMP SAFETY SHIELD 6. Insert a long flathead tweaker through the designated cutout in the LampLOC™ mount into the 3.3V or 5V adjustment dial (Figure 2-48). As the tweaker is rotated observe the CDP to see the adjustment value of the rail. Continue to turn the dial until the specified range is achieved. Rail Adjustment Ranges • 3.3V Rail Adjustment: 3.366 ± 0.003 • 5V Rail Adjustment: 5.110 ± 0.003 FIGURE 2-48 RAIL ADJUSTMENT CP2000-M/MR Service Booklet 020-100220-02 Rev. 1 (07/08) 2-41 Section 5: Parts and Module Replacement RAIL ADJUSTMENT VIA MULTIMETER (ALTERNATIVE METHOD) (1 hour) 1. Ensure the projector is powered down and AC is disconnected. 2. Remove the top lid. Refer to 2.5.5 Top Lid, on page 2-10. 3. Use a #2 Phillips™ screwdriver to loosen the 3 thumbscrews on the safety shield (Figure 2-47). 4. Remove the 6 screws securing the high security cover, unlock the high security access lock, lift the lid and slide out. 5. Remove the intake duct. Refer to 2.5.12 Intake Duct, on page 2-15. 6. Use a #2 Phillips™ screwdriver to loosen the 2 thumbscrews on top of the cardcage. 7. Use a #1 Phillips™ screwdriver to remove the 6 hex screws from the front cardcage plate. 8. Unclip the harness clips securing the harnesses to the top of the cardcage. 9. Pull the cardcage out a few centimeters in order to access the connections on the back of the Motherboard. NOTE: If more clearance is required disconnect the LVDS harnesses in order to pull the cardcage out further. 10. Connect a Fluke multimeter to the P3 connection on the Motherboard. Refer to the label on the high security cover. 11. Insert a long flathead tweaker through the designated cutout and position it into the 3.3V or 5V adjustment dial (Figure 2-48). As the tweaker is rotated observe the meter to see the adjustment value of the rail. Continue to turn the dial until the specified range is achieved. Rail Adjustment Ranges • 3.3V Rail Adjustment: 3.366 ± 0.003 • 5V Rail Adjustment: 5.110 ± 0.003 2-42 CP2000-M/MR Service Booklet 020-100220-02 Rev. 1 (07/08) Section 5: Parts and Module Replacement 2.7.11 FANS LIGHT ENGINE FANS - FAN 8 DANGER Use caution when working in and around fan assemblies. Fingers can get caught in fan blades. (20 minutes) 1. Remove top lid. Refer to 2.5.5 Top Lid, on page 2-10. 2. Remove the 6 screws securing the high security cover, unlock the high security access lock, lift the lid and slide out. 3. Remove intake duct. Refer to 2.5.12 Intake Duct, on page 2-15. 4. Pull the cardcage out a few centimeters and disconnect the fan harnesses from the Motherboard. 5. Holding the fan from the bottom pull up on the top to unmount the fan from the 4 rubber isolators (Figure 2-49). FIGURE 2-49 RUBBER ISOLATORS 6. Reverse the above steps to reinstall the fan. NOTE: Use needle nose pliers to pull the rubber isolators through the fan mounting holes. CP2000-M/MR Service Booklet 020-100220-02 Rev. 1 (07/08) 2-43 Section 5: Parts and Module Replacement INTAKE - FANS 7, 8, 10 AND 11 DANGER Use caution when working in and around fan assemblies. Fingers can get caught in fan blades. The 4 intake fans, attached to the cardcage compartment of the CP2000-M/MR, are used to draw filtered air into the cardcage compartment and the light engine. (20 minutes for 1 fan - 3 minutes for each additional fan) 1. Remove top lid. Refer to 2.5.5 Top Lid, on page 2-10. 2. Remove air filter cover. Refer to 2.5.3 Air Filter Cover, on page 2-9. 3. Disconnect the 4 fan power harnesses (Figure 250). For details, refer to the Interconnect Drawing. 4. Use a #2 Phillips™ to remove the 4 screws securing the fan bracket to the projector (Figure 2-51). 5. Lift the bracket with the attached fans up and out from the front of the projector. FIGURE 2-50 INTAKE FAN HARNESSES 6. Holding the fan from the bottom pull up on the top to unmount the fan from the rubber isolators. 7. Reverse the above steps to reinstall. NOTE: Use needle nose pliers to pull the rubber isolators through the fan mounting holes. FIGURE 2-51 INTAKE FAN ASSEMBLY 2-44 CP2000-M/MR Service Booklet 020-100220-02 Rev. 1 (07/08) Section 5: Parts and Module Replacement 2.8 FRONT ENGINE COMPARTMENT 2.8.1 PRIMARY LENS MOUNT (1 hour & 30 minutes; includes 10 minutes for boresight alignment) 1. Remove top lid. Refer to 2.5.5 Top Lid, on page 2-10. 2. Remove the exhaust panel skin. Refer to 2.5.9 Exhaust Panel Skin, on page 2-13. 3. Remove the front skin. Refer to 2.5.10 Front Face Skin, on page 2-14. 4. Remove the 15 screws securing the lens boot. 5. Remove the 6 screws securing the high security cover, unlock the high security access lock, lift the lid and slide out. 6. Remove the intact duct. Refer to 2.5.12 Intake Duct, on page 2-15. 7. Use a #1 Phillips™ to remove the 6 screws from the cardcage faceplate. 8. Pull the cardcage out a few centimeters in order to reach behind and unplug the lens mount motor harness from the Motherboard and out of the P-clip. 9. Use a #2 Phillips™ to remove the 4 screws (5mm hex) securing the lens mount to the IOS (Figure 2-52). 10. Remove the lens mount. 11. Reverse the above steps to reinstall the lens mount. 12. Perform boresight alignment. Refer to the CP2000-M/MR User Manual (#020-100123-xx) for details. FIGURE 2-52 LENS MOUNT CP2000-M/MR Service Booklet 020-100220-02 Rev. 1 (07/08) 2-45 Section 5: Parts and Module Replacement 2.8.2 LIQUID COOLING ASSEMBLY The liquid cooling assembly consists of a pump, coolant reservoir, radiator and heat sinks. All are connected together with hoses and mounted within the front portion of the projector. (30 minutes) 1. Remove top lid. Refer to 2.5.5 Top Lid, on page 2-10. 2. Remove side access panel. Refer to 2.5.9 Exhaust Panel Skin, on page 2-13. 3. Use a #2 Phillips™ to remove the 2 screws securing the reservoir (Figure 2-53). FIGURE 2-53 REMOVE REFILL HOSE 4. Disconnect the red and blue quick disconnects on the cooling hoses (Figure 2-54). FIGURE 2-54 QUICK DISCONNECTS 5. Use a #2 Phillips™ to remove the 3 screws securing the liquid cooling assembly to the frame. 6. Pull the assembly straight out of the projector by tilting upwards. 7. Reverse the above steps to install. 2-46 CP2000-M/MR Service Booklet 020-100220-02 Rev. 1 (07/08) Section 5: Parts and Module Replacement 2.8.3 INTEGRATOR ASSEMBLY WARNING Wear gloves when handling the integrator assembly. The integrator assembly is mounted on the light tube of the IOS. It runs through a firewall cutout, which separates the lamp housing from the light engine. (40 minute; includes 10 minutes for MCGD calibration & 10 minutes for alignment) 1. Remove top lid. Refer to 2.5.5 Top Lid, on page 2-10. 2. Remove exhaust panel skin. Refer to 2.5.9 Exhaust Panel Skin, on page 2-13. 3. Remove the 6 screws securing the high security cover, unlock the high security access lock, lift the lid and slide out. 4. Use a #2 Phillips™ to remove the 8 screws around the light engine cover and a flat head screwdriver to remove the 2 captive screws. NOTE: Cutouts in the cover provide access to the captive screws. 5. Use a #2 Phillips™ to remove the 1 screw securing the firewall, which separates the lamp housing and the light engine (Figure 2-55). FIGURE 2-55 REMOVE FIREWALL 6. Use a 2mm Allen™ key to remove the 6 hex screws securing the integrator cover (Figure 2-56). FIGURE 2-56 REMOVE INTEGRATOR COVER CP2000-M/MR Service Booklet 020-100220-02 Rev. 1 (07/08) 2-47 Section 5: Parts and Module Replacement 7. Remove the 2 (3mm hex) rotational integrator adjustment screws (Figure 257). 8. Slide the integrator rod back and tilt to remove from the casing. 9. Reverse the above steps to install. Ensure the integrator rod lines up with the slots in the casing (Figure 2-58). 10. Power up the projector and adjust the integrator/fold mirror for proper aperture alignment. For details, refer to the CP2000-M/MR User Manual (020100123-xx). FIGURE 2-57 REMOVE ADJUSTMENT SCREWS FIGURE 2-58 ALIGN INTEGRATOR ROD 2-48 CP2000-M/MR Service Booklet 020-100220-02 Rev. 1 (07/08) Section 5: Parts and Module Replacement 2.8.4 CONTRAST APERTURE The contrast aperture is located after fold mirror 1 in the light path. (15 minutes) 1. Remove top lid. Refer to 2.5.5 Top Lid, on page 210. 2. Disconnect the harness from the light sensor module (Figure 2-60). 3. Use a #2 Phillips™ to remove the 3 screws securing the contrast aperture to the IOS (Figure 2-59). 4. Slide the aperture out along the slotted tracks inside the IOS. 5. Reverse the above steps to install the contrast aperture. FIGURE 2-59 REMOVE CONTRAST APERTURE 2.8.5 LIGHT SENSOR MODULE The light sensor module, mounted to the side of the IOS, is orientated to sample the light coming through the fold mirror. (30 minutes; includes 10 minute calibration) 1. Remove top lid. Refer to 2.5.5 Top Lid, on page 210. 2. Disconnect the harness from the light sensor (Figure 2-60). 3. Use a 2mm Allen™ key to remove the 2 hex screws securing the sensor to the IOS (Figure 260). NOTE: The middle screw is used to adjust light tolerances. 4. Reverse the above steps to install. FIGURE 2-60 LIGHT SENSOR 5. Power up the projector and recalibrate the footLambert (fL) readings for minimum and maximum power. For details, refer to the CP2000-M/ MR User’s Manual (020-100123-xx). CP2000-M/MR Service Booklet 020-100220-02 Rev. 1 (07/08) 2-49 Section 5: Parts and Module Replacement 2.8.6 COLD MIRROR CAUTION Wear gloves when handling the cold mirror. (50 minutes; includes 30 minute calibration) 1. Remove top lid. Refer to 2.5.5 Top Lid, on page 2-10. 2. Use a 2mm Allen™ key to loosen the bottom 2 hex screws (2mm) and remove the top 2 hex screws and clips (Figure 2-61). FIGURE 2-61 LOOSEN COLD MIRROR HEX SCREWS 3. Grab the top corners of the mirror, pull up and out. 4. Reverse the above steps to install the cold mirror. NOTE: When installing ensure the reflective surface faces inwards (Figure 2-62). FIGURE 2-62 INSTALLING COLD MIRROR 5. LampLOC™ and MCGD must be calibrated after installation. For details, refer to the CP2000-M/ MR User Manual (020-100123-xx). 2-50 CP2000-M/MR Service Booklet 020-100220-02 Rev. 1 (07/08) Section 5: Parts and Module Replacement 2.8.7 FOLD MIRROR 1 CAUTION Wear gloves when handling the fold mirror. Fold mirror 1 is accessed from the front left-corner of the projector. The alignment screws are positioned along the top of the light tube, which allows them to be easily adjusted. (40 minutes; includes 10 minute calibration) 1. Remove top lid. Refer to 2.5.5 Top Lid, on page 2-10. 2. Remove exhaust panel skin. Refer to 2.5.9 Exhaust Panel Skin, on page 2-13. 3. Remove contrast aperture. Refer to 2.8.4 Contrast Aperture, on page 2-49. 4. Remove the light sensor module. Refer to 2.8.5 Light Sensor Module, on page 2-49. 5. Loosen the 2.5mm locking hex screw and remove the 2 hex screws securing fold mirror 1 to the bracket (Figure 2-63). A 2.5mm Locking Hex Screw B Hex Screw (1 of 2) FIGURE 2-63 FOLD MIRROR 1 6. Reverse the above steps to install fold mirror 1. NOTE: When installing ensure the reflective surface faces inwards (Figure 2-64). FIGURE 2-64 INSTALLING FOLD MIRROR 1 7. Power up the projector and align the fold mirror. For details, refer to the CP2000-M/MR User Manual (020-100123-xx). CP2000-M/MR Service Booklet 020-100220-02 Rev. 1 (07/08) 2-51 Section 5: Parts and Module Replacement 2.8.8 YELLOW NOTCH FILTER (YNF) The YNF is located on the IOS behind the contrast aperture. (50 minutes; includes 30 minute calibration) 1. Remove top lid. Refer to 2.5.5 Top Lid, on page 2-10. 2. Use a 2mm Allen key to remove the 3 hex screws securing the YNF to the IOS (Figure 2-65). If necessary, loosen the center nut. FIGURE 2-65 REMOVE YNF 3. Carefully pull the filter out of the IOS. 4. Reverse the above steps to install. 5. Green primary and MCGD must be calibrated after installation. For details, refer to the CP2000M/MR User Manual (020-100123-xx). 2-52 CP2000-M/MR Service Booklet 020-100220-02 Rev. 1 (07/08) Section 5: Parts and Module Replacement 2.8.9 SHUTTER ASSEMBLY The shutter is attached to the light engine prism. For additional details, refer to Appendix B: Shutter Override. (30 minutes) 1. Remove top lid. Refer to 2.5.5 Top Lid, on page 2-10. 2. Remove the 6 screws securing the high security cover, unlock the high security access lock, lift the lid and slide out. 3. Use a #2 Phillips™ to remove the 8 screws around the light engine cover and a flat head screwdriver to remove the 2 captive screws. Lift the cover off. NOTE: Cutouts in the cover provide access to the captive screws. 4. Use a 2mm Allen™ key to remove the 2 hex screws securing the light dump. 5. Pull the cardcage out and disconnect the shutter from the Motherboard. Refer to the Interconnect Drawing. NOTE: Ensure the harness clips, securing the harnesses to the top of the cardcage are removed before pulling the cardcage out. 6. Cut the cable tie to free the shutter harness. 7. Use a #2 Phillips to remove the 2 screws securing the shutter assembly (Figure 2-66). 8. Reverse the above steps to install. NOTE: Ensure the cardcage harness clips are reinstalled. FIGURE 2-66 REMOVE SHUTTER CP2000-M/MR Service Booklet 020-100220-02 Rev. 1 (07/08) 2-53 Section 5: Parts and Module Replacement 2.8.10 LIGHT ENGINE CAUTION Wear gloves and an electro-static bracelet when working with the light engine. (2 hours; includes 1 hour calibration) 1. Remove top lid. Refer to 2.5.5 Top Lid, on page 2-10. 2. Remove the 6 screws securing the high security cover, unlock the high security access lock, lift the lid and slide out. 3. Disconnect the light engine power and communications harnesses from the FFIB. NOTE: Save the harnesses and install on the replacement engine. 4. Use a #2 Phillips™ to remove the 8 screws around the light engine cover and a flat head screwdriver to remove the 2 captive screws. NOTE: Cutouts in the cover provide access to the captive screws. 5. Remove shutter assembly. Refer to 2.8.9 Shutter Assembly, on page 2-53. 6. Remove the 3 hex screws (3mm) securing the light engine to the IOS, 2 of which are located on each side of the engine and the 3rd underneath the green DMD. 7. Remove the screws from both rear corners of the engine and on the left/front side of the engine, behind the blue formatter board. 8. Cut the tie wraps on the harnesses. 9. Disconnect the temperature harnesses from each DMD (Figure 2-67). 10. Disconnect the lamp exhaust harness. 11. Carefully lift the light engine out of the projector with the hoses and harnesses attached. Grasp from the bottom and rest the light engine on the metal guard portion. FIGURE 2-67 DMD TEMPERATURE HARNESS 12. Disconnect flex cables, power cables and coolant hoses. Install them onto the replacement light engine. Reverse the above steps to install the light engine. NOTE: Always connect the temperature sensors, and the red and green LVDS cables before installing the light engine. For more information, refer to 2.8.11 LVDS Connector Cable Insertion, on page 2-55. 13. Cover the light engine with an electro-static protective cover. 14. Complete a full optical report, which includes; • • • • 2-54 Adjusting aperture shadows, reshooting MCGD, verifying TCGD correction, cutting new screen files and CP2000-M/MR Service Booklet 020-100220-02 Rev. 1 (07/08) Section 5: Parts and Module Replacement • verifying brightness uniformity. 2.8.11 LVDS CONNECTOR CABLE INSERTION IMPORTANT! If the red and green cables become damaged the light engine must be removed and the new cables attached to the engine before replacing. Any time LVDS cable swapping is performed as a troubleshooting step, the swap must occur at the FFIB board, not at the satellite boards. When connecting the LVDS connectors to the satellite board and FFIB it is essential they are connected properly to avoid damaging any of the pins on the 30-pin connectors. The harnesses must be inserted straight into the connectors (Figure 2-68, left) and not on an angle (Figure 2-68, right). Failure to properly install the LVDS connectors results in formatter failure. FIGURE 2-68 CONNECTING LVDS CONNECTORS CP2000-M/MR Service Booklet 020-100220-02 Rev. 1 (07/08) 2-55 Section 5: Parts and Module Replacement 2.8.12 COOLING HEAT SINKS AND HOSES Liquid coolant is routed through the system using Tygon tubing and 3 heat sinks. There is a dedicated heat sink for each of the 3 DMDs. The coolant runs through the heat sinks where heat is drawn from the DMDs to maintain the optimum operating temperature. In order to swap the hoses and heat sinks out the light engine must first be removed. (75 minutes) 1. Remove top lid. Refer to 2.5.5 Top Lid, on page 2-10. 2. Disconnect the hoses from the quick disconnects on the liquid cooling assembly (Figure 2-69). FIGURE 2-69 QUICK DISCONNECTS 3. Remove the 6 screws securing the high security cover, unlock the high security access lock, lift the lid and slide out. 4. Remove light engine. Refer to 2.8.10 Light Engine, on page 2-54. 5. Remove the 2 hex screws (3mm) and the bracket from each DMD (Figure 2-70). A DMD Bracket B Hex Screws FIGURE 2-70 REMOVE BRACKET 6. Reverse the above steps to install the cooling heat sinks and hoses. Check convergence and adjust if necessary. For details, refer to the CP2000-M/MR User Manual (020-100123-xx). 2-56 CP2000-M/MR Service Booklet 020-100220-02 Rev. 1 (07/08) Section 5: Parts and Module Replacement 2.8.13 ILLUMINATION OPTIC SYSTEM (IOS) The IOS is a magnesium frame designed to house the light engine. The light tube and most optical components are fastened to the IOS. All components except the second cold mirror can be removed on their own; therefore, the need to replace the IOS is low. A full optical performance evaluation/ calibration must be performed when the IOS is replaced. (2 hours; includes 1 hour calibration) 1. Remove top lid. Refer to 2.5.5 Top Lid, on page 2-10. 2. Remove reflector assembly. Refer to 2.6.4 Reflector Assembly (Including Heat Dump), on page 222. 3. Use a #2 Phillips™ to remove the 1 screw securing the firewall, which separates the lamp housing and the light engine. 4. Disconnect the LVDS and power harnesses from the FFIB. For details, refer to the Interconnect Drawing. 5. Disconnect the lens mount harnesses from the Motherboard. For details, refer to the Interconnect Drawing. 6. Remove the 3 hex screws (5mm) from the bottom of the IOS. 7. Lift the IOS out of the projector housing. 8. Reverse the above steps to install. 9. Complete a full optical report, which includes: • • • • • adjusting aperture shadows reshooting MCGD verifying TCGD correction cutting new screen files verifying brightness uniformity CP2000-M/MR Service Booklet 020-100220-02 Rev. 1 (07/08) 2-57 Section 5: Parts and Module Replacement 2.8.14 FOLD MIRROR 2 The second fold mirror is located underneath the IOS. (1 hour/15 minutes; includes 10 minute calibration) 1. Remove top lid. Refer to 2.5.5 Top Lid, on page 2-10. 2. Remove IOS. Refer to 2.8.13 Illumination Optic System (IOS), on page 2-57. 3. Remove 1 of the 2.5mm screws from each of the 3 tabs on fold mirror 2. 4. Loosen the remaining 2.5mm screws from each of the 3 tabs. 5. Hold the mirror in place and swing the tabs out to the side. 6. Carefully, lower the mirror to remove it. 7. Reverse the above steps to reinstall. NOTE: When installing ensure the reflective surface faces inwards (Figure 2-71). FIGURE 2-71 INSTALLING FOLD MIRROR 2 8. Power up the projector and align the fold mirror. For details, refer to CP2000-M/MR User Manual (020-100123-xx). 2-58 CP2000-M/MR Service Booklet 020-100220-02 Rev. 1 (07/08) 3 Troubleshooting This section provides troubleshooting procedures that can help direct you to the most likely cause of a specific performance problem. • 3.1 Overview • 3.2 Troubleshooting Trees CP2000-M/MR Service Booklet 020-100220-02 Rev. 1 (07/08) 3-1 Section 4: Troubleshooting 3.1 OVERVIEW The CP2000-M/MR offers a comprehensive system of diagnostics, tracking a wide range of conditions and alerting the operator to a potential problem by displaying specific status information on the Control Display Panel (CDP), through the web ui, or via available internal or external LEDs. This system includes: CDP Status Icons CDP Status LED Indicators CDP Status Menu Web User Interface Red Alarm Window Web User Interface Status Page Internal PCB-specific LEDs and Main AC status LED When troubleshooting, keep in mind the projector is comprised of numerous replaceable modules, such as printed circuit boards, optical assemblies and power supplies. This modular design can reduce the amount of time required to accurately diagnose and resolve a performance issue — the cause need only be traced down to the module level, at which point the faulty module is usually replaced. No further analysis is necessary. If the problem is not resolved contact technical support. For contact information, refer to Table 2.1 Technical Support Contact Information, on page 2-2. Product information can also be found on Christie's website at www.christiedigital.com. 3-2 CP2000-M/MR Service Booklet 020-100220-02 Rev. 1 (07/08) Section 4: Troubleshooting 3.2 TROUBLESHOOTING TREES Refer to this section if the existing problem can not be eliminated through proper projector adjustment. For more information, refer to the CP2000-M/MR User Manual (020-100123-xx). Note the symptoms present and work through the appropriate troubleshooting steps to determine the probable source of the problem. 3.2.1 CDP NO ACTIVITY/NO RESPONSE CP2000-M/MR Service Booklet 020-100220-02 Rev. 1 (07/08) 3-3 Section 4: Troubleshooting 3.2.2 PROJECTOR DOES NOT ATTEMPT TO GO INTO FULL POWER MODE FROM STANDBY 3-4 CP2000-M/MR Service Booklet 020-100220-02 Rev. 1 (07/08) Section 4: Troubleshooting 3.2.3 LAMP WILL NOT IGNITE CP2000-M/MR Service Booklet 020-100220-02 Rev. 1 (07/08) 3-5 Section 4: Troubleshooting 3.2.4 LAMP IGNITES BUT DOES NOT STAY ON 3-6 CP2000-M/MR Service Booklet 020-100220-02 Rev. 1 (07/08) Section 4: Troubleshooting 3.2.5 LampLOC™ Not Working CP2000-M/MR Service Booklet 020-100220-02 Rev. 1 (07/08) 3-7 Section 4: Troubleshooting 3.2.6 LiteLOC™ Not Working 3-8 CP2000-M/MR Service Booklet 020-100220-02 Rev. 1 (07/08) Section 4: Troubleshooting 3.2.7 DMD OVER-TEMPERATURE WARNING CP2000-M/MR Service Booklet 020-100220-02 Rev. 1 (07/08) 3-9 Section 4: Troubleshooting 3.2.8 ETHERNET COMMUNICATION ERROR 3-10 CP2000-M/MR Service Booklet 020-100220-02 Rev. 1 (07/08) Section 4: Troubleshooting 3.2.9 DLP COMMUNICATIONS ERROR CP2000-M/MR Service Booklet 020-100220-02 Rev. 1 (07/08) 3-11 Section 4: Troubleshooting 3.2.10 BALLAST COMMUNICATION FAILURE 3-12 CP2000-M/MR Service Booklet 020-100220-02 Rev. 1 (07/08) Section 4: Troubleshooting 3.2.11 ILS HAS LOST FOCUS, OFFSET AND/OR ZOOM CP2000-M/MR Service Booklet 020-100220-02 Rev. 1 (07/08) 3-13 4 CP2000-M/MR Service Booklet 020-100220-02 Rev. 1 (07/08) Serial Communications 4-1 Section 7: Serial Communications Table 4.1 Function Codes Address (ADR) DESCRIPTION Set/Query Device Address on ASCII Protocol network. Required only for RS - 232 connections that are daisy chained to allow directed messages. SUBCODE DESCRIPTION OF USE None Valid Address range is 0 to 999. Reserved broadcast address is 65535. EXAMPLES: (0 ADR 5) Set first device with an address of 0 to 5 (65535 ADR 0) Set all devices to address 0 (65535 1001ADR ?) Query address for all devices and return results to address 1001 Expected response to previous query (01001 00005ADR!005) Auxiliary Motorized Lens (AML) DESCRIPTION Control the motorized auxiliary lens (anamorphic or converter lens). SUBCODE DESCRIPTION OF USE CALI 1, Send command to find the center position of the sensor for MALM. CSTA 0-100%, read only command for returning the status of MALM calibration. Cxxx Replace xxx with the channel number. Range from 101 - 164. INST 0-1, the flag to indicate if MALM is installed. LENI steps, The steps to move MALM to lens in position where (AML1) is set. LENO steps, The steps to move MALM to lens out position where (AML0) is set. NONE Set auxiliary lens position 0 - lens removed from optical path 1 lens inserted in optical path. POSI Read only command which returns where MALM is located. EXAMPLES: (AML?) get the current status of auxiliary lens (AML+C108 1) Use auxiliary lens on channel 108 (AML+C108?) Query auxiliary lens setting for channel 108 (AML+C108!001) response form previous query (AML+INST 1) set flag for using MALM, otherwise MALM is ignored (AML+LENI 1000) move lens to step 1000 for lens in position (AML+LENO 7000) move lens to step 1000 for lens out position (AML+POSI ?) query where the lens is (AML+CSTA ?) query how much percent the MALM calibration is running 4-2 CP2000-M/MR Service Booklet 020-100220-02 Rev. 1 (07/08) Section 7: Serial Communications Table 4.1 Function Codes BACKUP (BAK) DESCRIPTION This control backs up various parts of the system. Files are zipped, date/time stamped and placed in the /var/www/ backup directory. SUBCODE DESCRIPTION OF USE CFIL Retrieve the name of the last sucessful configuration backup. Read only sub code. CHAN Meaningless value. Simply used to trigger. Use 1. CONF Meaningless value. Simply used to trigger. Use 1. HFIL Retrieve the name of the last sucessful channel file. IFIL Retrieve the name of the last sucessful interrogator file. INTR A value of 0 will launch the interrogator in normal mode. This collects the common logs in the system. A value of 1 will launch the interrogator in enhanced mode. Enhanced mode offers additional debug info as well as provides the normal info. ISTA Retrieve the current state of the interrogator. 0 means not running. ITST Read only (0-100), retrieve the progress percentage of interrogator. PFIL Retrieve the name of the last sucessful preference backup. Read only sub code. PREF Meaningless value. Simply used to trigger. Use 1. UFIL Retrieve the name of the last sucessful user backup. Read only sub code. USER Meaningless value. Simply used to trigger. Use 1. EXAMPLES: (BAK+CONF 1) Backup all configuration controls (BAK+PREF 1) - Backup all preference controls (BAK+USER 1) Backup all users (BAK+INTR 1) Run interrogator enhanced (BAK+INTR 0) Run interrogator normal (BAK+CFIL?)(BAK+CFIL!"http:192.168.0.0/backup/config_model_sub_serial_date_time.tar") (BAK+PFIL?)(BAK+PFIL!"http:192.168.0.0/backup/pref_model_sub_serial_date_time.tar") (BAK+UFIL?)(BAK+UFIL!"http:192.168.0.0/backup/user_model_sub_serial_date_time.tar") (BAK+IFIL?)(BAK+IFIL!"http:192.168.0.0/backup/intr_model_sub_serial_date_time.tar") (BAK+CHAN 1) - Backup all channel controls (BAK+HFIL?)(BAK+HFIL!"http:192.168.0.0/backup/channel_model_sub_serial_date_time.tar") CP2000-M/MR Service Booklet 020-100220-02 Rev. 1 (07/08) 4-3 Section 7: Serial Communications Table 4.1 Function Codes Baud Rate (BDR) DESCRIPTION Set the baud rate for a serial communications port. SUBCODE DESCRIPTION OF USE PRTA Set the baud rate on port A. Rates can be 1200, 2400,9600.19200,38400,57600 or 115200 EXAMPLES: (BDR+PRTA “115200”) Set baud rate on port A to 115200 bits per second (BDR+PRTA?) Get baud rate (BRD+PRTA! “115200”) Control Display Panel settings (CDP) DESCRIPTION Enable error messages. SUBCODE DESCRIPTION OF USE BACK 0 - 100. CDP Backlight Brightness level (both screen and key backlights). 0: disable backlight. CONT 0 - 100. CDP Contrast level. EXAMPLES: (CDP+CONT 60) change the contrast level to 60% (CDP+CONT?) requests current contrast level. Example response is (CDP+CONT!50) (CDP+BLACK 0) disable the backlight (CDP+BLACK 100) set the backlight to full brightness Channel (CHA) DESCRIPTION Select Channel configuration to use. Channel range is 101 to 164. Channel configuration sets the input routing and image processing options for input signals. SUBCODE DESCRIPTION OF USE None Select Channel. Range 101 - 164. EXAMPLES: (CHA?) get current active channel (CHA 108) set channel 108 as active channel Channel Icon (CHI) DESCRIPTION Set icon file name and path for the specified channel. This selects the icon to be displayed on web UI for the channel button. 4-4 SUBCODE DESCRIPTION OF USE Cxxx Replace xxx with the channel number.Valid Range is 101 - 164. None Select icon for the current channel. CP2000-M/MR Service Booklet 020-100220-02 Rev. 1 (07/08) Section 7: Serial Communications Table 4.1 Function Codes EXAMPLES: (CHI+C108 “/etc/data/icons/ch108.ico”) use ch 108.ico for channel 108 (CHI+C108 ?) get icon file name and path for channel 108 Color Space (CSP) DESCRIPTION Color space control, color space file will be set when PCF in Use (PIU) is off. This control describes the source colorimetry information. Can use index or text string to set control. SUBCODE DESCRIPTION OF USE Cxxx Replace xxx with the channel number. Valid Range is 101 - 164. None Select color space for the current channel. EXAMPLES: (CSP+C108 “RGB Unity”) Use file “RGB Unity” on channel 108 (CSP+C108?) get color space file name on channel 108 (CSP?L) list all entries of color space control Defaults (DEF) DESCRIPTION This control will reset all preference and configuration settings in the device to their default values. The value of 111 must be sent with each of the sub codes as well as the default. The number 111 helps prevent accidental use of this control. SUBCODE DESCRIPTION OF USE CHAN Restore default channels. 0 defaults all. CONF Set configuration controls to default. OPTN Set all option card controls to default. PREF Set preference controls to default. UNSV Set unsaved controls to default. USER Clears all users and restores the factory default user. Most UI’s will require you to log in again after issuing this command. EXAMPLES: (DEF 111) - Restore all preference, configuration, option, and unsaved controls to default (DEF+USER 111) - Clear all users and restore factory default user (DEF+CONF 111) - Reset all configuration controls (DEF+PREF 111) - Reset all preference controls (DEF+UNSV 111) - Reset all unsaved controls (DEF+CHAN 101) - Restore Channel 101 (DEF+CHAN 0) - Restore all channels (DEF+CHAN?) - Shows last channel defaulted or -1 on failure CP2000-M/MR Service Booklet 020-100220-02 Rev. 1 (07/08) 4-5 Section 7: Serial Communications Table 4.1 Function Codes Data Logging (DLG) DESCRIPTION Set data logging level. SUBCODE DESCRIPTION OF USE None There are 3 levels for data logging. EXAMPLES: Levels are: 0 = Minimum logging of activities. Logging system errors and power on/ off, lamp on/off, user login/logout only 1 = standard logging (errors plus select operations - shutter on/off, changing channels) 2 = Maximum logging. All activities are logged (DLG1) set current logging level to 1 (DLG?) get current logging level. Response is (DLG!001) Data Format (DTF) DESCRIPTION Select data packing format for selected input. Available data formats depends on current input port (as selected by SIN). SUBCODE DESCRIPTION OF USE Cxxx Replace xxx with the channel number. Valid Range is 101 - 164. None Select data format for current channel. EXAMPLES: DTF?) get current data format (DTF?L) Show entries on the list (DTF 1) or (DTF "422 Packed 12Bit") Set current data format to 1 (292: 422 Packed 12Bit) (DTF+C108?) get data format on channel 108 (DTF+C108 20) or (DTF+C108 "Unpacked 8Bit") use data format 20 (DVI: Unpacked 8Bit) on channel 1 Enable Error Messages (EME) DESCRIPTION Enable error messages. SUBCODE DESCRIPTION OF USE FANF 0 - No Fan Fail warning will be generated; 1 - Fan Fail warning will be generated. None 0 - disable broadcast; 1 - enable broadcast of error messages to all connected serial ports and telnet sessions. TEMP 0 - No Over Temperature warning will be generated; 1 - Over Temperature will be generated. EXAMPLES: (EME 1) enable broadcasting error messages (EME+FANF 0) disable fan fail alarm warnings (EME?) requests current state of broadcast. Example response is (EME!001) 4-6 CP2000-M/MR Service Booklet 020-100220-02 Rev. 1 (07/08) Section 7: Serial Communications Table 4.1 Function Codes Focus Lens Position Adjustment (FCS) DESCRIPTION Adjust focus lens to specific position. SUBCODE DESCRIPTION OF USE None Moving focus motor to a specified position. Default data range 1040 to 1040, by using pre-calibration feature it might be changed to be an actual value. EXAMPLES: (FCS 500) Move focus lens to position 500 (FCS+C101 300) Set the focus position on Channel 101 to 300 Gamma Control (GAM) DESCRIPTION Gamma control, gamma file will be set when PCF in Use (PIU) is OFF. This control describes the gamma response curve for the source signal. SUBCODE DESCRIPTION OF USE Cxxx Replace xxx with the channel number. Valid Range is 101 - 164. None Select gamma for the current channel. EXAMPLES: (GAM+C108 “gamma 2.6”) Use file “gamma 2.6” on channel 108 (GAM+C108?) get gamma file name on channel 108 (GAM?L) list all entries of gamma control ILS Config (ILS) DESCRIPTION Enable/disable the Intelligent Lens System in specified channel. SUBCODE DESCRIPTION OF USE Cxxx Replace xxx with the channel number. Valid Range is 101 - 164. None Select ILS for current channel. EXAMPLES: (ILS+C101 1) Enable ILS at Channel 101 (ILS+C101 0) Disable ILS at channel 101 CP2000-M/MR Service Booklet 020-100220-02 Rev. 1 (07/08) 4-7 Section 7: Serial Communications Table 4.1 Function Codes Lamp History (HIS) DESCRIPTION Retrieve lamp history entries, including the current lamp. There is an individual entry for each lamp in the history. The format for each entry is as follows: (HIS! AAA “BBBB/BB/BB” “C” “D” EEE FFF GGG HHH III JJJ), where: A = Lamp Number B = Date Lamp Installed C = Serial Number D = Type E = Strikes F = Failed Strikes G = Failed Restrikes H = Unexpected Lamp Off I = Pre-installed Hours J = Lamp Hours SUBCODE DESCRIPTION OF USE None None EXAMPLES: (HIS?) get the list of installed lamps Return: (HIS!001 "2007/05/21" "qa-1" "CDXL-30" 000 000 000 000 020 020) Internal Test Pattern (ITP) DESCRIPTION List and select internal test patterns. This command also create the customized test pattern list from the internal test patterns. The list of available test patterns is determined by what files are loaded on the TI cinema electronics. SUBCODE DESCRIPTION OF USE FULL Set(1)/Reset(0) full screen size. NOCR Internal command use only, select non - correction test patterns for measured color. None Select test pattern from full list of defined test patterns. SETP Internal command for updating user test pattern list. Should not be used by customers. USER Select test pattern from user defined test pattern list. EXAMPLES: (ITP ?) Get current test pattern, 0 means no test pattern is used. (ITP 4) or (ITP “ “) Use number or string to set test pattern. (ITP+USER 4) or (ITP+USER “ “) Use number of string to set test pattern from user’s test pattern list. (ITP+FULL 1) Use full screen size. (ITP+FULL 0) Use active channel screen file. 4-8 CP2000-M/MR Service Booklet 020-100220-02 Rev. 1 (07/08) Section 7: Serial Communications Table 4.1 Function Codes Lamp Intensity Calibration (LCA) DESCRIPTION This control is used to calibrate (correlate) the intensity feedback mechanism to footlamberts. Note the minimum/ maximum power are used to pick two points on the curve. These points will not stay consistent over the life of the lamp, but the conversion algorithm will extrapolate the conversion beyond the range of the two end points. Note: changing the lamp or lamp alignment will require re-calibration. SUBCODE DESCRIPTION OF USE MAXF Set footlamberts at maximum lamp power. MAXS Set sensor value at maximum lamp power. MINF Set footlamberts at minimum lamp power. MINS Set sensor value at minimum lamp power. None Not available. EXAMPLES: (LCA+MINF 10) set 10 footlamberts as measured brightness at minimum lamp power (LCA+MINF?) get footlamberts on minimum lamp power (LCA+MAXS 15000) set 15000 as reading value from the light sensor on maximum lamp power Lens Reset (LCB) DESCRIPTION Reset lens mount system to home position at horizontal and vertical axes, reset zoom, and focus lens to home position. Depends on ILS and ALC configurations, when ILS and ALC are both turned ON, when system was powered on LCB will be run automatically at all axes. SUBCODE DESCRIPTION OF USE None Run home position calibration on specified axis or all axes. Input range 0 - 5 0: Cancel reset 1) Run reset on horizontal axis of lens mount system 2) Run reset on vertical axis of lens mount system 3) Run calibration on Zoom Lens 4) Run calibration on focus lens 5) Run calibration on all axes. EXAMPLES: (LCB 0) Cancel lens reset (LCB 1) Run lens reset on horizontal axis (LCB 2) Run lens reset on vertical axis (LCB 3) Run lens reset on zoom lens (LCB 4) Run lens reset on focus lens (LCB 5) Run lens reset on all axes (LCB ?) Return current lens reset status, 0: stopped, 1-4: resetting on current axis LUT CLUT Control (LCT) DESCRIPTION Set Look up Table (LUT) Color Look Up Table (CLUT) file for the specified channel. The CLUT is used during color processing in the cinema electronics. CP2000-M/MR Service Booklet 020-100220-02 Rev. 1 (07/08) 4-9 Section 7: Serial Communications Table 4.1 Function Codes SUBCODE DESCRIPTION OF USE Cxxx Replace xxx with the channel number. Valid Range is 101 - 164. None Select CUT for the current channel. EXAMPLES: (LCT+C108 “9x9x9”) Use PCF file “9x9x9” on channel 108 (LCT+C108?) get LUT-CULT file name on channel 108 (LCT?L) list all entries of LUT-CLUT control Lens Type (LEN) DESCRIPTION Define model and serial number for primary installed lens and auxiliary lens. SUBCODE DESCRIPTION OF USE (AMOD) Auxiliary lens model. (ASER) Auxiliary lens serial number. (MMOD) Main lens model. (MSER) Main lens serial number. None Not available. EXAMPLES: (LEN+MMOD?L) list supported lens model (LEN+MMOD 1 set lens model (LEN+MSER “xxxx”) set lens serial number Lens Horizontal Position Adjustment (LHO) DESCRIPTION Adjust lens to specific horizontal position. SUBCODE DESCRIPTION OF USE Cxxx Replace xxx with the channel number. Valid range is 101-164. None Moving lens mount to a specified horizontal position. Default data range -2000 to 2000. EXAMPLES: (LHO 500) Move lens mount to position 500 at horizontal axis (LHO+C101 500) Set lens mount to position of channel 101 to 500 at horizontal axis Lamp ID (LID) DESCRIPTION Set or get lamp type (ID) for the currently installed lamp. Supports read back of the list of supported lamp types. 4-10 SUBCODE DESCRIPTION OF USE None Set Lamp ID for current lamp. CP2000-M/MR Service Booklet 020-100220-02 Rev. 1 (07/08) Section 7: Serial Communications Table 4.1 Function Codes EXAMPLES: (LID?L) list supported lamp IDs (LID?) get the lamp id for installed lamp (LID 4) or (LID “CDX-30”) set the lamp ID for installed lamp LampLOC™ Module (LLM) DESCRIPTION Allows adjustment of lamp position to optimize intensity and uniformity of the optical system. This is referred to as the LampLOC™ feature and can be done automatically or manually. SUBCODE DESCRIPTION OF USE AUTO Set to 1 to do LampLOC™ automatically. It will do calibration first, then moving x,y,z-motor to find the maximum brightness. CALI Set to 1 calibrate all 3 motors. I.e. Move all 3 motor to default position. Note: (LLM +CAL?) will return 1 if calibration is running and 0 if calibration is finished. MTRX Moving X-axis motor manually, data range: - 500 to 500. MTRY Moving Y-axis motor manually, data range: - 500 to 500. MTRZ Moving Z-axis motor manually, data range: - 500 to 500. None Not available. STAT Provides feedback (status) on the progress of the Auto mode. Read only command, data range from 0 to 100, where 100 indicates the lampLOC is finished. EXAMPLES: (LLM+MTRX 100) Move motor-X to position 100 (LLM+AUTO 1) Do LampLOC automatically (LLM+AUTO 0) Abort LampLOC, it will restore the motors to previous position automatically Lens Manual Override Global (LMO) DESCRIPTION Enable/disable the LENS MANUAL OPERATION mode, global control SUBCODE DESCRIPTION OF USE None Not available. EXAMPLES: (LMO 1) Enable LMO (LMO 0) Disable LMO Adjust all lens position parameters simultaneously (LMV) DESCRIPTION Adjust all lens position parameters simultaneously. SUBCODE DESCRIPTION OF USE None (LMV <lho> <lvo> <zom> <fcs>) CP2000-M/MR Service Booklet 020-100220-02 Rev. 1 (07/08) 4-11 Section 7: Serial Communications Table 4.1 Function Codes EXAMPLES: (LMV 1000 1500 500 -500) Move lens to horizontal/1000, vertical/15000, zoom/500 and focus -500. Local Settings (LOC) DESCRIPTION Set the localization options such as Language and display options for temperature units. SUBCODE DESCRIPTION OF USE LANG Set the primary language. 0 - English. TEMP Set the temperature units. 0 - Celsius. (Choices are Deferred past V1.0) TIME Set Time format. 0 - 24 hour, 1 - 12 hour. EXAMPLES: (LOC+TIME 1) Set time zone to standard 12 hour (LOC+TIME?1) Get list of formats (LOC+TIME?)(LOC+TIME!001) Get time format Lamp Changed (LPC) DESCRIPTION Record current lamp information into the lamp history, then start a new entry. Set lamp information of a new lamp type ID, serial number, and pre-used hours. SUBCODE DESCRIPTION OF USE LPID Set lamp type ID for the new lamp PREV Set lamp previous lamp hours for the new lamp SERL Set lamp serial number for the new lamp EXAMPLES: (LPC+LPID “CDX-30”) set lamp type ID (LPC+SERL “CDX30-001”) set lamp serial number (LPC 1) save information to lamp history Lamp Hours (LPH) DESCRIPTION Read only control, get information on installed lamp. 4-12 SUBCODE DESCRIPTION OF USE FLSK Return Total failed lamp strikes on the installed lamp. FRSK Return Total failed lamp restrikes on the installed lamp. LPOF Return Total lamp unexpected off times on the installed lamp. None Return Lamp usage for current lamp in hours. TLSK Return Total lamp strikes on the installed lamp. CP2000-M/MR Service Booklet 020-100220-02 Rev. 1 (07/08) Section 7: Serial Communications Table 4.1 Function Codes EXAMPLES: (LPH?) get usage in hours (LPH+FLSK?) get lamp strikes Lamp Intensity (LPI) DESCRIPTION Set lamp intensity set point. The value is used when lamp mode is set to LiteLOC™. The projector will adjust the Lamp Power to maintain this intensity. SUBCODE DESCRIPTION OF USE Cxxx Replace xxx with the channel number. Valid Range is 101 - 164. GLOB Set lamp intensity for all channels when PPB is OFF. EXAMPLES: (LPI+GLOB 4500) set lamp intensity to 4500 for global (LPI+C108 4500) set lamp intensity to 4500 for channel 108 (LPI+C108?) get lamp intensity for channel 108 Lamp Life (LPL) DESCRIPTION Set or get expected lamp life in hours. The default hours will be used if lamp life is ‘not set’. Lamp expiry message will be sent out when lamp usage is over the lamp life. SUBCODE DESCRIPTION OF USE LIFE 0 - No warning will be generated. 1 - Lamp Life Expiry Warning will be generated when lamp hours extends past lamp life. Warning will be reported in SST. Warning will be cleared by extending lamp life or changing the lamp. None Set or get expected lamp life. ROTA Set to 1 acknowledge the Lamp Rotation Warning. Will auto clear at lamp life or on lamp change. ROTW 0 - No warning will be generated. 1 - Lamp Rotation Warning will be generated when lamp hours extents past 1/2 lamp life. Warning will be reported in SST. Warning will be cleared by LPL+ROTA or changing the lamp. EXAMPLES: (LPL+LIFE 0) disable lamp expired message (LPL+ROTW 1) enable lamp rotation message ((LPL 1500) set lamp life limit to 1500 hours Lamp Mode (LPM) DESCRIPTION Set lamp mode to constant power or LiteLOC™ for global and per channel. SUBCODE DESCRIPTION OF USE Cxxx Replace xxx with the channel number. Valid Range is 101 - 164. GLOB Set lamp mode for global. The value is used when PPB is 0. CP2000-M/MR Service Booklet 020-100220-02 Rev. 1 (07/08) 4-13 Section 7: Serial Communications Table 4.1 Function Codes EXAMPLES: (LPM+GLOB 1) set lamp mode as LiteLOC™ for global (LPM+C108 1) set lamp mode as LiteLOC™ for channel 101 (LPM?) get the current lamp mode Lamp Power (LPP) DESCRIPTION Set lamp power to be used when in Constant Power Mode. SUBCODE DESCRIPTION OF USE Cxxx Replace xxx with the channel number. Valid Range is 101 - 164. GLOB Set lamp power for all channels when PPB is OFF. EXAMPLES: (LPP+GLOB 4500) set lamp power to 4500 for global (LLP+C108 4500) set lamp power to 4500 for channel 108 (LPP+C108 ?) get lamp power for channel 108 Lens Vertical Offset Position Adjustment (LVO) DESCRIPTION Adjust lens to specific vertical position. SUBCODE DESCRIPTION OF USE Cxxx Replace xxx with the channel number. Valid Range is 101 - 164. None Moving lens mount to a specified vertical position. Default data range -2200 to 2200. EXAMPLES: (LVO 500) Move lens mount to position 500 at vertical axis Measured Color (MCG) DESCRIPTION Select the Measured Color Gamut file. This file describes the native colorimetry for the projector as installed and is required for accurate color processing in the cinema electronics. This control is per channel to allow for different colorimetry for applications such as 3D. SUBCODE DESCRIPTION OF USE Cxxx Replace xxx with the channel number. Valid Range is 101 - 164. None Select measured color gamut for the current channel. Temp Select measured color file as DLP active file, do not change channel settings. EXAMPLES: (MCG+C108 “Nominal”) Use file “Nominal” on channel (MCG+C108?) get measured color file name on channel 108 (MCG?L) list all entries of measured color control Channel_Name (NAM) DESCRIPTION Set the descriptive channel name for the specified channel. 4-14 CP2000-M/MR Service Booklet 020-100220-02 Rev. 1 (07/08) Section 7: Serial Communications Table 4.1 Function Codes SUBCODE DESCRIPTION OF USE Cxxx Replace xxx with the channel number. Valid Range is 101 - 164. None Select channel name for the current channel. EXAMPLES: (NAM+C108 “Scope 2.39”) set channel name for channel 108 (NAM+C108?) get channel name for channel 108 Network Setup (NET) DESCRIPTION Set or request the network setup for this device. ETH0 and ETH1 are non transferable settings.**Kevin asked to not mention ETH1. MAC0 and MAC1 are read only settings. Note: Some devices may only have 1 Ethernet controller (ETHO). SUBCODE DESCRIPTION OF USE DLP0 IP Address for the Cinema Electronics. DOMA Set the domain name. ETH0 Set the IP address for the first ethernet controller. ETH1 Set the IP address for the second ethernet controller. GATE Set the network gateway. HOST Set the host name. MAC0 Gets the MAC address of the first ethernet controller. MAC1 Gets the MAC address of the second ethernet controller. SUB10 Set the network subnet mask for the first ethernet controller. SUB1 Set the network subnet mask for the second ethernet controller. CP2000-M/MR Service Booklet 020-100220-02 Rev. 1 (07/08) 4-15 Section 7: Serial Communications Table 4.1 Function Codes EXAMPLES: (NET+ETH0 "192.168.1.35") - Set new IP address on the first ethernet controller (NET+ETH1 "192.168.1.36") - Set new IP address on the second ethernet controller (NET+GATE "192.168.0.1") - Set the gateway (NET+SUB0 "255.255.255.0") - Set the subnet mask on the first ethernet controller (NET+HOST "MyHostName") - Set the host name (NET+DOMA "MyDomainName") - Set the domain name (NET+ETH0 ?) - Retrieve IP address from first controller. (NET+ETH0! 192.168.1.35) (NET+ETH0 ?) - Retrieve IP address from second controller. (NET+ETH1! 192.168.1.36) (NET+MAC0 ?) - Retrieve MAC address from first controller. (NET+MAC0! 00:12:3F:7B:76:B4) (NET+MAC1 ?) - Retrieve MAC address from second controller. (NET+MAC1! 00:12:3F:7B:76:B5) (NET+GATE ?) - Retrieve default gateway. (NET+GATE! 192.168.0.1) (NET+ETH0 "192.168.1.35") - Set new IP address on the MGMT ethernet controller (NET+ETH1 "192.168.1.36") - Set new IP address on the AUX ethernet controller (NET+SUB0 "255.255.255.0") - Set the subnet mask on the MGMT ethernet controller (NET+ETH0 ?) - Retrieve IP address from MGMT controller. (NET+ETH0! 192.168.1.35) (NET+ETH0 ?) - Retrieve IP address from AUX controller. (NET+ETH1! 192.168.1.36) (NET+MAC0 ?) - Retrieve MAC address from MGMT controller. (NET+MAC0! 00:12:3F:7B:76:B4) (NET+MAC1 ?) - Retrieve MAC address from AUX controller. (NET+MAC1! 00:12:3F:7B:76:B5) (NET+GATE ?) - Retrieve default gateway. (NET+GATE! 192.168.0.1) (NET+DLP0 "192.168.206.10") Set Cinema IP address (NET+DLP0? ) (NET+DLP0! "192.168.206.010") Query Cinema IP address and response Calibration Lens Mount and Lens System (PCB) DESCRIPTION Calibrating lens mount system at horizontal, vertical, zoom and focus lens to find home position, and the actual motor travel range on each axis. Also doing motor backlash calculating for each motor. 4-16 SUBCODE DESCRIPTION OF USE None Run home position calibration on specified axis or at all axes. Input range 0 - 5 0: Cancel calibration 1) Run calibration on horizontal axis of lens mount system 2) Run calibration on vertical axis of lens mount system 3) Run calibration on zoom Lens 4) Run calibration on focus lens 5) Run calibration on all axes. FBLL READ ONLY! Get the motor backlash on left-side of focus lens. FBLR READ ONLY! Get the motor backlash on right-side of focus lens. FRGL READ ONLY! Get the motor left-side travel range of focus lens. FRGR READ ONLY! Get the motor right-side travel range of focus lens. HBLL READ ONLY! Get the motor backlash on left-side of horizontal axis. HBLR READ ONLY! Get the motor backlash on right-side of horizontal axis. HRGL READ ONLY! Get the motor left-side travel range of horizontal axis. CP2000-M/MR Service Booklet 020-100220-02 Rev. 1 (07/08) Section 7: Serial Communications Table 4.1 Function Codes HRGR READ ONLY! Get the motor right-side travel range of horizontal axis. VBLD READ ONLY! Get the motor backlash on down-side of vertical axis. VBLU READ ONLY! Get the motor backlash on up-side of vertical axis. VRGD READ ONLY! Get the motor down-side travel range of vertical axis. VRGU READ ONLY! Get the motor up-side travel range of vertical axis. ZBLL READ ONLY! Get the motor backlash on left-side of zoom lens. ZBLR READ ONLY! Get the motor backlash on right-side of zoom lens. ZRGL READ ONLY! Get the motor left travel range of zoom lens. ZRGR READ ONLY! Get the motor right travel range of zoom lens. EXAMPLES: (PCB 0) Cancel pre-calibration (PCB 1) Run pre-calibration on horizontal axis of lens mount system (PCB 2) Run pre-calibration on vertical axis of lens mount system (PCB 3) Run pre-calibration on zoom lens (PCB 4) Run pre-calibration on focus lens (PCB 5) Run pre-calibration on all axes (PCB ?) Return current calibration status, 0: stopped, 1-4: calibrating on current axis (PCB+HRGR ?) Get the motor travel range on right-side of horizontal axis (PCB+HRGL ?) Get the motor travel range on left- side of horizontal axis (PCB+VRGU ?) Get the motor travel range on up-side of vertical axis (PCB+VRGD ?) Get the motor travel range on down-side of vertical axis (PCB+ZRGR ?) Get the motor travel range on right-side of zoom lens (PCB+ZRGL ?) Get the motor travel range on left-side of zoom lens (PCB+FRGR ?) Get the motor travel range on right-side of focus lens (PCB+FRGL ?) Get the motor travel range on left-side of focus lens (PCB+HBLR ?) Get the motor backlash on right-side of horizontal axis (PCB+HBLL ?) Get the motor backlash on left-side of horizontal axis (PCB+VBLU ?) Get the motor backlash on up-side of vertical axis (PCB+VBLD ?) Get the motor backlash on down-side of vertical axis (PCB+ZBLR ?) Get the motor backlash on right-side of zoom lens (PCB+ZBLL ?) Get the motor backlash on left-side of zoom lens (PCB+FBLR ?) Get the motor backlash on right-side of focus lens (PCB+FBLL ?) Get the motor backlash on left-side of focus lens CP2000-M/MR Service Booklet 020-100220-02 Rev. 1 (07/08) 4-17 Section 7: Serial Communications Table 4.1 Function Codes Projector Configuration File (PCF) DESCRIPTION Set Projector Configuration File (PCF) file for the specified channel. This file is used to configure many aspects of the cinema electronics. It will only be used if PCF in use (PIU) control is set. SUBCODE DESCRIPTION OF USE Cxxx Replace xxx with the channel number. Valid Range is 101 - 164. None Select PCF file for the current channel. EXAMPLES: (PCF+C108 “SCOPE 2.39”) Use PCF file “Scope 2.39” on channel 108. File used when PIU is on (PCF?L) list all entries of PCF control PCF In Use (PIU) DESCRIPTION Select whether to use the PCF file or not. SUBCODE DESCRIPTION OF USE Cxxx Replace xxx with the channel number. Valid Range is 101 - 164. None Select PCF for the current channel. EXAMPLES: (PIU?) get the current status of PCF file (PIU+C108 1) use PCF file on channel 108 (PIU+C108 0) do not use PCF file on channel 108 Ping (PNG) DESCRIPTION This command returns basic projector information to the user, which includes the type of device & main software version. Return parameters are: Type, Major, Minor, Beta. The beta value is optional, meaning its an engineering build and has not been validated. NOTE: List of types for the ‘type’ parameter include: 40 = ACT, 41 = CP2000-ZX, 42 = CP2000-M/ MR, 43 = Reserved, 44 = CorelII SUBCODE DESCRIPTION OF USE None None EXAMPLES: (PNG?)(PNG!41 001 00 0) -- Indicates ‘Cinema’ type, software: 1 major, 0 minor, 0 beta Power Per Button (PPB) DESCRIPTION Control whether lamp power settings are configured per channel or global. NOTE: See also other lamp commands LPI, LPP, LPM. 4-18 SUBCODE DESCRIPTION OF USE Cxxx None Replace xxx with the channel number. Valid Range is 101-164 Select Power Per Button for the current channel. CP2000-M/MR Service Booklet 020-100220-02 Rev. 1 (07/08) Section 7: Serial Communications Table 4.1 Function Codes EXAMPLES: (PPB 0) Don't use Power Per Button for current channel, use global settings instead (PPB+C108 1) Use Power Per Button for channel 108 (PPB+C108?) Get Power Per Button state for channel 108 (PPB?) Get Power Per Button state for current channel Processing Mode (PRM) DESCRIPTION Select whether to use cinema processing mode. Cinema processing mode. Cinema processing uses extended image pixel depth and color processing algorithms. Alternative content is not intended to use cinema processing. 0 - do not use Cinema Processing. SUBCODE DESCRIPTION OF USE Cxxx Replace xxx with channel number. Valid Range is 101 - 164. None Select processing mode for the current channel. EXAMPLES: (PRM+C108 1) Use cinema processing mode on channel 108 (PRM+C108 0) Do not use cinema processing mode on channel 108 (PRM?) Get current processing mode Power (PWR) DESCRIPTION Change the power state of the projector. Data can be: 3 - Power OFF - all electronics power off except Projector Control Module (PCM). It's also called standby mode 1 - Power ON projector is powered on with lamp) ON 0 - FULL POWER mode - projector is ready for lamp ON 11 - Warm up. Read only, it's middle status between STANDY and FULL POWER mode 10 - Cool down. Read only, projector will stay in COOLING DOWN mode for 15 minutes after lamp is turned OFF. SUBCODE DESCRIPTION OF USE None Select power state. STAT Read only status of current power state. EXAMPLES: (PWR+STAT?) - Get projector power status (PWR3) - Set the projector to STANDBY mode (PWR0) - Turn the projector ON and lamp OFF (PWR1) - Turn the projector ON and lamp ON (PWR?) - Get the last command sent to projector CP2000-M/MR Service Booklet 020-100220-02 Rev. 1 (07/08) 4-19 Section 7: Serial Communications Table 4.1 Function Codes Table 4.2 Projector Power Modes NOTES: 1) The green status LED flashes while the yellow LED is on steady while in “Boot Delay”. 2) Both green and yellow status LEDs flash during “Cool Down. Remote Access Level (RAL) DESCRIPTION Set the remote serial protocol access level for a serial communications port. Note: Valid sections are 0 - No Access, 1 - Login Required, 2 - Free Access. SUBCODE DESCRIPTION OF USE None Set the access level on Ethernet all ports. PRTA Set the access level on RS232 port A. EXAMPLES: (RAL 0) Disable remote serial protocol access for all Ethernet ports (RAL?) Get access level for Ethernet ports (RAL!0) (RAL+PRTA 2) Set remote serial protocol access level on port A to free access (RAL+PRTA?) Get access level (RAL+PRTA!2) Screen Format (SCF) DESCRIPTION Select Screen format file which describes the geometry for the output image. SUBCODE DESCRIPTION OF USE Cxxx Replace xxx with the channel number. Valid Range is 101 - 164. FULL Selects the full output screen. None Select screen file for the current channel. EXAMPLES: (SCF+C108 “FLAT”) Use file “FLAT” on channel 108 (SCF+C108?) get screen file name on channel 108 (SCF?L) list all available entries of screen control Shutter/Douser (SHU) DESCRIPTION Open/Close shutter/douser 4-20 CP2000-M/MR Service Booklet 020-100220-02 Rev. 1 (07/08) Section 7: Serial Communications Table 4.1 Function Codes SUBCODE DESCRIPTION OF USE None Select douser position 0 - douser removed from optical path 1 douser blocking optical path. EXAMPLES: (SHU 1) close shutter (SHU 0) open shutter (SHU?) get current status of shutter Select Input (SIN) DESCRIPTION Select Input Port. Selecting input port will reset the list and default data of DTF control. Use index number or text description to select input port. Available options are: 00000 “292-A”) 00001 “292-B”) 00002 “292-Dual”) 00003 “DVI-A”) 0005 “DVI-Twin”) SUBCODE DESCRIPTION OF USE Cxxx Replace xxx with the channel number. Valid Range is 101 - 164. None Select input for current channel. EXAMPLES: (SIN?) Get current input port (SIN?L) Show entries on the list (SIN 1) or (SIN “292-B”) Set current input port to 292-B (SIN+C101 ?) Get input port on channel 101 (SIN+C101 1) or (SIN+C101 “292-B”) Set input on channel 101 SNMP Agent Configuration (SNM) DESCRIPTION This control will set the various configuration options for SNMP Agent. SUBCODE DESCRIPTION OF USE LEXT LHLT TSIP ENVT Gets/Sets the Lamp Expire Trap Flag for the SNMP Agent. Gets/Sets the Lamp Half Life Trap Flag for the SNMP Agent. Sets the Trap IP address for the SNMP agent. Enable SNMP V2. EXAMPLES: (SNM+LHLT 1) - Setting this flag to 1 will disable any future lamp half life traps. (SNM+LEXT 1) - Setting this flag to 1 will disable any future lamp expire traps. (SNM+TSIP “xxx.xxx.xxx.xxx”) Sets the Trap IP address to xxx.xxx.xxx.xxx. (SNM+LEXT 1) - Setting this flag to 1 will disable any future lamp expire traps. (SNM+ENVT ?) - Get the flag to see if V2 is enabled (1) or disabled (0). (SNM+ENVT 1) - Enable SNMP V2. (SNM+ENVT 0) - Disable SNMP V2. Screen Orientation (SOR) DESCRIPTION Set screen orientation. This allows for flipping the screen orientation to allow for various mounting options of the projector including the use of mirrors and front or rear screen projection. CP2000-M/MR Service Booklet 020-100220-02 Rev. 1 (07/08) 4-21 Section 7: Serial Communications Table 4.1 Function Codes SUBCODE DESCRIPTION OF USE None Select Orientation. 0 - Normal Front, 1 - Inverted Rear, 2 - Normal Rear, 3- Inverted Front EXAMPLES: (SOR?L) list orientation options (SOR?) get the orientation status (SOR0) set orientation to front Select Source Format (SRF) DESCRIPTION Select the Source format file. SUBCODE DESCRIPTION OF USE Cxxx Replace xxx with the channel number. Valid Range is 101 - 164. None Select source format for the current channel. EXAMPLES: (SRF+C108 “XXX”) Use file “XXX” on channel 108 (SRF+C108?) get source file name on channel 108 (SRF?L) list all entries of source control System Status (SST) DESCRIPTION Retrieve the various system status groups. 4-22 SUBCODE DESCRIPTION OF USE ALRM Returns a summary of any active alarms. CONF Returns configuration data - model, sn, fans, air flow, etc. COOL Returns cooling data - cooling fans, air flow, etc. HLTH Returns system health. INTE Returns interlock data. LAMP Returns LAMP operational data. None Returns information on all status groups, with one message per item. PERI Returns peripherals data - Cine-IMP.etc. SIGN Returns signal data - freq, etc. SYST Returns system data - power, hours of use, shutter open, etc. TEMP Returns temperature data. VERS Returns version numbers. CP2000-M/MR Service Booklet 020-100220-02 Rev. 1 (07/08) Section 7: Serial Communications Table 4.1 Function Codes EXAMPLES: (SST+ALRM?) returns (SST+ALRM!000 002 “101” “Prism temperature”) Where parameters are P1=index number, P2=error level, P3=value, P4=description. Error level is 0=no errors or warnings, 1=warning, 2=error, 3=error and warning Target Color Gamut (TCG) DESCRIPTION Set the Target Color Gamut file. This file describes desired output colorimetry from the projector. For this control to function the Measured Color Gamut Data must be accurate. SUBCODE DESCRIPTION OF USE Cxxx Replace xxx with the channel number. Valid Range is 101 - 164. None Select target color gamut for the current channel. Temp Select target color file as DLP active file, do not change channel settings. EXAMPLES: (TCG+C108 “Altanis”) Use file “Altanis” on channel 108 (TCG+C108? ) get target color file name on channel 108 (TCG?L) list all available entries of target color control (TCG+TEMP "Altanis") Use file "Altanis" as DLP active file 3D Enable (TDC) DESCRIPTION Enable/Disable 3D on the specified channel. This controls the frame rate multiplication features that allow for simulated three dimensional image projection. SUBCODE DESCRIPTION OF USE Cxxx Replace xxx with the channel number. Valid Range is 101 - 164. None Select 3D enable for the current channel. EXAMPLES: (TDC+C108 1) Enable 3D on channel 108 (TDC+C108?) get 3D setting on channel 108 (TDC?) get current 3D status Display Reference GPI (TDI) DESCRIPTION Setup Display Reference GPI for 3D control. This signal selects the input signal that will be used as a reference to synchronize multiple projectors so that the gating technology so that the images can be targeted to the correct eyes. SUBCODE DESCRIPTION OF USE Cxxx Replace xxx with the channel number. Valid Range is 101 - 164. None Select display GPI for the current channel. CP2000-M/MR Service Booklet 020-100220-02 Rev. 1 (07/08) 4-23 Section 7: Serial Communications Table 4.1 Function Codes EXAMPLES: (TDI?L) list all entries on Display Reference GPI control (TDI+C101 1) set Display Reference GPI to 1 on channel 101 (TDI+C101?) get Display Reference GPI on channel 101 3D Dark Time (TDK) DESCRIPTION Setup Dark Time for 3D control. This controls how much time between displayed images the output remains dark to allow for the glasses on other gating mechanism to flip between the eyes. SUBCODE DESCRIPTION OF USE Cxxx Replace xxx with the channel number. Valid Range is 101 - 164. None Select dark time for the current channel. EXAMPLES: (TDK+C101 1) set Dark Time to 1 on channel 101 (TDK+C101?) get Dark Time on channel 101 Output Reference Delay (TDP) DESCRIPTION Setup Output Reference Delay phase for 3D control. Additional control for output timing relative to input timing. SUBCODE DESCRIPTION OF USE Cxxx Replace xxx with the channel number. Valid Range is 101 - 164. None Select output reference delay phase for the current channel. EXAMPLES: (TDP+C101 1) set Output Reference Delay phase to 1 on channel 101 (TDP+C101?) get Output Reference Delay phase on channel 101 3D Display Reference (TDR) DESCRIPTION Setup display reference timing signal for 3D control. SUBCODE DESCRIPTION OF USE Cxxx Replace xxx with the channel number. Valid Range is 101 - 164. None Select display reference for the current channel. EXAMPLES: (TDR?L) list all entries on display reference control (TDR+C101 1) set display reference to 1 on channel 101 (TDR+C101?) get display reference on channel 101 Output Reference Delay (TDT) DESCRIPTION Setup Output Reference Delay Time for 3D control. Controls how much delay between the input and output reference timing. 4-24 SUBCODE DESCRIPTION OF USE Cxxx Replace xxx with the channel number. Valid Range is 101 - 164. CP2000-M/MR Service Booklet 020-100220-02 Rev. 1 (07/08) Section 7: Serial Communications Table 4.1 Function Codes None Select reference delay for the current channel. EXAMPLES: (TDT+C101 1) set Output Reference Delay Time to 1 on channel 101 (TDT+C101?) get Output Reference Delay Time on channel 101 Input Frame Dominance (TFD) DESCRIPTION Setup Input Frame Dominance for 3D control. This selects which signal is considered first in the source signal, the left or the right. SUBCODE DESCRIPTION OF USE Cxxx Replace xxx with the channel number. Valid Range is 101 - 164. None Select frame dominance for the current channel. EXAMPLES: (TFD?L) list all entries on Input Frame Dominance control. (TFD+C101 1) set Input Frame Dominance to 1 on channel 101. (TFD+C101?) get Input Frame Dominance on channel 101 3D frame rate multiple (TFR) DESCRIPTION Setup frame rate multiple for 3D control SUBCODE DESCRIPTION OF USE Cxxx Replace xxx with the channel number. Valid Range is 101 - 164. None Select 3D frame rate for the current channel. EXAMPLES: (TFR?L) list all entries on the frame rate multiple factor (TFR+C101 1) set frame rate multiple to “4:2” on channel 101 (TFR+C101?) get frame rate multiple on channel 101 Input Reference GPI (TGI) DESCRIPTION Setup Input Reference General Purpose Input for 3D control. Selects the signal to be used to synchronize the video processing so the system knows which eye the images are targeted for. SUBCODE DESCRIPTION OF USE Cxxx Replace xxx with the channel number. Valid Range is 101 - 164. None Select Input reference GPI for the current channel. EXAMPLES: (TGI?L) list all entries on Input Reference GPI control (TGI+C101 1) set Input Reference GPI to 1 on channel 101 (TGI+C101?) get Input Reference GPI on channel 101 Input Reference (TIR) DESCRIPTION Setup Input timing Reference for 3D control. CP2000-M/MR Service Booklet 020-100220-02 Rev. 1 (07/08) 4-25 Section 7: Serial Communications Table 4.1 Function Codes SUBCODE DESCRIPTION OF USE Cxxx Replace xxx with the channel number. Valid Range is 101 - 164. None Select input reference for the current channel. EXAMPLES: (TIR?L) list all entries on Input Reference control (TIR+C101 1) set Input Reference to 1 on channel 101 (TIR+C101?) get Input Reference on channel 101 Time/Date (TMD) DESCRIPTION Set the time zone. SUBCODE DESCRIPTION OF USE DATE Set the date in the form yyyy/mm/dd. TIME Set the local time in the form hh:mm:ss. ZONE Set the time zone. EXAMPLES: (TMD+ZONE 20) Set time zone to EST (TMD+TIME “17:50:45”) Set new local time (TMD+DATE “2007/02/30”) Set the local date. (TMD+TIME?) Get local time (TMD+TIME! 17:50:45) Output Reference GPO (TOO) DESCRIPTION Setup Display Reference GPO for 3D control. This signal selects the output signal that will be used as a reference to the gating technology so that the images can be targeted to the correct eyes. SUBCODE DESCRIPTION OF USE Cxxx Replace xxx with the channel number. Valid Range is 101 - 164. None Select GPO for the current channel. EXAMPLES: (TOO?L) list all entries on Output Reference GPO control (TOO+C101 1) set Output Reference GPO to 1 on channel 101 (TOO+C101?) get Output Reference GPO on channel 101 Output Reference Polarity (TOP) DESCRIPTION Setup Output timing signal reference polarity for 3D control 4-26 SUBCODE DESCRIPTION OF USE Cxxx Replace xxx with the channel number. Valid Range is 101 - 164. None Select output reference polarity for the current channel. CP2000-M/MR Service Booklet 020-100220-02 Rev. 1 (07/08) Section 7: Serial Communications Table 4.1 Function Codes EXAMPLES: (TOP?L) list all on Output Reference Polarity control (TOP+C101 1) set Output Reference Polarity to 1 on channel 101 (TOP+C101? get Output Reference Polarity on channel 101 User ID login (UID) DESCRIPTION Log the username in with a password or query the current logged in level. SUBCODE DESCRIPTION OF USE None Log in user (UID “username” password”). None None EXAMPLES: Request the log in level (UID?). Response is (UID! “username” xx) where xx is the user level User levels are: status ( 1 ), Operator ( 2 ), Operator advanced ( 3 ), Advanced ( 4 ), Admin ( 5 ), Service ( 6 ) (UID) “username” “password”) Login a user (UID) Logout the current user, also happens automatically when a new user logs in (UID?)(UID! “username” 01) Display the current logged in user and their access level Zoom Lens Position Adjustment (ZOM) DESCRIPTION Adjust zoom lens to specific position. SUBCODE DESCRIPTION OF USE Cxxx Replace xxx with the channel number. Valid Range is 101 - 164. None Moving zoom motor to a specified position. Default data range -1050 to 1050, by using pre-calibration feature it might be changed to be an actual value. EXAMPLES: (ZOM 500) Move zoom lens to position 500 CP2000-M/MR Service Booklet 020-100220-02 Rev. 1 (07/08) 4-27 5 Specifications This section provides detailed CP2000-M/MR specifications, including: • • • • • • • • • 5.1 Display 5.2 Control Signal Compatibility 5.3 Control Display Panel (CDP) 5.4 Power Requirements 5.5 Lamp 5.6 Physical Specifications 5.7 Regulatory 5.8 Environment 5.9 Standard and Optional Components *Due to continuing research, specifications are subject to change without notice. CP2000-M/MR Service Booklet 020-100220-02 Rev. 1 (07/08) 5-1 Section 8: Specifications 5.1 DISPLAY 5.1.1 Panel Resolution and Refresh Rate Pixel format (H pixels x V pixels) 2048 x 1080 Refresh Rate • DLP Cinema® Processing 23.97 - 48Hz • Non-cinema Processing 23.97 - 85Hz • 3D (24 fps per eye input, DLP Cinema® Processing) 48Hz • Full Image (2048 x 1080) 96Hz (frame doubled) • Full Image (2048 x 1080) 144Hz (frame tripled) 5.1.2 Achievable Brightness (measured at screen center/2000W) CP2000-M: 2000W (CDXL-20SD) Xenon Short Arc Lamp12,000 lumens CP2000-MR: 2000W (CDXL-20SD) Xenon Short Arc Lamp10,000 lumens 5.1.3 Minimum Contrast Ratio 450:1 ANSI 2000:1 Full Field ON/OFF 5.1.4 Luminance Uniformity SMPTE 431-1-2006 Luminance Sides (theater) 85% of center SMPTE 431-1-2006 Luminance Corners (theater)85% of center 5.1.5 Color and Gray Scale Displayable colors 35.2 trillion Gray scale resolution 45 bits total linear, 15 bits each per RGB component 5.1.6 White Point CP2000-M: Nominal White (full white, after calibration to Telecine mode, theater) x = 0.314 ± 0.006 y = 0.351 ± 0.006 CP2000-MR: Nominal White (full white, after calibration to Telecine mode, Review Room) x = 0.314 ± 0.002 y = 0.351 ± 0.002 5.1.7 Gamma 5-2 CP2000-M: theater (nominal) 2.6 ± 5% CP2000-MR: Review Rooms (nominal) 2.6 ± 2% CP2000-M/MR Service Booklet 020-100220-02 Rev. 1 (07/08) Section 8: Specifications 5.1.8 Axial Focus Axial focus, any color to any color (measured by focal plane method with digital mircometer on lens mount) 30 µm max. 5.1.9 Lens Offset Range (usable) Horizontal Offset Range ±37% or 380 pixels minimum (without vignetting, from center position) Vertical Offset Range ±100% or 540 pixels minimum (without vignetting, from center position) 5.1.10 D-Cinema Ports • Number of inputs • Standard supported • Connector type 2 SMPTE 292M bit-serial BNC Table 5.1 Standard Single-Link 4:2:2 SMPTE 292M Formats Standard Source Resolution Source Vertical Rate (Hz) Scan Type Display Frame Rate (Hz) SMPTE 296M 1280 x 720 SMPTE 296M 1280 x 720 29.97 / 30 Progressive 29.97 /30 50 Progressive SMPTE 296M 50 1280 x 720 59.94 / 60 Progressive 59.94 / 60 SMPTE 260M 1920 x 1035 59.94 / 60 Interlaced with 3:2 pull-down 23.98 / 24 SMPTE 274M 1920 x 1080 23.98 / 24 Progressive 23.98 / 24 SMPTE 274M 1920 x 1080 25 Progressive 25 SMPTE 274M 1920 x 1080 29.97 / 30 Progressive 29.97 / 30 SMPTE 274M 1920 x 1080 59.94 / 60 Interlaced with 3:2 pull-down 23.98 / 24 SMPTE 295M 1920 x 1080 50 Interlaced with 2:2 pull-down 25 SMPTE RP 211 1920 x 1080 23.98 x 24 Progressive (sF) 23.98 / 24 SMPTE RP 211 1920 x 1080 25 Progressive (sF) 25 SMPTE RP 211 1920 x 1080 29.97 / 30 Progressive (sF) 29.97 / 30 DCI 2048 x 1080 24 Progressive 24 When both 292M inputs are used together in a dual-link configuration in accordance with the SMPTE 372M standard they support all the formats listed in Table 5.1 Standard Single-Link 4:2:2 SMPTE 292M Formats in 4:4:4 YCbCr or RGB format with 10 or 12 bits per component. Also supported is the 4:2:2 YCbCr progressive source with 10 bits per component and a pixel format of 1920 x 1080 or 2048 x 1080 at 47.96 or 48fps. CP2000-M/MR Service Booklet 020-100220-02 Rev. 1 (07/08) 5-3 Section 8: Specifications 5.1.11 Graphic Ports • Number of inputs • Standard supported 2 DVI-D Progressive Scan, RGB, HDCP-encrypted signals Table 5.2 Format for Generic Inputs to DVI-D Ports, Single Link Source Pixel Format Bits/Comp Vertical Rates Processing Mode 1024 x 768 8, 10 23 - 85 Hz Non-cinema 1280 x 1024 8, 10 23 - 85 Hz Non-cinema 1400 x 1050 8, 10 23 - 60 Hz Non-cinema 1920 x 1080 8, 10 23 - 48 Hz DLP-cinema 1920 x 1080 8, 10 23 - 62 Hz Non-cinema 2048 x 1080 8, 10 23 - 48 Hz DLP-cinema 2048 x 1080 8, 10 23 - 58 Hz Non-cinema Table 5.3 Format for Generic Inputs to DVI-D Ports, Twin Link Source Pixel Format 5.2 Bits/Comp Vertical Rates Processing Mode DLP Cinema 1920 x 1080 10 23 - 48 Hz 1920 x 1080 10 23 - 77 Hz Non-cinema 2048 x 1080 10 23 - 48 Hz DLP Cinema 2048 x 1080 10 23 - 72 Hz Non-cinema CONTROL SIGNAL COMPATIBILITY 5.2.1 Ethernet Management Port Interface 100 Base-T only Connector Female RJ-45 Bit rate 100 Mbps 5.2.2 Ethernet Auxiliary Port Interface 10 Base-T/100 Base-TX Connector Female RJ-45 Bit rate 10 Mbps/100 Mbps 5.2.3 RS232-A Port (TI Light Engine) 5-4 Interface TIA-232 Connector 9-pin subminiature D, female Bit rate 38,400 bps (default) - 115,200 bps (auto-detected) CP2000-M/MR Service Booklet 020-100220-02 Rev. 1 (07/08) Section 8: Specifications 5.2.4 RS232-B Port (PCM) Interface TIA-232 Connector 9-pin subminiature D, female Bit rate 9600 bps (default), not auto-detected 5.2.5 GPIO Port Number of I/O Lines 16 - 8 inputs, 8 outputs* Connector 37-pin subminiature D, male Type of Connection Opto-isolated Input Current 5mA nom., 50mA max. Input Forward Voltage Drop 1.1V nom., (@5mA) Output Current 50mA max. *1 output is dedicated to indicating the status of the TI light engine electronics. 5.2.6 Simple Contact Closure Interface (SCCI) Port Interface Opto-LED inputs, TTL voltage output Connector 9-pin subminiature D, male Number and type of I/O Input 1 - Lamp OFF Input 2 - Lamp ON Input 3 - Douser Open Input 4 - Douser Closed Output 1 - Lamp Indicator (high=lamp ON) 5.3 Input Current 5mA nom., 50mA max. Input Forward Voltage Drop 1.1V nom., (@5mA) Minimum Pulse Width 50 msec CONTROL DISPLAY PANEL (CDP) Type 4 x 20 character dot matrix Display Size 2” diagonal Display Resolution (H x V pixels) 122 x 32 pixels Integrated Operating System LCDPROC Dimensions (W x H x D) 10.6 cm (4.2”) x 15.7 cm (6.2”) x 3.1 cm (1.2”) Communication interface with projector RS232 Power Requirement: LCD display with status light Keypad Backlight Interface Connector CP2000-M/MR Service Booklet 020-100220-02 Rev. 1 (07/08) 0.25 A max. at 5VDC ± 10% 0.060 A max. at 5VDC ± 10% 9-pin subminiature D, female 5-5 Section 8: Specifications 5.4 POWER REQUIREMENTS 5.4.1 Standard Mode (uses line cord provided) Voltage Range: 200 - 240 VAC Line Frequency: 50 Hz - 60 Hz nominal Inrush Current: < 85 A max. Current Consumption: 16 A max. (at 200 VAC) Power Consumption: 3200 W max. Current Rating of AC Input: IEC-320-C19/20A (required by regulatory) Line Cord Plug Type NEMA 6-20P 5.4.2 UPS (Uninterruptible Power Supply) Mode Activation Discrete switch above power inlet cord(s) UPS Inlet Connector IEC-320-C13/10A, 240VAC (rating for powering main electronics on projector) 5.5 Inlet Rating 100-240VAC, 8A (refer to license label) Lamp Power Supply Inlet Rating (also required) IEC-320-C19/20A (required by regulatory) LAMP Type CDXL-20SD, Xenon Short Arc Lamp Power (software adjustable) 1000W min. - 2000W nom. - 2100W max. Average Life (See Notes 1, 2) 1500 hours @ 2000W Warm-up time to full brightness 20 minutes max. Wait time between lamp strikes (see Note 3) 2 minutes min. NOTES: 1) Based on use at nominal rated power; operating at greater than nominal power reduces lamp life. 2) End of life is defined as the point where the amount of flicker is above the manufacturer’s threshold; or the lamp fails to ignite; or brightness is <50% of initial brightness. Duty cycle 2 hours ON/0.5 hours OFF. 3) Hot re-strike (less than the minimum time between strikes) reduces lamp life; therefore it is strongly NOT recommended. 5-6 CP2000-M/MR Service Booklet 020-100220-02 Rev. 1 (07/08) Section 8: Specifications 5.6 PHYSICAL SPECIFICATIONS Size (without lens and with feet at minimum length) 26.18 inches (width) x 27.08 inches (length) x 15.55 inches (height) 664.9mm (width) x 687.8mm (length) x 394.9mm (height) Weight (as installed) 95 lb. max./43 kg max. Weight (shipped with packaging) 145 lb. max./65 kg max. Operating Position: Rotation about projection axis ± 5° maximum Tilt of projection axis from horizontal ± 20° maximum Tilt capacity with rear foot adjustment -15° (projection lens down-angle for stadium theatres. Requires use of foot lock down for stability) 5.7 REGULATORY This product conforms to the following regulations related to product safety, environmental requirements and electromagnetic compatibility (EMC): • • • • FCC Part 15, Subpart B Class A; CISPR22/EN55022; CISPR24/EN55024 UL 60950-1 First Edition; CAN/CSA-C22.2 No 60950-1-03 First edition; IEC60950-1:2001 2002/95/EC RoHS CP2000-M/MR Service Booklet 020-100220-02 Rev. 1 (07/08) 5-7 Section 8: Specifications 5.8 ENVIRONMENT Operating Environment Temperature Humidity (non-condensing) Altitude Maximum ambient temperature Non-Operating Environment Temperature Humidity (non-condensing) 10°C to 35°C (50°F to 95°F) 20% to 80% 0 - 3000 meters 35°C -25°C to 65°C (-13°F to 149°F) 0% to 95% NOTE: When transporting the projector from a cold environment it is essential the projector acclimatizes to the operating environment for a minimum of 3 hours before powering up the unit. Failure to ensure the projector has properly acclimatized could damage projector electronics. 5.9 STANDARD AND OPTIONAL COMPONENTS 5.9.1 Standard • Control Display Panel with interface cable • CP2000-M/MR User’s Manual (#020-100123-xx) • Line Cord 5.9.2 Optional Components • Prime Lenses • 1.03:1 mDC2K Fixed Lens (#108-319104-01) • 1.3-1.7:1 mDC2K Zoom Lens (#108-320106-01) • 1.39-1 1.9:1 mDC2K Zoom Lens (#108-327103-01) • 1.5 - 2.2:1 mDC2K Zoom Lens (#108-329105-01) • 1.7 - 2.4:1 mDC2K Zoom Lens (#108-321107-01) • 1.9 - 3.0:1 mDC2K Zoom Lens (#108-328104-01) • 2.4 - 3.9:1 mDC2K Zoom Lens (#108-322108-01) • 3.9 - 6.52:1 mDC2K Zoom Lens (#108-323109-01) • Auxiliary Lenses • *1.25 x Anamorphic Lens (#38-809054-01) • * 1.26x Wide Converter Lens (#108-281101-01) * Use of the anamorphic or wide converter lens requires the CP2000 M-MALM. • • • • • • • • 5-8 M-MALM (#119-101101-01) Replacement Bubble Lamps Replacement Air Filters DLP Cinema® Control DLP Cinema® Firmware Installation Program Rack Stand (#108-272-01 or #108-282-01) Extractor Kit (#119-103105-01) Service Documentation (#020-100124-xx) CP2000-M/MR Service Booklet 020-100220-02 Rev. 1 (07/08) 6 Interconnections The CP2000-M/MR Interconnect Diagram illustrates the path of electrical connections between modules. Manufacturer’s part numbers are included. NOTE: Part numbers are subject to change. CP2000-M/MR Service Booklet 020-100220-02 Rev. 1 (07/08) 6-1 Section 6: Interconnections 6.1 6-2 INTERCONNECT DRAWING CP2000-M/MR Service Booklet 020-100220-01 Rev. 1 (07/08) Appendix A: CP2000-M/MR Service Booklet 020-100220-02 Rev. 1 (07/08) Block Diagram A-1 Appendix A: Block Diagram A.1 BLOCK DIAGRAM A-2 CP2000-M/MR Service Booklet 020-100220-01 Rev. 1 (07/08) Appendix B: Shutter Override CP2000-M/MR Service Booklet 020-100220-02 Rev. 1 (07/08) B-1 Appendix B: Shutter Override B.1 SHUTTER MANUAL OVERRIDE The following procedure must only be executed in an emergency situation where time is an issue. This procedure outlines how to manually override the shutter when it remains partially open or closed. When time permits this procedure should be followed up with actual replacement of the shutter assembly. For details, refer to 2.8.9 Shutter Assembly, on page 2-53. 1. Remove the lens from the lens mount. 2. Use your finger to manually move the shutter assembly up and down 2 to 3 times. 3. Verify shutter operation via the Douser Open/Close button on the CDP or through the web ui. 4. If any attempt to correct the shutter movement via the CDP or web ui failed, manual override will be required. 5. Remove AC power from the projector and power down. 6. Cut either the red or black leads from the shutter motor (Figure B-1, B). 7. Manually move the shutter to either the open or close position (Figure B-1, C). 8. Replace the lens and reapply AC power to the projector. A Shutter Motor B Red/Black Leads C Shutter FIGURE B-1 SHUTTER ASSEMBLY B-2 CP2000-M/MR Service Booklet 020-100220-02 Rev. 1 (07/08)