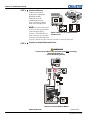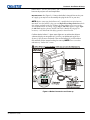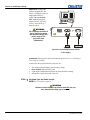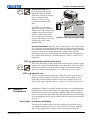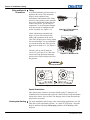
1
CP2000-X SETUP GUIDE 020-100059-01 China RoHS Compliance Information 关于中国《电子信息产品污染控制管理办法》的说明 • Environmentally Friendly Use Period 环保使用期限 The year number in the centre of the label indicates the Environmentally Friendly Use Period, which is required to mark on the electronic information product sold in China according to the China RoHS regulations. 本标志中表示的年数是根据《电子信息产品污染控制管理办法》(2006年2月28日)以及 《电子信息产品污染控制标识要求》(2006年11月6日)制定的、适用于在中华人民共和 国境内销售的电子信息产品的环保使用期限。 • Material Concentration Values Table 有毒有害物质含量表 Part Name 部件名称 铅 (Pb) 汞 (Hg) Material Concentration (有毒有害物质或元素) 镉 六价铬 多溴联苯 (Cd) (Cr 6+) (PBB) 多溴二联苯醚 (PBDE) X O O O O O Low voltage power 低压电源 supply X O O O O O Breaker/Switch 开关 O O O O O O AC Voltmeter AC电压表 X O O O O X 镇流器 Ballast X O O O O O AC分配模块 AC Distribution Module X O O O O O 继电器 AC relay X O O O O X 点火器 Ignitor X O O O O X 连接电线/缆 Harness/cable X O O O O O Enhanced Formatter 增强型格式化板 Interface Board X O O O O O 接口板 Interface Board X O O O O O Motherboard with Twin 双DVI接口主板 DVI X O O O O O 处理板 Processor Board X O O O O O 步进驱动板 Stepper Driver Board X O O O O O System Supervisor 系统监控模块 Module O O O O O O 液体冷却系统 Liquid Cooling system X O O O O O 触摸屏控制器 Touch Panel Controller X O O O O O 以太网集线器 Ethernet Hub O O O O O O 吹风机/风扇 Blower/Fan O O O O O O 传感器 Sensor X O X O O O 照明光学系统 Illumination optics system X O X O O O 投影镜头 Projection Lens X O X O O O 辅助光学器件 Auxiliary optics X O O O O O 机械附件 Mechanical enclosure* O O O O O O 软件光盘 Software CD X O O O O O 灯泡 Lamp O O O O O O 电池 Battery Note: O : indicates that the concentration value of the particular hazardous substance contained in all the homogeneous materials for this part, according to EIPA, EIP-B, EIP-C, is below the stipulated levels in China SJ/T11363-2006. 表示该有毒有害物质在该部件所有均质材料中的含量均在SJ/T11363-2006规定的限量要求以下。 X: indicates that the concentration value of the particular hazardous substance contained in all the homogeneous materials for this part, according to EIP-A, EIP-B, EIP-C, may be above the stipulated levels in China SJ/T11363-2006. 表示该有毒有害物质至少在该部件的某一均质材料中的含量可能超出SJ/T11363-2006规定的限量要求。 * This part uses metallic alloys, which may contain Lead. 因该部件使用金属合金材料,故可能含有铅。 CP2000-X SETUP GUIDE Table of Contents 1 Introduction 1.1 List of Components ...................................................................................................1-1 1.2 Ethernet Settings for This Projector ..........................................................................1-2 1.3 Who Should Use This Manual ..................................................................................1-2 2 Installation & Setup 2.1 Quick Setup ...............................................................................................................2-1 2.2 Installation Considerations ........................................................................................2-5 2.3 Projector Position and Mounting...............................................................................2-8 2.4 Installing a Lens, Lamp and Cooling ......................................................................2-15 2.5 Installing and Connecting Sources ..........................................................................2-21 2.6 Connecting for Communications.............................................................................2-22 2.7 Connecting the Ballast.............................................................................................2-23 2.8 Initial Power-up.......................................................................................................2-24 2.9 Maximizing Light Output........................................................................................2-25 2.10 Basic Image Alignment .........................................................................................2-25 2.11 Offset and Boresight Alignment............................................................................2-26 2.12 Fold Mirror and Convergence Adjustments ..........................................................2-29 2.13 Calibrating the CP2000-X System.........................................................................2-30 3 Basic Operation 3.1 Projector Basics.........................................................................................................3-1 3.2 Power-up Procedure ..................................................................................................3-5 3.3 Power-down Procedure ............................................................................................3-5 4 Maintenance 4.1 Warnings and Guidelines ..........................................................................................4-1 4.2 Maintaining Proper Cooling......................................................................................4-3 4.3 Maintenance & Cleaning...........................................................................................4-4 4.4 Replacing the Lamp & Filter.....................................................................................4-6 4.5 Replacing a Lens .....................................................................................................4-11 5 Troubleshooting 5.1 Power.........................................................................................................................5-1 5.2 Lamp..........................................................................................................................5-1 5.3 TPC............................................................................................................................5-2 5.4 Ethernet .....................................................................................................................5-2 5.6 Cinema Displays........................................................................................................5-3 5.7 Non-cinema Displays ................................................................................................5-3 6 Specifications 6.1 Specifications ............................................................................................................6-1 Due to continuing research, all information in this manual is subject to change without notice CP2000-X SETUP GUIDE 020-100059-01 Rev 1. (03/08) i Section 1 Introduction 1.1 List of Components The following components make up a complete CP2000-X system: Projection Head. Includes: • Line cord • Touch Panel Controller with mounting hardware and 3-ft. cable • Standard and highsecurity keys for lamp and igniter CP2000-X PROJECTOR service access, SHOWN WITH OPTIONAL FRAME plus assorted Allen keys • CP2000-X User’s Manual Lamp Ballast (three-phase 7 kW for all lamps in all countries) Choice of lamp kit (incl. protective gear) Cable kit (incl. two lamp power cables and two communication/control cables) Extractor Kit, 50/60 Hz Choice of high-contrast lens (does not include anamorphic lens or mount— both optional) Optional FredFrame™ (includes fork lift rails for bottom). Variations in CP2000-X Use h POWER LEVELS: The universal ballast in the CP2000-X offers adjustable lamp power to suit the size of lamp currently in use. Software allows each lamp to be “over-driven” by approximately 10% of its maximum rating. CP2000-X SETUP GUIDE 020-100059-01 Rev 1. (03/08) 1-1 Section 1: Introduction LAMPS: The four CP2000-X lamps are listed below: CP2000-X Lamps 2.0 kW * 3.0 kW ** 4.5 kW ** 6.0 kW ** CP2000-X Ballast 7 kW 7 kW 7 kW 7 kW * For this projector, the 2.0 kW is available in CDXL only (maximum performance) ** Available as CDXL (maximum performance) or CXL (less expensive). Refer to full specifications in Section 8. OTHER: Optional Christie components include an anamorphic lens mount and lens, DCP Librarian setup software, and a 50-ft TPC cable. Refer to the complete option list in User’s Manual - Section 8. 1.2 1.3 Ethernet Settings for This Projector Who Should Use This Manual The following Ethernet settings were defined during installation of the CP2000-X and its Touch Panel Controller: Ethernet Settings for This Installation Default Gateway DNS Server CP2000-X Projector Address: Projector Subnet Mask Touch Panel Controller Address: Touch Panel Controller device Subnet Mask USERS / OPERATORS: This manual is intended for trained users authorized to operate professional high-brightness projection systems located in restricted areas such as projection rooms in theatres or large rental/staging venues. Such users may also be trained to replace the lamp and air filter, but cannot install the projector or perform any other functions inside the product enclosures. SERVICE: Only trained and qualified Christie service technicians knowledgeable about all potential hazards associated with high voltage, ultraviolet exposure, explosion hazards of high-pressure arc lamps, and high temperatures generated by the lamp and associated circuits are authorized to 1) assemble/install the projector and 2) perform service functions inside product enclosures. 1-2 CP2000-X SETUP GUIDE 020-100059-01 Rev 1. (03/08) Section 2 Installation & Setup 2.1 Quick Setup Follow these steps for quick setup of the projector in a basic front mount position. NOTE: Unless otherwise specified, illustrations apply for either CP2000 or CP2000-X models and may not always show the rear-mounted TPC. STEP 1h Position the Projection Head Locate the projection head at an appropriate throw distance (projector-to-screen distance) and vertical position. See 2.3, Projector Position and Mounting. Make sure that the projector is level from side-to-side, and do not invert. Locate the lamp ballast so that its 4 cables can reach the rear of the projection head. STEP 2 h Install the Touch Panel Controller (TPC) Attach the Touch Panel Controller, pre-assembled with its ball joint base and mounting arm, to the matching ball joint base secured at the rear of the projector. Plug the TPC into the TPC port on the projector’s rear connector panel using the standard 3-ft. cable provided. Figure 2.1 Installing the TPC Alternatively, mount the TPC in a remote location up to 50 feet away and attach to the rear of the projector using the optional long-distance cable. STEP 3h Install Lens, Lamp and Heat Extractor Refer to 2.4, Installing a Lens, Lamp & Cooling for instructions. CP2000-X SETUP GUIDE 020-100059-01 Rev 1. (03/08) 2-1 Section 2: Installation & Setup STEP 4 h Connect a Source Connect your desired source to the appropriate HD-SDI (cinema) connector(s) on the Communications and Source Connection Panel at the rear of the projector. NOTE: To connect other types of sources, such as alternative content through DVI or Figure 2.2 Access to Cinema and NonChristie’s Cine-IPM 2K, you Cinema Ports must remove the access panel located on the underside of the projector near the air filter. Drill an exit hole or leave the panel off. STEP 5 h Connect to Lamp Ballast and Power WARNINGS • Connect all 4 cables to the projection head prior to turning the ballast breaker on. • Follow all labeling exactly. Figure 2.3 Connect Head to Ballast HEAD-TO-BALLAST: 2-2 Connect all 4 CP2000-X SETUP GUIDE 020-100059-01 Rev 1. (03/08) Section 2: Installation & Setup ballast cables—two DC power cables, and 2 communication/control cables— between the projector rear and lamp ballast. BALLAST-TO-AC: See Figure 2.4. Connect the ballast’s integral line cord to your AC supply (you may have to first modify the plug for the AC at your site). NOTE: Before connecting the ballast to AC, a qualified electrical technician must make sure the ballast’s plug type and Input Power Range Switch match the line voltage available at the site. Remove the lamp ballast cover to access the switch and determine its setting—toggle left for 200 VAC supplies, toggle right for 400 VAC supplies (factory default=200 VAC). Modify the plug type as necessary—as a delta load with safety ground, it has no neutral. Confirm that the ballast’s 3-phase status lights are on and that the adjacent voltmeter displays an acceptable AC level for your ballast and region. See Section 6, Specifications for details. Then set the ballast AC on/off switch to ON and listen for the internal cooling fan start-up. NOTE: There is no other indication of “ballast ON” status. Figure 2.4 Ballast Connection and Power-up CP2000-X SETUP GUIDE 020-100059-01 Rev 1. (03/08) 2-3 Section 2: Installation & Setup HEAD-TO-AC: Connect the Christie-supplied IEC 320 (220V) 15-amp line cord to a single phase 208V AC supply. Do not substitute other cords. Input power required is 200 - 240 VAC (±10%), 50 to 60 Hz @ 3 amps for 208 V. WARNING Do not attempt operation if the AC level is not within the specified voltage and power range for the projection head (180-265 AC). Figure 2.5 Connecting Projection Head to AC Supply EXTRACTOR: Also plug the extractor fan into the projector. See 2.4, Installing a Lens, Lamp, & Cooling At this point, the projection head is ready for use: • • • • The voltmeter should display the incoming voltage PROJ. STATUS light should be green Light engine compartment fans near the front should be running Remainder of projection head will be off STEP 6h Set Lamp Type and Cable Length NOTE: Service/installer required. WARNING Explosion hazard. Keep the projection head OFF until you have defined which lamp type is installed. 2-4 CP2000-X SETUP GUIDE 020-100059-01 Rev 1. (03/08) Section 2: Installation & Setup uch Panel To Controller SET THE LAMP TYPE: Before powering up the projector and igniting the lamp, the installer must define, in projector memory, the size of lamp installed; otherwise you risk severely overdriving or underdriving a lamp. At the TPC, go to the Admin: Lamp menu (password required). Enter the size of the lamp currently installed in the projector (factory default = 2.0 kW). Refer to the User’s Manual if you need help using the TPC menus. Also record the lamp type on the “Lamp Installed” label. Figure 2.6 Lamp Type and Cable Length SET THE CABLE LENGTH: Still in the Admin: Lamp menu, use the “Cable Length (m)” text box to record the length of high-voltage DC cables connected between your lamp ballast and projection head. This value regulates the voltage drop that occurs over distance, and ensures that adequate voltage reaches the lamp. Particularly in projectors rented for temporary installations, the setting may have to be changed from its last use. Adjustment range is 2-30m (6½-100 ft.) in 1m increments. uch Panel To Controller STEP 7h Ignite the Lamp and Select the Source At the TPC Main menu, press the lamp button and hold for two seconds to ignite the lamp. Press the desired channel button on the Main menu. The source will be displayed according to pre-defined factory defaults for this channel. Adjust or apply new settings as described in the User’s Manual-Section 3, Operation. STEP 8 h Adjust the Lens Turn the focus knob to sharpen the image. Adjust the zoom ring on the lens to increase or decrease image size. If desired, use the horizontal and/or vertical offset knobs to shift the image location. For other lens functions, refer to 2.8, Offset and Boresight Alignment and User’s Manual-3.8, Working With the Lens. 2.2 Installation Considerations Although the CP2000-X is carefully engineered to deliver an exceptional quality high-brightness, high-resolution output, your final display results could still be compromised if the projector is improperly installed. This subsection discusses issues to consider before proceeding with a permanent installation. Read through for an understanding of how good positioning will help ensure optimized images at any site. Screen Types Front Screen Installations This projector is intended for use with flat or slightly curved screens, front or rear, ranging from about 5 meters (16 ft.) to 25 meters (82 ft.) wide. Although flat screens generally offer a low gain similar to a matte white wall paint— CP2000-X SETUP GUIDE 020-100059-01 Rev 1. (03/08) 2-5 Section 2: Installation & Setup approximately 1 with a viewing angle just under 180°—and are considered most effective when ambient light is low, this difference in gain may be negligible given the very high light output from this projector. In addition, incident light reflects equally in all directions so the audience can see the display from more acute viewing angles. See Figure 2.7. Figure 2.7 Audience Coverage with a Flat Screen NOTE: CP2000-X high-contrast lenses are designed primarily for use with flat screens, but the projector’s depth-of-field range allows the lens to be focused on mildly curved screens as well. While focus remains sharp in the corners, there may be significant pincushion distortion, primarily at the top of the screen. Rear Screen Installations There are two basic types of rear screens: diffused and optical. A diffused rear screen has a surface that spreads the light striking it. Purely diffused screens have a gain of less than 1. The main advantage of the diffused screen is its wide viewing angle, similar to that of a flat screen for front screen projection. Optical rear screens take light from the projector and redirect it to increase the light intensity at the front of the screen. This reduces it in other areas, and creates a viewing cone similar to that of a curved front screen installation. To summarize, optical screens are better suited for brightly lit rooms where the audience is situated within the viewing cone. Diffused screens may be better suited when a wide viewing angle is required but there is low ambient room lighting. Screen Sizeh Screen size (image size) may be up to 145 feet across, depending on your lens and ambient light level. Choose a screen size appropriate for your lens and application. Keep in mind that if the projector will be used to display much text information, the image size must allow the audience to recognize all text clearly. The eye usually sees a letter clearly if eye-to-text distance is less than 150 times the height of the letter. In other words, small text that is simply located too far from the eye will be illegible no matter how sharply and clearly it is displayed. NOTE: Screens/images are most described according to their horizontal (ÅÆ) screen width. Aspect ratio is also specified if it is anything other than 4:3 (see below). The older “diagonal screen size” typically used for 4:3 displays such as televisions and monitors is less commonly used for large projection screens. 2-6 CP2000-X SETUP GUIDE 020-100059-01 Rev 1. (03/08) Section 2: Installation & Setup Table 2.1. Matching Lenses to Screen Size Lens Type Screen Width (<—>) 1.25 – 1.45:1 zoom 10-121 ft. 1.45 – 1.8:1 zoom 8-102 ft. 1.8 – 2.4:1 zoom 6-83 ft. 2.2 – 3.0:1 zoom 5-66 ft. 3.0 – 4.3:1 zoom 3-49 ft. 4.3 – 6.0:1 zoom 2.5-35 ft. 5.5 – 8.5:1 zoom 2-27 ft. Screen Aspect Ratio h Aspect ratio describes the proportion of the display and is expressed as the ratio of width to height, such as “5:4” or “16:9”. Typical aspect ratios range from 1.25 to 2.35—the higher the value, the wider or “less square” the image. See Table 2.2. Table 2.2. Typical Aspect Ratios Application Aspect Ratio SXGA 1.25 (5:4) 35mm filmstrip 1.32 (4:3) NTSC Video / XGA 1.33 (4:3) PAL Video / XGA 1.33 (4:3) HDTV Video 1.78 (16:9) Letterbox Video / “Flat” 1.89 (2048 x 1080) Cinemascope 2.35 Although image size and aspect ratio can be adjusted using projector controls, it is still ideal to use a screen with an aspect ratio that closely matches your likely source material. You can then more easily fill the screen with the image without restricting either image size or content. For example, standard video from a VCR has a 4:3 ratio (approximately) and can fill a 4:3 screen without side-to-side stretching, whereas a high-definition signal with a 16:9 aspect ratio is largest on a 16:9 screen. Figure 2.8 Aspect Ratios: Images vs. Screens As shown in Figure 2.8, an obvious mismatch between source material and screen is characterized by “black bars” on both sides of the image (if the screen is wider than the source material) or above and below the image (if the source material is wider—typically called a letterbox display). The black bars are unused display pixels and, in many installations such as theatres, are masked or hidden behind panels or curtains. Alternatively, if the area of unused pixels is CP2000-X SETUP GUIDE 020-100059-01 Rev 1. (03/08) 2-7 Section 2: Installation & Setup considered minimal, you may prefer to use the projector’s software control to slightly stretch the image either horizontally or vertically—enough to utilize the remaining pixels while not noticeably distorting the image. Displaying Both ‘Flat” and “Scope” As an example, two standard types of displays common in theatres—flat and scope—differ in their width-to-height aspect ratio as shown below: Figure 2.9 Typical Wide Formats Achieving either of these displays from a variety of incoming source material (that may or may not be in a format matching that of the screen) depends on lenses, proper settings in the projector, and certain room conditions. See also User’s Manual - 4.2, Image Formats. Ambient Lightingh The extraordinary brilliance of this projector is well suited for locations where ambient lighting might be considered less than ideal for projection. Even a typical room or large auditorium fully lit with ceiling lights and windows rarely requires special attention. Contrast ratio in your images will be noticeably reduced only if stray light directly strikes the screen, such as when a shaft of light from a window or floodlight falls on the image. Images may then appear washed out and less vibrant. In general, avoid or eliminate light sources directed at the screen. Other Considerations h Other considerations and tips that can help improve your installation: 2.3 2-8 Projector Position and Mounting • Keep the ambient temperature constant and below 35°C (95°F). Keep the projector away from heating and/or air conditioning vents. Changes in temperature may cause drifts in the projector circuitry, which may affect performance. • Keep the projector away from devices that radiate electromagnetic energy such as motors and transformers. Common sources of these include slide projectors, speakers, power amplifiers, elevators, etc. • Choose the best screen size for the application. Since more magnification reduces brightness, use a screen size appropriate for the venue but not larger than required. Installing a large screen in a small room is similar to watching television at a close range; too large a screen can overpower a room and interfere with the overall effect. A good rule of thumb is to be no closer than 1.5 times the width of the screen. Your installation site, the available screen, and ambient lighting all affect where the projector should be positioned. In addition, both throw distance (the distance between the projector and screen) and vertical position (the height of the projector in relation to the screen) must be determined for every new installation. CP2000-X SETUP GUIDE 020-100059-01 Rev 1. (03/08) Section 2: Installation & Setup Both depend on the screen size and lens type you are using. Make sure that the room can accommodate the required location of the projector for the chosen screen size. Positioning at a h With the projection head secured on a suitable cart, position the unit so that the front bezel is less than 2 feet from the theatre’s port window wall, or 3 feet if the Port Window Motorized Auxiliary Lens Mount will be added. Center the projector with the theatre screen (ÅÆ) if possible (see Figure 2.10 A). If forced to be off-center (such as when a film projector is already present), try to optimize aim as shown in Figure 2.10 B. This will slightly increase side keystoning, but will minimize horizontal lens offset required. NOTE: Unlike film projectors, it is best to keep the projector lens surface as parallel to the screen as possible, even if it is significantly above the screen center. Figure 2.10 Centering ÅÆ(AERIAL VIEWS) Note that when a particularly short throw distance combines with a very wide screen, you may have to forfeit some aim and stay more parallel to the screen. In such cases, some lens offset can reduce the keystone distortion. Later, when your projector is up-and-running, adjust precise image geometry and placement as described in 2.7, Basic Image Alignment. Throw Distanceh Throw distance is the distance between the projector and the screen (Figure 2.11). For any installation, placing the projector at an accurate throw distance is necessary in order for the image size to closely match your screen – the farther the projector is from the screen, the larger the image. With zoom lenses, you’ll want to know the approximate minimum and maximum image sizes possible from a given throw distance so that the most appropriate lens is installed at the site (throw distance / screen width = throw ratio of lens). Calculating Throw Distance Once you know the screen size and lens type, calculate the required throw distance by using the appropriate formula provided in Table 2.3. NOTES: 1) If your projector is tilted up or down in relation to the screen (typical in large venues and/or elevated installation), throw distance still represents the smallest measurement between the screen and front bezel. 2) Remember that throw CP2000-X SETUP GUIDE 020-100059-01 Rev 1. (03/08) 2-9 Section 2: Installation & Setup distances are calculated from the screen to the front bezel of the projector rather than its foot centers. To figure throw distance from foot centers, add 22.2 cm (8.74”). Figure 2.11 Estimating Throw Distance: Example As shown in Figure 2.11, throw distance is approximately equal to the full horizontal width of the screen multiplied by the type of lens you are using. For example, if you are using a 1.25:1 lens, the proper throw distance value will be approximately 25% more than that of the full screen width. Once you know your screen width and lens, you can estimate throw distance needed. Or, if you know the available throw distance beforehand, you can determine what images sizes are possible with a given zoom lens. IMPORTANT: For proper placement in any installation, use the throw distance formula provided for your lens. In addition, please keep in mind that due to lens manufacturing tolerances for lens focal length, actual throw distance can vary ±5% or more between lenses described as having the same throw ratio. Vertical & Horizontalh Refer to the offsets shown here for help in determining how high or low to install the projector in relation to the center of the screen, and/or how far off to one side. Position VERTICAL POSITION describes the elevation of the projector in relation to the screen. For many typical large venue rental/staging installations and theatres, the projector will be above screen center. An ideal vertical position helps ensure that 1) images will be accurately rectangular in shape rather than distorted into a keystoned shape with non-parallel sides, and 2) focus and brightness will remain optimized. Vertical position of the image can be manually offset—that is, placed higher or lower in relation to lens center—using the vertical offset knob on the lens mount. Starting with no offset, the 2048 x 1080 image from this projector can be moved by a maximum distance of 540 pixels, resulting in all of the image displayed above or below lens center (Figure 2.12). 2-10 CP2000-X SETUP GUIDE 020-100059-01 Rev 1. (03/08) Section 2: Installation & Setup VERTICAL TILT describes the angle of the projector in relation to the screen. Ideally, the projector should be inclined to match the screen, so that the face of the lens and the surface of the screen are parallel to each other. See Tilting and Special Orientations. Figure 2.12 Vertical Offset Range NOTE: 1) Assumes full 2048 x 1080 display. 2) Recommended offset range can sometimes be exceeded; however this may affect image quality. 3) Due to manufacturing tolerances, an offset range can vary ±5% or more between lenses described as having the same throw ratio, between projectors, and with any lens/projector combination. 4) Simultaneous horizontal and vertical offset can limit the adjustment range of each, as can long throw distances. ALTERNATIVE METHOD OF DESCRIBING VERTICAL OFFSET: Offset can also be specified as the distance traveled from lens center (such as 270 pixels) and expressed as a percentage (270 pixels=50%) of half of the image height. This concept of image movement is illustrated in the example below (Figure 2-13): CP2000-X SETUP GUIDE 020-100059-01 Rev 1. (03/08) 2-11 Section 2: Installation & Setup Figure 2.13 Example of Alternative Vertical Offset Specification If you find that you cannot raise or lower the image enough using mechanical vertical offset, try adjusting V-Position in the Size and Position menu when displaying at less than the minimum size (see User’s Manual - 3.7, Adjusting the Image). If images remain keystoned or exhibit uneven brightness, the projector may simply be too high or low in relation to the screen. Relocate for optimized performance. THE HORIZONTAL POSITION of the image can be manually offset—that is, shifted left or right of lens center—by using the horizontal offset knob on the lens mount. Starting with no offset, the 2048 x 1080 image from this projector can be moved by a distance of 410 pixels, resulting in up to 70% of the image displayed on one side of lens center (Figure 2.14). Note that the positioning shown at right is often mistakenly referenced as “70% offset” but it is not—it is 40% offset derived as 410/1024 x 100. A 70% offset is explained below and shown in Figure 2.15. Figure 2.14 Horizontal Offset Range 2-12 CP2000-X SETUP GUIDE 020-100059-01 Rev 1. (03/08) Section 2: Installation & Setup ALTERNATIVE METHOD OF DESCRIBING HORIZONTAL OFFSET: Horizontal offset can also be specified as the distance traveled from lens center and expressed as a percentage of half of the image width. For example, an offset spec of 70% means a centered image can be moved by a distance of 717 pixels, resulting in 85% of the image projected to one side of lens center and 15% on the other. See right. NOTE: Example only. Beyond range for this projector. Floor Mountingh For front projection without suspending, mount the projector and Leveling on a strong supporting structure or cart. Take special care if using Figure 2.15 Example of Alternative Horizontal Offset Specification a mobile cart—avoid sudden stops, force and uneven surfaces that may cause the top-heavy cart to lurch and overturn. Make sure your mounting structure is reasonably level then adjust one or more projector feet as necessary to fine-tune. NOTICE: Do not invert the projector. Adjusting the Feet For installations on a floor or suitable supporting structure, a single projection head should rest firmly on its feet. There is no need for the FredFrame™ unless stacking with another projector, or unless you decide to rig and fly the projector. To adjust the height and level of the projector, extend or retract the feet by rotating them. See Figure 2.16. CP2000-X SETUP GUIDE 020-100059-01 Rev 1. (03/08) Figure 2.16 Adjusting the Feet 2-13 Section 2: Installation & Setup Tilting and Special h Tilting In an ideal installation, the lens surface is Orientations parallel to the screen. This orientation helps to ensure optimized lens performance with minimal offset. If this position is not possible (such as when the projector is significantly higher than the center of the screen), rely on offset to compensate. To avoid keystoned images, keep the projector as orthogonal to the screen as possible (see Figure 2-17). Figure 2.17 Tilt Projector to Match Screen Check with theatre personnel for the degree of screen tilt, or measure this incline with a protractor at the screen. Then TILT the projector to closely match this screen tilt angle. For any installation, you can tilt the front end of the projector up or down as much as 15° (see Figure 218). Likewise, side-to-side tilt must not exceed 15° (see Figure 2.19). This limit ensures safe lamp operation and proper position of the liquid cooling reservoir in the projector. Figure 2.18 Maximum Tilt WARNING Tilt only as shown. Figure 2.19 Side-to-Side Tilt Special Orientations Since this projector cannot be inverted or tilted beyond 15° during use, all installations are front-mount and require the “Normal Front” Image Orientation setting in the Admin: General menu. For shipping, remove lamp and rotate the projector box as needed. Hoisting and Stacking h For some installations such as large venue rental/staging applications, you will likely have to lift or hoist this projector—or a stack of 2 projectors—into place. Keep in mind the following critical safety guidelines for all handling of the projector. 2-14 CP2000-X SETUP GUIDE 020-100059-01 Rev 1. (03/08) Section 2: Installation & Setup Carrying/Moving the Projection Head Four or more people can lift and hand-carry one projection head (with or without a FredFrame™) a short distance as required. Never attempt to carry a stack by hand. Always install a FredFrame™ to move the projection head using a forklift or other lifting equipemnt. Using a Forklift WARNING Do not attempt to use a forklift without first installing the fork lift rails on the bottom of the FredFrame™, otherwise the base of the projector may crush and damage internal components. Strong extruded rails that mount to the bottom of the FredFrame™ accommodate forks from a forklift, and are mandatory for this method of transport. Always follow the instructions provided with the FredFrame™ kit. Using the FredFrame™ To hoist, stack and/or “fly” projectors, you must properly secure each projection head within a FredFrame™ and use appropriate rigging and safety cables to raise and/or suspend this assembly. If desired, the lamp ballast can also be hoisted and flown from its integral rigging bars. Follow the instructions provided with the FredFrame™ kit. WARNING •Use straps and/or cabling with load capacity adequate for the total projection head and frame weight. • Remove the lens before hoisting. WARNING Never exceed the Load Rating specified in the FredFrame™ Stacking & Rigging Kit instructions. WARNING Use straps or cabling with load capacity adequate for the projector/frame weight. Refer to the complete instructions for using the FredFrame™. These include all installation instructions as well as mechanical adjustment procedures for proper image alignment. Stacking To stack two projection heads together, you must first secure each head within a FredFrame™, then secure all corners of the frames together using 4 stacking pins (provided in the FredFrame™ kit). You must also use the Side-Venting Exhaust Adapter to route exhaust air from the bottom projector away from the top projector (not required with a side-by-side projector row). Never stack more than 2 projection heads together, and do not attempt to move stacked projectors without proper transport equipment. CP2000-X SETUP GUIDE 020-100059-01 Rev 1. (03/08) 2-15 Section 2: Installation & Setup 2.4 Installing a Lens, Lamp & Cooling Before or after you have positioned the projector in its permanent or temporary location, install the remaining components: the lens, lamp and external extractor fan. Install Lens(es) h Primary Lens 1. Orient your high-contrast lens with its notches at the top, then fully insert the assembly straight into the lens mount opening all the way back without turning. With the lens fully back, it will seat properly within the lens mount and the aperture will be oriented correctly. 2. Lock the lens assembly by positioning the lens clamp in the DOWN position. 3. Secure lens safety ring, and tether to projector (not required if projector is floor-mounted). NOTICE: The lens seals the projector head, preventing contaminants from entering the area of main electronics. Never attempt to operate the projector without a lens installed. Install First Lamph Figure 2.20 Install the Lens WARNING Protective gear required. Qualified service technician required. Remove the lamp door and open the empty lamp-cooling compartment. Figure 2.21 Open Lamp Door and Cooling Compartment Install one of the following lamps in the projection head, depending on your model and site: 2-16 CP2000-X SETUP GUIDE 020-100059-01 Rev 1. (03/08) Section 2: Installation & Setup Single-or-3-Phase Ballast 2.0 kW * 3.0 kW ** 3-Phase Ballast Required 4.5 kW ** 6.0 kW ** * For this projector, the 2.0 kW is available in CDXL (maximum performance) only ** Available as CDXL (maximum performance) or original CXL (less expensive). Refer to full specifications in Section 8. 1. Check lamp cradle (anode end) location for your lamp For 4.5 or 6.0 kW lamps, the lamp cradle must be as far forward as possible (factory default). For 2.0 or 3.0 kW lamps, move the cradle to the rear position, i.e., approximately 1” closer to the reflector. See Figure 2.22. 2. Install Lamp See 4.4, Replacing the Lamp & Filter, Steps 7-11. Observe all warnings, and wear protective clothing and shielding. Don’t forget to properly mark the “Lamp Installed” label on the lamp door to indicate current lamp size. Also set the Lamp Type in the TPC Lamp menu (service/installer login required) before turning on the projector. Figure 2.22. Move cradle back for 2.0 or 3.0 kW lamps Cooling h Extractor Fan and Duct For any CP2000-X with any lamp, install the Christie extractor fan and duct to pull warm exhaust air from the projector at a minimum rate of 600 CFM. Use either the 6-in. or the 6-ft. duct in one of the configurations shown in Figure 2.23: CP2000-X SETUP GUIDE 020-100059-01 Rev 1. (03/08) 2-17 Section 2: Installation & Setup Figure 2.23 Extractor Fan Configurations (MANDATORY SAFETY CABLING NOT SHOWN) Direct the exhaust, as necessary, to keep ambient air temperature within operating spec (see Section 6, Specifications). If the projector is used for extended periods, particularly in a confined space, routing to the outside of the building may be required. In all cases, maintain at least 600 CFM at the projector’s top exit port: Table 2.3. Airflow Requirements Lamp (kW) Minimum Exhaust Airflow Rate 2.0 600 ft3/min. 3.0 600 ft3/min. 4.5 600 ft3/min. 6.0 600 ft3/min. INSTALLATION: Follow the installation guidelines provided below, securing all components in the order that best suits your site and installation requirements. NOTICE: Do not operate the projector without the Christie Extractor components installed. 2-18 CP2000-X SETUP GUIDE 020-100059-01 Rev 1. (03/08) Section 2: Installation & Setup INSTALL DUCT ON PROJECTOR: See Figure 2.24. Align either the 6-inch or 6-foot duct at the projector’s top exit port, twisting to secure “flaps” over projector pins. Confirm that 1) there are no obstructions or kinks within the ducting, 2) all air intake areas of the projector are clear and exposed, and 3) the vane switch at the exit duct moves freely. Figure 2.24 Securing Duct to Projector ADD EXTRACTOR: See Figure 2.25. Connect the other end of the duct to the Christie heat extractor/blower, twisting to secure “flaps” over pins on the fan. Make sure that the grille end of the fan faces down. For longer exhaust runs at your site, add extractors/boosters as necessary—the vane switch at the projector’s top exit port will trigger a projector shutdown if the airflow is inadequate. To prevent possible transfer of fan vibration to the image, do not mount the extractor directly on the projector—include at least 6” of duct. WARNING Do not exceed 6-ft. duct length without adding additional extractors. Figure 2.25 Securing Extractor to Duct To suspend the projector/fan assembly, always use appropriate rigging hardware and secure to adequate support structures at your site: • • The Christie 6-ft. duct-with-fan weighs approximately 22 lb. The Christie 6-in. duct-with-fan weighs approximately 15 lb. Use third-party extractors only if the minimum of 600 CFM airflow can be maintained. SECURE SAFETY CABLES: Three safety cables are provided, and are all mandatory whenever the fan/duct assembly is suspended. These cables prevent components from falling if your rigging equipment fails. Figure 2.26 shows the CP2000-X SETUP GUIDE 020-100059-01 Rev 1. (03/08) 2-19 Section 2: Installation & Setup safety cable required between the cooling assembly and projector in any installation, flown or not. Attach remaining safety cables between the 1) duct and fan, and 2) fan and supporting structure. Figure 2.26 Safety Cable at Projector—Flown or Front Mount CONNECT TO POWER: Connect the line cord of the extractor fan to the “Extractor Fan” outlet on the rear panel of the projector. Use appropriate extension cords if necessary. The fan will power-up with the projection head, and will run for a 10minute cool-down period after the projection head is powered OFF. This ensures proper lamp cooling. Use an air flow meter to measure the ft/min or ft/sec where the duct connects to the projector (measure at this end only). Then multiply the reading by the cross-sectional area of the 8” duct (0.34) to calculate the cubic feet/min airflow. The formula is: CALCULATE CFM in 8” DUCT: • Measured linear ft/min x 0.34 = CFM NOTE: If the duct becomes significantly 2-20 CP2000-X SETUP GUIDE 020-100059-01 Rev 1. (03/08) Section 2: Installation & Setup blocked – or if a fan fails – the projector should trigger an error message before becoming overheated or unsafe. Regardless, check airflow regularly. NOTICE: Never disable a vane switch. Attempting to operate the projector without monitoring airflow can result in dangerous overheating of the projector. Side-Venting Duct (Adapter) All stacks require a special side-venting duct adapter between projectors, otherwise the top projector blocks exhaust from the top of the bottom projector. This Side-Venting Exhaust Adapter Kit is required on any bottom projector used in an upright stack of two. Liquid Cooling During operation, a closed loop of flexible tubing circulates liquid coolant from a small reservoir to critical electronic components located near the front of the projection head. The coolant (a 50/50 mix of distilled water and ethylene glycol) should fill slightly more than half of the reservoir to ensure adequate circulation. The reservoir, which is located in the igniter compartment, is factory-filled and does not require draining before projector transit. Top up as necessary. NOTICE: Check regularly for leaks and proper liquid level. 2.5 Installing and Connecting Sources CINEMA: Connect your server/source to either the HDSDI A or HD-SDI B connector on the Communications and Source Connection Panel at the rear of the projector. Connect two independent sources, or connect a single source to both ports to create a dual-link cinema input. Figure 2.27 Connecting Cinema and Non-Cinema NON-CINEMA: To display alternative content from a DVI source or from Christie’s Cine-IPM 2K, remove the access panel located on the underside of the projector near the air filter. Connect two independent sources, or connect the Cine-IPM 2K to both ports for 10-bit processing. Add an exit hole to the panel, or leave the panel off. 2.6 Connecting for Communications CP2000-X SETUP GUIDE 020-100059-01 Rev 1. (03/08) Many communications with the projector are initiated on the TPC mounted at the rear of the projector. Depending on the installation, you may also need certain other serial and/or Ethernet links to the projector, such as from a server or PC functioning as a controller, or from an existing on-site network including other 2-21 Section 2: Installation & Setup related equipment. These system connections are typically done at time of installation, but are fully accessible and can be changed at any time. In rare cases, serial and/or Ethernet links are needed only during installation, and are disconnected afterwards. Connect your devices to the Communications and Source Connection Panel at the rear of the projection head. Figure 2.28 Communication Links with Projector TPC: Connect the TPC cable to the 6-pin XLR connector. This connector then routes to an internal 5-port Ethernet hub connected to the projector’s main processing electronics. PC/LAPTOP, SERVER OR NETWORK: To communicate with the CP2000-X from a computer, server or an existing network, connect the equipment to ETHERNET A or ETHERNET B. Both ports route to the 5-port Ethernet hub connected to the projector’s main processing electronics. If Ethernet is not available at your site, connect a standard serial cable to the RS232 port instead—note this communication link is acceptable for using a PC/laptop to run Christie’s DCP Librarian or to download new software, but is too slow for server communications and does not support ASCII messaging to the TPC (which requires Ethernet). 2.7 2-22 Connecting the Ballast HAZARD Do not connect the ballast to AC unless the projection head and ballast are already connected to each other, otherwise CP2000-X SETUP GUIDE 020-100059-01 Rev 1. (03/08) Section 2: Installation & Setup the exposed live ends of the heavy ballast cables could be a serious hazard. Configuring the Ballast h AC power levels vary from region to region For Incoming AC throughout the world, with 400 VAC common in some countries (such as those in Europe and Asia), and 200 AC common elsewhere (such as in North America and Japan). To accommodate both possibilities, the ballast includes an internal Input Power Range Switch for toggling to the level of AC available at the installation site, i.e. either 200 or 400 VAC. The line cord plug must also match. From the factory, the ballast switch and line cord are both set for 200 VAC use. Used/rented ballasts shipped from other installation sites may be set to either, Figure 2.29 Setting Up the 7kW Ballast depending on where they were last used—check the status of the line cord plug and switch before attempting to connect to AC. See instructions below (Figure 2.29). HAZARD Check the plug and internal switch before connecting to AC. Qualified electrical technician required. A visual inspection of the plug can indicate 200 or 400 VAC status. Modify as necessary for your site—as a delta load with safety ground, the plug has no neutral. 4. Remove the ballast cover to access and read the Input Power Range Switch. 5. Toggle the switch left for use with 200 VAC supplies, or toggle right for 400 VAC supplies. 6. Attach the ground lug to Earth Ground. 7. Re-install the ballast cover. Connect to Projector h Connect all 4 ballast cables—two DC power cables, and 2 communication/control cables—to the rear of the projector and to the lamp ballast. Refer back to Figure 2.3. 1. CP2000-X SETUP GUIDE 020-100059-01 Rev 1. (03/08) 2-23 Section 2: Installation & Setup 2.8 Initial PowerUp When the ballast has been properly configured (see 2.7, Connecting the Ballast) and connected to the projection head, connect its integral line cord to AC. Then: SET LAMP TYPE: WARNING Qualified Service Technician/Installer is required. HAZARD Explosion hazard. Keep the projection head OFF until you have defined which lamp type is installed. Before powering up the projector and igniting the lamp, the installer must define, in projector memory, which size lamp is installed; otherwise you risk severely overdriving or underdriving a lamp. At the TPC, go to the Admin: Lamp menu (password required). Enter the size of the lamp currently installed in the projector (factory Figure 2.30 Lamp Type and Cable Length default = 2.0 kW). See User’s Manual Section 3, Operation if you need help using the TPC menus. Also record the lamp type on the “Lamp Installed” label attached to the lamp door. SET CABLE LENGTH: Still in the Admin: Lamp menu (see Figure 2.30), use the “Cable Length (m)” text box to record the length of high-voltage DC cables connected between your lamp ballast and projection head. This value regulates the voltage drop that occurs over distance, and ensures that adequate voltage reaches the lamp. This setting may have to be changed from its last use, particularly in a projector rented for temporary installation. Adjustment range is 2-30m (6½-100 ft.). POWER-UP: Power up the CP2000-X system as described in User’s Manual - 3.2 Power-up Procedure. 2-24 CP2000-X SETUP GUIDE 020-100059-01 Rev 1. (03/08) Section 2: Installation & Setup 2.9 Maximizing Light Output Upon powering up the projector with a newly-installed/replaced lamp, adjust lamp position to help ensure optimized operation as well as peak brightness at the screen—you do not need an image displayed yet. Once you have done this LampLOC™ adjustment, the lamp will be well centered and distanced correctly from the remainder of the illumination system. Figure 2.31. Align the Lamp At the TPC, automatically optimize lamp position by pressing the DO AUTO button in the Advanced: Lamp menu. Watch the gauge on this menu. After 2-3 minutes, with the projector using an internal light sensor, the best lamp position will be established and the DO AUTO button will no longer be disabled. At this point, light output is optimized. NOTE: Lamp must be on and the shutter open during LampLOC™ adjustment, however the projector does not need to be displaying an image. Determining Screen Brightness (fL) In order for the TPC to display screen brightness in footlamberts (fL), you must measure screen brightness at both extremes of lamp power (minimum and maximum) for a given lamp type, and record these two readings in the TPC Admin: Lamp menu available to installers. These measurements establish a range (stored in memory) from which the TPC can interpolate all other lamp power settings, converting them to approximate footlamberts for display in the menus. Repeat the calibration if you ever switch to a different lamp type/size. For more information about menus and footlamberts, see User’s Manual - Section 3. 2.10 Basic Image Alignment This image alignment procedure assumes projector is fully assembled and powered up in its final locations. This initial optical alignment procedure is the foundation for optimizing your displays, ensuring that images reflected from the DMDs are parallel to and wellcentered with both the lens and screen. It should be complete before adjusting lens boresight. NOTE: Before you begin, properly position the projector relative to the screen (refer back to Figure 2.10) Basic Optical Alignment Procedure 1. Display a good test pattern appropriate for analyzing image focus and geometry, such as a single crosshair centered across the image. 2. COARSE FOCUS: Do a quick preliminary focus and (if available) zoom adjustment with the primary lens only (see User’s Manual - 3.8, Working with the Lens). Do not worry about consistency across the image at this point, just center focus. CP2000-X SETUP GUIDE 020-100059-01 Rev 1. (03/08) 2-25 Section 2: Installation & Setup 3. 4. 2.11 Offset and Boresight Alignment CENTER THE IMAGE IN THE LENS: Holding a piece of paper at the lens surface, adjust offsets as necessary until the image is centered within the lens perimeter. A full white field works best for this. Figure 2.32 Level the TOP Edge RE-CHECK SIDE-TO-SIDE LEVELING: With a good test pattern on screen, double-check projector leveling (see 2.3, Projector Position and Mounting) so that the top edge of the image is parallel to the top edge of the screen. See Figure 2.32. NOTES: 1) Projector must be fully assembled and powered up in its final location. Install the anamorphic lens, if it will be used at the site. 2) You will need a 3/16” allen wrench. To ensure proper offset for your site and consistently good focus in all areas of the screen, a primary lens must be installed and its lens mount precisely adjusted in relation to internal optics as described below. If desired, an anamorphic lens can then be added Figure 2.33 Anatomy of the Lens Mount to widen images for “scope” cinema displays. Once adjusted, boresight should remain stable until the lens is replaced. Refer to lens mount components illustrated in Figure 2.33. for these adjustments. Adjust Offset h Project an image with the primary lens only. The optional auxiliary lens, if present, can be mounted but swung aside. Adjust horizontal and vertical offsets as necessary (Figure 2.34) so that the image is square on screen. Always adjust offset before boresight. NOTE: For best performance and minimum keystoning, particularly in long throw theatres, make sure to minimize offsets by “aiming” the Figure 2.34 Lens Offsets projector lens at the center of the image. Refer back to Vertical & Horizontal Position. In short throw theatres with stadium seating, use a combination of offset and aiming. 2-26 CP2000-X SETUP GUIDE 020-100059-01 Rev 1. (03/08) Section 2: Installation & Setup The maximum vertical offset is shown in Figure 2.35, (bottom illustration). NOTES: 1) Horizontal offset is just a few dozen pixels, resulting in a maximum of 52% of the image displayed on one side or the other of the lens. 2) Maximum offsets are slightly less when offsetting in both directions (H an V) at once. Figure 2.35 Vertical Offset Range Adjust Left/Right h NOTE: Use a test pattern with Boresight a single pixel vertical and horizontal line and perimeter frame. 1. 2. CP2000-X SETUP GUIDE 020-100059-01 Rev 1. (03/08) Adjust focus at the far left center edge of the image (Figure 2.36). If possible, reduce image size for easier image analysis. Figure 2.36 Adjust Focus at Left Edge If the image appears well-focused on the left edge but not on the right, then the boresight currently differs from one side to the other—i.e., the right side of the image is well-focused either in front of or behind the screen surface rather than on it. To determine where the right side is focusing: On small accessible screens, hold a piece of white paper approximately parallel to the screen surface at the right side (and as close to the vertical center as possible), then move closer to the projector while watching the image on the paper. 2-27 Section 2: Installation & Setup • • If focus on the paper improves, this indicates that the right side of the image is focusing in front of the screen. See Figure 2.37. If focus on the paper worsens, this indicates that the right side of the image is focusing behind the screen. GOAL: If the image comes into focus on both sides simultaneously, left/right boresight is fine—skip to Step 7. Figure 2.37 Example of Poor Left/Right Boresight Adjust the horizontal boresight bolt (Figure 2.38) as necessary to direct or “aim” the lens toward the side of the image which focused too close to the lens. When both sides appear equally blurry, re-focus on the left side of the screen. 4. Adjust horizontal offset to re-center the image on the screen. 5. Repeat Steps 4 and 5 until both sides of the image are well focused. 6. Adjust the “hold” screw to lock in place, and check boresight again. 3. Adjust Top/Bottom h Boresight 2-28 1. Figure 2.38 Adjust L/R Boresight When left/right boresight is complete, focus the image at the top edge of the screen (Figure 2.39.). If the bottom remains blurry while the top edge is focused, refer back to Step 2 but use a paper at the bottom of the screen to determine whether the Figure 2.39 Adjust Top Focus bottom of the image is focused in front of the screen or behind the screen. If the bottom is well focused, skip to Step 11. CP2000-X SETUP GUIDE 020-100059-01 Rev 1. (03/08) Section 2: Installation & Setup 2. 3. 4. 5. 6. Adjust the vertical boresight bolt (Figure 2.40) using one Allen key to hold the bottom hex screw and another to turn the adjustment bolt above it. Adjust as necessary to direct or “aim” the lens toward the edge of the image that focused too close to the lens. When both top and bottom appear equally blurry, re-focus at the top of the screen. Adjust vertical offset to re-center the image on the screen. Repeat steps 8 and 9 until the top and bottom of screen are both well focused. REFOCUS: Although all sides of the image should now be in focus, the center of the image will be slightly blurry at this point. Refocus at center of image. The goal is good focus at center and on all sides. Adjust the “hold” screw to lock in place, and check boresight again. Figure 2.40 Adjust Top/Bottom Boresight 2.12 Fold Mirror and Convergence Adjustment In rare instances, shipping and handling may affect the precise factory alignments of one or more optical components—as a final step of installation, the installer may have to adjust the fold mirror and/or convergence of the DMDs as described below. DMD CONVERGENCE: A convergence problem is evident when one or more projected colors (red/green/blue) appears misaligned when examined with a proper convergence test pattern—where normally the 3 colors should overlap precisely to form pure white lines throughout the image, one or more poorly converged individual colors may appear adjacent to some or all of the lines. Qualified service technicians can correct as described on the color label provided inside the projection head. NOTE: Custom Convergence Kit required (available separately). FOLD MIRROR ADJUSTMENT: If a corner or edge of the image is missing, this may indicate that the fold mirror has become misaligned with the rest of the optical system, resulting in cropping of data. Correct as described below: CP2000-X SETUP GUIDE 020-100059-01 Rev 1. (03/08) 2-29 Section 2: Installation & Setup 1. Locate the fold mirror access plate secured to the underside of the projection head, just below the lens. It has 2 access holes along the front edge, through which you can carefully adjust the fold mirror screws: Figure 2.41 Fold Mirror Adjustment • To raise or lower the image, adjust the screw closest to the left side (exhaust side of projector). • To move the image left or right, adjust the screw closest to the right side (lamp side). Proper fold mirror adjustment is shown at right, with the whole image well centered between the projected edges of the integrator. NOTE: Use full white test pattern. 2.13 Calibrating the CP2000-X System NOTE: DCP Librarian described here is licensed software intended for Christie installers only. Many of its functions are now available at the TPC. DCP Librarian is a comprehensive Windows™-based software application used for calibrating image color performance and defining electronic screen masking required in your particular installation, and for creating individual Projector Configuration Files (PCFs) and specific source files necessary for proper display of incoming material. DCP Librarian also defines the system/network configuration for communication links to the projector, transmitting information to and from the CP2000 via an Ethernet or RS-232 connection. Chief functions, many of which can be done at the TPC, are introduced below. COLOR CALIBRATION: After the CP2000-X is installed and all components are mechanically aligned for optimized light output and geometry at the screen, its electronic system processing must be calibrated to ensure accurate color display in the new environment. In this one-time global calibration, the installer measures initial colors at the screen and enters this data—called Measured Color Gamut Data—into Windows™-based DCP Librarian software installed on a laptop. The software then calculates precise corrections needed for regaining the desired color performance—called Target Color Gamut Data—and essentially compensates for the type of port window (if present), screen, lens, light output, ambient light and other current environmental factors that affect color 2-30 CP2000-X SETUP GUIDE 020-100059-01 Rev 1. (03/08) Section 2: Installation & Setup performance. Results are defined in a file, activated, and downloaded to projector memory to be used as a basis for all future displays. If there are changes to the environment in the future (for example, a new screen is installed), the CP2000-X should be re-calibrated. Also note that correction for proper color balance sometimes reduces overall light output. NOTE: Most gamut functions are also now available in the TPC Gamut menu (password required). Multiple MCGD files can be saved for use in different situations, such as when an anamorphic lens is swapped on and off the projector. ELECTRONIC SCREEN MASKING: DCP Librarian also provides a powerful masking tool for precision cropping of the image to correct for geometry problems such as a keystoned image. The effect is similar to aperture plate filing typically done for correcting images from film projectors. As in the calibration of color, screen-masking adjustments are global—that is, you can create a variety masks and download them to projector memory for use with sources as desired. Mask settings are distinct from aspect ratio or screen position settings. NOTE: Most screen functions are also now available in the TPC Screen menu (password required). Numerous settings collected into a single Projector Configuration File further control processing variables for optimized display of specific source material. Each PCF file, typically created in DCP Librarian, pre-defines color space, target color gamut, source aspect ratio (resolution), and gamma (a.k.a. “degamma”) settings for a cinema or non-cinema source. Once the collected settings are downloaded to the projector’s internal memory, their “PCF” can be assigned to the corresponding CP2000-X input connection and quickly applied via a controller such as Christie’s Touch Panel Controller. No further adjustment in processing should be required. PCFs (rare): Refer to the DCP Librarian User’s Manual for all DCP Librarian Setup Software operating details and procedures. CP2000-X SETUP GUIDE 020-100059-01 Rev 1. (03/08) 2-31 Section 3 Basic Operation 3.1 Projector Basics This section describes basic projector operation once it is properly installed, by a qualified service technician, as described in Section 2, Installation and Setup. Refer to the User’s Manual for a description of the various components identified in Figure 3.1. Components/Features h Figure 3.1 Basic Projector and Related Components 3.2 Power-up Procedure NOTE: This is a typical manual power-up procedure. Cinema installations may include an automation system for controlling projector start-up and lamp ignition in conjunction with other variables such as lighting, audio, etc WARNINGS Do not attempt operation if the AC supply is not within the specified voltage range. 1. CP2000-X SETUP GUIDE 020-100059-01 Rev 1. (03/08) Make sure that ballast is properly configured for the AC at your site, and that it is connected via 4 cables to the projection head. See 2.7, Connecting the Ballast. 3-1 Section 3: Basic Operation 2. 3. 4. 5. 6. 7. 8. Connect the heat extractor fan to the projection head. See 2.4, Installing a Lens, Lamp & Cooling. Connect the head to AC. The voltmeter on the back of the projector will indicate the incoming level of AC, and the main PROJ STATUS light on the rear of the projector should glow a steady green. At this point, only the light engine fans will be running. Connect the ballast to AC. The 3-phase LEDs and voltmeter should light up. Turn the ballast breaker switch to ON. The internal ballast fan should start up. At the TPC, go to the Admin: Lamp menu (password required). Enter the size of the lamp currently installed in the projector (factory default = 2.0 kW). Still in the Admin: Lamp menu, set “Cable Length (m)” to match the length of DC cables currently connected between your lamp ballast and projection head. (range is 2-30m, or 6½-100 ft). On the Main menu, press the lamp button and hold for 2 seconds. The lamp should ignite (and full power is maintained for 15 seconds). Press the desired channel button on the Main menu. The source will be displayed according to pre-defined factory defaults for this channel. Adjust or apply new settings as described in User’s Manual - Section 3. IF THE LAMP DOES NOT IGNITE: • • If a safety interlock switch is open (such as when the lamp door is ajar), the lamp cannot be struck. The PROJ STATUS light on the rear of the projector will be red and the error will be indicated on the status display and LCD window. If the lamp fails to ignite even though the interlock system is OK, the projector will automatically re-try ignition using 100% of the maximum power acceptable for the installed lamp. If this re-try also fails, a new lamp is likely needed. NOTE: For complete power-up troubleshooting, see Section 5, Troubleshooting. 3.3 Power-down Procedure NOTE: Manual shut-down only. Your system may include automation. 1. Press the lamp button on the Main menu to turn the lamp off. You must hold the button down briefly. 2. Wait at least 10 minutes so that fans continue to cool the lamp. 3. Set the ballast breaker to OFF. 3-2 CP2000-X SETUP GUIDE 020-100059-01 Rev 1. (03/08) Section 4 Maintenance 4.1 Warnings and Guidelines This projector is designed for safe and reliable operation. However safe operation is not assured by design alone; installers, service technicians, trained operators and all other users must maintain a safe environment at all times. Please read through and understand all warnings and precautions before attempting to operate the projector. Labels and Markings h Observe and follow any warnings and instructions marked on the projector. The exclamation point within the equilateral triangle indicates related operating/maintenance instructions in the documentation accompanying the projector. The lightning flash and arrowhead symbol within the equilateral triangle indicates non-insulated "dangerous voltage" within the projector's enclosure that may be of sufficient magnitude to constitute a risk of electric shock. General Precautions h Be aware of the following general precautions in all installations: WARNING Never look directly into the projector lens or at the lamp. The extremely high brightness can cause permanent eye damage. WARNING For protection from ultraviolet radiation, keep all projector housings intact during operation. Protective clothing and safety goggles are recommended. NOTES: 1) The American Conference of Governmental Industrial Hygienists (ACGIH) recommends occupational UV exposure for an 8-hour day to be less than 0.1 microwatts per square centimeters of effective UV radiation. An evaluation of your workplace is advised to assure employees are not exposed to cumulative radiation levels exceeding the government guidelines for your area. 2) Be aware that some medications are known to increase one’s sensitivity to UV radiation. CP2000-X SETUP GUIDE 020-100059-01 Rev 1. (03/08) 4-1 Section 4: Maintenance WARNING FIRE HAZARD. Keep hands, clothes, and all combustible material at least 1m away from the concentrated light beam of the lamp. WARNING Position all cables where they cannot contact hot surfaces or be pulled or tripped over. This projector must be operated in an environment that meets the operating range specifications in Section 6, Specifications. WARNING Opening or removing a projector cover requires a qualified service technician. AC / Power Precautions h WARNING Do not attempt operation if the AC supply is not within the specified voltage range. Do not allow anything to rest on the power cords. Place the projector in a location where the cords cannot be abused by persons walking on them or objects rolling over them. Never operate the projector if a power cable appears damaged in any way. Do not overload power outlets and extension cords as this can result in fire or shock hazards. DANGER Only qualified service technicians are permitted to open any enclosure on the product, and only if AC has been fully disconnected from the projection head and ballast. Lamp Precautions h Xenon arc lamps are under high pressure and must be handled with great care at all times. Lamps may explode if dropped or mishandled. Wear Protective Clothing Never open the lamp door unless you are wearing authorized protective clothing such as that included in a Christie Protective Clothing Safety Kit #598900-095. Recommended protective clothing includes—but may not be limited to— protective gloves, latex lab gloves, double-layer 0.040” acetate face shield, and a quilted ballistic nylon jacket or a welder’s jacket. DANGER Never attempt to remove the lamp directly after use. The lamp is under increased pressure when hot and may explode, causing personal injury and/or property damage. Allow to cool completely. NOTES: 1) Christie’s protective clothing recommendations are subject to change. 2) Any local or federal specifications take precedence over Christie recommendations. 4-2 CP2000-X SETUP GUIDE 020-100059-01 Rev 1. (03/08) Section 4: Maintenance Cool the Lamp Completely The arc lamp operates at a very high pressure that increases with temperature. DANGER Failure to allow the lamp to sufficiently cool prior to handling, increases the potential for an explosion causing personal injury and/or property damage. After turning the lamp off, it is crucial that you wait at least 10 minutes before turning off the rest of the projector breakers, disconnecting AC and opening the lamp door. This provides enough time for the internal lamp cooling fans to properly cool the lamp. Cool completely before handling. Again, always wear protective clothing! WARNINGS • Never attempt to access the lamp while the lamp is on • Wait at least 10 min. after lamp shut-off before powering down, disconnecting from AC and opening the lamp door. DANGER SHOCK HAZARD. Disconnect projection head and ballast from AC before opening the lamp door. For all other precautions critical for safe removal and replacement of the lamp, refer to 4.4. Replacing the Lamp & Filter. 4.2 Maintaining Proper Cooling The high-intensity lamp and electronics rely on a variety of cooling components to reduce internal operating temperatures. Regular checking and maintenance of the entire cooling system is critical to prevent overheating and sudden projector failure, and helps to ensure reliable operation of all projector components over time. Ventilation h Vents and louvers in the projector covers provide ventilation, both for intake and exhaust. Never block or cover these openings. Do not install the projector near a radiator or heat register, or within an enclosure. Air Filter h It is recommended that you replace the air filter (located on the lamp side of the projection head) whenever you replace the lamp—or sooner, in dusty or dirty environments. A clogged filter reduces air flow, and can lead to overheating and failure of the projector. Check monthly. See 4.4, Replacing the Lamp & Filter for instructions. It is also recommended that you visually check the laminar airflow device (LAD) located nearby. The LAD should be nearly white or light grey in color. Liquid Cooler h The liquid cooler system circulates liquid to and from the DMDs in the CP2000X projection head, keeping their operating temperature at an acceptable level. Periodically check the coolant level visible by removing the igniter grille (rear side grille adjacent to the side input panel)—check for 1) leaks and 2) proper liquid level. CP2000-X SETUP GUIDE 020-100034-01 Rev 1. (03/08) 4-3 Section 4: Maintenance NOTE: A failure of the liquid cooling system will trigger an over-temperature alarm condition, clearly indicated with status displays/lights at the rear of the projector. FILLING THE COOLER: The cooler should require filling only upon projector installation. Fill with Christie’s 50/50 mix of distilled water and ethylene glycol. Top up as necessary, making sure not to over fill. Coolant does not need to be drained for transit. Exhaust Duct h After installation, check/maintain operation of both vane switches—one in the & Lamp Fan Interlocks exhaust duct and one near the lamp fan—as follows: 1. 2. 3. 4. 5. 6. 7. Turn projector ON (lamp is not needed). Turn your extractor fan OFF. Confirm that the LCD status display shows that the extractor fan vane switch has failed. Turn fan back ON to correct. Block air intake at rear corner (input side) of projection head. Confirm that the LCD status display shows that the lamp fan vane switch has failed. Clear air intake to correct. Repeat all steps every 6 months in permanent installations. Maintain vane switches as described in 4.3, Maintenance and Cleaning. NOTE: If the exhaust duct becomes significantly blocked—or if a fan fails—the projector airflow sensor should trigger a shutdown before the projector becomes overheated or unsafe. Regardless, check the airflow periodically. 4.3 Maintenance and Cleaning To help ensure optimized performance and reliability, regularly check electrical, optical and other components as described below. DANGER SHOCK HAZARD. Disconnect projection head and ballast from AC at BOTH wall breakers. Electrical h Do the following every 60 days or 500 hours (always disconnecting from AC first): • • Check the contact surfaces of positive (anode) and cathode (negative) connections for cleanliness. Clean electrical contact surfaces as necessary to prevent contact resistance from scorching connectors. Verify that all electrical and lamp connections are tight. Optical h Unnecessary cleaning of optics can be more harmful than helpful, increasing the risk of degrading delicate coatings and surfaces. In this projector, check only the lens and lamp reflector—maintenance of other optical components requires a qualified service technician. Check these components periodically in a clean, dust-free environment using a high-intensity light source or flashlight. Clean them only when dust, dirt, oil or other marks are obvious. Never touch an optical surface with your bare hand—always wear latex lab gloves. 4-4 CP2000-X SETUP GUIDE 020-100059-01 Rev 1. (03/08) Section 4: Maintenance When to Check LENS: A small amount of dust or dirt on the lens has minimal effect on image quality—to avoid the risk of scratching the lens, clean the lens only if absolutely required. See below. LAMP REFLECTOR: Inspect the mirror surface (reflector) for cleanliness only during a lamp replacement, when the lamp is out. If necessary, clean as described below—make sure to wear protective clothing while inspecting or cleaning. Note that color variation on the reflector surface is normal. Supplies For cleaning off dust and/or grease, you will need: 1. 2. 3. 4. 5. 6. 7. Soft camel-hair brush Dust-free blower—filtered dry nitrogen blown through an anti-static nozzle. Dust-free lens tissue such as Melles Griot Kodak tissues (18LAB020), Optowipes (18LAB022) or Kim Wipes or equivalent Lens cleaning solution such as Melles Griot Optics Cleaning Fluid 18LAB011 or equivalent. For lens only. Methanol. For reflector only. Cotton swabs with wooden stems only Lens cleaning cloth/microfibre such as Melles Griot 18LAB024 or equivalent. Cleaning the Lens IF DUSTY: Brush most of the dust off with a camel-hair brush and/or blow dust away with compressed air. Fold a microfibre cloth smooth and gently wipe remaining dust particles off the lens. Make sure to wipe evenly with the smooth portion of the cloth that has no folds or creases. Do not apply pressure with your fingers—use the tension in the folded cloth itself to collect the dust. If significant dust is still bound to the surface, dampen a clean microfibre cloth with lens cleaning solution (damp, not dripping). Wipe gently until clean. IF FINGERPRINTS, SMUDGES, OIL: Brush most of the dust off with a camel-hair brush and/or blow dust away with compressed air. 2. Roll a lens tissue around a swab and soak in lens cleaning solution. Tissue should be damp but not dripping. 3. Gently wipe the surface using a figure-8 motion. Repeat until blemish is removed. 1. CP2000-X SETUP GUIDE 020-100034-01 Rev 1. (03/08) 4-5 Section 4: Maintenance Cleaning the Reflector IF DUSTY: • • Brush most of the dust off with a camel-hair brush and/or blow dust away with compressed air. If some dust remains, just leave as is—air circulating at the lamp is unfiltered, so some dust is inevitable. Avoid unnecessary cleaning. IF FINGERPRINTS, SMUDGES, OIL: • • First brush dust off with a camel-hair brush and/or blow dust away with compressed air. Fold a clean microfibre cloth and dampen with methanol. Make sure to wipe evenly with the smooth portion of the cloth that has no folds or creases. Do not apply pressure with your fingers—use the solution in the cloth to collect the dirt. Other Components h In a normal operating environment check, clean and treat the following components every 6 months or so to help ensure proper lamp and projector function: LAMP FAN — A clogged lamp fan impeller or motor can reduce air flow, leading to possible overheating and failure of the lamp. Clean/treat the impeller as follows: • • Vacuum loose dirt from the lamp fan impeller. If necessary, use a brush with hot water and suitable detergent. NOTICE: Do not bend the impeller blades or loosen the balancing weights. IGNITER — Clean the high voltage terminal and insulator to remove accumulated dust or dirt. AIR FLOW INTERLOCKS — The lamp fan vane switch is located within the lamp cooling compartment. The extractor vane switch is located just inside the top duct on the projector lid. Check and, if necessary, clean the switches to remove accumulated dust or dirt that could impede movement. Within the exhaust duct connected at the top of the projector, adequate airflow must be maintained and routed away from the operating area surrounding the projector (or any nearby projectors). Inspect regularly and confirm that 1) there are no obstructions or “kinks” within the ducting, 2) all air intake areas of the projection head and ballast are unobstructed, and 3) exhaust airflow at the top vent is 600 CFM. Make sure lamp wiring does not interfere with vane switch operation. See also 4.2, Maintaining Proper Cooling. Whenever checking/replacing the air filter on the side of the projector, also visually check the small square laminar airflow device (LAD) just beyond the filter opening. The LAD should be nearly white in color—if very dark (rare), it may have to be replaced by a qualified service technician. Contact Christie or your dealer. LAMINAR AIRFLOW DEVICE (LAD) — 4-6 CP2000-X SETUP GUIDE 020-100059-01 Rev 1. (03/08) Section 4: Maintenance 4.4 Replacing the Lamp & Filter The high brightness of your projector is provided by a Xenon lamp mounted at the ends within a reflector, housed in the locked lamp compartment of the projection head. When the lamp approaches the end of its life, it must be replaced—do not exceed warranted lamp life by more than 20%, as an old lamp becomes increasingly and dangerously fragile, resulting in possible explosion. To determine the age of your current lamp, consult the Status menu in the Touch Panel Controller. Lamp hours appear under “Environment: Lamp”. Lamp hours are also displayed in the password-protected Advanced Lamp menu and the Advanced Lamp History menu. It is recommended that you replace the air filter with every lamp replacement, or sooner in dusty or dirty environments. Check its condition monthly in all projectors. Lamp Replacement h NOTE: For this procedure you will need a compatible Christie Xenon CDXL or Procedure CXL lamp as shown in Section 6, Specifications—never install a lamp intended for a different model or projector. WARNING Make sure to use the correct wattage lamp supplied by Christie. WARNING Lamp replacement is to be done by a qualified service technician only. DANGER EXPLOSION HAZARD —Wear authorized protective clothing whenever the lamp door is open! Never apply a twisting or bending force to the quartz lamp body. Read and follow all other general lamp precautions in 4.1, Warnings and Guidelines. STEP 1 h Turn off the projector. Allow the fans to run at least 10 minutes for cooling. DANGER Never attempt to remove the lamp when it is hot. The lamp is under great pressure when hot and may explode, causing personal injury and/or property damage. Allow to cool completely. STEP 2 h Set the ballast breaker (power switch) to OFF. STEP 3 h Disconnect projection head and ballast from AC supply DANGER SHOCK HAZARD. Disconnect both components from AC. STEP 4 h Open the lamp door. With protective clothing and shield on, unlock the lamp door and open it. Refer back to Figure 2.20. If desired, release the latch mechanism to remove the door entirely. CP2000-X SETUP GUIDE 020-100034-01 Rev 1. (03/08) 4-7 Section 4: Maintenance STEP 5 h Open cooling compartment. Turn knob to open the inner lamp-cooling compartment and reveal the cathode end (–) of the lamp. Refer back to Figure 2.20. STEP 6 h Remove the old lamp and inspect reflector. Loosen set screws from negative/cathode (rear, 7/64”) and positive/anode (front, 3/16”) lamp connectors. These screws are shown in Figure 4.2. NOTICE: Make sure to apply minimal torque and DO NOT STRESS the quartz tube. Carefully slip the positive anode connector off the front of the lamp. Handling the lamp by the cathode end only, unscrew the lamp from the rear connector and carefully remove from the projector. Immediately place the lamp inside the protective cover (saved from previous installation) and then seal it in a heavy carton on the floor where it cannot fall or be bumped. WARNING Handle box with extreme caution—the lamp is hazardous even when packaged. Dispose of lamp box according to safety regulations for your area. With the lamp removed, visually inspect the reflector for dust. Clean if necessary as described in 4.3, Maintenance and Cleaning. STEP 7 h Remove new lamp from protective cover Remove tape, knurled nut and locking star washer (if present) securing the lamp within its cover. 2. Handling at the ends only, extract the lamp from the cover. Set aside the protective cover for re-use in your next lamp disposal or for warranty return of an expired lamp. STEP 8 h Install new lamp 1. 1. 4-8 With protective clothing and shield on, insert the threaded cathode (–) end of the lamp into the negative lamp connector nut located in the rear of the lamp compartment and screw in fully (Figure 6.1, left). Hand-tighten only. NOTICE: Handle by the cathode/anode end shafts only, never the glass. Do not over-tighten and do not stress the glass. CP2000-X SETUP GUIDE 020-100059-01 Rev 1. (03/08) Section 4: Maintenance Figure 4.1 Install Lamp Rest the anode (+) end of the lamp on the lamp cradle as shown in Figure 4.1, right, and slip the positive lamp connector over the bulb end. 3. Tighten setscrews in both negative and positive lamp connectors (Figure 4.2). 2. Figure 4.2 Secure Lamp at cathode (–) and anode (+) connectors IMPORTANT: Proper electrical contact prevents resistance in the lamp connectors. If you accidentally touch the quartz body of the lamp with your bare hands, clean it as described in 4.3, Maintenance and Cleaning. CP2000-X SETUP GUIDE 020-100034-01 Rev 1. (03/08) 4-9 Section 4: Maintenance STEP 9 h Check Leads Make sure that the anode (+) lead between lamp and igniter is well away from any projector metal such as the reflector or firewall. DANGER Leads too close to metal parts will cause arcing during starting pulse. This is a SAFETY HAZARD, and the lamp may not ignite. STEP 10 h Close cooling compartment and lamp door The projector will not operate unless the louvered door is locked shut. STEP 11 h Record the LAMP INSTALLED With a blue dot label or dry-erase pen, mark the lamp door’s LAMP INSTALLED label (Figure 4.3) to indicate the size of the newly installed lamp — 2.0, 3.0, 4.5, or 6.0 kW. A supply of blue dot labels is secured inside the front cover of this manual. Figure 4.3 Always Mark the “Lamp Installed” Label (EXAMPLE) STEP 12 h Re-connect to AC and turn breaker to ON Re-connect the projection head and the ballast to AC (see 2.1, Quick Setup), then set the ballast breaker to ON. STEP 13 h Set proper LAMP TYPE (power) NOTE: Skip this step if your new lamp is the same size as the old lamp—the Lamp Type will still be correct in the Install menu. IMPORTANT: Requires access to TPC Install: Lamp menu (authorized access only). If your new lamp is larger or smaller than the old lamp, record the new lamp type (2.0, 3.0, 4.5 or 6.0 kW) in the Touch Panel Controller’s Install: Lamp menu before igniting the new lamp. This setting establishes the proper range of power available for the installed lamp, ensuring that the new lamp is neither underpowered nor over-driven. 4-10 CP2000-X SETUP GUIDE 020-100059-01 Rev 1. (03/08) Section 4: Maintenance WARNING Do not attempt to ignite the lamp until its type (kW) is correctly set in the Install menu. STEP 14 h Turn the lamp ON Press and hold the lamp button on the TPC Main menu. STEP 15 h Adjust lamp position Using the TPC, adjust the lamp position within the projector as described in User’s Manual - 3.7, Working With the Lamp. This ensures maximum performance, with the lamp (bulb) well centered with the reflector and distanced correctly from the rest of the illumination system. STEP 16 h Record the serial number of the new lamp 1. In the Advanced: Lamp menu, select “New Lamp”. 2. In the Lamp History submenu, enter the serial number in the text box. 3. Save to record the number and to reset the lamp timer. The timer will now begin to log time for the new lamp. Filter Replacement h Replace the air filter whenever the lamp module is replaced, or more frequently if Procedure operating the projector in a dusty or dirty environment. Check monthly in all cases. The filter is located on the operator’s side of the projection head, near the front. See Figure 4.4. BEFORE YOU BEGIN h Power down and disconnect from AC Follow steps 1-3 from the Lamp Replacement Procedure, above. STEPS 1-2 h Open/remove filter door Loosen 2 corner screws (flat screwdriver), and lift off door. STEPS 3-4 h Replace air filter Slide the old filter up and discard. Insert the new air filter, following the labeling for proper inside/outside orientation. Slide all the way down into its slot. WARNING Use only Christie filters. Never operate the projector without the filter installed. STEPS 5-6 h Close/replace filter door With the filter in place, insert the bottom tabs of the filter door into the corresponding slots, close the filter door, and secure with 2 screws. CP2000-X SETUP GUIDE 020-100034-01 Rev 1. (03/08) 4-11 Section 4: Maintenance Figure 4.4. Replacing the Air Filter 4.5 Replacing a Lens A variety of primary lenses can accommodate different throw distances and specific types of installations—see Section 6, Specifications. To replace or change a lens: Release the lens-locking lever (UP position). 2. Pull out lens and replace with a different high-contrast primary lens as described in 2.1, Assembly and Connection of Components. 3. Secure with lens locking lever (down position). 1. 4-12 CP2000-X SETUP GUIDE 020-100059-01 Rev 1. (03/08) Section 5 Troubleshooting If the projector does not appear to be operating properly, note the symptoms present and use the following guide to assist you. If you cannot resolve the problems yourself, contact your dealer for assistance. NOTE: A qualified service technician is required when opening an enclosure to diagnose any “probable cause”. 5.1 Power Projector Will Not Start h 1. Check for green “Main AC” light on projector. If not on, check all breakers on projector and at the wall. There are single-phase and 3-phase. 2. Are the CP breakers staying on when enabled? If they are “tripping” to OFF position, there is an electrical problem requiring investigation by a certified electrician. 5.2 Lamp Lamp Does Not Ignite h 1. If the lamp button is entirely disabled (not selectable at the TPC Main menu, indicated by a red “X” on the lamp button), there is an interlock failure such as an open lamp door, failed lamp fan, etc. A flashing red alarm window also indicates this. Refer to solutions listed in Table 3.2 of the User’s Manual. 2. For SSM communication failures, re-boot and try again. 3. If a DMD temperature is too high (“DMD over critical temp limit”), the lamp will not ignite. Cool the projector and try again. 4. If the Status menu indicates a ballast communication problem, re-boot and try again. 5. If the lamp does not ignite after a second try, replace the lamp. 6. If there is no “buzzing” indicating that the igniter is attempting ignition, there may be a problem with the igniter (Christie service required). 7. If there is a brief “buzz” attempting ignition but a lamp does not ignite, the lamp likely needs to be replaced. Lamp Suddenly Goes h Off CP2000-X SETUP GUIDE 020-100059-01 Rev 1. (03/08) Try increasing the lamp power (TPC Advanced Lamp menu). 2. The DMDs in the projection head may be overheated (this also triggers an alarm window at the TPC). 1. 5-1 Section 5: Troubleshooting An interlock may be interrupting lamp function. 4. Make sure the 220V connection near Panel C at the rear of the projector head (on the underside) is still plugged in. 5. Replace the lamp. 3. No Lamp Current h With this communication error, the lamp will be powered by the last lamp power Reading setting in effect. Flicker, Shadows h 1. LampLOC™ may need re-adjustment. Or Dimness 2. LampLOC™ may be in the middle of its adjustment. Wait approximately 2 min. 3. Increase lamp power, if possible. 4. Determine if it is mid-level grayscale flicker (beating)—adjust 3-phase balancing for minimized ripple (requires qualified service technician). LampLOC™ Does Not h 1. In the TPC Advanced Lamp menu, try adjusting lamp position using one Seem to Work button at a time—watch light level for changes indicating lamp movement. 2. If the motors do not respond via any TPC buttons, you can position the lamp manually within the projection head. UV danger. Qualified service technician only. LiteLOC™ Does Not h 1. Make sure LiteLOC™ is set and enabled in the Advanced: Lamp menu. Seem To Work 2. Changing the “Lamp Power” setting disables LiteLOC™. 3. If the lamp power has increased to its maximum in order to maintain a LiteLOC™ setting, LiteLOC™is automatically terminated. If the values shown in the Advanced: Lamp menu indicate that the lamp power has reached this “over-drive” state, either reduce your LiteLOC™setting or install a new lamp. 5.3 TPC 1. 2. 3. 4. 5. 6. 5.4 5-2 Ethernet 1. If the TPC fails to initialize, re-boot the projector and try again. A failed TPC usually indicates a system failure requiring service. A TPC communication failure (crash) while displaying a test pattern requires that the projector be cycled off and on again. If the TPC response becomes sluggish, try re-booting the projector. If it persists, the installer may have set the TPC “Data Logging” option to “Detailed”, which taxes memory and performance. For best results and normal operation, this setting should be reduced to “Errors” or “Standard”. Erratic TPC behavior or an error message such as “Could not write to file” can also indicate an internal memory shortage. Make sure to regularly delete back-up files or corrupt files from the IPSM and/or Compact Flash memory card. Save backups to a PC/laptop only, not the TPC (contact your administrator). If the locations of button presses on the screen seem to be misinterpreted, the TPC screen may need recalibrating. If the TPC stalls at “Waiting to Connect”, you have 30 seconds in which to enter a service login. Make sure the Ethernet settings are valid for your site— all devices should have the same subnet mask but unique IP addresses. CP2000-X SETUP GUIDE 020-100059-01 Rev 1. (03/08) Section 5: Troubleshooting Make sure to save any address changes, and re-boot to implement all changes. 3. IP address shown in TPC Admin menu must match that of the projector. 4. If you still have trouble establishing communications with a projector added to an existing Ethernet network, the projector’s IP address is likely in conflict with another address already in use. Contact your network administrator. 2. 5.5 Cinema Displays Symptom h Blank screen, no display of cinema image… 1. Confirm all power connections are still OK. 2. Make sure there is no lens cap present. 3. Make sure the douser/shutter is OPEN (button is on TPC Main menu). 4. Make sure there is not a full black test pattern selected for display. 5. Is the correct display file selected? Check the Touch Panel Controller. 6. Is the correct cinema port connected for this display file? Check connections. CAUSE/REMEDY: Symptom h Severe motion artifacts… CAUSE / REMEDY: Most likely there is a synchronization problem with reversed 3/2 pull-down in 60Hz-to-24Hz film-to-digital conversion in your source. The display file needs correction. Symptom h Image appears “squeezed” or vertically stretched into center of screen CAUSE / REMEDY: Source data converted from film and “pre-squeezed” for CP2000’s display format may require use of the anamorphic lens to regain full “scope” image width and proper proportions. Symptom h No image, just pink snow… CAUSE/REMEDY: 1. Make sure the projector’s lid is not open. In the event it is open, close the lid and pause or stop the show on the server. Then, press play on the server and wait several seconds for the projector to receive the set of decryption keys (from the server). If after 30 seconds the projector doesn’t recover, pause or stop the show and try playing again. If this doesn’t work, try resetting the server. 2. Make sure the IP octets for the projector and the server (Eth1 port) match. 3. CineCanvas does not have the correct projector IP address. Check the IP address of the projector and server and change if necessary. They should match. 5.6 Non-Cinema Displays CP2000-X SETUP GUIDE 020-100034-01 Rev 1. (03/08) The following troubleshooting entries assume that you are using a 3rd-party input source for displaying alternative “non-cinema” material. As a first step, always consult the documentation supplied with the external equipment. 5-3 Section 5: Troubleshooting Symptom h The projector is on but there’s no display... 1. Was a lens cover accidentally left on? Remove lens cover. 2. Make sure the douser is OPEN. 3. Is the lamp ignited? Press the lamp button on the Touch Panel Controller. 4. Is the correct DVI channel button selected on the Touch Panel Controller? 5. Is AC power connected? 6. Is an active source connected properly? Check the cable connections and make sure the alternative source is selected. 7. Can you access test patterns? If so, check your source connections again. Symptom h The display is jittery or unstable… CAUSE / REMEDY: 1. If the non-cinema display is jittery or blinking erratically, ensure that the source is properly connected and of adequate quality for detection. With a poor quality or improperly connected source, the projector will repeatedly attempt to display an image, however briefly. 2. The horizontal or vertical scan frequency of the input signal may be out of range for the projector. Refer to Section 8, Specifications for scan frequency ranges. 3. The sync signal may be inadequate. Correct the source problem. Symptom h The display is faint… CAUSE / REMEDY: 1. Brightness and/or contrast may be set too low. 2. The source may be double terminated. Ensure the source is terminated only once. 3. The source (if non-video) may need sync tip clamping. Symptom h The upper portion of the display is waving, tearing or jittering… CAUSE / REMEDY: 1. This can sometimes occur with video or VCR sources. Check your source. CAUSE / REMEDY: Symptom h Portions of the display are cut off or wrap to the opposite edge… 1. Resizing may need adjustment. Adjust until entire image is visible and centered. Symptom h The display appears compressed (vertically stretched)… CAUSE / REMEDY: 1. The frequency of the pixel-sampling clock is incorrect for the current source. 2. Sizing and positioning options may be adjusted poorly for the incoming source signal. 3. Use an anamorphic lens for typical HDTV and anamorphic DVD sources that have been re-sized and vertically stretched via 3rd-party software. Symptom h Data is cropped from edges CAUSE / REMEDY: 1. To display the missing material, reduce image size to fill the display area available in the projector, then stretch vertically to fill the screen from top to bottom. Add the anamorphic lens to regain the image width. CAUSE / REMEDY: Symptom h Display quality appears to drift from good to bad, bad to good… CAUSE / REMEDY: 1. The source input signal may be of low quality. 2. The H or V frequency of the input may have changed at the source end. 5-4 CP2000-X SETUP GUIDE 020-100059-01 Rev 1. (03/08) Section 5: Troubleshooting Symptom h The display has suddenly froze … 1. If the screen blacks out inexplicably, it is possible that excessive voltage noise on the AC or ground input has interrupted the projector’s ability to lock on to a signal. Power down the projector (see 3.3, Power-down Procedure) and unplug. Then plug in again and power up as usual (see 3.2, Power-up Procedure). Symptom h Colors in the display are inaccurate… CAUSE / REMEDY: 1. The color, tint, color space and/or color temperature settings may require adjustment at your input source. 2. Make sure you are using the proper PCF, TCGD and/or CSC file for this source. Symptom h The display is not rectangular… CAUSE / REMEDY: 1. Check leveling of the projector. Make sure that the lens surface and screen are parallel to one another. 2. Is the vertical offset correct? Adjust as necessary using the vertical offset knob. 3. Is the anamorphic lens straight? Rotate to orient aperture correctly. Symptom h The display is “noisy”… CAUSE / REMEDY: 1. Display adjustment at your input source may be required. Adjust pixel tracking, phase and filter. Noise is particularly common on YPbPr signals from a DVD player. 2. The video input may not be terminated. Make sure the video input is terminated (75Ω). If it is the last connection in a loop-through chain, the video input should be terminated at the last source input only. 3. The input signal and/or signal cables carrying the input signal may be of poor quality. 4. If the distance between the input source device and the projector is greater than 25 feet, signal amplification/conditioning may be required. 5. If the source is a VCR or off-air broadcast, detail may be set too high. Symptom h There are random streaks on the bottom of the image CAUSE / REMEDY: 1. If a 24Hz or 25Hz HDSDI signal or a 50 Hz SDI digital PAL signal, make sure to use non-cinema processing—delete the checkmark for “Cinema” checkbox in the Touch Panel Controller’s Advanced menu. NOTE: password-protected. 2. Or, if you do not have access to the Touch Panel Controller’s Advanced menu and cannot adjust the processing path, use your 3rd-party input source to crop off the streaks. CAUSE / REMEDY: CP2000-X SETUP GUIDE 020-100034-01 Rev 1. (03/08) 5-5 Section 6 Specifications 6.1 Specifications NOTE: Due to continuing research, specifications are subject to change without notice. Display h Panel Resolution and Refresh Rate Pixel format (H x V) on 3 DMDs 2D Refresh rate (DLP™ Cinema™ processing) 2D Refresh rate (non-cinema processing) 3D Refresh rate (24 Hz per eye) Pixel Clock rate 2048 x 1080 23.97 – 48 Hz (SMPTE 292M) ] 23.97 – 85 Hz (VESA DVI) ] 96 Hz max. 150 MHz max. Achievable Brightness (requires maximum output conditions) 14 footlamberts on 25m screen (4 kW or 6 kW) or 17m screen (2 kW or 3 kW) Achievable Contrast Ratio 2000:1 full on/off Colors and Gray Scale Displayable colors Gray scale resolution 35.2 trillion 15 bits each per RGB component (45 total linear) White Point Nominal white (full white after calibration, in telecine mode) x = 0.314 ± 0.002 y = 0.351 ± 0.002 Gamma 2.6 (nominal) Lenses h For all standard high-contrast lenses: Primary Zoom Lenses Maximum Image Offset as Distance (pixels) 1.25 – 1.45:1 zoom 1.45 – 1.8:1 zoom 1.8 – 2.4:1 zoom 2.2 – 3.0:1 zoom 3.0 – 4.3:1 zoom 4.3 – 6.0:1 zoom 5.5 – 8.5:1 zoom 540 ⋅ 410 pixels √ 540 ⋅ 410 pixels √ 540 ⋅ 410 pixels √ 540 ⋅ 410 pixels √ 540 ⋅ 410 pixels √ 540 ⋅ 410 pixels √ 540 ⋅ 410 pixels √ Max. % of Image Below or Above Lens Center, or to One Side of Lens Center ] 100% ⋅ (vertical), 70% √ (horizontal) 100% ⋅ (vertical), 70% √ (horizontal) 100% ⋅ (vertical), 70% √ (horizontal) 100% ⋅ (vertical), 70% √ (horizontal) 100% ⋅ (vertical), 70% √ (horizontal) 100% ⋅ (vertical), 70% √ (horizontal) 100% ⋅ (vertical), 70% √ (horizontal) * 100% = image moved by a distance of 540 pixels up or down (100% of image half-height). * 70% = image moved by distance of 410 pixels left or right (40% of image half-width). * Simultaneous vertical/horizontal offsetting may limit the range of each. See illustrations in 2.3, Projector Position and Mounting. CP2000-X SETUP GUIDE 020-100059-01 Rev 1. (03/08) 6-1 Section 6: Specifications Cinema Inputs h Number of inputs Standard supported Connector Type 2 SMPTE 292M bit-serial BNC * NOTE: Currently supported cinema formats are listed on page 4-2. Non-cinema DVI Inputs h (FOR ALTERNATIVE CONTENT) Number of inputs Standard supported Connector Type 2 VESA Digital Visual Interface (DVI-D) 24-pin female DVI-D * NOTE: Currently supported DVI formats (i.e., non-cinema formats) are listed on page 5-2. Control Ports h Touch Panel Controller h RS-232 connectors (2): 9-pin D female A= Non-ASCII PC communication B=Christie-proprietary accessories only Ethernet connectors (2): RJ-45 female Std. 100 base-TX, 100 Mbps max. GPIO connector (1): 37-pin D female Refer to Figure C.1 and Figure C.2 TPC connector ((1): 6-pin XLR See Touch Panel Controller, below. Ballast Control Port (1): 9-pin D male (for ballast only) Ballast Interlock Port (1): 9-pin D female (for ballast only) RS-232, w/proprietary protocol Type of Display Integrated Operating System Communication Interface w/CP Power Requirement Current Rating Interface Connector Memory 5.7” diagonal color LCD, backlit Microsoft Windows® CE 10BaseT Ethernet .05 A max., at 24 VDC ±10% 2.0 A max. 8-pin DIN, bayonet-locking 64MB +5V TTL-compatible, opto-isolated at ballast end. Power Specifications h Projection head Projection Compartment AC (near Panel B, at front) Connector type & rating Voltage range, nominal Line frequency, nominal AC input rating Max. inrush current * Max. current consumption* Max. power consumption* (1) IEC 320-compatible, 10 A rating 200 – 240 VAC ±10% 50 – 60 Hz 10 A 35 A 3A 700 W Lamp (DC) Max. operating voltage Max. start-up voltage Max. current consumption Max. power consumption Connector type 46 VDC 155 VDC 180 A 6600 W Female CAM Lock receptacle (+red) Male CAM Lock receptacle (–black) * With extractor 6-2 CP2000-X SETUP GUIDE 020-100059-01 Rev 1. (03/08) Section 6: Specifications 7 kW 3-Phase Ballast (38-814001-01) Nominal Voltage per φ Nominal Operating Range Line Frequency Inrush current (max.) note: excluding lamp Current consumption per phase (max.) @ 6.6 kW Power consumption (max.) Current rating (continuous) of 3-phase AC input at breaker Breaker rating • 208 VAC (North America / Japan) • 400 VAC (Europe) • 200-230 ± 10% (North America / Japan) • 380-415 ± 10% (Europe) 50-60 Hz nominal <50 A • 28 A @ 208 VAC (North America / Japan) • 16 A @ 400 VAC (Europe) • 14.4 kVA (9.1 kW), all regions 30 A, all regions 50 A BALLAST OUTPUT TO PROJECTION HEAD Operating voltage range Start-up voltage (open current) Operating current range Ripple Control ports Lamps h 18-46 VDC 125-155 VDC 50-180 A 1% max @ 25°C See Control Port and Interlock Port on previous page CXL/CDXL Lamps (kW) Current Range (amps) Lamp Life (warranty hrs.) CDXL-20 (2.0) 66-88 1200 full / 2400 pro-rated CXL/CDXL-30 (3.0) 82-120 720 full / 1440 pro-rated CXL/CDXL-45 (4.5) 112-150 60 full / 900 pro-rated CXL/CDXL-60 (6.0) 126-170 50 full / 500 pro-rated * NOTE: Current range shown includes “over-drive” of approximately 10% more than the original lamp rating. Type Stand-by lamp power level for 4-6 kW Stand-by lamp power level for 2-3 kW Motorized adjustment of position Recommended screen widths: 2.0 kW = 5 ft. max. 3.0 kW = 55 ft. max. 4.5 kW = 65 ft. max. 6.0 kW = 75 ft. max. Xenolite® 50% of lamp’s maximum current rating 75% of lamp’s maximum current rating 3-axis, 0.25” range for each All screen sizes approximate and assuming 1.5 screen gain if <70 ft., and 1.8 screen gain if >70 ft. Audible Noise h 70 dBA maximum (NOTE: Does not include customer-supplied external extractor fan.) Safety h • UL 60950-1 and CAN/CSA C22.2. No. 60950-1-03 1st edition, bi-national • IEC 60950-1:200 EMC Emissions h FCC CFR47, Part 15, Subpart B, Class A — Unintentional Radiation CISPR 22: 2003 +A1:2004 / EN55022: 1998 +A2:2003, Class A — Information Technology Equipment EMC Immunity h CISPR 24:1997 / EN55024:1998 +A1:2001 +A2:2003 EMC Requirements – Information Technology Equipment Operating Environment h CP2000-X SETUP GUIDE 020-100034-01 Rev 1. (03/08) Temperature Humidity (non-condensing) Altitude 10°C to 35°C (50°F to 95°F) 20% to 80% 0 – 3000 meters 6-3 Section 6: Specifications Non-Operating Environmenth Temperature Humidity (non-condensing) -25C to 65°C (-13°F to 149°F) 0% to 95% Weight & Size h NOTES: 1) Excludes lens, cabling, extractor. 2) All weights subject-to-change Shipping Weights Projection Head Ballast FredFrame 360 lb (163 kg) 145 lb (66 kg) 153 lb (70kg) Installed Weight Projection Head Ballast FredFrame 260 lb (118 kg) 110 lb (50 kg) 105 lb (48 kg) Standard Dimensions (W x L x H)| Size with Anamorph (W x L x H ) (incl. 25.6” x 49.0” x 20” (65 cm x 124.5 cm x 50.8 cm) 25.6” x 64.6” x 20” (65 cm x 164.1 cm x 50.8 cm) anamorphic lens mount & lens) Standard Components h Projection Head. Includes: Line cord Touch Panel Controller with mounting hardware and 3-ft. cable Security keys for lamp and igniter service access, plus assorted Allen keys CP2000-X User’s Manual Lamp Ballast (3-phase 7 kW for all lamps in all countries) Choice of lamp kit (incl. protective gear) Cable kit (incl. two lamp power cables and two communication/control cables) Extractor Kit, 50/60 Hz Choice of lens (Anamorphic lens and mount are both optional) Options h Standard High-Contrast Lenses 1.25 – 1.45 :1 — part# 38-809079-01 1.45 – 1.8:1 — part# 38-809061-01 1.8 – 2.4:1 — part# 38-809052-01 2.2 – 3.0:1 — part# 38-809053-01 3.0 – 4.3:1 — part# 38-809069-01 4.3 – 6.0 :1 — part# 38-809081-01 5.5 – 8.5 :1 — part#38-809080-01 Anamorphic Lens Mount — part# 38-813019-02 1.25x Anamorphic Lens — part# 38-809054-01 Lamp Ballasts 7 kW — part# 38-814001-01 Ballast Cable Kits 2 meters (6½ ft.) — part# 38-814003-01 7.5 meters (25 ft.) — part# 38-814004-01 15 meters (50 ft.) — part# 38-814005-01 30 meters (100 ft.) — part# 38-814006-01 Other FredFrame™ Rigging Frame — part# 38-814-007-01 Extra Heat Extractor Kit (50/60 Hz) — part# 38-814008-01 Side-Venting Duct Adapter Kit (required for stacked projectors) F# Aperture Kit (set of 4) — part# 38-813028-01 Protective Clothing Kit — part# 598900-095 (for opening of lamp door) KoRE 10-bit Librarian Setup Software 6-4 CP2000-X SETUP GUIDE 020-100059-01 Rev 1. (03/08)