1
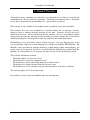
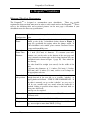
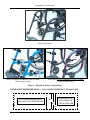
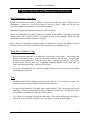
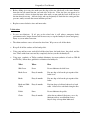
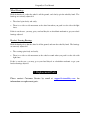
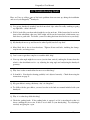
Dragonfly Handcycle
TM
User Instruction and Maintenance Manual
Part Number 25
Rev A, 12/11/2007
(PLEAS E PRINT OUT AT 100% S IZE – NO SCALING)
Dragonfly TM User M anual
Dealer: This manual must be given to the user of the handcycle.
User: Before using this handcycle, read this manual and save it for
future reference; it has installation and maintenance instructions along
with warranty information.
For more information regarding Rio Mobility products, parts, and
services, please contact Rio Mobility, a Daedalus Wings, Inc. company,
at www.riomobility.com.
You can also visit our retail store, conveniently located at 56 Tehama
Street in downtown San Francisco, CA 94105.
We would like to acknowledge the National Science Foundation for
their support of the development of the DragonflyT M handcycle.
© 2007 Daedalus Wings, Inc.
2
www.riomobility.com
Dragonfly TM User M anual
-Table of Contents1.
2.
3.
4.
5.
6.
7.
8.
9.
10.
11.
Product Registration/Warranty Form ………………..5
Limited Warranty…………………………………….6
Introduction to Handcycling …………………………8
DragonflyT M Guidelines……………………………...9
What Comes in the Box ……………………………14
Initial Installation Instructions ...……………………16
Routine Attachment and Removal ………………….27
Safety Checklist and Maintenance Instructions…….29
Replacement Parts…………………………………..31
Troubleshooting Guide ……………………………..32
Contact Information ………………………………...33
www.riomobility.com
3
Dragonfly TM User M anual
-WARNINGDO NOT OPERATE THIS EQUIPMENT WITHOUT FIRST
READING AND UNDERSTANDING THIS MANUAL. IF
YOU ARE UNABLE TO UNDERSTAND THE WARNINGS,
CAUTIONS, AND INSTRUCTIONS, CONTACT
CUSTOMER SERVICE AT [email protected]
BEFORE ATTEMPTING TO USE THIS EQUIPMENT –
OTHERWISE INJURY OR DAMAGE MAY RESULT.
IT IS RECOMMENDED THAT INITIAL SETUP OF THIS
HANDCYCLE BE PERFORMED BY A QUALIFIED
TECHNICIAN, SUCH AS A BICYCLE OR WHEELCHAIR
MECHANIC.
4
www.riomobility.com
Dragonfly TM User M anual
-1. Product Registration/Warranty FormPlease complete and mail or fax this form to:
Name:
Address:
City:
State/Province:
Zip/Postal Code:
Email:
Phone #:
Rio M obility M odel #:
Serial #:
Purchased from:
Date of Purchase:
Rio M obility
56 Tehama Street
San Francisco, CA 94105
(415) 520-0567 (f)
_____________________________________________
_____________________________________________
_____________________________________________
_____________________________________________
_____________________________________________
_____________________________________________
_____________________________________________
_____________________________________________
_____________________________________________
_____________________________________________
_____________________________________________
This product was purchased for use by (circle one):
Self Parent Spouse Child Other: _______________________
Product was purchased for use at (circle one):
Home Facility Other: _______________________
I purchased this product because (circle one):
Price Features Other: _______________________
Who referred you to this product (circle one)?
Doctor Therapist Friend Relative No Referral Other: _______________
Advertisement: TV Radio M agazine Newspaper Internet: _______________
What additional features, if any, would you like on this product?
______________________________________________________________________________
Would you like to receive information via mail or email about other Rio M obility products?
Do you have any suggestions for the RioM obility.com website?
To find out more about Rio M obility products, please visit our website, www.riomobility.com, or
visit our showroom at 56 Tehama Street, San Francisco, CA 94105.
www.riomobility.com
5
Dragonfly TM User M anual
-2. Limited WarrantyAll handcycle parts (excluding tires and tubes) are warrantied free of defects in material and
workmanship for 90 days from date of purchase. The handcycle structural frame is warrantied
free of defects in material and workmanship for 1 year from date of purchase.
This warranty is only available for the original owner or purchaser and is non-transferable.
Said warranty does not cover mechanical or structural failure due to improper assembly,
improper usage, or damage involving accidents of any kind. Warranty also does not cover
normal wear and tear. Also not included under this warranty is the loss of purchased product,
damage from exceeding the normal payloads of handcycle product, damage due to buyer/driver
mechanical negligence, or damage due to lack of preventative and routine maintenance.
Rio M obility is to do all warranty work if deemed necessary. One way shipping costs are the
sole responsibility of the buyer, return shipping costs will the responsibility of Rio M obility. Rio
M obility is not responsible for damages incurred to product during product return shipping. All
returns must be pre-approved and receive an official Return Authorization number from Rio
M obility. In some special cases, if requested, the buyer can pay for the repainting of product.
This warranty will become invalid if:
-
The frame number is removed or altered.
The handcycle is used in any competitive event.
The handcycle is used in stunt riding, jumping, or similar activity.
The handcycle is ridden with more than one person at a time.
The handcycle is used in a manner contrary to the instructions in the Owner’s M anual.
The warranty applies to U.S.A customers only.
Our product is to not be copied or modified under any circumstances.
6
www.riomobility.com
Dragonfly TM User M anual
-WARNINGThe dragonfly is a recreational product. It is not a medical device nor is it intended as a primary
means of mobility. These handcycles are intended for outdoor recreational use on paths and
sidewalks. Required operating conditions are on flat, dry, paved surfaces during daylight hours.
The use of a flag or tall marker is highly suggested for maximum visibility. Do not operate
handcycles from dawn to dusk or in other low visibility conditions.
In most states, the use of wheelchairs on public roads is prohibited. Whether this is the case or
not, you should not operate your handcycle on roads, streets, or highways.
Your must have your anti-tip devices installed on your wheelchair to insure a safe ride.
Operating in or around a handcycle involves a certain level of risk and inherent danger of serious
bodily injury. These possible risks include, but are not limited to, permanent disability, neck and
head trauma, limb dismemberment and in extreme cases, even death.
Handcycle riders must ride these vehicles with the utmost care, caution, and safety in mind. It is
recommended that you inspect your chair and handcycle carefully before each ride.
Operate your handcycle with the same care and caution as you would any wheelchair or bicycle.
Follow all the instructions and recommendations indicated in your wheelchair users’ manual.
Rio M obility cannot be held responsible for any accidents that may occur from misuse.
Please refer to Operating Requirements for more details on safe use of the handcycle.
www.riomobility.com
7
Dragonfly TM User M anual
-3. Introduction to HandcyclingThe Dragonfly TM will transform your wheelchair into a high performance machine, with the
potential to make you more mobile and physically fit. Just like many other exercises,
handcycling is an aerobic activity, so you should check with your physician before going for
your first ride or starting any handcycling on a regular basis.
If you’ve never ridden a handcycle before, you may feel soreness and fatigue in places you’ve
never felt it before. A little soreness is normal, but remember that overexertion can cause excess
soreness and potential injury, so be mindful of your limits. Be patient and reasonable with your
handcycling expectations; physical fitness takes time to achieve.
Most importantly, remember to have fun with your handcycle.
Enjoy the ride!
8
www.riomobility.com
Dragonfly TM User M anual
-4. DragonflyT M GuidelinesMinimum Wheelchair Requirements
The Dragonfly TM is designed to accommodate most wheelchairs.
There are specific
requirements that your chair must meet in order to safely attach and use the Dragonfly TM. Please
refer to the following table and associated pictures on the next page to determine if your
wheelchair meets the necessary specifications.
Chair
Configuration
Wheelchair
Frame
Wheelchair
Frame Tube
Diameter
Wheelchair must have pushrim wheels in the rear, castors in
front.
The geometry of the tubes at the front of your wheelchair must be
similar to one of the 3 wheelchair frames shown in Figure 1
(page 10), specifically the regions where the clamps attach. If
your wheelchair is not similar, please contact Customer Service
at [email protected].
For our standard product your wheelchair frame tube size must
be 1 inch (25.4 mm) in diameter. To measure your tube
diameter, cut out the ruler on the bottom of the next page and
wrap it around your frame tubes at the 4 clamp locations for your
wheelchair frame shown in Figure 1 (page 10). Note where the
lines line up.
The tube should be straight (not curved) for the width of the
ruler.
For frame tube diameters of 1 ⅛ inches (28.6 mm), 1.2 inches
(30.5 mm), and 1 ¼ inches (31.8 mm), order a set of 4 clamps for
the appropriate tube size.
Rear wheel
axle position
When seated in the wheelchair, your center of gravity must be far
enough forward of the rear axle so as to make “wheelies” or
tipping backward difficult – THIS IS VERY IM PORTANT. If
the chair is currently set up so that “wheelies” are very easy, it
will be very unstable and very unsafe when the handcycle is
attached, leading to possible serious injury to the head, neck, or
other parts of the body.
Anti-tips are also required.
Chair width
Wheelchair seat width must be between 12” (305 mm) and 20”
(510 mm) wide.
Wheel Locks
Weight
Wheelchair must have wheel locks installed.
Combined wheelchair and user weight of less than 280 lb. (130
kg.); user weight no more than 250 lb. (115 kg.)
www.riomobility.com
9
Dragonfly TM User M anual
Frame with Swing-Away Footrests
(balls facing inward)
Frame with Horizontal Bottom Tube Available
(balls facing outward)
Frame with No Horizontal Bottom Tube Available
(balls facing outward)
Figure 1. Wheelchair Frame Configurations
RULER MUS T BE PRINTED AT 100% - NO S CALING, RULER IS 6” (152 mm) LONG
S
T
A
R
T
H
E
R
E
10
1”
CUT ALONG DASHED LINE,
WRAP AROUND CHAIR FRAM E
1 ⅛”
1.2”
FRAM E M UST BE
STRAIGHT FOR
WIDTH OF RULER
1 ¼”
www.riomobility.com
Dragonfly TM User M anual
Proper Fit of Your Handcycle
•
•
•
•
•
You must be able to see over the hand crank and chain guard.
When seated in the wheelchair, your center of gravity must be far enough forward of the rear
axle so as to make “wheelies” or tipping backward difficult – THIS IS VERY IM PORTANT.
When riding the handcycle, your arms should never be straight; ideally elbows should be
slightly bent when the pedals are farthest away from you.
The hand crank must be clear of your knees at the lowest crank position – the Dragonfly TM
has coaster brakes, which are operated by rotating the cranks in the reverse direction. YOU
MUST BE ABLE TO PULL THE CRANKS BACK FREELY TO SLOW DOWN AND
STOP!
Your feet or footrest should not contact the front tire either when it is straight or turning – the
handcycle must be adjusted to prevent this.
Before You Ride
•
•
•
•
•
•
•
•
•
•
The handcycle transforms your chair into a highly maneuverable exercise device, so
ALWAYS WEAR A HELMET.
M ake sure reflectors are installed, oriented properly, and not covered with dirt or dust.
The use of safety belts is recommended when operating your handcycle.
Always engage the wheel locks on your wheelchair before attaching or detaching the
handcycle.
Secure your legs or feet so that they don’t fall off the footrest when riding.
ALWAYS check to make sure that your 4 ball sockets attachments to your wheelchair are
fully engaged before operating your handcycle.
Check to make sure all nuts and bolts are tight and all latches are secured before riding.
M ake sure both the coaster and the emergency hand brake work properly before riding your
handcycle.
Do not add any parts or accessories not authorized by Rio M obility to your handcycle, or you
will void your warranty.
Follow the maintenance procedures to keep your handcycle in good shape, and you’ll enjoy it
for a long time.
Operating Instructions
•
•
•
•
Operate your handcycle with the same care and caution as you would any wheelchair or
bicycle.
M ind your fingers and hands when using your handcycle – keep them and any loose hair or
jewelry away from the chain, sprocket, and the wing attachment points.
When moving slowly or in tight spaces, use the pushrims to propel and steer your
wheelchair, as you normally would – the Dragonfly TM won’t interfere with that.
Be very careful going over bumps and curbs over 1” (25 mm) high. Your front castors may
contact theses surfaces, making you unstable. Use your pushrims to get over these bumps,
NOT the handcycle. You should approach bumps and curbs straight on and at very low
www.riomobility.com
11
Dragonfly TM User M anual
•
•
•
•
•
•
•
•
•
•
•
speeds to avoid damage to your wheelchair and injury to you – your return spring should
keep the front wheel straight, freeing up your hands for the pushrims.
Be aware of the road surface, especially on inclines or declines. Watch out for water, ice, and
oil films.
Always mind your speed, especially when turning; you should have full control of your
wheelchair at all times. Do not exceed the maximum allowable speed recommended by your
wheelchair manufacturer.
This handcycle is meant for recreational use only, and it is not intended for use in
competition.
Keep children away from your handcycle to avoid maladjustment and possible injury to both
you and the child.
Always watch out for traffic and pedestrians when riding on the road and sidewalk – follow
traffic regulations.
Follow any and all local regulations which apply to bicycles, as these now apply to you as
well.
Do not carry any riders.
Do not carry anything that obstructs your view or interferes with the hand crank operation.
Do not lift your wheelchair by the handcycle.
Do not put weight on the wings – this includes weight due to objects and people.
Rio M obility is not responsible for any damage or injury due to misuse of your handcycle.
Tire Pressure
• All tires – including those on your current chair – have the pressure range printed on the
sidewall. Lower pressures in the Dragonfly TM tire result in greater traction and a better ride.
Weight Limits
•
The Dragonfly TM is designed for a maximum rider weight of 250 lbs. (114 kg.) and a
maximum combined weight of rider and wheelchair of 280 lbs. (130 kg.) Exceeding this
limit will greatly void the warranty and reduce the lifespan and increase the amount of
maintenance necessary for this handcycle.
Stability and Balance Notes
•
•
•
12
Three wheeled vehicles are inherently unstable in turns, so be careful to keep all three wheels
on the ground and moderate your speed when approaching curves.
Be very careful when reaching and leaning left or right from your wheelchair with your
handcycle attached – the longer wheelbase makes it less stable in sideways leans than your
normal wheelchair.
Narrow wheelchairs are less stable, so be extra careful if your wheelchair is narrow.
www.riomobility.com
Dragonfly TM User M anual
Weight Distribution Notes
•
When seated in the wheelchair, your center of gravity must be far enough forward of the rear
axle so as to make “wheelies” or tipping backward difficult – THIS IS VERY IM PORTANT.
If this is not the case, enough weight will not be on the front tire, and braking and stability
will be severely compromised.
Transfers
•
DO NOT attempt to transfer into or out of your wheelchair with your handcycle attached –
you MUST detach the handcycle before attempting transfers.
www.riomobility.com
13
Dragonfly TM User M anual
-5. What Comes in the BoxThe Dragonfly TM unit will arrive to you 90% assembled. You will need to install the pedals and
wings to the handcycle, the 4 clamps to your frame, and the reflectors to the wheel. The
following is what you should receive in the box (not shown to scale):
Item
Description
1
Handcycle users manual (actually, it’s in your hand)
2
Wheel hub user’s manual (for 3 or 7-speed hubs only)
3
Handcycle assembly (wheel, fork, top tube, etc.)
4
Left and right wings
5
Four M 6 screws, 4 lock washers, 4 flat washers, and 4 nuts to attach wings
6
Hand crank pedals, marked left and right
7
Four clamps for 1” (25mm) wheelchair frame tube size, including 4 ball nuts, 4 M 10
socket screws, 4 lock washers, and 4 flat washers
8
5 mm and 8 mm hex wrenches (7-speed also comes with a 4 mm wrench)
9
¾ inch (19 mm) and 10 mm open end wrench
10
2 cable ties to secure brake and shift cable housings (if necessary)
11
2 reflectors (attach to spokes)
12
2 blocks for lifting the front wheels for installation
If you are missing any of these items, please contact Rio M obility customer service
([email protected]).
14
www.riomobility.com
Dragonfly TM User M anual
On Your End
It is expected that you have the following tools for installation and setup of the Dragonfly TM:
1.
2.
3.
4.
5.
6.
Adjustable wrench
Pliers
Torque wrench
Tire pressure gauge
Bicycle pump
Philips head screwdriver (3-speed only)
The Parts of Your Handcycle
Figure 2 shows a handcycle. All the parts referred to in the instructions are labeled.
Crank
Pedal
Crank Arm
Top Tube
Parking/Emergency
Brake
Coupler
Top-link
Bottom-link
Wing (left)
Wing Plate
Steering Plate
Figure 2
www.riomobility.com
15
Dragonfly TM User M anual
-6. Initial Installation InstructionsBefore You Get Started:
The Dragonfly TM is engineered to be highly adjustable to the rider and his or her wheelchair.
After working through the initial setup and making adjustments as you ride, your handcycle
should fit you like a glove.
Getting your handcycle just right takes time, but your patience will be rewarded with years of
fun and energizing rides.
So, get your tools out, we’ve got work to do!
Other Notes on Installation:
Since the Dragonfly TM is a highly customizable product, it REQUIRES TWO PEOPLE to setup
properly. Of course, once you’ve got it configured for your wheelchair, you won’t need any help
with it, but you will have to get some help from another individual to get it from the box to the
street the first time around.
If you are uncomfortable adjusting your wheelchair or have trouble with tasks requiring a high
degree of dexterity, such as assembly, tightening nuts and bolts, or gripping a wrench, then it is
recommended that you have a qualified technician do the initial installation of your Dragonfly TM
handcycle for you.
Please refer to your local telephone directory to find a bicycle or wheelchair mechanic if you
wish to have someone else install your handcycle for you.
The following pages contain detailed information on how to adjust and setup your Dragonfly TM;
REM EM BER TO CHECK AND TIGHTEN ALL COMPONENTS AFTER SETUP!
DragonflyTM Installation in Five Easy Steps:
A.
B.
C.
D.
E.
F.
16
Installing Clamps on Your Wheelchair
Assemble the Handcycle
Determining the Right Position of the Wheel and Crank
Adjusting the Wings and Top-Links to Lock Your Handcycle Into Position
Tightening It All Down and Doing a Final Check
Go for a ride!
www.riomobility.com
Dragonfly TM User M anual
A. Installing Clamps on Your Wheelchair
1. Remove any plastic covers, such as on the axle nuts, and packing materials.
2. Determine which wheelchair front tube configuration is similar to your wheelchair (Figure 1,
page 10). If none are similar, please contact customer service at [email protected]
3. M easure the diameter of the tubes where the clamps will be installed (example locations are
shown in Figure 1, page 10) for the wheelchair frame configuration that is similar to your
wheelchair. Verify that you have the correct diameter clamps (instructions on page 9).
4. Install the clamps at the approximate locations shown in Figure 1 (page 10), paying special
attention to the orientation of the clamps and the direction the ball is facing. The ball should
face toward the outside of the wheelchair if possible, but for wide chairs, the ball may have
to face toward the center of the wheelchair. M ake sure the washers are in between the clamp
and the head of the screw (Figure 3). General guidelines for clamp location include:
•
•
Flat
The clamps must be installed on a straight section of tube
at least ⅛” inch (3 mm) away from any curve, bend, or
weld in the tube, but if possible a ½” (12 mm) gap is best.
The clamps should be in the approximate
location/orientation shown in Figure 1.
Lock
Figure 3
5. Tighten the clamp using the 8 mm Allen wrench to a tightness of approximately 10 ft-lbs
(13.6 N-m). This is approximately a force of 20 lb at 6 inches away from the screw (90 N at
15 cm away from the screw).
6. If you have difficulty with these steps, please contact customer service.
B. Assemble the Handcycle
Attach Handcycle Pedals
1. Your Dragonfly TM handcycle comes with a right hand pedal and a left hand pedal. The pedal
axles are marked (R for right, L for left on the top of the screw) and threaded in opposite
directions, so each pedal only fits into its specific crank arm. The right crank arm has a chain
ring attached to it; the left crank arm is free.
2. In order to keep the wheel still during pedal installation, you may apply the parking brake by
squeezing the brake lever and depressing the spring loaded pin next to it. Refer to Figure 4
on page 18. To release the parking brake, simple squeeze the brake lever again.
3. Thread the right pedal axle into the right crank arm in a clockwise direction. You should be
able to screw the axle into the crank arm completely by hand – if you encounter too much
resistance or it simply will not start, make sure the axle is properly aligned and the proper
pedal is in the correct crank arm.
www.riomobility.com
17
Dragonfly TM User M anual
4. Thread the left pedal axle into the left crank arm in a counter-clockwise direction. You
should be able to screw the axle into the crank arm completely by hand – if you encounter
too much resistance or it simply will not start, make sure the axle is properly aligned and the
proper pedal is in the correct crank arm.
5. Completely tighten the pedal axles to the crank arms using an adjustable wrench to a
tightness of approximately 10 ft-lbs (13.5 N-m). This is approximately a force of 20 lb at 6
inches away from the screw (90 N at 15 cm away from the screw).
Install reflectors and secure loose cable housings
1. Your handcycle comes with two reflectors – a long one that should be mounted to the wheel
spokes and a small one that should be mounted to the top tube.
Extend Top Tube and Tension Chain (if required)
1. Your handcycle should come with the top tube extended and the chain pretensioned, but if
you need to readjust it, please move on to Step 2. Otherwise, skip ahead to Step 1 on page
20.
2. Using the included 5 mm hex wrench, loosen the clamping bolts on the brake clamp, the
shifter clamp, and the top tube clamp – the top tube clamp is pictured being loosened in
Figure 4.
Lock pin
Parking brake
Figure 4
3. Extend the top tube until the chain is fairly taut, with roughly ½” (13 mm) of side to side
play. The crank sprocket should be roughly aligned with the wheel sprocket. Slide the brake
down until it contacts the top tube clamp. With the top tube extended, apply tension to the
chain by gripping the top tube and pushing against the top of the brake clamp with your
thumb (Figure 5, page 19). Tighten the brake clamp. The chain should now be tensioned,
but the top tube should still rotate freely.
18
www.riomobility.com
Dragonfly TM User M anual
Figure 5
4. Rotate the top tube so that the crank sprocket and the wheel sprocket are properly aligned,
and tighten the top tube clamp bolts to a tightness of 8 ft-lbs. (10.8 N-m). This is
approximately a force of 16 lb at 6 inches away from the screw (70 N at 15 cm away from
the screw).
5. M ove the shifter up the top tube so that the shifter clamp and brake clamp are a couple of
inches apart. Rotate the shifter so that the shifter lever is positioned about halfway between
the chain and the left crank arm and facing you (Figure 6). Tighten the shifter clamp.
Figure 6
6. Loosen the brake clamp, and rotate the brake so that the brake lever is positioned about
halfway between the chain and the left crank arm and facing AWAY from you, with the
crank in the down position (Figure 7, page 20). Tighten the brake clamp.
www.riomobility.com
19
Dragonfly TM User M anual
Figure 7
Attach Wings
1. Attach the right wing to the handcycle using the M 6 screw supplied. Insert the screw
through the bottom hole of the wing plate and steering plate (Figure 8). M ake sure you
position the washers as shown. Tighten the nut down all the way, and then back it off one
full turn so that the wing can rotate. Do not install the screw in the top holes. Do the same
with the left wing.
`
Lock
washer
Flat
washer
Figure 8
20
www.riomobility.com
Dragonfly TM User M anual
Check Tire Pressure
1. Inflate the tire to the pressure range printed on the sidewall.
Dragonfly TM tire result in greater traction and a better ride.
Lower pressures in the
C. Determining the Right Position of the Wheel and Crank
1. Set the parking brake on the handcycle. Refer to instructions on page 17 and Figure 4 on
page 18 if you are unsure on how to set the parking brake.
2. Set your wheelchair wheel locks. Carefully place 2 ½” blocks under the front castor wheels
– this puts your wheelchair into the approximate riding position (Figure 9). For added
safety, you may want to back your wheelchair up against a wall or other obstacle in addition
to engaging the wheelchair wheel locks. Be careful not to tip backward.
Figure 9
3. Rotate the top-links away from you (toward the wheel) (Figure 9). Each link (the 2 bottom
ones and the 2 top ones) has a coupler on the end - pull back the coupler sleeve until it is
latched in the open position. You should hear a click when it is latched. Do this for all four
couplers.
4. Seated in your wheelchair, pull the handcycle toward you with the wings extending toward
your legs. M ake sure only the bottom bolts are installed on the wings. Center the
handcycle wheel in front of you (Figure 9).
5. Place the handcycle wheel 2 inches (50 mm) away from the front of your shoes or from the
front edge of your footrest, whichever sticks out farthest (Figure 10, page 22).
www.riomobility.com
21
Dragonfly TM User M anual
1 ½” clearance
Figure 10
6. Release the parking brake. Have your friend lift the front end of the handcycle by the fork.
Rotate the crank so that the crank arms are vertical with the pedals low (Figure 10). Reengage the parking brake and set the wheel back down in the same position as before.
7. Sit in your wheelchair in a comfortable position, with your back flat against the backrest.
Rock the handcycle about the wheel until there are 1 ½” (38 mm) of clearance between the
bottom of the pedal and your thigh.
8. Swing the wings up to get the bottom-links lined up with the bottom ball clamp installed on
your wheelchair. The bottom-link can be lengthened or shortened using the threaded rod –
visually verify that you could connect the coupler to the ball, or physically verify it by
extending or shortening one of the bottom-links by unscrewing or screwing in the threaded
rod from the wing. You may have to loosen the jam nut to do this (Figure 12, page 24). Do
not unscrew the threaded rod beyond the red zone on the threads. M ake sure that your
handcycle is straight, centered, and still in the correct position. After you have verified that
the coupler can connect to the ball, move on to Step 9.
• If the bottom-link is still too long, you can push the wheel out until the coupler can attach
to the ball, but don’t move the wheel more than 6” away from your feet.
• If the couplers can’t reach the balls, even with the wheel only 2” away from your feet, try
moving the clamps forward. If this is not possible, please contact customer service.
9. At this point, the crank should be roughly in line with the center of your forearm (Figure 10).
If everything is lined up, skip ahead to Step 11 on page 23.
• If the crank is too close to you, simply rock the crank further away from you until it lines
up with your forearm. If this makes the crank too high, you can just move the wheel out
instead (maintaining the 1 ½” – 38 mm – height of the pedal), but don’t move the wheel
more than 6” away from your feet. Go back to step 8 after moving the wheel.
22
www.riomobility.com
Dragonfly TM User M anual
•
•
If you still can’t get the crank far enough away, you must remove links from the chain
and shorten the handcycle – please refer to Step 10.
If the crank is too far away from you and you need the crank closer, you must add links to
the chain to lengthen the handcycle – please contact customer service.
10. The handcycle is shipped with two 10-link removable sections of chain already installed.
Removing one 10-link section of chain moves the crank down 1 ¾” (44 mm) and away from
you 1 ¾” (44 mm).
To remove a section:
i.
Loosen the top tube clamp and lower the crank – this makes the chain slack.
ii.
Find the two master-links on either side of a 10-link sections (Figure 11). Use a pair
of pliers to remove the master-link clip from one of the master-links.
iii.
Now you can pop out the master-link. Remove the other master-link on the other side
of the 10-link section of chain – you can now remove the 10-link section of chain.
iv.
Use one of the removed master-links to reconnect the chain. Replace the master-link
clip using pliers.
v.
To shorten the handcycle more, remove the other 10-link section of chain.
vi.
Go back to Step 3 on page 18. If you still feel the crank is too high, please contact
customer service for additional help.
Master-link
clip
Figure 11
11. Now that you have the wheel and crank correctly positioned, put a piece of tape under the
axle of the wheel to mark that position.
12. Holding the handcycle in the correct position, swing the wings up to adjust the length of the
bottom-link. You can lengthen or shorten one of the bottom-links by unscrewing or screwing
in the threaded rod from the wing. You may have to loosen the jam nut to do this (Figure
12, page 24). Do not unscrew the threaded rod beyond the red zone on the threads. M ake
sure that your handcycle is straight, centered, and still in the correct position. When you
have lined up the coupler with the ball, snap it into place. The sleeve should automatically
slide into place to cover the coupler, and you should here a click.
www.riomobility.com
23
Dragonfly TM User M anual
Jam nut
Figure 12
13. Now extend the other bottom-link. Both bottom-links should be the same length. Snap it
into place onto the ball clamp. The sleeve should automatically slide into place and cover the
coupler, and you should here a click. The whole handcycle should now be able to pivot
about the bottom-link couplers AND the wing brackets.
D. Adjusting the Wings and Top-Links to Lock Your Handcycle Into Position
1. Now that you know where you want your handcycle, you have to find a way to keep it
there…luckily, we’ve thought that part out for you! With your handcycle in the desired
position (crank positioned at the right height and the right distance from your body, wheel at
the correct distance from your feet/footrest), rotate the handcycle back and forth slightly until
one of the two holes at the top of the wing plate lines up with one of the five holes on the
steering plate (Figure 13).
Figure 13
2. Insert the 6 mm screws, with washers at both ends, and tighten the nuts to 8 ft-lbs (10.8 Nm). Tighten the bottom screws and nuts to the same 8 ft-lbs. (10.8 N-m) tightness.
24
www.riomobility.com
Dragonfly TM User M anual
3. Now rotate the top-links back toward you and unscrew the threaded rod until the couplers
line up with the balls of the top clamps (Figure 14). You may have to loosen the jam nuts to
do this. The couplers should be unscrewed the same amount. Do not unscrew the threaded
rod beyond the red zone on the threads. If top-link extends too far, even when screwed in as
much as possible, then the wheel has to be moved away from your shoes by unscrewing the
bottom couplers, but there should be no more than 6” (150mm) between your shoes and the
wheel. If this is not possible, please contact customer service.
Jam nut
Figure 14
4. The coupler sleeves should already be pulled back and latched into place. If not, pull them
back until you hear a click – they should remain latched open. Press one of the ball and
coupler pairs together. The sleeve should automatically slide into place and cover the
coupler, and you should here a click. Line up the other ball and coupler, and click it into
place.
5. Tighten down the jam nut on each link (both the top AND bottom links) to a torque of 10
ft-lbs. (13.5 N-m). For the top-link, tighten the jam nut against the painted nut at the bottom
of the threaded rod by using the included wrench on one nut and an adjustable wrench on the
other. For the bottom-link, simply tighten the jam nut against the wing tube using the
included wrench.
You’re pretty much there…
You just need to do a final check before you go for a spin!
www.riomobility.com
25
Dragonfly TM User M anual
E. Tightening It All Down and Doing a Final Check
1. M ake sure that all nuts have been tightened, including the wing nuts and screws, top and
bottom-link jam nuts, and all clamp screws. Remove the blocks from under the front castors.
Your handcycle is now installed, and the front castors should be hanging in the air.
2. With your handcycle installed, the castors should be at least 1” (25 mm), and not more than
2.5” (64 mm), off the ground, and the front wheel should be approximately 2” (50 mm) to 6”
(150 mm) in front of your feet or the foot rest. If this is not the case, adjust using the
proceeding instructions.
3. Of course, every rider is different, so you may want to further adjust the Dragonfly TM after
you’ve taken a couple rides on it. You can try further adjustments which can affect both fit
and handling, but be sure to check that all nuts have been tightened after any adjustment, and
take your handcycle for a short test ride after each adjustment.
Alright, go for a ride! You’ve earned it!
26
www.riomobility.com
Dragonfly TM User M anual
-7. Routine Attachment and RemovalAttachment
1. Before attaching your handcycle, ALWA YS ENGAGE YOUR WHEELCHAIR WHEEL
LOCKS!
2. Seated in your wheelchair, pull the handcycle toward you with the wheel in front and the
wings extending toward your legs.
3. Pull back the coupler sleeve on all four links so that they click into place in the open position.
Swing the top-links away from you (toward the wheel).
4. Holding onto the top tube, pull either of the wings toward you and snap the coupler on to the
ball clamped to your chair. Next, hold onto the top tube with your other hand, and snap the
other coupler onto the other ball.
5. Now, the handcycle should be able to stand freely on the ground. In this position, install the
top-links.
6. Lift the front castors off the ground by pushing the top tube away from your body using one
hand. With the other hand, swing one of the top-links toward you. Bring the coupler in line
with the ball clamped to your chair by pushing more or less on the top tube. Snap the coupler
into place (you should hear a click). Swing the other top-link toward your and repeat the
procedure – you san still move the position of the top-link by pushing more or less on the top
tube. After making sure that the top-links are secured, you may let go of the top tube.
You are now ready for a ride!
Removal
1. Before removing your handcycle, ALWA YS ENGAGE YOUR WHEELCHAIR WHEEL
LOCKS!
2. Grasp the top tube with one hand and the coupler sleeve on one of the top-links with the
other hand.
3. Push the top tube away from your body to relieve the weight from the top-links, and pull
back the coupler sleeve of the top-link.
4. Jiggle the top tube back and forth gently with one hand and pull the top-link away from the
ball clamp – it should release the ball and come free. Swing it forward (toward the wheel) so
it is out of the way.
www.riomobility.com
27
Dragonfly TM User M anual
5. Again, push the top tube away from your body to relieve the weight from the top-link, and
pull back the coupler sleeve of the remaining top-link.
6. Firmly grip the top tube. Once more, gently jiggle the top tube back and forth with one hand
and pull the top-link away from the ball clamp – it should release the ball and come free. As
soon as it does, all the weight of the wheelchair is held up by your arm holding the top tube.
7. Once the top-links are disengaged, slowly bring the top tube toward you until the front
castors contact the ground. Swing the second top-link away from you to get it out of the
way.
8. Holding on to the top tube with one hand, pull back the coupler sleeve on one of the bottomlinks and pull the wing away from the ball clamp, disengaging the wing from your chair.
9. Grasping the top tube with the other hand, pull back the coupler sleeve on the other bottomlink and pull that wing away from the ball clamp. The hand cycle is now completely
detached from your wheelchair.
Storage
1. Your Dragonfly TM should be stored in a dry location to maintain lubrication and prevent
corrosion.
2. You may want to retain the box that your Dragonfly TM was shipped in, as it makes a handy
container for storage of your handcycle, your handcycle accessories, the included tools, and
the manual.
28
www.riomobility.com
Dragonfly TM User M anual
-8. Safety Checklist and Maintenance InstructionsBasic Maintenance Guidelines
Inspect your handcycle frequently. Failure to inspect your handcycle and to make repairs or
adjustments, as necessary, can result in injury to you or to others. M ake sure all parts are
correctly assembled and adjusted as written in this manual.
Immediately replace any damaged, missing, or badly worn parts.
M ake sure all fasteners are correctly tightened as written in this manual. Parts that are not tight
enough can be lost or operate poorly. Over tightened parts can be damaged. M ake sure any
replacement fasteners are the correct size and type.
Have a bicycle or wheelchair technician make any adjustments or repairs for which you do not
have the correct tools or if the instructions in this manual are not sufficient for you.
Three-Piece Cotterless Crank
•
Both three-piece crank arms were tightened to the spindle at the factory. After riding your
handcycle the first few times, make sure the crank arms have not loosened. If either crank
arm has loosened during this “break-in” period, have it tightened by a bicycle service shop,
because special tools are necessary. Frequently check the tightness of the crank arms. If
loose, have them tightened by a bicycle service shop.
•
If you ride your handcycle for a moderate length of time with a loose crank arm, the spindle
will damage the crank arm.
Tires
•
Frequently check the tire inflation pressure because all tires lose air slowly over time. For
extended storage, keep the weight of the handcycle off the tire.
•
Do not ride the handcycle if the inner tube is under inflated. This can damage the tire and
inner tube. Do not use unregulated air hoses to inflate the inner tubes. An unregulated hose
can suddenly over inflate tires and cause them to burst.
•
Use a hand or a foot pump to inflate the inner tubes. The correct inflation pressure range is
shown on the tire sidewall. Lower tire pressures improve traction and ride quality.
www.riomobility.com
29
Dragonfly TM User M anual
•
Before adding air to any tire, make sure the edge of the tire (the bead) is the same distance
from the rim, all around the rim, on both sides of the tire. If the tire does not appear to be
seated correctly, release air from the inner tube until you can push the bead of the tire in to
the rim where necessary. Add air slowly and stop frequently to check the tire seating and the
pressure, until you reach the correct inflation pressure.
•
Replace worn or defective tires and inner tubes.
Lubrication
•
Do not over lubricate. If oil gets on the wheel rim, it will reduce emergency brake
performance and a longer distance will be necessary to stop the handcycle (in an emergency).
Injury to you or others can occur.
•
The chain can throw excess oil onto the wheel rim. Wipe excess oil off the chain.
•
Keep all oil off the surfaces of the hand pedals.
•
Using soap and hot water wash all oil off the wheel rims, the brake shoes, the pedals, and the
tires. Rinse with clean water and dry completely before you ride the handcycle.
•
Using wax, synthetic, or Teflon synthetic lubricants (not non-synthetic oil such as WD-40
and Tri-Flo), follow these guidelines to lubricate the handcycle:
30
What
When
How
Shift Lever
Never
Do not lubricate the shift lever.
Brake Lever
Every 6 months
Put one drop of oil on the pivot point of the
brake lever.
Brake
Every 6 months
Put one drop of oil on the pivot point of the
brake.
Brake and Shift
Cables
Every 6 months
Put four drops of oil into both ends of each
cable. Allow oil to soak back along the line.
Pedals
None
Do not lubricate the pedals.
Chain
Every 6 months
After factory chain oil dissipates, use a dry
lubricant such as wax lubricant from a
bicycle shop to keep chain lubricated.
www.riomobility.com
Dragonfly TM User M anual
Wheel Bearings
Hold the handcycle so that the wheel is off the ground, and slowly spin the wheel by hand. The
bearings are correctly adjusted if:
•
The wheel spins freely and easily.
•
There is no side to side movement at the wheel rim when you push it to the side with light
force.
If this is not the case, you may go to your local bicycle or wheelchair mechanic to get your wheel
bearings adjusted.
Headset Steering Bearings
Hold the handcycle so that the wheel is off the ground, and turn the wheel by hand. The bearings
are correctly adjusted if:
•
The steering spins freely and easily.
•
There is no side to side movement at the wheel or crank when you push it to the side with
light force.
If this is not the case, you may go to your local bicycle or wheelchair mechanic to get your
headset bearings adjusted.
-9. Replacement PartsPlease contact Customer Service by email at [email protected] for
information on replacement parts.
www.riomobility.com
31
Dragonfly TM User M anual
-10. Troubleshooting GuideHere, we’ll try to address some of the basic problems that can come up during the installation
and use of your Dragonfly TM handcycle.
Q. I’ve got my handcycle attached, but the front wheel slips when I’m really cranking or going
up slight hills…what’s the deal?
A. Well, it looks like your front wheel might be too far out front. If the front wheel is too far in
front of the wheelchair, then very little weight will be on the front wheel, which means very
little force to push with. To fix this, you need to bring the front wheel in closer to your body.
Q. My handcycle moves up and down a lot when I pedal, how do I stop that?
A. M ost likely this is due to loose hardware. Tighten all nuts and bolts, including the clamps,
coupler nuts, and wing screws.
Q. I can’t seem to get those couplers to reach the balls, help!
A. Your top tube angle might be too severe (too far from vertical), making the distance from the
wheel to the wheelchair too far – try adjusting the wing angle and readjusting the handcycle
geometry.
Q. Why does it take so much effort for me to steer this thing?
A. It shouldn’t. Your headset bearing probably isn’t adjusted correctly. Check them using the
instructions on page 31.
Q. My gear shifter is acting a bit funny, why’s it doing that?
A. To fiddle with the gear shifter, you need to refer to the hub user manual included with your
handcycle.
Q. Why is it so hard to peddle this thing?
A. Check the parking brake. If the parking brake is engaged, or if it is misadjusted so that it is
always rubbing the tire or rim, it adds a lot of effort to your handcycling. Try adjusting it
correctly and going for a spin.
32
www.riomobility.com
Dragonfly TM User M anual
-11. Contact InformationQuestions or concerns? Contact us:
Email: [email protected]
Rio Mobility
56 Tehama Street
San Francisco, CA 94105
www.riomobility.com
33