1
MP480 series On-screen Manual
Page 1 of 681 pages
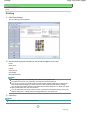
How to Use This Manual
Printing This Manual
MC-3050-V1.00
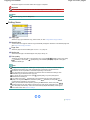
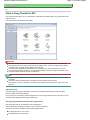
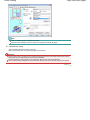
Basic Guide
Advanced Guide
Describes the summary of
this product.
Describes the detailed
function of this product.
Troubleshooting
MP480 series Basic Guide
Page 2 of 681 pages
How to Use This Manual
Printing This Manual
MP-2402-V1.10
Advanced Guide
Contents
Overview of the Machine
Other Usages
Main Components
Printing Photos Directly from Your Digital
Camera or Mobile Phone
Displaying the LCD
Machine Settings
Solution Menu and My Printer
Printing from a Memory Card
Printing Photos Saved on the Memory Card
Using Other Functions
Inserting the Memory Card
Loading Paper / Originals
Loading Paper
Loading Originals to Copy or Scan
Copying
Copying Documents
Using Various Copy Functions
Routine Maintenance
When Printing Becomes Faint or Colors Are
Incorrect
Replacing a FINE Cartridge
Printing with Template Print
Cleaning the Paper Feed Roller
Printing a Notebook Paper
Appendix
Scanning
Safety Precautions
Saving Scanned Data
Legal Limitations on Use of Your Product and
Use of Images
Tips on How to Use Your Machine
Printing from Your Computer
Printing Photos (Easy-PhotoPrint EX)
Printing Documents (Windows)
Printing Documents (Macintosh)
Overview of the Machine
Page 3 of 681 pages
Advanced Guide
Troubleshooting
Contents > Overview of the Machine
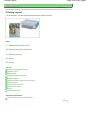
Overview of the Machine
This section shows the component names of the machine and describes the basic operations you need
to know before using it.
Main Components
Front View
Rear View
Inside View
Operation Panel
Displaying the LCD
Selecting Menus on the Top Menu Screen
Page top
Main Components
Page 4 of 681 pages
Advanced Guide
Troubleshooting
Contents > Overview of the Machine > Main Components
Main Components
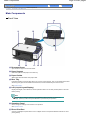
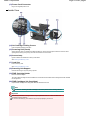
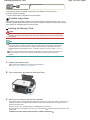
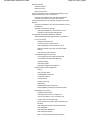
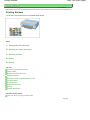
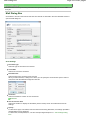
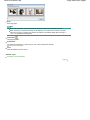
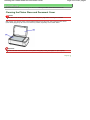
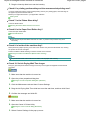
Front View
(1) Document Cover
Open to load an original on the Platen Glass.
(2) Paper Support
Raise and tip back to load paper in the Rear Tray.
(3) Paper Guides
Slide to align with both sides of the paper stack.
(4) Rear Tray
Load various sizes or types of paper which you can use on the machine. Two or more sheets of the same
size and type of paper can be loaded at the same time, and fed automatically one sheet at a time.
See Loading Paper.
(5) LCD (Liquid Crystal Display)
Displays messages, menu selections, and the operation status. You can also preview photos on the LCD
before printing.
Note
The LCD will turn off if the machine is not operated for about 5 minutes. To restore the
display, press any button except the ON button or perform the print operation.
(6) Operation Panel
Use to change the settings of the machine or to operate it.
See Operation Panel.
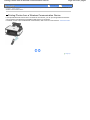
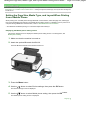
(7) Direct Print Port
Connect a PictBridge compliant device such as a digital camera or the optional Bluetooth Unit BU-30* when
printing directly.
Main Components
See Printing Photos Directly from Your Digital Camera or Mobile Phone.
You can also insert a USB flash drive to this port to save scanned data on it.
See Saving Scanned Data .
* The Bluetooth unit is not available in some countries or regions depending on the local laws and
regulations. For details, contact your local Canon service representative.
Warning
Do not connect any equipment other than PictBridge compliant devices, the optional
Bluetooth Unit BU-30, and USB flash drives to the Direct Print Port of the machine. This
may cause fire, electric shock, or damage to the machine.
Caution
Do not touch the metal casing.
(8) Paper Output Tray
Opens automatically when printing or copying starts and printed papers are ejected.
(9) Output Tray Extension
Open to support the printouts. Open it when printing or copying.
(10) Platen Glass
Load an original to copy or scan.
(11) Card Slot Cover
Open to insert a memory card.
See Inserting the Memory Card.
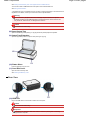
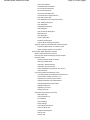
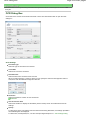
Rear View
(12) USB Port
Plug in the USB cable to connect the machine with a computer.
Caution
Do not touch the metal casing.
Important
Do not plug in or unplug the USB cable while the machine is printing from or scanning
originals to the computer.
Page 5 of 681 pages
Main Components
Page 6 of 681 pages
(13) Power Cord Connector
Plug in the supplied power cord.
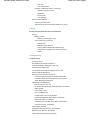
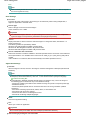
Inside View
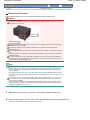
(14) Ink Cartridge Locking Covers
Locks the FINE Cartridges into place.
(15) Scanning Unit (Cover)
Scans originals. Open it to replace the FINE Cartridges or remove jammed paper inside the machine. When
opening the Scanning Unit (Cover), lift it with the Document Cover closed.
(16) Access lamp
Lights or flashes to indicate the memory card status.
See Inserting the Memory Card.
(17) Card Slot
Insert a memory card.
See Inserting the Memory Card.
(18) Scanning Unit Support
Holds the Scanning Unit (Cover) being opened.
(19) FINE Cartridge Holder
Install the FINE Cartridges.
The Color FINE Cartridge should be installed into the left slot and the Black FINE Cartridge should be installed
into the right slot.
(20) FINE Cartridges (Ink Cartridges)
A replaceable cartridge that is integrated with Print Head and ink tank.
Note
For details on installing the FINE Cartridges, refer to the printed manual: Getting Started .
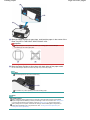
Important
The area (A) indicated in the figure below may be splattered with ink. It does not affect the
performance of the machine.
Do not touch the area (A). The machine may not print properly if you touch it.
Main Components
Page 7 of 681 pages
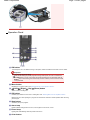
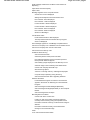
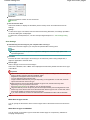
Operation Panel
(1) ON button
Turns the power on or off. Before turning on the power, make sure that the Document Cover is closed.
Important
Disconnecting the power plug
When disconnecting the power plug after turning off the power, be sure to confirm that
the Power lamp is not lit. If the power plug is disconnected from the wall outlet while the
Power lamp is lit or flashing, the machine may become unable to print since the Print Head
is not protected.
(2) Menu button
Displays the Top menu screen. See Selecting Menus on the Top Menu Screen .
(3)
(Left)
(Right)
(Up)
(Down) button
Selects a menu or setting item.
(4) OK button
Finalizes your selection for the menu or setting item. See Selecting Menus on the Top Menu Screen .
Resolves an error when printing is in progress or resumes the machine's normal operation after removing
jammed paper.
(5) Stop button
Cancels a print job in progress.
(6) Alarm lamp
Lights or flashes orange when an error, such as paper-out or ink-out, occurs.
(7) Power lamp
Lights green after flashing when the power is turned on.
(8) Color button
Main Components
Page 8 of 681 pages
Starts color copying or printing.
(9) Black button
Starts black & white copying, etc.
(10) Back button
Returns to the previous screen.
Page top
Displaying the LCD
Page 9 of 681 pages
Advanced Guide
Troubleshooting
Contents > Overview of the Machine > Displaying the LCD
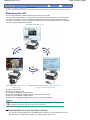
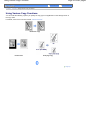
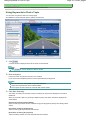
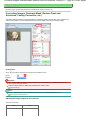
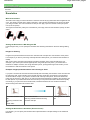
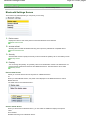
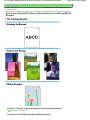
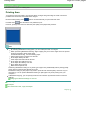
Displaying the LCD
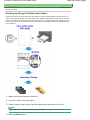
You can use the machine to make copies or print out without a computer.
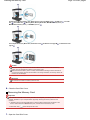
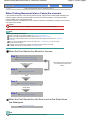
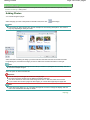
The copy mode screen appears on the LCD when the machine is turned on. When you insert a memory
card into the Card Slot or connect a PictBridge compliant device such as a digital camera to the Direct
Print Port of the machine, the LCD changes automatically to the corresponding mode screen, and allows
you to print using the appropriate functions.
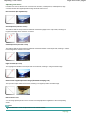
Copy mode screen. See Copying.
Card mode screen. See Printing from
a Memory Card.
Digital camera mode screen. See Printing Photos Directly from
Your Digital Camera or Mobile Phone .
(A) Insert a memory card
(B) Remove the memory card
(C) Connect the PictBridge compliant device
(D) Remove the PictBridge compliant device (a memory card is inserted)
(E) Connect the PictBridge compliant device
(F) Remove the PictBridge compliant device (a memory card is not inserted)
Note
A digital camera mode screen appears when a PictBridge compliant device such as a digital camera
is connected to the machine, even when memory card is already set.
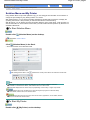
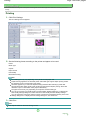
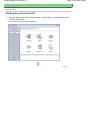
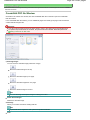
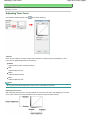
Selecting Menus on the Top Menu Screen
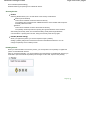
The Top menu screen appears when the Menu button is pressed. You can select menus on the
Top menu screen to start printing, scanning, or maintaining the machine, etc.
Displaying the LCD
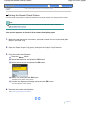
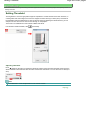
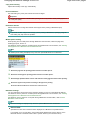
1.
Page 10 of 681 pages
Press the Menu button.
The Top menu screen appears.
2.
Use the
(Up) or
(Down) button to select the menu, and press the OK button.
The selected menu screen appears.
Note
To return to the previous screen, press the Back button.
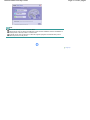
The following menus are available on the Top menu screen.
Copy:
You can make enlarged or reduced copies to fit the selected page size, or
copy books without black margins around the image. See Copying.
Scan:
You can save scanned data on your computer, or on a memory card or a
USB flash drive inserted into the machine using the Operation Panel. See
Scanning.
Photo print:
You can print photos on a memory card of your digital camera. See Printing
from a Memory Card .
Photo Index
Sheet:
You can easily print photos on a memory card using a Photo Index Sheet.
See Using Photo Index Sheet to print .
Template print:
You can print a template such as Notebook paper or Graph paper. See
Printing with Template Print.
Remaining ink:
You can confirm the ink status. See Replacing a FINE Cartridge.
Maintenance:
You can perform maintenance of the machine. See When Printing Becomes
Faint or Colors Are Incorrect , or Cleaning the Paper Feed Roller.
Device
settings:
You can change settings of the machine. See Machine Settings .
Page top
Printing from a Memory Card
Page 11 of 681 pages
Advanced Guide
Troubleshooting
Contents > Printing from a Memory Card
Printing from a Memory Card
You can preview photos taken with the digital camera on the LCD of the machine, and print the photos.
Printing Photos Saved on the Memory Card
Setting Items
Using Other Functions
Inserting the Memory Card
Before Inserting the Memory Card
Inserting the Memory Card
Removing the Memory Card
Page top
Printing Photos Saved on the Memory Card
Page 12 of 681 pages
Advanced Guide
Troubleshooting
Contents > Printing from a Memory Card > Printing Photos Saved on the Memory Card
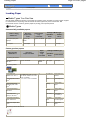
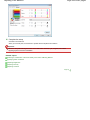
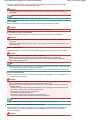
Printing Photos Saved on the Memory Card
Preview photos saved on the memory card on the LCD of the machine, and print the photos.
This section describes the basic operation to print borderless photos on 4" x 6" / 10 x 15 cm paper.
For the operation, see the notes and operation procedure described in the reference page.
You need to prepare:
A memory card on which photos are saved. See Before Inserting the Memory Card .
Paper for printing. See Media Types You Can Use .
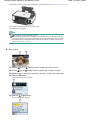
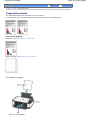
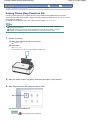
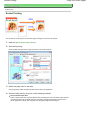
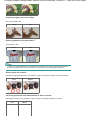
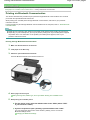
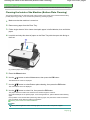
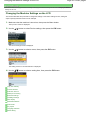
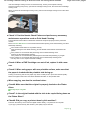
1.
Prepare for printing.
(1) Turn on the power.
See Operation Panel.
(2) Load paper.
See Loading Paper.
Here we load 4" x 6" / 10 x 15 cm photo paper in the Rear Tray.
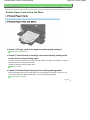
(3) Open the Paper Output Tray gently, and open the Output Tray Extension.
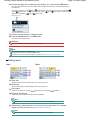
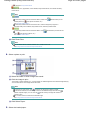
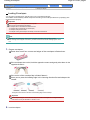
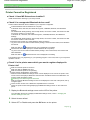
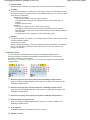
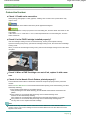
2.
Insert a memory card with the labeled side facing to the left into the Card Slot.
Printing Photos Saved on the Memory Card
Page 13 of 681 pages
For the types of memory cards you can use and the locations to insert them, see Inserting the Memory Card.
The machine starts reading photos on the memory card.
The card mode screen appears.
Note
may appear on the LCD while reading photos.
When the read/write attribute of the Card Slot is set to Writable from PC under Device settings,
you cannot print photos on a memory card by using the operation panel on the machine. Select
Not writable from PC for Read/write attribute under Device settings. For details, refer to the on
-screen manual: Advanced Guide.
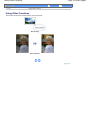
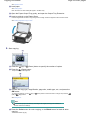
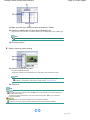
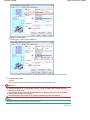
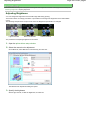
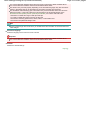
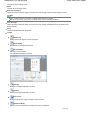
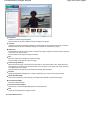
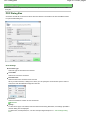
3.
Start printing.
(1) Use the
(Left) or
(2) Use the
(Up) or
(Right) button to display the photo to print.
(Down) button to specify the number of copies.
(3) Repeat steps (1) and (2) to specify the number of copies for each photo.
(4) Press the OK button.
The print confirmation screen appears.
(5) Press the
(Right) button.
The print settings screen appears.
Printing Photos Saved on the Memory Card
Page 14 of 681 pages
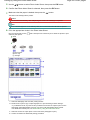
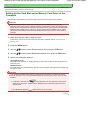
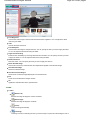
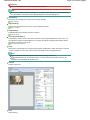
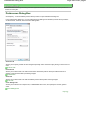
(6) Confirm the page size, media type, print quality, etc., and press the OK button.
Here we confirm that 4"x6" (10x15cm) is selected for the page size and the type of loaded photo paper for
the media type.
To change the settings, use the
(Down) button to select the item to change, and press the
(Up) or
(Left) or
(Right) button. To switch to the other tab, use the
(Up) or
(Down) button to select the
(Right) button.
settings tab, and press the
(Left) or
See Setting Items.
(7) Confirm the total number of sheets to print.
(8) Press the Color button or the OK button.
The machine starts printing photos.
Important
Do not remove the memory card until printing is completed.
Note
To cancel printing, press the Stop button.
Printing does not start if you press the Black button.
To remove the memory card after printing is completed, see Removing the Memory Card.
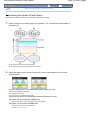
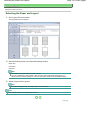
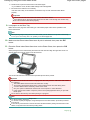
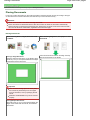
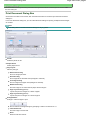
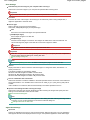
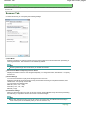
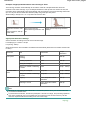
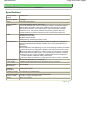
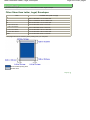
Setting Items
Tab 1:
Tab 2:
(1) Page size
Select the page size of the loaded paper: 4"x6" (10x15cm), A4, etc.
(2) Media type
Select the media type of the loaded paper: Glossy, Plain paper, etc.
(3) Print quality
Adjust the print quality: Print quality
(quality-priority), Print quality
(standard).
(4) Bordered, Borderless
Select bordered or borderless print: Bordered or Borderless.
Note
When Plain paper is selected in Media type, you cannot select Borderless.
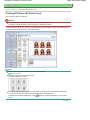
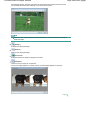
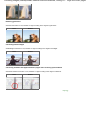
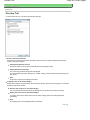
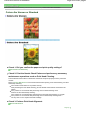
(5) Date printing: Select whether or not to print the shooting date. For a sample
image using this function, see Using Other Functions .
Note
The shooting date is printed according to Date display in Device settings.
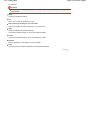
Printing Photos Saved on the Memory Card
Page 15 of 681 pages
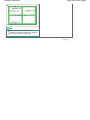
(6) Photo optimizer: Automatically optimizes brightness and tone of a photo. For a
sample image using this function, see Using Other Functions .
(7) Red-Eye correct: Corrects red eyes in portraits caused by direct flash
photography.
(8) Face brightener: Brightens a darkened face on the photo taken against the light.
Note
All settings such as the page size, media type, and print quality are retained, and these
settings will appear next time a photo is selected in the card mode even if the power is turned
off and on.
Some items cannot be specified in combination depending on the function.
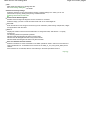
Using Photo Index Sheet to print
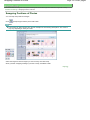
Thumbnails of photos on the memory card are printed on A4 or Letter-sized paper (this printed sheet is
called Photo Index Sheet). You can select photos, number of copies, page size, etc. on this sheet, and
print them.
Select Photo Index Sheet print in Photo Index Sheet on the Top menu screen. For the operation, refer to
the on-screen manual: Advanced Guide .
Page top
Using Other Functions
Page 16 of 681 pages
Advanced Guide
Troubleshooting
Contents > Printing from a Memory Card > Using Other Functions
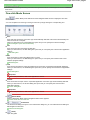
Using Other Functions
This section shows a few useful functions of the card mode.
Date printing
Photo optimizer
Page top
Inserting the Memory Card
Page 17 of 681 pages
Advanced Guide
Troubleshooting
Contents > Printing from a Memory Card > Inserting the Memory Card
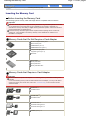
Inserting the Memory Card
Before Inserting the Memory Card
The following types of memory cards and image data are compatible with the machine.
Important
If you took and saved photos on a type of memory card that is not guaranteed operation to be used
on your digital camera, the image data may be unreadable on the machine or damaged. For
information on memory cards that your digital camera guarantees operation, refer to the instruction
manual supplied with your digital camera.
Format the memory card with a digital camera compliant with DCF (Design rule for Camera File
system) ver. 1.0/2.0 standard. The memory card may not be usable with the machine if it is
formatted on a computer.
Memory Cards that Do Not Require a Card Adapter
SD Secure Digital memory card
SDHC memory card
MultiMediaCard (ver.4.1)
MultiMediaCard Plus (ver.4.1)
Compact Flash (CF) Card
Supports Type I/II (3.3 V)
Microdrive
Memory Stick
Memory Stick PRO
Memory Stick Duo
Memory Stick PRO Duo
Memory Cards that Require a Card Adapter
Important
Be sure to attach the special card adapters to the following memory cards before inserting to the
Card Slot.
If one of the following memory cards is inserted without the card adapter, you may not be able to
remove the memory card. In this case, refer to the " Troubleshooting " in the on-screen manual:
Advanced Guide.
miniSD Card *1
miniSDHC Card *1
microSD Card *1
microSDHC Card *1
xD-Picture Card *2
xD-Picture Card Type M *2
xD-Picture Card Type H *2
RS-MMC (ver.4.1) *3
Inserting the Memory Card
Page 18 of 681 pages
Memory Stick Micro *4
*1 Use the special "SD Card Adapter".
*2 Requires purchase of a separate compact flash card adapter for xD-Picture Card.
*3 Use the special card adapter.
*4 Use the special "Memory Stick Micro Duo size Adapter".
Printable Image Data
This machine supports images created by DCF (Design rule for Camera File system) ver. 1.0/2.0
standard compliant digital cameras (Exif ver. 2.2/2.21 compliant, including TIFF etc.). Other image or
movie types such as RAW images cannot be printed.
Inserting the Memory Card
Caution
When a memory card is inserted into the Card Slot, the Access lamp is lit. When the Access lamp
is flashing, the machine is accessing to the memory card. In this case, do not touch the area around
the Card Slot.
Note
When the read/write attribute of the Card Slot is set to Writable from PC under Device settings, you
cannot print photos on a memory card by using the operation panel on the machine. After using the
Card Slot as the memory card drive of a computer, remove the memory card and be sure to set
Read/write attribute to Not writable from PC. For details, refer to the on-screen manual: Advanced
Guide.
When you use a computer to edit or enhance photos saved on a memory card, be sure to print them
from the computer. If you print the photos with the Operation Panel, they may not be printed
properly.
1.
Prepare your memory card.
Attach a special card adapter if your memory card requires one.
See Memory Cards that Require a Card Adapter .
2.
Turn on the power, and open the Card Slot Cover.
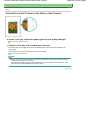
3.
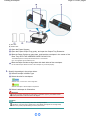
Insert only one memory card into the Card Slot.
The location to insert a memory card varies depending on each type of memory card. Insert your memory card
straightforward WITH THE LABELED SIDE FACING TO THE LEFT into the Card Slot, according to the insert
location in the figure below.
When the memory card is inserted properly, the Access lamp (A) will light up.
Be sure to attach the card adapter to the memory card with the mark
the Card Slot.
(asterisk) below, and then insert it into
For Memory Stick Duo, Memory Stick PRO Duo, or Memory Stick Micro
:
Inserting the Memory Card
Page 19 of 681 pages
For SD Secure Digital memory card, SDHC memory card, miniSDHC Card , miniSD Card , microSD
Card , microSDHC Card , Memory Stick, Memory Stick PRO, MultiMediaCard (ver.4.1),
MultiMediaCard Plus (ver.4.1), or RS-MMC (ver.4.1) :
For Compact Flash (CF), Microdrive, xD-Picture Card
Type H :
, xD-Picture Card Type M
, or xD-Picture Card
Caution
Part of the memory card will stick out of the Card Slot, but do not force it into the slot any
further. This can damage the machine or the memory card.
Make sure that the memory card is correctly oriented before inserting it into the Card Slot. If
you force the memory card into the Card Slot in the wrong orientation, the memory card or the
machine can be damaged.
Important
Do not insert more than one memory card at a time.
4.
Close the Card Slot Cover.
Removing the Memory Card
Important
If you used the Card Slot as the memory card drive of a computer, you must perform the "safe
removal" operation on your computer before physically removing the memory card from the
machine.
- In Windows, right-click the removable disk icon and click Eject. If Eject does not appear on the
screen, make sure that the Access lamp is lit, and then remove the memory card.
- In Macintosh, drag
1.
(Mount drive) into the Trash.
Open the Card Slot Cover.
Inserting the Memory Card
2.
Page 20 of 681 pages
Make sure that the Access lamp is lit, and remove the memory card.
Hold the part of the memory card that is sticking out and remove it from the machine straightforward.
Caution
Do not remove the memory card while the Access lamp is flashing. The Access lamp flashes
while the machine is reading or writing data from/to the memory card. If you remove the
memory card or turn off the power while the Access lamp is flashing, the data saved on the
memory card can be damaged.
3.
Close the Card Slot Cover.
Page top
Copying
Page 21 of 681 pages
Advanced Guide
Troubleshooting
Contents > Copying
Copying
You can make enlarged or reduced copies of the original to fit the page size, borderless copies of
photos, and copies of books without black margins around the image, besides standard copies.
Copying Documents
Setting Items
Using Various Copy Functions
Page top
Copying Documents
Page 22 of 681 pages
Advanced Guide
Troubleshooting
Contents > Copying > Copying Documents
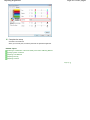
Copying Documents
This section describes the basic operation to copy documents.
For the operation, see the notes and operation procedure described in the reference page.
You need to prepare:
Originals to copy. See Originals You Can Load .
Paper for printing. See Media Types You Can Use .
1.
Prepare for copying.
(1) Turn on the power.
Copying Documents
Page 23 of 681 pages
See Operation Panel.
(2) Load paper.
See Loading Paper.
Here we load A4 or Letter-sized plain paper in the Rear Tray.
(3) Open the Paper Output Tray gently, and open the Output Tray Extension.
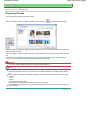
(4) Load an original on the Platen Glass.
Load the original with the side to copy facing down and align it with the alignment mark as shown below.
See Loading Originals to Copy or Scan .
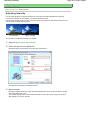
2.
Start copying.
(Down) button to specify the number of copies.
(1) Press the
(Up) or
(2) Press the
(Right) button.
The print settings screen appears.
(3) Confirm the copy type, magnification, page size, media type, etc., and press the
OK button.
To change the settings, use the
(Left) or
(Right) button.
(Up) or
(Down) button to select the item to change, and press the
See Setting Items.
Note
To automatically adjust the intensity according to the original, set Copy auto intensity to
Enable under Device settings.
(4) Press the Color button for color copying, or the Black button for black & white
copying.
The machine starts copying.
Copying Documents
Page 24 of 681 pages
Remove the original on the Platen Glass after copying is completed.
Important
Do not open the Document Cover or move the loaded original until the copying is completed.
Note
To cancel copying, press the Stop button.
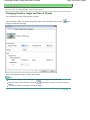
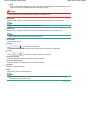
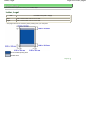
Setting Items
(1) Copy type
Select the copy type: Borderless copy, Frame erase, etc. See Using Various Copy Functions .
(2) Magnification
You can select Fit to page to make the copy automatically enlarged or reduced to fit the selected page size.
See Using Various Copy Functions .
(3) Page size
Select the page size of the loaded paper: A4, 8.5" x 11" (LTR), etc.
(4) Media type
Select the media type of the loaded paper: Plain paper, Glossy, etc.
(5) Print quality
Adjust the print quality according to the original to copy: Print quality
(quality-priority), Print quality
(standard), or Print quality
(speed-priority). The available print quality depends on the paper
selected in Media type.
Note
Settings such as the page size, media type, and print quality are retained, and these settings
will appear next time the copy mode is selected even if the power is turned off and on.
Some items cannot be specified in combination depending on the function.
You can specify the amount of extension in Extension amount under Device settings, when
Borderless copy is selected for the copy type.
(speed-quality) only when plain paper is
You can set the print quality to Print quality
selected for the media type.
If you select Print quality
(speed-priority) with the media type set to Plain paper and the
(standard) or Print quality
quality is not as good as expected, select Print quality
(quality-priority) and then try copying again.
When you make black & white copies by pressing the Black button, select Print quality
(quality-priority) for the print quality to render tones in range of gray (grayscale copy).
You can specify auto intensity. This function automatically adjusts the intensity of the original
on the Platen Glass. See Machine Settings .
Page top
Using Various Copy Functions
Page 25 of 681 pages
Advanced Guide
Troubleshooting
Contents > Copying > Using Various Copy Functions
Using Various Copy Functions
You can make the following copies if you specify the copy type or magnification on the settings screen in
the copy mode.
For details, refer to the on-screen manual: Advanced Guide .
Borderless copy
Frame erase
Fit-to-page copy
Page top
Printing with Template Print
Page 26 of 681 pages
Advanced Guide
Troubleshooting
Contents > Printing with Template Print
Printing with Template Print
You can print ruled lines or gilds on a paper and use it as a notebook or graph paper.
Printing a Notebook Paper
Printing in various layout
Page top
Printing a Notebook Paper
Page 27 of 681 pages
Advanced Guide
Troubleshooting
Contents > Printing with Template Print > Printing a Notebook Paper
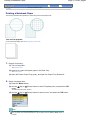
Printing a Notebook Paper
This section describes the operation to select and print the template forms.
You need to prepare:
A4 or Letter-sized paper. See Media Types You Can Use .
1.
Prepare for printing.
(1) Turn on the power.
See Operation Panel.
(2) Load A4 or Letter-sized plain paper in the Rear Tray.
See Loading Paper.
(3) Open the Paper Output Tray gently, and open the Output Tray Extension.
2.
Select a template form.
(1) Press the Menu button.
(2) Use the
button.
(Up) or
(Down) button to select Template print, and press the OK
The Select template screen appears.
(3) Use the
(Up) or
(Down) button to select a form, and press the OK button.
Note
For information on available templates forms, see Printing in various layout .
Only one sheet of the selected template form will be printed when the Color or Black button is
pressed.
Printing a Notebook Paper
3.
Page 28 of 681 pages
Start printing.
(1) Use the
(Up) or
(2) Use the
(Left) or
(Down) button to specify the number of copies to print.
(Right) button to specify the page size.
Note
You can only select A4 or 8.5"x11" (LTR) for the page size.
(3) Press the OK button.
The machine starts printing.
Note
You can also press the Color or Black button to start printing.
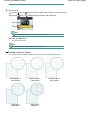
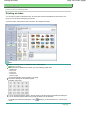
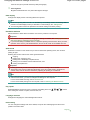
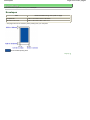
Printing in various layout
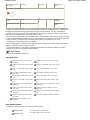
This section shows the template forms you can select on the Select template screen.
Notebook paper 1
8 mm spacing
Notebook paper 2
7 mm spacing
Graph paper 1
Graph 5 mm
Graph paper 2
Graph 3 mm
Notebook paper 3
6 mm spacing
Printing a Notebook Paper
Checklist
Page 29 of 681 pages
Staff paper
Page top
Scanning
Page 30 of 681 pages
Advanced Guide
Troubleshooting
Contents > Scanning
Scanning
You can send scanned data to your computer, edit or process them with the supplied software
application, then save them. You can also save scanned data on a USB flash drive or memory card
inserted into the machine.
Saving Scanned Data
Saving Scanned Data on the USB Flash Drive
Inserting the USB Flash Drive
Removing the USB Flash Drive
Page top
Saving Scanned Data
Page 31 of 681 pages
Advanced Guide
Troubleshooting
Contents > Scanning > Saving Scanned Data
Saving Scanned Data
You can save the scanned documents or photos on a USB flash drive, a memory card, or a computer
using the Operation Panel on the machine. You can also scan originals using your computer.
This section describes the operation to scan documents and save them on the USB flash drive in PDF
data.
For other operations, refer to the on-screen manual: Advanced Guide . You can find the detailed
procedures to correct scanned images or print them with various settings.
Important
We recommend that you make a backup of the data on the USB flash drive or memory card
regularly and save it on other storage media, in case of accidental loss.
Please note that Canon shall not be liable for any damage or loss of the data for any reason
whatsoever, even within the warranty period of the machine.
Saving Scanned Data on the USB Flash Drive
1.
Prepare for scanning.
(1) Turn on the power.
See Operation Panel.
(2) Insert a USB flash drive into the Direct Print Port.
See Inserting the USB Flash Drive .
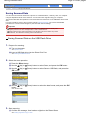
2.
Select the scan operation.
(1) Press the Menu button.
(2) Use the
(Up) or
(3) Use the (Up) or
OK button.
(4) Use the
button.
(Up) or
(Down) button to select Scan, and press the OK button.
(Down) button to select Save to USB flash, and press the
(Down) button to select the data format, and press the OK
Here we select PDF.
3.
Start scanning.
(1) Confirm the message, then load an original on the Platen Glass.
See Loading Originals to Copy or Scan .
Saving Scanned Data
Page 32 of 681 pages
Note
The size of original that can be scanned is either A4 or 8.5" x 11" (LTR) depending on the
country or region of purchase.
(2) Press the OK button.
The machine start scanning.
The message "Continue to scan?" appears after scanning procedure is completed. Follow the next step
below.
Important
Do not open the Document Cover or move the loaded original until scanning is completed.
Do not remove the USB flash drive or turn off the power while the machine is operating.
The scanned data will be saved in the folder "CANON_SC" on the USB flash drive. You cannot
print the saved data using the Operation Panel on the machine.
(3) Use the
(Up) or
(Down) button to select End, and press the OK button.
The scanned data will be saved on the USB flash drive in PDF data.
Remove the original on the Platen Glass after scanning is completed.
Note
To scan multiple pages of the originals, select Continue and press the OK button, and then
press the OK button again after loading the next original on the Platen Glass. Repeat the
procedures until you finish scanning all originals.
When you save the scanned data in PDF data, up to 100 pages can be saved in one file.
To remove the USB flash drive after scanning is completed, see Removing the USB Flash Drive
.
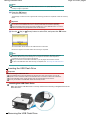
Inserting the USB Flash Drive
Important
Before inserting the USB flash drive
If your USB flash drive cannot be inserted into the Direct Print Port of the machine, you may be
required to use an extension cable for the USB flash drive. Purchase it at electronics retail stores.
For some USB flash drives, proper operation may not be guaranteed on the machine.
You may not be able to use USB flash drives with security function.
Inserting the USB Flash Drive
Make sure that the USB flash drive is correctly oriented before inserting it straightforward into the
Direct Print Port.
Removing the USB Flash Drive
Saving Scanned Data
1.
Page 33 of 681 pages
Make sure that the machine is not reading or writing data from/to the USB flash
drive.
Check if the reading or writing operation is completed on the LCD.
Important
Do not remove the USB flash drive or turn off the power while the machine is operating.
Note
If you use the USB flash drive with the access lamp, refer to the instruction manual supplied
with the USB flash drive to check if the reading or writing operation is completed on the USB
flash drive.
2.
Remove the USB flash drive.
Hold the USB flash drive and remove it from the machine straightforward.
Page top
Printing from Your Computer
Page 34 of 681 pages
Advanced Guide
Troubleshooting
Contents > Printing from Your Computer
Printing from Your Computer
This section describes how to print documents or photos with a computer.
You can easily print photos taken with your digital camera by using Easy-PhotoPrint EX supplied with
your machine.
Printing Photos (Easy-PhotoPrint EX)
Using Various Functions of Easy-PhotoPrint EX
Printing Documents (Windows)
Printing Documents (Macintosh)
For Mac OS X v.10.5.x
For Mac OS X v.10.4.x or Mac OS X v.10.3.9
Page top
Printing Photos (Easy-PhotoPrint EX)
Page 35 of 681 pages
Advanced Guide
Troubleshooting
Contents > Printing from Your Computer > Printing Photos (Easy-PhotoPrint EX)
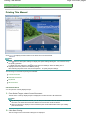
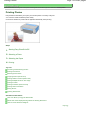
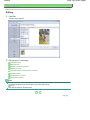
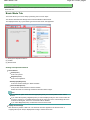
Printing Photos (Easy-PhotoPrint EX)
Print image data saved on your computer by using Easy-PhotoPrint EX supplied with your machine.
This section describes the procedure, using print setting for borderless photo print on 4" x 6" / 10 x 15 cm
photo paper as a sample.
For details on Easy-PhotoPrint EX, refer to the on-screen manual: Advanced Guide .
Note
The screens used in this section are for printing with Windows. The operations are also the same
for printing with Macintosh.
Install Easy-PhotoPrint EX from the Setup CD-ROM when it has not been installed or has been
uninstalled. To install Easy-PhotoPrint EX, select Easy-PhotoPrint EX in Custom Install.
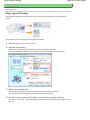
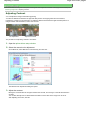
1.
Prepare for printing.
(1) Make sure that the machine is turned on.
See Operation Panel.
(2) Load paper.
See Loading Paper.
Here we load 4" x 6" / 10 x 15 cm photo paper in the Rear Tray.
2.
Open the Paper Output Tray gently, and open the Output Tray Extension.
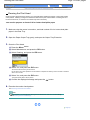
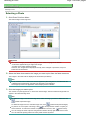
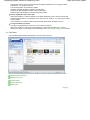
3.
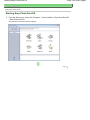
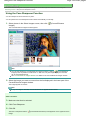
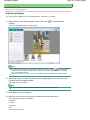
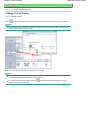
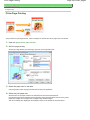
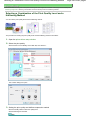
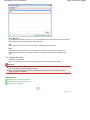
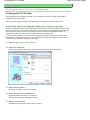
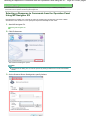
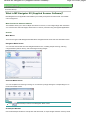
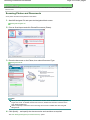
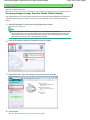
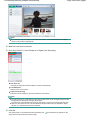
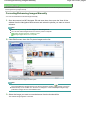
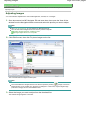
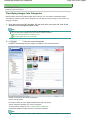
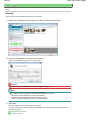
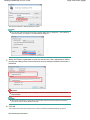
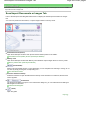
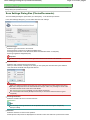
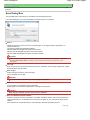
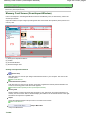
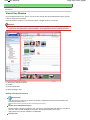
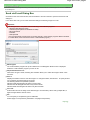
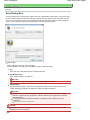
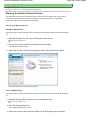
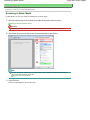
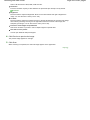
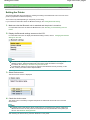
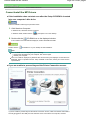
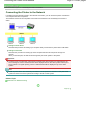
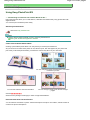
Start Easy-PhotoPrint EX, and select Photo Print.
(1) Start Easy-PhotoPrint EX.
Double-click
(Easy-PhotoPrint EX) on the desktop.
Printing Photos (Easy-PhotoPrint EX)
Page 36 of 681 pages
Click Here: Easy-PhotoPrint EX
Select the Go menu, Applications, Canon Utilities, Easy-PhotoPrint EX, then double-click EasyPhotoPrint EX.
Note
To start Easy-PhotoPrint EX from Solution Menu, double-click
(Solution Menu) on the
desktop and click
(Print photos or albums, etc.).
See To Start Solution Menu.
To start Easy-PhotoPrint EX from the Start menu, select All Programs (Programs in
Windows 2000), Canon Utilities, Easy-PhotoPrint EX, then Easy-PhotoPrint EX.
To start Easy-PhotoPrint EX from Solution Menu, click
(Solution Menu) in the Dock and
click
(Print photos or albums, etc.).
See To Start Solution Menu.
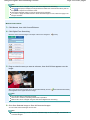
(2) Click Photo Print.
Note
You can select Album, Calendar, Stickers, etc., besides Photo Print.
See Using Various Functions of Easy-PhotoPrint EX .
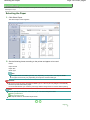
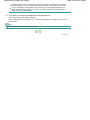
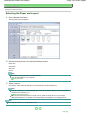
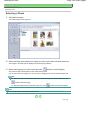
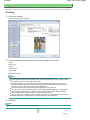
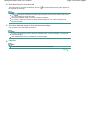
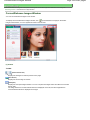
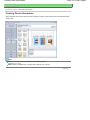
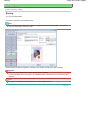
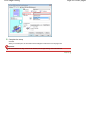
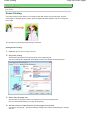
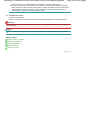
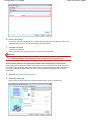
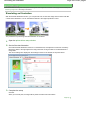
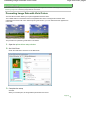
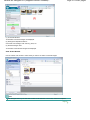
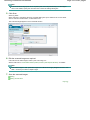
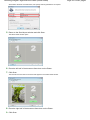
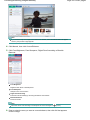
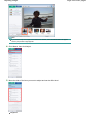
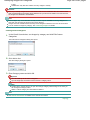
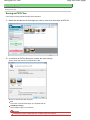
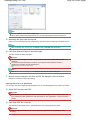
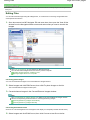
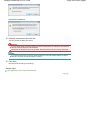
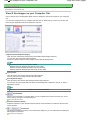
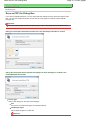
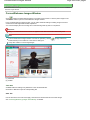
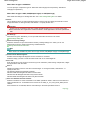
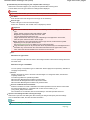
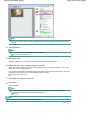
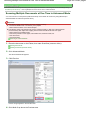
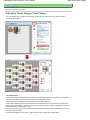
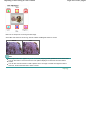
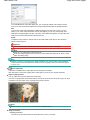
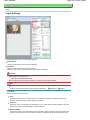
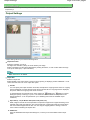
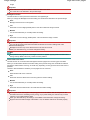
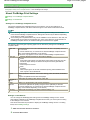
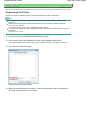
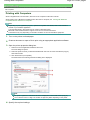
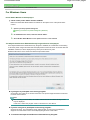
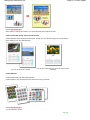
4.
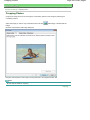
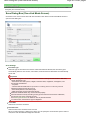
Select a photo to print.
(1) Select the folder in which images are saved.
(2) Click the image to print.
The number of copies appears as "1", and the image you selected appears in the selected image area (A).
You can select two or more images at the same time.
Note
To print two or more copies, click
(Up arrow) to change the number of copies.
To cancel the selection, click the image to cancel in the selected image area and click
(Delete Imported Image). You can also use
(Down arrow) to change the number of
copies to zero.
You can also correct or enhance the selected image.
See Using Various Functions of Easy-PhotoPrint EX .
(3) Click Select Paper.
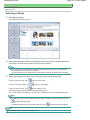
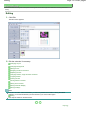
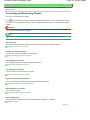
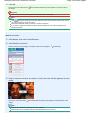
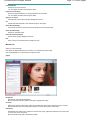
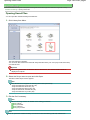
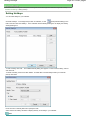
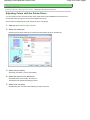
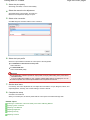
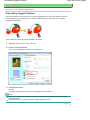
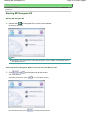
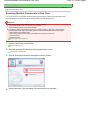
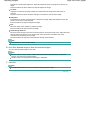
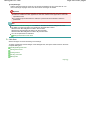
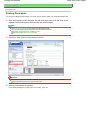
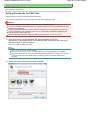
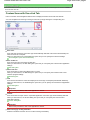
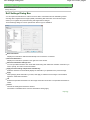
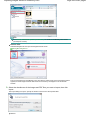
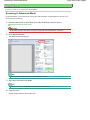
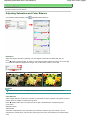
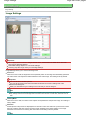
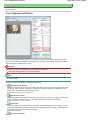
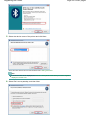
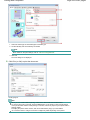
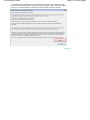
5.
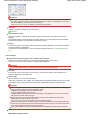
Select the loaded paper.
Printing Photos (Easy-PhotoPrint EX)
Page 37 of 681 pages
(1) Make sure that your machine's name is selected in Printer.
(2) Select the loaded paper in Paper Size and Media Type.
Here we select 4"x6" 10x15cm in Paper Size and the type of loaded photo paper in Media Type.
Note
If you select the wrong media type, the machine may not print with the proper print quality.
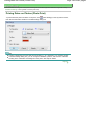
(3) Click Layout/Print.
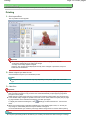
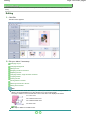
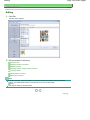
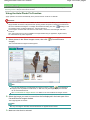
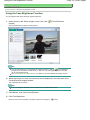
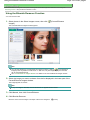
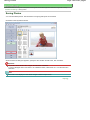
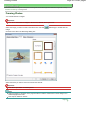
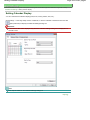
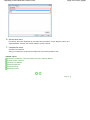
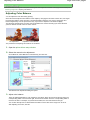
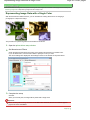
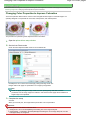
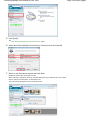
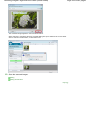
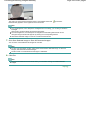
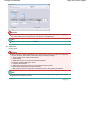
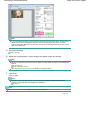
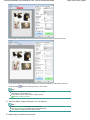
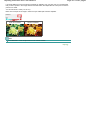
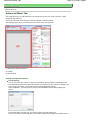
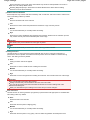
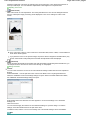
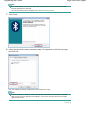
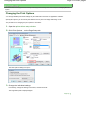
6.
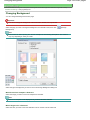
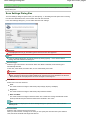
Select a layout and start printing.
(1) Select the layout of the photo.
Here we select Borderless [full].
The preview appears in the selected layout for confirmation of the required print result.
Note
You can change the direction of photo or crop a part of photo (trimming) to print.
For details on the operation, refer to the on-screen manual: Advanced Guide.
(2) Click Print.
Note
To cancel a print job in progress, press the Stop button on the machine or click Cancel Printing on
the printer status monitor.
To display the printer status monitor, click Canon XXX Printer (where " XXX" is your machine's
name) on the taskbar.
Click the printer icon in the Dock to display the list of print jobs in progress.
To cancel a print job in progress, select the desired job in the Name list and click Delete.
Page top
Using Various Functions of Easy-PhotoPrint EX
Page 38 of 681 pages
Advanced Guide
Troubleshooting
Contents > Printing from Your Computer > Printing Photos (Easy-PhotoPrint EX) > Using Various Functions of EasyPhotoPrint EX
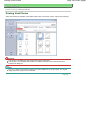
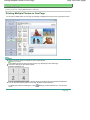
Using Various Functions of Easy-PhotoPrint EX
This section describes a few of the useful functions of Easy-PhotoPrint EX.
For details on the operation, refer to the on-screen manual: Advanced Guide .
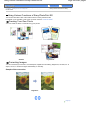
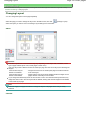
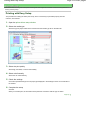
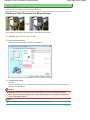
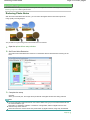
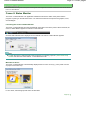
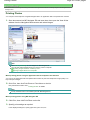
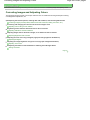
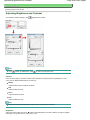
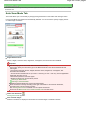
Creating Your Own Prints
You can create an album or calendar using your photos.
Album
Calendar
Stickers
Layout Print
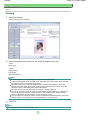
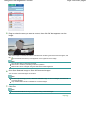
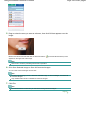
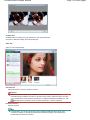
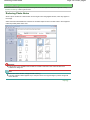
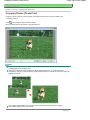
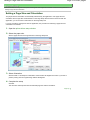
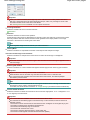
Correcting Images
You can use Red-Eye Correction, Face Sharpener, Digital Face Smoothing, Brightness, Contrast, etc. to
adjust, correct, or enhance images automatically or manually.
Sample of the correction
Brightness
Page top
Printing Documents (Windows)
Page 39 of 681 pages
Advanced Guide
Troubleshooting
Contents > Printing from Your Computer > Printing Documents (Windows)
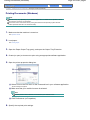
Printing Documents (Windows)
Note
Operations may vary depending on your software application. For details on the operation, refer to
the instruction manual of your application.
The screens used in this section are for printing with Windows Vista operating system Ultimate
Edition (hereafter referred to as "Windows Vista").
1.
Make sure that the machine is turned on.
See Operation Panel.
2.
Load paper.
See Loading Paper.
3.
Open the Paper Output Tray gently, and open the Output Tray Extension.
4.
Create (or open) a document to print using an appropriate software application.
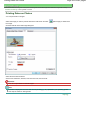
5.
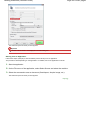
Open the printer properties dialog box.
(1) Select Print on the File menu or the command bar in your software application.
The Print dialog box appears.
(2) Make sure that your machine's name is selected.
Note
If another printer's name is selected, click and select your machine's name.
(3) Click Preferences (or Properties).
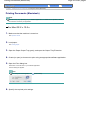
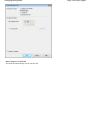
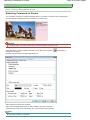
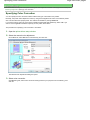
6.
Specify the required print settings.
Printing Documents (Windows)
(1) Select the media type of the loaded paper in Media Type.
Note
If you select the wrong media type, the machine may not print with the proper print quality.
(2) Specify the print quality, etc. in Print Quality and Color/Intensity as required.
Note
For details on the print settings, refer to the on-screen manual: Advanced Guide.
(3) Click OK.
Note
To confirm the page size, click the Page Setup tab. If the setting does not match the
document's page size already set in the software application, you need to reset the page size,
or otherwise use Scaled Printing or Fit-to-Page Printing.
For details, refer to the on-screen manual: Advanced Guide.
For details on the printer driver functions, click Help or Instructions to view the online help or
the on-screen manual: Advanced Guide. The Instructions button appears on the Main and
Maintenance sheets if the on-screen manual is installed on your computer.
To display the preview to confirm the print result, select the Preview before printing check box
on the Main sheet. Some software applications may not have a preview function.
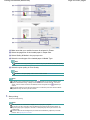
7.
Start printing.
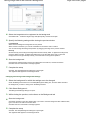
Click Print (or OK) to start printing.
Note
The message on how to load envelopes will appear when printing on them.
This message will not appear next time if you select the Do not show this message again.
check box.
To cancel a print job in progress, press the Stop button on the machine or click Cancel Printing
on the printer status monitor.
To display the printer status monitor, click Canon XXX Printer (where " XXX" is your machine's
name) on the taskbar.
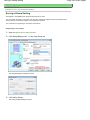
If printed ruled lines are misaligned or print results are unsatisfactory, adjust the print head
Page 40 of 681 pages
Printing Documents (Windows)
Page 41 of 681 pages
position. See Aligning the Print Head.
Page top
Printing Documents (Macintosh)
Page 42 of 681 pages
Advanced Guide
Troubleshooting
Contents > Printing from Your Computer > Printing Documents (Macintosh)
Printing Documents (Macintosh)
Note
Operations may vary depending on your software application. For details on the operation, refer to
the instruction manual of your application.
For Mac OS X v.10.5.x
1.
Make sure that the machine is turned on.
See Operation Panel.
2.
Load paper.
See Loading Paper.
3.
Open the Paper Output Tray gently, and open the Output Tray Extension.
4.
Create (or open) a document to print using an appropriate software application.
5.
Open the Print dialog box.
Select Print on the File menu in your software application.
The Print dialog box appears.
Note
If the dialog box below appears, click
6.
Specify the required print settings.
(Down arrow).
Printing Documents (Macintosh)
(1) Make sure that your machine's name is selected in Printer.
(2) Select the page size of the loaded paper in Paper Size.
(3) Select Quality & Media in the pop-up menu.
(4) Select the media type of the loaded paper in Media Type.
Note
If you select the wrong media type, the machine may not print with the proper print quality.
(5) Select the print quality in Print Quality.
Note
For details on the print quality, refer to the on-screen manual: Advanced Guide.
Note
(Question) on the Quality & Media, Color
For details on the printer driver functions, click
Options, Borderless Printing, or Margin screen to view the on-screen manual: Advanced
Guide. If the on-screen manual is not installed, it does not appear even if
(Question) is
clicked.
The preview appears on the left of the dialog box to confirm the print result. Some software
applications may not have a preview function.
7.
Start printing.
Click Print to start printing.
Note
Click the printer icon in the Dock to display the list of print jobs in progress.
To cancel a print job in progress, select the desired job in the Name list and click Delete. To
temporarily stop a job in progress, click Hold. To temporarily stop all the jobs in the list, click
Pause Printer.
If printed ruled lines are misaligned or print results are unsatisfactory, adjust the print head
position. See Aligning the Print Head.
Page 43 of 681 pages
Printing Documents (Macintosh)
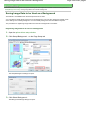
For Mac OS X v.10.4.x or Mac OS X v.10.3.9
Note
The screens used in this section are for printing in Mac OS X v.10.4.x.
1.
Make sure that the machine is turned on.
See Operation Panel.
2.
Load paper.
See Loading Paper.
3.
Open the Paper Output Tray gently, and open the Output Tray Extension.
4.
Create (or open) a document to print using an appropriate software application.
5.
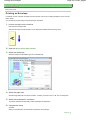
Specify the page size.
(1) Select Page Setup on the File menu in your software application.
The Page Setup dialog box appears.
(2) Make sure that your machine's name is selected in Format for.
(3) Select the page size of the loaded paper in Paper Size.
(4) Click OK.
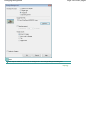
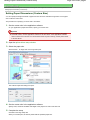
6.
Specify the required print settings.
(1) Select Print on the File menu in your software application.
The Print dialog box appears.
(2) Make sure that your machine's name is selected in Printer.
(3) Select Quality & Media in the pop-up menu.
(4) Select the media type of the loaded paper in Media Type.
Page 44 of 681 pages
Printing Documents (Macintosh)
Page 45 of 681 pages
Note
If you select the wrong media type, the machine may not print with the proper print quality.
(5) Select the print quality in Print Quality.
Note
For details on the print quality, refer to the on-screen manual: Advanced Guide.
Note
(Question) on the Quality & Media, Color
For details on the printer driver functions, click
Options, Special Effects, Borderless Printing, or Margin screen to view the on-screen manual:
Advanced Guide. If the on-screen manual is not installed, it does not appear even if
(Question) is clicked.
To display the preview to confirm the print result, click Preview. Some software applications
may not have a preview function.
7.
Start printing.
Click Print to start printing.
Note
Click the printer icon in the Dock to display the list of print jobs in progress.
To cancel a print job in progress, select the desired job in the Name list and click Delete. To
temporarily stop a job in progress, click Hold. To temporarily stop all the jobs in the list, click
Stop Jobs.
If printed ruled lines are misaligned or print results are unsatisfactory, adjust the print head
position. See Aligning the Print Head.
Page top
Other Usages
Page 46 of 681 pages
Advanced Guide
Troubleshooting
Contents > Other Usages
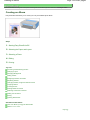
Other Usages
This section describes the function to print photos from your PictBridge compliant device such as a
digital camera connected with a USB cable or to print with wireless communication from mobile phones
compatible with Bluetooth communication, and the useful function to start supplied software
applications.
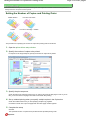
Printing Photos Directly from Your Digital Camera or Mobile Phone
Printing Photos from a PictBridge Compliant Device
Printing Photos from a Wireless Communication Device
Machine Settings
Solution Menu and My Printer
Page top
Printing Photos Directly from Your Digital Camera or Mobile Phone
Advanced Guide
Page 47 of 681 pages
Troubleshooting
Contents > Other Usages > Printing Photos Directly from Your Digital Camera or Mobile Phone
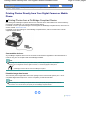
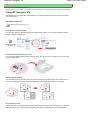
Printing Photos Directly from Your Digital Camera or Mobile
Phone
Printing Photos from a PictBridge Compliant Device
Connecting the PictBridge compliant device to this machine with a USB cable that is recommended by
the device's manufacturer, you can print saved images directly.
For details on how to print saved images connecting with the PictBridge compliant device, refer to the onscreen manual: Advanced Guide .
For details on the print settings on the PictBridge compliant device, refer to the instruction manual
supplied with the device.
Connectable devices:
Any PictBridge compliant device can be connected to this machine regardless of the manufacturer or
model as long as it is compliant with the PictBridge standard.
Note
PictBridge is the standard to print your photos directly without using a computer, connecting a
device such as a digital still camera, digital camcorder, or camera-equipped mobile phone.
(PictBridge) A device with this mark is PictBridge compliant.
Printable image data format:
This machine prints images taken with a DCF (Design rule for Camera File system) ver. 1.0/2.0compatible digital camera (Exif ver. 2.2/2.21 compliant), as well as PNG files.
Note
When printing from a PictBridge compliant device, set the print quality using the Operation Panel on
the machine. You cannot set the print quality on the PictBridge compliant device.
Page top
Printing Photos from a Wireless Communication Device
Page 48 of 681 pages
Advanced Guide
Troubleshooting
Contents > Other Usages > Printing Photos Directly from Your Digital Camera or Mobile Phone > Printing Photos from a
Wireless Communication Device
Printing Photos from a Wireless Communication Device
If the optional Bluetooth Unit BU-30 is connected to the machine, you can print image data with wireless
communication from Bluetooth compatible mobile phones or computers.
For details on how to print via Bluetooth communication, refer to the on-screen manual: Advanced Guide .
Page top
Machine Settings
Page 49 of 681 pages
Advanced Guide
Troubleshooting
Contents > Other Usages > Machine Settings
Machine Settings
This section describes the items you can set or change in Device settings of the Top menu screen. For
details on setting or changing, refer to the on-screen manual: Advanced Guide .
Copy auto intensity
Automatically adjusts the intensity according to the original on the Platen Glass.
Prevent abrasion
Use this setting only when the print surface becomes smudged.
Extension amount
Selects the extension amount of image to the edge of paper when making borderless copies.
Mobile phone setting
Specifies paper, layout, etc. when you print from the wireless communication device.
This setting appears only when the optional Bluetooth Unit is connected to the machine.
Bluetooth settings
Changes the Bluetooth settings, such as the device name or pass key.
This setting appears only when the optional Bluetooth Unit is connected to the machine.
PictBridge settings
Specifies paper, layout, etc. when you print from the PictBridge compliant device.
Date display
Selects the display format of the date the photos were taken when Date printing is used.
Read/write attribute
Selects whether to use the Card Slot of the machine as a memory card drive of a computer.
Quiet mode
Enables this function if you want to reduce the operating noise of the machine, such as when using
the machine at night (when copying, printing from the memory card, printing from the PictBridge
compliant device, or printing wirelessly).
Key repeat
, ,
Enables/disables continuous input of numerical values by pressing and holding down the
(Left), or
(Right) button. When this setting is disabled, holding down the button is the same as
pressing it once.
Language selection
Changes the language for LCD messages and menus.
Reset setting
Sets the machine settings back to the default, except for the LCD language and the adjustment
values of the print head position.
Page top
Solution Menu and My Printer
Page 50 of 681 pages
Advanced Guide
Troubleshooting
Contents > Other Usages > Solution Menu and My Printer
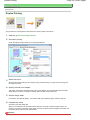
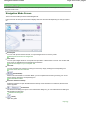
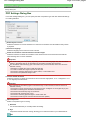
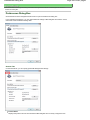
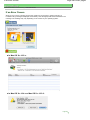
Solution Menu and My Printer
Using Solution Menu or My Printer (Window only), you can easily get the information on the machine or
change the print settings by only clicking buttons on a screen.
With Solution Menu, you can start the software applications supplied with the machine or display the
operating instructions. It also provides you with the information on troubleshooting.
With My Printer, you can display the printer properties dialog box of the printer driver. It also provides you
with the information on how to take an action when you have trouble with the operation. My Printer is not
available in Macintosh.
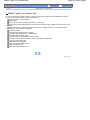
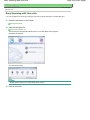
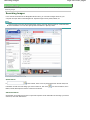
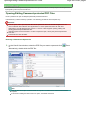
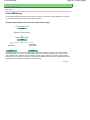
To Start Solution Menu
Double-click
(Solution Menu) on the desktop.
Click Here: Solution Menu
Click
(Solution Menu) in the Dock.
* The screens below are for Windows Vista.
Click the button of a function to use.
After starting Solution Menu, click
(Window size: small) on the title bar to reduce the window size.
Note
Install Solution Menu from the Setup CD-ROM when it has not been installed or has been
uninstalled. To install Solution Menu, select Solution Menu in Custom Install.
The buttons displayed on the screen may vary depending on the country or region of purchase.
To start Solution Menu from the Start menu, select All Programs (Programs in Windows 2000),
Canon Utilities, Solution Menu, then Solution Menu.
To start Solution Menu from the menu bar, select the Go menu, Applications, Canon Utilities, Solution
Menu, then double-click Solution Menu.
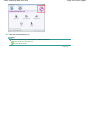
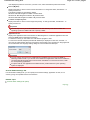
To Start My Printer
Double-click
(My Printer) on the desktop.
Solution Menu and My Printer
Page 51 of 681 pages
Note
You can also start My Printer from Solution Menu.
Install My Printer from the Setup CD-ROM when it has not been installed or has been uninstalled. To
install My Printer, select My Printer in Custom Install.
To start My Printer from the Start menu, select All Programs (Programs in Windows 2000), Canon
Utilities, My Printer, then My Printer.
Page top
Loading Paper / Originals
Page 52 of 681 pages
Advanced Guide
Troubleshooting
Contents > Loading Paper / Originals
Loading Paper / Originals
This section describes types of paper or originals you can load, how to load printing paper in the Rear
Tray, and how to load originals to copy or scan.
Loading Paper
Media Types You Can Use
Media Types You Cannot Use
Loading Paper
Loading Envelopes
Loading Originals to Copy or Scan
Originals You Can Load
Loading Originals
Page top
Loading Paper
Page 53 of 681 pages
Advanced Guide
Troubleshooting
Contents > Loading Paper / Originals > Loading Paper
Loading Paper
Media Types You Can Use
Choose paper suitable for printing, for the best print results. Canon provides you various types of paper
to enhance the fun of printing, such as stickers as well as papers for photo or document. We
recommend the use of Canon genuine paper for printing your important photos.
Media Types
Commercially available papers
Rear Tray
Paper Load
Limit
Name of Paper
<Model No.> *1
Settings in Media Type
Paper Output
Tray
Load Limit
Printer
Driver
Operation
Panel
Plain Paper (Recycled
paper)*2
Approx. 100
sheets
Approx. 50 sheets Plain paper
Envelopes *3
10 envelopes
*5
Plain Paper
Envelope
-
Canon genuine papers
Name of Paper
<Model No.> *1
Rear Tray
Paper Load Limit
Paper
Output
Tray
Load Limit
Settings in Media Type
Operation
Panel
Printer Driver
For printing documents:
Approx. 80 sheets
Approx. 50
sheets
Plain paper
Plain Paper
A4, Letter / 8.5" x 11", 5" x 7" /
13 x 18 cm, and 8" x 10" / 20 x
25 cm: 10 sheets
*5
Pro Platinum
Platinum <PT-101> *4
Photo Paper Pro
Platinum
Photo Paper Pro II <PR-
4" x 6" / 10 x 15 cm: 20 sheets
Pro II
Photo Paper Pro
Super White Paper <
SW-201>
For printing photos:
Photo Paper Pro
II
201>*4
Glossy Photo Paper
"Everyday Use" <GP-
Glossy
Glossy Photo
Paper
Glossy
Glossy Photo
Paper
501>*4
Photo Paper Glossy <
GP-502>*4
Photo Paper Plus
Glossy II <PP- 201>*4
Plus Glossy II Photo Paper
Plus Glossy II
Photo Paper Plus Semigloss <SG-201> *4
Plus Semi-
Matte Photo Paper <MP
-101>
Matte
For printing business documents:
gloss
Photo Paper
Plus Semi-gloss
Matte Photo
Paper
Loading Paper
High Resolution Paper
Page 54 of 681 pages
80 sheets
50 sheets
-
High Resolution
Paper
*5
-
T-Shirt
<HR-101N> *3
For creating your own prints:
T-Shirt Transfers <TR301>*3
1 sheet
Transfers
Photo Stickers <PS-101 1 sheet
>*3
Glossy Photo
Paper
*1 Paper with a Model Number is Canon genuine paper. Refer to the instruction manual supplied with
the paper for detailed information on the printable side and notes on handling paper. For information on
the page sizes available for each Canon genuine paper, visit our website. You may not be able to
purchase some Canon genuine papers depending on the country or region of purchase. Paper is not
sold in the US by Model Number. Purchase paper by name.
*2 Proper feeding of paper may not be possible at the maximum capacity depending on the type of paper
or environmental conditions (either very high or low temperature or humidity). In such cases, reduce the
number of paper you load at a time to less than half (100% recycled paper can be used).
*3 Available only when printing from your computer.
*4 When loading paper in stacks, the print side may become marked as it is fed or paper may not feed
properly. In this case, load one sheet at a time.
*5 We recommend that you remove the previously printed sheet from the Paper Output Tray before
continuously printing to avoid blurs and discoloration.
Page Sizes
You can use the following page sizes.
Standard sizes:
Letter (8.50 x 11.00 inches / 215.9 x
279.4 mm)
Legal (8.50 x 14.00 inches / 215.9 x 355.6
A5 (5.83 x 8.27 inches / 148.0 x 210.0
A4 (8.27 x 11.69 inches / 210.0 x 297.0 mm)
mm)
mm)
B5 (7.17 x 10.12 inches / 182.0 x 257.0
4" x 6" (4.00 x 6.00 inches / 10 x 15 cm)
mm)
4" x 8" (4.00 x 8.00 inches / 101.6 x
203.2 mm)
5" x 7" (5.00 x 7.00 inches / 13 x 18 cm)
8" x 10" (8.00 x 10.00 inches / 20 x 25
cm)
L (3.50 x 5.00 inches / 89.0 x 127.0 mm)
2L (5.00 x 7.01 inches / 127.0 x 178.0
Hagaki (3.94 x 5.83 inches / 100.0 x 148.0
mm)
mm)
Hagaki 2 (7.87 x 5.83 inches / 200.0 x
148.0 mm)
Comm. Env. #10 (4.12 x 9.50 inches / 104.6
x 241.3 mm)
DL Env. (4.33 x 8.66 inches / 110.0 x
220.0 mm)
Choukei 3 (4.72 x 9.25 inches / 120.0 x
235.0 mm)
Choukei 4 (3.54 x 8.07 inches / 90.0 x
205.0 mm)
Youkei 4 (4.13 x 9.25 inches / 105.0 x 235.0
Youkei 6 (3.86 x 7.48 inches / 98.0 x
Card (2.16 x 3.58 inches / 55.0 x 91.0 mm)
mm)
190.0 mm)
Wide (4.00 x 7.10 inches / 101.6 x
180.6 mm)
Non-standard sizes:
You can also specify a custom size within the following range.
Minimum size:
2.17 x 3.58 inches / 55.0 x 91.0 mm
Maximum size:
8.5 x 26.61 inches / 215.9 x 676.0 mm
Loading Paper
Page 55 of 681 pages
Paper Weight
17 to 28 lb / 64 to 105 gsm (plain paper except for Canon genuine paper)
Do not use heavier or lighter paper (except for Canon genuine paper), as it could jam in the machine.
Notes on Storing Paper
Take out only the necessary number of paper from the package, just before printing.
To avoid curling, when you do not print, put unused paper back into the package and keep it on a
level surface. And also, store it avoiding heat, humidity, and direct sunlight.
Page top
Media Types You Cannot Use
Page 56 of 681 pages
Advanced Guide
Troubleshooting
Contents > Loading Paper / Originals > Loading Paper > Media Types You Cannot Use
Media Types You Cannot Use
Do not use the following types of paper. Using such paper will not only produce unsatisfactory results,
but can also cause the machine to jam or malfunction.
Folded, curled, or wrinkled paper
Damp paper
Paper that is too thin (weighing less than 17 lb / 64 gsm)
Paper that is too thick (plain paper, except for Canon genuine paper, weighing more than 28 lb / 105
gsm)
Paper thinner than a postcard, including plain paper or notepad paper cut to a small size (when
printing on A5 or smaller sized paper)
Picture postcards
Postcards affixed with photos or stickers
Envelopes with a double flap (or sticker flaps)
Envelopes with pressure seals
Envelopes with an embossed or treated surface
Envelopes whose gummed flaps are already moistened and adhesive
Any type of paper with holes
Paper that is not rectangular
Paper bound with staples or glue
Paper with adhesives
Paper decorated with glitter, etc.
Page top
Loading Paper
Page 57 of 681 pages
Advanced Guide
Troubleshooting
Contents > Loading Paper / Originals > Loading Paper > Loading Paper
Loading Paper
Important
If you cut plain paper into small size such as 4" x 6" / 10 x 15 cm, 4" X 8" / 101.6 x 203.2 mm, 5" x 7"
/ 13 x 18 cm, or 2.16" x 3.58" / 55.0 x 91.0 mm (Card size) to perform trial print, it can cause paper
jams.
Note
We recommend Canon genuine photo paper for printing photos.
For details on the Canon genuine paper, see Media Types You Can Use .
You can use general copy paper. When printing on both sides, we recommend Canon's Super
White Paper.
For the page size and paper weight you can use for this machine, see Media Types You Can Use .
1.
Flatten the four corners of paper before loading it.
Note
Align the edges of paper neatly before loading. Loading paper without aligning the edges may
cause paper jams.
If paper is curled, hold the curled corners and gently bend them in the opposite direction until
the paper becomes completely flat.
For details on how to flatten curled paper, refer to the " Troubleshooting " in the on-screen
manual: Advanced Guide.
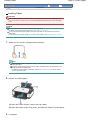
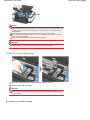
2.
Prepare for loading paper.
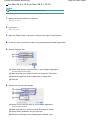
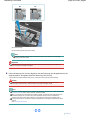
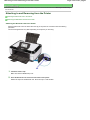
(1) Open the Paper Support, raise it, then tip it back.
(2) Open the Paper Output Tray gently, and open the Output Tray Extension.
3.
Load paper.
Loading Paper
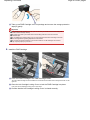
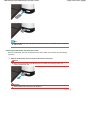
(1) Slide the Paper Guides to open them, and load the paper in the center of the
Rear Tray WITH THE PRINT SIDE FACING YOU.
Important
Always load paper in the portrait orientation (A). Loading paper in the landscape
orientation (B) can cause paper jams.
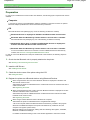
(2) Slide the Paper Guides to align them with both sides of the paper stack.
Do not slide the Paper Guides too hard. The paper may not be fed properly.
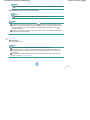
Note
Do not load higher than the Load Limit Mark (A).
The machine may make operating noise when feeding paper.
Note
After loading paper
When copying or printing without using a computer, select the size and type of the loaded
paper in Page size and Media type of the print settings in each menu screen. See Setting Items
in "Printing Photos Saved on the Memory Card" and Setting Items in "Copying Documents".
When printing with a computer, select the size and type of the loaded paper in Page Size (or
Paper Size) and Media Type in the printer driver. See Printing Documents (Windows) or
Printing Documents (Macintosh) .
Page 58 of 681 pages
Loading Paper
Page 59 of 681 pages
Page top
Loading Envelopes
Page 60 of 681 pages
Advanced Guide
Troubleshooting
Contents > Loading Paper / Originals > Loading Paper > Loading Envelopes
Loading Envelopes
You can print on European DL and US Comm. Env. #10-sized envelopes.
The address is automatically rotated and printed according to the envelope's direction by specifying with
the printer driver properly.
Important
You can only print on envelopes with the computer.
You cannot use the following envelopes.
- Envelopes with an embossed or treated surface
- Envelopes with a double flap (or sticker flaps)
- Envelopes with pressure seals
- Envelopes whose gummed flaps are already moistened and adhesive
Note
In Windows, the message on how to load envelopes will appear when printing on them.
This message will not appear next time if you select the Do not show this message again. check
box.
1.
Prepare envelopes.
Press down on all four corners and edges of the envelopes to flatten them.
If the envelopes are curled, hold the opposite corners and gently twist them in the
opposite direction.
If the corner of the envelope flap is folded, flatten it.
Use a pen to press the leading edge in the inserting direction flat and sharpen the
crease.
The figures above show a side view of the leading edge of the envelope.
Important
The envelopes may jam in the machine if they are not flat or the edges are not aligned. Make
sure that no curl or puff exceeds 0.1 inches / 3 mm.
2.
Load envelopes.
Loading Envelopes
Page 61 of 681 pages
(A) Rear side
(B) Address side
(1) Open the Paper Support.
(2) Open the Paper Output Tray gently, and open the Output Tray Extension.
(3) Slide the Paper Guides to open them, and load the envelopes in the center of the
Rear Tray WITH THE ADDRESS SIDE FACING YOU.
The folded flap of the envelope will be faced down on the left side.
Up to 10 envelopes can be loaded at once.
(4) Slide the Paper Guides to align them with both sides of the envelopes.
Do not slide the Paper Guides too hard. The envelopes may not be fed properly.
3.
Specify the settings in the printer driver.
(1) Select Envelope in Media Type.
(2) Select the size for envelopes.
Select DL Env. or Comm. Env. #10 in Page Size.
Select DL Envelope or #10 Envelope in Paper Size.
(3) Select Landscape in Orientation.
Important
If you do not specify Page Size (or Paper Size) or Orientation properly, the address will be
printed upside down or will be turned to 90 degrees.
Note
The machine may make operating noise when feeding envelopes.
In Windows, if the print result is upside down, select Rotate 180 degrees on the Page Setup
sheet in the printer properties dialog box of the printer driver.
Loading Envelopes
Page 62 of 681 pages
Page top
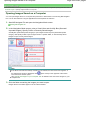
Loading Originals to Copy or Scan
Page 63 of 681 pages
Advanced Guide
Troubleshooting
Contents > Loading Paper / Originals > Loading Originals to Copy or Scan
Loading Originals to Copy or Scan
This section describes how to load an original on the Platen Glass.
Important
After loading the original, be sure to close the Document Cover before starting to copy or scan.
When scanning from a computer using a software application or saving the scanned data by
selecting Save to PC in the Scan menu using the Operation Panel on the machine, you need to load
originals in a different way. For details, refer to the on-screen manual: Advanced Guide.
Originals You Can Load
You can copy or scan the following originals.
Types of Original: Photos or Texts (documents, books, magazines, etc.)
Size (W x L):
Max. 8.5 x 11.7 inches / 216 x 297 mm
Note
When loading a thick original such as a book on the Platen Glass, you can load it by removing the
Document Cover from the machine. For details on how to remove or attach the Document Cover,
refer to the on-screen manual: Advanced Guide.
Page top
Loading Originals
Page 64 of 681 pages
Advanced Guide
Troubleshooting
Contents > Loading Paper / Originals > Loading Originals to Copy or Scan > Loading Originals
Loading Originals
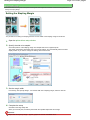
Load originals to copy or scan on the Platen Glass.
Note
Make sure any glue, ink, correction fluid, or the like on the original is completely dry before loading it.
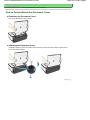
1.
Load an original on the Platen Glass.
(1) Open the Document Cover.
(2) Load an original with the side to copy or scan FACING DOWN on the Platen
Glass.
Align the corner of the original with the alignment mark
.
Important
Do not place any objects weighing more than 4.4 lb / 2.0 kg on the Platen Glass.
Do not press or put weight on the original with pressure exceeding 4.4 lb / 2.0 kg. Doing
so may cause the scanner to malfunction or the Platen Glass to break.
The machine cannot scan the shaded area (A) (0.04 inches / 1 mm from the edges of the
Platen Glass).
2.
Close the Document Cover gently.
Loading Originals
Page 65 of 681 pages
Page top
Routine Maintenance
Page 66 of 681 pages
Advanced Guide
Troubleshooting
Contents > Routine Maintenance
Routine Maintenance
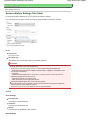
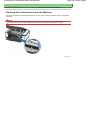
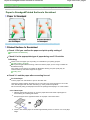
This section describes how to replace FINE Cartridges when they run out of ink, to clean the machine
when the print result is faint, or to take an action when paper does not feed properly.
When Printing Becomes Faint or Colors Are Incorrect
Printing the Nozzle Check Pattern
Examining the Nozzle Check Pattern
Cleaning the Print Head
Cleaning the Print Head Deeply
Aligning the Print Head
Replacing a FINE Cartridge
Checking the Ink Status
Replacing Procedure
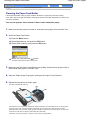
Cleaning the Paper Feed Roller
Page top
When Printing Becomes Faint or Colors Are Incorrect
Page 67 of 681 pages
Advanced Guide
Troubleshooting
Contents > Routine Maintenance > When Printing Becomes Faint or Colors Are Incorrect
When Printing Becomes Faint or Colors Are Incorrect
If print results are blurred or colors are not printed correctly, the print head nozzles (FINE Cartridges) are
probably clogged. Follow the procedure below to print the nozzle check pattern, check the print head
nozzle condition, then clean the Print Head.
If printed ruled lines are misaligned or print results are otherwise unsatisfactory, aligning the Print Head
may improve print quality.
Caution
Do not rinse or wipe the Fine Cartridges. This can cause trouble with the FINE Cartridges.
Note
Before performing maintenance
Check if ink remains in the FINE Cartridge. See Checking the Ink Status .
Check if the FINE Cartridges are installed correctly. See Replacing Procedure .
Check if the orange protective tape on the bottom of the FINE Cartridge is removed. See Replacing
Procedure .
When an error message appears on the LCD, refer to the " Troubleshooting " in the on-screen
manual: Advanced Guide.
Increasing the print quality in the printer driver settings may improve the print result.
For details, refer to the on-screen manual: Advanced Guide.
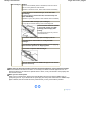
When the Print Results Are Blurred or Uneven:
Step 1
See Printing the Nozzle Check Pattern .
See Examining the Nozzle Check Pattern.
If the pattern is missing:
After cleaning the Print Head, print
and examine the nozzle check
pattern.
Step 2
See Cleaning the Print Head .
If the problem is not resolved after cleaning the Print Head
twice:
Step 3
See Cleaning the Print Head Deeply.
If the problem is not resolved after cleaning the Print Head
deeply twice:
Step 4
See Replacing a FINE Cartridge.
When the Print Results Are Not Even such as the Ruled Lines
Are Misaligned:
See Aligning the Print Head.
Note
You can also perform the maintenance operations from your computer.
When Printing Becomes Faint or Colors Are Incorrect
Page 68 of 681 pages
For details, refer to the on-screen manual: Advanced Guide.
Page top
Printing the Nozzle Check Pattern
Page 69 of 681 pages
Advanced Guide
Troubleshooting
Contents > Routine Maintenance > When Printing Becomes Faint or Colors Are Incorrect > Printing the Nozzle Check
Pattern
Printing the Nozzle Check Pattern
Print the nozzle check pattern to determine whether the ink ejects properly from the print head nozzles.
Note
If the remaining ink level is low, the nozzle check pattern will not be printed correctly. Replace the
FINE Cartridge whose ink is low.
See Replacing a FINE Cartridge.
You need to prepare: a sheet of A4 or Letter-sized plain paper
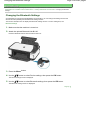
1.
Make sure that the power is turned on, and load a sheet of A4 or Letter-sized plain
paper in the Rear Tray.
2.
Open the Paper Output Tray gently, and open the Output Tray Extension.
3.
Print the nozzle check pattern.
(1) Press the Menu button.
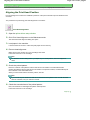
(2) Select Maintenance, and press the OK button.
(3) Select Nozzle check and press the OK button.
(4) Select Yes, and press the OK button.
The Nozzle check pattern will be printed.
(5) Confirm the displayed message and press the OK button.
The Check patterns screen appears
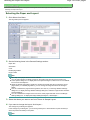
4.
Examine the nozzle check pattern.
See Examining the Nozzle Check Pattern.
Page top
Examining the Nozzle Check Pattern
Page 70 of 681 pages
Advanced Guide
Troubleshooting
Contents > Routine Maintenance > When Printing Becomes Faint or Colors Are Incorrect > Examining the Nozzle Check
Pattern
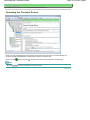
Examining the Nozzle Check Pattern
Examine the nozzle check pattern, and clean the Print Head if necessary.
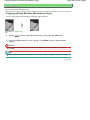
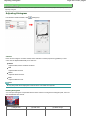
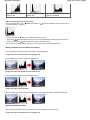
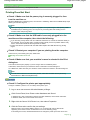
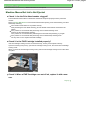
1.
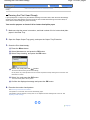
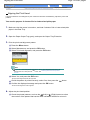
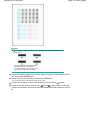
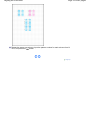
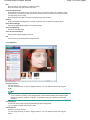
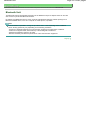
Check if there are no missing lines in the pattern (1) or no horizontal white streaks in
the pattern (2).
(A) No missing lines/No horizontal white streaks
(B) Lines are missing/Horizontal white streaks are present
2.
Select the pattern that is closer to the printed nozzle check pattern on the Check
patterns screen.
For (A) (no missing lines or no horizontal white streaks) in both (1) and (2):
Select All A and press the OK button.
The cleaning is not required.
The screen returns to the Maintenance screen.
For (B) (lines are missing or horizontal white streaks are present) in (1) or (2):
(1) Select Also B and press the OK button.
Clean the Print Head. The cleaning confirmation screen appears.
(2) Select Yes and press the OK button.
The machine starts cleaning the Print Head.
See Cleaning the Print Head .
Examining the Nozzle Check Pattern
Page 71 of 681 pages
Page top
Cleaning the Print Head
Page 72 of 681 pages
Advanced Guide
Troubleshooting
Contents > Routine Maintenance > When Printing Becomes Faint or Colors Are Incorrect > Cleaning the Print Head
Cleaning the Print Head
Clean the Print Head if lines are missing or if horizontal white streaks are present in the printed nozzle
check pattern. Cleaning unclogs the nozzles and restores the print head condition. Cleaning the Print
Head consumes ink, so clean the Print Head only when necessary.
You need to prepare: a sheet of A4 or Letter-sized plain paper
1.
Make sure that the power is turned on, and load a sheet of A4 or Letter-sized plain
paper in the Rear Tray.
2.
Open the Paper Output Tray gently, and open the Output Tray Extension.
3.
Clean the Print Head.
(1) Press the Menu button.
(2) Select Maintenance, and press the OK button.
(3) Select Cleaning, and press the OK button.
(4) Select Yes, and press the OK button.
The machine starts cleaning the Print Head.
Do not perform any other operations until the machine completes the cleaning of the Print Head. This takes
about 1 to 2 minutes.
(5) Select Yes, and press the OK button.
The nozzle check pattern will be printed.
(6) Confirm the displayed message and press the OK button.
4.
Examine the nozzle check pattern.
See Examining the Nozzle Check Pattern.
Note
If the problem is not resolved after cleaning the Print Head twice, clean the Print Head deeply.
See Cleaning the Print Head Deeply.
Page top
Cleaning the Print Head Deeply
Page 73 of 681 pages
Advanced Guide
Troubleshooting
Contents > Routine Maintenance > When Printing Becomes Faint or Colors Are Incorrect > Cleaning the Print Head
Deeply
Cleaning the Print Head Deeply
If print quality does not improve by the standard cleaning of the Print Head, clean the Print Head deeply.
Cleaning the Print Head deeply consumes more ink than the standard cleaning of the Print Head, so
clean the Print Head deeply only when necessary.
You need to prepare: a sheet of A4 or Letter-sized plain paper
1.
Make sure that the power is turned on, and load a sheet of A4 or Letter-sized plain
paper in the Rear Tray.
2.
Open the Paper Output Tray gently, and open the Output Tray Extension.
3.
Clean the Print Head deeply.
(1) Press the Menu button.
(2) Select Maintenance, and press the OK button.
(3) Select Deep cleaning, and press the OK button.
(4) Select Yes, and press the OK button.
The machine starts cleaning the Print Head deeply.
Do not perform any other operations until the machine completes the deep cleaning of the Print Head. This
takes about 2 minutes.
(5) Select Yes, and press the OK button.
The nozzle check pattern will be printed.
(6) Confirm the displayed message and press the OK button.
4.
Examine the nozzle check pattern.
See Examining the Nozzle Check Pattern.
If the problem is not resolved, clean the Print Head deeply again.
If the problem is still not resolved, ink may have run out. Replace the FINE Cartridge with a new one. See
Replacing a FINE Cartridge.
Page top
Aligning the Print Head
Page 74 of 681 pages
Advanced Guide
Troubleshooting
Contents > Routine Maintenance > When Printing Becomes Faint or Colors Are Incorrect > Aligning the Print Head
Aligning the Print Head
If printed ruled lines are misaligned or print results are otherwise unsatisfactory, adjust the print head
position.
You need to prepare: 2 sheets of A4 or Letter-sized plain paper
1.
Make sure that the power is turned on, and load 2 sheets of A4 or Letter-sized plain
paper in the Rear Tray.
2.
Open the Paper Output Tray gently, and open the Output Tray Extension.
3.
Print the print head alignment pattern.
(1) Press the Menu button.
(2) Select Maintenance, and press the OK button.
(3) Select Print head alignment, and press the OK button.
Note
To print the current head position adjustment values, select Head alignment print in the
Maintenance menu and press the OK button. See Selecting Menus on the Top Menu
Screen .
(4) Select Yes, and press the OK button.
The print head alignment sheet will be printed.
(5) Check the pattern is printed correctly, select Yes, then press the OK button.
(6) Confirm the displayed message and press the OK button.
The Print head alignment screen appears.
4.
Adjust the print head position.
(Left) or
(Right) button to select
(1) Check the printed patterns, and use the
the number of the pattern that has the least noticeable streaks for column A.
Aligning the Print Head
Page 75 of 681 pages
Note
If it is difficult to select the best pattern, select the pattern that has the least noticeable
white streaks.
(A) Less noticeable vertical white streaks
(B) Noticeable vertical white streaks
(C) Less noticeable horizontal white streaks
(D) Noticeable horizontal white streaks
(2) Repeat the same procedure to input the pattern number for each column from B
to L, then press the OK button.
(3) Select Yes to continue printing, and press the OK button.
The second page of print head alignment sheet will be printed.
(4) Confirm the message for print head alignment, and press the OK button.
(Right) button to input the
(Left) or
(5) Check the printed patterns and use the
number of the pattern that has the least noticeable horizontal streaks for column
M.
Aligning the Print Head
Page 76 of 681 pages
(6) Repeat the same procedure to input the pattern number for each column from N
to R, and press the OK button.
Page top
Replacing a FINE Cartridge
Page 77 of 681 pages
Advanced Guide
Troubleshooting
Contents > Routine Maintenance > Replacing a FINE Cartridge
Replacing a FINE Cartridge
When ink runs out while printing, an error message appears on the LCD or your computer screen.
Note
If the error message appears, confirm the displayed message and take an appropriate action.
For details, refer to the "An Error Message is Displayed on the LCD" in the " Troubleshooting " of the
on-screen manual: Advanced Guide.
For information on the compatible FINE Cartridges, refer to the printed manual: Getting Started .
Page top
Checking the Ink Status
Page 78 of 681 pages
Advanced Guide
Troubleshooting
Contents > Routine Maintenance > Replacing a FINE Cartridge > Checking the Ink Status
Checking the Ink Status
You can check the ink status on the LCD.
Note
The ink level detector is mounted on the machine to detect the remaining ink level. The machine
considers as ink is full when a new FINE Cartridge is installed, and then starts to detect a remaining
ink level. If you install a used FINE Cartridge, the indicated ink level of it may not be correct. In such
case, refer to the ink level information only as a guide.
(1) Make sure that the power is turned on, and press the Menu button.
(2) Press the
button.
(Up) or
(Down) button to select Remaining ink, and press the OK
Check if any symbol appears on the remaining ink volume screen.
Sufficient ink is left for printing if no symbol appears.
(Ink low) is running low. You can continue printing for a while, but we recommend you to
The ink with
have a new FINE Cartridge available.
Note
You can also check the ink status on a screen of the LCD displayed while printing.
Page top
Replacing Procedure
Page 79 of 681 pages
Advanced Guide
Troubleshooting
Contents > Routine Maintenance > Replacing a FINE Cartridge > Replacing Procedure
Replacing Procedure
When FINE Cartridges run out of ink, follow the procedure below to replace them.
Important
Handling FINE Cartridges
Do not touch the electrical contacts or print head nozzles on a FINE Cartridge. The machine may not
print properly if you touch it.
(A) Electrical contacts
(B) Print head nozzles
To maintain optimal print quality, we recommend the use of specified Canon brand FINE Cartridges.
Refilling ink is not recommended.
If you remove a FINE Cartridge, replace it immediately. Do not leave the machine with FINE
Cartridges removed.
Use new FINE Cartridges for replacement. Installing used FINE Cartridges may cause the nozzles to
clog.
Furthermore, with such cartridges, the machine will not be able to inform you when to replace the
cartridges properly.
To maintain optimal print quality, install FINE Cartridges in the machine within the date indicated on
the package box. And also use FINE Cartridges within 6 months of first use. (We recommend you to
put down the date when installing them.)
Note
If a FINE Cartridge runs out of ink, you can print with either Color or Black FINE Cartridge, in
whichever ink remains, only for a while. However the print quality may be reduced compared to
when printing with both cartridges. We recommend to use new FINE Cartridges in order to obtain
optimum qualities.
Even when printing with one ink only, print with leaving the empty FINE Cartridge installed. If either
of the Color FINE Cartridge or Black FINE Cartridge is not installed, an error occurs and the machine
cannot print.
For information on how to configure this setting, refer to the on-screen manual: Advanced Guide.
Color ink may be consumed even when printing a black-and-white document or when black-andwhite printing is specified.
Every ink is also consumed in the standard cleaning and deep cleaning of the Print Head, which
may be necessary to maintain the machine's performance. When ink has run out, replace the FINE
Cartridge immediately with a new one.
1.
Make sure that the power is turned on, and open the Paper Output Tray.
2.
Lift the Scanning Unit (Cover), then hold it open with the Scanning Unit Support (C).
The FINE Cartridge Holder moves to the replacement position.
Replacing Procedure
Caution
The inside of the machine may be stained with ink. Be careful not to stain your hands or
clothing when replacing FINE Cartridges. You can easily wipe off the ink from the inside of the
machine with a dry cloth or the like. For details on the cleaning, refer to the printed manual:
Getting Started .
When opening the Scanning Unit (Cover), lift it with the Document Cover closed.
Do not hold the FINE Cartridge Holder to stop or move it forcibly. Do not touch the Print Head
Holder until it stops completely.
Do not touch the metallic parts or other parts inside the machine.
Important
If the Scanning Unit (Cover) is left open for more than 10 minutes, the FINE Cartridge Holder
moves to the right. In this case, close and reopen the Scanning Unit (Cover).
3.
Remove the empty FINE Cartridge.
(1) Pinch the tabs and open the Ink Cartridge Locking Cover.
(2) Remove the FINE Cartridge.
Important
Handle FINE Cartridges carefully to avoid staining of clothing or the surrounding area.
Discard empty FINE Cartridges according to the local laws and regulations regarding disposal
of consumables.
4.
Prepare the new FINE Cartridge.
Page 80 of 681 pages
Replacing Procedure
Page 81 of 681 pages
(1) Take a new FINE Cartridge out of its package and remove the orange protective
tape (D) gently.
Important
If you shake a FINE Cartridge, ink may spill out and stain your hands and the surrounding area.
Handle a FINE Cartridge carefully.
Be careful not to stain your hands and the surrounding area with ink on the removed
protective tape.
Do not reattach the protective tape once you have removed it. Discard it according to the local
laws and regulations regarding disposal of consumables.
Do not touch the electrical contacts or print head nozzles on a FINE Cartridge. The machine
may not print properly if you touch it.
5.
Install the FINE Cartridge.
(1) Put a new FINE Cartridge in the FINE Cartridge Holder.
The Color FINE Cartridge should be installed into the left slot and the Black FINE Cartridge should be into the
right slot.
(2) Close the Ink Cartridge Locking Cover to lock the FINE Cartridge into place.
Push down the Ink Cartridge Locking Cover until it clicks.
(3) Confirm that the Ink Cartridge Locking Cover is closed correctly.
Replacing Procedure
Page 82 of 681 pages
(E) Closed correctly
(F) Not closed correctly (the cover is tilted)
Note
If the Ink Cartridge Locking Cover is not closed correctly, push down the Ink Cartridge
Locking Cover until it clicks.
Important
The machine cannot print unless both the Color and Black FINE Cartridges are installed. Be
sure to install both the FINE Cartridges.
6.
Lift the Scanning Unit (Cover) slightly to set the Scanning Unit Support back to its
original position, and gently close the Scanning Unit (Cover).
If you replaced the FINE Cartridge while printing, the machine resumes printing automatically.
Caution
When setting the Scanning Unit Support back to its original position, be sure to hold the
Scanning Unit (Cover) firmly, and be careful not to get your fingers caught.
Note
If the error message appears on the LCD after the Scanning Unit (Cover) is closed, refer to the
"Troubleshooting " in the on-screen manual: Advanced Guide.
When you start printing after replacing the FINE Cartridge, the machine starts cleaning the Print
Head automatically. Do not perform any other operations until the machine completes the
cleaning of the Print Head. While cleaning is in progress, the Power lamp is flashing green.
If printed ruled lines are misaligned or the print head position is misaligned, adjust the print head
position.
See Aligning the Print Head.
Page top
Cleaning the Paper Feed Roller
Page 83 of 681 pages
Advanced Guide
Troubleshooting
Contents > Routine Maintenance > Cleaning the Paper Feed Roller
Cleaning the Paper Feed Roller
If the Paper Feed Roller is dirty or paper powder is attached to it, paper may not be fed properly.
In this case, clean the Paper Feed Roller. Cleaning will wear out the Paper Feed Roller, so perform this
only when necessary.
You need to prepare: three sheets of A4 or Letter-sized plain paper
1.
Make sure that the power is turned on, and remove any paper from the Rear Tray.
2.
Clean the Paper Feed Roller.
(1) Press the Menu button.
(2) Select Maintenance, and press the OK button.
(3) Select Roller cleaning, and press the OK button.
(4) Select Yes, and press the OK button.
The Paper Feed Roller will rotate as it is cleaned.
3.
Make sure that the Paper Feed Roller stops rotating, and load three sheets of A4 or
Letter-sized plain paper in the Rear Tray.
4.
Open the Paper Output Tray gently, and open the Output Tray Extension.
5.
Repeat the procedures in step 2 again.
The paper is ejected after cleaning.
If the problem is not resolved after cleaning the Paper Feed Roller (A) as described above, turn off the power,
unplug the power cord, then wipe the Paper Feed Roller located in the center inside the Rear Tray with a
moistened cotton swab or the like. Rotate the roller manually in the direction of the arrow (B) as you clean it. Do
not touch the roller with your fingers; rotate it with the cotton swab.
If this does not solve the problem, contact your Canon service representative.
Cleaning the Paper Feed Roller
Page 84 of 681 pages
Page top
Appendix
Page 85 of 681 pages
Advanced Guide
Troubleshooting
Contents > Appendix
Appendix
Safety Precautions
Legal Limitations on Use of Your Product and Use of Images
Tips on How to Use Your Machine
Page top
Safety Precautions
Page 86 of 681 pages
Advanced Guide
Troubleshooting
Contents > Appendix > Safety Precautions
Safety Precautions
Please read the safety warnings and cautions provided in this manual to ensure that you use the
machine safely. Do not attempt to use the machine in any way not described in this manual. It causes
unexpected accident, fire, or electrical shock.
Warning
You may cause an electric shock, fire, or damage the machine if you ignore any of these safety
precautions.
Choosing a
location
Do not place the machine close to flammable solvents such as
alcohol or thinners.
Power
supply
Never attempt to plug in or unplug the machine from the
power supply when your hands are wet.
Always push the plug all the way into the power outlet.
Never damage, modify, stretch or
excessively bend or twist the power
cord.Do not place heavy objects on
the power cord.
Never plug the machine into a power
socket that is shared with other
equipment (extension lead/cord, 2- or
3-way adapter, etc.).
Never use the machine if the power cord is bundled or
knotted.
If you detect smoke, unusual smells or strange noises around
the machine, immediately unplug the machine at the power
supply and call for service.
Periodically, unplug the machine and
use a dry cloth to wipe off any dust or
dirt collected on the plug and the
power outlet. If the machine is placed
at a location exposed to a lot of dust,
smoke, or high humidity, the dust
collected on the plug absorbs
moisture and may cause insulation
failure and fire.
If you hear thunder, disconnect the power supply of the
machine and refrain from using it. Leaving the machine
plugged in may cause fire, electric shock, or damage to the
machine, depending on the thunder storm.
Use the power cable included with the machine.
Cleaning the
machine
Use a damp cloth to clean the
machine. Never use flammable
solvents such as alcohol, benzene or
thinners.
If flammable solvents come in contact with
electrical components inside the machine, it
could cause a fire or electric shock.
Always unplug the machine from the power outlet before
cleaning the machine.
If you accidentally switch the machine on while cleaning it, you could
Safety Precautions
Page 87 of 681 pages
injure yourself or damage the machine.
Maintaining
the machine
Do not attempt to disassemble or modify the machine. There
are no user serviceable parts inside the machine.
The machine contains high-voltage components. Never attempt any
maintenance procedure not described in this guide.
Working
around the
machine
Do not use highly flammable sprays near the machine.
This could cause a fire or electric shock if the spray comes into contact
with electrical components inside the machine.
Caution
You may cause injury or damage the machine if you ignore any of these safety precautions.
Choosing a
location
Do not install the machine in a location that is unstable or
subject to excessive vibration.
Do not install the machine in locations that are very humid or
dusty, in direct sunlight, outdoors, or close to a heating
source.
To avoid the risk of fire or electric shocks, install the
machine in a location with an ambient temperature range of
5°C to 35°C (41°F to 95°F) and humidity of 10% to 90%
(condensation free).
Do not place the machine on a thick rug or carpet.
Do not place the machine with its back attached to the wall.
Power supply
Ensure that the area around the
power outlet is kept clear at all
times so you can easily unplug the
power cord if necessary.
Never remove the plug by pulling
on the cord.
Do not use an extension lead/cord.
Working around Never put your hands or fingers in the machine while it is
printing.
the machine
Do not place any object on the machine.
Do not place metal objects (paper clips, staples, etc.) or
containers of flammable solvents (alcohol, thinners, etc.) on
top of the machine.
If any foreign object (metal or liquid) fall into the machine,
unplug the power cord and call for service.
Do not use or transport the machine on a slant, vertically or
upside-down, as the ink may leak and damage the machine.
When loading a thick book on the Platen Glass, do not press
hard on the Document Cover. The Platen Glass may break
and cause injury.
FINE Cartridges
Keep FINE Cartridges (Ink Cartridges) out of the reach of
Safety Precautions
Page 88 of 681 pages
(Ink Cartridges) children.
In case ink is accidentally licked or swallowed, rinse out mouth or
give one or two glasses of water to drink.
If irritation or discomfort occurs, obtain medical advice immediately.
In case ink gets in contact with eyes, rinse with water
immediately.
In case ink gets in contact with skin, wash with soap and
water immediately.
If irritation to eyes or skin persists, obtain medical advice immediately.
Do not shake FINE Cartridges (Ink Cartridges).
Ink may spill out and stain clothing or the surrounding area.
Never touch the electrical contacts
or print head nozzles on a FINE
Cartridge (Ink Cartridge) after
printing.
The metal parts may be very hot and
could cause burns.
Do not throw FINE Cartridges (Ink Cartridges) into fire.
Do not attempt to disassemble or modify the FINE
Cartridges.
Do not handle the FINE Cartridges roughly such as applying
them excessive pressure or dropping them.
Do not rinse or wipe the FINE Cartridges.
Once you have installed the FINE Cartridges, do not remove
them unnecessarily.
Note when you place the machine near other electrical appliances such as fluorescent lamps
Place the machine at least 5.91 inches / 15 cm away from other electrical appliances such as
fluorescent lamps. If the machine is placed closer to those, it may not be able to work properly due
to fluorescent noises.
When you turn off the power
When you turn off the power, always press the ON button and be sure that the Power lamp (in
green) has gone out. If you disconnect the power plug from the power outlet when the Power lamp
lights or flashes, the Print Head cannot be protected and you may not be able to print later.
Page top
Legal Limitations on Use of Your Product and Use of Images
Advanced Guide
Page 89 of 681 pages
Troubleshooting
Contents > Appendix > Legal Limitations on Use of Your Product and Use of Images
Legal Limitations on Use of Your Product and Use of Images
It may be unlawful to make copies of, scan, print, or use reproductions of the following documents.
The list provided is non-exhaustive. When in doubt, check with a legal representative in your jurisdiction.
Paper money
Money orders
Certificates of deposit
Postage stamps (canceled or
uncanceled)
Identifying badges or insignias
Selective service or draft papers
Checks or drafts issued by
governmental agencies
Motor vehicle licenses and
certificates of title
Traveler's checks
Food stamps
Passports
Immigration papers
Internal revenue stamps (canceled or
uncanceled)
Bonds or other certificates of indebtedness
Stock certificates
Copyrighted works/works of art without
permission of copyright owner
Page top
Tips on How to Use Your Machine
Page 90 of 681 pages
Advanced Guide
Troubleshooting
Contents > Appendix > Tips on How to Use Your Machine
Tips on How to Use Your Machine
This section introduces the tips on how to use your machine and for printing with optimal quality.
Ink is used for various purposes.
How is ink used for various purposes other than printing?
Ink may be used for purposes other than printing. Ink is not only used for printing, but also for cleaning
the Print Head to maintain the optimal printing quality.
The machine has the function to automatically clean the ink jet nozzles to prevent clogging. In the
cleaning procedure, ink is pumped out from the nozzles. Used ink for nozzle cleaning is limited to a
small amount.
Important
The ink pumped out from the nozzles, such as when cleaning the Print Head, is absorbed by ink
absorber in the machine. The ink absorber needs to be replaced when it is full. You cannot replace
it by yourself. When the error message appears, contact your Canon service representative as
soon as possible.
Refer to the "Troubleshooting " in the on-screen manual: Advanced Guide.
Does black-and-white printing use color ink?
The use of color or black ink varies depending on the color of image to be printed or the contents of
document. Black-and-white printing may also use color ink. So, color ink is consumed even when
printing in black-and-white.
Printing on special paper: How to print with optimal quality!?
Tip!: Check the machine status before printing!
Is the Print Head ok?
If print head nozzles are clogged, print will be faint and papers will be wasted. Print the nozzle
check pattern to check the Print Head.
See When Printing Becomes Faint or Colors Are Incorrect .
Is the inside of the machine smeared with ink?
After printing large quantities of paper or performing borderless printing, the area where papers
go through may get smeared with ink. Clean the inside of your machine with the Bottom Plate
cleaning.
Refer to the on-screen manual: Advanced Guide .
Tip!: Check how to load the paper correctly!
Is the paper loaded in the correct orientation?
To load paper in the Rear Tray, load paper with the printing side facing you.
Is the paper curled?
Tips on How to Use Your Machine
Page 91 of 681 pages
The curled paper causes paper jam. Flatten the curled paper, then reload it.
Refer to the "Troubleshooting" in the on-screen manual: Advanced Guide .
Tip!: After loading paper, be sure to specify the paper settings!
After loading paper, be sure to select the loaded paper in Media Type of the printer driver or with the
Operation Panel. If the type of paper is not selected, you may not be able to get the satisfactory print
result.
See Loading Paper .
There are various types of paper: paper with special coating on the surface for printing photos with
optimal quality and paper suitable for documents. Media Type of the printer driver has different settings
for each type of paper in advance (such as using ink, ejecting ink, or distance from nozzles) so that you
can print on each paper with the optimal image quality. You can print with different settings in Media Type
of the printer driver suitable for each type of loaded paper.
Use the Stop button to cancel printing!
Tip!: Never press the ON button!
If you press the ON button while printing is in progress, the print data sent from the computer queues in
the machine and you may not be able to continue to print.
Press the Stop button to cancel printing.
Note
If you cannot cancel printing by pressing the Stop button while printing from a computer, open the
printer properties dialog box to delete the unnecessary print jobs from the printer status monitor
(Windows).
How to maintain the optimal printing quality?
The key to printing with the optimal printing quality is to prevent the Print Head from drying or clogging.
Always follow the following steps for optimal printing quality.
Follow the procedure below to turn the power off.
1 Press the ON button on the machine to turn it off.
2 Be sure that the Power lamp is not lit.
3 Unplug the power cord from the wall outlet, or turn off the extender cable connector.
If you press the ON button to turn off the power, the machine caps the Print Head (nozzles)
automatically to prevent from drying. If you unplug the power cord from the wall outlet or turn off
the extender cable connector before the Power lamp is turned off, the Print Head will not be
capped properly and this will cause drying or clogging.
To turn off the power, be sure to follow this procedure.
Print periodically!
Just as the tip of a felt pen becomes dry and unusable if it has not been used for a long time,
even if it is capped, the Print Head too, may become dried or clogged if the machine has not
been used for a long time.
We recommend the machine to be used at least once a month.
Note
Depending on the type of paper, ink may blur if you trace the printed area with a highlight pen
or paint-stick, or bleed if water or sweat comes in contact with the printed area.
Does the machine need to be handled with care when using or
Tips on How to Use Your Machine
Page 92 of 681 pages
transporting?
Tip!: Do not use or transport the machine vertically or slanted!
If the machine is used or transported vertically or slanted, the machine may become damaged or ink
may leak from the machine.
Be sure not to store or transport the machine vertically or slanted.
Colors are uneven, and print results are blurred.
Tip!: Print the nozzle check pattern to check if the nozzles are
clogged.
If the print head nozzles are clogged, colors may become uneven or the print results may be blurred.
In this case
Print the nozzle check pattern
Check the printed check pattern to see if the nozzles are clogged.
See When Printing Becomes Faint or Colors Are Incorrect .
Page top
MP480 series Advanced Guide
Page 93 of 681 pages
MC-3090-V1.00
Basic Guide
Printing
Scanning
Copying
Printing
Printing from a Computer
Printing with the Bundled Application Software
What Is Easy-PhotoPrint EX?
Troubleshooting
How to Use This Manual
Printing Photos
Starting Easy-PhotoPrint EX
Selecting a Photo
Printing This Manual
Selecting the Paper
Maintenance
Printing
About Bluetooth Communication
Creating an Album
Starting Easy-PhotoPrint EX
Changing the Machine Settings
Selecting the Paper and Layout
Appendix
Selecting a Photo
Editing
When you display this On-screen
Manual in a language environment
other than English, some English
descriptions may be displayed.
Printing
Printing Calendars
Starting Easy-PhotoPrint EX
Selecting the Paper and Layout
Selecting a Photo
Editing
Printing
Printing Stickers
Starting Easy-PhotoPrint EX
Selecting the Paper and Layout
Selecting a Photo
Editing
Printing
Printing Layout
Starting Easy-PhotoPrint EX
Selecting the Paper and Layout
Selecting a Photo
Editing
Printing
Correcting and Enhancing Photos
Using the Auto Photo Fix Function
Using the Red-Eye Correction Function
Using the Face Brightener Function
Using the Face Sharpener Function
Using the Digital Face Smoothing Function
Using the Blemish Remover Function
MP480 series Advanced Guide
Page 94 of 681 pages
Adjusting Images
Correct/Enhance Images Window
Questions and Answers
How Can I Move (or Copy) the Saved File?
Which Side of the Displayed Image Does the Printing
Start from?
How Do I Print with Even Margins?
What Is "C1" or "C4"?
Appendix 1: Easy-PhotoPrint EX Settings
Printing Vivid Photos
Reducing Photo Noise
Cropping Photos (Photo Print)
Printing Dates on Photos (Photo Print)
Printing Multiple Photos on One Page
Printing an Index
Printing ID Photos (ID Photo Print)
Printing Photo Information
Saving Photos
Opening Saved Files
Changing Layout
Changing Background
Adding Photos
Swapping Positions of Photos
Replacing Photos
Changing Position, Angle and Size of Photos
Cropping Photos
Framing Photos
Printing Dates on Photos
Attaching Comments to Photos
Adding Text to Photos
Saving
Setting Holidays
Setting Calendar Display
Printing with Other Application Software
Various Printing Methods
Printing with Easy Setup
Setting a Page Size and Orientation
Setting the Number of Copies and Printing Order
Setting the Stapling Margin
Borderless Printing
Fit-to-Page Printing
Scaled Printing
Page Layout Printing
Poster Printing
Booklet Printing
Duplex Printing
Stamp/Background Printing
Saving a Stamp Setting
Saving Image Data to be Used as a Background
Printing an Envelope
MP480 series Advanced Guide
Page 95 of 681 pages
Displaying the Print Results before Printing
Setting Paper Dimensions (Custom Size)
Changing the Print Quality and Correcting Image Data
Selecting a Combination of the Print Quality Level
and a Halftoning Method
Printing a Color Document in Monochrome
Specifying Color Correction
Optimal Photo Printing of Image Data
Adjusting Colors with the Printer Driver
Printing with ICC Profiles
Adjusting Color Balance
Adjusting Brightness
Adjusting Intensity
Adjusting Contrast
Simulating an Illustration
Representing Image Data with a Single Color
Presenting Image Data with Vivid Colors
Smoothing Jagged Outlines
Changing Color Properties to Improve Coloration
Reducing Photo Noise
Overview of the Printer Driver
Canon IJ Printer Driver
How to Open the Printer Driver Setup Window
Maintenance Tab
Canon IJ Status Monitor
The Canon IJ Preview
Printing Using the Operation Panel of the Machine
Printing from a Memory Card
Printing Photographs Saved on a Memory Card
Setting Items
Printing by Using the Photo Index Sheet
Setting Up the Card Slot as the Memory Card Drive of the
Computer
Printing Photographs Directly from a Compliant Device or a
Wireless Communication Device
Printing Photographs Directly from a Compliant Device
Printing Photographs Directly from a Compliant Device
About PictBridge Print Settings
Settings on a PictBridge Compliant Device
Settings on the Machine
Printing Photographs from a Wireless Communication Device
Setting the Page Size, Media Type, and Layout When
Printing from a Mobile Phone
Displaying the Mobile phone settings screen
Printing via Bluetooth Communication
Printing through Bluetooth Communication
Changing the Bluetooth Settings
Scanning
Scanning
MP480 series Advanced Guide
Page 96 of 681 pages
Scanning Images
Scanning Images
Before Scanning
Placing Documents
Saving Scanned Data on the USB flash drive/Memory Card
Using the Operation Panel of the Machine
Saving Scanned Data on the USB flash drive/Memory
Card Using the Operation Panel of the Machine
Saving Scanned Data to PC Using the Operation Panel of the
Machine
Saving Scanned Data to PC Using the Operation Panel of
the Machine
Appendix: Various Scan Settings
Selecting a Response to Commands from the
Operation Panel Using MP Navigator EX
Scanning with the Bundled Application Software
What Is MP Navigator EX (Supplied Scanner Software)?
Let's Try Scanning
Starting MP Navigator EX
Scanning Photos and Documents
Scanning Multiple Documents at One Time
Scanning Images Larger than the Platen (Stitch
Assist)
Easy Scanning with One-click
Useful MP Navigator EX Functions
Correcting/Enhancing Images Automatically
Correcting/Enhancing Images Manually
Adjusting Images
Searching Images
Classifying Images into Categories
Utilizing Images in MP Navigator EX
Saving
Saving as PDF Files
Creating/Editing PDF Files
Printing Documents
Printing Photos
Sending via E-mail
Editing Files
Setting Passwords for PDF Files
Opening/Editing Password-protected PDF Files
MP Navigator EX Screens
Navigation Mode Screen
Scan/Import Documents or Images Tab
View & Use Images on your Computer Tab
Custom Scan with One-click Tab
Photos/Documents (Platen) Screen (Scan/Import
Window)
Scan Settings Dialog Box (Photos/Documents)
Save Dialog Box
Save as PDF file Dialog Box
PDF Settings Dialog Box
Memory Card Screen (Scan/Import Window)
MP480 series Advanced Guide
Page 97 of 681 pages
View & Use Window
Create/Edit PDF file Window
Print Document Dialog Box
Print Photo Dialog Box
Send via E-mail Dialog Box
Correct/Enhance Images Window
One-click Mode Screen
Save Dialog Box (One-click Mode Screen)
Scan Settings Dialog Box
Save Dialog Box
Exif Settings Dialog Box
PDF Dialog Box
Save as PDF file Dialog Box
Mail Dialog Box
OCR Dialog Box
Custom Dialog Box
Preferences Dialog Box
Scanner Button Settings Tab (Save)
Appendix: Opening Files Other than Scanned Images
Importing Images Saved on a Memory Card
Opening Images Saved on a Computer
Scanning with Other Application Software
What Is ScanGear (Scanner Driver)?
Scanning with Advanced Settings Using ScanGear
(Scanner Driver)
Starting ScanGear (Scanner Driver)
Scanning in Basic Mode
Scanning in Advanced Mode
Scanning in Auto Scan Mode
Scanning Multiple Documents at One Time in
Advanced Mode
Correcting Images and Adjusting Colors
Correcting Images (Unsharp Mask, Reduce Dust
and Scratches, Fading Correction, etc.)
Adjusting Colors Using a Color Pattern
Adjusting Saturation and Color Balance
Adjusting Brightness and Contrast
Adjusting Histogram
Adjusting Tone Curve
Setting Threshold
ScanGear (Scanner Driver) Screens
Basic Mode Tab
Advanced Mode Tab
Input Settings
Output Settings
Image Settings
Color Adjustment Buttons
Auto Scan Mode Tab
Preferences Dialog Box
Scanner Tab
Preview Tab
MP480 series Advanced Guide
Page 98 of 681 pages
Scan Tab
Color Settings Tab
Appendix: Useful Information on Scanning
Adjusting Cropping Frames
Resolution
File Formats
Color Matching
Other Scanning Methods
Scanning with WIA Driver
Scanning using the Control Panel (Windows XP Only)
Copying
Printing Using the Operation Panel of the Machine
Copying
Making Copies
Reducing or Enlarging a Copy
Using Useful Copy Functions
Special Copy
Settings for Special Copy
Copying without Borders (Borderless Copy)
Copying Thick Originals Such as Books (Frame
Erase)
Troubleshooting
Troubleshooting
If an Error Occurs
The Machine Can Not Be Powered On
An Error Message Is Displayed on the LCD
LCD Cannot Be Seen At All
An Unintended Language Is Displayed on the LCD
Cannot Install the MP Drivers
Cannot Connect to Computer Properly
Printing or Scanning Speed Is Slow/Hi-Speed USB
Connection Does Not Work/"This device can perform
faster" Message Is Displayed
Print Results Not Satisfactory
Cannot Print to End of Job
No Printing Results/Printing Is Blurred/Colors Are Wrong/
White Streaks
Colors Are Unclear
Lines Are Misaligned
Printed Paper Curls or Has Ink Blots
Paper Is Smudged/Printed Surface Is Scratched
Back of the Paper Is Smudged
Vertical Lines Are Printed on the Sides of the Printout
Colors Are Uneven or Streaked
Printing Does Not Start
Copying/Printing Stops Before It Is Completed
Machine Moves But Ink Is Not Ejected
Printing Speed Not as Fast as Expected
MP480 series Advanced Guide
Page 99 of 681 pages
FINE Cartridge Holder Does Not Move to the Position for
Replacing
Paper Does Not Feed Properly
Paper Jams
Message Appears on the Computer Screen
Service Error 5100 Is Displayed
Writing Error/Output Error/Communication Error
Error Number: 300 Is Displayed
Error Number: 1700 Is Displayed
Ink Info Number: 1688 Is Displayed
Ink Info Number: 1686 Is Displayed
Error Number: 2001 Is Displayed
Error Number: 2002 Is Displayed
Other Error Messages
For Windows Users
Printer Status Monitor Is Not Displayed
The Inkjet Printer/Scanner Extended Survey Program
Screen Is Displayed
Error Message Appears on a PictBridge Compliant Device
Cannot Print Properly from a Wireless Communication Device
Cannot Print Properly from a Photo Index Sheet
Cannot Remove a Memory Card
Problems with Scanning
Scanner Does Not Work
ScanGear (Scanner Driver) Does Not Start
Error Message Appears and the ScanGear (Scanner
Driver) Screen Does Not Appear
Scan Quality (Image Displayed on the Monitor) Is Poor
Scanned Image Is Surrounded by Extra White Areas
Cannot Scan Properly with Multi Crop
Slow Scanning Speed
"There is not enough memory." Message Is Displayed
Computer Stops Operating during Scanning
Scanner Does Not Work After Upgrading Windows
Software Problems
E-mail Software Program You Want to Use Does Not
Appear in the Screen for Selecting an E-mail Software
Program
Scanned Image Is Printed Enlarged (Reduced)
Scanned Image Is Enlarged (Reduced) on the Computer
Monitor
Scanned Image Does Not Open
MP Navigator EX Problems
Cannot Scan at the Correct Size
Position or Size of the Image Cannot Be Detected
Correctly When Scanning Using the Operation Panel
Document Is Placed Correctly, but the Scanned Image Is
Slanted
Document Is Placed Correctly, but the Orientation
Changes in the Scanned Image
FAQs
If You Cannot Resolve the Problem
MP480 series Advanced Guide
Page 100 of 681 pages
Instructions for Use (Printer Driver)
General Notes (Scanner Driver)
Using Easy-PhotoPrint EX
Using MP Navigator EX
About Solution Menu
How to Use This Manual
Page 101 of 681 pages
Advanced Guide > How to Use This Manual
How to Use This Manual
Operating the Contents Screen
Operating the Explanation Screen
Printing This Manual
Using Keywords to Find a Topic
Registering Topics to My Manual
Symbols Used in this Document
Trademarks
Page top
Operating the Contents Screen
Page 102 of 681 pages
Advanced Guide > How to Use This Manual > Operating the Contents Screen
Operating the Contents Screen
When you click a title displayed in the Contents screen found to the left of the On-screen Manual, the
pages of that title are displayed in the description window on the right side.
When you click
found to the left of
, the titles found in the lower hierarchies are displayed.
Note
Click
to close or display the Contents screen.
Page top
Operating the Explanation Screen
Page 103 of 681 pages
Advanced Guide > How to Use This Manual > Operating the Explanation Screen
Operating the Explanation Screen
(1) Click the green characters to jump to the corresponding page.
(2) The cursor jumps to the top of this page.
Page top
Printing This Manual
Page 104 of 681 pages
Advanced Guide > How to Use This Manual > Printing This Manual
Printing This Manual
Click
to display the Print window to the left of the On-screen Manual.
Note
Click , and then click Option Settings to display the Option Settings dialog box. You can then set up
the printing operation.
To display the Print dialog box, click and then click Print Settings. When the dialog box is
displayed, select the printer to be used for printing.
After selecting the printer to be used, click Properties... to specify the print settings.
The following four methods of printing are available:
Current Document
Selected Documents
My Manual
All Documents
Current Document
You can print the currently displayed topic.
1. From Select Target, select Current Document
The title of the currently displayed topic is displayed in the Documents to Be Printed list.
Note
By selecting Print linked documents, you can also print documents that are linked to the current
document. The linked documents are added to the Documents to Be Printed list.
Click Print Preview to display and check what the print results will look like before you actually
print the document.
2. Click Start Printing
The Print Page Count Confirmation dialog box is displayed.
Printing This Manual
Page 105 of 681 pages
3. Execute print
Confirm the number of pages to be printed, and then click Yes.
The topics that are currently displayed are printed.
Selected Documents
You can select and print the topics that you want printed.
1. From Select Target, select Selected Documents
The titles of all topics are displayed in the Documents to Be Printed list.
2. Select the topics to be printed
From the Documents to Be Printed list, select the title check boxes of the topics to be printed.
Note
When you select the Automatically select documents in lower hierarchies check box, the check
boxes of all titles found in the lower hierarchies are selected.
Click Select All to select the check boxes of all titles.
Click Clear All to clear the check boxes of all titles.
Click Print Preview to display and check what the print results will look like before you actually
print the document.
3. Click Start Printing
The Print Page Count Confirmation dialog box is displayed.
4. Execute print
Confirm the number of pages to be printed, and then click Yes.
All topics with selected check boxes are printed.
My Manual
You can select and print topics registered in My Manual.
For details about My Manual, see " Registering Topics to My Manual ."
1. From Select Target, select My Manual
The titles of the topics that have been registered to My Manual are displayed in the Documents to Be
Printed list.
2. Select the topics to be printed
From the Documents to Be Printed list, select the title check boxes of the topics to be printed.
Note
Click Select All to select the check boxes of all titles.
Click Clear All to clear the check boxes of all titles.
Click Print Preview to display and check what the print results will look like before you actually
print the document.
3. Click Start Printing
The Print Page Count Confirmation dialog box is displayed.
4. Execute print
Confirm the number of pages to be printed, and then click Yes.
All topics with selected check boxes are printed.
All Documents
You can print all topics of the On-screen Manual.
Printing This Manual
Page 106 of 681 pages
1. From Select Target, select All Documents
The titles of all topics are displayed in the Documents to Be Printed list, and the check boxes are
automatically selected.
Note
If you clear the check box of a topic, that topic is not printed.
Click Select All to select the check boxes of all titles.
Click Clear All to clear the check boxes of all titles.
Click Print Preview to display and check what the print results will look like before you actually
print the document.
2. Click Start Printing
The Print Page Count Confirmation dialog box is displayed.
3. Execute print
Confirm the number of pages to be printed, and then click Yes.
All topics are printed.
Important
A large amount of paper is necessary to print all topics. Before printing, be sure to check the
number of print pages displayed in the Print Page Count Confirmation dialog box.
You can change the print magnification from the Print Preview dialog box. However, if the print
data extends outside the paper with the new magnification, the portion of the document will not
be printed on the paper.
Page top
Using Keywords to Find a Topic
Page 107 of 681 pages
Advanced Guide > How to Use This Manual > Using Keywords to Find a Topic
Using Keywords to Find a Topic
You can enter a keyword to search for a target page.
All installed On-screen Manuals (user's guides) are searched.
1. Click
A search window is displayed to the left of the On-screen Manual.
Note
Click
to close or display the Search window.
2. Enter a keyword
In Keyword, enter a keyword for the item to be checked.
If you want to enter multiple keywords, insert a space between the keywords.
Note
You can enter up to 10 keywords or up to 255 characters.
Uppercase and lowercase are not discriminated.
The program can also search for keywords that contain spaces.
3. Click Start Searching
The search is started, and the titles of topics containing the keyword are displayed in the search
results list.
When you execute a search by entering multiple keywords, the search results are displayed as
shown below.
[Documents Containing Perfect Match]
Topics containing the entire search character string (including spaces) exactly as entered (perfect
match)
[Documents Containing All Keywords]
Topics containing all keywords that were entered
[Documents Containing Any Keyword]
Topics containing at least one of the keywords that were entered
Using Keywords to Find a Topic
Page 108 of 681 pages
4. Display the topic that you want to read
From the search results list, double-click (or select and press Enter) the title of the topic you want to
read.
When the pages of that title are displayed, the keywords found on those pages are highlighted.
Page top
Registering Topics to My Manual
Page 109 of 681 pages
Advanced Guide > How to Use This Manual > Registering Topics to My Manual
Registering Topics to My Manual
Register frequently read pages as My Manual topics so that you can refer to those pages easily at any
time.
1. Display the topic
Display the topic to be added to My Manual.
2. Click
The My Manual window is displayed to the left of the On-screen Manual.
Note
Click
to close or display the My Manual window.
3. Register the topic to My Manual
Click Add.
The currently displayed topic is added to List of My Manual.
Note
Alternatively, from the Recently Displayed Documents list, double-click (or select and press
Enter) the topic to be added to My Manual to display that topic, and then click Add.
4. Display My Manual
When you double-click (or select and press Enter) a topic displayed in List of My Manual, that topic is
displayed in the Description window.
Note
To delete a topic from List of My Manual, select that topic from the list, and then click Delete (or
press Delete).
Page top
Symbols Used in this Document
Page 110 of 681 pages
Advanced Guide > How to Use This Manual > Symbols Used in this Document
Symbols Used in this Document
Warning
Instructions that, if ignored, could result in death or serious personal injury caused by incorrect operation
of the equipment. These must be observed for safe operation.
Caution
Instructions that, if ignored, could result in personal injury or material damage caused by incorrect
operation of the equipment. These must be observed for safe operation.
Important
Instructions that must be observed for safe operation.
Note
Instructions as notes for operation or additional explanations.
Indicates operations in Windows.
Indicates operations in Macintosh.
Page top
Trademarks
Page 111 of 681 pages
Advanced Guide > How to Use This Manual > Trademarks
Trademarks
Microsoft is a registered trademark of Microsoft Corporation.
Windows is a trademark or registered trademark of Microsoft Corporation in the U.S. and/or other
countries.
Windows Vista is a trademark or registered trademark of Microsoft Corporation in the U.S. and/or
other countries.
Macintosh and Mac are trademarks of Apple Inc., registered in the U.S. and other countries.
Adobe, Adobe Photoshop, Adobe RGB and Adobe RGB (1998) are either registered trademarks or
trademarks of Adobe Systems Incorporated in the United States and or other countries.
Bluetooth is a trademark of Bluetooth SIG, Inc.,U.S.A. and licensed to Canon Inc.
Page top
Printing from a Computer
Page 112 of 681 pages
Advanced Guide > Printing from a Computer
Printing from a Computer
Printing with the Bundled Application Software
Printing with Other Application Software
Page top
Printing with the Bundled Application Software
Page 113 of 681 pages
Advanced Guide > Printing from a Computer > Printing with the Bundled Application Software
Printing with the Bundled Application Software
What Is Easy-PhotoPrint EX?
Printing Photos
Creating an Album
Printing Calendars
Printing Stickers
Printing Layout
Correcting and Enhancing Photos
Questions and Answers
Appendix 1: Easy-PhotoPrint EX Settings
Page top
What Is Easy-PhotoPrint EX?
Page 114 of 681 pages
Advanced Guide > Printing from a Computer > Printing with the Bundled Application Software > What Is Easy-PhotoPrint
EX?
What Is Easy-PhotoPrint EX?
Easy-PhotoPrint EX allows you to create albums, calendars and stickers easily using photos taken with
digital cameras.
You can also print borderless photos easily.
Important
Easy-PhotoPrint EX does not support Windows 95, Windows 98, Windows Me, or Windows NT4.
Easy-PhotoPrint EX can only be used with Canon inkjet printers. It does not support some printers,
including Canon compact printers (SELPHY CP series).
If a printer that supports Easy-PhotoPrint EX is not installed, you cannot print items you create.
If Easy-PhotoPrint EX is installed on a computer that already has Easy-LayoutPrint installed, EasyLayoutPrint will be replaced by Easy-PhotoPrint EX.
Note
Printing on paper larger than A4 is available with supported printers only. See your printer manual
for details.
See Help of Easy-PhotoPrint EX for descriptions of Easy-PhotoPrint EX screens.
Click Help in a screen or dialog box, or select Easy-PhotoPrint EX Help from the Help menu. Help
appears.
About Exif Print
Easy-PhotoPrint EX supports "Exif Print." Exif Print is a standard for enhancing the communication
between digital cameras and printers.
By connecting to an Exif Print-compliant digital camera, the image data at the time of shooting is used
and optimized, yielding extremely high quality prints.
Starting Easy-PhotoPrint EX from Other Applications
Easy-PhotoPrint EX can be started from other applications.
See the application's manual for details on the procedure for starting.
The Album function is available with the following applications:
MP Navigator EX Ver.1.00 or later
ZoomBrowser EX Ver.5.8 or later
What Is Easy-PhotoPrint EX?
Page 115 of 681 pages
The Photo Print function is available with the following applications:
MP Navigator EX Ver.1.00 or later
ZoomBrowser EX Ver.6.0 or later
Digital Photo Professional Ver.3.2 or later
Note
Easy-PhotoPrint EX is subject to the following restrictions when started from Digital Photo
Professional:
- Menu does not appear in the step button area on the left side of the screen.
- Images cannot be corrected/enhanced.
- Image display order cannot be changed.
- Edited images cannot be saved.
- Options other than Enable ICC Profile cannot be selected for Color correction for printing on the
Advanced tab of the Preferences dialog box. Therefore, you cannot use the Vivid Photo and Photo
Noise Reduction functions.
Supported Image File Formats (Extensions)
BMP (.bmp)
JPEG (.jpg, .jpeg)
TIFF (.tif, .tiff)
PICT (.pict, .pct)
Easy-PhotoPrint image files (.epp)
Important
When selecting an image, if there is a TIFF file in the selected folder, the image may not be
displayed correctly or Easy-PhotoPrint EX may shut down depending on the TIFF format. In such
cases, move the TIFF file to another folder or recreate the file in a different file format, and then
select the folder again.
The thumbnails of files in unsupported formats are displayed as
(Question Mark).
Note
When Easy-PhotoPrint EX is started from Digital Photo Professional, all image files supported by
Digital Photo Professional will be displayed.
File Formats (Extensions) Supported by Easy-PhotoPrint EX
Easy-PhotoPrint EX Photo Print file (.el6)
Easy-PhotoPrint EX Album file (.el1)
Easy-PhotoPrint EX Stickers file (.el2)
Easy-PhotoPrint EX Calendar file (.el4)
Easy-PhotoPrint EX Layout file (.el5)
Page top
Printing Photos
Page 116 of 681 pages
Advanced Guide > Printing from a Computer > Printing with the Bundled Application Software > Printing Photos
Printing Photos
Easy-PhotoPrint EX allows you to print your favorite photos in a variety of layouts.
You can also create borderless photos easily.
Corrections suitable for photos will be applied automatically when printing.
Steps
1. Starting Easy-PhotoPrint EX
2. Selecting a Photo
3. Selecting the Paper
4. Printing
Try This
Correcting and Enhancing Photos
Printing Vivid Photos
Reducing Photo Noise
Cropping Photos (Photo Print)
Printing Dates on Photos (Photo Print)
Printing Multiple Photos on One Page
Printing an Index
Printing ID Photos (ID Photo Print)
Printing Photo Information
Saving Photos
Opening Saved Files
Questions and Answers
How Can I Move (or Copy) the Saved File?
Which Side of the Displayed Image Does the Printing Start from?
How Do I Print with Even Margins?
Page top
Starting Easy-PhotoPrint EX
Page 117 of 681 pages
Advanced Guide > Printing from a Computer > Printing with the Bundled Application Software > Printing Photos > Starting
Easy-PhotoPrint EX
Starting Easy-PhotoPrint EX
1. From the Start menu, select (All) Programs > Canon Utilities > Easy-PhotoPrint EX
> Easy-PhotoPrint EX.
Easy-PhotoPrint EX starts and Menu appears.
Page top
Selecting a Photo
Page 118 of 681 pages
Advanced Guide > Printing from a Computer > Printing with the Bundled Application Software > Printing Photos >
Selecting a Photo
Selecting a Photo
1. Click Photo Print from Menu.
The Select Images screen appears.
Important
The reduced images (thumbnails) displayed in the screen may appear as follows:
- A black line appears along an edge of the image.
- An edge of the image appears cropped.
However, such images will be displayed normally when enlarged or previewed, and print
results will not be affected.
2. Select the folder that contains the image you want to print from the folder tree area.
The images in the folder will be displayed as thumbnails (miniatures).
Note
If Easy-PhotoPrint EX is started from another application (MP Navigator EX, ZoomBrowser EX
or Digital Photo Professional), the folder tree area will not be displayed.
The images opened in the application will be displayed as thumbnails.
3. Click the image you want to print.
The number of copies appears as "1" below the clicked image, while the selected image itself will
appear in the selected image area.
Note
To delete an image in the selected image area, select the image you want to delete and click
(Delete Imported Image).
To delete all images from the selected image area, click
To print two or more copies of an image, click
(Delete All Imported Images).
(Up arrow) until the number of copies you
want is reached. To reduce the number of copies shown in the box, click
(Down arrow).
You can change the order of photos using the list located at the top right corner of the screen.
You can select the printing order from Sort by Date and Sort by Name.
Selecting a Photo
Page 119 of 681 pages
Note
You can correct or enhance the selected image before printing.
Correcting and Enhancing Photos
See Help for details on the Select Images screen.
Page top
Selecting the Paper
Page 120 of 681 pages
Advanced Guide > Printing from a Computer > Printing with the Bundled Application Software > Printing Photos >
Selecting the Paper
Selecting the Paper
1. Click Select Paper.
The Select Paper screen appears.
2. Set the following items according to the printer and paper to be used:
Printer
Paper Source
Paper Size
Media Type
Note
The paper sizes and media types may vary depending on the printer. See Help for details.
The paper sources may vary depending on the printer and the media type.
Important
When Fine Art Photo Rag is selected for Media Type, a 1.38 inch (35 mm) margin is automatically
left at the top and bottom of the paper.
It is recommended that you check the print range with the image shown in Preview before printing.
Note
You can print photos with more vivid colors or you can reduce the photo noise.
Printing Vivid Photos
Reducing Photo Noise
See Help for details on the Select Paper screen.
Page top
Printing
Page 121 of 681 pages
Advanced Guide > Printing from a Computer > Printing with the Bundled Application Software > Printing Photos > Printing
Printing
1. Click Layout/Print.
The Layout/Print screen appears.
Important
The reduced images (thumbnails) displayed in the screen may appear as follows:
- A black line appears along an edge of the image.
- An edge of the image appears cropped.
However, such images will be displayed normally when enlarged or previewed, and print
results will not be affected.
2. Select a layout you want to use.
Click a borderless layout to print borderless photos.
Note
The layouts that can be selected may vary depending on the printer, paper size, and media
type.
3. Click Print.
Important
When you print on large size paper such as A3/A3+, some computers cannot print properly if you
print more than one page or copy at a time. It is recommended that you print page by page when
you print on such paper.
While printing on paper larger than A4 or printing high-resolution images, data may be printed only
to the middle if many images are printed at one time. In such cases, select the Spool print job page
by page checkbox in the Preferences dialog box, and then print again.
To display the Preferences dialog box, click
(Settings) or select Preferences... from the File
menu.
When Fine Art Photo Rag is selected for Media Type in the Select Paper screen, a 1.38 inch (35
mm) margin is automatically left at the top and bottom of the paper.
It is recommended that you check the print range with the image shown in Preview before printing.
Note
The photo print settings will be discarded if you exit Easy-PhotoPrint EX without saving the settings.
Printing
Page 122 of 681 pages
It is recommended that you save the printed image if you want to print it again.
Saving Photos
When you print on a bordered layout, the margins on the left and right or the top and bottom may
become wider than the other.
How Do I Print with Even Margins?
You can crop images or print dates on photos.
Cropping Photos (Photo Print)
Printing Dates on Photos (Photo Print)
You can correct or enhance the selected image before printing.
Correcting and Enhancing Photos
You can specify advanced Photo Print settings (number of copies, print quality, etc.) in the
Preferences dialog box.
To display the Preferences dialog box, click
(Settings) or select Preferences... from the File
menu.
See Help for details on the Layout/Print screen.
Page top
Creating an Album
Page 123 of 681 pages
Advanced Guide > Printing from a Computer > Printing with the Bundled Application Software > Creating an Album
Creating an Album
Easy-PhotoPrint EX allows you to create your own personalized photo album.
Steps
1. Starting Easy-PhotoPrint EX
2. Selecting the Paper and Layout
3. Selecting a Photo
4. Editing
5. Printing
Try This
Correcting and Enhancing Photos
Changing Layout
Changing Background
Adding Photos
Swapping Positions of Photos
Replacing Photos
Changing Position, Angle and Size of Photos
Cropping Photos
Framing Photos
Printing Dates on Photos
Attaching Comments to Photos
Adding Text to Photos
Saving
Opening Saved Files
Questions and Answers
How Can I Move (or Copy) the Saved File?
What Is "C1" or "C4"?
Page top
Starting Easy-PhotoPrint EX
Page 124 of 681 pages
Advanced Guide > Printing from a Computer > Printing with the Bundled Application Software > Creating an Album >
Starting Easy-PhotoPrint EX
Starting Easy-PhotoPrint EX
1. From the Start menu, select (All) Programs > Canon Utilities > Easy-PhotoPrint EX
> Easy-PhotoPrint EX.
Easy-PhotoPrint EX starts and Menu appears.
Page top
Selecting the Paper and Layout
Page 125 of 681 pages
Advanced Guide > Printing from a Computer > Printing with the Bundled Application Software > Creating an Album >
Selecting the Paper and Layout
Selecting the Paper and Layout
1. Click Album from Menu.
The Page Setup screen appears.
2. Set the following items in the General Settings section:
Paper Size
Orientation
Cover
Double page album
Page number
Note
See Help on the paper size that can be selected.
You can select whether to display images on the inside of the front and back covers in the
Cover Options dialog box. To display the Cover Options dialog box, select Front or Front & Back
for Cover and click Options....
Select the Double page album checkbox to enable the spread page layout (consisting of twopage master). In a double-page album, you can arrange an image across the left and right
pages.
You can customize the page numbers (position, font size, etc.) in the Page Number Settings
dialog box. To display the Page Number Settings dialog box, select the Page number checkbox
and click Settings....
You can customize the margins of the front cover, inside pages and back cover in the Margin
Settings dialog box. To display the Margin Settings dialog box, click Margins....
3. Select the theme you want to use from Theme in Sample Layout.
4. If you want to change the layout, click Layout....
The Change Layout dialog box appears.
In the Change Layout dialog box, you can change the layout or select whether to print the date (on
which the picture was taken) on the photo.
Note
Selecting the Paper and Layout
Page 126 of 681 pages
The album layouts that can be selected may vary depending on the Paper Size, Orientation,
Double page album, or the type of page selected (front cover, inside pages or back cover).
You can customize the date (position, size and color) in the Date Settings dialog box. To
display the Date Settings dialog box, select the Print date checkbox in the Change Layout
dialog box and click Date Settings....
5. If you want to change the background, click Background....
The Change Background dialog box appears.
In the Change Background dialog box, you can paint the background in a single color or paste an
image file to it.
Note
See Help for details on the Page Setup screen.
Page top
Selecting a Photo
Page 127 of 681 pages
Advanced Guide > Printing from a Computer > Printing with the Bundled Application Software > Creating an Album >
Selecting a Photo
Selecting a Photo
1. Click Select Images.
The Select Images screen appears.
2. Select the folder that contains the image you want to print from the folder tree area.
The images in the folder will be displayed as thumbnails (miniatures).
Note
If Easy-PhotoPrint EX is started from another application (MP Navigator EX or ZoomBrowser
EX), the folder tree area will not be displayed.
The images opened in MP Navigator EX or ZoomBrowser EX will be displayed as thumbnails.
3. Select the image(s) you want to print, and click one of the buttons below.
To print on the front cover, click
To print on the inside pages, click
To print on the back cover, click
(Import to Front Cover).
(Import to Inside Pages).
(Import to Back Cover).
The selected images are displayed in the selected image area.
You can also select the image(s) you want to print by dragging them into the selected image area.
Note
To delete an image in the selected image area, select the image you want to delete and click
(Delete Imported Image).
To delete all images from the selected image area, click
Note
See Help for details on the Select Images screen.
(Delete All Imported Images).
Selecting a Photo
Page 128 of 681 pages
Page top
Editing
Page 129 of 681 pages
Advanced Guide > Printing from a Computer > Printing with the Bundled Application Software > Creating an Album >
Editing
Editing
1. Click Edit.
The Edit screen appears.
2. Edit your album if necessary.
Changing Layout
Changing Background
Adding Photos
Swapping Positions of Photos
Replacing Photos
Changing Position, Angle and Size of Photos
Cropping Photos
Framing Photos
Printing Dates on Photos
Attaching Comments to Photos
Adding Text to Photos
Note
The edit information will be discarded if you exit Easy-PhotoPrint EX without saving the edited
album. It is recommended that you save the item if you want to edit it again.
The page numbers on the front and back covers of the album are displayed as follows:
C1: Front cover
C2: Inside the front cover
C3: Inside the back cover
C4: Back cover
Saving
See Help for details on the Edit screen.
Editing
Page 130 of 681 pages
Page top
Printing
Page 131 of 681 pages
Advanced Guide > Printing from a Computer > Printing with the Bundled Application Software > Creating an Album >
Printing
Printing
1. Click Print Settings.
The Print Settings screen appears.
2. Set the following items according to the printer and paper to be used:
Printer
Media Type
Copies
Paper Source
Print Quality
Borderless Printing
Note
The media types may vary depending on the printer and the paper size.
Duplex Printing appears if the selected printer and media type support duplex printing. Select
this checkbox to print on both sides of the paper.
Automatic appears if you select the Duplex Printing checkbox after selecting a printer that
supports automatic duplex printing and media type that supports duplex printing. Select this
checkbox to print on both sides of the paper automatically.
The paper sources may vary depending on the printer and the media type.
You can set a custom print quality level in the Print Quality Settings dialog box. To display the
Print Quality Settings dialog box, select Custom for Print Quality and click Quality Settings....
Select the Borderless Printing checkbox to print borderless photos.
You can specify the print range and the amount of extension for borderless printing in the Print
Settings dialog box. To display the Print Settings dialog box, click Advanced....
3. Click Print.
Note
See Help for details on the Print Settings screen.
Printing
Page 132 of 681 pages
Page top
Printing Calendars
Page 133 of 681 pages
Advanced Guide > Printing from a Computer > Printing with the Bundled Application Software > Printing Calendars
Printing Calendars
Easy-PhotoPrint EX allows you to create your own calendar using your favorite photos.
Steps
1. Starting Easy-PhotoPrint EX
2. Selecting the Paper and Layout
3. Selecting a Photo
4. Editing
5. Printing
Try This
Correcting and Enhancing Photos
Changing Layout
Changing Background
Adding Photos
Swapping Positions of Photos
Replacing Photos
Changing Position, Angle and Size of Photos
Cropping Photos
Framing Photos
Printing Dates on Photos
Adding Text to Photos
Setting Calendar Display
Setting Holidays
Saving
Opening Saved Files
Questions and Answers
How Can I Move (or Copy) the Saved File?
Page top
Starting Easy-PhotoPrint EX
Page 134 of 681 pages
Advanced Guide > Printing from a Computer > Printing with the Bundled Application Software > Printing Calendars >
Starting Easy-PhotoPrint EX
Starting Easy-PhotoPrint EX
1. From the Start menu, select (All) Programs > Canon Utilities > Easy-PhotoPrint EX
> Easy-PhotoPrint EX.
Easy-PhotoPrint EX starts and Menu appears.
Page top
Selecting the Paper and Layout
Page 135 of 681 pages
Advanced Guide > Printing from a Computer > Printing with the Bundled Application Software > Printing Calendars >
Selecting the Paper and Layout
Selecting the Paper and Layout
1. Click Calendar from Menu.
The Page Setup screen appears.
2. Set the following items in the General Settings section:
Paper Size
Orientation
Start from
Period
Note
See Help on the paper size that can be selected.
You can add holidays to your calendar.
Setting Holidays
3. Select a layout.
If necessary, make advanced settings on the calendar and set the background.
Note
You can customize the calendar display (font colors of the dates and days of the week, position
and size of the calendar, etc.).
Setting Calendar Display
You can paint the background in a single color or paste an image file to it in the Change
Background dialog box. To display the Change Background dialog box, click Background....
Note
See Help for details on the Page Setup screen.
Page top
Selecting a Photo
Page 136 of 681 pages
Advanced Guide > Printing from a Computer > Printing with the Bundled Application Software > Printing Calendars >
Selecting a Photo
Selecting a Photo
1. Click Select Images.
The Select Images screen appears.
2. Select the folder that contains the image you want to print from the folder tree area.
The images in the folder will be displayed as thumbnails (miniatures).
3. Select the image(s) you want to print and click
(Import to Inside Pages).
The selected images are displayed in the selected image area.
You can also select the image(s) you want to print by dragging them into the selected image area.
Note
To delete an image in the selected image area, select the image you want to delete and click
(Delete Imported Image).
To delete all images from the selected image area, click
(Delete All Imported Images).
Note
See Help for details on the Select Images screen.
Page top
Editing
Page 137 of 681 pages
Advanced Guide > Printing from a Computer > Printing with the Bundled Application Software > Printing Calendars >
Editing
Editing
1. Click Edit.
The Edit screen appears.
2. Edit the calendar if necessary.
Changing Layout
Changing Background
Adding Photos
Swapping Positions of Photos
Replacing Photos
Changing Position, Angle and Size of Photos
Cropping Photos
Framing Photos
Printing Dates on Photos
Adding Text to Photos
Setting Calendar Display
Setting Holidays
Note
The edit information will be discarded if you exit Easy-PhotoPrint EX without saving the edited
calendar. It is recommended that you save the item if you want to edit it again.
Saving
See Help for details on the Edit screen.
Page top
Printing
Page 138 of 681 pages
Advanced Guide > Printing from a Computer > Printing with the Bundled Application Software > Printing Calendars >
Printing
Printing
1. Click Print Settings.
The Print Settings screen appears.
2. Set the following items according to the printer and paper to be used:
Printer
Media Type
Copies
Paper Source
Print Quality
Borderless Printing
Note
The media types may vary depending on the printer and the paper size.
Duplex Printing appears if the selected printer and media type support duplex printing. Select
this checkbox to print on both sides of the paper.
Automatic appears if you select the Duplex Printing checkbox after selecting a printer that
supports automatic duplex printing and media type that supports duplex printing. Select this
checkbox to print on both sides of the paper automatically.
The paper sources may vary depending on the printer and the media type.
You can set a custom print quality level in the Print Quality Settings dialog box. To display the
Print Quality Settings dialog box, select Custom for Print Quality and click Quality Settings....
You can specify the print range and the amount of extension for borderless printing in the Print
Settings dialog box. To display the Print Settings dialog box, click Advanced....
3. Click Print.
Note
See Help for details on the Print Settings screen.
Page top
Printing Stickers
Page 139 of 681 pages
Advanced Guide > Printing from a Computer > Printing with the Bundled Application Software > Printing Stickers
Printing Stickers
You can print your favorite photos on compatible sticker sheets.
Steps
1. Starting Easy-PhotoPrint EX
2. Selecting the Paper and Layout
3. Selecting a Photo
4. Editing
5. Printing
Try This
Correcting and Enhancing Photos
Adding Photos
Swapping Positions of Photos
Replacing Photos
Changing Position, Angle and Size of Photos
Cropping Photos
Framing Photos
Adding Text to Photos
Saving
Opening Saved Files
Questions and Answers
How Can I Move (or Copy) the Saved File?
Page top
Starting Easy-PhotoPrint EX
Page 140 of 681 pages
Advanced Guide > Printing from a Computer > Printing with the Bundled Application Software > Printing Stickers >
Starting Easy-PhotoPrint EX
Starting Easy-PhotoPrint EX
1. From the Start menu, select (All) Programs > Canon Utilities > Easy-PhotoPrint EX
> Easy-PhotoPrint EX.
Easy-PhotoPrint EX starts and Menu appears.
Page top
Selecting the Paper and Layout
Page 141 of 681 pages
Advanced Guide > Printing from a Computer > Printing with the Bundled Application Software > Printing Stickers >
Selecting the Paper and Layout
Selecting the Paper and Layout
1. Click Stickers from Menu.
The Page Setup screen appears.
2. Set the following items in the General Settings section:
Paper Size
Orientation
Print date
Use the same image in all frames
Note
Paper sizes other than Photo Stickers cannot be selected.
Select the Use the same image in all frames checkbox to use the same image in all the
frames on the page.
You can customize the date (position, size and color) in the Date Settings dialog box. To
display the Date Settings dialog box, select the Print date checkbox and click Date Settings....
Note
See Help for details on the Page Setup screen.
Page top
Selecting a Photo
Page 142 of 681 pages
Advanced Guide > Printing from a Computer > Printing with the Bundled Application Software > Printing Stickers >
Selecting a Photo
Selecting a Photo
1. Click Select Images.
The Select Images screen appears.
2. Select the folder that contains the image you want to print from the folder tree area.
The images in the folder will be displayed as thumbnails (miniatures).
3. Select the image(s) you want to print and click
(Import to Inside Pages).
The selected images are displayed in the selected image area.
You can also select the image(s) you want to print by dragging them into the selected image area.
Note
To delete an image in the selected image area, select the image you want to delete and click
(Delete Imported Image).
To delete all images from the selected image area, click
(Delete All Imported Images).
Note
See Help for details on the Select Images screen.
Page top
Editing
Page 143 of 681 pages
Advanced Guide > Printing from a Computer > Printing with the Bundled Application Software > Printing Stickers > Editing
Editing
1. Click Edit.
The Edit screen appears.
2. Edit the stickers if necessary.
Adding Photos
Swapping Positions of Photos
Replacing Photos
Changing Position, Angle and Size of Photos
Cropping Photos
Printing Dates on Photos
Adding Text to Photos
Note
The edit information will be discarded if you exit Easy-PhotoPrint EX without saving the edited
stickers. It is recommended that you save the item if you want to edit it again.
Saving
See Help for details on the Edit screen.
Page top
Printing
Page 144 of 681 pages
Advanced Guide > Printing from a Computer > Printing with the Bundled Application Software > Printing Stickers >
Printing
Printing
1. Click Print Settings.
The Print Settings screen appears.
2. Set the following items according to the printer and paper to be used:
Printer
Media Type
Copies
Paper Source
Print Quality
Borderless Printing
Note
The media types may vary depending on the printer and the paper size.
The paper sources may vary depending on the printer and the media type.
You can set a custom print quality level in the Print Quality Settings dialog box. To display the
Print Quality Settings dialog box, select Custom for Print Quality and click Quality Settings....
You can adjust the printing position in the Adjust Print Position dialog box. To display the Adjust
Print Position dialog box, click Print Position....
You can specify the print range and the amount of extension for borderless printing in the Print
Settings dialog box. To display the Print Settings dialog box, click Advanced....
3. Click Print.
Note
See Help for details on the Print Settings screen.
Page top
Printing Layout
Page 145 of 681 pages
Advanced Guide > Printing from a Computer > Printing with the Bundled Application Software > Printing Layout
Printing Layout
You can add text to your favorite photos and print them in a variety of layouts.
Steps
1. Starting Easy-PhotoPrint EX
2. Selecting the Paper and Layout
3. Selecting a Photo
4. Editing
5. Printing
Try This
Correcting and Enhancing Photos
Changing Layout
Adding Photos
Swapping Positions of Photos
Replacing Photos
Changing Position, Angle and Size of Photos
Cropping Photos
Printing Dates on Photos
Adding Text to Photos
Saving
Opening Saved Files
Questions and Answers
How Can I Move (or Copy) the Saved File?
Page top
Starting Easy-PhotoPrint EX
Page 146 of 681 pages
Advanced Guide > Printing from a Computer > Printing with the Bundled Application Software > Printing Layout > Starting
Easy-PhotoPrint EX
Starting Easy-PhotoPrint EX
1. From the Start menu, select (All) Programs > Canon Utilities > Easy-PhotoPrint EX
> Easy-PhotoPrint EX.
Easy-PhotoPrint EX starts and Menu appears.
Page top
Selecting the Paper and Layout
Page 147 of 681 pages
Advanced Guide > Printing from a Computer > Printing with the Bundled Application Software > Printing Layout >
Selecting the Paper and Layout
Selecting the Paper and Layout
1. Click Layout Print from Menu.
The Page Setup screen appears.
2. Set the following items in the General Settings section:
Paper Size
Orientation
Print date
Note
See Help on the paper size that can be selected.
You can customize the date (position, size and color) in the Date Settings dialog box. To
display the Date Settings dialog box, select the Print date checkbox and click Date Settings....
3. Select a layout from Layouts.
Note
The layouts displayed may vary depending on the Orientation.
Note
See Help for details on the Page Setup screen.
Page top
Selecting a Photo
Page 148 of 681 pages
Advanced Guide > Printing from a Computer > Printing with the Bundled Application Software > Printing Layout >
Selecting a Photo
Selecting a Photo
1. Click Select Images.
The Select Images screen appears.
2. Select the folder that contains the image you want to print from the folder tree area.
The images in the folder will be displayed as thumbnails (miniatures).
3. Select the image(s) you want to print and click
(Import to Inside Pages).
The selected images are displayed in the selected image area.
You can also select the image(s) you want to print by dragging them into the selected image area.
Note
To delete an image in the selected image area, select the image you want to delete and click
(Delete Imported Image).
To delete all images from the selected image area, click
(Delete All Imported Images).
Note
See Help for details on the Select Images screen.
Page top
Editing
Page 149 of 681 pages
Advanced Guide > Printing from a Computer > Printing with the Bundled Application Software > Printing Layout > Editing
Editing
1. Click Edit.
The Edit screen appears.
2. Edit the layout if necessary.
Changing Layout
Adding Photos
Swapping Positions of Photos
Replacing Photos
Changing Position, Angle and Size of Photos
Cropping Photos
Printing Dates on Photos
Adding Text to Photos
Note
The edit information will be discarded if you exit Easy-PhotoPrint EX without saving the edited layout.
It is recommended that you save the item if you want to edit it again.
Saving
See Help for details on the Edit screen.
Page top
Printing
Page 150 of 681 pages
Advanced Guide > Printing from a Computer > Printing with the Bundled Application Software > Printing Layout > Printing
Printing
1. Click Print Settings.
The Print Settings screen appears.
2. Set the following items according to the printer and paper to be used:
Printer
Media Type
Copies
Paper Source
Print Quality
Borderless Printing
Note
The media types may vary depending on the printer and the paper size.
Duplex Printing appears if the selected printer and media type support duplex printing. Select
this checkbox to print on both sides of the paper.
Automatic appears if you select the Duplex Printing checkbox after selecting a printer that
supports automatic duplex printing and media type that supports duplex printing. Select this
checkbox to print on both sides of the paper automatically.
The paper sources may vary depending on the printer and the media type.
You can set a custom print quality level in the Print Quality Settings dialog box. To display the
Print Quality Settings dialog box, select Custom for Print Quality and click Quality Settings....
Select the Borderless Printing checkbox to print borderless photos.
You can specify the print range and the amount of extension for borderless printing in the Print
Settings dialog box. To display the Print Settings dialog box, click Advanced....
3. Click Print.
Note
See Help for details on the Print Settings screen.
Page top
Correcting and Enhancing Photos
Page 151 of 681 pages
Advanced Guide > Printing from a Computer > Printing with the Bundled Application Software > Correcting and
Enhancing Photos
Correcting and Enhancing Photos
You can correct and enhance images.
(Correct/Enhance Images) in the Select Images or Edit screen, or in the Layout/Print screen of
Click
Photo Print. You can make the following corrections and enhancements in the Correct/Enhance Images
window.
Important
For Photo Print, if you select Enable ICC Profile in the Advanced tab of the Preferences dialog box,
you cannot correct/enhance images.
Note
See "Correct/Enhance Images Window " for details on the Correct/Enhance Images window.
Auto Photo Fix
This function will automatically analyze the captured scene and apply suitable corrections.
Using the Auto Photo Fix Function
Red-Eye Correction Function
You can correct red eyes caused by a camera flash.
Using the Red-Eye Correction Function
Face Brightener Function
You can brighten dark faces caused by bright background.
Using the Face Brightener Function
Face Sharpener Function
You can sharpen out-of-focus faces in a photo.
Using the Face Sharpener Function
Digital Face Smoothing Function
You can enhance skin beautifully by removing blemishes and wrinkles.
Using the Digital Face Smoothing Function
Blemish Remover Function
You can remove moles.
Using the Blemish Remover Function
Image Adjustment
You can make fine adjustments to the overall brightness, contrast, etc. of images.
Adjusting Images
Page top
Using the Auto Photo Fix Function
Page 152 of 681 pages
Advanced Guide > Printing from a Computer > Printing with the Bundled Application Software > Correcting and
Enhancing Photos > Using the Auto Photo Fix Function
Using the Auto Photo Fix Function
Apply optimum corrections automatically to the photos used for an album or calendar.
Important
The Auto Photo Fix function is not available for Photo Print. Photo Print allows you to automatically
apply suitable corrections to all photos when printing. Select this option in Image on the Advanced
tab of the Preferences dialog box. To display the Preferences dialog box, click
(Settings) in the
Layout/Print screen or select Preferences... from the File menu.
Once image is corrected with Auto Photo Fix and saved, it cannot be corrected again with Auto
Photo Fix.
Also, Auto Photo Fix may not be available for images edited using an application, digital camera,
etc. manufactured by other companies.
1. Select photos in the Select Images screen, then click
(Correct/Enhance
Images).
The Correct/Enhance Images window appears.
Note
(Correct/Enhance
You can also display the Correct/Enhance Images window by clicking
Images) in the Layout/Print or Edit screen. In that case, only the image displayed in Preview
can be corrected/enhanced.
See "Correct/Enhance Images Window " for details on the Correct/Enhance Images window.
2. Select the image you want to correct from the list displayed in the lower part of the
Correct/Enhance Images window.
The image appears in Preview.
Note
If only one image is selected, the thumbnail does not appear below Preview.
3. Make sure that Auto is selected.
Using the Auto Photo Fix Function
Page 153 of 681 pages
4. Click Auto Photo Fix, then click OK.
The entire photo is corrected automatically and the
the upper left of the image.
(Correction/Enhancement) mark appears on
Note
(Compare) to display the images before and after the correction side by side so that
Click
you can compare and check the result.
Click Reset Selected Image to undo the correction operation.
If you want to apply the correction to all the selected images at once, select the Apply to all
images checkbox.
5. Click Save Selected Image or Save All Corrected Images.
You can save corrected images as new files.
Note
To save only the image you like, click Save Selected Image. To save all images, click Save All
Corrected Images.
Only JPEG/Exif file format is available for corrected images.
6. Click Exit.
Note
The corrections will be lost if you exit before saving corrected images.
Page top
Using the Red-Eye Correction Function
Page 154 of 681 pages
Advanced Guide > Printing from a Computer > Printing with the Bundled Application Software > Correcting and
Enhancing Photos > Using the Red-Eye Correction Function
Using the Red-Eye Correction Function
You can correct red eyes caused by a camera flash.
You can perform the Red-Eye Correction function either automatically or manually.
Note
Photo Print allows you to automatically correct red eyes when printing. To correct automatically,
select Enable Auto Photo Fix in Color correction for printing on the Advanced tab of the Preferences
dialog box and select the Enable Red-Eye Correction checkbox.
1. Select photos in the Select Images screen, then click
(Correct/Enhance
Images).
The Correct/Enhance Images window appears.
Note
(Correct/Enhance
You can also display the Correct/Enhance Images window by clicking
Images) in the Layout/Print or Edit screen. In that case, only the image displayed in Preview
can be corrected/enhanced.
See "Correct/Enhance Images Window " for details on the Correct/Enhance Images window.
2. Select the image you want to correct from the list displayed in the lower part of the
Correct/Enhance Images window.
The image appears in Preview.
Note
If only one image is selected, the thumbnail does not appear below Preview.
Auto Correction
3. Make sure that Auto is selected.
4. Click Red-Eye Correction.
Using the Red-Eye Correction Function
Page 155 of 681 pages
5. Click OK.
Red eyes are corrected and the
the image.
(Correction/Enhancement) mark appears on the upper left of
Important
Areas other than the eyes may be corrected depending on the image.
Note
(Compare) to display the images before and after the correction side by side so that
Click
you can compare and check the result.
Click Reset Selected Image to undo the correction operation.
If you want to apply the correction to all the selected images at once, select the Apply to all
images checkbox.
Manual Correction
3. Click Manual, then click Correct/Enhance.
4. Click Red-Eye Correction.
Move the cursor over the image. The shape of the cursor changes to
(Paintbrush).
5. Drag to select the red area you want to correct, then click OK that appears over the
image.
Red eye is corrected and the
(Correction/Enhancement) mark appears on the upper left of the
image.
Note
Click Undo to undo the preceding correction operation.
Effect levels can be changed using the slider below Red-Eye Correction.
Using the Red-Eye Correction Function
Page 156 of 681 pages
6. Click Save Selected Image or Save All Corrected Images.
You can save corrected images as new files.
Note
To save only the image you like, click Save Selected Image. To save all images, click Save All
Corrected Images.
Only JPEG/Exif file format is available for corrected images.
7. Click Exit.
Note
The corrections will be lost if you exit before saving corrected images.
Page top
Using the Face Brightener Function
Page 157 of 681 pages
Advanced Guide > Printing from a Computer > Printing with the Bundled Application Software > Correcting and
Enhancing Photos > Using the Face Brightener Function
Using the Face Brightener Function
You can brighten dark faces caused by bright background.
1. Select photos in the Select Images screen, then click
(Correct/Enhance
Images).
The Correct/Enhance Images window appears.
Note
(Correct/Enhance
You can also display the Correct/Enhance Images window by clicking
Images) in the Layout/Print or Edit screen. In that case, only the image displayed in Preview
can be corrected/enhanced.
See "Correct/Enhance Images Window " for details on the Correct/Enhance Images window.
2. Select the image you want to correct from the list displayed in the lower part of the
Correct/Enhance Images window.
The image appears in Preview.
Note
If only one image is selected, the thumbnail does not appear below Preview.
3. Click Manual, then click Correct/Enhance.
4. Click Face Brightener.
Move the cursor over the image. The shape of the cursor changes to
(Cross).
Using the Face Brightener Function
Page 158 of 681 pages
5. Drag to select the area you want to correct, then click OK that appears over the
image.
The entire image is corrected so that the selected area containing the face becomes brighter, and
the
(Correction/Enhancement) mark appears on the upper left of the image.
Note
You can also drag to rotate the rectangle.
Click Undo to undo the preceding correction operation.
Effect levels can be changed using the slider below Face Brightener.
6. Click Save Selected Image or Save All Corrected Images.
You can save corrected images as new files.
Note
To save only the image you like, click Save Selected Image. To save all images, click Save All
Corrected Images.
Only JPEG/Exif file format is available for corrected images.
7. Click Exit.
Note
The corrections will be lost if you exit before saving corrected images.
Page top
Using the Face Sharpener Function
Page 159 of 681 pages
Advanced Guide > Printing from a Computer > Printing with the Bundled Application Software > Correcting and
Enhancing Photos > Using the Face Sharpener Function
Using the Face Sharpener Function
You can sharpen out-of-focus faces in a photo.
You can perform the Face Sharpener function either automatically or manually.
1. Select photos in the Select Images screen, then click
(Correct/Enhance
Images).
The Correct/Enhance Images window appears.
Note
You can also display the Correct/Enhance Images window by clicking
(Correct/Enhance
Images) in the Layout/Print or Edit screen. In that case, only the image displayed in Preview
can be corrected/enhanced.
See "Correct/Enhance Images Window " for details on the Correct/Enhance Images window.
2. Select the image you want to correct from the list displayed in the lower part of the
Correct/Enhance Images window.
The image appears in Preview.
Note
If only one image is selected, the thumbnail does not appear below Preview.
Auto Correction
3. Make sure that Auto is selected.
4. Click Face Sharpener.
5. Click OK.
The face is sharpened and the
image.
(Correction/Enhancement) mark appears on the upper left of the
Using the Face Sharpener Function
Page 160 of 681 pages
Note
Effect levels can be changed using the slider below Face Sharpener.
(Compare) to display the images before and after the correction side by side so that
Click
you can compare and check the result.
Click Reset Selected Image to undo the correction operation.
If you want to apply the correction to all the selected images at once, select the Apply to all
images checkbox.
Manual Correction
3. Click Manual, then click Correct/Enhance.
4. Click Face Sharpener.
Move the cursor over the image. The shape of the cursor changes to
(Cross).
5. Drag to select the area you want to correct, then click OK that appears over the
image.
The facial area in and around the selected area is sharpened and the
Enhancement) mark appears on the upper left of the image.
(Correction/
Note
You can also drag to rotate the rectangle.
Click Undo to undo the preceding correction operation.
Effect levels can be changed using the slider below Face Sharpener.
6. Click Save Selected Image or Save All Corrected Images.
You can save corrected images as new files.
Note
To save only the image you like, click Save Selected Image. To save all images, click Save All
Corrected Images.
Using the Face Sharpener Function
Page 161 of 681 pages
Only JPEG/Exif file format is available for corrected images.
7. Click Exit.
Note
The corrections will be lost if you exit before saving corrected images.
Page top
Using the Digital Face Smoothing Function
Page 162 of 681 pages
Advanced Guide > Printing from a Computer > Printing with the Bundled Application Software > Correcting and
Enhancing Photos > Using the Digital Face Smoothing Function
Using the Digital Face Smoothing Function
You can enhance skin beautifully by removing blemishes and wrinkles.
You can perform the Digital Face Smoothing function either automatically or manually.
1. Select photos in the Select Images screen, then click
(Correct/Enhance
Images).
The Correct/Enhance Images window appears.
Note
You can also display the Correct/Enhance Images window by clicking
(Correct/Enhance
Images) in the Layout/Print or Edit screen. In that case, only the image displayed in Preview
can be corrected/enhanced.
See "Correct/Enhance Images Window " for details on the Correct/Enhance Images window.
2. Select the image you want to enhance from the list displayed in the lower part of the
Correct/Enhance Images window.
The image appears in Preview.
Note
If only one image is selected, the thumbnail does not appear below Preview.
Auto Enhancement
3. Make sure that Auto is selected.
4. Click Digital Face Smoothing.
5. Click OK.
Skin is enhanced beautifully and the
of the image.
(Correction/Enhancement) mark appears on the upper left
Using the Digital Face Smoothing Function
Page 163 of 681 pages
Note
Effect levels can be changed using the slider below Digital Face Smoothing.
(Compare) to display the images before and after the enhancement side by side so
Click
that you can compare and check the result.
Click Reset Selected Image to undo the enhancement operation.
If you want to apply the enhancement to all the selected images at once, select the Apply to all
images checkbox.
Manual Enhancement
3. Click Manual, then click Correct/Enhance.
4. Click Digital Face Smoothing.
Move the cursor over the image. The shape of the cursor changes to
(Cross).
5. Drag to select the area you want to enhance, then click OK that appears over the
image.
Skin in and around the selected area is enhanced beautifully and the
mark appears on the upper left of the image.
(Correction/Enhancement)
Note
You can also drag to rotate the rectangle.
Click Undo to undo the preceding enhancement operation.
Effect levels can be changed using the slider below Digital Face Smoothing.
6. Click Save Selected Image or Save All Corrected Images.
You can save enhanced images as new files.
Note
To save only the image you like, click Save Selected Image. To save all images, click Save All
Corrected Images.
Using the Digital Face Smoothing Function
Page 164 of 681 pages
Only JPEG/Exif file format is available for enhanced images.
7. Click Exit.
Note
The enhancements will be lost if you exit before saving enhanced images.
Page top
Using the Blemish Remover Function
Page 165 of 681 pages
Advanced Guide > Printing from a Computer > Printing with the Bundled Application Software > Correcting and
Enhancing Photos > Using the Blemish Remover Function
Using the Blemish Remover Function
You can remove moles.
1. Select photos in the Select Images screen, then click
(Correct/Enhance
Images).
The Correct/Enhance Images window appears.
Note
(Correct/Enhance
You can also display the Correct/Enhance Images window by clicking
Images) in the Layout/Print or Edit screen. In that case, only the image displayed in Preview
can be corrected/enhanced.
See "Correct/Enhance Images Window " for details on the Correct/Enhance Images window.
2. Select the image you want to enhance from the list displayed in the lower part of the
Correct/Enhance Images window.
The image appears in Preview.
Note
If only one image is selected, the thumbnail does not appear below Preview.
3. Click Manual, then click Correct/Enhance.
4. Click Blemish Remover.
Move the cursor over the image. The shape of the cursor changes to
(Cross).
Using the Blemish Remover Function
Page 166 of 681 pages
5. Drag to select the area you want to enhance, then click OK that appears over the
image.
Moles in and around the selected area are removed and the
appears on the upper left of the image.
(Correction/Enhancement) mark
Note
Click Undo to undo the preceding enhancement operation.
6. Click Save Selected Image or Save All Corrected Images.
You can save enhanced images as new files.
Note
To save only the image you like, click Save Selected Image. To save all images, click Save All
Corrected Images.
Only JPEG/Exif file format is available for enhanced images.
7. Click Exit.
Note
The enhancements will be lost if you exit before saving enhanced images.
Page top
Adjusting Images
Page 167 of 681 pages
Advanced Guide > Printing from a Computer > Printing with the Bundled Application Software > Correcting and
Enhancing Photos > Adjusting Images
Adjusting Images
You can make fine adjustments to the overall brightness, contrast, etc. of images.
1. Select photos in the Select Images screen, then click
(Correct/Enhance
Images).
The Correct/Enhance Images window appears.
Note
(Correct/Enhance
You can also display the Correct/Enhance Images window by clicking
Images) in the Layout/Print or Edit screen. In that case, only the image displayed in Preview
can be corrected/enhanced.
See "Correct/Enhance Images Window " for details on the Correct/Enhance Images window.
2. Select the image you want to adjust from the list displayed in the lower part of the
Correct/Enhance Images window.
The image appears in Preview.
Note
If only one image is selected, the thumbnail does not appear below Preview.
3. Click Manual, then click Adjust.
4. Move the slider of the item you want to adjust and set the effect level.
The following adjustments are available:
Brightness
Contrast
Sharpness
Blur
Show-through Removal
Adjusting Images
Page 168 of 681 pages
Note
Click Defaults to reset all adjustments.
5. Click Save Selected Image or Save All Corrected Images.
You can save adjusted images as new files.
Note
To save only the image you like, click Save Selected Image. To save all images, click Save All
Corrected Images.
Only JPEG/Exif file format is available for adjusted images.
6. Click Exit.
Note
The adjustments will be lost if you exit before saving adjusted images.
Page top
Correct/Enhance Images Window
Page 169 of 681 pages
Advanced Guide > Printing from a Computer > Printing with the Bundled Application Software > Correcting and
Enhancing Photos > Correct/Enhance Images Window
Correct/Enhance Images Window
You can correct/enhance images in this window.
To display the Correct/Enhance Images window, click
(Correct/Enhance Images) in the Select
Images or Edit screen, or in the Layout/Print screen of Photo Print.
(1)Toolbar
Toolbar
(Zoom In/Zoom Out)
Displays the enlarged or reduced preview of the page.
(Full Screen)
Displays the entire image in Preview.
(Compare)
Displays the Compare Images window. You can compare the images before and after the correction
side by side.
The image before the correction/enhancement is displayed on the left, and the image after the
correction/enhancement is displayed on the right.
Correct/Enhance Images Window
Page 170 of 681 pages
(2)Task Area
Available tasks and settings may vary between the Auto and Manual tabs.
Click Auto or Manual to display the corresponding tab.
Auto Tab
Select to correct automatically.
Auto Photo Fix
Applies automatic corrections suitable for photos.
Important
The Auto Photo Fix function is not available for Photo Print. Photo Print allows you to
automatically apply suitable corrections to all photos when printing. Select this option in Image
on the Advanced tab of the Preferences dialog box. To display the Preferences dialog box, click
(Settings) in the Layout/Print screen or select Preferences... from the File menu.
Red-Eye Correction
Corrects red eyes.
Note
For Photo Print, you can also correct red eyes by selecting Enable Auto Photo Fix in Color
correction for printing on the Advanced tab of the Preferences dialog box and selecting the
Enable Red-Eye Correction checkbox.
Correct/Enhance Images Window
Page 171 of 681 pages
Face Sharpener
Sharpens out-of-focus faces.
You can adjust the effect level using the slider.
Digital Face Smoothing
Enhances skin beautifully by removing blemishes and wrinkles.
You can adjust the effect level using the slider.
Apply to all images
Automatically corrects all the images displayed in the list.
OK
Applies the selected effect to the selected image or all images.
Reset Selected Image
Cancels all corrections and enhancements applied to the selected image.
Save Selected Image
Saves the selected image.
Save All Corrected Images
Saves all the images displayed in the list.
Exit
Click to close the Correct/Enhance Images window.
Manual Tab
Select to correct manually.
Use Adjust to adjust brightness and contrast, or to sharpen the entire image.
Use Correct/Enhance to correct/enhance specific areas.
Adjust
Brightness
Adjusts the overall image brightness.
Move the slider to the left to darken and right to brighten the image.
Contrast
Adjusts the contrast of the image. Adjust the contrast when the image is flat due to lack of contrast.
Move the slider to the left to decrease and right to increase the contrast of the image.
Sharpness
Emphasizes the outline of the subjects to sharpen the image. Adjust the sharpness when the photo
is out of focus or text is blurred.
Move the slider to the right to sharpen the image.
Correct/Enhance Images Window
Page 172 of 681 pages
Blur
Blurs the outline of the subjects to soften the image.
Move the slider to the right to soften the image.
Show-through Removal
Removes show-through of text from the reverse side or removes the base color. Adjust the showthrough level to prevent text on the reverse side of thin document or the base color of the document
from appearing on the image.
Move the slider to the right to increase the show-through removal effect.
Defaults
Resets all adjustments (brightness, contrast, sharpness, blur, and show-through removal).
Reset Selected Image
Cancels all adjustments applied to the selected image.
Save Selected Image
Saves the selected image.
Save All Corrected Images
Saves all the images displayed in the list.
Exit
Click to close the Correct/Enhance Images window.
Correct/Enhance
Red-Eye Correction
Corrects red eyes.
You can specify the area you want to apply the effect to. You can adjust the effect level using the
slider.
Note
For Photo Print, red eyes are automatically corrected when Enable Auto Photo Fix is selected in
Color correction for printing on the Advanced tab of the Preferences dialog box and the Enable
Red-Eye Correction checkbox is selected. To disable the automatic correction, deselect the
checkbox.
Face Brightener
Corrects the entire image so that the selected facial area is brightened.
You can adjust the effect level using the slider.
Face Sharpener
Sharpens out-of-focus faces.
You can specify the area you want to apply the effect to. You can adjust the effect level using the
slider.
Correct/Enhance Images Window
Page 173 of 681 pages
Digital Face Smoothing
Enhances skin beautifully by removing blemishes and wrinkles.
You can specify the area you want to apply the effect to. You can adjust the effect level using the
slider.
Blemish Remover
Removes moles.
You can specify the area you want to apply the effect to.
Undo
Cancels the latest correction/enhancement.
OK
Applies the selected effect to the specified area.
Reset Selected Image
Cancels all corrections and enhancements applied to the selected image.
Save Selected Image
Saves the selected image.
Save All Corrected Images
Saves all the images displayed in the list.
Exit
Click to close the Correct/Enhance Images window.
Page top
Questions and Answers
Page 174 of 681 pages
Advanced Guide > Printing from a Computer > Printing with the Bundled Application Software > Questions and Answers
Questions and Answers
How Can I Move (or Copy) the Saved File?
Which Side of the Displayed Image Does the Printing Start from?
How Do I Print with Even Margins?
What Is "C1" or "C4"?
Page top
How Can I Move (or Copy) the Saved File?
Page 175 of 681 pages
Advanced Guide > Printing from a Computer > Printing with the Bundled Application Software > Questions and Answers
> How Can I Move (or Copy) the Saved File?
How Can I Move (or Copy) the Saved File?
If you want to move (or copy) a file created and saved with Easy-PhotoPrint EX from one folder to another,
you need to move (or copy) the folder that was automatically created when originally saving that file as
well.
For example, when you save a file named "MyAlbum.el1," a folder named "MyAlbum.el1.Data" is
automatically created in the same folder that contains the "MyAlbum.el1" file. If you want to move (or copy)
the "MyAlbum.el1" file to another folder, move (or copy) the "MyAlbum.el1.Data" folder as well.
The "MyAlbum.el1.Data" folder contains the photos used in the album.
Note
The icons may vary depending on the items.
Important
Do not change the Data folder name; otherwise you will not be able to display the photos you edited
with Easy-PhotoPrint EX.
Page top
Which Side of the Displayed Image Does the Printing Start from?
Page 176 of 681 pages
Advanced Guide > Printing from a Computer > Printing with the Bundled Application Software > Questions and Answers
> Which Side of the Displayed Image Does the Printing Start from?
Which Side of the Displayed Image Does the Printing Start
from?
As shown below, printing starts from the left side of the image displayed in the Layout/Print screen.
Outputs the paper in the direction as the arrow indicates.
See your printer manual for details on how to load paper (to print on the front/back, etc.).
Page top
How Do I Print with Even Margins?
Page 177 of 681 pages
Advanced Guide > Printing from a Computer > Printing with the Bundled Application Software > Questions and Answers
> How Do I Print with Even Margins?
How Do I Print with Even Margins?
When you print on a bordered layout, the margins on the left and right or the top and bottom may become
wider than the other, depending on the image and printer.
To always print with even margins, select the Always crop images when selecting a layout with margins
checkbox on the Advanced tab of the Preferences dialog box.
To display the Preferences dialog box, click
Preferences... from the File menu.
(Settings) in the Layout/Print screen or select
Crop the photo to apply even margins individually.
Cropping Photos (Photo Print)
Note
The following setting is available for Photo Print only.
Page top
What Is "C1" or "C4"?
Page 178 of 681 pages
Advanced Guide > Printing from a Computer > Printing with the Bundled Application Software > Questions and Answers
> What Is "C1" or "C4"?
What Is "C1" or "C4"?
When an album is printed, labels such as "C1" and "C4" are printed as page numbers.
The "C1" and "C4" represent the front cover and back cover, respectively.
C1: Front cover
C2: Inside the front cover
C3: Inside the back cover
C4: Back cover
Page top
Appendix 1: Easy-PhotoPrint EX Settings
Page 179 of 681 pages
Advanced Guide > Printing from a Computer > Printing with the Bundled Application Software > Appendix 1: EasyPhotoPrint EX Settings
Appendix 1: Easy-PhotoPrint EX Settings
Printing Vivid Photos
Reducing Photo Noise
Cropping Photos (Photo Print)
Printing Dates on Photos (Photo Print)
Printing Multiple Photos on One Page
Printing an Index
Printing ID Photos (ID Photo Print)
Printing Photo Information
Saving Photos
Opening Saved Files
Changing Layout
Changing Background
Adding Photos
Swapping Positions of Photos
Replacing Photos
Changing Position, Angle and Size of Photos
Cropping Photos
Framing Photos
Printing Dates on Photos
Attaching Comments to Photos
Adding Text to Photos
Saving
Setting Holidays
Setting Calendar Display
Page top
Printing Vivid Photos
Page 180 of 681 pages
Advanced Guide > Printing from a Computer > Printing with the Bundled Application Software > Appendix 1: EasyPhotoPrint EX Settings > Printing Vivid Photos
Printing Vivid Photos
Select the Vivid Photo checkbox in the Select Paper screen to boost the colors in a photo before printing.
Important
This function is available only with a printer that supports Vivid Photo.
This function is not available when Enable ICC Profile is selected on the Advanced tab of the
Preferences dialog box.
Note
Even if you select the Vivid Photo checkbox, this effect applies only to the print result. The original
image or preview image will not be affected.
Page top
Reducing Photo Noise
Page 181 of 681 pages
Advanced Guide > Printing from a Computer > Printing with the Bundled Application Software > Appendix 1: EasyPhotoPrint EX Settings > Reducing Photo Noise
Reducing Photo Noise
When a photo is taken in a dark location such as night scene using digital camera, noise may appear in
the image.
Select the Photo Noise Reduction checkbox in the Select Paper screen to reduce noise in the image and
make the printed photos more vivid.
Important
This function is not available when Enable ICC Profile is selected on the Advanced tab of the
Preferences dialog box.
Note
When the noise is severe, change Normal to Strong.
The noise reduction effect applies only to the print result. The original image or preview image will
not be affected.
Page top
Cropping Photos (Photo Print)
Page 182 of 681 pages
Advanced Guide > Printing from a Computer > Printing with the Bundled Application Software > Appendix 1: EasyPhotoPrint EX Settings > Cropping Photos (Photo Print)
Cropping Photos (Photo Print)
Cropping a photo is the act of removing the unnecessary portions of the photo by selecting the
necessary portions.
Click
(Crop Image) in the Layout/Print screen.
Move the white frame to the portion to print and click OK.
Note
To move the cropping area, place the cursor within the white frame and drag it. Drag the white lines
to enlarge/reduce the cropping area.
Select the The Rule of Thirds checkbox to display white broken lines. To create a balanced
composition, drag any of the intersecting points (white squares) or white broken lines over the main
subject of the photo.
The cropping effect applies only to the print result. The original image will not be cropped.
See Help for details on the Crop window.
Page top
Printing Dates on Photos (Photo Print)
Page 183 of 681 pages
Advanced Guide > Printing from a Computer > Printing with the Bundled Application Software > Appendix 1: EasyPhotoPrint EX Settings > Printing Dates on Photos (Photo Print)
Printing Dates on Photos (Photo Print)
To print the date the photo was taken on the photo, click
(Date Settings) in the Layout/Print screen,
then select the Print date checkbox in the Date Settings dialog box.
Note
The date is displayed in the short date format (mm/dd/yyyy, etc.) specified in your operating system.
In the Date Settings dialog box, you can change the orientation, position, size and color of the date
according to the orientation and background of the photo. See Help for details.
Page top
Printing Multiple Photos on One Page
Page 184 of 681 pages
Advanced Guide > Printing from a Computer > Printing with the Bundled Application Software > Appendix 1: EasyPhotoPrint EX Settings > Printing Multiple Photos on One Page
Printing Multiple Photos on One Page
You can print multiple photos on one page by selecting a multiple-photo layout in the Layout/Print screen.
Note
See the following section for details on how to select photos.
Selecting a Photo
The available number of photos and layout may vary depending on the media type.
Photos are arranged in the following order.
Example: Borderless (x4)
You can change the printing order in Printing Order on the Print tab of the Preferences dialog box.
You can select the printing order from By Date, By Name and By Selection.
To display the Preferences dialog box, click
menu.
(Settings) or select Preferences... from the File
Page top
Printing an Index
Page 185 of 681 pages
Advanced Guide > Printing from a Computer > Printing with the Bundled Application Software > Appendix 1: EasyPhotoPrint EX Settings > Printing an Index
Printing an Index
You can print an index of selected photos. An index print shows the thumbnails of the photos in one
page. It is convenient for managing your photos.
To print an index, select Index from the layouts in the Layout/Print screen.
Note
See the following section for details on how to select photos.
Selecting a Photo
Index print will be disabled if you select any of the following paper sizes.
- Credit Card
- Fine Art A4
- Fine Art A3
- Fine Art A3+
- Fine Art Letter
Up to 80 thumbnails can be printed on one page.
Photos are arranged in the following order.
Example: Index (x20)
You can change the printing order in Printing Order on the Print tab of the Preferences dialog box.
You can select the printing order from By Date, By Name, and By Selection.
To display the Preferences dialog box, click
menu.
(Settings) or select Preferences... from the File
Page top
Printing ID Photos (ID Photo Print)
Page 186 of 681 pages
Advanced Guide > Printing from a Computer > Printing with the Bundled Application Software > Appendix 1: EasyPhotoPrint EX Settings > Printing ID Photos (ID Photo Print)
Printing ID Photos (ID Photo Print)
You can print a variety of ID photos.
Important
The photo may not qualify as an official ID photo depending on its use.
For details, contact the party to whom you will be submitting the photo.
To print ID photos, select 4"x6" 10x15cm for Paper Size in the Select Paper screen, and select a layout of
the ID photo from the layouts in the Layout/Print screen.
Note
See the following section for details on how to select photos.
Selecting a Photo
Photos are arranged in the following order.
Example: ID Photo 3.5x4.5cm
You can change the printing order in Printing Order on the Print tab of the Preferences dialog box.
You can select the printing order from By Date, By Name, and By Selection.
To display the Preferences dialog box, click
menu.
(Settings) or select Preferences... from the File
Page top
Printing Photo Information
Page 187 of 681 pages
Advanced Guide > Printing from a Computer > Printing with the Bundled Application Software > Appendix 1: EasyPhotoPrint EX Settings > Printing Photo Information
Printing Photo Information
Select Captured Info from the layouts in the Layout/Print screen to print the photo and the Exif information
side by side.
Note
See the following section for details on how to select photos.
Selecting a Photo
This function is available only on paper sizes Letter 8.5"x11" and A4.
Page top
Saving Photos
Page 188 of 681 pages
Advanced Guide > Printing from a Computer > Printing with the Bundled Application Software > Appendix 1: EasyPhotoPrint EX Settings > Saving Photos
Saving Photos
You can save edited photos. The information of cropping and layout can be saved.
Click Save in the Layout/Print screen.
When the Save As dialog box appears, specify the save location and file name, then click Save.
Important
If you edit a saved file and save it again, the file will be overwritten.
To save a file again with a new name or to a different location, select Save As... from the File menu
and save.
Note
Save will not be displayed in the Select Images or Select Paper screen.
Page top
Opening Saved Files
Page 189 of 681 pages
Advanced Guide > Printing from a Computer > Printing with the Bundled Application Software > Appendix 1: EasyPhotoPrint EX Settings > Opening Saved Files
Opening Saved Files
You can open files created with Easy-PhotoPrint EX.
1. Click Library from Menu.
The Open dialog box appears.
You can check files created and saved with Easy-PhotoPrint EX by icon view (only for Windows Vista)
or thumbnail view.
Important
When using 64bit Edition of Windows Vista or Windows XP, the contents of files cannot be
displayed on Explorer.
2. Select the file you want to open and click Open.
The Edit or Select Paper screen appears.
Note
Easy-PhotoPrint EX supports the following file formats (extensions).
- Easy-PhotoPrint EX Photo Print file (.el6)
- Easy-PhotoPrint EX Album file (.el1)
- Easy-PhotoPrint EX Stickers file (.el2)
- Easy-PhotoPrint EX Calendar file (.el4)
- Easy-PhotoPrint EX Layout file (.el5)
3. Edit the file if necessary.
Note
See the following sections for details on the editing procedures.
Editing Album
Editing Calendar
Editing Stickers
Editing Layout Print
Note
You can open files created with Easy-PhotoPrint EX with the following methods, besides from
Opening Saved Files
Page 190 of 681 pages
Library in Menu.
- Double-click or click the file.
- From the File menu, click Open..., then select the file you want to edit.
You can also open a recently used file by clicking the file name shown in the File menu.
Page top
Changing Layout
Page 191 of 681 pages
Advanced Guide > Printing from a Computer > Printing with the Bundled Application Software > Appendix 1: EasyPhotoPrint EX Settings > Changing Layout
Changing Layout
You can change the layout of each page separately.
Select the page you want to change the layout of in the Edit screen, then click
(Change Layout).
Select the layout you want to use in the Change Layout dialog box and click OK.
Album
Important
The album layouts that can be selected may vary depending on the Paper Size, Orientation, or the
type of page selected (front cover, inside pages or back cover).
If the new layout has a different number of frames per page from the current layout, the following will
happen:
: Images will move from the subsequent pages to fill all the frames
If the number of layout
in the new layout.
frames is increased
If the number of layout
: Pages with the new layout will be added until all the images on the
frames is decreased
pages with the current layout can be fitted.
If you change the selected layout for the front or back cover to one that has fewer layout frames, any
image that does not fit in the new layout will be deleted, starting with the last image that was added
to the former layout page.
Note
Select the Apply to all pages checkbox to change the layouts of all pages to the one you newly
selected.
Calendar
Changing Layout
Page 192 of 681 pages
Important
The layouts that can be selected may vary depending on the Paper Size and Orientation.
The layouts of all pages are changed to the selected layout.
All images that do not fit in the new layout will be collected on one page.
Layout Print
Important
The layouts that can be selected may vary depending on the Paper Size and Orientation.
If the new layout has a different number of frames per page from the current layout, the following will
happen:
: Images will move from the subsequent pages to fill all the frames
If the number of layout
in the new layout.
frames is increased
If the number of layout
frames is decreased
: Pages with the new layout will be added until all the images on the
pages with the current layout can be fitted.
Note
Select the Apply to all pages checkbox to change the layouts of all pages to the one you newly
selected.
Page top
Changing Background
Page 193 of 681 pages
Advanced Guide > Printing from a Computer > Printing with the Bundled Application Software > Appendix 1: EasyPhotoPrint EX Settings > Changing Background
Changing Background
You can change the background of each page.
Important
You cannot change the background of the Photo Print, Stickers, and Layout Print.
Select the page you want to change the background of in the Edit screen, then click
Background).
(Change
Note
The screens for Album printing are used as examples in the following descriptions. The screens
may vary depending on what you create.
Select the type of background you want to use in the Change Background dialog box.
When Select from samples is Selected
Select the image you want to use from Samples and click OK.
Note
Select from samples will be displayed only if Album has been selected.
When Single color is Selected
Select the color you want to use from Standard color or Custom color and click OK.
Changing Background
When Image file is Selected
Set Image File Path and Image Layout, then click OK.
Page 194 of 681 pages
Changing Background
Page 195 of 681 pages
Note
See Help for details on how to set the background in the Change Background dialog box.
Page top
Adding Photos
Page 196 of 681 pages
Advanced Guide > Printing from a Computer > Printing with the Bundled Application Software > Appendix 1: EasyPhotoPrint EX Settings > Adding Photos
Adding Photos
You can add images to pages.
Select the page you want to add photos in the Edit screen, then click
(Add Image).
Note
The screens for Album printing are used as examples in the following descriptions. The screens
may vary depending on what you create.
Select the folder containing the image you want to add from the folder tree area on the left of the Add
Image dialog box, and select the image you want to add from the thumbnail window on the right.
Note
Click an image to select it (background turns blue) or deselect it (background turns white). You can
also select multiple images.
Select an option for Add to and click OK.
Important
You can add up to 20 images at one time to a single page.
Up to 99 of the same images can be added to all pages combined.
You cannot add two or more of the same image at one time. In that case, add it one at a time.
If you increase the number of pages to add images, you cannot add images beyond page 400.
Note
In the Add Image dialog box, you can select all images at one time or change the display size and
order of the thumbnails. See Help for details.
Page top
Swapping Positions of Photos
Page 197 of 681 pages
Advanced Guide > Printing from a Computer > Printing with the Bundled Application Software > Appendix 1: EasyPhotoPrint EX Settings > Swapping Positions of Photos
Swapping Positions of Photos
You can swap the positions of images.
Click
(Swap Image Positions) in the Edit screen.
Note
The screens for Album printing are used as examples in the following descriptions. The screens
may vary depending on what you create.
Select the target and source images you want to swap, then click Swap.
When you finish swapping all images you want to swap, click Back to Edit.
Page top
Replacing Photos
Page 198 of 681 pages
Advanced Guide > Printing from a Computer > Printing with the Bundled Application Software > Appendix 1: EasyPhotoPrint EX Settings > Replacing Photos
Replacing Photos
You can replace an image with another image.
Select the image you want to replace in the Edit screen, then click
(Replace Selected Image).
Select the folder containing the image you want to replace with from the folder tree area on the left of the
Replace Image dialog box.
Select the image you want to replace with from the thumbnail window on the right of the screen and click
OK.
If you want to select from the images already imported, click the Imported Images tab and select the
image you want to replace with from the thumbnail window and click OK.
Important
You cannot select multiple images in the Replace Image dialog box.
Note
If you select multiple images in the Edit screen and use the replacement function, all the images
selected in the Edit screen will be replaced with the image selected in the Replace Image dialog
box.
When images are replaced, the following settings of the old image are inherited to the new image.
- Position
- Size
- Frame
- Position and size of the date
The cropping information and image orientation are not inherited.
In the Replace Image dialog box, you can change the display size and order of the thumbnails. See
Help for details.
Page top
Changing Position, Angle and Size of Photos
Page 199 of 681 pages
Advanced Guide > Printing from a Computer > Printing with the Bundled Application Software > Appendix 1: EasyPhotoPrint EX Settings > Changing Position, Angle and Size of Photos
Changing Position, Angle and Size of Photos
You can adjust the position, angle and size of images.
Select the image of which you want to change the position or size in the Edit screen and click
Image) or double-click the image.
(Edit
Set the Center Position, Rotation and Size, then click OK.
Note
You can also change the position and size of an image by dragging it in the Edit screen.
(Free Rotate) and drag a corner of the image to
Select an image in the Edit screen, then click
rotate it.
See Help for details on the position and size of images.
Page top
Cropping Photos
Page 200 of 681 pages
Advanced Guide > Printing from a Computer > Printing with the Bundled Application Software > Appendix 1: EasyPhotoPrint EX Settings > Cropping Photos
Cropping Photos
Cropping an image is the act of removing the unnecessary portions of the image by selecting the
necessary portions.
Select the image you want to crop in the Edit screen and click
(Edit Image) or double-click the
image.
Click the Crop tab in the Edit Image dialog box.
Drag the white squares on the image to change the area to be cropped and click OK.
Note
See Help for details on cropping.
Page top
Framing Photos
Page 201 of 681 pages
Advanced Guide > Printing from a Computer > Printing with the Bundled Application Software > Appendix 1: EasyPhotoPrint EX Settings > Framing Photos
Framing Photos
You can add frames to images.
Important
You cannot add frames to images in Photo Print, Stickers, and Layout Print.
Select the image you want to frame in the Edit screen and click
image.
(Edit Image) or double-click the
Click the Frame tab in the Edit Image dialog box.
Select the frame you want to use from Frames and click OK.
Important
You cannot print dates on framed photos.
Note
Select the Apply to all images in the page checkbox to add the same frame to all the images on a
selected page at one time.
See Help for details on frames.
Page top
Printing Dates on Photos
Page 202 of 681 pages
Advanced Guide > Printing from a Computer > Printing with the Bundled Application Software > Appendix 1: EasyPhotoPrint EX Settings > Printing Dates on Photos
Printing Dates on Photos
You can print dates on images.
Select the image you want to print the date in the Edit screen and click
the image.
(Edit Image) or double-click
Click the Date tab in the Edit Image dialog box.
Select the Show date checkbox.
Set the Text Orientation, Position, Font Size and Color, then click OK.
Important
You cannot print dates on framed images.
Note
The date is displayed in the short date format (mm/dd/yyyy, etc.) specified in your operating system.
See Help for details on setting dates.
Page top
Attaching Comments to Photos
Page 203 of 681 pages
Advanced Guide > Printing from a Computer > Printing with the Bundled Application Software > Appendix 1: EasyPhotoPrint EX Settings > Attaching Comments to Photos
Attaching Comments to Photos
You can attach comments to images and display them in your album. The photo name, shooting date
and comments are displayed (from top to bottom) in a comment box.
Important
You cannot attach comments to Photo Print, Calendar, Stickers, and Layout Print.
Select the image you want to attach comments to in the Edit screen and click
double-click the image.
Click the Comments tab in the Edit Image dialog box.
Select the Show comment box checkbox.
Select the checkboxes of the items you want to display, and enter comments.
Set the size and color of font, and position, etc. of the comments, then click OK.
Note
See Help for details on comments.
(Edit Image) or
Attaching Comments to Photos
Page 204 of 681 pages
Page top
Adding Text to Photos
Page 205 of 681 pages
Advanced Guide > Printing from a Computer > Printing with the Bundled Application Software > Appendix 1: EasyPhotoPrint EX Settings > Adding Text to Photos
Adding Text to Photos
You can add text to photos.
Click
(Add Text) in the Edit screen and drag the mouse over the area in which you want to add text.
Note
The screens for Album printing are used as examples in the following descriptions. The screens
may vary depending on what you create.
Select the Text tab in the Edit Text Box dialog box and enter text.
Note
In the Edit Text Box dialog box, you can change the position, angle and size of the text. You can also
set the color and line of the text box. See Help for details.
To change the entered text, select it and click
appears. You can change the text.
(Edit Text Box). The Edit Text Box dialog box
Page top
Saving
Page 206 of 681 pages
Advanced Guide > Printing from a Computer > Printing with the Bundled Application Software > Appendix 1: EasyPhotoPrint EX Settings > Saving
Saving
You can save edited items.
Click Save in the Edit or Print Settings screen.
Note
The screens for Album printing are used as examples in the following descriptions. The screens
may vary depending on what you create.
When the Save As dialog box appears, specify the save location and file name, then click Save.
Important
If you edit a saved file and save it again, the file will be overwritten.
To save a file again with a new name or to a different location, select Save As... from the File menu
and save.
Note
Save will not be displayed in the Page Setup or Select Images screen.
Page top
Setting Holidays
Page 207 of 681 pages
Advanced Guide > Printing from a Computer > Printing with the Bundled Application Software > Appendix 1: EasyPhotoPrint EX Settings > Setting Holidays
Setting Holidays
You can add holidays to your calendar.
Click Set Holidays... in the Page Setup screen of Calendar, or click
(Setup Period/Holiday) in the
Edit screen and click Set Holidays... in the Calendar General Settings dialog box to display the Holiday
Settings dialog box.
To add a holiday, click Add.... The Add/Edit Holiday dialog box appears. To edit a saved holiday, select it
and click Edit....
To delete a holiday, select it and click Delete. To delete all the saved holidays within your calendar
period, click Clear.
Enter the name in Holiday Name and specify the date.
Select the Set as Holiday checkbox to display that day as a holiday in your calendar.
Note
Setting Holidays
Page 208 of 681 pages
See Help for details on each dialog box.
Page top
Setting Calendar Display
Page 209 of 681 pages
Advanced Guide > Printing from a Computer > Printing with the Bundled Application Software > Appendix 1: EasyPhotoPrint EX Settings > Setting Calendar Display
Setting Calendar Display
You can customize the calendar display (fonts, lines, colors, position, size, etc.).
Click Settings... in the Page Setup screen of Calendar, or select a calendar in the Edit screen and click
(Setup Calendar) to display the Calendar Settings dialog box.
Important
The Position & Size tab is displayed only when the Calendar Settings dialog box is displayed from
the Edit screen.
Note
See Help for details on the Calendar Settings dialog box.
Page top
Printing with Other Application Software
Page 210 of 681 pages
Advanced Guide > Printing from a Computer > Printing with Other Application Software
Printing with Other Application Software
Various Printing Methods
Changing the Print Quality and Correcting Image Data
Overview of the Printer Driver
Page top
Various Printing Methods
Page 211 of 681 pages
Advanced Guide > Printing from a Computer > Printing with Other Application Software > Various Printing Methods
Various Printing Methods
Printing with Easy Setup
Setting a Page Size and Orientation
Setting the Number of Copies and Printing Order
Setting the Stapling Margin
Borderless Printing
Fit-to-Page Printing
Scaled Printing
Page Layout Printing
Poster Printing
Booklet Printing
Duplex Printing
Stamp/Background Printing
Saving a Stamp Setting
Saving Image Data to be Used as a Background
Printing an Envelope
Displaying the Print Results before Printing
Setting Paper Dimensions (Custom Size)
Page top
Printing with Easy Setup
Page 212 of 681 pages
Advanced Guide > Printing from a Computer > Printing with Other Application Software > Various Printing Methods >
Printing with Easy Setup
Printing with Easy Setup
The procedure for setting the basic print setup, which is necessary to print data properly with this
machine, is as follows:
1. Open the printer driver setup window
2. Select the media type
Select the type of paper loaded in the machine from the Media Type list on the Main tab.
3. Select the print quality
Select High, Standard, or Fast for Print Quality.
4. Select color/intensity
Select Auto for Color/Intensity.
5. Check the settings
Check the specified settings such as paper type displayed in the Settings Preview on the left side of
the window.
6. Complete the setup
Click OK.
When you execute print, the document will be printed in accordance with the type of media.
Page top
Setting a Page Size and Orientation
Page 213 of 681 pages
Advanced Guide > Printing from a Computer > Printing with Other Application Software > Various Printing Methods >
Setting a Page Size and Orientation
Setting a Page Size and Orientation
The paper size and orientation are essentially determined by the application. If the page size and
orientation set for Page Size and Orientation on the Page Setup tab are same as those set with the
application, you do not need to select them on the Page Setup tab.
If you are not able to specify them with the application, the procedure for selecting a page size and
orientation is as follows:
1. Open the printer driver setup window
2. Select the paper size
Select a page size from the Page Size list on the Page Setup tab.
3. Select Orientation
Select Portrait or Landscape for Orientation. Check Rotate 180 degrees check box if you want to
perform printing with the original being rotated 180 degrees.
4. Complete the setup
Click OK.
The document will be printed with the selected page size and the orientation.
Page top
Setting the Number of Copies and Printing Order
Page 214 of 681 pages
Advanced Guide > Printing from a Computer > Printing with Other Application Software > Various Printing Methods >
Setting the Number of Copies and Printing Order
Setting the Number of Copies and Printing Order
Default Setting
Print from Last Page
Collate
Print from Last Page + Collate
The procedure for specifying the number of copies and printing order is as follows:
1. Open the printer driver setup window
2. Specify the number of copies to be printed
For Copies on the Page Setup tab, specify the number of copies to be printed.
3. Specify the print sequence
Check the Print from Last Page check box if you want to print from the last page in order. If you do
this, you do not need to sort pages into their correct order after printing.
4. Set up collated printing when you specify multiple copies in the Copies box
Check the Collate check box if you are specifying multiple copy together.
Uncheck this check box to print all pages with the same page number together.
5. Complete the setup
Click OK.
The specified number of copies will be printed with the specified printing order.
Important
Setting the Number of Copies and Printing Order
Page 215 of 681 pages
If your application has the same function, make the settings with the application. If you specify the
number of copies and the printing order with both the application and this printer driver, the number
of copies may be multiplied numbers of the two settings or the specified printing order may not be
enabled.
Print from Last Page and Collate appear grayed out and are unavailable if Booklet Printing is
selected for Page Layout.
Print from Last Page appears grayed out and is unavailable if Poster Printing is selected for Page
Layout.
Note
By setting both Print from Last Page and Collate, you can perform printing so that papers are
collated one by one starting from the last page.
These settings can be used in combination with Borderless Printing, Normal-size Printing, Fit-toPage Printing, Scaled Printing, Page Layout Printing, and Duplex Printing.
Page top
Setting the Stapling Margin
Page 216 of 681 pages
Advanced Guide > Printing from a Computer > Printing with Other Application Software > Various Printing Methods >
Setting the Stapling Margin
Setting the Stapling Margin
The procedure for setting the stapling direction and the width of the stapling margin is as follows:
1. Open the printer driver setup window
2. Specify the side to be stapled
Check the position of the stapling margin from Staple Side on the Page Setup tab.
The printer analyzes the Orientation and Page Layout settings, and automatically selects the best
staple position. If you want to change the setting, select from the list.
3. Set the margin width
If necessary, click Specify Margin... and set the width of the stapling margin, and then click OK.
4. Complete the setup
Click OK on the Page Setup tab.
When you execute print, the data is printed with the specified staple side and margin.
Important
Staple Side and Specify Margin... appear grayed out and are unavailable when:
Setting the Stapling Margin
Page 217 of 681 pages
Poster Printing or Booklet Printing is selected for Page Layout.
Scaled Printing is selected for Page Layout (If Duplex Printing is also selected, only Staple Side is
selectable).
Borderless Printing check box is checked (If Duplex Printing is also selected, only Staple Side is
selectable).
Page top
Borderless Printing
Page 218 of 681 pages
Advanced Guide > Printing from a Computer > Printing with Other Application Software > Various Printing Methods >
Borderless Printing
Borderless Printing
The borderless printing function allows you to print data without any margin by enlarging the data so that
it extends slightly off the paper. Without the borderless printing function, a margin is provided around the
printed data. If you want to print data such as a photo without providing any margin around it, select
Borderless Printing.
The procedure for performing borderless printing is as follows:
Setting Borderless Printing
1. Open the printer driver setup window
2. Set borderless printing
Check the Borderless Printing check box on the Page Setup tab.
Click OK when the confirmation message appears.
When a message prompting you to change the media type appears, select a media type from the
list and click OK.
3. Check the paper size
Check the Page Size list. If you want to change, select another page size from the list. The list
displays only sizes that can be used for borderless printing.
4. Adjust the amount of extension from the paper
Adjust the amount of extension using the Amount of Extension slider as necessary.
Moving the slider to the right makes the amount larger and moving the slider to the left makes the
amount smaller.
Borderless Printing
Page 219 of 681 pages
It is recommended to set the slider at the second position from the right for most cases.
Important
If you set the slider at the rightmost position, the back side of the paper may become smudged.
5. Complete the setup
Click OK.
The data will be printed without any margins on the paper.
Important
If a page size that cannot be used for borderless printing is selected, the size is automatically
changed to the valid page sizes for borderless printing.
When High Resolution Paper, T-Shirt Transfers, or Envelope is selected from the Media Type list on
the Main tab, you cannot perform borderless printing.
When Borderless Printing is checked, the Printer Paper Size, Page Layout, Staple Side (when
Duplex Printing is not selected) settings, and the Stamp/Background... button on the Page Setup tab
appear grayed out and are unavailable.
Print quality may deteriorate or the sheet may be stained at the top and bottom depending on the
type of the media used.
When the ratio of the height to the width differs greatly from the image data, a portion of the image
may not be printed depending on the size of the media used.
In this case, crop the image data with an application software according to the paper size.
Note
When Plain Paper is selected for Media Type on the Main tab, borderless printing is not
recommended, and therefore the dialog box for media selection appears.
If you are using plain paper for test printing, select Plain Paper, and click OK.
Expanding the range of the document to print
Specifying a large amount of extension allows you to perform borderless printing with no problems.
However, the portion of the document that extends off the paper range will not be printed. Subjects
around the perimeter of a photo may not be printed.
Try borderless printing once. If you are not satisfied with the result of borderless printing, reduce the
amount of extension. The extension amount becomes shorter as the Amount of Extension slider is
moved to the left.
Important
If the Amount of Extension is shortened, an unexpected margin may be produced on the print,
depending on the size of the paper.
Note
If Preview before printing is checked on the Main tab, you can confirm before printing whether there
will be no border.
Page top
Fit-to-Page Printing
Page 220 of 681 pages
Advanced Guide > Printing from a Computer > Printing with Other Application Software > Various Printing Methods > Fitto-Page Printing
Fit-to-Page Printing
The procedure for printing document, which is enlarged or reduced to fit to the page size, is as follows:
1. Open the printer driver setup window
2. Set fit-to-page printing
Select Fit-to-Page Printing from the Page Layout list on the Page Setup tab.
3. Select the paper size for the data
Using Page Size, select the page size that was set with your application.
4. Select the print paper size
Select the size of the paper loaded in the machine from the Printer Paper Size list.
If the printer paper size is smaller than the Page Size, the page image will be reduced. If the printer
paper size is larger than the page size, the page image will be enlarged.
The current settings are displayed in the Settings Preview on the left side of the printer driver.
Fit-to-Page Printing
Page 221 of 681 pages
5. Complete the setup
Click OK.
When you execute print, the document will be enlarged or reduced to fit to the page size.
Important
When Borderless Printing check box is checked, Fit-to-Page Printing cannot be selected.
Page top
Scaled Printing
Page 222 of 681 pages
Advanced Guide > Printing from a Computer > Printing with Other Application Software > Various Printing Methods >
Scaled Printing
Scaled Printing
The procedure for printing a document with pages enlarged or reduced is as follows:
1. Open the printer driver setup window
2. Set scaled printing
Select Scaled Printing from the Page Layout list on the Page Setup tab.
3. Select the paper size for the data
Using Page Size, select the page size that was set with your application.
4. Set the scaling rate by using one of the following methods:
Select a Printer Paper Size
Select a printer paper size, which is different from the Page Size, from the Printer Paper Size list.
If the printer paper size is smaller than the Page Size, the page image will be reduced. If the
printer paper size is larger than the page size, the page image will be enlarged.
Scaled Printing
Page 223 of 681 pages
Specify a scaling factor
Directly type in a value into the Scaling box.
The current settings are displayed in the Settings Preview on the left side of the printer driver.
5. Complete the setup
Click OK.
When you execute print, the document will be printed with the specified scale.
Important
If the application software with which you created the original has the scaled printing function,
configure the settings on your application software. You do not need to also configure the same
setting in the printer driver.
When Scaled Printing is selected, the Staple Side list box appears grayed out and is unavailable
(when Duplex Printing is not selected).
When Borderless Printing check box is checked, Scaled Printing cannot be selected.
Note
Selecting Scaled Printing changes the printable area.
Page top
Page Layout Printing
Page 224 of 681 pages
Advanced Guide > Printing from a Computer > Printing with Other Application Software > Various Printing Methods >
Page Layout Printing
Page Layout Printing
The page layout printing function allows you to print more than one page image on a single sheet of
paper.
The procedure for performing page layout printing is as follows:
1. Open the printer driver setup window
2. Set page layout printing
Select Page Layout Printing from the Page Layout list on the Page Setup tab.
The current settings are displayed in the Settings Preview on the left side of the printer driver.
3. Select the print paper size
Select the size of the paper loaded in the machine from the Printer Paper Size list.
Now you have finished setting the layout of the document from left to right.
4. Set the number of pages to be printed on one sheet and the page sequence
If necessary, click Specify..., specify the following settings in the Page Layout Printing dialog box, and
click OK.
Page Layout Printing
Page 225 of 681 pages
Pages
To increase the number of pages to be included on a single sheet of paper, select a desired
number of pages from the list.
Page Order
To change the page arrangement order, select an icon from the list to change the page placement
order.
Page Border
To print a page border around each document page, check this check box.
5. Complete the setup
Click OK on the Page Setup tab.
When you execute print, the specified number of pages will be arranged on each sheet of paper in
the specified order.
Important
When Borderless Printing check box is checked, Page Layout Printing cannot be selected.
Page top
Poster Printing
Page 226 of 681 pages
Advanced Guide > Printing from a Computer > Printing with Other Application Software > Various Printing Methods >
Poster Printing
Poster Printing
The poster printing function allows you to enlarge image data, divide it into several pages, and print
these pages on separate sheets of paper. When the pages are pasted together, they form a large print
like a poster.
The procedure for performing poster printing is as follows:
Setting Poster Printing
1. Open the printer driver setup window
2. Set poster printing
Select Poster Printing from the Page Layout list on the Page Setup tab.
The current settings are displayed in the Settings Preview on the left side of the printer driver.
3. Select the print paper size
Select the size of the paper loaded in the machine from the Printer Paper Size list.
Now you have finished setting 2 by 2-page poster printing.
4. Set the number of image divisions and the pages to be printed.
If necessary, click Specify..., specify the following settings in the Poster Printing dialog box, and then
click OK.
Poster Printing
Page 227 of 681 pages
Image Divisions
Select the number of divisions (vertical x horizontal) from the Image Divisions list. As the number of
divisions increases, the number of sheets used for printing increases, allowing you to create a
larger poster.
Print "Cut/Paste" in margins
To leave out words "Cut" and "Paste", uncheck this check box.
Important
This feature is unavailable when the 64-bit printer driver is used.
Print "Cut/Paste" lines in margins
To leave out cut lines, uncheck this check box.
Pages
To reprint only specific pages, enter the page number you want to print. To print multiple pages,
specify by separating the pages with commas or entering a hyphen between the page numbers.
Note
You can also specify the print range by clicking the pages in the setup preview.
5. Complete the setup
Click OK on the Page Setup tab.
When you execute print, the document will be divided into several pages during printing.
After all poster pages have been printed, paste the pages together to create a poster.
Printing Only Specific Pages
If ink becomes faint or runs out during printing, you can print the pages you still need, by following the
procedure below:
1. Set the print range
In the Settings Preview on the left of the Page Setup tab, click the pages that do not need to be
printed.
The pages that were clicked are deleted, and only the pages to be printed are displayed.
Poster Printing
Page 228 of 681 pages
Note
Click the deleted pages to display them again.
Right-click the Settings Preview to select Print all pages or Delete all pages.
2. Complete the setup
After completing the page selection, click OK.
When you execute print, only specified pages will be printed.
Important
When Poster Printing is selected, the Duplex Printing and Print from Last Page check boxes and the
Staple Side list box appear grayed out and are unavailable.
When Borderless Printing check box is checked, Poster Printing cannot be selected.
Since poster printing enlarges the document when printing it, the print results may become coarse.
Page top
Booklet Printing
Page 229 of 681 pages
Advanced Guide > Printing from a Computer > Printing with Other Application Software > Various Printing Methods >
Booklet Printing
Booklet Printing
The booklet printing function allows you to print data for a booklet. Data is printed on both sides of the
paper. This type of printing ensures that pages can be collated properly, in page number order, when the
printed sheets are folded and stapled at the center.
The procedure for performing booklet printing is as follows:
1. Open the printer driver setup window
2. Set booklet printing
Select Booklet Printing from the Page Layout list on the Page Setup tab.
The current settings are displayed in the Settings Preview on the left side of the window.
3. Select the print paper size
Select the size of the paper loaded in the machine from the Printer Paper Size list.
4. Set the margin for stapling and the margin width
Click Specify..., specify the following settings in the Booklet Printing dialog box, and then click OK.
Margin for stapling
Select which side the stapling margin should be on when the booklet is completed.
Booklet Printing
Page 230 of 681 pages
Insert blank page
To leave one side of a sheet blank, check Insert blank page check box, and select the page to be left
blank.
Margin
Enter the margin width. The specified width from the center of the sheet becomes the margin for one
page.
Page Border
To print a page border around each document page, check the Page Border check box.
5. Complete the setup
Click OK on the Page Setup tab.
When you execute print, the document will be printed on one side of a sheet of paper. When the
printing of one side is complete, set the paper correctly by following the message and click OK.
When the printing of the other side is complete, fold the paper at the center of the margin and make
a booklet.
Important
Booklet Printing is unavailable when:
A media type other than Plain Paper is selected from the Media Type list.
Borderless Printing check box is checked.
When Booklet Printing is selected, Duplex Printing, Staple Side, Print from Last Page, and Collate
appear grayed out and are unavailable.
Note
The stamp and background are not printed on blank sheets inserted with the Insert blank page
function of Booklet Printing.
Page top
Duplex Printing
Page 231 of 681 pages
Advanced Guide > Printing from a Computer > Printing with Other Application Software > Various Printing Methods >
Duplex Printing
Duplex Printing
The procedure for printing data on both sides of a sheet of paper is as follows:
1. Open the printer driver setup window
2. Set duplex printing
Check the Duplex Printing check box on the Page Setup tab.
3. Select the layout
Select Normal-size Printing (or Fit-to-Page Printing, Scaled Printing, or Page Layout Printing) from
the Page Layout list.
4. Specify the side to be stapled
The printer analyzes the Orientation and Page Layout settings, and automatically selects the best
Staple Side. If you want to change the setting, select another value from the list.
5. Set the margin width
If necessary, click Specify Margin... and set the width of the stapling margin, and then click OK.
6. Complete the setup
Click OK on the Page Setup tab.
When you execute print, the document will be printed on one side of a sheet of paper. When the
printing of one side is complete, set the paper correctly by following the message and click OK. The
document will be printed on the opposite side.
Important
Duplex Printing
Page 232 of 681 pages
Duplex Printing is unavailable when:
A media type other than Plain Paper is selected from the Media Type list.
Poster Printing is selected from the Page Layout list.
When Booklet Printing is selected from the Page Layout list, Duplex Printing and Staple Side
appear grayed out and are unavailable.
Note
If the Media Type dialog box appears when performing borderless printing during duplex printing,
select Plain Paper.
If the back side of the paper becomes smudged during duplex printing, perform Bottom Plate
Cleaning in the Maintenance tab.
Page top
Stamp/Background Printing
Page 233 of 681 pages
Advanced Guide > Printing from a Computer > Printing with Other Application Software > Various Printing Methods >
Stamp/Background Printing
Stamp/Background Printing
This feature is unavailable when the 64-bit printer driver is used.
The Stamp function allows you to print a stamp text or a bitmap over or behind document data. The
Background function allows you to print a light illustration behind the document data.
The procedure for performing stamp/background printing is as follows:
Printing a stamp
"CONFIDENTIAL," "IMPORTANT," and other stamps that are used often in companies are pre-registered.
1. Open the printer driver setup window
2. Click Stamp/Background... on the Page Setup tab
The Stamp/Background dialog box opens.
3. Select a stamp
Check the Stamp check box, and select a desired stamp from the list.
The current settings are displayed in the Settings Preview on the left side of the Page Setup tab.
4. Set the stamp details
If necessary, complete the following settings, and then click OK.
Place stamp over text
To print the stamp on the front of the document, check this check box.
Stamp/Background Printing
Page 234 of 681 pages
Note
The stamp is given priority because the stamp is printed over the document data in the
sections where the stamp and the document data overlap. If the Place stamp over text check
box is unchecked, the stamp is printed behind the document data and may be hidden in the
overlapping sections depending on the application used.
Stamp first page only
To print the stamp only on the first page, check this check box.
Define Stamp... button
To change the stamp text, bitmap, or position, click this (refer to Saving a Stamp Setting).
5. Complete the setup
Click OK on the Page Setup tab.
When you execute print, the data is printed with the specified stamp.
Printing a background
1. Select the background for which the settings are to be changed
Two bitmap files are pre-registered as samples.
2. Click Stamp/Background... on the Page Setup tab
The Stamp/Background dialog box opens.
3. Select the background
Check the Background check box, and select a desired background from the list.
The current settings are displayed in the Settings Preview on the left side of the Page Setup tab.
4. Set the background details
If necessary, complete the following settings, and then click OK.
Background first page only
To print the background only on the first page, check this check box.
Select Background... button
To use another bitmap file or change the layout or density of a background, click this (refer to Saving
Image Data to be Used as a Background ).
5. Complete the setup
Click OK on the Page Setup tab.
When you execute print, the data is printed with the specified background.
Important
When the Borderless Printing check box is checked, the Stamp/Background... button appears
grayed out and is unavailable.
Note
The stamp and background are not printed on blank sheets inserted with the Insert blank page
function of Booklet Printing.
Related Topics
Saving a Stamp Setting
Saving Image Data to be Used as a Background
Page top
Saving a Stamp Setting
Page 235 of 681 pages
Advanced Guide > Printing from a Computer > Printing with Other Application Software > Various Printing Methods >
Stamp/Background Printing > Saving a Stamp Setting
Saving a Stamp Setting
This feature is unavailable when the 64-bit printer driver is used.
You can create and save a new stamp. You can also change and register some of the settings of an
existing stamp. Unnecessary stamps can be deleted at any time.
The procedure for registering a new stamp is as follows:
Registering a new stamp
1. Open the printer driver setup window
2. Click Stamp/Background... on the Page Setup tab
The Stamp/Background dialog box opens.
3. Click Define Stamp...
The Stamp Settings dialog box opens.
Saving a Stamp Setting
Page 236 of 681 pages
4. Configure the stamp while viewing the preview window
Stamp tab
Select Text or Bitmap with Stamp Type.
When registering a text, the characters must already be entered in Stamp Text. Change the True
Type Font, Style, Size, and Outline settings, as necessary. You can select the color of the stamp
by clicking Select Color....
For Bitmap, click Select File... and select the bitmap file (.bmp) to be used. Change the settings
of the Size and Transparent white area if necessary.
Placement tab
Select the stamp position from the Position list. You can also select Custom from the Position
list and specify coordinates for X-Position and Y-Position.
You can also change the stamp position by dragging the stamp in the preview window.
To change the stamp position angle, type a value in the Orientation box directly.
5. Save the stamp
Click the Save settings tab and enter a new stamp title in the Title box, and then click Save.
Click OK when the confirmation message appears.
6. Complete the setup
Click OK. The Stamp/Background dialog box opens again.
The registered title appears in the Stamp list.
Changing and registering some of stamp settings
1. Select the stamp for which the settings are to be changed
Check the Stamp check box in the Stamp/Background dialog box, and then select the title of the
stamp to be changed from the Stamp list.
2. Click Define Stamp...
The Stamp Settings dialog box opens.
3. Configure the stamp while viewing the preview window
4. Save the stamp
Click Save overwrite on the Save settings tab.
If you want to save the stamp with a different title, type a new title in the Title box and click Save.
Click OK when the confirmation message appears.
5. Complete the setup
Saving a Stamp Setting
Page 237 of 681 pages
Click OK. The Stamp/Background dialog box opens again.
The registered title appears in the Stamp list.
Deleting an unnecessary stamp
1. Click Define Stamp... in the Stamp/Background dialog box
The Stamp Settings dialog box opens.
2. Select the stamp to be deleted
Select the title of the stamp you want to delete from the Stamps list on the Save settings tab. Then
click Delete.
Click OK when the confirmation message appears.
3. Complete the setup
Click OK. The Stamp/Background dialog box opens again.
Page top
Saving Image Data to be Used as a Background
Page 238 of 681 pages
Advanced Guide > Printing from a Computer > Printing with Other Application Software > Various Printing Methods >
Stamp/Background Printing > Saving Image Data to be Used as a Background
Saving Image Data to be Used as a Background
This feature is unavailable when the 64-bit printer driver is used.
You can select a bitmap file and save it as a new background. You can also change and register some
of the settings of an existing background. An unnecessary background can be deleted at any time.
The procedure for registering image data to be used as a background is as follows:
Registering image data to be used as a background
1. Open the printer driver setup window
2. Click Stamp/Background... on the Page Setup tab
The Stamp/Background dialog box opens.
3. Click Select Background...
The Background Settings dialog box opens.
Saving Image Data to be Used as a Background
Page 239 of 681 pages
4. Select the image data to be registered to the background
Click Select File.... Select the target image data (bitmap file), and then click Open.
5. Specify the following settings while viewing the preview window
Layout Method
Select how the background image data is to be placed.
When Custom is selected, you can set coordinates for X-Position and Y-Position.
You can also change the background position by dragging the image in the preview window.
Intensity
Set the intensity of the background image data with the Intensity slider. To lighten the background,
move the slider to the left. To darken the background, move the slider to the right. To print the
background at the original bitmap intensity, move the slider to the rightmost position.
6. Save the background
Click the Save settings tab and enter a new stamp title in the Title box, and then click Save.
Click OK when the confirmation message appears.
7. Complete the setup
Click OK. The Stamp/Background dialog box opens again.
The registered title appears in the Background list.
Changing and saving some background settings
1. Select the background for which the settings are to be changed
Check the Background check box in the Stamp/Background dialog box, and then select the title of
the background you want to change from the Background list.
2. Click Select Background...
The Background Settings dialog box opens.
3. While viewing the preview, set the items on the Background tab
4. Save the background
Click Save overwrite on the Save settings tab. If you want to save the background with a different title,
type a new title in the Title box and click Save.
Click OK when the confirmation message appears.
5. Complete the setup
Click OK. The Stamp/Background dialog box opens again.
The registered title appears in the Background list.
Saving Image Data to be Used as a Background
Page 240 of 681 pages
Deleting an unnecessary background
1. Click Select Background... in the Stamp/Background dialog box
The Background Settings dialog box opens.
2. Select the background to be deleted
Select the title of the background you want to delete from the Backgrounds list on the Save settings
tab, and then click Delete.
Click OK when the confirmation message appears.
3. Complete the setup
Click OK. The Stamp/Background dialog box opens again.
Page top
Printing an Envelope
Page 241 of 681 pages
Advanced Guide > Printing from a Computer > Printing with Other Application Software > Various Printing Methods >
Printing an Envelope
Printing an Envelope
For details on how to load an envelope into the machine, refer to the "Loading Envelopes" in the manual:
Basic Guide.
The procedure for performing envelope printing is as follows:
1. Load an envelop into the machine
Fold down the envelope flap.
Orient the envelope so that the flap is on the left and the folded surface is facing down.
2. Open the printer driver setup window
3. Select the media type
Select Envelope from the Media Type list on the Main tab.
4. Select the paper size
Click the Page Setup tab, and select Youkei 4, Youkei 6, Comm.Env. #10, or DL Env. for Page Size.
5. Select the landscape for orientation
To print the addressee horizontally, select Landscape for Orientation.
6. Complete the setup
Click OK.
When you execute print, the information is printed on the envelope.
Page top
Displaying the Print Results before Printing
Page 242 of 681 pages
Advanced Guide > Printing from a Computer > Printing with Other Application Software > Various Printing Methods >
Displaying the Print Results before Printing
Displaying the Print Results before Printing
You can display and check the print result before printing.
The procedure for displaying the print result before printing is as follows:
1. Open the printer driver setup window
2. Set the preview
Check the Preview before printing check box on the Main tab.
3. Complete the setup
Click OK.
The Canon IJ Preview will start and the print result will be displayed before printing.
Related Topic
Canon IJ Preview
Page top
Setting Paper Dimensions (Custom Size)
Page 243 of 681 pages
Advanced Guide > Printing from a Computer > Printing with Other Application Software > Various Printing Methods >
Setting Paper Dimensions (Custom Size)
Setting Paper Dimensions (Custom Size)
You can specify the height and width of paper if its size cannot be selected in Page Size. Such a paper
size is called a custom size.
The procedure for specifying a custom size is as follows:
1. Set the custom size in the application software
On your application's paper size feature, specify your custom size.
Important
If the application software that created the document has a function for specifying the height
and width values, use the application software to set the values. If the application software
does not have such a function or if the document does not print correctly, use the printer driver
to set the values.
2. Open the printer driver setup window
3. Select the paper size
Select Custom... for Page Size on the Page Setup tab.
The Custom Paper Size dialog box opens.
4. Set the custom size in the application software
Specify Units, and enter the Width and Height of the paper to be used. Then click OK.
5. Complete the setup
Click OK on the Page Setup tab.
When you execute print, the data is printed with the specified paper size.
Setting Paper Dimensions (Custom Size)
Page 244 of 681 pages
Page top
Changing the Print Quality and Correcting Image Data
Page 245 of 681 pages
Advanced Guide > Printing from a Computer > Printing with Other Application Software > Changing the Print Quality and
Correcting Image Data
Changing the Print Quality and Correcting Image Data
Selecting a Combination of the Print Quality Level and a Halftoning Method
Printing a Color Document in Monochrome
Specifying Color Correction
Optimal Photo Printing of Image Data
Adjusting Colors with the Printer Driver
Printing with ICC Profiles
Adjusting Color Balance
Adjusting Brightness
Adjusting Intensity
Adjusting Contrast
Simulating an Illustration
Representing Image Data with a Single Color
Presenting Image Data with Vivid Colors
Smoothing Jagged Outlines
Changing Color Properties to Improve Coloration
Reducing Photo Noise
Page top
Selecting a Combination of the Print Quality Level and a Halftoning Method
Page 246 of 681 pages
Advanced Guide > Printing from a Computer > Printing with Other Application Software > Changing the Print Quality and
Correcting Image Data > Selecting a Combination of the Print Quality Level and a Halftoning Method
Selecting a Combination of the Print Quality Level and a
Halftoning Method
You can set the print quality level and the halftoning method.
The procedure for setting the print quality level and the halftoning method is as follows:
1. Open the printer driver setup window
2. Select the print quality
Select Custom for Print Quality on the Main tab, and click Set....
The Custom dialog box opens.
3. Setting the print quality and halftone expression method
Move the Quality slider to select the quality level.
Select Halftoning and click OK.
Note
Selecting a Combination of the Print Quality Level and a Halftoning Method
Page 247 of 681 pages
Halftones refer to color shades between the darkest color and the brightest color.
The printer replaces the color shades with a collection of small dots to express the halftones.
Dither arranges the dots according to fixed rules to express the halftones. Diffusion places the
dots randomly to express the halftones. When you select Auto, the data is printed with the
optimal halftoning method for the selected print quality.
4. Complete the setup
Click OK on the Main tab.
When you execute print, the data is printed with the specified quality level and halftoning method.
Important
Certain print quality levels and halftoning methods cannot be selected depending on the settings of
Media Type.
Note
When the part of the object is not printed, selecting Diffusion for Halftoning may solve the problem.
Related Topics
Specifying Color Correction
Adjusting Color Balance
Adjusting Brightness
Adjusting Intensity
Adjusting Contrast
Page top
Printing a Color Document in Monochrome
Page 248 of 681 pages
Advanced Guide > Printing from a Computer > Printing with Other Application Software > Changing the Print Quality and
Correcting Image Data > Printing a Color Document in Monochrome
Printing a Color Document in Monochrome
The procedure for printing a color document in monochrome is as follows:
1. Open the printer driver setup window
2. Set grayscale printing
Check the Grayscale Printing check box on the Main tab.
3. Complete the setup
Click OK.
When you execute print, the document is converted to grayscale data. It allows you to print the color
document in monochrome.
Important
When the Grayscale Printing check box is checked, the printer driver processes image data as
sRGB data. In this case, actual colors printed may differ from those in the original image data.
When using the grayscale printing function to print Adobe RGB data, convert the data to sRGB data
using an application software.
Note
During Grayscale Printing, color inks may be used as well as black ink.
Page top
Specifying Color Correction
Page 249 of 681 pages
Advanced Guide > Printing from a Computer > Printing with Other Application Software > Changing the Print Quality and
Correcting Image Data > Specifying Color Correction
Specifying Color Correction
You can specify the color correction method suited to the type of document to be printed.
Normally, the printer driver adjusts the colors by using Canon Digital Photo Color so that data is printed
with color tints that most people prefer. This method is suitable for printing sRGB data.
If you want to print by using the color space of sRGB or Adobe RGB data effectively, select ICM. If you
want to use an application software to specify an ICC profile, select None.
The procedure for specifying color correction is as follows:
1. Open the printer driver setup window
2. Select the manual color adjustment
On the Main tab, select Manual for Color/Intensity, and click Set....
The Manual Color Adjustment dialog box opens.
3. Select color correction
Click Matching tab, select Color Correction setting suited to your purpose from the following, and
click OK.
Specifying Color Correction
Page 250 of 681 pages
Driver Matching
By using Canon Digital Photo Color, you can print sRGB data with color tints that most people prefer.
Driver Matching is the default setting for Color Correction.
ICM
You can print by using the color space of sRGB or Adobe RGB data effectively.
None
The printer driver does not perform color adjustment. Select this value if you are specifying an
individually created profile or a profile for special Canon paper in an application software to print
data.
4. Complete the setup
Click OK on the Main tab.
When you execute print, the data is printed with the specified color adjustment method.
Important
If ICM is disabled in the application software, ICM is unavailable for Color Correction and the printer
may not be able to print the image data properly.
When the Grayscale Printing check box on the Main tab is checked, Color Correction appears
grayed out and is unavailable.
Related Topics
Optimal Photo Printing of Image Data
Adjusting Colors with the Printer Driver
Printing with ICC Profiles
Page top
Optimal Photo Printing of Image Data
Page 251 of 681 pages
Advanced Guide > Printing from a Computer > Printing with Other Application Software > Changing the Print Quality and
Correcting Image Data > Specifying Color Correction > Optimal Photo Printing of Image Data
Optimal Photo Printing of Image Data
When people print images taken with digital cameras, they sometimes feel that the printed color tones
differ from those of actual image or those displayed on the monitor.
To get the print results as close as possible to the desired color tones, you must select a printing
method that is best suited to the application software used or to your purpose.
Color Management
Devices such as digital cameras, scanners, monitors, and printers handle color differently. Color
management (color matching) is a method that manages device-dependent "colors" as a common color
space. For Windows, a color management system called "ICM" is built into the operating system.
sRGB and Adobe RGB are popularly used as common color spaces. Adobe RGB has a wider color
space than sRGB.
ICC profiles convert device-dependent "colors" into a common color space.
By using an ICC profile and carrying out color management, you can draw out the color space of the
image data within the color reproduction area that the printer can express.
Selecting a printing method suited to the image data
The recommended printing method depends on the color space (Adobe RGB or sRGB) of the image
data or the application software to be used. There are two typical printing methods. Check the color
space (Adobe RGB or sRGB) of the image data and the application software to be used, and then select
the printing method suited to your purpose.
To print using Canon Digital Photo Color
Target data: sRGB data
Printing method: Adjusting Colors with the Printer Driver
To print using the color space of the data effectively
Target data: Adobe RGB data or sRGB data
Application software: An ICC profile can or cannot be specified.
Printing method: Printing with ICC Profiles
Page top
Adjusting Colors with the Printer Driver
Page 252 of 681 pages
Advanced Guide > Printing from a Computer > Printing with Other Application Software > Changing the Print Quality and
Correcting Image Data > Specifying Color Correction > Adjusting Colors with the Printer Driver
Adjusting Colors with the Printer Driver
You can specify the color correction function of the printer driver to print sRGB data with color tints that
most people prefer (through the use of Canon Digital Photo Color).
The procedure for adjusting colors with the printer driver is as follows:
1. Open the printer driver setup window
2. Select the media type
Select the type of paper loaded in the machine from the Media Type list on the Main tab.
3. Select the print quality
Select High, Standard, or Fast for Print Quality.
4. Select the manual color adjustment
Select Manual for Color/Intensity, and click Set....
The Manual Color Adjustment dialog box opens.
5. Select color correction
Click Matching tab, and select Driver Matching for Color Correction.
Adjusting Colors with the Printer Driver
Page 253 of 681 pages
6. Set the other items
If necessary, click Color Adjustment tab, and adjust the color balance of Cyan, Magenta, Yellow, and
adjust Brightness, Intensity, and Contrast settings, and then click OK.
7. Complete the setup
Click OK on the Main tab.
When you execute print, the printer driver adjusts the colors when printing the data.
Related Topics
Selecting a Combination of the Print Quality Level and a Halftoning Method
Specifying Color Correction
Adjusting Color Balance
Adjusting Brightness
Adjusting Intensity
Adjusting Contrast
Page top
Printing with ICC Profiles
Page 254 of 681 pages
Advanced Guide > Printing from a Computer > Printing with Other Application Software > Changing the Print Quality and
Correcting Image Data > Specifying Color Correction > Printing with ICC Profiles
Printing with ICC Profiles
If the image data has a specified ICC profile, you can effectively use the color space (Adobe RGB or
sRGB) of the data when printing.
The printer driver setting procedure varies depending on the application software used to print.
Printing image data from the application software that can specify an ICC profile
When using Adobe Photoshop, Canon Digital Photo Professional, or any other application software that
allows you to specify an ICC profile, you can use the color management system (ICM) found in Windows
when printing the data. You can print the editing and touch-up results of an application software by
effectively using the color space of the ICC profile specified in the image data.
To use this printing method, you must first use an application software to specify an ICC profile in the
image data. For instructions on specifying an ICC profile with an application software program, refer to
the manual of the application software you are using.
1. Open the printer driver setup window
2. Select the media type
Select the type of paper loaded in the machine from the Media Type list on the Main tab.
3. Select the print quality
Select High, Standard, or Fast for Print Quality.
4. Select the manual color adjustment
Select Manual for Color/Intensity, and click Set....
The Manual Color Adjustment dialog box opens.
5. Select color correction
Click Matching tab, and select ICM for Color Correction.
Printing with ICC Profiles
Page 255 of 681 pages
6. Set the other items
If necessary, click Color Adjustment tab, and adjust the color balance of Cyan, Magenta, Yellow, and
adjust Brightness, Intensity, and Contrast settings, and then click OK.
7. Complete the setup
Click OK on the Main tab.
When you execute print, the printer uses the color space of the image data.
Important
If you print an image by specifying an individually created profile or a profile for special Canon paper
in an application software, select None from the Color Correction menu of the printer driver.
Printing image data from the application software that cannot specify an ICC profile
When printing from an application software that does not allow you to specify an ICC profile, specify the
ICC profile in the print settings of the printer driver and print the data. When printing Adobe RGB data, you
can print the data with the Adobe RGB color space even if the application software does not support
Adobe RGB.
1. Open the printer driver setup window
2. Select the media type
Select the type of paper loaded in the machine from the Media Type list on the Main tab.
Printing with ICC Profiles
Page 256 of 681 pages
3. Select the print quality
Select High, Standard, or Fast for Print Quality.
4. Select the manual color adjustment
Select Manual for Color/Intensity, and click Set....
Manual Color Adjustment dialog box opens.
5. Select color correction
Click Matching tab, and select ICM for Color Correction.
6. Select the input profile
Select an Input Profile that matches the color space of the image data.
For sRGB data or data without an ICC profile:
Select Standard.
For Adobe RGB data:
Select Adobe RGB (1998).
Important
If the application software specifies an input profile, the input profile setting of the printer driver
becomes invalid.
If no ICC profiles are installed on your computer, Adobe RGB (1998) is not displayed. You can
install ICC profiles from the Setup CD-ROM that accompanies the machine.
7. Set the other items
If necessary, click Color Adjustment tab, and adjust the color balance of Cyan, Magenta, Yellow, and
adjust Brightness, Intensity, and Contrast settings, and then click OK.
8. Complete the setup
Click OK on the Main tab.
When you execute print, the data is printed with the color space of the selected image data.
Related Topics
Selecting a Combination of the Print Quality Level and a Halftoning Method
Specifying Color Correction
Adjusting Color Balance
Adjusting Brightness
Adjusting Intensity
Adjusting Contrast
Printing with ICC Profiles
Page 257 of 681 pages
Page top
Adjusting Color Balance
Page 258 of 681 pages
Advanced Guide > Printing from a Computer > Printing with Other Application Software > Changing the Print Quality and
Correcting Image Data > Adjusting Color Balance
Adjusting Color Balance
You can adjust the color tints during printing.
Since this function adjusts color balance of the output by changing the ink ratios of each color, it changes
the total color balance of the document. Use the application software if you want to change the color
balance significantly. Use the printer driver only if you want to adjust the color balance slightly.
The following sample shows the case when Color Balance is used to intensify cyan and to diminish
yellow so that the overall colors are more uniform.
No adjustment
Adjusted in Color Balance
The procedure for adjusting color balance is as follows:
1. Open the printer driver setup window
2. Select the manual color adjustment
On the Main tab, select Manual for Color/Intensity, and click Set....
The Manual Color Adjustment dialog box opens.
3. Adjust color balance
There are individual sliders for Cyan, Magenta, and Yellow. Each color becomes stronger when the
corresponding slider is moved to the right, and becomes weaker when the corresponding slider is
moved to the left. For example, if cyan becomes weaker, the color red becomes stronger.
You can also directly enter a value linked to the slider. Enter a value in the range from -50 to 50.
After adjusting each color, click OK.
Adjusting Color Balance
Page 259 of 681 pages
4. Complete the setup
Click OK on the Main tab.
When you execute print, the document is printed with the adjusted color balance.
Important
When the Grayscale Printing check box on the Main tab is checked, Cyan, Magenta, and Yellow
appear grayed out and are unavailable.
Related Topics
Selecting a Combination of the Print Quality Level and a Halftoning Method
Specifying Color Correction
Adjusting Brightness
Adjusting Intensity
Adjusting Contrast
Page top
Adjusting Brightness
Page 260 of 681 pages
Advanced Guide > Printing from a Computer > Printing with Other Application Software > Changing the Print Quality and
Correcting Image Data > Adjusting Brightness
Adjusting Brightness
You can change the brightness of the overall image data during printing.
This function does not change pure white or pure black but it changes the brightness of the intermediate
colors.
The following sample shows the print result when the Brightness specification is changed.
Light is selected
Normal is selected
Dark is selected
The procedure for adjusting brightness is as follows:
1. Open the printer driver setup window
2. Select the manual color adjustment
On the Main tab, select Manual for Color/Intensity, and click Set....
The Manual Color Adjustment dialog box opens.
3. Specify the brightness
Select Light, Normal, or Dark for Brightness, and click OK.
Adjusting Brightness
Page 261 of 681 pages
4. Complete the setup
Click OK on the Main tab.
When you execute print, the data is printed at the specified brightness.
Related Topics
Selecting a Combination of the Print Quality Level and a Halftoning Method
Specifying Color Correction
Adjusting Color Balance
Adjusting Intensity
Adjusting Contrast
Page top
Adjusting Intensity
Page 262 of 681 pages
Advanced Guide > Printing from a Computer > Printing with Other Application Software > Changing the Print Quality and
Correcting Image Data > Adjusting Intensity
Adjusting Intensity
You can dilute (brighten) or intensify (darken) the colors of the overall image data during printing.
If you want to sharpen the print results, you should intensify the colors.
The following sample shows the case when the intensity is increased so that all colors become more
intense when the image data is printed.
No adjustment
Higher Intensity
The procedure for adjusting intensity is as follows:
1. Open the printer driver setup window
2. Select the manual color adjustment
Select Manual for Color/Intensity on the Main tab, and click Set....
The Manual Color Adjustment dialog box opens.
3. Adjust intensity
Moving the Intensity slider to the right intensifies (darkens) the colors. Moving the slider to the left
dilutes (brightens) the colors.
You can also directly enter a value linked to the slider. Enter a value in the range from -50 to 50.
After adjusting each color, click OK.
Adjusting Intensity
Page 263 of 681 pages
Important
Adjust the slider gradually.
4. Complete the setup
Click OK on the Main tab.
When you execute print, the image data is printed with the adjusted intensity.
Related Topics
Selecting a Combination of the Print Quality Level and a Halftoning Method
Specifying Color Correction
Adjusting Color Balance
Adjusting Brightness
Adjusting Contrast
Page top
Adjusting Contrast
Page 264 of 681 pages
Advanced Guide > Printing from a Computer > Printing with Other Application Software > Changing the Print Quality and
Correcting Image Data > Adjusting Contrast
Adjusting Contrast
You can adjust the image contrast during printing.
To make the differences between the light and dark portions of images greater and more distinct,
increase the contrast. On the other hand, to make the differences between the light and dark portions of
images smaller and less distinct, reduce the contrast.
No adjustment
Adjust the contrast
The procedure for adjusting contrast is as follows:
1. Open the printer driver setup window
2. Select the manual color adjustment
On the Main tab, select Manual for Color/Intensity, and click Set....
The Manual Color Adjustment dialog box opens.
3. Adjust the contrast
Moving the Contrast slider to the right increases the contrast, and moving it to the left decreases the
contrast.
You can also directly enter a value linked to the slider. Enter a value in the range from -50 to 50.
After adjusting each color, click OK.
Adjusting Contrast
Page 265 of 681 pages
4. Complete the setup
Click OK on the Main tab.
When you execute print, the image is printed with the adjusted contrast.
Related Topics
Selecting a Combination of the Print Quality Level and a Halftoning Method
Specifying Color Correction
Adjusting Color Balance
Adjusting Brightness
Adjusting Intensity
Page top
Simulating an Illustration
Page 266 of 681 pages
Advanced Guide > Printing from a Computer > Printing with Other Application Software > Changing the Print Quality and
Correcting Image Data > Simulating an Illustration
Simulating an Illustration
With the Simulate Illustration function, you can print full-color or 256-color image data so that it looks like
a hand-drawn illustration. You can add different effects to the original profile and colors.
The procedure for performing Simulate Illustration is as follows:
1. Open the printer driver setup window
2. Set the Simulate Illustration
Check the Simulate Illustration check box on the Effects tab, and adjust the Contrast as necessary.
Moving the slider to the right lightens the image data and moving the slider to the left darkens the
image data.
The current settings are displayed in the Settings Preview on the left side of the printer driver.
3. Complete the setup
Click OK.
When you execute print, the image will be printed so that it looks hand-drawn.
Page top
Representing Image Data with a Single Color
Page 267 of 681 pages
Advanced Guide > Printing from a Computer > Printing with Other Application Software > Changing the Print Quality and
Correcting Image Data > Representing Image Data with a Single Color
Representing Image Data with a Single Color
With the Monochrome Effects function, you can benefit from coloring effects such as changing a
photograph to a sepia tone image.
The procedure for performing Monochrome Effects is as follows:
1. Open the printer driver setup window
2. Set Monochrome Effects
Check the Monochrome Effects check box on the Effects tab and select your desired color.
If you use Select Color, move the Color slider to specify the color you want.
The current settings are displayed in the Settings Preview on the left side of the printer driver.
3. Complete the setup
Click OK.
When you execute print, the image will be printed with a single color.
Important
When the Grayscale Printing check box on the Main tab is checked, Monochrome Effects appears
grayed out and is unavailable.
Page top
Presenting Image Data with Vivid Colors
Page 268 of 681 pages
Advanced Guide > Printing from a Computer > Printing with Other Application Software > Changing the Print Quality and
Correcting Image Data > Presenting Image Data with Vivid Colors
Presenting Image Data with Vivid Colors
The Vivid Photo function allows you to print image data with vivid colors.
The notable feature of Vivid Photo is that it emphasizes the colors in background sceneries while
maintaining the human skin color natural. By using this function, you can make vivid hues appear even
more vivid.
The procedure for performing Vivid Photo is as follows:
1. Open the printer driver setup window
2. Set Vivid Photo
Check the Vivid Photo check box on the Effects tab.
3. Complete the setup
Click OK.
When you execute print, the image will be printed with vivid colors.
Page top
Smoothing Jagged Outlines
Page 269 of 681 pages
Advanced Guide > Printing from a Computer > Printing with Other Application Software > Changing the Print Quality and
Correcting Image Data > Smoothing Jagged Outlines
Smoothing Jagged Outlines
The Image Optimizer function allows you to smooth jagged outlines in photos and graphics that have
been enlarged with your application. This feature is especially useful when printing low-resolution
images from Web pages.
The procedure for performing Image Optimizer is as follows:
1. Open the printer driver setup window
2. Perform Image Optimizer
Check the Image Optimizer check box on the Effects tab.
3. Complete the setup
Click OK.
The photos and graphics will be printed with jagged outlines smoothed.
Note
Depending on application software or resolution of image data, the Image Optimizer may have no
discernible effects.
It may take longer to complete printing if the Image Optimizer is used.
Page top
Changing Color Properties to Improve Coloration
Page 270 of 681 pages
Advanced Guide > Printing from a Computer > Printing with Other Application Software > Changing the Print Quality and
Correcting Image Data > Changing Color Properties to Improve Coloration
Changing Color Properties to Improve Coloration
The Photo Optimizer PRO function corrects colors of digital camera images or scanned images. It is
specially designed to compensate for color shift, overexposure, and underexposure.
The procedure for performing Photo Optimizer PRO is as follows:
1. Open the printer driver setup window
2. Set the Auto Photo mode
Check the Photo Optimizer PRO check box on the Effects tab.
Normally there is no need to check the Apply Throughout Page check box.
Images within each page are optimized on an image-by-image basis.
Note
Check the Apply Throughout Page check box when printing image data that has been
processed, such as being cropped or rotated. In this case the entire page will be treated as a
single image to be optimized.
3. Complete the setup
Click OK.
When you execute print, the images will be printed with color compensation.
Important
Photo Optimizer PRO does not function when:
Background is set in the Stamp/Background dialog box on the Page Setup tab.
Define Stamp... is selected in the Stamp/Background dialog box on the Page Setup tab, and the
bitmapped stamp is configured.
Changing Color Properties to Improve Coloration
Page 271 of 681 pages
Note
Depending on images, the Photo Optimizer PRO may have no discernible effect.
Page top
Reducing Photo Noise
Page 272 of 681 pages
Advanced Guide > Printing from a Computer > Printing with Other Application Software > Changing the Print Quality and
Correcting Image Data > Reducing Photo Noise
Reducing Photo Noise
With the Photo Noise Reduction function, you can reduce the digital camera noise and improve the
image quality of the digital print.
The procedure for performing Photo Noise Reduction is as follows:
1. Open the printer driver setup window
2. Set Photo Noise Reduction
Check the Photo Noise Reduction check box on the Effects tab and select Normal or Strong for the
level.
3. Complete the setup
Click OK.
When you execute print, the image will be printed with the digital camera noise being reduced.
Note
It is recommended to select Normal for most cases. Select Strong if you have selected Normal and
the noise still bothers you.
Depending on application software or resolution of image data, effects of digital camera noise
reduction may not be obvious.
When this function is used for other than photos taken by digital cameras, image may be distorted.
Page top
Overview of the Printer Driver
Page 273 of 681 pages
Advanced Guide > Printing from a Computer > Printing with Other Application Software > Overview of the Printer Driver
> Overview of the Printer Driver
Overview of the Printer Driver
Canon IJ Printer Driver
How to Open the Printer Driver Setup Window
Maintenance Tab
Canon IJ Status Monitor
The Canon IJ Preview
Page top
Canon IJ Printer Driver
Page 274 of 681 pages
Advanced Guide > Printing from a Computer > Printing with Other Application Software > Overview of the Printer Driver
> Canon IJ Printer Driver
Canon IJ Printer Driver
The Canon IJ printer driver is software that is installed on your computer for printing data on this
machine.
The Canon IJ printer driver converts the print data created by your Windows application into data that your
printer can understand and sends the converted data to the printer.
Because the format of print data varies depending on the your model, you need to have a Canon IJ
printer driver for the specific model you are using.
How to Use Help
You can display the Help describing the driver setting items through the Printing Preferences screen of
the Canon IJ printer driver.
To view all descriptions of a tab...
Click the Help button on each tab.
A description for each item on the tab appears.
You can also display a description for a dialog box by clicking the link that appears on the
corresponding tab.
To see a description for each item...
Right-click the item you want to learn about and then click Help.
Alternatively, if the
[Help] button is found at the right end of the title bar, click that button, and
then click the item you want to learn about.
A description of the item is displayed.
Related Topic
How to Open the Printer Driver Setup Window
Page top
How to Open the Printer Driver Setup Window
Page 275 of 681 pages
Advanced Guide > Printing from a Computer > Printing with Other Application Software > Overview of the Printer Driver
> Canon IJ Printer Driver > How to Open the Printer Driver Setup Window
How to Open the Printer Driver Setup Window
The printer driver setup window can be displayed through the application software in use or the Start
menu of the Windows.
Note
This guide mainly describes operations on the Windows Vista. Operations may differ depending on
versions of the Windows.
Open the Printer Driver Setup Window through the Application Software
Follow the procedure below to configure print settings when printing.
1. Select the command you perform printing on the application software in use
In general, select Print on the File menu to open the Print dialog box.
2. Select your model name and click Preferences (or Properties)
The printer driver setup window appears.
Note
Depending on application software you use, command names or menu names may vary and
there may be more steps. For details, refer to the user's manual of your application software.
Open the Printer Driver Setup Window through the Start Menu
Follow the procedure below to perform maintenance operations such as print head cleaning, or to
configure print settings that are common for all application software.
1. Select items from the Start menu as shown below:
In Windows Vista, select the Start menu -> Control Panel -> Hardware and Sound -> Printers.
In Windows XP, select the Start menu -> Control Panel -> Printers and Other Hardware ->
Printers and Faxes.
In Windows 2000, select the Start menu -> Settings -> Printers.
2. Right-click your model name icon, and then select Printing Preferences from the
displayed menu.
The printer driver setup window appears.
Important
Opening the printer driver setup window through Properties displays such tabs regarding the
Windows functions as the Ports (or Advanced) tab. Those tabs do not appear when opening
through Printing Preferences or application software. About tabs regarding Windows functions,
refer to the user's manual for the Windows.
Page top
Maintenance Tab
Page 276 of 681 pages
Advanced Guide > Printing from a Computer > Printing with Other Application Software > Overview of the Printer Driver
> Canon IJ Printer Driver > Maintenance Tab
Maintenance Tab
The Maintenance tab allows you to perform machine maintenance or change the settings of the
machine.
Features
Cleaning the Print Heads
Cleaning the Paper Feed Rollers
Aligning the Print Head Position
Checking the Print Head Nozzles
Cleaning Inside the Machine
Setting the Ink Cartridge
Managing the Machine Power
Related features
Reducing the Machine Noise/Quiet Mode
Changing the Machine Operation Mode
Page top
Canon IJ Status Monitor
Page 277 of 681 pages
Advanced Guide > Printing from a Computer > Printing with Other Application Software > Overview of the Printer Driver
> Canon IJ Status Monitor
Canon IJ Status Monitor
The Canon IJ Status Monitor is an application software that shows the status of the printer and the
progress of printing on the Windows screen. You will know the status of the printer with graphics, icons,
and messages.
Launching the Canon IJ Status Monitor
The Canon IJ Status Monitor launches automatically when data is sent to the printer. When launched, the
Canon IJ Status Monitor appears as a button on the Task Bar.
Click the Status Monitor button displayed on the Task Bar. The Canon IJ Status Monitor appears.
Note
To open the Canon IJ Status Monitor when the printer is not printing, open the printer driver setup
window and click View Printer Status... on the Maintenance tab.
When Errors Occur
The Canon IJ Status Monitor is automatically displayed when an error occurs (e.g., if the printer runs out
of paper or if the ink is low).
In such cases, take the appropriate action as described.
Page top
The Canon IJ Preview
Page 278 of 681 pages
Advanced Guide > Printing from a Computer > Printing with Other Application Software > Overview of the Printer Driver
> The Canon IJ Preview
The Canon IJ Preview
The Canon IJ Preview is an application software that displays what the print result will look like before a
document is actually printed.
The preview reflects the information that is set within the printer driver and allows you to check the
document layout, print sequence, and number of pages. You can also change the media type settings.
If you want to display a preview before printing, open the printer driver setup window , click the Main tab,
and check the Preview before printing check box.
If you do not want to display a preview before printing, uncheck the check box.
Related Topic
Displaying the Print Results before Printing
Page top
Printing Using the Operation Panel of the Machine
Page 279 of 681 pages
Advanced Guide > Printing Using the Operation Panel of the Machine
Printing Using the Operation Panel of the Machine
Copying
Printing from a Memory Card
Page top
Copying
Page 280 of 681 pages
Advanced Guide > Printing Using the Operation Panel of the Machine > Copying
Copying
Making Copies
Using Useful Copy Functions
Page top
Making Copies
Page 281 of 681 pages
Advanced Guide > Printing Using the Operation Panel of the Machine > Copying > Making Copies
Making Copies
For the basic procedure to make copies, refer to Copying.
Reducing or Enlarging a Copy .
Using Useful Copy Functions
Page top
Reducing or Enlarging a Copy
Page 282 of 681 pages
Advanced Guide > Printing Using the Operation Panel of the Machine > Copying > Making Copies > Reducing or Enlarging
a Copy
Reducing or Enlarging a Copy
1. Make sure that the machine is turned on.
2. Press the Menu button, then press the OK button to select Copy if another mode
has been selected.
Note
Removing the memory card in the Card Slot or the PictBridge compliant device connected to
the Direct Print Port returns to the copy mode.
3. Load paper on the Rear Tray.
4. Load the original document on the Platen Glass.
5. Press the
button.
The paper setting screen is displayed.
6. Press the
7. Use the
button to select 100%.
button to select Fit-to-page.
Note
You can select Fit-to-page when Standard copy or Borderless copy is selected.
Copied images are automatically reduced or enlarged in the lengthwise/widthwise direction to
fit the page size you select.
Select 100% if you do not reduce or enlarge a copy.
8. Press the OK button.
The LCD returns to the copy mode screen.
9. Use the
button to specify the number of copies.
Note
Pressing the Back or Stop button returns the number of copies to 1.
10. Press the Color button for color copying, or the Black button for black & white
copying.
The machine starts fit-to-page copying.
Important
Do not open the Document Cover or remove the original from the Platen Glass until copying is
complete.
Note
To cancel copying, press the Stop button.
Page top
Using Useful Copy Functions
Page 283 of 681 pages
Advanced Guide > Printing Using the Operation Panel of the Machine > Copying > Using Useful Copy Functions
Using Useful Copy Functions
Special Copy
Choose the copy method according to your purpose.
Borderless Copy
You can copy images so that they fill the entire page without borders.
Copying without Borders (Borderless Copy)
Frame Erase
When copying a thick original document such as books, you can make a copy without black
margins around the image.
Copying Thick Originals Such as Books (Frame Erase)
Page top
Settings for Special Copy
Page 284 of 681 pages
Advanced Guide > Printing Using the Operation Panel of the Machine > Copying > Using Useful Copy Functions >
Settings for Special Copy
Settings for Special Copy
1. Make sure that the machine is turned on.
2. Press the Menu button to select Copy if another mode has been selected.
3. Load paper on the Rear Tray.
4. Load the original document on the Platen Glass.
Note
For details on the types and conditions of originals which you can copy, refer to Loading Paper /
Original .
5. Press the
button.
The paper setting screen is displayed.
Page top
Copying without Borders (Borderless Copy)
Page 285 of 681 pages
Advanced Guide > Printing Using the Operation Panel of the Machine > Copying > Using Useful Copy Functions >
Copying without Borders (Borderless Copy)
Copying without Borders (Borderless Copy)
You can copy images so that they fill the entire page without borders.
Settings for Special Copy
1. Use the
button to select Borderless copy, then press the OK button.
2. Press the Color button for color copying, or the Black button for black & white
copying.
Important
Do not open the Document Cover or remove the original from the Platen Glass until copying is
complete.
Note
Slight cropping may occur at the edges since the copied image is enlarged to fill the whole page.
Page top
Copying Thick Originals Such as Books (Frame Erase)
Page 286 of 681 pages
Advanced Guide > Printing Using the Operation Panel of the Machine > Copying > Using Useful Copy Functions >
Copying Thick Originals Such as Books (Frame Erase)
Copying Thick Originals Such as Books (Frame Erase)
When copying a thick original document such as books, you can make a copy without black margins
around the image. Using this function, you can reduce unnecessary ink consumption.
Settings for Special Copy
1. Use the
button to select Borderless copy, then press the OK button.
2. Press the Color button for color copying, or the Black button for black & white
copying.
Note
Close the Document Cover.
There may be a narrow black margin that appears around the image. This function removes the
dark margins only. If a scanned book is too thin or when the machine is used nearby a window or in
a bright environment, a faint black frame may remain. Also, if the color of an original is dark, the
machine cannot distinguish the document color from the shadow and this may cause slight
cropping.
Page top
Printing from a Memory Card
Page 287 of 681 pages
Advanced Guide > Printing Using the Operation Panel of the Machine > Printing from a Memory Card
Printing from a Memory Card
Printing Photographs Saved on a Memory Card
Setting Up the Card Slot as the Memory Card Drive of the Computer
Page top
Printing Photographs Saved on a Memory Card
Page 288 of 681 pages
Advanced Guide > Printing Using the Operation Panel of the Machine > Printing from a Memory Card >Printing
Photographs Saved on a Memory Card
Printing Photographs Saved on a Memory Card
For the basic procedure to print from a memory card, refer to Printing from a Memory Card .
Page top
Setting Items
Page 289 of 681 pages
Advanced Guide > Printing Using the Operation Panel of the Machine > Printing from a Memory Card > Printing
Photographs Saved on a Memory Card > Setting Items
Setting Items
Pressing the
copies.
button displays the setting items after specifying the photo to print and the number of
Note
Depending on the functions, some setting items cannot be specified in combination.
Tab 1
1. Page size
Select the page size of the loaded paper.
2. Media type
Select the media type of the loaded paper.
3. Print quality
Adjust print quality according to the original.
4. Bordered/Borderless
Select bordered or borderless print.
Tab 2
5. Date printing
Activate/deactivate to print the shooting date on a photo.
Note
The shooting date is printed according to Date display in Device settings.
6. Photo optimizer
Automatically optimizes brightness and tone of a photo.
7. Red-Eye correct
Corrects red eyes in portraits caused by flash photography.
8. Face brightener
Brightens a darkened face on the photo taken against the light.
Page top
Printing by Using the Photo Index Sheet
Page 290 of 681 pages
Advanced Guide > Printing Using the Operation Panel of the Machine > Printing from a Memory Card > Printing by Using
the Photo Index Sheet
Printing by Using the Photo Index Sheet
Photo Index Sheet is an A4 or Letter-size plain paper on which thumbnail images of photos saved on a
memory card are printed. Print out a Photo Index Sheet, mark the images that you want to print, scan the
sheet in, and the machine then prints the selected images. You can also specify other settings, such as
paper size and type, by using this sheet; you do not have to make settings by using the Operation Panel
on the machine.
1. Make sure that the machine is turned on.
2. Load A4 or Letter-sized plain paper.
3. Insert a memory card into the Card Slot following the instruction on the LCD.
Note
For information on how to insert a memory card, refer to Printing from a Memory Card .
4. Press the Menu button.
Printing by Using the Photo Index Sheet
5. Use the
Page 291 of 681 pages
button to select Photo Index Sheet, then press the OK button.
6. Confirm that Photo Index Sheet is selected, then press the OK button.
7. Make sure that the paper is loaded, then press the OK button.
The Photo Index Sheet(s) will be printed.
Caution
Do not remove the memory card until printing the Photo Index Sheet(s) is completed.
Note
If 31 or more images are on the memory card, two or more Photo Index Sheets are printed.
8. Fill in the appropriate circles in the Photo Index Sheet.
Fill in the appropriate circles (
and their print options.
Good
) with a dark pencil or a black ink pen to select the photos to print
Bad
(a) Check mark
(b) Line only
(c) Too light
A. Select the Date/page size and other printing formats.
B. Fill this circle to print a copy of all photographs or to print according to DPOF settings..
* If you filled this circle, any other circles you filled for the number of copies to print for each
photograph will be disregarded, and one copy each of all photographs will be printed.
*For details about DPOF print, see DPOF Print by Using the Photo Index Sheet .
C. Select the number of copies (fill in a circle under each photograph to print).
D. Confirm and follow the described printing procedure.
Printing by Using the Photo Index Sheet
Page 292 of 681 pages
E. Fill this circle to print the same Photo Index Sheet again.
* If you filled this circle, all other filled settings will be disregarded.
F. Be careful not to make the bar code dirty.
If the bar code is dirty or has wrinkles, the machine may not scan the Photo Index Sheet
properly.
Important
If there is more than one Photo Index Sheet, fill in all the sheets.
If the filled circles on the Photo Index Sheet are not dark or vast enough, the machine may
not scan the Photo Index Sheet properly.
9. Load paper on the Rear Tray.
Make sure that the page size and media type of the loaded paper match those specified on the
Photo Index Sheet.
Note
When printing images using the Photo Index Sheet, you can select 4" x 6" (101.6 x 152.4 mm),
5" x 7" (127 x 177.8 mm), 8.5" x 11" (Letter), or A4 for the page size.
10. Make sure that Photo Index Sheet scan & print is selected, then press the OK
button.
11. Place the Photo Index Sheet face-down on the Platen Glass, then press the OK
button.
When placing the Photo Index Sheet, place the front side down and align the upper left corner of it
with the alignment mark as shown in the figure below.
The Photo Index Sheet is scanned and the specified photos will be printed.
Important
If Failed to scan Photo Index Sheet. is displayed on the LCD, press the OK button and confirm
the following:
The Platen Glass and the Photo Index Sheet are not dirty
The Photo Index Sheet is placed in the correct position with its front side facing down
You have filled in all the necessary circles on the sheet
Only one option is selected for items that do not accept two or more selections
Is the circle for the number of copies to print for each photograph filled when you print with
DPOF print?
Do not remove the memory card while printing is in progress.
Note
To cancel printing, press the Stop button.
To continue to print photographs using subsequent Photo Index Sheets, repeat the procedure
from step 10.
If the memory card has been removed and then reinserted before printing with the Photo Index
Sheet, it may take some time before printing starts.
Page top
Setting Up the Card Slot as the Memory Card Drive of the Computer
Page 293 of 681 pages
Advanced Guide > Printing Using the Operation Panel of the Machine > Printing from a Memory Card > Setting Up the
Card Slot as the Memory Card Drive of the Computer
Setting Up the Card Slot as the Memory Card Drive of the
Computer
The Card Slot of the machine can also be used as the memory card drive of the computer.
Important
When Read/write attribute under Device settings is set to Writable from PC using the
Operation Panel of the machine, card direct printing cannot be done. After using the Card Slot
as the memory card drive of the computer, remove the memory card, be sure to set Read/write
attribute to Not writable from PC. When you turned off the machine, Writable from PC will be
canceled and the setting is returned to Not writable from PC when you turn on the machine
next time.
1. Make sure that the memory card is not set.
If the memory card is set, remove it from the Card Slot. For details, refer to Printing from a
Memory Card .
2. Press the Menu button.
3. Use the
button to select Device settings, then press the OK button.
4. Use the
button to select Read/write attribute, then press the OK button.
5. Specify the read/write attribute.
Not writable from PC
The Card Slot is used only for reading. Be sure to select this mode when printing photos from
a memory card.
Writable from PC
The Card Slot is used as the memory card drive of the computer. Photo data can be written into
the memory card.
Important
If you used the Card Slot as the memory card drive of the computer, you need to do a "safe
removal" operation on your computer before physically removing the memory card from your
machine.
In Windows, right-click the
Removable Disk icon and click Eject. If Eject is not
displayed on the screen, confirm that the Access lamp is not flashing and remove the
memory card.
On a Macintosh, drag the
Mount drive icon into the Trash.
Page top
Scanning
Page 294 of 681 pages
Advanced Guide > Scanning
Scanning
Scanning Images
Saving Scanned Data on the USB flash drive/Memory Card Using the Operation Panel of the Machine
Saving Scanned Data to PC Using the Operation Panel of the Machine
Scanning with the Bundled Application Software
Scanning with Other Application Software
Other Scanning Methods
Page top
Scanning Images
Page 295 of 681 pages
Advanced Guide > Scanning > Scanning Images
Scanning Images
Scanning Images
Before Scanning
Placing Documents
Page top
Scanning Images
Page 296 of 681 pages
Advanced Guide > Scanning > Scanning Images > Scanning Images
Scanning Images
You can scan images from the machine to a computer without printing them and save them in popular
image data, such as JPEG, TIFF, bitmaps, or PDF. You can also save scanned images in a PDF or
JPEG data format in the memory card or USB flash drive.
Select the scanning method according to your purpose.
Saving Scanned Data on the USB flash drive/Memory Card Using the Operation Panel of the Machine
Saving Scanned Data to PC Using the Operation Panel of the Machine
Scanning with the Bundled Application Software
Scanning with Other Application Software
Page top
Before Scanning
Page 297 of 681 pages
Advanced Guide > Scanning > Scanning Images > Before Scanning
Before Scanning
Before scanning images, confirm the following:
Does the original to be scanned meet the requirements for an original to
be set on the Platen Glass?
If you save the data to PC, refer to Placing Documents for details.
If you save the data to the USB flash drive/Memory Card, refer to Loading paper / Originals for details.
Page top
Placing Documents
Page 298 of 681 pages
Advanced Guide > Scanning > Scanning Images > Placing Documents
Placing Documents
Learn how to place documents on the machine's Platen. Place documents correctly according to the type
of document to be scanned. Otherwise, documents may not be scanned correctly.
Important
Close the Document Cover when scanning documents.
Place documents as described below to allow the machine to detect the document automatically.
When scanning by specifying the document size, always align an upper corner of the document with
the corner at the arrow of the Platen, regardless of the document type.
Placing Documents
When Scanning Photos, Hagaki, Business Cards
or CD/DVD
When Scanning Magazines, Newspapers or Text
Documents
Placing a Single Document
Place the document face-down and align correctly
with the arrow/marks on the Platen.
Place the document face-down on the Platen, with 3
/8 inches (1 cm) or more space between the edges
of the Platen and the document.
Important
If the document is large (such as an A4 photo)
and cannot be placed away from the edges/
arrow of the Platen, scan by specifying the file
format.
Reflective CD/DVD labels may not be scanned
properly.
Placing Multiple Documents
Allow 3/8 inches (1 cm) or more space between the
edges of the Platen and documents, and between
documents.
Placing Documents
Page 299 of 681 pages
Note
You can place up to 10 documents.
Positions of slanted documents (10 degrees
or less) are corrected automatically.
Page top
Saving Scanned Data on the USB flash drive/Memory Card Using the Oper... Page 300 of 681 pages
Advanced Guide > Scanning > Saving Scanned Data on the USB flash drive/Memory Card Using the Operation Panel of
the Machine
Saving Scanned Data on the USB flash drive/Memory Card
Using the Operation Panel of the Machine
Saving Scanned Data on the USB flash drive/Memory Card Using the Operation Panel of the Machine
Page top
Saving Scanned Data on the USB flash drive/Memory Card Using the Oper... Page 301 of 681 pages
Advanced Guide > Scanning > Saving Scanned Data on the USB flash drive/Memory Card Using the Operation Panel of
the Machine > Saving Scanned Data on the USB flash drive/Memory Card Using the Operation Panel of the Machine
Saving Scanned Data on the USB flash drive/Memory Card
Using the Operation Panel of the Machine
You can save scanned data on the USB flash drive or memory card using the Operation Panel.
Important
Before inserting the USB flash drive.
You may need an extension cable if the USB flash drive cannot be inserted into the Direct Print
Port of the machine. For details, ask an electronics store.
Depending on the type of USB flash drive, the operation may not be guaranteed.
Some USB flash drives with security settings may not be used.
Do not remove the USB flash drive or memory card from the machine under the following
conditions:
while scanning is in progress
before saving scanned data
You cannot use the USB flash drive and memory card at the same time. Be sure to use either of
them as a media for saving scanned data.
Scanned data saved on the USB flash drive or memory card cannot be printed.
For safety reasons, we recommend storing the scanned data saved on a memory card or USB
flash drive to another media periodically to avoid unexpected accidents.
We assume no responsibility for damage or loss of data for whatever reasons even within the
warranty period
1. Make sure that the machine is turned on.
2. Press the Menu button.
3. Use the
button to select Scan, then press the OK button.
The Scan & save to screen is displayed.
4. Insert the USB flash drive in the Direct Print Port or the memory card in the Card
Slot.
Note
For information on the types of the memory card compatible with the machine, refer to Printing
from a Memory Card .
5. Use the
button to select Save to USB flash or Save to memory card, then
press the OK button.
Select either one you will use as a media for saving scanned data.
6. Select the Data format, then press the OK button.
Select JPEG or PDF.
7. Load the original on the Platen Glass following the instruction on the LCD.
Note
Saving Scanned Data on the USB flash drive/Memory Card Using the Oper... Page 302 of 681 pages
Refer to Loading Paper/ Originals for how to load the original on the PlaatenGlass.
The size of scanned data will be A4, regardless of the size of the original.
8. Press the OK button.
The machine starts scanning and scanned data is saved either on the USB flash drive or the
memory card, which you select as the media for saving scanned data.
Note
You can scan images continuously only when selecting PDF. Continue scanning following the
confirmation screen. You can save up to 100 pages of images in one PDF file.
If the USB flash drive or the memory card becomes full while scanning images is in progress,
only the images already scanned can be saved.
You can save up to 2000 files of scanned data in both JPEG and PDF Data format.
The folder and file name of scanned data saved on the USB flash drive or the memory card is
as follows:
Folder name (file extension: PDF): CANON_SC\DOCUMENT\0001
Folder name (file extension: JPG): CANON_SC\IMAGE\0001
File name: Running numbers, starting from SCN_0001
Page top
Saving Scanned Data to PC Using the Operation Panel of the Machine
Page 303 of 681 pages
Advanced Guide > Scanning > Saving Scanned Data to PC Using the Operation Panel of the Machine
Saving Scanned Data to PC Using the Operation Panel of the
Machine
Saving Scanned Data to PC Using the Operation Panel of the Machine
Appendix: Various Scan Settings
Page top
Saving Scanned Data to PC Using the Operation Panel of the Machine
Page 304 of 681 pages
Advanced Guide > Scanning > Saving Scanned Data to PC Using the Operation Panel of the Machine > Saving Scanned
Data to PC Using the Operation Panel of the Machine
Saving Scanned Data to PC Using the Operation Panel of the
Machine
You can scan images using the Operation Panel of the Machine.
Important
If the software (MP Navigator EX) is not yet installed, refer to your setup manual.
Do not insert or remove USB cables when scanning images with the machine, or when the
computer is in the sleep or standby mode.
1.
Set the Starting application.
You need to set MP Navigator EX as the starting application software in Image Capture under
Applications of Mac OS X.
This operation is not necessary for Mac OS X v.10.4.x.
If you are using Mac OS X v.10.3.9:
Select Applications on the Go menu, then double-click the Image Capture icon. Click Options at the
lower left of the scanner window, select MP Navigator EX 2 in Application to launch when the
scanner button is pressed, then click OK. To quit Image Capture, select Quit Image Capture on the
Image Capture menu.
Important
If Options is not displayed, select Preferences on the Image Capture menu, click Scanner, and
click Use TWAIN software whenever possible to clear the option. Then quit Image Capture and
restart it.
2. Make sure that the machine is turned on.
Note
Refer to Placing Documents for how to load the Original on the Platen Glass.
3. Press the Menu button.
4. Use the
button to select Scan, then press the OK button.
The screen for selecting to which you save the data is displayed.
5. Select Save to PC, then press the OK button.
Load the original on the Platen Glass following the instruction on the LCD.
Note
Options for scan operations can be specified in MP Navigator EX. For details, refer to Let's Try
Scanning .
6. Press the OK button.
The settings configured from MP Navigator EX apply when scanning.
7.
To specify MP Navigator EX 2.0
Saving Scanned Data to PC Using the Operation Panel of the Machine
Page 305 of 681 pages
If you are using Windows Vista:
The program selection screen may be displayed after pressing the Color or Black button. In this
case, select MP Navigator EX Ver2.0 and click OK.
You can set MP Navigator EX to launch whenever pressing the Color or Black button. For details,
refer to Selecting a Response to Commands from the Operation Panel Using MP Navigator EX .
If you are using Windows XP:
The program selection screen may be displayed after pressing the Color or Black button for the first
time. In this case, specify MP Navigator EX 2.0 as the application software to use, select Always use
this program for this action, then click OK. From the next time, MP Navigator EX is automatically
started.
Important
If the position or size of an image is not scanned in correctly depending on the type of the
original, refer to Scanning Photos and Documents and change the MP Navigator EX Document
Type and Document Size settings to match the original being scanned.
If You Want to Edit or Print the Scanned Images
MP Navigator EX enables you to edit the scanned images, such as optimizing or trimming.
You can also start application software from MP Navigator EX to edit or print the scanned images.
Let's Try Scanning
If You Want to Scan Originals with Advanced Settings
ScanGear enables you to scan originals with advanced settings such as the resolution.
Scanning with Advanced Settings Using ScanGear (Scanner Driver)
Note
You can use a TWAIN- or WIA- (Windows Vista and Windows XP only) compliant application
software and the Control Panel (Windows Vista and Windows XP only) to scan originals with
this machine.
For details, refer to Other Scanning Methods .
Page top
Appendix: Various Scan Settings
Page 306 of 681 pages
Advanced Guide > Scanning > Scanning Images > Appendix: Various Scan Settings
Appendix: Various Scan Settings
Specifying how to respond when scanning using the Operation Panel of the machine
Selecting a Response to Commands from the Operation Panel Using MP Navigator EX
Page top
Selecting a Response to Commands from the Operation Panel Using MP N... Page 307 of 681 pages
Advanced Guide > Scanning > Scanning Images > Appendix: Various Scan Settings > Selecting a Response to
Commands from the Operation Panel Using MP Navigator EX
Selecting a Response to Commands from the Operation Panel
Using MP Navigator EX
MP Navigator EX enables you to specify the response resulting from pressing the Color Start or Black
Start button on the machine. You can specify the response individually for each event.
1. Start MP Navigator EX.
Starting MP Navigator EX
2. Click Preferences.
The Preferences dialog box opens.
Note
The Preferences dialog box can also be opened by clicking Preferences in the One-click Mode
screen.
3. On the Scanner Button Settings tab, specify Actions.
Selecting a Response to Commands from the Operation Panel Using MP N... Page 308 of 681 pages
Note
See the section below for details.
Scanner Button Settings Tab (Save)
4. Click OK.
The operation will be performed according to the settings when you press the Color Start or Black
Start button on the machine.
Page top
Scanning with the Bundled Application Software
Page 309 of 681 pages
Advanced Guide > Scanning > Scanning with the Bundled Application Software
Scanning with the Bundled Application Software
What Is MP Navigator EX (Supplied Scanner Software)?
Let's Try Scanning
Useful MP Navigator EX Functions
Utilizing Images in MP Navigator EX
MP Navigator EX Screens
Appendix: Opening Files Other than Scanned Images
Page top
What Is MP Navigator EX (Supplied Scanner Software)?
Page 310 of 681 pages
Advanced Guide > Scanning > Scanning with the Bundled Application Software > What Is MP Navigator EX (Supplied
Scanner Software)?
What Is MP Navigator EX (Supplied Scanner Software)?
MP Navigator EX is an application that enables you to easily scan photos and documents. It is suitable
even for beginners.
What You Can Do with this Software
This software allows you to scan multiple documents at one time, or scan images larger than the Platen.
You can also save scanned images, attach them to e-mail or print them using the supplied applications.
Screens
Main Menus
There are two types of MP Navigator EX Main Menu: Navigation Mode screen and One-click Mode screen.
Navigation Mode Screen
You can start various tasks from the Navigation Mode screen, including simple scanning, scanning
using ScanGear (scanner driver), and enhancing/correcting images.
One-click Mode Screen
You can complete from scanning to saving, etc. at one time by simply clicking the corresponding icon on
the One-click Mode screen.
Note
Click
(Switch Mode) to switch to the Navigation Mode screen.
Scan/Import Window
Use the Scan/Import window to scan photos and documents, or import images saved on memory cards.
What Is MP Navigator EX (Supplied Scanner Software)?
Page 311 of 681 pages
(1) Thumbnail Window
Thumbnails of scanned images are displayed.
(2) Settings and Operation Buttons
Customize scan settings, start scanning, save, etc.
(3) Selected Images Area
Thumbnails of the selected images are displayed.
View & Use Window
Use the View & Use window to select what you want to do with the scanned images.
Note
MP Navigator EX may not start from a button on the machine. In that case, restart the computer.
Page top
Let's Try Scanning
Page 312 of 681 pages
Advanced Guide > Scanning > Scanning with the Bundled Application Software > Let's Try Scanning
Let's Try Scanning
Try scanning using MP Navigator EX.
Starting MP Navigator EX
Starting MP Navigator EX
Scanning documents, photos, magazines, etc. from the Platen
Scanning Photos and Documents
Scanning two or more photos (small documents) at one time
Scanning Multiple Documents at One Time
Scanning images larger than the Platen
Scanning Images Larger than the Platen (Stitch Assist)
Scanning easily according to purpose (scan and save, attach to e-mail, etc.)
Easy Scanning with One-click
Page top
Starting MP Navigator EX
Page 313 of 681 pages
Advanced Guide > Scanning > Scanning with the Bundled Application Software > Let's Try Scanning > Starting MP
Navigator EX
Starting MP Navigator EX
Starting MP Navigator EX
1. Double-click
MP Navigator EX 2.0 icon on the desktop.
MP Navigator EX starts.
Note
Alternatively, from the Start menu, select (All) Programs > Canon Utilities > MP Navigator EX 2.0
> MP Navigator EX 2.0.
Switching between Navigation Mode screen and One-click Mode screen
1. Click
or
at the bottom left of the screen.
The mode switches.
Navigation Mode Screen (Click
One-click Mode Screen (Click
in One-click Mode Screen)
in Navigation Mode Screen)
Starting MP Navigator EX
Page 314 of 681 pages
Note
Select the Show this window at startup checkbox in the Navigation Mode screen to always open
the Navigation Mode screen at startup. If this checkbox is not selected, the last used screen
appears at startup.
Page top
Scanning Photos and Documents
Page 315 of 681 pages
Advanced Guide > Scanning > Scanning with the Bundled Application Software > Let's Try Scanning > Scanning Photos
and Documents
Scanning Photos and Documents
Scan photos and documents placed on the Platen.
1. Start MP Navigator EX and open the Navigation Mode screen.
Starting MP Navigator EX
2. Point to Scan/Import and click Photos/Documents (Platen).
3. Place the document on the Platen, then select Document Type.
Placing Documents
Note
When you select Magazine(Color), the Descreen function will be enabled and scanning takes
longer than usual. To disable the Descreen function, deselect the Descreen checkbox in the
Scan Settings dialog box.
Select Text(OCR) to extract the text in the image and convert to editable text data using MP
Navigator EX.
4. Click Specify... and specify the document size and resolution as required.
The Scan Settings Dialog Box (Photos/Documents) opens.
Scanning Photos and Documents
Page 316 of 681 pages
Note
If the document is large (such as an A4 photo) and cannot be placed away from the edges/
arrow of the Platen, specify the document size in the Scan Settings dialog box.
5. Click Scan.
Scanning starts.
When scanning is completed, the Scan Complete dialog box opens. Select Scan or Exit. Select
Scan to scan the next document, or select Exit to end.
The scanned images appear in the Thumbnail window.
6. Edit the scanned images as required.
Use Edit Tools to rotate images, select a part of an image, etc.
See the Edit Tools in " Photos/Documents (Platen) Screen (Scan/Import Window) " for details.
Note
First select images to edit. (Selected images are outlined in orange.) Drag the mouse or use
Shift + arrow keys to select multiple images.
7. Save the scanned images.
Saving
Saving as PDF Files
Page top
Scanning Multiple Documents at One Time
Advanced Guide > Scanning > Scanning with the Bundled Application Software > Let's Try Scanning > Scanning
Multiple Documents at One Time
Scanning Multiple Documents at One Time
You can scan two or more photos (small documents) at one time by setting Document Size to Auto
Detect (Multiple Documents) in the Scan Settings dialog box of MP Navigator EX.
Important
The following types of documents cannot be cropped correctly.
- Documents smaller than 1.18 inches (3 cm) square
- Photos that have been cut to various shapes
The following types of documents may not be cropped correctly. In that case, start ScanGear
(scanner driver), then adjust the cropping frame on the Advanced Mode tab and scan again.
- Photos that have a whitish border
- Documents printed on white paper, hand-written text, business cards, etc.
- Thin documents
- Thick documents
Scanning in Advanced Mode
1. Place the document on the Platen.
Placing Documents
2. Start MP Navigator EX and open the Navigation Mode screen.
Starting MP Navigator EX
3. Point to Scan/Import and click Photos/Documents (Platen).
4. Select Document Type according to the document to be scanned.
Page 317 of 681 pages
Scanning Multiple Documents at One Time
5. Click Specify....
The Scan Settings Dialog Box (Photos/Documents) opens.
6. Select Auto Detect (Multiple Documents) for Document Size and click OK.
7. Return to the Scan/Import window and click Scan.
Multiple documents are scanned at one time.
When scanning is completed, the Scan Complete dialog box opens. Select Scan or Exit. Select
Scan to scan the next document, or select Exit to end.
The scanned images appear in the Thumbnail window.
Page 318 of 681 pages
Scanning Multiple Documents at One Time
Page 319 of 681 pages
8. Edit the scanned images as required.
Use Edit Tools to rotate images, select a part of an image, etc.
See the Edit Tools in " Photos/Documents (Platen) Screen (Scan/Import Window) " for details.
Note
First select images to edit. (Selected images are outlined in orange.) Drag the mouse or use
Shift + arrow keys to select multiple images.
9. Save the scanned images.
Saving
Saving as PDF Files
Note
If you want to preview the images before scanning, start ScanGear (scanner driver) and use the
Advanced Mode tab.
Scanning Multiple Documents at One Time in Advanced Mode
Page top
Scanning Images Larger than the Platen (Stitch Assist)
Page 320 of 681 pages
Advanced Guide > Scanning > Scanning with the Bundled Application Software > Let's Try Scanning > Scanning Images
Larger than the Platen (Stitch Assist)
Scanning Images Larger than the Platen (Stitch Assist)
Stitch Assist allows you to scan the left and right halves of a large document separately and combine the
scanned images back into one image. You can scan documents that are up to twice as large as the
Platen.
1. Start MP Navigator EX and open the Navigation Mode screen.
Starting MP Navigator EX
Note
You can complete from scanning to saving, etc. at one time by simply clicking the
corresponding icon on the One-click Mode screen. Stitch Assist is available from the One-click
Mode screen as well, by changing the document size. Click the corresponding icon and select
Stitch Assist for Document Size. Then skip ahead to Step 5.
2. Point to Scan/Import and click Photos/Documents (Platen).
3. Select Document Type according to the document to be scanned.
4. Click Specify....
The Scan Settings Dialog Box (Photos/Documents) opens.
Scanning Images Larger than the Platen (Stitch Assist)
Select Stitch Assist for Document Size, then specify Scanning Resolution as required.
5. Return to the Scan/Import window and click Scan.
The Stitch-assist window opens.
6. Place the left half of the document face-down on the Platen.
7. Click Scan.
The left half of the document is scanned and appears in the Stitch-assist window.
8. Place the right half of the document face-down on the Platen.
9. Click Scan.
Page 321 of 681 pages
Scanning Images Larger than the Platen (Stitch Assist)
Page 322 of 681 pages
The right half of the document is scanned.
10. Adjust the scanned image as required.
Use the icons to swap the left and right halves, rotate the image 180 degrees or enlarge/reduce the
image.
(Swap Left & Right)
Swaps the left and right halves.
Important
This function is not available while the image is enlarged/reduced.
Rotate 180°
Rotates the image 180 degrees.
Important
This function is not available while the image is enlarged/reduced.
(Enlarge)
Enlarges the displayed image.
(Reduce)
Reduces the displayed image.
(Full-screen)
Enlarges/reduces the image to display it full-screen.
Note
Enlarge/Reduce/Full Screen does not affect the actual size of the scanned image.
When the document is scanned upside down, the image displayed in the Stitch-assist window
will also be upside down. Click Rotate 180° to rotate the image to the correct orientation.
You can drag the right half of the image from right to left or up and down to adjust the position.
If the left and right halves do not match due to a slanted document, place the document
correctly and click Back, then scan again.
11. Click Next.
12. Drag the mouse to specify the area to be saved, then click OK.
Scanning Images Larger than the Platen (Stitch Assist)
Page 323 of 681 pages
The combined image appears in the Thumbnail window.
When scanning is completed, the Scan Complete dialog box opens. Select Scan or Exit. Select
Scan to scan the next document, or select Exit to end.
13. Save the scanned images.
Saving
Saving as PDF Files
Page top
Easy Scanning with One-click
Page 324 of 681 pages
Advanced Guide > Scanning > Scanning with the Bundled Application Software > Let's Try Scanning > Easy Scanning
with One-click
Easy Scanning with One-click
You can complete from scanning to saving at one time by simply clicking the corresponding icon.
1. Place the document on the Platen.
Placing Documents
2. Start MP Navigator EX.
Starting MP Navigator EX
The MP Navigator EX Navigation Mode screen or One-click Mode screen appears.
Navigation Mode Screen
One-click Mode Screen
Note
Skip ahead to Step 4 if One-click Mode screen is open.
3. Point to One-click.
Easy Scanning with One-click
Page 325 of 681 pages
4. Click the corresponding icon.
Note
See the corresponding sections below for details on each icon.
Custom Scan with One-click Tab
One-click Mode Screen
Page top
Useful MP Navigator EX Functions
Page 326 of 681 pages
Advanced Guide > Scanning > Scanning with the Bundled Application Software > Useful MP Navigator EX Functions
Useful MP Navigator EX Functions
With MP Navigator EX, you can correct/enhance scanned images beautifully, and search saved images
quickly.
Correcting/enhancing images automatically
Correcting/Enhancing Images Automatically
Correcting/enhancing images manually
Correcting/Enhancing Images Manually
Adjusting color characteristics such as brightness and contrast
Adjusting Images
Searching for lost images
Searching Images
Classifying and sorting images
Classifying Images into Categories
Page top
Correcting/Enhancing Images Automatically
Page 327 of 681 pages
Advanced Guide > Scanning > Scanning with the Bundled Application Software > Useful MP Navigator EX Functions >
Correcting/Enhancing Images Automatically
Correcting/Enhancing Images Automatically
MP Navigator EX will analyze and correct/enhance scanned images automatically.
1. Scan documents into MP Navigator EX and save them, then open the View & Use
window from the Navigation Mode screen and select the photos you want to correct/
enhance.
Note
See "Let's Try Scanning " to scan images into MP Navigator EX.
You can also select images saved on a memory card or computer.
Importing Images Saved on a Memory Card
Opening Images Saved on a Computer
2. Click Edit/Convert, then click Fix photo images on the list.
The Correct/Enhance Images window opens.
Note
The Correct/Enhance Images window can also be opened by clicking
(Image Correction/
Enhancement) on the Toolbar or in the Zoom in dialog box. In that case, only the target image
(outlined in orange) can be corrected/enhanced.
3. Select the image you want to correct/enhance from the thumbnail list.
The selected image appears in Preview.
Correcting/Enhancing Images Automatically
Page 328 of 681 pages
Note
If you selected only one image in the View & Use window, the thumbnail list does not appear
and only the preview image appears.
4. Make sure that Auto is selected.
5. Click Auto Photo Fix, Face Sharpener or Digital Face Smoothing.
Auto Photo Fix
Analyzes the image and makes suitable corrections automatically.
Face Sharpener
Sharpens out-of-focus faces.
Digital Face Smoothing
Enhances skin beautifully by removing blemishes and wrinkles.
Note
The Face Sharpener and Digital Face Smoothing effect levels can be changed using the slider
that appears by clicking the corresponding buttons.
Once image is corrected with Auto Photo Fix and saved, it cannot be corrected again with Auto
Photo Fix. Auto Photo Fix may not be available for images edited using an application, digital
camera, etc. manufactured by other companies.
6. Click OK.
The entire image is corrected/enhanced automatically and
upper left of the thumbnail and preview image.
(Correct/Enhance) appears on the
Correcting/Enhancing Images Automatically
Page 329 of 681 pages
Note
Click Reset Selected Image to undo the correction/enhancement.
Select the Apply to all images checkbox to correct/enhance all selected images.
7. Click Save Selected Image or Save All Corrected Images.
You can save corrected/enhanced images as new files.
Note
To save only the images you like, select them and click Save Selected Image. To save all
images, click Save All Corrected Images.
The file format of corrected/enhanced images is JPEG/Exif.
Adobe RGB images are saved as sRGB images.
8. Click Exit.
Note
The corrections/enhancements will be lost if you exit before saving corrected/enhanced
images.
Page top
Correcting/Enhancing Images Manually
Page 330 of 681 pages
Advanced Guide > Scanning > Scanning with the Bundled Application Software > Useful MP Navigator EX Functions >
Correcting/Enhancing Images Manually
Correcting/Enhancing Images Manually
You can correct/enhance scanned images manually.
1. Scan documents into MP Navigator EX and save them, then open the View & Use
window from the Navigation Mode screen and select the photos you want to correct/
enhance.
Note
See "Let's Try Scanning " to scan images into MP Navigator EX.
You can also select images saved on a memory card or computer.
Importing Images Saved on a Memory Card
Opening Images Saved on a Computer
2. Click Edit/Convert, then click Fix photo images on the list.
The Correct/Enhance Images window opens.
Note
The Correct/Enhance Images window can also be opened by clicking
(Image Correction/
Enhancement) on the Toolbar or in the Zoom in dialog box. In that case, only the target image
(outlined in orange) can be corrected/enhanced.
3. Select the image you want to correct/enhance from the thumbnail list.
The selected image appears in Preview.
Correcting/Enhancing Images Manually
Page 331 of 681 pages
Note
If you selected only one image in the View & Use window, the thumbnail list does not appear
and only the preview image appears.
4. Click Manual, then click Correct/Enhance.
5. Click Face Brightener, Face Sharpener, Digital Face Smoothing or Blemish
Remover.
Face Brightener
Brightens dark faces in backlit photos.
Face Sharpener
Sharpens out-of-focus faces.
Digital Face Smoothing
Enhances skin beautifully by removing blemishes and wrinkles.
Blemish Remover
Removes moles.
Note
Move the cursor over the image. The shape of the cursor changes to
(Cross).
6. Drag to select the area you want to correct/enhance, then click OK that appears
over the image.
Correcting/Enhancing Images Manually
The portion in and around the selected area is corrected/enhanced and
Enhancement) appears on the upper left of the thumbnail.
Page 332 of 681 pages
(Correction/
Note
For Face Brightener, Face Sharpener and Digital Face Smoothing, you can drag to rotate the
rectangle.
Click Undo to undo the latest correction/enhancement.
The Face Brightener, Face Sharpener and Digital Face Smoothing effect levels can be
changed using the slider that appears by clicking the corresponding buttons.
Click Reset Selected Image to undo the correction/enhancement.
7. Click Save Selected Image or Save All Corrected Images.
You can save corrected/enhanced images as new files.
Note
To save only the images you like, select them and click Save Selected Image. To save all
images, click Save All Corrected Images.
The file format of corrected/enhanced images is JPEG/Exif.
8. Click Exit.
Note
The corrections/enhancements will be lost if you exit before saving corrected/enhanced
images.
Page top
Adjusting Images
Page 333 of 681 pages
Advanced Guide > Scanning > Scanning with the Bundled Application Software > Useful MP Navigator EX Functions >
Adjusting Images
Adjusting Images
You can make fine adjustments to the overall brightness, contrast, etc. of images.
1. Scan documents into MP Navigator EX and save them, then open the View & Use
window from the Navigation Mode screen and select the photos you want to adjust.
Note
See "Let's Try Scanning " to scan images into MP Navigator EX.
You can also select images saved on a memory card or computer.
Importing Images Saved on a Memory Card
Opening Images Saved on a Computer
2. Click Edit/Convert, then click Fix photo images on the list.
The Correct/Enhance Images window opens.
Note
The Correct/Enhance Images window can also be opened by clicking
(Image Correction/
Enhancement) on the Toolbar or in the Zoom in dialog box. In that case, only the target image
(outlined in orange) can be corrected/enhanced.
3. Select the image you want to adjust from the thumbnail list.
The selected image appears in Preview.
Adjusting Images
Page 334 of 681 pages
Note
If you selected only one image in the View & Use window, the thumbnail list does not appear
and only the preview image appears.
4. Click Manual, then click Adjust.
5. Move the slider of the item you want to adjust and set the effect level.
Brightness
Adjusting Images
Page 335 of 681 pages
Adjusts the overall image brightness. Adjust the brightness when the image is too dark or too
bright.
Move the slider to the left to darken and right to brighten the image.
Contrast
Adjusts the contrast of the image. Adjust the contrast when the image is flat due to lack of
contrast.
Move the slider to the left to decrease and right to increase the contrast of the image.
Sharpness
Emphasizes the outline of the subjects to sharpen the image. Adjust the sharpness when the
photo is out of focus or text is blurred.
Move the slider to the right to sharpen the image.
Blur
Blurs the outline of the subjects to soften the image.
Move the slider to the right to soften the image.
Show-through Removal
Removes show-through of text from the reverse side or removes the base color. Adjust the showthrough level to prevent text on the reverse side of thin document or the base color of the
document from appearing on the image.
Move the slider to the right to increase the show-through removal effect.
Note
Click Defaults to reset all adjustments.
6. Click Save Selected Image or Save All Corrected Images.
You can save adjusted images as new files.
Note
To save only the images you like, select them and click Save Selected Image. To save all
images, click Save All Corrected Images.
The file format of corrected/enhanced images is JPEG/Exif.
7. Click Exit.
Note
The adjustments will be lost if you exit before saving adjusted images.
Page top
Searching Images
Page 336 of 681 pages
Advanced Guide > Scanning > Scanning with the Bundled Application Software > Useful MP Navigator EX Functions >
Searching Images
Searching Images
In the View & Use window of the Navigation Mode screen, you can search images saved on your
computer and open them in MP Navigator EX. Opened images can be printed, edited, etc.
Note
Search images in My Box (Scanned/Imported Images), Recently Saved Images or a selected folder
and its subfolders. You can also specify folder and search in Specify Folder.
Quick Search
In
on the Toolbar, enter a word or phrase included in the file name, Exif
information or PDF text of the image you want to search for, then click
Maker, Model, Description and User Comment is searched.
. For Exif information, text in
Advanced Search
Click Search on the left of the screen to open search options. Enter information of the image you want to
search for, then click Start Search.
Searching Images
Page 337 of 681 pages
Search in
If you know where to look for, select the drive, folder or network from Specify Folder.
File Name
If you know the file name, enter it.
A word or phrase in the file
Enter a word or phrase included in the items selected in More Advanced Options.
Note
For PDF files, you can only search for those created with MP Navigator EX. You cannot search
PDF files created or edited in other applications. Also, searching PDF files is available only
when keyword search is set.
For details of creating PDF files that enables keyword search, see " PDF Settings Dialog Box ."
Password-protected PDF files cannot be searched.
Categories
You can search for images by category.
Modified Date
To search for files that have been updated in a specific time period, enter the first and last dates of
the period.
Shooting Date
To search for images captured in a specific time period, enter the first and last dates of the period.
Note
Captured date is the date and time of data creation, which are included in the document's Exif
information.
More Advanced Options
A word or phrase in the file
In A word or phrase in the file, select the items to search. If you select the Exif information
checkbox, text in Maker, Model, Description and User Comment is searched. If you select the
PDF text checkbox, text in PDF files is searched.
Note
Searching Images
Page 338 of 681 pages
Text in password-protected PDF files cannot be searched.
Search subfolders
Select this checkbox to search subfolders.
Case sensitive
Select this checkbox to match case.
Match all criteria
Searches for files that meet all the specified criteria.
Match any criteria
Searches for files that meet any of the specified criteria.
Start Search
Start search.
Note
See "View & Use Window" for details on the View & Use window.
Page top
Classifying Images into Categories
Page 339 of 681 pages
Advanced Guide > Scanning > Scanning with the Bundled Application Software > Useful MP Navigator EX Functions >
Classifying Images into Categories
Classifying Images into Categories
Display images scanned with MP Navigator EX by category. You can classify unclassified images
automatically, and also create custom categories. You can drag and drop an image to move it from one
category to another.
1. Scan documents into MP Navigator EX and save them, then open the View & Use
window from the Navigation Mode screen.
Note
See "Let's Try Scanning " to scan images into MP Navigator EX.
You can also select images saved on a memory card or computer.
Importing Images Saved on a Memory Card
Opening Images Saved on a Computer
2. In
(Sort by), select Categories.
Images are automatically sorted by category and appear in the Thumbnail window.
Images are sorted into the following categories.
Photos: Portrait, Others
Documents: Business Card, Hagaki, Standard Size, PDF File, Others
Custom categories: Displays your custom categories.
To create custom categories, see " Creating Custom Categories ."
Unclassified: Displays images that have not yet been classified.
Note
Click Classify Images to classify images displayed in Unclassified automatically. Click Cancel
Classifying Images into Categories
Page 340 of 681 pages
to stop.
Classification may take time if there are many images to classify.
Important
Even if you classify images saved in removable media such as USB flash drive and external hard
disk, the classification information will be deleted once you remove the media. From the next time,
the images are classified to Unclassified.
Note
Some images may not be detected correctly and thus may be classified into wrong categories. In
that case, drag and drop the image to the correct category.
Images cannot be classified when Recently Saved Images is selected in the View & Use window.
You can search for images by category. See " Searching Images " for details.
Creating Custom Categories
1. In the View & Use window, sort images by category and click Edit Custom
Categories.
The Edit Custom Categories dialog box opens.
2. Click Add to List.
The Add Category dialog box opens.
3. Enter Category name and click OK.
Important
You can create up to 20 custom categories.
Up to 50 single-byte characters can be used for a category name.
Note
Double-click a created category to open the Change Category Name dialog box in which you
can change the category name.
Select a custom category and click Delete to delete it.
Note
See "View & Use Window" for details on the View & Use window.
Page top
Utilizing Images in MP Navigator EX
Page 341 of 681 pages
Advanced Guide > Scanning > Scanning with the Bundled Application Software > Utilizing Images in MP Navigator EX
Utilizing Images in MP Navigator EX
You can save or print scanned images using MP Navigator EX.
Saving scanned images to computer
Saving
Saving scanned image as PDF Files
Saving as PDF Files
Creating PDF files from scanned images and editing PDF files
Creating/Editing PDF Files
Printing multiple scanned images at one time or printing at specific size, quality, etc.
Printing Documents
Printing scanned photos
Printing Photos
Sending scanned images via e-mail
Sending via E-mail
Correcting/enhancing scanned images or converting them to text
Editing Files
Setting passwords for created PDF files
Setting Passwords for PDF Files
Opening/Editing Password-protected PDF Files
Page top
Saving
Page 342 of 681 pages
Advanced Guide > Scanning > Scanning with the Bundled Application Software > Utilizing Images in MP Navigator EX >
Saving
Saving
Save images scanned with MP Navigator EX to a computer.
1. Select the checkboxes of the images you want to save, then click Save.
2. In the Save dialog box, specify the save settings.
Specify the destination folder, file name and file type.
Important
You cannot select JPEG/Exif when Document Type is Text(OCR).
Note
See "Save Dialog Box " for details on the Save dialog box.
By default, the following folders are specified as the destination folders.
Windows Vista: MP Navigator EX folder in Picture folder
Windows XP: MP Navigator EX folder in My Pictures folder
Windows 2000: MP Navigator EX folder in My Pictures folder
3. Click Save.
Scanned images are saved according to the settings.
To further use/edit the scanned images on MP Navigator EX, click Open saved location in the Save
Complete dialog box.
Creating/Editing PDF Files
Printing Documents
Saving
Page 343 of 681 pages
Printing Photos
Sending via E-mail
Editing Files
Page top
Saving as PDF Files
Page 344 of 681 pages
Advanced Guide > Scanning > Scanning with the Bundled Application Software > Utilizing Images in MP Navigator EX >
Saving as PDF Files
Saving as PDF Files
Save images scanned with MP Navigator EX as PDF files.
1. Select the checkboxes of the images you want to save, then click Save as PDF file.
2. In the Save as PDF file dialog box, specify the save settings.
Specify the file type, file name and destination folder.
Select from the following PDF file types:
PDF
Save each of the selected images as a separate PDF file.
PDF(Multiple Pages)
Save multiple images in one PDF file.
Important
PDF(Multiple Pages) is displayed when multiple images are selected.
Saving as PDF Files
Page 345 of 681 pages
PDF(Add Page)
Add the scanned images to a PDF file. The images are added to the end of the PDF file. You
cannot rearrange the pages of the PDF file to which the images are added.
Important
Images can only be added to PDF files created with MP Navigator EX. You cannot specify
PDF files created with other applications. PDF files edited in other applications cannot be
specified as well.
If a password-protected PDF file is edited, the passwords will be deleted. Reset the
passwords.
Note
See "Save as PDF file Dialog Box " for details on the Save as PDF file dialog box and Set....
By default, the following folders are specified as the destination folders.
Windows Vista: MP Navigator EX folder in Picture folder
Windows XP: MP Navigator EX folder in My Pictures folder
Windows 2000: MP Navigator EX folder in My Pictures folder
You can set passwords for PDF files.
Setting Passwords for PDF Files
3. Click Save.
Scanned images are saved according to the settings.
To further use/edit the scanned images on MP Navigator EX, click Open saved location in the Save
Complete dialog box.
Creating/Editing PDF Files
Printing Documents
Printing Photos
Sending via E-mail
Editing Files
Page top
Creating/Editing PDF Files
Page 346 of 681 pages
Advanced Guide > Scanning > Scanning with the Bundled Application Software > Utilizing Images in MP Navigator EX >
Creating/Editing PDF Files
Creating/Editing PDF Files
Create/edit PDF files. You can add/delete pages, rearrange page order, etc.
1. Scan documents into MP Navigator EX and save them, then open the View & Use
window from the Navigation Mode screen and select what you want to do with the
images.
Note
See "Let's Try Scanning " to scan images into MP Navigator EX.
You can also select images saved on a memory card or computer.
Importing Images Saved on a Memory Card
Opening Images Saved on a Computer
Creating/Editing PDF Files with MP Navigator EX
2. Select files and click PDF.
3. Click Create/Edit PDF file on the list.
Important
You can select PDF, JPEG, TIFF and BMP files.
For PDF files, you can only edit those created with MP Navigator EX. You cannot edit PDF files
created with other applications. PDF files edited in other applications cannot be edited as well.
If a password-protected PDF file is selected, you will be prompted to enter the password.
Opening/Editing Password-protected PDF Files
4. Add/delete pages as required.
To add an existing file, click Add Page and select the file. To delete a page, select it and click Delete
Selected Pages.
Creating/Editing PDF Files
Page 347 of 681 pages
Note
You can add PDF, JPEG, TIFF and BMP files.
When adding a password-protected PDF file, you will be prompted to enter the password.
5. Rearrange the page order as required.
Use the icons to rearrange the order. Alternatively, drag and drop the thumbnail to the target location.
Note
See "Create/Edit PDF file Window " for details on the Create/Edit PDF file window.
6. Click Save Selected Pages or Save All Pages.
The Save as PDF file dialog box opens.
Important
You cannot save images scanned at 10501 pixels or more in the vertical and horizontal
directions.
If a password-protected PDF file is edited, the passwords will be deleted. Reset the
passwords in the Save as PDF file dialog box.
Setting Passwords for PDF Files
Note
See "Save as PDF file Dialog Box " for details on the Save as PDF file dialog box.
7. Specify the save settings in the Save as PDF file dialog box, then click Save.
Images are saved according to the settings.
Opening PDF Files in an Application
You can open PDF files created with MP Navigator EX in an associated application and edit or print them.
2. Select PDF files and click PDF.
Important
For PDF files, you can only select those created with MP Navigator EX. You cannot select PDF
files created with other applications. PDF files edited in other applications cannot be selected
as well.
3. Click Open PDF file on the list.
The application associated with the .pdf file extension by the operating system starts.
Important
Password-protected PDF files cannot be opened in applications not supporting security
setting.
Creating/Editing PDF Files
Page 348 of 681 pages
4. Use the application to edit/print the file.
For details, refer to the application's manual.
Important
In some applications, the commands (print, edit, etc.) restricted by Permissions Password
may differ from those in MP Navigator EX.
Page top
Printing Documents
Page 349 of 681 pages
Advanced Guide > Scanning > Scanning with the Bundled Application Software > Utilizing Images in MP Navigator EX >
Printing Documents
Printing Documents
You can print multiple scanned images at one time, print at specific quality, etc. using MP Navigator EX.
1. Scan documents into MP Navigator EX and save them, then open the View & Use
window from the Navigation Mode screen and select images.
Note
See "Let's Try Scanning " to scan images into MP Navigator EX.
You can also select images saved on a memory card or computer.
Importing Images Saved on a Memory Card
Opening Images Saved on a Computer
2. Click Print, then click Print Document on the list.
Important
If a password-protected PDF file is selected, you will be prompted to enter the password.
Opening/Editing Password-protected PDF Files
3. Specify print settings as required.
In the displayed dialog box, specify print count, quality, scale, etc.
Printing Documents
Page 350 of 681 pages
Important
At 100% Normal-size, some images may be printed small or with some portions cropped. In
that case, select Auto to resize the print in proportion to the paper size.
Note
See "Print Document Dialog Box" for details.
4. Click Print.
Printing starts.
Important
When printing a multiple-page PDF file via Print Document, printing may take time depending
on your computer. In that case, follow these steps and change settings.
1. From the Start menu, select Control Panel.
2. Click Printers.
3. Right-click the icon of your printer and click Properties.
The printer properties dialog box opens.
4. Click the Advanced tab.
5. Select Spool print documents so program finishes printing faster.
6. Select Start printing after last page is spooled.
7. After printing, return the setting on the Preferences tab to Start printing immediately.
Note
To cancel while spooling, click Cancel. To cancel while printing, select the printer icon on the
taskbar and click Cancel Printing.
Page top
Printing Photos
Page 351 of 681 pages
Advanced Guide > Scanning > Scanning with the Bundled Application Software > Utilizing Images in MP Navigator EX >
Printing Photos
Printing Photos
You can print scanned photos using MP Navigator EX or an application that accompanies the machine.
1. Scan documents into MP Navigator EX and save them, then open the View & Use
window from the Navigation Mode screen and select images.
Note
See "Let's Try Scanning " to scan images into MP Navigator EX.
You can also select images saved on a memory card or computer.
Importing Images Saved on a Memory Card
Opening Images Saved on a Computer
When printing photos using an application that accompanies the machine
You can use an application that accompanies the machine to print scanned photos at high quality or to
layout and print images.
2. Click Print, then click Print Photo or Print Album on the list.
Easy-PhotoPrint EX starts. See " Printing Photos" for details.
Note
If Easy-PhotoPrint EX is not installed, print with MP Navigator EX.
When printing photos using MP Navigator EX
2. Click Print, then click Print Photo on the list.
3. Specify print settings as required.
In the displayed dialog box, specify paper size, print count, etc.
Printing Photos
Page 352 of 681 pages
Note
See "Print Photo Dialog Box " for details.
4. Click Print.
Printing starts.
Note
To cancel while spooling, click Cancel. To cancel while printing, select the printer icon on the
taskbar and click Cancel Printing.
Page top
Sending via E-mail
Page 353 of 681 pages
Advanced Guide > Scanning > Scanning with the Bundled Application Software > Utilizing Images in MP Navigator EX >
Sending via E-mail
Sending via E-mail
Send scanned images via e-mail.
Important
MP Navigator EX is compatible with the following e-mail software programs:
- Windows Mail (Windows Vista)
- Outlook Express (Windows XP/Windows 2000)
- Microsoft Outlook
- EUDORA
- Netscape Mail
(If an e-mail software program does not operate properly, check that the program's MAPI is enabled.
To enable MAPI, refer to the manual of the e-mail software program.)
1. Scan documents into MP Navigator EX and save them, then open the View & Use
window from the Navigation Mode screen and select images.
Note
See "Let's Try Scanning " to scan images into MP Navigator EX.
You can also select images saved on a memory card or computer.
Importing Images Saved on a Memory Card
Opening Images Saved on a Computer
2. Click Send, then click Attach to E-mail on the list.
3. Set save options as required.
Specify the destination folder and file name.
Sending via E-mail
Page 354 of 681 pages
Important
You can select a compression type when sending JPEG images via e-mail. Click Set... to open
a dialog box and select High(Low Compression), Standard or Low(High Compression).
Note
See "Send via E-mail Dialog Box " for details on the Send via E-mail dialog box.
4. Click OK.
Files are saved according to the settings, and the e-mail software program starts.
5. Specify the recipient, enter the subject and message, then send e-mail.
For details, refer to the manual of the e-mail software program.
Page top
Editing Files
Page 355 of 681 pages
Advanced Guide > Scanning > Scanning with the Bundled Application Software > Utilizing Images in MP Navigator EX >
Editing Files
Editing Files
You can edit scanned images using MP Navigator EX, or convert them to text using an application that
accompanies the machine.
1. Scan documents into MP Navigator EX and save them, then open the View & Use
window from the Navigation Mode screen and select what you want to do with the
images.
Note
See "Let's Try Scanning " to scan images into MP Navigator EX.
You can also select images saved on a memory card or computer.
Importing Images Saved on a Memory Card
Opening Images Saved on a Computer
Correcting photo images
You can correct/enhance images in the Correct/Enhance Images window.
2. Select images and click Edit/Convert, then click Fix photo images on the list.
The Correct/Enhance Images window opens.
3. Correct/enhance images in the Correct/Enhance Images window.
Note
See "Correct/Enhance Images Window " for details on the Correct/Enhance Images window.
See the corresponding sections below for correcting/enhancing images.
Correcting/Enhancing Images Automatically
Correcting/Enhancing Images Manually
Converting documents to text
Scan text in scanned magazines and newspapers and display it in Notepad (included with Windows).
2. Select images and click Edit/Convert, then click Convert to text file on the list.
Editing Files
Page 356 of 681 pages
Notepad (included with Windows) starts and editable text appears.
Note
Only text written in languages that can be selected on the General tab can be extracted to
Notepad (included with Windows). Click Set... on the General tab and specify the language.
Preferences Dialog Box
Text displayed in Notepad (included with Windows) is for guidance only. Text in the image of
the following types of documents may not be detected correctly.
- Documents containing text with font size outside the range of 8 points to 40 points (at 300 dpi)
- Slanted documents
- Documents placed upside down or documents with text in the wrong orientation (rotated
characters)
- Documents containing special fonts, effects, italics, or hand-written text
- Documents with narrow line spacing
- Documents with colors in the background of text
- Documents containing multiple languages
Page top
Setting Passwords for PDF Files
Page 357 of 681 pages
Advanced Guide > Scanning > Scanning with the Bundled Application Software > Utilizing Images in MP Navigator EX >
Setting Passwords for PDF Files
Setting Passwords for PDF Files
Set passwords for opening, editing and printing PDF files.
You can set two passwords: one for opening the file and one for editing/printing it.
Important
Internet Explorer 5.5 Service Pack 2 or later is required to use this function.
You will not be able to open/edit the file if you forget the password. Record your passwords in a safe
place for future reference.
Password-protected PDF files cannot be opened in applications not supporting security settings.
In some applications, the commands (print, edit, etc.) restricted by Permissions Password may
differ from those in MP Navigator EX.
Password-protected PDF files cannot be searched by text from the View & Use Window.
1. Scan documents into MP Navigator EX, then click Save as PDF file.
Alternatively, edit existing files in the Create/Edit PDF file window, then click Save
Selected Pages or Save All Pages.
The Save as PDF file dialog box opens.
Note
See "Let's Try Scanning " to scan images.
See "Creating/Editing PDF Files " to create PDF files from existing images or to edit files.
Passwords cannot be set when images are automatically saved after scanning, such as when
scanning from the One-click Mode screen or scanning using the Operation Panel of the
machine.
2. Select the Password security settings checkbox.
Setting Passwords for PDF Files
Page 358 of 681 pages
The Password Security -Settings dialog box opens.
Note
You can also open the Password Security -Settings dialog box by clicking Set..., then selecting
Password Security for Security in the PDF Settings dialog box.
3. Select the Require a password to open the document or Use a password to restrict
printing and editing of the document and its security settings checkbox, then enter a
password.
Important
Up to 32 single-byte alphanumeric characters can be used for the password. Passwords are
case sensitive.
Note
Select both checkboxes to set both Document Open Password and Permissions Password.
You cannot use the same password for both.
4. Click OK.
The Confirm Document Open Password or Confirm Permissions Password dialog box opens.
Document Open Password
Setting Passwords for PDF Files
Page 359 of 681 pages
Permissions Password
5. Re-enter the password and click OK.
The Save as PDF file dialog box returns.
Important
If you close the Save as PDF file dialog box without clicking Save, the settings in the Password
Security -Settings dialog box will be deleted.
Passwords are deleted once the file is edited. Reset the passwords when saving edited files.
Note
If you set the passwords via the PDF Settings dialog box, the PDF Settings dialog box returns.
Click OK. The Save as PDF file dialog box returns.
6. Click Save.
Files are saved according to the settings.
Related Topic
Opening/Editing Password-protected PDF Files
Page top
Opening/Editing Password-protected PDF Files
Page 360 of 681 pages
Advanced Guide > Scanning > Scanning with the Bundled Application Software > Utilizing Images in MP Navigator EX >
Opening/Editing Password-protected PDF Files
Opening/Editing Password-protected PDF Files
Enter a password to open or edit/print password-protected PDF files.
Password entry method varies by operation. The following procedures are examples only.
Important
You can open, edit or print only PDF files whose passwords were set with MP Navigator EX. You
cannot edit PDF files edited in other applications or whose passwords were set with other
applications. Only MP Navigator EX version 1.1 and 2.0 or later supports opening, editing and
printing password-protected PDF files.
Internet Explorer 5.5 Service Pack 2 or later is required to open, edit or print password-protected
PDF files.
Passwords are case sensitive.
Entering a Password to Open a File
1. In the View & Use window, select the PDF file you want to open and click
Zoom
in.
Alternatively, double-click the PDF file.
Note
Only the Document Open Password will be required. The Permissions Password will not be
required.
If the Zoom in dialog box with a lock icon opens, click Enter Password.
Opening/Editing Password-protected PDF Files
Page 361 of 681 pages
2. The Password dialog box opens. Enter the password and click OK.
The PDF file opens in the Zoom in dialog box.
Important
To reopen the file after closing the Zoom in dialog box, re-enter the password.
Entering a Password (Permissions Password) to Edit or Print a File
1. In the View & Use window, select PDF files and click PDF or Print.
2. To create a PDF file or edit the file, select Create/Edit PDF file on the list. To print
the file, click Print Document.
Opening/Editing Password-protected PDF Files
Page 362 of 681 pages
In the Password dialog box, you will be prompted to enter a password.
Important
If the Document Open Password is set as well, the Document Open Password will be
required, then the Permissions Password will be required.
3. Enter the password and click OK.
The corresponding dialog box opens.
Important
If a password-protected PDF file is edited, the passwords will be deleted. Reset the
passwords.
Setting Passwords for PDF Files
Related Topic
Setting Passwords for PDF Files
Page top
MP Navigator EX Screens
Page 363 of 681 pages
Advanced Guide > Scanning > Scanning with the Bundled Application Software > MP Navigator EX Screens
MP Navigator EX Screens
Learn about the screens and functions of MP Navigator EX.
Navigation Mode Screen
Scan/Import Documents or Images Tab
View & Use Images on your Computer Tab
Custom Scan with One-click Tab
Photos/Documents (Platen) Screen (Scan/Import Window)
Scan Settings Dialog Box (Photos/Documents)
Save Dialog Box
Save as PDF file Dialog Box
PDF Settings Dialog Box
Memory Card Screen (Scan/Import Window)
View & Use Window
Create/Edit PDF file Window
Print Document Dialog Box
Print Photo Dialog Box
Send via E-mail Dialog Box
Correct/Enhance Images Window
One-click Mode Screen
Save Dialog Box (One-click Mode Screen)
Scan Settings Dialog Box
Save Dialog Box
Exif Settings Dialog Box
PDF Dialog Box
Save as PDF file Dialog Box
Mail Dialog Box
OCR Dialog Box
Custom Dialog Box
Preferences Dialog Box
Scanner Button Settings Tab (Save)
Page top
Navigation Mode Screen
Page 364 of 681 pages
Advanced Guide > Scanning > Scanning with the Bundled Application Software > MP Navigator EX Screens >
Navigation Mode Screen
Navigation Mode Screen
This is one of the startup screens of MP Navigator EX.
Point to the icon at the top of the screen to display each tab. Use each tab depending on what you want to
do.
Scan/Import
You can scan photos and documents, or import images saved on memory cards.
Scan/Import Documents or Images Tab
View & Use
You can open images saved on a computer and print them or attach them to e-mail. You can also edit
them using an application that accompanies the machine.
View & Use Images on your Computer Tab
One-click
You can complete from scanning to saving at one time by simply clicking the corresponding icon.
Custom Scan with One-click Tab
(Switch Mode)
Switch to One-click Mode. In One-click Mode, you can complete from scanning to saving, etc. at one
time by simply clicking the corresponding icon.
One-click Mode Screen
Show this window at startup
Select this checkbox to open the Main Menu at startup. If this checkbox is not selected, the last used
screen appears.
Preferences
The Preferences dialog box opens. In the Preferences dialog box, you can make advanced settings to
MP Navigator EX functions.
Preferences Dialog Box
(Guide)
Open this guide.
Page top
Scan/Import Documents or Images Tab
Page 365 of 681 pages
Advanced Guide > Scanning > Scanning with the Bundled Application Software > MP Navigator EX Screens > Scan/
Import Documents or Images Tab
Scan/Import Documents or Images Tab
Point to Scan/Import in the Navigation Mode screen to display the Scan/Import Documents or Images
tab.
You can scan photos and documents, or import images saved on memory cards.
Photos/Documents (Platen)
Open the Scan/Import window. Scan photos and documents placed on the Platen.
Photos/Documents (Platen) Screen (Scan/Import Window)
Memory Card
Open the Scan/Import window with Memory Card selected. Import images saved on memory cards.
Memory Card Screen (Scan/Import Window)
(Switch Mode)
Switch to One-click Mode screen. In One-click Mode, you can complete from scanning to saving, etc. at
one time by simply clicking the corresponding icon.
One-click Mode Screen
Show this window at startup
Select this checkbox to open the Main Menu at startup. If this checkbox is not selected, the last used
screen appears.
Preferences
The Preferences dialog box opens. In the Preferences dialog box, you can make advanced settings to
MP Navigator EX functions.
Preferences Dialog Box
(Guide)
Open this guide.
Page top
View Use Images on your Computer Tab
Page 366 of 681 pages
Advanced Guide > Scanning > Scanning with the Bundled Application Software > MP Navigator EX Screens > View &
Use Images on your Computer Tab
View & Use Images on your Computer Tab
Point to View & Use in the Navigation Mode screen to display the View & Use Images on your Computer
tab.
You can open images saved on a computer and print them or attach them to e-mail. You can also edit
them using an application that accompanies the machine.
My Box (Scanned/Imported Images)
Open the View & Use window with My Box (Scanned/Imported Images) selected.
You can open and use images saved in My Box.
My Box is a specific folder for saving images scanned with MP Navigator EX.
Note
The following folders are specified by default.
Windows Vista: MP Navigator EX folder in Picture folder
Windows XP: MP Navigator EX folder in My Pictures folder
Windows 2000: MP Navigator EX folder in My Pictures folder
Specify Folder
Open the View & Use window with Specify Folder selected.
You can open and use images saved in specific folders.
Recently Saved Images
Open the View & Use window with Recently Saved Images selected.
You can open and use images that have been "Scanned/Imported", "Attached to E-mail", or "Sent to
Application" recently.
Note
See "View & Use Window" for details on the View & Use window.
(Switch Mode)
Switch to One-click Mode. In One-click Mode, you can complete from scanning to saving, etc. at one
time by simply clicking the corresponding icon.
One-click Mode Screen
Show this window at startup
Select this checkbox to open the Main Menu at startup. If this checkbox is not selected, the last used
screen appears.
Preferences
The Preferences dialog box opens. In the Preferences dialog box, you can make advanced settings to
MP Navigator EX functions.
Preferences Dialog Box
View Use Images on your Computer Tab
Page 367 of 681 pages
(Guide)
Open this guide.
Related Topic
Opening Images Saved on a Computer
Page top
Custom Scan with One-click Tab
Page 368 of 681 pages
Advanced Guide > Scanning > Scanning with the Bundled Application Software > MP Navigator EX Screens > Custom
Scan with One-click Tab
Custom Scan with One-click Tab
Point to One-click in the Navigation Mode screen to display the Custom Scan with One-click tab.
You can complete from scanning to saving at one time by simply clicking the corresponding icon.
Save to PC
Scan and save documents. Document type is automatically detected. File format is automatically set.
Files are saved to a computer.
When you click this icon, the Save dialog box opens and you can specify the scan/save settings.
Save Dialog Box (One-click Mode Screen)
Save as PDF file
Scan documents and save them as PDF files.
When you click this icon, the PDF dialog box opens and you can specify the scan/save and application
settings.
PDF Dialog Box
Attach to E-mail
Scan documents or photos and attach them to e-mail.
When you click this icon, the Mail dialog box opens and you can specify the scan/save and e-mail
software program settings.
Mail Dialog Box
OCR
Scan text documents then extract and display text in the image on Notepad (included with Windows).
When you click this icon, the OCR dialog box opens and you can specify the scan/save and application
settings.
OCR Dialog Box
Important
For further procedures, refer to the application's manual.
Custom
Scan documents and open them in a specified application. Document type is automatically detected.
When you click this icon, the Custom dialog box opens and you can specify the scan/save and
application settings.
Custom Dialog Box
Important
For further procedures, refer to the application's manual.
Start scanning by clicking the button
Select this checkbox and click an icon to start scanning immediately.
Custom Scan with One-click Tab
Page 369 of 681 pages
(Switch Mode)
Switch to One-click Mode and the One-click Mode screen appears.
One-click Mode Screen
Show this window at startup
Select this checkbox to open the Main Menu at startup. If this checkbox is not selected, the last used
screen appears.
Preferences
The Preferences dialog box opens. In the Preferences dialog box, you can make advanced settings to
MP Navigator EX functions.
Preferences Dialog Box
(Guide)
Open this guide.
Important
The following restrictions apply when you scan with Document Type set to Auto Mode in the Save or
Custom dialog box.
Specify Document Type (other than Auto Mode) to extract the text in the image and convert to
editable text after scanning.
Related Topic
Easy Scanning with One-click
Page top
Photos/Documents (Platen) Screen (Scan/Import Window)
Page 370 of 681 pages
Advanced Guide > Scanning > Scanning with the Bundled Application Software > MP Navigator EX Screens > Photos/
Documents (Platen) Screen (Scan/Import Window)
Photos/Documents (Platen) Screen (Scan/Import Window)
Point to Scan/Import in the Navigation Mode screen and click Photos/Documents (Platen).
Open this window to scan documents from the Platen.
(1) Settings and Operation Buttons
(2) Toolbar
(3) Thumbnail Window
(4) Selected Images Area
Settings and Operation Buttons
(View & Use)
Click this when you want to open images and PDF files saved on your computer. The View & Use
window opens.
View & Use Window
Photos/Documents (Platen)
Displays the screen for scanning photos, documents, magazines and other printed materials.
Memory Card
Click this when you want to import images saved on a memory card. The screen for importing
images from a memory card appears.
Memory Card Screen (Scan/Import Window)
Document Type
Select the type of document to be scanned.
Scanning photos: Color Photo or Black and White Photo
Scanning text documents: Color Document, Black and White Document or Text(OCR)
Scanning magazines: Magazine(Color)
Important
You cannot select Document Type when the Use the scanner driver checkbox is selected.
Specify...
Specify the document size, resolution, and other advanced scan settings.
Scan Settings Dialog Box (Photos/Documents)
Important
Photos/Documents (Platen) Screen (Scan/Import Window)
Page 371 of 681 pages
Specify... is not available if the Use the scanner driver checkbox is selected.
Use the scanner driver
Select this checkbox when you want to scan with ScanGear (scanner driver). Use ScanGear
(scanner driver) to correct images and adjust colors when scanning documents.
Scan
Scanning starts.
Note
This button changes to Open Scanner Driver when you select the Use the scanner driver
checkbox.
Open Scanner Driver
ScanGear (scanner driver) starts.
See "ScanGear (Scanner Driver) Screens" for details on ScanGear (scanner driver) screens.
Note
This button changes to Scan when you deselect the Use the scanner driver checkbox.
Clear
Delete all images in the Thumbnail window.
Important
Images not saved on a computer will be deleted. To keep important images, use Save or other
methods to save them to a computer before clicking Clear.
Save
Save the selected images. Click to open the Save Dialog Box and specify the save settings.
Save as PDF file
Save the selected images as PDF files. Click to open the Save as PDF file Dialog Box and specify
the save settings.
Jump to Main Menu
Jump to the Main Menu.
Toolbar
Preferences
The Preferences dialog box opens. In the Preferences dialog box, you can make advanced settings
to MP Navigator EX functions.
Preferences Dialog Box
(Guide)
Open this guide.
Edit Tools
(Select All)
Selects all images in the Thumbnail window.
(Cancel All)
Cancels all image selections in the Thumbnail window.
(Rotate Left)
Rotates the target image (outlined in orange) 90 degrees counter-clockwise.
(Rotate Right)
Rotates the target image (outlined in orange) 90 degrees clockwise.
(Invert)
Photos/Documents (Platen) Screen (Scan/Import Window)
Page 372 of 681 pages
Inverts the target image (outlined in orange) horizontally.
(Trimming)
Trims the target image (outlined in orange) in the Thumbnail window. Trimming is the act of
selecting the area you want to keep in a photo and discarding the rest. Click this button to open
the Crop window and specify the trimming frame.
Zoom in
Enlarges the target image (outlined in orange). You can also enlarge the image by doubleclicking it.
(Display Size)
Changes the size of images in the Thumbnail window.
(Sort by)
Sorts the images in the Thumbnail window by category or by date (ascending or descending).
Thumbnail Window
Thumbnail Window
Images scanned from the Platen are displayed.
When you select the checkbox of an image, the image appears in the Selected Images area.
Important
Thumbnails may appear as "?" when there is not enough memory to display the images.
When Images are Sorted by Categories
Open All
Displays all images.
Close All
Hides all images.
Selected Images Area
(Cancel All)
Cancels the selection of all images in the Selected Images area.
(Cancel Selection)
Cancels the selection of the target image (outlined in orange) in the Selected Images area.
Selected Images Area
Images selected in the Thumbnail window are displayed.
Related Topic
Scanning Photos and Documents
Page top
Scan Settings Dialog Box (Photos/Documents)
Page 373 of 681 pages
Advanced Guide > Scanning > Scanning with the Bundled Application Software > MP Navigator EX Screens > Scan
Settings Dialog Box (Photos/Documents)
Scan Settings Dialog Box (Photos/Documents)
The Scan Settings dialog box opens when you click Specify... in the Scan/Import window.
In the Scan Settings dialog box, you can make advanced scan settings.
Document Type
Select the type of document to be scanned.
Scanning photos: Color Photo or Black and White Photo
Scanning text documents: Color Document, Black and White Document or Text(OCR)
Scanning magazines: Magazine(Color)
Important
To scan correctly, select a document type that matches the document to be scanned.
Document Size
Select the size of the document to be scanned.
When you select Custom, a dialog box in which you can specify the document size opens. Select a
Units, then enter the Width and Height and click OK.
Important
When you select Auto Detect, the image may not be scanned at the correct position and size. In
that case, change the size to the actual document size (A4, Letter, etc.) and align a corner of the
document with the corner at the arrow of the Platen.
See "Placing Documents " for details on how to place documents.
You cannot select Auto Detect (Multiple Documents) or Auto Detect when Document Type is
Text(OCR).
Scanning Resolution
Select the resolution at which to scan documents.
Resolution
Note
The following scanning resolutions can be specified when Document Type is Text(OCR).
300 dpi / 400 dpi
Descreen
Select this checkbox to reduce moire patterns.
Printed photos and pictures are displayed as a collection of fine dots. Moire is a phenomenon where
Scan Settings Dialog Box (Photos/Documents)
Page 374 of 681 pages
dots may interfere with each other and cause uneven gradation and a stripe pattern in the image.
Descreen is the function for reducing this moire effect.
Important
You cannot select this checkbox when Document Type is Color Photo, Black and White Photo or
Text(OCR).
Note
Scanning takes longer than usual when you enable Descreen.
Unsharp Mask
Select this checkbox to emphasize the outline of the subjects and sharpen the image.
Important
You cannot select this checkbox when Document Type is Text(OCR).
Prevent show-through of the document
Select this checkbox to sharpen text in a document or reduce show-through in newspapers.
Important
You cannot select this checkbox when Document Type is Color Photo, Black and White Photo or
Text(OCR).
Select this checkbox when Document Type is text document and show-through is apparent in the
scanned image.
Remove gutter shadow
Select this checkbox to correct shadows that appear between pages when scanning open booklets.
Important
Align the document correctly with the marks on the Platen.
Gutter shadows can be corrected only when Document Size is set to a standard size.
You cannot select this checkbox when Document Size is Auto Detect, Auto Detect (Multiple
Documents) or Stitch Assist.
Note
Use ScanGear's Advanced Mode tab to correct gutter shadows when scanning non-standard size
documents or when custom cropping frames are set.
For details, see Gutter Shadow Correction in " Image Settings " (ScanGear's Advanced Mode tab).
Correct slanted document
Select this checkbox to detect the scanned text and correct the angle (within -0.1 to -10 degrees or +0.1
to +10 degrees) of the document.
Important
You cannot select this checkbox when Document Type is Color Photo, Black and White Photo.
You cannot select this checkbox when Document Size is Stitch Assist.
The inclination of the following types of documents may not be corrected, as the text cannot be
detected correctly.
- Documents in which the text lines are inclined more than 10 degrees or the angles vary by line
- Documents containing both vertical and horizontal text
- Documents with extremely large or small fonts
- Documents with small amount of text
- Documents containing figures/images or hand-written text
- Documents containing both vertical and horizontal lines (tables)
Note
Scanning takes longer than usual when you enable Correct slanted document.
Detect the orientation of text documents and rotate images
Select this checkbox to detect the orientation of the document from the scanned text and rotate the
scanned image to the correct orientation. Select the language of the document to be scanned in
Document Language.
Important
Scan Settings Dialog Box (Photos/Documents)
Page 375 of 681 pages
You cannot select this checkbox when Document Type is Color Photo, Black and White Photo.
You cannot select this checkbox when Document Size is Stitch Assist.
This function may not work properly depending on the document language. Only text documents
written in languages that can be selected from Document Language are supported.
The orientation of the following types of documents may not be corrected, as the text cannot be
detected correctly. In that case, select the scanned image in the Thumbnail window of the
Photos/Documents (Platen) Screen (Scan/Import Window) and rotate it with Edit Tools.
- Resolution is outside the range of 300 dpi to 600 dpi
- Font size is outside the range of 8 points to 48 points
- Documents containing special fonts, effects, italics, or hand-written text
- Documents with patterned backgrounds
Note
Scanning takes longer than usual when you enable Detect the orientation of text documents and
rotate images.
Document Language
Select the language of the document to be scanned.
Important
You cannot select this checkbox when Document Type is Color Photo, Black and White Photo.
You cannot select this checkbox when Document Size is Stitch Assist.
Defaults
Restore the default settings.
Page top
Save Dialog Box
Page 376 of 681 pages
Advanced Guide > Scanning > Scanning with the Bundled Application Software > MP Navigator EX Screens > Save
Dialog Box
Save Dialog Box
The Save dialog box opens when you click Save in the Scan/Import window.
In the Save dialog box, you can make settings for saving images to a computer.
Save in
Displays the folder in which to save the scanned images. To change the folder, click Browse... to
specify another one.
The following folders are specified by default.
Windows Vista: MP Navigator EX folder in Picture folder
Windows XP: MP Navigator EX folder in My Pictures folder
Windows 2000: MP Navigator EX folder in My Pictures folder
Important
When saving to a memory card, enable writing on the Card Slot of the machine. For details on
how to enable writing, refer to " Setting Up the Card Slot as the Memory Card Drive of the
Computer ."
File name
Enter the file name of the image to be saved (up to 32 characters). When saving multiple files, 4 digits
are appended to each file name.
Save as type
Select a file type to save the scanned images.
Select JPEG/Exif, TIFF or BMP.
Important
You cannot select JPEG/Exif when Document Type is Text(OCR).
Set...
You can specify a compression type for JPEG files.
Select High(Low Compression), Standard or Low(High Compression).
Important
This setting is available only when Save as type is JPEG/Exif.
Save to a Subfolder with Current Date
Select this checkbox to create a subfolder in the folder specified in Save in with the current date and
save imported files in it. A subfolder with a name such as "2008_01_01" (Year_Month_Date) will be
created.
If this checkbox is not selected, files are saved directly in the folder specified in Save in.
Page top
Save as PDF file Dialog Box
Page 377 of 681 pages
Advanced Guide > Scanning > Scanning with the Bundled Application Software > MP Navigator EX Screens > Save as
PDF file Dialog Box
Save as PDF file Dialog Box
In the Save as PDF file dialog box, you can make advanced settings for saving scanned images as PDF
files. You can save multiple documents as one PDF file or add pages to a PDF file created with MP
Navigator EX.
Important
You cannot save images scanned at 10501 pixels or more in the vertical and horizontal directions.
Dialog box that opens when Save as PDF file in the Scan/Import window is clicked
Dialog box that opens when Save Selected Pages or Save All Pages is clicked in the
Create/Edit PDF file window
Save as type
Select a PDF file type to save the scanned images.
PDF
Save each of the selected images as a separate PDF file.
PDF(Multiple Pages)
Save multiple images in one PDF file.
Important
Save as PDF file Dialog Box
Page 378 of 681 pages
PDF(Multiple Pages) is displayed when multiple images are selected.
PDF(Add Page)
Add the scanned images to a PDF file. The images are added to the end of the PDF file. You
cannot rearrange the pages of the PDF file to which the images are added.
Important
Images can only be added to PDF files created with MP Navigator EX. You cannot specify
PDF files created with other applications. PDF files edited in other applications cannot be
specified as well.
If a password-protected PDF file is edited, the passwords will be deleted. Reset the
passwords.
Setting Passwords for PDF Files
Set...
Make advanced settings for creating PDF files.
See "PDF Settings Dialog Box " for details.
Password security settings
Select this checkbox to open the Password Security -Settings dialog box in which you can set
passwords for opening, editing and printing created PDF files.
Setting Passwords for PDF Files
Add to
This is displayed when you select PDF(Add Page) for Save as type and specify the PDF file to which
images are added. To change the file, click Browse... to specify another one.
Important
Images can only be added to PDF files created with MP Navigator EX. You cannot specify PDF
files created with other applications. PDF files edited in other applications cannot be specified
as well.
File name
Enter the file name of the image to be saved (up to 32 characters). When saving multiple files, 4
digits are appended to each file name.
Save in
Displays the folder in which to save the PDF files. To change the folder, click Browse... to specify
another one.
The following folders are specified by default.
Windows Vista: MP Navigator EX folder in Picture folder
Windows XP: MP Navigator EX folder in My Pictures folder
Windows 2000: MP Navigator EX folder in My Pictures folder
Save to a Subfolder with Current Date
Select this checkbox to create a subfolder in the folder specified in Save in with the current date and
save imported files in it. A subfolder with a name such as "2008_01_01" (Year_Month_Date) will be
created.
If this checkbox is not selected, files are saved directly in the folder specified in Save in.
Page top
PDF Settings Dialog Box
Page 379 of 681 pages
Advanced Guide > Scanning > Scanning with the Bundled Application Software > MP Navigator EX Screens > PDF
Settings Dialog Box
PDF Settings Dialog Box
In the PDF Settings dialog box, you can specify the PDF compression type and other advanced settings
for creating PDF files.
Enable keyword search
Select this checkbox to convert characters in a document to text data. This will enable an easy search
by keyword.
Document Language
Select the language of the document to be scanned.
Detect the orientation of text documents and rotate images
Select this checkbox to detect the orientation of the document from the scanned text and rotate the
scanned image to the correct orientation.
Important
This function may not work properly depending on the document language. Only text documents
written in languages that can be selected from Document Language are supported.
The orientation of the following types of documents may not be corrected, as the text cannot be
detected correctly.
- Resolution is outside the range of 300 dpi to 600 dpi
- Font size is outside the range of 8 points to 48 points
- Documents containing special fonts, effects, italics, or hand-written text
- Documents with patterned backgrounds
Correct slanted document
Select this checkbox to detect the scanned text and correct the angle (within -0.1 to -10 degrees or +0.1
to +10 degrees) of the document.
Important
The inclination of the following types of documents may not be corrected, as the text cannot be
detected correctly.
- Documents in which the text lines are inclined more than 10 degrees or the angles vary by line
- Documents containing both vertical and horizontal text
- Documents with extremely large or small fonts
- Documents with small amount of text
- Documents containing figures/images or hand-written text
- Documents containing both vertical and horizontal lines (tables)
PDF Compression
Select a compression type for saving.
Standard
It is recommended that you normally select this setting.
High
Compresses the file size when saving, allowing you to reduce the load on your network/server.
Note
PDF Settings Dialog Box
Page 380 of 681 pages
The following images can be compressed with high efficiency.
- Images with resolutions within the range of 75 dpi to 600 dpi
Security
Set passwords for opening, editing and printing the created PDF files.
Important
Internet Explorer 5.5 Service Pack 2 or later is required to use this function.
This function is not available when images are automatically saved after scanning, such as when
scanning from the One-click Mode screen or scanning using the Operation Panel of the machine.
Note
Select Password Security and set passwords in the Password Security -Settings dialog box.
Setting Passwords for PDF Files
Page top
Memory Card Screen (Scan/Import Window)
Page 381 of 681 pages
Advanced Guide > Scanning > Scanning with the Bundled Application Software > MP Navigator EX Screens > Memory
Card Screen (Scan/Import Window)
Memory Card Screen (Scan/Import Window)
Point to Scan/Import in the Navigation Mode screen and click Memory Card, or click Memory Card in the
Scan/Import window.
Open this window to import images (including PDF files scanned with the operation pannel) saved on a
memory card.
(1) Settings and Operation Buttons
(2) Toolbar
(3) Thumbnail Window
(4) Selected Images Area
Settings and Operation Buttons
(View & Use)
Click this when you want to open images and PDF files saved on your computer. The View & Use
window opens.
View & Use Window
Photos/Documents (Platen)
Click this when you want to scan photos, documents, magazines and other printed materials. The
screen for scanning photos and documents appears.
Photos/Documents (Platen) Screen (Scan/Import Window)
Memory Card
Displays folders of images and PDF files (grouped by year, year/month and year/month/date) on a
memory card in tree view. Select a folder to display its contents in the Thumbnail window to the right.
File date is the captured or updated date.
Import
Import the selected images and open them in the View & Use window.
View & Use Window
Jump to Main Menu
Jump to the Main Menu.
Toolbar
Memory Card Screen (Scan/Import Window)
Page 382 of 681 pages
Preferences
The Preferences dialog box opens. In the Preferences dialog box, you can make advanced settings
to MP Navigator EX functions.
Preferences Dialog Box
(Guide)
Open this guide.
Edit Tools
(Select All)
Selects all images in the Thumbnail window.
(Cancel All)
Cancels all image selections in the Thumbnail window.
Zoom in
Enlarges the target image (outlined in orange). You can also enlarge the image by doubleclicking it. You can check all pages when you select a PDF file.
(Refresh)
Refreshes the Thumbnail window contents.
(Display Size)
Changes the size of images in the Thumbnail window.
(Sort by)
Sorts the images in the Thumbnail window by date (ascending or descending).
Thumbnail Window
Thumbnail Window
Images saved on the memory card are displayed by year or year/month.
When you select the checkbox of an image, the image appears in the Selected Images area.
Selected Images Area
(Cancel All)
Cancels the selection of all images in the Selected Images area.
(Cancel Selection)
Cancels the selection of the target image (outlined in orange) in the Selected Images area.
Selected Images Area
Images selected in the Thumbnail window are displayed.
Related Topic
Importing Images Saved on a Memory Card
Page top
View Use Window
Page 383 of 681 pages
Advanced Guide > Scanning > Scanning with the Bundled Application Software > MP Navigator EX Screens > View &
Use Window
View & Use Window
In the Navigation Mode screen, point to View & Use and click My Box (Scanned/Imported Images), Specify
Folder or Recently Saved Images.
Open this window to display or use scanned images or images saved on a computer.
Important
For PDF files, only those created with MP Navigator EX are displayed. You cannot display PDF files
created with other applications. PDF files edited in other applications cannot be displayed as well.
(1) Settings and Operation Buttons
(2) Toolbar
(3) Thumbnail Window
(4) Selected Images Area
Settings and Operation Buttons
(Scan/Import)
Click this when you want to scan photos, documents, magazines and other printed materials. The
Scan/Import window opens.
Photos/Documents (Platen) Screen (Scan/Import Window)
My Box (Scanned/Imported Images)
Displays folders of images (grouped by year, year/month, year/month/date and category) in My Box in
tree view. Select a folder to display its contents in the Thumbnail window to the right.
Image date is the scanned, captured or updated date.
Specify Folder
View Use Window
Page 384 of 681 pages
Displays all hard disks and folders in tree view. Select a folder to display images in the Thumbnail
window to the right.
Recently Saved Images
Images that have been "Scanned/Imported", "Attached to E-mail" or "Sent to Application" recently are
displayed in tree view by date. For "Scanned/Imported" images, "Scanned from the Machine" and
"Imported from Memory Cards" are displayed separately. Select a Year/Month/Day folder to display
images by date in the Thumbnail window to the right.
Image date is the scanned or sent date.
Search
The advanced search options open.
Searching Images
Task Button Area
Specify what to do with the selected images. See the corresponding sections below for details on
each button.
Creating/Editing PDF Files
Printing Documents
Printing Photos
Sending via E-mail
Editing Files
Note
The buttons in the Task Button area are displayed when the corresponding applications are
installed.
Jump to Main Menu
Jump to the Main Menu.
Toolbar
Preferences
The Preferences dialog box opens. In the Preferences dialog box, you can make advanced settings
to MP Navigator EX functions.
Preferences Dialog Box
(Guide)
Open this guide.
Edit Tools
(Select All)
Selects all images in the Thumbnail window.
(Cancel All)
Cancels all image selections in the Thumbnail window.
(Image Correction/Enhancement)
Allows you to correct the target image (outlined in orange). Click this button to open the Correct/
Enhance Images window in which you can correct/enhance images and also adjust the
brightness, contrast, etc.
Important
Image correction/enhancement cannot be applied to PDF files or black and white binary
files.
Note
See "Correct/Enhance Images Window " for details.
Zoom in
Enlarges the target image (outlined in orange). You can also enlarge the image by double-
View Use Window
Page 385 of 681 pages
clicking it. You can check all pages when you select a PDF file.
You can also check file information such as file name, date, size and security setting. A lock icon
appears for PDF files with Document Open Password set.
Note
See "Opening/Editing Password-protected PDF Files " to open password-protected files.
(Search)
Enter a word or phrase included in the file name, Exif information or PDF text of the image you
want to search for, then click
User Comment is searched.
. For Exif information, text in Maker, Model, Description and
Note
Search images in My Box (Scanned/Imported Images), Recently Saved Images or a
selected folder and its subfolders.
(Refresh)
Refreshes the Thumbnail window contents.
(Display Size)
Changes the size of images in the Thumbnail window.
(Sort by)
Sorts the images in the Thumbnail window by category, date (ascending or descending) or
name (ascending or descending).
Images can be sorted by category only when My Box (Scanned/Imported Images) or Specify
Folder is displayed.
Thumbnail Window
Thumbnail Window
Images scanned from the Platen are displayed.
When you select the checkbox of an image, the image appears in the Selected Images area.
Important
A lock icon appears for PDF files with Document Open Password set.
Images may appear as "?" in the following cases.
- Opening unsupported images
- File size is too large and there is not enough memory to display the image
- The file is corrupted
Internet Explorer 5.5 Service Pack 2 or later is required to open password-protected PDF files.
When Images are Sorted by Categories
Images scanned from the Platen are displayed in tree view by category.
Note
Some images may not be detected correctly and thus may be classified into wrong categories. In
that case, drag and drop an image and move it from one category to another.
Category name Images: N (Selected: n)
Category name
The category name (Photos, Documents, Custom categories, Unclassified, etc.) is displayed.
View Use Window
Page 386 of 681 pages
Image: N
The number of images classified into the category is displayed.
(Selected: n)
The number of images with the checkbox selected is displayed.
Note
This portion is displayed only when one or more images are selected.
Open All
Displays all images.
Close All
Hides all images.
Edit Custom Categories
When My Box (Scanned/Imported Images) or Specify Folder is displayed, open the Edit Custom
Categories dialog box.
In the Edit Custom Categories dialog box, you can add/delete categories displayed in Custom
Categories.
See "Classifying Images into Categories " for details.
Classify Images
Images imported from hard disks or memory cards appear in Unclassified. Click Classify Images to
classify them automatically.
This button is displayed only when My Box (Scanned/Imported Images) or Specify Folder is
displayed.
Note
Classification may take time if there are many images to classify.
Selected Images Area
(Cancel All)
Cancels the selection of all images in the Selected Images area.
(Cancel Selection)
Cancels the selection of the target image (outlined in orange) in the Selected Images area.
Selected Images Area
Images selected in the Thumbnail window are displayed.
Related Topic
Opening Images Saved on a Computer
Page top
Create/Edit PDF file Window
Page 387 of 681 pages
Advanced Guide > Scanning > Scanning with the Bundled Application Software > MP Navigator EX Screens > Create/
Edit PDF file Window
Create/Edit PDF file Window
Click PDF in the View & Use window, then click Create/Edit PDF file on the list to open the Create/Edit
PDF file window.
In the Create/Edit PDF file window, you can add/delete pages and rearrange the page order of PDF files
created with MP Navigator EX.
Important
You cannot save images scanned at 10501 pixels or more in the vertical and horizontal directions.
If a password-protected PDF file is edited, the passwords will be deleted. Reset the passwords.
Setting Passwords for PDF Files
Rearrange Pages
You can move the selected image (outlined in orange).
Moves the selected image to the top.
Moves the selected image up one page.
Moves the selected image down one page.
Moves the selected image to the end.
Note
You can also drag and drop the image to rearrange the order.
Delete Selected Pages
Deletes the selected image.
Add Page
Allows you to select and add an existing PDF file.
Note
A password will be required to add a password-protected PDF file.
Undo
Create/Edit PDF file Window
Page 388 of 681 pages
Cancels the latest change made.
Reset
Cancels all the changes made.
Save Selected Pages
Opens the Save as PDF file dialog box. Specify the save settings. Only the selected page is saved.
Note
When multiple pages are selected, a multiple-page PDF file is created.
See "Save as PDF file Dialog Box " for details on the Save as PDF file dialog box.
Save All Pages
Opens the Save as PDF file dialog box. Specify the save settings. All PDF files in the list will be saved
as one PDF file.
Finish
Closes the Create/Edit PDF file window.
Toolbar
(Rotate Left)
Rotates the file 90 degrees counter-clockwise.
(Rotate Right)
Rotates the file 90 degrees clockwise.
(Preview Mode)
Switches to Preview Mode.
The selected file appears in Preview.
(Enlarge)
Enlarges the image displayed in Preview.
(Reduce)
Reduces the image displayed in Preview.
(Full-screen)
Enlarges/reduces the image to display it fully in Preview.
(Thumbnail Mode)
Switches to Thumbnail Mode. Thumbnails of files are displayed.
Page top
Print Document Dialog Box
Page 389 of 681 pages
Advanced Guide > Scanning > Scanning with the Bundled Application Software > MP Navigator EX Screens > Print
Document Dialog Box
Print Document Dialog Box
Click Print in the View & Use window, then click Print Document on the list to open the Print Document
dialog box.
In the Print Document dialog box, you can make advanced settings for printing multiple scanned images
at one time.
Note
The setting items in the Print Document dialog box vary by printer.
Printer
Select the printer to use.
Paper Source
Select paper source.
Page Layout
Select a print type.
Normal-size Printing
Print one image per sheet.
Scaled Printing
Print images at the selected scale (enlarged or reduced).
Fit-to-Page Printing
Print an image at the paper size (enlarged or reduced).
Borderless Printing
Print the image on an entire sheet of paper without margins.
Page Layout Printing (2 on 1)
Layout and print two images on a sheet of paper.
Page Layout Printing (4 on 1)
Layout and print four images on a sheet of paper.
Enlarge/Reduce
Enlarge or reduce images to print.
Print a reduced or enlarged image by specifying a scale in increments of 1%.
100% Normal-size
Print the image in normal size.
Scale
Select a scale from the list.
Print Document Dialog Box
Page 390 of 681 pages
Auto
Scale is adjusted automatically according to the detected paper width and the selected paper size.
Image may be printed rotated 90 degrees depending on its size.
Important
At 100% Normal-size, some images may be printed small or with some portions cropped. In that
case, select Auto to resize the print in proportion to the paper size.
Paper Size
Select the size of paper for printing. Match the size to the size of the paper set in the machine.
Note
Selectable paper sizes depend on the selected printer.
Media Type
Select the type of paper for printing. Print quality may be fixed depending on the paper type.
Note
Selectable paper types depend on the selected printer.
Print Quality
Select the print quality.
Density
to select the print density.
Click
Density cannot be changed for images scanned with Document Type set to Text(OCR).
Copies
Click
to select the number of copies to be printed.
Grayscale Printing
Select this checkbox to print the document in black and white.
Preview before printing
Select this checkbox to display the print result before printing.
Defaults
Restore the default settings.
Print
Start printing with the specified settings.
Note
To cancel while spooling, click Cancel. To cancel while printing, select the printer icon on the
taskbar and click Cancel Printing.
Page top
Print Photo Dialog Box
Page 391 of 681 pages
Advanced Guide > Scanning > Scanning with the Bundled Application Software > MP Navigator EX Screens > Print
Photo Dialog Box
Print Photo Dialog Box
Click Print in the View & Use window, then click Print Photo on the list to open the Print Photo dialog box.
Important
The Print Photo dialog box will not open if Easy-PhotoPrint EX is installed.
PDF files cannot be printed.
Note
Double-click an image to display it in a different window.
Printer
Select the printer to use.
Properties...
Display the selected printer's advanced setting screen.
Paper Size
Select the size of paper for printing. Match the size to the size of the paper set in the machine.
Media Type
Select the type of paper for printing. Print quality may be fixed depending on the paper type.
Page Layout
Select a print type.
Normal-size Printing
Print one image per sheet.
Fit-to-Page Printing
Print an image at the paper size (enlarged or reduced).
Borderless Printing
Select this checkbox to print the image on an entire sheet of paper without margins.
Important
Page Layout setting will be disabled when you select Borderless Printing.
This setting is only available with printers that support borderless printing.
Orientation
Print Photo Dialog Box
Page 392 of 681 pages
Specify the print orientation.
Important
This setting is available only when Page Layout is Normal-size Printing. For others, the image is
automatically rotated according to the aspect ratio of the paper.
Copies
Specify the number of copies to print.
Vivid Photo
Select this checkbox to print the image in vivid colors.
Preview before printing
Select this checkbox to display the print result before printing.
Print
Start printing.
Note
Only the images in the Thumbnail window with the checkbox selected are printed.
Close
Closes the dialog box without printing the photo.
Page top
Send via E-mail Dialog Box
Page 393 of 681 pages
Advanced Guide > Scanning > Scanning with the Bundled Application Software > MP Navigator EX Screens > Send via
E-mail Dialog Box
Send via E-mail Dialog Box
Click Send in the View & Use window, then click Attach to E-mail on the list to open the Send via E-mail
dialog box.
In the Send via E-mail, you can make advanced settings for attaching images to e-mail.
Important
MP Navigator EX is compatible with the following e-mail software programs:
- Windows Mail (Windows Vista)
- Outlook Express (Windows XP/Windows 2000)
- Microsoft Outlook
- EUDORA
- Netscape Mail
(If an e-mail software program does not operate properly, check that the program's MAPI is enabled.
To enable MAPI, refer to the manual of the e-mail software program.)
Mail Program
The e-mail software program set up via Preferences in the Navigation Mode screen is displayed.
Select the e-mail software program you want to use.
Adjust attachment file size
When Save as type is JPEG, selecting this checkbox allows you to resize the images. Select a size
from Size.
Save in
Displays the folder in which to save the images. To change the folder, click Browse... to specify another
one. If resized, the resized images are saved.
The following folders are specified by default.
Windows Vista: MP Navigator EX folder in Picture folder
Windows XP: MP Navigator EX folder in My Pictures folder
Windows 2000: MP Navigator EX folder in My Pictures folder
File name
Enter the file name of the image to be attached (up to 32 characters). When saving multiple files, 4
digits are appended to each file name.
Set...
You can specify a compression type for JPEG files.
Select High(Low Compression), Standard or Low(High Compression).
Page top
Correct/Enhance Images Window
Page 394 of 681 pages
Advanced Guide > Scanning > Scanning with the Bundled Application Software > MP Navigator EX Screens > Correct/
Enhance Images Window
Correct/Enhance Images Window
(Image Correction/Enhancement) in the View & Use window or click Fix photo images in the
Click
Task Button area to open the Correct/Enhance Images window.
In the Correct/Enhance Images window, you can make advanced settings including image correction/
enhancement and brightness/contrast adjustment.
You can also display the source image and corrected image side by side for comparison.
Important
Image correction/enhancement cannot be applied to PDF files or black and white binary files.
Note
The Correct/Enhance Images window can also be opened by clicking
Enhancement) on the Toolbar or in the Zoom in dialog box.
It may take a while to correct large images.
(Image Correction/
(1) Task Area
(2) Toolbar
Task Area
Available tasks and settings vary between the Auto and Manual tabs.
Click Auto or Manual to open the corresponding tab.
Auto Tab
Use the functions in the Auto tab to apply corrections and enhancements to the entire image.
See "Correcting/Enhancing Images Automatically " for details.
Correct/Enhance Images Window
Page 395 of 681 pages
Auto Photo Fix
Applies automatic corrections suitable for photos.
Face Sharpener
Sharpens out-of-focus faces. You can adjust the effect level using the slider.
Digital Face Smoothing
Enhances skin beautifully by removing blemishes and wrinkles. You can adjust the effect level using
the slider.
Apply to all images
Applies the correction to all images.
OK
Applies the selected effect to the selected image or all images.
Reset Selected Image
Cancels all corrections and enhancements applied to the selected image.
Save Selected Image
Saves the selected image.
Save All Corrected Images
Saves all the corrected images displayed in the thumbnail list.
Exit
Close the Correct/Enhance Images window.
Manual Tab
Use Adjust to adjust brightness and contrast, or to sharpen the entire image.
Use Correct/Enhance to correct/enhance specific areas.
See "Correcting/Enhancing Images Manually " for details.
Adjustment
Correct/Enhance Images Window
Page 396 of 681 pages
Brightness
Adjusts the overall image brightness.
Move the slider to the left to darken and right to brighten the image.
Contrast
Adjusts the contrast of the image. Adjust the contrast when the image is flat due to lack of contrast.
Move the slider to the left to decrease and right to increase the contrast of the image.
Sharpness
Emphasizes the outline of the subjects to sharpen the image. Adjust the sharpness when the photo
is out of focus or text is blurred.
Move the slider to the right to sharpen the image.
Blur
Blurs the outline of the subjects to soften the image.
Move the slider to the right to soften the image.
Show-through Removal
Removes show-through of text from the reverse side or removes the base color. Adjust the showthrough level to prevent text on the reverse side of thin document or the base color of the document
from appearing on the image.
Move the slider to the right to increase the show-through removal effect.
Defaults
Resets all adjustments (brightness, contrast, sharpness, blur, and show-through removal).
Reset Selected Image
Cancels all corrections, enhancements and adjustments applied to the selected image.
Save Selected Image
Saves the selected image.
Save All Corrected Images
Saves all the corrected images displayed in the thumbnail list.
Exit
Close the Correct/Enhance Images window.
Correction/Enhancement
Correct/Enhance Images Window
Page 397 of 681 pages
Face Brightener
Corrects the entire image so that the selected facial area is brightened. You can adjust the effect
level using the slider.
Undo
Cancels the latest correction.
Face Sharpener
Corrects the entire image to sharpen the face. You can specify the area you want to apply the effect
to. You can adjust the effect level using the slider.
Digital Face Smoothing
Enhances skin beautifully by removing blemishes and wrinkles. You can specify the area you want
to apply the effect to. You can adjust the effect level using the slider.
Blemish Remover
Removes moles. You can specify the area you want to apply the effect to.
Reset Selected Image
Cancels all corrections, enhancements and adjustments applied to the selected image.
Save Selected Image
Saves the selected image.
Save All Corrected Images
Saves all the corrected images displayed in the thumbnail list.
Exit
Close the Correct/Enhance Images window.
OK
Applies the selected effect to the specified area.
Toolbar
Toolbar
(Rotate Left)
Rotates the image 90 degrees counter-clockwise.
(Rotate Right)
Rotates the image 90 degrees clockwise.
(Invert)
Inverts the image horizontally.
(Trimming)
Trimming is the act of selecting the area you want to keep in a photo and discarding the rest. In
Correct/Enhance Images Window
Page 398 of 681 pages
the displayed window, drag the white frame to specify the trimming area. Move the mouse
pointer inside the white frame and drag to move the trimming area.
Note
Place the main subjects along the broken white lines or at the intersections to create a
balanced image.
(Enlarge)
Enlarges the displayed image.
(Reduce)
Reduces the displayed image.
(Full-screen)
Enlarges/reduces the image to display it full-screen.
(Compare)
Opens the source image for comparison.
The source image appears on the left and the corrected image appears on the right.
Page top
One-click Mode Screen
Page 399 of 681 pages
Advanced Guide > Scanning > Scanning with the Bundled Application Software > MP Navigator EX Screens > One-click
Mode Screen
One-click Mode Screen
(Switch Mode) at the bottom left of the Navigation Mode screen to display the One-click
Click
Mode screen.
You can complete from scanning to saving at one time by simply clicking the corresponding icon.
Save
Scan and save documents. Document type is automatically detected. File format is automatically set.
Files are saved to a computer.
When you click this icon, the Save dialog box opens and you can specify the scan/save settings.
Save Dialog Box (One-click Mode Screen)
PDF
Scan documents and save them as PDF files.
When you click this icon, the PDF dialog box opens and you can specify the scan/save and application
settings.
PDF Dialog Box
Mail
Scan documents or photos and attach them to e-mail.
When you click this icon, the Mail dialog box opens and you can specify the scan/save and e-mail
software program settings.
Mail Dialog Box
OCR
Scan text documents then extract and display text in the image on Notepad (included with Windows).
When you click this icon, the OCR dialog box opens and you can specify the scan/save and application
settings.
OCR Dialog Box
Important
For further procedures, refer to the application's manual.
Custom
Scan documents and open them in a specified application. Document type is automatically detected.
When you click this icon, the Custom dialog box opens and you can specify the scan/save and
application settings.
Custom Dialog Box
Important
For further procedures, refer to the application's manual.
(Switch Mode)
Switch to Navigation Mode and the Navigation Mode screen appears.
Custom Scan with One-click Tab
Preferences
The Preferences dialog box opens. In the Preferences dialog box, you can make advanced settings to
MP Navigator EX functions.
Preferences Dialog Box
(Guide)
Open this guide.
One-click Mode Screen
Page 400 of 681 pages
Important
The following restrictions apply when you scan with Document Type set to Auto Mode in the Save or
Custom dialog box.
Specify Document Type (other than Auto Mode) to extract the text in the image and convert to
editable text after scanning.
Related Topic
Easy Scanning with One-click
Page top
Save Dialog Box (One-click Mode Screen)
Page 401 of 681 pages
Advanced Guide > Scanning > Scanning with the Bundled Application Software > MP Navigator EX Screens > Save
Dialog Box (One-click Mode Screen)
Save Dialog Box (One-click Mode Screen)
Click Save to PC on the Custom Scan with One-click tab or click Save in the One-click Mode screen to
open the Save dialog box.
Scan Settings
Document Type
Select the type of document to be scanned. When Auto Mode is selected, the document type is
automatically detected. In that case, Color Mode, Document Size and Resolution are automatically
set as well.
Important
The following types of documents cannot be scanned correctly with Auto Mode. In that case,
specify Document Type.
- Documents other than photos, Hagaki, business cards, magazines, newspapers, text
documents and CD/DVD
- A4 photos
- Text documents smaller than 2L (5 inches x 7 inches) (127 mm x 178 mm), such as
paperback pages with the spine cut off
- Documents printed on thin white paper
- Wide documents such as panoramic photos
Reflective CD/DVD labels may not be scanned properly.
Place documents correctly according to the type of document to be scanned. Otherwise,
documents may not be scanned correctly.
See "Placing Documents " for details on how to place documents.
To reduce moire, set Document Type to Magazine.
Color Mode
Select how to scan the document.
Document Size
Select the size of the document to be scanned.
When you select Custom, a dialog box in which you can specify the document size opens. Select a
Units, then enter the Width and Height and click OK.
Save Dialog Box (One-click Mode Screen)
Page 402 of 681 pages
Important
When you select Auto Detect, the image may not be scanned at the correct position and size. In
that case, change the size to the actual document size (A4, Letter, etc.) and align a corner of the
document with the corner at the arrow of the Platen.
See "Placing Documents " for details on how to place documents.
Resolution
Select the resolution at which to scan documents.
Resolution
Use the scanner driver
Select this checkbox to display the ScanGear (scanner driver) screen and make advanced scan
settings.
Color Mode, Document Size, Resolution and other settings in the Save dialog box will be disabled.
Specify these settings in the ScanGear (scanner driver) screen.
Specify...
For Document Type, Color Mode, Document Size and Scanning Resolution, the settings specified in
the Save dialog box are displayed.
For Descreen, Unsharp Mask, etc., see the corresponding descriptions in " Scan Settings Dialog
Box."
Save Settings
Automatically save the image to your computer after scanning it
Select this to save the images to your computer as specified after scanning them.
The File name, Save as type and Save in settings will be displayed.
Important
If you select this function, you will not be able to set passwords for PDF files.
File name
Enter the file name of the image to be saved (up to 32 characters). When saving multiple files, 4
digits are appended to each file name.
Save as type
Select a file type to save the scanned images.
Select Auto, JPEG/Exif, TIFF or BMP. Auto is displayed and selected by default when Document Type
is Auto Mode. When saving as PDF files, select PDF, PDF(Multiple Pages) or PDF(Add Page).
Important
When Auto is selected, files are saved in the following formats according to the document type.
Photos, Hagaki, business cards and CD/DVD: JPEG
Magazines, newspapers and text documents: PDF
You can change the file format from Set....
Images saved as PDF files may not open depending on the application. In that case, select an
option other than PDF in Save as type.
When Document Type is Auto Mode and Save as type is Auto, the file format may differ
depending on how you place the document.
See "Placing Documents " for details on how to place documents.
Large documents (such as A4 photos) that cannot be placed away from the edges/arrow of the
Platen may not be saved in the correct file format when Save as type is Auto. In that case, select
a file format suitable for the document to be scanned.
If you select JPEG/Exif, the Save the JPEG/Exif file in AdobeRGB checkbox will be selectable.
Set...
When Save as type is Auto
Save Dialog Box (One-click Mode Screen)
Page 403 of 681 pages
You can specify the file format in which to save images. Select a file format for Document and Photo
each.
When Save as type is JPEG/Exif
You can specify a compression type for JPEG files. Select High(Low Compression), Standard or
Low(High Compression).
When Save as type is PDF, PDF(Multiple Pages) or PDF(Add Page)
Make advanced settings for creating PDF files. See " PDF Settings Dialog Box " for details.
Save in
Displays the folder in which to save the scanned images. To change the folder, click Browse... to
specify another one.
The following folders are specified by default.
Windows Vista: MP Navigator EX folder in Picture folder
Windows XP: MP Navigator EX folder in My Pictures folder
Windows 2000: MP Navigator EX folder in My Pictures folder
Save to a Subfolder with Current Date
Select this checkbox to create a subfolder in the folder specified in Save in with the current date and
save imported files in it. A subfolder with a name such as "2008_01_01" (Year_Month_Date) will be
created.
If this checkbox is not selected, files are saved directly in the folder specified in Save in.
Save the JPEG/Exif file in AdobeRGB
Select this checkbox to save the images in colors that correspond to Adobe RGB.
Important
This function is available only when Save as type is JPEG/Exif.
This function is not available if the Adobe RGB profile is not installed.
Note
You cannot select this setting if the Use the scanner driver checkbox is selected.
If you save an image with the Save the JPEG/Exif file in AdobeRGB checkbox selected, an
underscore is added to the beginning of the file name. (Example: _Image0001.jpg)
Open the save dialog box after scanning the image (Input Exif information)
Select this to open the Save dialog box after scanning the images and specify the save settings
such as destination folder, file name and Exif information.
Save Dialog Box
Note
To set passwords for PDF files, select Open the save dialog box after scanning the image
(Input Exif information). After scanning, you can set the passwords in the Save dialog box.
Setting Passwords for PDF Files
Application Settings
Open with
You can select whether to open the View & Use window or Explorer after saving the images.
Start scanning by clicking the one-click button
Select this checkbox to start scanning when you click an icon.
Apply
Saves and applies the specified settings.
Click Cancel instead of Apply to cancel the specified settings.
Cancel
Cancels the specified settings. The current dialog box closes.
Defaults
Returns all settings in the dialog box to their defaults.
Save Dialog Box (One-click Mode Screen)
Page 404 of 681 pages
Scan
Scan and save documents with the specified settings.
When Save as type is Auto, a confirmation appears. Click Open Manual to open this guide (if it is
installed).
Page top
Scan Settings Dialog Box
Page 405 of 681 pages
Advanced Guide > Scanning > Scanning with the Bundled Application Software > MP Navigator EX Screens > Scan
Settings Dialog Box
Scan Settings Dialog Box
The Scan Settings dialog box opens when you click Specify... in the dialog box that opens when scanning
from the One-click Mode screen or the Custom Scan with One-click tab.
In the Scan Settings dialog box, you can make advanced scan settings.
Important
The displayed items vary by document type and how the screen was appeared.
Note
The Scan Settings dialog box can also be opened by clicking Specify... on the Scanner Button
Settings tab of the Preferences dialog box.
Document Type
Select the type of document to be scanned. When Auto Mode is selected, the document type is
automatically detected.
In that case, Color Mode, Document Size, etc. are automatically set as well.
Important
To scan correctly, select a document type that matches the document to be scanned.
When opened from the Scanner Button Settings tab, the Document Type specified in the Scanner
Button Settings tab is displayed and cannot be changed in this dialog box.
Color Mode
Select how to scan the document.
Color
This mode renders the image in 256 levels (8 bit) of R(ed), G(reen), and B(lue).
Grayscale
This mode renders the image in 256 levels (8 bit) of black and white.
Black and White
This mode renders the image in black and white. The contrast in the image is divided at certain
levels (threshold level) into black and white and is rendered in two colors.
Note
Color Mode is not displayed in the Scan Settings dialog box opened from the Scanner Button
Settings tab.
Document Size
Select the size of the document to be scanned.
When you select Custom, a dialog box in which you can specify the document size opens. Select a
Units, then enter the Width and Height and click OK.
Scan Settings Dialog Box
Page 406 of 681 pages
Important
When you select Auto Detect, the image may not be scanned at the correct position and size. In
that case, change the size to the actual document size (A4, Letter, etc.) and align a corner of the
document with the corner at the arrow of the Platen.
See "Placing Documents " for details on how to place documents.
Scanning Resolution
Select the resolution at which to scan documents.
Resolution
Descreen
Select this checkbox to reduce moire patterns.
Printed photos and pictures are displayed as a collection of fine dots. Moire is a phenomenon where
dots may interfere with each other and cause uneven gradation and a stripe pattern in the image.
Descreen is the function for reducing this moire effect.
Note
Scanning takes longer than usual when you enable Descreen.
Unsharp Mask
Select this checkbox to emphasize the outline of the subjects and sharpen the image.
Prevent show-through of the document
Select this checkbox to sharpen text in a document or reduce show-through in newspapers.
Important
Select this checkbox when Document Type is text document and show-through is apparent in the
scanned image.
Remove gutter shadow
Select this checkbox to correct shadows that appear between pages when scanning open booklets.
Important
Align the document correctly with the marks on the Platen.
Gutter shadows can be corrected only when Document Size is set to a standard size.
You cannot select this checkbox when Document Size is Auto Detect, Auto Detect (Multiple
Documents) or Stitch Assist.
Note
Use ScanGear's Advanced Mode tab to correct gutter shadows when scanning non-standard size
documents or when custom cropping frames are set.
For details, see Gutter Shadow Correction in " Image Settings " (ScanGear's Advanced Mode tab).
Correct slanted document
Select this checkbox to detect the scanned text and correct the angle (within -0.1 to -10 degrees or +0.1
to +10 degrees) of the document.
Important
You cannot select this checkbox when Document Size is Stitch Assist.
The inclination of the following types of documents may not be corrected, as the text cannot be
detected correctly.
- Documents in which the text lines are inclined more than 10 degrees or the angles vary by line
- Documents containing both vertical and horizontal text
- Documents with extremely large or small fonts
- Documents with small amount of text
- Documents containing figures/images or hand-written text
- Documents containing both vertical and horizontal lines (tables)
Scan Settings Dialog Box
Page 407 of 681 pages
Note
Scanning takes longer than usual when you enable Correct slanted document.
Detect the orientation of text documents and rotate images
Select this checkbox to detect the orientation of the document from the scanned text and rotate the
scanned image to the correct orientation. Select the language of the document to be scanned in
Document Language.
Important
You cannot select this checkbox when Document Size is Stitch Assist.
This function may not work properly depending on the document language. Only text documents
written in languages that can be selected from Document Language are supported.
The orientation of the following types of documents may not be corrected, as the text cannot be
detected correctly.
- Resolution is outside the range of 300 dpi to 600 dpi
- Font size is outside the range of 8 points to 48 points
- Documents containing special fonts, effects, italics, or hand-written text
- Documents with patterned backgrounds
Note
Scanning takes longer than usual when you enable Detect the orientation of text documents and
rotate images.
Document Language
Select the language of the document to be scanned.
Important
You cannot select this checkbox when Document Size is Stitch Assist.
Defaults
Restore the default settings.
Page top
Save Dialog Box
Page 408 of 681 pages
Advanced Guide > Scanning > Scanning with the Bundled Application Software > MP Navigator EX Screens > Save
Dialog Box
Save Dialog Box
The Save dialog box for specifying the image's file name and destination opens after you scan with Open
the save dialog box after scanning the image (Input Exif information) selected in the Save dialog box that
opens when you click Save to PC on the Custom Scan with One-click tab or Save in the One-click Mode
screen. You can specify the file type and destination while viewing the thumbnails.
Save as type
Select a file type to save the scanned images.
Select JPEG/Exif, TIFF, BMP, PDF, PDF(Multiple Pages) or PDF(Add Page).
PDF
Save each of the selected images as a separate PDF file.
PDF(Multiple Pages)
Save multiple images in one PDF file.
Important
PDF(Multiple Pages) is displayed when multiple images are scanned.
PDF(Add Page)
Add the scanned images to a PDF file. The images are added to the end of the PDF file. You
cannot rearrange the pages of the PDF file to which the images are added.
Important
Images can only be added to PDF files created with MP Navigator EX. You cannot specify
PDF files created with other applications. PDF files edited in other applications cannot be
specified as well.
If a password-protected PDF file is edited, the passwords will be deleted. Reset the
passwords.
Setting Passwords for PDF Files
Important
PDF(Multiple Pages) and PDF(Add Page) cannot be selected for images scanned using the
Operation Panel of the machine.
Set...
Save Dialog Box
Page 409 of 681 pages
When Save as type is JPEG/Exif
You can specify a compression type for JPEG files. Select High(Low Compression), Standard or
Low(High Compression).
When Save as type is PDF, PDF(Multiple Pages) or PDF(Add Page)
Make advanced settings for creating PDF files. See " PDF Settings Dialog Box " for details.
Add to
This is displayed when you select PDF(Add Page) for Save as type and specify the PDF file to which
images are added. To change the file, click Browse... to specify another one.
Important
Images can only be added to PDF files created with MP Navigator EX. You cannot specify PDF
files created with other applications. PDF files edited in other applications cannot be specified as
well.
Exif Settings...
When Save as type is JPEG/Exif, you can input Exif information into the file to be saved.
Exif Settings Dialog Box
Password security settings
Select this checkbox to open the Password Security -Settings dialog box in which you can set
passwords for opening, editing and printing created PDF files.
Setting Passwords for PDF Files
Note
This function is available only when Save as type is PDF, PDF(Multiple Pages) or PDF(Add Page).
Rotate Left 90°/Rotate Right 90°
Rotates scanned images 90 degrees counter-clockwise or clockwise.
Select the image you want to rotate and click Rotate Left 90° or Rotate Right 90°.
File name
Enter the file name of the image to be saved (up to 32 characters). When saving multiple files, 4 digits
are appended to each file name.
Save in
Displays the folder in which to save the scanned images. To change the folder, click Browse... to
specify another one.
The following folders are specified by default.
Windows Vista: MP Navigator EX folder in Picture folder
Windows XP: MP Navigator EX folder in My Pictures folder
Windows 2000: MP Navigator EX folder in My Pictures folder
Save to a Subfolder with Current Date
Select this checkbox to create a subfolder in the folder specified in Save in with the current date and
save imported files in it. A subfolder with a name such as "2008_01_01" (Year_Month_Date) will be
created.
If this checkbox is not selected, files are saved directly in the folder specified in Save in.
Page top
Exif Settings Dialog Box
Page 410 of 681 pages
Advanced Guide > Scanning > Scanning with the Bundled Application Software > MP Navigator EX Screens > Exif
Settings Dialog Box
Exif Settings Dialog Box
You can input Exif information into a file to be saved. Exif is a standard format for embedding various
shooting data in digital camera images (JPEG). Embedding Exif information into scanned images
allows you to organize and print them along with digital camera images.
The Exif Settings dialog box can be opened when Save as type is JPEG/Exif.
Basic Information
Displays the information obtained automatically from the machine or software.
Advanced Information
Displays the information specified on the right side of the window.
Advanced Information Settings Area
You can input Exif information such as the title and shooting data. Select the checkbox of the items you
want to specify, and select or enter information.
Apply the Same Setting of Input Items Automatically
Select this checkbox to automatically display the information you specified for the previous image.
Apply
After specifying all the information you need, click Apply to embed it into the image. The information
appears in Advanced Information.
OK
Embeds the specified information into the image and closes the window. The specified information is
saved.
Cancel
Cancels the settings and closes the window.
Information is embedded when Cancel is clicked after clicking Apply.
Page top
PDF Dialog Box
Page 411 of 681 pages
Advanced Guide > Scanning > Scanning with the Bundled Application Software > MP Navigator EX Screens > PDF
Dialog Box
PDF Dialog Box
Click Save as PDF file on the Custom Scan with One-click tab or click PDF in the One-click Mode screen
to open the PDF dialog box.
Scan Settings
Document Type
Select the type of document to be scanned.
Color Mode
Select how to scan the document.
Document Size
Select the size of the document to be scanned.
When you select Custom, a dialog box in which you can specify the document size opens. Select a
Units, then enter the Width and Height and click OK.
Resolution
Select the resolution at which to scan documents.
Resolution
Specify...
For Document Type, Color Mode, Document Size and Scanning Resolution, the settings specified in
the PDF dialog box are displayed.
For Descreen, Unsharp Mask, etc., see the corresponding descriptions in " Scan Settings Dialog
Box."
PDF Dialog Box
Page 412 of 681 pages
Save Settings
Automatically save the image to your computer after scanning it
Select this to save the images to your computer as specified after scanning them.
Important
If you select this function, you will not be able to set passwords for PDF files.
File name
Enter the file name of the image to be saved (up to 32 characters). When saving multiple files, 4
digits are appended to each file name.
Save as type
Select a file type to save the scanned images.
Select PDF, PDF(Multiple Pages) or PDF(Add Page).
PDF
Save each of the selected images as a separate PDF file.
PDF(Multiple Pages)
Save multiple images in one PDF file.
PDF(Add Page)
Add the scanned images to a PDF file. The images are added to the end of the PDF file. You
cannot rearrange the pages of the PDF file to which the images are added.
Important
Images cannot be added to password-protected PDF files.
Important
Click Set... to open the PDF Settings dialog box in which you can specify the PDF compression
type and other advanced settings for creating PDF files.
PDF Settings Dialog Box
Note
See "Creating/Editing PDF Files " to delete or rearrange the pages of saved PDF files.
Save in
Displays the folder in which to save the scanned images. To change the folder, click Browse... to
specify another one.
The following folders are specified by default.
Windows Vista: MP Navigator EX folder in Picture folder
Windows XP: MP Navigator EX folder in My Pictures folder
Windows 2000: MP Navigator EX folder in My Pictures folder
Save to a Subfolder with Current Date
Select this checkbox to create a subfolder in the folder specified in Save in with the current date and
save imported files in it. A subfolder with a name such as "2008_01_01" (Year_Month_Date) will be
created.
If this checkbox is not selected, files are saved directly in the folder specified in Save in.
Open the save dialog box after scanning the image
Select this to open the Save as PDF file dialog box after scanning the images and specify the save
settings such as destination folder and file name.
Save as PDF file Dialog Box
Note
To set passwords for PDF files, select Open the save dialog box after scanning the image. After
scanning, you can set the passwords in the Save as PDF file dialog box.
Setting Passwords for PDF Files
Application Settings
Open with
Specify an application with which to open scanned images. Drag and drop the icon of an application
that supports the file format displayed in Save as type. The specified application starts after images
PDF Dialog Box
Page 413 of 681 pages
are scanned.
Important
Depending on the specified application, the images may not appear correctly or the application
may not start.
Reset
Cancel the application setting.
Set...
Allows you to select an application to start.
Start scanning by clicking the one-click button
Select this checkbox to start scanning when you click an icon.
Apply
Saves and applies the specified settings.
Click Cancel instead of Apply to cancel the specified settings.
Cancel
Cancels the specified settings. The current dialog box closes.
Defaults
Returns all settings in the dialog box to their defaults.
Scan
Scan and save documents as PDF files with the specified settings.
Page top
Save as PDF file Dialog Box
Page 414 of 681 pages
Advanced Guide > Scanning > Scanning with the Bundled Application Software > MP Navigator EX Screens > Save as
PDF file Dialog Box
Save as PDF file Dialog Box
The Save as PDF file dialog box opens when you scan from Save as PDF file on the Custom Scan with
One-click tab or from PDF in the One-click Mode screen after selecting Open the save dialog box after
scanning the image.
In the Save as PDF file dialog box, you can make settings for saving images to a computer.
Important
You cannot save images scanned at 10501 pixels or more in the vertical and horizontal directions.
Save as type
Select a PDF file type to save the scanned images.
PDF
Save each of the selected images as a separate PDF file.
PDF(Multiple Pages)
Save multiple images in one PDF file.
Important
PDF(Multiple Pages) is displayed when multiple images are scanned.
PDF(Add Page)
Add the scanned images to a PDF file. The images are added to the end of the PDF file. You
cannot rearrange the pages of the PDF file to which the images are added.
Important
Images can only be added to PDF files created with MP Navigator EX. You cannot specify
PDF files created with other applications. PDF files edited in other applications cannot be
specified as well.
If a password-protected PDF file is edited, the passwords will be deleted. Reset the
passwords.
Important
You can set passwords for PDF files.
Setting Passwords for PDF Files
Save as PDF file Dialog Box
Page 415 of 681 pages
Set...
Make advanced settings for creating PDF files.
See "PDF Settings Dialog Box " for details.
Password security settings
Select this checkbox to open the Password Security -Settings dialog box in which you can set
passwords for opening, editing and printing created PDF files.
Setting Passwords for PDF Files
Rotate Left 90°/Rotate Right 90°
Rotates scanned images 90 degrees counter-clockwise or clockwise.
Select the image you want to rotate and click Rotate Left 90° or Rotate Right 90°.
File name
Enter the file name of the image to be saved (up to 32 characters). When saving multiple files, 4 digits
are appended to each file name.
Save in
Displays the folder in which to save the PDF files. To change the folder, click Browse... to specify
another one.
The following folders are specified by default.
Windows Vista: MP Navigator EX folder in Picture folder
Windows XP: MP Navigator EX folder in My Pictures folder
Windows 2000: MP Navigator EX folder in My Pictures folder
Save to a Subfolder with Current Date
Select this checkbox to create a subfolder in the folder specified in Save in with the current date and
save imported files in it. A subfolder with a name such as "2008_01_01" (Year_Month_Date) will be
created.
If this checkbox is not selected, files are saved directly in the folder specified in Save in.
Page top
Mail Dialog Box
Page 416 of 681 pages
Advanced Guide > Scanning > Scanning with the Bundled Application Software > MP Navigator EX Screens > Mail
Dialog Box
Mail Dialog Box
Click Attach to E-mail on the Custom Scan with One-click tab or click Mail in the One-click Mode screen to
open the Mail dialog box.
Scan Settings
Document Type
Select the type of document to be scanned.
Color Mode
Select how to scan the document.
Document Size
Select the size of the document to be scanned.
When you select Custom, a dialog box in which you can specify the document size opens. Select a
Units, then enter the Width and Height and click OK.
Resolution
Select the resolution at which to scan documents.
Resolution
Use the scanner driver
Select this checkbox to display the ScanGear (scanner driver) screen and make advanced scan
settings.
Specify...
For Document Type, Color Mode, Document Size and Scanning Resolution, the settings specified in
the Mail dialog box are displayed.
For Descreen, Unsharp Mask, etc., see the corresponding descriptions in " Scan Settings Dialog
Box."
Mail Dialog Box
Page 417 of 681 pages
Save Settings
File Size
Select a size from Small (fits in a 640 by 480 window), Medium (fits in a 800 by 600 window), Large
(fits in a 1024 by 768 window) and Original.
File name
Enter the file name of the image to be saved (up to 32 characters). When saving multiple files, 4
digits are appended to each file name.
Save as type
Select a file type to save the scanned images.
Select JPEG/Exif, PDF or PDF(Multiple Pages).
Important
For JPEG/Exif images, click Set... to open a dialog box in which you can select a compression
type from High(Low Compression), Standard and Low(High Compression).
You cannot set passwords for PDF files.
Save in
Displays the folder in which to save the scanned images. To change the folder, click Browse... to
specify another one.
The following folders are specified by default.
Windows Vista: MP Navigator EX folder in Picture folder
Windows XP: MP Navigator EX folder in My Pictures folder
Windows 2000: MP Navigator EX folder in My Pictures folder
Save to a Subfolder with Current Date
Select this checkbox to create a subfolder in the folder specified in Save in with the current date and
save imported files in it. A subfolder with a name such as "2008_01_01" (Year_Month_Date) will be
created.
If this checkbox is not selected, files are saved directly in the folder specified in Save in.
Attachment Settings
Mail Program
Specify an e-mail software program.
Note
Select Add... to open the Select Mail Program dialog box in which you can select an e-mail
software program. If the e-mail software program you want to use is not listed, click Add to List
and select it.
Start scanning by clicking the one-click button
Select this checkbox to start scanning when you click an icon.
Apply
Saves and applies the specified settings.
Click Cancel instead of Apply to cancel the specified settings.
Cancel
Cancels the specified settings. The current dialog box closes.
Defaults
Returns all settings in the dialog box to their defaults.
Scan
Mail Dialog Box
Page 418 of 681 pages
Scan documents with the specified settings.
When scanning is completed, the e-mail software program starts automatically and a new message
window opens with the image attached.
Page top
OCR Dialog Box
Page 419 of 681 pages
Advanced Guide > Scanning > Scanning with the Bundled Application Software > MP Navigator EX Screens > OCR
Dialog Box
OCR Dialog Box
Click OCR on the Custom Scan with One-click tab or in the One-click Mode screen to open the OCR
dialog box.
Scan Settings
Document Type
Select the type of document to be scanned.
Color Mode
Select how to scan the document.
Document Size
Select the size of the document to be scanned.
When you select Custom, a screen in which you can specify the document size appears. Select a
Units, then enter the Width and Height and click OK.
Resolution
Select the resolution at which to scan documents.
Resolution
Use the scanner driver
Select this checkbox to display the ScanGear (scanner driver) screen and make advanced scan
settings.
Specify...
For Document Type, Color Mode, Document Size and Scanning Resolution, the settings specified in
the OCR dialog box are displayed.
For Descreen, Unsharp Mask, etc., see the corresponding descriptions in " Scan Settings Dialog
OCR Dialog Box
Page 420 of 681 pages
Box."
Note
When scanning slanted documents, select the Correct slanted document checkbox to improve
the text recognition accuracy.
Save Settings
File name
Enter the file name of the image to be saved (up to 32 characters). When saving multiple files, 4
digits are appended to each file name.
Save as type
Select a file type to save the scanned images.
Select JPEG/Exif, TIFF or BMP.
Important
For JPEG/Exif images, click Set... to open a dialog box in which you can select a compression
type from High(Low Compression), Standard and Low(High Compression).
Save in
Displays the folder in which to save the scanned images. To change the folder, click Browse... to
specify another one.
The following folders are specified by default.
Windows Vista: MP Navigator EX folder in Picture folder
Windows XP: MP Navigator EX folder in My Pictures folder
Windows 2000: MP Navigator EX folder in My Pictures folder
Save to a Subfolder with Current Date
Select this checkbox to create a subfolder in the folder specified in Save in with the current date and
save imported files in it. A subfolder with a name such as "2008_01_01" (Year_Month_Date) will be
created.
If this checkbox is not selected, files are saved directly in the folder specified in Save in.
Application Settings
OCR with
After the image is scanned, the text in the image is extracted and appears in Notepad (included with
Windows).
Note
Only text written in languages that can be selected on the General tab can be extracted to
Notepad (included with Windows). Click Set... on the General tab and specify the language.
Preferences Dialog Box
Text displayed in Notepad (included with Windows) is for guidance only. Text in the image of
the following types of documents may not be detected correctly.
- Documents containing text with font size outside the range of 8 points to 40 points (at 300 dpi)
- Slanted documents
- Documents placed upside down or documents with text in the wrong orientation (rotated
characters)
- Documents containing special fonts, effects, italics, or hand-written text
- Documents with narrow line spacing
- Documents with colors in the background of text
- Documents containing multiple languages
Reset
Cancel the application setting.
Set...
Allows you to select an application.
Important
You cannot specify a text editor other than Notepad (included with Windows).
Start scanning by clicking the one-click button
OCR Dialog Box
Page 421 of 681 pages
Select this checkbox to start scanning when you click an icon.
Apply
Saves and applies the specified settings.
Click Cancel instead of Apply to cancel the specified settings.
Cancel
Cancels the specified settings. The current dialog box closes.
Defaults
Returns all settings in the dialog box to their defaults.
Scan
Scan documents with the specified settings.
Page top
Custom Dialog Box
Page 422 of 681 pages
Advanced Guide > Scanning > Scanning with the Bundled Application Software > MP Navigator EX Screens > Custom
Dialog Box
Custom Dialog Box
Click Custom on the Custom Scan with One-click tab or in the One-click Mode screen to open the
Custom dialog box.
Scan Settings
Document Type
Select the type of document to be scanned. When Auto Mode is selected, the document type is
automatically detected. In that case, Color Mode, Document Size and Resolution are automatically
set as well.
Important
The following types of documents cannot be scanned correctly with Auto Mode. In that case,
specify Document Type.
- Documents other than photos, Hagaki, business cards, magazines, newspapers, text
documents and CD/DVD
- A4 photos
- Text documents smaller than 2L (5 inches x 7 inches) (127 mm x 178 mm), such as
paperback pages with the spine cut off
- Documents printed on thin white paper
- Wide documents such as panoramic photos
Reflective CD/DVD labels may not be scanned properly.
Place documents correctly according to the type of document to be scanned. Otherwise,
documents may not be scanned correctly.
See "Placing Documents " for details on how to place documents.
To reduce moire, set Document Type to Magazine.
Color Mode
Select how to scan the document.
Document Size
Select the size of the document to be scanned.
When you select Custom, a dialog box in which you can specify the document size opens. Select a
Units, then enter the Width and Height and click OK.
Custom Dialog Box
Page 423 of 681 pages
Resolution
Select the resolution at which to scan documents.
Resolution
Use the scanner driver
Select this checkbox to display the ScanGear (scanner driver) screen and make advanced scan
settings.
Specify...
For Document Type, Color Mode, Document Size and Scanning Resolution, the settings specified in
the Custom dialog box are displayed.
For Descreen, Unsharp Mask, etc., see the corresponding descriptions in " Scan Settings Dialog
Box."
Save Settings
Automatically save the image to your computer after scanning it
Select this to save the images to your computer as specified after scanning them.
Note
If an application to start is specified in Application Settings, the scanned image opens in the
specified application.
File name
Enter the file name of the image to be saved (up to 32 characters). When saving multiple files, 4
digits are appended to each file name.
Save as type
Select a file type to save the scanned images.
Select Auto, JPEG/Exif, TIFF or BMP. Auto is displayed and selected by default when Document Type
is Auto Mode.
Important
When Auto is selected, files are saved in the following formats according to the document type.
Photos, Hagaki, business cards and CD/DVD: JPEG
Magazines, newspapers and text documents: PDF
You can change the file format from Set....
Images saved as PDF files may not open depending on the application. In that case, select an
option other than PDF in Save as type.
When Document Type is Auto Mode and Save as type is Auto, the file format may differ
depending on how you place the document.
See "Placing Documents " for details on how to place documents.
Large documents (such as A4 photos) that cannot be placed away from the edges/arrow of the
Platen may not be saved in the correct file format when Save as type is Auto. In that case, select
a file format suitable for the document to be scanned.
If you select JPEG/Exif, the Save the JPEG/Exif file in AdobeRGB checkbox will be selectable.
Set...
When Save as type is Auto
You can specify the file format in which to save images. Select a file format for Document and Photo
each.
When Save as type is JPEG/Exif
You can specify a compression type for JPEG files. Select High(Low Compression), Standard or
Low(High Compression).
Custom Dialog Box
Page 424 of 681 pages
Save in
Displays the folder in which to save the scanned images. To change the folder, click Browse... to
specify another one.
The following folders are specified by default.
Windows Vista: MP Navigator EX folder in Picture folder
Windows XP: MP Navigator EX folder in My Pictures folder
Windows 2000: MP Navigator EX folder in My Pictures folder
Save to a Subfolder with Current Date
Select this checkbox to create a subfolder in the folder specified in Save in with the current date and
save imported files in it. A subfolder with a name such as "2008_01_01" (Year_Month_Date) will be
created.
If this checkbox is not selected, files are saved directly in the folder specified in Save in.
Save the JPEG/Exif file in AdobeRGB
Select this checkbox to save the images in colors that correspond to Adobe RGB.
Important
This function is available only when Save as type is JPEG/Exif.
This function is not available if the Adobe RGB profile is not installed.
Note
You cannot select this setting if the Use the scanner driver checkbox is selected.
If you save an image with the Save the JPEG/Exif file in AdobeRGB checkbox selected, an
underscore is added to the beginning of the file name. (Example: _Image0001.jpg)
Open the save dialog box after scanning the image (Input Exif information)
Select this to open the Save dialog box after scanning the images and specify the destination folder,
file name and Exif information.
Note
See "Save Dialog Box " for details on the Save dialog box.
Application Settings
Open with
Specify an application with which to open scanned images. Drag and drop the icon of an application
that supports the file format displayed in Save as type. The specified application starts after images
are scanned.
Important
Depending on the specified application, the images may not appear correctly or the application
may not start.
Reset
Cancel the application setting.
Set...
Allows you to select an application to start.
Start scanning by clicking the one-click button
Select this checkbox to start scanning when you click an icon.
Apply
Saves and applies the specified settings.
Click Cancel instead of Apply to cancel the specified settings.
Cancel
Cancels the specified settings. The current dialog box closes.
Defaults
Returns all settings in the dialog box to their defaults.
Scan
Scan and save documents with the specified settings.
When Save as type is Auto, a confirmation appears. Click Open Manual to open this guide (if it is
Custom Dialog Box
Page 425 of 681 pages
installed).
Page top
Preferences Dialog Box
Advanced Guide > Scanning > Scanning with the Bundled Application Software > MP Navigator EX Screens >
Preferences Dialog Box
Preferences Dialog Box
Click Preferences in the Navigation Mode screen to open the Preferences dialog box.
In the Preferences dialog box, you can make advanced settings to MP Navigator EX functions via the
General and Scanner Button Settings tabs.
General Tab
On the General tab, you can specify general MP Navigator EX settings.
Product Name
Displays the product name of the machine that MP Navigator EX is currently configured to use.
Page 426 of 681 pages
Preferences Dialog Box
Page 427 of 681 pages
If the displayed product is not the one you want to use, select the desired product from the list.
Save in (My Box)
Displays the folder in which to save scanned documents. To change the folder, click Browse... to
specify another one.
The following folders are specified by default.
Windows Vista: MP Navigator EX folder in Picture folder
Windows XP: MP Navigator EX folder in My Pictures folder
Windows 2000: MP Navigator EX folder in My Pictures folder
Location of Temporary Files
Displays the folder in which to save images temporarily. To change the folder, click Browse... to
specify another one.
Important
An error may occur if you set the destination to the root directory of the drive on which the
operating system is installed. Be sure to specify a folder.
Application to run
Displays the applications that can be started via MP Navigator EX. Install the applications from the
Setup CD-ROM that accompanies the machine.
For Attach to E-mail, you can select an e-mail software program to start.
For Convert to text file, Notepad (included with Windows) is displayed. In that case, click Set... to
open the Language Setting dialog box and specify the language. Only text written in languages that
can be selected in the Language Setting dialog box can be extracted to Notepad.
Important
You can change which items are installed during installation from the Setup CD-ROM by
selecting Custom Install. If you choose not to install some applications with Custom Install, the
corresponding MP Navigator EX functions will be unavailable. To use those functions, install
the corresponding applications.
For Open PDF file, the application associated with the .pdf file extension by the operating
system is displayed.
Scanner Button Settings Tab
In Scanner Button Settings tab, you can specify the scan/save settings, application to start, etc. for
scanning using the Operation Panel of the machine.
Related Topic
Scanner Button Settings Tab (Save)
Page top
Scanner Button Settings Tab (Save)
Page 428 of 681 pages
Advanced Guide > Scanning > Scanning with the Bundled Application Software > MP Navigator EX Screens > Scanner
Button Settings Tab (Save)
Scanner Button Settings Tab (Save)
On the Scanner Button Settings tab, you can specify the following settings.
You can specify how to respond when scanning using the Operation Panel of the machine.
Event
Select Event
Save to PC is set.
Document Type
Auto Mode is set. The document type is automatically detected.
Important
The following types of documents cannot be scanned correctly with Auto Mode. In that case,
specify Document Type in MP Navigator EX.
See "Scanning Photos and Documents " to scan images using MP Navigator EX.
- Documents other than photos, Hagaki, business cards, magazines, newspapers, text
documents and CD/DVD
- A4 photos
- Text documents smaller than 2L (5 inches x 7 inches) (127 mm x 178 mm), such as
paperback pages with the spine cut off
- Documents printed on thin white paper
- Wide documents such as panoramic photos
Reflective CD/DVD labels may not be scanned properly.
Place documents correctly according to the type of document to be scanned. Otherwise,
documents may not be scanned correctly.
See "Placing Documents " for details on how to place documents.
Actions
Scan Settings
Document Size
This setting is automatically set.
Resolution
This setting is automatically set.
Specify...
This setting is not available for this machine.
Save Settings
Scanner Button Settings Tab (Save)
Page 429 of 681 pages
Automatically save the image to your computer after scanning it
Select this to save the images to your computer as specified after scanning them.
The File Name, Save as type and Save in settings will be displayed.
Important
If you select this function, you will not be able to set passwords for PDF files.
File Name
Enter the file name of the image to be saved (up to 32 characters).
Save as type
Select a file type to save the scanned images.
Select Auto, JPEG/Exif, TIFF or BMP. Auto is displayed by default.
Important
When Auto is selected, files are saved in the following formats according to the document
type.
Photos, Hagaki, business cards and CD/DVD: JPEG
Magazines, newspapers and text documents: PDF
You can change the file format from Set....
Images saved as PDF files may not open depending on the application. In that case,
select an option other than PDF in Save as type.
When Document Type is Auto Mode and Save as type is Auto, the file format may differ
depending on how you place the document.
See "Placing Documents " for details on how to place documents.
Large documents (such as A4 photos) that cannot be placed away from the edges/arrow of
the Platen may not be saved in the correct file format when Save as type is Auto. In that
case, select a file format suitable for the document to be scanned.
Set...
When Save as type is Auto
You can specify the file format in which to save images. Select a file format for saving Document
and Photo each.
When Save as type is JPEG/Exif
You can specify a compression type for JPEG files. Select High(Low Compression), Standard or
Low(High Compression).
Save in
Displays the folder in which to save the scanned images. To change the folder, click Browse...
to specify another one.
The following folders are specified by default.
Windows Vista: MP Navigator EX folder in Picture folder
Windows XP: MP Navigator EX folder in My Pictures folder
Windows 2000: MP Navigator EX folder in My Pictures folder
Save to a Subfolder with Current Date
Select this checkbox to create a subfolder in the folder specified in Save in with the current date
and save imported files in it. A subfolder with a name such as "2008_01_01"
(Year_Month_Date) will be created.
If this checkbox is not selected, files are saved directly in the folder specified in Save in.
Open the save dialog box after scanning the image
Select this to open the Save dialog box after scanning the images and specify the save settings
such as destination folder, file name and Exif information.
Note
See "Save Dialog Box " for details.
Page top
Appendix: Opening Files Other than Scanned Images
Page 430 of 681 pages
Advanced Guide > Scanning > Scanning with the Bundled Application Software > Appendix: Opening Files Other than
Scanned Images
Appendix: Opening Files Other than Scanned Images
You can save or print data other than scanned images using MP Navigator EX.
Using images saved on a memory card
Importing Images Saved on a Memory Card
Using images saved on a computer
Opening Images Saved on a Computer
Page top
Importing Images Saved on a Memory Card
Page 431 of 681 pages
Advanced Guide > Scanning > Scanning with the Bundled Application Software > Appendix: Opening Files Other than
Scanned Images > Importing Images Saved on a Memory Card
Importing Images Saved on a Memory Card
You can import images (including PDF files scanned with the operation pannel) saved on a memory
card, and save them to a computer or print them using MP Navigator EX. You can also attach them to email, or edit them using an application that accompanies the machine.
When saving PDF files, you can select whether to enable keyword search, and also specify the
compression type and other advanced settings.
Important
Do not remove or insert memory cards while they are being accessed or the Access Lamp of the
machine is flashing.
The machine can only detect one memory card at a time. Do not simultaneously insert multiple
memory cards.
When switching to another memory card of the same type or inserting another memory card in a
different Card Slot, make sure that the Access Lamp of the machine is not flashing, then remove the
memory card. Then, insert another memory card.
The machine's Card Slot (memory card) may become inaccessible. In that case, restart the
machine or turn it off and reconnect the USB cable.
1. Insert a memory card containing image/PDF files into the machine's Card Slot.
For details on how to insert a memory card into the machine, refer to the on-screen manual: Basic
Guide.
2. Start MP Navigator EX as follows.
Windows Vista and Windows XP:
The program selection dialog box opens. Click MP Navigator EX Ver2.0.
Note
If you want to start MP Navigator EX every time a memory card is inserted into the machine,
follow these steps.
Windows Vista:
Select the Always do this for pictures checkbox and click MP Navigator EX Ver2.0.
Windows XP:
Select MP Navigator EX Ver2.0, then select the Always do the selected action. checkbox and
click OK.
The Memory Card screen of the Scan/Import window appears, and the images and PDF files
saved on the memory card appear in the Thumbnail window.
Importing Images Saved on a Memory Card
Page 432 of 681 pages
Note
See "Memory Card Screen (Scan/Import Window) " for details on the Memory Card screen
(Scan/Import window).
Windows 2000:
Start MP Navigator EX and open the Navigation Mode screen.
Starting MP Navigator EX
Point to Scan/Import and click Memory Card. The Memory Card screen of the Scan/Import window
appears, and the images and PDF files saved on the memory card appear in the Thumbnail
window.
3. Select the checkboxes of the images and PDF files you want to import, then click
Import.
The Import dialog box opens. Specify the folder in which to save the imported files.
Save in
Importing Images Saved on a Memory Card
Page 433 of 681 pages
Displays the folder in which to save the imported images and PDF files. To change the folder,
click Browse... to specify another one.
The following folders are specified by default.
Windows Vista: MP Navigator EX folder in Picture folder
Windows XP: MP Navigator EX folder in My Pictures folder
Windows 2000: MP Navigator EX folder in My Pictures folder
Save to a Subfolder with Current Date
Select this checkbox to create a subfolder in the folder specified in Save in with the current date
and save imported files in it. A subfolder with a name such as "2008_01_01" (Year_Month_Date)
will be created.
If this checkbox is not selected, files are saved directly in the folder specified in Save in.
Change the PDF file properties
This option is displayed when the memory card contains a PDF file.
Select this checkbox to specify advanced settings for saving PDF files. Click Set... to open a
dialog box in which you can specify advanced settings. See " PDF Settings Dialog Box " for details.
4. Click Save.
The imported images and PDF files appear in the View & Use window.
See the corresponding sections below for details on using the imported images and PDF files.
Creating/Editing PDF Files
Printing Documents
Printing Photos
Sending via E-mail
Editing Files
Page top
Opening Images Saved on a Computer
Page 434 of 681 pages
Advanced Guide > Scanning > Scanning with the Bundled Application Software > Appendix: Opening Files Other than
Scanned Images > Opening Images Saved on a Computer
Opening Images Saved on a Computer
You can open images saved on a computer and print them or attach them to e-mail using MP Navigator
EX. You can also edit them using an application that accompanies the machine.
1. Start MP Navigator EX and open the Navigation Mode screen.
Starting MP Navigator EX
2. In the Navigation Mode screen, point to View & Use and click My Box (Scanned/
Imported Images), Specify Folder or Recently Saved Images.
Click My Box (Scanned/Imported Images) to open images saved in My Box (Scanned/Imported
Images), click Specify Folder to open images saved in a specific folder, or click Recently Saved
Images to open recently saved images.
Note
If the Show this window at startup checkbox is not selected, the last used screen appears. If
(View & Use) on the upper left of the screen.
the Scan/Import window is displayed, click
The View & Use window opens.
See "View & Use Images on your Computer Tab" for details on the View & Use Images on your
Computer tab.
3. Click the folder containing the images you want to open.
Images saved in the folder appear in the Thumbnail window.
Opening Images Saved on a Computer
Page 435 of 681 pages
4. Select the images you want to use, then select what you want to do with them.
See the corresponding sections below for details on using images.
Creating/Editing PDF Files
Printing Documents
Printing Photos
Sending via E-mail
Editing Files
Page top
Scanning with Other Application Software
Page 436 of 681 pages
Advanced Guide > Scanning > Scanning with Other Application Software
Scanning with Other Application Software
What Is ScanGear (Scanner Driver)?
Scanning with Advanced Settings Using ScanGear (Scanner Driver)
Correcting Images and Adjusting Colors
ScanGear (Scanner Driver) Screens
Appendix: Useful Information on Scanning
Page top
What Is ScanGear (Scanner Driver)?
Page 437 of 681 pages
Advanced Guide > Scanning > Scanning with Other Application Software > What Is ScanGear (Scanner Driver)?
What Is ScanGear (Scanner Driver)?
ScanGear (scanner driver) is software required for scanning documents. It enables you to specify the
output size and make image corrections when scanning documents.
ScanGear can be started from MP Navigator EX or from other applications that are compatible with a
standard interface called TWAIN. (ScanGear (scanner driver) is a TWAIN-compatible driver.)
What You Can Do with this Software
This software enables you to preview scan results or set document type and output size, etc. when
scanning documents. It is useful when you want to scan in a specific color tone, as it allows you to make
various corrections and adjust brightness, contrast, etc.
Screens
There are three modes: Basic Mode, Advanced Mode and Auto Scan Mode.
Switch modes by clicking a tab on the upper right of the screen.
Note
ScanGear (scanner driver) starts in the last used mode.
Settings are not retained when you switch between modes.
Basic Mode
Use Basic Mode to scan easily by following three simple on-screen steps (
,
and
).
Advanced Mode
Use Advanced Mode to select color mode, specify resolution, correct images, adjust colors, etc. when
scanning documents.
What Is ScanGear (Scanner Driver)?
Page 438 of 681 pages
Auto Scan Mode
Use Auto Scan Mode to scan easily by simply placing the document on the Platen and clicking Scan.
Page top
Scanning with Advanced Settings Using ScanGear (Scanner Driver)
Page 439 of 681 pages
Advanced Guide > Scanning > Scanning with Other Application Software > Scanning with Advanced Settings Using
ScanGear (Scanner Driver)
Scanning with Advanced Settings Using ScanGear (Scanner
Driver)
Starting ScanGear (scanner driver)
Starting ScanGear (Scanner Driver)
Scanning documents after making simple image corrections
Scanning in Basic Mode
Scanning documents after making advanced image corrections and brightness/color adjustments
Scanning in Advanced Mode
Scanning with a simple operation
Scanning in Auto Scan Mode
Scanning multiple documents at one time after making image corrections and color adjustments
Scanning Multiple Documents at One Time in Advanced Mode
Page top
Starting ScanGear (Scanner Driver)
Page 440 of 681 pages
Advanced Guide > Scanning > Scanning with Other Application Software > Scanning with Advanced Settings Using
ScanGear (Scanner Driver) > Starting ScanGear (Scanner Driver)
Starting ScanGear (Scanner Driver)
Use ScanGear (scanner driver) to make image corrections and color adjustments when scanning
documents. ScanGear (scanner driver) can be started from MP Navigator EX or an application.
Follow these steps to start ScanGear (scanner driver).
Starting from MP Navigator EX
Navigation Mode Screen
Follow these steps to start ScanGear (scanner driver) from the Navigation Mode screen of MP Navigator
EX.
1. Start MP Navigator EX and open the Navigation Mode screen.
Starting MP Navigator EX
2. Point to Scan/Import and click Photos/Documents (Platen).
The Scan/Import window opens.
3. Select the Use the scanner driver checkbox, then click Open Scanner Driver.
The ScanGear (scanner driver) screen appears.
One-click Mode Screen
Follow these steps to start ScanGear (scanner driver) from the One-click Mode screen of MP Navigator
EX.
1. Start MP Navigator EX and open the One-click Mode screen.
Starting MP Navigator EX
2. Click the corresponding icon.
The corresponding dialog box opens.
3. Select the Use the scanner driver checkbox in Scan Settings, then click Scan.
Starting ScanGear (Scanner Driver)
Page 441 of 681 pages
The ScanGear (scanner driver) screen appears.
Important
Use the scanner driver is not displayed in the PDF dialog box.
Starting from an Application
Follow these steps (example) to start ScanGear (scanner driver) from an application.
The procedure varies depending on the application. For details, refer to the application's manual.
1. Start the application.
2. On the File menu of the application, select Select Source and select the machine.
3. Select the command to scan a document (Scan/Import, Acquire image, etc.).
The ScanGear (scanner driver) screen appears.
Page top
Scanning in Basic Mode
Page 442 of 681 pages
Advanced Guide > Scanning > Scanning with Other Application Software > Scanning with Advanced Settings Using
ScanGear (Scanner Driver) > Scanning in Basic Mode
Scanning in Basic Mode
In Basic Mode, you can scan easily by following the on-screen steps.
1. Place the document on the Platen, then start ScanGear (scanner driver).
Starting ScanGear (Scanner Driver)
Important
Place the document face-down and align correctly with the arrow/marks on the Platen.
2. Set Select Source according to the document placed on the Platen.
Note
To scan magazines containing many color photos, scan in Advanced Mode with Color Mode
set to Color and Descreen set to ON.
Scanning in Advanced Mode
3. Click Preview.
Preview image appears in the Preview area.
Scanning in Basic Mode
Page 443 of 681 pages
Note
If you scan without preview, colors are adjusted based on the document type selected in Select
Source.
4. Set Destination.
Note
To scan at 301 dpi or higher, scan in Advanced Mode.
Scanning in Advanced Mode
5. Set Output Size.
Output size options vary by the items selected in Select Source and Destination.
6. Adjust the scan area (cropping frame) as required.
Adjust the size and position of the scan area (cropping frame) on the preview image. You can also
create two or more cropping frames.
If an area is not specified, the document will be scanned at the document size (Auto Crop). If an area
is specified, only the portion in the specified area will be scanned.
Adjusting Cropping Frames
7. Set Image corrections as required.
8. Click Scan.
Scanning starts.
Note
ScanGear's response after scanning can be specified in Status of ScanGear dialog after
scanning on the Scan tab of the Preferences dialog box.
Scan Tab
Note
See "Basic Mode Tab " for details on the Basic Mode tab.
Page top
Scanning in Advanced Mode
Page 444 of 681 pages
Advanced Guide > Scanning > Scanning with Other Application Software > Scanning with Advanced Settings Using
ScanGear (Scanner Driver) > Scanning in Advanced Mode
Scanning in Advanced Mode
In Advanced Mode, you can specify the color mode, output resolution, image brightness, color tone, etc.
when scanning documents.
1. Place the document on the Platen, then start ScanGear (scanner driver).
Starting ScanGear (Scanner Driver)
Important
Place the document face-down and align correctly with the arrow/marks on the Platen.
2. Click Advanced Mode.
The Advanced Mode tab appears.
Note
Settings are not retained when you switch between modes.
3. Set Paper Size and Color Mode.
Note
See "Input Settings " for details on Paper Size and Color Mode.
4. Click Preview.
Preview image appears in the Preview area.
Scanning in Advanced Mode
Page 445 of 681 pages
Note
If you scan without preview, the show-through prevention function will be active. This function is
useful when scanning magazines. However, when scanning photos, the color tone of the
scanned image may differ from the source due to the show-through prevention function. In that
case, use preview first.
5. Set Output Settings.
Output Settings
6. Adjust the cropping frame, correct images and adjust colors as required.
Note
See the corresponding sections below for details on Image Settings and the Color Adjustment
Buttons.
Image Settings
Color Adjustment Buttons
See "Adjusting Cropping Frames " for details on cropping frames.
7. Click Scan.
Scanning starts.
Note
ScanGear's response after scanning can be specified in Status of ScanGear dialog after
scanning on the Scan tab of the Preferences dialog box.
Scan Tab
Note
See "Advanced Mode Tab " for details on the Advanced Mode tab.
Page top
Scanning in Auto Scan Mode
Page 446 of 681 pages
Advanced Guide > Scanning > Scanning with Other Application Software > Scanning with Advanced Settings Using
ScanGear (Scanner Driver) > Scanning in Auto Scan Mode
Scanning in Auto Scan Mode
You can scan easily in Auto Scan Mode of ScanGear (scanner driver) by letting it automatically determine
the type of document placed on the Platen.
Note
Supported document types are photos, Hagaki, business cards, magazines, newspapers, text
documents and CD/DVD. To scan other documents, specify the document type on the Basic Mode
tab or the Advanced Mode tab.
Scanning in Basic Mode
Scanning in Advanced Mode
See "Auto Scan Mode Tab " for details on the Auto Scan Mode tab.
1. Place the document on the Platen, then start ScanGear (scanner driver).
Placing Documents
Starting ScanGear (Scanner Driver)
2. Click Auto Scan Mode.
The Auto Scan Mode tab appears.
3. Click Scan.
Scanning starts.
Note
ScanGear's response after scanning can be specified in Status of ScanGear dialog after
scanning on the Scan tab of the Preferences dialog box.
Scan Tab
Page top
Scanning Multiple Documents at One Time in Advanced Mode
Page 447 of 681 pages
Advanced Guide > Scanning > Scanning with Other Application Software > Scanning with Advanced Settings Using
ScanGear (Scanner Driver) > Scanning Multiple Documents at One Time in Advanced Mode
Scanning Multiple Documents at One Time in Advanced Mode
You can scan two or more photos (small documents) on the Platen at one time by using Multi-Crop in
Advanced Mode of ScanGear (scanner driver).
Important
The following types of documents cannot be cropped correctly.
- Documents smaller than 1.18 inches (3 cm) square
- Photos that have been cut to various shapes
The following types of documents may not be cropped correctly. In that case, start ScanGear
(scanner driver), then adjust the cropping frame in Advanced Mode tab and scan again.
- Photos that have a whitish border
- Documents printed on white paper, hand-written text, business cards, etc.
- Thin documents
- Thick documents
Scanning in Advanced Mode
1. Place the document on the Platen, then start ScanGear (scanner driver).
Placing Documents
Starting ScanGear (Scanner Driver)
2. Click Advanced Mode.
The Advanced Mode tab appears.
3. Click Preview.
Preview image appears in the Preview area.
4. Click Multi-Crop above the Preview area.
Scanning Multiple Documents at One Time in Advanced Mode
Page 448 of 681 pages
Each image is cropped (scan area is specified) automatically according to the document size.
If you do not want to scan one, select the image and press the Delete key. Alternatively, select the
image and click
(Remove Cropping Frame) on the Toolbar.
Note
When you click Multi-Crop, Multi-Crop changes to Reset.
Click Reset to cancel Multi Crop.
Cancel Multi Crop to create custom cropping frames.
Adjusting Cropping Frames
5. Set Color Mode, Output Resolution, etc. as required.
Note
See "Input Settings " for details on the Color Mode.
See "Output Settings" for details on the Output Resolution.
The settings are applied to all cropping frames.
6. Make image corrections as required.
Scanning Multiple Documents at One Time in Advanced Mode
Page 449 of 681 pages
Note
See "Image Settings " for details on each function.
The settings are applied to all cropping frames.
7. Click Scan.
Each cropping frame is scanned as an individual image.
Note
ScanGear's response after scanning can be specified in Status of ScanGear dialog after
scanning on the Scan tab of the Preferences dialog box.
Scan Tab
Page top
Correcting Images and Adjusting Colors
Page 450 of 681 pages
Advanced Guide > Scanning > Scanning with Other Application Software > Correcting Images and Adjusting Colors
Correcting Images and Adjusting Colors
The following sections provide you with tips and know-how on advanced scanning techniques involving
color/brightness adjustment, etc.
Sharpening out-of-focus photos, reducing dust and scratches, and correcting faded colors
Correcting Images (Unsharp Mask, Reduce Dust and Scratches, Fading Correction, etc.)
Previewing and changing the color tone of the entire image to scan
Adjusting Colors Using a Color Pattern
Brightening colors that have faded with time or due to colorcast
Adjusting Saturation and Color Balance
Adjusting images that are too dark or bright, or too flat due to lack of contrast
Adjusting Brightness and Contrast
Adjusting the color tone using histogram (a graph showing brightness distribution)
Adjusting Histogram
Adjusting the image brightness using tone curve (a graph of brightness balance)
Adjusting Tone Curve
Sharpening characters in text documents or reducing show-through effects
Setting Threshold
Page top
Correcting Images (Unsharp Mask, Reduce Dust and Scratches, Fading Co... Page 451 of 681 pages
Advanced Guide > Scanning > Scanning with Other Application Software > Correcting Images and Adjusting Colors >
Correcting Images (Unsharp Mask, Reduce Dust and Scratches, Fading Correction, etc.)
Correcting Images (Unsharp Mask, Reduce Dust and
Scratches, Fading Correction, etc.)
The Image Settings functions in Advanced Mode of ScanGear (scanner driver) allow you to enhance the
outline of the subjects, reduce dust/scratches and correct faded colors when scanning images.
Setting Items
Click
of a function and select an item from the pull-down menu.
Important
Do not apply these functions to images without moire, dust/scratches or faded colors. The color
tone may be adversely affected.
See the section below for details and precautions on each function.
Image Settings
Note
See the section below to start ScanGear (scanner driver) in Advanced Mode and scan.
Scanning in Advanced Mode
Adjusting the image brightness and color tone
Set Auto Tone to ON.
OFF
ON
Correcting Images (Unsharp Mask, Reduce Dust and Scratches, Fading Co... Page 452 of 681 pages
Sharpening slightly out-of-focus images
Set Unsharp Mask to ON.
OFF
ON
Reducing gradations and stripe patterns
Set Descreen to ON.
OFF
ON
Note
Moire is an uneven gradation or stripe pattern that appears in parts of a scanned image where the
dots have interfered with each other. Descreen is the function for reducing this moire effect.
Reducing dust and scratches
Set Reduce Dust and Scratches to Low, Medium or High according to the degree of dust and scratches.
Medium
None
Correcting photos that have faded with time or due to colorcast
Set Fading Correction to Low, Medium or High according to the degree of fading or colorcast.
None
Medium
Correcting Images (Unsharp Mask, Reduce Dust and Scratches, Fading Co... Page 453 of 681 pages
Reducing graininess
Set Grain Correction to Low, Medium or High according to the degree of graininess.
None
Medium
Correcting backlit images
Set Backlight Correction to Low, Medium or High according to the degree of backlight.
None
Medium
Correcting shadows that appear between pages when scanning open booklets
Set Gutter Shadow Correction to Low, Medium or High according to the degree of shadows.
None
Medium
Page top
Adjusting Colors Using a Color Pattern
Page 454 of 681 pages
Advanced Guide > Scanning > Scanning with Other Application Software > Correcting Images and Adjusting Colors >
Adjusting Colors Using a Color Pattern
Adjusting Colors Using a Color Pattern
You can preview color changes and reproduce natural colors by using the Color Pattern function in
ScanGear's Basic Mode.
Color Adjustment
Correct colors that have faded with time or due to colorcast. Colorcast is a phenomenon where a specific
color affects the entire picture due to the weather or ambient strong colors.
Click an arrow in Color Adjustment to emphasize the corresponding color.
Cyan & red, magenta & green and yellow & blue are complementary color pairs (each pair produces a
shade of gray when mixed). You can reproduce the natural colors of the scene by reducing the cast color
and increasing the complementary color.
It is recommended that you find a portion in the image where it should be white, and adjust the colors so
that the portion turns white.
Preview image appears in the center. Preview image colors change as you adjust them.
Adjusting Colors Using a Color Pattern
Page 455 of 681 pages
Below is an example of correcting a bluish image.
Since Blue and Green are too strong, click the Yellow and Magenta arrows to correct.
Before
After
Note
Color adjustments are applied only to the scan area (cropping frame) specified in the Preview area.
You can also select a color tone from the color pattern displayed on the left of the Color Pattern
screen.
You can also use this function to add a specific tint to an image. Increase the magenta to add a
warm tint, and increase the blue to add a cool tint.
Page top
Adjusting Saturation and Color Balance
Page 456 of 681 pages
Advanced Guide > Scanning > Scanning with Other Application Software > Correcting Images and Adjusting Colors >
Adjusting Saturation and Color Balance
Adjusting Saturation and Color Balance
In ScanGear's Advanced Mode, click
(Saturation/Color Balance).
Saturation
Adjust the image's saturation (vividness). You can brighten colors that have faded with time, etc.
Move
(slider) under Saturation to the left to reduce the saturation (darken the image), and to the right
to increase the saturation (brighten the image). You can also enter a value (-127 to 127).
Saturation decreased
Original image
Saturation increased
Note
The natural color tone of the original image may be lost if you increase saturation too much.
Color Balance
Adjust images that have a colorcast. Colorcast is a phenomenon where a specific color affects the entire
picture due to the weather or ambient strong colors.
Move
(slider) under each color pair to the left or right to emphasize the corresponding color.
Cyan & Red
Magenta & Green
Yellow & Blue
These are complementary color pairs (each pair produces a shade of gray when mixed). You can
reproduce the natural colors of the scene by reducing the cast color and increasing the complementary
color.
Adjusting Saturation and Color Balance
Page 457 of 681 pages
It is usually difficult to correct the image completely by adjusting only one color pair. It is recommended
that you find a portion in the image where it should be white, and adjust all three color pairs so that the
portion turns white.
You can also enter a value (-127 to 127).
Below is an example of an image in which the Cyan & Red pair has been adjusted.
Cyan is increased
Red is increased
Note
Click Defaults to reset all adjustments in the current window.
Page top
Adjusting Brightness and Contrast
Page 458 of 681 pages
Advanced Guide > Scanning > Scanning with Other Application Software > Correcting Images and Adjusting Colors >
Adjusting Brightness and Contrast
Adjusting Brightness and Contrast
In ScanGear's Advanced Mode, click
(Brightness/Contrast).
Note
Click
to switch to detailed view. Click
to return to the previous view.
Channel
Each dot of an image is a mixture of Red, Green and Blue in various proportions (gradation). These
colors can be adjusted individually as a "channel."
Master
Adjust the Red, Green and Blue combined.
Red
Adjust the Red channel.
Green
Adjust the Green channel.
Blue
Adjust the Blue channel.
Note
Only Grayscale will be displayed in Channel when Color Mode is Grayscale.
Brightness
Adjust the image brightness. Move
(slider) under Brightness to the left to darken and right to brighten
the image. You can also enter a value (-127 to 127).
Adjusting Brightness and Contrast
Darkened
Original image
Page 459 of 681 pages
Brightened
Note
Highlights may be lost if you brighten the image too much, and shadows may be lost if you darken
the image too much.
Contrast
Contrast is the degree of difference between the brighter and darker parts of an image. Increasing
contrast will increase the difference, thus sharpening the image. Decreasing contrast will decrease the
difference, thus softening the image.
Move
(slider) under Contrast to the left to decrease and right to increase the contrast of the image.
You can also enter a value (-127 to 127).
Decreased contrast
Original image
Increased contrast
Note
Increasing the contrast is effective in adding a three-dimensional feel to soft images. However,
shadows and highlights may be lost if you increase the contrast too much.
Note
Click Defaults to reset all adjustments in the current window.
Page top
Adjusting Histogram
Page 460 of 681 pages
Advanced Guide > Scanning > Scanning with Other Application Software > Correcting Images and Adjusting Colors >
Adjusting Histogram
Adjusting Histogram
In ScanGear's Advanced Mode, click
(Histogram).
Channel
Each dot of an image is a mixture of Red, Green and Blue in various proportions (gradation). These
colors can be adjusted individually as a "channel."
Master
Adjust the Red, Green and Blue combined.
Red
Adjust the Red channel.
Green
Adjust the Green channel.
Blue
Adjust the Blue channel.
Note
Only Grayscale will be displayed in Channel when Color Mode is Grayscale.
Reading Histograms
You can open Histogram of a specified area for each Channel. The higher the Histogram peak, the more
data is distributed to that level.
(1) Bright area
(2) Dark area
(3) Whole image
Adjusting Histogram
Page 461 of 681 pages
More data is distributed to the
highlight side.
More data is distributed to the
shadow side.
Data is widely distributed between the
highlight and shadow.
Adjusting Histograms (Using the Slider)
Select a Channel, then move
set as the shadow or highlight.
- All parts to the left of
- The parts at
(Black-point Slider) or
(White-point Slider) to specify the level to be
(Black-point Slider) will be black (level 0).
(Mid-point Slider) will turn to the color exactly between the black-point and white-point.
- All parts to the right of
(White-point Slider) will turn white (level 255).
Auto Tone is set to ON by default. Adjustments shown below are automatically performed.
Moving the Black-point and White-point Sliders
Move the Black-point Slider or White-point Slider to adjust brightness.
Images with more data distributed to the highlight side
Move the Black-point Slider toward the highlight side.
Images with more data distributed to the shadow side
Move the White-point Slider toward the shadow side.
Images with widely distributed data
Move the Black-point Slider toward the highlight side, and White-point Slider toward the shadow side.
Moving the Mid-point Slider
Move the Mid-point Slider to specify the level to be set as the middle of the tonal range.
Images with more data distributed to the highlight side
Adjusting Histogram
Page 462 of 681 pages
Move the Mid-point Slider toward the highlight side.
Images with more data distributed to the shadow side
Move the Mid-point Slider toward the shadow side.
Adjusting Histograms (Using the Droppers)
When you select a Channel and click the Black-point, Mid-point or White-point Dropper, the mouse
pointer on the preview image changes to a dropper. Click a Dropper displayed below the histogram to
change the setting.
- The point clicked with
to 245).
(Black-point Dropper) will be the darkest point. You can also enter a value (0
- The point clicked with
a value (5 to 250).
(Mid-point Dropper) will be the middle of the tonal range. You can also enter
- The point clicked with
(10 to 255).
(White-point Dropper) will be the brightest point. You can also enter a value
- Click
for Gray Balance and click the area you want to adjust the color in the preview image.
The clicked point will be set as the achromatic color reference, and the rest of the image is adjusted
accordingly. For instance, if snow in a photo appears bluish, click the bluish part to adjust the whole
image and reproduce natural colors.
Note
Click Defaults to reset all adjustments in the current window.
Page top
Adjusting Tone Curve
Page 463 of 681 pages
Advanced Guide > Scanning > Scanning with Other Application Software > Correcting Images and Adjusting Colors >
Adjusting Tone Curve
Adjusting Tone Curve
In ScanGear's Advanced Mode, click
(Tone Curve Settings).
Channel
Each dot of an image is a mixture of Red, Green and Blue in various proportions (gradation). These
colors can be adjusted individually as a "channel."
Master
Adjust the Red, Green and Blue combined.
Red
Adjust the Red channel.
Green
Adjust the Green channel.
Blue
Adjust the Blue channel.
Note
Only Grayscale will be displayed in Channel when Color Mode is Grayscale.
Reading Tone Curves
With ScanGear (scanner driver), scanning images via a scanner is the input, and displaying to a monitor
is the output. Tone Curve shows the balance of tone input and output for each Channel.
Adjusting Tone Curve
Page 464 of 681 pages
Adjusting Tone Curve
In Select Tone Curve, select a tone curve from No correction, Overexposure, Underexposure, High
contrast, Reverse the negative/positive image and Edit custom curve.
No correction (No adjustment)
Overexposure (Convex curve)
The midtone data of the input side is stretched toward the highlight of the output side, resulting in a
bright-toned image when viewed on a monitor.
Underexposure (Convex curve)
The midtone data of the input side is stretched toward the shadow of the output side, resulting in a darktoned image when viewed on a monitor.
High contrast (S curve)
The highlight and shadow of the input side are enhanced, resulting in a high-contrast image.
Reverse the negative/positive image (Downward-sloping line)
The input and output sides are reversed, resulting in a negative-positive inverted image.
Edit custom curve
You can drag specific points on the Tone Curve to freely adjust the brightness of the corresponding
areas.
Note
Click Defaults to reset all adjustments in the current window.
Page top
Setting Threshold
Page 465 of 681 pages
Advanced Guide > Scanning > Scanning with Other Application Software > Correcting Images and Adjusting Colors >
Setting Threshold
Setting Threshold
The brightness of color and grayscale images is expressed in a value between 0 and 255. However, in
creating black and white images, all colors are mapped to either black (0) or white (255). Threshold is
the borderline value that determines a color as black or white. By adjusting the threshold level, you can
sharpen text in a document or reduce show-through in newspapers.
This function is available when Color Mode is Black and White.
In ScanGear's Advanced Mode, click
(Threshold).
Adjusting Threshold
Move
(slider) to the right to increase the threshold value and thus increase the black areas. Move the
slider to the left to decrease the value and thus increase the white areas. You can also enter a value (0 to
255).
Note
Click Defaults to reset all adjustments in the current window.
Page top
ScanGear (Scanner Driver) Screens
Page 466 of 681 pages
Advanced Guide > Scanning > Scanning with Other Application Software > ScanGear (Scanner Driver) Screens
ScanGear (Scanner Driver) Screens
The following sections describe ScanGear's screens and functions, and how to use ScanGear (scanner
driver).
Basic Mode Tab
Advanced Mode Tab
Input Settings
Output Settings
Image Settings
Color Adjustment Buttons
Auto Scan Mode Tab
Preferences Dialog Box
Scanner Tab
Preview Tab
Scan Tab
Color Settings Tab
Page top
Basic Mode Tab
Page 467 of 681 pages
Advanced Guide > Scanning > Scanning with Other Application Software > ScanGear (Scanner Driver) Screens >
Basic Mode Tab
Basic Mode Tab
This mode allows you to scan easily by following the on-screen steps.
This section describes the settings and functions available in Basic Mode.
The displayed items vary by document type and how the screen was appeared.
(1) Settings and Operation Buttons
(2) Toolbar
(3) Preview Area
Settings and Operation Buttons
Select Source
Photo(Color)
Scan color photos.
Magazine(Color)
Scan color magazines.
Newspaper(Grayscale)
Scan text and line drawings in black and white.
Document(Grayscale)
Scan photos and documents in black and white.
Select this mode to create high-resolution black and white images.
Note
If you select an option other than Newspaper(Grayscale), the Unsharp Mask function will be
active.
If you select Photo(Color), Magazine(Color) or Document(Grayscale), the Auto Tone function will
be active. However, if you disable Always Execute the Auto Tone on the Color Settings tab of the
Preferences dialog box, the Auto Tone function will be disabled.
If you select Magazine(Color), the Descreen function will be active.
Display Preview Image
Click Preview to perform a trial scan. The scanned document appears in the Preview area. A
cropping frame (scan area) is displayed according to the document size.
Basic Mode Tab
Page 468 of 681 pages
Note
If you scan without preview, colors are adjusted based on the document type selected in Select
Source.
When using the machine for the first time, scanner calibration starts automatically. Wait a while
until the preview image appears.
Destination
Select what you want to do with the scanned image.
Print (300 dpi)
Select this to print the scanned image on a printer.
Image display (150 dpi)
Select this to view the scanned image on a monitor.
OCR (300 dpi)
Select this to use the scanned image with OCR software.
OCR software is software that converts text scanned as an image into text data that can be
edited in word processors and other programs.
Note
To scan at 301 dpi or higher, scan in Advanced Mode after setting the Output Resolution.
See "Scanning in Advanced Mode " to scan in Advanced Mode.
Output Size
Select an output size.
Output size options vary by the item selected in Destination.
Flexible
When a cropping frame is displayed, the portion within the cropping frame will be scanned at
100%. When no cropping frame is displayed, the entire Preview area will be scanned.
Paper Size (L, A4, etc.)
Select an output paper size. The portion within the cropping frame will be scanned at the size of
the selected paper size. You can drag the cropping frame to enlarge/reduce it while maintaining
the aspect ratio.
Monitor Size (1024 x 768 pixels, etc.)
Select an output size in pixels.
A cropping frame of the selected monitor size will be displayed and the portion within the
cropping frame will be scanned. You can drag the cropping frame to enlarge/reduce it while
maintaining the aspect ratio.
Add/Delete...
Open the Add/Delete the Output Size dialog box, in which you can save custom output sizes. You
can select this option when Destination is Print (300 dpi) or Image display (150 dpi).
Basic Mode Tab
Page 469 of 681 pages
In the Add/Delete the Output Size dialog box, you can specify multiple output sizes and save
them at one time. Saved items appear in the Output Size list along with the predefined items.
Add
To add a size, enter Output Size Name, Width and Height, then click Add. For Unit, you can
select mm or inches when Destination is Print (300 dpi) but you can only select pixels when
Destination is Image display (150 dpi). The name of the added size appears in Output Size List.
Click Save to save the items listed in Output Size List.
Delete
To delete an item, select it in Output Size List and click Delete. Click Save to save the items
listed in Output Size List.
Important
You cannot delete predefined output sizes such as A4 and 1024 x 768 pixels.
Note
Save up to 10 output sizes to Output Size List.
An error message appears when you enter a value outside the setting range. Enter a value
within the setting range.
Note
Whether or how the cropping frame is initially displayed on a preview image can be specified
on the Preview tab of the Preferences dialog box. See Cropping Frame on Previewed Images in
"Preview Tab ."
Invert aspect ratio
This button is available when Output Size is set to anything but Flexible.
Click this button to rotate the cropping frame. Click again to return it to the original orientation.
Adjust cropping frames
You can adjust the scan area within the Preview area.
If an area is not specified, the document will be scanned at the document size (Auto Crop). If an area
is specified, only the portion in the cropping frame will be scanned.
Note
See "Adjusting Cropping Frames " for details on cropping frames.
Image corrections
Fading correction
Corrects and scans photos that have faded with time or have a colorcast.
Basic Mode Tab
Page 470 of 681 pages
Backlight correction
Corrects photos that have been shot against light.
Gutter shadow correction
Corrects shadows that appear between pages when scanning open booklets.
Important
For precautions on using this function, see Gutter Shadow Correction in " Image Settings
" (Advanced Mode tab).
Color Pattern...
Allows you to adjust the image's overall color. You can correct colors that have faded due to
colorcast, etc. and reproduce natural colors while previewing color changes.
Note
See "Adjusting Colors Using a Color Pattern " for details.
Perform Scan
Click Scan to start scanning.
Note
When scanning starts, the progress will be displayed. Click Cancel to cancel the scan.
Preferences...
The Preferences dialog box opens and you can make scan/preview settings.
See "Preferences Dialog Box " for details.
Close
Close ScanGear (scanner driver).
Toolbar
Toolbar
You can rotate preview images using the Toolbar.
(Auto Crop)
Displays and adjusts the cropping frame automatically to the size of the document displayed in
the Preview area. The scan area is reduced every time you click this button if there are cropping
area within the cropping frame.
(Remove Cropping Frame)
Removes the selected cropping frame.
(Rotate Left)
Rotates the preview image 90 degrees counter-clockwise.
- The result will be reflected in the scanned image.
- The image returns to its original state when you preview again.
(Rotate Right)
Rotates the preview image 90 degrees clockwise.
- The result will be reflected in the scanned image.
- The image returns to its original state when you preview again.
(Information)
Displays the version of ScanGear (scanner driver) and the current settings.
(Open Guide)
Open this guide.
Preview Area
Basic Mode Tab
Page 471 of 681 pages
Preview Area
This is where a trial image is displayed after you click Preview.
You can specify the scan area (cropping frame) on the displayed image.
You can also create two or more cropping frames.
Note
See "Adjusting Cropping Frames " for details on cropping frames.
Related Topic
Scanning in Basic Mode
Page top
Advanced Mode Tab
Page 472 of 681 pages
Advanced Guide > Scanning > Scanning with Other Application Software > ScanGear (Scanner Driver) Screens >
Advanced Mode Tab
Advanced Mode Tab
This mode allows you to make advanced scan settings such as the color mode, resolution, image
brightness and color tone.
This section describes the settings and functions available in Advanced Mode.
The displayed items vary by document type and how the screen was appeared.
(1) Settings and Operation Buttons
(2) Toolbar
(3) Preview Area
Settings and Operation Buttons
Favorite Settings
You can name and save a group of settings (Input Settings, Output Settings, Image Settings and
Color Adjustment Buttons), and load it as required. It is convenient to save a group of settings if you
will be using it repeatedly. You can also use this to reload the default settings.
Select Add/Delete... from the pull-down menu and the Add/Delete Favorite Settings dialog box
opens.
Enter Setting Name and click Add. The name appears in Favorite Settings List.
When you click Save, the item appears in the Favorite Settings list along with the predefined items.
Advanced Mode Tab
Page 473 of 681 pages
Important
You can set Add/Delete... in Favorite Settings after preview.
Note
Save up to 10 items to Favorite Settings List. To delete an item, select it in Favorite Settings List
and click Delete. Click Save to save settings displayed in Favorite Settings List.
Input Settings
Specify the input settings such as the document type and size.
Input Settings
Output Settings
Specify the output settings such as the output resolution and size.
Output Settings
Image Settings
Enable/disable various image correction functions.
Image Settings
Color Adjustment Buttons
These buttons can be used to make fine corrections to the image brightness and color tones. You
can adjust the image's overall brightness or contrast, and adjust its highlight and shadow values
(histogram) or balance (tone curve).
Color Adjustment Buttons
Zoom
Rescans the portion within the cropping frame at higher magnification. When the image is zoomed
in, Zoom changes to Undo. Click Undo to return the display to its non-magnified state.
Note
Zoom rescans the image and displays high-resolution image in Preview.
(Enlarge/Reduce) on the Toolbar zooms in on the preview image quickly. However, the
resolution of the displayed image will be low.
Preview
Perform a trial scan.
Scan
Start scanning.
Advanced Mode Tab
Page 474 of 681 pages
Note
When scanning starts, the progress will be displayed. Click Cancel to cancel the scan.
When scanning is completed, a dialog box prompting you to select the next action may open.
Follow the prompt to complete. For details, see Status of ScanGear dialog after scanning in "
Scan Tab" (Preferences dialog box).
If the total size of the images to be scanned exceeds 100 MB, a message appears warning you
that scanning may take time. Click OK to continue, or Cancel to cancel the scan.
Preferences...
The Preferences dialog box opens and you can make scan/preview settings.
See "Preferences Dialog Box " for details.
Close
Close ScanGear (scanner driver).
Toolbar
Toolbar
With the Advanced Mode Toolbar, you can make adjustments to the preview image and also select a
part of the displayed image.
(Clear)
Click this button to delete the preview image.
It also resets the Toolbar and color adjustment settings.
(Crop)
Allows you to specify the scan area by dragging the mouse.
(Move Image)
If an enlarged image is too large to fit in the Preview area, you can click this button and drag the
image across the screen until the part you want to see is displayed. You can also move the
image using the scroll bars.
(Enlarge/Reduce)
Click this button then click on the image to enlarge it (zoom in). Right-click on the image to
reduce it (zoom out).
(Rotate Left)
Rotates the preview image 90 degrees counter-clockwise.
- The result will be reflected in the scanned image.
- The image returns to its original state when you preview again.
(Rotate Right)
Rotates the preview image 90 degrees clockwise.
- The result will be reflected in the scanned image.
- The image returns to its original state when you preview again.
(Information)
Displays the version of ScanGear (scanner driver) and the current settings.
(Open Guide)
Open this guide.
(Auto Crop)
Displays and adjusts the cropping frame automatically to the size of the document displayed in
the Preview area. The scan area is reduced every time you click this button if there are cropping
area within the cropping frame.
(Remove Cropping Frame)
Removes the selected cropping frame.
Advanced Mode Tab
Page 475 of 681 pages
Select All Crops
This button is available when there are two or more cropping frames.
All cropping frames will be displayed in thick broken lines. The settings will be applied to all the
cropping frames.
Multi-Crop
Automatically detects and crops multiple documents placed on the Platen.
You can remove the cropping frames of the images you do not want to scan.
Note
See "Scanning Multiple Documents at One Time in Advanced Mode " to scan multiple
documents at one time.
Preview Area
Preview Area
This is where a trial image is displayed after you click Preview.
You can specify the scan area (cropping frame) on the displayed image.
You can also create two or more cropping frames.
Note
See "Adjusting Cropping Frames " for details on cropping frames.
Related Topic
Scanning in Advanced Mode
Page top
Input Settings
Page 476 of 681 pages
Advanced Guide > Scanning > Scanning with Other Application Software > ScanGear (Scanner Driver) Screens > Input
Settings
Input Settings
Input Settings allows you to set the following items:
Select Source
The type of document to be scanned is displayed.
Paper Size
Select the size of the document to be scanned.
When you select a size, the Preview area size changes accordingly.
Important
Some applications have a limit to the amount of scan data they can receive. ScanGear (scanner
driver) can scan data that is of:
- 21000 pixels x 30000 pixels or less
If you change Paper Size after previewing, the preview image will be deleted.
Note
If you are not sure which size you should select for Paper Size, set Paper Size to Full Platen, then
measure the size of the document and enter the values into
(Width) and
(Height).
Color Mode
Select how to scan the document.
Color
Select this mode to scan color documents or to create color images. This mode renders the
image in 256 levels (8 bit) of R(ed), G(reen), and B(lue).
Grayscale
Select this mode to scan black and white photos, or to create black and white images. This mode
renders the image in 256 levels (8 bit) of black and white.
Black and White
Select this mode to scan photos and other documents in black and white. This mode renders the
image in black and white. The contrast in the image is divided at certain levels (threshold level)
Input Settings
Page 477 of 681 pages
into black and white and is rendered in two colors. The threshold level can be set with
(Threshold).
Input Size
The Paper Size is displayed before preview. After preview, the cropping frame size is displayed.
You can adjust the cropping frame (scan area) size by entering the values into
(Height).
(Keep Aspect Ratio) and change it to
Click
specify the cropping frame size.
(Width) and
(Locked) to maintain the aspect ratio when you
Important
Input size settings are available only when Output Size in Output Settings is Flexible. If you select
a size other than Flexible, a cropping frame calculated from Output Size and Output Resolution is
displayed, and its aspect ratio is fixed.
Note
The values you can enter will be within the range of the selected document size. The minimum
size is 96 pixels x 96 pixels when Output Resolution is 600 dpi and Enlarge/Reduce is 100%.
When Auto Crop is performed, the aspect ratio will not be maintained since the size will be
prioritized.
See "Adjusting Cropping Frames " for details on cropping frames.
Page top
Output Settings
Page 478 of 681 pages
Advanced Guide > Scanning > Scanning with Other Application Software > ScanGear (Scanner Driver) Screens >
Output Settings
Output Settings
Output Settings allows you to set the following items:
Output Resolution
Select the resolution to scan at.
The higher the resolution (value), the more detail in your image.
Select a resolution from the options displayed by clicking the button, or enter a value within the range
of 25 dpi to 19200 dpi (in 1 dpi increments).
Note
See "Resolution" for details.
Output Size
Select an output size.
Select Flexible to set custom sizes or select a size for printing or displaying. Select Add/Delete... to set
custom size and save it as a new output size option.
Flexible
You can specify the output resolution and scale, and adjust the cropping frame. When no cropping
frame is displayed, the entire Preview area will be scanned. When a cropping frame is displayed,
the portion within the cropping frame will be scanned.
(Width) and
To enlarge/reduce the scanned image, enter values into
(Height) in Output
Settings or specify a value (by 1%) for %. The maximum value available for % depends on the
Output Resolution. % can be specified for up to 19200 dpi (the maximum available output
resolution).
Paper Size (L, etc.) & Monitor Size (1024 x 768 pixels, etc.)
Width, height and scale cannot be specified. The preview image will be cropped according to the
selected output size and resolution. The portion within the cropping frame will be scanned at the
size of the selected paper/monitor size. You can drag the cropping frame to enlarge, reduce or
move it while maintaining the aspect ratio.
Add/Delete...
Open the Add/Delete the Output Size dialog box, in which you can save/delete custom output
sizes.
Output Settings
Page 479 of 681 pages
In the Add/Delete the Output Size dialog box, you can specify multiple output sizes and save them
at one time. Saved items appear in the Output Size list along with the predefined items.
Add
To add a size, select Print or Image display for Destination, then enter Output Size Name, Width,
and Height then click Add. The name of the added size appears in Output Size List.
Click Save to save all the added items. Click Cancel to cancel all items that were added after you
opened the Add/Delete the Output Size dialog box.
Delete
To delete an item, select it in Output Size List and click Delete. The deleted items will disappear
from Output Size List.
When you click Save, the items that disappeared from Output Size List will be deleted. When you
click Cancel, they will not be deleted.
Important
You cannot delete predefined output sizes such as A4 and 1024 x 768 pixels.
Note
Save up to 10 output sizes to Output Size List for each destination.
An error message appears when you enter a value outside the setting range. Enter a value
within the range displayed in the message.
Unit varies by Destination. For Print, select mm or inches. For Image display, the unit is
pixels.
Note
See "Adjusting Cropping Frames " for details on cropping frames.
Whether or how the cropping frame is initially displayed on a preview image can be specified on
the Preview tab of the Preferences dialog box. See Cropping Frame on Previewed Images in "
Preview Tab ."
(Switch Aspect Ratio)
Rotate the cropping frame 90 degrees. Click again to return it to the original orientation.
Data Size
An image file is created when the preview image is scanned. Its size when saved in BMP format is
displayed.
When the file size is 100 MB or more, the value appears in red. In that case, a warning message
appears when you click Scan.
Page top
Image Settings
Page 480 of 681 pages
Advanced Guide > Scanning > Scanning with Other Application Software > ScanGear (Scanner Driver) Screens >
Image Settings
Image Settings
Important
Do not apply these functions to images without moire, dust/scratches or faded colors. The color
tone may be adversely affected.
Selectable settings depend on color mode settings.
Scanning may take longer when you use Image Settings.
Image Settings allows you to set the following items:
Auto Tone
When this is set to ON, the brightness of the specified portion of the image is automatically optimized.
The result of the color adjustment will be reflected in the entire image. This setting is ON by default.
Important
You can set Auto Tone after preview.
You can set this setting when Recommended is selected on the Color Settings tab of the
Preferences dialog box.
When you click Multi-Crop, this setting turns to ON and you cannot change it.
Note
When previewing or scanning images with consistent color tone (such as the sky), the color tone
may change from the source image due to the Auto Tone function. In that case, set Auto Tone to
OFF.
Unsharp Mask
When this is set to ON, the outline of the subjects is emphasized to sharpen the image. This setting is
ON by default.
Descreen
Printed photos and pictures are displayed as a collection of fine dots. Moire is a phenomenon where
dots may interfere with each other and cause uneven gradation and a stripe pattern in the image.
Descreen is the function for reducing this moire effect. This setting is OFF by default.
Note
Image Settings
Page 481 of 681 pages
Even if Descreen is set to ON, some moire effects may remain if Unsharp Mask is set to ON. In
that case, set Unsharp Mask to OFF.
Selecting Magazine(Color) in Select Source in Basic Mode has the same effect as setting
Descreen to ON in Advanced Mode.
Reduce Dust and Scratches
Scanned photos may contain white dots caused by dust or scratches. Use this function to reduce such
noise. This setting is None by default.
None
Dust and scratches will not be reduced.
Low
Select this to reduce small dust particles and scratches. Large ones may remain.
Medium
It is recommended that you normally select this setting.
High
Select this to reduce small/large dust particles and scratches. Evidence of the reduction process
may remain and may also remove delicate parts of the image.
Important
This function may not be effective for some types of photos.
Note
It is recommended that you select None when scanning printed materials.
Fading Correction
Use this function to correct photos that have faded with time or have a colorcast. Colorcast is a
phenomenon where a specific color affects the entire picture due to the weather or ambient strong
colors. This setting is None by default.
None
Fading correction will not be applied.
Low
Select this to correct a small amount of fading and colorcast.
Medium
It is recommended that you normally select this setting.
High
Select this to correct a large amount of fading and colorcast. This can affect the tone of the image.
Important
You can set Fading Correction after preview.
Fading Correction may not be effective if the scan area is too small.
You can set this setting when Recommended is selected on the Color Settings tab of the
Preferences dialog box.
When you click Multi-Crop, this setting turns to None and you cannot change it.
Grain Correction
Use this function to reduce graininess (roughness) in photos taken with high-speed or sensitized film.
This setting is None by default.
None
Graininess will not be reduced.
Low
Select this when the photo is slightly grainy.
Medium
It is recommended that you normally select this setting.
High
Select this when the photo is very grainy. This can affect the gradation and sharpness of the
Image Settings
Page 482 of 681 pages
image.
Important
Grain Correction may not be effective if the scan area is too small.
The result will not be reflected in the preview image.
Backlight Correction
Use this function to correct photos that have been shot against light.
When you change the Backlight Correction setting, the result will be reflected in the preview image.
None
Backlight correction will not be applied.
Low
Select this to correct slightly backlit photos. This will not affect the image contrast.
Medium
It is recommended that you normally select this setting.
High
Select this to correct strongly backlit photos. This can affect the image contrast.
Important
You can set Backlight Correction after preview.
You can set this setting when Recommended is selected on the Color Settings tab of the
Preferences dialog box.
Backlight Correction may not be effective if the scan area is too small.
When you click Multi-Crop, you cannot change this setting.
Note
Noise patterns may appear when Backlight Correction is applied. Applying Grain Correction and
setting Unsharp Mask to OFF may reduce the noise patterns.
Gutter Shadow Correction
Use this function to correct shadows that appear between pages when scanning open booklets.
When you set the Gutter Shadow Correction setting in the preveiw image, the result will be reflected.
Preview the effects before scanning, as results vary depending on the type of document and how it is
pressed.
Unclear or blurred text/lines caused by curved pages are not corrected.
None
Gutter shadow will not be corrected.
Low
Select this when the effect level is too strong with the medium setting.
Medium
It is recommended that you normally select this setting.
High
Select this when the effect level is too weak with the medium setting.
Important
Do not place items that weigh 4.4 lbs (2.0 kg) or more on the Platen. Also, do not press on the
document with a force exceeding 4.4 lbs (2.0 kg). If you press heavily, the scanner may not work
correctly or you might break the glass.
When you click Multi-Crop, this setting is not available. Click Reset then change the setting.
Align the document with the edge of the Platen. If not, the shadow will not be corrected properly.
Image Settings
Page 483 of 681 pages
Shadows may not be corrected properly depending on the document. If the page background is
not white, shadows may not be detected correctly or may not be detected at all.
While scanning, press down on the spine with the same amount of pressure you used to preview
the scan. If the binding part is not even, the shadow will not be corrected properly.
How to place the document depends on your model and the document to be scanned.
Note
Cover the document with black cloth if white spots, streaks, or colored patterns appear in scan
results due to ambient light entering between the document and the Platen.
If the shadow is not corrected properly, adjust the cropping frame on the preview image.
Adjusting Cropping Frames
Page top
Color Adjustment Buttons
Page 484 of 681 pages
Advanced Guide > Scanning > Scanning with Other Application Software > ScanGear (Scanner Driver) Screens > Color
Adjustment Buttons
Color Adjustment Buttons
The Color Adjustment Buttons allow you to make fine corrections to the image brightness and color
tones. You can adjust the image's overall brightness or contrast, and adjust its highlight and shadow
values (histogram) or balance (tone curve).
Important
The Color Adjustment Buttons are not available when you apply Multi-Crop or when you select Color
Matching on the Color Settings tab of the Preferences dialog box.
Selectable settings depend on color mode settings.
Note
When you adjust the image via the Color Adjustment Buttons, the results will be reflected in the
preview image.
Click a Color Adjustment Button to set the following items:
(Saturation/Color Balance)
Adjust the vividness and color tone of the image. Use this function to brighten colors that have faded
with time or due to colorcast. Colorcast is a phenomenon where a specific color affects the entire
picture due to the weather or ambient strong colors.
Adjusting Saturation and Color Balance
(Brightness/Contrast)
Adjust the brightness and contrast of the image. If the image is too dark or too bright, or if the image
quality is flat due to lack of contrast, you can adjust the levels of brightness and contrast.
Adjusting Brightness and Contrast
(Histogram)
A histogram allows you to see the data concentration at each brightness level of an image. You can
specify the darkest level (shadow) and brightest level (highlight) within an image, cut the levels and
expand the middle of the tonal range of the image.
Adjusting Histogram
(Tone Curve Settings)
Color Adjustment Buttons
Page 485 of 681 pages
Adjust the brightness of an image by selecting the type of graph (tone curve) showing the balance of
tone input and output. You can make fine adjustments to the brightness of a specific area.
Adjusting Tone Curve
(Final Review)
Make a final check of color adjustments. The final synthesized tone curve and the histogram derived
from the subsequent image processing will be displayed. There are no settings to make in this
screen.
For a color image, select a color in Channel to check either Red, Green or Blue, or select Master to
check three colors together.
If you place the cursor on the preview image, the portion will be enlarged and its RGB values (only
K when Color Mode is Grayscale) before and after the adjustments will be displayed.
(Threshold)
Set the boundary (threshold) at which black and white are divided. By adjusting the threshold level, you
can sharpen text in a document or reduce show-through in newspapers.
Setting Threshold
Custom
You can name and save a set of tone curve and threshold settings created with the Color Adjustment
Buttons.
Select Add/Delete... from the pull-down menu. When Color Mode is set to anything but Black and
White, the Add/Delete Tone Curve Settings dialog box opens. When Color Mode is Black and White,
the Add/Delete Threshold Settings dialog box opens.
Enter Setting Name and click Add. The name appears in Tone Curve Settings List or Threshold
Settings List.
Click Save to save.
You can load and apply the saved tone curve/threshold settings to a preview image. To load the
settings, select the saved item from the pull-down menu.
To delete an item, select it in Tone Curve Settings List or Threshold Settings List and click Delete.
Note
Color Adjustment Buttons
Page 486 of 681 pages
Save up to 20 items.
Defaults
Reset all adjustments (saturation/color balance, brightness/contrast, histogram and tone curve).
Page top
Auto Scan Mode Tab
Page 487 of 681 pages
Advanced Guide > Scanning > Scanning with Other Application Software > ScanGear (Scanner Driver) Screens > Auto
Scan Mode Tab
Auto Scan Mode Tab
This mode allows you to scan easily by simply placing documents on the Platen and clicking a button.
In Auto Scan Mode, documents are automatically detected. You do not need to specify cropping frames
or make image corrections.
Supported Documents
Photos, Hagaki, business cards, magazines, newspapers, text documents and CD/DVD.
Important
The following types of documents cannot be scanned correctly.
In that case, specify the document type on the Basic Mode tab or the Advanced Mode tab and
scan again.
- Documents other than photos, Hagaki, business cards, magazines, newspapers, text
documents and CD/DVD
- Text documents smaller than 2L (5 inches x 7 inches) (127 mm x 178 mm), such as paperback
pages with the spine cut off
- Documents printed on thin white paper
- Wide documents such as panoramic photos
Scanning in Basic Mode
Scanning in Advanced Mode
Reflective CD/DVD labels may not be scanned properly.
Place documents correctly according to the type of document to be scanned. Otherwise,
documents may not be scanned correctly.
See "Placing Documents " for details on how to place documents.
Scan from the Basic Mode Tab or Advanced Mode Tab to reduce moire.
How to set documents
Placing Documents appears.
View scanned images
Select this checkbox to display the thumbnails of scanned images in a different window.
Auto Scan Mode Tab
Page 488 of 681 pages
Scan
Scanning starts.
Note
When scanning starts, the progress will be displayed. Click Cancel to cancel the scan.
When scanning is completed, a dialog box prompting you to select the next action may open.
Follow the prompt to complete. For details, see Status of ScanGear dialog after scanning in "
Scan Tab" (Preferences dialog box).
Instructions
This page appears.
Preferences...
The Preferences dialog box opens and you can make scan/preview settings.
Preferences Dialog Box
Close
Close ScanGear (scanner driver).
Related Topic
Scanning in Auto Scan Mode
Page top
Preferences Dialog Box
Page 489 of 681 pages
Advanced Guide > Scanning > Scanning with Other Application Software > ScanGear (Scanner Driver) Screens >
Preferences Dialog Box
Preferences Dialog Box
Click Specify... in the ScanGear (scanner driver) screen to open Preferences dialog box.
In the Preferences dialog box, you can make advanced settings to ScanGear (scanner driver) functions
via the Scanner, Preview, Scan and Color Settings tabs.
Scanner Tab
Allows you to specify a folder to save images temporarily and a music file to play during or at the end of a
scan.
Scanner Tab
Preview Tab
Allows you to select what to do with Preview when ScanGear (scanner driver) is started and how to
display cropping frames after previewing images.
Preview Tab
Scan Tab
Allows you to select what to do with ScanGear (scanner driver) after scanning images.
Scan Tab
Color Settings Tab
Allows you to select how to adjust color, enable/disable Auto Tone, and specify the monitor gamma
value.
Color Settings Tab
Page top
Scanner Tab
Page 490 of 681 pages
Advanced Guide > Scanning > Scanning with Other Application Software > ScanGear (Scanner Driver) Screens >
Scanner Tab
Scanner Tab
On the Scanner tab, you can specify the following settings.
Quiet Mode
Select this checkbox to reduce scanner sound by slowing down the scanner head when previewing or
scanning documents. This checkbox is not selected by default.
Note
Scanning takes longer than usual when you enable this function.
Select Folder Where Temporary Files are Saved
Displays the folder in which to save images temporarily. To change the folder, click Browse... to specify
another one.
Sound Settings
You can set the machine to play music during/at the end of a scan.
Select the Play Music During Scanning or Play Sound When Scanning is Completed checkbox, then
click Browse... and specify a sound file.
You can specify the following files.
MIDI file (*.mid, *.rmi, *.midi)
Audio file (*.wav, *.aif, *.aiff)
MP3 file (*.mp3)
Calibration Settings
When you set Execute at Every Scan to ON, the scanner will be calibrated every time before previewing
and scanning, to reproduce correct color tones in scanned images.
Note
Even when Execute at Every Scan is set to OFF, the scanner may be calibrated automatically in
some cases (such as immediately after you turn the machine on).
Page top
Preview Tab
Page 491 of 681 pages
Advanced Guide > Scanning > Scanning with Other Application Software > ScanGear (Scanner Driver) Screens >
Preview Tab
Preview Tab
On the Preview tab, you can specify the following settings.
Preview at Start of ScanGear
Select what to do with Preview when ScanGear (scanner driver) is started. Display Saved Preview
Image is selected by default.
Automatically Execute Preview
ScanGear (scanner driver) will automatically start previewing at startup.
Display Saved Preview Image
The previously previewed image will be displayed.
The Color Adjustment Button settings, the Toolbar settings, and the Advanced Mode settings are
also saved.
None
No preview image will be displayed at startup.
Cropping Frame on Previewed Images
Select how to display cropping frames after previewing images. Execute Auto Cropping on Previewed
Images is selected by default.
Execute Auto Cropping on Previewed Images
The cropping frame will automatically be displayed in the document size after previewing.
Display the Last Frame on Previewed Images
A cropping frame of the same size as the last used cropping frame will be displayed after
previewing.
None
No cropping frame will be displayed after previewing.
Page top
Scan Tab
Page 492 of 681 pages
Advanced Guide > Scanning > Scanning with Other Application Software > ScanGear (Scanner Driver) Screens > Scan
Tab
Scan Tab
On the Scan tab, you can specify the following settings.
Status of ScanGear dialog after scanning
Select what to do with ScanGear (scanner driver) after scanning images. Close ScanGear
automatically is selected by default.
Close ScanGear automatically
Select this to return to the original application when scanning is completed.
Do not close ScanGear automatically
Select this to return to the ScanGear (scanner driver) screen for another scan when scanning is
completed.
Display the dialog to select next action
Select this to open a dialog box and select what to do when scanning is completed.
Note
Even if Do not close ScanGear automatically or Display the dialog to select next action is set,
some applications may not support it.
Page top
Color Settings Tab
Page 493 of 681 pages
Advanced Guide > Scanning > Scanning with Other Application Software > ScanGear (Scanner Driver) Screens > Color
Settings Tab
Color Settings Tab
On the Color Settings tab, you can specify the following settings.
Color Adjustment
Select either of the following. Recommended is selected by default.
This function is available when Color Mode is Color or Grayscale.
Recommended
Select this to vividly reproduce the tone of a document on the screen. It is recommended that you
normally select this setting.
Color Matching
Select this to automatically match the scanner, monitor and color printer colors, thus reducing
time and trouble to manually match the monitor and printer colors.
Color Adjustment Buttons will be disabled.
This function is available when Color Mode is Color.
- Source(Scanner): Select scanner profile.
- Target: Select target profile.
- Monitor: Select this to display preview image with optimum correction for monitor.
- Defaults: Returns to the default Color Matching settings.
None
Select this to disable color correction provided by ScanGear (scanner driver).
Note
Color Matching is available when ScanGear (scanner driver), monitor, color managementcompliant application (such as Photoshop) and printer are set up correctly.
Refer to the corresponding manual for the monitor, printer and application settings.
Always Execute the Auto Tone
Select this checkbox to always apply Auto Tone to scanned images. This checkbox is selected by
default.
Important
This function is available when Color Mode is Color or Grayscale.
You cannot select this setting when None or Color Matching is selected on the Color Settings tab.
Color Settings Tab
Page 494 of 681 pages
Note
When previewing or scanning images with plain backgrounds, the color tone may change from
the source image due to the Auto Tone function. In that case, deselect the Always Execute the
Auto Tone checkbox.
Monitor Gamma
By setting the gamma value of a monitor (display), you can adjust the input data to the brightness
characteristics of the monitor. Adjust the value if your monitor's gamma value does not match the
default value set in ScanGear (scanner driver), and the colors of the original image are not accurately
reflected in the monitor.
Click Defaults to return to the default Monitor Gamma value (2.20).
Note
Refer to the manual of your monitor to check its gamma value. If it is not written in the manual,
contact the manufacturer.
Page top
Appendix: Useful Information on Scanning
Page 495 of 681 pages
Advanced Guide > Scanning > Scanning with Other Application Software > Appendix: Useful Information on Scanning
Appendix: Useful Information on Scanning
Adjusting the cropping frame (scan area)
Adjusting Cropping Frames
Selecting the best resolution
Resolution
Learning about file formats
File Formats
Learning about Color Matching
Color Matching
Matching the colors between the document and monitor
See Monitor Gamma in the following section.
Color Settings Tab
Page top
Adjusting Cropping Frames
Page 496 of 681 pages
Advanced Guide > Scanning > Scanning with Other Application Software > Appendix: Useful Information on Scanning >
Adjusting Cropping Frames
Adjusting Cropping Frames
You can specify the scan area by creating a cropping frame on the image displayed in the Preview area.
When you click Scan, only the portion within the cropping frame will be scanned and passed to the
application.
You can create two or more cropping frames. When you click Scan, all cropping frames will be scanned.
(Scan is repeated for each cropping frame.)
Important
You cannot create additional cropping frames when you used Multi-Crop in ScanGear's Advanced
Mode.
Cropping frame types
(1) Focus Cropping Frame (rotating thick broken lines)
The settings in Basic Mode or Advanced Mode will be applied.
(2) Selected Cropping Frame (stationary thick broken lines)
The settings will be applied to the Focus Cropping Frame and Selected Cropping Frames
simultaneously. You can select multiple cropping frames by clicking them while pressing the Ctrl key.
(3) Unselected Cropping Frame (stationary thin broken lines)
The settings will not be applied.
Initial cropping frame
A cropping frame (Focus Cropping Frame) is displayed automatically around the preview image
according to the document size. You can also create a cropping frame by dragging the mouse in the
Preview area.
Adjusting a cropping frame
The cursor will change into
when it is positioned over a cropping frame. If you click and drag
the mouse in the direction of the arrow, the cropping frame will expand or contract accordingly.
The cursor will change into
when it is positioned within a cropping frame. Click and drag the mouse
to move the entire cropping frame.
You can rotate a cropping frame 90 degrees by clicking
Aspect Ratio) is not available when Output Size is Flexible.
(Switch Aspect Ratio). However,
(Switch
Adjusting Cropping Frames
Page 497 of 681 pages
In Advanced Mode, you can specify the cropping frame size by entering the values into
(Width) and
(Height) in Input Settings.
Note
Cropping frames are set according to the document size (Auto Crop) by default. For details, see
Cropping Frame on Previewed Images in " Preview Tab " (Preferences dialog box).
Creating multiple cropping frames
Click and drag the mouse in a space outside the existing cropping frame to create a new cropping frame
in the Preview area. The new cropping frame will be the Focus Cropping Frame, and the old cropping
frame will be the Unselected Cropping Frame.
You can create multiple cropping frames and apply different scan settings to each cropping frame.
You can select multiple cropping frames by clicking them while pressing the Ctrl key.
If you select multiple cropping frames and change the settings on a tab at the right of ScanGear (scanner
driver), the settings will be applied to all the selected cropping frames.
When you create a new cropping frame, it retains the settings of the latest cropping frame.
Note
Create up to 10 cropping frames.
Scanning takes longer than usual when multiple cropping frames are selected.
Deleting cropping frames
To delete a cropping frame, select it and click
Alternatively, press the Delete key.
(Remove Cropping Frame) on the Toolbar.
When there are multiple cropping frames, all the selected cropping frames (Focus Cropping Frame and
Selected Cropping Frames) are deleted simultaneously.
Page top
Resolution
Page 498 of 681 pages
Advanced Guide > Scanning > Scanning with Other Application Software > Appendix: Useful Information on Scanning >
Resolution
Resolution
What is Resolution?
The data in the image you have scanned is a collection of dots carrying information about brightness and
color. The density of these dots is called "resolution", and resolution will determine the amount of detail
your image contains. The unit of resolution is dots per inch (dpi). Dpi is the number of dots per square
inch (2.54 cm square).
The higher the resolution (value), the more detail in your image; the lower the resolution (value), the less
detail.
Setting the Resolution in MP Navigator EX
In MP Navigator EX, you can specify the resolution with Scanning Resolution in the Scan Settings dialog
box.
Images for Printing
Images to be printed should be scanned at a resolution that corresponds to the resolution of the printer.
For example, if you want to print using a 600 dpi black and white printer, you should set the resolution to
600dpi.
With a color printer, specifying the resolution at half the resolution of the printer should be fine. For
example, if you want to print scanned paper/photos using a 600 dpi color printer, you should set the
resolution to 300dpi. However, with a high-resolution printer, printing takes longer than usual if you set
the resolution to half the resolution of the printer.
Example of Appropriate Resolution when Printing to Scale
If you print a document at twice the size both vertically and horizontally, the resolution of the document will
be reduced by half. If the resolution of the original document is 300 dpi, the resolution of the enlarged
document will be 150 dpi. If you print the document with a 600 dpi color printer, the lack of detail in the
image may be obvious. In that case, if you scan at the Scanning Resolution of 600 dpi, the resolution will
be 300 dpi even if you double the size of document and you can print the document with sufficient quality.
Conversely, if you print a document at half scale, it should be sufficient to scan at half the resolution.
When Printing Color Photos at Twice the Size
Document resolution: 300
dpi
Scanning resolution: 600
dpi
Scale: 200%
Print at twice the size
Scanning resolution/actual scanning
resolution: 600 dpi
Printing resolution: 300
dpi
Setting the Resolution in ScanGear (Scanner Driver)
In ScanGear, you can specify the resolution with Output Resolution in Output Settings on the Advanced
Mode tab.
Resolution
Page 499 of 681 pages
Example of Appropriate Resolution when Printing to Scale
The scanning resolution is automatically set so that the value set in Output Resolution will be the
resolution of the scanned image. If you set Output Resolution to 300 dpi and scan at twice the size, the
document will be automatically scanned at 600 dpi, and the resolution of the scanned image will be 300
dpi. You can print the document with sufficient quality using a 600 dpi color printer.
When Printing L Size (8.9 cm x 12.7 cm) Photos at Twice the Size
Document resolution: 300
dpi
Output resolution: 300 dpi
Scale: 200%
Scan at twice the size
Actual scanning resolution: 600
Image resolution/printing resolution:
300 dpi
dpi
Appropriate Resolution Settings
Set the resolution according to the use of the scanned image.
For displaying on a monitor: 150 dpi
For printing: 300 dpi
When Output Size is set to Flexible in ScanGear's Advanced Mode (Select Source is Platen and the scale
is 100%):
Document
Use
Color Mode
Output
Resolution
Copying
(Printing)
Color
300 dpi
Creating a postcard
Color
300 dpi
Saving to a computer
Color
75 dpi - 300 dpi
Using on a website or attaching
to e-mail
Color
75 dpi - 150 dpi
Black and white
photo
Saving to a computer
Grayscale
75 dpi - 300 dpi
Using on a website or attaching
to e-mail
Grayscale
75 dpi - 300 dpi
Text document
Copying
Color, Grayscale or Black
and White
300 dpi
Attaching to e-mail
Color, Grayscale or Black
and White
300 dpi
Color photo
Note
Although you can change Output Resolution in ScanGear (scanner driver), it is recommended that
you scan at the default value.
If you double the resolution, the file size quadruples. If the file is too large, the processing speed will
slow down significantly, and you will experience inconvenience such as lack of memory. Set the
minimum required resolution according to the use of the image.
Page top
File Formats
Page 500 of 681 pages
Advanced Guide > Scanning > Scanning with Other Application Software > Appendix: Useful Information on Scanning >
File Formats
File Formats
You can select a file format when saving scanned images. You should specify the most suitable format
according to how you want to use the image on which application.
Available file formats vary by application and computer (Windows or Macintosh).
See below for the characteristics of each image file format.
BMP (Standard File Extension: .bmp)
A standard file format for Windows.
BMP is often selected for images that are used only on Windows.
JPEG (Standard File Extension: .jpg)
A file format often used on websites and for digital camera images.
JPEG features high compression rates. JPEG images slightly degrade every time they are saved, and
cannot be returned to their original state.
JPEG is not available for black and white images.
Exif (Standard File Extension: .jpeg)
A file format supported by many digital cameras.
It adds information such as the date of image capture, camera model, shutter speed, shooting mode
and comments to JPEG files.
The file format version must be Exif 2.2 or later in order to print on a Direct Print compatible printer.
TIFF (Standard File Extension: .tif)
A file format featuring a relatively high compatibility between various computers and applications. (Some
TIFF files are incompatible.) TIFF is suitable for editing saved images.
Note
MP Navigator EX supports the following TIFF file formats.
- Uncompressed, black and white binary
- Uncompressed, RGB (8 bits per channel)
- Uncompressed, YCC (8 bits per component)
- Grayscale
PDF (Standard File Extension: .pdf)
A file format developed by Adobe Systems. It can be used on various computers and operating systems.
Therefore, PDF files can be exchanged between people who use different operating systems, fonts, etc.
regardless of the differences.
Note
Only PDF files created with MP Navigator EX are supported. PDF files created or edited in other
applications are not supported.
Page top
Color Matching
Page 501 of 681 pages
Advanced Guide > Scanning > Scanning with Other Application Software > Appendix: Useful Information on Scanning >
Color Matching
Color Matching
Color Matching adjusts devices as shown below to match the colors of an image displayed on a monitor
or a printed image with the colors of the original document.
Example: When sRGB is selected as the output profile (target)
Input Profile (Source)
Scanner
ScanGear (Scanner Driver)
Output Profile (Target)
sRGB
OS
Application
Application
Printer Driver
Monitor
Printer
ScanGear (scanner driver) converts the image's color space from the scanner's color space to sRGB.
When displaying on a monitor, the image's color space is converted from sRGB to the monitor's color
space based on the operation system's monitor settings and the application's working space settings.
When printing, the image's color space is converted from sRGB to the printer's color space based on the
application's print settings and the printer driver's settings.
Page top
Other Scanning Methods
Page 502 of 681 pages
Advanced Guide > Scanning > Other Scanning Methods
Other Scanning Methods
Scanning with WIA Driver
Scanning using the Control Panel (Windows XP Only)
Page top
Scanning with WIA Driver
Page 503 of 681 pages
Advanced Guide > Scanning > Other Scanning Methods > Scanning with WIA Driver
Scanning with WIA Driver
You can scan an image from a WIA-compliant application and use the image in that application.
The procedure varies depending on the application. The following procedures are examples only.
For details, refer to the application's manual.
Important
In Windows 2000, you cannot scan using the WIA driver.
In Windows XP, you cannot scan using the WIA driver 2.0.
Scanning with WIA Driver 1.0
The following is an example of scanning using Paint.
1. Place the document on the Platen.
Placing Documents
2. In File, click From Scanner or Camera.... (Select the command to scan a document
in the application.)
3. Select an image type according to the document to be scanned.
Note
To scan with the values previously set in Adjust the quality of the scanned picture, select
Custom Settings.
4. Click Adjust the quality of the scanned picture and set the preferences as required.
Brightness
Move the slider to adjust the brightness. Move it to the left to darken and right to brighten the
Scanning with WIA Driver
Page 504 of 681 pages
image. You can also enter a value (-127 to 127).
Contrast
Move the slider to adjust the contrast. Moving it to the left will decrease the contrast of the image,
thus softening the image. Moving it to the right will increase the contrast of the image, thus
sharpening the image. You can also enter a value (-127 to 127).
Resolution
Enter the resolution. Specify a value between 50 dpi and 600 dpi.
Resolution
Picture type
Select the type of scan you want for your document.
Reset
Click to restore the original settings.
5. Click Scan.
When scanning is completed, the scanned image appears in the application.
Scanning with WIA Driver 2.0
The following is an example of scanning using Windows Photo Gallery.
1. Place the document on the Platen.
Placing Documents
2. In File, click From Scanner or Camera..., then double-click WIA Canon (model
name).
The scan setting screen appears.
3. Specify the settings.
Scanner
The currently set product name is displayed. To change the scanner, click Change... and select
the product you want to use.
Profile
Select Photo (Default) or Documents according to the document to be scanned. To save a new
Profile, select Add profile.... You can specify the details in the Add New Profile dialog box.
Source
Select a scanner type.
Paper Size
This setting is not available for this machine.
Color format Tab
Select how to scan the document.
Save as type
Scanning with WIA Driver
Page 505 of 681 pages
Select a file format from JPEG, BMP, PNG and TIFF.
Resolution
Enter the resolution. Specify a value between 50 dpi and 600 dpi. 300 dpi is set by default.
Resolution
Brightness
Move the slider to adjust the brightness. Move it to the left to darken and right to brighten the
image. You can also enter a value (-100 to 100).
Contrast
Move the slider to adjust the contrast. Moving it to the left will decrease the contrast of the image,
thus softening the image. Moving it to the right will increase the contrast of the image, thus
sharpening the image. You can also enter a value (-100 to 100).
Preview or scan images as separate files
Select this checkbox to preview or scan multiple images as separate files.
See how to scan a picture
Click to open Windows Help and Support.
4. Click Preview to preview the image.
The preview image appears on the right.
5. Click Scan.
When scanning is completed, the scanned image appears in the application.
Page top
Scanning using the Control Panel (Windows XP Only)
Page 506 of 681 pages
Advanced Guide > Scanning > Other Scanning Methods > Scanning using the Control Panel (Windows XP Only)
Scanning using the Control Panel (Windows XP Only)
You can scan images via the Control Panel of Windows XP using the WIA driver.
Windows Image Acquisition (WIA) is a driver model implemented in Windows XP. It allows you to scan
documents without using an application. Scan documents from a TWAIN-compliant application to specify
advanced settings for scanning.
1. From the Start menu, select Control Panel.
2. Click Printers and Other Hardware > Scanners and Cameras, then double-click WIA
Canon (model name).
The Scanner and Camera Wizard dialog box opens.
3. Click Next.
4. Select Picture type according to the document to be scanned.
Note
To scan with the values previously set in Custom Settings, select Custom.
5. Click Custom Settings to set the preferences as required.
Brightness
Move the slider to adjust the brightness. Move it to the left to darken and right to brighten the
image. You can also enter a value (-127 to 127).
Contrast
Move the slider to adjust the contrast. Moving it to the left will decrease the contrast of the image,
thus softening the image. Moving it to the right will increase the contrast of the image, thus
sharpening the image. You can also enter a value (-127 to 127).
Scanning using the Control Panel (Windows XP Only)
Page 507 of 681 pages
Resolution
Enter the resolution. Specify a value between 50 dpi and 600 dpi.
Resolution
Picture type
Select the type of scan you want for your document.
Reset
Click to restore the original settings.
6. Click Preview to preview the image.
The preview image appears on the right. Drag
to specify the scan area.
7. Click Next and follow the instructions.
Page top
Printing Photographs Directly from a Compliant Device or a Wireless Comm... Page 508 of 681 pages
Advanced Guide > Printing Photographs Directly from a Compliant Device or a Wireless Communication Device
Printing Photographs Directly from a Compliant Device or a
Wireless Communication Device
Printing Photographs Directly from a Compliant Device
Printing Photographs from a Wireless Communication Device
Page top
Printing Photographs Directly from a Compliant Device
Page 509 of 681 pages
Advanced Guide > Printing Photographs Directly from a Compliant Device or a Wireless Communication Device > Printing
Photographs Directly from a Compliant Device
Printing Photographs Directly from a Compliant Device
Printing Photographs Directly from a Compliant Device
About PictBridge Print Settings
Page top
Printing Photographs Directly from a Compliant Device
Page 510 of 681 pages
Advanced Guide > Printing Photographs Directly from a Compliant Device or a Wireless Communication Device > Printing
Photographs Directly from a Compliant Device > Printing Photographs Directly from a Compliant Device
Printing Photographs Directly from a Compliant Device
You can connect a PictBridge compliant device such as a digital camera, camcorder, or mobile phone
using a USB cable recommended by the device's manufacturer, and print recorded images directly
without using a computer.
Note
When printing photos with the PictBridge compliant device connected to the machine, we
recommend the use of the AC adapter supplied with the device. If you are using the device battery,
be sure to charge it fully.
Depending on the model or brand of your device, you may have to select a print mode compliant
with PictBridge before connecting the device. You may also have to turn on the device or select Play
mode manually after connecting the device to the machine.
Perform necessary operations on the PictBridge compliant device before connecting it to this
machine according to instructions given in the device's instruction manual.
1. Make sure that the machine is turned on.
2. Load paper on the Rear Tray.
3. Make sure that the PictBridge compliant device is turned off.
4. Connect the PictBridge compliant device to the machine using a USB cable (A)
recommended by the manufacturer of the device.
The PictBridge compliant device turns on automatically.
If your device does not turn on automatically, turn it on manually.
will appear on the LCD of the device when the machine is correctly connected.
5. Specify the print settings such as paper type and layout.
You can perform settings using the menu on the LCD of your PictBridge compliant device. Select the
size and type of paper that you loaded in the machine.
Settings on a PictBridge Compliant Device
If your PictBridge compliant device does not have a setting menu, change the setting from the
machine.
Settings on the Machine
Printing Photographs Directly from a Compliant Device
Page 511 of 681 pages
6. Start printing from your PictBridge compliant device.
Important
Never disconnect the USB cable during printing unless when explicitly allowed to by the
PictBridge compliant device. When disconnecting the USB cable between the PictBridge
compliant device and machine, follow the instructions given in the device's instruction manual.
Page top
About PictBridge Print Settings
Page 512 of 681 pages
Advanced Guide > Printing Photographs Directly from a Compliant Device or a Wireless Communication Device > Printing
Photographs Directly from a Compliant Device > About PictBridge Print Settings
About PictBridge Print Settings
Settings on a PictBridge Compliant Device
Settings on the Machine
Settings on a PictBridge Compliant Device
This section describes the PictBridge function of the machine. For the print settings on a
PictBridge compliant device, refer to the instructions given in the device's instruction manual.
Note
In the following description, names of setting items are given according to those used in
Canon-brand PictBridge compliant devices. Setting item names may be different depending
on the brand or model of your device.
Some setting items explained below may not be available on some devices. In this case, the
settings made on the machine are applied. Also, when some items are set to Default on a
PictBridge compliant device, the machine settings for these items are applied.
The following sizes and types of printing paper can be used when printing from a PictBridge
compliant device.
Paper size
4" x 6"/10 x 15 cm, 5" x 7"*1, 8" x 10"/ 20 x 25 cm, A4, 8.5" x 11"(Letter), 4" x 7.1"/
10.1 x 18 cm*2
*1 Can be selected only on certain Canon-brand PictBridge compliant devices.
(May not be selected depending on the device.)
*2 Hi Vision may appear on a non-Canon brand PictBridge compliant device.
Paper type
Default: (Selections based on the machine setting)
Photo:
Photo Paper Plus Glossy II PP-201/Glossy Photo Paper "Everyday Use" GP501/Photo Paper Glossy GP-502/Photo Paper Plus Semi-gloss SG-201
Fast Photo:
Photo Paper Pro PR-201
Plain:
A4/Letter
When Paper type is set to Plain, borderless printing will be disabled even
when Layout is set to Borderless.
Layout
Default (Selections based on the machine setting), Index, Bordered, Borderless,
4-up *
* Layout compatible with A4/Letter sized paper
Print date &
file no.
Default (Off: No printing), Date, File No., Both, Off
Image
optimize
Default *1*2, On (Exif Print), Off, Face*2, Red-Eye*2
*1 Photos are optimized for printing using the Photo optimizer pro function.
*2 Can be selected only on certain Canon-brand PictBridge compliant devices.
(May not be selected depending on the device.)
Trimming
Default (Off: No trimming), On (follow camera's setting), Off
Settings on the Machine
You can change the PictBridge print settings from the PictBridge settings screen. Set the
print settings to Default on the PictBridge compliant device when you want to print according
to the settings on the machine.
This section describes the procedure to display the PictBridge settings screen. For setting
items, see PictBridge settings .
1.
Make sure that the machine is turned on.
2.
Press the Menu button.
About PictBridge Print Settings
Page 513 of 681 pages
3.
Use the
button to select Device settings, then press the OK button.
4.
Use the
button to select PictBridge settings, then press the OK button.
The PictBridge settings screen is displayed.
Page top
Printing Photographs from a Wireless Communication Device
Page 514 of 681 pages
Advanced Guide > Printing Photographs Directly from a Compliant Device or a Wireless Communication Device > Printing
Photographs from a Wireless Communication Device
Printing Photographs from a Wireless Communication Device
Setting the Page Size, Media Type, and Layout When Printing from a Mobile Phone
Printing via Bluetooth Communication
Page top
Setting the Page Size, Media Type, and Layout When Printing from a Mobil... Page 515 of 681 pages
Advanced Guide > Printing Photographs Directly from a Compliant Device or a Wireless Communication Device > Printing
Photographs from a Wireless Communication Device > Setting the Page Size, Media Type, and Layout When Printing from
a Mobile Phone
Setting the Page Size, Media Type, and Layout When Printing
from a Mobile Phone
When printing from a mobile phone through Bluetooth communication, select the page size, media type,
layout, and borderless print setting on the Mobile phone setting screen. For details on how to print from a
computer through Bluetooth communication, refer to About Bluetooth Communication .
* The default is borderless printing on L size Photo Paper Plus Glossy II.
Displaying the Mobile phone setting screen
This section describes how to display the Mobile phone setting screen. For setting items, see
Mobile phone setting .
1. Make sure that the machine is turned on.
2. Attach the optional Bluetooth Unit BU-30.
Insert the Bluetooth Unit BU-30 to the Direct Print Port.
3. Press the Menu button.
4. Use the
button to select Device settings, then press the OK button.
The Device settings screen is displayed.
5. Use the
button to select Mobile phone setting, then press the OK button.
The Mobile phone setting screen is displayed.
Page top
Printing via Bluetooth Communication
Page 516 of 681 pages
Advanced Guide > Printing Photographs Directly from a Compliant Device or a Wireless Communication Device > Printing
Photographs from a Wireless Communication Device > Printing via Bluetooth Communication
Printing via Bluetooth Communication
This section describes the procedure to print photos through Bluetooth communication from a mobile
phone with the optional Bluetooth Unit BU-30.
When printing from a mobile phone through Bluetooth communication, refer also to your product's
instruction manual.
For the procedure to print through Bluetooth communication from the computer, refer to About Bluetooth
Communication.
Note
Mobile phones supporting OPP (Object Push Profile) or BIP (Basic Image Profile) can print photos.
Depending on your mobile phone, you may not perform printing even if your mobile phone supports
the profiles above. For information on the profiles your mobile phone supports, refer to your
product's instruction manual.
Printing through Bluetooth Communication
1.
Make sure that the machine is turned on.
2.
Load paper on the Rear Tray.
3.
Attach the optional Bluetooth Unit BU-30.
Insert the Bluetooth Unit BU-30 to the Direct Print Port.
4.
Set the page size and layout.
Setting the Page Size, Media Type, and Layout When Printing from a Mobile Phone
5.
Start printing from a mobile phone.
For the device name, select the default value Canon XXX-1 (where "XXX"
is your machine's name).
If you are required to input a passkey, input the default value "0000".
You can change the device name of the machine, passkey, and so on from the
Bluetooth settings screen.
Changing the Bluetooth Settings
Printing via Bluetooth Communication
Page 517 of 681 pages
Note
Communication is possible in a range of up to about 33 ft. / 10 m depending on
the conditions below. Printing speed may vary depending on the following
conditions:
Presence of obstacles between the communication equipment, and radio
conditions.
Presence of magnetic fields, static electricity, or electromagnetic interference.
Receiver sensitivity and antenna performance of the communication equipment.
Video files cannot be printed.
Depending on your device, data saved on a memory card may not be printed.
About transmittable data
Due to security settings on the mobile phone, downloaded content or
photos downloaded from a URL attached to an E-mail cannot be printed.
Depending on the size of a photo, it may take a while for this machine to
start printing after starting wireless communication.
Printed quality and orientation (portrait or landscape) is determined
automatically according to the shot photo size.
Depending on the photo size shot on the mobile phone, the edges of the
image may be cut off when performing borderless printing; the margin size
may change when printing with borders.
If the photo file is over 1.8 MB in size, it may not be possible to send the
file.
Page top
Changing the Bluetooth Settings
Page 518 of 681 pages
Advanced Guide > Printing Photographs Directly from a Compliant Device or a Wireless Communication Device > Printing
Photographs from a Wireless Communication Device > Printing via Bluetooth Communication > Changing the Bluetooth
Settings
Changing the Bluetooth Settings
As preparation for printing through Bluetooth communication, you can change the settings such as the
device name and passkey from the Bluetooth settings screen.
This section describes how to display the Bluetooth settings screen. For each setting item, see
Bluetooth settings .
1. Make sure that the machine is turned on.
2. Attach the optional Bluetooth Unit BU-30.
Insert the Bluetooth Unit BU-30 to the Direct Print Port.
3. Press the Menu button.
4. Use the
button to select Device settings, then press the OK button.
The Device settings screen is displayed.
5. Use the
button to select Bluetooth settings, then press the OK button.
The Bluetooth settings screen is displayed.
Page top
Maintenance
Page 519 of 681 pages
Advanced Guide > Maintenance
Maintenance
Cleaning Your Machine
Performing Maintenance from a Computer
Page top
Cleaning Your Machine
Page 520 of 681 pages
Advanced Guide > Maintenance > Cleaning Your Machine
Cleaning Your Machine
Cleaning
Cleaning the Exterior of the Machine
Cleaning the Platen Glass and Document Cover
Cleaning the Inside of the Machine (Bottom Plate Cleaning)
Cleaning the Protrusions Inside the Machine
Page top
Cleaning
Page 521 of 681 pages
Advanced Guide > Maintenance > Cleaning Your Machine > Cleaning
Cleaning
This section describes the cleaning procedure that is needed to maintain your machine.
Caution
Do not use tissue paper, paper towels, rough-textured cloth, or similar materials for cleaning so as
not to scratch the surface. Paper tissue powder or fine threads may remain inside the machine and
cause problems such as Print Head blockage and poor printing results. Be sure to use a soft cloth.
Never use volatile liquids such as thinners, benzene, acetone, or any other chemical cleaner to
clean the machine, as this may cause a malfunction or damage the machine's surface.
Cleaning the Exterior of the Machine
Cleaning the Platen Glass and Document Cover
Cleaning the Inside of the Machine (Bottom Plate Cleaning)
Cleaning the Protrusions Inside the Machine
Page top
Cleaning the Exterior of the Machine
Page 522 of 681 pages
Advanced Guide > Maintenance > Cleaning Your Machine > Cleaning the Exterior of the Machine
Cleaning the Exterior of the Machine
Be sure to use a soft cloth such as eyeglasses cleaning cloth and wipe off dirt on the surface gently.
Smooth out wrinkles on the cloth if necessary before cleaning.
Caution
Be sure to turn off the power and disconnect the power plug before cleaning the machine.
Do not use tissue paper, paper towels, rough-textured cloth, or similar materials, as this may
scratch the surface.
Page top
Cleaning the Platen Glass and Document Cover
Page 523 of 681 pages
Advanced Guide > Maintenance > Cleaning Your Machine > Cleaning the Platen Glass and Document Cover
Cleaning the Platen Glass and Document Cover
Caution
Be sure to turn off the power and disconnect the power plug before cleaning the machine.
With a clean, soft, lint-free cloth, wipe the Platen Glass (A) and the inner side of the Document Cover
(white sheet) (B) gently. Be sure not to leave any residue, especially on the Platen Glass.
Important
The inner side of the Document Cover (white sheet) (B) is easily damaged, so wipe it gently.
Page top
Cleaning the Inside of the Machine (Bottom Plate Cleaning)
Page 524 of 681 pages
Advanced Guide > Maintenance > Cleaning Your Machine > Cleaning the Inside of the Machine (Bottom Plate Cleaning)
Cleaning the Inside of the Machine (Bottom Plate Cleaning)
This section explains how to clean the inside of the machine. If the inside of the machine becomes dirty,
printed paper may get dirty, so we recommend performing cleaning regularly.
1. Make sure that the machine is turned on.
2. Remove any paper from the Rear Tray.
3. Fold a single sheet of A4 or Letter-sized plain paper in half widthwise, then unfold the
paper.
4. Load this and only this sheet of paper on the Rear Tray with the open side facing to
the front.
(A) Load the paper after unfolding it.
5. Press the Menu button.
6. Use the
button to select Maintenance, then press the OK button.
The Maintenance screen is displayed.
7. Use the
button to select Bottom plate cleaning, then press the OK button.
The confirmation screen is displayed.
8. Use the
button to select Yes, then press the OK button.
The paper cleans the inside of the machine as it feeds through the machine.
Check the folded part of the ejected paper. If it is smudged with ink, perform Bottom Plate Cleaning
again.
If the problem is not resolved after performing cleaning again, the protrusions inside the machine
may be stained. Clean them according to instructions.
Cleaning the Protrusions Inside the Machine
Note
When performing Bottom Plate Cleaning again, be sure to use a new piece of paper.
Page top
Cleaning the Protrusions Inside the Machine
Page 525 of 681 pages
Advanced Guide > Maintenance > Cleaning Your Machine > Cleaning the Protrusions Inside the Machine
Cleaning the Protrusions Inside the Machine
If protrusions inside the machine are stained, wipe off any ink from the protrusions using a cotton swab
or the like.
Caution
Be sure to turn off the power and disconnect the power plug before cleaning the machine.
Page top
Performing Maintenance from a Computer
Page 526 of 681 pages
Advanced Guide > Maintenance > Performing Maintenance from a Computer
Performing Maintenance from a Computer
Cleaning the Print Heads
Cleaning the Paper Feed Rollers
Aligning the Print Head Position
Checking the Print Head Nozzles
Cleaning Inside the Machine
Page top
Cleaning the Print Heads
Page 527 of 681 pages
Advanced Guide > Maintenance > Performing Maintenance from a Computer > Cleaning the Print Heads
Cleaning the Print Heads
The print head cleaning function allows you to remove any blockages in the print head nozzles. Perform
print head cleaning if printing is faint or a specific color fails to print, even though there is enough ink.
The procedure for cleaning the print heads is as follows:
Cleaning
1. Open the printer driver setup window
2. Click Cleaning on the Maintenance tab
The Print Head Cleaning dialog box opens. Follow the instruction shown in the dialog box.
Click Initial Check Items to display the items you need to check before performing Cleaning.
3. Execute cleaning
Make sure that the machine is on and then click Execute.
Print head cleaning starts.
4. Complete cleaning
Click OK when the confirmation message appears.
Next, the Nozzle Check dialog box opens.
5. Check the results
To check whether the print quality has improved, click Print Check Pattern. To cancel the check
process, click Cancel.
If cleaning the head once does not resolve the print head problem, clean it once more.
Deep Cleaning
Deep Cleaning is more thorough than Cleaning. Perform deep cleaning when two cleaning attempts do
not resolve the print head problem.
1. Open the printer driver setup window
2. Click Deep Cleaning on the Maintenance tab
The Deep Cleaning dialog box opens. Follow the instruction shown in the dialog box.
Click Initial Check Items to display the items you need to check before performing Deep Cleaning.
3. Make sure that the machine is on and then click Execute.
Click OK when the confirmation message appears.
Print head deep cleaning starts.
Important
Cleaning consumes a small amount of ink. Deep Cleaning consumes a larger amount of ink than
Cleaning.
Cleaning the print heads frequently will rapidly deplete your printer's ink supply. Consequently,
perform cleaning only when necessary.
Note
Cleaning the Print Heads
Page 528 of 681 pages
If there is no sign of improvement after Deep Cleaning, switch off the machine and perform again. If
there is still no sign of improvement, the ink may have run out or the print head may be worn. For
details on the remedial action to be taken, see " Machine Moves But Ink Is Not Ejected ."
Related Topic
Checking the Print Head Nozzles
Page top
Cleaning the Paper Feed Rollers
Page 529 of 681 pages
Advanced Guide > Maintenance > Performing Maintenance from a Computer > Cleaning the Paper Feed Rollers
Cleaning the Paper Feed Rollers
The feed roller cleaning function allows you to clean the paper feed roller. Perform feed roller cleaning
when there are paper particles sticking to the paper feed roller and paper is not fed properly.
The procedure for cleaning the feed rollers is as follows:
Roller cleaning
1. Prepare the machine
Remove all sheets of paper from the rear tray.
2. Open the printer driver setup window
3. Click Roller Cleaning on the Maintenance tab
The confirmation message appears.
4. Execute paper feed roller cleaning
Make sure that the machine is on and click OK.
Paper feed roller cleaning starts.
5. Complete paper feed roller cleaning
After the rollers have stopped, follow the instruction in the message, load three sheets of plain
paper into the rear tray, and click OK.
Paper will be ejected and feed roller cleaning will be completed.
Page top
Aligning the Print Head Position
Page 530 of 681 pages
Advanced Guide > Maintenance > Performing Maintenance from a Computer > Aligning the Print Head Position
Aligning the Print Head Position
Print head alignment corrects the installation positions of the print head and improves deviated colors
and lines.
The procedure for performing print head alignment is as follows:
Print Head Alignment
1. Open the printer driver setup window
2. Click Print Head Alignment on the Maintenance tab
The Start Print Head Alignment dialog box opens.
3. Load paper in the machine
Load two sheets of A4 size or Letter size plain paper into the rear tray.
4. Execute head alignment
Make sure that the machine is on and click Align Print Head.
Follow the instruction in the message.
Note
To check the current setting before you adjust the print head position, click Print Alignment
Value.
5. Check the printed pattern
Enter the numbers of the patterns with the least amount of streaks in the associated boxes.
Clicking the patterns with the least amount of streaks in the preview window, will automatically set
their numbers in the associated boxes.
When you have entered all the necessary values, click OK.
Note
If you look at the print results and still cannot determine which pattern is the one with the least
amount of streaks, see your machine manual.
6. Check the second sheet of the printed pattern.
Next, second sheet of head alignment pattern will be printed.
Follow the instruction in the message.
Page top
Checking the Print Head Nozzles
Page 531 of 681 pages
Advanced Guide > Maintenance > Performing Maintenance from a Computer > Checking the Print Head Nozzles
Checking the Print Head Nozzles
The nozzle check function allows you to check whether the print heads are working properly by printing a
nozzle check pattern. Print the pattern if printing becomes faint, or if a specific color fails to print.
The procedure for printing a nozzle check pattern is as follows:
Nozzle Check
1. Open the printer driver setup window
2. Click Nozzle Check on the Maintenance tab
The Nozzle Check dialog box opens.
To display a list of items that you should check before printing the check pattern, click Initial Check
Items.
3. Load paper in the machine
Load a sheet of A4 size or Letter size plain paper into the rear tray.
4. Print a nozzle check pattern
Make sure that the machine is on and click Print Check Pattern.
The nozzle check pattern is printed.
Click OK when the confirmation message appears.
The Pattern Check dialog box opens.
5. Check the print result
Check the print result. If the print result is normal, click Exit.
If the print result is smudged or if there are any unprinted sections, click Cleaning to clean the print
head.
Related Topic
Cleaning the Print Heads
Page top
Cleaning Inside the Machine
Page 532 of 681 pages
Advanced Guide > Maintenance > Performing Maintenance from a Computer > Cleaning Inside the Machine
Cleaning Inside the Machine
The bottom plate cleaning function allows you to prevent smudges on the reverse side of a sheet of
paper. Perform bottom plate cleaning before you perform duplex printing.
Also perform bottom plate cleaning if ink smudges caused by something other than print data appear on
the printed page.
For details on how to load paper into the machine, see " Cleaning the Inside of the Machine (Bottom Plate
Cleaning) ."
The procedure for performing bottom plate cleaning is as follows:
Bottom Plate Cleaning
1. Open the printer driver setup window
2. Click Bottom Plate Cleaning on the Maintenance tab
The Bottom Plate Cleaning dialog box opens.
3. Load paper in the machine
As instructed in the dialog box, fold the A4 size or Letter size plain paper in half horizontally, and then
unfold the sheet.
Load the paper into the rear tray in the portrait orientation with the crest of the crease facing down.
4. Perform the bottom plate cleaning
Make sure that the machine is on and click Execute.
Bottom plate cleaning starts.
Page top
About Bluetooth Communication
Page 533 of 681 pages
Advanced Guide > About Bluetooth Communication
About Bluetooth Communication
Handling Precautions
Preparation to Use the Bluetooth Unit
Printing Data via Bluetooth Communication
Basic Procedure for Printing via Bluetooth Communication
Bluetooth Settings
Troubleshooting
Specifications
Page top
Handling Precautions
Page 534 of 681 pages
Advanced Guide > About Bluetooth Communication > Handling Precautions
Handling Precautions
Shipping the Product
Page top
Shipping the Product
Page 535 of 681 pages
Advanced Guide > About Bluetooth Communication > Handling Precautions > Shipping the Product
Shipping the Product
This product may not be used in countries or regions other than the country or region where it was
purchased due to local laws and regulations. Please note that the use of this product in such countries
or regions may lead to penalties and that Canon should not be liable for such punishment.
Page top
Preparation to Use the Bluetooth Unit
Page 536 of 681 pages
Advanced Guide > About Bluetooth Communication > Preparation to Use the Bluetooth Unit
Preparation to Use the Bluetooth Unit
Bluetooth Unit
Attaching to and Removing from the Printer
Page top
Bluetooth Unit
Page 537 of 681 pages
Advanced Guide > About Bluetooth Communication > Preparation to Use the Bluetooth Unit > Bluetooth Unit
Bluetooth Unit
The Bluetooth Unit BU-30 (hereafter referred to as the Bluetooth unit) is an adaptor which can be used
with a Canon IJ printer with Bluetooth interface.
By attaching the Bluetooth unit to a Canon IJ printer with Bluetooth interface, wireless printing from a
Bluetooth enabled device, such as a computer or mobile phone, is possible.
Note
Communication is possible in a range of up to about 33 ft. / 10 m depending on the conditions
below. Printing speed may vary depending on the following conditions:
-Presence of obstacles between the communication equipment and radio wave conditions.
-Presence of magnetic fields, static electricity or electromagnetic interference.
-Software and operating system to be used.
-Receiver sensitivity and antenna performance of the communication equipment.
Page top
Attaching to and Removing from the Printer
Page 538 of 681 pages
Advanced Guide > About Bluetooth Communication > Preparation to Use the Bluetooth Unit > Attaching to and Removing
from the Printer
Attaching to and Removing from the Printer
Attaching the Bluetooth Unit to the Printer
Removing the Bluetooth Unit from the Printer
Attaching the Bluetooth Unit to the Printer
Attach the Bluetooth unit to the Direct Print Port (A) of the printer in accordance with the following
procedure.
The external appearance may differ depending on the printer you are using.
1.
Check the Power lamp.
Make sure that the Power lamp is lit.
2.
Insert the Bluetooth unit to the Direct Print Port of the printer.
Detach the cap from the Bluetooth unit. Store the cap in a safe location.
Attaching to and Removing from the Printer
Page 539 of 681 pages
Note
When the Bluetooth unit is properly attached to the printer, the Power lamp on the printer
flashes twice.
Removing the Bluetooth Unit from the Printer
Remove the Bluetooth unit from the Direct Print Port of the printer in accordance with the following
procedure.
1.
Remove the Bluetooth unit from the Direct Print Port of the printer.
Caution
Make sure that the lamp on the Bluetooth unit is neither lit nor flashing before you
remove the Bluetooth unit.
Important
Store the Bluetooth unit with the cap attached.
Page top
Printing Data via Bluetooth Communication
Page 540 of 681 pages
Advanced Guide > About Bluetooth Communication > Printing Data via Bluetooth Communication
Printing Data via Bluetooth Communication
Preparation
Installing the MP Drivers
Setting the Printer
Registering the Printer
Deleting the Printer
Page top
Preparation
Page 541 of 681 pages
Advanced Guide > About Bluetooth Communication > Printing Data via Bluetooth Communication > Preparation
Preparation
In order to print via Bluetooth communication with Windows, the following system requirements must be
satisfied.
Computer
A computer in which an internal Bluetooth module is installed or a computer to which an optional
Bluetooth adapter (available from various manufacturers) is attached.
OS
Microsoft Windows Vista (Satisfying any one of the following conditions is needed)
Bluetooth Devices is displayed in Hardware and Sound under Control Panel
Bluetooth Stack for Windows by Toshiba Version 5.10.04 or later is installed
Microsoft Windows XP (Satisfying any one of the following conditions is needed)
Windows XP SP2 or later is installed, and Bluetooth Devices is displayed in
Printers and Other Hardware under Control Panel
Bluetooth Stack for Windows by Toshiba Version 3.00.10 or later is installed
For more information about how to confirm the version of Bluetooth Stack for Windows by
Toshiba, see Check 2: Is unsupported Bluetooth driver used? .
In order to connect the Bluetooth unit and print via Bluetooth communication, the following steps are
required.
1. Check that the Bluetooth unit is properly attached to the printer.
See Attaching to and Removing from the Printer .
2. Install the MP Drivers.
See Installing the MP Drivers .
3. Check the device name of the printer using the LCD.
See Setting the Printer .
4. Register the printer as a Bluetooth device using Bluetooth Devices.
When using Windows Vista, and when Bluetooth Devices is displayed in Hardware and
Sound under Control Panel
Authenticate the printer as a Bluetooth device on Bluetooth Devices in Hardware and Sound
under Control Panel.
See Registering the Printer .
When using Windows XP SP2 or later, and when Bluetooth Devices is displayed in Printers
and Other Hardware under Control Panel
Authenticate the printer as a Bluetooth device on Bluetooth Devices in Printers and Other
Hardware under Control Panel.
See Registering the Printer .
When using a Toshiba Windows Vista or Windows XP computer
Authenticate the printer as a Bluetooth device using Bluetooth Settings*.
* When the computer which has Bluetooth Stack for Windows by Toshiba or the program
attached to the Bluetooth adapter of the option manufactured by Toshiba is used, the
computer can register a printer easily.
Bluetooth Settings can be started by clicking Start and selecting All Programs, TOSHIBA,
Bluetooth, and Bluetooth Settings.
For details on Bluetooth Settings, refer to the software application's instruction manual.
Preparation
Page 542 of 681 pages
The operations may vary depending on your operating program. In this case, refer to your
computer's operation manual.
Page top
Installing the MP Drivers
Page 543 of 681 pages
Advanced Guide > About Bluetooth Communication > Printing Data via Bluetooth Communication > Installing the MP
Drivers
Installing the MP Drivers
Note
If you use the printer connecting with a computer, the MP Drivers have already been installed. In this
case, move to the next step.
Setting the Printer
Before connecting the Bluetooth unit to the printer for wireless printing, first the USB cable must be
connected between the printer and computer, and the MP Drivers must be installed using the Setup CDROM.
Install the MP Drivers according to your setup manual.
Page top
Setting the Printer
Page 544 of 681 pages
Advanced Guide > About Bluetooth Communication > Printing Data via Bluetooth Communication > Setting the Printer
Setting the Printer
This section describes the procedures for checking the settings of the Bluetooth unit on the LCD of the
printer in preparation for Bluetooth printing.
The screens may differ depending on the printer you are using.
If you need more information about the Bluetooth settings, see Setting Bluetooth Printing .
1. Make sure that the Bluetooth unit is attached and the printer is turned on.
For information about how to attach the Bluetooth unit, see Attaching to and Removing from the
Printer .
2. Display the Bluetooth settings screen on the LCD.
For information about how to display the Bluetooth settings screen, refer to Changing the Machine
Settings on the LCD .
Note
If the Bluetooth settings screen is not displayed on the LCD, the Bluetooth unit may not be
attached correctly. Remove the Bluetooth unit from the printer and attach it once again.
For details, see Attaching to and Removing from the Printer .
If the Bluetooth settings screen still is not displayed, the Bluetooth unit may be faulty. In this
case, contact your Canon service representative.
3. Select Device name.
The Device name screen is displayed.
4. Check the device name.
The device name is necessary to register the printer as a Bluetooth device. Be sure to note the
device name.
Note
If multiple printer units with the same model name are connected to the system, assigning a
different device name to each printer is recommended for easy identification of the printer you
will use. See Bluetooth Settings Screen .
After checking the device name, press the OK button on the printer.
Setting the Printer
Page 545 of 681 pages
After checking the Bluetooth settings using the LCD, register the printer on your computer.
Registering the Printer
Page top
Registering the Printer
Page 546 of 681 pages
Advanced Guide > About Bluetooth Communication > Printing Data via Bluetooth Communication > Registering the Printer
Registering the Printer
Register the printer as a Bluetooth device using Bluetooth Devices under Control Panel.
Note
The following procedure is described assuming that Windows Vista has been installed in your
computer.
Before registering the printer on Bluetooth Devices under Control Panel, enable the Bluetooth
function of your computer.
For more information, refer to your computer's operation manual.
If you want to re-register the printer as a Bluetooth device, first delete the registered printer, and then
re-register it.
See Deleting the Printer .
1. Log into a user account with the administrator privilege.
2. Click Control Panel, then Bluetooth Devices under Hardware and Sound.
In non-Vista Windows, click Control Panel, Printers and Other Hardware, then Bluetooth Devices.
3. Click Add on the Devices page.
Add Bluetooth Device Wizard will start.
4. Make sure that the printer is turned on, check the My device is set up and ready to
be found check box and then click Next.
Registering the Printer
Page 547 of 681 pages
5. Select the device name of the printer and click Next.
Select the same device name as that checked under Setting the Printer .
Note
If the device name is not displayed, see Check 3: Is the printer name which you want to register
displayed in Printer List? .
6. Select Don't use a passkey, and then Next.
Registering the Printer
Page 548 of 681 pages
Note
If you set a passkey on the printer, select Use the passkey found in the documentation and
input the passkey then click Next.
For more information about a passkey, see Bluetooth Settings Screen .
7. Click Finish.
8. Check that the device name selected at step 5 is registered on the Devices page,
and click OK.
Now, the settings for printing via Bluetooth communication are ready.
Note
In Windows Vista, the Windows needs to install driver software for your Bluetooth Peripheral
Device screen may be displayed automatically. In this case, click Don't show this message
again for this device.
Page top
Deleting the Printer
Page 549 of 681 pages
Advanced Guide > About Bluetooth Communication > Printing Data via Bluetooth Communication > Deleting the Printer
Deleting the Printer
This section describes the procedure to delete the registered printer.
If you want to re-register the printer as a Bluetooth device, first follow the procedure below to delete the
printer, and then re-register it.
For the procedure to re-register the printer, see Registering the Printer .
1. Log into a user account with the administrator privilege.
2. Click Control Panel, then Printers under Hardware and Sound.
When using non-Vista Windows, click Control Panel, then Printers and Faxes under Printers and
Other Hardware.
3. Click the icon of the printer used for printing via Bluetooth communication.
4. Select Delete from the Organize menu.
When using non-Vista Windows, select Delete from the File menu.
Page top
Basic Procedure for Printing via Bluetooth Communication
Page 550 of 681 pages
Advanced Guide > About Bluetooth Communication > Basic Procedure for Printing via Bluetooth Communication
Basic Procedure for Printing via Bluetooth Communication
Printing with Computers
Printing with Bluetooth Compliant Devices other than a Computer
Page top
Printing with Computers
Page 551 of 681 pages
Advanced Guide > About Bluetooth Communication > Basic Procedure for Printing via Bluetooth Communication > Printing
with Computers
Printing with Computers
When using Bluetooth communication, also refer to the computer's instruction manual.
When printing from a Bluetooth compliant device other than a computer, see Printing with Bluetooth
Compliant Devices other than a Computer .
Note
Depending on your application program, operations may differ. For details, refer to the instruction
manual of your software application.
The steps described in this section are for printing in Windows Vista.
Bluetooth communication distance: Approx. 33 ft./10 m in normal environment.
The distance may vary depending on the radio conditions or the communication equipment.
1. Turn on the printer and load paper.
2. Create a document or open a file to print using an appropriate application software.
3. Open the printer properties dialog box.
1. Select Print on the application software's File menu.
The Print dialog box opens.
2. Select the printer to which you attached the Bluetooth unit such as Canon XXX Printer (Copy X)
from Select Printer.
3. Click Preferences (or Properties).
The Main sheet of the Printing Preferences dialog box is displayed.
Note
The printer registered on Bluetooth Devices is displayed as Canon XXX Printer (Copy X).
"X" is a device name or a digit. The number of digits may differ depending on the printer.
4. Specify the required settings.
Printing with Computers
Page 552 of 681 pages
1. Select the media type of the loaded paper in Media Type.
2. Set Print Quality and Color/Intensity as needed.
Note
For details on the print settings, refer to Various Printing Methods .
3. Click OK.
The Print dialog box is displayed.
5. Click Print (or OK) to print the document.
Printing begins.
Note
When you use a USB cable for printing, select Canon XXX Printer from Select Printer.
To cancel a print job in progress, press the Stop button on the printer or click Cancel Printing
on the printer status monitor. After printing is canceled, a sheet of paper may be ejected with no
printing results.
To display the printer status monitor, click Canon XXX Printer (Copy X) on the taskbar.
"X" is a device name or a digit. The number of digits may differ depending on the printer.
Printing with Computers
Page 553 of 681 pages
Page top
Printing with Bluetooth Compliant Devices other than a Computer
Page 554 of 681 pages
Advanced Guide > About Bluetooth Communication > Basic Procedure for Printing via Bluetooth Communication > Printing
with Bluetooth Compliant Devices other than a Computer
Printing with Bluetooth Compliant Devices other than a
Computer
The LCD of the printer allows you to perform settings for printing using Bluetooth compliant devices other
than a computer.
When you print with one of these devices, also refer to your product's instruction manual.
When printing from a computer, see Printing with Computers .
Note
Mobile phones, PDAs and digital cameras supporting OPP (Object Push Profile) or BIP (Basic
Imaging Profile) can print photos.
Depending on your product, you may not perform printing even if your product supports the profiles
above. For details of profiles, refer to your product's instruction manual.
1. Turn on the printer and load paper.
2. Display the Mobile phone print settings or Mobile phone settings screen on the LCD
and set the media type and the paper size.
For information about how to display the Mobile phone print settings or Mobile phone settings
screen, refer to Changing the Machine Settings on the LCD .
3. Start printing from the Bluetooth compliant device.
When you select the device name, select the initial value of the printer "Canon XXX-1" (where "XXX"
is your printer's name).
If you are required to input the passkey, input the initial value "0000".
You can change the device name of the printer or passkey on the Bluetooth settings screen on the
LCD.
Setting Bluetooth Printing
Page top
Bluetooth Settings
Page 555 of 681 pages
Advanced Guide > About Bluetooth Communication > Bluetooth Settings
Bluetooth Settings
Setting Bluetooth Printing
Bluetooth Settings Screen
Page top
Setting Bluetooth Printing
Page 556 of 681 pages
Advanced Guide > About Bluetooth Communication > Bluetooth Settings > Setting Bluetooth Printing
Setting Bluetooth Printing
1. Make sure that the printer is turned on, and attach the Bluetooth unit.
Note
When the Bluetooth unit is properly attached to the printer, the Power lamp on the printer
flashes twice.
2. Display the Bluetooth settings screen on the LCD.
For information about how to display the Bluetooth settings screen, refer to Changing the Machine
Settings on the LCD .
3. Select the contents which you want to set on the LCD.
Bluetooth Settings Screen
Note
For information about how to set a media type and a paper size when printing from a mobile
phone, refer to Changing the Machine Settings on the LCD .
Page top
Bluetooth Settings Screen
Page 557 of 681 pages
Advanced Guide > About Bluetooth Communication > Bluetooth Settings > Bluetooth Settings Screen
Bluetooth Settings Screen
The screens may differ depending on the printer you are using.
1. Device name
Displays the device name of the printer to which the Bluetooth unit is attached.
Device name Screen
2. Access refusal
Selecting ON or Enable will disable searching of this printer by a Bluetooth compatible device.
Access refusal Screen
3. Security
Select Enable and then specify the security mode to activate the passkey set on the Passkey screen.
Security Screen
4. Passkey
You can change the passkey. The passkey refers to an identification number to be determined. It is
used to prevent unwanted access from other Bluetooth devices. The initial value is set to 0000.
Passkey Screen
Device name Screen
Allows you to set the device name of the printer on a Bluetooth device.
Ex:
When you select MP630 series-2, the printer name displayed on the Bluetooth device is Canon
MP630 series-2.
The initial value is set to MP630 series-1.
Access refusal Screen
When you search from a Bluetooth device, you can enable or disable the display of the printer
name.
ON or Enable
Disables searching from a Bluetooth device.
Bluetooth Settings Screen
Page 558 of 681 pages
OFF or Disable (Default setting)
Enables searching and printing from a Bluetooth device.
Security Screen
Enable
Selecting Enable allows you to choose either of the security modes below.
Mode 3(recommended)
This mode is activated on link level enforced security.
The passkey will be required when a Bluetooth device communicates with the printer.
Normally select this mode.
Mode 2
This mode is activated on service level enforced security.
The passkey will be required when printing through the Bluetooth communication.
After setting the security mode, we recommend making a trial print through Bluetooth
communication. If printing does not start, change the security mode and try again.
Disable (Default setting)
When you register the printer, you are not required to input a passkey.
Setting a passkey will prevent unwanted access from other Bluetooth devices. You can
change the passkey on the Passkey screen.
Passkey Screen
When you select Enable on the Security screen, you are required to set a passkey to register the
printer on other Bluetooth devices.
After you change the passkey, you may be asked to input the passkey on the Bluetooth devices you
were able to print from before the passkey was changed. In this case, input the new passkey.
Page top
Troubleshooting
Page 559 of 681 pages
Advanced Guide > About Bluetooth Communication > Troubleshooting
Troubleshooting
Troubleshooting
Printer Cannot be Registered
Printing Does Not Start
Page top
Troubleshooting
Page 560 of 681 pages
Advanced Guide > About Bluetooth Communication > Troubleshooting > Troubleshooting
Troubleshooting
This section describes how to solve the problems occurred during the use of the Bluetooth unit.
Problems related to the printer's hardware, MP Drivers installation, and so on, are also described in
Troubleshooting.
Page top
Printer Cannot be Registered
Page 561 of 681 pages
Advanced Guide > About Bluetooth Communication > Troubleshooting > Printer Cannot be Registered
Printer Cannot be Registered
Check 1: Have MP Drivers been installed?
Install the MP Drivers referring to your setup manual.
Check 2: Is unsupported Bluetooth driver used?
Confirm that the Bluetooth driver installed on your computer is supported.
Toshiba Windows Vista or Windows XP computer
In Windows Vista, click Start, and select All Programs, TOSHIBA, Bluetooth, then Bluetooth
Settings.
On the Bluetooth Settings dialog, click the help button, the version number, then make sure that
the version number is 5.10.04 or later.
In Windows XP, click Start, and select All Programs, TOSHIBA, Bluetooth, then Bluetooth
Settings.
On the Bluetooth Settings dialog, click the help button, the version number, then make sure that
the version number is 3.00.10 or later.
Windows Vista (except for Toshiba Windows Vista computers)
Log into a user account with the administrator privilege, and click Control Panel, then Hardware
and Sound.
Make sure that the
Bluetooth Devices icon is displayed in the dialog.
Windows XP SP2 or later (except for Toshiba Windows XP computers)
Log into a user account with the administrator privilege, click Control Panel, then Printers and
Other Hardware.
Make sure that the
Bluetooth Devices icon is displayed in the dialog.
The operations may vary depending on your operating program. In this case, refer to your computer's
operation manual.
Check 3: Is the printer name which you want to register displayed in
Printer List?
Make sure that the printer is turned on.
Make sure that the Power lamp is lit.
Make sure that the printer is not operating.
Check whether the Bluetooth unit is usable.
Make sure that the Bluetooth settings screen can be displayed on the LCD of the printer. If the
screen cannot be displayed, Bluetooth communication is disabled. Remove the Bluetooth unit
from the printer and attach it again.
Attaching to and Removing from the Printer
Make sure that the Bluetooth settings screen can be displayed on the LCD of the printer, and try
to register again.
Check whether access from a Bluetooth compatible device is refused.
Check the printer access setting displaying the Bluetooth settings screen on the LCD of the
printer.
1. Display the Bluetooth settings screen on the LCD of the printer.
For information about how to display the Bluetooth settings screen, refer to Changing the
Machine Settings on the LCD .
2. Select Access refusal.
3. Select OFF or Disable and press the OK button on the printer.
Page top
Printing Does Not Start
Page 562 of 681 pages
Advanced Guide > About Bluetooth Communication > Troubleshooting > Printing Does Not Start
Printing Does Not Start
Check 1: Is Bluetooth unit ready for use?
Make sure that the Bluetooth settings screen can be displayed on the LCD of the printer. If the
screen cannot be displayed, Bluetooth communication is disabled. Remove the Bluetooth unit from
the printer and attach it once again.
Attaching to and Removing from the Printer
Make sure that the Bluetooth settings screen can be displayed on the LCD of the printer, and try to
print again.
If the Bluetooth settings screen still is not displayed after you remove the Bluetooth unit from the
printer and attach it again, the Bluetooth unit may be faulty. In this case, contact your Canon service
representative.
Check 2: Is there a problem with the location of the printer or is the
distance between the printer and computer too great?
The maximum communication distance between the printer and a computer is about 33 ft./10 m, but
it varies depending on the following conditions:
Presence of obstacles between the communication equipment and radio wave conditions
Location where magnetic fields, static electricity, or radio interference occurs
Type of software and operating system used
Receiver sensitivity and antenna performance of the communication equipment
Change the printer installation place or move the printer closer to the computer.
Check 3: Is the printer to be used selected correctly?
Follow the procedure described below to select the printer to which the Bluetooth unit is attached.
1. Log into a user account with the administrator privilege.
2. Click Control Panel, then Printers under Hardware and Sound.
When using non-Vista Windows, click Control Panel, then Printers and Faxes under Printers
and Other Hardware.
3. Click the
icon of the printer to be used for printing via Bluetooth
communication.
By default, the icon name is Canon XXX Printer (Copy X).
Note
"X" is a device name or a digit. The number of digits may differ depending on the printer.
4. Select Properties from the Organize (File in non-Vista Windows) menu.
5. Click the Ports tab and select an applicable printer from Port.
It may vary depending on how you authenticate the printer.
When authenticating the printer as a Bluetooth device in Control Panel
BTHnnn (Canon XXX Printer (Copy X)) ("n" is a digit).
When authenticating the printer as a Bluetooth device using Bluetooth Settings built in the
computer
TBPnnn (Canon XXX Printer (Copy X)) ("n" is a digit)
For more information about how to register the printer, see Register the printer as a Bluetooth
device using Bluetooth Devices. in Preparation .
6. Click OK.
Printing Does Not Start
Page 563 of 681 pages
Check 4: Is the message "This document failed to print" displayed?
Do not retry printing. Check the error message on the LCD.
Clear the error according to An Error Message Is Displayed on the LCD .
When you use a Microsoft Bluetooth driver, make sure that the Printing (HCRP) service is
effective on your computer.
Click Control Panel, Bluetooth Devices under Hardware and Sound (Printers and Other
Hardware in non-Vista Windows), then select the printer to be used for Bluetooth
communication and click Properties.
Make sure that Printing (HCRP) on the Services sheet is checked.
If Printing (HCRP) is not checked or the Printing (HCRP) service is not detected, follow the
procedure below and register the printer again.
1. Click Control Panel, then Printers under Hardware and Sound.
When using non-Vista Windows, click Control Panel, then Printers and Faxes under Printers
and Other Hardware.
2. Click the
icon of the printer for printing via Bluetooth communication.
3. Select Delete from the Organize (File in non-Vista Windows) menu.
4. Authenticate the printer as a Bluetooth device on Bluetooth Devices in Control
Panel.
For more information about the procedure, see Registering the Printer .
This message is displayed when the print job is sent from the Bluetooth device while another
print job through the USB port is being printed out.
Printing will begin automatically when the print queue is finished.
Printing cannot be carried out with Bluetooth communication from more than one computer at
the same time. In this case, this message is displayed on the computer during standing by.
Printing will begin automatically when the print queue is finished.
Check 5: Were the MP Drivers installed after printer registration on
Bluetooth Devices?
If you have installed the MP Drivers after registering the printer as a Bluetooth device on Bluetooth
Devices, delete the printer and then register it again.
For more information about the procedure, see Preparation.
Page top
Specifications
Page 564 of 681 pages
Advanced Guide > About Bluetooth Communication > Specifications
Specifications
Communication
method
Bluetooth v2.0
Maximum Speed
1.44 Mbps
Output
Bluetooth Power Class 2
Communication
distance
Line-of-sight distance: approx. 33 ft./10 m *
* It may vary depending on factors including the presence of obstacles between
communication equipment, radio wave conditions, the presence of magnetic
fields around microwave ovens and locations where electrostatic and radio
interference occur, the types of software and operating systems used, and
receiver sensitivity and antenna performance of communication equipment.
Profile
SPP(Serial Port Profile)
OPP(Object Push Profile)
BIP(Basic Imaging Profile)
HCRP(Hardcopy Cable Replacement Profile)
Compatible PCs
A computer in which an internal Bluetooth module is installed or a computer to
which an optional Bluetooth adapter (available from various manufacturers) is
attached.
OS/Software:
Microsoft Windows Vista (Satisfying any one of the following conditions is needed)
Bluetooth Devices is displayed in Hardware and Sound under Control Panel
Bluetooth Stack for Windows by Toshiba Version 5.10.04 or later is installed
Microsoft Windows XP (Satisfying any one of the following conditions is needed)
Windows XP SP2 or later is installed, and Bluetooth Devices is displayed in
Printers and Other Hardware under Control Panel
Bluetooth Stack for Windows by Toshiba Version 3.00.10 or later is installed
Frequency band
2.4 GHz band (2.400 GHz to 2.4835 GHz)
Power supply
Supplied from the Direct Print Port on the printer, DC 4.4 V to 5.25 V
Maximum power
consumption
500 mW (MAX)
Operating
temperature
5 to 35˚C (41 to 95˚F)
Operating humidity 10 to 90% RH (no condensation)
Dimensions (Width 18.5 (W) x 47.5 (D) x 8.7 (H) mm (with cap attached)
x Depth x Height)
0.73 (W) x 1.87 (D) x 0.35 (H) inches
Weight
Approx. 7 g (0.25 oz)
Page top
Changing the Machine Settings
Page 565 of 681 pages
Advanced Guide > Changing the Machine Settings
Changing the Machine Settings
Changing the Machine Settings on the LCD
Changing Machine Settings from Your Computer
Page top
Changing the Machine Settings on the LCD
Page 566 of 681 pages
Advanced Guide > Changing the Machine Settings > Changing the Machine Settings on the LCD
Changing the Machine Settings on the LCD
Changing the Machine Settings on the LCD
Copy auto intensity
Prevent abrasion
Extension amount
Mobile phone setting
Bluetooth settings
PictBridge settings
Date display
Read/write attribute
Quiet mode
Key repeat
Language selection
Reset setting
Page top
Changing the Machine Settings on the LCD
Page 567 of 681 pages
Advanced Guide > Changing the Machine Settings > Changing the Machine Settings on the LCD > Changing the Machine
Settings on the LCD
Changing the Machine Settings on the LCD
This section describes the procedure to change the settings in the Device settings screen, taking the
steps to specify Extension amount as an example.
1. Make sure that the machine is turned on, then press the Menu button.
The top menu screen is displayed.
2. Use the
button to select Device settings, then press the OK button.
The Device settings screen is displayed.
3. Use the
button to select a menu, then press the OK button.
The setting screen for the selected item is displayed.
4. Use the
button to select a setting item, then press the OK button.
Copy auto intensity
Prevent abrasion
Extension amount
Mobile phone setting
Bluetooth settings
PictBridge settings
Date display
Read/write attribute
Quiet mode
Key repeat
Language selection
Reset setting
Changing the Machine Settings on the LCD
Page 568 of 681 pages
Copy auto intensity
Adjusts the intensity of the copy automatically.
Prevent abrasion
Use this setting only if the print surface becomes smudged.
Important
Be sure to set this back to Disable after printing since it may result in lower printing speed or
lower print quality.
Extension amount
Selects the amount of image that extends off the paper when printing in Borderless (full).
Note
If printouts contain margins even though you are printing in Borderless, specifying Large for
this setting may help solve the problem.
Mobile phone setting
When printing from a mobile phone through Bluetooth communication, select the page size,
media type, layout, and so on.
For details on how to print from a mobile phone through Bluetooth communication, see Printing
Photographs from a Wireless Communication Device .
Note
Mobile phone setting is displayed only when the optional Bluetooth Unit is attached.
1.
Select the page size for printing photos saved on a mobile phone.
2.
Select the media type for printing photos saved on a mobile phone.
3.
Select Image optimizer ON to correct and smooth out the jagged contours when printing.
4.
Select the layout of the photos according to the paper for printing.
Borderless/Bordered/Bordered x2/Bordered x4/Bordered x8
Bluetooth settings
You can change the device name of the machine, passkey, and so on in the Bluetooth settings.
For details on how to print from a mobile phone through Bluetooth communication, see Printing
Photographs from a Wireless Communication Device .
For details on how to print from a computer through Bluetooth communication, refer to About
Bluetooth Communication .
Note
Bluetooth settings is displayed only when the optional Bluetooth Unit is attached.
Device name:
Specifies the name of this machine that is displayed on a Bluetooth compatible device.
For example, if you set it to XXX-2, the machine will be displayed as "Canon XXX-2" on the
Bluetooth device. The default value is XXX-1 (where "XXX" is your machine's name).
Changing the Machine Settings on the LCD
Page 569 of 681 pages
Access refusal:
Selecting Enable will disable searching of this machine by a Bluetooth compatible device.
Security:
When you select Enable, the passkey set on the Passkey screen becomes effective. Setting
the passkey prevents unwanted access from other Bluetooth devices. You can choose either
of the security modes below.
Mode 3 (recommend)
This mode is activated on link level enforced security.
The passkey will be required when a Bluetooth device communicates with the
machine.
Normally select this mode.
Mode 2
This mode is activated on service level enforced security.
The passkey will be required when printing through Bluetooth communication.
After setting the security mode, we recommend making a trial print through Bluetooth
communication.
If printing does not start, change the security mode and try again.
Passkey
Changes the passkey. The passkey is a four-digit number used to prevent unwanted access
from other Bluetooth devices.
The initial value is 0000.
After you change the passkey, you may be required to input the new passkey on a Bluetooth
device, even though it had previous access to the machine. In this case, enter the new
passkey on the device.
PictBridge settings
You can change the print settings when printing from a PictBridge compliant device.
Set the print settings to Default on the PictBridge compliant device when you want to print
according to the settings on the machine.
See Settings on a PictBridge Compliant Device to change print settings from the PictBridge
compliant device.
1.
Select the page size, when printing directly from a PictBridge compliant device.
When you perform PictBridge settings from the machine, set Paper size to Default on the
PictBridge compliant device.
2.
Select the media type, when printing directly from a PictBridge compliant device.
When you perform PictBridge settings from the machine, set Paper type to Default on the
PictBridge compliant device.
3.
Select the print quality, when printing directly from a PictBridge compliant device.
4.
Select bordered or borderless print.
When you perform PictBridge settings from the machine, set Layout to Default on the
PictBridge compliant device.
5.
Photo optimizer
Automatically optimizes the brightness and tone of a photo.
6.
Red-Eye correction
Changing the Machine Settings on the LCD
Page 570 of 681 pages
Corrects red eyes in portraits caused by flash photography.
7.
Face brightener
Brightens a darkened face on a photo taken against the light.
Date display
Changes the display format of shooting dates when printed.
Note
When Date printing ON in the Tab 1 on the Memory card settings screen, the shooting date is
printed in the date display format you selected. For Print settings, see Setting Items .
The shooting date format is as specified in the DPOF setting from DPOF printing.
Read/write attribute
Selects whether to allow data to be written onto memory cards from a computer.
Important
Remove the memory card before changing this setting. For details, see Setting Up the Card
Slot as the Memory Card Drive of the Computer .
If you set this setting to Writable from PC, card direct printing cannot be done. After you finish
operation of the memory card dedicated drive, be sure to set it back to Not writable from PC.
Quiet mode
Enables this function on the machine if you want to reduce the operating noise, such as when
printing at night.
Enabling this function reduces the noises generated while:
Copying,
Printing from a memory card,
Printing from a PictBridge compliant device,
Printing from a wireless communication device, and
Printing a template form.
Important
Printing speed may be reduced compared to when this setting is set to Disable.
This function may not be so effective depending on the print quality setting. Furthermore,
certain noise, such as when the machine is preparing for printing, is not reduced.
Note
The noises generated while scanning or printing from the computer can also be reduced. To
reduce these noises, you need to configure the settings on the computer.
For the noises while scanning, refer to Scanner Tab .
For the noises while printing from the computer, refer to Reducing the Machine Noise .
Key repeat
Enables/Disables continuous input by pressing and holding down the
when setting the number of copies, the zoom ratio, etc.
,
,
, or
button
Language selection
Changes the language for LCD messages and menus.
Reset setting
You can change the settings back to the default, except for the LCD language and the current
position of the Print Head.
Page top
Changing Machine Settings from Your Computer
Page 571 of 681 pages
Advanced Guide > Changing the Machine Settings > Changing Machine Settings from Your Computer
Changing Machine Settings from Your Computer
Changing the Print Options
Saving a Changed Printing Profile
Setting the Ink Cartridge
Managing the Machine Power
Reducing the Machine Noise
Changing the Machine Operation Mode
Page top
Changing the Print Options
Page 572 of 681 pages
Advanced Guide > Changing the Printer Settings > Changing Printer Settings from Your Computer > Changing the Print
Options
Changing the Print Options
You change detailed print driver settings for print data that is sent from an application software.
Specify this option if you encounter print failures such as part of an image data being cut off.
The procedure for changing the print options is as follows:
1. Open the printer driver setup window
2. Click Print Options... on the Page Setup tab
The Print Options dialog box opens.
3. Change the individual settings
If necessary, change the setting of each item, and then click OK.
The Page Setup tab is displayed again.
Page top
Saving a Changed Printing Profile
Page 573 of 681 pages
Advanced Guide > Changing the Printer Settings > Changing Printer Settings from Your Computer > Saving a Changed
Printing Profile
Saving a Changed Printing Profile
You can assign a name to the settings made on the Main, Page Setup, and Effects tabs and save them
as a printing profile. The saved printing profile can be retrieved and used from the Profiles tab at any
time. Unnecessary printing profiles can be deleted at any time.
The procedure for registering a printing profile is as follows:
Registering a printing profile
1. Open the printer driver setup window
2. Set the necessary items
Make your desired settings on the Main, Page Setup, and Effects tabs.
3. On the Profiles tab, click Add to Profiles...
The Add to Profiles dialog box opens.
4. Save the settings
Set Name, Icon, and Description, then click OK.
The profile is saved and the Profiles tab is displayed again.
The name and icon are added to the Printing Profiles list.
Note
If you install the printer driver again or upgrade the version of the printer driver, the print settings you
Saving a Changed Printing Profile
Page 574 of 681 pages
registered will be deleted from Printing Profiles.
Registered print settings cannot be saved and preserved. In this case, register the print settings
again.
Using registered print settings
1. Select the print settings to be used
Select a printing profile in the Printing Profiles list on the Profiles tab.
The parameters and settings of the profile are displayed in the Details box.
2. Retrieve from Profiles
Click Retrieve from Profiles.
Click OK when a message appears.
Settings of the selected profile are applied to the Main, Page Setup, and Effects tabs.
Note
If you want to revert a profile to the default settings, select Default Settings in the Printing Profiles list
and click Retrieve from Profiles. Click OK on the confirmation message window. The settings which
were made on the Main, Page Setup, and Effects tabs are reverted to the default settings.
Deleting unnecessary printing profile
1. Select the printing profile to be deleted
Select the printing profile you want to delete from the Printing Profiles list on the Profiles tab.
2. Delete the printing profile
Click Delete. When the confirmation message appears, click OK.
The selected printing profile is deleted from the Printing Profiles list.
Note
Current Settings and Default Settings cannot be deleted.
Page top
Setting the Ink Cartridge
Page 575 of 681 pages
Advanced Guide > Changing the Printer Settings > Changing Printer Settings from Your Computer > Setting the Ink
Cartridge
Setting the Ink Cartridge
When printing, you can specify the ink cartridge you use.
If one of the ink cartridges becomes empty, you can continue printing by specifying the ink cartridge that
still has ink.
The procedure for specifying the ink cartridge is as follows:
Ink Cartridge Settings
1. Open the printer driver setup window
2. Click Ink Cartridge Settings on the Maintenance tab
The Ink Cartridge Settings dialog box appears.
3. Select the ink cartridge to be used
Select the ink cartridge to be used for printing and click OK.
The specified ink cartridge will be used from the next printing.
Important
When the following settings are configured, Black Only is disabled. The color ink cartridge is also
used to print.
A media type other than Plain Paper, Hagaki, or Envelope is selected for Media Type on the Main
tab.
Borderless Printing is checked on the Page Setup tab.
Canon recommends that you use the ink cartridges installed in the machine and not remove them
until the ink runs out.
Page top
Managing the Machine Power
Page 576 of 681 pages
Advanced Guide > Changing the Printer Settings > Changing Printer Settings from Your Computer > Managing the
Machine Power
Managing the Machine Power
This function allows you to manage the machine power from the printer driver.
The procedure for managing the printer power is as follows:
Power Off
The Power Off function turns off the machine. If you use this function, you will not be able to turn the
machine on from the printer driver.
1. Open the printer driver setup window
2. Execute power off
Click Power Off on the Maintenance tab. When the confirmation message appears, click OK.
The machine power switches off, and the Maintenance tab is displayed again.
Page top
Reducing the Machine Noise
Page 577 of 681 pages
Advanced Guide > Changing the Printer Settings > Changing Printer Settings from Your Computer > Reducing the
Machine Noise
Reducing the Machine Noise
This function allows you to reduce the operating noise of the machine. Select if you wish to reduce the
operating noise of the printer at night, etc.
Using this function may lower the print speed.
The procedure for changing the quiet mode settings is as follows:
Quiet Mode
1. Open the printer driver setup window
2. Click Quiet Mode on the Maintenance tab
The Quiet Mode dialog box opens.
3. Set the silent function
If necessary, specify one of the following items:
Do not use quiet mode
The operating noise of the machine is at normal volume.
Always use quiet mode
Select this option when you wish to reduce the operating noise of the machine.
Use quiet mode within specified time
The operating noise of the machine can be reduced during a specified period of time.
Set the Start time and End time when you wish the quiet mode to be activated.
Important
The time specified in Start time and in End time must be different.
4. Transmit the settings
Make sure that the machine is on and click Send.
Click OK when the confirmation message appears.
The selected settings are enabled hereafter.
Note
Depending on print quality settings, effects of the quiet mode may be less.
Page top
Changing the Machine Operation Mode
Page 578 of 681 pages
Advanced Guide > Changing the Printer Settings > Changing Printer Settings from Your Computer > Changing the
Machine Operation Mode
Changing the Machine Operation Mode
This function allows you to switch between various modes of machine operation.
The procedure for changing the printer settings is as follows:
Custom Settings
1. Open the printer driver setup window
2. Make sure that the machine is on, and then click Custom Settings on the
Maintenance tab
The Custom Settings dialog box opens.
Note
If the machine is off or bi-directional communication is disabled, a message may appear
because the computer cannot collect the machine status.
If this happens, click OK to display the most recent settings specified on your computer.
3. If necessary, complete the following settings:
Prevent paper abrasion
The printer can increase the gap between the print head and the paper during high-density printing
to prevent paper abrasion.
Check this check box to use this function.
Ink Drying Wait Time
You can set the length of the machine rest time until printing of the next page begins. Moving the
slider to the right increases the pause time and moving the slider to the left decreases the time.
If the paper gets stained because the next page is ejected before the ink on the printed page dries,
increase the ink drying wait time.
Reducing the ink drying wait time speeds up printing.
4. Transmit the settings
Click Send. When the confirmation message appears, click OK.
The machine runs in the changed mode hereafter.
Page top
Troubleshooting
Page 579 of 681 pages
Advanced Guide > Troubleshooting
Troubleshooting
If an Error Occurs
The Machine Can Not Be Powered On
An Error Message Is Displayed on the LCD
LCD Cannot Be Seen At All
An Unintended Language Is Displayed on the LCD
Cannot Install the MP Drivers
Cannot Connect to Computer Properly
Print Results Not Satisfactory
Printing Does Not Start
Copying/Printing Stops Before It Is Completed
Machine Moves But Ink Is Not Ejected
Printing Speed Not as Fast as Expected
FINE Cartridge Holder Does Not Move to the Position for Replacing
Paper Does Not Feed Properly
Paper Jams
Message Appears on the Computer Screen
For Windows Users
Error Message Appears on a PictBridge Compliant Device
Cannot Print Properly from a Wireless Communication Device
Cannot Print Properly from a Photo Index Sheet
Cannot Remove a Memory Card
Problems with Scanning
Software Problems
MP Navigator EX Problems
FAQs
If You Cannot Resolve the Problem
Instructions for Use (Printer Driver)
General Notes (Scanner Driver)
Page top
If an Error Occurs
Page 580 of 681 pages
Advanced Guide > Troubleshooting > If an Error Occurs
If an Error Occurs
When an error occurs in printing such as the machine is out of paper or paper is jammed, a
troubleshooting message is displayed automatically. Take the appropriate action described in the
message. The message may vary depending on the version of your operating system.
In Mac OS X v.10.5.x:
In Mac OS X v.10.4.x or Mac OS X v.10.3.9:
Page top
The Machine Cannot Be Powered On
Page 581 of 681 pages
Advanced Guide > Troubleshooting > The Machine Cannot Be Powered On
The Machine Cannot Be Powered On
Check 1: Press the ON button.
Check 2: Make sure that the power plug is securely plugged into the
Power Cord Connector of the machine, then turn it back on.
Check 3: Unplug the machine from the power supply, then plug the
machine back in and turn the machine back on after leaving it for at
least 1 minute.
If the problem is not resolved, contact your Canon service representative.
Page top
An Error Message Is Displayed on the LCD
Page 582 of 681 pages
Advanced Guide > Troubleshooting > An Error Message Is Displayed on the LCD
An Error Message Is Displayed on the LCD
If an error message is displayed on the LCD, take the corresponding action described below.
Message
Action
Print head is not installed. Install the
print head.
U051
The type of print head is incorrect.
Install the correct print head.
U052
The ink cartridge cannot be recognized.
U053/U059
The FINE Cartridge may not be installed properly, or the
Cartridge may not be compatible with this machine.
Open the Scanning Unit (Cover) and install the appropriate
FINE Cartridge.
If the error is not resolved, the FINE Cartridge may be
damaged. Contact your Canon service representative.
Some ink cartridges are not installed in
place.
U075/U076
Make sure that each FINE Cartridge is installed in the correct
position.
Routine Maintenance
The ink cartridge cannot be recognized.
U140
The FINE Cartridge may not be compatible with this
machine.
Install the FINE Cartridge compatible with this machine.
Routine Maintenance
The ink cartridge cannot be recognized.
U150
The FINE Cartridge may not be installed properly.
Open the Scanning Unit (Cover) and install the appropriate
FINE Cartridge.
If the error is not resolved, the FINE Cartridge may be
damaged. Contact your Canon service representative.
Ink may have run out. Replacing the ink
cartridge is recommended.
U162
Ink may have run out.
The function for detecting the remaining ink level will be
disabled since the ink level cannot be correctly detected.
If you want to continue printing without this function, press
the Stop button for at least 5 seconds.
Canon recommends to use new genuine Canon cartridges
in order to obtain optimum qualities.
Please be advised that Canon shall not be liable for any
malfunction or trouble caused by continuation of printing
under the ink out condition.
Note
If the function for detecting the remaining ink level is
disabled, the ink cartridge in grey is displayed in the
remaining ink volume screen on the LCD.
Routine Maintenance
Ink has run out. Replace the ink
cartridge.
U163
Ink has run out.
Replace the ink cartridge and close the Scanning Unit
(Cover).
If printing is in progress and you want to continue printing,
press the Stop button for at least 5 seconds with the ink
cartridge installed. Then printing can continue under the ink
out condition.
The function for detecting the remaining ink level will be
disabled.
Replace the empty ink cartridge immediately after the
printing. The resulting print quality is not satisfactory, if
printing is continued under the ink out condition.
Note
If the function for detecting the remaining ink level is
disabled, the ink cartridge in grey is displayed in the
remaining ink volume screen on the LCD.
An Error Message Is Displayed on the LCD
Page 583 of 681 pages
Routine Maintenance
There is no photo data on memory card.
There is no image data saved on the memory card that
can be read by this machine.
The machine may not recognize the file if the file name or
the folder path contains certain characters. Use only
alphanumeric characters.
Photo data edited or processed on a computer must be
printed from the computer.
Ink absorber is almost full.
The ink absorber is becoming full.
The machine has a built-in ink absorber to hold the ink used
during Print Head Cleaning.
Press the OK button to cancel the error so you can continue
printing. Before the ink absorber becomes completely full,
contact a Canon service representative. (You will need to
replace a particular part of the machine.)
Ink absorber full. Service required.
The ink absorber has become full.
The machine has a built-in ink absorber to hold the ink used
during Print Head Cleaning.
When the ink absorber becomes completely full, contact a
Canon service representative. (You will need to replace a
particular part of the machine.)
Timeout error has occurred.
Some errors occurred while copying and a certain time
passed.
Press the OK button to dismiss the error, and try to copy
again.
Incompatible device detected.
Remove the device.
Check the device connected to the Direct Print Port.
Printing photos directly is possible with a PictBridge
compliant device or the optional Bluetooth Unit BU-30.
A communication time out occurs if an operation takes
too long or if it takes too much time to send data. This
may cancel printing. In such cases, disconnect and
reconnect the USB cable.
When printing from a PictBridge compliant device,
depending on the model or brand of your device, you may
have to select a PictBridge compliant print mode on the
device before connecting it to the machine. You may also
have to turn on your device or select Play mode manually
after connecting the device to the machine. Perform
necessary operations before connecting your device
referring to its instruction manual.
If the error is still not resolved, check if you can print
another photograph.
An unsupported USB hub is connected.
Remove the hub.
If a PictBridge compliant device is connected via a USB hub,
remove the hub and connect it directly to the machine.
B200
Printer error has occurred.
See the manual.
Turn off the machine, and unplug the power cord of the
machine from the power supply.
If the problem is not resolved, contact your Canon service
representative.
****
"****" is displayed in the alphanumeric character and
depends on the error occurred.
5100/5110 is displayed:
Cancel printing, turn off the machine. Then clear the
jammed paper or protective material that is preventing
the FINE Cartridge Holder from moving.
Printer error has occurred.
Turn off power then back on again.
If problem persists, see the manual.
Caution
Be careful not to touch the components inside the
machine. The machine may not print out properly if
you touch it.
Turn the machine back on.
If the problem is not resolved, contact your Canon service
An Error Message Is Displayed on the LCD
Page 584 of 681 pages
representative.
In other cases:
Turn off the machine, and unplug the power cord of the
machine from the power supply.
Plug the machine back in and turn the machine back on.
If the problem is not resolved, contact your Canon service
representative.
Page top
LCD Cannot Be Seen At All
Page 585 of 681 pages
Advanced Guide > Troubleshooting > LCD Cannot Be Seen At All
LCD Cannot Be Seen At All
If the Power lamp is lit:
The machine is not powered on. Connect the power cord and press the ON button.
If the Power lamp is lit:
The LCD may be in the screen-saver mode. On the Operation Panel, press a button other than the
ON button.
Page top
An Unintended Language Is Displayed on the LCD
Page 586 of 681 pages
Advanced Guide > Troubleshooting > An Unintended Language Is Displayed on the LCD
An Unintended Language Is Displayed on the LCD
Select the language you want to be displayed according to the following procedure.
1. Press the Menu button, then wait for about 5 seconds.
2. Press the
button seven times, then press the OK button.
3. Press the
button eight times, then press the OK button.
If the Bluetooth Unit is connected, press the
4. Use the
button 10 times, then press the OK button.
button to select the language for the LCD, then press the OK button.
Page top
Cannot Install the MP Drivers
Page 587 of 681 pages
Advanced Guide > Troubleshooting > Cannot Install the MP Drivers
Cannot Install the MP Drivers
If the installation does not start even after the Setup CD-ROM is inserted
into your computer's disc drive:
Start the installation following the procedure below.
1. Click Start then Computer.
In Windows XP, click Start then My Computer.
In Windows 2000, double-click the
2. Double-click the
My Computer icon on the desktop.
CD-ROM icon on the displayed window.
If the contents of the CD-ROM are displayed, double-click MSETUP4.EXE.
Double-click the
CD-ROM icon on your desktop to start installation.
Note
If the CD-ROM icon is not displayed, try the following:
Remove the CD-ROM from your computer, then insert it again.
Restart your computer.
If the icon is still not displayed, try different discs and see if they are displayed. If other discs are
displayed, there is a problem with the Setup CD-ROM . In this case, contact your Canon service
representative.
If you are unable to proceed beyond the Printer Connection screen:
If you are unable to proceed beyond the Printer Connection screen, make sure that the USB cable is
securely plugged into the USB port of the machine and is connected to the computer, and then
Cannot Install the MP Drivers
Page 588 of 681 pages
follow the procedure below to reinstall the MP Drivers.
Note
In Windows Vista, "The printer is not detected. Check the connection." may be displayed
depending on the computer you use. In this case, wait for a while. If you still cannot proceed to
the next step, follow the procedure below to reinstall the MP Drivers.
1. Click Cancel on the Printer Connection screen.
2. Click Start Over on the Installation Failure screen.
3. Click Back on the screen that appears next.
4. Click Exit on the PIXMA XXX screen, then remove the CD-ROM.
5. Turn the machine off.
6. Restart the computer.
7. Make sure that you have no application software running.
8. Follow the procedure described in your setup manual to reinstall the MP Drivers.
In other cases:
Follow the procedure described in your setup manual to reinstall the MP Drivers.
If the MP Drivers were not installed correctly, uninstall the MP Drivers, restart your computer, and
then reinstall the MP Drivers.
Uninstalling the MP Drivers
If you reinstall the MP Drivers, select Custom Install on the Setup CD-ROM .
Note
If the installer was forced to be terminated due to a Windows error, the system may be in an
unstable condition and you may not be able to install the drivers. Restart your computer before
reinstalling.
Page top
Cannot Connect to Computer Properly
Page 589 of 681 pages
Advanced Guide > Troubleshooting > Cannot Connect to Computer Properly
Cannot Connect to Computer Properly
Printing or Scanning Speed Is Slow/Hi-Speed USB Connection Does Not Work/
"This device can perform faster" Message Is Displayed
If your system environment is not fully compatible with Hi-Speed USB, the machine will operate at
a lower speed provided under USB 1.1. In this case, the machine operates properly but printing
speed may slow down due to communication speed.
Check: Check the following to make sure that your system environment supports
Hi-Speed USB connection.
Does the USB port on your computer support Hi-Speed USB connection?
Do the USB cable, and the USB hub if you are using one, support Hi-Speed USB
connection?
Be sure to use a certified Hi-Speed USB cable. We recommend that the cable is no
longer than around 10 feet / 3 meters.
Does the operating system of your computer support Hi-Speed USB connection?
Obtain and install the latest update for your computer.
Does the Hi-Speed USB driver operate properly?
Obtain the latest version of the Hi-Speed USB driver compatible with your hardware
and reinstall it on your computer.
Important
For details on Hi-Speed USB of your system environment, contact the manufacturer of
your computer, USB cable, or USB hub.
Page top
Print Results Not Satisfactory
Page 590 of 681 pages
Advanced Guide > Troubleshooting > Print Results Not Satisfactory
Print Results Not Satisfactory
If the print result is not satisfactory due to white streaks, misaligned lines, or uneven colors, confirm the
paper and print quality settings first.
Check 1: Do the page size and media type settings match the size and
type of the loaded paper?
When these settings are incorrect, you cannot obtain a proper print result.
If you are printing a photograph or an illustration, incorrect paper type settings may reduce the quality
of the printout color.
Also, if you print with an incorrect paper type setting, the printed surface may be scratched.
In borderless printing, uneven coloring may occur depending on the combination of the paper type
setting and the loaded paper.
The method to confirm the paper and print quality settings differs depending on what you do with
your machine.
To copy by operating the machine
Confirm by using the Operation Panel on the
machine.
Copying
To print from your memory card by operating the
Confirm by using the Operation Panel on the
machine.
Setting Items
machine
To print from a PictBridge compliant device
Confirm by using your PictBridge compliant
device.
Printing Photographs Directly from a
Compliant Device
Confirm by using the Operation Panel on the
machine.
Changing the Machine Settings on the LCD
To print from a wireless communication device
Confirm by using the Operation Panel on the
machine.
Changing the Machine Settings on the LCD
To print from a computer
Confirm by using the printer driver.
Printing with Easy Setup
Check2: Make sure that the appropriate print quality is selected
according to the media type and printing data referring to the table in
Check 1.
Select a print quality option suitable for the paper and image for printing. If you notice blurs or uneven
colors, increase the print quality setting and try printing again.
Note
When printing from a PictBridge compliant device, set the print quality setting by using the
Operation Panel on the machine.
You cannot make this setting from a PictBridge compliant device.
You cannot change the print quality setting when printing from a wireless communication
device.
Check 3: If the problem is not resolved, there may be other causes.
See also the sections below:
Cannot Print to End of Job
No Printing Results/Printing Is Blurred/Colors Are Wrong/White Streaks
Colors Are Unclear
Lines Are Misaligned
Printed Paper Curls or Has Ink Blots
Print Results Not Satisfactory
Page 591 of 681 pages
Paper Is Smudged/Printed Surface Is Scratched
Back of the Paper Is Smudged
Vertical Lines Are Printed on the Sides of the Printout
Colors Are Uneven or Streaked
Page top
Cannot Print to End of Job
Page 592 of 681 pages
Advanced Guide > Troubleshooting > Print Results Not Satisfactory > Cannot Print to End of Job
Cannot Print to End of Job
Check 1: Is the size of the print data extremely large?
Click Print Options on the Page Setup sheet. Then, select the Prevent loss of print data check box in
the displayed dialog.
Check 2: Is the space of your computer's hard disk sufficient?
Delete unnecessary files to free disk space.
Page top
No Printing Results/Printing Is Blurred/Colors Are Wrong/White Streaks
Page 593 of 681 pages
Advanced Guide > Troubleshooting > Print Results Not Satisfactory > No Printing Results/Printing Is Blurred/Colors Are
Wrong/White Streaks
No Printing Results/Printing Is Blurred/Colors Are Wrong/White
Streaks
Check 1: Did you confirm the paper and print quality settings?
Print Results Not Satisfactory
Check 2: Is the FINE Cartridge installed properly?
No Printing Results/Printing Is Blurred/Colors Are Wrong/White Streaks
Page 594 of 681 pages
If the Ink Cartridge Locking Cover is not closed securely, ink may not be ejected correctly.
Open the Scanning Unit (Cover), open the Ink Cartridge Locking Cover, then close the Ink Cartridge
Locking Cover.
When you close the Ink Cartridge Locking Cover, push the Ink Cartridge Locking Cover until it clicks
into place.
Check 3: Print the Nozzle Check Pattern and perform any necessary
maintenance operations such as Print Head Cleaning.
Print the Nozzle Check Pattern to determine whether the ink ejects properly from the print head
nozzles.
Refer to Routine Maintenance for the Nozzle Check Pattern printing, Print Head Cleaning, and Print
Head Deep Cleaning.
If the Nozzle Check Pattern is not printed correctly:
After performing the Print Head Cleaning, print the Nozzle Check Pattern and examine the
pattern.
If the problem is not resolved after performing the Print Head Cleaning twice:
Perform the Print Head Deep Cleaning.
If the problem is not resolved after performing the Print Head Deep Cleaning, try it again.
If the problem is not resolved after performing the Print Head Deep Cleaning twice:
Ink may have run out. Replace the FINE Cartridge.
Check 4: When a FINE Cartridge runs out of ink, replace it with a new
one.
Check 5: When using paper with one printable surface, make sure that
the paper is loaded with the printable side facing up.
Printing on the wrong side of such paper may cause unclear prints or prints with reduced quality.
Refer to the paper's instruction manual for detailed information on the printable side.
When copying, see also the sections below:
Check6: Make sure that the original is properly loaded on the Platen
Glass.
Loading Paper / Originals
Check7: Is the original loaded with the side to be copied facing down on
the Platen Glass?
Check8: Did you copy a printout done by this machine?
Print from the memory card or from the digital camera directly, or reprint from the computer.
If you copy a printout done by this machine, print quality may be reduced.
Page top
Colors Are Unclear
Page 595 of 681 pages
Advanced Guide > Troubleshooting > Print Results Not Satisfactory > Colors Are Unclear
Colors Are Unclear
Check 1: Enable color correction.
When printing photographs or other graphics, enabling color correction in the printer driver may
improve color.
Select Vivid Photo in the Effects sheet in the printer properties dialog box.
Select Color Options in the pop-up menu in the Print dialog box, and then select Vivid Photo on the
Color Mode.
In Mac OS X v 10.4.x or Mac OS X v 10.3.9, select Special Effects in the Print dialog box, and then
select Vivid Photo.
Check 2: Is the FINE Cartridge installed properly?
If the Ink Cartridge Locking Cover is not closed securely, ink may not be ejected correctly.
Open the Scanning Unit (Cover), open the Ink Cartridge Locking Cover, then close the Ink Cartridge
Locking Cover.
When you close the Ink Cartridge Locking Cover, push the Ink Cartridge Locking Cover until it clicks
into place.
Check 3: When a FINE Cartridge runs out of ink, replace it with a new
one.
Check 4: Is the Nozzle Check Pattern printed properly?
Print the Nozzle Check Pattern to determine whether the ink ejects properly from the print head
nozzles.
Refer to Routine Maintenance for the Nozzle Check Pattern printing, Print Head Cleaning, and Print
Head Deep Cleaning.
If the Nozzle Check Pattern is not printed correctly:
After performing the Print Head Cleaning, print the Nozzle Check Pattern and examine the
pattern.
If the problem is not resolved after performing the Print Head Cleaning twice:
Perform the Print Head Deep Cleaning.
If the problem is not resolved after performing the Print Head Deep Cleaning, try it again.
If the problem is not resolved after performing the Print Head Deep Cleaning twice:
Ink may have run out. Replace the FINE Cartridge.
Note
Printed colors may not match screen colors due to basic differences in the methods used to
produce colors. Color control settings and environmental differences can also affect how colors
appear on the screen.
Page top
Lines Are Misaligned
Page 596 of 681 pages
Advanced Guide > Troubleshooting > Print Results Not Satisfactory > Lines Are Misaligned
Lines Are Misaligned
Check 1: Did you confirm the paper and print quality settings?
Print Results Not Satisfactory
Check 2: Perform Print Head Alignment
If you did not align the Print Head after installation, straight lines may be printed misaligned.
Routine Maintenance
Check 3: Is the size of the print data extremely large?
Click Print Options on the Page Setup sheet. Then, select the Prevent loss of print data check box in
the displayed dialog.
Check 4: Is the Printing layout printing or Binding margin function being
used?
When the Printing layout printing or Binding margin function is being used, thin lines may not be
printed. Try thickening the lines in the document.
Page top
Printed Paper Curls or Has Ink Blots
Page 597 of 681 pages
Advanced Guide > Troubleshooting > Print Results Not Satisfactory > Printed Paper Curls or Has Ink Blots
Printed Paper Curls or Has Ink Blots
Check 1: Did you confirm the paper and print quality settings?
Print Results Not Satisfactory
Check 2: If the intensity is set high, reduce the Intensity setting in the
printer driver and try printing again.
If you are using plain paper to print images with high intensity, the paper may absorb too much ink
and become wavy, causing paper abrasion.
Confirm the intensity using the printer driver.
Adjusting Intensity
Check 3: Is Photo Paper being used for printing photographs?
When printing data with high color saturation such as photographs or images in deep color, we
recommend using Photo Paper Plus Glossy II or other Canon speciality paper.
Loading Paper / Originals
Page top
Paper Is Smudged/Printed Surface Is Scratched
Page 598 of 681 pages
Advanced Guide > Troubleshooting > Print Results Not Satisfactory > Paper Is Smudged/Printed Surface Is Scratched
Paper Is Smudged/Printed Surface Is Scratched
Check 1: Did you confirm the paper and print quality settings?
Print Results Not Satisfactory
Check 2: Is the appropriate type of paper being used? Check the
following:
Check to see if the paper you are printing on is suitable for your printing purpose.
Loading Paper / Originals
When performing Borderless Printing, make sure that the paper you are using is suitable for
Borderless Printing.
If the paper you are using is not suitable for Borderless Printing, the print quality may be
reduced at the top and bottom edges of the paper.
Printing Area
Check 3: Load the paper after correcting its curl.
For Plain Paper
Turn the paper over and reload it to print on the other side.
Leaving the paper loaded on the Rear Tray for a long time may cause the paper to curl. In this
case, load the paper with the other side facing up. It may resolve the problem.
We recommend putting unused paper back into the package and keeping it on a level surface.
For Other Paper
1. With the printing side (A) facing up, cover the paper with a fresh sheet of plain paper to
avoid staining or scratching the surface.
2. Roll up the paper in the opposite direction to the paper curl as seen below.
3. Check to see that the paper curl is within approximately 0.08 to 0.2 inches / 2 to 5 mm (B) in
height.
Paper Is Smudged/Printed Surface Is Scratched
Page 599 of 681 pages
We recommend printing curl-corrected paper one sheet at a time.
Note
Depending on the media type, the paper may be smudged or may not be fed properly even if it
is not curled. In such cases, follow the procedure described above to curl the paper before
printing. This may improve the print result.
Check 4: If you are printing on thick paper, select the Prevent paper
abrasion setting.
Selecting the Prevent paper abrasion setting will widen the clearance between the Print Head and
the loaded paper. If you notice abrasion even with the media type set correctly to match the loaded
paper, set the machine to prevent paper abrasion by using the Operation Panel or the printer driver.
Print speed is reduced if you are selecting the Prevent paper abrasion setting.
* Deactivate the Prevent paper abrasion setting once printing is complete. If not, this setting remains
enabled for all subsequent print jobs.
To set by using the Operation Panel
Press the Menu button, select Device settings, then set Prevent abrasion to Enable.
Changing the Machine Settings on the LCD
To set by using the printer driver
Open the printer properties dialog box, and in Custom Settings in the Maintenance sheet, select
the Prevent paper abrasion check box, and then click Send.
To open the printer properties dialog box, see Opening the Printer Properties Dialog Box
(Windows) .
In the Canon IJ Printer Utility, select Custom Settings in the pop-up menu, select the Prevent
paper abrasion check box, and then click Send.
To open the Canon IJ Printer Utility, see Opening the Canon IJ Printer Utility (Macintosh) .
Check 5: If the intensity is set high, reduce the Intensity setting in the
printer driver and try printing again.
If you are using plain paper to print images with high intensity, the paper may absorb too much ink
and become wavy, causing paper abrasion.
Reduce the Intensity setting in the printer driver and try printing again.
1. Open the printer properties dialog box.
Opening the Printer Properties Dialog Box (Windows)
Click Here: Printer Driver
* Before clicking here to open the printer properties dialog box, quit the running application
software.
2. On the Main sheet, select Manual for Color/Intensity, and then click Set.
3. Drag the Intensity slide bar on the Color Adjustment sheet to adjust the intensity.
1. Open the Print dialog box.
Opening the Page Setup and Print Dialog Box (Macintosh)
2. Select Color Options in the pop-up menu.
Paper Is Smudged/Printed Surface Is Scratched
Page 600 of 681 pages
3. Drag the Intensity slide bar to set the intensity.
Check 6: Is printing performed beyond the recommended printing area?
If you are printing beyond the recommended printing area of your printing paper, the lower edge of
the paper may become stained with ink.
Resize your original document in your application software.
Printing Area
Check 7: Is the Platen Glass dirty?
Clean the Platen Glass.
Cleaning the Platen Glass and Document Cover
Check 8: Is the Paper Feed Roller dirty?
Clean the Paper Feed Roller.
Routine Maintenance
Note
Cleaning the Paper Feed Roller will wear the roller, so perform this procedure only when
necessary.
Check 9: Is inside of the machine dirty?
When performing duplex printing, the inside of the machine may become stained with ink, causing
the printout to become smudged.
Perform the Bottom Plate Cleaning to clean the inside of the machine.
Cleaning the Inside of the Machine (Bottom Plate Cleaning)
Note
To prevent the inside of the machine from stains, set the paper size correctly.
Check 10: Set Ink Drying Wait Time longer.
Doing so gives the printed surface enough time to dry so that paper smudged and scratched are
prevented.
1. Make sure that the machine is turned on.
2. Open the printer properties dialog box.
Opening the Printer Properties Dialog Box (Windows)
3. Click the Maintenance tab and then Custom Settings.
4. Drag the Ink Drying Wait Time slide bar to set the wait time, and then click Send.
5. Confirm the message and click OK.
1. Make sure that the machine is turned on.
2. Open the Canon IJ Printer Utility.
Opening the Canon IJ Printer Utility (Macintosh)
3. Select Custom Settings in the pop-up menu.
Paper Is Smudged/Printed Surface Is Scratched
Page 601 of 681 pages
4. Drag the Ink Drying Wait Time slide bar to set the wait time, and then click Send.
5. Confirm the message and click OK.
Check 11: Is the paper scratched by other loaded paper?
Depending on the media type, the paper may be scratched by other loaded paper when feeding from
the Rear Tray. In this case, load one sheet at a time.
Page top
Back of the Paper Is Smudged
Page 602 of 681 pages
Advanced Guide > Troubleshooting > Print Results Not Satisfactory > Back of the Paper Is Smudged
Back of the Paper Is Smudged
Check 1: Did you confirm the paper and print quality settings?
Print Results Not Satisfactory
Check 2: Perform the Bottom Plate Cleaning to clean the inside of the
machine.
Cleaning the Inside of the Machine (Bottom Plate Cleaning)
Note
When performing duplex printing or too much printing, the inside may become stained with ink.
Page top
Vertical Lines Are Printed on the Sides of the Printout
Page 603 of 681 pages
Advanced Guide > Troubleshooting > Print Results Not Satisfactory > Vertical Lines Are Printed on the Sides of the
Printout
Vertical Lines Are Printed on the Sides of the Printout
Check 1: Did you confirm the paper type and print quality settings?
Print Results Not Satisfactory
Check 2: Is the size of the loaded paper correct?
The margin may be smudged if the size of the loaded paper is larger than that specified in the
printer driver.
Set the paper size correctly according to the paper you loaded.
Print Results Not Satisfactory
Note
This machine performs automatic cleaning when necessary to keep printouts clean. A small
amount of ink is ejected for cleaning.
Although ink is usually ejected on the ink absorber, it may be ejected on the paper if you load
paper larger than that specified with the printer driver.
Page top
Colors Are Uneven or Streaked
Page 604 of 681 pages
Advanced Guide > Troubleshooting > Print Results Not Satisfactory > Colors Are Uneven or Streaked
Colors Are Uneven or Streaked
Check 1: Did you confirm the paper and print quality settings?
Print Results Not Satisfactory
Check 2: Print the Nozzle Check Pattern and perform any necessary
maintenance operations such as Print Head Cleaning.
Print the Nozzle Check Pattern to determine whether the ink ejects properly from the print head
nozzles.
Refer to Routine Maintenance for the Nozzle Check Pattern printing, Print Head Cleaning, and Print
Head Deep Cleaning.
If the Nozzle Check Pattern is not printed correctly:
After performing the Print Head Cleaning, print the Nozzle Check Pattern and examine the
pattern.
If the problem is not resolved after performing the Print Head Cleaning twice:
Perform the Print Head Deep Cleaning.
If the problem is not resolved after performing the Print Head Deep Cleaning, try it again.
If the problem is not resolved after performing the Print Head Deep Cleaning twice:
Ink may have run out. Replace the FINE Cartridge.
Check 3: Perform Print Head Alignment.
Routine Maintenance
Page top
Printing Does Not Start
Page 605 of 681 pages
Advanced Guide > Troubleshooting > Printing Does Not Start
Printing Does Not Start
Check 1: Make sure that the power plug is securely plugged in, then
turn the machine on.
While the Power lamp is flashing green, the machine is initializing. Wait until the Power lamp stops
flashing and remains lit green.
Note
When printing large data such as a photo or graphics, it may take longer to start printing. While
the Power lamp is flashing green, the computer is processing data and sending it to the
machine. Wait until printing starts.
Check 2: Make sure that the USB cable is securely plugged in to the
machine and the computer, then check the following:
If you are using a relay device such as a USB hub, disconnect it, connect the machine directly to
the computer, and try printing again. If printing starts normally, there is a problem with the relay
device. Consult the reseller of the relay device for details.
There could also be a problem with the USB cable. Replace the USB cable and try printing
again.
Check 3: Restart your computer if you are printing from the computer.
If there are any unnecessary print jobs, delete them.
Deleting the Undesired Print Job
Check 4: Make sure that your machine's name is selected in the Print
dialog box.
The machine will not print properly if you are using a driver for a different printer.
In Windows, make sure that your machine's name is selected in the Print dialog box.
On a Macintosh, make sure that your machine's name is selected in Printer in the Print dialog box.
Note
To make the machine the one selected by default, select Set as Default Printer (Windows),
Default Printer or Make Default (Macintosh).
Check 5: Configure the printer port appropriately.
Configure "USBnnn" (where "n" is a number) as the printer port.
1. Log on as a user account with administrator privilege.
2. Click Control Panel, then Printer under Hardware and Sound.
In Windows XP, click Control Panel, Printers and Other Hardware, then Printers and Faxes.
In Windows 2000, click Control Panel then Printers.
3. Right-click the Canon XXX Printer icon, then select Properties.
4. Click the Ports tab to confirm the port settings.
Make sure that a port named USBnnn (where "n" is a number) with Canon XXX Printer
appearing in the Printer column is selected for Print to the following port(s).
If the setting is incorrect, reinstall the MP Drivers or change the printer port to the correct one.
Page top
Copying/Printing Stops Before It Is Completed
Page 606 of 681 pages
Advanced Guide > Troubleshooting > Copying/Printing Stops Before It Is Completed
Copying/Printing Stops Before It Is Completed
Check 1: Has the machine been printing continuously for a long
period?
If the machine has been printing continuously for a long time, the Print Head may overheat. To
protect the Print Head, the machine may stop printing at a line break for a period of time and then
resume printing.
In this case, interrupt your print session at a convenient time and turn the machine off for at least 15
minutes.
Additionally, if the machine has been printing graphics or photos with intense colors continuously
over a period of time, the machine may stop printing to protect the Print Head. In this case, printing
will not resume automatically. Turn the machine off for at least 15 minutes.
Caution
The Print Head and the surrounding area can become extremely hot inside the machine. Never
touch the Print Head or nearby components.
Check 2: Is the paper loaded?
Make sure that paper is loaded in the Rear Tray.
If the machine has run out of paper, load paper.
Check 3: Do the printing documents have lots of photographs or
illustrations?
Printing large data such as photos or graphics takes time for the machine and the computer to
process, during which the machine may appear to have stopped operating.
In addition, when printing data that uses a large amount of ink continuously on plain paper, the
machine may pause temporarily. In either case, wait until the process is complete.
Note
If you are printing a document with a large printing area or printing multiple copies of a
document, printing may pause to allow the ink to dry.
Page top
Machine Moves But Ink Is Not Ejected
Page 607 of 681 pages
Advanced Guide > Troubleshooting > Machine Moves But Ink Is Not Ejected
Machine Moves But Ink Is Not Ejected
Check 1: Are the Print Head nozzles clogged?
Print the Nozzle Check Pattern to determine whether the ink ejects properly from the print head
nozzles.
Refer to Routine Maintenance for the Nozzle Check Pattern printing, Print Head Cleaning, and Print
Head Deep Cleaning.
If the Nozzle Check Pattern is not printed correctly:
After performing the Print Head Cleaning, print the Nozzle Check Pattern and examine the
pattern.
If the problem is not resolved after performing the Print Head Cleaning twice:
Perform the Print Head Deep Cleaning.
If the problem is not resolved after performing the Print Head Deep Cleaning, try it again.
If the problem is not resolved after performing the Print Head Deep Cleaning twice:
Ink may have run out. Replace the FINE Cartridge.
Check 2: Is the FINE Cartridge installed properly?
If the Ink Cartridge Locking Cover is not closed securely, ink may not be ejected correctly.
Open the Scanning Unit (Cover), open the Ink Cartridge Locking Cover, then close the Ink Cartridge
Locking Cover.
When you close the Ink Cartridge Locking Cover, push the Ink Cartridge Locking Cover until it clicks
into place.
Check 3: When a FINE Cartridge runs out of ink, replace it with a new
one.
Page top
Printing Speed Not as Fast as Expected
Page 608 of 681 pages
Advanced Guide > Troubleshooting > Printing Speed Not as Fast as Expected
Printing Speed Not as Fast as Expected
Check 1: Is printing performed in Quiet Mode?
Print speed is reduced if you specified to print in Quiet Mode in the printer driver or Operation Panel.
For faster printing, do not print in Quiet Mode.
For information on the printer driver settings, refer to Reducing the Machine Noise .
For information to make setting on the Operation Panel, see Changing the Machine Settings on the
LCD.
Check 2: Is the print quality set too high?
Increase the printing speed setting in the printer driver. Setting to prioritize speed makes printing
faster.
1. Open the printer properties dialog box.
Opening the Printer Properties Dialog Box (Windows)
Click Here: Printer Driver
* Before clicking here to open the printer properties dialog box, quit the running application
software.
2. On the Main sheet, select Fast for the Print Quality setting.
Depending on the media type, the Fast option may not be available.
1. Open the Print dialog box.
Opening the Page Setup and Print Dialog Box (Macintosh)
2. Select Quality & Media in the pop-up menu and then select Fast for the Print
Quality setting.
Depending on the media type, the Fast option may not be available.
Note
Printing speed may not improve noticeably by following the instructions above, depending on your
system environment.
Page top
FINE Cartridge Holder Does Not Move to the Position for Replacing
Page 609 of 681 pages
Advanced Guide > Troubleshooting > FINE Cartridge Holder Does Not Move to the Position for Replacing
FINE Cartridge Holder Does Not Move to the Position for
Replacing
Check 1: Is the Power lamp off?
Check if the Power lamp is lit green.
The FINE Cartridge Holder will not move unless the power is on. If the Power lamp is off, close the
Scanning Unit (Cover) and turn the machine on.
While the Power lamp is flashing green, the machine is initializing. Wait until the Power lamp stops
flashing and remains lit green, and then open the Scanning Unit (Cover) again.
Check 2: Is an error message displayed on the LCD?
Close the Scanning Unit (Cover), confirm the number of times the Alarm lamp is flashing, take the
appropriate action to resolve the error, and then reopen it. For details on how to resolve the error,
see An Error Message Is Displayed on the LCD .
Check 3: Has the Scanning Unit (Cover) been left open for 10 minutes or
longer?
If the Scanning Unit (Cover) is left open for more than 10 minutes, the FINE Cartridge Holder moves
to the right to prevent the Print Head from drying out. Close and reopen the Scanning Unit (Cover) to
return the FINE Cartridge Holder to the left.
Check 4: Has the machine been printing continuously for a long
period?
Close the Scanning Unit (Cover), wait a while, then reopen it.
If the machine has been printing continuously for a long time, the Print Head will overheat, and the
machine stops printing temporarily to protect the Print Head.
Note
Opening the Scanning Unit (Cover) while printing moves the FINE Cartridge Holder to the right.
Close the Scanning Unit (Cover), and reopen it after printing is complete.
Page top
Paper Does Not Feed Properly
Page 610 of 681 pages
Advanced Guide > Troubleshooting > Paper Does Not Feed Properly
Paper Does Not Feed Properly
Check 1: Make sure of the following when you load paper.
When loading two or more sheets of paper, align the edges of the sheets before loading.
When loading two or more sheets of paper, make sure that the paper stack does not exceed the
paper support load limit.
However, proper feeding of paper may not be possible at this maximum capacity depending on
the type of paper or environmental conditions (either very high or low temperature and humidity).
In such cases, reduce the sheets of paper you load at a time to less than half of the paper
support load limit.
Always load the paper in portrait orientation, regardless of the printing orientation.
When you load the paper on the Rear Tray, load the paper with the print side facing UP and
slide the Paper Guides to align with the both side of the paper.
Loading Paper / Originals
Check 2: Check to see if the paper you are printing on is too thick or
curled.
Loading Paper / Originals
Check 3: Make sure of the following when you load envelopes.
When printing on envelopes, refer to Loading Paper / Originals , and prepare the envelopes before
printing.
Once you have prepared the envelopes, load them in portrait orientation. If the envelopes are placed
in landscape orientation, they will not feed properly.
Check 4: Remove any foreign objects from the Rear Tray.
Check 5: Clean the Paper Feed Roller.
Routine Maintenance
Note
Cleaning the Paper Feed Roller will wear the roller, so perform this procedure only when
necessary.
Page top
Paper Jams
Page 611 of 681 pages
Advanced Guide > Troubleshooting > Paper Jams
Paper Jams
Note
If you need to turn off the machine to remove jammed paper during printing, press the Stop button
to cancel print jobs before turning off the machine.
If the paper is jammed in the Paper Output Slot or the Rear Tray:
Remove the paper following the procedure below.
1.
Slowly pull the paper out, either from the Rear Tray or from the Paper Output Slot,
whichever is easier.
Note
If the paper tears and a piece remains inside the machine, turn the machine off, open
the Scanning Unit (Cover), and remove the paper.
Be careful not to touch the components inside the machine.
After removing all paper, close the Scanning Unit (Cover), and turn the machine back on.
If you cannot pull the paper out, turn the machine off and turn it back on. The paper may
be ejected automatically.
2.
Reload the paper, and press the OK button on the machine.
If you turned off the machine in step (1), all print jobs in the queue are canceled. Reprint if
necessary.
Note
When reloading the paper, confirm that you are using the correct paper and are loading it
correctly.
Loading Paper / Originals
A5-sized paper is suited to printing documents consisting mainly of text. We do not
recommend using such paper to print documents with photos or graphics, since the
printout may curl and cause paper exit jams.
If you cannot remove the paper or the paper tears inside the machine, or if the paper jam error
continues after removing the paper, contact your Canon service representative.
In other cases:
Make sure of the following:
Check 1: Are there any foreign objects in the Rear Tray or around the Paper
Output Slot?
Check 2: Is the paper curled?
Check 3: Load the paper after correcting its curl.
Paper Jams
Page 612 of 681 pages
Page top
Message Appears on the Computer Screen
Page 613 of 681 pages
Advanced Guide > Troubleshooting > Message Appears on the Computer Screen
Message Appears on the Computer Screen
Service Error 5100 Is Displayed
Writing Error/Output Error/Communication Error
Error Number: 300 Is Displayed
Error Number: 1700 Is Displayed
Ink Info Number: 1688 Is Displayed
Ink Info Number: 1686 Is Displayed
Error Number: 2001 Is Displayed
Error Number: 2002 Is Displayed
Other Error Messages
Service Error 5100 Is Displayed
Check: Is the movement of the FINE Cartridge Holder blocked?
Cancel printing from your computer, turn off the machine. Then clear the jammed paper or
protective material that is preventing the FINE Cartridge Holder from moving.
Important
Be careful not to touch the components inside the machine. The machine may not print
out properly if you touch it.
Turn the machine back on.
If the problem is not resolved, contact your Canon service representative.
Writing Error/Output Error/Communication Error
Check 1: If the Power lamp is off, make sure that the power plug is plugged in,
then turn the machine on.
While the Power lamp is flashing green, the machine is initializing. Wait until the Power lamp
stops flashing and remains lit green.
Check 2: Make sure that the printer port is configured appropriately in the MP
Drivers.
* In the following instructions, " XXX" signifies your machine's name.
1.
Log on as a user account with administrator privilege.
2.
Click Control Panel, then Printer under Hardware and Sound.
In Windows XP, click Control Panel, Printers and Other Hardware, then Printers and
Faxes.
In Windows 2000, click Control Panel then Printers.
3.
Right-click the Canon XXX Printer icon, then select Properties.
4.
Click the Ports tab to confirm the port settings.
Make sure that a port named USBnnn (where "n" is a number) with Canon XXX Printer
appearing in the Printer column is selected for Print to the following port(s).
If the port setting is not correct, reinstall the MP Drivers or change the port setting
according to the interface you are using.
Message Appears on the Computer Screen
Page 614 of 681 pages
Check 3: Make sure that the USB cable is securely plugged in to the machine
and the computer.
If you are using a relay device such as a USB hub, disconnect it, connect the machine
directly to the computer, and try printing again. If printing starts normally, there is a
problem with the relay device. Consult the reseller of the relay device for details.
There could also be a problem with the USB cable. Replace the USB cable and try
printing again.
Check 4: Make sure that the MP drivers are installed correctly.
Uninstall the MP Drivers following the procedure described in Uninstalling the MP Drivers and
reinstall them following the procedure described in your setup manual.
Check 5: Check the status of the device on your computer.
Follow the procedure below to check the status of the device.
1.
Click Control Panel, Hardware and Sound, then Device Manager.
If the User Account Control screen is displayed, follow the on-screen instructions.
In Windows XP, click Control Panel, Performance and Maintenance, System, then click
Device Manager on the Hardware sheet.
In Windows 2000, click Control Panel, System, then Device Manager on the Hardware
sheet.
2.
Double-click Universal Serial Bus controllers then USB Printing Support.
If USB Printing Support is not displayed, make sure that the machine is correctly
connected to the computer.
Check 3: Make sure that the USB cable is securely plugged in to the machine and the
computer.
3.
Click the General tab and make sure that there is no indication of a problem with the
device.
If a device error is displayed, refer to Windows help to resolve the error.
Error Number: 300 Is Displayed
Check 1: If the Power lamp is off, make sure that the power plug is plugged in,
then turn the machine on.
While the Power lamp is flashing green, the machine is initializing. Wait until the Power lamp
stops flashing and remains lit green.
Check 2: Make sure that the USB cable is securely plugged in to the machine
and the computer.
If you are using a relay device such as a USB hub, disconnect it, connect the machine
directly to the computer, and try printing again. If printing starts normally, there is a
problem with the relay device. Consult the reseller of the relay device for details.
There could also be a problem with the USB cable. Replace the USB cable and try
printing again.
Check 3: Make sure that your machine's name is selected in the Print dialog
box.
Opening the Page Setup and Print Dialog Box (Macintosh)
Error Number: 1700 Is Displayed
Check: See Ink absorber is almost full. in An Error Message Is Displayed on the
LCD and take the appropriate action.
Ink Info Number: 1688 Is Displayed
Message Appears on the Computer Screen
Page 615 of 681 pages
Check: See Ink has run out. Replace the ink cartridge. in An Error Message Is
Displayed on the LCD and take the appropriate action.
Ink Info Number: 1686 Is Displayed
Check: See Ink may have run out. Replacing the ink cartridge is recommended. in
An Error Message Is Displayed on the LCD and take the appropriate action.
Error Number: 2001 Is Displayed
Check: See Incompatible device detected. in An Error Message Is Displayed on
the LCD and take the appropriate action.
Error Number: 2002 Is Displayed
Check: See An unsupported USB hub is connected. Remove the hub. in An Error
Message Is Displayed on the LCD and take the appropriate action.
Other Error Messages
Check: If an error message is displayed outside the printer status monitor, check
the following:
"Could not spool successfully due to insufficient disk space"
Delete any unnecessary files to increase the amount of free space on the disk.
"Could not spool successfully due to insufficient memory"
Quit other running applications to increase available memory.
If you still cannot print, restart your computer and retry printing.
"Printer driver could not be found"
Uninstall the printer driver according to the procedure described in Uninstalling the MP
Drivers, and then reinstall it.
"Could not print Application name - File name"
Try printing again once the current job is complete.
Page top
For Windows Users
Page 616 of 681 pages
Advanced Guide > Troubleshooting > For Windows Users
For Windows Users
Printer Status Monitor Is Not Displayed
Check: Is the printer status monitor enabled?
Make sure that Enable Status Monitor is selected on the Option menu of the printer status
monitor.
1.
Open the printer properties dialog box.
Opening the Printer Properties Dialog Box (Windows)
2.
On the Maintenance sheet, click View Printer Status.
3.
Select Enable Status Monitor on the Option menu if it is not selected.
The Inkjet Printer/Scanner Extended Survey Program Screen Is Displayed
If the Inkjet Printer/Scanner Extended Survey Program is installed, the confirmation screen asking
to send the printer usage information will be displayed three months and then six months after the
installation. After that, it will be displayed every half a year for about four years.
Read the instructions on the screen and follow the procedure below.
If you agree to participate in the survey program:
Click Agree, then follow the on-screen instructions. The printer usage information will be sent
to Canon via the Internet.
Note
When sending the information, the caution screen such as an Internet security screen
may be displayed.
In this case, confirm the program name is "IJPLMUI.exe", then allow it.
If you do not agree to participate in the survey program:
Click Do not agree. The confirmation screen will be closed, and the survey at that time is
skipped. The confirmation screen will be displayed again three months later.
To uninstall the Inkjet Printer/Scanner Extended Survey Program:
For Windows Users
Page 617 of 681 pages
To uninstall the Inkjet Printer/Scanner Extended Survey Program, click Details, then click
Uninstall on the detail description screen. Once the program has been uninstalled, neither
the survey nor the transmission of the printer usage information will be performed.
Page top
Error Message Appears on a PictBridge Compliant Device
Page 618 of 681 pages
Advanced Guide > Troubleshooting > Error Message Appears on a PictBridge Compliant Device
Error Message Appears on a PictBridge Compliant Device
The following are the possible errors that may occur when printing directly from a PictBridge compliant
device and the countermeasures to clear them.
Note
This section describes errors that are indicated on Canon-brand PictBridge compliant devices. The
error messages and operations may vary depending on the device you are using. For errors on non
-Canon PictBridge compliant devices, check the error message on the LCD and take the
appropriate action to clear the error. For details, see An Error Message Is Displayed on the LCD .
For the errors indicated on the PictBridge compliant device and their solution, also refer to the
instruction manual of the device. For other troubles on the device, contact the manufacturer.
Error Message On PictBridge
Compliant Device
Action
"Printer in use"
If the machine is printing from the computer or warming up,
wait until the job ends.
When it is ready, the machine starts printing automatically.
"No paper"
Load paper on the Rear Tray, and select Continue* in the
display on your PictBridge compliant device.
* To resume printing, you can also press the OK button on
the machine instead of selecting Continue on the device.
"Paper jam"
Select Stop in the display on your PictBridge compliant
device to stop printing.
Remove the jammed paper, load new paper, press the OK
button on the machine, and try printing again.
"Printer cover open"
Close the Scanning Unit (Cover) on the machine.
"No print head"
The FINE Cartridge is not installed or the Cartridge may not
be compatible with this machine.
Check: See Print head is not installed. Install the print head.
in An Error Message Is Displayed on the LCD and take the
appropriate action.
"Waste tank full"/"Ink absorber full"
The ink absorber is nearly full.
Check: See Ink absorber is almost full. in An Error Message
Is Displayed on the LCD and take the appropriate action.
"No ink"/
"Ink cassette error"
The FINE Cartridge has or may have run out of ink.
The FINE Cartridge may not be installed properly or may
not be compatible with this machine.
Check the error message on the LCD and take the
appropriate action to resolve the error.
An Error Message Is Displayed on the LCD
"Hardware Error"
FINE Cartridge errors have occurred.
Replace the FINE Cartridge.
Routine Maintenance
"Printer error"
An error requiring servicing may have occurred. (The Power
lamp flashes green and Alarm lamp flashes orange
alternately.)
Disconnect the USB cable between the machine and the
PictBridge compliant device, turn off the machine, and
unplug the power cord of the machine from the power
supply.
Plug the power cord of the machine back in, turn on the
machine, and then reconnect the PictBridge compliant
device to the machine.
If the same error occurs, contact your Canon service
representative.
Error Message Appears on a PictBridge Compliant Device
Page 619 of 681 pages
Page top
Cannot Print Properly from a Wireless Communication Device
Page 620 of 681 pages
Advanced Guide > Troubleshooting > Cannot Print Properly from a Wireless Communication Device
Cannot Print Properly from a Wireless Communication Device
Check: Is printing possible through Bluetooth communication?
Troubleshooting
Page top
Cannot Print Properly from a Photo Index Sheet
Page 621 of 681 pages
Advanced Guide > Troubleshooting > Cannot Print Properly from a Photo Index Sheet
Cannot Print Properly from a Photo Index Sheet
Check the following if Failed to scan Photo Index Sheet. is displayed on
the LCD, press the OK button, and perform the Scan sheet and print
menu again.
Did you set Photo Index Sheet in the correct position and orientation on the Platen Glass?
Are the Platen Glass and the Photo Index Sheet dirty?
Are all required circles on the Photo Index Sheet filled in?
Is the circle for the number of copies to print for each photograph filled when you print with
DPOF print?
Note
If the filled circles on the Photo Index Sheet are not dark or vast enough, the machine may not
scan the Photo Index Sheet properly.
Page top
Cannot Remove a Memory Card
Page 622 of 681 pages
Advanced Guide > Troubleshooting > Cannot Remove a Memory Card
Cannot Remove a Memory Card
Contact your Canon service representative.
Important
Never attempt to remove a memory card using a thin stick or tweezers. Doing so may damage the
machine.
Note
Exclusive adapters are required for the following memory cards. Insert these cards in the machine
with adapters attached.
miniSD Card/miniSDHC Card/microSD Card/microSDHC Card/xD-Picture Card/xD-Picture Card
Type M/xD-Picture Card Type H/Memory Stick Micro/RS-MMC (ver.4.1)
Page top
Problems with Scanning
Page 623 of 681 pages
Advanced Guide > Troubleshooting > Problems with Scanning
Problems with Scanning
Scanner Does Not Work
ScanGear (Scanner Driver) Does Not Start
Error Message Appears and the ScanGear (Scanner Driver) Screen Does Not Appear
Scan Quality (Image Displayed on the Monitor) Is Poor
Scanned Image Is Surrounded by Extra White Areas
Cannot Scan Properly with Multi Crop
Slow Scanning Speed
"There is not enough memory." Message Is Displayed
Computer Stops Operating during Scanning
Scanner Does Not Work After Upgrading Windows
Page top
Scanner Does Not Work
Page 624 of 681 pages
Advanced Guide > Troubleshooting > Problems with Scanning > Scanner Does Not Work
Scanner Does Not Work
Check: Restart the computer.
Page top
ScanGear (Scanner Driver) Does Not Start
Page 625 of 681 pages
Advanced Guide > Troubleshooting > Problems with Scanning > ScanGear (Scanner Driver) Does Not Start
ScanGear (Scanner Driver) Does Not Start
Check 1: Make sure that the MP Drivers are installed.
Insert the Setup CD-ROM into the computer's disc drive, then select Custom Install and install MP
Drivers.
Check 2: On the File menu of the application, select Select Source and
select the machine.
Important
Do not select the model name that includes WIA in it.
Note
The operation may differ depending on the application.
Check 3: Start from a TWAIN-compliant application.
Page top
Error Message Appears and the ScanGear (Scanner Driver) Screen Does N... Page 626 of 681 pages
Advanced Guide > Troubleshooting > Problems with Scanning > Error Message Appears and the ScanGear (Scanner
Driver) Screen Does Not Appear
Error Message Appears and the ScanGear (Scanner Driver)
Screen Does Not Appear
Check 1: Make sure that the machine is turned on.
Check 2: Connect the USB cable to a different USB port on the computer.
Check 3: If the USB cable is connected to a hub, remove it from the hub
and connect it to a USB port on the computer.
Check 4: Make sure that the MP Drivers are installed.
If it is not installed, insert the "Setup CD-ROM" into the computer's disc drive, then select Custom Install
and install MP Drivers.
Check 5: On the File menu of the application, select Select Source and
select the machine.
Note
The operation may differ depending on the application.
Check 6: Make sure that the application is TWAIN-compliant.
You cannot open ScanGear (scanner driver) from applications not supporting TWAIN.
Check 7: Exit ScanGear (scanner driver) if it is running on another
application.
Page top
Scan Quality (Image Displayed on the Monitor) Is Poor
Page 627 of 681 pages
Advanced Guide > Troubleshooting > Problems with Scanning > Scan Quality (Image Displayed on the Monitor) Is Poor
Scan Quality (Image Displayed on the Monitor) Is Poor
Check 1: Increase the scanning resolution.
Resolution
Check 2: Set the scale to 100%.
Some applications do not display images clearly if the image is too small.
Check 3: If moire (stripe pattern) appears, take the following measures and
scan again.
On the Basic Mode tab of ScanGear (scanner driver), select Magazine(Color) in Select Source.
On the Advanced Mode tab of ScanGear (scanner driver), set Descreen in Image Settings to ON.
Image Settings
Important
If moire appears when you scan a digital print photo, take the above measures and scan again.
If you use MP Navigator EX, set Document Type to Magazine(Color) or enable Descreen in the Scan
Settings dialog box and scan again.
Scan Settings Dialog Box (Photos/Documents)
Check 4: Check the monitor's color depth.
From the Start menu, select Control Panel > Appearance and Personalization > Adjust screen resolution
to open the Display Settings dialog box. Set the color depth to Medium (16 bit) or Highest (32 bit).
Windows XP:
From the Start menu, select Control Panel > Display to open the Display Properties dialog box. On
the Settings tab, set the color depth to Medium (16 bit) or Highest (32 bit).
Windows 2000:
From the Start menu, select Settings > Control Panel > Display to open the Display Properties dialog
box. On the Settings tab, set Colors to High Color (16 bit) or True Color (32 bit).
Check 5: The Platen or Document Cover may be dirty.
Clean the parts by following the procedures in " Cleaning the Exterior of the Machine ."
Check 6: If the document is in poor condition (dirty, faded, etc.), use
Reduce Dust and Scratches, Fading Correction, Grain Correction, etc. in
Image Settings on the Advanced Mode tab of ScanGear (scanner driver).
Image Settings
Check 7: If the color tone of images with consistent color tone (such as the
sky) is different from the original document, take the following measures
and scan again.
On the Advanced Mode tab of ScanGear (scanner driver), set Auto Tone in Image Settings to OFF.
Image Settings
Open the Preferences dialog box from the Advanced Mode tab of ScanGear (scanner driver) and set
Color Matching on the Color Settings tab.
Color Settings Tab
Page top
Scanned Image Is Surrounded by Extra White Areas
Page 628 of 681 pages
Advanced Guide > Troubleshooting > Problems with Scanning > Scanned Image Is Surrounded by Extra White Areas
Scanned Image Is Surrounded by Extra White Areas
Check: Specify the scan area.
(Auto Crop) in ScanGear (scanner driver) to automatically set the scan area for your document.
Click
You can also manually specify the scan area, for example when there are white margins along the
document.
Adjusting Cropping Frames
Page top
Cannot Scan Properly with Multi Crop
Page 629 of 681 pages
Advanced Guide > Troubleshooting > Problems with Scanning > Cannot Scan Properly with Multi Crop
Cannot Scan Properly with Multi Crop
Check 1: Make sure that the documents are placed correctly on the Platen.
Placing Documents
Check 2: Scan each item individually without using Multi Crop.
Some applications do not support multiple image scanning.
Page top
Slow Scanning Speed
Page 630 of 681 pages
Advanced Guide > Troubleshooting > Problems with Scanning > Slow Scanning Speed
Slow Scanning Speed
Check 1: To view the image on a monitor, set the output resolution to
around 150 dpi. To print, set it to around 300 dpi.
Resolution
Check 2: Disable Fading Correction, Grain Correction, etc.
Image Settings
Check 3: In MP Navigator EX, deselect the Correct slanted document
checkbox and scan again.
Scan Settings Dialog Box
Check 4: In MP Navigator EX, deselect the Detect the orientation of text
documents and rotate images checkbox and scan again.
Scan Settings Dialog Box
Page top
"There is not enough memory." Message Is Displayed
Page 631 of 681 pages
Advanced Guide > Troubleshooting > Problems with Scanning > "There is not enough memory." Message Is Displayed
"There is not enough memory." Message Is Displayed
Check 1: Exit other applications and try again.
Check 2: Reduce the resolution or output size and scan again.
Page top
Computer Stops Operating during Scanning
Page 632 of 681 pages
Advanced Guide > Troubleshooting > Problems with Scanning > Computer Stops Operating during Scanning
Computer Stops Operating during Scanning
Check 1: Restart the computer, reduce the output resolution in ScanGear
(scanner driver) and scan again.
Check 2: Delete unnecessary files to obtain sufficient free hard disk space,
then scan again.
Error message may appear when scanning a large document at high resolution.
Check 3: For Location of Temporary Files in MP Navigator EX, specify a
folder on a drive with sufficient free space.
See "Preferences Dialog Box " for details.
Check 4: Multiple devices may be connected to USB ports.
Disconnect other devices.
Page top
Scanner Does Not Work After Upgrading Windows
Page 633 of 681 pages
Advanced Guide > Troubleshooting > Problems with Scanning > Scanner Does Not Work After Upgrading Windows
Scanner Does Not Work After Upgrading Windows
Check: Disconnect the machine from the computer, then uninstall and
reinstall the MP Drivers and MP Navigator EX.
Step 1: Uninstall the MP Drivers.
See "Uninstalling the MP Drivers " for details.
Step 2: Uninstall MP Navigator.
1.
From the Start menu, select (All) Programs > Canon Utilities > MP Navigator EX 2.0 > MP
Navigator EX Uninstall.
2.
When a confirmation appears, click Yes.
3.
When uninstallation is complete, click OK.
MP Navigator EX is uninstalled.
Step 3: Reinstall the MP Drivers and MP Navigator EX.
Insert the Setup CD-ROM into the computer's disc drive, then select Custom Install and reinstall the
MP Drivers and MP Navigator EX.
Page top
Software Problems
Page 634 of 681 pages
Advanced Guide > Troubleshooting > Software Problems
Software Problems
E-mail Software Program You Want to Use Does Not Appear in the Screen for Selecting an E-mail
Software Program
Scanned Image Is Printed Enlarged (Reduced)
Scanned Image Is Enlarged (Reduced) on the Computer Monitor
Scanned Image Does Not Open
Page top
E-mail Software Program You Want to Use Does Not Appear in the Screen f... Page 635 of 681 pages
Advanced Guide > Troubleshooting > Software Problems > E-mail Software Program You Want to Use Does Not Appear
in the Screen for Selecting an E-mail Software Program
E-mail Software Program You Want to Use Does Not Appear in
the Screen for Selecting an E-mail Software Program
Check 1: MP Navigator EX may not support the e-mail software program.
The following e-mail software programs are supported. (Image are attached to the mail message
automatically.)
- Windows Mail (Windows Vista)
- Outlook Express (Windows XP/Windows 2000)
- Microsoft Outlook
- EUDORA
- Netscape Mail
Check 2: If an e-mail software program does not operate properly, check
that the program's MAPI is enabled.
To enable MAPI, refer to the manual of the e-mail software program.
Check 3: If using an e-mail software program other than the ones listed
above, select None (Attach Manually) when prompted to select a program
and attach the scanned image manually.
Page top
Scanned Image Is Printed Enlarged (Reduced)
Page 636 of 681 pages
Advanced Guide > Troubleshooting > Software Problems > Scanned Image Is Printed Enlarged (Reduced)
Scanned Image Is Printed Enlarged (Reduced)
Check: Set the printing size in the application.
Page top
Scanned Image Is Enlarged (Reduced) on the Computer Monitor
Page 637 of 681 pages
Advanced Guide > Troubleshooting > Software Problems > Scanned Image Is Enlarged (Reduced) on the Computer
Monitor
Scanned Image Is Enlarged (Reduced) on the Computer
Monitor
Check 1: Change the display setting in the application.
You cannot reduce the display size in Paint. To reduce the display size, open the images in an
application that accompanies the machine.
For details, refer to the application's manual. If you have any questions, contact the manufacturer of the
application.
Check 2: Change the resolution setting in ScanGear (scanner driver) and
scan again.
The higher the resolution, the larger the resulting image will be.
Resolution
Page top
Scanned Image Does Not Open
Page 638 of 681 pages
Advanced Guide > Troubleshooting > Software Problems > Scanned Image Does Not Open
Scanned Image Does Not Open
Check: If the file format is not supported by the application, scan the image
again and save it in a popular file format such as JPEG.
For details, refer to the application's manual. If you have any questions, contact the manufacturer of the
application.
Page top
MP Navigator EX Problems
Page 639 of 681 pages
Advanced Guide > Troubleshooting > MP Navigator EX Problems
MP Navigator EX Problems
Cannot Scan at the Correct Size
Position or Size of the Image Cannot Be Detected Correctly When Scanning Using the Operation
Panel
Document Is Placed Correctly, but the Scanned Image Is Slanted
Document Is Placed Correctly, but the Orientation Changes in the Scanned Image
Page top
Cannot Scan at the Correct Size
Page 640 of 681 pages
Advanced Guide > Troubleshooting > MP Navigator EX Problems > Cannot Scan at the Correct Size
Cannot Scan at the Correct Size
Check 1: Make sure that the documents are placed correctly on the Platen.
Placing Documents
Check 2: Set Document Size to the actual document size and scan again.
If the matching size is not found, scan at a larger size and trim the image.
See the Toolbar (Trimming) in " Correct/Enhance Images Window " for details.
Page top
Position or Size of the Image Cannot Be Detected Correctly When Scanning... Page 641 of 681 pages
Advanced Guide > Troubleshooting > MP Navigator EX Problems > Position or Size of the Image Cannot Be Detected
Correctly When Scanning Using the Operation Panel
Position or Size of the Image Cannot Be Detected Correctly
When Scanning Using the Operation Panel
Check 1: Make sure that the documents are placed correctly on the Platen.
Placing Documents
Check 2: Check that the MP Navigator EX settings are correctly set
according to the document.
Scanning Photos and Documents
Page top
Document Is Placed Correctly, but the Scanned Image Is Slanted
Page 642 of 681 pages
Advanced Guide > Troubleshooting > MP Navigator EX Problems > Document Is Placed Correctly, but the Scanned Image
Is Slanted
Document Is Placed Correctly, but the Scanned Image Is
Slanted
Check: In MP Navigator EX, deselect the Correct slanted document
checkbox and scan again.
Scan Settings Dialog Box (Photos/Documents)
Page top
Document Is Placed Correctly, but the Orientation Changes in the Scanned ... Page 643 of 681 pages
Advanced Guide > Troubleshooting > MP Navigator EX Problems > Document Is Placed Correctly, but the Orientation
Changes in the Scanned Image
Document Is Placed Correctly, but the Orientation Changes in
the Scanned Image
Check: In MP Navigator EX, deselect the Detect the orientation of text
documents and rotate images checkbox and scan again.
Scan Settings Dialog Box (Photos/Documents)
Page top
FAQs
Page 644 of 681 pages
Advanced Guide > Troubleshooting > FAQs
FAQs
No Printing Results/Printing Is Blurred/Colors Are Wrong/White Streaks
Machine Moves But Ink Is Not Ejected
Cannot Install the MP Drivers
Printing Does Not Start
Copying/Printing Stops Before It Is Completed
Writing Error/Output Error/Communication Error
Print Results Not Satisfactory
Paper Jams
Paper Does Not Feed Properly
Page top
If You Cannot Resolve the Problem
Page 645 of 681 pages
Advanced Guide > Troubleshooting > If You Cannot Resolve the Problem
If You Cannot Resolve the Problem
If you cannot resolve the problem with any of the workarounds in this chapter, please contact the seller of
the machine or a Canon service representative.
Canon support staff are trained to be able to provide technical support to satisfy customers.
Caution
If the machine emits any unusual sound, smoke, or odor, turn it off immediately. Unplug the power
cord from the outlet and contact the seller or your Canon service representative. Never attempt to
repair or disassemble the machine yourself.
Attempts by customers to repair or take apart the machine will invalidate any warranty regardless of
whether the warranty has expired.
Before contacting your Canon service representative, confirm the following:
Product name:
* Your machine's name is located on the front cover of the setup manual.
Serial number: please refer to the setup manual
Details of the problem
What you tried to solve the problem, and what happened
Page top
Instructions for Use (Printer Driver)
Page 646 of 681 pages
Advanced Guide > Troubleshooting > Instructions for Use (Printer Driver)
Instructions for Use (Printer Driver)
This printer driver is subject to the following restrictions. Keep the following points in mind when using
the printer driver.
Restrictions on the Printer Driver
With some applications, the Copies setting in the Page Setup tab of the printer driver may not be
enabled.
In this case, use the copies setting in the Print dialog box of the application software.
If the selected Language in the About dialog box does not match the operating system interface
language, the driver screen may not be displayed properly.
Do not change the Advanced tab items of the printer properties. If you change any of the items, you
will not be able to use the following functions correctly.
Also, if Print to file is selected in the Print dialog box of the application software and with applications
that prohibit EMF spooling, such as Adobe Photoshop LE and MS Photo Editor, the following
functions will not operate.
Preview before printing on the Main tab
Prevent loss of print data in the Print Options dialog box
Page Layout Printing, Poster Printing, Booklet Printing, Duplex Printing, Specify Margin..., Print from
Last Page, Collate, and Stamp/Background... on the Page Setup tab
Since the resolution in the preview display differs from the printing resolution, text and lines in the
preview display may appear different from the actual print result.
With some applications, the printing is divided into multiple print jobs.
To cancel printing, delete all divided print jobs.
If image data is not printed correctly, display the Print Options dialog box from the Page Setup tab
and change the setting of Disable ICM required from the application software. This may solve the
problem.
If you use the Bluetooth option and perform one of the actions listed below, the print job may not end
and "Printing" may remain displayed on the status monitor even after printing ends and the printout
is ejected. If this happens, either click the Cancel Printing button on the Status Monitor or cancel that
print job from the print job queue of the printer.
If you move the machine during printing to a location where radio waves cannot reach or if the
radio wave status becomes poor
If you turn off the machine
If you are using a Bluetooth printer and you cancel printing after a printer error occurs, you may not
be able to execute subsequent printing operations. If this happens, turn off the machine and turn it
back on again.
If you are using Bluetooth, you cannot use the operation panel on the machine while the status
monitor is displayed from View Printer Status... on the Maintenance tab.
Software windows may not appear correctly on Windows Vista when fonts are set to Larger scale. If
you want to display the windows with Larger scale fonts, set the desktop theme to Windows Classic
as follows:
1. Select Control Panel from the Start menu.
2. Select Appearance and Personalization -> Personalization -> Theme.
The Theme Settings dialog box opens.
3. At the Theme Settings dialog box, click the Themes tab, and select Windows Classic from
Theme.
4. Click OK.
Desktop changes to Windows Classic display.
The card slot (memory card) of the machine may become inaccessible. In such cases, restart the
machine or turn it off and reconnect the USB cable.
Points to Note with Applications
There are following restrictions in Microsoft Word (Microsoft Corporation).
Instructions for Use (Printer Driver)
Page 647 of 681 pages
If Microsoft Word has the same printing functions as the printer driver, use Word to specify them.
When selecting Scaled Printing, Fit-to-Page Printing, or Page Layout Printing from the Page Layout
list on the Page Setup tab, the selected printing function may not be effective, depending on the
version of Word.
If this happens, follow the procedure below.
1. Open Word's Print dialog box.
2. Open the printer driver setup window, specify Page Layout on the Page Setup tab, and click
OK.
3.
4.
5.
6.
Without starting printing, close the Print dialog box.
Open Word's Print dialog box again.
Open the printer driver setup window again and click OK.
Start printing.
Illustrator/Adobe Systems Inc.
If Bitmap Printing takes effect, printing may take time or some data may not be printed. Print after
clearing the Bitmap Printing check box in the Print dialog box.
Page top
General Notes (Scanner Driver)
Page 648 of 681 pages
Advanced Guide > Troubleshooting > General Notes (Scanner Driver)
General Notes (Scanner Driver)
ScanGear (scanner driver) is subject to the following restrictions. Keep these points in mind when using
it.
Scanner Driver Restrictions
When using the NTFS file system, the TWAIN data source may not be invoked. This is because the
TWAIN module cannot be written to the winnt directory for security reasons. Contact the computer's
administrator for help.
Some computers (including laptops) connected to the machine may not resume correctly from
standby mode. In that case, restart the computer.
Do not connect two or more machine or multifunction printers with scanner function to the same
computer simultaneously. If multiple scanning devices are connected, you cannot scan from the
Operation Panel of the machine and also may experience errors while accessing the devices.
Software screens may not appear correctly on Windows Vista when font size is set to Larger scale. If
you want to display the screens with Larger scale fonts, change the theme in Appearance and
Personalization to Windows Classic as follows:
1. From the Start menu, select Control Panel.
2. Select Appearance and Personalization > Personalization > Theme.
The Theme Settings dialog box opens.
3. On the Theme tab of the Theme Settings dialog box, select Windows Classic under Theme.
4. Click OK.
Desktop changes to Windows Classic view.
Use the default display font size of the OS. Otherwise, software screens may not appear correctly.
Scanning may fail if the computer has resumed from sleep or stanby mode. In that case, follow
these steps and scan again.
1. Turn off the machine.
2. Exit ScanGear (scanner driver), then disconnect the USB cable from the computer and reconnect
it.
3. Turn on the machine.
ScanGear (scanner driver) cannot be opened in multiple applications at the same time. Within an
application, ScanGear (scanner driver) cannot be opened for the second time when it is already
open.
Be sure to close the ScanGear (scanner driver) window before closing the application.
Make sure that you have adequate disk space available when scanning large images at high
resolutions. For example, at least 300 MB of free space is required to scan an A4 document at 600
dpi in full-color.
ScanGear (scanner driver) and WIA driver cannot be used at the same time.
Do not enter the computer into sleep or hibernate state during scanning.
Applications with Restrictions on Use
If you start Media Center included in Windows XP Media Center Edition 2005, you may not be able to
scan using the Operation Panel of the machine. In that case, restart the computer.
You cannot scan images with Media Center included in Windows Vista™ and Windows XP Media
Center Edition 2005. Scan with other applications such as MP Navigator EX.
In some applications, you may encounter a problem when you use Multi-Crop in the Advanced Mode
tab of ScanGear (scanner driver). In that case, scan each document individually, changing Paper
Size according to the document.
In some applications, if you select the View scanned images checkbox in the Auto Scan Mode tab of
ScanGear (scanner driver), the window displaying the thumbnails of the scanned images may close
automatically.
Some applications may not display the TWAIN user interface. In that case, refer to the application's
General Notes (Scanner Driver)
Page 649 of 681 pages
manual and change the settings accordingly.
Some applications do not support continuous scanning of multiple images. In some cases, only the
first scanned image is accepted, or multiple images are scanned as one image.
When scanning platen size images into a Microsoft Office application (such as Word, Excel or
PowerPoint), click Custom Insert in the Insert Picture from Scanner or Camera dialog box.
Otherwise, images may not be scanned correctly.
Images may not be scanned correctly in some applications. In that case, increase the operating
system's virtual memory and retry.
When image size is too large (such as when scanning large images at high resolution), your
computer may not respond or the progress bar may remain at 0% depending on the application. In
that case, cancel the action (for example by clicking Cancel on the progress bar), then increase the
operating system's virtual memory or reduce the image size/resolution and retry. Alternatively, scan
the image via MP Navigator EX first, then save and import it into the application.
Page top
Appendix
Page 650 of 681 pages
Advanced Guide > Appendix
Appendix
Printing Area
How to Detach/Attach the Document Cover
DPOF Print by Using the Photo Index Sheet
Deleting the Undesired Print Job
Updating the MP Drivers
Uninstalling the On-Screen Manuals
Transporting the Machine
Opening the Printer Properties Dialog Box (Windows)
Opening the Page Setup and Print Dialog Box (Macintosh)
Opening the Canon IJ Printer Utility (Macintosh)
Connecting the Printer to the Network
Page top
Printing Area
Page 651 of 681 pages
Advanced Guide > Appendix > Printing Area
Printing Area
To ensure the best print quality, the machine allows a margin along each edge of media. The actual
printable area will be the area inside these margins.
Recommended printing area
Printable area
: Canon recommends that you print within this area.
: The area where it is possible to print.
However, printing in this area can affect the print quality or the paper feed precision.
Note
Borderless Printing
By selecting Borderless Printing option, you can make prints with no margins.
When performing Borderless Printing, slight cropping may occur at the edges since the printed
image is enlarged to fill the whole page.
For Borderless Printing, use the following paper.
Glossy Photo Paper "Everyday Use" GP-501
Photo Paper Glossy GP-502
Photo Paper Plus Semi-Gloss SG-201
Photo Paper Pro Platinum PT-101
Photo Paper Plus Glossy II PP-201
Photo Paper Pro II PR-201
Matte Photo Paper MP-101
Performing Borderless Printing on any other type of paper may substantially reduce printing quality
and/or result in printouts with altered color hues.
Borderless Printing on plain paper may result in printouts with reduced quality. Use them only for
test printing. You can perform Borderless Printing on plain paper only when printing from your
computer.
In Borderless Copying, you can specify the amount of extension by Extension amount in Device
settings.
Changing the Machine Settings on the LCD
Letter, Legal
Envelopes
Other Sizes than Letter, Legal, Envelopes
Page top
Other Sizes than Letter, Legal, Envelopes
Page 652 of 681 pages
Advanced Guide > Appendix > Printing Area > Other Sizes than Letter, Legal, Envelopes
Other Sizes than Letter, Legal, Envelopes
Size
Printable Area (width x height)
A5
5.56 x 7.95 inches / 141.2 x 202.0 mm
A4
8.00 x 11.38 inches / 203.2 x 289.0 mm
B5
6.90 x 9.80 inches / 175.2 x 249.0 mm
4" x 6" / 10 x 15 cm
3.73 x 5.69 inches / 94.8 x 144.4 mm
4" x 8" / 10 x 20 cm*
3.73 x 7.69 inches / 94.8 x 195.2 mm
5" x 7" / 13 x 18 cm*
4.73 x 6.69 inches / 120.2 x 169.8 mm
8" x 10" / 20 x 25 cm
7.73 x 9.69 inches / 196.4 x 246.0 mm
Wide
3.73 x 6.80 inches / 94.8 x 172.6 mm
* This page size can be used only when printing from your computer.
Recommended printing area
Printable area
Page top
Letter, Legal
Page 653 of 681 pages
Advanced Guide > Appendix > Printing Area > Letter, Legal
Letter, Legal
Size
Printable Area (width x height)
Letter
8.00 x 10.69 inches / 203.2 x 271.4 mm
Legal*
8.00 x 13.69 inches / 203.2 x 347.6 mm
* This page size can be used only when printing from your computer.
Recommended printing area
Printable area
Page top
Envelopes
Page 654 of 681 pages
Advanced Guide > Appendix > Printing Area > Envelopes
Envelopes
Size
Recommended Printing Area (width x height)
European DL*
4.06 x 7.12 inches / 103.2 x 180.8 mm
US Comm. Env. #10*
3.86 x 7.96 inches / 98.0 x 202.1 mm
* This page size can be used only when printing from your computer.
Recommended printing area
Page top
How to Detach/Attach the Document Cover
Page 655 of 681 pages
Advanced Guide > Appendix > How to Detach/Attach the Document Cover
How to Detach/Attach the Document Cover
Detaching the Document Cover:
Hold up the Document Cover vertically.
Attaching the Document Cover:
Insert both hinges (A) of the Document Cover vertically into the holder (B) to attach the Document
Cover as illustrated bellow.
Page top
DPOF Print by Using the Photo Index Sheet
Page 656 of 681 pages
Advanced Guide > Appendix > DPOF Print by Using the Photo Index Sheet
DPOF Print by Using the Photo Index Sheet
Print out a Photo Index Sheet, select DPOF print, scan the sheet in, and you can print using DPOF
settings stored in the memory card.
This section describes the DPOF Print function and the setting items of the Photo Index Sheet.
DPOF Print
If you have specified Digital Print Order Format (DPOF) settings on your digital camera, you can
print using these settings. The machine supports the following DPOF functions.
Note
DPOF is a standard format to record the specified information regarding images, such as
which image or number of copies to print.
If you scan the Photo Index Sheet with DPOF print though the photo saved on the memory
card has no DPOF information, the error message is displayed on the LCD.
Version:
Based on ver. 1.00
Supported image types:
CIFF, Exif (TIFF), and JFIF
Print Style Standard Print:
Prints photos that were specified as "Standard Print" with DPOF
Print Style Index Print:
Prints an index of photos that were specified as "Index Print" with DPOF using the machine's
index printing layout
Print Style Multi-Image Print:
Prints a photo that was specified as "Multi-Image Print" with DPOF (with the specified number
of copies and layout)
Print Photo Select:
Prints only photos specified with DPOF
Number of copies:
Prints the number of copies specified with DPOF
Setting Items of the Photo Index Sheet
You can select the following setting items on the Photo Index Sheet.
Important
When you print with DPOF print, do not fill the circle to specify the number of copies or to print
a copy of all photographs on the Photo Index Sheet.
If the circle is filled, the error message is displayed on the LCD.
1.
Select the page size and other printing formats.
When you select the paper type other than plain paper, the photo specified as Standard Print
or Multi-Image Print with DPOF is printed in Borderless. When you select plain paper, the
DPOF Print by Using the Photo Index Sheet
Page 657 of 681 pages
photo is printed in Bordered.
2.
Even if you fill this circle, the layout setting is disregarded.
The photo is printed in the layout specified with DPOF.
3.
Specify each advanced setting.
The date printing setting is specified with DPOF. If you print the index of photos that is
specified as Index Print with DPOF, all advanced setting is disregarded.
4.
Fill this circle to print with DPOF print.
5.
If the circle is filled when you print with DPOF print, the error message is displayed on the
LCD.
6.
If the circle is filled when you print with DPOF print, the error message is displayed on the
LCD.
Note
Prints are automatically enlarged or reduced to match the page size. Edges of the photo
may be clipped off depending on the page size.
The shot date order setting by which photos are sorted follows that of DPOF.
Page top
Deleting the Undesired Print Job
Page 658 of 681 pages
Advanced Guide > Appendix > Deleting the Undesired Print Job
Deleting the Undesired Print Job
If the printer does not start printing, the print job data cancelled or failed may be remaining.
Delete the undesired print job by using the Canon IJ Status Monitor.
1. Display the Canon IJ Status Monitor
Click the Status Monitor button displayed on the Task Bar.
The Canon IJ Status Monitor appears.
2. Display the print jobs
Click Display Print Queue....
The Print Queue window opens.
3. Delete the print jobs
Select Cancel All Documents from the Printer menu.
When the confirmation message appears, click Yes.
The print job is deleted.
Important
Users who have not been granted access permission for printer management cannot delete the
print job of another user.
Page top
Updating the MP Drivers
Page 659 of 681 pages
Advanced Guide > Appendix > Updating the MP Drivers
Updating the MP Drivers
Obtaining the Latest MP Drivers
Uninstalling the MP Drivers
Before Installing the MP Drivers
Installing the MP Drivers
Page top
Obtaining the Latest MP Drivers
Page 660 of 681 pages
Advanced Guide > Appendix > Updating the Printer Driver > Obtaining the Latest MP Drivers
Obtaining the Latest MP Drivers
The MP Drivers include a printer driver and scanner driver (ScanGear).
By updating the MP Drivers to the latest version of the MP Drivers, unresolved problems may be solved.
Access our web site through the Internet and download the latest MP Drivers for your model.
Important
You can download the MP Drivers for free, but any Internet access charges incurred are your
responsibility.
Before installing the latest MP Drivers, delete the previously installed version.
For information on how to delete the MP Drivers, refer to Uninstalling the MP Drivers .
Related Topics
Before Installing the MP Drivers
Installing the MP Drivers
Page top
Uninstalling the MP Drivers
Page 661 of 681 pages
Advanced Guide > Appendix > Updating the Printer Driver > Uninstalling the MP Drivers
Uninstalling the MP Drivers
The MP drivers you no longer use can be deleted.
When deleting the MP drivers, first exit all programs that are running.
The procedure to delete the unnecessary MP drivers is as follows:
If there is an uninstaller
1. Start the uninstaller
In Windows Vista or Windows XP, select the Start menu -> All Programs -> "Your model name" ->
MP Drivers Uninstaller.
In Windows 2000, select the Start menu -> Programs -> "Your model name" -> MP Drivers
Uninstaller.
The MP Drivers Uninstaller dialog box is displayed.
Important
In Windows Vista, a confirmation/warning dialog box may appear when installing, uninstalling
or starting software.
This dialog box appears when administrative rights are required to perform a task.
If you are logged on to an administrator account, click Continue or Allow to continue.
Some applications require an administrator account to continue. If you are logged on to a
standard account, switch to an administrator account, and restart the operation from the
beginning.
2. Execute the uninstaller
Click Execute. When the confirmation message appears, click Yes.
When all the files have been deleted, click Complete.
The deletion of the MP Drivers is completed.
Important
Printer driver and scanner driver (ScanGear) will be deleted if you uninstall the MP Drivers.
If there is no uninstaller
If there is no uninstaller in the Start menu of Windows Vista, follow these steps:
1. Select the printer to be deleted
Select the Start menu -> Control Panel -> Hardware and Sound -> Printers.
Click the model to delete, then press the Alt key on your keyboard. On the File menu, click Delete.
2. Delete the printer
If the User Account Control dialog box appears, click Continue. Then when the confirmation
message appears, click Yes.
The icon is deleted.
3. Select the printer driver to be deleted
Press the Alt key. On the File menu, select Run as administrator, and then click Sever Properties....
If the User Account Control dialog box appears, click Continue.
Click the Drivers tab. In the Installed printer drivers list, click the printer to delete.
4. Delete the printer driver
When you click Remove..., Remove Driver And Package dialog box is displayed.
Select Remove driver and driver package, and then click OK.
In the confirmation dialog box, click Yes.
Uninstalling the MP Drivers
Page 662 of 681 pages
When data collection is completed in the Remove Driver Package dialog box, click Delete.
5. Click OK.
The deletion of the printer driver is complete.
Important
You may not be able to delete the printer driver properly from the Installed printer drivers list.
If this happens, restart your computer, and try again.
Page top
Before Installing the MP Drivers
Page 663 of 681 pages
Advanced Guide > Appendix > Updating the Printer Driver > Before Installing the MP Drivers
Before Installing the MP Drivers
This section describes the items that you should check before installing the MP Drivers. You should also
refer to this section if the MP Drivers cannot be installed.
Check the machine status
Properly connect the personal computer and the machine. For details on connection instructions,
refer to the "Install the Software" in the manual: Getting Started.
Turn off the machine.
Check the Personal Computer Settings
Terminate all running applications.
In Windows Vista, log on as a user who has the administrator rights.
In Windows XP, log on as the computer administrator.
In Windows 2000, log on as a member of the Administrators group.
Note
If an old version of the MP Drivers is already installed, first delete (uninstall) that version. For
instructions on deleting the MP Drivers, see Uninstalling the MP Drivers .
Related Topics
Obtaining the Latest MP Drivers
Installing the MP Drivers
Page top
Installing the MP Drivers
Page 664 of 681 pages
Advanced Guide > Appendix > Updating the Printer Driver > Installing the MP Drivers
Installing the MP Drivers
You can access our web site through the Internet and download the latest MP Drivers for your model.
The procedure for installing the downloaded MP Drivers is as follows:
1. Turn off the machine
Important
If you turn on the computer while the machine is on, the Windows Plug and Play function is
executed automatically, and the Found New Hardware window (Windows Vista) or Found New
Hardware Wizard window (Windows XP, Windows 2000) is displayed. In this case, click
Cancel.
2. Start the installer
Double-click the icon of the downloaded file.
The installation program starts.
Important
In Windows Vista, a confirmation/warning dialog box may appear when installing, uninstalling
or starting software.
This dialog box appears when administrative rights are required to perform a task.
If you are logged on to an administrator account, click Continue or Allow to continue.
Some applications require an administrator account to continue. If you are logged on to a
standard account, switch to an administrator account, and restart the operation from the
beginning.
3. Install the driver
At the Welcome window, click Next.
Read the contents of the License Agreement window. After checking the contents, click Yes.
Installation of the MP Drivers begins.
After the Installation Complete window is displayed, check that the machine and the computer are
connected through a cable.
To select the connection port for your machine manually, check the Select printer port check box, and
click Manual selection. At the Select printer port window, select the connection destination, and then
click OK.
4. Complete the installation
Click Complete.
Turn on the machine, and wait awhile until the connection is recognized.
This procedure installs the MP Drivers.
Depending on the environment you are using, a message prompting you to restart the computer may be
displayed. To complete the installation properly, restart the computer.
Important
You can download the MP Drivers for free, but any Internet access charges incurred are your
responsibility.
Related Topics
Obtaining the Latest MP Drivers
Before Installing the MP Drivers
Page top
Uninstalling the On-Screen Manuals
Page 665 of 681 pages
Advanced Guide > Appendix > Uninstalling the On-Screen Manuals
Uninstalling the On-Screen Manuals
Follow the procedure below to uninstall all of the installed on-screen manuals from your computer.
All of the installed on-screen manuals will be deleted at the same time.
1. Click Start > All Programs (Programs in Windows 2000) > Canon XXX Manual
(where "XXX" is your machine's name) > Uninstall.
2. Click OK when the confirmation message appears.
Note
When the message prompting you to restart your computer is displayed, click OK to restart your
computer.
On-screen manuals other than printer driver's help and scanner driver's help are uninstalled at a time.
1.
Select Applications on the Go menu.
2.
Double-click the Canon Utilities folder, and then the IJ Manual folder.
3.
Drag the folder of your machine's name into the trash.
4.
Drag the
XXX On-screen Manual icon (where " XXX" is your machine's name) on your
desktop into the trash.
Page top
Transporting the Machine
Page 666 of 681 pages
Advanced Guide > Appendix > Transporting the Machine
Transporting the Machine
When relocating the machine, pack the machine using the original packing materials.
If you do not have the original packing materials, pack the machine carefully using protective material
and place it inside a sturdy box.
Caution
Do not transport or store the machine slanted, vertically, or upside-down, as the ink may leak and
damage the machine.
1. Turn the machine off.
2. Confirm that the Power lamp is off and unplug the machine.
Important
Do not unplug the machine while the Power lamp is lit or flashing green, as it may cause
malfunction or damage to the machine, making the machine unable to print.
3. Retract the Paper Support and the Output Tray Extension, close the Paper Output
Tray, then close the Operation Panel.
4. Disconnect the printer cable from the computer and from the machine, and then
disconnect the power plug from the machine.
5. Use adhesive tape to secure all the covers on the machine to keep them from
opening during transportation. Then pack the machine in the plastic bag.
6. Attach the protective material to the machine when packing the machine.
Important
Pack the machine with the FINE Cartridges left installed in the machine.
Note
Clearly label the box as "FRAGILE" or "HANDLE WITH CARE".
Page top
Opening the Printer Properties Dialog Box (Windows)
Page 667 of 681 pages
Advanced Guide > Appendix > Opening the Printer Properties Dialog Box (Windows)
Opening the Printer Properties Dialog Box (Windows)
The printer driver setup window can be displayed through the application software in use or the Start
menu of the Windows.
Open the Printer Properties Dialog Box through the Application Software
Follow the procedure below to configure print settings when printing.
1.
Select the command you perform printing on the application software in use.
In general, select Print on the File menu to open the Print dialog box.
2.
Select your model name and click Preferences (or Properties).
The printer properties dialog box opens.
Note
Opening the printer properties dialog box through Properties displays such tabs
regarding the Windows functions as the Ports (or Advanced) tab. Those tabs do not
appear when opening through Printing Preferences or application software. About tabs
regarding Windows functions, refer to the user's manual for the Windows.
Open the Printer Properties Dialog Box through the Start Menu
Follow the procedure below to perform maintenance operations such as print head cleaning, or to
configure print settings that are common for all application software.
1.
Select items from the Start menu as shown below.
In Windows Vista, select the Start menu > Control Panel > Hardware and Sound > Printers.
In Windows XP, select the Start menu > Control Panel > Printers and Other Hardware >
Printers and Faxes.
In Windows 2000, select the Start menu > Settings > Printers.
2.
Right-click your model name icon and then select Printing Preferences from the displayed
menu.
The printer properties dialog box opens.
Important
Depending on application software you use, command names or menu names may vary
and there may be more steps. For details, refer to the user's manual of your application
software.
Page top
Opening the Page Setup and Print Dialog Box (Macintosh)
Page 668 of 681 pages
Advanced Guide > Appendix > Opening the Page Setup and Print Dialog Box (Macintosh)
Opening the Page Setup and Print Dialog Box (Macintosh)
You can open the Page Setup dialog box and the Print dialog box from the application program you are
using.
Opening the Page Setup Dialog Box
Open the Page Setup dialog box to specify page (paper) settings before printing.
1.
Select Page Setup... on the File menu in your application program.
The Page Setup dialog box opens.
Opening the Print Dialog Box
Open the Print dialog box to specify print settings before printing.
1.
Select Print... on the File menu in your application program.
The Print dialog box opens.
Page top
Opening the Canon IJ Printer Utility (Macintosh)
Advanced Guide > Appendix > Opening the Canon IJ Printer Utility (Macintosh)
Opening the Canon IJ Printer Utility (Macintosh)
To open the Canon IJ Printer Utility, follow the procedure below.
In Mac OS X v.10.5.x
1.
Select System Preferences on the Apple menu.
2.
Click Print & Fax.
3.
Select your machine's name in the Printers and click Open Print Queue....
The job list of your machine is displayed.
4.
Click Utility.
The Printer List opens.
5.
Select your machine's name in the Product list and click Maintenance.
The Canon IJ Printer Utility starts up.
In Mac OS X v.10.4.x or Mac OS X v 10.3.9
Page 669 of 681 pages
Opening the Canon IJ Printer Utility (Macintosh)
1.
Select Applications on the Go menu.
2.
Double-click the Utilities folder, and then double-click the Printer Setup Utility icon.
Page 670 of 681 pages
The Printer List opens.
3.
Select your machine's name in the Name list and click Utility.
4.
Select your machine's name in the Product list and click Maintenance.
The Canon IJ Printer Utility starts up.
Page top
Connecting the Printer to the Network
Page 671 of 681 pages
Advanced Guide > Appendix > Connecting the Printer to the Network
Connecting the Printer to the Network
If multiple computers are being used in the network environment, you can share the printer connected to
one computer with other computers.
The Windows versions of the computers connected to the network do not necessarily have to be the
same.
Settings on Print Server
Describes the procedure for setting up a computer directly connected to a printer with a USB cable.
Settings on Client PC
Describes the procedure for setting up those computers that will use this printer through the
network.
When you execute print, the data is sent through the print server system to the printer.
Important
In case an error occurred when a document is printed by the client system to a shared printer, the
error message of Canon IJ Status Monitor will be displayed both on the client system and the print
server system. For regular printing, Canon IJ Status Monitor will be displayed only on the client
system.
Note
Install the printer driver from the Setup CD-ROM that accompanies the machine on the print server
system and each of the client systems according to the OS of each system.
Related Topic
Restrictions on Network Printing
Page top
Settings on Print Server
Page 672 of 681 pages
Advanced Guide > Appendix > Connecting the Printer to the Network > Settings on Print Server
Settings on Print Server
To use a printer in a network, set printer sharing on the print server system.
The procedure for setting up the print server systems is as follows:
1. Install the printer driver on the print server system
For installation instructions, see the user's manual.
2. Select items from the Start menu as shown below:
In Windows Vista, select the Start menu -> Control Panel -> Hardware and Sound -> Printers.
In Windows XP, select the Start menu -> Control Panel -> Printers and Other Hardware ->
Printers and Faxes.
In Windows 2000, select the Start menu -> Settings -> Printers.
The Printers window (Windows Vista, Windows 2000) or Printers and Faxes window (Windows XP)
is displayed.
3. Click the icon for the model name of printer to be shared
In Windows Vista, press the Alt key on your keyboard and then select Run as administrator ->
Sharing... from the displayed File menu.
In Windows XP or Windows 2000, select Sharing... from the File menu.
Note
Windows XP may display a message recommending the user to use the Network Setup
Wizard to set up sharing.
When this message appears, choose not to use the wizard and then set up sharing.
4. Set sharing
Select Share this printer (Windows Vista, Windows XP) or Shared as (Windows 2000) on the
Sharing tab to set a shared name as desired, and click OK.
Important
In Windows Vista, a confirmation/warning dialog box may appear when installing, uninstalling,
or starting software.
This dialog box appears when administrative rights are required to perform a task.
If you are logged on to an administrator account, click Continue or Allow to continue.
Some applications require an administrator account to continue. If you are logged on to a
standard account, switch to an administrator account, and restart the operation from the
beginning.
This completes the setup on the print server system. Next, set up the client systems.
Page top
Settings on Client PC
Page 673 of 681 pages
Advanced Guide > Appendix > Connecting the Printer to the Network > Settings on Client PC
Settings on Client PC
After setting up the print server system, set up the client system.
The procedure for setting up the client systems is as follows:
In Windows Vista
1. Install the printer driver on the client systems
Select Custom Install for the installation method.
For details on connection instructions, refer to the "Install the Software" in the manual: Getting
Started.
Note
During the installation, a screen prompting you to turn the printer on appears. Click Manual
Selection and then select an appropriate port to complete your installation.
2. Start the wizard
Select the Start menu -> Network -> Add a printer.
The Add Printer window appears.
3. Add a printer
Select Add a network, wireless or Bluetooth printer, and click the icon for the printer that you have
configured on the print server system to be shared, and then click Next.
Note
If the icon for the printer is not displayed, check that the printer is actually connected to the print
server.
It may take some time for the icon for the printer to appear.
4. Complete the setup
Take the appropriate action as described on the screen and then click Finish.
The icon for the shared printer will be created in the Printers window.
This completes the setup on the client systems. You can now share the printer in the network.
In Windows XP/Windows 2000
1. Install the printer driver on the client systems
Select Custom Install for the installation method.
For details on connection instructions, refer to the "Install the Software" in the manual: Getting
Started.
Note
During the installation, a screen prompting you to turn the printer on appears. Click Manual
Selection and then select an appropriate port to complete your installation.
2. Start the wizard
In Windows XP, select the Start menu -> Control Panel -> Printers and Other Hardware ->
Printers and Faxes -> Add a printer.
In Windows 2000, select the Start menu -> Settings -> Printers -> Add a printer.
When Welcome to the Add Printer Wizard screen appears, click Next.
3. Add a printer
Settings on Client PC
Page 674 of 681 pages
Select A network printer, or a printer attached to another computer (Windows XP) or Network printer
(Windows 2000), then click Next.
On the Specify a Printer window (Windows XP) or Locate Your Printer window (Windows 2000), click
Next and then search for the print server system.
Click the icon for the printer that you have configured on the print server system to be shared, and
then click Next.
Note
If the icon for the printer is not displayed, check that the printer is actually connected to the print
server.
4. Complete the setup
Take the appropriate action as described on the screen and then click Finish.
The icon for the shared printer will be created in the Printers and Faxes window (Windows XP) or
Printers window (Windows 2000).
This completes the setup on the client systems. You can now share the printer in the network.
Page top
Restrictions on Network Printing
Page 675 of 681 pages
Advanced Guide > Appendix > Connecting the Printer to the Network > Restrictions on Network Printing
Restrictions on Network Printing
These are restrictions that apply if you are using a printer in a network environment. Check the
restrictions for the environment you are using.
If you are sharing a printer in a network
A print completion message may be displayed. To disable the message display, follow the
procedure below.
In Windows Vista:
Press the Alt key from the Printers window on the client system. Open Run as administrator ->
Server Properties... from the displayed File menu.
Uncheck Show informational notifications for network printers on the Advanced tab, and then
restart the computer.
In Windows XP or Windows 2000:
Open Server Properties from the File menu of the Printer and Faxes window (Windows XP) or the
Printers window (Windows 2000) on the print server system.
Uncheck Notify when remote documents are printed on the Advanced tab, and then restart the
computer.
The bi-directional communication function is disabled so that the correct printer status may not be
recognized.
If a client user opens the printer driver properties and then clicks OK with the Enable bidirectional
support check box on the Ports tab unchecked, the bi-directional function of the printer server system
may also be disabled.
In this case, check Enable bidirectional support check box on both the print server system and the
client system.
When you print from a client system, you cannot use Canon IJ Preview.
If the functions on the Maintenance tab cannot be set properly from a client system, they may be
grayed out. In this case, change the settings from the print server.
When you change the settings of the print server, you should delete the icon of the shared printer
from the client system, and then specify the shared settings again in the client system.
If the same printer driver is installed in the print server system and the client system as
the local printer
The net crawl function may automatically create a network printer icon on the client system.
Page top
Using Easy-PhotoPrint EX
Page 676 of 681 pages
Advanced Guide > Using Easy-PhotoPrint EX
Using Easy-PhotoPrint EX
--- Transforming Your Photos into Creative Works of Art --Easy-PhotoPrint EX allows you to create albums, calendars and stickers easily using photos taken with
digital cameras.
You can also print borderless photos easily.
Start Easy-PhotoPrint EX
Click Here: Easy-PhotoPrint EX
Note
See the section below for details on how to use Easy-PhotoPrint EX.
Printing with the Bundled Application Software
Create a Personalized Photo Album
Creating a personalized photo album is an easy task if you use Easy-PhotoPrint EX!
All you need to do is select which photos to use, select a layout, then load paper into your printer and
print. After you bind the printed sheets, you'll have the one and only album of your memories!
You can change the layout and background, and attach
comments to photos.
You can also select the size and orientation.
You can arrange a photo across the left and right
pages.
CHECK!
Select a theme (background design) to create a single-themed album.
Decorate Items with Text and Frames
You can add text and frames to photos. Attach a description of the photo in an album, and add a frame to
enhance the photo's atmosphere.
Using Easy-PhotoPrint EX
Page 677 of 681 pages
CHECK!
Select Album to add text and frames. You cannot decorate photos with Photo Print.
Create a Calendar Using Your Favorite Photos
Create calendars easily with Easy-PhotoPrint EX. Create your own calendar using your favorite photos!
It'll be exciting to turn the calendar pages.
You can use all kinds of photos.
You can also create 2-month, 6-month and 12-month
calendars.
Create Stickers
Create stickers easily with Easy-PhotoPrint EX!
Create stickers of your favorite photos and share them with your friends!
CHECK!
You can add text to photos.
Page top
Using MP Navigator EX
Page 678 of 681 pages
Advanced Guide > Using MP Navigator EX
Using MP Navigator EX
MP Navigator EX is an application that enables you to easily scan photos and documents. It is suitable
even for beginners.
Start MP Navigator EX
Click Here: MP Navigator EX
Scan Photos and Documents
You can scan easily by navigating through MP Navigator EX screens. You can also save/print scanned
images using MP Navigator EX.
Scan Small Documents at One Time
You can scan multiple small documents (photos, cards, etc.) at one time. It is useful as you do not need
to scan multiple times.
Scan Large Documents
You can easily scan documents that are larger than the Platen using MP Navigator EX. It allows you to
scan the left and right halves of a document separately and combine them back into one image.
Scan with One-click
In One-click Mode, MP Navigator EX completes from scanning to saving, with a click of an icon. One-click
Mode also allows you to scan and save images as PDF files or attach them to e-mail automatically.
Using MP Navigator EX
Page 679 of 681 pages
Scan and Correct/Enhance Photos
You can easily correct/enhance scanned photos using MP Navigator EX. You do not need to use other
applications.
For details on how to use MP Navigator EX, refer to " Scanning with the Bundled Application Software ."
Page top
About Solution Menu
Page 680 of 681 pages
Advanced Guide > About Solution Menu
About Solution Menu
Quick Shortcut!! Solution Menu
Solution Menu is a menu window that provides quick access from your desktop to Canon applications,
manuals, and online product information.
Important
The number and types of buttons displayed in the window may vary depending on your printer and
region.
Starting Solution Menu
Click Here: Solution Menu
To start from desktop, see below.
Double-click the Solution Menu icon on the desktop. Alternatively, from the Start menu, select (All)
Programs > Canon Utilities > Solution Menu > Solution Menu.
From the next time, Solution Menu starts when Windows starts.
If the Start Solution Menu when Windows starts checkbox at the bottom left of the window is not selected,
Solution Menu does not start when Windows starts.
Important
Solution Menu will start automatically when you install it using the Setup CD-ROM that
accompanies the printer.
Changing the Window Size
(window size: large) or
Click
(large or small).
(window size: small) on the title bar to change the window size
Solution Menu opens with the last used window size next time it is started.
When screen size is small
About Solution Menu
Page 681 of 681 pages
Starting an Application
1. Point to a button on the window to display the description of each application.
2. By clicking each button, the introduced application starts.
Follow the same steps to view the manuals or online product information.
Important
Internet connection is required to access the online information. Internet connection fees apply.
Exiting Solution Menu
Click
(Close) on the title bar.
Restriction on Use of Solution Menu
This software is subject to the following restriction. Keep this point in mind when using it.
All icons of the installed applications that support Solution Menu are displayed in the window. After
the installation, you cannot rearrange the icons or delete only the icons.
Page top