1
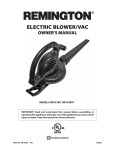
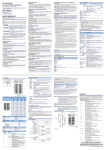
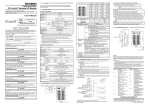
SERVICE MANUAL
Standard Horizon PF-P330 Suction-Feed Paper Folder
Read this manual, and thoroughly
familiarize yourself with its contents
before operating or servicing this
equipment.
PF-P330/SM
FOREWORD
Paper Folder PF-P330
Important Information
This service manual is designed to help you to repair and maintain the PF-P330 in order to keep it in good operating condition. Please read and understand the instructions in this service manual before performing any repair or maintenance.
- Horizon International Inc. shall not be liable for incidental or consequential damages resulting from: improper or inadequate
maintenance by the customer; unauthorized modification or misuse; or operation outside of the environmental specifications
for the product.
- Horizon International Inc. follows a policy of continuing improvement in design and performance of the product. Therefore,
the product design and specifications are subject to change without prior notice and without our legal obligation.
- All rights are reserved. No part of the manual may be photocopied, reproduced or translated to another language without the
prior written consent of Horizon International Inc.
031021/PFP330/00E/NO/HF/HO
I
US503009-00
Safety Precautions
- Please read and understand all safety instructions with include the terms
instructions are ignored, personal injury may result.
WARNING, and
CAUTION. If these safety
- The repair, maintenance and safety instructions in this manual are valid only when the repair or maintenance work is performed
according to the procedures described in this manual.
- The term WARNING indicates a potentially hazardous situation which, if not avoided, could result in death or serious injury.
- The term CAUTION indicates a potentially hazardous situation which, if not avoided, may result in damage on machines. It may
also be used to alert against unsafe practices.
- Horizon International Inc. cannot anticipate every possible situation that might involve a potential hazard. The instructions in this
manual and the warning labels on the machine are therefore not all-inclusive.
- All equipment shall be locked out or tagged out to protect against accidental or inadvertent operation when such operation, repair
or maintenance could cause injury to personnel. Do not attempt to operate any switch, valve, or other energy isolating device
when it has been locked or tagged out.
- Some of the drawings in this manual show the machine uncovered for explanations of details inside the machine.
II
Abbreviations
1. Abbreviations for wire colors
BRN
RED
ORN
YEL
GRN
=
=
=
=
=
Brown
Red
Orange
Yellow
Green
BLU
VIO
GRY
WHT
BLK
3. Other Abbreviations
=
=
=
=
=
Blue
Violet
Gray
White
Black
CON =
DSW =
NF
=
BRN(#) = the character (#) that follows the wire color indicates the
attached gray sticker. The sticker is to identify the wire in case there
are two wires of the same color.
RED/BLU = "/BLU"; the color that follows slash indicates the base
color of the wire. In this case, the wire is striped red on the blue color.
2. Abbreviations for electrical parts
Axx
Bxx
Fxx
Gxx
Kxx
Lxx
Mxx
=
=
=
=
=
=
=
Inverter/Driver
Sensor
Fuse
Power Supply
Contactor
LED
Motor
Qxx =
QPM =
QPW =
S/SWxx =
Xxx =
Yxx =
Circuit Protector/Breaker
(Multi Layer) P. C. Board
(Single Layer) P. C. Board
Switch
Terminal Board/Connector
Solenoid/Clutch/Brake
III
Connector
Dip Switch
Noise Filter
R/VR =
SL/SOL=
SSR =
Volume
Solenoid
Solid State Relay
Heading Precautions for P.C.Board and ROM
P.C.Board and ROM can be damaged by humanly inperceptible static electricity.
Handle P.C.Board and ROM with following care.
Keep P.C.Board in a
shield bag.
Acrylic
Cover
Shield Bag
P.C.Board
Conductive
Sponge
Do not put P.C.Board and
ROM on the machine,
especially on the acrylic cover.
(No problem on the conductive
plate.)
And keep the P.C.Board and
ROM away from the insulators.
Insulators: Plastic, form polystyrene,
chemical fiber fabric, dry
paper, etc.
Clip
Put the ROM on a
conductive sponge
and keep in a shield
bag.
Machine
Frame
Shield Bag
Wrist
Strap
IV
When replacing the P.C.Board
and ROM, or setting the dip
switches and volumes on the
P.C.Board, wear a wrist strap,
and connect the clip to the
machine frame (not painted
surface).
Contents
3. Adjusting and Checking Procedures
1. Mechanism
1-1
1-2
1-3
1-4
1-5
1-6
1-7
1-8
1-9
1-10
Feed Table Unit .......................................................................... 1-2
Table Up/Down Unit .................................................................. 1-3
Table Height Detect Unit ............................................................ 1-4
Feed Rotor Unit .......................................................................... 1-5
Double Feed Stop Unit ............................................................... 1-6
Fold Roller Unit .......................................................................... 1-7
Deflector Unit ............................................................................. 1-8
Delivery Unit .............................................................................. 1-9
Buckle Chute Unit .................................................................... 1-10
Air Circuit Unit ......................................................................... 1-11
3-1
3-2
3-3
3-4
3-5
3-6
3-7
3-8
3-9
3-10
Sheet Guides Right Angle and Parallel Adjustment ................... 3-2
Rack and Pinion Position Adjustment ........................................ 3-3
Lower Guide and Fold Roller Gap Adjustment ......................... 3-4
Deflector Position Adjustment ................................................... 3-5
Buckle Chute Stopper Level Adjustment ................................... 3-6
Belt Tension Adjustment ............................................................ 3-7
Stopper (Roller Lever) Position Adjustment .............................. 3-8
Table Upper Limit Switch S01 Position Adjustment ................. 3-9
Feed Rotor Check ..................................................................... 3-10
Feed Ring Replacement ............................................................ 3-11
4. Mechanical Troubleshooting
2. Service Mode
2-1
2-2
4-1
4-2
4-3
4-4
4-5
4-6
4-7
4-8
4-9
4-10
4-11
4-12
Operations of Service Mode ....................................................... 2-2
Calibrating the Home Position (Buckle Chute Stopper) ............ 2-3
V
Error Code 01 Is Indicated (= Feed Table Does Not Lower) ..... 4-2
Error Code 02 Is Indicated (= Feed Table Does Not Lift) ......... 4-3
Buckle Chute Sounds Loudly and Q01/02 Are Actuated ........... 4-4
Feed Rotor Does Not Suction the Sheets ................................... 4-5
Feed Rotor Does Not Drive ........................................................ 4-6
Fold Rollers Do Not Rotate ........................................................ 4-7
Delivery Conveyor Belt Does Not Drive ................................... 4-8
Deflector Malfunctions ............................................................... 4-9
Buckle Stopper Does Not Move ............................................... 4-10
Motor Does Not Drive .............................................................. 4-11
Display Does Not Show Any Image ........................................ 4-13
Error Message “Close Buckle” Is Shown (Even though it is closed) 4-14
5. Folding Quality Troubleshooting
5-1
5-2
5-3
5-4
5-5
5-6
Wrinkled Sheets ..........................................................................
Folded Corners ...........................................................................
Sheet Edges Do Not Align .........................................................
Sheet Is Folded Askew ...............................................................
Sheets Are Not Arranged On the The Delivery ..........................
Sheet Jams at the Deflector ........................................................
5-2
5-3
5-4
5-5
5-6
5-7
6. Electrical Circuit
6-1
6-2
6-3
6-4
6-5
6-6
6-7
Electrical Parts Leyout and Descripton ...................................... 6-2
Electrical Chassis Layout and Description ................................. 6-3
P.C.B. Layout and Description ................................................... 6-4
Control P.C.B. QPM-192 ........................................................... 6-5
6-4-1
QPM-192 P.C.B. Layout ............................................ 6-5
6-4-2
QPM-192 LED Layout .............................................. 6-6
LCD P.C.B. QPW-677 ............................................................... 6-7
24V/5VDC Wiring Diagram ...................................................... 6-8
6-6-1
Buckle Chute Section ................................................. 6-8
6-6-2
Main Section ............................................................... 6-9
Power Circuit Wiring Diagram ................................................ 6-10
VI
1: Mechanism
1. Mechanism
1
Mechanism
1-1
1-2
1: Mechanism
1-1
Feed Table Unit
Window for Sensor
Sheet Guide
The screw works as
the fulcrum of
sheet guide angle.
Feed Angle
Adjusting Mechanism
Angle is adjustable
within the range of
this square.
Sheet Guide
Fixing Knob
The sheet guides rotate
on this fulcrum.
Sheet Guide
1
2
Fulcrum
Screw
Guide Shaft
Adjusting
Screw
Link
This rod is eccentric.
Slide Bracket
Eccentric Rod
Feed Angle Adjusting Mechanism
Nut Plate
Sheet Guide Angle Adjusting Mechanism
1: Mechanism
1-2
Table Up/Down Unit
Rack (rear)
Joint
Rack (front)
Bearing
Pinion
Side Plate (rear)
Guides
Side Plate
(front)
Table Fixing Hole
Joint
Table Bracket
(Rack)
Pinion
Pinion
M02
Table Up/Down Motor
Guides
Pinion
Side View
Top View
1-2: Table Up/Down Unit
1
Mechanism
1-3
1-4
1: Mechanism
1-3
Table Height Detect Unit
Adjusting Lever
Sensor
L : Table Height Low
B06
O : Table Height Standard
H : Table Height High
L O
H
Height Detecting Bar
When the top of the loaded
sheets pushes up this bar,
the sensor detects the metal
attached on the back of the bar.
Fulcrum
Height Detecting Bar
Adjusting Lever
Fulcrum for both
1: Mechanism
1-4
Feed Rotor Unit
Vacuum Pipe
This pipe does not rotate.
This suctions the air through
the holes at the bottom.
Feed Ring
Vacuum Rotor
Vacuum Rotor
This ring rotates and
suctions the sheet
through the radial slits.
Vacuuming Mechanism
A
Drive Motor
M01
Fold Rollers
Clutch
Electromagnetic
Valve
Vacuum
Rotor Unit
Driving Mechanism Viewing from A
Vacuuming Mechanism
1-4: Feed Rotor Unit
1
Mechanism
1-5
1-6
1: Mechanism
1-5
Double Feed Stop Unit
Gate Plate
Up/Down Slide Plate
Urethane
When installing the
gate plate, push it
down and screw it.
Double Feed
Prevention Unit
Fulcrum
Gate Lever
Moves Up/Down within
the range of this slot.
Vacuum Roller
Blower (exhale)
Square Pipe
Blowing Outlet
Double Feed Stop Plate
The double feed stop unit
moves Up/Down on this fulcrum.
Gate Lever
The bending and friction of this urethan
prevents the double feeding of the sheets.
Urethan
Gate Plate
When the flat
disappears, replace
to a new one.
Worn out
1: Mechanism
1-6
Fold Roller Unit
The gap between the first roller and guide plate
= 1 mm (0.04")
1
[CHECK]
1mm 1 Remove the second and fourth rollers.
(0.04") 2 After removing the rollers, raise the buckle
2
fixing lever and reset the roller lever level.
(If the buckle fixing lever is left lowered, the roller
lever pushes the guide plate up.)
3 Insert an 1 mm (0.04") allen wrench from the
infeed side, and check the gap.
Roller Lever
Buckle
Chute
Side
Solenoid ON = When the deflector is Up.
4
2
3
Mechanism
3
4
1
2
4
2
1-6: Fold Roller Unit
1
5
4
Solenoid OFF = When the deflector is Down.
- When the solenoid turns OFF, the deflector
lowers and makes a space between the
deflector and the third roller.
- The sheet that comes through the second
and third roller goes over the deflector, then
goes to the second buckle chute through
the third and fourth roller.
Vacuum Rotor
3
- When the solenoid turns ON, the deflector
goes up and closer to the third roller.
- The sheet that comes through the second
and third roller goes under the deflector and
is delivered. (As shown with the arrow to
the right.)
Guide Plate
1-7
1-8
1: Mechanism
1-7
Deflector Unit
Deflector Unit
Deflector
Fulcrum Shaft
Deflector
Side Plate
Deflector Holder
Deflector Lever
Solenoid ON:
The upper/lower limit of the
deflector is decided by the
15 hole on the side plate.
15 hole
on the side plate
Solenoid OFF:
Deflector
Lock the deflector with this screw.
Deflector Holder
Deflector Lever (front)
Adjust the tilt of the deflector by
adjusting the deflector holder with
these two screws.
1: Mechanism
1-8
Delivery Unit
M01
Drive Motor
Delivery Belt
Adjust the belt tension
by fixing the shaft within
the range of the slot.
Tension Adjustment of the Delivery Belt
O Ring
1-8: Delivery Unit
1
Mechanism
The O ring contacts the shaft directly
and drives the delivery shaft.
(The motor does not have reduction gear.
This wheel makes large reduction ratio.)
1-9
1-10
1: Mechanism
1-9
Buckle Chute Unit
Buckle Chute Unit
Idle Gear
Screw Shaft Drive Gear
Motor Gear
Sensor Plate
M03
M04
Stopper
Encoder
Sensor
B01
Home Position
Sensor
Sensor
Plate
Encoder Unit
Stopper Drive Mechanism
1: Mechanism
1-10 Air Circuit Unit
Blower Box
Vacuum Rotor
M05
This ring rotates and
suctions the sheet
through the radial slits.
Blower Motor
- Inside the box, the motor M05 is installed.
- The air comes from top goes out through
the coil of the motor. The coil is also cooled
down by the air blow.
Electromagnetic
Valve
Open/Close
Vacuum Air
Vacuum Plug
IN
OUT
Separation Air Outlet
Carbon Brush
Separates the suctioned top
sheet from the rest of the sheets.
[CAUTION]
The carbon brush can not be replaced
singly. Replace the whole blower box.
Blower Air Outlet
Blows the top of the loaded sheets
and flips it up.
1-10: Air Circuit Unit
1
Mechanism
The carbon
worn out
1-11
2: Service Mode
2. Service Mode
2
2-1
Service Mode
2-2
2: Service Mode
2-1
Operations of Service Mode
In the service mode, the operations listed
on the chart to the right can be performed
by pressing the power switch and the other
switches together.
To quit the service mode, turn OFF the
power switch.
While the PF-P330 is performing the service mode operations listed on the chart to
the right, the sheet sensor B08 is deactivated. Therefore, the PF-P330 can run
without sheets on the feed table.
On the numeric key pad, press the
button and turn ON the power switch.
The first and second buckle chute stoppers move
Up/Down at full stroke.
Buckle Chute
Single Moving
Mode
On the numeric key pad, press the
button and turn ON the power switch.
The total counter is indicated.
(Total counter: The total number of the folding that is
counted since the machine has been shipped. This
is not cleared by pressing the [C] button.)
Total Counter
Indication
[1]
[2]
On the numeric key pad, press the
button and turn ON the power switch.
[3]
1 Buckle chute stopper Up/Down
2 Drive
motor drives
3 Feed table Up + Blower ON +
Clutch ON + Valve ON
4 Feed table Down +
Repeat
Blower OFF + Clutch OFF + Valve OFF
3
4
Non-Production
Run Mode
1
On the numeric key pad, press the
button and turn ON the power switch.
1 Drive motor drives + Feed table Up and stops
2 Clutch repeats ON/OFF
Clutch Unit Single
Operation Mode
On the numeric key pad, press the
button and turn ON the power switch.
1 Drive motor drives
2 Feed table Up +
Blower ON + Clutch ON + Valve ON
3 Feed
table Down + Blower OFF + Clutch OFF + Valve
Repeat 2
OFF
3
Non-Production
Run Mode Except
Buckle Chute Unit
On the numeric key pad, press the
button and turn ON the power switch.
All stored memories are cleared.
Memory
All Clear
[O] & [C] and turn ON the power switch.
Total counter is reset to “0”
Total Counter
Clear
When the folding pattern is NOT the Single
Fold, press the [0] button and [Feed Gap]
button.
Solenoid Y02 and Y03 turn ON and the deflector
closes.
Deflector Close
[4]
[5]
[C]
On the numeric key pad, press the
2: Service Mode
2-2
Calibrating the Home Position (Buckle Chute Stopper)
On the PF-P330, the home position of the
buckle chute stopper only should be
calibrated manually.
Fold one sheet and adjust the home position depending on the shift of the folded
sheet.
Delivered with this
face top.
The First
Stopper
Raise the B01
by the half of the
shift.
Single Fold
Perform the single folding.
Measure the shift of the fold position.
(Fig.1)
Adjust the first buckle chute home position sensor B01 by the half of the folding
shift. (Fig.2)
Perform the parallel folding.
Measure the shift of the fold position.
(Fig.1)
Adjust the second buckle chute home
position sensor B02 by the half of the
folding shift.
Delivered with this
face top.
Parallel Fold
Raise the B02
by the half of the
shift.
Fig.1 Adjusting Amount
The sensor position
is adjustable within
the range of this slot.
B02
B01
The Second
Buckle Chute
Home Position
Sensor
3
4
B01
Fig.2 The First Buckle Chute Home Position
Sensor B01
The First
Buckle Chute
Home Position
Sensor
Buckle Chute
Side
5
[Additional Information]
After the fold pattern and sheet size are
selected, the stopper lowers. When the home
position sensor detects the stopper, the
motor reverses and the stopper lifts.
The stopper moving amount is calculated
from the fold pattern and the sheet size.
Therefore, if the sensor position is shifted
upward, the stopper position is also shifted
upward by the same amount.
The Second
Stopper
1
2
Deflector
Fig.3 Folding Unit
2-2 Adjusting the Home Position (Buckle Chute Stopper)
2
2-3
Service Mode
3: Adjusting and Checking Procedures
3. Adjusting and Checking Procedures
3
3-1
Adjusting and Checking Procedures
3-2
3: Adjusting and Checking Procedures
3-1
Sheet Guides Right Angle and Parallel Adjustment
PF-P330 has the mechanism that the sheet
guides F and R turn together to feed sheets
to the feed rotor at right angle. (Fig.1)
Sheet Guide R
The screw works as
the fulcrum of
sheet guide angle.
Sheet Guide F
This section describes instructions to
correct the angle of the sheet guides F and
R in case their angle differs each other
(Fig.2)
Guide Fulcrum
Loosen the fulcrum screw on the sheet
guide. (Fig.2)
Angle is adjustable
within the range of
this square.
Eccentric Rod
- Do not remove the screw completely, just loosen it
by the half of a rotation.
Loosen the adjusting screw.
- Do not remove the screw completely, just loosen it
by one rotation.
Fig. 1 Feed Angle Adjusting Mechanism
Sheet Guide
Fixing Knob
Sheet Guide
Front Stop
Adjust the sheet guide angle at right
angle and parallel. (Fig.3)
- Load a square sheet on the feed table.
- Place the sheet so that sheet edge touches the
front stop.
- Align the sheet guide F and R with the sheet and
tighten the screws described in step
and
.
Slide Bracket
1
2
Fulcrum
Screw
Adjusting
Screw
Nut Plate
Sheet
Fig. 3 Right Angle and Parallel Adjustment
Fig. 2 Sheet Guide Mechanism
3: Adjusting and Checking Procedures
3-2
Rack and Pinion Position Adjustment
The feed table moves Up/Down by the rack F/
R and the pinions. If the position of the rack
and pinion differs at the front and rear, the
feed table can not move smoothly.
- Slide guides 2 and 3 are identical.
Rack R
Fig2,3
2 Fix the slide guide
at inner (exit) side.
3 At last, put the slide
guide on the rack
and fix it.
Pinion
Remove the feed table.
Side Plate
Spacer
Loosen the fixing screws on pinion.
- Release the pinion so that it can turns freely.
Insert the rack into the slot on the side
plate.
Apply grease
(back as well)
1 Put the rack on infeed side of the slot.
Set the rack. (Fig.2)
- Place two slide guides on both side of the rack and
fix the rack on the infeed side.
1 The slot on the side plate is wider than the plate
thickness of the rack. Put the rack on the infeed
(entrance) side of the slot.
2 Fix the slide guide at the inner (exit) side of the
machine.
3 Fix the other slide guide at the infeed (entrance)
side.
Fig. 1 Rack and Pinion
Rack is at the upper
limit.
Lock the pinion. (Fig.3)
Enough grease is applied on the rack that is
installed between the slide guides.
The rack that is installed between the slide
guides moves Up/Down smoothly.
Raise the rack to the upper limit. (Fig.3)
- Keep the rack at the upper limit during performing
the next step
. Hold the rack using a rope or
magnet.
Fig. 2 Rack and Slide Guide
- Tighten the fixing screws
on pinion here. (Front side
as well)
- The screw should be put
on the flat face of the pinion
shaft.
The tops of rack F and rack R are at the same
height.
Grease is applied on the mesh of rack and
pinion.
Set the rack at front side as well.
Check the items listed in Fig.4.
Fig. 3 Lock the Pinion
Fig. 4 Check List
3-2: Rack and Pinion Position Adjustment
3
3-3
Adjusting and Checking Procedures
3-4
3: Adjusting and Checking Procedures
Lower Guide and Fold Roller Gap Adjustment
The shape of the lower guide is easy to be
deformed as shown in Fig.1.
1mm
(0.04")
Lower Guide
Sheet goes to the fold roller after passing
through between the upper guide and
lower guide as shown in Fig.3.
1mm
(0.04")
The First Fold Roller
1mm
(0.04")
3-3
The gap between the lower guide and the
first fold roller should be 1 mm (0.04”.)
Check the gap.
These fronts align, and there is
1 mm (0.04") gap between the
lower guide and the fold roller.
- Looking from the infeed entrance, use a small light
and check if the three gaps between the lower
guide and fold roller are 1 mm (0.04” .) (Fig.2)
Fig. 1 Lower Guide and First Fold Roller
[Note]
Fig. 2 Amount of the Gap
.
Open the feed section cover. (Fig.4)
Upper Gudie
The First Fold Roller
Feed Roller
Cover
1mm
- If the gap is not correct, go to the next step
(0.04
")
Use a 1 mm-thick strip of sheet to check the
gap accurately.
Remove the feed roller cover. (Fig.4)
- The lower guide positions under the upper guide.
Adjust the front edge of the lower guide to adjust
the gap.
Lower Guide
Sheet
Feed Section
Cover
Fig. 3 Upper and Lower Guides
Fig. 4 Feed Section Covers
3: Adjusting and Checking Procedures
3-4
Deflector Position Adjustment
.3
No
The deflector decides if the sheet is delivered or folded again.
Deflector
Fulcrum Shaft
The upper or lower limit of the deflector is
defined by the 15 hole on the side plate.
(Fig.2)
Deflector
Side Plate
Deflector
Deflector Holder
Deflector Lever
Remove the second and fourth rollers.
Deflector Holder
Solenoid ON:
15 Side Plate
Hole
Deflector Lever (front)
Loosen the fixing screws on the deflector holder. (Fig.3)
Insert a 0.5 mm (0.02”) thickness of the
sheet between the third roller and the
deflector. (Fig.3)
Y02
Solenoid
Solenoid OFF:
Fig. 1 Deflector Drive Mechanism
Fig. 2 Solenoid ON/OFF and Deflector Position
0.5 mm (0.02") thickness of the sheet
Lock the deflector holder.
5
- Hold up the deflector holder and tighten the fixing
screws.
- Remove the inserted sheet.
Adjust the solenoid position. (Fig.4)
- Position the solenoid so that when the plunger is
pushed in, the deflector touches the 15 side plate
hole. Tighten the fixing screws in that position.
5
3
4
3
4
1
2
Push In
1
2
Little gap
at this side
Deflector Holder
Check
- These screws set the position of the deflector.
Fix the solenoid with this side
touches the side plate.
- Remove the fold roller drive belt. Keep pressing
plunger on the solenoid and turn the third roller
manually. Check that the roller turns silently (the
deflector does not touch the roller.)
- These screws can also adjust the tilt of the
deflector.
Solenoid Fixing Screws
Fig. 3 Deflector Holder
Fig. 4 Solenoid Position Adjustment
3-4: Deflector Position Adjustment
3
3-5
Adjusting and Checking Procedures
3-6
3: Adjusting and Checking Procedures
3-5
Buckle Chute Stopper Level Adjustment
Check the sheet guides.
Front Stop
Sheet Guide
- Place a sheet so that the sheet edge touches the
front stop and check that the sheet guides are
parallel to the sheet. (Fig.1)
If the sheet guides are askew, see Section 3-1:
Sheet Guides Right Angle and Parallel Adjustment
and correct the sheet guides angle.
Remove the cover on buckle chute
section.
- Lay down the buckle chute section and loosen the
fixing screws at the bottom of the buckle chute.
(Fig.2)
Sheet Guide
No gap between the sheet guide and the
sheet that is aligned with the front stop.
Remove the rear cover.
Fig. 1 Sheet Guide
- In later procedure, the motor belt will be driven
manually to feed a sheet.
Fig. 2 Remove the Covers
Load a sheet on the feed table.
- Load a square sheet and place the sheet guides on
both side.
Two screws
adjust the tilt.
Feed a sheet.
- Drive the motor belt manually and feed a sheet.
- Stop the belt at position where the sheet front edge
touches the stopper.
Stopper
Stopper
Adjust the stopper angle.
- Adjust the stopper angle within the play made by
the two fixing screws so that the stopper is parallel
to the sheet. (Fig.3)
Sheet
Slide Guide
Fig. 3 Stopper Fixing Section
3: Adjusting and Checking Procedures
3-6
Belt Tension Adjustment
Drive Timing Belt Tension
Fold Roller Drive Timing Belt Tension
The tension of the drive timing belt is adjusted
by the fixing position of the drive motor (M01.)
Too much belt tension may result in that the
timing belt vibrated by the motion of the
machine. Do not tense the belt too much.
The tension of the fold roller drive timing belt
is adjusted by the fixing position of the tension
roller. The hole on the side plate to fix the
tension roller is slot.
Delivery Belt Tension
The delivery belts are flexible, therefore, the
belt tension is not adjustable. Fix the delivery
roller shaft at the center of the slot on the side
plate.
If the delivery belt slips, set the delivery roller
shaft at exit side of the slot.
Tension Roller
The fold roller drive
timing belt bends by
about 1 mm (0.04")
When the belt is pushed by
200 g at its center, the belt
bends by 3-4 mm (0.12"-0.16".)
Delivery Belt
Feed Roller Drive
Timing Belt
Fold Roller Drive
Timing Belt
Power Timing Belt
Fix at the center
of the slot.
M01
3-6: Belt Tension Adjustment
3
3-7
Adjusting and Checking Procedures
3-8
3: Adjusting and Checking Procedures
3-7
Stopper (Roller Lever) Position Adjustment
The stopper of the roller lever prevents the
removable rollers (the second and fourth
rollers) from compressing the other rollers
(the first, third and fifth rollers) too much.
(Fig.1)
If the rollers are compressed each other for
a long time, the roller lever is raised gradually. To avoid that, limit the pressure of
compressing the rollers by the stopper
position.
Spring
5
3
A
B
2
Stopper
Roller Lever
Fig.1 Roller Unit
When the stopper positions as shown in
the Fig.2-B, the second and fourth rollers
compress the first, third and fifth rollers
too much. If the rollers are left as such for
a long period, they may be deformed.
Adjust the eccentric stopper angle.
Eccentric Min.
1
4
When the stopper positions as shown in
the Fig.2-A, the second and fourth rollers
can not touch the first, third and fifth
rollers and can not fold a sheet.
Install the second and fourth rollers.
Eccentric Max.
Fig.2 Eccentric Stopper Position
Eccentric Stopper
Hole for Wrench
5
3
4
1
0.05 0.15 mm
0.002" 0.005"
2
- Set the stopper so that the hole for Allen wrench
positions at the delivery (exit) side.
Set the gap between the stopper and
the roller lever.
- Fix the stopper so that the gap is 0.05 -0.15 mm
(0.002” -0.005”.)
- In case of 64 gsm sheet, insert one or two sheets in
between and fix the eccentric stopper.
(When the eccentric stopper positions as Fig.2 -B,
the rollers compress too much and are deformed.)
Roller Lever
Fig.3 Roller Compressing
Fig.4 Correct Gap
3: Adjusting and Checking Procedures
3-8
Table Upper Limit Switch S01 Position Adjustment
The table upper limit switch S01 (Fig.1)
detects the upper limit of the feed table.
B06
When the feed table is Up, the sheet loaded
on the feed table is detected by the sheet
upper limit sensor B06 (Fig.2) and the feed
table stops there.
If the sensor B06 malfunctions or the feed
table lifts with an object on it, the upper
guide is raised and the S01 activates to
stop the feed table.
Upper Guide
S01
Sheet Upper Limit
Sensor
S01
Feed Table
Magnet
Loosen the fixing screws on table
upper limit switch S01.
Fig.1 Table Upper Limit Switch S01
Fig.2 Sheet Upper Limit Sensor B06
Lock the S01 in position that its actuator positions as shown in Fig.3.
Check the followings.
1 Load a couple of sheets on the feed table.
2 Turn ON the power switch.
3 Press the test feed button.
The feed table moves Up.
4 Raise the upper guide manually.
If the table stops and starts lowering, the S01 is
installed correctly.
S01
When the actuator
is pushed, there is
still 0.5 mm (0.02")
space.
Nut Plate
Fig.3 S01 Actuator Position
3-8: Table Upper Limit Switch S01 Position Adjustment
3
3-9
Adjusting and Checking Procedures
3-10
3: Adjusting and Checking Procedures
3-9
Feed Rotor Check
PF-P330 has the same feed rotor that is
installed on collating machine VAC-100.
Check
Wave Washer
Feed Ring
Profile
Vacuum Rotor
1 The cutouts on both edge of the
vacuum pipe face the bottom. (Fig.2)
2
4 The shrink amount of the wave washer
is 2 mm (0.08”.) (Fig.3)
[Additional Information]
The stretching force of the washer removes
the gap in the thrust direction.
5
6
Vacuum Rotor
Vacuum Pipe
Thrust Ring
This ring rotates and suctions
the sheet through the radial slits.
Setting Block
Fig.1 Feed Rotor Unit
2 This parts (front
/rear) are at the
same angle.
Grease
does not
come out.
6 Can be turned
smoothly by hand.
Thrust Ring
Wave Washer
WW-30
N4
60 mm
3 (2.4")
The torque on the setting block is
11kg/cm. (Fig.2)
The installed feed rotor rotates
smoothly.
This pipe does not rotate.
Suctions air the holes
at the bottom.
Holes at the
bottom
The setting blocks (front and rear)
faces at same angle and level to each
other. (Fig.2)
3 The edge of the pipe positions 60 mm
(2.4”) ahead from face of the setting
block. (At front and rear) (Fig.2)
Vacuum Pipe
WW-30
SB4-20
5 Torque
1 Cutout at the bottom
11kg / cm
Fig.2 Feed Roller (front)
4 Shrink = 2 mm
amount (0.08")
Setting Block
(rear)
Fig.3 Wave Washer
3: Adjusting and Checking Procedures
3-10 Feed Ring Replacement
The external diameter of the feed ring is
bigger than the that of feed rotor by 0.3 mm
(0.01”.) [Diameter: by 0.6 mm (0.02”)]
When the feed ring is worn out and becomes smaller, it can not feed sheets
correctly. (Fig.1)
B4-6ZP X 4
B4-8ZP
0.3 mm
(0.01")
Setting Block
When replacing the feed ring, do not
dismantle the feed rotor unit.
Feed Ring
Remove the rear cover.
Remove the hoses and conntecting
parts.
Fig.1 Feed Ring
Fig.2 Valve AS
- Remove the hoses and connectors to the pump.
Remove the valve unit. (Fig.2)
Rear
Vacuum Plug
Feed Rotor AS
Remove the vacuum plug. (Fig.3)
Feed Ring
Pull out the feed rotor.
Front
- Displace the timing belt and pull out the vacuum
roller.
Cut the feed ring using a nipper.
When installing
the feed rotor AS,
adjust this cutout
on the notch
Install new feed rings. (Fig.4)
- After installing the new feed ring, fit the ring on the
groove.
Fig.3 Vacuum Plug
[Note]
- To install the feed ring easily,
push this rotor to the rear
side.
- After installing the feed ring,
fit the ring on the groove.
Fig.4 Feed Rotor AS
3-10: Feed Ring Replacement
3
3-11
Adjusting and Checking Procedures
4: Mechanical Troubleshooting
4. Mechanical Troubleshooting
4
4-1
Mechanical Troubleshooting
4-2
4: Mechanical Troubleshooting
4-1
Error Code 01 Is Indicated (= Feed Table Does Not Lower)
The error code 01 is indicated when the
feed table lower limit sensor B07 does not
detect the feed table within 7 seconds after
the signal to lower the table has been sent.
Table Up/Down motor M02 does not
drive.
The feed table Up/Down mechanism
malfunctions.
Rack
1 Joint
When the feed table lowers and sounds
loudly, the sensor B07 has a problem.
QPM-192
2 Pinion
X02
M02
4
Pinion Shaft
QPM-192
Slide
3 Guide
2 CON8
B07
1.
The fixing screws on the joint and the motor
are fully tightened.
2.
The fixing screws on two pinions are fully
tightened.
3.
The rack moves smoothly between the two
slide guides.
4.
The bearing for the pinion shaft positions
correctly.
Check the followings:
When a ferrous object is put on the detecting
part of the B07, the LED L12 illuminates.
2.
B07 is installed correctly.
3.
The wiring and connection between B07 CON10 on QPM192 is OK.
5
6
[ Moving Up/Down the Feed Table]
Check the following mechanism functions:
5 CON10
6
CON8
Table Up/Down Motor
24VDC
Geared Motor
L12
YEL
1
2 GRN
3 BLU
B07
1.
M02
Table Up/Down
Motor
GRN
BLU
Turn OFF the power switch. Keep pressing the [5]
button on the numeric key pad and turn ON the power
switch. The blower, valve, clutch and table Up/Down
motor repeat the cycle of feeding operation. (To stop,
turn OFF the power switch.)
If the M02 does not drive, or does not try to
drive, check the followings:
1.
When the fixing screw on the joint is loosened
and unloaded, the M02 drives.
2.
The connectors of X02 and CON8 on QPM192
are OK.
3.
The voltage of the X02 at the QPM192 side is
24VDC.
4.
The voltage between the Pin5 and Pin6 of the
CON8 on QPM192 is 24VDC.
4: Mechanical Troubleshooting
4-2
Error Code 02 Is Indicated (= Feed Table Does Not Lift)
The error code 02 is indicated when the
feed table upper limit sensor B06 does not
turn ON within 7 seconds after the signal to
lift the table has been sent.
Table upper limit switch S01
malfunctions.
The upper guide is raised.
Upper Guide
The height detect lever of the sensor
B06 is raised.
QPM-192
L9
S01
Sensor
NC
ORN
NO
YEL
C
3
4
CON3
S01
B06
Magnet
1.
S01 is installed correctly as shown in Section
[3-8: Table Upper Limit Switch S01 Position
Adjustment] , Fig.3.
Check the followings:
2.
When raising the upper guide manually, the
LED L9 on QPM192 lights OFF.
1.
An object on the feed table raises the upper
guide.
3.
2.
An object sticks on the magnet that is installed
under the upper guide, and it raises the upper
guide.
When raising the upper guide manually and
pushing down the actuator of the S01, L9
illuminates.
4.
Wiring and connection between the S01 and
Pin3,4 of CON3 on QPM192 is OK.
3.
The upper guide is deformed and positions
apart from the S01.
Fulcrum
On the back of the height detect lever, a thin iron chip
is attached. When the lever is raised by the sheets
and detected by the sensor B06, the feed table stops.
Check the followings:
1.
Installation and function of the height detect
lever.
2.
The installation of the iron chip on the back of
the height detect lever, and the B06.
3.
Wiring and connection between the B06 and
Pin1, 2 of CON10 on QPM192.
Check the followings:
The upper guide is held by a magnet. When the
upper guide is raised and remains there, the table
upper limit switch S01 works and stop the feed table.
Height Detect Lever
The feed table Up/Down mechanism
malfunctions.
See Section [4-1: Error Code 01 Is Indicated] and
check the same heading.
4-2: Error Code 02 Is Indicated
4
4-3
Mechanical Troubleshooting
4-4
4: Mechanical Troubleshooting
4-3
Buckle Chute Sounds Loudly and Q01/02 Are Actuated
Buckle stopper stops at the lower limit.
Buckle stopper stops at the upper limit.
Buckle chute home position sensors B01/
02 malfunction or are installed incorrectly.
A set of sensors on the encoder P.C.B.
QPW422 malfunctions.
Buckle stopper stops on the way.
The guide shaft and the bushing of the
stopper Up/Down mechanism
malfunction.
Second Buckle Chute
Encoder P.C.B
QPW-422
B02
Pointer
B01
Screw Shaft
First Buckle Chute
Encoder P.C.B
QPW-422
QPW-422
BRN
1
BLK
2
B01
BLU
3
The First Buckle Chute
Home Position
1
2
3
CON2
CON1
BRN
1
BLK
2
BLU
3
The Second Buckle Chute
Home Position
1
2
3
CON2
B02
1
2
3
4
6
QPW-422
QPM-192
BRN
RED
ORN
YEL
GRN
1 CON1
2
L3
3
4
6
1 BRU 1 CON2
VIO
2
2
3 GRY 3
WHT
L6
4
4
6 BLK
6
BRN/WHT
8
CON1 8
Then, circuit protector is actuated.
Check the followings:
3.
4.
1 CON1
2
L1
3
4
L2
6
The Second
Buckle Chute
Side
1
2
3
4
6
8
BLU
VIO
GRY
WHT
BLK
BRN/WHT
1 CON2
2
3
L4
4
L5
6
8
The couble of optical sensors on the encoder
P.C.B. QPW422 read and counts the rotation. If
the sensor malfunctions and they can not count the
rotation, the stopper goes father than the set
position until it stops at the upper limit. Then, the
circuit protector is actuated.
If the buckle chute home position sensors B01/02
malfunction, the stopper goes farther than the
home position until it stops at the lower limit and
overloads.
B01/02 are installed correctly.
When a ferrous object is put on the detecting
part of the B01/02, the sensor LED illuminates.
At the same time, LED L3 or L6 illuminates on
QPM192.
Wiring and connection between B01/02 QPW422 - CON1/CON2 on QPM192 is OK.
The First
Buckle Chute
Side
BRN
RED
ORN
YEL
GRN
Bushing
Check the followings:
QPW-422
QPW-422
1.
2.
QPM-192
1
2
3
4
6
1.
The bushing is not deformed and installed
correctly.
2.
The screw shaft is inserted into the bushing
correctly.
3.
The screw shaft does not bend and is not
deformed.
Check the followings:
1.
2.
3.
Installation of the QPW422
Installation of the sensor plate
When the sensor plate is rotated manually, the
LED L1 and L2 or L4 and L5 on QPM192
illuminates by turns.
If the sensors malfunction, replace the sensors and
QPW422 together.
(Check the guide shaft by turning it manually.)
4.
The pointer in the stopper position checking
window is not caught with the buckle frame
and stopped.
4: Mechanical Troubleshooting
4-4
Feed Rotor Does Not Suction the Sheets
When the M05 does not drive at all, go to
Section [4-10: Motor Does Not Drive]
Valve Y04 malfunctions.
When the vacuum is weak, check if the air
hose is installed correctly or it is not torn.
The valve spring is weakened.
Y04
Valve Spring
The rotation of the blower motor is set
low.
17 mm
(0.7")
QPM-192
CON7
3
4
ORN
YEL
X06 RED
BLK
Y04
Upper Stopper 2 Moving Button
2nd
Stopper
Stopper
Position
Display
1st
Stopper
1
2
3
4
5
6
7
8
9
0
Memory
C
[Activating the Valve]
Mode
Turn OFF the power switch. Keep pressing the [5]
button on the numeric key pad, and turn ON the
power switch. The blower, valve, clutch and table Up/
Down motor repeat the cycle of feeding operation.
(To stop, turn OFF the power switch.)
Mode Selecting Button
Air
Press the mode selecting button to show the
[Air] screen on the display. By pressing the
upper stopper 2 moving button, the rotation of
the blower motor M05 is increased and
vacuum becomes stronger.
- When the mode selecting button is pressed
again, the setting is entered and the display
goes back to the counter screen.
The valve spring prevents the pump from
choking when the vacuum hose is clogged.
Check the followings:
Check the followings:
1.
The valve spring is installed correctly.
1.
While the machine is performing the feeding
operation described above, the valve sounds
working.
2.
The length of the valve spring is 17 mm (0.7”)
as shown above.
2.
While the machine is performing the feeding
operation, 24VDC is measured at the connector X06.
3.
Wiring and connection between Y04 - X06 Pin3,4 of CON7 on QPM192 is OK.
4-4: Feed Rotor Does Not Suction the Sheets
4
Mechanical Troubleshooting
4-5
4-6
4: Mechanical Troubleshooting
4-5
Feed Rotor Does Not Drive
Checking the feed rotor:
Drive motor M01 does not drive
- Remove the feed rotor cover and the rear cover.
- Turn OFF the power switch. Keep pressing the [5]
button on the numeric key pad and turn ON the
power switch. The blower, valve, clutch and table
Up/Down motor repeat the cycle of feeding operation. (To stop, turn OFF the power switch.)
Clutch Y01 malfunctions
X10 Q03 X12
Y01
2A
S00
X11
Capacitor
SSR
Drive belts are installed incorrectly.
QPM-192
K02
1 2
CON7
11
22
BRN
1 RED
2
M01
X05
11
22
BLK
BLK
Y01
Y01
Clutch
M01
Check the followings:
Check the followings:
Drive Motor
1.
The circuit protector Q03 for M01 is not
actuated.
1.
While the machine is performing the feeding
operation, the clutch sounds working.
2.
The fixing screws on timing pulley of the M01
are fully tightened.
2.
While the machine is performing the feeding
operation, 24VDC is measured on connector
X05.
3.
The voltage on the SSR terminal Pin2 and
BL connector X11 is 115/230VAC.
3.
Wiring and connection between Y01 - X05 Pin1,2 of CON7 on QPM192 is OK.
Tension
Check the followings:
1.
The four drive timing belts are installed and
work correctly.
2.
The tension presses the belt correctly.
4.
Wiring and connection between S00 - M01
(shown above) is OK.
4: Mechanical Troubleshooting
4-6
Fold Rollers Do Not Rotate
Checking the fold roller rotating
Drive motor M01 does not drive
- Remove the rear cover.
- Turn OFF the power switch. Keep pressing the [5]
button on the numeric key pad and turn ON the
power switch. The blower, valve, clutch and table
Up/Down motor repeat the cycle of feeding operation. (To stop, turn OFF the power switch.)
X10 Q03 X12
2A
S00
X11
Capacitor
SSR
Drive belts are installed incorrectly.
K02
1 2
Fold
Rollers
M01
11
22
M01
Drive Motor
Check the followings:
1.
The circuit protector Q03 for M01 is not
actuated.
2.
The fixing screws on timing pulley of the M01
are fully tightened.
3.
The voltage on the SSR terminal Pin2 and
BL connector X11 is 115/230VAC.
4.
Wiring and connection between S00 - M01
(shown above) is OK.
Tension
Check the followings:
1.
The drive timing belts are installed and work
correctly.
2.
The fixing screws on the timing pulley are fully
tightened.
3.
The tension presses the belt correctly.
4-6: Fold Rollers Do Not Rotate
4
Mechanical Troubleshooting
4-7
4-8
4: Mechanical Troubleshooting
4-7
Delivery Conveyor Belt Does Not Drive
The tension of delivery belt is
loosened.
O ring is cut, or slips on the grease.
Delivery Belts
Delivery belt drive mechanism
malfunctions.
Idle Shaft
M
O Ring
Delivery Roller
Shaft
Adjusting
Screw
O Ring
Delivery Pulley
Idle Shaft
Fix the screw at the
center of this slot.
[Profile]
Check the followings:
1.
Drive
Shaft
Power is transmitted from the idle shaft to the
drive shaft through the O-ring, to make large
reduction ratio.
The adjusting screws for belt tension are set in
correct position.
- If the delivery belt is loosened even though the
adjusting screw is set at the farther edge (exit side)
of the slot, replace the belt.
Check the followings:
1.
2.
Delivery Roller Pulley
Check the followings:
1.
The fixing screw on the timing pulley of the
idle shaft at motor side is fully tightened.
2.
The fixing screw on the delivery roller pulley is
fully tightened.
3.
The delivery roller pulley and the drive shaft
do not run idle.
O ring is not cut or deformed.
Idle shaft does not slip on the grease.
4: Mechanical Troubleshooting
4-8
Deflector Malfunctions
Deflector mechanism malfunctions.
Solenoids Y02, Y03 malfunction.
Deflector closes = Solenoid Y02 and Y03
turn ON during the single folding operation. To perform the single folding, the
deflector is raised (closed) and the folded
sheet is delivered to the conveyor.
Fulcrum
Deflector
Deflector Holder
A jammed sheet is left inside.
Y02
Deflector Solenoid (front)
QPM-192
3
4
CON9
2
Deflector Lever (front)
Y03
1
2
3
4
Deflector Solenoid (rear)
BRN
RED
ORN
YEL
1 1 BRN
2 2 WHT
X04
1 1 BRN
2 2 WHT
[Additional Information]
Y03
In case either of Y02 or Y03 malfunctions, the
deflector can be switched by the other solenoid.
Although, that makes the space between the deflector
and roller at the side where the solenoid malfunctions,
and causes sheet jam.
While the fold pattern is NOT set to single fold, keep
pressing the [0] button and press the [Feed Gap]
button. The Y02 and Y03 turn ON. To turn OFF the
Y02, Y03, turn OFF the power switch.
Check the followings:
There is a jammed sheet between the deflector and the fold roller.
[Check]
Turn OFF the power switch. Remove the second and
fourth rollers and put your hand from the delivery
side. Insert your nail between the roller and the
deflector on the other (infeed) side, and slide to check
the gap.
Check the followings:
Check the followings:
1.
2.
1.
When activating the Y02 and Y03 (described
above), the plungers are pulled in.
3.
2.
When activating the Y02 and Y03, 24VDC is
measured on the connector X03 and X04.
4.
3.
Wiring and connection between the Y02, Y03 X03, X04 - Pin1, 2, 3, 4 of CON9 on QPM192
is OK.
5.
4-8: Deflector Malfunctions
4
Lever Bracket
Plunger
Y02
[Activating the Y02, Y03]
Deflector
1.
Y02
X03
Mechanical Troubleshooting
Fulcrum screw is fully tightened.
The connection of the lever bracket and the
plunger.
While the power is OFF, the plunger can be
moved manually and smoothly.
The spring on the plunger is not cut.
The spring is not deformed nor fall into the
plunger hole.
The fixing screws of Y02 and Y03 are fully
tightened.
4-9
4-10
4: Mechanical Troubleshooting
4-9
Buckle Stopper Does Not Move
The circuit of the motors M03 and M04 that
moves the buckle stopper includes the
circuit protector Q01 and Q02.
Buckle Chute Mechanism
Malfunctions.
When the buckle chute sounds loudly, see
Section [4-3: Buckle Chute Sounds Loudly
and Q01/02 is Actuated]
The voltage on M03 and M04 is not
24VDC.
Screw Shaft
Drive Gear
Idle Gear
QPM-192
CON6
Sensor Plate
Motor Gear
Encoder
Sensor
The circuit protector Q01 or Q02 is
actuated.
Motor
1
2
3
4
5
Circuit
Protector
Q01
Q02
X08
X07
11
22
33
44
M03
M04
1
2
X09
1
2
The First
Buckle Chute
M03
The Second
Buckle Chute
M04
Power Cable Plug
Circuit Protector
For the First Stopper
Q01
0.3A
0.3A
For the Second Stopper
Q02
For Control
The motor gear is fixed with the screw SS3-4.
[Moving the buckle chute stopper singly]
If the motor M03 and M04 does not drive even
when this screw is loosened, there is a problem in the electrical circuit.
Turn OFF the power switch. Keep pressing the [1]
button on the numeric key pad, turn ON the power
switch. The machine starts moving the buckle chute
stopper. (To stop, turn OFF the power switch.)
Check the followings:
For Pump
1.
The fixing screws on the motor gears are fully
tightened.
2.
The cog of the gears mesh correctly.
3.
The circuit protector is the heat accumulating
type.
To reset the circuit protector, wait until it is
cooled down.
- In case the circuit protector is actuated again after
resetting, the motor drive section locks or the M03
or M04 is short circuited.
4.
Check the followings:
1.
The motor gear can be turned manually and
smoothly.
During moving the buckle chute stopper
(described above), 24VDC is measured on
X08 and X09.
2.
The screw shaft is not deformed and it is
inserted into the bushing correctly.
24VDC is measured between the Pin1 and 2,
or Pin3 and 4 of CON6 on QPM192.
3.
There is a continuity between the terminals of
the circuit protector when it is pushed in.
4: Mechanical Troubleshooting
4-10 Motor Does Not Drive
1
Drive motor M01 does not drive
Table Up/Down motor M02 does not drive
Buckle Chute Motors M03/M04 do not drive
X10 Q03 X12
QPM-192
2A
S00
X02
X11
M02
Capacitor
SSR
11
22
M01
Check the followings:
1.
The circuit protector Q03 for M01 is not
actuated.
2.
The fixing screws on timing pulley of the M01
are fully tightened.
3.
The voltage on the SSR terminal Pin2 and
BL connector X11 is 115/230VAC.
4.
Wiring and connection between S00 - M01
(shown above) is OK.
CON8
5
6
Q01
Q02
X08
X07
11
22
33
44
1
2
X09
1
2
The First
Buckle Chute
M03
The Second
Buckle Chute
M04
[ Moving Up/Down the Feed Table]
[Moving the buckle chute stopper singly]
Turn OFF the power switch. Keep pressing the [5]
button on the numeric key pad and turn ON the power
switch. The blower, valve, clutch and table Up/Down
motor repeat the cycle of feeding operation. (To stop,
turn OFF the power switch.)
Turn OFF the power switch. Keep pressing the [1]
button on the numeric key pad, turn ON the power
switch. The machine starts moving the buckle chute
stopper. (To stop, turn OFF the power switch.)
If the M02 does not drive, or does not try to
drive, check the followings:
Check the followings:
1.
When the fixing screw on the joint is loosened
and unloaded, the M02 drives.
2.
The connectors of X02 and CON8 on QPM192
are OK.
3.
The voltage of the X02 at the QPM192 side is
24VDC.
4.
The voltage between the Pin5 and 6 of the
CON8 on QPM192 is 24VDC.
4-10: Motor Does Not Drive
4
1
2
3
4
5
Table Up/Down Motor
24VDC
Geared Motor
K02
1 2
GRN
BLU
QPM-192
CON6
Circuit
Protector
Mechanical Troubleshooting
1.
During moving buckle chute stopper (described above), 24VDC is measured on X08
and X09.
2.
24VDC is measured between the Pin1 and 2,
or Pin3 and 4 of CON6 on QPM192.
3.
There is a continuity between the terminals of
the circuit protector when it is pushed in.
4-11
4-12
4: Mechanical Troubleshooting
4-10 Motor Does Not Drive
Blower motor M05 does not drive.
X10 Q04
3A
S00
SSR
2
The motor for cleaner shown as 13 to the right is
used for the blower motor.
This motor has limited longevity and needs to be
replaced by about 1,000 hours. This is because
that the carbon brush inside the motor is worn out.
K02
1 2
X11
Blower Motor
X14
11
22
33
6
The blower motor can not be replaced singly.
Replace the whole blower box.
4
M05
3
[Driving the Blower Motor M05]
Turn OFF the power switch. Keep pressing the [5]
button on the numeric key pad and turn ON the power
switch. The blower, valve, clutch and table Up/Down
motor repeat the cycle of feeding operation. (To stop,
turn OFF the power switch.)
M05
13
Check the followings:
1.
The connecter between the M05 and the
machine is fully connected.
2.
Circuit protector Q04 is not actuated.
3.
The voltage between the BL terminal X10 and
X11 is 115/230VAC.
4.
When the air amount is set at maximum, the
voltage between the Pin1 and 2 of terminal
X14 is about 115/230VAC.
2
5
Fig.1 Blower Box
4: Mechanical Troubleshooting
4-11 Display Does Not Show Any Image
The volume for panel brightness is
turned to Min.
1
1
CON4
CON5
VR1
CON6
BZ
DSW1
1
VR2
CON12
CON8
1
1
CON9
CON11
1
Display
1
When selecting sheet size or fold
pattern, the machine does not sound
activating.
C10
C11
1
1
CON10
TP5
1
CON2
CON1
CON1
CON1
QPW-422
CON2 CON3
QPW-422
CON2 CON3
GND
TP4
5V
BZ
Control P.C.B
QPM-192
Check the followings:
The brightness of the display panel is adjusted
by the volume VR1 on QPM192 (shown
above.)
The flat cable (shown above) is fully connected.
When replacing the QPM192 and the VR1 is
turned to Min, the display can not show any
image.
When no sound can be heard
1.
VR1
CON12
1
Flat Cable
1
CON5
CON11
QPM-192
1
IC2
1
CON3
1
CPU
ROM
CON7
LCD P.C.B
QPW-677
- The display panel is assembled with the LCD
P.C.B. QPW677. Therefore, to replace the display
panel, replace the QPW677.
If the problem is still not resolved, replace the
control P.C.B. QPM192.
[Additional Information]
Rotary Switch DSW1 Setting
0
1
2
3
Not Used
Japanese
English
English
/mm
/inch
/mm
4-11: Display Does Not Show Any Image
4
Mechanical Troubleshooting
4-13
4-14
4: Mechanical Troubleshooting
4-12 Error Message “Close Buckle” Is Shown (Even though it is closed)
The buckle cover sensor B03
malfunctions.
The buckle cover sensor B03 is
installed incorrectly.
Buckle Fixing Lever
QPM-192
CON2
B03
QPW-422
B03
CON1
BLK
6
6
8 BRN/WHT 8
1
2
CON3
1
2
Buckle Cover
Sensor
Magnet
Check the followings:
1.
The buckle fixing lever is fully closed.
2.
The fixing screw on the sensor B03 is fully
tightened.
3.
The sensor connector is fully connected.
4.
Magnet is installed correctly.
Check the followings:
1.
Remove the magnet that holds the buckle
fixing lever, and put it on the sensor B03
directly. Check that the LED L7 on the
QPM192 illuminates.
2.
Wiring and connection:
- Between the B03 and CON3 on QPW422
- Between the Pin6, 8 of CON1 on QPW422
and Pin6, 8 of CON2 on QPM192
PAGE INTENTIONALLY BLANK
5: Folding Quality Troubleshooting
5. Folding Quality Troubleshooting
5
5-1
Folding Quality Troubleshooting
5-2
5: Folding Quality Troubleshooting
5-1
Wrinkled Sheets
The buckle chute guide is installed
incorrectly or deformed.
The deflector is deformed.
The Third Fold Roller
Buckle Chute Guide
At Center
The sheets are curled or concave.
Fit on the infeed
(entrance) side
of the slot.
Curled
Concave
- The sheets immediately after printed or left in the
humid place may shape as shown above. If those
shaped sheets pass through the rubber rollers, that
may cause wrinkles on the folded sheet. Instruct the
operator to flatten out or dry the sheets before
folding.
[Additional Information]
- The wrapping of the sheets blocks the humidity. If the wrapping is opened and left for a
long time, the sheet becomes damp around
but dry inside. Therefore, the sheet becomes
concave.
- The recycled papers are more likely to be
effected by the humidity.
Deflector
Correct
Incorrect
Not deformed
like this.
- When the buckle chute at the infeed (entrance) side
is deformed as shown above, the sheet may hit the
guide and cause wrinkles. If the buckle chute guide
is deformed by more than 0.5 mm (0.02”), correct
the buckle chute guide.
If the jammed sheet is pulled by force to remove,
that may deform the guide.
- The buckle chute guide is installed on the side plate
by inserting the edge of the 1.6 mm (0.06”) thickness spacer into the 2 mm (0.08”) width slot. The
spacer should be fixed on the infeed (entrance) side
of the slot. If not, that changes the position of the
buckle chute and results in the wrinkles on the
folded sheet.
- If the deflector is deformed and does not align with
the fold roller at the center, the sheet path is
blocked there and may cause wrinkles.
Remove the deflector and flatten it out. [Distortion:
within 0.1 mm (0.004”) ]
- When removing the jammed sheet on the deflector,
if it is pulled by force, that may deform the deflector.
Instruct the operator how to remove the jammed
sheet.
5: Folding Quality Troubleshooting
5-2
Folded Corners
The deflector is deformed.
The Third Fold Roller
At Center
The jammed sheets are left on the
sheet path.
Deflector
Correct
Piece together the jammed sheet.
- When removing the jammed sheet, remove it
completely without any scraps left inside.
When the scrap of paper is left on the sheet path,
the delivered sheet hits it and the corners is folded
(dog ear.)
Incorrect
- If the deflector is deformed and does not align with
the fold roller at the center, the sheet path is
blocked there and may cause wrinkles.
Remove the deflector and flatten it out. [Distortion:
within 0.1 mm (0.004”) ]
- When removing the jammed sheet on the deflector,
if it is pulled by force, that may deform the deflector.
Instruct the operator how to remove the jammed
sheet.
- Instruct the operator to piece together the torn
scraps and make sure to remove all the jammed
sheet completely.
5-2: Folded Corners
5
Folding Quality Troubleshooting
5-3
5-4
5: Folding Quality Troubleshooting
5-3
Sheet Edges Do Not Align
The sheet edges do not
align even though it is
folded in correct setting.
Jammed sheet is left in the buckle
chute.
Stopper drive mechanism malfunctions.
1
- When removing a jammed sheet, if a scrap of sheet
is left on the back of the buckle chute, it works as a
stopper and the sheet is folded incorrectly.
2
3
- The sheet immediately after printed by the laser
printer at high printing speed is hot and dry because
it is compressed and delivered by the toner transferring rollers.
Especially in winter season, the sheet described
above becomes static and it sticks on the metal
part, such as buckle chute, and can not reach the
buckle chute stopper. In case of the short folding
pattern that the large part of the sheet enters the
buckle chute, the sheet is more likely to be effected
by the statics.
[Remedy]
- The sheet printed by the high speed laser
printer should be left for a while to cool it down
and adapt to the temperature and humidity
before folding.
- The static is reduced by jogging the sheet
using the jogging machine.
- Lower the printing speed on the laser printer.
- Reduce the statics on the laser printer.
6
4
The sheet is static.
The sheet has the cross grain direction.
5
Check the followings:
1 The fixing screw on the drive gear is fully
Cross
Grain
Direction
2
3
- The cross grain direction sheet is easy to break
against the feed direction. If there is another
problem such as static, the sheet may not reach the
stopper and cause incorrect folding.
4
5
6
Sheet size is incorrect.
- Measure the sheet.
The correct sheet size: (Long Edge)
A3
A4
B3
B4
420 mm
297 mm
515 mm
364 mm
tightened.
The fixing screw on the gear collar is fully
tightened.
The sensor plate and 1 is tightly connected.
The fixing screw on idle block is fully tightened.
The fixing screw on the motor gear is fully
tightened.
The fixing screw on the stopper home position
sensor is fully tightened.
[Additional Information]
The stopper home position is set using the 64
gsm sheet as a standard. Therefore, when
using thinner sheet or cross grain direction,
home position does not match.
It is useful to memorise the stopper setting
that is adjusted for the other types of sheet
using the stopper adjusting knob.
5: Folding Quality Troubleshooting
5-4
Sheet Is Folded Askew
Roller pressure (spring force) is not
even at front and rear.
5
3
4
The sheet guide is not at right angle
against the front stop or not parallel
each other.
Stopper is askew.
1
2
Stopper
Spring
Stopper
Roller Lever
Sheet Guide
Sheet
Front Stop
- The pressure of the fold roller is produced by the
spring of the roller lever. When installing the second
and fourth fold rollers, if the roller lever positions
incorrectly but is pulled up by force, the spring will
be extended. In case that, replace the spring.
- To adjust the stopper tilt angle, fold a sheet and
adjust the stopper depending on the shift of the
folded sheet. See Section [3-5: Buckle Chute
Stopper Parallel Adjustment].
Sheet Guide
- When a sheet is loaded so that the sheet edge
touches the front stop and the sheet guides are
aligned with the sheet edge, the guides should be
parallel to the sheet.
- If the sheet guides are not parallel to the sheet, see
Section [3-1: Sheet Guides Right Angle and Parallel
Adjustment] and adjust the sheet guide.
- There should be a gap of 0.1 mm (0.004”) between
the stopper and roller lever (at front and rear), when
the lever is pulled up.
If there is no gap in-between, the pressure of the
fold roller changes. See Section [3-7: Stopper
(Roller Lever) Position Adjustment] .
Fold rollers are contaminated.
Especially the stencil printed sheet, if the
sheet is folded before it drys out, the ink
adheres to the fold roller and changes the
friction and results in incorrect folding.
- Instruct the operator to clean the fold rollers
following the instruction of “Maintenance” in the
operation manual .
5-4: Sheet Folded Askew
5
Folding Quality Troubleshooting
5-5
5-6
5: Folding Quality Troubleshooting
5-5
Sheets Are Not Arranged On the The Delivery
Delivery conveyor belt slips.
Antistatic tapes come off.
1 Delivery Conveyor Belt
Deflector
3 O Ring
Folded sheets stick each other because of static.
2
Antistatic
Tape
4 Idle Shaft
Check the followings:
Feed Gap
Sto
Po
Di
2nd
Stopper
1 The delivery conveyor belt is not cut.
2 The delivery conveyor belt is tensed correctly.
(See Section 3-6 Belt Tension Adjustment)
3 The O ring on the delivery roller pulley is not
- If the sheets are static, they stick each other and do
not arrange.
cut.
4 Grease is not applied on the O ring or idle
Fan the sheet well before folding and reduce the
static.
If the sheet is still effected by the static, run the
machine by Feed Gap operation.
shaft causing slip.
Antistatic Tape
[On the infeed
(entrance) side]
- The antistatic tapes are attached on the infeed
(entrance) side of the deflector and delivery (exit)
side of the delivery conveyor.
5: Folding Quality Troubleshooting
5-6
Sheet Jams at the Deflector
Antistatic tape on the deflector comes
off.
Deflector mechanism malfunctions.
2 Fulcrum
The Third
Fold Roller
The Third Fold Roller
Deflector
3
Antistatic Tape
3
Deflector Holder
Plunger
5
Deflector
3
4
4
1
2
Lever Bracket
Y02/Y03
Deflector
5
1 The fixing screws on the deflector are fully
2
When the deflector is raised (when the solenoid
Y02 is ON), the edge of the sheet that comes
through the second and third fold roller touches the
antistatic tape and is delivered.
- Check the attachment of the antistatic tape by
inserting hand from the delivery conveyor side and
touching the rear (infeed) side of the deflector.
3
4
5
At Center
1
Deflector Lever (front)
Check the followings:
- The antistatic tape is attached on the deflector as
shown above.
The deflector is deformed.
tightened.
The fulcrum screw on the deflector lever is
fully tightened.
The connecting screw on the deflector lever is
fully tightened.
The screw connecting the plunger of the
solenoid Y02/Y03 and the lever bracket is fully
tightened.
The fixing screws on the solenoid Y02/Y03 are
fully tightened.
Correct
Incorrect
- If the deflector is deformed and does not align with
the fold roller at the center, the sheet path is
blocked there and may cause wrinkles.
Remove the deflector and flatten it out. [Distortion:
within 0.1 mm (0.004”) ]
- When removing the jammed sheet on the deflector,
if it is pulled by force, that may deform the deflector.
Instruct the operator how to remove the jammed
sheet.
- When pushing in the plunger of the Y02/Y03
manually, the deflector moves smoothly.
- When changing the fold patterns by pressing the
fold pattern selecting button, the Y02/Y03 moves
correctly.
5-6: Sheet Jams at the Deflector
5
Folding Quality Troubleshooting
5-7
6: Electrical Circuit
6. Electrical Circuit
6
6-1
Electrical Circuit
6-2
6: Electrical Circuit
6-1
Electrical Parts Leyout and Descripton
3
1
2
M04
The Second
Buckle Chute
Motor
B02
The Second Buckle Chute
Home Position Sensor
B01
The First Buckle Chute
Home Position Sensor
B03
M03
The First
Buckle Chute Motor
Buckle Cover Sensor
Code
Name
B01
1
The First Buckle Chute Home Position Sensor
B02
3
The Second Buckle Chute Home Position Sensor
B04
B03
3
Buckle Cover Sensor
Count Sensor (Projector)
B04
4
Count Sensor (Projector)
B05
4
Count Sensor (Receiver)
B06
5
Sheet Upper Limit Sensor
B07
7
Table Lower Limit Sensor
B08
8
Sheet Detect Sensor
M01
11 Drive Motor
Single Phase 90W
M02
10 Table Up/Down Motor
24VDC Geared Motor
M03
2
24VDC DC Motor
M04
2
4
B05
Count Sensor
(Receiver)
6
Y01
12
11
Feed Clutch
Y04
M01
Feed Valve
Drive Motor
Y03
10
Deflector Solenoid
(rear)
Y02
M02
Deflector Solenoid
(front)
Table Up/Down
Motor
M05
The Second Buckle Chute Motor 24VDC DC Motor
Single Phase
14 Blower Motor
Commutator Motor
Y01
12 Feed Clutch
24VDC
Y02
6
Deflector Solenoid (front)
24VDC
Y03
6
Deflector Solenoid (rear)
24VDC
Y04
12 Feed Valve
S00
13 Power Switch
S01
9
9
S01
13 S00
Table Upper Limit Switch
8
Main Switch
7
B07
Table Lower Limit Sensor
5
B06
Sheet Upper Limit Sensor
B08
Sheet Detect Sensor
14
M05
The First Buckle Chute Motor
Blower Motor
Table Upper Limit Switch
24VDC
6: Electrical Circuit
Electrical Chassis Layout and Description
24VDC
G02
Power Supply
5VDC
BLK
K01
SSR Relay
For Blower Motor M05
BLK
K02
SSR Relay
For Drive Motor M01
Q01
Circuit Protector
For the First Buckle Chute Motor M03
Q02
Circuit Protector
For the Second Buckle Chute Motor M04
Q03
Circuit Protector
For M01, G01, G02
Q04
Circuit Protector
For Blower Motor M05
WHT
115/230VAC
24VDC
BL
WHT
VIO
3
(For M01)
4
To QPM-192 CON9 6
To QPM-192 CON9 5
GRN
Ground
To M01
3
SSR
K01
(For M05)
To Q03
2
1
BLU
To X07 M03
To QPM192 CON6 1
To QPM-192 CON8 7
SSR
K02
M05 Ground
To Q04
BL
X11
BL
2
To M05
Q04
4
Q01
1
GRY
To QPM-192 CON8 8
X12
For M03 (0.3A)
BLK
To X07 M04
To QPM192 CON6 3
5VDC
Q02
BLK
For M04 (0.3A)
G02
GRY
VIO
X10
For M05 230VAC: 3A
115VAC: 5A
To QPM-192 CON7 8
To QPM-192 CON7 7
115/230VAC
S00
K02_1
G01
To X10
To X12
BLU
Power Supply
Q03
To QPM-192 CON7 6
G01
230VAC: 2A
115VAC: 3A
GRN
ORN
Name
For M01
To QPM-192 CON7 5
To B08 connector X01 1
Code
To K01_1
To X10 S00
6-2
6-2: Electrical Chassis Layout and Description
6
6-3
Electrical Circuit
6-4
6: Electrical Circuit
6-3
P.C.B. Layout and Description
QPW-422
E n c o d e r P. C. B.
P.C.B. for the encoder
that decides the buckle
stopper position.
QPW-677
QPM-192
QPW-307
L C D P. C. B.
C o n t r o l P. C. B.
Deliver y LED P.C.B.
P.C.B. that receives
the signal from the
buttons and shows
images on the panel.
Main P.C.B. that
controls the machine.
P.C.B. for the LED
that guides the delivery
roller position.
6: Electrical Circuit
1
CON9
To
Delivery LED P.C.B.
QPW-307
To LCD P.C.B.
QPW-677
1
CON8
VR
1
CON4
CON5
CON6
DSW1
VR2
1
To M04
To M03
IC2
Brightness
Adjustment
VR2
Not Used
DSW1
0
Not Used
1
Japanese
/mm
2
English
/inch
3
English
/mm
ROM
1
CPU
1
1
To B07
CON10
To B06
To B05
To B04
To S01
To B08
C11
CON3
To G02 +5V
To G01 +24V
To Y04
To Y01
CON7
C10
VR1
1
QPM-192
BZ
1
Control P.C.B.
1
VR1
CON11 CON12
1
To K02
To B06
To B07
To M02
QPM-192 P.C.B. Layout
To Y02
To Y03
6-4-1
Control P.C.B. QPM-192
To K01
6-4
TP5
1
CON2
CON1
CON1
CON1
QPW-422
CON2 CON3
QPW-422
CON2 CON3
GND
Encoder P.C.B.
TP4
5V
For details on connectors,
see Section [6-6: 24V/5VDC Wiring Diagram].
To B02 To B03 To B01
6-4-1: QPM-192 P.C.B. Layout
6
6-5
Electrical Circuit
6-6
6: Electrical Circuit
QPM-192 LED Layout
LED Illuminating Condition
1
CON9
1
CON8
1
CON4
CON5
CON6
BZ
1
VR1
DSW1
L1
Sensor A on the first stopper encoder P.C.B. QPW-422 does not receive light.
L2
Sensor B on the first stopper encoder P.C.B. QPW-422 does not receive light.
L3
The first buckle chute home position sensor B01 is ON
L4
Sensor A on the second stopper encoder P.C.B. QPW-422 does not receive light.
L5
Sensor B on the second stopper encoder P.C.B. QPW-422 does not receive light.
L6
The second buckle chute home position sensor B02 is ON
L7
Buckle cover sensor B03 is ON.
L8
Sheet detect sensor B08 is ON.
L9
Table upper limit switch S01 is ON.
L10
Count sensor (receiver) B05 does not receive light (sheet is passing.)
L11
Sheet upper limit sensor B06 is ON.
L12
Table lower limit sensor B07 is ON.
1
1
VR2
CON11 CON12
1
CON7
C10
QPM-192
C11
IC2
ROM
1
CON3
1
CPU
1
1
CON2
TP4
TP5
1
CON1
5V
GND
TR2
TR3
CON10
L10
CON3
L9
1
1
CON10
L3
L2
L1
L7
L6
L5
L4
L8
L12
L11
6-4-2
Control P.C.B. QPM-192
1
6-4
1
CON2
CON1
6: Electrical Circuit
LCD P.C.B. QPW-677
2nd Stopper
Start/Stop
1st Stopper
11"x7"
81/2"x11"
81/2"x14"
Counter / Preset Counter
51/2"x81/2"
Feed Gap
2nd
Stopper
Stopper
Position
Display
1st
Stopper
1
2
3
4
5
6
7
8
9
0
Memory
C
Mode
Folding Pattern
CON1
L1
SW3
1
6-5
SW6
SW8
SW10 SW12 SW14
SW15
SW24
SW19
SW5
SW7
SW9
SW16
SW17
SW18
SW4
SW2
SW11 SW13
SW1
L2
L3
L4
L5
L6
L7
SW20
Sheet Size
Test Feed
L8
SW23
L9
L10
L11
SW21
(Top)
SW22
CON2
1
(Back)
QPW-677
6-5: LCD P.C.B. QPW-677
6
6-7
Electrical Circuit
6-8
6: Electrical Circuit
6-6
6-6-1
24V/5VDC Wiring Diagram
Buckle Chute Section
The First Buckle Chute
Home Position Sensor
1
2
3
Encoder P.C.B.
(1st Buckle Chute)
B01
QPW-422
The Second Buckle Chute
Home Position Sensor
1
2
3
Encoder P.C.B.
(2nd Buckle Chute)
Control P.C.B.
B02
Buckle Cover Sensor
QPM-192
1
2
QPW-422
Circuit Protector
0.3A
X07
Circuit Protector
0.3A
1
2
3
4
Q0
1
Q
02
B03
1
2
3
4
X08
Capacitor
1
2
The First Buckle Chute
Motor
M03
Terminal
Board
X09
Capacitor
1
2
Terminal
Board
The Second Buckle Chute
Motor
M04
6: Electrical Circuit
6-6
6-6-2
24V/5VDC Wiring Diagram
Main Section
X03
1 1
2 2
X01
Sheet Detect Sensor
B08
Feed Table
Upper Limit Switch
S01
1 1
2 2
3 3
Y02
Deflector Solenoid
Y03
Deflector Solenoid
K01
SSR for
Blower Motor M05
Y04
Feed Clutch
Y01
Feed Valve
X04
1 1
2 2
X05
Count Sensor
(Projector)
B04
1 1
2 2
Control
P.C.B.
X06
1 1
2 2
3 3
QPM-192
Count Sensor
(Receiver)
B05
X02
Table Up/Down Motor
SSR For
Drive Motor M01
1 1
2 2
3 3
M02
G01
24VDC
G02
5VDC
Delivery LED
P.C.B.
K02
QPW-307
B06
1
2
3
Sheet Upper Limit Sensor
Cable Harness
1
2
3
Table Lower Limit Sensor
LCD P.C.B.
QPW-677
B07
6-6-2: Main Section
6
6-9
Electrical Circuit
6-10
6: Electrical Circuit
6-7
Power Circuit Wiring Diagram
(#) means that gray label is sticked on the wire.
Motor Capacitor
AC115V
AC230V
K02
Q03
To Power Source
X10
Noise Filter
Main Switch
Z01
S00
Circuit Protector
(115V: 3A)
BL Connector WHT
2A
C01
SSR
X12
M01
1 1
Drive Motor
(#) 2 2
BL Connector WHT
X11
X01
1 1
2 2
3 3
BL Connector BLK
(#)
(#)
G01
G02
K01
To B08
QPM-192
SSR
Q04
Circuit Protector
(115V: 5A)
3A
X14
1 1
2 2
3 3
M05
Blower Motor
PAGE INTENTIONALLY BLANK
PF-P330/PM
Revision 0
Standard Business Systems
10 Connector Road, Andover, MA 01810
(978) 490-1920 Fax (978) 470-2771