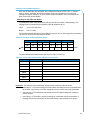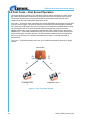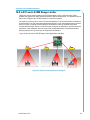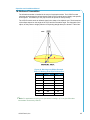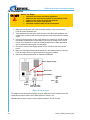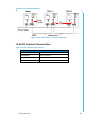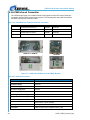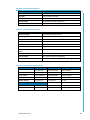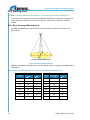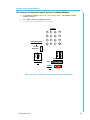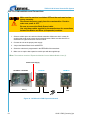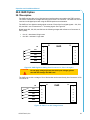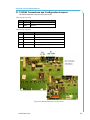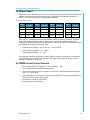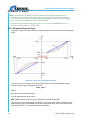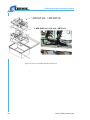
1
™ TM70/3/4/5/6/7/8/9/10 and i-Kontrol Console Remote Control System Operation and Installation Manual U036.3-TM70_Console_Sys 2013 Cervis, Inc. TM70/3-10 & i-Kontrol Console RC System This document is the property of Cervis, Inc. and cannot be copied, modified, e-mailed, or reproduced without the express prior written consent of Cervis, Inc. Cervis, Inc. reserves the right to change this manual or edit, delete, or modify any information without prior notification. FCC Statements 15.19 – Two Part Warning This device complies with Part 15 of the FCC rules. Operation is subject to the following two conditions: (1) This device may not cause harmful interference and (2) This device must accept any interference received, including interference that may cause undesired operation. 15.21 – Unauthorized Modification NOTICE: The manufacturer is not responsible for any unauthorized modifications to this equipment made by the user. Such modifications could void the user’s authority to operate the equipment. 15.105(b) – Note: This equipment has been tested and found to comply with the limits for a Class B digital device, pursuant to Part 15 of the FCC Rules. These limits are designed to provide reasonable protection against harmful interference in a residential installation. This equipment generates, uses and can radiate radio frequency energy and, if not installed and used in accordance with the instructions, may cause harmful interference to radio communications. However, there is no guarantee that interference will not occur in a particular installation. If this equipment does cause harmful interference to radio or television reception, which can be determined by turning the equipment off and on, the user is encouraged to try to correct the interference by one or more of the following measures: • Reorient or relocate the receiving antenna. • Increase the separation between the equipment and receiver. • Connect the equipment into an outlet on a circuit different from that to which the receiver is connected. Industry Canada Statement This device complies with Canadian RSS-210. The installer of this radio equipment must ensure that the antenna is located or pointed such that it does not emit RF field in excess of Health Canada limits for the general population; consult Safety Code 6, obtainable from Health Canada’s website www.hc-sc.gc-ca/rpb. Le présent appareil est conforme aux CNR d'Industrie Canada applicables aux appareils radio exempts de licence. L'exploitation est autorisée aux deux conditions suivantes : (1) l'appareil ne doit pas produire de brouillage, et (2) l'utilisateur de l'appareil doit accepter tout brouillage radioélectrique subi, même si le brouillage est susceptible d'en compromettre le fonctionnement. Cervis, Inc. Visit our Web site at: www.cervisinc.com 2013 Cervis, Inc. All rights reserved. Content is subject to change without notice. Operation and Installation Manual Notes and Observations 2013 Cervis, Inc. i TM70/3-10 & i-Kontrol Console RC System Table of Contents List of Figures .............................................................................................................................. iv List of Tables ................................................................................................................................ vi Cervis Inc. Safety Precautions .................................................................................................... 1 1.1 What You MUST Do ........................................................................................................... 2 1.2 What You MUST NOT Do .................................................................................................. 2 2.0 TM70 System Description .................................................................................................... 3 2.1 TM70 System Specifications ............................................................................................ 4 3.0 CB70 Battery Charger and BT24IK Batteries ..................................................................... 5 3.1 Charging Tips .................................................................................................................... 6 4.0 Receiver ................................................................................................................................. 7 5.0 Starting Up .......................................................................................................................... 10 6.0 Operating Instructions ....................................................................................................... 13 6.1 Using the System ............................................................................................................ 13 6.2 General Instructions ....................................................................................................... 13 6.3 Transmitter Power Monitoring ....................................................................................... 14 7.0 Maintenance ........................................................................................................................ 15 7.1 Fault Identification .......................................................................................................... 15 7.1.1 Transmitter .................................................................................................................. 15 7.1.2 Receiver ...................................................................................................................... 15 7.2 Returning Equipment for Repair .................................................................................... 16 8.0 Warranty .............................................................................................................................. 17 9.0 Parts Information ................................................................................................................ 17 10.0 Programming a Spare Transmitter ................................................................................... 18 11.0 Program the Machine ID in LCD Transmitters ................................................................. 20 12.0 Change Base Channel ........................................................................................................ 21 13.0 CANopen Interface v2.4 ..................................................................................................... 22 13.1 Introduction...................................................................................................................... 22 13.2 CAN Bus Connection ...................................................................................................... 22 13.3 Bus Termination .............................................................................................................. 23 13.4 Transmitter Data Dictionary ........................................................................................... 23 13.5 Pushbuttons and Console Box PDOs ........................................................................... 26 13.6 Receiver Data Dictionary ................................................................................................ 27 13.7 Receiver Signaling ......................................................................................................... 29 13.8 TM70 CAN Receivers ...................................................................................................... 30 14.0 LCD70 Display Option ........................................................................................................ 33 14.1 Functional Description ................................................................................................... 33 14.1.1 Keyboard Options ....................................................................................................... 33 14.1.2 LEDs and Backlight..................................................................................................... 33 14.1.3 Block Diagram ............................................................................................................. 33 14.2 Internal Connection ......................................................................................................... 34 14.2.1 Power Supply and I2C Bus ......................................................................................... 34 14.2.2 Range Limiter.............................................................................................................. 34 14.3 LCD70 Display Operating Modes ................................................................................... 35 14.4 Data Feedback Operating Mode .................................................................................... 36 14.4.1 Multiple Returns/Multiple Feedback............................................................................ 36 ii U035.3-TM70_Console_Sys Operation and Installation Manual 14.5 ASCII Character Map ...................................................................................................... 37 14.6 Available Icons ................................................................................................................ 38 14.7 VT100 Display Control .................................................................................................... 38 14.7.1 Control Characters ..................................................................................................... 38 14.7.2 Valid Control Sequences ............................................................................................ 38 15.0 First Come – First Served Operation ............................................................................... 42 16.0 LA70 and LA70M Range Limiter ....................................................................................... 43 16.1 Infrared Sensor ............................................................................................................... 44 16.2 Infrared Transmitter ........................................................................................................ 45 16.3 Installation ....................................................................................................................... 46 16.4 LA70 Technical Characteristics .................................................................................... 47 16.5 LA70M Infrared Transmitter ........................................................................................... 48 16.6 Working Zone .................................................................................................................. 50 16.6.1 Zone Coverage (Working Area) ................................................................................. 50 16.6.2 Jumper Configuration and ID Selector for Master Modules ....................................... 51 16.6.3 LA70M Installation and Connections.......................................................................... 52 17.0 Tandem Operation ............................................................................................................. 53 17.1 Single Master Transmitter Systems .............................................................................. 54 17.2 Two Master Transmitter Systems ................................................................................. 55 18.0 TM70 Analog Feedback Calibration ................................................................................. 56 18.1 LR71/72 and IN0-10V Assembly .................................................................................... 58 19.0 IN0450P Option................................................................................................................... 59 19.1 Description ...................................................................................................................... 59 19.2 IN0450P and LR70 Assembly......................................................................................... 60 20.0 IN4D Option ........................................................................................................................ 61 20.1 Description ...................................................................................................................... 61 20.2 IN4D and LR71/LR72 Assembly..................................................................................... 63 21.0 INCAN Option ..................................................................................................................... 64 21.1 INCAN Connections and Configuration Jumpers ....................................................... 65 22.0 A1P4RCAN Option ............................................................................................................. 66 22.1 A1P4RCAN Connection and Jumper Configurations ................................................. 67 22.1.1 LR72 Electrical Connection ........................................................................................ 67 22.1.2 Relay Outputs (Terminal RL1) ................................................................................... 68 22.1.3 Analog Output (Terminal RL2) ................................................................................... 68 22.1.4 Tele-Teaching (only V3.1 Software or Higher) ........................................................... 68 23.0 A2ICAN Option ................................................................................................................... 70 23.1 Response Curve ............................................................................................................. 70 23.2 Ramp Speed .................................................................................................................... 71 23.3 PWM Current Output Features ...................................................................................... 71 23.4 A2ICAN Connections and Jumper Configurations ..................................................... 72 23.4.1 LR72 Connections ...................................................................................................... 72 23.5 Outputs ............................................................................................................................ 72 23.5.1 Output PWM1 ............................................................................................................. 72 23.5.2 Output PWM2 ............................................................................................................. 72 23.6 ISP (In-Circuit/In-System Programming) ...................................................................... 73 24.0 A2VCAN Option .................................................................................................................. 74 24.1 Output Response Curves ............................................................................................... 74 24.2 Ramp Speed .................................................................................................................... 75 2013 Cervis, Inc. iii TM70/3-10 & i-Kontrol Console RC System 24.3 Pulse Width Modulation (PWM) Specifications ............................................................ 75 24.4 A2VCAN to LR72 Connections....................................................................................... 75 24.5 A2VCAN Voltage Outputs ............................................................................................... 76 24.5.1 Output 1 (VO1)............................................................................................................ 76 24.5.2 Output 2 (VO2)............................................................................................................ 76 24.6 ISP (In Circuit/In-System Programming) ....................................................................... 76 24.7 A2VCAN Power Supply Board POT70V4 ...................................................................... 78 25.0 Tele-Alignment Option ....................................................................................................... 79 25.1 Tele-Alignment Process ................................................................................................. 79 25.2 Menu 3.1 Adjust ............................................................................................................... 82 25.2.1 Parameter Response Type ......................................................................................... 82 25.2.2 Limit Values ................................................................................................................ 83 25.2.3 Polarity INV ................................................................................................................. 83 25.2.4 Curve Type ................................................................................................................. 83 25.2.5 Ramps ......................................................................................................................... 84 25.2.6 PWM (Pulse Width Modulated) Frequency (Available Only for A2ICAN) ................... 84 25.2.7 Dither .......................................................................................................................... 84 25.2.8 Reset Output ............................................................................................................... 84 25.2.9 Troubleshooting .......................................................................................................... 85 25.2.10 Menu 3.2 Reset Values ......................................................................................... 85 25.2.11 Menu 3.3 FORB CAL MEN .................................................................................... 85 26.0 R70/Plus Receivers – Software V3.2 Compatible ............................................................ 86 26.1 Detail Characteristics ...................................................................................................... 86 26.1.1 V3.2 TM70 Software Features .................................................................................... 86 26.1.2 V3.2 Software Compatible Hardware ......................................................................... 86 26.2 Internal Wiring ................................................................................................................. 91 27.0 i-Kontrol Console Box ........................................................................................................ 92 27.1 i-Kontrol Console Remote Description ......................................................................... 93 27.2 i-Kontrol Specifications .................................................................................................. 94 List of Figures Figure 1. TM70 System Components with a T70 Transmitter and R70/29 Receiver ................3 Figure 2. CB70 Battery Charger ....................................................................................................5 Figure 3. Typical MOV Wiring Across Contactor Coil .................................................................7 Figure 4. Receiver Footprint ..........................................................................................................8 Figure 5. Receiver Antenna with Extension Kit ...........................................................................8 Figure 6. Main Board Connections, Relays, and LEDs ...............................................................9 Figure 7. LEDs by Number .......................................................................................................... 10 Figure 8. Transmitter Details ...................................................................................................... 11 Figure 9. EP70 Extraction and Insertion .................................................................................... 18 Figure 10. Copy EP ...................................................................................................................... 19 Figure 11. Change Base Channel Assignment ......................................................................... 21 Figure 12. CAN Bus LR72 PCB P4 Connection ........................................................................ 23 Figure 13. Receiver CAN Signal LEDs ....................................................................................... 29 Figure 14. Receiver Connections and Footprint....................................................................... 31 Figure 15. LCD70 Keypad Option Examples ............................................................................. 33 Figure 16. µC Block Diagram ...................................................................................................... 33 Figure 17. LCD P6 PCB Connect Location ................................................................................ 34 Figure 18. T70 Transmitter and LCD70 Display Assembly ...................................................... 35 Figure 19. TM70 Configuration and Navigation Buttons ......................................................... 36 Figure 20. ASCII Special Character Map ................................................................................... 37 iv U035.3-TM70_Console_Sys Operation and Installation Manual Figure 21. Two Transmitter System ........................................................................................... 42 Figure 22: Range Limiter Application Examples ...................................................................... 43 Figure 23. Transmitter IR Sensor Location ............................................................................... 44 Figure 24: Working Area Ellipse Example ................................................................................. 45 Figure 25: LA70 Layout ............................................................................................................... 46 Figure 26: LA70 Master/Slave Jumper Configuration .............................................................. 47 Figure 27. LA70M AC/LA70M DC and LA70M EX Modules ...................................................... 48 Figure 28: Working Area Example .............................................................................................. 50 Figure 29. Jumper Configuration and ID Selector for Master Modules .................................. 51 Figure 30. LA70M and LA70M Expansion Network .................................................................. 52 Figure 31. Single Master Transmitter System ........................................................................... 54 Figure 32.Two Master Transmitters System .............................................................................. 55 Figure 33. TM70 Analog Feedback Reference ........................................................................... 57 Figure 34. INO-10V (Ref. 2303755) .............................................................................................. 58 Figure 35. IN0450P Specifications .............................................................................................. 59 Figure 36. IN0450P ....................................................................................................................... 59 Figure 37. IN0340P and LR70 Assembly .................................................................................... 60 Figure 38. IN4D Digital-to-Analog Card Connector 13, Pins 1 through 6 ............................... 61 Figure 39. IN4D 12 to 20V Voltage Source ................................................................................. 61 Figure 40. IN4D and LR70 Signal Block Diagram...................................................................... 62 Figure 41. IN4D and LR71/LR72 Assembly ................................................................................ 63 Figure 42. INCAN Interface Block Diagram ............................................................................... 64 Figure 43. INCAN Expansion Connections ................................................................................ 65 Figure 44. A1P4RCAN Expansion Module Block Diagram ...................................................... 66 Figure 45. A1P4RCAN Terminal Connections ........................................................................... 67 Figure 46. Analog Output Tele-Teaching Configuration .......................................................... 69 Figure 47. A2ICAN Block Diagram.............................................................................................. 70 Figure 48. A2ICAN Expansion Module Jumper and Terminal Block Configurations............ 73 Figure 49. A2VCAN Block Diagram ............................................................................................ 74 Figure 50. A2VCAN Expansion Board Configuration ............................................................... 77 Figure 51. PTO70V4 DC/DC Power Supply Expansion Board ................................................. 78 Figure 52. LCD70 Display ............................................................................................................ 79 Figure 53. Tele-Alignment Default Startup Sequence .............................................................. 79 Figure 54. Configuration Mode Chart (Part 1) ........................................................................... 80 Figure 55. Configuration Mode Chart (Part 2) ........................................................................... 81 Figure 56. Parameter Configuration Options ............................................................................ 82 Figure 57. Inverse Polarity Graph ............................................................................................... 83 Figure 58. V3.2 Compatible Hardware Option 1 ........................................................................ 86 Figure 59. V3.2 Compatible Hardware Option 2 ........................................................................ 87 Figure 60. V3.2 Compatible Hardware Option 3 ........................................................................ 88 Figure 61. V3.2 Compatible Hardware Option 4 ........................................................................ 89 Figure 62. i-Kontrol Console Remote Features......................................................................... 93 2013 Cervis, Inc. v TM70/3-10 & i-Kontrol Console RC System List of Tables Table 1. TM70 System Main Specifications ..................................................................................4 Table 2. Receiver LED States During Power-Up ....................................................................... 10 Table 3. Transmitter Details ........................................................................................................ 11 Table 4. Transmitter Status LED Fault Identification ............................................................... 15 Table 5. Receiver Status LED Fault Identification .................................................................... 16 Table 6. Character Entry Reference ........................................................................................... 20 Table 7.Implemented CiA DS-401 v2.1 Characteristics ........................................................... 22 Table 8. Dictionary Items Supported by TM70 .......................................................................... 23 Table 9. Receiver LED Maintenance and Troubleshooting ..................................................... 32 Table 10. I2C Bus Connection Wiring ........................................................................................ 34 Table 11. LAL (P8) Connector Wiring ........................................................................................ 34 Table 12. Display Programming Option A ................................................................................. 40 Table 13. Display Programming Option B ................................................................................. 40 Table 14. Display Programming Option B ................................................................................. 40 Table 15. First Data Packet: LED State Values ......................................................................... 41 Table 16. Second Data Packet: LEDs & Buzzer Determination............................................... 41 Table 17: Working Area Ellipse Dimensions............................................................................. 45 Table 18: LA70 Technical Characteristics ................................................................................. 47 Table 19: LA70M Modules, Expansions Module, and Cable ................................................... 48 Table 20: LA70M Specifications ................................................................................................. 48 Table 21: LA70M EX Specifications ........................................................................................... 49 Table 22: PC Enclosure Specifications ..................................................................................... 49 Table 23: Working Area Dimensions for Circular and Elliptical Working Areas ................... 50 Table 24. RL4 (2-pins).................................................................................................................. 65 Table 25. RL3 (5-pins).................................................................................................................. 65 Table 26. LR72 CAN Connections .............................................................................................. 67 Table 27. A1P4RCAN RL1 Relay Wiring* ................................................................................... 68 Table 28. Analog Output RL2 Wiring ......................................................................................... 68 Table 29. Ramp Speeds............................................................................................................... 71 Table 30. A2ICAN Connections to LR72 Board (see Figure 49) .............................................. 72 Table 31. Output PWM1 Connections ........................................................................................ 72 Table 32. Output PWM2 Connections ........................................................................................ 72 Table 33. ISP Connector Pin-out ................................................................................................ 73 Table 34. Output Minimum-to-Maximum Ramp Time ............................................................... 75 Table 35. PWM Specifications .................................................................................................... 75 Table 36. Power Connections (2-pins) ....................................................................................... 75 Table 37. CAN Connections (5-pins) .......................................................................................... 75 Table 38. Output1 (VO1) Terminal Connections ....................................................................... 76 Table 39. Output2 (VO2) Terminal Connections ....................................................................... 76 Table 40. ISP Connector Pin-out ................................................................................................ 76 Table 41. POT70V4 DC/DC Specifications................................................................................. 78 Table 42. Output Minimum-to-Maximum Ramp Time ............................................................... 84 Table 43. PWM Frequency Selections ....................................................................................... 84 Table 44. Troubleshooting .......................................................................................................... 85 Table 45. Expansion Card Type and Required Slot Size ......................................................... 89 Table 46. v3.2 R70/XX Specifications ........................................................................................ 90 Table 47. Internal Wiring ............................................................................................................. 91 Table 48. i-Kontrol Transmitter Specifications ......................................................................... 94 vi U035.3-TM70_Console_Sys User Whatever v1.00 Cervis Inc. Safety Precautions Read and follow all instructions. Failure to abide by Safety Precautions may result in equipment failure, loss of authority to operate the equipment, and personal injury. Use and maintain proper wiring. Follow equipment manufacturer instructions. Improper, loose, and frayed wiring can cause system failure, equipment damage, and intermittent operation. Changes or modifications made to equipment not expressly approved by the manufacturer will void the warranty. Owner/operators of the equipment must abide by all applicable Federal, State, and Local laws concerning installation and operation of the equipment. Failure to comply could result in penalties and could void user authority to operate the equipment. Make sure that the machinery and surrounding area is clear before operating. Do not activate the remote control system until certain that it is safe to do so. Turn off the handheld remote and remove power from the base unit before attempting any maintenance. This will prevent accidental operation of the controlled machinery. Use a damp cloth to keep units clean. Remove mud, concrete, dirt, etc. after use to prevent obstructing or clogging the buttons, levers, wiring, and switches. Do not allow liquid to enter the handheld or receiver enclosures. Do not use high pressure equipment to clean the handheld remote or receivert. Disconnect the receiver before welding on the machine. Failure to disconnect the receiver may result in destruction of or damage to the unit. These instructions must be read carefully in order to install and use the system properly, to keep it in safe working condition, and to reduce the risks of misuse. Do not use this system in potentially explosive atmospheres. Any use other than that specified in this manual is DANGEROUS. Strict adherence to the following instructions is a MUST. Note: To comply with FCC RF exposure compliance requirements, this device and its antenna must not be co-located or operating in conjunction with any other antenna or transmitter. TM70/3-10 & i-Kontrol Console RC System 1.1 What You MUST Do Strictly adhere to the installation instructions contained in this manual. Make sure that professional and competent personnel carry out the installation. Make sure that all site and prevailing safety regulations are fully followed. Make sure that this manual is permanently available to the operator and maintenance personnel. Keep the transmitter out of reach of unauthorized personnel. Remove the transmission key when the transmitter is not in use. At the beginning of each work day, check to make sure that the Stop Button and other safety measures are working. When in doubt, press the Stop Button. Whenever several systems have been installed, make sure the transmitter you are about to use is the right one. Identify the machine controlled by the transmitter on the transmitter label (customer supplied). An audible or visual warning device indicating the machine is electrically active and that the transmitter has control should be installed on the machine. Service the equipment periodically. When carrying out repairs, only use parts supplied by Cervis dealers. 1.2 What You MUST NOT Do 2 Never make changes to the system that have not been studied and approved by Cervis. Never power the equipment with anything other than with the specified power supply. Never allow unqualified personnel to operate the equipment. Never leave the equipment ON after use. Always use the ON/OFF Key or the Stop Button to avoid accidental movements. Never use the system when visibility is limited. Never abuse the transmitter. Avoid dropping. Never use the system if failure is detected. U035.3-TM70_Console_Sys Operation and Installation Manual 2.0 TM70 System Description The TM70/3, TM70/4, TM70/5, TM70/6, TM70/7, TM70/8, TM70/9, and TM70/10 console remote control systems are designed for remote control of hoists and cranes (overhead cranes, tower cranes, hydraulic loader cranes, concrete pumps, driverless vehicles, etc.). They are particularly suitable for applications where an operator using a console transmitter can determine the safest location from which to carry out operations. A system consists of a battery powered remote transmitter for selecting commands and a receiver that is connected to the electrical system of the controlled device. A standard Cervis TM70 system comes complete with: • • • • T70 Console Remote (with strap) R70 Receiver CB70 Battery Charger with Two (2) BT24IK Batteries An Antenna (internal or external) TM70 Console Remote CB70 Charger 115 VAC Power Supply BT24iK Batteries TM70 Receiver External Antenna Kit Figure 1. TM70 System Components with a T70 Transmitter and R70/29 Receiver The TM70 comes with a detachable harness that allows the remote to be worn by the operator (not shown). The sturdy water resistant case allows the unit to be operated in all weather and harsh outdoor environments. Weighing a mere 2.9 lbs, the TM70 is light and ergonomically design for ease of use. 2013 Cervis, Inc. 3 TM70/3-10 & i-Kontrol Console RC System 2.1 TM70 System Specifications Table 1. TM70 System Main Specifications Transmitters: TM70/3, TM70/4, TM70/5, TM70/6, TM70/7, TM70/8, TM70/9, and TM70/10 Frequency band 914.150 – 915.875 MHz 45.5 – 463.5 MHz Response Time 100 ms Temperature Range -4 to 158 °F (-20 to 70 °C) Protection IP65 Weight Approximately 3 lbs. ERP < 1 mW ERP < 25 mW Receivers: R70/13, R70/21, R70/29, R70/36, R70/13A4V, R70/13A6V, R70/13A8V, R70/13A4I, R70/13A6I, R70/13A8I, and R70/Plus Power Supply 48, 115, 230 VAC ± 10% -- 50/60 Hz Optional 12 or 24 VDC 9 – 35 VDC (with external power supply) Consumption 20 W Relays 230 VAC/8A STOP Relays 230 VAC/6A Protection IP65 Electrical Security Class II (EN50178) CB70 Battery Charger Power Supply 115 VAC ±10% @ 50/60 Hz 12/24 VDC BT24IK Batteries 4 Voltage 4.8 V Capacity 2000 mAh NiMH Charging Temperature +32 to +113°F (0 to 45°C) Discharge Temperature -4 to 122°F (-20 to 50°C) Battery Life 16 hrs. @ 50% duty cycle U035.3-TM70_Console_Sys Operation and Installation Manual 3.0 CB70 Battery Charger and BT24IK Batteries THE BATTERIES MUST BE INITIALLY CHARGED BEFORE USE. Batteries must be charged for a full twelve (12) hours before they can be installed in the transmitter. Using a battery before initially charging will shorten its life span and can possibly result in an immediate degradation of service. Note: You must fully charge the batteries before installing and using in the transmitter. It takes twelve (12)hours to initially charge or recharge an exhausted battery. Once a battery is charged, do NOT charge it again until the transmitter indicates a low charge. You will shorten the battery life by charging it before it is exhausted. To guard against disruption of service, be sure to have one battery fully charged or in the process of being fully charged while the other is in use at all times. The CB70 battery charger, Figure 2, has two charging cradles and is capable of simultaneously charging two BT24IK batteries. Nominal charging time for new or discharged batteries is a minimum of 12 hours. Initial charging should be at least 12 hours, recommended that the charger be left powered ON overnight. LEDs lit while charging BAT1 BAT2 Charger Power Supply Power LED lit when powered by the Power Supply BT24IK 4.8V Batteries Figure 2. CB70 Battery Charger Note: The Charging LED lights when the battery is first seated in the cradle indicating the battery is properly seated and is charging. The Charging LED goes out after 12 hours of charging. 2013 Cervis, Inc. 5 TM70/3-10 & i-Kontrol Console RC System 1. Connect the charger to the proper power source using adaptor supplied for your system. Note: When installing the battery charger, bear in mind: • Batteries must be charged at temperatures over 41ºF (5ºC) . • The power supply must be left on without interruption for the entire time that it takes to charge the batteries. • The charger must not be left in direct sunlight as the batteries will not become fully charged at temperatures exceeding 95ºF (35ºC). 2. Place the batteries in the charger. The LED’s should illuminate indicating that recharging is in process. Complete recharging takes 12 hours. Batteries may remain in the charger for an unlimited period of time after they are fully charged. Note: If the LED does not illuminate when the battery is seated for charging, there is an improper connection. Remove the battery from the charger, check that the terminals are clean and unobstructed, and reseat the battery firmly in its cradle; check to see that the LED is on. Should this fail, contact Cervis Customer Support. The capacity of the batteries decreases with use. Battery life span is estimated to be 500 recharging cycles, but this depends largely on the conditions of use, for which the following is recommended: CAUTION Only use batteries certified by Cervis. When the batteries are exhausted, they should be safely disposed of or recycled according to local regulations. Never carry batteries in your pockets with other metal objects where a short across the terminals may occur resulting in burns or injuries. 3.1 Charging Tips • Do not recharge the battery until it is completely flat (fully discharged). The transmitter indicates when the battery is nearing a charge cycle when the LED flashes red; this also indicates the transmitter will switch OFF in five (5) minutes. • • Always charge the batteries at temperatures between 41ºF and 95ºF. • • 6 Avoid short-circuits between the battery contacts. Do not carry charged batteries in toolboxes or next to other metal objects (keys, coins, etc.). Always keep the contacts clean. Never leave batteries in direct sunlight. U035.3-TM70_Console_Sys Operation and Installation Manual 4.0 Receiver Receiver Installation Make sure the machine on which the receiver is to be attached is disabled while during installation. Turn off the main line disconnect switch. Check the power supply voltage. MAKE SURE THE POWER SUPPLY IS OFF. For a crane, park the crane and position the end stops at a suitable distance so that other cranes on the same runway do not hit it. If end stops are not available, use appropriate signs instead. Keep the work area free from unnecessary clutter. Wear protective clothing. Note: Before installing the receiver, make sure that the outputs diagram supplied with the system is available. Note: Installations subject to vibration should install the optional Shock Absorber Kit part # 1166074 available at Cervis. The kit has four absorbers that you place between the receiver and the mounting surface as per the kit directions. Note: Always mount the receiver and antenna away from any intense radio or electric disturbance sources. Note: When using contactors with the system, it is advisable to use arc suppressors, such as MOV’s, by installing them across the coil of the contactors as shown in Figure 3. Note: If necessary, it is possible to improve signal reception by using the extension cables and external antenna kit. See Figure 5. 3. Find a suitable location for the receiver with clear access to the transmitter radio signal. Figure 4 below shows the footprint of the receiver and illustrates the distance between the mounting holes. 2013 Cervis, Inc. Figure 3. Typical MOV Wiring Across Contactor Coil 7 TM70/3-10 & i-Kontrol Console RC System 10” 255.5mm 6.7” 169.5mm Figure 4. Receiver Footprint External Antenna Kit Part #EXT-ANT10-1 Figure 5. Receiver Antenna with Extension Kit 4. Follow the Outputs Diagram supplied with the system to connect the power supply and the receiver outputs on the relay board plug-in terminals. The Output Diagram indicates the relationship between the transmitter commands and the receiver outputs. 8 • The STOP relays KSTOP1 and KSTOP2 are in series and must be connected to the main contactor coil circuit. • The K2/START is activated once the Warning/START command is held down. • The K1/SAFETY relay is a safety relay. It is activated when certain commands predefined as Active—commands that give rise to movements—are activated. U035.3-TM70_Console_Sys Operation and Installation Manual Figure 6. Main Board Connections, Relays, and LEDs 5. Select the appropriate voltage on the receiver. 6. Be certain to connect the ground cable. Use only fireproof cables for connections. 2013 Cervis, Inc. 9 TM70/3-10 & i-Kontrol Console RC System 5.0 Starting Up Proceed with caution upon initial Startup! Disconnect the power supply from the motors before applying power to the Receiver to prevent unintended movement of the equipment in case of improper connections. 1. Once the receiver has been connected, disconnect the power supply to the motors—by removing the fuses for example—and then power up the receiver. The receiver enters into a SCANNING mode upon power-up; the receiver LED power-up states are defined in Table 2. Table 2. Receiver LED States During Power-Up LED State Indication POWER (1) ON Power supply is correct HARDOK (2) ON Absence of faults on the boards SIGNAL (3) OFF Blinks Channels are signal free An RF signal on the channels DATA (4) OFF Blinks Another TM70 system is not active in the area Another TM70 system is active in the area ID (5) OFF System Transmitter not on. CAN_RUN (6) ON Indicates that CAN communications with expansion boards are OK. CAN_ERR (7) OFF 6 7 1 2 3 4 5 Figure 7. LEDs by Number 10 U035.3-TM70_Console_Sys Operation and Installation Manual Table 3. Transmitter Details Item Number Indication 1 Crane Identification Label 2 LED Command Controls 3 Contact Key 4 5 Start Button 6 STOP Button 7 Option: LA70 Range Limitation 8 Option: LCD70 Display and LA70 (able to be activated by EEPROM) 5 1 4 2 6 3 8 7 Figure 8. Transmitter Details 2. Turn the transmitter ON to OPERATION Mode as follows: a. Place a charged battery in the transmitter. b. Turn the Contact Key clockwise to ON. c. Push in and then pull out the STOP Button. The transmitter LED flashes orange once, and then illuminates green for three (3) seconds. If the transmitter has an LCD, it displays the identification of the machine and the battery level. d. Press and hold the START Button. The green LED should now light indicating that the transmitter is transmitting. Release the START Button. 3. Upon receiving a signal from the transmitter, the receiver enters into Operation Mode. The following LEDs will light up on the receiver: Power ON – indicates that the power supply is OK. HARDOK ON – indicates that board defects have not been detected. 2013 Cervis, Inc. 11 TM70/3-10 & i-Kontrol Console RC System SIGNAL ON – indicates the working frequency RF signal is being received. DATA (When) ON – indicates that received data is correctly formatted. ID ON – indicates the receiver has recognized the transmitter identification code. CAN_RUN ON – indicates that communications with CAN expansion boards are OK. CAN_ERR OFF 4. STOP relays KSTOP1 and KSTOP2 will be activated. The K2/START relay is energized when the Start button is pushed. 5. Press any Control function button; its corresponding relay should energize. In case of an active function, the safety relay K1/SAFETY will also energize. Check each control in this manner. 6. Turn off the transmitter using the STOP button. Check to make sure all of the relays are de-energized and that the DATA, ID, and SIGNAL LEDs go out. At this point, they behave as they do in SCANNING mode. 7. Reconnect power to the motors. Move to the usual working position. Check to make sure that all Control functions and the STOP button are properly operating. Note: Neither Cervis or Ikusi is responsible for incorrect installation of equipment, interferences produced as a result of frequency collisions, or of the working frequencies in fixed facilities where several radio remote systems share or have the ability to share the same zone or working area. 12 U035.3-TM70_Console_Sys Operation and Installation Manual 6.0 Operating Instructions The following instructions cover only the radio control equipment supplied by Cervis Inc. Safe operation of any controlled equipment must be governed and maintained in accordance to local and plant rules and regulations. 6.1 Using the System All Command Function controls (controls associated with active movement) must be in the neutral position, inactive position to start up the transmitter. Once started, the transmitter will automatically go into STAND BY mode if four (4) minutes passes without user control activity. This is indicated by the LED pulsing Green every three (3) seconds. To re-start, press the START button. To switch the transmitter OFF, press the STOP button or turn off the Contact Key. 6.2 General Instructions Use the following instructions to properly operate the equipment: 1. Attach the harness to the transmitter to prevent the equipment from falling. 2. Make sure of the transmitter you are going to use. Verify that the machine you want to operate matches the transmitter identification label—the label allows the operator to identify the machine before starting the equipment. 3. Install a fully charged battery into the transmitter. 4. Make sure all command controls are in the neutral position. All the command controls associated with active motions must be in the neutral position (inactive) to enable the transmitter. 5. Turn the ON/OFF key ON (clockwise) to enable the transmitter. 6. Pull out the Stop Button. The LED should pulse orange/green telling you the transmitter is ready for use. Note: If you find that the Stop Button is already pulled out, you must push it in and then pull it out again. This sequence permits proper operation of the Stop circuit. If the unit has experienced a time-out auto-disconnect, it is not necessary to repeat the Stop Button procedure; instead, push and hold the START Button for one (1) second. 7. Press and hold the START Button. This activates the warning/start alarm if one is installed on the crane/machine and indicates to you the receiver is under your control. 8. The green LED should light indicating that the transmitter is now transmitting. Now when any of the transmitter command pushbuttons are pressed, the corresponding motion is activated. 9. Press the Stop Button or turn the ON/OFF Key counter clockwise to turn the transmitter OFF. 2013 Cervis, Inc. 13 TM70/3-10 & i-Kontrol Console RC System 6.3 Transmitter Power Monitoring The transmitter is equipped with a battery level monitor. When the transmitter voltage level drops below a pre-established limit, the transmitter LED flashes RED for a five minute grace period to allow the operator time to move the load to a safe position. Do not use the stop button during this time until the load is in a safe position! If the STOP button is used within the 5-minute grace period, the transmitter will not start again until a fresh battery is installed. Battery power level is indicated on the screen of transmitters with an LCD. Power level is indicated by the number of segments displayed on screen. Values are: 14 3 segments — Charge greater than 50% 2 segments — Charge between 10 and 50% 1 segment — Charge between 5 and 10% 0 segments — Charge below 5% U035.3-TM70_Console_Sys Operation and Installation Manual 7.0 Maintenance The TM70 is designed for use in an industrial environment. However, we recommend you follow the following instructions to extend the life of your remote control system. • Use the shoulder harness or belt provided with the transmitter to prevent the transmitter from falling. • Do not clean the transmitter with solvents or pressurized water. Use a damp cloth or soft brush. • • • Regularly use and recharge the battery. • Periodically check the condition of the transmitter’s rubber seal. Change the seals if they show signs of deterioration to ensure the unit remains watertight. • Keep battery contacts clean. Check that the STOP pushbutton is working on a daily basis. Disconnect the receiver cables if soldering/welding work is going to be done on the crane or controlled machinery. 7.1 Fault Identification Both the transmitter and receiver have status monitoring LEDs that help to identify failures. The most common signals are contained in the tables below. 7.1.1 Transmitter Table 4. Transmitter Status LED Fault Identification LED Indication Solid Green Transmitter transmitting normally. OPERATION Mode. Green Pulses Transmitter ready for Start-up. STAND BY Mode. Red – Slow Flashing Battery level low. Red – Fast Flashing EEPROM module is not plugged in. Red – Double Flashing Transmitter cannot start up because a motion command is present (stuck or broken switch). Red – Solid Transmitter failure. 7.1.2 Receiver In OPERATION mode the five LED’s must be lit as previously described. If this condition exists, press the transmitter motion pushbuttons and observe the response of the output relays. • If the response is normal, the problem is not related to the remote control equipment and the installation must be evaluated. • If any of the relays are not activated, the problem is associated with the remote control equipment. Observe the status of the LED’s and reference Table 5 to determine the problem source. 2013 Cervis, Inc. 15 TM70/3-10 & i-Kontrol Console RC System Table 5. Receiver Status LED Fault Identification LED LIT ON OFF POWER Power Supply OK HARDOK Board OK Slow: fault in the board Fast: error in EEPROM Fault in the board SIGNAL RF signal OK RF signal detection in SCANNING Mode The receiver is not receiving RF signals DATA Is receiving the correct data from a TM701 Fault in the board ID ID Code OK1 ID NOT recognized Power Supply NOT OK Note: The DATA and ID LED’s flash dimly when data and the ID code are received correctly, but the Start command has not yet been received. Once the START button is pushed ON, the DATA and ID LED’s will brightly as normal. LED LIT FLASHING OFF CAN_RUN Operating status Pre-operating status CAN communication non-active CAN_ERR Communication OK Communication error CAN controller disconnected 7.2 Returning Equipment for Repair If you find a problem with the equipment: 1. Contact our Customer Service. 2. Discuss your problem with the Cervis technician. In many cases the problem can be resolved over the telephone and thus not require you to return any equipment. 3. When equipment is determined to need service, the technician will issue an Return Material Authorization (RMA) number to you. 4. Return the defective device to our Customer Service Department. Please: • • Include a description of the problem and the status of the LEDs. Clearly mark your issued RMA number on the outside of the package. Note: Please address all equipment returned to Cervis, Inc. to the attention of our Customer Service Department, together with a description of the problem and the status of all LED’s. It is our intention to make the necessary repairs quickly and return the system to you as soon as possible. Note: If the transmitter becomes inoperable, a spare can be quickly substituted by following the instructions in Heading10.0. 16 U035.3-TM70_Console_Sys Operation and Installation Manual 8.0 Warranty Subject to the limitations below, Cervis warrants all of its products to be free from material defects in material and workmanship. However, Cervis liability under such warranty shall be limited to repair or replacement of any product which Cervis’ inspection shall disclose to have been defective. This warranty does not apply to any products, which have been subject to abuse, mishandling, or improper use, and does not include field labor of any type. Cervis’ quotation does not include price provision for performance bond of indemnity. Therefore, the additional cost incurred to provide such a bond shall be added to the total amount of the quote and paid by Purchaser. The warranty period for the TM70 series equipment shipped hereunder is one (1) year and covers all labor and materials manufactured by Cervis provided the Purchaser returns them to the factory for repair. Defective items under warranty will be repaired or replaced free of charge at Cervis’ discretion, during the one (1) year term of this warranty. Freight and/or postage are not covered by said warranty and will be paid by the purchaser. Any services rendered in the field will be performed at current rates for time and travel at the discretion of Cervis and will be paid by the purchaser. All TM70 products of Cervis carry a warranty period of one (1) year. Batteries, cases, switches, faceplates, foils, and such other items subject to normal wear and deterioration are not included in the warranty. Cervis’ warranty period begins at system receipt after direct shipment to Purchaser. IN NO EVENT WILL CERVIS BE LIABLE FOR INDIRECT, SPECIAL, INCIDENTAL, OR CONSEQUENTIAL DAMAGES. EXCEPT AS STATED ABOVE, CERVIS MAKES NO REPRESENTATIONS OR WARRANTIES, EXPRESSED OR IMPLIED, NO OTHER REPRESENTATION OR WARRANTY IS GIVEN, AND NO AFFIRMATION OF CERVIS OR ITS REPRESENTATIVES BY WORD OR ACTION SHALL CONSTITUTE A WARRANTY. THERE ARE NO WARRANTIES WHICH EXTEND BEYOND THE ONE (1) YEAR PERIOD DESCRIBED HEREIN. CERVIS SPECIFICALLY DISCLAIMS, AND PURCHASER HEREBY WAIVES, ANY WARRANTIES OF MERCHANTABILITY OR FITNESS FOR PARTICULAR PURPOSE. The warranty does not cover damage resulting from the following: • • • • transport incorrect installation repairs or alterations made by personnel other than from CERVIS obvious misuse or incorrect maintenance of the equipment. Our Technical Service reserves the right to evaluate all break-downs and damage to determine warranty Under no circumstances will CERVIS be held responsible for delays or work stoppage, accidents or expenses incurred as a result of equipment malfunctioning. 9.0 Parts Information Please contact Cervis, Inc. Customer Service for spare or replacement parts ordering information. 2013 Cervis, Inc. 17 TM70/3-10 & i-Kontrol Console RC System 10.0 Programming a Spare Transmitter The EP70 EEPROM of a spare transmitter can be can be programmed to match the original transmitter EP70 EEPROM. In the following steps, the original console box is called the Master while the replacement transmitter is referred to as the Replacement. Note: In the event that the console is damaged to the extent that its EP70 cannot be removed, the copy process can be carried out by using the receiver EP70 EEPROM. Note: Electronic components such as EEPROMs and memory chips are susceptible to static damage. Take static precautions when handling. Avoid touching pins and surface connections. Improper handling may void the warranty. 1. Identify the COPY EP on the transmitter as shown in Figure 10. It can be identified by recognizing the square and triangle symbols adjacent to the switch. 2. Remove the battery from the Master to ensure that transmitter it turned OFF. Recessed Philips Screws 3. Remove the four screws from the bottom of the transmitter. Figure 9. EP70 Extraction and Insertion 4. Remove the Master’s EP70 EEPROM. 5. Remove the battery from the Replacement to ensure that it is turned OFF. Remove the Replacement’s EP70 module. 6. Insert the Master EP70 EEPROM into the Replacement’s EP70 socket. 7. Insert a charged battery into the Replacement console box. 8. Turn the ON/OFF key to ON. 9. Release the STOP button. The unit LED will pulse GREEN for approximately 15 seconds. 18 U035.3-TM70_Console_Sys Operation and Installation Manual 10. Press and hold the switch identified as “COPY EP” and the START button at the same time (Figure 10). The LED blinks RED. 11. Continue to hold the both until the LED blinks ORANGE and then release both buttons. The LED will light GREEN. LCD display models will display “Reading…” and then “Reading ok Chang EEP”. Note: In the event that the LED remains lit RED, or the LCD displays “Reading nok”, you will have to repeat the process. 12. When the copying process is complete, remove the Master EP70 and replace it with a blank EEPROM. 13. Move the switch to COPY EP ( ). The LED will flash ORANGE indicating that the copied memory is being written to the blank EP70. An LCD display will indicated “Writing..” and then “Writing ok”. If the LED remains RED, or the LCD displays “Writing nok”, repeat the process. 14. When complete, press the STOP button. This completes the programming process. Reassemble the console box. LED Copy EEPROM START Figure 10. Copy EP 2013 Cervis, Inc. 19 TM70/3-10 & i-Kontrol Console RC System 11.0 Program the Machine ID in LCD Transmitters Transmitters with an LCD display allow the operator to program a machine identification label of up to 24 text characters that is displayed upon start up. The programmed text should be carefully chosen to allow for immediate identification of the machine for which it is intended to control. The ID text can be entered using the following steps. 1. Use the Technical Data Sheet supplied with your system to identify the following functions • • • • • Configuration Enter Up Down, and ESC 2. Place a charged battery in the transmitter and turn the ON/OFF key to ON. 3. Push and relese the STOP button. The LED will pulse ORANGE-GREEN. 4. Press and hold both the Configuration and START buttons. Hold for 2-seconds following which you will enter into CONFIG mode. 5. Press ENTER to get to Menu. 6. Use the UP and DOWN buttons to navigate the menu to EDIT LABEL. Press ENTER. 7. The display will show CRANE ??; the first 3-characters will be blinking. You can edit the machine name from here by using the DOWN, UP, ENTER, and ESCAPE: Table 6. Character Entry Reference Key Instruction DOWN Use to move through the available list characters in descending order. UP Use to move through the available list characters in ascending order. ESC Use to return to the previous character ENTER Use to validate the chosen character and to move to the next character selection to the immediate right. 8. Push START to store the edited text. The LCD will display SAVED for 2-seconds. 9. Exit Editing Mode by press the STOP button. 20 U035.3-TM70_Console_Sys Operation and Installation Manual 12.0 Change Base Channel Console box transmitters using software version V2.4 and above can more easily change the base channel than previous versions. The is done as follows: 1. Recognize that a switch (Figure 11), lever, joystick, etc. marked with a triangle and a square are used to change base unit channel Tens and Units. The ▲ allows base channel tens to be changed, and the ■ symbol position allows base channel units to be changed. Tens Increment Unit Increment Figure 11. Change Base Channel Assignment 2. Turn the transmitter ON and release the STOP button. 3. Press and hold the ▲ and then press the START pushbutton. 4. Although the Active status is signalled (red LED blinking and buzzer active), continue to wait until the LED is constantly lit ORANGE. 5. The LED will then indicate the base channel using RED and GREEN pulses. • The number of GREEN pulses indicates the number of Tens where 5 GREEN pulses equals 50. • The number of RED pulses indicates the number of Units, where 5 RED pulses equals 5. 6. The LED will then light steady ORANGE. 7. Press the switch, button, etc. toward the ■ (Base Channel Units) the number of times needed to register the new Base Channel unit number desired. For instance, for 2 you would work the toggle UP two times to equal 2. Press the switch ▲ ( Base Channel Tens) the number of times needed to register the number of tens needed. For instance, for 2 you would work the toggle two time to equal 20. After Saving (Step 7), the combined effort will yield a desired Base Channel 22 that will flash-display on the LED as two GREEN and two RED when ▲ and START is pressed and held under normal operation. 8. Press and hold the START button. The unit will go through a series of flashes, but continue to hold the START button unit the LED lights steady Orange (Amber); this saves the changes. 9. Press the STOP button to exit the procedure. 2013 Cervis, Inc. 21 TM70/3-10 & i-Kontrol Console RC System 13.0 CANopen Interface v2.4 13.1 Introduction The TM70 system with CANopen interface is integrated in CANopen networks where it will work in slave mode. It handles the state of TM70 transmitter pushbutton operations so that external devices on the Bus can react. The TM70 system adheres to CiA DS-301 v4.0.2 specification. The implemented profile is described in CiA DS-401 v2.1 (Input/Output standard), where pushbutton operations are interpreted as digital inputs. The implemented characteristics are shown in Table 7. Table 7.Implemented CiA DS-401 v2.1 Characteristics Item Description NMT Functioning Slave NodeID EEPROM configurable from 1 to 127 Baud Rate EEPROM configurable. Supported speeds: 10, 20, 50, 100, 125, 250, 500, 800, and 1000 Kbps Error Control Heartbeat and Node/Life Guarding; EEPROM configurable Number of PDOs TPDO (maneuver state): EEPROM Parameters Recording • Objects 1800 – 1A00 • Objects 0x1801 – 0x1A01 2 RPDO (receiver PDOs) Not supported 13.2 CAN Bus Connection CAN Bus connection is a 5-pin connector to P4 on the LR72 pcb (printed circuit board) as shown in Figure 12. LED signaling is as recommended in CiA (CAN in Automation) document DR-3031. 22 U035.3-TM70_Console_Sys Operation and Installation Manual Figure 12. CAN Bus LR72 PCB P4 Connection 13.3 Bus Termination Adjacent to P4 is a jumper that can be configured to connect and disconnect bus termination. Termination must be used on both ends of the bus connection, while all nodes between must not be terminated. Specific details for terminating the network are included with Application Drawings provided with your specific system. 13.4 Transmitter Data Dictionary Table 8. Dictionary Items Supported by TM70 ID Object 1000: DEVICE TYPE 1001: ERROR REGISTER 1002: STATUS REGISTER 1003: PREDEFINED ERROR FIELD 2013 Cervis, Inc. 23 TM70/3-10 & i-Kontrol Console RC System ID Object 1003.0: number of errors 1003.x: standard error field 1005: COB-ID SYNC 1006: COMMUNICATION CYCLE PERIOD 1007: SYNCHRONOUS WINDOW LENGTH 1008: MANUFACTURER DEVICE NAME 1009: MANUFACTURER HARDWARE VERSION 100A: MANUFACTURER SOFTWARE VERSION 100C: GUARD TIME 100D: LIFE TIME FACTOR 1014: COB-ID EMCY 1015: INHIBIT TIME EMERGENCY 1017: PRODUCER HEARTBEAT TIME 1018: IDENTITY OBJECT 1800: 1801: 1A00: 24 1018.0: Number of entries 1018.1: Vendor ID 1018.2: Product Code 1018.3: Revision Number 1018.4: Serial Number TRANSMIT PDO COMMUNICATION PARAMETER 1800.0: NUMBER OF ENTRIES 1800.1: COB-ID 1800.2: Transmission type 1800.3: Inhibit time 1800.4: Event timer TRANSMIT PDO COMMUNICATION PARAMETER 1801.0: NUMBER OF ENTRIES 1801.1: COB-ID 1801.2: Transmission type 1801.3: Inhibit time 1801.4: Event timer TRANSMIT PDO MAPPING PARAMETER 1A00.0: Number of entries 1A00.1: PDO mapping entry 1A00.2: PDO mapping entry 1A00.3: PDO mapping entry 1A04.0: PDO mapping entry U035.3-TM70_Console_Sys Operation and Installation Manual ID Object 1A01: TRANSMIT PDO MAPPING PARAMETER 6000: 2013 Cervis, Inc. 1A01.0: Number of entries 1A01.1: PDO mapping entry 1A01.2: PDO mapping entry 1A01.3: PDO mapping entry 1A01.4: PDO mapping entry DIGITAL INPUT 8 BITS 6000.0: Number of entries 6000.1: Start and stop buttons (start1, start2, stop) 6000.2: Inputs 1-8 6000.3: Inputs 9-16 6000.4: Inputs 17-24 6000.5: Inputs 25-32 6000.6: Inputs 33-40 6000.7: Inputs 41-48 6000.8: Inputs 49-56 6000.9: Inputs 57-64 6000.10: Inputs 65-72 6000.11: Inputs 73-80 6000.12: Display status (CAN return) 25 TM70/3-10 & i-Kontrol Console RC System 13.5 Pushbuttons and Console Box PDOs Pushbuttons The system is provided with 4-byte configured transmission PDO (information bytes). st nd rd th 1 byte Object 6000.1 2 byte Object 6000.2 3 byte Object 6000.3 4 byte Object 6000.4 Start1 Start2 Stop 0 0 0 0 0 M1 M2 M3 M4 M5 M6 M7 M8 M9 M10 M11 M12 M13 M14 M15 M16 M17 M18 M19 M20 A1 A2 0 0 Transmission default is event driven, sent each time there is a change on any input. Console Box The system is provided with 12-byte configured transmission PDO (information bytes). The 12 byte includes one bit (0 or 1) corresponding with the display status Ready (0) Busy (1). st nd rd th th th th 1 byte Object 6000.1 2 byte Object 6000.2 3 byte Object 6000.3 4 byte Object 6000.4 5 byte Object 6000.5 6 byte Object 6000.6 7 byte Object 6000.7 Start1 Start2 Stop 0 0 0 0 0 I1 I2 I3 I4 I5 I6 I7 I8 I9 I10 I11 I12 I13 I14 I15 I16 I17 I18 I19 I20 I21 I22 I23 I24 I25 I26 I27 I28 I29 I30 I31 I32 I33 I34 I35 I36 I37 I38 I39 I40 I41 I42 I43 I44 I45 I46 I47 I48 TH th th th th th 8 byte Object 6000.3 9 byte Object 6000.4 10 byte Object 6000.5 11 byte Object 6000.6 12 byte Object 6000.7 I49 I50 I51 I52 I53 I54 I55 I56 I57 I58 I59 I60 I61 I62 I63 I64 I65 I66 I67 I68 I69 I70 I71 I72 I73 I74 I75 I76 I77 I78 I79 I80 0 or 1 PDO transmission default is event driven, sent each time there is a change on any input. 26 U035.3-TM70_Console_Sys Operation and Installation Manual 13.6 Receiver Data Dictionary NumRPDO: Variable that must be configured to us CAN return or not. The value to activate CAN return is 2. The value to deactivate CAN return is 0. ID Object 1400 RECEIVE PDO1 COMMUNICATION PARAMETER 1400.0 Number of entries 1400.1 COB-ID 1400.2 Transmission type 1400.3 Inhibit time 1400.4 Event timer 1401 RECEIVE PDO2 COMMUNICATION PARAMETER 1401.0 Number of entries 1401.1 COB-ID 1401.2 Transmission type 1401.3 Inhibit time 1401.4 Event timer 1600 RECEIVE PDO1 MAPPING PARAMETER 1600.0 Number of entries 1600.1 PDO mapping entry 1600.2 PDO mapping entry 1601 RECEIVE PDO2 MAPPING PARAMETER 1601.0 Number of entries 1601.1 PDO mapping entry 1601.2 PDO mapping entry 1601.3 PDO mapping entry 1601.4 PDO mapping entry 1601.5 PDO mapping entry 1601.6 PDO mapping entry 1601.7 PDO mapping entry 1601.8 PDO mapping entry 6200 DIGITAL OUTPUT 8 BITS 6200.0 Number of entries 6200.1 LEDs 6200.2 Buzzer 6411 ANALOG OUTPUT 16 BITS 6411.0 Number of entries 6411.1 LCD1 6411.2 LCD2 2013 Cervis, Inc. 27 TM70/3-10 & i-Kontrol Console RC System ID Object 6411.3 LCD3 6411.4 LCD4 6411.5 LCD5 6411.6 LCD6 6411.7 LCD7 6411.8 LCD8 When the receiver is configured as a SLAVE on a CANopen standard bus, it can communicate with other devices on the CAN bus. The receiver can transmit control information in CAN RETURN operating mode: for example, LEDs, buzzer, and LCD70 display messages for the console box; messages only in pushbutton models. Console Box The receiver can accept a maximum of two (2) frames of data. • The first frame contains 2-bytes of data: the first byte controls the LED status; the second byte controls the buzzer state. • The second frame contains eight (8) bytes of data. These bytes contain the information that can be shown on the display using VT100 commands that control the editing format of the displayed data. Pushbutton Pushbutton VT100 commands are different from console box commands because display layout and functionality are different. Return Information Management Example Data transmission and reception: • The external device and the remote control receiver can communicate through the CAN bus. Both devices can interchange data frames called PDOs (Programming Device Objects). • The external device will send 2-data frames to the remote control receiver to be sent to the transmitter. There will be two different data frames: RPDOs (Reception Programming Device Object) input data frames from the external device to the radio remote receiver; TPDOs (Transmission Programming Device Object) from the radio remote receiver to the external device. RPDO The user, depending on the external device, can control the messages to edit in the LCD display as well as the LEDs and the internal buzzer. In case of handheld pushbutton transmitters, the system can only send messages to the display. In the case of console box transmitters, the system can manage messages, LEDs, and internal buzzer. Two (2) RPDOs will be received. RPDO1 In this data frame, the receiver will obtain the information about the LEDs status and the buzzer status as digital data input: COB-ID = RPDO1_ID + Node_ID = 0x200 + 100 28 U035.3-TM70_Console_Sys Operation and Installation Manual Two pieces of data will be received: 6200 object, sub-index 1 (LEDs) 6200 object, sub-index 2 (buzzer) RPDO2 This data frame contains the information to be shown in the display. This data package contains eight (8) bytes: VT100 commands or data to be shown in the display: COB-ID = RPDO2_ID + Node_ID = 0x300 + 100 Eight (8) pieces of data will be received: 6410 object, sub-index 1 to 8 (8-bytes with VT100 compatible commands) The received display commands will be 8-byte grouped frames. If the length of the frame is higher, the radio remote receiver will split the data in 8-byte data frames. For the radio remote receiver, the received data are transparent; the receiver does not process the information. 13.7 Receiver Signaling Figure 13. Receiver CAN Signal LEDs The receiver is furnished with two CAN signal LEDs, CAN ERR (red) and CAN RUN (green) in accordance to CIA DR-303-3 recommendation. CAN-RUN (green): Indicates the system state inside of the CANopen machine. • • • Blinks every 200ms – In preoperational state Solid Green – In operational state Blink/second – Stop state CAN-ERR (red): Indicates an error if switched ON; in normal conditions it must be switched OFF. 2013 Cervis, Inc. 29 TM70/3-10 & i-Kontrol Console RC System 13.8 TM70 CAN Receivers Ref. 3302626 70GR902 RX-RCANNOCE Technical Specification 70GR902 RX-RCANNOCE Ref. 3302626 Specifications Available frequencies (ISM bands) 915MHz (FCC certified) Power supply / Maximum consumption 9-35v DC / 5W maximum Inputs / Outputs interface CAN: Standard CAN Open protocol 401 (CIA DS401) Ingress protection IP67 / NEMA-6 Antenna External: NEARSON S325TR-015 or equivalent Working frequency selection Automatic: LBT (listen before talking) Weight 430 gr. Dimensions Long = 151mm / Width = 129mm (160mm with PG) / Height = 61mm EEPROM Extractable EP70 module Signaling Multiple LEDs: 7 external LEDS (6 green + 1 bicoloured) 2 internal LEDS (CAN status: 1 red + 1 green) Connections Fast PLUG-IN connectors and 2 x M16 cable glands 1) Power supply cable gland: M16 / IP67 2) Inputs / Outputs interface cable gland: M16 / IP67 STOP function Cat. 1 EN-954-1 / 1 STOP relay: 250V / 6A maximum STOP response time = 50 milliseconds CAN BUS termination (120 Ohm) ON / OFF jumper (internal) Passive STOP time Programmable: 0.5 to 2 seconds (max) Input protection PTC / 0,3A fuse Output protections (STOP) VDR in contacts Operating mode temperature range -20ºC / +70ºC (-4ºF / 158ºF) Storage temperature (24h) -25ºC / +75ºC (-13ºF / 167ºF) Storage temperature –long periods- -25ºC / +55ºC (-13ºF / 131ºF) TM70 range supported transmitters T70/1/2; T70/3/4; T70/5/6; T70/8 30 U035.3-TM70_Console_Sys Operation and Installation Manual Figure 14. Receiver Connections and Footprint 2013 Cervis, Inc. 31 TM70/3-10 & i-Kontrol Console RC System Table 9. Receiver LED Maintenance and Troubleshooting LED Color Status Description POWER GREEN Switch ON if powered Power supply OK Solid Green– OK Hardware OK HARDOK GREEN Blinking during start-up Hardware OK Solid Red – ERROR - Watchdog activated - Oscillator breakdown - Wrong checksum - Reset activated Electronic board breakdown Blinking fast – ERROR - Wrong EEPROM Checksum - Data corrupted - CAN Bus error EEPROM problem Reprogram EEPROM Check transmitter radio and battery HARDOK RED Suggestion Please wait to finish the start-up Replace board SIGNAL GREEN OFF – no radio signal detected (Squelch) LED ON when the transmitter switched OFF indicates an occupied radio channel. LED ON and DATA switched OFF indicates radio channel occupied by a non-Ikusi system. DATA GREEN Blinking – Correct ID received OFF and SIGNAL LED ON indicates radio breakdown. Replace radios Switched OFF and DATA LED ON: no valid ID If the radio channel is not busy: verify transmitter’s selected ID or reset receiver ID. SIGNAL, DATA, and ID LED ON indicates valid frames from the transmitter. Correct link. OK ID GREEN RELAY GREEN ORDER GREEN Blinking if correct ID received. STOP relay activated Indicates system status when in CANopen machine state: CAN-RUN (Internal) CAN-ERR (Internal) 32 GREEN RED • Preoperational State – Blink every 200ms • Permanent Operation State – Solid green • Stop State – One blink per second Indicates error in the field-bus when switched on. Must be switched OFF in normal conditions. U035.3-TM70_Console_Sys Operation and Installation Manual 14.0 LCD70 Display Option The LCD70 is a 102x80 dot matrix display that can be configured with a Standard LCD70 keyboard; a 4-function customized keyboard; or as a 4-function standard keyboard (different ESC and ENTER key locations) with all offering 4-bicolored LEDs. 14.1 Functional Description The LCD70 supports three different display formats: • • • 2-lines x 12 characters/line + icons (V2.4.x) 4-lines x 12 characters/line + icons (not yet supported) Graphic icons (102 x 80 dots) (not yet supported) Standard Keyboard Custom Keyboards Figure 15. LCD70 Keypad Option Examples 14.1.1 Keyboard Options Three keyboard layouts are available, the standard and two custom, as shown in Figure 15 above. 14.1.2 LEDs and Backlight The LCD70 display has a backlight and four (4) bicolor LEDs ( red, green, and orange). 14.1.3 Block Diagram The µC (microcontroller) manages the shared information between the LE73/74/7F card, the keypad functions, the LCD display, and the LEDs (one direction only). The µC software can be programmed using an ISP programming system (the microcontroller UART port). Figure 16. µC Block Diagram 2013 Cervis, Inc. 33 TM70/3-10 & i-Kontrol Console RC System 14.2 Internal Connection 14.2.1 Power Supply and I2C Bus The LE73/74/73F card provided 3V3 and GND signals to power the display module through the connector marked LCD (P6) on the PC board; and SDA and SCL I2C bus signals, using a colored four (4) wire braid cable (IKUSI code 1095083). Table 10. I2C Bus Connection Wiring Pin Name Description 1 3V3 3.3 VDC Power Supply 2 SCL I2C Clock 3 SDA I2C Data 4 GND Ground Figure 17. LCD P6 PCB Connect Location 14.2.2 Range Limiter The LCD70 display provides a connector for the range limit option. Cable connection is made through the PC Board connector marked LAL (P8). The cable is a colored braided 3-wire cable (IKUSI code 1095082). Table 11. LAL (P8) Connector Wiring 34 Pin Name Description 1 5VIR 5 VDC Power Supply 2 DATA Range Limiter Data 3 GROUND Ground U035.3-TM70_Console_Sys Operation and Installation Manual Figure 18. T70 Transmitter and LCD70 Display Assembly 14.3 LCD70 Display Operating Modes The LCD70 allows the operator to enter in the following modes: 1. EDIT CRANE LABEL: Edit machine identification. 2. INPUT CALIBRATION: Calibrate 0 – 10V analog voltage feedback. 3. OUTPUT CALIBRATION: Select Tele Alignment option to configure analog outputs. 4. Special Operating Modes, such as Programming Spare Transmitter (with copy EEPROM function) and Change Base Channel (see Appendix A and C). 2013 Cervis, Inc. 35 TM70/3-10 & i-Kontrol Console RC System ENTER ESCAPE START Figure 19. TM70 Configuration and Navigation Buttons Enter Configuration Mode To enter the Configuration Mode, press the LCD70 ENTER key and then press the transmitter START button. The UP and DOWN buttons allow menu navigation to select the preferred software option, and they also allow value selection when a range of values is available. The ESCAPE button aborts any selected menu option, and it also allows return to an upper level in the software menu. 14.4 Data Feedback Operating Mode The Data Feedback mode can be performed through software or by change using a rotary switch. Software selection, the default method, is performed using the UP and DOWN buttons on the LCD panel. Hardware selection is performed by moving a particular switch as determined on the technical datasheet provided with the system. 14.4.1 Multiple Returns/Multiple Feedback The transmitter can process multiple feedback of two types of information, but only one type can be displayed at a time. 1. CAN return + one direct input in the receiver. In this case, the receiver must have an analog card (IN010V or IN0450P) or a digital card (IN4D) connected to the LR70 card. The INCAN configuration is not allowed in this case. The receiver is a slave in the CAN bus. 2. INCAN board + one direct receiver input. In this case, any number of analog or digital cards can be connected directly, or the INCAN expansion card can be used; the CAN return will be disabled. The receiver is a master in the CAN bus. Only systems using software revision 2.4.x support direct connect of the feedback signal to the LR72 card. Regardless, use of the INCAN card option allows simultaneous system management of several feedbacks using software revision 3.1.x or greater. The user can select the feedback information to display through software or hardware. UP and DOWN display buttons allow the user to sequentially scroll through the feedback information. The priority order of feedback is: 1. Information corresponding to the card—IN 0-10 (2303755-10) or 0-450P (2303758-450P)— directly connected to the receiver LR72 board. 2. Order for subsequent cards associated to the INCAN inputs depend on the order in which they are connected – reading from low to high. The INCAN file and parameters are configured and saved to the EEPROM. 36 U035.3-TM70_Console_Sys Operation and Installation Manual 14.5 ASCII Character Map Characters for the display adhere to the ASCII standard. The standard ASCII table is available at: http://www.asciitable.com/ Large characters can be createdby combining four: two characters in the upper line and two in the lower. Characters used to create larger characters start at B0h. Therefore, to write a large 1 you would consecutively write the character of B0h and B1h for the upper line, and characters B2h and B3h for the lower line. The following are also is available by using these special characters: − km/h in three characters: 0x83, 0x84, 0x85 − ft in one character: 0x86 − lbs in two separated characters: 0x8A, 0x8B The map shown in Figure 20 shows special characters that adhere to the ASCII standard. Figure 20. ASCII Special Character Map 2013 Cervis, Inc. 37 TM70/3-10 & i-Kontrol Console RC System 14.6 Available Icons Icons available for display are: • Battery: 43h direction. This icon is composed by four other icons: Battery cover Left cell Central cell Right cell • NEW: 2h direction. This will appear if the level is other than zero 14.7 VT100 Display Control 14.7.1 Control Characters LDC70 recognized control characters are: • • ESC (1Bh): Control character that initializes a control sequence. NUL (00h): Ignored on input (not stored in the input buffer). All other control characters cause no action to be taken 14.7.2 Valid Control Sequences Definitions: The following defines the basic elements of the ANSI mode control sequences. 1. VT100 Control Sequence Introducer (CSI): ESC [ 2. Parameter string: A string of parameters separated by a semicolon (3Bh). 3. Final character: a character whose bit combination terminates an escape or control sequence (‘m’, 6Dh). Control Sequences • ESC [ 0 (1Bh 5Bh 30h): Control sequence to turn off all character attributes (‘0’ is the optional, default value) • ESC [Pn ; Pn H (1Bh 5Bh line 3Bh column 48h): moves the active position of the cursor to the position specified by the parameters. The default condition with no parameters present is equivalent to a cursor to home action. Lines are numbered consecutively, with the origin being line 1, column 1. The cursor is not allowed to be positioned outside the margins (lines 1 to 4, columns 1 to 12). A sequence with one Pn numeric parameter with a default (0) parameter will be interpreted as wrong sequence. Example: ESC [ 2 ; 0 H or ESC [ 2 ; H are wrong sequences! • • ESC [ 2 J (1Bh 5Bh 32h 4Ah): all lines are erased, and the cursor does not move • ESC [ 5 (1Bh 5Bh 35h): All following characters transmitted are blink until receiving an escape sequence ESC [ 0 m • ESC [ 7 1Bh 5Bh 37h): All following characters transmitted are negative (reverse) image until receiving an escape sequence ESC [ 0 m ESC [ 4 (1Bh 5Bh 34h): All following characters transmitted are underscored until receiving an escape sequence ESC [ 0 m All other control sequences or wrong sequences cause no action to be taken. Example 38 U035.3-TM70_Console_Sys Operation and Installation Manual Control Sequence to turn off all character attributes, and then turn on underscore and blink attributes simultaneously. Alternative sequences which will accomplish the same thing: In only one sequence: ESC [ ; 4 ; 5 ; m (1Bh 5Bh 3Bh 34h 3Bh 35h 3Bh 5Dh) Same, but devided in three independent sequences: ESC [ m (1Bh 5Bh 6Dh) ESC [ 4 m (1Bh 5Bh 34h 5Dh) ESC [ 5 m (1Bh 5Bh 35h 6Dh) Buffered Messages When the application interest is refreshing a full screen, or a line: Two control characters, STX and ETX, allow to store the partially received text in an internal buffer until complete reception is received. Only then it will it be written in the LCD. ASCII Control Character Codes Implemented • • STX (02h): start of text. Init entering text in the input buffer. ETX (03h): end of text. Finish entering data in the input buffer and writs the buffer contents in the LCD. If these ASCII Character Codes are not used, data will be immediately represented as soon as it is received by the display. STX and ETX ASCII control characters cannot be used as parameters of a VT100 control sequence. Buffered messages can include control sequences with arrays of characters. Example: VT100 Data Feedback Write Messages on Display The texts are sent in 8 packages of 8 bytes each, preceded by an identifier COB_ID=0x300+node_ID. Inside these packages, you can send texts by different modes for view the same message. For example, the next text: Column File 1 2 3 4 5 1 I K U S I 2 I K U S I 6 7 8 9 10 11 I K U S I 12 The message can be written other ways: 2013 Cervis, Inc. 39 TM70/3-10 & i-Kontrol Console RC System Option A: IKUSI text appears, then the cursor moves to Line 2 – Column 1; IKUSI IKUSI displays on Line 2. Table 12. Display Programming Option A Text Shift Command Text Text Position Message (Hex) Meaning Position Message (Hex) Meaning Position Message (Hex) Meaning Position Message (Hex) Meaning LCD1 49 I LCD1 1B ESC LCD1 49 I LCD1 49 I LCD2 4B K LCD2 5B [ LCD2 4B K LCD2 4B K LCD3 55 U LCD3 32 Line 2 LCD3 55 U LCD3 55 U LCD4 53 S LCD4 3B ; LCD4 53 S LCD4 53 S LCD5 49 I LCD5 31 Column 1 LCD5 49 I LCD5 49 I LCD6 00 LCD6 48 LCD6 20 Space LCD6 20 Space LCD7 00 LCD7 6D LCD7 00 LCD7 00 LCD8 00 LCD8 00 LCD8 00 LCD8 00 Final command 'm’ Option B: Message identical to Option A can be written as follows. Table 13. Display Programming Option B Text Shift Command Text Text Position Message (Hex) Meaning Position Message (Hex) Meaning Position Message (Hex) Meaning Position Message (Hex) Meaning LCD1 49 I LCD1 1B ESC LCD1 49 I LCD1 55 U LCD2 4B K LCD2 5B [ LCD2 4B K LCD2 53 S LCD3 55 U LCD3 32 Line 2 LCD3 55 U LCD3 49 I LCD4 53 S LCD4 3B ; LCD4 53 S LCD4 20 Space LCD5 49 I LCD5 31 Column 1 LCD5 49 I LCD5 00 LCD6 00 LCD6 48 LCD6 20 Space LCD6 00 LCD7 00 LCD7 6D LCD7 49 I LCD7 00 LCD8 00 LCD8 00 LCD8 4B K LCD8 00 Final command 'm’ Option C: All text displays at once written as follows. Table 14. Display Programming Option B Text 40 Shift Command Text Text Message (Hex) Meaning Position Message (Hex) Meaning Position Message (Hex) Meaning Position Message (Hex) Meaning LCD1 02 Start ‘STX’ LCD1 1B ESC LCD1 49 I LCD1 49 I LCD2 49 I LCD2 5B [ LCD2 4B K LCD2 4B K LCD3 4B K LCD3 32 Line 2 LCD3 55 U LCD3 55 U LCD4 55 U LCD4 3B ; LCD4 53 S LCD4 53 S LCD5 53 S LCD5 31 Column 1 LCD5 49 I LCD5 49 I LCD6 49 I LCD6 48 LCD6 20 Space LCD6 20 Space LCD7 00 LCD7 6D LCD7 00 LCD7 03 End ‘ETX’ LCD8 00 LCD8 00 LCD8 00 LCD8 00 Position Final command 'm’ U035.3-TM70_Console_Sys Operation and Installation Manual Once the 24 characters are completed, the command for sent the cursor to line 1, column 1 must be written; otherwise, all previously written will be lost. We still have only used four packages of 8-bytes; therefore, we have another 4-bytes available to send, for example, the state of the LEDs and the Buzzer. Switching On the LEDs and Buzzer To establish the state of the LEDs and the Buzzer, we have to send a 2-data package. This package must be preceded by the identifier COB_ID=0x200+node_ID. LEDs From 0 to 255 value Buzzer 0 or 1 value The first data package determines if the LEDs are lit green, red, or amber (green/red combined). The value is a binary code that reads as follows: Table 15. First Data Packet: LED State Values LED 4 Data LED 3 LED 2 LED 1 Red Green Red Green Red Green Red Green 128 64 32 16 8 4 2 1 0 0 1 1 1 0 0 1 = 57h The second data packet determines if the buzzer is ON (1) or OFF (0). Table 16. Second Data Packet: LEDs & Buzzer Determination Position Message (Hex) Meaning LCD 1 57 LED 1 = Green; LED 2 = Red; LED 3 = Amber; LED 4 = Off LCD 2 01 Buzzer ON LCD 3 LCD 4 LCD 5 LCD 6 LCD 7 LCD 8 Important: The last byte of the transmitted second packet could have different values: • If the value is 1: The CAN message from the master is already sent to the transmitter and the receiver could receive one more messge and save it to later send to the transmitter. • If the value is 0: The transmitter has already received a CAN message and is ready to receive another. • If the value is 3: The buffer is full and is waiting for confirmation from the transmitter. A message may be lost if sent while in this state because it has nowhere to be stored. 2013 Cervis, Inc. 41 TM70/3-10 & i-Kontrol Console RC System 15.0 First Come – First Served Operation This option allows the operation of an individual crane by multiple transmitter ID codes, where the governing transmitter is determined by being the first ID to be recognized by the receiver. The receiver determines the governing transmitter by scanning the radio channels until it recognizes the first active transmitter contained in its list. First Come – First Serve mode is defined by the receiver EEPROM; the transmitters do not need to have a selector switch. The receiver frees the ID code each time the transmitter is switched OFF. When turned ON again, the receiver searches for IDs defined in the EEPROM ID code list. The first valid ID code of an active transmitter found is selected and locked onto until the operator releases the crane by pressing the STOP button. After a defined time in the receiver EEPROM (0.1 – 25 seconds, default 4-seconds), the receiver frees the currently locked ID and begins scanning IDs and radio channels. The first transmitter switched ON and recognized by the receiver is locked as the controlling transmitter and remains so until that transmitter is switched OFF. First Come – First Served systems can have up to 32 different transmitters governing a single receiver. RECEIVER ID1 ID2 F1 F1 F2 F2 ID2 ID1 TRANSMITTER 1 TRANSMITTER 2 Figure 21. Two Transmitter System 42 U035.3-TM70_Console_Sys Operation and Installation Manual 16.0 LA70 and LA70M Range Limiter TM70 radio remote control systems LA70 Infrared Range Limiter (LA70 IR Limiter) option prohibits the system from being operated outside a defined working area. The operator must be within Line-Of-Sight of the LA70 IR module to control the machine. The system consists of one or more LA70 Infrared Modules. The LA70 IR module is installed in a fixed position or on the controlled crane and positioned to cover the targeted working zone as shown in Figure 22. Range Limited TM70 RF transmitters contain an infrared sensor that receives the information from the LA70 IR module, analyzes the information, and then acts as a permissive. If the transmitter does not receive the infrared data within a pre-determined time (factory setting is four (4) seconds), the outputs are deactivated. Figure 22 shows some LA70 IR Range Limiter application examples. LA7 0 Figure 22: Range Limiter Application Examples 2013 Cervis, Inc. 43 TM70/3-10 & i-Kontrol Console RC System 16.1 Infrared Sensor As the system or operator moves, an infrared sensor located in the TM70 remote control transmitter (Figure 23) receives infrared information as it is transmitted from the LA70 IR module. The remote microprocessor gathers the sensor information and checks for the crane or machine ID. If the operator is too far away from the LA70, the sensor stops receiving an IR signal and the TM70 transmitter LED begins to flash RED—belly box transmitters also sound an audible warning—letting the operator know that the sensor must be moved back within signal range within four (4) seconds (the system default). If the operator fails to get back into range within the allotted time, all active commands are stopped; however, the RF communication is maintained with the receiver and remains in control of the main-line contactor. Figure 23. Transmitter IR Sensor Location The operator must move the TM70 transmitter into the defined working area, or zone, to reestablish control of the crane or machine. Once the transmitter returns to the working area, control of any machine movement previously established is ignored and remains disabled until all movement controls are returned to zero. If the remote is equipped with a display, the display will read OUT OF RANGE when appropriate. Modes of Operation The remote control unit has four (4) modes of operation defined in the EEPROM. The infrared range of operation is referred to as the Work Zone. These modes are: 1. Range Limiter Only at STARTUP (Electronic Key): The transmitter must be in the infrared range of operation (Work Zone). 2. Range Limiter Only Operation: The transmitter can be started anywhere inside or outside of the Work Zone, but the there is no control until the transmitter is within the infrared range of operation and all movement controls are at zero command. 3. Range Limiter at STARTUP and Operation: The transmitter must always be in the infrared range of operation (Work Zone). 4. Range Limiter Only as an Output Relay: The transmitter will not show In range or out of range in the transmitter itself. No order is masked. Information is sent to the receiver to process as an output relay or as a condition to the relay table. 44 U035.3-TM70_Console_Sys Operation and Installation Manual 16.2 Infrared Transmitter The infrared transmitter is installed in the crane of overhead machine. The LA70 IR module generates and transmits the infrared signal. Each LA70 IR module has an identity code specific to the system. This allows up to ten (10) LA70 IRs to operate in close proximity. The LA70 IR module emits an Infrared signal in the shape of an elliptical cone. The dimensions of the ellipse depend on the height of the LA70 and the orientation angle. The diagonals of the ellipse, as they relate to height (with the LA70 pointing straight down) are shown in Table One. LA70 Figure 24: Working Area Ellipse Example Table 17: Working Area Ellipse Dimensions h (ft.) D (ft.) ±63° d (ft.) ±40° 20 80 20 26 105 26 33 130 33 40 157 40 46 184 40 52 210 52 60 225 60 65 230 65 Note: For applications requiring more operational coverage, up to six (6) LA70s slave transmitters can be daisy chained. 2013 Cervis, Inc. 45 TM70/3-10 & i-Kontrol Console RC System 16.3 Installation Before You Begin: • • • • • Follow all local codes and safety regulations. Make sure the main electrical power to the machine is OFF. Make sure the work area is free from hazards. Make sure of a proper earth ground. Use flame resistant cables for the connections. 1. Make sure the Operator and TM70 transmitter position is line-of-site with the LA70 IR module installation site. 2. Take appropriate precautions to make sure the LA70 IR module installation site is away from electrical noise sources and obstacles that could shield the infrared signal. 3. Use the mounting bracket on top of the enclosure to mount the LA70 IR module. Remember, the dimensions of the ellipse (Figure 24) will change if the LA70 IR module is not positioned so that it is pointing straight down. A wider operational area is created by adjusting the mounting angle. 4. Choose the correct power supply setting on the LA70 IR module and connect power. 5. Make sure the Master/Slave selector jumper is in the Master position for the first LA70 IR module. Refer to Figure 26 below for the jumper location. 6. Select the code programmed in the transmitter EEPROM. Select Supply Voltage Select Code Select Mode Master Slave Power Supply Communication with other LA70 Figure 25: LA70 Layout The diagram below illustrates the proper wiring of additional LA70 IR modules. Note the master/slave jumper is shown in the Slave position in slaves 1 & 2. Shielded cable must be used for communication between LA70 IR modules. 46 U035.3-TM70_Console_Sys Operation and Installation Manual Figure 26: LA70 Master/Slave Jumper Configuration 16.4 LA70 Technical Characteristics Table 18: LA70 Technical Characteristics Infrared Transmitter Power Supply 48, 115, 230 Vac ± 10%; 50/60 Hz Consumption 100 mA at 230 Vac Operating Temperature –4ºF to +150ºF (-20ºC to +65ºC) Protection IP55 2013 Cervis, Inc. 47 TM70/3-10 & i-Kontrol Console RC System 16.5 LA70M Infrared Transmitter The LA70M range limiter is a compact modular reconfiguration of the LA70 range limiter fully compatible with the TM70 remote control systems. The following table describes the modules and slave (expansions) connection cable. Table 19: LA70M Modules, Expansions Module, and Cable S.A. Cod. 7505 Description Code Com. Ref. LA70M Module with DC PS 2305228 LA70M DC LA70M Module with AC PS 2305229 LA70M AC LA70M Expansion Module 2305230 LA70M EX 70GU101 Cable CONEX-M12 10MT 2301234 CABLE CONEX-M12 LA70M AC / LA70M DC LA70M EX Figure 27. LA70M AC/LA70M DC and LA70M EX Modules Table 20: LA70M Specifications 48 Modules: LA70M AC/LA70M DC Description AC Power Supply 48/115/230v AC +/-20% 50/60Hz DC Power Supply 8-35v DC AC Power Supply Fuse 0,63A /250v DC Power Supply Fuse 2A/250v Maximum power consumption 20VA Operating temperatura range -20/+70 ºC IP ingress protection rating IP67 Maximum range 50 meters External connection M12 conector -5 poles- (female) I8 Jumper ON/OFF load resistor terminal I14 Jumper TM60 or TM70 range compatible selector mode U035.3-TM70_Console_Sys Operation and Installation Manual Modules: LA70M AC/LA70M DC Description I3 Jumper ID selector code / ID codes: “2” to “F” / ID =”3” by default I2 jumper (Not available functioality) Module LED Status HARDWARE OK –green blinking- / ERROR –switched off- Fast assembly By magnets (standard configuration) External dimensions 80 mm x 160 mm x 65 mm (Length x Width x Height) Table 21: LA70M EX Specifications Modules: LA70M AC/LA70M DC Description DC power supply Provided by the Master module Operating temperatura range -20/+70 ºC IP ingress protection rating IP67 Maximum range 50 meters External connections 2 x M12 connectors -5 poles- (male - female) Maximum number of expansions 2 (for each Master module) LA70M XX / LA70M EX connection cable 10 meters M12 –female/male- (supplied as spare part) LED signalling Hardware OK –green blinking- / ERROR –switched off- Fast assembly By magnets (standard configuration) External dimensions 82 mm x 80 mm x 65 mm (Length x Width x Height) Table 22: PC Enclosure Specifications Materials Rating Material Polycarbonate Ingress Protection IP67 EN 60529 Base colour RAL 7035 Impact Resistance IK07 EN 62262 Cover colour Clear transparent Electrical Isulation Totally insulated Cover screws material Stainless steel Halogen free SI / DIN-VDE 0472 Part 815 Gasket material Polyurethane UV resistance UL 508 Flammability rating UL 746 C 5: UL 94 5V Temperatures Short term -40…..+120 ºC Glow Wire Test IEC (695-2-1) ºC:960 Continous -40…..+ 80 ºC NEMA Class NEMA 1,4,4X,12,13 2013 Cervis, Inc. 49 TM70/3-10 & i-Kontrol Console RC System 16.6 Working Zone Note: Operating Mode for the following is as previously described in Heading 16.0. The covered working zone can be circular (standard configuration) or elliptical (if required as an option, opening the LEDs about ±20° per one direction D) for each LA70M or LA70M Ex module. 16.6.1 Zone Coverage (Working Area) All LEDs are assembled in parallel mode for infrared emission coverage of a Circular zone (where D=d). Circular Zone & Elliptical Zone Figure 28: Working Area Example LEDs are assembled in wide-assembly mode for infrared emission coverage of an Elliptical zone (where D≠d). Table 23: Working Area Dimensions for Circular and Elliptical Working Areas Circular Zone Coverage D (ft.) d (ft.) h (ft.) ±63° ±40° 50 Elliptical Zone Coverage d (ft.) h (ft.) D (ft.) ±63° ±40° 20 7 7 20 23 7 26 10 10 26 30 10 33 13 13 33 39 13 40 13 13 39 46 13 46 16 16 46 52 16 52 20 20 52 59 20 59 20 20 59 69 20 66 – 115 23 23 66 75 23 U035.3-TM70_Console_Sys Operation and Installation Manual 16.6.2 Jumper Configuration and ID Selector for Master Modules • I-3: ID Selector. Range: 2, 3, 4, 5, 6, 7, 8, 9, A, B, C, D, E, F (14 positions). Default configured as ID=3. • • I-14: TM60 or TM70 compatibility selector. I-2: Unavailable. Default factory set to Normal IR LEDS CODE SELECTOR I-2 Normal Expanded F 0 2 CONNECTORS ID SELECTOR I-3 J-TAG LA60/70 I-14 LA70 Figure 29. Jumper Configuration and ID Selector for Master Modules 2013 Cervis, Inc. 51 TM70/3-10 & i-Kontrol Console RC System 16.6.3 LA70M Installation and Connections Make sure the machine is switched OFF and the work area is clear during assembly. Disconnect the power supply from the crane/machine. Check to make sure power is OFF. Be sure to connect the Earth Ground cable. Use only those cables supplied by the manufacturer for connections between the Master and Slave (or expansion) modules. 1. Select a suitable place to install the infrared transmitter. Make sure that it is away for anything that could cause intense electrical disturbances. Make sure that there are no obstructions to light transmission from the module. 2. Connect the unit to the proper power supply. 3. Jumper the Master/Slave block as MASTER. 4. Select the code that is programmed in the EEPROM of the transmitter. 5. Make sure to cap the last expansion module port with the supplied cap. Note: The maximum number of Expansion Modules for each Master Module is two (2). AC/DC Power Supply LA70M AC / LA70M DC LA70M EX LA70M EX ID=3 (*) CAP Figure 30. LA70M and LA70M Expansion Network 52 U035.3-TM70_Console_Sys Operation and Installation Manual 17.0 Tandem Operation Introduction This option allows the operation of two cranes individually or in tandem using one transmitter. Mode of operation is determined by selection of ID codes. For tandem applications, both receivers are required to scan radio channels to receive the individual transmitters. Access to a receiver or receivers is blocked for all other transmitters while the active transmitter is in control. This blocking is maintained even when the equipment is switched OFF. The selected transmitter will not restart in any other mode. If the proper mode is not set when the transmitter is restarted, the transmitter LED will pulse every 0.4s. The transmitter must be switched OFF and then restarted with the selector switch in the position that it was in when the transmitter was last used for tandem operation. CAUTION Tandem operation with cranes is always delicate. You must keep in mind that there are safety devices — limit switches, anti-collision guard systems, etc. — that can affect and stop one of the cranes while the other continues to work. st In tandem systems with LCD display options, the 1 line of the display will show the name of nd Crane 1; the name of Crane 2 is displayed in the 2 line. When the selector switch is in the 1+2 position, both names are displayed. You can personalize the name of the cranes using the methods described in Appendix A. Note: Crane names modified in the transmitter are not updated in the receiver EEPROM. The information must be copied from the transmitter EEPROM to the receiver memory. CAUTION Frequency setup of tandem systems is supplied from IKUSI, default F1=CB/F2=CB+4. By default, CB=CT. 2013 Cervis, Inc. 53 TM70/3-10 & i-Kontrol Console RC System 17.1 Single Master Transmitter Systems RECEIVER 2 RECEIVER 1 F2 F1 F2 ID1 ID2 ID2 SLAVE MASTER SLAVE F1 F2 F2 ID1 ID2 Figure 31. Single Master Transmitter System The Master Transmitter crane selector has options 1/1+2/2.The Slave Transmitter only has an R release pushbutton. When Tandem Operation Is Needed (Figure 31) 1. The operator of the Master Transmitter must have the Slave Transmitter operator RELEASE Receiver 1. To release, the R pushbutton and the START button must by simultaneously pressed. Transmitter 1 commands Receiver 1 to disconnect and ready itself to accept a new ID code. 2. The operator of the Master Transmitter then selects Switch Position 1+2. 3. The operator of the Master Transmitter must press and hold the START button until the Green LED switches ON. This commands Receiver 2 to release Receiver 2, and then new ID codes are sent to both Receiver 1 and Receiver 2. Both receivers 1 and 2 are then started, ready for tandem operation. When Tandem Operation Is Finished When tandem operation has finished, the Master Transmitter must select Switch Position 2 again (in our example above) and press the Start button. Receiver 1 is release again ready to be used by the Slave Transmitter, and the Master Transmitter then only controls Receiver 2. Note: To reconnect Transmitter 1 to Receiver 1 in our example above, the operator must first cycle the transmitter — power it OFF and then ON — and then press the START button while the selector switch in set to 1. 54 U035.3-TM70_Console_Sys Operation and Installation Manual 17.2 Two Master Transmitter Systems RECEIVER 1 RECEIVER 2 F1 F2 F1 F2 ID1 ID2 ID1 ID2 F1 F2 F1 F2 ID2 ID1 MASTER II MASTER I Figure 32.Two Master Transmitters System In Two Master Transmitter Systems, each transmitter will have a 1/1+2/2 Selector Switch and an R (release) Pushbutton. When Tandem Operation Is Needed (Figure 32) In the following example, Master II is going to become the tandem operator for Receiver 1 and Receiver 2. 1. Transmitter Master 1 operator must simultaneously press the R (release) and START buttons. This frees Receiver 1. 2. Transmitter Master 2 operator sets the selector switch to 1 & 2. 3. Transmitter Master 2 operator presses and holds the START button until the Green LED switches ON. This commands Receiver 2 to release Receiver 2, and then new ID codes are sent to both Receiver 1 and Receiver 2. Both receivers 1 and 2 are then started, ready for tandem operation. When Tandem Operation Is Finished When tandem operation has finished, the Master Transmitter must select Switch Position 2 again (in our example above) and press the Start button. Receiver 1 is release again ready to be used by the Slave Transmitter to reconnect. The Master Transmitter then only controls Receiver 2. Note: To reconnect Transmitter 1 to Receiver 1 in our example above, the operator must first cycle the transmitter — power it OFF and then ON — and then press the START button while the selector switch in set to 1. 2013 Cervis, Inc. 55 TM70/3-10 & i-Kontrol Console RC System 18.0 TM70 Analog Feedback Calibration Analog feedback systems must have the Display and Analog Feedback options. The analog input must be calibrated upon startup. Transmitters with the display option allow the operator to calibrate the analog input using the display three digit value and a comma; and, a measurement unit of up to three characters. Note: Calibration generates a linear interpolation of the possible values. This means that it can be used with all systems that generate a linear analog output. For non-linear systems, the interpolation will display an incorrect value. Analog Feedback Calibration Using the LCD Display Note: Feedback calibration modified in the transmitter are not updated in the receiver EEPROM. The information must be copied from the transmitter EEPROM to the receiver memory. 1. Insert a fully charged battery into the transmitter and turn the Key Switch to ON. 2. Push and then pull-out the STOP button. 3. Place a known load on the crane to introduce the first value. 4. Turn off the remote control and start the system in CALIBRATION mode as follows: Press and hold the LCD70 ENTER button, then press and hold the TM70 START button. Hold both until CONFIG option appears on the display. 5. Press the ENTER button to get into MENU. Use the UP and DOWN arrows on the display to navigate the MENU. 6. Use the UP and Down buttons to find CAL. (Calibration). Press ENTER to gain the Calibration submenu. 7. Use the UP and DOWN buttons to navigate through the Calibration submenu. You will find Value 1, Value 2, and UNITS. 8. Navigate to the desired submenu, Value 1, and press ENTER to enter that submenu. Note that the receiver will start up, but you will not have control over crane motion. The transmitter must communicate with the receiver in order for the information from the analog input to be sent to the transmitter. While in a submenu (Value 1, Value 2, or UNITS), you can use the Display Keys in the following manner: • • • • The DOWN Key moves through the character list in descending order. A to B for instance. The UP Key moves through the character list in ascending order. B to A for instance. The ESC Key is used to return to the previously stored character. The ENTER Key is used to select the chosen character for that digit position and move to the next digit position. 9. Once a corresponding value is assigned to the suspended load, the display will show three digits plus a comma. Make sure the value displayed is accurate. 10. Press the START Button to Save the displayed value. The value will be memorized for that calibration item. Communication with the receiver will stop. 11. Press ESC to return to the previous menu to edit the Units. Units can be no more than three (3) characters. 56 U035.3-TM70_Console_Sys Operation and Installation Manual 12. Press STOP and restart the crane. Replace the current load with another known load. 13. Repeat process Steps 4 through 12 to calibrate Value 2. 14. Press STOP and restart the crane. The system should now be ready for normal operation. Note: Inconsistent data will display until Feedback Calibration is performed. STOP Button UP Key DOWN Key Figure 33. TM70 Analog Feedback Reference 2013 Cervis, Inc. 57 TM70/3-10 & i-Kontrol Console RC System 18.1 LR71/72 and IN0-10V Assembly asfdkafj Figure 34. INO-10V (Ref. 2303755) 58 U035.3-TM70_Console_Sys Operation and Installation Manual 19.0 IN0450P Option 19.1 Description The IN045P card when connected to the LR70 0–3V analog input, allows frequency measurement conversion of a pulse generator operating between 0-450Hz. The card supplies a + 12VDC output used to provide power to the sensor. As a frequency to voltage converter, feedback from an anemometer providing a pulsed signal is displayed providing real-time wind speed information. Card Technical Specifications Figure 35. IN0450P Specifications Characteristic Detail Max. Resolution 8 bits Input Frequency Range 0 – 450Hz Operating Temperature Range -20ºC @ +70ºC Isolation Galvanically isolated from main logic board (LR70) +12VDC OUT Pulsed Signal IN GND Figure 36. IN0450P 2013 Cervis, Inc. 59 TM70/3-10 & i-Kontrol Console RC System 19.2 IN0450P and LR70 Assembly Cod-2303758 Cod. 1131026 (x4) IN0450P Cod. 1135024 (x2) Figure 37. IN0340P and LR70 Assembly 60 U035.3-TM70_Console_Sys Operation and Installation Manual 20.0 IN4D Option 20.1 Description The IN4D card provides a four (4) digital input interface when connected to the TM70 receiver. The card is connected as a single-card using the receiver P16 connector. The IN4D can also be used as a multi-digital input card using the INCAN option as an alternative. The IN4D is a four digital-to-analog signal converter. Each of the four digital signals — IN1, IN2, IN3, and IN4 — are converted to a 0 – 3V analog signal. See Figure 38. Digital inputs IN1, IN2, IN3, and IN4 use the following voltages with reference to Connector 13, Pin 6 (GND): • • 0 to 4V = deactivated 0 logic state 8 to 28V = activated 1 logic state I3 +VI 1 IN1 IN2 IN3 IN4 GND I1 IN4D 1 2 2 3 3 4 4 5 5 6 6 Figure 38. IN4D Digital-to-Analog Card Connector 13, Pins 1 through 6 CAUTION Do not apply voltages greater than 28V. Input voltages greater than 28V will damage the IN4D card. The IN4D can provide a voltage of 12 to 20volts that can be used directly from Connector 13:Pin 1 as shown in . +VI IN1 IN2 IN3 IN4 GND I3 1 IN4D I1 1 2 2 3 3 4 4 5 5 6 6 Figure 39. IN4D 12 to 20V Voltage Source 2013 Cervis, Inc. 61 TM70/3-10 & i-Kontrol Console RC System LR70 P16 +VI IN1 IN2 IN3 IN4 GN I3 IN4D I1 1 1 1 2 2 2 3 3 3 4 4 4 5 5 5 6 6 6 Top View Figure 40. IN4D and LR70 Signal Block Diagram 62 U035.3-TM70_Console_Sys Operation and Installation Manual 20.2 IN4D and LR71/LR72 Assembly Cod-2303758 IN0450P Cod. 1131026 (x4) Cod. 1135024 (x2) Figure 41. IN4D and LR71/LR72 Assembly 2013 Cervis, Inc. 63 TM70/3-10 & i-Kontrol Console RC System 21.0 INCAN Option The INCAN interface provides a means to increase the number of analog and digital inputs for the LR72 (up to N*5 + 1 where N = number of ICAN cards; maximum = 2 units). Figure 42. INCAN Interface Block Diagram Each INCAN interface can support a maximum of five (5) digital/analog micro-modules. • • • IN4D: four (4) digital inputs module (0-24VDC) IN010V: analog Voltage input for 0-10VDC 9N0450P: Pulse Inputs for 0-450pps (for example, use with an anemometer) A TM70 system can operate with a maximum of two (2) INCAN cards using the following configurations: • • • 64 40+(4) IN4D card directly connected to the LR72 max. 44 digital 0-24VDC inputs 10+ IN10V card directly connected to the LR72 max. 11 analog inputs (8-bit resolution) 10+ IN45P card directly connected to the LR72 max. 11 input pulse-signal counter (0450) U035.3-TM70_Console_Sys Operation and Installation Manual 21.1 INCAN Connections and Configuration Jumpers The INCAN expansion uses two LR72 connectors: Table 24. RL4 (2-pins) Pin Name Function + +VI DC power supply between 8 and 30V – GND Ground Table 25. RL3 (5-pins) Pin Name Function 1 GNDCAN CAN Ground 2 CANL CANL bus signal (CAN low) 3 SHLCAN Shielding 4 CANH CANH bus signal (CAN high) 5 VCAN Power Supply Figure 43. INCAN Expansion Connections 2013 Cervis, Inc. 65 TM70/3-10 & i-Kontrol Console RC System 22.0 A1P4RCAN Option The A1P4RCAN CAN expansion module proves four (4) relay outputs and an analog output. The analog output simulates a digital potentiometer with 64-steps of the power supply per each half axis. See the diagram block below (size ½ of LR72): K1 K2 CAN K3 K4 +V 11k2 VOUT -V GND Figure 44. A1P4RCAN Expansion Module Block Diagram This CAN expansion provides ser the following outputs: • • A Galvanically isolated analog output that simulates a 128-step digital potentiometer four relay outputs; K1, K2, K3 and K4. These outputs with their addresses written to CANopen frames are CAN Bus controlled. The CAN address for the card is set using the 7-jumper P1 connector. The jumper in position 1 corresponds with the first bit of the CAN address. In this way, using several jumpers it is possible 7 to select addresses ranging from 1 to 127 (2 ). CAUTION 66 Address 0 is not a valid address, so the board must always be fitted with at least one jumper. With one jumper, it is possible to configure seven (7) different addresses. U035.3-TM70_Console_Sys Operation and Installation Manual 22.1 A1P4RCAN Connection and Jumper Configurations 22.1.1 LR72 Electrical Connection The Expansion is connected to the LR72 board using the 2-pin RL4 connector for the 8-30V (+VI and GND) power supply, and the 5-pin RL3 connector for the CAN Bus connection. See Figure 45. Table 26. LR72 CAN Connections Pin Name Function 1 CNDCAN Ground 2 CANL CANL bus signal (CAN Low) 3 SHLCAN Shielding 4 CANH CANH bus signal (CAN High) 5 VCAN Power Supply Cod. 1141684: TM70 1M abatable base Cod. 1184005: UNEX 2221-0 clip Cod. 1095040: CAN RC70 1 expansion cable Cod. 1131030: M3x6 C/R DIN84 screw Cod. 2303908: A1P4RCAN electronic board Figure 45. A1P4RCAN Terminal Connections 2013 Cervis, Inc. 67 TM70/3-10 & i-Kontrol Console RC System 22.1.2 Relay Outputs (Terminal RL1) The connections shown in Table 25 are for the four possible relays of RL1. Table 27. A1P4RCAN RL1 Relay Wiring* *K1 through K4 relays rated at 250V@8A each. Relay Pin K1 K2 K3 K4 Function 1 Normally Closed (NC) 2 Common 3 Normally Open (NO) 4 Normally Closed (NC) 5 Common 6 Normally Open (NO) 7 Normally Closed (NC) 8 Common 9 Normally Open (NO) 10 Normally Closed (NC) 11 Common 12 Normally Open (NO) 22.1.3 Analog Output (Terminal RL2) Table 28. Analog Output RL2 Wiring Pin Name Function 1 VOUT Analog Output 2 GND Midpoint of Potentiometer 3 –V Power supply Negative (-50V min.) 4 +V Power supply Positive (50V max.) 22.1.4 Tele-Teaching (only V3.1 Software or Higher) The following properties of the Analog Output can be set using Tele-Alignment: • • • • Maximum and minimum values, Polarity inversion Acceleration or deceleration ramp, and Curve type. To configure the card for Tele Alignment mode, a bridge must be installed in Jumper P5 (see Figure 46). 68 U035.3-TM70_Console_Sys Operation and Installation Manual CAN CAN +VI GND CAN TeleAlingnment Analog Relay Outputs Figure 46. Analog Output Tele-Teaching Configuration 2013 Cervis, Inc. 69 TM70/3-10 & i-Kontrol Console RC System 23.0 A2ICAN Option The CANopen interface controlled A2ICAN expansion board provides an analog output current for Pulse Width Modulation (PWM) control of electro-hydraulic proportions valves. The board has two isolated output stages isolated from each other and common control logic. CAN bus CANopen Protocol LR72 Receiver Logic Board + Vi CONTROL LOGIC BOARD ( µP ) A2ICAN VPP1 GND1 VO1 VR1 VPP2 GND2 VO2 VR2 PWM1 VO1 PWM2 VO2 ISP Figure 47. A2ICAN Block Diagram The A2ICAN board has its own microprocessor (µP) that performs the following functions: • • Provides two (2) analog outputs with individual instruction sets Communicates with the LR72 board using CANopen input/output digital/analog 401 standard profile (CI DS401 – CANopen Device Profile for Generic I/O Modules). 23.1 Response Curve The A2ICAN expansion board has two (2) types of response curves for each output: • • Linear, where the response of the analog output is proportional to the input Non-linear, where the response of the analog output is exponential to the input. Variations of joystick input at the beginning of movement result in small changes of output, while the same joystick input variations result in major changes in the output current towards the end of the joystick movement. Choice of response curve is made by changing parameter P — changed by programming the EEPROM or by Tele-Alignment — where 0 represents a linear response and 1, 2, or 3 is chosen for an exponential response (from low to high, respectively). 70 U035.3-TM70_Console_Sys Operation and Installation Manual 23.2 Ramp Speed Ramp speed rise and/or fall from min. to max. can also be programmed for both the positive and negative (semi-axes) action of a joystick or lever. The Ramp Speed parameter default is 0, where 0 = no ramp. See Table 27 for adjustable ramp times. Table 29. Ramp Speeds Value Time in Seconds Value Time in Seconds Value Time in Seconds Value Time in Seconds 0 no ramp 4 0.4 8 1.0 12 2.0 1 0.1 5 0.5 9 1.2 13 2.5 2 0.2 6 0.6 10 1.5 14 3.5 3 0.3 7 0.7 11 1.7 15 5.0 Each output is a PWM signal with current feedback control for switching frequency and pulse width. The unit superimposes a “dither” signal on the output (with variable frequency and amplitude) to soften the response of certain hydraulic valves. The “dither” is available only when the PWM switching output frequency is 5kHz: • • • PWM Frequency Range — 33, 35, 40, 45… 1275 and 5kHz Dither Frequency Range — 33… 255Hz Dither Amplitude Range — 0… 50% As mentioned, maximum and minimum values, polarity inversion, acceleration or deceleration ramp, and analog curve type can be set using Tele-Alignment provided the bridge jumper is made to P6 as shown in Figure 49. 23.3 PWM Current Output Features • • • Power Supply Range of Expansion 8 – 30V; Outputs 5 – 35V • Output resolution of 128 steps per semi-axis, where Step 0 is a null output and Step 127 is permanent exit from the positive supply • • 5A maximum current for each output Two (2) identical but independent PWM outputs Each output channel has two (2) outputs, but only one is connected dependent upon the sign (+ or –) of the input Output s short circuit protected 2013 Cervis, Inc. 71 TM70/3-10 & i-Kontrol Console RC System 23.4 A2ICAN Connections and Jumper Configurations 23.4.1 LR72 Connections The expansion card connects to the LR72 board using two (2) connectors: one 2-pin connector for the power supply (VI+ and GND), and a 5-pin connector for the CAN bus. See Table 28. Table 30. A2ICAN Connections to LR72 Board (see Figure 48.) 2-Pin Connector Name Function GND Ground +VI DC power supply between 8 and 30V 5-Pin Connector Name Function VCAN Power Supply CANH CANH bus signal (CAN high) GNDCAN Ground (Shielding) CANL CANL bus signal (CAN low) GNDCAN CAN Ground 23.5 Outputs Each Analog Output has two serial relays that switch the output signal in one of two ways: Direct or Inverse. If none of the relays are activated, these outputs (Direct and Inverse) are disconnected. 23.5.1 Output PWM1 Output1 is connected to the 4-pole terminal block shown in Figure 48. Table 31. Output PWM1 Connections 5-Pin Connector Name Function VPP1 Channel 1 power GND1 Channel 1 ground VO1 Channel 1 Direct Analog PWM output VR1 Channel 1 Inverse Analog PWM output 23.5.2 Output PWM2 Output2 is connected to the 4-pole terminal block shown in Figure 48. Table 32. Output PWM2 Connections 5-Pin Connector Name Function 72 VPP2 Channel 2 power GND2 Channel 2 ground VO2 Channel 2 Direct Analog PWM output VR2 Channel 2 Inverse Analog PWM output U035.3-TM70_Console_Sys Operation and Installation Manual 23.6 ISP (In-Circuit/In-System Programming) The A2ICAN card has a 10-pin connector primarily used for programming/µP software updates. See Figure 48. Table 33. ISP Connector Pin-out Pin Name ISP2 TX2 RX2 GND RX1 TX1 ISP VCC MRNOT +VI Function Input connected to ground to put the microcontroller in Recording Mode unused Receive (data signal) Ground Receive (data signal) Transmit (date signal) unused 3.3V Power Supply Output Reset Input: Active when connected to ground 12V Supply Output (unregulated, 8 to 22V) P5 Jumper LR72 Connections ISP Connector P6 Jumper Configuration Jumper for CAN expansion direction. Jumper ON = logic 1 Programmable addresses: 1 to 63 max. Jumper ON Enable Tele-Alignment Jumper ON P6 Jumper Disable Tele-Alignment Jumper OFF Tele-Teach Jumper ON VR1 PWM Out Inverse analog VO1 PWM out Direct analog GND2 Ch GND VPP2 Ch PWR VPP2 Ch PWR GND2 Ch GND VO2 Direct analog PWM out VR2 Inverse analog PWM out Figure 48. A2ICAN Expansion Module Jumper and Terminal Block Configurations 2013 Cervis, Inc. 73 TM70/3-10 & i-Kontrol Console RC System 24.0 A2VCAN Option CAN bus CANopen Protocol LR72 Receiver Logic Board + Vi CONTROL LOGIC BOARD ( µP ) The A2VCAN expansion board provides an analog voltage that can be used to control external devices such as frequency drives with voltage control; electro-hydraulic proportional valves with input reference voltage; etc. The board provides two (2) output stages Galvanically isolated from each other and from the control common logic (see Figure 49). VPP1 GND1 VO1 VR1 VPP2 GND2 VO2 VR2 OUTPUT1 VO1 OUTPUT2 VO2 ISP Figure 49. A2VCAN Block Diagram The A2VCAN two analog outputs, dependent on the supply voltage and controlled by CANopen interface, can provide 10 bit (1024 steps) resolution. It has its own microprocessor (µP) providing the following functions: • LR72 communication through CANopen protocol using the standard 401, input/outputdigital/analog protocol CIA DS4011—CANopen Device Profile for Generic I/O Modules. • Provides two (2) analog voltage outputs per programmed setting for each output. 24.1 Output Response Curves The A2VCAN expansion board has two (2) types of response curves for each output: • • Linear, where the response of the analog output is proportional to the input Non-linear, where the response of the analog output is exponential to the input. Variations of joystick input at the beginning of movement result in small changes of output, while the same joystick input variations result in major changes in the output current towards the end of the joystick movement. Choice of response curve is made by changing parameter P — changed by programming the EEPROM or by Tele-Alignment — where 0 represents a linear response and 1, 2, or 3 is chosen for an exponential response (from low to high, respectively). Selection can also be programmed according to the rise and fall for each semi-axis. Ramp Response is found under defined output type as Linear or Nonlinear. 74 U035.3-TM70_Console_Sys Operation and Installation Manual 24.2 Ramp Speed The selected ramp speed for each semi-axis is entered into the Ramp Speed parameter. Each value shown in Table 34 is a ramp time for a semi-axis minimum to maximum value. Table 34. Output Minimum-to-Maximum Ramp Time Value Time Value Time Value Time Value Time 0 No Ramp 4 0.4s 8 1.0s 12 2.0s 1 0.1s 5 0.5s 9 1.2s 13 2.5s 2 0.2s 6 0.6s 10 1.5s 14 3.5s 3 0.3s 7 0.8s 11 1.7s 15 5.0s As mentioned, maximum and minimum values, polarity inversion, acceleration or deceleration ramp, and analog curve type can be set using Tele-Alignment provided the bridge jumper is made to P6 as shown in Figure 49. This is only available with TM70 console boxes using software of V3.1 or higher. 24.3 Pulse Width Modulation (PWM) Specifications Table 35. PWM Specifications Item Description Operating Power 8–30V Number of Outputs Two (2) Output Power 5–35V Output Current 10mA maximum Output Protection short-circuit protected 24.4 A2VCAN to LR72 Connections (see Figure 51) Table 36. Power Connections (2-pins) Name +VI GND Function DC power supply between 8 and 30V Ground Table 37. CAN Connections (5-pins) Name Function VCAN Power Supply CANH CANH bus signal (CAN high) SHLCAN Shielding CANL CANL bus signal (CAN low) GNDCAN CAN Ground 2013 Cervis, Inc. 75 TM70/3-10 & i-Kontrol Console RC System 24.5 A2VCAN Voltage Outputs The A2VCAN provides two (2) isolated outputs by converting PWM pulses to voltage outputs dependent on the supply voltage. The outputs are isolated from both the board logic and each other. The relay control must be activated by the VCOMREL signal through the common of the two relays VREL1 and VREL2. When the relays are OFF, the output voltages VO1 and VO2 are equal to the reference voltages VR1 and VR2 at respectively. The output range is from 0% to 100% of the power supplies VPP1 and VPP2 when connected to the two outputs. Signal resolution is 10bits (1024 values). 24.5.1 Output 1 (VO1) (see Figure 51) Table 38. Output1 (VO1) Terminal Connections Terminal Function VPP1 Channel 1 power GND1 Channel 1 ground VO1 Channel 1 Analog Output VR1 Zero position signal to get through output 1 when the relay is inactive 24.5.2 Output 2 (VO2) Table 39. Output2 (VO2) Terminal Connections Terminal Function VPP2 Channel 2 power GND2 Channel 2 ground VO2 Channel 2 Analog Output VR2 Zero position signal to get through output 2 when the relay is inactive 24.6 ISP (In Circuit/In-System Programming) Table 40. ISP Connector Pin-out Pin Name ISP2 TX2 RX2 GND RX1 TX1 ISP VCC MRNOT +VI 76 Function Input connected to ground to put the microcontroller in Recording Mode unused Receive (data signal) Ground Receive (data signal) Transmit (date signal) unused 3.3V Power Supply Output Reset Input: Active when connected to ground 12V Supply Output (unregulated, 8 to 22V) U035.3-TM70_Console_Sys Operation and Installation Manual P5 Jumper LR72 Connections Configuration Jumper for CAN expansion direction. Jumper ON = logic 1 Programmable addresses: 1 to 63 max. ISP Connector Jumper ON P6 Jumper Enable Tele-Alignment Jumper ON P6 Jumper Disable Tele-Alignment Jumper OFF Tele-Teach Jumper ON VR1 PWM Out Inverse analog VO1 PWM out Direct analog VPP2 Ch PWR GND2 Ch GND GND2 Ch GND VO2 Direct analog PWM out VR2 Inverse analog PWM out VPP2 Ch PWR Figure 50. A2VCAN Expansion Board Configuration 2013 Cervis, Inc. 77 TM70/3-10 & i-Kontrol Console RC System 24.7 A2VCAN Power Supply Board POT70V4 The POT70V4 is an independent, isolated board that provides four (4) power supplies used to supply the output stage of the A2VCAN expansion board’s analog outputs. This board is mounted per the directions provided on the IKUSI datasheet. Only the required number of POT70V4 DC/DCs (power supplies) shall be mounted. Each DC/DC can supply the outputs of two A2VCAN expansion cards — a total of four (4) analog voltages. Table 41. POT70V4 DC/DC Specifications Item Description Operating Power Provided by the LR72 board Two Output Types 12V/0/–12V @ 85mA 15V/0/–15V@ 65mA Output Power Supply Range 9 to 18V Output Current 10mA maximum Figure 51. PTO70V4 DC/DC Power Supply Expansion Board 78 U035.3-TM70_Console_Sys Operation and Installation Manual 25.0 Tele-Alignment Option Tele-Alignment provides a means for the operator to adjust the output parameters. Access to the option can be activated and deactivated through the EEPROM, EEPROM recorder, or TM70Config provided the expansion card Jumper is set to enable Tele-Alignment. Cards that support the option are: • • • A1P4RCAN (One (1) relay-based potentiometric transducer output card) A2VCAN (Two (2) voltage analog output card) A2ICAN (Two (2) pulse-width-modulated current analog output card) A2ICAN and A2VCAN expansion cards are interchangeable, the position and number of outputs are the same, but when interchanged it is necessary to adjust their particular parameters. The new expansion card is automatically recognized by the system, and all expansion cards and CANbus supported outputs are identified at the instance of using the Tele-Alignment menu; the information is synchronized between the transmitter and the receiver. Tele-Alignment requires use of the LCD70 option (software version 3.1 or higher, Figure 52), or the TM70 Tele-Teaching support module (IKUSI Ref. 2305120-00A) that is specifically design for that purpose. Figure 52. LCD70 Display 25.1 Tele-Alignment Process Software navigation is performed using the ▲(UP), ▼ (DOWN), ENTER (validate selection), and ESC (abort selection) keys of the LCD70, and are also configurable through the EEPROM or TM70Config. In situations where multiple keystrokes are necessary to reach a desired value, the ▲ or ▼ keys can be held, in which case the values scroll on the display. Access to Tele-Alignment is by pressing and holding ENTER (default), and then START as shown in Figure 53. 1. Hold ENTER 2. Start Figure 53. Tele-Alignment Default Startup Sequence Note: Though the default is Enter then Start, TM70Config allows for custom keystroke modifications if desired. 2013 Cervis, Inc. 79 TM70/3-10 & i-Kontrol Console RC System Figure 54. Configuration Mode Chart (Part 1) 80 U035.3-TM70_Console_Sys Operation and Installation Manual Figure 55. Configuration Mode Chart (Part 2) 2013 Cervis, Inc. 81 TM70/3-10 & i-Kontrol Console RC System 25.2 Menu 3.1 Adjust Note: It is important to remember to Confirm/Validate each setting adjustment for each parameter in each semi-axis before going back or exiting the menu. If the desired setting is not confirmed before leaving the currently displayed changed parameter, the desired setting is lost; it will not be available to be saved to the EEPROM. Once all desired parameter settings are made, you must use the 4. SAVE ALL menu to record all changed settings to the EEPROM. 25.2.1 Parameter Response Type The graph in Figure 56 shows the different response types that can be chosen for the parameter action. Type Szero Figure 56. Parameter Configuration Options In this menu, the user is asked to select the output response. Outputs associated with the selected response type are displayed as follows: X EXP_TYPE Y Where: X is the Number of the analog output Y is the Output Number of the output EXP_TYPE is the type of analog output (A1P4CAN, A2VCAN, or A2ICAN) The user must select which output to tele-adjust. The chosen output should be flashing. If two outputs display, use the UP/DOWN keys to select the desired output and confirm the selection by pressing START. The selected output will briefly display. 82 U035.3-TM70_Console_Sys Operation and Installation Manual 25.2.2 Limit Values The paddle or joystick must be used to adjust the +Smin, –Smin, +Smax, –Smax, and Szero parameters. • Min and Max adjustments are performed per semi-axis according to the particular lever/joystick being manipulated. • • • UP and DOWN key press changes are displayed as they are performed. • ZERO RELE ON: Selecting this submenu, the output is activated. This menu can be used to identify potential errors that may cause unwanted machine movement. Output Zero is set with the lever/joystick in its neutral position. The LCD will display that the five possible parameters are adjusted in accordance to the lever/joystick position. 25.2.3 Polarity INV This parameter allows for reverse polarity of outputs. See . V+ V+ 100% 50% Position– Position+ 100% Position– 50% Position+ 0% 0% V– V– Figure 57. Inverse Polarity Graph 25.2.4 Curve Type There are four (4) available curve types: • • Type 0 – Linear Response Type 1, 2, and 3 – Exponential Response 2013 Cervis, Inc. 83 TM70/3-10 & i-Kontrol Console RC System 25.2.5 Ramps Ramp speed is defined for each half-axis. Parameter values are shown in Table 42. Table 42. Output Minimum-to-Maximum Ramp Time Value Time Value Time Value Time Value Time 0 No Ramp 4 0.4s 8 1.0s 12 2.0s 1 0.1s 5 0.5s 9 1.2s 13 2.5s 2 0.2s 6 0.6s 10 1.5s 14 3.5s 3 0.3s 7 0.8s 11 1.7s 15 5.0s The parameter values are modified using EEPROM recorder. 25.2.6 PWM (Pulse Width Modulated) Frequency (Available Only for A2ICAN) This parameter only applies to outputs that have current regulation (A2ICAN). See Table 43. Table 43. PWM Frequency Selections Parameter Value PWM Frequency 0 500Hz 1… 5 Invalid 6 33Hz 7… 255 35… 1275Hz (Parameter x 5) The Tele-Alignment adjustments made to Output 1 are automatically set to Output 2. 25.2.7 Dither This parameter only applies to outputs that have current regulation (A2ICAN), and only if PWM FREQ. = 0 (5000Hz). • • • Dither Frequency Range – 33… 255Hz Dither Amplitude 0… 50% The Tele-Alignment adjustments made to Output 1 are automatically set to Output 2. 25.2.8 Reset Output This parameter allows the user to restore the analog output to its default values from the EEPROM. 84 U035.3-TM70_Console_Sys Operation and Installation Manual 25.2.9 Troubleshooting Table 44. Troubleshooting Error Type On Screen Description Comments More than one joystick moves together ERROR 1 Hardware Not Detected No output associated More than two associated outputs (maximum 2 associated analog outputs per lever/joystick) ERROR 2 Hardware Not Detected Expansion is not initialized (output associated absent) Place Enable Jumper Initialized expansion, Tele-Alignment jumper not connected. Two Joystick Selected When moving the analog paddle to adjust, more than one axis/joystick outputs are selected. Different Joystick A different joystick than selected moved when the Tele-Alignment menu starts. This Adjust Not Possible If the expansion’s output relay only activates when Cmin exceeded. This Adjust Not Possible Output relay is activated when link exist. Put Joystick To Neutral If the adjustment is possible and any paddle moves. No Access To Memory No access to memory to update data. Adjust Not Valid The expansion indicates invalid values. Quest./Answ. Not Valid Erroneous communication between RX and expansions. No Answer Of Expans. The expansion doesn’t answer; communication error. Error Other error. ERROR 3 ERROR 4 ERROR 5 GEN. ERROR 25.2.10 Menu 3.2 Reset Values Restores all outputs that support Tele-Alignment to default values. 25.2.11 Menu 3.3 FORB CAL MEN Used to disable or cancel an entry to the Tele-Alignment menu. User should use Recorder and/or TM70Config if the entry needs to be re-activated. 2013 Cervis, Inc. 85 TM70/3-10 & i-Kontrol Console RC System 26.0 R70/Plus Receivers – Software V3.2 Compatible 26.1 Detail Characteristics 26.1.1 V3.2 TM70 Software Features • • Up to five (5) R8CAN boards – allows for upt to 53 relays in the same box • • • IN 0– 4/20mA analog expansion card supported Up to ten (10) analog outputs – maximum of five A2VCAN, five A2ICAN, five A1P4RCAN, or a mix of expansion cards that will not exceed ten (10) analog outputs. IN4D sans feedback as a link-condition in multi-receiver systems Independent and progressive response analog outputs. Up to eight (8) individual and selectable progressive responses. 26.1.2 V3.2 Software Compatible Hardware Note: This software is compatible only with LR72 E or higher version expansion cards. Compatible R70 receivers are capable of using the following expansion cards (max 4): Option 1 Figure 58. V3.2 Compatible Hardware Option 1 86 U035.3-TM70_Console_Sys Operation and Installation Manual Option 2 Figure 59. V3.2 Compatible Hardware Option 2 2013 Cervis, Inc. 87 TM70/3-10 & i-Kontrol Console RC System Option 3 Figure 60. V3.2 Compatible Hardware Option 3 88 U035.3-TM70_Console_Sys Operation and Installation Manual Option 4 Figure 61. V3.2 Compatible Hardware Option 4 Expansion Card Type and Required Slot Size Table 45. Expansion Card Type and Required Slot Size Expansion Card Type Slot Size R8CAN 1/2 A1P4RCAN 1/2 INCAN ½ IN 0-10V Direct assembly in LR72 or INCAN cards IN 0-450P Direct assembly in LR72 or INCAN cards IN-4D Direct assembly in LR72 or INCAN cards A2ICAN ¼ A2VCAN ¼ 2013 Cervis, Inc. 89 TM70/3-10 & i-Kontrol Console RC System R70/XX Specifications Table 46. v3.2 R70/XX Specifications 90 R70/XX Specifications Available frequencies (ISM bands) 915MHz 870MHz/433MHz 419MHz AC current power supply range 48V/115/230v AC DC current power supply range 8-32v DC Ingress protection IP65 / NEMA-4 Antenna External (standard) Working frequency channel selection Fix or automatic (listen before talking EEPROM) Weight Maximum = 7 Kg (53 relays) Dimensions Length = 350 mm / Wide = 250 mm / Heigth = 150mm EEPROM Internal and extractable (EP70) Signaling MultiLED: internal LEDs Connections External input/output terminal plugs for using with cable glands and base panel connectors Maximun current over resistive load 6ª Operating temperature -20ºC / +70ºC (-4ºF / 158ºF) Storage temperature -25ºC / +75ºC (-13ºF / 167ºF) Storage temperature –long periods- -25ºC / +55ºC (-13ºF / 131ºF) Maximun comsumption 40 VA 50/60Hz (+15% / -20% Vin) U035.3-TM70_Console_Sys Operation and Installation Manual 26.2 Internal Wiring POWER CAN bus CAUTION: POWER cables MUST be wired and confined to the center of the slot. Other wiring location is not critical. UPPER SLOT BOTTOM SLOT P.S. LR72 R8CAN Table 47. Internal Wiring 2013 Cervis, Inc. 91 TM70/3-10 & i-Kontrol Console RC System 27.0 i-Kontrol Console Box i-Kontrol console box transmitters are designed for crane/hoisting and mobile applications using digital (On/Off) and proportional control. Features • Bands Available (MHz): 433, 870, 915, 419, 865, and 918 • NiMh rechargeable batteries • Fast (< 2 hours) and intelligent CB70 battery charger • LE70IK emitter logic board • Fully compatible with TM70 remote control products • Compatibility: Two axis multi-step or step-less MO70 joystick; single axis resistive analog lever/joystick; two axis resistive analog lever/joystick auxiliaries • Auxiliary Details: o 1-0-1 position selector switches with maintained-position or forced return-to-0 o 0-1 position selector switches with maintained-position or forced return-to-0 o 6, 16, and 24-position binary and rotary switches • • Potentiometers • • CANbus physical layer compatible receiver with CANopen communication protocol Fast and Easy working frequency channel change by software or by automatic channel selection Other communication protocols: IQAN, SAE J1939, Profibus DP and RS-232/RS-485 (optional) • • TFT color display option for feedback information • Digital and analog signal feedback to the machine’s or user’s interface. Warning and alarm signal management with feedback option using the graphic display and/or bi-color LEDs For systems with Umbilical Connection Option, it is highly recommended to disconnect unused umbilical cables from systems. If the umbilical is not to be used, disconnect! 92 U035.3-TM70_Console_Sys Operation and Installation Manual 27.1 i-Kontrol Console Remote Description 1 2 6 4 3 8 9 7 5 1 – LA70 Range Limiter (option) 2 – TFT Color Display (option) 3 – Signal LED 4 – Two Axis (step or step-less) joysticks/Single Axis or Dual Axis Resistive Levers 5 – Auxiliary function 6 – STOP pushbutton 7 – EP70 external, removable EEPROM 8 – Rechargeable battery 9 – Umbilical Cable connection option Figure 62. i-Kontrol Console Remote Features 2013 Cervis, Inc. 93 TM70/3-10 & i-Kontrol Console RC System 27.2 i-Kontrol Specifications Table 48. i-Kontrol Transmitter Specifications 94 Item Specification IP / NEMA ingress protection IP65 / NEMA4 Type of display TFT color EEPROM External and extractable EP70 / Fast maintenance Emitter logic LE70IK (new emitter logic) Anti-condensation system Gore-Tex blade or similar Material Polyamide (high impact resistance) Cable connection M12 connector Battery life 16 h (50% duty cycle) Confort belt anchorages Belt hooks or integrated Operating temperatura range -20ºC +70ºC Joysticks 2 (MO70) max. Single Axis Electrical Paddles 6 (MA70) max. Dual Axis Electrical Paddles 3 (EUCHNER) max. Auxiliary Sided Pushbuttons 6 (3+3) max. Weight (battery included) 1780g U035.3-TM70_Console_Sys Operation and Installation Manual Visit our Web site at: www.cervisinc.com 2013 Cervis, Inc. All rights reserved. Content is subject to change without notice. 2013 Cervis, Inc. 95