1
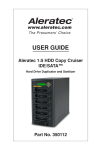
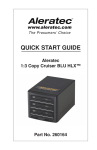
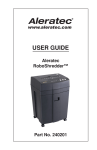
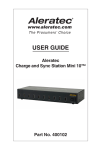
Quick Start Guide
1:3 HDD Copy Dock Duplicator™ Included Items
•
•
•
•
•
•
•
1:3 HDD Copy Dock Duplicator™
USB 3.0 Cable
eSATA Cable
Power Adapter and Cord
Quick Start Guide (this document)
User Guide
Aleratec Registration Card
Part No. 350117
Product Features
The 1:3 HDD Copy Dock Duplicator™ is a Hard Disk Drive Duplicator that can also function as
a Hard Disk Drive USB Docking Station.
•
•
•
•
Makes Hard Disk Drive copies/backups
Quick-load drive bays
Supports 2.5” and 3.5” SATA Hard Disk Drives
Supports Compact Flash (CF) memory, CFast Memory and 50mm
mSATA SSDs with optional adapters, not included.
Key Items on the 1:3 HDD Copy Dock Duplicator
HDD Release
Buttons
Display
Panel
Individual
HDD Power Buttons
SATA HDD
Drive Slots
Main
Power
Button
Controller
Buttons
Power Cord
Port
USB 3.0 Port
eSATA Port
Summary of Operation
Duplicating Hard Drives
The “Copy HDD” function performs an actual copy from the source HDD to the target HDDs. The target HDDs must
be at least as large as the source. The 1:3 HDD Copy Dock will copy every block of capacity on the source HDD.
1. Use the included power adapter and cord to plug the HDD Copy Dock Duplicator into a power outlet.
2. Insert the SATA Hard Drive you want to copy into the slot marked “SOURCE DISK 4”. When inserting, align the SATA port on the
Hard Drive with the SATA connector in the drive bay slot. Press the “SOURCE DISK 4” power button on the front of the unit to
power up the drive.
3. Insert the destination SATA Hard Drives into the slots marked “TARGET DISK 1”, “TARGET DISK 2” and “TARGET DISK 3”. When
inserting, align the SATA port on the Hard Drive with the SATA connector in the drive bay slot. Press the power button on the
front of the unit to power up the drive target drive(s).
Note: Make sure the target Hard Drive has the same or higher capacity than your source Hard Drive. The duplication
process will not start if the target drive has a lower capacity. Also make sure the unit is not connected to a PC through
the USB or eSATA ports.
4. Push the main power button to turn the unit on.
Continued on back...
Summary of Operation (Continued)
5. Push the DOWN button to select the Duplicator Mode menu item and press ENT. Press ENT two more times to switch to Duplicator Mode.
The system will auto-detect the hard drives. After the drives have been detected, a screen similar to the one below will be displayed:
==
Dup.
Menu ==
HDD
Duplicator
1.
Copy HDD ver:
1-1
0.92C
UP
ENT
DOWN
ESC
POWER
Note: Before copying be sure that the capacity of the target HDD is equal to or larger than the source hard drive.
6. Press ENT to start copying. The system will auto-detect the hard drives. 7. During the copy process the HDD Copy Dock Duplicator will display progress information.
ENT
UP
Copy
- 36MB/s
0%
HDD Duplicator
POWER
235.7GB
00:01:48
1-1
ver:
ESC
DOWN
0.92C
The amount of data remaining to be transferred (shown in gigabytes), and time will be displayed in increasing increments as
the
percentage of completion increases. The process information is refreshed every 15 to 20 seconds.
Note: The copying speed, capacity and duration may vary from one source hard drive to another.
8. Once duplication is complete, a job status screen will be displayed:
Final
38 MB/s
100%
HDD Duplicator
0.0
1-1GB
ver:00:32:57
0.92C
UP
ENT
DOWN
ESC
POWER
Using as a USB HDD Docking Station
1. Use the included power adapter and cord to plug the HDD Copy Dock Duplicator into a power outlet.
2. For USB, connect the included USB 3.0 Type-A connector to your computer’s USB Port. Note: The USB 3.0 Type-A connector is also
compatible with USB 2.0 ports.
3. For USB, connect the USB 3.0 Type-B connector to the USB 3.0 Port located on the back of the HDD Copy Dock Duplicator.
4. For eSATA, connect the included eSATA cable to your computer’s eSATA port. Connect the other end of the eSATA cable to the eSATA
port located on the back of the HDD Copy Dock Duplicator.
5. Insert 1 to 4 SATA Hard Disk Drives into the drive slots on the top of the HDD Copy Dock Duplicator. When inserting, align the SATA
port on the Hard Drive with the SATA connector in the drive bay slot.
6. Power on the HDD Copy Dock Duplicator.
7. Power on each hard drive bay that you would like to access.
Note: Any unformatted Hard Disk Drive will not show up as a drive in the Windows® Operating System. You must format
these drives using the operating system’s tools. When inserting and removing hard drives, make sure the unit is powered off.
Technical Support Addresses and Phone Numbers
• By e-mail: [email protected]
• By Telephone: 1-818-678-0484 – Skype: support.aleratec.com – FAX: 1-818-678-0483
Technical Support Group can be reached 8:00 AM to 5:00 PM, Pacific Time, Monday through Friday, excluding U.S. holidays. Please try to call from a phone near your computer system.
• Access is available 24 hours a day, 365 days a year, via The World Wide Web at: www.aleratec.com
© 2012 Aleratec, Inc.
9851 Owensmouth Avenue / Chatsworth, CA 91311 U.S.A.
Specifications subject to change without notice.
Document Number: 350117_QSG_ENG_Rev-A