1
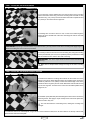
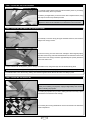
q Enlarge the hole in one servo arm that is 3/8" (10mm) out from the centre
of the servo horn, using a 1/16" (1.6mm) diameter drill bit.
q Install the Z-Bend in one pushrod wire into the hole that you enlarged in the
servo arm.
+The pushrod wire should be orientated on top of the servo arm.
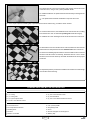
q Use a couple of pieces of masking tape, taped between the elevon and the wing, to hold the elevon centred.
q Centre the elevon servo, then install the servo horn onto the servo, making
sure that the servo horn is centred and pointing out toward the wing tip.
q Install the servo horn retaining screw to secure the servo horn to the servo.
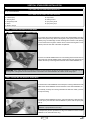
q With both the servo horn and the elevon centred, thread one clevis onto the
pushrod wire and snap the clevis into the outermost hole in the control horn.
q Remove the masking tape and double-check that both the servo horn and
the elevon are still centred. If necessary, thread the clevis in or out to centre
the elevon, then move the elevon up and down several times to ensure proper
movement.
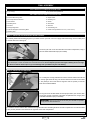
q Repeat the previous procedures to install the second elevon control linkage
onto the other half of the wing.
LANDING SKID AND MOTOR INSTALLATION
You'll Need the following parts FROM THE KIT:
q (1) Cowling
q (4) M3 x 18mm Machine Screws
q (1) Landing Skid
q (4) M3 Flat Washers
q (2) Plywood Spacer Plates
q (4) M2 x 10mm Washer-Head Wood Screws
q (4) M3 x 12mm Machine Screws
You'll Need the following TOOLS AND SUPPLIES:
q Thin and Thick C/A
q 1/16" (1.6mm) Drill Bit
q # 2 Philips Head Screwdriver
q Straight Edge Ruler
q Modeling Knife
q Pencil
q Scissors
q 220 Grit Sandpaper with Sanding Block
q Electric or Hand Drill
q Masking Tape
Page