1
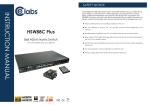
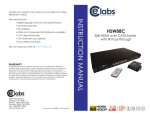
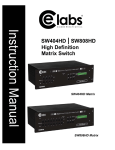
INSTRUCTION MANUA L
TABLE OF CONTENTS
1. Cautions
MP60
HD Media Player
1-2
2. Features and Specifications
3-5
3. Unit and Accessories
6
4. Functions of buttons on the Remote Controller
6-8
5. Media Player's connections
9
6. How to play multimedia files
11-17
6.1 How to play video files
11-12
6.2 How to play audio files
13-14
6.3 How to play pictures
16-17
7. System Setup
18
8. FAQ
20
Thank you for choosing this product. For optimum performance, please read this
User’s Manual carefully, especially the Cautions part.
CAUTIONS
1.1 Please do not use this product in environments of high temperature or
high-humidity.
1.6 When you power on the Media Player, please be patient as the boot up time
may be long if a Hard Drive is attached.
1.7 Please don’t remove the Storage Device while it is being read by the Media
Player. Please turn off power before removing Storage Device to prevent any
damage to the Media Player or Storage Device.
1.8 Please don’t turn on the power instantly after turning off the power as this may
damage the product.
1.2 Keep the Media Player away from magnetic devices, since it might affect
data transfer of the product.
1.3 Please do not move or strike the Media Player while it is working.
1.4 Please use the power adapter included. Other power adapters may damage
the Media Player.
1.5 Please don't turn on the power until you finish connecting the Media Player
with TV and Storage Devices.
1
2
FEATURES AND SPECIFICATIONS
2.2 Specifications
2.1 Features:
2.1.1 The MP60 can be connected to a SD or HD TV and play Multimedia
Files such as : Movies, Music, and Pictures. Supports multiple Storage
Devices: Memory Cards and multiple USB Storage Devices.
The Media Player with Resource Management function can classify
and list supported multimedia files in 4 categories automatically:
Movie, Music, Photo, and File.
Note: In order to shorten the time for file search, we suggest you to put the
same types of files in the same folders, like all movies in one folder,
all music in one folder, etc. But it is also ok if the files are mixed in
different folders, it will just take a bit longer for the Media Player to
classify and list the folders and files.
MP3, MPA, WMA, ACC
3
4
UNIT AND ACCESSORIES
Media Player
AC Power Adaptor
Remote Control
1
1
1
User’s manual
HDMI Cable (1 meter)
1
1
REMOTE CONTROL FUNCTIONS
Note:
Only one video and audio may be selected. This unit does not support
simultaneous outputs of SD and HD signals.
When using the HDMI output, audio may be routed inside the HDMI signal or
to the TOSLINK optical output. Both are not on at the same time.
5
6
II
R
R
Pause / play or OK
V
Decrease the volume while playing Movie/Music.
VO
Increase the volume while playing Movie/Music.
Power
To switch on and off
Skip backward in a movie/music at speed of 2X, 4X, 8X
Home
Go to the main menu
Fast forward in a movie/music at speed of 2X, 4X, 8X
To put the function buttons at the downside of the screen while
Skip backward to previous file while file playing.
OSD
mute
GO TO
AV / HDMI
Rotate
Back
playing
Skip forward to next file while file playing.
to enable/disable mute function while playing movie/music
Stop media playback
To move to an exact time during a movie play
To change the TV output to Composite Video or to HDMI
To change the photo display
ZOOM
Zoom In photos and videos while playing
X2, X4, X8,
X16
Go back to the previous menu
Setup
Go to the setup menu (N/A on thin remote control)
Move cursor upward
16:9
To change the video ratio to 16:9 or 4:3 (N/A on thin remote
control)
Move cursor downward
Move to left selection
Move to right selection
7
8
MEDIA PLAYER CONNECTIONS
Mode 1.
(1) Video connection: Video (Yellow)
Audio connection: Stereo
AUDIO-L (white)/AUDIO-R (Red)
(2) Insert the media card and plug in the
Power Adapter
(3) Turn on the TV and set the TV to AV
input
(4) Set the MP60 to NTSC (A/V) output
Mode 2
(1) Connect HDMI cable from the media
player HDMI output to the TV HDMI
input
(2) Insert the media card and plug in the
Power Adapter
(3) Turn on the TV and set the TV to
HDMI input
(4) Set the MP60 to HDMI (at the desired
resolution) output
6.0 How to play multimedia files
• Connect the unit to the TV.
• Turn on the TV and the media player, choose right TV mode, and you will
see the main menu on the TV.
Select MOVIE for example and then select either usb disk or sd card (depends
upon how you wish to use the unit). You will see the list files (Movies if this is what
you selected) on the storage device. Select the file you wish to play.
10
6.1 How to play video files
• To press ►II to confirm and choose the memory device to confirm and play.
And ▼ or ▲ are used to choose different files.
• Volume + /volume - for changing the volume, MUTE is to disable volume and
enable when pressed again.
• To change the screen proportion by press the 16:9 button
• Fast forward or rewind: press ►► or ◄◄ button to fast forward or reverse
movie play back at a speed of 1X / 2X / 4X / or 8X.
During a movie playback, you may press the OSD button to access additional
menu options as seen at the bottom of the screen at right.
The following parameters may be set:
• Audio track, users can change the output audio track
• Subtitle: users can turn on the subtitle
• Video scale: 16:9 and 4:3, fit view, video full screen, default
• Play mode: loop all, sequence, random, play only once, loop one file
• Subtitle code: GB2312, GBK, BIG5, UTF8
• To skip to the next chapter/movie file: If you’re playing one movie, and you
want to skip to next chapter or movie, you can press ►►| or press |◄◄ to
skip to play the previous one.
• Press ■ to stop playback of any file.
• If you want to view another category like Music, Photo or Files while the movie
playing, please press ■ button to stop, and press the BACK button or HOME
button to go to the Menu, and choose from there.
11
12
6.2 How to play music
Press the HOME button on the remote and choose the MUSIC icon.
To press ►II to confirm and choose the memory device to confirm and play.
And ▼ or ▲ are used to choose different files.
• Volume + /volume - for changing
the volume, MUTE is to disable volume
and enable when pressed again.
• Fast forward or backward: press ►►
or ◄◄ button to fast forward or reverse
song.
• To skip to next music file: If you’re
playing one song, and you want to
skip to next one, you can press ►►|
or |◄◄ to skip to play the next or
previous file.
• To press ■ to stop music playback
• If you want to view other category like movie, Photo or eBook during the
music playing, please press ■ button to stop, and press BACK or HOME
button to go to the Menu, and choose from there.
13
During music playback, you may press the OSD button to access additional menu
options.
The following parameters may be set:
• Play Mode: only once, rotate one file, rotate all files, alphabetical
sequence, or random
• Equalizer: natural, vocal, dance, soft, default, pop, rock, classic, jazz,
• Show mode: spectrum, lyric
• Lyric color: Orange, blue, red, yellow, green,
• Lyrics codec: GB2312, GBK, BIG5, UTF8
14
How to display lyrics on the TV:
1.
Users need to download the lyrics file. It is LRC format, and rename the
files and make it the same as the music name.
2.
Put them into one folder
3.
Go to the Music play page, and press OSD, and choose:
Show mode>>Lyric
4.
Users can change the lyrics colors
15
6.3 How to play Pictures
• Press the HOME button on the remote, navigate to the Picture icon and
press OK.
• To press ►II to confirm and choose the memory device to confirm and play
• To press ►►| or |◄◄ to play next or previous photos
• To change the picture/photo proportion by pressing ZOOM
• If you want to view other category like movie, Photo or eBook during the
Photo playing, please press ■ button to stop, and press or button to go to
the Menu, and choose from there.
16
While photos are playing, you may press the OSD button to see additional menu
options at the bottom of the screen.
You can change these modes following own favorite:
• Timeslot to show photo: 1s, 3s , 5s , 10s
• Switch: default, fade in fade out, Persian blinds H, Persian blinds V,
slide up, slide down, slide left, slide right, stretch up, stretch down,
stretch left, stretch right, mosaic, zoom in, zoom out, or random-switch
SYSTEM SETUP
Press the HOME button on the remote. Navigate to the SETTINGS icon and press
the OK button.
1. To press ▲ or ▼ to select item to change
2. Press OK to change the setup. Press BACK to return to previous menu
3. Scroll down past keytone to see other options
17
18
SETUP MENU OPTIONS
• Output: NTSC and PAL or HDMI resolutions
• Language: Chinese, Traditional Chinese, English, Russian, Portuguese,
Spanish, Korean, and Hungarian
• Media auto play: Select media type to autostart, Picture, Movie, Music
• Auto play gate: Auto start content when the unit is powered on.
• Auto off: Select “always on” or 5, 10, 30 minutes, or 1 hour
• Audio output: normal, SPDIF LCPM, SPDIF RAW
• Keytone: On or Off for remote button press
• Software version
• Restore default setting
Note: When Audio NORMAL is selected, this means the NTSC output will have
audio on the R/L RCAs and the HDMI will audio imbedded in the HDMI signal.
When either SPDIF is enabled, this disables the normal audio output path.
19
FAQ
Q: Why can’t I see any video on the HDMI monitor?
A: The unit may be set to output on the Composite Video output port. The MP60
does not support dual output and either HDMI or composite video output must
be selected. Press the A/V or HDMI button on the remote to change.
Q: The unit will not play my files but I can see them on the
computer?
A: The SD card may have corrupt files on it that are confusing the player.
Reformat the SD card and reload your content. (Do not use “Quick Format”)
Q: Why I can’t turn on the power after long time standing by?
A: The unit may be hibernating caused by a long time in standing by, please
disconnect and reconnect the power plug.
Also: We suggest you disconnect the power if you’re not going to use the
media player for an extended period of time.
Q: Why does the computer access the files stored on the hard disk
A: through the USB port but the media player cannot play the files?
Please check if the media files are the formats supported by the media player
(Media files format please refer to 2.2 Specifications.)
20
WARRANTY
Cable Electronics, Inc. warrants this product to be free from defects in
material and workmanship, under normal use and service, for a period of
one year from the purchase by the original purchaser. If this product is
defective or malfunctions, Cable Electronics will replace or repair this unit (at
their option) within a reasonable time. No expressed or implied warranty is
made for any defects caused by immersion or exposure to liquids, abuse,
neglect, improper operation of unit, excess wear and tear and defects
resulting from unauthorized disassembly and or modification.
3209 Wood Drive
Garland, TX 75041
Phone: (469) 429-9200
Toll free: (800) 767-6189
Fax: (469) 429-9205
www.celabs.net
930-2216-01 Rev. A
Document: MP60_manual.pdf