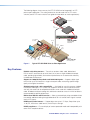
1
Installation
This section contains installation procedures for the XTP SR HDMI and wiring details. Topics
in this section include:
•
Rear Panel Connectors
•
Making Connections
The XTP SR HDMI can be placed on a tabletop or mounted in a rack or under a desk (see
Mounting on page 43).
Rear Panel Connectors
SIG
POWER
12V
1.0 A MAX
LINK
OVER XTP
RS-232
AUDIO
IR
OUTPUTS
AUDIO
L
ON
R
RELAYS
1
2
REMOTE
RS-232
RESET
OFF
I
XTP IN
LAN
Tx Rx G Tx Rx
HDMI
A
B
C
D
A
B
C
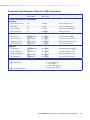
XTP input connector (page 4)
D
E
HDMI output connector (page 5)
E
−
S/PDIF
F
Tx Rx G
G
H
S/PDIF audio output connector
(page 6)
G
H
I
Relay connectors (page 6)
Remote RS-232 connector (page 6)
DC power connector (page 6)
Analog audio output connector
(page 5)
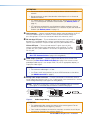
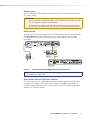
Figure 2.
A
+
F
LAN connector (page 5)
RS-232 and IR Over XTP connector
(page 5)
+ −
XTP SR HDMI Rear Panel Connectors
XTP input connector — Connect a twisted pair cable to the RJ-45 connector labeled
XTP IN on the XTP SR HDMI and the XTP output port on another XTP device to pass
all signals (see TP Cable Termination and Recommendations on page 7). This
cable carries the following signals:
•
Digital video
•
Digital audio
•
Bidirectional RS-232 and IR commands
•
Remote power
•
Ethernet communication
•
System communication
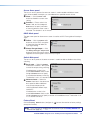
Signal LED indicator — Lights green when the XTP SR HDMI receives an active XTP
input signal from a compatible transmitter or matrix switcher.
Link LED indicator — Lights yellow when a valid XTP link is established.
XTP SR HDMI Scaling Receiver • Installation
4