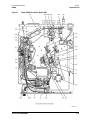
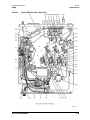
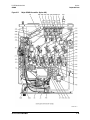
1
Keysight 85309B LO/IF Distribution Unit Use this manual with the Keysight Antenna Selection Guide, part number 5968-6759E. User’s and Service Guide Notices © Keysight Technologies 2013 - 2015 Manual Part Number No part of this manual may be reproduced in any form or by any means (including electronic storage and retrieval or translation into a foreign language) without prior agreement and written consent from Keysight Technologies as governed by United States and international copyright laws. 85309-90082 Edition May 12, 2015 Keysight Technologies 1400 Fountaingrove Parkway Santa Rosa, CA 95403 Warranty The material contained in this document is provided “as is,” and is subject to being changed, without notice, in future editions. Further, to the maximum extent permitted by applicable law, Keysight disclaims all warranties, either express or implied, with regard to this manual and any information contained herein, including but not limited to the implied warranties of merchantability and fitness for a particular purpose. Keysight shall not be liable for errors or for incidental or consequential damages in connection with the furnishing, use, or performance of this document or of any information contained herein. Should Keysight and the user have a separate written agreement with warranty terms covering the material in this document that conflict with these terms, the warranty terms in the separate agreement shall control. Technology Licenses The hardware and/or software described in this document are furnished under a license and may be used or copied only in accordance with the terms of such license. Restricted Rights Legend If software is for use in the performance of a U.S. Government prime contract or subcontract, Software is delivered and licensed as “Commercial computer software” as defined in DFAR 252.227-7014 (June 1995), or as a “commercial item” as defined in FAR 2.101(a) or as “Restricted computer software” as defined in FAR 52.227-19 (June 1987) or any equivalent agency regulation or contract clause. Use, duplication or disclosure of Software is subject to Keysight Technologies’ standard commercial license terms, and non-DOD Departments and Agencies of the U.S. Government will receive no greater than Restricted Rights as defined in FAR 52.227-19(c)(1-2) (June 1987). U.S. Government users will receive no greater than Limited Rights as defined in FAR 52.227-14 (June 1987) or DFAR 252.227-7015 (b)(2) (November 1995), as applicable in any technical data. Safety Notices CAU TI O N A CAUTION notice denotes a hazard. It calls attention to an operating procedure, practice, or the like that, if not correctly performed or adhered to, could result in damage to the product or loss of important data. Do not proceed beyond a CAUTION notice until the indicated conditions are fully understood and met. WA RN ING A WARNING notice denotes a hazard. It calls attention to an operating procedure, practice, or the like that, if not correctly performed or adhered to, could result in personal injury or death. Do not proceed beyond a WARNING notice until the indicated conditions are fully understood and met. Printing Copies of Documentation from the Web To print copies of documentation from the Web, download the PDF file from the Keysight web site: • Go to http://www.keysight.com. • Enter the product model number (Ex: 85309B) in the Search function. • Click Search. • Click the Manuals hyperlink. • Click the hyperlink title for the document you want to print - this downloads the PDF • Print the document after the PDF has fully downloaded. Definitions • Specifications describe the performance of parameters covered by the product warranty (temperature –0 to 50 C, unless otherwise noted.) • Typical describes additional product performance information that is not covered by the product warranty. It is performance beyond specification that 80% of the units exhibit with a 95% confidence level over the temperature range 20 to 30 C. Typical performance does not include measurement uncertainty. • Nominal values indicate expected performance or describe product performance that is useful in the application of the product, but is not covered by the product warranty. • Characteristic Performance describes performance parameter that the product is expected to meet before it leaves the factory, but is not verified in the field and is not covered by the product warranty. A characteristic includes the same guard bands as a specification. 85309B Overview The 85309B LO/IF Distribution Unit is a broadband, distributed frequency converter that utilizes fundamental mixing to provide the performance for antenna test systems. The 85309B, together with mixers in the antenna test configuration (not supplied), down convert a microwave signal to an IF signal. This IF signal is input directly to the PNA digitizer (via either front panel jumpers or a rear panel connector), bypassing the PNA’s RF conversion stage, for increased measurement sensitivity. The 85309B LO/IF Distribution Unit contains LO signal amplifiers, which Service Guide 85309-90082 amplify LO drive power through RF cables to the mixers in the antenna test configuration. The high output power allows the mixers to be located more than seven meters from the 85309B. There are also IF amplifiers located in the 85309B, which serve as a preamplifier for the receiver, reducing the overall system noise figure significantly. The 85309B LO/IF Distribution Unit can be installed in a variety of configurations for antenna testing. To learn about the various system configurations, refer to the “Configuration Examples” section in Chapter 1 of this document, and the online document Keysight Antenna Test Selection Guide, part number 5968-6759E. See “Printing Copies of Documentation from the Web” on the previous page. 85309B Options 85309B Standard Provides one test channel and one reference channel. 85309B Option 001 - One Additional Test Channel Adds one additional test channel. Provides a total of two test channels and one reference channel. 85309B Option 002 - Two Additional Test Channels Adds two additional test channels. Provides a total of three test channels and one reference channel. 85309B Option 400 - Low and High Frequency Bands, One Test Channel 0.1 – 1 GHz low frequency band; 0.3 – 18 GHz high frequency band. Provides a total of one test channel and one reference channel. 85309B Option 401 - Low and High Frequency Bands, Two Test Channels 0.1 – 1 GHz low frequency band; 0.3 – 18 GHz high frequency band. Adds one additional test channel. Provides a total of two test channels and one reference channel. 85309B Option 402 - Low and High Frequency Bands, Three Test Channels 0.1 – 1 GHz low frequency band; 0.3 – 18 GHz high frequency band. Adds two additional test channels. Provides a total of three test channels and one reference channel. Option 1CM - Rack Mount Kit Without Handles Rack mount kit without handles. To obtain this item after receiving the 85309B, order part number 5063-9214. Service Guide 85309-90082 Option 1CP - Rack Mount Kit With Handles Rack mount kit with handles. To obtain this item after receiving the 85309B, order part number 5063-9221. Service Guide 85309-90082 Contents 1 Getting Started STEP 1. Check the Shipment . . . . . . . . . . . . . . . . . . . . . . . . . . . . . . . . . . . . . . . . . . . . . . . . . . . . . . . . . . . . . . . . . . . . . 2-2 STEP 2. Meet Electrical and Environmental Requirements . . . . . . . . . . . . . . . . . . . . . . . . . . . . . . . . . . . . . . . . . . . 2-3 Step 3. Connect the 85309B with Other System Components . . . . . . . . . . . . . . . . . . . . . . . . . . . . . . . . . . . . . . . . . . 2-4 Compatible Network Analyzers . . . . . . . . . . . . . . . . . . . . . . . . . . . . . . . . . . . . . . . . . . . . . . . . . . . . . . . . . . . . . . . . . . 2-4 Configuration Examples . . . . . . . . . . . . . . . . . . . . . . . . . . . . . . . . . . . . . . . . . . . . . . . . . . . . . . . . . . . . . . . . . . . . . . . . 2-5 Step 4. (Option 40x Only): Set the 85309B Band Selection . . . . . . . . . . . . . . . . . . . . . . . . . . . . . . . . . . . . . . . . . . . . . 2-8 Step 5: Power On the 85309B . . . . . . . . . . . . . . . . . . . . . . . . . . . . . . . . . . . . . . . . . . . . . . . . . . . . . . . . . . . . . . . . . . . . . 2-9 Step 6. Adjust the LO Power . . . . . . . . . . . . . . . . . . . . . . . . . . . . . . . . . . . . . . . . . . . . . . . . . . . . . . . . . . . . . . . . . . . . . 2-10 Procedure . . . . . . . . . . . . . . . . . . . . . . . . . . . . . . . . . . . . . . . . . . . . . . . . . . . . . . . . . . . . . . . . . . . . . . . . . . . . . . . . . . . 2-10 STEP 7. (Optional) Run the 85309B Operator’s Check . . . . . . . . . . . . . . . . . . . . . . . . . . . . . . . . . . . . . . . . . . . . . . . 2-11 Getting Help with Your 85309B . . . . . . . . . . . . . . . . . . . . . . . . . . . . . . . . . . . . . . . . . . . . . . . . . . . . . . . . . . . . . . . . . . . 2-12 Keysight Antenna Test Selection Guide . . . . . . . . . . . . . . . . . . . . . . . . . . . . . . . . . . . . . . . . . . . . . . . . . . . . . . . . . . 2-12 Contacting Keysight . . . . . . . . . . . . . . . . . . . . . . . . . . . . . . . . . . . . . . . . . . . . . . . . . . . . . . . . . . . . . . . . . . . . . . . . . . 2-12 Shipping Your Instrument to Keysight for Service or Repair . . . . . . . . . . . . . . . . . . . . . . . . . . . . . . . . . . . . . . . . . 2-12 2 Operating Information Electrostatic Discharge Protection . . . . . . . . . . . . . . . . . . . . . . . . . . . . . . . . . . . . . . . . . . . . . . . . . . . . . . . . . . . . . . . . . 3-2 85309B Front Panel Features. . . . . . . . . . . . . . . . . . . . . . . . . . . . . . . . . . . . . . . . . . . . . . . . . . . . . . . . . . . . . . . . . . . . . . 3-3 DETECTOR VOLTAGE Display . . . . . . . . . . . . . . . . . . . . . . . . . . . . . . . . . . . . . . . . . . . . . . . . . . . . . . . . . . . . . . . . . . . 3-3 LO POWER ADJUST . . . . . . . . . . . . . . . . . . . . . . . . . . . . . . . . . . . . . . . . . . . . . . . . . . . . . . . . . . . . . . . . . . . . . . . . . . . 3-3 LO POWER OUT OF RANGE . . . . . . . . . . . . . . . . . . . . . . . . . . . . . . . . . . . . . . . . . . . . . . . . . . . . . . . . . . . . . . . . . . . . . 3-4 BAND SELECTION (Option 40x Only) . . . . . . . . . . . . . . . . . . . . . . . . . . . . . . . . . . . . . . . . . . . . . . . . . . . . . . . . . . . . . 3-4 85309B Rear Panel Features . . . . . . . . . . . . . . . . . . . . . . . . . . . . . . . . . . . . . . . . . . . . . . . . . . . . . . . . . . . . . . . . . . . . . . 3-5 Ref Mixer Connector Group . . . . . . . . . . . . . . . . . . . . . . . . . . . . . . . . . . . . . . . . . . . . . . . . . . . . . . . . . . . . . . . . . . . . . 3-5 Test Mixers Connector Group . . . . . . . . . . . . . . . . . . . . . . . . . . . . . . . . . . . . . . . . . . . . . . . . . . . . . . . . . . . . . . . . . . . 3-6 LO Source Connector Group . . . . . . . . . . . . . . . . . . . . . . . . . . . . . . . . . . . . . . . . . . . . . . . . . . . . . . . . . . . . . . . . . . . . 3-6 Receiver Connector Group . . . . . . . . . . . . . . . . . . . . . . . . . . . . . . . . . . . . . . . . . . . . . . . . . . . . . . . . . . . . . . . . . . . . . . 3-6 Available Fuses . . . . . . . . . . . . . . . . . . . . . . . . . . . . . . . . . . . . . . . . . . . . . . . . . . . . . . . . . . . . . . . . . . . . . . . . . . . . . . . 3-7 85309B Block Diagrams . . . . . . . . . . . . . . . . . . . . . . . . . . . . . . . . . . . . . . . . . . . . . . . . . . . . . . . . . . . . . . . . . . . . . . . . . . 3-8 Instrument Block Diagrams Sheet 1. . . . . . . . . . . . . . . . . . . . . . . . . . . . . . . . . . . . . . . . . . . . . . . . . . . . . . . . . . . . . . 3-9 Instrument Block Diagrams Sheet 2. . . . . . . . . . . . . . . . . . . . . . . . . . . . . . . . . . . . . . . . . . . . . . . . . . . . . . . . . . . . . 3-10 Cable Length Limits. . . . . . . . . . . . . . . . . . . . . . . . . . . . . . . . . . . . . . . . . . . . . . . . . . . . . . . . . . . . . . . . . . . . . . . . . . . . . 3-11 Performing the Operator’s Check . . . . . . . . . . . . . . . . . . . . . . . . . . . . . . . . . . . . . . . . . . . . . . . . . . . . . . . . . . . . . . . . . 3-14 Function. . . . . . . . . . . . . . . . . . . . . . . . . . . . . . . . . . . . . . . . . . . . . . . . . . . . . . . . . . . . . . . . . . . . . . . . . . . . . . . . . . . . . 3-14 Description . . . . . . . . . . . . . . . . . . . . . . . . . . . . . . . . . . . . . . . . . . . . . . . . . . . . . . . . . . . . . . . . . . . . . . . . . . . . . . . . . . 3-14 Equipment Required . . . . . . . . . . . . . . . . . . . . . . . . . . . . . . . . . . . . . . . . . . . . . . . . . . . . . . . . . . . . . . . . . . . . . . . . . . 3-14 LO Power Output Test . . . . . . . . . . . . . . . . . . . . . . . . . . . . . . . . . . . . . . . . . . . . . . . . . . . . . . . . . . . . . . . . . . . . . . . . . 3-15 Reference IF and Test IF . . . . . . . . . . . . . . . . . . . . . . . . . . . . . . . . . . . . . . . . . . . . . . . . . . . . . . . . . . . . . . . . . . . . . . . 3-18 IF the Operator’s Check Fails . . . . . . . . . . . . . . . . . . . . . . . . . . . . . . . . . . . . . . . . . . . . . . . . . . . . . . . . . . . . . . . . . . . 3-20 3 General Information General Specifications . . . . . . . . . . . . . . . . . . . . . . . . . . . . . . . . . . . . . . . . . . . . . . . . . . . . . . . . . . . . . . . . . . . . . . . . . . . 1-2 85309B Characteristic Performance . . . . . . . . . . . . . . . . . . . . . . . . . . . . . . . . . . . . . . . . . . . . . . . . . . . . . . . . . . . . . . . . 1-4 General Safety Considerations . . . . . . . . . . . . . . . . . . . . . . . . . . . . . . . . . . . . . . . . . . . . . . . . . . . . . . . . . . . . . . . . . . . . 1-5 Introduction . . . . . . . . . . . . . . . . . . . . . . . . . . . . . . . . . . . . . . . . . . . . . . . . . . . . . . . . . . . . . . . . . . . . . . . . . . . . . . . . . . 1-5 Cleaning the Instrument . . . . . . . . . . . . . . . . . . . . . . . . . . . . . . . . . . . . . . . . . . . . . . . . . . . . . . . . . . . . . . . . . . . . . . . . 1-5 Connector Care and Cleaning . . . . . . . . . . . . . . . . . . . . . . . . . . . . . . . . . . . . . . . . . . . . . . . . . . . . . . . . . . . . . . . . . . . 1-5 Service Guide 85309-90082 Contents-1 Contents Declaration of Conformity. . . . . . . . . . . . . . . . . . . . . . . . . . . . . . . . . . . . . . . . . . . . . . . . . . . . . . . . . . . . . . . . . . . . . . . 1-5 Statement of Compliance . . . . . . . . . . . . . . . . . . . . . . . . . . . . . . . . . . . . . . . . . . . . . . . . . . . . . . . . . . . . . . . . . . . . . . . 1-6 General Safety Considerations . . . . . . . . . . . . . . . . . . . . . . . . . . . . . . . . . . . . . . . . . . . . . . . . . . . . . . . . . . . . . . . . . . 1-6 Regulatory Information . . . . . . . . . . . . . . . . . . . . . . . . . . . . . . . . . . . . . . . . . . . . . . . . . . . . . . . . . . . . . . . . . . . . . . . . . . . 1-8 Instrument Markings. . . . . . . . . . . . . . . . . . . . . . . . . . . . . . . . . . . . . . . . . . . . . . . . . . . . . . . . . . . . . . . . . . . . . . . . . . . 1-8 4 Service Replaceable Parts . . . . . . . . . . . . . . . . . . . . . . . . . . . . . . . . . . . . . . . . . . . . . . . . . . . . . . . . . . . . . . . . . . . . . . . . . . . . . . . 2-2 Introduction . . . . . . . . . . . . . . . . . . . . . . . . . . . . . . . . . . . . . . . . . . . . . . . . . . . . . . . . . . . . . . . . . . . . . . . . . . . . . . . . . . 2-2 Ordering Information . . . . . . . . . . . . . . . . . . . . . . . . . . . . . . . . . . . . . . . . . . . . . . . . . . . . . . . . . . . . . . . . . . . . . . . . . . . 2-2 Replaceable Parts Listings . . . . . . . . . . . . . . . . . . . . . . . . . . . . . . . . . . . . . . . . . . . . . . . . . . . . . . . . . . . . . . . . . . . . . . 2-4 Contents-2 Service Guide 85309-90082 1 Getting Started Service Guide 85309-90082 1-1 Getting Started STEP 1. Check the Shipment LO/IF Distribution Unit 85309B STEP 1. Check the Shipment 1. Unpack the contents of the shipping container. Keep the packaging material in case the analyzer needs to be returned to the factory. 2. Carefully inspect the 85309B to make sure that it was not damaged during shipment. If damaged, refer to “Contacting Keysight” on page 1-12. 3. Use the Contents List in the shipping container to verify the completeness of your shipment. If not complete, refer to “Contacting Keysight” on page 1-12. 1-2 Service Guide 85309-90082 LO/IF Distribution Unit 85309B Getting Started STEP 2. Meet Electrical and Environmental Requirements STEP 2. Meet Electrical and Environmental Requirements CAUTION This instrument has autoranging line voltage input. Be sure the supply voltage is within the specified range. 1. Ensure the available AC power source meets the requirements found in “General Specifications” on page 3-2. 2. Ensure the operating environment meets the requirements found in “General Specifications” on page 3-2. 3. Verify that the AC power cable is not damaged, and that the power-source outlet provides a protective earth contact. CAUTION Always use the three-prong AC power cord supplied with this product. Failure to ensure adequate earth grounding by not using this cord may cause personal injury or product damage. 4. Plug the unit into an appropriate AC power source. Service Guide 85309-90082 1-3 Getting Started Step 3. Connect the 85309B with Other System Components LO/IF Distribution Unit 85309B Step 3. Connect the 85309B with Other System Components Your antenna test system configuration includes the 85309B and a PNA network analyzer. The need for other components is determined by the type of measurements required. To learn about the various system configurations, refer to the Keysight Antenna Test Selection Guide, part number 5968-6759E. See “Printing Copies of Documentation from the Web” in the first section of this manual. CAUTION The 85309B should be turned off when connecting it with other system components. Compatible Network Analyzers The following network analyzers are compatible with the 85309B. Family Receiver Firmware Required Options E836xC All revisions H11 N522xA All revisions 020 N524xA All revisions 020 N5264A All revisions None PNA PNA-X 1-4 Service Guide 85309-90082 LO/IF Distribution Unit 85309B Getting Started Step 3. Connect the 85309B with Other System Components Configuration Examples Figure 1-1 Simplified Configuration Block Diagram Service Guide 85309-90082 1-5 Getting Started Step 3. Connect the 85309B with Other System Components Figure 1-2 1-6 LO/IF Distribution Unit 85309B Typical Far-Field Configuration Service Guide 85309-90082 LO/IF Distribution Unit 85309B Figure 1-3 Getting Started Step 3. Connect the 85309B with Other System Components Typical PNA-X Compact Range Configuration Service Guide 85309-90082 1-7 Getting Started Step 4. (Option 40x Only): Set the 85309B Band Selection LO/IF Distribution Unit 85309B Step 4. (Option 40x Only): Set the 85309B Band Selection The Band Selection knob on the front panel of the 85309B Option 400/401/402 models allows the user to switch between the low band, high band, and external selections. For more information, refer to “85309B Front Panel Features” on page 2-3. 1-8 Service Guide 85309-90082 LO/IF Distribution Unit 85309B Getting Started Step 5: Power On the 85309B Step 5: Power On the 85309B Power on the 85309B by pressing the front panel On/Off switch. If the 85309B will not power on, make sure the instrument is plugged into an operating AC power outlet, and check the fuse. Service Guide 85309-90082 1-9 Getting Started Step 6. Adjust the LO Power LO/IF Distribution Unit 85309B Step 6. Adjust the LO Power The procedure below is applicable to all 85309B models, and assumes the user has basic knowledge on the antenna test system. To learn about the various antenna test systems, refer to the Keysight Antenna Test Selection Guide, part number 5968-6759E. See “Printing Copies of Documentation from the Web” in the first section of this manual. The front panel of the 85309B has a DETECTOR VOLTAGE window, an LO POWER ADJUST mechanism, and an LO POWER OUT OF RANGE LED. Refer to “85309B Front Panel Features” on page 2-3. The value shown in the DETECTOR VOLTAGE window is the voltage coming from a power detector in the reference mixer. The voltage is directly proportional to the amount of LO power arriving at the mixer. A label on the reference mixer shows the precise voltage which corresponds to the power at the mixer's LO input. In the procedure below, you adjust the LO POWER ADJUST so the DETECTOR VOLTAGE display matches the voltage on the mixer label. Once set, the ALC loop will maintain the desired LO power level regardless of LO frequency. Repeat the procedure below only if you change one of the mixer modules or the LO source. Find the detector voltage value written on the reference mixer. Record the value in Table 1-1 below. Table 1-1 Value Indicated on the Reference Mixer Parameter Value mV (typically –40 to –80): Procedure 1. Set the LO source power to 6 dBm. 2. Observe the voltage displayed in the 85309B’s front panel DETECTOR VOLTAGE window. 3. Adjust the 85309B’s LO POWER ADJUST mechanism until the voltage displayed in the window is equal to the voltage written in Table 1-1 (also shown on the reference mixer label). If the LO POWER OUT OF RANGE LED is lit, there is an unleveled ALC state. To fix the problem, refer to “LO POWER OUT OF RANGE” on page 2-4. Note that due to the long LO cable length (the RF cable between the LO source and the 85309B) you must compensate for cable loss by increasing the LO source power. NOTE 1-10 The voltage displayed in the DETECTOR VOLTAGE window varies with frequency. This is normal. The LO POWER OUT OF RANGE LED is lit only if the system's automatic leveling loop cannot level the voltage sufficiently. This can happen if the LO source is disconnected, or if more power is needed than the 85309B unit can supply for a given frequency range. Service Guide 85309-90082 LO/IF Distribution Unit 85309B Getting Started STEP 7. (Optional) Run the 85309B Operator’s Check STEP 7. (Optional) Run the 85309B Operator’s Check The operator’s check should be performed when you first receive your 85309B, and any time you wish to have confidence that it is working properly. The operator’s check does not verify performance to specifications, but should give you a high degree of confidence that the 85309B is performing properly. For instructions, refer to “Performing the Operator’s Check” on page 2-14. Service Guide 85309-90082 1-11 Getting Started Getting Help with Your 85309B LO/IF Distribution Unit 85309B Getting Help with Your 85309B Keysight Antenna Test Selection Guide Use the Keysight Antenna Test Selection Guide (part number 5968-6759E) to: • Learn about interface requirements between system components. • Understand issues related to selecting the equipment required to make antenna measurements. For information on how to view and print this document online, see “Printing Copies of Documentation from the Web” in the first section of this manual. Contacting Keysight Assistance with test and measurements needs and information or finding a local Keysight office are available on the Web at: http://www.keysight.com/find/assist If you do not have access to the Internet, please contact your Keysight field engineer. NOTE In any correspondence or telephone conversation, refer to the Keysight product by its model number and full serial number. With this information, the Keysight representative can determine whether your product is still within its warranty period. Shipping Your Instrument to Keysight for Service or Repair If you wish to send your instrument to Keysight Technologies for service or repair: • Include a complete description of the service requested or of the failure and a description of any failed test and any error message. • Ship the instrument using the original or comparable antistatic packaging materials. • Contact Keysight for instructions on where to ship your instrument. 1-12 Service Guide 85309-90082 2 Operating Information Service Guide 85309-90082 2-1 Operating Information Electrostatic Discharge Protection LO/IF Distribution Unit 85309B Electrostatic Discharge Protection Protection against electrostatic discharge (ESD) is essential while removing assemblies from or connecting cables to the 85309B. Static electricity can build up on your body and can easily damage sensitive internal circuit elements when discharged. Static discharges too small to be felt can cause permanent damage. To prevent damage to the instrument: • always have a grounded, conductive table mat in front of your test equipment. • always wear a grounded wrist strap, connected to a grounded conductive table mat, having a 1 M resistor in series with it, when handling components and assemblies or when making connections. • always wear a heel strap when working in an area with a conductive floor. If you are uncertain about the conductivity of your floor, wear a heel strap. • always ground yourself before you clean, inspect, or make a connection to a static-sensitive device or test port. You can, for example, grasp the grounded outer shell of the test port or cable connector briefly. • always ground the center conductor of a test cable before making a connection to any static-sensitive device. This can be done as follows: 1. Connect a short (from your calibration kit) to one end of the cable to short the center conductor to the outer conductor. 2. While wearing a grounded wrist strap, grasp the outer shell of the cable connector. 3. Connect the other end of the cable to the test port and remove the short from the cable. Figure 2-1 shows a typical ESD protection setup using a grounded mat and wrist strap. Refer to Chapter 6 for part numbers. Figure 2-1 2-2 ESD Protection Setup Service Guide 85309-90082 LO/IF Distribution Unit 85309B Operating Information 85309B Front Panel Features 85309B Front Panel Features Figure 2-2 85309B Standard/Option 001/002 Front Panel Figure 2-3 85309B Option 400/401/402 Front Panel DETECTOR VOLTAGE Display The reference mixer has a detector that measures the amount of LO power coming into its LO input. This voltage is sent to the 85309B where it is displayed in the DETECTOR VOLTAGE display. The voltage is directly proportional to the amount of LO power. This display allows you to monitor the amount of LO power going to the reference mixer. It is assumed that the cable lengths to the reference and test mixers are the same. This ensures that the LO power going to the test mixer is the same as that going to the reference mixer. LO POWER ADJUST This adjustment controls the amount of LO power going to the mixers. The 85309B and LO source must provide enough power to match the needs of your specific mixers and to compensate for loss through the LO cable (the cable that goes from the LO source to the 85309B). “Step 6. Adjust the LO Power” on page 1-10 explains how to select the proper amount of power. Service Guide 85309-90082 2-3 Operating Information 85309B Front Panel Features LO/IF Distribution Unit 85309B LO POWER OUT OF RANGE When lit, this LED indicates that the LO source is not supplying the amount of LO power requested by the LO POWER ADJUST control. The LO POWER OUT OF RANGE circuit compares the LO POWER ADJUST setting with the voltage coming back from the reference detector. The amount of expected detector voltage varies depending on the LO POWER ADJUST setting. Normally the detector voltage is within the expected range, and the LED is not lit. However, if anything interrupts the ALC loop, or a relatively low detector voltage is measured, the LED is lit. (The circuit activates the light if the detector voltage is not within 25% of the expected voltage.) If the LED is lit, the cause may be one or more of the following: • The LO source is not set to output a sufficient amount of power. To remedy this, increase power output (if possible). Make sure your LO source can generate sufficient power at the maximum LO frequency. • The LO POWER ADJUST is not set properly on the 85309B. Refer to “Step 6. Adjust the LO Power” on page 1-10 for instructions. • The LO source's RF OUTPUT is not connected to the 85309B, or the LO source is turned off. This can also happen if the LO source is on, but its RF output is turned off. • The LO source is not able to supply the requested amount of power in the measurement frequency range. Make sure your LO source is specified to produce enough power in the desired frequency range. If the LO cannot produce enough power at high frequencies, the LO POWER OUT OF RANGE LED will be lit during the high-frequency portion of the measurement. During this time LO power will not be correct. • The reference mixer is not connected to the REFERENCE LO OUTPUT of the 85309B (in other words, the reference mixer is not getting sufficient LO power). • The reference mixer's Detector Voltage output is not connected to the 85309B. • There is a failure of the 85309B's ALC circuitry. An ALC failure will usually cause the LED to be lit permanently, even though all equipment is connected properly. BAND SELECTION (Option 40x Only) The Band Selection knob on the front panel of the 85309B Option 400/401/402 models allows the user to switch between the low band, high band, and external selections. The Band Selection switch positions are: • LOW • HIGH 0.3 GHz to 18 GHz operating frequency. • EXT Enables external control of band selection via rear panel J15 HIGH/LOW BAND SELECT port. TTL high (+5 V) selects HIGH band; TTL low (0 V) selects LOW band. NOTE 0.1 GHz to 1 GHz operating frequency. Use Keysight 85320A/B Option H20 external mixer modules to utilize the 0.1 GHz to 3 GHz frequency range of operation. If the green LED above the Band Selection knob is lit, the HIGH band is selected. If the LED is not lit, the LOW band is selected. 2-4 Service Guide 85309-90082 LO/IF Distribution Unit 85309B Operating Information 85309B Rear Panel Features 85309B Rear Panel Features CAUTION The 85309B contains static sensitive devices. Never touch the center conductor of any connector. When cleaning connectors, wear a grounded wrist strap. Figure 2-4 shows 85309B Option 402 rear panel features, including two additional test channels and an active J15 “High/Low Band Select” port. The rear panel on your 85309B model may not include all of the ports shown. Note that the connectors are arranged in the following groups: • Ref Mixer • Test Mixers • LO Source • Receiver • J7 and J8 are separate connectors that function as jumpers for the IF path or as ports for non-diplexed test mixers of the LO/IF unit. • (Option 40x only) J15 is a separate connector that allows external control of the HIGH/LOW BAND SELECT feature. Figure 2-4 85309B Rear Panel Features (Option 402) Ref Mixer Connector Group The three connectors in this group, J2 REFERENCE LO OUT, J4 REFERENCE IF IN, and J5 REFERENCE DET IN, are connected to the reference mixer. Besides the RF, LO, and IF ports, the reference mixer has an additional DETECTOR output. J2 REFERENCE LO OUT. This port sends the local oscillator signal to the reference mixer. J4 REFERENCE IF IN. This port receives the IF from the reference mixer. The 85309B amplifies this signal and sends it to the receiver using the J10 REFERENCE IF OUT connector. J5 REFERENCE DET IN. A power detector in the reference mixer measures incoming LO power and outputs a proportional voltage. This voltage enters the 85309B through this connector, and is used to level the LO Service Guide 85309-90082 2-5 Operating Information 85309B Rear Panel Features LO/IF Distribution Unit 85309B power. The allowable input voltage range for this connector is 0 to -200 mV. Test Mixers Connector Group The three connectors in this group, J3 TEST 1 LO/IF (standard), J11 TEST 2 LO/IF (option 001 or 401), and J13 TEST 3 LO/IF (option 002 or 402), are connected to the test mixers. A test mixer only requires one connection. A diplexer allows the LO signal (which goes to the test mixer) and the IF signal (which comes back from the test mixer) to travel over the same physical cable. This allows both signals to go through a single-channel rotary joint. J3 TEST 1 LO/IF (standard). This port sends the local oscillator signal to the test mixer, and receives the IF signal over the same connection. A diplexer inside the test mixer and the 85309B makes this possible. The IF signal from the test mixer is amplified and sent to the receiver through J9 TEST 1 IF OUT. J11 TEST 2 LO/IF (option 001). This port operates the same as the TEST 1 LO/IF port. Option 001 or 401 adds a second test channel. The IF signal from a second test mixer is amplified and sent to the receiver through J12 TEST 2 IF OUT. J13 TEST 3 LO/IF (option 002). This port operates the same as the TEST 1 LO/IF and TEST 2 LO/IF ports. Options 002 or 402 adds a third test channel. The IF signal from a third test mixer is amplified and sent to the receiver through J14 TEST 3 IF OUT. LO Source Connector Group The two connectors in this group, J1 LO INPUT and J6 POS Z BLANK, are connected to the LO source. J1 LO INPUT. Receives the local oscillator signal from the LO source. The 85309B distributes this to the test and reference mixers. J6 POS Z BLANK. The LO source sends out the POS Z BLANK (TTL logic) signal during sweep retrace. POS Z BLANK is monitored by the 85309B through this connector. The 85309B monitors this signal, and lowers the gain in the automatic leveling control circuit during retrace. This keeps the gain of the ALC from peaking during known power drops. Receiver Connector Group The four connectors in this group, J9 TEST 1 IF OUT (standard), J1O REFERENCE IF OUT, J12 TEST 2 IF OUT (option 001 or 401), and J14 TEST 3 IF OUT (option 002 or 402), output the test and reference IF signals to the receiver. J9 TEST 1 IF OUT (standard). This connector sends the test mixer's IF signal to the receiver. Generally, this signal is connected, through the BNC-to-RECEIVER ADAPTER cable, to the receiver b2 input. J1O REFERENCE IF OUT. This connector sends the reference mixer's IF signal to the receiver. Generally, this signal is connected, through the BNC-to-RECEIVER ADAPTER cable, to a1 on the receiver. J12 TEST 2 IF OUT (option 001 or 401). This connector sends the test mixer's IF signal to the receiver. Generally, this signal is connected, through the BNC-to-RECEIVER ADAPTER cable, to the receiver b1 input. J14 TEST 3 IF OUT (option 002 or 402). This connector sends the test mixer's IF signal to the receiver. Generally, this signal is connected, through the BNC-to-RECEIVER ADAPTER cable, to the receiver a2 input. 2-6 Service Guide 85309-90082 LO/IF Distribution Unit 85309B Operating Information 85309B Rear Panel Features J7 and J8 (Using Non-Diplexed Mixers). J7 and J8 allow you to use a non-diplexed test mixer (a mixer that has separate connections for the LO and IF signal). This is done by removing the Type-N jumper that normally connects J7 and J8. With the jumper removed, make the following connections to your test mixer: Table 2-1 Connections for Non-Diplexed Mixers 85309B Connector Connection J3 TEST LO/IF Mixer LO INPUT J7 TEST IF IN Mixer IF OUTPUT J8 DIPLEXER IF OUT 50-ohm Loada a. It is recommended that you place a 50-ohm load on this connector. If you are using a test mixer that uses a single LO/IF connection and a diplexer, always place the supplied Type-N jumper between J7 and J8. J15 HIGH/LOW BAND SELECT (option 40x). Allows external control of the HIGH/LOW BAND SELECT feature when the front panel BAND SELECTION knob is in the EXT position. See “BAND SELECTION (Option 40x Only)” on page 2-4. TTL high (+5 V) selects HIGH band; TTL low (0 V) selects LOW band. Available Fuses • Fuse (5 A/250V, 2110-0709) U.L. listed and CSA certified WARNING For continued protection against fire hazard replace line fuse only with same type and rating: Fuse 5A/250V, Part Number 2110-0709. The use of other fuses or material is prohibited. Figure 2-5 Line Fuse Service Guide 85309-90082 2-7 Operating Information 85309B Block Diagrams LO/IF Distribution Unit 85309B 85309B Block Diagrams Block diagrams are located on the following two pages. 2-8 Service Guide 85309-90082 LO INPUT J1 W24 FL1 85309-61607 DPDT A22 POWER SUPPLY +15, +15 -15V +24V W10 W21 W52 B1 FAN W12 F5 J15 15V F3 5V F1 F2 7 J6 -15V W54 Regulator 15V to 12V Regulator 24V to 20V 15V 15V -15V F4 24V J7 15V DC-DC 15V to 5V J16 J12 A10 0955-0791 85309-60135 7 5087-7768 -15V 5V J1 W17 J4 To J3, J4, J5, J17, J18 J18 J17 J3 DC-DC 15V to 10V To J3,J4,J17,J18 J5 J8 A14 A2 REG/ALC BOARD To J8, J9, J13, J14 To J3,J4,J5,J8,J9,J11,J13 ,J14,J15,J17,J18 10V Reg Ref 15V A17 ALC DISPLAY BOARD A1 85309-80026 Regulator -15V to -10V A14 A13-J1 W55 A12-J1 W18 A24-J1 W56 A27-J1 W19 A17 W20 J4 W3 85309-60134 J9 A15 REF CHAN IF INPUT J13 J14 J11 ALC J10 A18 85309-61601 LO POWER ADJUST A26 85309B Block Diagram Rev 10 Standard/Opt 001/Opt 002 A29 85309-61602 A20 LED LO POWER OUT OF RANGE 0955-2245 A11 J2 J1 LOAD AT6 W16 W15 LOAD AT14 W5 W4 J6 POS Z BLANK J5 REF CHAN DET IN AT4 13dB Slope Pad 33340-67007 AT3 13dB Slope Pad 33340-67007 W14 * remove load on A11 OPT 002 5087-7755 A13 5087-7755 A12 AT2 13dB Slope Pad 33340-67007 W35 AT1 13dB Slope Pad 33340-67007 * remove load on A11 OPT 001 5087-7755 A27 W30 W26 W22 5087-7755 A24 AT15 W7 W58 A15 W23 W8 85110-80015 A43 A16 Diplexer 5076-6336 LOAD A19 Diplexer 5076-6336 W28 W27 85309-80026 J9 W37 85309-80026 A26 W59 85309-80026 A29 W32 TEST 1 IF OUT TEST IF IN 85110-80015 85110-80015 A45 TEST 1 LO / IF REF CHAN LO OUT REF CHAN IF OUT DIPLEXER IF OUT A44 A25 Diplexer 5076-6336 W33 A28 Diplexer 5076-6336 W38 W11 J7 J8 J3 J2 J10 W39 W34 J14 J13 TEST 3 IF OUT TEST 3 LO / IF J12 J11 TEST 2 IF OUT TEST 2 LO / IF CPLD programming J6 + W24 J4 Remote APPL 85309-61607 FL1 33311-60069 SW3 + W21 W52 B1 FAN Switch Control F5 J12 J15 15V F4 24V J7 15V F3 F1 F2 7 J6 -15V W54 W42 Regulator 15V to 12V J1 5V -15V W17 J4 To J3, J4, J5, J17, J18 J18 DC-DC 15V to 10V LOAD LOAD J17 J3 To J3,J4,J17,J18 J5 J8 AT11 1dB W3 85309-60134 J9 A40 A39 A42 J13 85309-61601 J14 1 4 A37 A41 ALC J11 0955-2249 2 J10 A18 AT8 1dB LO POWER ADJUST A46 0955-2249 W48 0955-2249 A38 A36 0955-2249 * remove load on A32 * remove load on A32 W50 AT9 1dB AT7 1dB OPT 401 OPT 402 A2 REG/ALC BOARD To J8, J9, J13, J14 To J3,J4,J5,J8,J9,J11,J13 ,J14,J15,J17,J18 10V Reg Ref 15V Regulator -15V to -10V 85309-61603 A21 HIGH BAND LED HIGH LOW EXT 5087-7768 85309-60135 7 ALC A17 ALC 6 AT12 AT13 85309-80022 A32 W45 W44 DISPLAY BOARD A1 AT10 10dB SW2, 85309-61609 W2 W41 Regulator 24V to 20V 15V 15V -15V A31 85309-80025 A30 85309-80024 5V J9 J7 W25 J5 DC-DC 15V to 5V J16 15V, -15V W53 SW5 SW6 J12 J10 J11 J14 J13 5V J3 J8 W57 J15 SELECT HI/ LOW POWER SUPPLY +15, +15 -15V +24V DPDT A22 A5 DC PWR DIST J2 J1 6 W1 85309-60136 OPT H40 (LO Band) A31 A30 J1 SW3 LO INPUT SW4 W43 A13-J1 W55 SW7 85309-80026 A12-J1 W18 A14 A24-J1 W56 A10 A27-J1 W19 0955-0791 A14 W12 A17 W20 J4 A15 REF CHAN IF INPUT A26 85309B Block Diagram Rev 10 Option 400/401/402 A29 85309-61602 A20 0955-2245 A11 LED LO POWER OUT OF RANGE 3 J2 J1 LOAD AT6 W16 W15 LOAD AT14 W4 W5 J6 POS Z BLANK J5 REF CHAN DET IN AT4 13dB Slope Pad 33340-67007 AT3 13dB Slope Pad 33340-67007 W14 * remove load on A11 OPT 402 5087-7755 A13 2 5087-7755 A12 1 AT1 13dB Slope Pad 33340-67007 33311-60069 SW5 33311-60069 AT2 13dB Slope Pad 33340-67007 * remove load on A11 OPT 401 W6 W9 SW4 W35 4 5087-7755 A27 W30 W47 W40 SW6 A15 85309-80026 W51 33311-60069 W58 W8 W7 W23 33311-60069 SW7 W31 85110-80015 A43 A16 Diplexer 5076-6336 LOAD A19 Diplexer 5076-6336 W36 5087-7755 A24 3 AT15 W49 J9 W37 A29 W39 85309-80026 A26 W59 85309-80026 W32 TEST 1 IF OUT TEST IF IN 85110-80015 85110-80015 A45 TEST 1 LO / IF REF CHAN LO OUT REF CHAN IF OUT DIPLEXER IF OUT A44 A25 Diplexer 5076-6336 W33 A28 Diplexer 5076-6336 W38 W11 J7 J8 J3 J2 J10 W34 J14 J13 TEST 3 IF OUT TEST 3 LO / IF J12 J11 TEST 2 IF OUT TEST 2 LO / IF LO/IF Distribution Unit 85309B Operating Information Cable Length Limits Cable Length Limits The following figure defines the allowable maximum cable lengths from the LO Source to the 85309B, and the cable connecting the 85309B and the external mixers. The cable lengths are provided when using standard RF cable assemblies and with MicroCoax (UFB311A RF) low-loss cable assemblies. The standard mixers used in Keysight antenna measurement systems are the 85320A test mixer and the 85320B reference mixer. Both mixers operate from 2 to 18 GHz in fundamental mode, and from 6 to 26.5 GHz in third-harmonic mode. Figure 2-6 on page 2-12 and Figure 2-7 on page 2-13 show the RF power levels required for proper operation with the 85320A/B mixers and various other mixer products provided by Keysight Technologies. Service Guide 85309-90082 2-11 Operating Information Cable Length Limits Figure 2-6 2-12 LO/IF Distribution Unit 85309B Cable Length Configurations (1 of 2) Service Guide 85309-90082 LO/IF Distribution Unit 85309B Figure 2-7 Operating Information Cable Length Limits Cable Length configurations (2 of 2) Service Guide 85309-90082 2-13 Operating Information Performing the Operator’s Check LO/IF Distribution Unit 85309B Performing the Operator’s Check Function The Operator’s Check verifies that the 85309B functions properly before permanent installation in the antenna test system. It may also be used as a stand-alone check anytime that a problem is suspected with the 85309B. Description The Operator’s Check drives an LO power signal into the rear panel LO INPUT (J1) port and measures the power output response of the LO channels (reference and test) across the entire frequency range of operation. It also checks the Reference IF and Test IF channels. Passing the Operator’s Check indicates that all 85309B internal cables have stable connections and that the amplifiers are working properly. The Operator’s Check consists of the following tests: • “LO Power Output Test” on page 2-15 • “Reference IF and Test IF” on page 2-18 Equipment Required Table 2-2 Equipment Required for the Operator’s Check Equipment Type Recommended Model or Part Number Alternate Model or Part Number PNA/ENAa Any PNA with frequency range up to 18 GHz Any ENA with frequency range up to 18 GHz 30 dB pad attenuatorb 08493-60017 11708A or equivalent Power meter E4418B/19B N1913A Power sensor E4413A 8485A Cables 85131C 85131E Adapter, 3.5 mm (m–m) 83059A 85052-60014 Adapter, Type N (m) to SMA (m) 1250-1636 equivalent Adapter, BNC (f) to SMA (m) 1250-1200 equivalent Adapter, SMA (f–f) 1250-1158 equivalent a. If users don’t have a PNA, an ENA may be used. The PNA and ENA can supply the LO signal since the LO sources only need to operate over the frequency range of 0.1 to 18 GHz. The LO source must also be able to supply –35 dBm to 6 dBm power. b. An external 30 dB pad attenuator is required if the receiver does not have an internal step attenuator. 2-14 Service Guide 85309-90082 LO/IF Distribution Unit 85309B Operating Information Performing the Operator’s Check LO Power Output Test NOTE The PNA input must be attenuated to avoid causing receiver compression or damaging the receiver. An external 30 dB pad attenuator is required if the PNA does not have an internal source step attenuator. The instructions for this test use PNA Port 1 to generate the LO source, and use PNA Port 2 as receiver B. NOTE All keystrokes in the following procedure are for the PNA. Using an ENA may require different keystrokes. 1. On the PNA, select Preset. 2. Unless already accomplished by the Preset selection, select Start Frequency and enter 0.1 GHz, then select Stop Frequency and enter 18 GHz. 3. To activate the PNA receiver B, select Response > Meas > More > Receivers. 4. Set the Port 1 source power level to 0 dBm. 5. Zero and calibrate the power sensor. 6. Connect a test cable between PNA Port 1 and the power sensor. 7. To perform the source power calibration, select Cal > Power Cal > Source Cal. 8. Make the following selections in the Source Power Calibration menu: a. Channel 1 = Port 1 b. Tolerance = 0.1 dBm c. Maximum number of readings = 50 9. Follow the calibration wizard instructions on the PNA to complete the source power calibration. If necessary, refer to the section titled “Power Calibration” in the embedded Help System of the PNA. 10. After completing the source power calibration, remove the power sensor from the Port 1 cable. 11. Make the following selections to set the PNA receiver attenuator1 B to 30 dB: a. Select Power > Power and Attenuator. b. Select receiver attenuator B. c. Enter a value of 30 dB. 12. Connect a test cable to Port 2. 13. Connect a thru adapter between Port 1 and Port 2. 14. Normalize the receiver B trace. If necessary, get instructions by searching the embedded Help System of the PNA for “normalize.” After normalizing, the trace should be flat at 0 dBm. 15. Remove the thru adapter between the two test cables. 1. If the PNA receiver does not have an internal step attenuator, an external 30 dB pad attenuator must be connected to Port 2. Service Guide 85309-90082 2-15 Operating Information Performing the Operator’s Check LO/IF Distribution Unit 85309B Checking the 85309B Test 1 LO/IF (J3) Channel 16. Connect a test cable between the PNA Port 1 and the 85309B rear panel port LO Input (J1). 17. Connect a test cable between the PNA Port 2 and the 85309B rear panel port Test 1 LO/IF (J3). 18. For a standard model or Option 00x models only: Compare the output power traces from the Test 1 LO/IF (J3) port with the limits across the entire frequency range in Table 2-3 on page 2-17. 19. For Option 40x models only: a. Place the 85309B front panel Band Selection switch in the HIGH position, and compare the output power traces with the limits across the entire frequency range in Table 2-4 on page 2-18. b. Place the 85309B front panel Band Selection switch in the LOW position, and compare the output power traces with the limits across the entire frequency range in Table 2-5 on page 2-18. 20. Set the PNA Port 1 source power to 6 dBm. 21. Repeat Step 18 or Step 19, as appropriate. Checking the 85309B Reference LO Out (J2) Channel 22. Connect a test cable between the PNA Port 1 and the 85309B rear panel port LO Input (J1). 23. Connect a test cable between the PNA Port 2 and the 85309B rear panel port Reference LO OUT (J2). 24. Set the PNA Port 1 source power to 0 dBm. 25. For a standard model or Option 00x models only: Compare the output power traces from the Reference LO OUT (J2) port with the limits across the entire frequency range in Table 2-3 on page 2-17. 26. For Option 40x models only: a. Place the 85309B front panel Band Selection switch in the HIGH position, and compare the output power traces with the limits across the entire frequency range in Table 2-4 on page 2-18. b. Place the 85309B front panel Band Selection switch in the LOW position, and compare the output power traces with the limits across the entire frequency range in Table 2-5 on page 2-18. 27. Set the PNA Port 1 source power to 6 dBm. 28. Repeat Step 25 or Step 26, as appropriate. For Option 00x and 40x Models Only: Checking the 85309B Test 2 LO/IF (J11) Channel 29. Connect a test cable between the PNA Port 1 and the 85309B rear panel port LO Input (J1). 30. Connect a test cable between the PNA Port 2 and the 85309B rear panel port Test 2 LO/IF (J11). 31. Set the PNA Port 1 source power to 0 dBm. 32. For a standard model or Option 00x models only: Compare the output power traces from the Test 2 LO/IF (J11) port with the limits across the entire frequency range in Table 2-3 on page 2-17. 33. For Option 40x models only: a. Place the 85309B front panel Band Selection switch in the HIGH position, and compare the output power traces with the limits across the entire frequency range in Table 2-4 on page 2-18. b. Place the 85309B front panel Band Selection switch in the LOW position, and compare the output 2-16 Service Guide 85309-90082 LO/IF Distribution Unit 85309B Operating Information Performing the Operator’s Check power traces with the limits across the entire frequency range in Table 2-5 on page 2-18. 34. Set the PNA Port 1 source power to 6 dBm. 35. Repeat Step 32 or Step 33, as appropriate. For Option 002 and 402 Models Only: Checking the 85309B Test 3 LO/IF (J13) Channel 36. Connect a test cable between the PNA Port 1 and the 85309B rear panel port LO Input (J1). 37. Connect a test cable between the PNA Port 2 and the 85309B rear panel port Test 3 LO/IF (J13). 38. Set the PNA Port 1 source power to 0 dBm. 39. For Option 002 models only: Compare the output power traces from the Test 3 LO/IF (J13) port with the limits across the entire frequency range in Table 2-3 on page 2-17. 40. For Option 402 models only: a. Place the 85309B front panel Band Selection switch in the HIGH position, and compare the output power traces with the limits across the entire frequency range in Table 2-4 on page 2-18. b. Place the 85309B front panel Band Selection switch in the LOW position, and compare the output power traces with the limits across the entire frequency range in Table 2-5 on page 2-18. 41. Set the PNA Port 1 source power to 6 dBm. 42. Repeat Step 39 or Step 40, as appropriate. Table 2-3 85309B Standard or Options 001 or 002 Output Power Limits LO Output Power (+6 dBm Input) Frequency Range Power Level 0.3 – 0.5 GHz > +21.6 dBm 0.5 – 3 GHz > +24.1 dBm 3 – 6.2 GHz > +26.3 dBm 6.2 – 18 GHz > +23.5 dBm LO Output Power (0 dBm Input) 0.3 – 0.5 GHz > +21.6 dBm 0.5 – 3 GHz > +23 dBm 3 – 6.2 GHz > +25 dBm 6.2 – 18 GHz > +23 dBm Service Guide 85309-90082 2-17 Operating Information Performing the Operator’s Check LO/IF Distribution Unit 85309B Table 2-4 85309B Options 40x Output Power Limits for HIGH Band LO Output Power (+6 dBm Input) Frequency Range Power Level 0.3 – 0.5 GHz > +21.3 dBm 0.5 – 3 GHz > +22.4 dBm 3 – 6.2 GHz > +24.4 dBm 6.2 – 18 GHz > +22 dBm LO Output Power (0 dBm Input) 0.3 – 0.5 GHz > +21.3 dBm 0.5 – 3 GHz > +22.4 dBm 3 – 6.2 GHz > +24.4 dBm 6.2 – 18 GHz > +22 dBm Table 2-5 85309B Options 40x Output Power Limits for LOW Band LO Output Power (+6 dBm Input) Frequency Range Power Level 0.1 – 1 GHz > +14 dBm LO Output Power (0 dBm Input) 0.1 – 1 GHz > +13 dBm Reference IF and Test IF After completing the LO Power Output test, use the same cable set and perform the following steps to perform a 2-port calibration and check the Reference IF channels. 1. On the PNA, select Preset. 2. Disconnect the 30 dB pad attenuator, if present. 3. Make the following selections on the PNA: a. Measurement = S21 b. Power = –35 dBm c. IF bandwidth = 1 kHz d. Start frequency = 10 MHz e. Stop frequency = 100 MHz 4. Connect a test cable to PNA Port 1. 5. Connect a test cable to PNA Port 2. 2-18 Service Guide 85309-90082 LO/IF Distribution Unit 85309B Operating Information Performing the Operator’s Check 6. Connect a thru adapter between the two test cables. 7. Normalize the PNA trace. If necessary, get instructions by searching the embedded Help System of the PNA for “normalize.” After normalizing, the trace should be flat at 0 dBm 8. Remove the thru adapter between the two test cables. Checking the J10 Reference IF Out 9. Connect the test cable on PNA Port 1 to the 85309B rear panel port Reference IF In (J4). 10. Connect the test cable on PNA Port 2 to the 85309B rear panel port Reference IF Out (J10). 11. Place a marker on the PNA trace. In the frequency range of 10 – 20 MHz, the IF Gain trace should be in the range of +21 dB to +25 dB, +/–0.5 dB. See Figure 2-8 for a typical IF Gain response trace. Figure 2-8 Typical IF Gain Response Trace Checking the J9 Test 1 IF Out 12. Connect a test cable between the PNA Port 1 and the 85309B rear panel port Test 1 LO/IF (J3). 13. Connect a test cable between the PNA Port 2 and the 85309B rear panel port Test 1 IF Out (J9). 14. Verify that the W59 jumper is in place between the J7 and J8 ports on the 85309B rear panel. 15. Place a marker on the PNA trace. In the frequency range of 10 – 20 MHz, the Test IF response trace should be in the range of +21 dB to +25 dB. See Figure 2-9 for a typical Test IF response trace. Service Guide 85309-90082 2-19 Operating Information Performing the Operator’s Check LO/IF Distribution Unit 85309B Figure 2-9 Typical Test IF Response Trace For Option 00x and 40x Models Only: Checking the J12 Test 2 IF Out 1. Connect a test cable between the PNA Port 1 and the 85309B rear panel port Test 2 LO/IF (J11). 2. Connect a test cable between the PNA Port 2 and the 85309B rear panel port Test 2 IF Out (J12). 3. Place a marker on the PNA trace. In the frequency range of 10 – 20 MHz, the Test IF response trace should be in the range of +21 dB to +25 dB. See Figure 2-9 for a typical Test IF response trace. For Option 002 and 402 Models Only: Checking the J14 Test 3 IF Out 1. Connect a test cable between the PNA Port 1 and the 85309B rear panel port Test 3 LO/IF (J13). 2. Connect a test cable between the PNA Port 2 and the 85309B rear panel port Test 3 IF Out (J14). 3. Place a marker on the PNA trace. In the frequency range of 10 – 20 MHz, the Test IF response trace should be in the range of +21 dB to +25 dB. See Figure 2-9 for a typical Test IF response trace. IF the Operator’s Check Fails 1. Clean the cables and adapters and repeat the Operator’s Check. 2. If the Operator’s Check still fails, possibly the amplifiers are biased incorrectly or there is a faulty component. See “Contacting Keysight” on page 1-12. 2-20 Service Guide 85309-90082 3 General Information Service Guide 85309-90082 3-1 General Information General Specifications LO/IF Distribution Unit 85309B General Specifications Environmental: Operating Temperature Range 0 to 50 °C; for indoor use ONLY Storage Temperature Range –40 to 70 °C Operating Altitude 3000 m (9842 ft.) EMC Complies with European EMC Directive 2004/108/EC. * IEC/EN 61326-1:2005 * CISPR Pub 11 Group 1, class A * AS/NZS CISPR 11:2004 * ICES/NMB-001:2006 South Korean Class A EMC declaration This equipment is Class A suitable for professional use and is for use in electromagnetic environments outside of the home. A 급 기기 ( 업무용 방송통신기자재 ) 이 기기는 업무용 (A 급 ) 전자파적합기기로서 판 매자 또는 사용자는 이 점을 주 의하시기 바라 며 , 가정외의 지역에서 사용하는 것을 목적으 로 합니다 . Safety Compliance Complies with European Low Voltage Directive 2006/95/EC. * IEC/EN 61010-1:Third Edition * Canada: CAN/CSA-C22.2 No. 61010-1-12 * USA: UL Std No. 61010-1, Third edition Operating Humidity 95% RH at 40 °C (non-condensing) Pollution Degree Pollution degree 2 Installation Category Power Requirements: Nominal Frequency Range 50/60 Hz Nominal Voltage Range 100/120/220/240 Vac (Fluctuation should not exceed +/- 10% of nominal supply voltage) Power 300 Watts Weight and Dimensions: 3-2 Net Weight Std: 9.1 kg Option 001: 9.7 kg Option 002: 10.3 kg Option 400: 9.9 kg Option 401: 10.65 kg Option 402: 11.35 kg Dimensions Height: 146 mm Width: 426 mm Depth: 529 mm Service Guide 85309-90082 LO/IF Distribution Unit 85309B CAUTION General Information General Specifications Ventilation Requirements: When installing the instrument in a cabinet, the convection into and out of the instrument must not be restricted. The ambient temperature (outside the cabinet) must be less than the maximum operating temperature of the instrument by 4 C for every 100 watts dissipated in the cabinet. If the total power dissipated in the cabinet is greater than 800 watts, forced convection must be used. Service Guide 85309-90082 3-3 General Information 85309B Characteristic Performance LO/IF Distribution Unit 85309B 85309B Characteristic Performance Parameter Value Absolute Maximum Rating LO input port (CW) 20 dBm Reference channel IF input port (CW) 13 dBm Reference channel detector input ±20 VDC Positive Z/blanking input ±10 VDC (Option 40x only) Select HIGH/LOW input ±5.5 VDC Frequency Range Low band1 0.1 GHz to 1.0 GHz High band 0.3 GHz to 18.0 GHz Input Power Range (LO Input Recommended) 0.1 GHz to 1.0 GHz 6 dBm to 10 dBm 0.3 GHz to 3.0 GHz 6 dBm to 10 dBm 2.0 GHz to 18 GHz 0 dBm to 6 dBm Minimum Power Output with 0 dBm Input (LO Ports) 0.1 GHz to 1.0 GHz1 13 dBm 0.3 GHz to 0.5 GHz: 21.5 dBm 0.5 GHz to 3.0 GHz: 22.75 dBm 3.0 GHz to 6.2 GHz: 24.75 dBm 6.2 GHz to 18.0 GHz: 22.5 dBm Output Power Channel Tracking (typical) 0.1 GHz to 1.0 GHz1 ±2 dB 0.3 GHz to 18 GHz ±2 dB Port Return Loss, 0.1 GHz to 18 GHz (typical) LO Input 9 dB LO Output 7 dB 1. Options 40x only. 3-4 Service Guide 85309-90082 LO/IF Distribution Unit 85309B Parameter General Information General Safety Considerations Minimum Maximum IF Channel Small Signal Gain 20 MHz 21 dB 25 dB General Safety Considerations Introduction Review this product and related documentation to familiarize yourself with safety markings and instructions before you operate the instrument. The documentation contains information and warnings that must be followed by the user to ensure safe operation and to maintain the product in a safe condition. Cleaning the Instrument WARNING To prevent electrical shock, disconnect the Keysight Technologies 85309B from the mains before cleaning. Use a dry cloth or one slightly dampened with water to clean the external case parts. Do not attempt to clean internally. Connector Care and Cleaning Cleaning connectors with alcohol shall only be done with the instrument power cord removed, and in a well ventilated area. Allow all residue alcohol moisture to evaporate and the fumes to dissipate prior to energizing the instrument. WARNING Keep isopropyl alcohol away from heat, sparks, and flame. Store in a tightly closed container. It is extremely flammable. In case of fire, use alcohol foam, dry chemical, or carbon dioxide; water may be ineffective. Use isopropyl alcohol with adequate ventilation and avoid contact with eyes, skin, and clothing. It causes skin irritation, may cause eye damage, and is harmful if swallowed or inhaled. It may be harmful if absorbed through the skin. Wash thoroughly after handling. In case of spill, soak up the sand or earth. Flush spill area with water. Dispose of isopropyl alcohol in accordance with all applicable federal, state, and local environmental regulations. Declaration of Conformity A declaration of conformity is available upon request, or a copy is available on the Keysight Technologies Web site at http://www.keysight.com/go/conformity or by contacting Keysight - see “Contacting Keysight” on page 1-12. Service Guide 85309-90082 3-5 General Information General Safety Considerations LO/IF Distribution Unit 85309B Statement of Compliance This instrument has been designed and tested in accordance with IEC Publication 61010, Safety Requirements for Electronic Measuring Apparatus, and has been supplied in a safe condition. The instruction documentation contains information and warnings which must be followed by the user to ensure safe operation and to maintain the instrument in a safe condition. General Safety Considerations Ground the Instrument WARNING This is a Safety Class I product (provided with a protective earthing ground incorporated in the power cord). The mains plug shall only be inserted in a socket outlet provided with a protective earth contact. Any interruption of the protective conductor, inside or outside of the instrument, will make the instrument dangerous. Intentional interruption is prohibited. Before Applying Power Verify that the product is configured to match the available main power source. If this product is to be powered by autotransformer, make sure the common terminal is connected to the neutral (grounded) side of the ac power supply. Cautions applicable to this instrument. WARNING Always use the three-prong AC power cord supplied with this instrument with adequate electric rating. Failure to ensure adequate earth grounding or using a power cord with inadequate rating will impair the safety protection provided by the equipment and make the instrument dangerous. CAUTION This product is designed for use in Installation Category II and Pollution Degree 2. CAUTION This instrument has autoranging line voltage input; be sure the supply voltage is within the specified range. CAUTION Ventilation Requirements: When installing the instrument in a cabinet, the convection into and out of the instrument must not be restricted. The ambient temperature (outside the cabinet) must be less than the maximum operating temperature of the instrument by 4 C for every 100 watts dissipated in the cabinet. If the total power dissipated in the cabinet is greater than 800 watts, forced convection must be used. 3-6 Service Guide 85309-90082 LO/IF Distribution Unit 85309B General Information General Safety Considerations Servicing Warnings applicable to this instrument. WARNING For continued protection against fire hazard replace line fuse only with same type and rating: Fuse 5A/250V, Part Number 2110-0680 The use of other fuses or material is prohibited. WARNING Always use the three-prong AC power cord supplied with this instrument with adequate electric rating. Failure to ensure adequate earth grounding or using a power cord with inadequate rating will impair the safety protection provided by the equipment and make the instrument dangerous. WARNING This is a Safety Class I product (provided with a protective earthing ground incorporated in the power cord). The mains plug shall be inserted only into a socket outlet provided with a protective earth contact. Any interruption of the protective conductor, inside or outside the product is likely to make the product dangerous. Intentional interruption is prohibited. WARNING These servicing instructions are for use by qualified personnel only. To avoid electrical shock, do not perform any servicing unless you are qualified to do so. WARNING The opening of covers or removal of parts is likely to expose dangerous voltages. Disconnect the instrument from all voltage sources while it is being opened. WARNING This product is designed for use in Installation Category II and Pollution Degree 2. WARNING No operator serviceable parts inside. Refer servicing to qualified personnel. To prevent electrical shock do not remove covers. WARNING If this product is not used as specified, the protection provided by the equipment could be impaired. This product must be used in a normal condition (in which all means for protection are intact) only. WARNING The detachable power cord is the instrument disconnecting device. It disconnects the mains circuits from the mains supply before other parts of the instrument. Service Guide 85309-90082 3-7 General Information Regulatory Information LO/IF Distribution Unit 85309B Regulatory Information This section contains information that is required by various government regulatory agencies. Instrument Markings Familiarize yourself with these instrument markings and their meanings before operating the instrument. The instruction documentation symbol. The product is marked with this symbol when it is necessary for the user to refer to the instructions in the documentation. The AC symbol indicates the required nature of the line module input power. This symbol indicates separate collection for electrical and electronic equipment, mandated under EU law as of August 13, 2005. All electric and electronic equipment are required to be separated from normal waste for disposal (Reference WEEE Directive, 2002/96/EC). This symbol indicates that the power line switch is ON. This symbol indicates that the power line switch is in the OFF position. This symbol is used to identify a terminal which is internally connected to the product frame or chassis. The CE mark is a registered trademark of the European Community. (If accompanied by a year, it is when the design was proven.) Indicates that antistatic precautions should be taken. The CSA mark is a registered trademark of the CSA International. This mark designates the product is an Industrial Scientific and Medical Group 1 Class A product (reference CISPR 11, Clause 5). ICES/NMB-001 This is a marking to indicate product compliance with the Canadian Interference-Causing Equipment Standard (ICES-001). The RCM mark is a registered trademark of the Australian Communications and Media Authority. Indicates the time period during which no hazardous or toxic substance elements are expected to leak or deteriorate during normal use. Forty years is the expected useful life of the product. South Korean Certification (KC) mark; includes the marking's identifier code which follows the format: MSIP-REM-YYY-ZZZZZZZZZZZZZZ or KCC-REM-YYY-ZZZZZZZZZZZZ. 3-8 Service Guide 85309-90082 LO/IF Distribution Unit 85309B General Information Regulatory Information This symbol on all primary or secondary packaging indicates compliance to China standard GB 18455-2001. IP 20 Degree of protection. Service Guide 85309-90082 3-9 General Information Regulatory Information 3-10 LO/IF Distribution Unit 85309B Service Guide 85309-90082 4 Service Service Guide 85309-90082 4-1 Service Replaceable Parts LO/IF Distribution Unit 85309B Replaceable Parts Introduction This section contains information for ordering replaceable parts for the 85309B LO/IF Distribution Unit. The replaceable parts include major assemblies and cables. Ordering Information To order a part listed in the replaceable parts lists: • include the part number • indicate the quantity required • Contact Keysight Technologies for instructions on where to send the order. Refer to “Contacting Keysight” on page 1-12. To order a part that is not listed in the replaceable parts lists: • include the instrument model number and complete instrument serial number • include the description and function of the part • indicate the quantity required • Contact Keysight Technologies for instructions on where to send the order. Refer to “Contacting Keysight” on page 1-12. 4-2 Service Guide 85309-90082 LO/IF Distribution Unit 85309B Service Replaceable Parts This page is intentionally left blank. Service Guide 85309-90082 4-3 Service Replaceable Parts LO/IF Distribution Unit 85309B Replaceable Parts Listings Table 4-1 Major 85309B Assemblies (Standard) Reference Designator Part Number Qty A1 A2 A10 A11 A12 A13 A14 A15 A16 A17 A18 A19 A22 A43 AT3 AT4 B1 SW1 85309-60135 85309-60134 0955-0791 0955-2245 5087-7755 5087-7755 85309-80026 85309-80026 5076-6336 5087-7768 85309-61601 5076-6336 0950-5271 85110-80015 33340-67007 33340-67007 54574-68501 85309-61607 1 1 1 1 1 1 1 1 1 1 1 1 1 1 1 1 1 1 4-4 Description PC board, Display PC board, ALC/REG Low pass filter, 30 MHz Power divider, 18 GHz, 4-way RF amplifier, 0.3 to 18 GHz (Ref Chan) RF amplifier, 0.3 to 18 GHz (Test1 Chan) IF amplifier, 0.5 to 500 MHz (Ref Chan) IF amplifier, 0.5 to 500 MHz (Test1 Chan) Diplexer (Test1 Chan) RF amplifier, 0.3 to 18 GHz (Input) Potentiometer, 5K ohm + 5PCT 1W 10-Turn Wirebound Diplexer (Ref Chan) Power supply unit Filter, 30 MHz low pass (Test1 Chan) Coax, attenuator, sloped (Ref Chan) Coax, attenuator, sloped (Test1 Chan) Fan assembly Switch, SPDT Service Guide 85309-90082 LO/IF Distribution Unit 85309B Figure 4-1 Service Replaceable Parts Major 85309B Assemblies (Standard) Service Guide 85309-90082 4-5 Service Replaceable Parts Table 4-2 LO/IF Distribution Unit 85309B Cables (Standard) Reference Designator Part Number Qty W3 85309-20139 1 A17 OUT - A11 IN W4 85309-20141 1 AT3 OUT - A12 IN W5 85309-20140 1 AT4 OUT - A13 IN W7 85309-20144 1 A16 OUT - RPJ3 W8 85309-60112 1 A16 - RPJ8 W10 85309-20138 1 A17 IN - RPJ1 W11 85309-60109 1 A15 OUT- RPJ9 W12 85309-60109 1 A10 IN- RPJ4 W14 85309-60109 1 A14 OUT- RPJ10 W15 8120-8483 1 A2J1- RPJ5 W16 8120-8483 1 A2J2- RPJ6 W22 85309-20168 1 A12 OUT - A19 IN W23 85309-20144 1 A19 OUT - RPJ2 W26 85309-20143 1 A13 OUT - A16 IN W54 8120-5020 1 A2J12 - A17 W58 8120-5067 1 A43 IN - RPJ7 W59 85309-20169 1 Rear Panel Jumper, RPJ7 - RPJ8 4-6 Description Service Guide 85309-90082 LO/IF Distribution Unit 85309B Figure 4-2 Service Replaceable Parts Cable Locations (Standard) Service Guide 85309-90082 4-7 Service Replaceable Parts Table 4-3 LO/IF Distribution Unit 85309B Major 85309B Assemblies (Option 001) Reference Designator Part Number Qty A1 A2 A10 A11 A12 A13 A14 A15 A16 A17 A18 A19 A22 A24 A25 A26 A43 A44 AT1 AT3 AT4 B1 SW1 85309-60135 85309-60134 0955-0791 0955-2245 5087-7755 5087-7755 85309-80026 85309-80026 5076-6336 5087-7768 85309-61601 5076-6336 0950-5271 5087-7755 5076-6336 85309-80026 85110-80015 85110-80015 33340-67007 33340-67007 33340-67007 54574-68501 85309-61607 1 1 1 1 1 1 1 1 1 1 1 1 1 1 1 1 1 1 1 1 1 1 1 4-8 Description PC board, Display PC board, ALC/REG Low pass filter, 30 MHz Power divider, 18 GHz, 4-way RF amplifier, 0.3 to 18 GHz (Ref Chan) RF amplifier, 0.3 to 18 GHz (Test1 Chan) IF amplifier, 0.5 to 500 MHz (Ref Chan) IF amplifier, 0.5 to 500 MHz (Test1 Chan) Diplexer (Test1 Chan) RF amplifier, 0.3 to 18 GHz (Input) Potentiometer, 5K ohm + 5PCT 1W 10-Turn Wirebound Diplexer (Ref Chan) Power supply unit RF amplifier, 0.3 to 18 GHz (Test2 Chan) Diplexer (Test2 Chan) IF amplifier, 0.5 to 500 MHz (Test2 Chan) Filter, 30 MHz low pass (Test1 Chan) Filter, 30 MHz low pass (Test2 Chan) Coax, attenuator, sloped (Test2 Chan) Coax, attenuator, sloped (Ref Chan) Coax, attenuator, sloped (Test1 Chan) Fan assembly Switch, SPDT Service Guide 85309-90082 LO/IF Distribution Unit 85309B Figure 4-3 Service Replaceable Parts Major 85309B Assemblies (Option 001) Service Guide 85309-90082 4-9 Service Replaceable Parts Table 4-4 LO/IF Distribution Unit 85309B Cables (Option 001) Reference Designator Part Number Qty W3 85309-20139 1 A17 OUT - A11 IN W4 85309-20141 1 AT3 OUT - A12 IN W5 85309-20140 1 AT4 OUT - A13 IN W7 85309-20144 1 A16 OUT - RPJ3 W8 85309-60112 1 A16 - RPJ8 W10 85309-20138 1 A17 IN - RPJ1 W11 85309-60109 1 A15 OUT- RPJ9 W12 85309-60109 1 A10 IN- RPJ4 W14 85309-60109 1 A14 OUT- RPJ10 W15 8120-8483 1 A2J1- RPJ5 W16 8120-8483 1 A2J2- RPJ6 W22 85309-20168 1 A12 OUT - A19 IN W23 85309-20144 1 A19 OUT - RPJ2 W26 85309-20143 1 A13 OUT - A16 IN W27 85309-20146 1 A24 OUT - A25 IN W30 85309-20145 1 AT1 OUT - A24 IN W32 85309-20147 1 A25 OUT - RPJ11 W33 85309-60111 1 A25 - A44 IN W34 85309-60109 1 A26 OUT- RPJ12 W54 8120-5020 1 A2J12 - A17 W58 8120-5067 1 A43 IN - RPJ7 W59 85309-20169 1 Rear Panel Jumper, RPJ7 - RPJ8 4-10 Description Service Guide 85309-90082 LO/IF Distribution Unit 85309B Figure 4-4 Service Replaceable Parts Cable Locations (Option 001) Service Guide 85309-90082 4-11 Service Replaceable Parts Table 4-5 LO/IF Distribution Unit 85309B Major 85309B Assemblies (Option 002) Reference Designator Part Number Qty A1 A2 A10 A11 A12 A13 A14 A15 A16 A17 A18 A19 A22 A24 A25 A26 A27 A28 A29 A43 A44 A45 AT1 AT2 AT3 AT4 B1 SW1 85309-60135 85309-60134 0955-0791 0955-2245 5087-7755 5087-7755 85309-80026 85309-80026 5076-6336 5087-7768 85309-61601 5076-6336 0950-5271 5087-7755 5076-6336 85309-80026 5087-7755 5076-6336 85309-80026 85110-80015 85110-80015 85110-80015 33340-67007 33340-67007 33340-67007 33340-67007 54574-68501 85309-61607 1 1 1 1 1 1 1 1 1 1 1 1 1 1 1 1 1 1 1 1 1 1 1 1 1 1 1 1 4-12 Description PC board, Display PC board, ALC/REG Low pass filter, 30 MHz Power divider, 18 GHz, 4-way RF amplifier, 0.3 to 18 GHz (Ref Chan) RF amplifier, 0.3 to 18 GHz (Test1 Chan) IF amplifier, 0.5 to 500 MHz (Ref Chan) IF amplifier, 0.5 to 500 MHz (Test1 Chan) Diplexer (Test1 Chan) RF amplifier, 0.3 to 18 GHz (Input) Potentiometer, 5K ohm + 5PCT 1W 10-Turn Wirebound Diplexer (Ref Chan) Power supply unit RF amplifier, 0.3 to 18 GHz (Test2 Chan) Diplexer (Test2 Chan) IF amplifier, 0.5 to 500 MHz (Test2 Chan) RF amplifier, 0.3 to 18 GHz (Test3 Chan) Diplexer (Test3 Chan) IF amplifier, 0.5 to 500 MHz (Test3 Chan) Filter, 30 MHz low pass (Test1 Chan) Filter, 30 MHz low pass (Test2 Chan) Filter, 30 MHz low pass (Test3 Chan) Coax, attenuator, sloped (Test2 Chan) Coax, attenuator, sloped (Test3 Chan) Coax, attenuator, sloped (Ref Chan) Coax, attenuator, sloped (Test1 Chan) Fan assembly Switch, SPDT Service Guide 85309-90082 LO/IF Distribution Unit 85309B Figure 4-5 Service Replaceable Parts Major 85309B Assemblies (Option 002) Service Guide 85309-90082 4-13 Service Replaceable Parts Table 4-6 LO/IF Distribution Unit 85309B Cables (Option 002) Reference Designator Part Number Qty W3 85309-20139 1 A17 OUT - A11 IN W4 85309-20141 1 AT3 OUT - A12 IN W5 85309-20140 1 AT4 OUT - A13 IN W7 85309-20144 1 A16 OUT - RPJ3 W8 85309-60112 1 A16 - RPJ8 W10 85309-20138 1 A17 IN - RPJ1 W11 85309-60109 1 A15 OUT- RPJ9 W12 85309-60109 1 A10 IN- RPJ4 W14 85309-60109 1 A14 OUT- RPJ10 W15 8120-8483 1 A2J1- RPJ5 W16 8120-8483 1 A2J2- RPJ6 W22 85309-20168 1 A12 OUT - A19 IN W23 85309-20144 1 A19 OUT - RPJ2 W26 85309-20143 1 A13 OUT - A16 IN W27 85309-20146 1 A24 OUT - A25 IN W28 85309-20149 1 A27 OUT - A28 IN W30 85309-20145 1 AT1 OUT - A24 IN W32 85309-20147 1 A25 OUT - RPJ11 W33 85309-60111 1 A25 - A44 IN W34 85309-60109 1 A26 OUT- RPJ12 W35 85309-20148 1 AT2 OUT- A27 IN W37 85309-20147 1 A28 OUT - RPJ13 W38 85309-60111 1 A28- A45 IN W39 85309-60109 1 A29 OUT- RPJ14 W54 8120-5020 1 A2J12 - A17 W58 8120-5067 1 A43 IN - RPJ7 W59 85309-20169 1 Rear Panel Jumper, RPJ7 - RPJ8 4-14 Description Service Guide 85309-90082 LO/IF Distribution Unit 85309B Figure 4-6 Service Replaceable Parts Cable Locations (Option 002) Service Guide 85309-90082 4-15 Service Replaceable Parts Table 4-7 Reference Designator A1 A2 A5 A10 A11 A12 A13 A14 A15 A16 A17 A18 A19 A22 A30 A31 A32 A36 A38 A43 AT3 AT4 AT7 AT9 AT10 B1 SW1 SW2 SW3, SW4, SW5 4-16 LO/IF Distribution Unit 85309B Major 85309B Assemblies (Option 400) Part Number Qty Description 85309-60135 85309-60134 85309-60136 0955-0791 0955-2245 5087-7755 5087-7755 85309-80026 85309-80026 5076-6336 5087-7768 85309-61601 5076-6336 0950-5271 85309-80024 85309-80025 85309-80022 0955-2249 0955-2249 85110-80015 33340-67007 33340-67007 0955-2530 0955-2530 0955-1503 54574-68501 85309-61607 85309-61609 1 1 1 1 1 1 1 1 1 1 1 1 1 1 1 1 1 1 1 1 1 1 1 1 1 1 1 1 PC board, Display PC board, ALC/REG PC board, Combi Low pass filter, 30 MHz Power divider, 18 GHz, 4-way RF amplifier, 0.3 to 18 GHz (Ref Chan) RF amplifier, 0.3 to 18 GHz (Test1 Chan) IF amplifier, 0.5 to 500 MHz (Ref Chan) IF amplifier, 0.5 to 500 MHz (Test1 Chan) Diplexer (Test1 Chan) RF amplifier, 0.3 to 18 GHz (Input) Potentiometer, 5K ohm + 5PCT 1W 10-Turn Wirebound Diplexer (Ref Chan) Power supply unit RF amplifier, 10 to 1200 MHz RF amplifier, 10 to 1000 MHz Power divider, 1 GHz, 4way Filter, 100 MHz high pass (Ref Chan) Filter, 100 MHz high pass (Test1 Chan) Filter, 30 MHz low pass (Test1 Chan) Coax, attenuator, sloped (Ref Chan) Coax, attenuator, sloped (Test1 Chan) Microwave attenuator, 6 GHz MAX 1W 1dB SMA (Ref Chan) Microwave attenuator, 6 GHz MAX 1W 1dB SMA (Test1 Chan) Microwave attenuator, 18 GHz MAX 2W SMA Fan assembly Switch, SPDT Switch, SP3T, rotary 33311-60069 3 Switch, RF SPDT, 15 Vdc 18 GHz Service Guide 85309-90082 LO/IF Distribution Unit 85309B Figure 4-7 Service Replaceable Parts Major 85309B Assemblies (Option 400) Service Guide 85309-90082 4-17 Service Replaceable Parts Table 4-8 LO/IF Distribution Unit 85309B Cables (Option 400) Reference Designator Part Number Qty W1 85309-20151 1 RPJ1 - SW3 (C) W2 85309-20152 1 SW3 (2) - A17 IN W3 85309-20139 1 A17 OUT - A11 IN W4 85309-20141 1 AT3 OUT - A12 IN W5 85309-20140 1 AT4 OUT - A13 IN W6 85309-20156 1 A13 OUT - SW5 (2) W7 85309-20144 1 A16 OUT - RPJ3 W8 85309-60112 1 A16 - RPJ8 W9 85309-20156 1 A12 OUT - SW4 (2) W11 85309-60109 1 A15 OUT- RPJ9 W12 85309-60109 1 A10 IN- RPJ4 W14 85309-60109 1 A14 OUT- RPJ10 W15 8120-8483 1 A2J1- RPJ5 W16 8120-8483 1 A2J2- RPJ6 W23 85309-20144 1 A19 OUT - RPJ2 W25 8120-5022 1 A2J12 - A5J5 W40 85309-20161 1 SW4 (C) - A19 IN W41 85309-20153 1 SW3 (1) - AT10 IN W42 85309-20154 1 A30 OUT - A31 IN W43 85309-20155 1 A31 OUT - A32 IN W44 85309-20162 1 AT7 - A32 OUT W45 85309-20165 1 AT9 - A32 OUT W47 85309-20167 1 SW5 (C) - A16 IN W54 8120-5020 1 A2J12 - A17 W58 8120-5067 1 A43 IN - RPJ7 W59 85309-20169 1 Rear Panel Jumper, RPJ7 - RPJ8 4-18 Description Service Guide 85309-90082 LO/IF Distribution Unit 85309B Figure 4-8 Service Replaceable Parts Cable Locations (Option 400) Service Guide 85309-90082 4-19 Service Replaceable Parts Table 4-9 Reference Designator A1 A2 A5 A10 A11 A12 A13 A14 A15 A16 A17 A18 A19 A22 A24 A25 A26 A30 A31 A32 A36 A37 A38 A43 A44 AT1 AT3 AT4 AT7 AT8 AT9 AT10 B1 SW1 SW2 SW3, SW4, SW5, SW6 4-20 LO/IF Distribution Unit 85309B Major 85309B Assemblies (Option 401) Part Number Qty Description 85309-60135 85309-60134 85309-60136 0955-0791 0955-2245 5087-7755 5087-7755 85309-80026 85309-80026 5076-6336 5087-7768 85309-61601 5076-6336 0950-5271 5087-7755 5076-6336 85309-80026 85309-80024 85309-80025 85309-80022 0955-2249 0955-2249 0955-2249 85110-80015 85110-80015 33340-67007 33340-67007 33340-67007 0955-2530 0955-2530 0955-2530 0955-1503 54574-68501 85309-61607 85309-61609 1 1 1 1 1 1 1 1 1 1 1 1 1 1 1 1 1 1 1 1 1 1 1 1 1 1 1 1 1 1 1 1 1 1 1 PC board, Display PC board, ALC/REG PC board, Combi Low pass filter, 30 MHz Power divider, 18 GHz, 4-way RF amplifier, 0.3 to 18 GHz (Ref Chan) RF amplifier, 0.3 to 18 GHz (Test1 Chan) IF amplifier, 0.5 to 500 MHz (Ref Chan) IF amplifier, 0.5 to 500 MHz (Test1 Chan) Diplexer (Test1 Chan) RF amplifier, 0.3 to 18 GHz (Input) Potentiometer, 5K ohm + 5PCT 1W 10-Turn Wirebound Diplexer (Ref Chan) Power supply unit RF amplifier, 0.3 to 18 GHz (Test2 Chan) Diplexer (Test2 Chan) IF amplifier, 0.5 to 500 MHz (Test2 Chan) RF amplifier, 10 to 1200 MHz RF amplifier, 10 to 1000 MHz Power divider, 1 GHz, 4way Filter, 100 MHz high pass (Ref Chan) Filter, 100 MHz high pass (Test2 Chan) Filter, 100 MHz high pass (Test1 Chan) Filter, 30 MHz low pass (Test1 Chan) Filter, 30 MHz low pass (Test2 Chan) Coax, attenuator, sloped (Test2 Chan) Coax, attenuator, sloped (Ref Chan) Coax, attenuator, sloped (Test1 Chan) Microwave attenuator, 6 GHz MAX 1W 1dB SMA (Ref Chan) Microwave attenuator, 6 GHz MAX 1W 1dB SMA (Test2 Chan) Microwave attenuator, 6 GHz MAX 1W 1dB SMA (Test1 Chan) Microwave attenuator, 18 GHz MAX 2W SMA Fan assembly Switch, SPDT Switch, SP3T, rotary 33311-60069 4 Switch, RF SPDT, 15 Vdc 18 GHz Service Guide 85309-90082 LO/IF Distribution Unit 85309B Figure 4-9 Service Replaceable Parts Major 85309B Assemblies (Option 401) Service Guide 85309-90082 4-21 Service Replaceable Parts Table 4-10 LO/IF Distribution Unit 85309B Cables (Option 401) Reference Designator Part Number Qty W1 85309-20151 1 RPJ1 - SW3 (C) W2 85309-20152 1 SW3 (2) - A17 IN W3 85309-20139 1 A17 OUT - A11 IN W4 85309-20141 1 AT3 OUT - A12 IN W5 85309-20140 1 AT4 OUT - A13 IN W6 85309-20156 1 A13 OUT - SW5 (2) W7 85309-20144 1 A16 OUT - RPJ3 W8 85309-60112 1 A16 - RPJ8 W9 85309-20156 1 A12 OUT - SW4 (2) W11 85309-60109 1 A15 OUT- RPJ9 W12 85309-60109 1 A10 IN- RPJ4 W14 85309-60109 1 A14 OUT- RPJ10 W15 8120-8483 1 A2J1- RPJ5 W16 8120-8483 1 A2J2- RPJ6 W23 85309-20144 1 A19 OUT - RPJ2 W25 8120-5022 1 A2J12 - A5J5 W30 85309-20145 1 AT1 OUT - A24 IN W31 85309-20156 1 A24 OUT - SW6 (2) W32 85309-20147 1 A25 OUT - RPJ11 W33 85309-60111 1 A25 - A44 IN W34 85309-60109 1 A26 OUT- RPJ12 W40 85309-20161 1 SW4 (C) - A19 IN W41 85309-20153 1 SW3 (1) - AT10 IN W42 85309-20154 1 A30 OUT - A31 IN W43 85309-20155 1 A31 OUT - A32 IN W44 85309-20162 1 AT7 - A32 OUT W45 85309-20165 1 AT9 - A32 OUT W47 85309-20167 1 SW5 (C) - A16 IN W48 85309-20159 1 AT8 - A32 OUT W49 85309-20164 1 SW6 (C) - A25 IN W54 8120-5020 1 A2J12 - A17 W58 8120-5067 1 A43 IN - RPJ7 W59 85309-20169 1 Rear Panel Jumper, RPJ7 - RPJ8 4-22 Description Service Guide 85309-90082 LO/IF Distribution Unit 85309B Figure 4-10 Service Replaceable Parts Cable Locations (Option 401) Service Guide 85309-90082 4-23 Service Replaceable Parts Table 4-11 Reference Designator A1 A2 A5 A10 A11 A12 A13 A14 A15 A16 A17 A18 A19 A22 A24 A25 A26 A27 A28 A29 A30 A31 A32 A36 A37 A38 A43 A44 A45 A46 AT1 AT2 AT3 AT4 AT7 AT8 AT9 AT10 AT11 B1 SW1 SW2 SW3 - SW7 4-24 LO/IF Distribution Unit 85309B Major 85309B Assemblies (Option 402) Part Number Qty 85309-60135 85309-60134 85309-60136 0955-0791 0955-2245 5087-7755 5087-7755 85309-80026 85309-80026 5076-6336 5087-7768 85309-61601 5076-6336 0950-5271 5087-7755 5076-6336 85309-80026 5087-7755 5076-6336 85309-80026 85309-80024 85309-80025 85309-80022 0955-2249 0955-2249 0955-2249 85110-80015 85110-80015 85110-80015 0955-2249 33340-67007 33340-67007 33340-67007 33340-67007 0955-2530 0955-2530 0955-2530 0955-1503 0955-2530 54574-68501 85309-61607 85309-61609 33311-60069 1 1 1 1 1 1 1 1 1 1 1 1 1 1 1 1 1 1 1 1 1 1 1 1 1 1 1 1 1 1 1 1 1 1 1 1 1 1 1 1 1 1 5 Description PC board, Display PC board, ALC/REG PC board, Combi Low pass filter, 30 MHz Power divider, 18 GHz, 4-way RF amplifier, 0.3 to 18 GHz (Ref Chan) RF amplifier, 0.3 to 18 GHz (Test1 Chan) IF amplifier, 0.5 to 500 MHz (Ref Chan) IF amplifier, 0.5 to 500 MHz (Test1 Chan) Diplexer (Test1 Chan) RF amplifier, 0.3 to 18 GHz (Input) Potentiometer, 5K ohm + 5PCT 1W 10-Turn Wirebound Diplexer (Ref Chan) Power supply unit RF amplifier, 0.3 to 18 GHz (Test2 Chan) Diplexer (Test2 Chan) IF amplifier, 0.5 to 500 MHz (Test2 Chan) RF amplifier, 0.3 to 18 GHz (Test3 Chan) Diplexer (Test3 Chan) IF amplifier, 0.5 to 500 MHz (Test3 Chan) RF amplifier, 10 to 1200 MHz RF amplifier, 10 to 1000 MHz Power divider, 1 GHz, 4way Filter, 100 MHz high pass (Ref Chan) Filter, 100 MHz high pass (Test2 Chan) Filter, 100 MHz high pass (Test1 Chan) Filter, 30 MHz low pass (Test1 Chan) Filter, 30 MHz low pass (Test2 Chan) Filter, 30 MHz low pass (Test3 Chan) Filter, 100 MHz high pass (Test3 Chan) Coax, attenuator, sloped (Test2 Chan) Coax, attenuator, sloped (Test3 Chan) Coax, attenuator, sloped (Ref Chan) Coax, attenuator, sloped (Test1 Chan) Microwave attenuator, 6 GHz MAX 1W 1dB SMA (Ref Chan) Microwave attenuator, 6 GHz MAX 1W 1dB SMA (Test2 Chan) Microwave attenuator, 6 GHz MAX 1W 1dB SMA (Test1 Chan) Microwave attenuator, 18 GHz MAX 2W SMA Microwave attenuator, 6 GHz MAX 1W 1dB SMA (Test3 Chan) Fan assembly Switch, SPDT Switch, SP3T, rotary Switch, RF SPDT, 15 Vdc 18 GHz Service Guide 85309-90082 LO/IF Distribution Unit 85309B Figure 4-11 Service Replaceable Parts Major 85309B Assemblies (Option 402) Service Guide 85309-90082 4-25 Service Replaceable Parts Table 4-12 Reference Designator W1 W2 W3 W4 W5 W6 W7 W8 W9 W11 W12 W14 W15 W16 W23 W25 W30 W31 W32 W33 W34 W35 W36 W37 W38 W39 W40 W41 W42 W43 W44 W45 W47 W48 W49 W50 W51 W54 W58 W59 4-26 LO/IF Distribution Unit 85309B Cables (Option 402) Part Number Qty 85309-20151 85309-20152 85309-20139 85309-20141 85309-20140 85309-20156 85309-20144 85309-60112 85309-20156 85309-60109 85309-60109 85309-60109 8120-8483 8120-8483 85309-20144 8120-5022 85309-20145 85309-20156 85309-20147 85309-60111 85309-60109 85309-20148 85309-20156 85309-20147 85309-60111 85309-60109 85309-20161 85309-20153 85309-20154 85309-20155 85309-20162 85309-20165 85309-20167 85309-20159 85309-20164 85309-20158 85309-20157 8120-5020 8120-5067 85309-20169 1 1 1 1 1 1 1 1 1 1 1 1 1 1 1 1 1 1 1 1 1 1 1 1 1 1 1 1 1 1 1 1 1 1 1 1 1 1 1 1 Description RPJ1 - SW3 (C) SW3 (2) - A17 IN A17 OUT - A11 IN AT3 OUT - A12 IN AT4 OUT - A13 IN A13 OUT - SW5 (2) A16 OUT - RPJ3 A16 - RPJ8 A12 OUT - SW4 (2) A15 OUT- RPJ9 A10 IN- RPJ4 A14 OUT- RPJ10 A2J1- RPJ5 A2J2- RPJ6 A19 OUT - RPJ2 A2J12 - A5J5 AT1 OUT - A24 IN A24 OUT - SW6 (2) A25 OUT - RPJ11 A25 - A44 IN A26 OUT- RPJ12 AT2 OUT - A27 IN A27 OUT - SW7 (2) A28 OUT - RPJ13 A28 - A45 IN A29 OUT- RPJ14 SW4 (C) - A19 IN SW3 (1) - AT10 IN A30 OUT - A31 IN A31 OUT - A32 IN AT7 - A32 OUT AT9 - A32 OUT SW5 (C) - A16 IN AT8 - A32 OUT SW6 (C) - A25 IN A11 - A32 OUT SW7 (C) - A28 IN A2J12 - A17 A43 IN - RPJ7 Rear Panel Jumper, RPJ7 - RPJ8 Service Guide 85309-90082 LO/IF Distribution Unit 85309B Figure 4-12 Service Replaceable Parts Cable Locations (Option 402) Service Guide 85309-90082 4-27 Service Replaceable Parts 4-28 LO/IF Distribution Unit 85309B Service Guide 85309-90082 This information is subject to change without notice. © Keysight Technologies 2013 - 2015 May 12, 2015 *85309-90082* 85309-90082 www.keysight.com