1
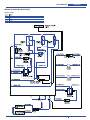
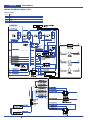
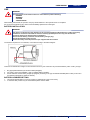
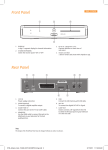
User Manual
FANG 20-EU
FANG 20T-EU
english
deutsch
français
nederlands
italiano
español
português
User manual ......................................................................1-21
Betriebsanleitung ............................................................. xxx
Notice d’utilisation ........................................................... xxx
Gebruiksaanwijzing ......................................................... xxx
Istruzioni sull’uso .............................................................. xxx
Instrucciones de manejo ................................................ xxx
Instruções de operação .................................................. xxx
Company information:
www.vipercleaning.eu
[email protected]
82089E(1) - 2009-04-01
USER MANUAL
ENGLISH
TABLE OF CONTENTS
INTRODUCTION .............................................................................................................................................................. 2
MANUAL PURPOSE AND CONTENTS .......................................................................................................................................... 2
TARGET........................................................................................................................................................................................... 2
HOW TO KEEP THIS MANUAL....................................................................................................................................................... 2
DECLARATION OF CONFORMITY ................................................................................................................................................ 2
IDENTIFICATION DATA................................................................................................................................................................... 2
OTHER REFERENCE MANUALS................................................................................................................................................... 3
SPARE PARTS AND MAINTENANCE............................................................................................................................................. 3
CHANGES AND IMPROVEMENTS ................................................................................................................................................ 3
OPERATION CAPABILITIES ........................................................................................................................................................... 3
CONVENTIONS .............................................................................................................................................................................. 3
UNPACKING/DELIVERY ................................................................................................................................................. 3
SAFETY ........................................................................................................................................................................... 4
SYMBOLS ....................................................................................................................................................................................... 4
GENERAL INSTRUCTIONS ............................................................................................................................................................ 4
MACHINE DESCRIPTION ............................................................................................................................................... 6
MACHINE STRUCTURE ................................................................................................................................................................. 6
ACCESSORIES/OPTIONS.............................................................................................................................................................. 8
TECHNICAL DATA........................................................................................................................................................................... 8
WIRING DIAGRAM (FANG20-EU)................................................................................................................................................... 9
WIRING DIAGRAM (FANG20T-EU)...............................................................................................................................................10
USE ................................................................................................................................................................................ 11
BATTERY INSTALLATION ............................................................................................................................................................ 11
BATTERY CHARGER SETTING ...................................................................................................................................................11
BEFORE MACHINE START-UP .................................................................................................................................................... 12
PRE- OPERATION CHECKS ........................................................................................................................................................ 12
INSTALLING PAD DRIVER OR BRUSH............. ......................................................................................................................... 12
MOUNTING THE SQUEEQEE...................................................................................................................................................... 12
FILLING THE SOLUTION TANK....................................................................................................................................................12
MACHINE START AND STOP....................................................................................................................................................... 13
SOLUTION FLOW ADJUSTMENT ............................................................................................................................................... 14
BATTERY DISCHARGR DURING OPERATION .......................................................................................................................... 14
WHILE OPERATING MACHINE ....................................................................................................................................................15
TANK DRAINING .......................................................................................................................................................................... 16
BATTERY CHARGE.... .................................................................................................................................................................. 16
MAINTENANCE ............................................................................................................................................................. 17
DALIY MAINTENANCE ................................................................................................................................................................. 17
WEEKLY MAINTENANCE ............................................................................................................................................................ 17
MONTHLY MAINTENANCE .........................................................................................................................................................17
VACUUM SYSTEM MOTOR FILTER CLEANING......................................................................................................................... 18
SOLUTION/CLEAN WATER FILTER CLEANING ........................................................................................................................ 18
SQUEEGEE BLADE CHECK AND REPLACE..... ......................................................................................................................... 18
BRUSH/PAD CLEANING............................................................................................................................................................... 18
TROUBLESHOOTING ................................................................................................................................................... 20
SCRAPPING .................................................................................................................................................................. 21
REMARKS ...................................................................................................................................................................…21
82089E(1)200904A
SCRUBBERS FANG20-EU / FANG20T-EU
1
ENGLISH
USER MANUAL
INTRODUCTION
NOTE
The numbers in brackets refer to the components shown in Machine Description chapter.
MANUAL PURPOSE AND CONTENTS
The purpose of this Manual is to provide the operator with all necessary information to use the machine properly, in a safe and
autonomous way. It contains information about technical data, safety, operation, storage, maintenance, spare parts and disposal.
Before performing any procedure on the machine, the operators and qualified technicians must read this Manual carefully. Contact
Alto in case of doubts concerning the interpretation of the instructions and for any further information.
TARGET
This Manual is intended for operators and technicians qualified to perform the machine maintenance.
The operators must not perform procedures reserved for qualified technicians. Alto will not be answerable for damages coming from
the non-observance of this prohibition.
HOW TO KEEP THIS MANUAL
The User Manual must be kept near the machine, inside an adequate case, away from liquids and other substances that can cause
damage to it.
DECLARATION OF CONFORMITY
The declaration of conformity, supplied with the machine, certifies the machine conformity with the law in force.
NOTE
Two copies of the original declaration of conformity are provided together with the machine documentation.
CE-declaration is print in Quick Guide
IDENTIFICATION DATA
The machine model and serial number are marked on the plate (27 ).
The machine model year is written in the declaration of conformity and it is also indicated by the first two figures of the machine
serial number.
This information is useful when requiring machine spare parts. Use the following table to write down the machine identification data.
MACHINE model ...............................................................................
MACHINE serial number ...................................................................
2
SCRUBBERS FANG20-EU / FANG20T-EU
82089E(1)2009-04A
USER MANUAL
ENGLISH
OTHER REFERENCE MANUALS
The following Manuals are available:
–
Service Manual (that can be consulted at Viper Service Centers)
–
Spare Parts List (see www.vipercleaning.eu )
SPARE PARTS AND MAINTENANCE
All necessary operating, maintenance and repair procedures must be performed by quali ed personnel or by Viper Service Centers.
Only original spare parts and accessories must be used.
Contact Viper for service or to order spare parts and accessories, specifying the machine model and serial number.
CHANGES AND IMPROVEMENTS
Viper constantly improves its products and reserves the right to make changes and improvements at its discretion without being
obliged to apply such bene ts to the machines that were previously sold.
Any change and/or addition of accessories must be approved and performed by Viper.
OPERATION CAPABILITIES
These scrubber-dryers are used to clean (scrubbing and drying) smooth and solid floors, in civil or industrial environment, under
safe operation conditions by a qualified operator.
The scrubber-dryers cannot be used for fitted carpet and carpet cleaning.
CONVENTIONS
Forward, backward, front, rear, left or right are intended with reference to the operator’s position, that is to say in driving position
with the hands on the handlebar (14).
UNPACKING/DELIVERY
To unpack the machine, carefully follow the instructions on the packing.
When the machine is delivered, check that the packing and the machine were not damaged during transportation. In case of visible
damages, keep the packing and have it checked by the carrier that delivered it. Call the carrier immediately to ll in a damage claim.
Check that the machine is equipped with the following features:
1.
Technical documents:
•
Scrubber-dryer User Manual
•
Scrubber-dryer Spare Parts List
82089E(1)2009-04A
SCRUBBERS FANG20-EU / FANG20T-EU
3
ENGLISH
USER MANUAL
SAFETY
The following symbols indicate potentially dangerous situations. Always read this information carefully and take all necessary
precautions to safeguard people and property.
The operator's cooperation is essential in order to prevent injury. No accident prevention program is effective without the total
cooperation of the person responsible for the machine operation. Most of the accidents that may occur in a factory, while working
or moving around, are caused by failure to comply with the simplest rules for exercising prudence. A careful and prudent operator is
the best guarantee against accidents and is essential for successful completion of any prevention program.
SYMBOLS
DANGER!
It indicates a dangerous situation with risk of death for the operator.
WARNING!
It indicates a potential risk of injury for people or damage to objects.
CAUTION!
It indicates a caution related to important or useful functions. Pay
careful attention to the paragraphs marked by this symbol.
NOTE
It indicates the necessity to refer to the User Manual before performing any procedure.
GENERAL INSTRUCTIONS
Specific warnings and cautions to inform about potential damages to people and machine are shown below.
–
–
–
–
–
–
–
–
–
–
–
–
–
–
–
–
DANGER!
Disconnect the batteries before performing any maintenance/repair procedure.
This machine must be used by properly trained and authorised personnel only. Children or disabled people cannot
use this machine.
Keep the battery away from sparks, flames and incandescent material. During the normal operation explosive gases
are released.
Do not wear jewels when working near electrical components.
Do not work under the lifted machine without supporting it with safety stands.
Do not operate the machine near toxic, dangerous, flammable and/or explosive powders, liquids or vapours.
Battery charging produces highly explosive hydrogen gas. Keep the tank assembly open during battery charging and
perform this procedure in well-ventilated areas and away from naked flames.
Read the instruction manual before using the appliance.
The appliance is not suitable for picking up hazardous dust.
The appliance is for dry use only and is not to be used or stored outdoors in wet conditions.
Do not use on surfaces having a gradient exceeding that marked on the appliance.
WARNING!
Only use the brushed provided with the appliance or those specified in the instruction manual. The use of the other
brushes may impair safety.
The appliance is only to be used by persons who have been adequately instructed.
The precautions to be taken when using the appliance under specific conditions such as handing flammable liquids or
dust, and dust hazardous to health.
The appliance is to be disconnected from its power source during cleaning or maintenance and when replacing parts or
converting the appliance to another function. The key of the supply switch is to be removed or an equivalent
disconnection is to be made.
Doors and covers are to be positions as indicated in the instruction manual before using the appliance.
4
SCRUBBERS FANG20-EU / FANG20T-EU
82089E(1)2009-04A
USER MANUAL
–
–
–
–
–
–
–
–
–
–
–
–
–
–
–
–
–
–
–
–
–
–
–
–
–
–
–
–
–
–
–
–
–
–
–
–
–
–
–
–
–
–
–
ENGLISH
In order to prevent unauthorized use of the appliance, the power source is to be switched off or locked, for example, by
removing the key of the power switch.
The appliance left unattended are to be secured against unintentional movement.
This appliance is not intended for use by persons (including children) with reduced physical, sensory or mental
capabilities, or lack of experience and knowledge, unless they have been given supervision or instruction concerning
use of the appliance by a person responsible for their safety.
Children should be supervised to ensure that they do not play with the appliance.
Before using the battery charger, ensure that frequency and voltage values, indicated on the machine serial number
plate, match the electrical mains voltage.
Do not pull or carry the machine by the battery charger cable and never use the battery charger cable as a handle. Do
not close a door on the battery charger cable, or pull the battery charger cable around sharp edges or corners. Do not
run the machine on the battery charger cable.
Keep the battery charger cable away from heated surfaces.
Do not charge the batteries if the battery charger cable or the plug are damaged. If the machine is not working as it
should, has been damaged, left outdoors or dropped into water, return it to the Service Center.
To reduce the risk of fire, electric shock, or injury, do not leave the machine unattended when it is plugged in. Before
performing any maintenance procedure, disconnect the battery charger cable from the electrical mains.
Do not smoke while charging the batteries.
Always protect the machine against the sun, rain and bad weather, both under operation and inactivity condition.
Store the machine indoors.
Do not allow to be used as a toy. Close attention is necessary when used near children.
Use only as shown in this Manual. Use only Viper's recommended accessories.
Take all necessary precautions to prevent hair, jewels and loose clothes from being caught by the machine moving
parts.
Do not leave the machine unattended without being sure that it cannot move independently.
Do not use the machine on slopes with a gradient exceeding the specifications.
Do not use the machine in particularly dusty areas.
While using this machine, take care not to cause damage to people or objects.
Do not bump into shelves or scaffoldings, especially where there is a risk of falling objects.
Do not put any can containing fluids on the machine.
The machine working temperature must be between 0°C and +40°C.
The machine storage temperature must be between 0°C and +40°C.
The humidity must be between 30% and 95%.
Do not use the machine as a means of transport.
Do not use the machine on slopes with an inclination higher than 2%.
Do not allow the brushes to operate while the machine is stationary to avoid damaging the floor.
In case of fire, use a powder fire extinguisher, not a water one.
Do not tamper with the machine safety guards and follow the ordinary maintenance instructions scrupulously.
Do not allow any object to enter into the openings. Do not use the machine if the openings are clogged. Always keep
the openings free from dust, hairs and any other foreign material which could reduce the air flow.
Do not remove or modify the plates affixed to the machine.
If the machine is used according to the instructions, the vibrations are not dangerous. The machine vibration level is
less than 2.5 m/s2 (ISO 5349).
The Hand/arm vibration levels are well below 2,5 m/s² (measured according to ISO 5349), which is the limit for an 8
hour continuous working period.
Full body vibrations (ride on machines, measured on the seat) have to be not more than 0,5 m/s² (measured according
to ISO 2631-1), also the limit for 8 hour continuous operation.
This machine cannot be used on roads or public streets.
Pay attention during machine transportation when temperature is below freezing point. The water in the recovery tank
or in the hoses could freeze and seriously damage the machine.
Use brushes and pads supplied with the machine and those specified in the User Manual. Using other brushes or
pads could reduce safety.
In case of machine malfunctions, ensure that these are not due to lack of maintenance. If necessary, request
assistance from the authorised personnel or from an authorised Service Center.
If parts must be replaced, require ORIGINAL spare parts from an Authorised Dealer or Retailer.
To ensure machine proper and safe operation, the scheduled maintenance shown in the relevant chapter of this
Manual, must be performed by the authorised personnel or by an authorised Service Center.
Carefully read all the instructions before performing any maintenance/repair procedure.
Do not wash the machine with direct or pressurised water jets, or with corrosive substances.
The machine must be disposed of properly, because of the presence of toxic-harmful materials (batteries, etc.), which
are subject to standards that require disposal in special centers (see Scrapping chapter).
VIPER machines can be used in combination with standard detergents which can not damage any materials of VIPER
machines (no use of solvents or other aggressive liquid materials). VIPER will not pay any claims regarding using
aggressive detergents in VIPER machine. If you need a special detergent for cleaning purpose, please contact VIPER
dealer.
82089E(1)2009-04A
SCRUBBERS FANG20-EU / FANG20T-EU
5
ENGLISH
USER MANUAL
MACHINE DESCRIPTION
MACHINE STRUCTURE
1. Vacuum ON/OFF switch
16. Transport wheels
2. Brush ON/OFF switch
17. Scrub head
3. Battery level light
18. Scrub head skirt
4. Solution ON/OFF switch
19. Protective rollers
5. Solution control knob
20. Front solution fill
6. Recovery tank drain hose
21. Recovery tank
7. Squeegee assembly
22. Recovery tank lid
8. Brush lift foot pedal
23. Operating triggers
9. Solution tank level sight tube
24. Main power ON/OFF switch
10. Console adjustment levers
25. Reverse switch
11. Rear solution fill
26. Speed control knob
12. Circuit breakers
27. Name plate
13. Squeegee lift lever
/technical data
14. Control housing
28. Key switch
15. Solution tank
29. Squeegee vacuum hose
30. Squeegee adjustment nut & shaft
31. Squeegee mounting handwheel
6
SCRUBBERS FANG20-EU / FANG20T-EU
82089E(1)2009-04A
USER MANUAL
13
2
1
3
ENGLISH
4
28
5
12
6
11
22
10
23
14
21
29
13
9
20
11
8
30
7
31
FANG20-EU
15
19
24
1
3 2 4
16
18
17
26
25
27
12
29
30
31
FANG20T-EU
82089E(1)2009-04 A
SCRUBBERS FANG20-EU / FANG20T-EU
7
ENGLISH
USER MANUAL
ENGLISH
ACCESSORIES/OPTIONS
In addition to the standard components, the machine can be equipped with the following accessories/options, according to the
machine specific use:
Neoprene squeegee blades
For further information concerning the optional accessories, contact an authorised Retailer.
TECHNICAL DATA
FANG20-EU
Model
FANG20T-EU
(1 brush/pad-holder, without drive system)
(1 brush/pad-holder, with drive system)
Machine height
990mm
Solution/clean water tank capacity
50 litres
Recovery water tank capacity
57 litres
Front wheel diameter
76 mm
Front and rear wheel specific pressure on the floor
0.9 N/mm2 - 3 N/mm2
Rear wheel diameter
200 mm
Vacuum system motor power
353 W
Drive system motor power
—
Drive speed (variable)
—
250 W
0 to 4.5 km/h
Gradeability
2%
Sound pressure level at workstation
68 dB(A)
Standard batteries
(2 x 12 V) 95 - 125 Ah @ 20 h
Battery compartment size (length x width x height)
340 x 345 x 300 mm
1,200 mm H O
Vacuum system circuit capacity
2
Cleaning width
508 mm
Squeegee width
712 mm
Machine maximum length
1,300 mm
Machine width without squeegee
560 mm
Brush diameter
508 mm
Weight without batteries and with empty tanks
86 kg
Maximum weight with batteries and full tanks
200 kg
Brush motor power
92kg
206 kg
560 W
Brush speed
200 rpm
Brush/pad-holder pressure with extra-pressure
function turned off
19.0 kg
20.5 kg
Brush/pad-holder pressure with extra-pressure
function turned on
30 kg
30 kg
8
SCRUBBERS FANG20-EU / FANG20T-EU
82089E(1)2009-04A
ENGLISH
USER MANUAL
ENGLISH
WIRING DIAGRAM (FANG20-EU)
Colour codes
BLK
BLU
GRN
RED
WHT
Black
Blue
Green
Red
White
82089E(1)2009-04A
SCRUBBERS FANG20-EU / FANG20T-EU
9
ENGLISH
ENGLISH
USER MANUAL
WIRING DIAGRAM (FANG20T-EU )
Colour codes
BLK
BLU
GRN
RED
WHT
Black
Blue
Green
Red
White
10
SCRUBBERS FANG20-EU / FANG20T-EU
82089E(1)2009-04A
USER MANUAL
ENGLISH
USE
WARNING!
On some points of the machine there are some adhesive plates indicating:
–
DANGER
–
WARNING
–
CAUTION
–
CONSULTATION
While reading this Manual, the operator must pay careful attention to the symbols shown on the plates.
Do not cover these plates for any reason and immediately replace them if damaged.
BATTERY INSTALLATION
WARNING!
The electric components of the machine can be seriously damaged if the batteries are either improperly
installed or connected. The batteries must be install by qualified personnel only. Set the function
Check the batteries for damage before installation.
Disconnect the battery connector and the battery charger plug.
Handle the batteries with great care.
Install the battery terminal protection caps supplied with the machine.
The machine requires two 12 V batteries, connected according to the below diagram.
There are no batteries and charger on the machine from factory, but customers can purchase batteries ( WET or GEL), charger .
1.
2.
3.
Buy appropriate batteries (see Technical Data paragraph).
For battery choice and installation, apply to qualified battery Retailers.
Set the machine and the battery charger (if equipped) according to the type of batteries installed (WET or GEL) as shown in
the following paragraph.(in detail see remark)
BATTERY CHARGER SETTING
1.
2.
The charger default setting is common position for AGM,Gel,SLA,VRLA from factory
If need use WET position only for lead batteries please contact dealer
82089E(1)2009-04A
SCRUBBERSFANG20-EU / FANG20T-EU
11
ENGLISH
USER MANUAL
BEFORE MACHINE START-UP
PRE-OPERATION CHECKS
1.
2.
3.
4.
Sweep or dust mop the surface to be cleaned.
Check battery meter to make sure batteries are fully charged. (see BATTERY CHARGING)
Check that squeegee is properly installed.
Check that brush / pad is properly installed.
INSTALLING PAD DRIVER OR BRUSH
1.
2.
3.
Ensure that the machine is turned off.
Lower brush head assembly to the floor by stepping on the foot pedal and pushing pedal forward.
Tilt the machine backward to access the drive motor hub.
NOTE
Remove the squeegee assembly prior to tilting the machine backwards. It makes the process faster and easier.
WARNING!
Do not keep the machine tilted back for a long time. This could cause battery acid to leak from the batteries.
4.
5.
If using a pad driver, first attach the appropriate pad to the pad driver surface.
Mount the pad driver or brush to the drive motor hub by lining up the three studs with the three holes in the drive motor hub.
Once in the holes, rotate the driver toward the spring clip to lock driver into place.
MOUNTING THE SQUEEGEE
1.
2.
3.
Pull back on the squeegee lift lever to raise the squeegee bracket up.
Loosen the two knobs on the squeegee and slide the squeegee into the slots at the rear of the squeegee bracket. (the wheels
on the squeegee point to the back)
Tighten the knobs securely.
FILLING THE SOLUTION TANK
1.
2.
3.
The Fang 20-EU / Fang 20T-EU can be filled in two different locations:
a. Front fill area for use with a hose or a bucket.
b. Rear fill area for use with a hose only.
Determine which fill area you would like to use to fill the machine with water.
Fill solution tank with up to 48 liters of water. (water temperature should not exceed 40° C) The clear tube in the back left
of the machine has gallon markers to help determine the water level in the solution tank.
NOTE
If you are filling the solution tank with a bucket, make sure the bucket is clean. This will prevent debris from clogging
the lines or solenoid.
WARNING!
Do not put any flammable materials into solution tank. This can cause an explosion or a fire. Only use recommended cleaning chemicals. Contact your janitorial supply distributor for recommendations on proper chemicals.
12
SCRUBBERS FANG20-EU / FANG20T-EU
82089E(1)2009-04A
USER MANUAL
ENGLISH
MACHINE START AND STOP
WARNING!
Do not operate machine unless you have read and understand this manual.
1. Set control housing to a comfortable operating height by squeezing together the two thumb
levers directly underneath the housing. (see machine components, item #10)
2. Lower squeegee assembly to the floor by releasing the lift lever from its locked position.(see machine components, item #13)
3. Lower brush head assembly to the floor by stepping on the foot pedal and pushing pedal forward. (see machine components,
item #8)
4. Turn main power to “on” position.(see machine components,item#24)
5. Turn brush motor to “on” position. (see machine components, item #2)
6. Turn vacuum motor switch to “on” position.(see machine components, item #1)
7. Turn the solution switch to “on” position. (seemachine components, item #4)
a. Solution will not begin to flow until the operating triggers are pulled.
8. The Fang 20T-EU is self-propelled.The speed can be controlled by a dial located on the right side of the control housing.(see
machine components,item #26)
9. The Fang 20T-EU has reverse.In order to activate reverse,there is a toggle switch located on the left side of the control housing.(see
machine components,item #25)
10. To begin scrubbing, pull on one or both of the red operating triggers. (see machine components, item #23) When these triggers
are pulled, the brush will begin to spin and the solution will begin to flow.The Fang 20T-EU will propel itself.
11. The Fang 20-EU Begin scrubbing by moving the machine forward. : Do not keep the machine in the same position with the pad /
brush spinning, or you could cause damage to the floor.
WARNING!
Do not keep the machine in the same position with the pad / brush spinning, or you could cause damage
to the floor.
12. Adjust amount of solution flow by turning the solution control knob. Turn to the right for more solution, or turn left for less
solution. (see machine components, item #5)
NOTE
For correct scrubbing/drying of floors at the sides of the walls, Alto suggests to go near the walls with the right side of
the machine as shown .
A
B
CAUTION!
To avoid any damage to the floor surface, turn off the brush/pad-holder when the machine stops in one
place, especially when the extra pressure function is on.
82089E(1)2009-04A
SCRUBBERS FANG20-EU / FANG20T-EU
13
ENGLISH
USER MANUAL
Solution flow adjustment
1.
2.
Turn the solution switch (A) to “ON” position.
Adjust amount of solution flow by turning the solution control knob (B), turn left (counter-clockwise) for more solution, or Turn right
(clockwise) for less solution. The pin (C) is limit position of the solution control knob (B).
NOTE
Even if turn on the solution switch (A) ,the solution will not begin to flow until the operating triggers (D) are pulled.
Battery discharge during operation
Until the green warning light (3)stays on, the batteries allow the machine to work normally.
When the green warning light (3) turns off, and the yellow warning light (3) turns on, it is advisable to charge the
batteries, because the residual autonomy will last for a few minutes (depending on battery characteristics and work to be
performed).
When the red warning light (3) turns on, the autonomy is over. After a few seconds, the brush/pad-holder is automatically
tuned off, while the vacuum system and the drive system stay on, to finish drying the floor and drive the machine to the
appointed recharging area.
CAUTION!
Do not use the machine with discharged batteries, to avoid damaging the batteries
and reducing the battery life.
14
SRUBBERS FANG20-EU / FANG20T-EU
82089E(1)2009-04 A
USER MANUAL
ENGLISH
WHILE OPERATING MACHINE
1. Occasionally look through the clear recovery tank lid to see if there is any foam build-up. If excessive foam is found, add defoamer
to the recovery tank.
WARNING!
Foam must not enter the float shut-off screen, or damage can occur to the vacuum motor. Foam will not
activate the machines float shut-off device.
2. Occasionally view the clear tube at the back left of the machine to check the amount of cleaning solution that is left in the machine.
3. Occasionally check the battery level meter. (see machine components, item #3) When meter is in the red, recharge the batteries.
WARNING!
When battery meter is in the red, do not continue to operate the machine. Battery damage may result.
4. If the squeegee assembly leaves streaks on the floor, raise the squeegee off the floor and wipe the blades down with a damp cloth.
WARNING!
Do not use your fingers to wipe or remove debris from the blades, as injury may occur.
5. When the solution tank runs empty, turn off the brush switch, solution switch and raise the brush head. Keep the squeegee down
and continue to vacuum until all the dirty water is picked up. (see TANK DRAINING section to learn how to drain recovery and solution
tanks)
NOTE
The brush motor is circuit breaker protected to protect it from damage. If this breaker trips, it can’t be reset immediately.
You must first determine what caused the breaker to trip, and allow the motor to cool down before you can reset the
breaker. The breaker is located on the back panel of the control housing.
82089E(1)2009-04A
SCRUBBERS FANG20-EU / FANG20T-EU
15
ENGLISH
USER MANUAL
TANK DRAINING
1.
2.
Turn the power off on the machine.
With the squeegee and brush head in their “up” position, transport machine to approved area for draining tank(s).
DRAINING THE RECOVERY (DIRTY) TANK
NOTE
Any time scrubbing is completed, or when refilling solution tank, the recovery tank should be drained and cleaned.
WARNING!
If the recovery tank is not drained when the solution tank has been refilled, foam or water may enter the float
shut-off mechanism and cause damage to the vacuum motor.
1.
2.
Remove the drain hose from the holder, and place the drain hose over the floor drain. Twist off the drain hose plug to begin the
draining process. In order to completely empty the recovery tank, hinge opens the recovery tank and let it rest on the support stand.
Clean the recovery tank after every use. Use a fresh water hose to rinse out the recovery tank. Be careful not to spray water into the float shut-off mechanism.
NOTE
If you are storing the machine for any period of time, always leave the clear recovery tank lid off the tank so the tank
can dry completely and smell fresh.
3.
Replace the drain hose plug tightly as soon as you are done draining the tank.
DRAINING THE SOLUTION (CLEAN) TANK
NOTE
Any time scrubbing operation is completed, the solution tank should be drained and cleaned.
1.
2.
3.
4.
Pull down on the clear tube (back left of the machine) to remove it from the hose barb. This will allow the solution to flow freely
into a bucket or floor drain.
Rinse the solution tank with clean water after every use. This will help prevent chemical buildup and clogging of the solution lines.
With clean water in solution tank, turn machine power on, solution switch “on” and pull the operating triggers. This will allow the
clean water to flush through and clean the solution plumbing.
Once tank is rinsed, flushed and drained, reconnect the clear tube to the hose barb. Be sure the tube is pushed all the way up
on the hose barb.
16
SCRUBBERS FANG20-EU / FANG20T-EU
82089E(1)2009-04A
USER MANUAL
ENGLISH
BATTERY CHARGING
NOTE
For the best machine performance, keep batteries charged at all times. Do not let them sit in a discharged condition.
CAUTION!
Use only approved chargers with the following specifications:
z
Automatic shut off circuit
z
Deep cycle charging
z
Output current of 10-20 Amps
z
Output voltage of 24 Volts
CAUTION!
Batteries are dangerous! Batteries emit hydrogen gas and an explosion or fire can result. Keep sparks and fire
away from batteries at all times. When charging the machine, make sure the battery compartment is left open.
1.
2.
3.
4.
Place charge and machine in a well ventilated area.
Turn machine off.
Open recovery tank up, exposing battery compartment .
Check fluid level in each battery cell. Do not charge batteries unless fluid is slightly covering the battery plates. Do not overfill the
batters. Overfilling may cause the batteries to overflow during charging due to expansion. Replace the caps prior to charging.
5. Plug approved charger into grounded wall out let before plugging the charger into the machine.
6. Plug charger into red charger receptacle located in the front left of the battery compartment.
7. Flip up the recovery tank “Kick stand” and gently lay the recovery tank down until it rests on the stand.
8. The charter will automatically begin to charger the batteries, and it will automatically shut down once the batteries are fully
charged.
9. Upon completion of charging, first unplug the charger from the wall outlet, and then disconnect the charger from the machine.
10. Check the battery level after charging is complete. If fluid level is low, add distilled water to bring the fluid level up to the bottom of
the sight tubes. Replace the caps and wipe the batteries down with a towel.
82089E(1)2009-04A
SCRUBBERS FANG20-EU / FANG20T-EU
17
ENGLISH
USER MANUAL
MAINTENANCE
DAILY MAINTENANCE
1.
2.
3.
4.
5.
6.
Remove pad driver / brush and clean with approved cleaner.
Drain recovery and solution tanks completely and rinse out with clean water. Visually check the recovery tank for debris and clean out as necessary.
Raise squeegee assembly off floor and wipe it down with a damp towel. Be sure to store the squeegee in the up position.
Remove the float shut-off assembly and rinse it out with clean water.
Clean machine with an approved cleaner and a damp towel.
Recharge batteries.
WEEKLY MAINTENANCE
1.
2.
3.
Check fluid level in batteries.
Check batteries for loose or corroded cables.
Keep battery tops clean from corrosion.
MONTHLY MAINTENANCE
1.
2.
3.
Check machine for leaks and loose fasteners.
Lubricate all grease points and pivot points with silicon spray and approved grease.
Place machine over a floor drain. Flush solution system by pouring 10 liters of hot water and approved alkaline detergent into
the solution tank and running machine (with solution control on) for 45 seconds. Turn machine off and let it sit overnight. Then
next day, drain the remaining solution and rinse the solution tank out with clean water.
VACUUM SYSTEM MOTOR FILTER CLEANING
1.
2.
3.
4.
5.
6.
Drive the machine on a level floor.
Turn the ignition key (28) to “0”.
Open the recovery water tank.
If necessary, drain the water from the tank in order to make the filter visible.
Check that the pre-filter is clean. If necessary clean it with water and compressed air, then install it.
Perform steps 1, 2 and 3 in the reverse order.
SOLUTION/CLEAN WATER FILTER CLEANING
1.
2.
3.
Drive the machine on a level floor.
Turn the ignition key (28) to “0”.
Remove the transparent cover (D), then remove the filter strainer (B). Clean and install them on the support (A).
NOTE
The filter strainer (B) must be correctly positioned on the housing (E) of the support (A).
18
SCRUBBERS FANG20-EU / FANG20T-EU
82089E(1)2009-04A
USER MANUAL
ENGLISH
SQUEEGEE BLADE CHECK AND REPLACEMENT
Clean the squeegee (Fig. 5) as shown in the previous paragraph.
Check that the edge (E, Fig. 5) of the front blade (C) and the edge (F) of the rear blade (D) lay down on the same level, along
their length; otherwise adjust their height according to the following procedure:
• Remove the tie rod (G), disengage the retainers (M) to adjust the rear blade (D); then engage the retainers and install the
tie rod.
• Loosen the handwheels (I) and adjust the front blade (C); then tighten the handwheels.
Check the front blade (C) and rear blade (D) for integrity, cuts and tears; if necessary replace them as shown below. Check
that the front corner (J) of the rear blade is not worn; otherwise, overturn the blade to replace the worn corner with an integ ral
one. If the other corners are worn too, replace the blade according to the following procedure:
• Remove the tie rod (G), disengage the retainers (M) and remove the retaining strip (K), then replace/overturn the rear
blade (D). Install the blade in the reverse order of removal.
• Unscrew the handwheels (I) and remove the retaining strip (L), then replace the front blade (C). Install the blade in the
reverse order of removal.
After the blade replacement (or overturning), adjust the height as shown in the previous step.
Connect the vacuum hose (29) to the squeegee.
Install the squeegee (7) and screw down the handwheels (31).
If necessary, adjust the squeegee adjusting handwheel (30).
1.
2.
3.
4.
5.
6.
BRUSH/PAD CLEANING
CAUTION!
It is advisable to wear protective gloves when cleaning the brush/pad because there may be sharp debris.
1.
2.
3.
4.
Remove the brush/pad from the machine, as shown in Use chapter.
Clean and wash the brush/pad with water and detergent.
Check the brush bristles for integrity and wear; if necessary, replace the brush.
Check the pad for wear; if necessary, replace the pad.
82089E(1)2009-04A
SCRUBBERS FANG20-EU / FANG20T-EU
19
ENGLISH
USER MANUAL
BASIC TROUBLESHOOTING
PROBLEM
No power
Brush motor does
not run
Vacuum motor does
not run
Short run time
Little or no solution
flow
CAUSE
Batteries gives no electricity
Batteries need to be charged
Loose battery cable
Batteries not connected properly
SOLUTION
Replace batteries
Charge batteries (see Battery Charging)
Tighten loose cable(s)
Follow battery installation instructions
Bad brush switch
Brush circuit breaker has tripped
Rectifier has burned out
Bad wiring
Brush motor is not turing around
Carbon brushes worn out
Bad solenoid
Contact Viper dealer
Check brush motor for obstructions and reset breaker
Contact Viper Dealer
Contact Viper Dealer
Contact Viper Dealer
Contact Viper Dealer
Contact Viper Dealer
Bad vacuum switch
Bad wiring
Bad vacuum motor
Carbon brushes worn out
Batteries need to be charged
Batteries need maintenance
Bad cell in battery(s)
Bad charger
Bad solution switch
Contact Viper Dealer
Contact Viper Dealer
Contact Viper Dealer
Contact Viper Dealer
Charge batteries (see Battery Charging)
See Battery Maintenance in this manual
Replace batteries
Replace charger
Contact Viper Dealer
Contact Viper Dealer
Remove filter and clean
Remove solution line and clean
Increase flow by twisting solution adjustment knob to the
Solution flow adjustment knob in need
right. Decrease flow by twisting solution adjustment knob
of adjustment
to the left.
Poor water pick up
Squeegee clogged
Clean debris off squeegee with damp towel
Squeegee blades worn
Install new squeegee blades
Confirm that the squeegee assembly is securely fastened
Squeegee not mounted correctly
to the machine and not loose fitting.
Check hose connections and make sure they are firm.
Vacuum hoses have a hole or are loose
Replace hose if damaged.
Vacuum hose may be clogged
Check hose for debris and remove any clog.
Drain hose stopper is loose
Tighten drain plug.
Batteries need to be charged
Charge batteries (see Battery Charging)
Tighten vac motor mounting screws. Do not overtighten or
Vacuum motor is loose
damage will occur.
Recovery tank lid is loose
Confirm the clear recovery tank lid is securely in place.
Drain recovery tank and tilt tank on side. Check the inlet
Recovery tank inlet hole is clogged
hole for debris and remove debris.
Recovery tank is full
Drain recovery tank.
Remove float shut off from inside recovery tank and
Float shut off is clogged
remove any debris.
20
Clogged solution solenoid
Clogged solution filter
Solution line obstructed
SCRUBBERS FANG20-EU / FANG20T-EU
82089E(1)2009-04A
ENGLISH
USER MANUAL
SCRAPPING
Have the machine scrapped by a qualified scrapper.
Before scrapping the machine, remove and separate the following materials, which must be disposed of properly according to the
Law in force:
–
Batteries
–
Brushes/pads
–
Plastic hoses and components
–
Electrical and electronic components (*)
(*)
Refer to the nearest Viper Center especially when scrapping electrical and electronic components.
NOTE
If the machine has an optional battery charger installed, the machine cannot operate if the charger is not on board. In
case of battery charger malfunction, contact an authorised Service Center.
For further information refer to the Service Manual, available at any Viper Service Center.
REMARKS
CAUTION!
The use of non-genuine spare parts, accessories, Batteries and chargers can impair the safety of the
appliance. Only use spare parts and accessories from VIPER and use batteries and chargers which VIPER
recommend. When using non-certified and not recommended batteries and chargers, VIPER will not cover the
cost of damages (warranty) caused of this.
The following are batteries installing instruction:
a)
Batteries (WET or GEL) already installed and ready to be used
1. Check that the batteries are connected to the machine with the charger plug.
2. Insert the ignition key (28) and turn it to "on".
If the green warning light (3a) turns on, the batteries are ready to be used.
If the yellow or red warning light (3) turns on, the batteri es must be charged (see the procedure in Maintenance
chapter).
b)
Batteries (WET) installed on the machine, but without electrolyte
1. Open the cover (22) and check that the recovery water tank (21) is empty, otherwise empty it with the drain hose (6).
2. Carefully lift the tank (21).
WARNING!
Pay attention when using sulphuric acid, as it is corrosive. If it comes in contact with skin or eyes, rinse
thoroughly with water and consult a physician.
Batteries have to be filled in a well-ventilated area. Wear protective gloves.
3.
4.
5.
6.
Fill up the battery cells with sulphuric acid for batteries (density 1.27 to 1.29 kg at 25°C) in accordance with the instructions
shown in the Battery Manual. The correct quantity of sulphuric acid is shown in the Battery Manual.
To avoid damaging the floor, dry with a cloth both acid and water on the top of the batteries after charging.
Let the batteries rest and fill in with sulphuric acid in accordance with the instructions shown in the Battery Manual.
Charge the batteries (see the procedure in Maintenance chapter).
Viper Europe
Sognevej 25 DK-2605 Brondby Denmark
82089E(1)2009-04A
SCRUBBERS FANG20-EU / FANG20T-EU
21