1
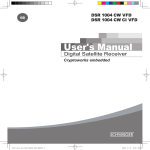
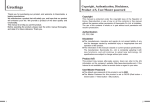
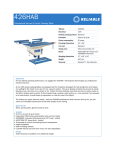
Front Panel ENG_112620 2 1 4 3 1. DISPLAY. 4-digit 7-segment display for channel information. 2. STAND BY(POWER) Switch the receiver power "ON" or "OFF". 3. CH ▲/▼ ( Program ▲/▼) Channel Up/Down or select item of sub-menu. 4. Smart card Slot 1 Slot for smart card (insert with chipside to up). Rear Panel 1 2 3 6 4 7 5 1. 12V IN Power supply connection. 5. USB Connect the USB memory with USB cable. 2. S/PDIF(Optical) To connect a digital amplifier output. 6. ANT IN To connect the digital CATV RF in Signal. 3. SCART FOR TV Connect this port to the TV via SCART cable. 7. 4. HDMI/DVI Use the HDMI cable to connect this jack to the HDMI jack on your television for the best quality picture. LOOP OUT Used to connect a RF signal from the STB to either the RF input jack on your television or to the next STB. Note The design of the Front/Rear Panel may be changed without any notice in advance. STB_Adrenio_Cab_112620_KCF-SA700PCO_Eng.indd 2 2/17/2011 11:16:28 AM H4_ENG_112619 Please read the entire manual thoroughly and retain it for future reference. The company will not take any responsibility for accidents or damage resulting from careless handling by the user. User's Manual Digital Cable Receiver General Safety Warning Connection 2. Teletext Press the Teletext button to select the Teletext. Sub-T (subtitle) 1. To connect Cable Antenna Press the SUB-T button, then you can see the subtitle menu. Press arrow up or arrow down button and set the function subtitle with the OK button on or off. Connect the antenna cable to ANT IN. 2. To connect TV / VCR 3. Once, Daily, Weekly Reservation The user can reserve a desired program at a desired time by using the Timer function. Connect SCART cable to the receiver. 3. To connect Digital Audio System 4. Loop Through CAUTION : To reduce the risk of electrical shock, do not remove the cover. No user serviceable parts inside. Refer any servicing to qualified Service personnel. • • • • • • • • • • • • • • • • • • • Always follow these instructions to avoid the risk of injury to yourself or damage to your equipment. Unplug the receiver from the AC power outlet before cleaning. Use only a damp cloth for cleaning the exterior of the receiver. Do not use accessories or attachments not recommended by the receiver manufacturer as they may cause problems to the equipment and will avoid the warranty. Do not place the receiver on an unstable cart, stand, tripod, bracket, or table. The receiver may fall, causing serious personal injury and damage to the receiver. Do not block or cover the slot opening in the receiver. (These are provided for ventilation and protection from overheating.) Never place the receiver near or over a radiator or any heat source. Do not place the receiver in an enclosure such as a cabinet without proper ventilation. Do not stack the receiver on top of or below other electronic devices. The apparatus shall not be exposed to dripping or splashing and with no object filled with liquids, such as vases, shall be placed on the apparatus. Operate the receiver using only the type of power source indicated on the marking label. Unplug the receiver power cord by gripping the power plug, not the cord. Route power supply cord so that are not likely to be walked on or pinched by items placed upon or against them. Pay particular attention to the cords that plugs in the convenience receptacles, and the point where they exit from the unit. Use an outlet that contains surge suppression or ground fault protection. Do not keep the apparatus in the following situations: Doing so might cause Problems. - where is it too hot or cold. - where there is high humidity. - where there are excessive temperatures, for example in front of aiconditioners or heating vents. - where there is dust or soot - in confined areas where the heat cannot be released. - where it is exposed to directly sunlight. For added protection during a lightning storm, or when the receiver is left unattached and unused for long periods of time, unplug it from the wall outlet and disconnect the lines between the receiver and the antenna. This will provide some protection against electrical damage caused by lightning or power line surges. The mains plug is used as the disconnect device. The disconnect device shall remain readily operable. Servicing • Do not attempt to service the receiver yourself, as opening or removing covers may expose you to dangerous voltage, and will avoid warranty. Refer all servicing to authorized service personnel. STB_Adrenio_Cab_112619_KCF-SA700PCO_Eng.indd 1 4. Simple Channel List Connect coaxial cable to the Loop Through on the STB and connect the other STB, or a TV (analog). Note The design of the Rear Panel may be changed without any notice in advance. CAUTION RISK OF ELECTRIC SHOCK DO NOT OPEN Pressing the YELLOW button to use the ▲/▼/◄/► buttons in the Timer Setting screen to select the date and time. Timer Setting screen to select the date and time.(The PIN Code is required if Menu Lock is On) Connect S/PDIF coaxial cable to a digital amplifier. Menu Application 1. When you press OK button during receiving service stream, you can get Channel List view. 2. Using ▲/▼ buttons in Channel List view, you can choose another channel. Channel List Press the MENU button on the remote control unit. You will see the Main Menu on the screen. 1. Press the ▲/▼/◄/► buttons to move to sub menu. 2. Press the OK button to select or confirm menu. 3. Press the MENU button to return to previous menu. 4. Press the EXIT button to quit the menu. This menu helps you to easily select the channel that you want to watch. You can see the channel list when you had searched before. To use this menu, you should set channel group you want in the Edit Channel List menu. 1. To see the available channel list, press OK and then use the SUB-T(Red) button. The channel list moves in the following sequence : ALL → Favorite from 1 to 8 → Lock Easy Installation You will see only Easy Installation menu at first when you plug in your system. The Easy Installation gives you the convenience of selecting various languages, adjusting the time and channel search. Edit Channel List From these menus, You can edit favorite lists, lock, skip, delete, or move channel. Access about the Menu button, Edit Channel List, OK, PIN Code (default 0000) and the red button. 1. Favorite Channel 1. Language The Language of Menu, Audio, or Subtitle will be changed to the selected language. 2. Screen Type You can edit favorite TV and Radio list. Choose your picture format (16:9 / 4:3 Pilar Box / Full Screen) 2. Lock Channel 3. Local Time From here you can lock channels in any of the list in order to prevent your children from watching. You can set your local time according to your location. 4. Channel Search You can search the channels according to the Automatic or Manual mode. 3. Skip Channel You can skip TV or Radio channel from the current list. 4. Genre Channel You can edit TV and Radio list of the genre which is various. (Movie, News and Factual, Entertainment, Sport, Children’s, Factual, Education, Lifestyle, Drama, Music, Arts, Current Affairs, Special, Comedy, Documentary.) Menu Guide Basic Function 1. Program Information Banner If you press the INFO button, you will see the information box. Note If you press the button below, the banner will be displayed like the following. 1. Right button → Next information banner. 2. INFO button → Channel information banner. 2/17/2011 11:14:04 AM 8. Channel Lock If you select On, you may need PIN code every time you select the lock channel program as Program Guide Select “Program Guide” in the main menu with the UP/DOWN buttons and press the OK button. 1.Grid EPG Program Guide • Press UP/DOWN buttons to change channels. You can find out channel Information at top screen. • Press OK button, you can charge channel as well. •P ress LEFT/RIGHT buttons to check the existing EPG info as per its time. • In case detailed info content is too long to check, you can check its information as a long lists form, and resize its lists by pressing BLUE button. • Press GREEN button in oder to sort channel lists. 2.Reservation from EPG • Selects the desired program to be reserved from the EPG screen. • Pressing the YELLOW button will open the Reserve window. • Press OK buttons to select mode Once, Daliy, Weekly, or Off. you set in the channel control. 9. Receiver Lock If you select On, you will have to enter the PIN code every time you start the receiver 10. Menu Lock If you select On, you will have to enter the PIN code every time when you enter the Menu. 11. Parental Control from standby. Parental Control enables you to place certain restrictions on the viewers by setting age limits. The password is required to view the blocked programmes. Press the UP/DOWN button to select to the desired option and press the OK button. 12. S/PDIF Output You can hear digital audio of the Dolby 5.1 channel using S/PDIF Output. • If selecting OFF, the digital audio will not be output. • When selecting PCM, the unzipped digital audio is output through S/PDIF. • When selecting Dolby Digital, if the current channel is a Dolby audio channel, the zipped Dolby stream is output through S/PDIF. 13. Auto Power System Setting You will be asked to enter your PIN code before you can enter this menu. The PIN code preset to 0000 from the factory. The code can be changed from the Change PIN Code menu . If you want to customize the system to suit you better, you can specify some settings from the submenus in the System Setting menu. 1. Menu Language / Audio Language / Subtitle Language In this menu you can change default language for menus, audio, and subtitle when changing services. 2. SD Video Output If your SCART supports RGB control, select RGB. Otherwise select CVBS. 3. Screen Type If you have a TV set with the 4:3 picture format and the transmission is in 16:9, you can select 4:3 letterbox, 4:3 full screen, and 16:9 full screen. 4. Banner Time You can select for how long the banner will be shown. 5. Local Time You can set your local time according to your location. 6. Menu Transparency Give the variable transparency on Video and OSD screen. 7. Change PIN Code From here you can change the PIN code from the standard 0000. DO NOT FORGET IT! Without it, you are not able to access to any of the functions where the code is required. Note If you forget the PIN code, press the RGYB(Color) button in sequence. (i.e. Red → Green → Yellow → Blue button) The PIN code will be changed to 0000. STB_Adrenio_Cab_112619_KCF-SA700PCO_Eng.indd 2 If the Auto Power is set to On and power is off, the Set turns on automatically and turns into the channel mode which you were watching before power breakdown. If you continue from here, all your previous settings and all channels will be cleared. The default data will be loaded. 14. Factory Reset Use this option only if you have to start the complete installation procedure from scratch. 15. OTA Upgrade To set up OTA Upgrade. It is possible to set up OTA upgrade manually or automatically. 16. System Information Displays the system information PVR Connect a USB memory device to the receiver by using the USB port and select "Information" in "PVR Menu." • File List : Displays the recorded files. It plays the image that has been recorded on File List. When you press the Yellow button on File List, you can select File List or Image Viewer. (Only JPG format available) In order to see a JPG image, press the Yellow button and select Image Viewer. You cannot see JPG images on File List. • Format HDD : Formats the hard disk. When you format the • PVR Setting - D efault HDD Volume - I nstant Replay Press the replay button to jump back and play from that location. When the replay is completed the program will play from the current point. You can set the replay time interval by using the PVR Setting menu. - C ommercial Skip Press the skip button to jump forward and play from that location. When the skip is completed the program will play from the current point. You can set the skip time interval by using the PVR Setting menu. - R ecording Notify Duration To set duration icon appears. - Time Shift To select Time Shift Off or On. - T ime Shift Recording Time To set recording Time. • Information : Displays information of hard disk that is connected to the receiver. CA System (Option) The menus are provided by Smartcard. Your receiver is equipped with one Smartcard slot, Plug in the appropriate a valid Smartcard. You will then have access to the respective scrambled and Pay-Per-View services. Insert the Smartcard into the Slot on the front panel. (Chip side down) If you insert the Smartcard into the Smartcard slot then you can watch you selected channel. Utility You can use Utilty menu which is various. (Calendar, Mail Box) Troubleshooting Problem No display LED on the front panel. No power supply Power cord plug in correctly. No Picture Ensure that the STB is switched on. Check connection and correct. Check channel and video output and correct Poor picture quality Check the signal level, and the antenna cable. No Sound Check the volume level of the TV and STB. Check the mute status of the TV and STB. Check the connection of audio cord. Remote Control does not operate Point remote control directly towards the receiver. Check and replace batteries. Check that nothing blocks the front panel. Service is not running or scrambled Check the whether the Common Interface module and smart card is correctly inserted. Check that the smart card is appropriate for the selected service. You have forgotten your secret PIN code Refer to Change PIN code of this owner's manual. hard disk, the KaonPVR folder is created. To set default HDD Volume. If HDD has one partition, you can set for Volume 0. If HDD has two partition, you can set for Volume 1. - Default Record Duration To set the default record duration. Solution 2/17/2011 11:14:04 AM Remote Control Unit 2 STANDBY 4 5 6 7 9 TV/RADIO AUDIO RECORDED LIST 11 OK MUTE 1 NUMERIC BUTTONS 3 TV/STB EXIT MENU 8 UP/DOWN/LEFT/RIGHT 10 CH (CHANNEL) 12 13 VOL (VOLUME) REW PLAY REPLAY RECORD COLOR BUTTONS DISPLAY SUB-T RECALL 14 17 15 16 18 19 21 20 FF PAUSE SKIP STOP 22 23 24 27 26 25 28 Accessories User’s Manual E A A F B E SLEEP TEXT EPG 1 MUTE Press to enable or disable audio. 2 STANDBY Press to switch between operation and standby mode. 3 Numeric buttons Press to select the channel and enter the channel edit and PIN code. 4 TV/STB Press to switch between TV and STB receive mode. 5 TV/RADIO Press to switch between TV and Radio. 6 EXIT Press to return the normal viewing mode from a menu. 7 AUDIO To select the sound mode. (Mono, Left, Right, Stereo) 8 MENU Press to display the main menu on the screen or return to the previous menu. 9 RECORDED LIST To open the recorded list screen. 10 //◄/► (Arrow buttons) Press to move the cursor to the up, down, left or right menu option. You can also increase or decrease the volume by pressing the ◄ or ► button. 11 OK Press to selects a menu, or confirms the selected operation. 12 CH (Channel) Press to change the channel. 13 VOL (Volume) Press to adjust the volume. 14 REW Used for rewinding. 15 Play Used for playing files. 16 Pause Used for pausing files. 17 FF Used for fast-forwarding. Remote Control C C D AAA Batteries (2pcs) RCA Cable 18 REPLAY Press to jump back and plays from that location. 19 Record Saves the current channel to the external HDD. 20 Stop Used for stopping record or play. 21 SKIP Press to jump ahead in a recording. 22 Color buttons Red button(MAIL): To select button in the On Screen Display(OSD). Green button(SORT): To sort channel list. To select button in the On Screen Display(OSD). Yellow button(TIMER): To display the reserved list. To select button in the On Screen Display(OSD). Blue button(INFO): Shows the information field To select button in the On Screen Display(OSD). 23 DISPLAYIf you press shortly: To change resolution of HD picture (1080i, 1080p, 720p, 576p). If you press long: To change screen size. 24 SUB-T Press to enable or disable subtitle. 25 TEXT Press to see the teletext by OSD. (Option) 26 SLEEPPress more times to select a present time interval for automatic shut off. 27 RECALL Press to return to the previous channel. 28 EPG Press to display the TV/radio program guide. Note 1. When inserting batteries, make sure that the polarity (+/-) is correct. 2. The design of the Remote Control Unit may be changed without any notice in advance. STB_Adrenio_Cab_112620_KCF-SA700PCO_Eng.indd 2 2/17/2011 11:18:17 AM