1
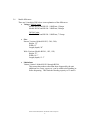
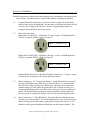
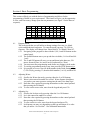
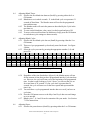
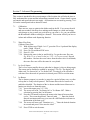
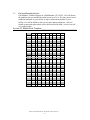
BLENDTEC
DIVISION OF
K-TEC, INC
1206 SOUTH 1680 WEST
OREM, UTAH 84058
USA
801.222.0888 TELEPHONE
801.762.0369 FACSIMILE
DOCUMENT NUMBER
OWN-CE-004
DOCUMENT TITLE
Model BI Owners’ Manual – Blender with Ice Dispenser
For Models BI-501, BI-502, BI-503, BI-504, BI-505, BI-506
REVISON
02
RELEASE INFORMATION
Approval Signatures/Dates
Created By
B. Moore 6/4/08
Check
S. Johnson 6/11/08
Asst. Prod. Mgr.
L. Archuleta 6/4/08
T. Rassier 6/12/08
Prod. Mgr.
Mat. Mgr.
K. Andrews 6/4/08
B. Hanson 6/17/08
Eng. Mgr.
Comp. Mgr.
N. Shelley
Sales Mgr.
G. Wright
Revision
1
2
Date
11/10/2004
6/18/2008
Change History
Initial Release
Various updates
DCN#
UK
2057
PROPRIETARY INFORMATION:
THIS DOCUMENT AND ALL INFORMATION CONTAINED HEREIN SHALL NOT BE COPIED, REPRODUCED, OR DISCLOSED WITHOUT EXPRESS WRITTEN
AUTHORIZATION BY K-TEC INC.
OWN-CE-004 Manual, BI Rev 02 Blender with Ice Dispenser
-1-
Table of Contents
Section
Page
1.0 Important Safeguards . . . . . . . . . . . . . . . . . . . . . . . . . . . . . . . . . . . . . . . . . . . . . . . 3
2.0 Introduction . . . . . . . . . . . . . . . . . . . . . . . . . . . . . . . . . . . . . . . . . . . . . . . . . . . . . . 5
3.0 Installation . . . . . . . . . . . . . . . . . . . . . . . . . . . . . . . . . . . . . . . . . . . . . . . . . . . . . . . 7
3.1 Counter Placement
3.2 Electrical Connections
3.3 Water Connection
3.4 Drain Connection
4.0 Basic Operations . . . . . . . . . . . . . . . . . . . . . . . . . . . . . . . . . . . . . . . . . . . . . . . . . . .8
4.1 Loading Ice
4.2 Making Drinks
4.3 Dispense Ice Only
4.4 Dispense Water Only
4.5 Run Blender Only
5.0 Cleaning and Sanitizing . . . . . . . . . . . . . . . . . . . . . . . . . . . . . . . . . . . . . . . . . . . . . .9
5.1 After Each Use
5.2 Jar Care
5.3 Short Term
5.4 Long Term
6.0 Basic Programming . . . . . . . . . . . . . . . . . . . . . . . . . . . . . . . . . . . . . . . . . . . . . . . . . 11
6.1 Program Mode
6.2 Adjusting Water
6.3 Adjusting Ice
6.4 Adjusting Blend Times
6.5 Adjusting Blend Cycles
6.6 Adjusting Pause
6.7 Changing the Drink Size Ratio
7.0 Advanced Programming . . . . . . . . . . . . . . . . . . . . . . . . . . . . . . . . . . . . . . . . . . . . 14
7.1 Calibration
7.2 Water Flow Rate
7.3 Ice Temperature Range
7.4 Small Drink Default
7.5 Ice Buster
7.6 Restore Defaults
7.7 Locking the Machine
7.8 Drink Counts
7.9 Advanced Blend Cycle Control
8.0 Troubleshooting . . . . . . . . . . . . . . . . . . . . . . . . . . . . . . . . . . . . . . . . . . . . . . . . . . 17
9.0 Warranty Information including Service. . . . . . . . . . . . . . . . . . . . . . . . . . . . . . . .19
10.0 Blank Drink Template . . . . . . . . . . . . . . . . . . . . . . . . . . . . . . . . . . . . . . . . . . . . .20
OWN-CE-004 Manual, BI Rev 02 Blender with Ice Dispenser
-2-
Section 1: Important Safeguards___________________________________
READ ALL INSTRUCTIONS CAREFULLY BEFORE USING YOUR BI MODEL UNIT.
1.1
Safety Certification
BI models 501, 503, 505, 506 are certified by ETL to comply with UL/ANSI
standard 763-2000, 3rd Edition, November 30, 2000 and to comply with CSA
standard C22.2 No. 195-M1987.
BI models 502 and 504 are 240VAC versions are certified by CE standards.
1.2
Health Certification
All BI models are certified by NSF International to comply with Standard 8.
1.3
Avoid Contact with Moving Parts
• Keep fingers, hair, hands and clothing away from all moving parts.
• Keep utensils away from drive socket, ice augers and blender blades during
operation. Metal utensils will damage blades and augers.
• NEVER place a jar into the drive socket if the blender motor is operating.
• DO NOT rock the blender jar while it is operating. Keep the blender jar
straight up until the operation is complete.
• These precautions will prevent personal injury and/or damage to the blender
dispenser.
1.4
Power Cord Precautions
• DO NOT operate with a damaged power cord or plug.
• If the power cord or plug are damaged they must be replaced by the
manufacturer or its authorized service agent in order to prevent any hazard.
• DO NOT let the power cord hang over the edge of the work surface.
• NEVER use an extension cord with the unit.
• Unplug the unit when changing location, servicing or cleaning.
1.5
NEVER remove the covers or panels on the unit. The unit does not contain
adjustable or customer serviceable parts. The manufacturer or their authorized agent
must perform all interior service and adjustments. Removing covers or panels, or
attempting to effect repairs, will void the warranty. Please call Blendtec Technical
Support (1-800-748-5400) for guidance on your warranty and service options.
1.6
Turn the unit off when not in use.
1.7
NEVER operate the unit if it appears to be damaged.
If the unit malfunctions, call the manufacturer first. If it is dropped or damaged in
any way, call Blendtec Technical Support for service to evaluate the extent of
damage and the possibility of either repair or replacement.
OWN-CE-004 Manual, BI Rev 02 Blender with Ice Dispenser
-3-
1.8
NEVER operate in liquid. DO NOT allow the unit to sit in a pool of liquid or use
the unit outdoors where it will be subject to precipitation. This will void the
warranty.
1.9
NEVER put items such as metal, rocks, or other hard materials into the blender jar
or the ice hopper. Metal utensils and other hard objects can damage the blender
jar or ice hopper and will void the warranty.
1.10
NEVER operate the unit with attachments not sold or authorized by BLENDTEC.
The use of unauthorized attachments may cause fire, electric shock, unit
malfunction or injury. Damage incurred by the use of such attachments will not
be covered by warranty.
1.11
ALWAYS operate the blender with the clear door closed.
1.12
ALWAYS secure the blender jar lid before starting the machine.
Even with the blending chamber it is important to put a lid on the blender jar
before initiating a blend cycle.
1.13
The blender jar blades are sharp - handle carefully.
1.14
Power Receptacle Requirements
120VAC (all are 50-60Hz):
Models BI-501 and BI-503: 1800Watts, 15Amps – require a 20AMP dedicated
120VAC receptacle (NEMA 5-15R).
Models BI-505 and BI-506: 2400Watts, 20Amps – require a 20AMP dedicated
120VAC receptacle (NEMA 5-20R).
Models BI-502 and BI-504: 1800 and 2400 Watts respectively, 7.5Amps – require
cord set specific receptacles with 10Amp dedicated circuits.
1.15
DO NOT use any other electrical equipment on the same circuit as the unit or you
risk overloading the circuit and either burning the fuse or possibly the electronics
inside the unit. This will void the warranty. ALWAYS use a surge protector
device.
1.16
NEVER use a water jet to clean the unit. Use of water jet to clean the unit can
result in the malfunction or damage to the unit. This type of damage/malfunction
will not be covered under warranty.
Save these Instructions for Future Reference
IMPORTANT
We shipped a clean machine but we do not have any control over shipping conditions or
times. We strongly recommend that you sanitize the machine before you prepare
any drinks (see section 5.4).
OWN-CE-004 Manual, BI Rev 02 Blender with Ice Dispenser
-4-
Section 2: Introduction to the Blender with Ice Dispenser ______________
WELCOME TO AN EXCITING NEW WAY OF BLENDING.
Introducing the Blendtec Blender with Ice
Dispenser!
The Blendtec Blender with Ice Dispenser combines some of the best ideas in blending
into one easy-to-operate machine. The result is a machine that provides:
•
•
•
•
•
Fast delivery to large crowds.
Controlled labor and finished product costs.
Portability and easy set-up.
Maximum revenue generated per square foot.
Multiple drink combinations from one machine.
The Blender with Ice Dispenser is a microprocessor-controlled machine designed to
quickly make precise blended drinks from concentrate or other liquid (including
alcohol), ice, and water. It has three main sections, the blend station, the ice
hopper, and the control board section. The following pages will introduce you to
the most advanced blending system available today.
2.1
The Blend Station: contains a powerful blender motor that is controlled by the
microprocessor in the control board. You can select the speed and duration of
each blend cycle for each drink size.
2.2
The Ice Hopper: contains a double auger system for consistent ice delivery to
ensure that your drinks are the same every time. The ice hopper will hold six
gallons of ice. The hopper is insulated to minimize temperature loss. The hopper
also integrates an interlock safety feature to prevent personal injury – the removal
of the lid will stop the movement of the augers.
2.3
The Control Board: contains the microprocessor that controls all of the functions
of the unit. The control board is utilized to make and program drinks.
2.4
Water Input Line: allows cold water to be added to drinks to help reconstitute
concentrated purees or to help increase volume.
2.5
Drain Line: provides for the removal of melt water as well as minor spillage in
the blend station. Drain line is located on the back of the unit.
OWN-CE-004 Manual, BI Rev 02 Blender with Ice Dispenser
-5-
2.6
Model differences:
There are 10 models of BI, below is an explanation of the differences:
• Voltage: 120VAC units
Models BI-501 and BI-503: 1800Watts, 15Amps
Models BI-505 and BI-506: 2400Watts, 20Amps
240VAC units
Models BI-502 and BI-504: 1800Watts, 7.5Amps
•
Size:
Narrow Versions (Models BI-503, -504, -506):
Height: 32”
Width: 12”
Length (depth): 20”
Wide Versions (Models BI-501, -502, -505)
Height: 32”
Width: 18.5”
Length (depth): 13.5”
•
Limitations:
Volume Limited - Models BI-501 through BI-506
This means that products other than those dispensed by the unit
(additional ice cream, yogurt, etc.) can be added to the blending jar
before dispensing. This limits the blending capacity to 32 ounces.
OWN-CE-004 Manual, BI Rev 02 Blender with Ice Dispenser
-6-
Section 3: Installation____________________________________________
Read all instructions, cautions, notes and warnings before attempting to setup and operate
this machine. Warranties may be voided if this machine is improperly installed.
3.1
Counter Placement: insure there are at least 4 inches on each side and at least 6
inches in back (room for plumbing). Be sure there is sufficient room above the BI
to remove the ice hopper lid and put ice in the ice hopper during regular use.
Counter location should be near water and ice.
3.2
Electrical Connections:
Models BI-501 and BI-503: 1800Watts, 15Amps – require a 20AMP dedicated
120VAC receptacle NEMA 5-15R (see figure 1).
Figure 1 – NEMA 5-15R
Models BI-505 and BI-506: 2400Watts, 20Amps – require a 20AMP dedicated
120VAC receptacle NEMA 5-20R (see figure 2).
Figure 2 – NEMA 5-20R
Models BI-502 and BI-504: 1800 and 2400 Watts respectively, 7.5Amps – require
cord set specific receptacles with 10Amp dedicated circuits.
3.3
Water Connection: 3/8” Compression fitting. Located behind the lower panel in
the upper right-hand corner (from the rear of the machine). It is recommended
that you use a reinforced water line with this unit. Incoming water must have a
pressure rating of at least 30PSI (no greater than 120) to operate correctly. It is
recommended adding a inline water filter with a flow rate of at least 1 gallon per
minute. The Blender Dispenser with Ice must be installed with adequate backflow protection to comply with Federal, state or local codes having jurisdiction.
3.4
Drain Connection: ¾” Hose Bib fitting. Located on the lower left-hand corner
(from the rear of the machine). It is recommended that you use Teflon tape on the
threads to help prevent leaks. Only a rigid reinforced hose with at least a ¾” ID
should be used to prevent kinking and backflow into the blender chamber. The
OWN-CE-004 Manual, BI Rev 02 Blender with Ice Dispenser
-7-
Blender Dispenser with Ice must be installed with adequate back-flow protection
to comply with Federal, state or local codes having jurisdiction.
Section 4: Basic Operations_______________________________________
4.1
Loading Ice:
Remove the black ice hopper lid from atop the unit (removing the lid will disable
the functions of the unit). Carefully pour up to 6 gallons of ice into the ice
hopper. Ensure that the ice covers both augers to ensure the most consistent ice
dispense. Place the lid back on the top of the unit to re-enable the unit to
function. If you are filling an empty ice hopper you should prime the system by
putting a blender jar in the blend station and press the ICE button on the control
panel (see 4.4).
4.2
Making Drinks:
Place a filled blender jar in the blend station with the blender lid in place. After
programming drinks into the microprocessor (see section 6.0), you simply press
the drink number (1-64) of the drink, select the size (S, M or L) and then press
GO. The unit will automatically dispense ice and water and then blend. All
parameters for drink production can be manipulated to suit your needs (see
section 6.0).
4.3
Dispense Ice Only:
This feature will allow you to dispense Ice only. Press and hold the ICE button to
dispense the desired amount of ice. The ice will dispense as long as the ICE
button is held down or to 25 seconds. Use this feature when you filling an empty
ice hopper to prime the system.
4.4
Dispense Water Only:
By pressing and holding the WATER button you can dispense cold water only as
desired. The maximum amount of time the feature will run is 25 seconds.
4.5
Run Blender Motor Only:
This feature can be used in two ways: as a ramp pulse (gradually increasing
speed) or to run a constant speed. To use as a ramp pulse, press and hold the
BLEND button until the drink is completed, the motor will stop when the BLEND
button is released. To run at a constant speed, select the speed (1-9) and then
press and hold the BLEND button. The unit will run until the BLEND button is
released or for 25 seconds.
OWN-CE-004 Manual, BI Rev 02 Blender with Ice Dispenser
-8-
Section 5: Cleaning and Sanitizing_________________________________
5.1
After Each Use:
After every use of the unit, the operator should ensure that the blender jar has
been rinsed, the blend station has been wiped out if there is spillage, and that the
blender door is wiped down if there is spillage. Always keep an empty jar on
the blender motor when the unit is not in use. This helps any melt water that is
not captured by the ice hopper drain from creeping into the blender motor itself.
5.2
Jar Care:
SHORT TERM – as needed, wash the jars with a mild detergent solution. Do not
immerse the jars for longer than necessary in any type of liquid. Wash quickly
(with a smooth cloth or sponge), rinse, sanitize with appropriate solution (some
sanitizer manufacturers require their sanitizer to remain in contact with the
sanitized object for a specific amount of time before rinsing or removing. Refer
to your manufacturer’s instructions before rinsing) and rinse again. Hold the jar
by the handle and give three or more sharp downward shakes to remove all water
from around the shaft area. Then place the jar upside down on a rack to dry.
LONG TERM – as needed, fill the jar with hot water and a tablespoon of chlorine
bleach (or other chlorine based sanitizer per manufacturer’s instructions). Stir and
let set for 5 minutes. Empty and rinse with clear hot water. Hold the jar by the
handle and give three or more sharp downward shakes to remove all water from
around the shaft area. Then place the jar upside down on a rack to dry.
5.3
Short Term (Unit):
As time permits (daily or weekly), wipe down the exterior of the unit and the
interior of the blend station with a damp rag. Carefully tilt the machine either
back or forward (2 person operation) and wipe underneath the unit with a damp
rag. Disconnect the drain tube from the back of the unit and run hot sanitizer
solution through the tube to help keep the tube clear.
5.4
Long Term (Unit):
As time permits (monthly), sanitize all product lines and ice hopper utilizing the
steps below. The best time to perform this cleaning cycle is either before or after
work hours when you have plenty of time. Mix up 2-5 gallons of sanitizer
solution per the manufacturer’s directions.
5.4.1
ICE HOPPER:
5.4.1.1 Turn off the power. Remove all ice from the ice hopper.
Manually take the ice out around the augers. Once you have
removed as much ice as you can, replace the ice hopper lid and
place an empty blender jar in the blend station. Turn the power
back on. Press and hold the ICE button to dump the remaining ice
pieces. Empty the jar and replace in the blend station.
OWN-CE-004 Manual, BI Rev 02 Blender with Ice Dispenser
-9-
5.4.1.2 Spray or wipe the interior surface of the ice hopper with a mild
soapy solution. Allow this solution to remain in contact with the
ice hopper surfaces for at least five minutes.
5.4.1.3 Spray clean, hot water over the surfaces of the ice hopper to rinse
the soapy solution away. A handheld spray bottle will work best.
The rinse water will mostly run down the drain of the unit but
some will go into the empty blender jar (watch so that it does not
overflow and empty as needed).
5.4.1.4 Spray the sanitizing solution over the surfaces of the ice hopper. A
handheld spray bottle will work best.
Remember that some sanitizer manufacturers require their sanitizer
to remain in contact with the sanitized object for a specific amount
of time before rinsing or removing. Refer to your manufacturer’s
instructions before rinsing.
5.4.1.5 Rinse the ice hopper surfaces with clean, hot water following step
5.4.1.3 above. A handheld spray bottle will work best.
5.4.2
BLEND STATION:
5.4.2.1 Remove the blender jar from the blender station (empty if needed).
5.4.2.2 Using a mild soapy solution, wipe down all surfaces of the blend
station. Excess water will drain through the drain opening located
at the back of the unit.
5.4.2.3 Use clear, hot water to rinse the surfaces of the blend station. A
handheld spray bottle will work best.
5.4.2.4 To sanitize the surfaces of the blend station either spray or wipe
the surfaces of the blend station with the sanitizing solution.
5.4.2.5 Remove the blend station door by opening the door and gently
lifting it off the hinges (do not lose the small plastic washers).
Wash the door in the sink and allow to air dry.
5.4.2.6 Use clear, hot water to rinse the sanitizing solution off the surfaces
of the blend station.
5.4.2.7 Dry any water off the blender motor area and replace the blender
door.
5.4.3
DRAIN HOSE:
5.4.3.1 After sanitizing the ice hopper and blend station, the internal drain
tube should be fairly well cleaned so it is not necessary to run
sanitizer down the internal tube again.
5.4.3.2 Remove the drain hose from the back of the machine.
5.4.3.3 Slowly pour sanitizer solution down the tube. It is not necessary to
rinse the drain hose.
OWN-CE-004 Manual, BI Rev 02 Blender with Ice Dispenser
- 10 -
Section 6: Basic Programming_____________________________________
This section will help you with the basics of programming and allows for the
programming of drinks to your requirements. This feature will give you the opportunity
to view, and if necessary, change your data set parameters (see figure 3 for the data set
sequence).
Watr Ice Stime Scycl Mtime Mcycl Ltime Lcycl Pause
Drink 1
Drink 2
Drink 64
Figure 3 – Date set sequence in programming mode.
6.1
Program Mode:
This is the mode that you will utilize to change settings for water, ice, blend
cycles and blend times and pause. To enter the mode you press 7-8-9-GO in
sequence. The display will change from “Enter Drink #” to “Drink 1 Watr 00”.
6.1.1 Navigating in the program is done with the S, M, L and GO buttons on the
control panel.
6.1.2 The S and M buttons move you up and down in drinks; 1-64 on M and 641 on S.
6.1.3 The L and GO button will move you up and down in the data sets; GO
moves forward (Watr, Ice) and L moves backward (Ice, Watr).
6.1.4 You must enter the programming mode before any changes can be made.
6.1.5. To exit the programming mode at any time press the STOP button twice.
6.1.6 It is possible to access a specific drink number in the Drink Settings Menu
(7-8-9-GO) by pressing a 1, then the drink number (1 to 64), and then GO.
6.2
Adjusting Water:
6.2.1 Scroll to the Water data set by pressing either the L or GO buttons.
6.2.2 Water is also entered in tenths of a second. Water dispense should not
vary unless your water pressure coming into the unit is less than 30psi.
6.2.3 Enter the value required by pressing the numbers on the control pad and
then pressing the GO button.
6.2.4 To zero out the water value, enter 0 on the keypad and press GO.
6.3
Adjusting Ice:
6.3.1 Scroll to the Ice data set by pressing either the L or GO buttons.
6.3.2 Ice is also entered in tenths of a second.
6.3.3 Enter the value required by pressing the numbers on the control pad and
then pressing the GO button.
6.3.4 To zero out the ice value, enter 0 on the keypad and press GO.
6.3.5 Ice dispense rate may vary depending on the type and shape of ice cube
that you utilize. See Section 7.1 for calibration instructions.
OWN-CE-004 Manual, BI Rev 02 Blender with Ice Dispenser
- 11 -
6.4
Adjusting Blend Times:
6.4.1 Scroll to the first blend time data set (Small) by pressing either the L or
GO buttons.
6.4.2 Blend times are in whole seconds. 21 in the blend cycle set represents 21
seconds of blend time. The blender motor will run for the programmed
time and then stop.
6.4.3 The blender motor will run in the pattern as described by the Cycle in the
next data set.
6.4.4 To zero out the blend time value, enter 0 on the keypad and press GO.
6.4.5 To move to the next blend time for Medium or Large press the GO button
to reach them (cycle settings are between each).
6.5
Adjusting Blend Cycles:
6.5.1 Scroll to the first blend cycle data set (Small) by pressing either the L or
GO buttons.
6.5.2 There are 6 pre-programmed cycles already stored in the unit. See figure
4 below.
6.5.3 Select the cycle you want by pressing the appropriate number (1-6) and
press GO.
SpeedA TimeA SpeedB TimeB SpeedC TimeC SpeedD TimeD SpeedE TimeE SpeedF TimeF SpeedG TimeG SpeedH TimeH
Cycle 1
5
Cycle 2
6
15
15
Cycle 3
7
15
Cycle 4
3
1
4
1
1
2
3
1
4
2
5
2
6
2
7
3
Cycle 5
3
1
5
1
1
2
3
2
5
2
3
3
6
6
8
6
Cycle 6
3
2
1
3
3
3
5
3
6
4
7
15
8
6
Figure 4 standard blend cycle profiles.
6.5.4
Regardless of the time listed above (figure 4), the blender motor will run
for the amount of time that you have programmed into the Cycle time data
set. However, the cycle will start over at the beginning of its programmed
time. In other words, looking at Cycle 5 above, you can see that it is set
for a total time of 24 seconds. If your cycle time is greater than 24
seconds, the cycle will start over at the lower speed and repeat until the
time is up.
6.5.5 You must have a cycle programmed into the data set even if you have no
cycle time.
6.5.6 Press the GO button to move to the Mcycl and Lcycl data sets and change
or set as needed.
6.5.7 Blend cycles 7, 8, 9 and 10 can be customized for your needs. See Section
7.12 for instructions.
6.6
Adjusting Pause:
6.6.1 Scroll to the pause data set (Small) by pressing either the L or GO buttons.
OWN-CE-004 Manual, BI Rev 02 Blender with Ice Dispenser
- 12 -
6.6.2
Pause is the amount of time the blender motor will wait until it begins to
blend.
6.6.3 The use of Pause is to allow your ingredients to dispense into the blender
jar without being thrown back out.
6.6.4 Pause is again, in whole seconds. Enter the value with the number keys on
the control panel and press GO.
6.7
Changing the Drink Size Ratio:
6.7.1 You can set the drink sizes for the S, M and L buttons on the keypad.
6.7.2 To access the menu, press 7-8-8-GO on the control pad (from the Enter
Drink # screen).
6.7.3 The display will now read “Size Small XX”. Enter the size, in ounces, of
the small drink you want to make and press GO.
6.7.4 The data set will automatically move to the Size Medium data set; enter
the ounces size of your medium drink and press GO.
6.7.5 The data set will automatically move to the Size Large data set; enter the
ounces size of your large drink and press GO.
6.7.6 It is not necessary to have all three sizes, but you must have a “small”
drink. The “small” drink size correlates directly with the data set
programmed into the 7-8-9-GO menu. This is very important! If you set
your 7-8-9-GO menu, ice and water values to make a 12 ounce drink and
your small size to 14 you will only make 12 ounce drinks and the M and L
drinks will not turn out correct. The microprocessor uses the small drink
size and the settings in the 7-8-9-GO menu to automatically generate your
M and L drinks. Ensure that the size of drink and the programmed data
sets match directly.
6.7.7 Press the STOP button twice to exit the drink size menu.
OWN-CE-004 Manual, BI Rev 02 Blender with Ice Dispenser
- 13 -
Section 7: Advanced Programming_________________________________
This section is intended for the owner/manager of the location who will take the time to
fully understand the system and the information contained herein. Greater detail is spent
on controls and reports the unit can supply. All functions are accessed by pressing 7-8-9GO on the control panel unless otherwise noted.
7.1
Calibration:
There are two ways to optimize the drinks made in the BI. You can use the trial
and error method, which involves making small changes to a drink and testing
each change as you go until you get it the way you want it. Or, you can calibrate
the BI and make drinks according to a formula. This section will tell you how to
isolate and calibrate each dispensing function
7.2
Water Flow Rate:
Calibrate Water flow:
7.2.1 With all data sets of Drink 1 at “0”, press the GO or L pad until the display
reads: “Drink 1 Watr 0”.
7.2.2 Press 5-0-GO and then STOP twice.
7.2.3 Press S-1-GO.
7.2.4 Measure the water in the jar and divide by 5 to get the water flow rate.
E.g. With 2.5 oz. of water in the jar, 2.5/5 = 0.5 oz per second. Record
this number. Because the water comes from the same valve for all drinks,
the water flow rate will be the same for every drink.
7.3
Ice Level Sensor:
The Ice level sensor notifies the user when the ice hopper is close to being empty.
The sensor can be disabled or enabled by pressing 3-5-8-GO. The display will
either read, "Ice Sensor On" or "Ice Sensor Off". Pressing S or M will make a
selection. Once the mode of operation is selected press STOP to exit the menu.
7.4
Ice Buster:
The ice busters purpose is to run the ice auger for a period of time every so often
to keep the ice ready to be dispensed. This feature allows the Ice buster to be
enabled or disabled. The duration of the ice buster and the interval between ice
busting can also be set from this menu.
7.4.1 Access this menu press 3-5-7-GO.
7.4.2 The screen will read, "Ice Buster On" or "Ice Buster Off". Make a
selection by pressing the S or M button.
7.4.3 Press the GO button to advance the menu to the Interval between bust
cycles. The screen should read, "Interval (min)___". Enter the desired
interval in minutes and Press go to store the value and also to advance to
the duration of the bust cycle.
7.4.4 The screen will now read, "Duration (sec)___” Enter the desired duration
in seconds and press GO to store the value.
7.4.5 Press STOP to exit the menu.
OWN-CE-004 Manual, BI Rev 02 Blender with Ice Dispenser
- 14 -
7.5
Small Drink Default:
Use this feature to select the mode for the default drink size. There are 3 options.
The first is for the SMALL to be the default drink size (this means that SMALL
will be automatically selected after a drink has been made). The second is that the
drink size will remain the same after a drink has been made. The third option is
that no drink size will be selected after a drink is made (this requires that the user
select a drink size each time a drink is made).
7.5.1 To make a selection for the mode of operation press 3-5-6-GO.
7.5.2 The screen will show one of the 3 following options: "Revert To Small",
"Revert To Same", and "Revert To None”.
7.5.3 Press the S or M button to scroll through the three options.
7.5.4 Once you have the option you want selected, press STOP. The setting you
selected will be stored.
7.6
Restore Defaults:
There are three types of restore defaults: Drink Settings, Blend Cycles, and Misc
Settings. These three will revert key setting back to the factory default. If you do
not have a profile that is installed at the factory then the default settings will
revert to “0”.
7.6.1 Restore Drink Settings:
This feature will restore the Drink Settings to their factory defaults. Press
4-4-4-GO and the screen reads, "Reset Drinks?". Press GO again to
confirm that the drink settings should be reset to the defaults. The screen
will say "Storing Drinks" and a count will show the progress.
7.6.2 Restore Blend Cycles:
This feature will restore the Blend Cycles to their factory defaults. Press
4-4-5-GO and the screen reads, "Reset Cycles?". Press GO again to
confirm that the Blend Cycles should be reset to the defaults. The screen
will say "Storing Cycles" and a count will show the progress.
7.6.3 Restore Misc Settings:
This feature will restore various settings to their factory defaults. Press 44-6-GO and the screen reads, "Reset Settings?". Press GO again to
confirm that the settings should be reset to the defaults. The settings that
will be reset to factory defaults are: The Ice Sensor will be set to ON, Ice
Low Temperature will be set to 10C, the Size Default will be set to Revert
to Small, the ice buster will be set to ON, the Ice Buster Interval will be
set to 30 minutes, and the Ice Buster Duration will be set to 6 seconds.
7.7
Locking the Machine:
This feature allows the manager/owner to lock the machine out of use by other
employees without the use of a code. The manager/owner can decide and change
the lockout code at will.
7.7.1 Change or set machine lock out code:
OWN-CE-004 Manual, BI Rev 02 Blender with Ice Dispenser
- 15 -
Enter 7-7-8-GO on the keypad. The screen will then read, "Enter Code:".
Enter the current code (the factory default is 0) and press GO. The screen
now reads, "New Code:". Enter the new one to four digit code that is
desired and press GO. The screen then reads, "Re-Enter:" Re-enter the
desired code and press GO.
7.7.2 Lock Machine:
To lock the machine press 7-7-7-GO. This will disable all functions
except for the ice buster. The screen will say, "Enter Code:". The
machine will not work until the correct security code is entered and the
GO button is pressed.
7.7.3 Write your code down and hide it in case you forget. If you do forget your
code and cannot find where you have it written down call us for assistance
at 1-800-253-6383.
7.8
Drink Counts:
The following options allow the user to maintain counts of the individual drinks
made by day and total for lifespan.
7.8.1 Total Machine Count:
To access the machine count press 8-0-0-GO. The machine count will be
displayed. If the number of cycles has exceeded 65,535 cycles then there
will be a multiplying counter that is displayed also. The multiplying
counter will increment each time the machine count reaches 65,535 and
resets to 0. To exit the machine count screen press STOP twice. This
count cannot be reset.
7.8.2 Individual Drink Counts:
Each time a Drink Cycle is run a respective count will be incremented.
This count can be viewed by pressing 8-0-1-GO. The screen will read,
"Drink # 1 ____". Use the M button to increment the Drink number and
use the S button to decrement the Drink number. These counts can be
cleared by using the 8-0-3-GO feature.
7.8.3 Total Drink Count:
A total of all of the individual drinks can be viewed by pressing 8-0-2-GO.
This total count is reset to zero when the 8-0-3-GO feature is executed.
7.8.4 Clear Drink Count:
By pressing 8-0-3-GO, all of the individual drink counts are cleared as
well as the Total Drink Count. After pressing 8-0-3-GO, the screen reads,
"Clear Counts?". Press GO to confirm that the Counts should be cleared.
7.9
Advanced Blend Cycle Control
This feature allows the user to customize up to 10 blend cycles.
7.9.1 Press 7-9-0-GO to access the Blend Cycle Menu.
7.9.2 The first thing that appears on the screen is, "Cycle 1 SpeedA: 0".
7.9.3 From this point use the S, M, L, and Go buttons to navigate to any of the
parameters in the Blend Cycle. S will decrement the Blend Cycle number,
M will increment the Blend Cycle number, L will advance through the
OWN-CE-004 Manual, BI Rev 02 Blender with Ice Dispenser
- 16 -
7.9.4
7.9.5
7.9.6
7.9.7
7.9.8
speed/time parameters in the reverse direction, and Go will advance
through the speed/time parameters in the forward direction.
Enter the speed for SpeedA. (Speeds start at 1 and continue through 9
with 9 being the most aggressive.) Press GO to store the value.
The data set will change to TimeA. Enter the time in whole seconds that
you want the blender to run the speed and press GO.
Repeat the steps to input the blend speeds and times for each sub speed
and time to create a cycle to set up to your own parameters. All 10 of the
cycles can be manipulated.
Note – you can reduce the amount of noise coming from the blender motor
by keeping the blender speed under 7. We recommend that you only
manipulate cycles 7-10 and leave the default cycles alone.
Press STOP twice to exit the menu.
Section 8: Troubleshooting_______________________________________
We hope you will never have to use this section but if you do, please don’t take offense at
some of the simplistic answers. We have had most of these problems occur during our
development and with other customers.
8.1
Machine won’t run. Check the power cord to be sure it is plugged into a live,
grounded 20 Amp. 120 V. circuit. Check that the switch on the back of the
machine is in the ON position. Check in the rear of the machine to see if the
circuit breaker button has tripped (little white button). If it has press the breaker
button back in to reset it (the BI takes a 13 AMP circuit breaker
8.2
Blender Stopped Working: If the unit does not blend, check in the rear of the
machine to see if the circuit breaker button has tripped. If it has press the breaker
button back in to reset it (the BI takes a 13 AMP circuit breaker).
8.3
Ice Stopped Dispensing or Ice Auger Not Turning: Insure there is ice in the
hopper. Check for obstructions (foreign objects) and blockage in the ice hopper
and its chute. Replace the ice hopper lid or make sure it is firmly in place to
activate the lid sensor switch and try again.
8.4
Ice Dispenses When Not in Use: If the machine dispenses ice by itself for about
two seconds every hour or so, this is just our timed ice “cluster-buster” being
automatically activated. The Blender Dispenser-Ice is programmed with a timed
ice “cluster-buster” that will activate the ice auger every 30 minutes and dispense
ice for six seconds when the machine is on, but not in use. This helps keep the ice
cubes from possibly freezing into one big block of ice over time. The timer resets
after the last drink made; meaning if the machine does not make a drink 30
minutes after the last drink was made then the ice auger will turn for six seconds
every hour. Therefore, it is important to always have a jar in the blender station to
OWN-CE-004 Manual, BI Rev 02 Blender with Ice Dispenser
- 17 -
catch any ice that may be dispensed during that two second turning of the ice
auger.
8.5
Drinks too soft. Insure the ice hopper is full. See Section 6 to reprogram your
ingredients if necessary. Make sure the ice hopper lid is firmly in place to
activate the ice auger.
8.6
Drinks too firm or Cavitation in blender. Insure that enough product was put
into the jar; the water supply is on and unblocked; the water, and ice amounts are
programmed correctly. See Section 6 above to reprogram your ingredients.
Cavitation is caused when the liquid and ice mixture in the blender jar is too thick
and an air pocket (or bubble) is created around the spinning blender blade. This
leaves your drink stuck to the sides of the jar and full of large ice particles. Be
sure to put in enough product to produce a good flavor then add water until the
blender does not cavitate when you make the drink. If your drink is too watery,
you can add more ice or less water until you get a drink that will form a smooth
peak when you pour it into a cup.
8.7
Ice chunks in drinks. Check the blend time in the program for the drink with the
chunks. Watch for cavitation, you may need to reprogram quantities. Make sure
the blender aggressiveness is on the cycle speed you want, and the pause is not
too long.
8.8
Water Won’t Dispense: Check that the water is on and that there are no kinks in
the hose to the machine. Call Blendtec Technical Support.
Section 9: Warranty Information including Service____________________
Blendtec warrants the BI unit for 1 year. The jars, including all moving parts, are
covered against leaking or breakage for 180 days. The BI housing, controller and ice
auger are warranted for one year. Should you experience any difficulty in using your BI,
please proceed as follows:
9.1
For Warranty Service:
Call Blendtec Technical Support at 1-800-Blendtec (253-6383). We will discuss
the problem with you and decide on the best way to fix it. We may send a service
technician to your facility and ship parts for the repair or we may ship a
replacement machine to you.
9.2
Blender Jars:
If you experience trouble with your jars, call Blendtec Customer Service and we
can walk through some simple troubleshooting over the phone. If necessary, we
will ship you replacement jars at no charge.
OWN-CE-004 Manual, BI Rev 02 Blender with Ice Dispenser
- 18 -
9.3
For Non-Warranty Service:
Call Blendtec Technical Support at 1-800-Blendtec (253-6383). We will discuss
the problem with you and decide on the best way to fix it. We may send a service
technician and parts to your facility or ship a replacement machine to your
facility. You will be billed for the cost of repair and any shipment. All costs
related to parts and replacement will be discussed before hand. Service cost will
vary with provider.
Section 10: Blank Drink Template__________________________________
Watr Ice Stime Scycl Mtime Mcycl Ltime Lcycl Pause
Drink 1
Drink 2
Drink 3
Drink 4
Drink 5
Drink 6
Drink 7
Drink 8
Drink 9
Drink 10
Drink 11
Drink 12
Drink 13
Drink 14
Drink 15
Drink 16
Drink 17
Drink 18
Drink 19
Drink 20
Drink 21
Drink 22
Drink 23
Drink 24
Drink 25
OWN-CE-004 Manual, BI Rev 02 Blender with Ice Dispenser
- 19 -