1
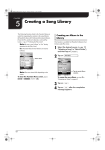
Disklavier Control Unit DKC-850
SPECIAL MESSAGE SECTION
This product utilizes an external power supply (adaptor).
DO NOT connect this product to any power supply or
adaptor other than one described in the manual, on the
name plate, or specifically recommended by Yamaha.
IMPORTANT NOTICE: All Yamaha electronic products are tested and approved by an independent safety
testing laboratory in order that you may be sure that
when it is properly installed and used in its normal and
customary manner, all foreseeable risks have been eliminated. DO NOT modify this unit or commission others
to do so unless specifically authorized by Yamaha. Product performance and/or safety standards may be diminished. Claims filed under the expressed warranty may be
denied if the unit is/has been modified. Implied warranties may also be affected.
NOTICE: Service charges incurred due to lack of
knowledge relating to how a function or effect works
(when the unit is operating as designed) are not covered
by the manufacturer’s warranty, and are therefore the
owners responsibility. Please study this manual carefully
and consult your dealer before requesting service.
NAME PLATE LOCATION: The graphic below indicates the location of the name plate. The model number,
serial number, power requirements, etc., are located on
this plate. You should record the model number, serial
number, and the date of purchase in the spaces provided
below and retain this manual as a permanent record of
your purchase.
SPECIFICATIONS SUBJECT TO CHANGE: The
information contained in this manual is believed to be
correct at the time of printing. However, Yamaha reserves the right to change or modify any of the specifications without notice or obligation to update existing
units.
ENVIRONMENTAL ISSUES: Yamaha strives to produce products that are both user safe and environmentally friendly. We sincerely believe that our products and
the production methods used to produce them, meet
these goals. In keeping with both the letter and the spirit
of the law, we want you to be aware of the following:
Model ________________________________________
Serial No. _____________________________________
Purchase Date __________________________________
Battery Notice: This product MAY contain a small nonrechargeable battery which (if applicable) is soldered in
place. The average life span of this type of battery is approximately five years. When replacement becomes neccessary, contact a qualified service representative to
perform the replacement.
Warning: Do not attempt to recharge, disassemble, or
incinerate this type of battery. Keep all batteries away
from children. Dispose of used batteries promptly and as
regulated by applicable laws. Note: In some areas, the
servicer is required by law to return the defective parts.
However, you do have the option of having the servicer
dispose of these parts for you.
Disposal Notice: Should this product become damaged
beyond repair, or for some reason its useful life is considered to be at an end, please observe all local, state,
and federal regulations that relate to the disposal of products that contain lead, batteries, plastics, etc.
PLEASE KEEP THIS MANUAL
IMPORTANT NOTICE FOR THE UNITED KINGDOM
Applies to Power Adaptor
Connecting the Plug and Cord
IMPORTANT
THE WIRES IN THE MAINS LEAD ARE COLOURED IN
ACCORDANCE WITH THE FOLLOWING CODE:
BLUE
BROWN
: NEUTRAL
: LIVE
As the colours of the wires in the mains lead of this apparatus may
not correspond with the coloured markings identifying the
terminals in your plug, proceed as follows:
The wire which is coloured BLUE must be connected to the
terminal which is marked with the letter N or coloured BLACK.
The control unit is classified as a Class 1 laser product. One of the
labels below is located on the inside of the CD drive unit.
L’unité de commande est classée produit laser de Classe 1. Une des
étiquettes ci-dessous ou une étiquette similaire se trouve à l’intérieur
du lecteur de CD.
Die Steuereinheit ist als ein Lasergerät der Klasse 1 eingestuft. Eins
der nachstehend abgebildeten Etiketts bzw. ein Etikett ähnlichen
Inhalts befindet sich im Inneren des CD-Laufwerks.
CLASS 1 LASER PRODUCT
LASER KLASSE 1
LUOKAN 1 LASERLAITE
KLASS 1 LASER APPARAT
APAREIL A LASER DE CLASSE 1
EN60825
CLASS 1 LASER PRODUCT
LASER KLASSE 1
The wire which is coloured BROWN must be connected to the
terminal which is marked with the letter L or coloured RED.
Making sure that neither core is connected to the earth terminal of
the three pin plug.
CAUTION—Use of controls or adjustments or performance of
procedures other than those specified herein may result in
hazardous radiation exposure.
Laser Diode Properties
* Material: GaAIAs
* Wavelength: 790 nm
* Laser Output Power at the lens of the Laser Pick Up Unit: max.
0.2 mW
ATTENTION—L’utilisation de commandes ou de réglages, ou
l’exécution de procédures, autres que celles qui sont spécifiées ici
peuvent conduire à une exposition à des rayonnements dangereux.
Propriétés de la diode à semi-conducteur
* Matériau : GaAlAs
* Longueur d’ondes : 790 nm
* Puissance de sortie laser à la lentille du capteur laser : 0.2 mW
max.
VORSICHT—Die Verwendung von Bedienungselementen oder
Einstellungen, oder die Anwendung von Verfahren, die nicht in
dieser Anleitung angegeben sind, kann zu gefährlicher Freisetzung
von Strahlung fü hren.
Eigenschaften der Laserdiode
* Werkstoff: GaAlAs
* Wellenlänge: 790 nm
* Laserausgangsleistung an Abtasterlinse: 0.2 mW max.
Information for Users on Collection and Disposal of Old Equipment and used Batteries
These symbols on the products, packaging, and/or accompanying documents mean that used electrical and electronic
products and batteries should not be mixed with general household waste.
For proper treatment, recovery and recycling of old products and used batteries, please take them to applicable
collection points, in accordance with your national legislation and the Directives 2002/96/EC and 2006/66/EC.
By disposing of these products and batteries correctly, you will help to save valuable resources and prevent any
potential negative effects on human health and the environment which could otherwise arise from inappropriate
waste handling.
For more information about collection and recycling of old products and batteries, please contact your local
municipality, your waste disposal service or the point of sale where you purchased the items.
[For business users in the European Union]
If you wish to discard electrical and electronic equipment, please contact your dealer or supplier for further
information.
[Information on Disposal in other Countries outside the European Union]
These symbols are only valid in the European Union. If you wish to discard these items, please contact your local
authorities or dealer and ask for the correct method of disposal.
Note for the battery symbol (bottom two symbol examples):
This symbol might be used in combination with a chemical symbol. In this case it complies with the requirement set
by the Directive for the chemical involved.
Information concernant la Collecte et le Traitement des piles usagées et des déchets d’équipements
électriques et électroniques
Les symboles sur les produits, l’emballage et/ou les documents joints signifient que les produits électriques ou
électroniques usagés ainsi que les piles ne doivent pas être mélangés avec les déchets domestiques habituels.
Pour un traitement, une récupération et un recyclage appropriés des déchets d’équipements électriques et
électroniques et des piles usagées, veuillez les déposer aux points de collecte prévus à cet effet, conformément à la
réglementation nationale et aux Directives 2002/96/EC et 2006/66/EC.
En vous débarrassant correctement des déchets d’équipements électriques et électroniques et des piles usagées, vous
contribuerez à la sauvegarde de précieuses ressources et à la prévention de potentiels effets négatifs sur la santé
humaine qui pourraient advenir lors d’un traitement inapproprié des déchets.
Pour plus d’informations à propos de la collecte et du recyclage des déchets d’équipements électriques et
électroniques et des piles usagées, veuillez contacter votre municipalité, votre service de traitement des déchets ou le
point de vente où vous avez acheté les produits.
[Pour les professionnels dans l’Union Européenne]
Si vous souhaitez vous débarrasser des déchets d’équipements électriques et électroniques veuillez contacter votre
vendeur ou fournisseur pour plus d’informations.
[Information sur le traitement dans d’autres pays en dehors de l’Union Européenne]
Ces symboles sont seulement valables dans l’Union Européenne. Si vous souhaitez vous débarrasser de déchets
d’équipements électriques et électroniques ou de piles usagées, veuillez contacter les autorités locales ou votre
fournisseur et demander la méthode de traitement appropriée.
Note pour le symbole « pile » (deux exemples de symbole ci-dessous) :
Ce symbole peut être utilisé en combinaison avec un symbole chimique. Dans ce cas il respecte les exigences établies
par la Directive pour le produit chimique en question.
Verbraucherinformation zur Sammlung und Entsorgung alter Elektrogeräte und benutzterBatterien
Befinden sich diese Symbole auf den Produkten, der Verpackung und/oder beiliegenden Unterlagen, so sollten
benutzte elektrische Geräte und Batterien nicht mit dem normalen Haushaltsabfall entsorgt werden.
In Übereinstimmung mit Ihren nationalen Bestimmungen und den Richtlinien 2002/96/EC und 2006/66/EC, bringen
Sie alte Geräte und benutzte Batterien bitte zur fachgerechten Entsorgung, Wiederaufbereitung und
Wiederverwendung zu den entsprechenden Sammelstellen.
Durch die fachgerechte Entsorgung der Elektrogeräte und Batterien helfen Sie, wertvolle Ressourcen zu schützen
und verhindern mögliche negative Auswirkungen auf die menschliche Gesundheit und die Umwelt, die andernfalls
durch unsachgerechte Müllentsorgung auftreten könnten.
Für weitere Informationen zum Sammeln und Wiederaufbereiten alter Elektrogeräte und Batterien, kontaktieren Sie
bitte Ihre örtliche Stadt- oder Gemeindeverwaltung, Ihren Abfallentsorgungsdienst oder die Verkaufsstelle der
Artikel.
[Information für geschäftliche Anwender in der Europäischen Union]
Wenn Sie Elektrogeräte ausrangieren möchten, kontaktieren Sie bitte Ihren Händler oder Zulieferer für weitere
Informationen.
[Entsorgungsinformation für Länder außerhalb der Europäischen Union]
Diese Symbole gelten nur innerhalb der Europäischen Union. Wenn Sie solche Artikel ausrangieren möchten,
kontaktieren Sie bitte Ihre örtlichen Behörden oder Ihren Händler und fragen Sie nach der sachgerechten
Entsorgungsmethode.
Anmerkung zum Batteriesymbol (untere zwei Symbolbeispiele):
Dieses Symbol kann auch in Kombination mit einem chemischen Symbol verwendet werden. In diesem Fall
entspricht dies den Anforderungen der Direktive zur Verwendung chemischer Stoffe.
COMPLIANCE INFORMATION STATEMENT
(DECLARATION OF CONFORMITY PROCEDURE)
Responsible Party
Address
Telephone
Fax
Type of Equipment
Model Name
: Yamaha Corporation of America
: 6600 Orangethorpe Avenue, Buena Park, CA 90620 USA
: 1-714-522-9011
: 1-714-522-9301
: Player Piano Control Unit
: DKC-850
This device complies with Part 15 of the FCC Rules.
Operation is subject to the following two conditions:
1) this device may not cause harmful interference, and
2) this device must accept any interference received including interference that may cause undesired operation.
See user manual instructions if interference to radio reception is suspected.
The above statements apply ONLY to those products distributed by Yamaha Corporation of America or its subsidiaries.
FCC INFORMATION (U.S.A.)
1. IMPORTANT NOTICE: DO NOT MODIFY THIS UNIT!
This product, when installed as indicated in the instructions contained in this manual, meets FCC requirements. Modifications not expressly
approved by Yamaha may void your authority, granted by the FCC, to use the product.
2. IMPORTANT: When connecting this product to accessories and/or another product use only high quality shielded cables. Cable/s supplied
with this product MUST be used. Follow all installation instructions. Failure to follow instructions could void your FCC authorization to use
this product in the USA.
3. NOTE: This product has been tested and found to comply with the requirements listed in FCC Regulations, Part 15 for Class “B” digital
devices. Compliance with these requirements provides a reasonable level of assurance that your use of this product in a residential
environment will not result in harmful interference with other electronic devices. This equipment generates/uses radio frequencies and, if not
installed and used according to the instructions found in the users manual, may cause interference harmful to the operation of other electronic
devices. Compliance with FCC regulations does not guarantee that interference will not occur in all installations. If this product is found to be
the source of interference, which can be determined by turning the unit “OFF” and “ON”, please try to eliminate the problem by using one of
the following measures:
Relocate either this product or the device that is being affected by the interference.
Utilize power outlets that are on different branch (circuit breaker or fuse) circuits or install AC line filter/s.
In the case of radio or TV interference, relocate/reorient the antenna. If the antenna lead-in is 300 ohm ribbon lead, change the lead-in to
coaxial type cable.
If these corrective measures do not produce satisfactory results, please contact the local retailer authorized to distribute this type of product. If
you can not locate the appropriate retailer, please contact Yamaha Corporation of America, Electronic Service Division, 6600 Orangethorpe
Ave, Buena Park, CA 90620
The above statements apply ONLY to those products distributed by Yamaha Corporation of America or its subsidiaries.
English
Disklavier Control Unit DKC-850
Operation manual
Welcome to the Yamaha DisklavierTM!
Thank you for purchasing the Yamaha Disklavier control unit!
This control unit is a fascinating instrument that integrates a classic Yamaha acoustic piano with innovative
electronics to suit your entertainment, educational, and creative needs, while retaining the tone, touch and
long-term value that have long made Yamaha pianos the world’s finest.
English
Before using your Disklavier control unit, please read this manual thoroughly and retain it for future
reference.
■ Notes on Source Code Distribution
For three years after the factory shipment, you may request from Yamaha the source code for any portions
of the product which are licensed under the GNU General Public License by writing to the following address:
1480 Ryoke, Kakegawa, Shizuoka, 436-0038, JAPAN
Piano International Sales Division, Yamaha Corporation
The source code will be provided at no charge; however, we may require you to reimburse Yamaha for the
cost of delivering the source code to you.
The source code download is also available on the following website:
http://www.global.yamaha.com/download/disklavier_e3/
• Note that we shall bear no responsibility whatsoever for any damage arising from changes (additions/
deletions) made to the software for this product by a third party other than Yamaha (or party authorized by
Yamaha).
• Note that re-use of source code released to the public domain by Yamaha is unguaranteed, and Yamaha
shall not bear any responsibility whatsoever for the source code.
■ Trademarks & Copyrights
• The contents of this operation manual and the copyrights thereof are under exclusive ownership by
Yamaha Corporation.
• Yamaha, Disklavier, Silent, PianoSoft, PianoSoft·Plus, and PianoSoft·PlusAudio are trademarks of
Yamaha Corporation.
• SmartKey, CueTIME, and You Are The Artist are trademarks of Yamaha Corporation or Yamaha
Corporation of America.
• Disklavier software, Copyright © 2008 Yamaha Corporation.
• This contains programs licensed under the GNU General Public License, GNU Lesser General Public
License, the BSD Copyright, the Artistic License, and the others.
• This product includes software developed by the OpenSSL Project for use in the OpenSSL Toolkit.
(http://www.openssl.org/)
• Windows is a registered trademark of Microsoft Corporation in the United States and other countries.
• Macintosh and Mac OS are trademarks of Apple Inc., registered in the U.S. and other countries.
• The company names and product names in this operation manual are the trademarks or registered
trademarks of their respective companies.
i
Important Precautions
Read the following before operating the Disklavier control unit.
■ Warnings
■ Cautions
• Do not locate the Disklavier control unit in a
place subject to excessive heat, low
temperatures, or direct sunlight. This could be a
fire hazard and may damage the finish and
internal parts.
• Turn off all audio devices when connecting to
the Disklavier control unit. Refer to the user’s
guide for each device. Use the correct cables
and connect as specified.
• Excessive humidity or dust can lead to fire or
electric shock.
• Connect the plug of the AC adaptor to a
compatible AC outlet. Failure to do so will
present a fire and electric shock hazard. If the
AC adaptor is not compatible with your AC
outlet, consult your dealer.
• Do not plug several devices into the same AC
outlet. This can overload the AC outlet, and lead
to fire and electric shock hazard. It may also
affect the performance of some devices.
• Do not place heavy objects on the AC adaptor
cable. A damaged cable is a potential fire and
electric shock hazard. If the cable runs under a
carpet, make sure heavy objects are not placed
on top of the cable.
• If the AC adaptor cable is damaged (i.e. cut or a
bare wire is exposed), ask your dealer for a
replacement. Using the Disklavier control unit in
this condition is a fire and shock hazard.
• When disconnecting the AC adaptor cable from
an AC outlet, always pull from the plug. Never
pull the cable. Damaging the cable in this way is
a potential fire and electric shock hazard.
• The cover of the unit should be removed only by
qualified service technicians.
• Do not place liquid containers such as vases,
potted plants, glasses, cosmetic bottles,
medicines, etc., on the Disklavier control unit.
• Do not try to modify the Disklavier control unit,
as this could lead to fire or electric shock hazard.
• When moving the Disklavier control unit to
another location, turn off the power, remove the
AC adaptor from the AC outlet, and remove all
cables connected to external devices.
• Use only the specified AC adaptor. Use of other
AC adaptors may result in damage, overheating,
or fire.
• Set the volume level on all the devices to
minimum before applying power.
• Do not play the Disklavier control unit at a high
volume for extended periods; you may damage
your hearing. This is especially important when
using headphones. If you think your hearing
ability is impaired, consult your doctor.
• If the Disklavier control unit is worked extremely
hard — that is, prolonged playback of very
“busy” songs — the thermal relay of the
Disklavier control unit may trip. The thermal
relay will automatically reset when the Disklavier
control unit has cooled down.
• If you notice any abnormality — such as smoke,
odor, or noise — turn off the Disklavier control
unit immediately, and remove the AC adaptor
from the AC outlet. Consult your dealer for
repair.
• If a foreign object or water gets inside the
Disklavier control unit turn it off immediately, and
remove the power plug from the AC outlet.
Consult your dealer.
• If you plan not to use the Disklavier control unit
for a long period of time (such as when you are
on vacation), disconnect the AC adaptor from
the AC outlet.
• Always remove the AC adaptor from the AC
outlet before cleaning the Disklavier control unit.
Leaving the AC adaptor connected presents a
risk of electric shock.
• Do not use benzene, thinner, cleaning
detergent, or a chemical cloth to clean the
Disklavier control unit.
• Do not place metal objects with rubber feet on
the Disklavier control unit. The color and finish of
the Disklavier control unit can be damaged.
• Do not place heavy objects on the Disklavier
control unit. Doing so can damage the Disklavier
control unit.
• Use a soft, dry cloth to clean the Disklavier
control unit. However, if you discover a stain,
carefully use a soft damp cloth to remove it.
ii
■ Interference
• The Disklavier control unit uses high-frequency
digital circuits that may cause interference to
radios and TVs placed close to it. If interference
does occur, relocate the affected equipment.
The remote control of this unit is powered by dry
batteries. Improper use or misuse of the dry
batteries can cause the dry batteries to heat up,
leak electrolyte or burst which in turn may result in
a fire, damage to equipment and/or nearby objects
or in burns, injury or other bodily harm. Read
through and familiarize yourself with the following
safety precautions prior to use to ensure correct
usage.
• Remove spent batteries immediately from
equipment. Otherwise, batteries will
overdischarge, causing them to heat up, leak
electrolyte or burst which in turn may result in
damage to nearby objects or in burns, injury or
other bodily harm.
English
■ Handling Batteries
• When the battery-powered unit is not going to be
used for a prolonged period of time, remove the
dry batteries from the unit. Otherwise the
batteries will run down and their electrolyte may
leak, resulting in damage to the unit.
• Dispose of batteries in accordance with the
applicable regulations and ordinances.
• The batteries shall not be exposed to excessive
heat such as sunshine, fire or the like.
• Do not directly touch the chemicals (electrolyte)
which have leaked from dry batteries.
1. If electrolyte from dry batteries has made
contact with your eyes, rinse your eyes
thoroughly with clean water and seek medical
treatment from a physician immediately.
2. If electrolyte from dry batteries has touched
your skin or clothing, rinse it off immediately
with clean water.
3. If electrolyte from dry batteries has found its
way inside your mouth, gargle immediately
and consult a physician.
• Do not install the dry batteries with the “+” and
“–” poles reversed. Misaligning the poles of dry
batteries can lead the dry batteries to be
charged or shorted or it can cause them to heat
up, leak electrolyte or burst which in turn may
result in a fire, damage to nearby objects or in
burns, injury or other bodily harm.
• Use only the designated batteries. Do not use
used batteries with unused batteries or different
types of batteries together. This can cause them
to heat up, leak electrolyte or burst which in turn
may result in a fire or in burns, injury or other
bodily harm. Replace all the dry batteries at the
same time. Do not use new and old dry batteries
together. Do not use different types of batteries
(alkaline and manganese batteries, batteries
made by different manufacturers or different
battery products made by the same
manufacturer) together: this can cause them to
heat up, ignite or leak electrolyte.
Please keep this manual for future reference.
iii
Table of Contents
Chapter 1
Introduction
Chapter 5
Features .................................................................1
Internet Direct Connection
(IDC)
Items Supplied with the Disklavier Control Unit .....1
What is Internet Direct Connection (IDC)? .......... 35
Names of Parts and Their Functions......................2
Obtaining an ID and Password for the IDC Service
Basic Disklavier Terminology .................................6
(IDC Registration)................................................ 35
Connecting the Disklavier to the Internet ............ 35
Chapter 2
Getting Started
Accessing the Internet......................................... 37
Checking the Type of Your Piano ..........................7
Checking Your Account Information.................... 38
Replacing the Existing Control Unit with the
Updating the Disklavier Control Unit Using the
Disklavier Control Unit............................................8
Internet ................................................................ 39
Connecting the Disklavier Control Unit with the
Setting the Disklavier Control Unit for the Internet
MIDI Cables .........................................................10
Connection .......................................................... 41
Connecting Monitor Speakers..............................12
Initializing Internet Settings ................................. 42
Using the Remote Control....................................13
Turning On the Disklavier Control Unit.................14
Chapter 6
Advanced Song Playback
Setting the Type of Your Piano ............................15
Changing the Playback Tempo ........................... 43
Setting the Internal Calendar ...............................16
Playing Back Songs in a Different Key
Turning Off the Disklavier Control Unit
(Transposition) .................................................... 43
(Standby Mode)....................................................19
Repeating Song Playback ................................... 44
Shutting Down the Disklavier Control Unit ...........19
Repeating a Specific Section of a Song
Compatible Media Format for the Removable
(A-B Repeat) ....................................................... 45
Media ...................................................................19
Playing Back Only the Desired Piano Part .......... 46
Compatible File Format........................................20
Adjusting the Volume Balance among the
Basic Precautions for Using CDs .........................20
Keyboard Playing, Ensemble Sound, and
Software Playback............................................... 48
Chapter 3
Basic Song Playback
Adjusting the Pitch of Audio ................................ 50
Types of Playable Software .................................21
Adjusting the L/R Balance of Audio..................... 50
Selecting Medium and Their Contents .................22
Using Timer Play ................................................. 51
Using the Number Keypad ...................................24
Skipping the Blank Part at the Beginning of a
Starting Playback .................................................24
Song .................................................................... 55
Stopping Playback ...............................................25
SmartKey™ Playback ......................................... 56
Pausing Playback.................................................25
Inactivating the Key Movement during
Fast Preview & Review ........................................27
Playback.............................................................. 57
Fast Forward & Reverse ......................................28
Searching a Specific Section of a Song ...............29
Chapter 7
Advanced Recording
Listening to the DisklavierRadio...........................30
Recording with the Internal Metronome .............. 58
Adjusting the Volume ...........................................31
Recording the Left and Right Parts Separately ... 60
Recording the Left and Right Parts Together
Chapter 4
iv
Basic Recording
(Setting a Split Point)........................................... 62
Recording a New Song ........................................32
Re-Recording One Part....................................... 64
Titling a Song .......................................................33
Changing the Default Tempo .............................. 65
Chapter 8
Advanced Piano Playing
Restoring the Backups ...................................... 108
Playing the Disklavier along with the Internal
Metronome ...........................................................68
English
Playing the Disklavier with an Ensemble Voice ...69
Chapter 12 Enhancing the Disklavier by
Hooking Up Other Devices
Hooking Up Audio Equipment ........................... 110
Chapter 9
Video Synchronization
Connecting Monitor Speakers ........................... 111
Video Synchronized Recording............................71
Setting the Disklavier Control Unit for Audio Data
Video Synchronized Playback .............................75
Reception/Transmission.................................... 113
Hooking Up MIDI Devices ................................. 115
Chapter 10 CD Synchronization
Setting the Disklavier Control Unit for MIDI Data
CD Synchronized Recording................................76
Reception .......................................................... 115
Adding Disklavier Accompaniment to Commercial
Setting the Disklavier Control Unit for MIDI Data
CD Songs (PianoSmart™ Playback) ...................77
Transmission ..................................................... 117
Setting the Disklavier Control Unit for Keyboard
Chapter 11 Media Management
Managing Albums ................................................78
Playing Data Transmission ............................... 118
Making Copies of Albums ....................................78
Chapter 13 Other Settings
Deleting Albums...................................................80
Tuning the Tone Generator
Creating a New Album .........................................81
(TG Master Tune).............................................. 120
Renaming an Album ............................................82
Switching the Languages for the Screen .......... 121
Rearranging the Order of Albums ........................84
Resetting the Disklavier Control Unit ................ 122
Managing Songs ..................................................85
Updating the Disklavier Control Unit ................. 123
Making Copies of Songs ......................................85
Deleting Songs.....................................................87
Renaming a Song ................................................88
Rearranging the Order of Songs ..........................89
Converting Song Format......................................90
Changing the Counter Display .............................91
Converting MIDI Data to a Standard Form
Chapter 14 Troubleshooting .................. 126
Chapter 15 Error Messages ................... 129
Chapter 16 Glossary ................................. 131
Managing Playlists ...............................................93
Chapter 17 Internal Tone Generator
Voices
Adding Songs/Albums to the Playlist ...................94
Internal GM/XG Tone Generator Basic Voice
Deleting a Playlist ................................................95
List..................................................................... 134
Creating a New Playlist ........................................96
Internal TG3 Tone Generator Basic Voice
Renaming a Playlist .............................................97
List..................................................................... 137
(Strip XP) .............................................................92
Managing Media ..................................................98
Making Copies of the Entire Contents in a
Chapter 18 Specifications
Medium ................................................................99
General Specifications ...................................... 139
Deleting the Entire Contents in a Medium .........100
Functions & Controls ......................................... 140
Copying Song File from a Personal Computer to
the Disklavier Control Unit .................................101
Refreshing the Contents in [FromToPC] ............105
Appendix
Software License Notice ....A-1
MIDI Data Format ..............A-21
Formatting the Floppy Disk (Optional) ...............106
Making Backups of Songs .................................107
MIDI IMPLEMENTATION CHART
v
Chapter
1
Introduction
Features
English
The Disklavier control unit offers the valuable features that open up your musical possibility to explore. Here
are brief explanations of such features:
Advanced Features for Your Listening Pleasure
• Special music CDs, contain over 17 hours of fantastic music, let you start listening on the day this unit
arrives at your home.
• DisklavierRadio; you can listen to over 11 music channel by streaming broadcasts over the Internet.
(Available only on models of which the control unit is replaced with the Disklavier control unit.)
Convenient Recording Features to Preserve Your Musical Memories
• Total 128 megabytes of internal memory comes with the Disklavier control unit to preserve your valuable
data.
• Connecting external USB devices to the Disklavier control unit allows you to record your performance
directly onto them, or even make backups of your valuable data in the internal memory.
• Video synchronization features offer great listening experience with sights. You can see as well as hear
performances with perfectly synchronized audio and video.
• Your valuable music data on the floppy disk can be played back with the optional floppy disk drive (UDFD01).
Simple and Easy-to-use Features Enhancing Your Performance
• The remote control, with clear and logical layout of buttons, lets you quickly enjoy the features of the
Disklavier control unit.
• The display on the front panel employs an organic electro-luminescent display which makes it brighter
and more easily readable than ever.
Items Supplied with the Disklavier Control Unit
Check that the following items are supplied with your Disklavier control unit.
• 1 Remote control
• 2 Batteries for remote control
• 1 Remote control sensor shielding sticker
• 1 Sample PianoSoft CD software
• 2 MIDI cables
• 1 Audio cable (pin plugs – stereo mini plug)
• 2 Audio cables (pin plug – phone plug)
• 1 Conversion cable for control
• 1 AC adaptor (PJP-PS02/PJP-PS04 or an equivalent recommended by Yamaha)
• 1 Power cable
• 1 Operation manual
• 1 PianoSoft CD song list
1
Chapter
1
Introduction
Names of Parts and Their Functions
■ Front Panel
4
1
2
3
5
6
7
8
9
[ON/OFF] button
Turns on or shuts down the Disklavier control unit.
Press once to turn it on, and once again to shut it
down.
1
USB port
Used to connect a USB flash memory, etc.
2
10
11
Cursor/[ENTER] buttons
Cursor: Used to select options and parameters.
[ENTER]: Used to execute the selection.
10
11
Display
Shows various information.
Dial
Used to adjust the volume, and to set parameter
values.
12
Remote control sensor
When using the remote control, point it toward this
sensor.
3
4
CD drive
Insert a PianoSoft·PlusAudio or other audio or
audio/MIDI CD here.
CD eject button
Used to open the CD drive.
5
[PLAY/PAUSE] button
() pages 24 and 25)
Used to start and pause playback.
6
[STOP] button () page 25)
Used to stop playback and recording.
7
[RECORD] button () page 32)
Used to engage the record standby mode before
recording starts.
8
9
[SELECT] button
Used to select media.
2
12
Chapter
Introduction
1
■ Rear Panel
1
2
3
4
5
6
English
7
8
9
USB TO DEVICE port
Used to connect a USB flash memory, an optional
USB floppy disk drive, etc.
1
2
LAN port
Used to connect to the Internet.
OUTPUT jacks
Used to connect the speaker cord from optional
monitor speakers.
3
ANALOG MIDI IN jacks
Used to connect the audio equipment such as an
external CD changer.
4
10
11
MIDI OUT terminal
For models to be replaced with Disklavier control
unit:
Used to connect external MIDI equipment.
For models to be connected with the MIDI cables:
Used to connect the existing control unit.
10
MIDI IN terminal
For models to be replaced with Disklavier control
unit:
Used to connect external MIDI equipment.
For models to be connected with the MIDI cables:
Used to connect the existing control unit.
11
OMNI (SYNC) OUT jacks
Used to connect the microphone/line input of a
camcorder.
5
OMNI (SYNC) IN jacks
Used to connect the audio output of a camcorder.
6
7
TO PIANO connectors
Used to connect the piano.
DC-IN 12V connector
Used to connect to the supplied AC adaptor.
8
USB TO HOST port
Used to connect the USB cable from a computer.
9
3
Chapter
1
Introduction
■ Remote Control
1
13
2
14
15
16
3
17
4
18
5
19
20
6
21
7
22
8
9
23
24
10
25
26
11
12
27
1
[ON/STANDBY] button
Turns on the Disklavier control unit or puts it in the
standby mode.
5
[RECORD] button () page 32)
Used to engage the record standby mode before
recording starts.
Number keypad
Used for direct album/song selection and to enter a
start time for song playback.
[PLAY] button () page 24)
Used to start playback.
2
6
[REVERSE]/[FORWARD] buttons
In the play mode: used to fast preview and review.
In the pause mode: used to fast forward and
reverse.
7
[SYSTEM] button
Used to access the system menu.
3
[VOICE] button () page 69)
Used to access the voice function.
4
4
Cursor buttons
Used to select options and parameters.
8
Chapter
Introduction
9
[BACK] button
Used to cancel the selection, and return to the
previous screen.
1
20
[PAUSE] button () page 25)
Used to pause playback.
[STOP] button () page 25)
Used to stop playback and recording.
21
[VOLUME] buttons () page 31)
Used to adjust the volume.
[–] lowers the volume, [+] raises the volume.
10
[TRANSPOSE] buttons
Used to transpose song playback.
[–] transposes down, [+] transposes up, and [0]
resets the transposition value to 00.
12
[INTERNET] button
Used to access the Internet menu.
English
11
[TEMPO] buttons
Used to change the playback tempo.
[–] decreases the tempo, [+] increases the tempo,
and [0] resets the tempo to 00.
[ENTER] button
Used to execute the selection.
22
[FUNC.] button
Used to access the function menu.
23
24
[SELECT] button
Used to select media.
[+/YES]/[–/NO] buttons
Used to select parameters, adjust setting values,
and execute or cancel the selected functions.
25
13
[SEARCH] button
Used to access the search function.
[BALANCE] button
Used to adjust the TG, audio and voice balance.
26
14
15
[SETUP] button
Used to access the setup menu.
[METRONOME] button
Used to access the metronome function.
16
27
Color buttons
Green: For future use.
Yellow: Used to switch character types when titling
albums and songs.
Red:
For future use.
Blue: For future use.
[REPEAT] button
Used to select one of the repeat modes: ALL, RPT,
RND, or OFF.
17
18
[A-B] button
Used to enter A and B points for the A-B repeat
mode.
[PART SELECT] buttons
For L/R and ensemble songs, these buttons are
used to choose which part will play: left-hand part,
right-hand part, or both parts.
They are also used to select a part for recording.
19
5
Chapter
1
Introduction
Basic Disklavier Terminology
The following is a list of several basic Disklavier
words that you may need to know before
proceeding with operational procedures in this
manual. For additional Disklavier terminology, see
the glossary provided in Chapter 16.
PianoSoft·Plus
PianoSoft·Plus software contains
prerecorded ensemble songs featuring
instrumental accompaniment that can be played
back on the Disklavier. See your Disklavier dealer
for a PianoSoft catalog.
Ensemble Song
An ensemble song contains the same left- and
right-hand parts as an L/R song, and extra tracks
that are played by the internal XG tone generator.
Accompanying tracks can include acoustic bass,
drums, strings, vibes, etc.
L/R Song
In a L/R song, the left-hand piano part is stored on
track 1 (L) and the right-hand piano part is stored
on track 2 (R). During playback you can cancel
either part, and practice that part yourself. When
recording an L/R song, you can record the two
parts simultaneously or separately.
Internal Flash Memory
The Disklavier control unit has a total of 128
megabytes of internal flash memory that allow you
to store song data without a floppy disk.
MIDI
An acronym for Musical Instrument Digital
Interface. MIDI allows electronic musical
instruments to communicate with each other.
PianoSoft
The PianoSoft Disk Collection is a
library of prerecorded song disks made by Yamaha
for use with the Disklavier series. Many titles are
available, and among the many musical styles
included are classical, jazz, and popular. The disk
includes songs for listening enjoyment, piano study
disks for the piano student, and accompaniment
disks for vocal and instrumental practice. PianoSoft
is sometimes used as a generic term for PianoSoft
and PianoSoft·Plus.
6
PianoSoft·PlusAudio
CD software made by Yamaha
containing audio and MIDI
signals for playing back on the Disklavier.
SmartPianoSoft
Software made by Yamaha
containing MIDI signals for
playing back along with standard audio CDs.
Song
A “song” usually means a short piece of music with
lyrics. However, in this manual the term “song” is
used to refer to any piece of music.
Tone Generator
An electronic device that generates instrument
voices. The Disklavier control unit has an internal
XG tone generator that can produce nearly 700
instrumental and percussion voices.
Voice
The sounds produced by a tone generator
expressing various instruments.
XG
Yamaha XG is an extension of the GM
(General MIDI) format. With greater polyphony,
more voice, and effects, it improves song
compatibility between MIDI devices. When a song
in the Yamaha XG format is played on another XG
compatible tone generator or synthesizer, it will
play and sound as the original composer/creator
intended.
Chapter
2
Getting Started
This chapter describes instructions for connecting with your Disklavier piano and other
preparation.
Checking the Type of Your Piano
English
The Disklavier control unit can be connected to several models of the Yamaha Disklavier pianos, however,
connections and setup procedures vary depending on the piano model. Check the model number on the
existing control unit and find your piano model following the descriptions below before connecting.
Note:
The model number of the control unit is on the upper part of the display.
■ Models to be Replaced with the Disklavier Control Unit
If you are using the piano listed below, replace the existing control unit with the Disklavier control unit.
Models
Upright pianos
Grand pianos
Model Number on the Control Unit
Disklavier Mark II XG Series
DKC500R, DKC500RXG, DKC500RW,
DKC500RWXG
Disklavier Mark II XG Series (MX600)
DKC50R
Disklavier Mark III Series (DU1A)
DKC55RCD
Disklavier Mark II XG Series
DKC500R, DKC500RXG, DKC500RW,
DKC500RWXG
Disklavier Mark III Series Full-Function Models
DKC55RCD
Disklavier Mark III Series Standard Models
DKC60RCD
Disklavier Mark III Series PRO Models
DKC55RCD
Disklavier Mark III Series Playback Models
DKC55, DKC55CD
For details on connections and setup, see Chapter 2 “Getting Started – Replacing the Existing Control Unit
with the Disklavier Control Unit” on page 8.
Note:
You can also connect the piano listed above with the Disklavier control unit using the MIDI cables. However, you cannot use Internet Direct
Connection when connected with the MIDI cables.
■ Models to be Connected with the MIDI Cables
If you are using the piano listed below, connect your piano to the Disklavier control unit with the MIDI
cables.
Models
Model Number on the Control Unit
Upright pianos
Disklavier Mark II Series
DKC100R or built-in
Grand pianos
Disklavier Mark II Series
DKC100R
For details on connections and setup, see Chapter 2 “Getting Started – Connecting the Disklavier Control
Unit with the MIDI Cables” on page 10.
Note:
You cannot replace the control unit of the piano listed above with the Disklavier control unit.
Note:
You cannot use Internet Direct Connection on the piano listed above.
7
Chapter
2
Getting Started
Replacing the Existing Control Unit with the Disklavier Control Unit
Connect the Disklavier control unit to your piano, replacing with the existing control unit.
7
6
4
Tighten
Disklavier
control unit
5
Conversion
cable
(supplied)
AC adaptor (PJP-PS02/PJP-PS04)
(supplied)
Connect monitor
speakers.
See page 12.
.
Power cable
(supplied)
Control
cable
Your piano
3
2
Tighten
8
Loosen
Cautions
• Use the Yamaha PJP-PS02/PJP-PS04 adaptor, or an equivalent recommended by Yamaha. Use of
other AC adaptors may result in damage, overheating, or fire.
• Do not stretch the cable or bend its ends.
• Do not attempt to use the cable if it is stretched or if the ends of the cable have been bent. Attempting
to do so may cause interruptions to the power supply.
• Always turn off the main unit power before disconnecting the AC adaptor.
• When you wish to move the Disklavier control unit, unplug the AC adaptor from the AC wall outlet
and disconnect if from the DC-IN 12V connector on the rear panel of the Disklavier control unit before
proceeding.
• Unplug the AC adaptor from the AC wall outlet if you do not intend to use the instrument for an
extended period of time.
8
Chapter
Getting Started
Turn off your piano, and disconnect the power cable from
the AC wall outlet.
2
Disconnect the control cable from the TO CONTROL
CABLE FOR PIANO connector on the rear panel of your
control unit.
Loosen the two screws attached to the connector by the
screwdriver.
3
Note:
The location of the TO CONTROL
CABLE FOR PIANO connector
varies depending on the piano
model.
English
1
2
Important:
Please keep the disconnected control
unit for future maintenance.
Connect the supplied conversion cable to the control
cable disconnected in step 2.
Tighten the two screws attached to the connector by the
screwdriver.
4
Connect the supplied conversion cable to the TO PIANO
connector on the rear panel of the Disklavier control unit.
Tighten the two screws attached to the connector by the
screwdriver.
5
Connect monitor speakers to the OUTPUT jacks on the
rear panel of the Disklavier control unit.
6
Connect the supplied AC adaptor to the DC-IN 12V
connector on the rear panel of the Disklavier control unit.
7
Connect the supplied power cable to the AC adaptor.
8
Connect the power cable extended from your piano and
the AC adaptor to the AC wall outlet.
The connection completed.
Turn on the Disklavier control unit, and set the piano type.
)
See Chapter 2 “Getting Started –
Connecting Monitor Speakers” on
page 12.
)
See Chapter 2 “Getting Started –
Setting the Type of Your Piano” on
page 15.
9
Chapter
2
Getting Started
Connecting the Disklavier Control Unit with the MIDI Cables
Connect the Disklavier control unit to your piano using the MIDI cables.
2, 3
2, 3
4
.
Connect monitor speakers.
See page 12.
Disklavier
control unit
Your control unit
MIDI cable (supplied)
5
AC adaptor
(PJP-PS02/PJP-PS04)
(supplied)
Power cable
(supplied)
6
Your piano
8
Backing paper
7
Adhesive tape
Remote control sensor
shielding sticker
Remote control
sensor
Cautions
• Use the Yamaha PJP-PS02/PJP-PS04 adaptor, or an equivalent recommended by Yamaha. Use of
other AC adaptors may result in damage, overheating, or fire.
• Do not stretch the cable or bend its ends.
• Do not attempt to use the cable if it is stretched or if the ends of the cable have been bent. Attempting
to do so may cause interruptions to the power supply.
• Always turn off the main unit power before disconnecting the AC adaptor.
• When you wish to move the Disklavier control unit, unplug the AC adaptor from the AC wall outlet
and disconnect if from the DC-IN 12V connector on the rear panel of the Disklavier control unit before
proceeding.
• Unplug the AC adaptor from the AC wall outlet if you do not intend to use the instrument for an
extended period of time.
10
Chapter
Getting Started
Turn off your piano, and disconnect the power cable from
the AC wall outlet.
2
Connect the MIDI IN terminal of your control unit to the
MIDI OUT terminal of the rear panel of the Disklavier
control unit with the supplied MIDI cable.
Note:
The location of the MIDI IN
terminal varies depending on the
piano model.
3
Connect the MIDI OUT terminal of your control unit to the
MIDI IN terminal of the rear panel of the Disklavier control
unit with the supplied MIDI cable.
Note:
The location of the MIDI OUT
terminal varies depending on the
piano model.
4
Connect monitor speakers to the OUTPUT jack on the rear
panel of the Disklavier control unit.
5
Connect the supplied AC adaptor to the DC-IN 12V
connector on the rear panel of the Disklavier control unit.
6
Connect the supplied power cable to the AC adaptor.
7
Connect the power cable extended from your piano and
the AC adaptor to the AC wall outlet.
8
Place the remote control sensor shielding sticker over the
remote control sensor of the control unit of your piano.
English
1
2
)
See Chapter 2 “Getting Started –
Connecting Monitor Speakers” on
page 12.
Note:
For the location of the remote
control sensor, refer to your piano’s
owner’s manual.
The remote control supplied with the Disklavier control unit will also
operate the control unit of your piano.
In order to prevent this, be sure to place the remote control sensor
shielding sticker.
9
Turn on your piano, and make the MIDI data transmission/
reception settings on the control unit of your piano.
Make the settings as follows. For details on setting, refer to your
piano’s owner’s manual.
Settings
MIDI IN CH
HP
MIDI IN
DELAY IN (500ms)
MIDI OUT
KBD OUT
OUT CH
HP
The connection completed.
Turn on the Disklavier control unit, and set the piano type.
)
See Chapter 2 “Getting Started –
Setting the Type of Your Piano” on
page 15.
11
Chapter
2
Getting Started
Connecting Monitor Speakers
To listen to the internal XG tone generator voices, you have to connect
monitor speakers. Connection methods vary depending on whether your
piano is equipped with the Silent Piano™ function or not.
■ For Pianos Equipped with the Silent Piano™
Function
Connect the AUX IN jacks of your piano to the OUTPUT jacks on the rear
of the Disklavier control unit with the supplied audio cable.
For models with the control box
Connect with the supplied audio
cable (pin plugs – stereo mini plug).
For models with the amplifier
Connect with the supplied audio
cables (pin plug – phone plug).
To AUX IN jack
(stereo mini plug)
To AUX IN jacks
(phone plug)
Audio cable
(supplied)
Disklavier
control unit
Disklavier
control unit
Audio cables
(supplied)
■ For Pianos Not Equipped with the Silent Piano™
Function
Connect the input jacks of monitor speakers (phone jacks) to the OUTPUT
jacks on the rear of the Disklavier control unit with the supplied audio
cables (pin plug – phone plug).
AC wall outlet
Monitor
speaker (left)
Monitor
speaker (right)
POWER
ON
OFF
POWER
POWER
ON
INPUT
ON
INPUT
LINE 1
(--10dB)
OFF
LINE 1
(--10dB)
OFF
LINE 2
(--4dB)
LINE 2
(--4dB)
PARALLEL
Audio cable
(supplied)
Disklavier
control unit
12
PARALLEL
Audio cable
(supplied)
Note:
The shape of units or the location of
the AUX IN jacks varies depending
on the piano model.
Chapter
Getting Started
2
Using the Remote Control
The Disklavier control unit is equipped with a remote control which allows
convenient control from almost anywhere in the room. This section
provides notes on handling the remote control.
English
■ Installing Batteries in the Remote Control
Before the remote control can be used, the two batteries supplied with the
Disklavier control unit must be installed.
Remove the battery cover from the rear of the remote control, install the
batteries, and then replace the cover.
A diagram inside the battery compartment shows which way the batteries
should be installed. Make sure you insert them correctly.
■ Battery Replacement
When the remote control fails to work from a distance, replace the
batteries.
• Replacement batteries should be UM-3, AA, R6P, or LR6 type.
• Do not use new and old dry batteries together.
Important:
Be sure to read the section on
“Handling Batteries” on page iii for
details on the safe handling of dry
batteries.
• Do not use different types of batteries (alkaline and manganese
batteries, batteries made by different manufacturers or different battery
products made by the same manufacturer) together.
• Remove spent batteries immediately from the remote control.
Otherwise, batteries will overdischarge, causing them to leak electrolyte
or burst which in turn may result in damage to nearby objects or in
burns, injury or other bodily harm.
• Dispose of batteries in accordance with the applicable regulations and
ordinances.
• If the remote control is not to be used for a prolonged period of time,
remove the batteries to prevent possible damage by battery leakage.
• If the batteries have leaked, dispose of them immediately. Avoid
touching the leaked electrolyte or letting it come into contact with skin or
clothing. Clean the battery compartment thoroughly before installing
new batteries.
13
Chapter
2
Getting Started
■ Using the Remote Control
To use the remote control, point it at the remote control sensor on the front
panel.
Approx. 5 m
30°
30°
30°
30°
Turning On the Disklavier Control Unit
1
Make sure that the AC adaptor is plugged into the AC wall
outlet.
When you connected the Disklavier control unit to your piano with
the MIDI cables, first turn on the power of your piano.
2
Press [ON/OFF] on the front panel.
While the control unit is in the standby mode, you can also turn on
the Disklavier control unit by pressing [ON/STANDBY] on the
remote control.
The following message appears on the display, and [ON/OFF] on
the front panel lights green.
After several seconds, the loading screen will appear, and last
selected song will be loaded.
PLEASE WAIT
=Memory=
------<-----> (no
Your Disklavier control unit is now ready for use.
14
V+00
song)
)
See Chapter 2 “Getting Started –
Turning Off the Disklavier Control
Unit (Standby Mode)” on page 19.
Chapter
Getting Started
2
Setting the Type of Your Piano
[SYSTEM]
“PianoType”
After you have connected the Disklavier control unit to your piano, you
must set the type of your piano.
English
1
Press [SYSTEM] on the remote control.
The system menu screen appears.
!"#${
2
Select “PianoType” with the cursor buttons ([
[ ]), then press [ENTER].
][
][
]
}
The piano type setup screen appears.
=PianoType=
>Type=Replace
>Piano=REC
3
-+ENT
Press [+/YES] and [–/NO] to change the connection type
setting.
=PianoType=
>Type=Add
-+ENT
The following connection type settings are available:
Setting
Description
Replace
Select this when you replaced the existing unit with
the Disklavier control unit (see page 8).
Add
Select this when you connected the Disklavier
control unit to your piano with the MIDI cables (see
page 10).
Note:
If you select “Replace” and this unit
detects your piano as the playback
model, “[PB]” appears on the right
of the screen.
15
Chapter
2
Getting Started
4
Press [ENTER].
The piano type is set, and this unit is automatically rebooted.
=PianoType=
Restarting...
Setting the Internal Calendar
[SYSTEM]
“TimeZone” and “Clock Adj.”
The Disklavier control unit has an internal calendar that can be set from 1/
1/1985 00:00:00 to 12/31/2084 23:59:59. Set the calendar accurately so
that the Disklavier control unit displays the correct current time during the
stop mode.
Time is displayed in 24-hour format.
■ Time Zone
1
Press [SYSTEM] on the remote control.
The system menu screen appears.
!"#${
2
Select “TimeZone” with the cursor buttons ([
[ ]), then press [ENTER].
!"#${
The time zone setup screen appears.
16
][
][
]
)
Setting the correct time is also
important for engaging timercontrolled programs. See Chapter 6
“Advanced Song Playback – Using
Timer Play” on page 51.
Chapter
Getting Started
3
2
Press [+/YES] and [–/NO] to change the time zone.
Note:
The time zone listed here should be
used only as a guide. For more
details, contact your local
observatories.
English
Examples of Time Zone
The chart below shows the correspondence between the time zone
setting on the Disklavier control unit and actual time zone used in
each area.
For U.S. and Canada:
Setting
Actual Time Zone
GMT-10
Hawaii-Aleutian Standard Time
GMT-9
Alaska Standard Time (AKST)
GMT-8
Alaska Daylight Time (AKDT)
Pacific Standard Time (PST)
GMT-7
Pacific Daylight Time (PDT)
Mountain Standard Time (MST)
GMT-6
Mountain Daylight Time (MDT)
Central Standard Time (CST)
GMT-5
Central Daylight Time (CDT)
Eastern Standard Time (EST)
GMT-4
Eastern Daylight Time (EDT)
For Europe:
4
Setting
Actual Time Zone
GMT+0
U.K.
GMT+1
Central Europe (Paris, Berlin)
GMT+2
Eastern Europe (Athens)
Press [ENTER].
The time zone is set, and the display returns to the system menu.
Proceed to the calendar setting.
17
Chapter
2
Getting Started
■ Calendar
1
Select “Clock Adj.” with the cursor buttons ([
[ ]), then press [ENTER].
][
][
]
!"#${
The current date and time appear.
2
Press [ENTER].
The time setup screen appears with the cursor flashing on the
hours display.
}{
3
Select year, month, date, hours, minutes, and seconds
with the cursor buttons ([ ] [ ]), then press [+/YES] and
[–/NO] to set a value.
}{
4
Press [ENTER].
The date and time are stored in the internal calendar, and the
display returns to the current time screen.
5
Press [BACK] on the remote control.
The display returns to the system menu screen.
18
Chapter
Getting Started
2
Turning Off the Disklavier Control Unit (Standby Mode)
Press [ON/STANDBY] on the remote control.
The ending screen appears, and [ON/OFF] on the front panel lights
red.
Note:
Press [ON/STANDBY] on the
remote control to turn the Disklavier
control unit back on.
English
See you again
When you connected the Disklavier control unit to your piano with
the MIDI cables, turn off your piano.
Shutting Down the Disklavier Control Unit
Press [ON/OFF] on the front panel.
The ending screen appears, and [ON/OFF] on the front panel turns
off.
Note:
Be sure to wait 5 seconds before
turning the Disklavier control unit
back on.
See you again
When you connected the Disklavier control unit to your piano with
the MIDI cables, turn off your piano.
Compatible Media Format for the Removable Media
Compact Disc
The Disklavier control unit can play songs on commercial audio CDs and
data CDs (such as PianoSoft·PlusAudio).
• The audio CDs should be formatted in CD-DA.
Note:
If the external medium contains a
number of albums or songs, it may
take some time for the Disklavier
control unit to recognize them.
• The data CDs should be formatted in ISO 9660 Level 1.
USB Flash Memory
You can use commercially available USB flash memories to store song
data. The USB flash memory should be formatted in FAT16 or FAT32 file
system.
USB Hard Disk
You can use commercially available USB hard disk drives to store song
data or make a backup of song data. The USB hard disk drive should be
formatted in FAT32 file system.
Note:
Yamaha does not assure the
operation of commercially available
USB flash memories or USB hard
disk drives. For a list of compatible
products, please visit:
www.yamaha.com/disklavier/
Note:
Do not insert or remove the USB
media while reading or writing data.
Make sure that reading or writing
has finished before doing so.
Floppy Disk (Optional)
With the optional USB floppy disk drive, you can use 3.5” 2DD or 2HD floppy
disks to store song data. The floppy disk should be formatted in MS-DOS.
19
Chapter
2
Getting Started
Compatible File Format
The Disklavier control unit can handle these three types of file format:
SMF0
Standard MIDI File format 0 for playback and recording. The name of the
file should have an extension as “.MID” or “.mid.”
SMF1
Standard MIDI File format 1 for playback only. The name of the file should
have an extension as “.MID” or “.mid.”
E-SEQ
Format developed by Yamaha, for playback only. The name of the file
should have an extension as “.FIL” or “.fil.”
Basic Precautions for Using CDs
■ Handling CDs
In order to protect data stored on compact discs from damage or loss,
handle them with care, and observe the following precautions.
• Do not touch the surface of a CD.
• Do not expose CDs to extreme temperatures or humidity. The working
temperature range is between 4°C and 52°C (40°F and 125°F).
• Wipe CDs with a clean, dry cloth before playback.
• Remove the CD from the CD drive before turning off the Disklavier
control unit.
■ Loading a CD
1
Press the CD eject button on the front panel to open the
CD tray.
CD
CD eject button
2
20
Place a CD on the tray, and then close the tray.
Chapter
3
Basic Song Playback
Types of Playable Software
When piano songs such as those contained in
PianoSoft and PianoSoft·Plus software are played back
on the Disklavier, the piano parts are actually played by the Disklavier
keyboard, and the keys move up and down as though they were being
played by an invisible performer. The ensemble parts (contained in
PianoSoft·Plus software) are played by the internal tone generator and are
heard from optional monitor speakers.
English
PianoSoft and PianoSoft·Plus
PianoSoft·PlusAudio
PianoSoft·PlusAudio songs are recorded using two
channels, an analog MIDI channel for the piano parts
and an audio channel for instrumentals and vocals. When they are played
back on the Disklavier, the piano parts area played by the Disklavier
keyboard as with PianoSoft and PianoSoft·Plus songs, and all other
instrumental and vocal parts are heard from optional monitor speakers just
like a normal stereo system.
SmartPianoSoft
SmartPianoSoft contains a recorded piano
accompaniment to the commercial CDs, and the acoustic
accompaniment will play back matching with the commercial CD. You can
also record your own accompaniment for your favorite commercial CDs at
home; play your Disklavier as you listen to a CD, and SmartPianoSoft will
match the music together during playback, essentially adding you to
famous performances.
Standard Audio CDs
Standard audio CDs contain two audio channels (L and R), and are both
heard from optional monitor speakers just like a normal stereo system. In
other words, the Disklavier can be used to play CDs in place of a stereo
system.
21
Chapter
3
Basic Song Playback
Selecting Medium and Their Contents
[SELECT]
1
Insert a desired medium.
CD
CD eject button
USB flash memory
USB port
2
Press [SELECT].
The media selection screen appears with the current selected
medium highlighted.
=MEDIA SELECT=
or
Front panel
3
Remote control
Memory
?]
CD
Select a desired medium with the cursor buttons ([
[ ]).
]
Note:
“D-Radio” is available only on
models of which the control unit is
replaced with the Disklavier control
unit.
)
See Chapter 3 “Basic Song Playback
– Listening to the DisklavierRadio”
on page 30.
The following media are available:
22
Medium
Description
Memory
Internal flash memory
CD
Audio CD or data CD
USB1,
USB2
USB flash memory or USB HDD (USB1 indicates the
first inserted one, and USB2 indicates the second.)
Playlist
Playlist in the internal flash memory
D-Radio
DisklavierRadio
FromToPC
Network folder in the internal flash memory
)
See Chapter 11 “Media
Management – Copying Song File
from a Personal Computer to the
Disklavier Control Unit” on
page 101.
Chapter
Basic Song Playback
4
Press [ENTER] or [
3
].
The album selection screen appears.
or
][{
01:50 Greats for t
English
5
Select a desired album with the cursor buttons ([
][
]).
][{
Note:
You can also select albums directly
using the number keypad on the
remote control. See Chapter 3
“Basic Song Playback – Using the
Number Keypad” on page 24.
01:50 Greats for t
Album number
Album title
To return to the media selection screen, press [
6
Press [ENTER] or [
Note:
The maximum number of the
selectable albums in a medium is 99.
].
].
The song selection screen appears.
or
7
001:Invention 1
Select a desired song with the cursor buttons ([
[{
001:Invention 1
Song number
Song title
To return to the album selection screen, press [
8
[{
][
]).
Note:
The maximum number of the
selectable songs in an album is 999.
Note:
You can also select songs directly
using the number keypad on the
remote control. See Chapter 3
“Basic Song Playback – Using the
Number Keypad” on page 24.
].
Press [ENTER].
The selected song is loaded.
23
Chapter
3
Basic Song Playback
Using the Number Keypad
Album or song selection screen
Number button
You can also select albums or songs directly with the number keypad on
the remote control.
Press the corresponding number button, then press
[ENTER].
Note:
If you enter a number higher than
the existed, the last album or song
appears.
For example, to select album number 5, first press [0], then [5],
then [ENTER].
=ALBUM SELECT= 0-9/ENT
05:
To select song number 36, first press [0], then [3], then [6], then
[ENTER].
036:
Starting Playback
[PLAY]
Press [PLAY/PAUSE] on the front panel or [PLAY] on the
remote control.
[PLAY/PAUSE] on the front panel lights green, and the numerical
value of the counter advances.
or
Front panel
Remote control
=Memory=
A02-001
<00:01>
LR SO V+00
Piano Sonate
At the end of the song, the Disklavier control unit selects the next
song automatically and continues playback.
After playback the last song in the album, playback stops.
24
Note:
If your piano is in the Silent Piano™
function mode, the damper pedal
does not move. However, the
damper effect is effective for the
piano tone.
Chapter
Basic Song Playback
3
Stopping Playback
During playback
[STOP]
Press [STOP].
or
Remote control
English
Front panel
Playback stops, and the song returns to the beginning.
[PLAY/PAUSE] on the front panel turns off, and the counter is reset
to “00:00” or “001-1.”
Pausing Playback
During playback
1
[PAUSE]
Press [PLAY/PAUSE] on the front panel, or [PAUSE] on
the remote control.
or
Front panel
Remote control
Playback pauses.
[PLAY/PAUSE] on the front panel flashes, and the counter stops
counting.
2
Press [PLAY/PAUSE] on the front panel or [PLAY] on the
remote control to continue playback.
or
Front panel
Remote control
25
Chapter
3
Basic Song Playback
■ Song Playback Screen
Here are a few things that you will often see during playback.
1
2
3
4
5
6
7
1
Media
The selected medium is displayed here.
Album/Song Number
The number of the selected album and song is
displayed here.
2
Display
Description
Axx-yyy
xx: album number (01 to 99)
yyy: song number (001 to 999)
Pxx-yyy
xx: playlist number (01 to 99)
yyy: song number (001 to 999)
5
Song Format
The format of the selected song is displayed here.
Display
Description
S0
SMF (Standard MIDI File) format 0
S1
SMF (Standard MIDI File) format 1
ES
E-SEQ format
6
Volume
The current volume setting is displayed here.
Song Title
The title of the selected song is displayed here. If
the title is long, it scrolls across the display.
7
Counter
Playing time is indicated in one of two formats.
3
Display
Description
xx:yy
Minutes (xx) and seconds (yy)
xxx-y
Measures (xxx) and beats (y)
Song Type
The type of the selected songs is displayed here.
4
26
Display
Description
LR
PianoSoft
XP
PianoSoft recorded on the PRO model
PS
SmartPianoSoft
SK
SmartKey
YM
PianoSoft·PlusAudio
AU
Stereo audio
Chapter
Basic Song Playback
3
Fast Preview & Review
During playback
[FORWARD] or [REVERSE]
During playback, fast preview and review allow you to quickly search
through a song while listening to the sound. This is useful for locating a
desired position within a song.
English
■ Fast Preview
1
Note:
No sound is produced by the piano
when fast-previewing or reviewing
PianoSoft·PlusAudio CDs.
To preview, hold [ ] on the front panel or press
[FORWARD] on the remote control.
or
Front panel
2
Remote control
Release [ ] on the front panel, or press [FORWARD] on
the remote control again to return to normal playback.
If a song is previewed all the way to the end, it will be paused at the
end of the song.
■ Fast Review
1
To review, hold [ ] on the front panel or press
[REVERSE] on the remote control.
or
Front panel
2
Remote control
Release [ ] on the front panel, or press [REVERSE] on
the remote control again to return to normal playback.
If a song is reviewed all the way to the beginning, it will be paused
at the beginning of the song.
27
Chapter
3
Basic Song Playback
Fast Forward & Reverse
Stop or pause mode
[FORWARD] or [REVERSE]
In the stop or pause mode, fast forward and reverse allow you to quickly
locate a desired position in a song.
Reverse can also be used to return a song to the beginning, ready to play
again.
■ Fast Forward
1
In the stop or pause mode, hold [ ] on the front panel or
press [FORWARD] on the remote control.
=Memory=
or
Front panel
Remote control
LR SO V+00
<00:15> FORWARD
[PLAY/PAUSE] on the front panel flashes quickly and the counter
shows the current position.
2
Release [ ] on the front panel, or press [FORWARD] on
the remote control again to return to the pause mode.
If you fast forward a song all the way to the end, it will be paused at
the end of the song.
■ Fast Reverse
1
In the pause mode, hold [ ] on the front panel or press
[REVERSE] on the remote control.
=Memory=
or
Front panel
Remote control
LR SO V+00
<02:22> REWIND
[PLAY/PAUSE] on the front panel flashes quickly and the counter
shows the current position.
2
Release [ ] on the front panel, or press [REVERSE] on
the remote control again to return to the pause mode.
If you reverse a song all the way to the beginning, it will be paused
at the beginning of the song.
28
Chapter
Basic Song Playback
3
Searching a Specific Section of a Song
During playback or stop/pause mode
[SEARCH]
Playback can be started from a specified point in a song. Instead of using
fast forward or preview, you can use this function to go directly to a desired
point within a song.
1
English
If the current song uses the minutes and seconds time format, you specify
the point in minutes and seconds. If it uses the measures and beats time
format, you specify the point in measures and beats.
Press [SEARCH] on the remote control.
The song search screen appears with the counter flashing.
=Memory=
A02-001
<00:00>
0-9/SEARCH
Flashes
The song will be paused at the exact point as you press [SEARCH].
2
Enter the time that you want to search for with the number
keypad.
Note:
If you enter a value higher than the
entire song time, the search goes to
the end of the song.
For example, to search for 2:56 (minutes and seconds), first press
[0], then [2], [5], and [6].
=Memory=
A02-001
<02:56>
0-9/SEARCH
For example, to search for 52-3 (measures and beats), first press
[0], then [5], [2], and [3].
=Memory=
A02-001
<052-3>
3
0-9/SEARCH
Press [SEARCH] again.
The position of the song goes to the specified point.
29
Chapter
3
Basic Song Playback
Listening to the DisklavierRadio
Media selection screen
“D-Radio”
You can listen to streaming broadcasts of music, with many channels of
music contents.
1
Select “D-Radio” in the media selection screen.
)
To enjoy the DisklavierRadio, first
you need to connect to the Internet.
See Chapter 5 “Internet Direct
Connection (IDC) – Connecting the
Disklavier to the Internet” on
page 35.
The channel selection screen appears.
Note:
DisklavierRadio is available only on
models of which the control unit is
replaced with the Disklavier control
unit.
][{
01:Complimentary C
)
2
Press [
] or [
] or [+/YES] or [–/NO] to select a channel.
or
3
Press [ENTER] or [
selected channel.
}][{
] to begin the broadcast of the
The DisklavierRadio screen appears.
Channel
Number Medium
or
=D-Radio=
CH-08:
My
Jazz
Channel Title
4
V+00
Funny Val
Song Title
Press [ ] twice to stop the broadcast and return to the
media selection screen.
×2
30
Volume
To select a medium, see Chapter 3
“Basic Song Playback – Selecting
Medium and Their Contents” on
page 22.
Chapter
Basic Song Playback
3
■ Muting the Sound
1
Press [PAUSE] or [STOP].
“MUTE” appears on the upper right of the screen.
2
MUTE
Funny Val
English
=D-Radio=
CH-08:
My
Jazz
or
Note:
Streaming broadcasts continue
during muting. Therefore, the song
broadcasted when releasing muting
may differ from the one when
muting.
Press [PAUSE] or [STOP] again to release muting.
or
Adjusting the Volume
[VOLUME +] or [VOLUME –]
You can adjust volume with the dial on the front panel or with the remote
control as described below. Since all piano songs are recorded at the
maximum volume level of 0, volume can be decreased down to –10, the
softest volume at which the piano can play.
For ensemble songs, the volume of the piano and internal XG tone
generator are adjusted simultaneously, so it is a good idea to first balance
the volume of the piano and XG tone generator.
For songs on PianoSoft·PlusAudio, you should first balance the volume of
the MIDI piano and audio parts.
1
Note:
This setting does not affect manual
playing.
)
See Chapter 6 “Advanced Song
Playback – Adjusting the Volume
Balance among the Keyboard
Playing, Ensemble Sound, and
Software Playback” on page 48.
Press [VOLUME +] or [VOLUME –] on the remote control.
The main volume setting screen appears.
=BALANCE=
VOLUME-/+
MAIN VOLUME -01
2
Press [VOLUME +] or [VOLUME –] to adjust the volume.
Volume can be adjusted in a range of –10 to 0.
Note:
You can also use the dial on the
front panel to adjust the volume.
Note:
When the volume is set to –10, there
may be a slight delay in sound
production following key strokes,
and the Disklavier control unit may
skip some notes. Furthermore, at
this volume setting, touch strength
does not affect note dynamics.
31
Chapter
4
Basic Recording
A song that you play on the Disklavier can be recorded and the recorded song can be easily
saved for the selected medium. Furthermore, you can title your new recording for simple
distinguish before recording.
Recording a New Song
[RECORD]
You can save a new song that you play for an album.
1
Select a destination medium and album.
2
Press [RECORD].
(New Song)
The level appears in the format section as soon as you play a
keyboard or press a pedal.
Press [PLAY].
[PLAY/PAUSE] stops flashing.
The Disklavier is now ready for you to play.
4
Start playing your song.
Recording will start automatically as soon as you touch a key. The
counter starts to advance.
5
(New Song)
Press [STOP] when you finish playing your song.
The recorded song is loaded.
32
Note:
Up to 999 songs can be recorded in a
medium.
)
The recording standby screen appears, and [RECORD] on the front
panel lights red and [PLAY/PAUSE] flashes in green.
3
Note:
You cannot record a song on the
playback model.
To select a medium and album, see
Chapter 3 “Basic Song Playback –
Selecting Medium and Their
Contents” on page 22.
Chapter
Basic Recording
4
Titling a Song
[RECORD]
[FUNC.]×2
Title a new song before you start recording.
Select a destination medium and album.
2
Press [RECORD].
3
Press [FUNC.] twice in the recording standby screen.
)
To select a medium and album, see
Chapter 3 “Basic Song Playback –
Selecting Medium and Their
Contents” on page 22.
English
1
)
To rename the existing song, see
Chapter 11 “Media Management –
Renaming a Song” on page 88.
The song title editing screen appears.
=Record=
[A-Z]
×2
4
Use [
5
Select characters with [+/YES] and [–/NO].
] and [
] to move the cursor.
=Record=
Chopin
[a-z]
)
For details on characters, see
“Available Characters” on next
page.
Note:
You can enter space by pressing
[+/YES] and [–/NO]
simultaneously.
You can enter up to 64 characters.
6
Press [PLAY] after title determined.
Recording begins.
33
Chapter
4
Basic Recording
Available Characters
The following table shows which characters are available. You can switch the character types by the yellow
button on the remote control.
Character Type
Letters
(Upper Case)
[A-Z]
Letters
(Lower Case)
[a-z]
Symbols
[etc]
Numbers
[0-9]
Characters
Space
A
B
C
D
E
F
G
H
I
J
K
L
N
O
P
Q
R
S
T
U
V
W
X
Y
Z
Space
a
b
c
d
e
f
g
h
i
j
k
l
n
o
p
q
r
s
t
u
v
w
x
y
z
Space
!
”
#
$
%
&
’
(
)
*
+
,
-
.
/
:
;
<
=
>
?
_
@
Space
0
1
2
3
4
5
6
7
8
M
m
Note: To delete a character, first move the cursor on the character to delete, and then enter space.
34
9
Chapter
5
Internet Direct Connection (IDC)
By connecting to the Internet, you can enjoy a streaming broadcast or download update
programs directly. Internet Direct Connection is available only on models of which the control
unit is replaced with the Disklavier control unit.
What is Internet Direct Connection (IDC)?
Note:
Internet Direct Connection (IDC) is
available only on models of which
the control unit is replaced with the
Disklavier control unit.
English
Internet Direct Connection (IDC) is a feature that allows you to connect
your Disklavier directly to the Internet. Internet Direct Connection users are
able to listen to a streaming broadcast (DisklavierRadio), and receive
valuable information such as product updates. Your Disklavier can be
upgraded remotely as new technologies and services are developed
through the IDC service.
Obtaining an ID and Password for the IDC Service
(IDC Registration)
To use the IDC service, initial registration is required using an Internetconnected computer.
Please register at the following website:
https://music.yamaha.com/serviceRegistration.html
Once you have an IDC account, you will interact with that account using
the remote control. To use the full IDC service, you are required to enter
your registered ID (e-mail address) and password with the remote control
or the keyboard.
Note:
If you have already registered for
the IDC service with any other
instrument (such as the Clavinova),
you do not need to register again.
You can use your ID and password
obtained through that registration.
Note:
Some IDC service functions do not
require an ID and password.
Connecting the Disklavier to the Internet
You can connect the Disklavier to a full-time online Internet connection
(ADSL, optical fiber, cable Internet, etc.) via a router or a modem equipped
with a router.
■ Preparations
• To use the Internet connection, you will first need to subscribe to an
Internet service or provider.
• Use a computer to obtain and configure Internet service. You cannot
obtain Internet service or configure router settings on a local area
network using the Disklavier control unit itself.
• Use an STP (shielded twisted pair) cable to connect the control unit and
a router.
• Before connecting the LAN cable, make sure to turn off (or shut down)
the Disklavier control unit.
35
Chapter
5
Internet Direct Connection (IDC)
■ Connecting the Disklavier Control Unit to the
Internet
Connection example 1:
Using a modem with router function
Modem
(with router function)
Other device
(such as computer)
LAN
cable
Note:
Some types of modems (such as
ADSL modems or cable modems)
have multiple ports for connecting
two or more devices (such as
computer, musical instrument, etc.).
If your modems have only one port,
an optional router or hub is required
in order to connect several devices
simultaneously.
Note:
Use an STP (shielded twisted pair)
cable for connection. For details, see
“Preparations” on previous page.
Disklavier control unit
Connection example 2:
Using a modem without router function
Modem
(without router
function)
Router
Other device
(such as computer)
LAN
cable
Disklavier control unit
36
Note:
Depending on the contract with your
Internet provider, you may not be
able to connect two or more devices
(for example, a computer and this
unit) to the Internet. Please check
your contract or contact your
Internet provider for further
information.
Chapter
Internet Direct Connection (IDC)
5
For further information on the Internet connection (only a wired LAN
connection is supported), visit the Yamaha Disklavier website:
http://www.yamaha.com/disklavier/
(for US customers)
http://www.yamaha.ca/content/piano/products/disklavierpianos/
(for Canadian customers)
English
http://www.yamaha-disklavier.com/
(for European customers)
http://www.yamaha.com.au/au/
(for Australian customers; Check the Disklavier website)
■ Notes on Network Security
The Disklavier control unit attempts to achieve a balance between security
and usability in its network implementation. However, a determined hacker
may be able to defeat these security measures and utilize the network of
the purchaser in an unauthorized manner. Since each network is different,
only the purchaser can determine whether the security measures
discussed here will adequately protect their network.
The purchaser acknowledges that connection to the Internet and use of the
Disklavier control unit Internet features is done at the risk of the purchaser.
In no event shall Yamaha, its subsidiaries or Yamaha’s and/or its
subsidiaries’ directors, officers, or employees be responsible for
unauthorized access, loss or alteration of the data of the purchaser or be
liable for any damage from intrusions.
Accessing the Internet
[INTERNET]
Once you have established an IDC account and successfully connected
your Disklavier to the Internet, you can access a special Disklavier website
where you can access the DisklavierRadio, and download software
updates.
Note:
Free contents that do not require an
ID and password are available.
D-Radio:
)
Select this to listen to streaming broadcasts of music, with many
channels of music content. You can enjoy listening to piano
performances that play continuously.
Note:
The service contents are subject to
change without prior notice.
See Chapter 3 “Basic Song Playback
– Listening to the DisklavierRadio”
on page 30.
MyAccount:
Select this to log in to the IDC service. You can also refer to the
help information from this option.
Update:
Select this to update the Disklavier control unit using Internet
connection.
37
Chapter
5
Internet Direct Connection (IDC)
1
Press [INTERNET] on the remote control.
The Internet menu screen appears.
(1/1)
=Internet=
*D-Radio
*MyAccount
*Update
2
Select a desired menu with the cursor buttons ([
[ ] [ ]), then press [ENTER].
][
]
Perform operations on the screen that appears.
Checking Your Account Information
[INTERNET]
“MyAccount”
You can confirm your current account information of IDC service. You can
also log out from the IDC service.
Login:
Select this to log in to the IDC service. You need to enter your ID
and password.
Logout:
If you wish to use another IDC account or prevent the current account
from being used by others, select this to log out from the IDC service.
Account Information:
Select this to confirm your account information.
Subscription Status:
Select this to confirm your DisklavierRadio subscription status.
1
Press [INTERNET] on the remote control.
The Internet menu screen appears.
=Internet=
(1/1)
*D-Radio
*MyAccount
*Update
38
Note:
ID and password are not required for
free contents (such as free channel
of DisklavierRadio).
Chapter
Internet Direct Connection (IDC)
2
Select “MyAccount” with the cursor buttons ([
[ ] [ ]), then press [ENTER].
][
5
]
(1/1)
=Internet=
*D-Radio
*MyAccount
*Update
English
The MyAccount screen appears.
]
3
Select a desired option with the cursor buttons ([
then press [ENTER].
][
]),
Perform operations on the screen that appears.
Updating the Disklavier Control Unit Using the Internet
[INTERNET]
“Update”
You can download the update program directly from the Internet and
update the firmware of the Disklavier control unit.
1
Press [INTERNET] on the remote control.
The Internet menu screen appears.
=Internet=
*D-Radio
*Update
(1/1)
*MyAccount
39
Chapter
5
Internet Direct Connection (IDC)
2
Select “Update” with the cursor buttons ([
[ ]), then press [ENTER].
=Internet=
*D-Radio
*Update
][
][
]
(1/1)
*MyAccount
The update screen appears if there is any update program
available.
]
You can scroll the screen up or down with the cursor buttons ([
[ ]).
3
]
Following the instructions on the screen, select the option
with the cursor buttons ([ ] [ ] [ ] [ ]), then press
[ENTER].
][
The download process of the update program starts.
=Update=
Now Downloading...
50% ( 1 / 1 )
4
Shut down the Disklavier control unit with [ON/OFF] on the
front panel after the download process is completed.
=Update=
]
Turn OFF,Turn ON again
while holding [PLAY]
The update program is now prepared.
Update the firmware following the procedures in Chapter 13 “Other
Settings – Updating the Disklavier Control Unit” on page 123.
40
Chapter
Internet Direct Connection (IDC)
5
Setting the Disklavier Control Unit for the Internet Connection
[SETUP]
“Network”
You can change various settings related to the Internet connection. In most
cases, you do not have to change the default factory settings.
Information:
Use DHCP:
Select the method to determine several addresses. If your router
has DHCP server function, we recommend that you to select
“DHCP” or “DHCP+DNS.”
To use the Internet connection,
inquire of your Internet service
provider.
Note:
For information about DNS server
address, IP address, subnet mask
and gateway server address, inquire
of your internet service provider.
English
You can confirm the information of network settings.
)
DNS1/DNS2:
Enter the address of the primary and secondary DNS server. These
settings must be made when Use DHCP is set to “DHCP+DNS” or
“MANUAL.”
IPAddr./SubMask/Gateway:
Enter the address of the control unit, subnet mask and gateway
server. These settings must be made when Use DHCP is set to
“MANUAL.”
Proxy/Proxy Port:
Enter the name and the port number for the proxy server. These
settings are necessary only when a proxy server is located in your
local network.
1
Press [SETUP] on the remote control.
The setup menu screen appears.
(1/2)]
=SETUP MENU=
*TimerPlay *AudioI/O
*MIDI
*M-tune
2
Select “Network” with the cursor buttons ([
[ ]), then press [ENTER].
][
][
]
}
The network setting screen appears.
] 41
Chapter
5
Internet Direct Connection (IDC)
3
Select a desired option with the cursor buttons ([ ] [
[ ] [ ]), then press [+/YES] and [–/NO] to change
setting.
]
If you select “Information” on the network setting screen, the
current network setting appears. To return to the network setting
screen, press [ENTER] after confirming.
4
Press [ENTER] to complete the operation.
Initializing Internet Settings
[SETUP]
“Reset”
If you want to initialize the Internet settings, first you must reset the
Disklavier control unit to its initial factory setting.
However, cookies are still remain after parameter resetting. To delete
cookies, perform the appropriate operation on the reset screen.
)
For details on cookies, see Chapter
16 “Glossary” on page 131.
)
See Chapter 13 “Other Settings –
Resetting the Disklavier Control
Unit” on page 122.
42
Chapter
6
Advanced Song Playback
Changing the Playback Tempo
[TEMPO –] or [TEMPO +]
Note:
You cannot change the playback
tempo of songs on audio CDs.
These tempo settings remain in effect until recording is started, another
medium or album is selected, or the Disklavier control unit is turned off.
)
1
Press [TEMPO –] or [TEMPO +] on the remote control.
English
You can speed up or slow down the playback tempo. Slowing down the
playback tempo can be useful when practicing a difficult piano part.
Tempo changes to songs that you
have recorded yourself can be made
permanent. See Chapter 7
“Advanced Recording – Changing
the Default Tempo” on page 65.
The tempo setting screen appears.
=Memory=
TEMPO-/0/+
TEMPO +01%
2
Press [TEMPO –] or [TEMPO +] to adjust the tempo.
Note:
You can also use the dial on the
front panel to adjust the tempo.
Playback tempo can be adjusted from –50% to +50% in 1%
increments.
Press [TEMPO 0] to set to the original tempo.
Playing Back Songs in a Different Key (Transposition)
[TRANSPOSE –] or [TRANSPOSE +]
Playback can be transposed up or down by up to two octaves. This is
useful, for example, when you want to sing along (karaoke) in a different
key from the original recording.
Transposition changes remain in effect until recording is started, another
medium or album is selected, or the Disklavier control unit is turned off.
Note:
This function cannot be used to
transpose songs from external
devices connected to the OMNI IN
jacks, or on audio CDs.
43
Chapter
6
Advanced Song Playback
1
Press [TRANSPOSE –] or [TRANSPOSE +] on the remote
control.
The transposition setting screen appears.
=Memory=
TRANS-/0/+
TRANS +01key
2
Press [TRANSPOSE –] or [TRANSPOSE +] to change the
key.
Playback can be transposed in half-step increments up or down
two octaves (–24 key to +24 key).
Press [TRANSPOSE 0] to set to the original key.
Repeating Song Playback
[REPEAT]
There are three repeat modes (ALL, RPT, RND) as described below. You
can use these functions for entertainment or study purpose.
Repeat mode settings remain in effect until recording is started, another
medium or album is selected, or the Disklavier control unit is tuned off.
1
Press [REPEAT] on the remote control.
The repeat setting screen appears.
=Memory=
REPEAT ALL
44
REPEAT
Note:
You can also use the dial on the
front panel to adjust the key.
Chapter
Advanced Song Playback
2
6
Press [REPEAT] to select repeat modes.
The following options are available:
Description
ALL
Repeats all songs on the selected album.
RPT
Repeats selected song.
RND
Shuffles the order of songs on the selected album and
repeats the cycle.
OFF
Plays back songs normally.
3
Press [PLAY] to start repeat playback.
4
To cancel the repeat mode, press [REPEAT] until “OFF”
appears on the screen.
English
Option
Repeating a Specific Section of a Song (A-B Repeat)
During playback
[A-B]
In the A-B repeat, playback is repeated between two specified points in a
song: point A and point B. This function is useful when practicing or
memorizing a difficult section of a song.
Once specified, points A and B are saved until another song is selected,
recording is started, or the Disklavier control unit is turned off.
1
To set point A, play back a song and press [A-B] on the
remote control when the desired point is reached.
Point A is set.
The A-B repeat setting screen appears with the “B” flashing.
=Memory=
A-B
Flashes
45
Chapter
6
Advanced Song Playback
2
Note:
You cannot set point B that is
beyond the selected song.
To set point B, press [A-B] again.
Point B is set.
=Memory=
A-B
<02:22> A-B
Playback starts from point A, continues up to point B and, returns to
point A and playback starts repeatedly.
Point B
Point A
SONG 1
SONG 2
SONG 3
Start
Cycle
3
To cancel the A-B repeat, press [A-B] so that “OFF”
flashes on the screen.
=Memory=
A-B
Note:
The A-B repeat is cancelled if you
escape from the A-B repeat setting
screen by other operations.
Flashes
Pressing [BACK] also cancels the point setting, and returns to the
song playback screen.
Playing Back Only the Desired Piano Part
[PART SELECT L] or [PART SELECT R]
This could be useful, for example, when listening carefully to one part, and
also when you practice only the left- or right-hand part while the Disklavier
plays the other.
■ Cancelling the Piano Part
)
1
Select the desired song.
2
Press [PART SELECT L] or [PART SELECT R] on the
remote control to cancel a part.
The part cancellation screen appears with the corresponding part
canceled.
=Piano Part=
L/R
L=ON R=OFF P=ON
46
To select a song, see Chapter 3
“Basic Song Playback – Selecting
Medium and Their Contents” on
page 22.
Chapter
Advanced Song Playback
Notes of displays:
Note:
Guide part can be set on the models
capable of the SmartKey playback.
Display
Description
L
Left hand part
R
Right hand part
P
Pedal part
ON
Plays part
OFF
Cancels part
G
Plays part with guide (only for SmartKey song)
---
No plays on part
Note:
For the SmartKey song, “ON”,
“OFF” and “G” appear sequentially
each time you press [PART
SELECT L] or [PART SELECT R].
English
3
6
To replay the cancelled part, press [PART SELECT L] or
[PART SELECT R] again so that “ON” appears on the
screen.
=Piano Part=
L/R
L=ON R=ON P=ON
4
Press [BACK] to return to the song playback screen.
■ Cancelling the Pedal Part
1
On the part cancellation screen, press [
=Piano Part=
] to select “P=.”
L/R
L=ON R=OFF P=ON
2
Press [–/NO] to cancel a pedal part.
L=ON
R=OFF P=OFF
47
Chapter
6
Advanced Song Playback
3
To replay the pedal part, press [+/YES] to select “ON” with
the cursor is on “P=.”
L=ON
4
R=OFF P=ON
Press [BACK] to return to the song playback screen.
Adjusting the Volume Balance among the Keyboard Playing,
Ensemble Sound, and Software Playback
[BALANCE]
Besides adjusting the overall volume, the volume balance among the
different sound sources as described below can be adjustable.
TG:
Adjusts the volume of the ensemble sound reproduced by the
tone generator (TG) of the Disklavier control unit.
Audio:
Adjusts the volume of the accompaniment or standard audio
sound pre-recorded in the software (CDs).
Voice:
Adjusts the volume of the ensemble voice when you play using
the voice function.
■ Adjusting the TG Balance
1
Note:
You cannot adjust the volume
balance during the DisklavierRadio
playback.
)
See Chapter 8 “Advanced Piano
Playing – Playing the Disklavier
with an Ensemble Voice” on
page 69.
Press [BALANCE] on the remote control.
The TG balance setting screen appears.
=BALANCE=
TG BALANCE 100
2
-+
Press [+/YES] and [–/NO] to adjust the volume of the tone
generator.
Tone generator volume can be adjusted in a range of 10 to 127.
48
Note:
You can also use the dial on the
front panel to adjust the volume.
Chapter
Advanced Song Playback
6
■ Adjusting the Audio Balance
1
Press [BALANCE] twice on the remote control.
The audio balance setting screen appears.
=BALANCE=
2
-+
AUDIO BALANCE 100
Press [+/YES] and [–/NO] to adjust the volume of the
audio.
English
×2
Note:
You can also use the dial on the
front panel to adjust the volume.
Audio volume can be adjusted in a range of 10 to 127.
■ Adjusting the Voice Balance
1
Press [BALANCE] three times on the remote control.
The voice balance setting screen appears.
=BALANCE=
×3
2
-+
VOICE BALANCE 100
Press [+/YES] and [–/NO] to adjust the volume of the voice.
Note:
You can also use the dial on the
front panel to adjust the volume.
Voice volume can be adjusted in a range of 0 to 127.
49
Chapter
6
Advanced Song Playback
Adjusting the Pitch of Audio
During playback
[FUNC.]
You can temporarily adjust the pitch of the song contains audio
(PianoSoft·PlusAudio, SmartPianoSoft) or an audio CD for your listening
pleasure.
Pitch adjustments are effective until another medium or album is selected,
recording is started, or the Disklavier control unit is turned off.
1
During the song playback, press [FUNC.] on the remote
control.
The audio pitch setting screen appears.
=CD=
-+ENT
AudioPitch=+00cent
2
Press [+/YES] and [–/NO] to change the audio pitch.
=CD=
-+ENT
AudioPitch=+01cent
Audio pitch can be adjusted in a range of –50 cent to +50 cent (one
semitone as 100 cent).
Adjusting the L/R Balance of Audio
During playback
[FUNC.]
You can temporarily adjust the L/R balance of an audio CD.
Balance adjustments are effective until another song is selected, recording
is started, or the Disklavier control unit is turned off.
1
During the song playback, press [FUNC.] several times.
The audio pan setting screen appears.
=CD=
-+ENT
AudioPan=Center
50
Note:
This function cannot be used to
adjust the pitch of external audio
CDs connected to the OMNI IN
jacks.
Chapter
Advanced Song Playback
2
6
Press [+/YES] and [–/NO] to change the audio pan.
=CD=
-+ENT
AudioPan=Left
Option
Description
Left
Audio of the L channel is output to both of the L and R
channels.
Center
Audio of the L channel is output to the L channel, and the
R channel is output to the R channel.
Right
Audio of the R channel is output to both of the L and R
channels.
English
The following pan settings are available:
Using Timer Play
[SETUP]
“TimerPlay”
You can program your Disklavier to start or stop playback of a song at
various specified times. All you need to do is register up to a maximum of
99 timer settings, and your Disklavier will perform them unattended. This
function is called “timer play.”
Note:
The internal calendar must be set in
advance in order for the timer play
to function. See Chapter 2 “Getting
Started – Setting the Internal
Calendar” on page 16.
■ Setting the Timer Play
Note:
The control unit must be turned on
in advance in order for the timer
play to function. The timer play
cannot turn on/off the control unit.
1
Press [SETUP] on the remote control.
The setup menu screen appears.
(1/2)]
=SETUP MENU=
*TimerPlay *AudioI/O
*MIDI
*M-Tune
51
Chapter
6
Advanced Song Playback
2
Select “TimerPlay” with the cursor buttons ([
[ ]), then press [ENTER].
][
][
]
(1/2)]
=SETUP MENU=
*TimerPlay *AudioI/O
*MIDI
*M-Tune
The timer play setting screen appears.
Timer
switch
=TimerPlay=
>TimerPlay=OFF
01[##:## ----
_?]-+
]
Program Time Function Album
number
selection
List of the parameters
Item
Option
Description
Timer
switch
ON, OFF
Enables or disables the timer play function.
Program
number
01 - 99
Indicates the number of a program.
Time
##:##
No set.
00:00 23:59
Indicates the time at which a function is to be
performed.
----
No set.
PLAY
Plays back songs at the specific time.
STOP
Stops the timer play.
-----
Plays back the current selected song.
Mem01 Mem99
Indicates the album number in the internal flash
memory.
Lst01 Lst99
Indicates the list number in the playlist.
Function
Album
selection
■ Switching the Timer Play On and Off
To switch the timer play on and off, press [ ] to move the
cursor to the timer switch, then press [+/YES] and [–/NO].
=TimerPlay=
_?]-+
>TimerPlay=ON
01[##:## ---- -----]
52
Chapter
Advanced Song Playback
6
■ Moving Program Number
Press [
] and [
] to go to the program number.
English
The cursor moves to the function parameter.
■ Setting Function
The following describes how to play back the first album in the internal
flash memory at 8:15 AM.
To switch the function parameter, press [ ] and [ ] to
move the cursor to the function parameter, then press
[+/YES] and [–/NO].
=TimerPlay=
_?=]-+
>TimerPlay=ON
01[##:## PLAY -----]
“PLAY” and “STOP” change sequentially.
When “PLAY” is selected, the album selection parameter appears.
■ Selecting Album
Press [ ] to move the cursor to the album selection
parameter, then press [+/YES] and [–/NO] to select the
album.
Note:
You can select the album in the
internal flash memory.
=TimerPlay=
_?=]-+
>TimerPlay=ON
01[##:## PLAY Mem01]
53
Chapter
6
Advanced Song Playback
■ Setting Time
1
Press [ ] and [ ] to move the cursor to the hour
parameter, then press [+/YES] and [–/NO] to set hours.
=TimerPlay=
_?=]-+
>TimerPlay=ON
01[08:00 PLAY Mem01]
2
Press [ ] to move the cursor to the minute parameter,
then press [+/YES] and [–/NO] to set minutes.
=TimerPlay=
_?=]-+
>TimerPlay=ON
01[08:15 PLAY Mem01]
3
Press [ENTER] to return to the setup menu screen.
■ About Song Playback Screen
When the song playback is stopped — with the timer play function is set to
ON and the current time is displayed — “T” flashes to the right side of the
current time.
Indicates that the timer play is on.
54
Chapter
Advanced Song Playback
6
Skipping the Blank Part at the Beginning of a Song
[SETUP]
“Playback”
When there is a blank part created at the beginning of the recorded song,
turning on this function automatically skips the unwanted part and starts
playback from the actual beginning of the song.
English
1
Press [SETUP] on the remote control.
The setup menu screen appears.
{
2
Select “Playback” with the cursor buttons ([
[ ]), then press [ENTER].
][
][
]
}
The playback setting screen appears with the cursor flashing.
-+
=Playback=
>SkipSpace=OFF
>KeyMotion=ON
3
Press [+/YES] and [–/NO] to change the setting.
=Playback=
>SkipSpace=ON
>KeyMotion=ON
4
-+
Press [ENTER] to return to the setup menu screen.
55
Chapter
6
Advanced Song Playback
SmartKey™ Playback
Select a SmartKey song
[PLAY]
Special SmartKey software uses all the “SmartKey” features to create an
exciting way in which non-players can learn to play simple melodies, one
note at a time, without the need for written music. SmartKey software does
this by partially depressing the piano key to signal which note should be
played. The Disklavier then waits for you to press this key before it
continues to the next note in the melody (If you miss the movement of the
key, the Disklavier will repeat the movement until you press the key).
When you press the key, the Disklavier will reward you with ear tickling
phrases, incredible harmonies, and lush arpeggios to give you the aural
and visual image of a complete high-quality performance. In short, it
SHOWS you which key to play, WAITS for you to play that key before it
continues, and REWARDS you with music. It is like having an eternally
patient music teacher showing your fingers which notes to play.
1
Select a desired SmartKey song.
2
Press [PLAY].
Playback stops, and the key to play next moves slightly.
Key moves slightly
The key to play flashes in the counter.
Pachelbel=s
Flashes
3
Play the key that the keyboard indicates.
This will continue until the song is finished. Notice that the
Disklavier patiently waits for you to play the right key before
proceeding to the next key. Also, notice that if you happen to miss
the cue, it will gently remind you what the key is every few seconds
until you play the right key.
56
Note:
The SmartKey playback is available
only on models of which the control
unit is replaced with the Disklavier
control unit.
)
To select a song, see Chapter 3
“Basic Song Playback – Selecting
Medium and Their Contents” on
page 22.
Chapter
Advanced Song Playback
6
■ Key notation
As a reference, “C3” is middle “C”, which means “C4” is an octave above
middle “C” and so on.
C 2D 2
F 2G 2 A 2
C 3D 3
F 3G 3A 3 C 4
English
C2 D2 E2 F2 G2 A2 B2 C3 D3 E3 F3 G3 A3 B3 C4
Middle C
Inactivating the Key Movement during Playback
During playback
[FUNC.]
During playback of a song, key normally move in accordance with the
playback of the respective note’s key. For models equipped with the Silent
Piano™ function, you can select an option of stopping this key movement
during the song playback with the Silent Piano™ function. This enables
you, for example, to play along with the song being played back, to add
your own improvisation, or to create a four-hand duet.
1
Note:
Key movement can only be
inactivated on models of which the
control unit is replaced with the
Disklavier control unit.
Note:
You can change the setting for key
movement from the “Playback”
option in the setup menu.
During the song playback with the Silent Piano™ function,
press [FUNC.] several times.
The key motion setting screen appears.
=Memory=
-+ENT
KeyMotion=ON
2
Press [+/YES] and [–/NO] to change the setting.
=Memory=
KeyMotion=OFF
-+ENT
57
Chapter
7
Advanced Recording
This chapter describes further functions for the advanced piano recording such as playing and
measuring the current playing song tempo with the metronome, recording the left-hand part
and the right-hand part separately.
Recording with the Internal Metronome
[METRONOME]
[RECORD]
You can use the metronome to record songs.
Songs recorded with the metronome will be in the measures and beats
format.
All metronome parameters are reset when the Disklavier control unit is
switched off.
1
Press [METRONOME] on the remote control.
The metronome setting screen appears.
=METRONOME=
}][{-+
TEMPO=117bpm $=4/4
VOLUME=HHHH SOUND=BUZZER
2
To change the tempo, move the cursor to the tempo
parameter with the cursor buttons ([ ] [ ] [ ] [ ]),
then press [+/YES] and [–/NO].
=METRONOME=
}][{-+
TEMPO=125bpm $=4/4
VOLUME=HHHH SOUND=BUZZER
The tempo can be adjusted in a range of 30 bpm to 400 bpm.
3
To change the beat, move the cursor to the beat parameter
with the cursor buttons ([ ] [ ] [ ] [ ]), then press
[+/YES] and [–/NO].
=METRONOME=
}][{-+
TEMPO=125bpm $=3/4
VOLUME=HHHH SOUND=BUZZER
The following beat settings are available: 1/4, 2/4, 3/4, 4/4, 5/4, 6/4,
7/4, 8/4, 9/4.
58
Note:
The tempo parameter displayed on
the metronome setting screen
indicates the number of beats in a
minute, and one beat represents a
quarter. When you play a song
written in different measure unit
from quarter note, change the setting
(e.g. When playing a song in 3/2, set
beat to 6/4).
Chapter
Advanced Recording
4
7
To change the volume, move the cursor to the volume
parameter with the cursor buttons ([ ] [ ] [ ] [ ]),
then press [+/YES] and [–/NO].
=METRONOME=
}][{-+
TEMPO=125bpm $=3/4
VOLUME=HHHD SOUND=BUZZER
5
English
The volume can be adjusted in 4 steps.
To change the sound, move the cursor to the sound
parameter with the cursor buttons ([ ] [ ] [ ] [ ]),
then press [+/YES] and [–/NO].
=METRONOME=
}][{-+
TEMPO=125bpm $=3/4
VOLUME=HHH SOUND=TG
The following sound settings are available: BUZZER, TG.
6
Press [RECORD] in the metronome setting screen.
The metronome recording setting screen appears.
=Record=
}][{-+
TEMPO=125bpm $=3/4
VOLUME=HHHD SOUND=TG
7
Press [PLAY].
Recording begins immediately.
[PLAY/PAUSE], [REC] and [SELECT] on the front panel flash
simultaneously at the first beat of the metronome.
8
Start playing your song.
9
Press [STOP] when you finish playing your song.
The recorded song is loaded.
59
Chapter
7
Advanced Recording
Recording the Left and Right Parts Separately
[RECORD]
[FUNC.]
When recording an L/R song, the left- and right-hand parts can be
recorded separately. Either part can be recorded first, and the pedals can
be recorded with the first part.
While you record the second part, the first part will play back for
monitoring.
If the left-hand or right-hand part is difficult to play at normal speed, the first
part can be recorded at a slow tempo, and then the tempo changed
afterwards to record the second part at the normal song speed.
This section describes how to record the left-hand part first then the
right-hand part second.
■ Recording the Left-Hand Part
1
Select a destination medium and album.
2
Press [RECORD].
3
)
To select a medium and album, see
Chapter 3 “Basic Song Playback –
Selecting Medium and Their
Contents” on page 22.
)
Press [FUNC.] in the recording standby screen.
The part selection screen appears.
In the case you want to title your
new song before recording, see
Chapter 4 “Basic Recording –
Titling a Song” on page 33, to
rename the title after recording, see
Chapter 11 “Media Management –
Renaming a Song” on page 88.
)
=Record=
L=REC R=OFF
4
LR
Make sure that the left-hand part is set to be recorded
(“L=REC”), then press [PLAY].
This Disklavier is now ready for you to play the left-hand part.
5
Start playing your song.
Recording will start as soon as you touch a key.
6
Press [STOP] when you finish playing your song.
The L/R song with the left-hand part recorded is saved onto the
selected album.
60
If you want to record your L/R song
using the metronome, see Chapter 7
“Advanced Recording – Recording
with the Internal Metronome” on
page 58.
Chapter
Advanced Recording
7
■ Recording the Right-Hand Part
Press [RECORD].
2
Press [ ] and [ ] to select the L/R song with the lefthand part that you have just recorded, then press
[ENTER].
3
Press [FUNC.] in the recording standby screen.
English
1
The part selection screen appears.
=Record=
L=PLY R=OFF
LR
The part that has already been recorded is displayed as “L=PLY.”
4
Press [PART SELECT R] to record the right-hand part.
=Record=
L=PLY R=REC
LR
The part set to “REC” will be recorded.
5
Press [PLAY].
Playback of the left-hand recorded part starts immediately, so be
sure that you are ready to play the right-hand part along with it.
61
Chapter
7
Advanced Recording
6
Press [STOP] when you finish playing your song.
The following screen appears.
=Record=
_]ENT
Save to Disk?
*SAVE *NEW *CANCEL
The following table gives a description of each of the options.
Option
Description
SAVE
The second part is saved with the first part under the
current song number.
NEW
The second part is saved under a new song number.
The first part is kept under the previous song number.
CANCEL The second part is discarded. The first part is kept
under the previous song number.
7
Press [ ] and [
[ENTER].
] to select an option, then press
The right-hand part is saved as indicated or canceled.
Recording the Left and Right Parts Together (Setting a Split Point)
[RECORD]
[FUNC.]
You can also record an L/R song by playing the left- and right-hand parts
simultaneously. In this case, a keyboard split point is set, and the notes
played on the left-hand side of the split point are saved as the left-hand
part, and notes played on the right-hand side of the split point are saved as
the right-hand part.
1
Select a destination medium and album.
2
Press [RECORD].
3
)
To select a medium or album, see
Chapter 3 “Basic Song Playback –
Selecting Medium and Their
Contents” on page 22.
)
Press [FUNC.] in the recording standby screen.
The part selection screen appears.
In the case you want to title your
new song before recording, see
Chapter 4 “Basic Recording –
Titling a Song” on page 33, to
rename the title after recording, see
Chapter 11 “Media Management –
Renaming a Song” on page 88.
)
=Record=
L=REC R=OFF
62
LR
If you want to record your L/R song
using the metronome, see Chapter 7
“Advanced Recording – Recording
with the Internal Metronome” on
page 58.
Chapter
Advanced Recording
4
7
Press [PART SELECT R] to set both parts to record.
The split point setting screen appears.
=Record=
-+
LR=REC SPLIT=C3
English
The above display shows that the default keyboard split point is
note C3, or middle C. In this case, note C3 and notes below are
saved as the left-hand part and notes above C3 are saved as the
right-hand part, as shown in the following figure.
C3
Left-hand part
5
Right-hand part
To change the split point, press a key on the keyboard or
[+/YES] and [–/NO] to select a different key.
or
The split point can be set from note A-1 to note C7.
6
Press [PLAY].
The Disklavier is now ready for you to play.
7
Starts playing your song with the left- and right-hand parts
and the pedal part simultaneously.
Recording will start as soon as you touch a key.
8
Press [STOP] when you finish playing your song.
The recorded song is loaded.
63
Chapter
7
Advanced Recording
Re-Recording One Part
[RECORD]
Select the L/R song
[PART SELECT L] or [PART SELECT R]
You can re-record the only one part left-hand or the right-hand of the
existing L/R song.
1
Select a desired medium and album.
2
Press [RECORD].
3
Press [ ] and [ ] to select the L/R song that you want to
re-record, then press [ENTER].
4
Press [PART SELECT L] or [PART SELECT R] to select the
part to re-record.
The part set to “REC” will be re-recorded.
5
Press [PLAY].
Recording will start immediately, so be sure that you are ready to
play the part.
64
)
To select a medium and album, see
Chapter 3 “Basic Song Playback –
Selecting Medium and Their
Contents” on page 22.
Chapter
Advanced Recording
6
7
Press [STOP] when you finish playing your song.
The following screen appears.
=Record=
_]ENT
Save to Disk?
*SAVE *NEW *CANCEL
Option
Description
SAVE
The re-recorded part is saved with the other existing
part under the current song number.
NEW
The re-recorded part is saved under a new song
number. The existing parts are kept under the current
song number.
English
The following table gives a description of each of the options.
CANCEL The re-recorded part is discarded. The existing parts
are kept under the current song number.
7
Press [ ] and [
[ENTER].
] to select an option, then press
The re-recorded part is saved as indicated or canceled.
Changing the Default Tempo
[RECORD]
Select the song
[FUNC.]×3
This function allows you to change the default tempo of a song and save
the change. It should not be confused with the playback tempo function
described in Chapter 6 “Advanced Song Playback – Changing the
Playback Tempo” in which tempo changes are lost when the Disklavier
control unit is turned off.
The tempo of a song can be changed many times. This function can be
used when recording a very complex song that is difficult to play at a fast
tempo. First, record the song at a tempo you can manage, then change the
tempo afterwards. For example, you could record a difficult left-hand part
at a slow tempo, use this function to change the tempo, then record the
right-hand part at the normal tempo.
If a song’s time format is minutes and seconds, tempo changes are
specified as a percentage of the original tempo.
If a song’s time format is measures and beats, tempo changes are
specified in beats per minute.
65
Chapter
7
Advanced Recording
1
Select a desired medium and album.
2
Press [RECORD].
3
Press [ ] and [ ] to select the song in which you want
to change the tempo, then press [ENTER].
4
Press [FUNC.] three times.
)
To select a medium or album, see
Chapter 3 “Basic Song Playback –
Selecting Medium and Their
Contents” on page 22.
×3
For measures and beats, the current song tempo (bpm) is shown.
=Record=
}][{-+
TEMPO=117bpm $=4/4
VOLUME=HHHH SOUND=BUZZER
For minutes and seconds, the current song tempo is shown as
“000%.”
=Record=
TEMPO=+000%
5
-+
Press [+/YES] and [–/NO] to change the tempo.
[+/YES] increases the tempo, and [–/NO] decreases the tempo.
For measure and beats, the tempo range is from 30 bpm to 400
bpm.
For minutes and seconds, the tempo range is from –75% to
+242%.
66
Note:
You cannot change the beat setting
on the prerecorded songs.
Chapter
Advanced Recording
6
7
Press [STOP] to save the tempo change.
The following screen appears.
=Record=
_]ENT
Save to Disk?
*SAVE *NEW *CANCEL
Option
Description
SAVE
The song is saved at its new tempo under the current
song number.
NEW
The song is saved at its new tempo under a new song
number. The original song is kept under the previous
song number.
English
The following table gives a description of each of the options.
CANCEL The song with a new tempo is discarded. The original
song is kept under the previous song number.
7
Press [
] and [
] to select an option, then press [ENTER].
To change the tempo again or to reset the original tempo, repeat
steps 1 to 6.
67
Chapter
8
Advanced Piano Playing
Playing the Disklavier along with the Internal Metronome
[METRONOME]
The internal metronome helps you playing along the meter (beat) and the
tempo you set. Also the volume of the metronome can be adjusted.
1
Press [METRONOME] on the remote control.
The metronome setting screen appears and the metronome starts
to click.
=METRONOME=
}][{-+
TEMPO=117bpm $=4/4
VOLUME=HHHH SOUND=BUZZER
2
To change the tempo, move the cursor to the tempo
parameter with the cursor buttons ([ ] [ ] [ ] [ ]),
then press [+/YES] and [–/NO].
=METRONOME=
}][{-+
TEMPO=125bpm $=4/4
VOLUME=HHHH SOUND=BUZZER
The tempo can be adjusted in a range of 30 bpm to 400 bpm.
3
To change the beat, move the cursor to the beat parameter
with the cursor buttons ([ ] [ ] [ ] [ ]), then press
[+/YES] and [–/NO].
=METRONOME=
}][{-+
TEMPO=125bpm $=3/4
VOLUME=HHHH SOUND=BUZZER
The following beat settings are available: 1/4, 2/4, 3/4, 4/4, 5/4, 6/4,
7/4, 8/4, 9/4.
68
Note:
The tempo parameter displayed on
the metronome setting screen
indicates the number of beats in a
minute, and one beat represents a
quarter. When you play a song
written in different measure unit
from quarter note, change the setting
(e.g.When playing a song in 3/2, set
beat to 6/4).
Chapter
Advanced Piano Playing
4
8
To change the volume, move the cursor to the volume
parameter with the cursor buttons ([ ] [ ] [ ] [ ]),
then press [+/YES] and [–/NO].
=METRONOME=
}][{-+
TEMPO=125bpm $=3/4
VOLUME=HHHD SOUND=BUZZER
English
The volume can be adjusted in 4 steps.
5
To change the sound, move the cursor to the sound
parameter with the cursor buttons ([ ] [ ] [ ] [ ]),
then press [+/YES] and [–/NO].
=METRONOME=
}][{-+
TEMPO=125bpm $=3/4
VOLUME=HHH SOUND=TG
6
To cancel this function, press [METRONOME] again.
Playing the Disklavier with an Ensemble Voice
[VOICE]
The [VOICE] on the remote control lets you assign a voice from the internal
XG tone generator to accompany the piano while you play. You will hear in
unison the piano sound coming from the Disklavier and an ensemble voice
produced by the internal XG tone generator. This is sometimes referred to
as voice layering or unison.
The internal XG tone generator offers 480 instrumental voices and 11
drum kits for playing the keyboard.
1
Note:
You cannot use the voice function
on the playback model.
)
For details on voice groups and
voices, see Chapter 17 “Internal
Tone Generator Voices” on
page 134.
Press [VOICE] on the remote control.
The voice selection screen appears.
][
69
Chapter
8
Advanced Piano Playing
2
Press [+/YES] and [–/NO] to select a voice group.
Changing the voice group displays the top voice of that group in the
voice parameters.
][
3
To change the voice, press [ ] to move the cursor to the
voice parameter, then press [+/YES] and [–/NO].
][ !
If necessary, adjust the volume of the voice in the voice balance
setting screen.
4
To cancel this function, press [VOICE] again.
)
See Chapter 6 “Advanced Song
Playback – Adjusting the Volume
Balance among the Keyboard
Playing, Ensemble Sound, and
Software Playback” on page 48.
Note:
The voice function is cancelled if
you escape from the voice selection
screen by other operations.
70
Chapter
9
Video Synchronization
You can record a song synchronized with the video, and enjoy a synchronized playback of
piano and video later on. This feature offers great listening experience with sight.
Video Synchronized Recording
[SETUP]
“AudioI/O”
Connect a camcorder and a DVD recorder
)
For details on video synchronized
playback, see Chapter 9 “Video
Synchronization – Video
Synchronized Playback” on page 75.
English
By recording a song played on the Disklavier synchronized with the video
recording, later on, you can enjoy piano playback with the video. First set
up the camcorder, the DVD recorder, and the Disklavier control unit, and
then start recording by following the procedures below.
■ Setting for Video Synchronized Recording
1
Press [SETUP] on the remote control.
The setup menu screen appears.
{
2
Select “AudioI/O” with the cursor buttons ([
[ ]), then press [ENTER].
][
][
]
{
The audio I/O setting screen appears.
] 3
Select “OMNI IN” with the cursor buttons ([ ] [ ]), then
press [+/YES] and [–/NO] to change setting to “Auto
Detect”.
] 71
Chapter
9
Video Synchronization
4
Select “OMNI OUT” with the cursor buttons ([ ] [
then press [+/YES] and [–/NO] to change setting to
“SYNC”.
]),
][
5
Press [ENTER] to complete the operation.
6
Connect a camcorder and a DVD recorder to the Disklavier
control unit.
Camcorder
(for shooting)
DVD recorder
(for recording and playback)
TV
(for displaying)
To A/V output
To video
input
Video
connector
(yellow)
To video
input
A/V cord
(supplied with the
camcorder)
RCA cord
(not supplied)
Disklavier
control unit
72
To
video
output
To
audio
input
To audio
output
Video cord
(not supplied)
RCA cord
(not supplied)
Note:
Confirm the shape of input/output
connectors on the camcorder and the
DVD recorder, and prepare the
cables fit to them.
Chapter
Video Synchronization
9
■ Starting Video Synchronized Recording
1
Select a destination medium and album.
2
Press [RECORD].
)
To select a medium and album, see
Chapter 3 “Basic Song Playback –
Selecting Medium and Their
Contents” on page 22.
English
The video synchronized recording standby screen appears, and
[RECORD] on the front panel lights red, and [PLAY/PAUSE]
flashed in green.
=Record=(SYNC) SO LR 99%
A01-005
<00:00>
(New Song)
3
Set the camcorder to video shooting mode.
4
Select the video input on the DVD recorder which the
camcorder is connected to, then start recording on the
DVD recorder.
5
Press [PLAY].
[PLAY/PAUSE] stops flashing, and the counter starts to advance.
=Record=(SYNC) SO LR 99%
A01-005
<00:00>
(New Song)
6
Wait for approximately ten seconds, and then start playing
your song.
7
Press [STOP] when you finish playing your song.
8
Stop recording on the DVD recorder.
Note:
This step is necessary for
synchronization of the song and the
video playback, and should not be
omitted.
73
Chapter
9
Video Synchronization
■ Using the Camcorder only
If your camcorder has both mic input and audio output, you can
perform video synchronized recording using the camcorder only.
1. Set the Disklavier control unit following the procedures 1 to 5 on
page 71.
2. Connect a camcorder to the Disklavier control unit.
Camcorder
To mic/line
input
To audio
output
RCA cord with
resistance
(not supplied)
RCA cord
(not supplied)
Disklavier control unit
3. Select a destination medium and album.
4. Press [RECORD].
5. Start recording on the camcorder.
6. Press [PLAY].
7. Wait for approximately ten seconds, and then start playing your
song.
8. Press [STOP] when you finish playing your song.
9. Stop recording on the camcorder.
74
Chapter
Video Synchronization
9
Video Synchronized Playback
You can enjoy piano playback with the video recorded on the DVD
recorder.
1
Perform the video synchronized recording in advance.
Make sure that the OMNI IN setting is set to “AutoDetect”.
3
Turn down the volume completely on the TV if you
connect the audio output of the DVD recorder to the TV.
Turn down the volume completely on the camcorder if you use the
camcorder only.
4
Start playback on the DVD recorder.
Start playback on the camcorder if you use the camcorder only.
The Disklavier control unit automatically searches and selects the
song paired with the video, and then starts playback as well.
PIANO005.MID
For details on video synchronized
recording, see Chapter 9 “Video
Synchronization – Video
Synchronized Recording” on
page 71.
Note:
Be sure to rewind the video cassette
to locate the beginning of the
recording. It may take some time
before piano playback starts if you
start playback halfway through the
video.
English
2
)
Note:
When using the song copied to the
USB flash memory, it may take
some time until the Disklavier
control unit recognizes the
information for synchronization.
)
See “Setting for Video
Synchronized Recording” on
page 71.
)
If the piano playing is not
synchronized with the video picture,
adjust the offset time for
synchronization. See Chapter 12
“Enhancing the Disklavier by
Hooking Up Other Devices –
Setting the Disklavier Control Unit
for Audio Data Reception/
Transmission” on page 113.
)
If noises (synchronized signal) are
heard during video synchronized
playback, turn down the signal level
and re-record. See Chapter 12
“Enhancing the Disklavier by
Hooking Up Other Devices –
Setting the Disklavier Control Unit
for Audio Data Reception/
Transmission” on page 113.
Note:
You cannot operate the Disklavier
using the front panel or remote
control during video synchronized
playback. If you want to stop
playback of the song, stop playback
on the DVD recorder (or the
camcorder).
75
Chapter
10
CD Synchronization
You can record a piano performance along with the playback of songs on commercially
available CDs. Once you record a song with this feature, later on, you can enjoy piano
playback along with the played back songs on the CD.
CD Synchronized Recording
Insert an audio CD
[RECORD]
You can record a Disklavier piano performance along with the playback of
songs on commercial CDs.
1
Select a destination medium and album, then song in the
selected album.
2
Insert an audio CD and select the song that you want to
synchronize with.
3
Press [RECORD].
Note:
The Disklavier control unit
recognizes the destination album by
selecting the song in it. Note that the
selected song is not overwritten by
this procedure.
)
To select a medium and album, see
Chapter 3 “Basic Song Playback –
Selecting Medium and Their
Contents” on page 22.
The SPS recording standby screen appears, and [RECORD] on the
front panel lights red, and [PLAY/PAUSE] flashes in green.
=Record=(SPS)
A01-038
<00:00>
LR 99%
(New Song)
4
Select the desired part of a song, then press [PLAY] to
start synchronizing.
Recording begins with the CD playback.
5
Start playing the Disklavier along with the CD playback.
6
Press [STOP] to stop recording.
The recorded song is loaded.
76
)
To play back the performance
recorded with this feature, see
Chapter 10 “CD Synchronization –
Adding Disklavier Accompaniment
to Commercial CD Songs
(PianoSmart™ Playback)” on
page 77.
Chapter
CD Synchronization
10
Adding Disklavier Accompaniment to Commercial CD Songs
(PianoSmart™ Playback)
Insert a CD
Select a SmartPianoSoft song
[PLAY]
1
Insert a desired CD that you want to synchronize with the
SmartPianoSoft song.
2
Select a desired SmartPianoSoft song.
3
Press [PLAY].
)
To record the piano performance to
add, see Chapter 10 “CD
Synchronization – CD Synchronized
Recording” on page 76.
English
You can add a Disklavier piano performance you recorded or on
commercially available SmartPianoSoft software to the playback of songs
on your favorite CDs.
)
To select a song, see Chapter 3
“Basic Song Playback – Selecting
Medium and Their Contents” on
page 22.
Playback begins with the CD playback.
=Memory=
A01-038
<00:03> My
(SPS)V+00
Favorite
77