1
Simplified System Programming
Feature Programming Procedure (standalone applications)
Feature and RF Option descriptions
The following programming may be required, depending on the specific application:
•
Standalone application using default settings (see table): no system programming required
•
Standalone application using custom settings: follow Feature Programming
Procedure
•
Connected to compatible Directed system: RF selection must first be programmed (follow RF Selection Procedure), and the SmartKey module must then
be paired with the connected system (Pairing with Connected System).
1.
1.
2.
3.
4.
5.
6.
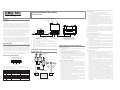
Navigating SmartKey module programming mode
The following steps are used to navigate programming mode for RF Selection or
Feature Programming:
1. Within 60 seconds of applying power to the SmartKey module, press and
hold the Learn and Pair buttons simultaneously for five seconds, until the Red
LED comes on solid.
2. Release the buttons. The Red LED shuts off and starts flashing once every two
seconds to confirm entry into the RF Selection/Feature Programming list, menu
item #1.
3. Press/release the Pair button (further away from LED) to navigate to the desired
option for that menu step. If you go past the desired setting, you can advance
to the end of the options and then restart at option 1. The option selected will
be shown by number of blue LED flashes.
4. Press/release the Learn button (closer to the LED) to navigate to the desired
menu step. The menu step will be indicated by number of Red LED flashes.
Selecting menu step 10 will reset the module to default, standalone programming values.
5. You can exit programming at any time by holding the Pair and Learn buttons
down until you see a combined Blue/Red flash on the LED. If you stop entering
menu or option steps, the module will exit programming automatically after
60 seconds.
RF Selection Procedure (when used with compatible system)
1.
2.
3.
4.
5.
6.
7.
Menu
Item
Feature
Opt. 1
Opt. 2
Opt. 3
Opt.4
1
RF Learning 1
Off (standalone)
Keeloq
Supercode
Astro
2
RF Learning 2
Autostart *
HDR-AM-TYPE1
HDR-AMTYPE2
HDR-AMTYPE3
HDR-AMTYPE4
3
Lock output
0.8 sec.
0.4 sec.
3.5 sec.
0.4 sec. x2
4
Unlock output
0.8 sec.
0.4 sec.
3.5 sec.
0.4 sec. x2
5
Comfort Close
Off
CC1
CC2
6
Output 1 type
Lock
Unlock
Trunk
Start
7
Output 2 type
Lock
Unlock
Trunk
Start
8
Output 3 type
Lock
Unlock
Trunk
Start
9
Output 4 type
Lock
Unlock
Trunk
Start
10
*
Opt. 5+
5. HDR-FM
6. LDR-FM
5. Aux 1
6. Aux 2
You must always select the correct RF type when connecting the SmartKey
module to a compatible security or remote start system.
Follow the procedure above to place the SmartKey in programming mode.
Press/release the Learn button (closer to the LED) to navigate to the desired
menu step.
RF Selection settings are either made in Menu Item 1 (Directed or AstroStart
systems) or Menu Item 2 (Autostart systems).
For Autostart systems, look up the correct option setting for Menu Item 2 in the
Autostart RF Type Table.
Once you’ve selected the correct RF Setting to match the connected system,
exit programming.
You must now Pair the SmartKey with the connected system before moving on
to testing the system.
Pairing with Connected System
1.
Feature and RF Options Menu
Default settings are in bold type. Refer to the Feature and RF Selection Description
section at the end of this guide if you are unsure about the correct settings for your
application.
No programming is required if you are using the default flex output configuration as shown in the table above (bold options).
Follow the procedure above to place the SmartKey in programming mode.
Press/release the Learn button (closer to the LED) to navigate to the desired
menu step.
Feature settings for standalone mode start at Menu Item 3, do not change the
option settings for Menu Items 1 or 2.
Press/release the Pair button (further away from LED) to navigate to the desired
option (feature) for that menu step.
When you’ve configured the outputs to the desired settings, exit programming
and use the SmartStart app on a linked handset to test the system.
2.
3.
4.
5.
Make sure the SmartKey module has been programmed correctly for RF type.
If your system has RF transmitters, you can send a command via the transmitter;
the system will respond if the SmartKey module was programmed to the correct
RF type. If it doesn’t respond, go back to RF Selection Procedure and make sure
the correct option was selected.
Place the connected system in Transmitter Learn routine (refer to the installation
guide for the specific connected system for correct procedure).
When the connected system has entered Transmitter Learn routine, press/release the Pair button on the SmartKey module (button further from the LED).
Note: some systems have a very short window where they will accept a command during Learn routine. Make sure you are pressing the Pair button on the
SmartKey module during that window.
When you press the Pair button, the LED should flash blue indicating a Lock
command was generated, and the connected system should respond indicating it received the command and accepted the SmartKey module as an
authorized transmitter.
If you get that acknowledgement, exit Transmitter Learn routine on the connected system. If you do not get that acknowledgement, go back to the RF Selection Procedure to make sure you selected the correct RF type for that system.
2.
3.
4.
5.
6.
RF Learning 1: Off/Keeloq/Supercode/Astro
•
Off (Standalone): The RF function of the unit is disabled and the Flex
Outputs are active (see Note at end of this step).
•
Keeloq: Directed older generation receiver technology
•
Supercode: Directed new generation receiver technology
•
Astro: AstroStart receiver technology
RF Learning 2 (Autostart), HDR-AM type 1,2,3,4/HDR-FM/LDR FM
•
AS HDR AM: Autostart HDR (AM based) receiver technology.
•
AS HDR FM: Autostart HDR (new generation FM based) receiver technology.
•
AS LDR: Autostart LDR (older generation) receiver technology.
Lock output:
0.8 sec.: the lock output pulses = 800 ms
0.4 sec.: the lock output pulses = 400 ms
3.5 sec.: the lock output pulses = 3.5 sec
4s X2: the lock output pulses twice, each pulse 400 ms duration
Unlock output:
0.8 sec.: the unlock output pulses = 800 ms
0.4 sec.: the unlock output pulses = 400 ms
3.5 sec.: the unlock output pulses = 3.5 sec
4s X2: the unlock output pulses twice, each pulse 400 ms duration
Comfort Closure:
Off: Comfort Closure is defeated when locking
Comfort Closure 1: the door lock pulse (or 2nd pulse for double pulses) remains on for 20 seconds.
Comfort Closure 2: 800 mS following the end of the door lock pulse (or 2nd
pulse for double pulses); the door lock output turns on again for 20 seconds.
Output 1-4
•
Opt 1 Lock: Output 1 operates as a Lock output
•
Opt 2 Unlock: Output 1 operates as an Unlock output
•
Opt 3 Trunk: Output 1 operates as a Trunk Release output
•
Opt 4 Start: Output 1 operates as a Remote Start trigger output (to an
add-on remote starter)
•
Opt 5 Aux 1: Output 1 operates as the AUX 1 output when activating
from the app
•
Opt 6 Aux 2: Output 1 operates as the AUX 2 output when activating
from the app
•
Opt 7 OEM Arm: Output 1 operates as Factory Alarm Arm and pulses
prior to the Lock pulse from the system when Locking from the app
•
Opt 8 OEM Disarm: Output 1 operates as Factory Alarm Disarm and
pulses prior to the Unlock pulse from the system when Unlocking from
the app
7. Output 2 same option choice and definitions as Output 1 options except default option is 2: Unlock
8. Output 3 same option choice and definitions as Output 1 options except default option is 3: Trunk (Please refer to * note after Menu table for this Opt.)
9. Output 4 same option choice and definitions as Output 1 options except default option is 4: Start (Please refer to * note after Menu table for this Opt.)
10. Factory Reset, returns the system to the factory default settings. When resetting
the unit, the features programming mode exits and is indicated by the LED
flashing Red/Blue once.
Note 1: Resetting the unit does not delete paired smartphones from memory.
The Blue LED may come on after the reset and exit from programming mode if
the module is still connected to a paired smartphone.
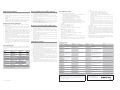
Autostart RF type Table
RF Menu 2 steps:
RF type:
Model list:
AUTOSTART
AUTOSTART USA
PolarStart
Nordic Start
Command Start
Opt 1
Opt 2
Opt 3
Opt 4
Opt 5
HDR-AM-TYPE1
HDR-AM-TYPE2
HDR-AM-TYPE3
HDR AM-TYPE4
HDR FM
LDR FM
1W 5btn RS/Combo
1W 4btn Combo
1W 2btn RS
1W 4btn RS
2W LED/LCD
RS/Combo
2W LED/LCD RS
AS-1774, AS-1774SR,
AS-1775, AS-1780 AS6270, AS-6280
AS-1271, AS-1272
AS-1475, AS-1470
AS-1875FM, AS-1880FM, AS-2371TWFM, AS-2381TW-FM, AS-2471TW-FM,
AS-2381TW-FM, AS-6870TW-FM AS2482TWS, AS-6880TWS
AS-1774U,
AS-1780U,
AS-2780U,
AS-6270U,
AS-2272, AS-1272U,
AS-1271U
AS-1475U
AS-2372TWU, AS-2382TWU, AS2472TWU, AS-2482TWSU, AS-3372TWFM, AS-3382TW-FM, AS-3472TW-FM,
AS-3482TWS, AS-6870TWU, AS6880TWSU
AS-1774SRU,
AS-2775,
AS-1775U,
AS-6280U
PS-3175, PS-3175E,
PS-3175ESR, PS-3175SR,
PS-3180E, PS-3180ESR,
PS-7270, PS-7280
PS-3675FM, PS-3680FM, PS-4471TWFM, PS-4481TWS, PS-4681TW-FM,
PS-7870TWE-FM, PS-7880TWS
NS-1084
NS-1074
CS-398i, CS-498i
start RF type Table on page 2.
Orbit
Premier Defense
NS-2432TW, NS-2332TW, NS-5070TWFM
OB-3481, OB-3485, OB-3681
Prostart
PS-4461TWE-FM PS-4661TWE-FM,
PS-3655EFM
CS-1875i, CS-2371TW-FM, CS-2372TWFM, CS-2381TW-FM, CS-2471TW-FM
CS-2472TW-FM, CS-2481TWS, CS6870TW-FM
Factory Reset
For Autostart models, look up the RF mode Option number using the Auto-
Opt 6
CT-3471, CT-5072,
CT-5472
CT-3271
PD-2.8, PD-3.0
Visions
OB-3475, OB-3671, OB2471
CT-3371
PD-371, PD-372, PD-382, PD-385, PD-471
PD-472, PD-485, PD-870
AS-2373TW-FM-v, AS-2383TW-FM-v, AS2472TW-FM-v
Table note: Panic and Trunk may not be supported on all models.
Notes: SmartKey response time to active commands can vary depending on
range and proximity to the vehicle. Operating temperature range: -30°C to
+ 70°C (-22°F to +158°F).
Additional information can be
found at: www.directechs.com
QRNDSK100 2014-02
© 2013 Directed. All rights Reserved.
2