1
Professional Single CD Player
CDX-05
OWNER'S MANUAL
NOTE
1 The CDX-05 cannot read CD-R/RW discs that are not finalized.
2 The CDX-05 can convert tracks to CD-DA and MP3 formats.
If the CD has been made on a computer, it can only read MP3 and CD-DA formats.
CD-DA format tracks will be given priority to play when both CD-DA and MP3 data is
recorded in the disc, MP3 tracks will not be played.
※There are features that are not supported when playing MP3 tracks. Read P.20
[ MP3 file playback ] for further instructions.
3 The CDX-05 cannot guarantee stable operation when playing a [ COPY GUARD CD ] or
other CDs that do not conform to the standard level. For details of standard CDs, please
ask the producer of the CD.
VESTAX CORPORATION
1-18-6 Wakabayashi, Tokyo 154-0023 Japan
Phone:03-3412-7011 Fax:03-3412-7013
VESTAX (Europe)Ltd.
Unit 5 Riverwey Industrial Park Alton, Hampshire GU34 2QL England
Phone:44-1420-83000 Fax:44-1420-80040
JUL. 04. CDX05E 1
D00829300A
Thank you for purchasing the VESTAX CDX-05, Professional Single CD player.
Please read this owner's manual carefully before you start to use your mixer in
order to fully understand all of the special feafures.
CONTENTS
CAUTION ・・・・・・・・・・・・・・・・・・・・・・・・・・・・・・・・・・・・・・・・・・・・・・・・・・・・・・・・・・・・・・・・・・・・・・・・・・・・・・・・・・・・・・・・
IMPORTANT SAFEGUARDS
・・・・・・・・・・・・・・・・・・・・・・・・・・・・・・・・・・・・・・・・・・・・・・・・・・・・・・・・・・・・・・・・・・・・・・・・・・・・・・・・・・・・・・・・
2
FEATURES ・・・・・・・・・・・・・・・・・・・・・・・・・・・・・・・・・・・・・・・・・・・・・・・・・・・・・・・・・・・・・・・・・・・・・・・・・・・・・・・・・・・・・・・・
BEFORE USE ・・・・・・・・・・・・・・・・・・・・・・・・・・・・・・・・・・・・・・・・・・・・・・・・・・・・・・・・・・・・・・・・・・・・・・・・・・・・・・・・・・・・・・・・
1 . Functions and Controls ・・・・・・・・・・・・・・・・・・・・・・・・・・・・・・・・・・・・・・・・・・・・・・・・・・・・・・・・・・・・・・・・・・・・・・・・・・・・・・・・・・・・・・・・
2 . Play back operation ・・・・・・・・・・・・・・・・・・・・・・・・・・・・・・・・・・・・・・・・・・・・・・・・・・・・・・・・・・・・・・・・・・・・・・・・・・・・・・・・・・・・・・・・
11
3 . More adranced operation
・・・・・・・・・・・・・・・・・・・・・・・・・・・・・・・・・・・・・・・・・・・・・・・・・・・・・・・・・・・・・・・・・・・・・・・・・・・・・・・・・・・・・・・・
15
4 . Specifications ・・・・・・・・・・・・・・・・・・・・・・・・・・・・・・・・・・・・・・・・・・・・・・・・・・・・・・・・・・・・・・・・・・・・・・・・・・・・・・・・・・・・・・・・
4
5
6
7
2
24
NOTE
This equipment has been tested and found to comply with the limits for a Class B
digital device, pursuant to Part 15 of the FCC Rules. These limits are designed to
provide reasonable protection against harmful interference in a residential
installation. This equipment generates, uses and can radiate radio frequeney energy
and, If not installed and used in accordance with the lnstructions, may cause harmful
interference to radio communications. However, there is no guarantee that
interference will not occur in a particular installation. If this equipment dose cause
harmful interference to radio or television reception, which can be determined by
turning the equipment off and on, the user is encouraged to try to correct the
interference by one or more of the following measures.
●Reorient or relocate the recelving antenna.
●Increase the separation between the equipment and receiver.
●Connect the equipment into an outlet on a circuit different from that to which the
receiver is connected.
●Consult the dealer or an experiencced radio/TV technician for help.
NOTE
Changes or modifications may cause this unit to fail to comply wiht Part 15 of the
FCC Rules and may void the user's authority to operate the equipment.
This Class B digital apparatus meets all requirements of the Canadian Interference-Causing Equipment
Regulations.
Cet appareil numerique
de la Classe B respecte toutesles exigences du Reglement
sur le materier
´
´
´ brouilleur du
Canada.
IMPORTANT
HOW TO CONNECT A PLUG
This apparatus is fitted with an approved moulded 13
Amp plug.To change a fuse in this type of plug
proceed as follows:
1.Remove fuse cover and fuse.
2.Fix new fuse which should be a BS1362 5A.
A.S.T.A. or BSI approved type.
3.Refit the fuse cover.
If the fitted plug is not suitable for your socket
outlets, It should be cut off and an appropriate plug
fitted in its place. It the mains plug conlains a fuse.
this should have a value of 5A. If a plug without a
fuse is used, the fuse at the distribution board
should not be greater than 5A.
The wires in the mains lead are coloured in
accordance with the following code:
BLUE-"NEUTRAL"("N")
BROWN-"LIVE"(L")
1.The BLUE wire must be connected to the terminal
which is marked with the letter "N" or coloured
BLACK.
2.The BROWN wire must be connected to the
terminal which is marked with the letter "L" or
coloured RED.
3.Do not connect either wires to the earth terminal in
the plug which is marked by the letter "E" or by the
safely earth symbol ↓or coloured green or greenand-yellow.
Betore replacing the plug cover, make cenain that the
cord grip is clamped over the sheath of the lead-not
simply over the two wires.
NOTE
The severed plug must be destroyed to
avoid a possible shock hazard it be
inserted into a 13A socket elsewhere.
CLASS 1 LASEN PNOOCUT
LUOKAN 1 LASENLAITE KLASS 1
LASENAPPANAT
3
IMPORTANT SAFEGUARDS
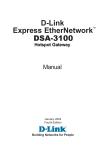
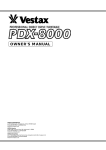
Dimensions
READ BEFORE OPERATING EQUIPMENT
This product was designed and manufactured to meet strict quality and
safety standards. There are, however, some installation and operation
precautions which you should be particularly aware of.
10. Power sources-This product should be operated only
from the type of power source indicated on the
arking label. If you are not sure of the type of
power supply to your home, consult your appliance
dealer or local power company.
11. Grounding or Polarization-This product is equipped
with a polarized alternating-current line plug (a plug
aving one blade wider than the other). This piug
will fit into the power outlet only one way. This is
safety feature. If you are unable to insert the plug
fully into the outlet, try reversing the plug. If this
should still fail to fit, contact your electrician to
replace your obsolete outlet. Do not defeat the safety
purpose of the polarized plug.
12. Power-Cord Protection-Power supply cords should
be routed so that they are not likely to be walked on
or pinched by intems placed upon or against them,
paying particular attention to cords at plugs,
onvenience receptacles, and the point where they
exit from the appliance.
13. Protective Attachment Plug-The appliance is
equipped with an attachment plug having overload
protection. This is a safety feature. See Instruction
Manual for replacement or resetting of protective
evice. If replacement of the plug is required, be
sure the service technician has used a replacement
plug specified by the manufacturer that has the same
overload protection as the original plug.
14. Lightning-For added protection for this product
during lightning storm, or when it is left unattended
and unused for long periods of time, unplug it from
the wall outlet. This will prevent damage to the
product due to lightning and power-line surges.
15. Overloading-Do not overload wall outlets and
extension cords as this can result in a risk of fire or
electric shock.
16. Object and Liquid Entry-Never push objects of any
kind into this product through openings as they may
touch dangerous voltage points or short-out parts
that could result in a fire or electric shock. Never
spill liquid of any kind on the product.
4
TIME
/ ENTER
PROFESSIONAL CD PLAYER
EJECT
LOOP
(SHIFT)
EFFECT
SAMPLER
PLAY MODE
EFFECT SYNC
RELOOP
/ EXIT
FILTER
FLANGE
DELAY
REC
(PGM EDIT)
COUNT RESET
TAP
LOOP
START
LOOP
END
(DISPLAY)
CUE- PLAY
LOOP
ON / OFF
CUE-SET
/ DEL
/ INS
CUE 2
(TRK RECALL)
(TRK MEMO)
SKIP
CUE 1
PLAY
MASTER
TEMPO
PITCH
RANGE
CUE 3
BEND
SEARCH
300
1. Read instructions-All the safety and operating
instructions should be read before the appliance is
operated.
2. Retain instructions-The safety and operating
instructions should be retained for future reference.
3. Heed Warnings-All warnings on the appliance and
in the operating instructions should be adhered to.
4. Follow Instructions-All operating and use
instructions should be followed.
5. Cleaning-Unplug this product from the wall outlet
before cleaning. Do not use liquid cleaners or
aerosol cleaners. Use a damp cloth for cleaning.
6. Attachments-Do not use attachments not
recommended by the product manufacturer as they
may cause hazards.
7. Water and Moisture-Do not use this product near
water-for example, near a dath tub, wash bowl,
kitchen sink, or laundry tub, in a wet basement, or
near a swimming pool, and the like.
8. Accessories-Do not place this product on an
unstable cart, stand, tripod, or table. The product
may fall, causing serious injury to a child or adult,
and serious damage to the appliance. Use only with
a cart,. stand, tripod, bracket, or table recommended
by the manufacturer, or sold with product. Any
mounting of the appliance should follow the
manufacturer's instructions, and sholud use a
mounting accessory recommended by the
manufacturer.
9. Ventilation-Slots and openings in the cabinet are
provided for ventilation and to ensure reliable
operation of the product and to protect it from
overheating, and these openings must not be blocked
or covered. The openings should never be blocked by
placting the product on a bed, sofa, rug, or other
similar surface. This product should never be placed
near or over a radiator or heat register. This product
should not be placed in a built-in installation such as
a bookcase or rack unless proper ventilation is
provided or the manufacturer's instructions have been
adhered to.
PITCH
SCRA
TCH
BRAKE
BREAK
RSE
REVE
85
242
25
3-13. Backup Memory
Each time you turn off the power, the status of following
features are stored into backup memory.
・Preset Settings
・CUE mode
・Program
・Effect on/off
・Reverse Play on/off
・Master Tempo on/off
・Time mode
・Play mode
・CUE-PLAY on/off
・Brake on/off
・Brake Time
・TEMPO Range
4. Specifications
Disc type: 8cm / 12cm CD, CD-DA/CD-R/CD-RW
Number of channels: 2-channel
Resolution: 16-bit
Sampling frequency: 44.1kHz
Analog output: RCA pin jack
Output impedance: <1kohm
Nominal output level: -10dBV(0.32V)
Maximum output level: +6dBV(2.0V)
Digital output: Coaxial
Format: IEC60958 Type II
Fader Start jack: φ3.5 mini phone jack
TT-LINK jack: MIDI DIN
Voltage requirements
USA/Canada: 120V AC, 60Hz
UK/Europe: 230V AC, 50Hz
Power consumption: 11W
Peak inrush current: 0.9A
Applicable electromagnetic
environment: E4
Dimensions (W x H x D mm)
Main unit: 242 x 300 x 85
Weight: 5.9kg
17. Servicing-Do not attempt to service product
yourself as opening or removing covers may expose
you to dangerrous voltage or other hazards. Refer
all servicing to qualified personnel.
18. Damage Requiring Service-Unplug this product
from the wall outlet and refer servicing to qualified
service personnel under the following conditions:
a. When the power-supply cord or plug is damage.
b. If liquid has been spilled or objects have fallen
into the product.
c. If the product has been exposed to rain or water.
d. If the product dose not operate normally by
following the operating instructions. Adjust only
those controls that are coverd by the operating
instructions as an improper adjustment of other,
controls may result in damage and will often
require extensive work by a qualified technician
to restore the product to its normal operation.
e. If the product has been dropped or cabinet has
been damaged.
f. When the product exhibits a distinct change in
perfromance-this indicates need for service.
19. Replacement Parts-When replacement parts are
required, be sure the service technician has used
replacement parts specified by the manufacturer or have
the same characterristics as the original parts.
Unauthorized substitutions may result in fire, electric
shock or other hazards.
20. Safety Check-Upon completion of any service or
repairs to product, ask the service technician to
perfrom sefety checks to determine that the product is
in proper operating condition.
21. Carts and Stands-The appliance should be used only
with a cart stand that is recommended by
manufacturer.
22. An appliance and cart combination should be moved
with care. Quick stops, excessive force, and uneven
surfaces may cause the appliance and cart
combination to overturn.
FEATURES
Error Messages
● It is the single CD player for DJ which corresponded to the function and the performance for which CD player for
DJ is required, and adhered to tone quality.
If any of the numbered error messages occur, try using another disc.
If the errors continue with a number of discs, turn the unit off, wait for a few seconds, and turn it on again.
If the errors still continue or other error occurs, contact your VESTAX distributor for repair.
● By passing through the electronic parts selected carefully and an original circuit, a digital sound peculiar to CD is
made to the tone quality which creates the warmth of analog. Thereby, the mixture condition of the sound when mixing
with the sound of an analog turntable changes at the time of DJ play.
Err 01 TOC Read error - the disc's Table of Contents cannot be read within 20 seconds - try with another disc or
remove and clean the existing disc before replacing it
Err 02 GFS error ? GFS signal cannot be detected within five seconds - try with another disc or remove and clean
the existing disc before replacing it
Err 03 Focus error - after repeating the attempt eight times to focus, an error still occurs - try with another disc or
remove and clean the existing disc before replacing it
Err 04 Sub-Q error - the sub-Q code cannot be detected (twice within five seconds) - try with another disc
Err 05 Loading error - the open or close operation cannot be completed, even after retries, or there is an internal
error - make sure that there are no obstructions preventing the tray's operation
Err 06 Sled error - an internal drive error - try turning the power off, waiting a few seconds, and turning it on again
Err 07 Error in communication between decks - try turning the unit off, waiting a few seconds, and turning it on again
Err 10 S-DRAM error - an internal S-DRAM error - try turning the power off, waiting a few seconds, and turning it on
again
24
● Three kinds of effects(flanger, a delay and filter) are built in this unit, and it can be synchronized with
BPM which automatic-detected or set manual up (it is to one line that it can be used simultaneously).
● It corresponds also to reproduction of an MP3 file in addition to the usual CD data. It is possible to reproduce the
MP3 file recorded on CD-R/RW. (However, MP3 reproduction has restriction in functions, such as a CUE point and
loop reproduction
● Each music is distinguished from the number of time of the whole CD, or the length of music, and the track memory
function to make a setup memorize in a main part at the time of reproduction of a maximum of 100 tracks is carried.
The work of teaching a CUE point LOOP point, a BPM value, etc. beforehand can also be done.
● The JOG wheel with a touch switch convenient for a search and scratch operation is adopted as a JOG wheel. Thereby,
operation becomes possible with the operation feeling of an analog turntable. Moreover, it can be operated by connecting
with TASCAM TT-M1 using VESTAX turntable PDX-2000 series instead of a JOG wheel.
5
BEFORE USE
Using CDs.
A conventional CD consists of two (2) sides. Typically one side bears a label stating the name of the CD and artist
whilst the front side, rainbow like in its color, contains the information that makes this technology work. There are
approximately six (6) million data items stored on any one given CD front surface. Please make sure to load the
CD into the playing mechanism correctly, so that the front side (rainbow) is unable to be seen once the lid is
closed.
Unlike conventional analog turntables, CD technology uses a fine laser beam instead of a stylus to read the
contents of the disc. As a result of there being little physical contact, a CD will take infinitely longer to degrade.
Repeated use of a CD, even playing over the same track again and again will likely have very little effect on the
audible quality of the discs data.
However, the front surface of a CD is brittle and may be scratched or damaged if you are careless in its handling.
Thus, please take care to load you CDs correctly and ensure that you store them in a safe place. Furthermore,
avoid leaving CDs in direct sunlight or in close proximity to a heating device or hot object, in the rain or in water,
or on surfaces that have excessive moisture or surface dirt/grime. Also take care when cleaning any CD by using a
recommended or special purpose cleaning cloth, cleaning spray or product and always wipe in the direction
illustrated below.
Playing the MP3 file
NOTE
1. Insert the CD-ROM which including the MP3 files.
2. Pressing the SKIP key selects the MP3 file.
3. Press the PLAY/PAUSE key.
●Since the CDX-05 does not support the text
display, the text information which are included
in the ID tag are not displayed. File number is
shown in the TRACK number area and directory
number is shown in the parameter display.
When parameter display shows the directory
number, DIR indicator will light.
Pressing and holding the SHIFT key and then pressing
the SKIP key to skips the directory.
3-12. Preset menu
Pressing and holding the SHIFT key and then using the
Jog wheel selects the preset menu.
Set the parameter with the Jog wheel.
TIME
/ ENTER
●Wipe from the inside out.
●Do not wipe in a circular fashion.
●Never use record cleaner designed for conventional analog disks, this will degrade the CD disc surface.
(SHIFT)
■Always store disc properly in the case.
Warning
・Please do not inhibit access to this unit's main switch by operating it in a confined area.
・Do not expose to water, moist environments or operate this device in an area likely to be effected by liquid
spillage or dripping.
Select the preset menu then press the ENTER key, the
LCD shows the preset menu and its parameter.
Pressing the ENTER key confirms the new paramete.
TIME
TIME
/ ENTER
/ ENTER
(SHIFT)
(SHIFT)
Preset Number Item
CD FILTER
TIMER start
DIRECT mode
Pressing any other key exits the preset operation.
Parameter (*: default) Function
,
*,
*,
*
TOC READ mode
*,
FADER Start mode
*, ,
Turns the "CD filter" on or off
Turns the "gpower on play" on or off
When direct mode is set to on, disc can be ejected
when disc is played, and when insert the disc,
playback is started automatically.
Selects the TOC read mode.
: Uses the previous servo value.
: Adjust the servo value every time.
Select the FADER start mode.
: Disc playback is started and stopped with
the fader.
: Controls the playback of the sampler.
: Controls a combination of disc and sampler
playback.。
Initialize the preset menu.
Clear the all memorized data.
Factory Preset
Memory All Clear
6
23
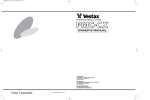
1. Functions and Controls
5. Repeat 2-4.
3. Press CUE-SET/INS key.
6. Exit the program edit mode by pressing andholding the
SHIFT key and then pressing the PLAY MODE/PGM
EDIT key.
CUE-SET
/ INS
8
7
10
9
TAP LED
1-1. Top Panel
11
TIME
(TRK MEMO)
/ ENTER
1
4. Select desired track with track skip keys.
TIME
/ ENTER
EFFECT
LOOP
PLAY MODE
SAMPLER
PLAY MODE
EFFECT SYNC
RELOOP
/EXIT
SKIP
13
PROFESSIONAL CD PLAYER
(SHIFT)
EJECT
FILTER
FLANGE
DELAY
16
REC
(PGM EDIT)
(SHIFT)
2
(PGM EDIT)
COUNT RESET
TAP
LOOP
START
(DISPLAY)
CUE- PLAY
/ DEL
LOOP
END
/ INS
CUE 2
(TRK RECALL)
SKIP
3
/ ENTER
(TRK MEMO)
CUE 1
PLAY
MASTER
TEMPO
PITCH
RANGE
18
CUE 3
BEND
SEARCH
4
3. Press CUE-PLAY/DEL key.
17
19
Delete program
1. Enter the program edit mode by pressing and holding
the SHIFT key and then pressing the PLAY MODE/
PGM EDIT key. TIME
LOOP
ON / OFF
CUE-SET
20
PITCH
PLAY MODE
CUE-SET
/ INS
(SHIFT)
12
(PGM EDIT)
2. Program number is shown in the parameter display.
Select desired program number that you wan to delete
the program with the Jog wheel.
(TRK MEMO)
4. Repeat 2-3.
5. Exit the program edit mode by pressing and holding the
SHIFT key and then pressing the PLAY MODE/PGM
EDIT key.
TIME
/ ENTER
(SHIFT)
21
22
5
SCR
ATC
H
PLAY MODE
BRAKE
BREAK
E
ERS
REV
6
(PGM EDIT)
14
15
3-11. MP3 file playback
NOTE
The CDX-05 can play the MP3 file which is
recorded as following specific format.
Disc format: ISO9660 Level 1
Number of directories: up to 254
Number of files: up to 255
File format: MPEG 1 audio layer 3
Bit rate: 32kbps to 190kbps,
Constant Bit Rate
Sampling frequency: 44.1KHz, Stereo
File extension: mp3, Mp3, mP3, MP3
NOTE
● Backward direction of the scratching can be
performed up to 7 seconds.
● If the disc is recorded with multi session , the CDX-05
can read the files in first session area only.
● Variable bit rate (VBR) format is not supported.
● MP3 playback function does not support following
functions.
- CUE and CUE 1-3
- Loop play
- Search
- Reverse play
- Track memory
- Total remain time display
- Remain time display
- Time address bar display
25
23
24
1. EJECT
A disc is ejected.
NOTE
These keys cannot be used when direct mode
(Preset menu: page 23) is off and a disc is being
played back.
5. CUE
Locates to the cue point, then pauses.
Stutter play can be performed with this key.(P.11)
Selects the CUE key's operation mode.(P.11)
2. RELOOP/EXIT, LOOP START, LOOP END
Sets the loop points, or engages or disengages the
loop playing.(P.12)
3. Track Skip keys
Use these to perform track searches.
4. SEARCH key
Use these to perform track searches.
22
7
6. PLAY/PAUSE
10. EFFECT SYNC / FLANGE / FILTER / DELAY
EFFECT SYNC:Turns on and off synchronization of
the effect time with the BPM.(P.16)
FLANGE
:Turns the Flanger effect on and off.(P.17)
FILTER
:Turns the Filter effect on and off.(P.17)
DELAY
:Turns the Echo effect on and off.(P.17)
Changes the playback mode between playback and
pause.
The light stays on solid in playback mode and flashes
in pause mode
7. TIME / ENTER / SHIFT
2. Program number is shown in the parameter display.
Select the desired track with the track skip keys.
or
SKIP
Sets the tempo in BPM by tapping this key. When you
press this key, the parameter counter mode momentarily changes to TAP BPM display mode. (P.14)
REMAIN
ELAPSED
:REMAIN indicator in the LCD will light
:Elapsed time will show in the numerical portion
in display, but no additional indicator will light.
TOTAL REMAIN:The track number display area shows the
number of tracks of inserted disc, however, for 5
seconds in the end of track, the current track
number flashes and for 5 seconds in the beginning
of the track, the current track number lights.
Pressing and holding the SHIFT key while pressing this
key selects the parameter display mode.
TEMPO -> KEY -> TAP -> BPM -> (FDR) ->
12. CUE-PLAY / TRK RECALL / DEL
Turns the CUE-PLY mode on and off.
Recalls the track memory data.
Deletes the current selected song from the program list.
(P.11)
Another function of this key is the modifier key (SHIFT
function). Holding SHIFT while pressing another key
performs the following functions;
13. CUE-SET / TRK MEMO / INS
SHIFT + PLAY MODE: Program Edit
SHIFT + CUE-PLAY: Track memory Recall
SHIFT + CUE-SET: Track memory
SHIFT + TAP: Parameter display select
SHIFT + JOG: Preset
SHIFT + LOOP END: Loop end point edit
SHIFT + CUE: Select the CUE keyユs operation
3. Go to next program number by pressing the ENTER
key or using the Jog wheel.
Edit program
Depending on the setting, these keys locate to cue
points, flash start (cue-ply) from cue points, or stutter
play from cue points. (P.11)
8. PLAY MODE / PGM EDIT
Selects the play mode, either all play, single play (1
track play), programmed play, all repeat play, single
repeat play or program repeat play.
5. Exit the program edit mode by pressing and holding the
SHIFT key then pressing the PLAY MODE/PGM EDIT
key.
TIME
PLAY MODE
/ ENTER
(SHIFT)
TIME
/ ENTER
PLAY MODE
(SHIFT)
(PGM EDIT)
SKIP
4. Repeat 2-3.
5. Exit the program edit mode by pressing and holding the
SHIFT key then pressing the PLAY MODE/PGM EDIT
key.
2. Program number is shown in the parameter display.
Select the desired program number with the Jog wheel.
TIME
15. JOG Wheel
The following functions can be controlled by the Jog
wheel.
□ Search
□ Pitch Bend
□ Scratch
□ Brake time
□ Key control
□ Preset menu
□ Effect parameters
□ Sampler tempo/level
□ Program edit
□ Track memory number select
All play
Single play
: No indication in the LCD
:`
`SINGLE´
´indicator in the LCD will
light
Programmed play
:`
`PGM´
´indicator in the LCD will light
All repeat play
:`
`ALL
´
´and`
`LOOP´
´indicators in the
LCD will light
Single repeat play
:`
`SINGLE´
´
,`
`S´
´
and`
`LOOP´
´
indicators
in the LCD will light
Programmed repeat play:`
`PGM´
´and`
`LOOP´
´indicators in
the LCD will light
16. REC
Pressing and holding the TIME/ENTER/SHIFT key
while pressing the PLAY MODE key, enters program
edit mode. (P.20)
If this key is pushed once, it will be in a sampling
standby state (blink), and a sampling will be
started(lighting) if it pushes on the next . A sampling will
be stopped if it pushes again (lights out).(p.18)
Sampling time is for 8 seconds at the maximum.。
9. LCD
Displays visual feedback for CDX-05 functions
8
(PGM EDIT)
3. Select desired track with track skip keys.
1. Enter the program edit mode by pressing and holding
the SHIFT key and then press the PLAY MODE/PGM
EDIT key.
Set the cue points with CUE 1-3.
Memorizes the track memory data.
Deletes the current selected song from the program list.
(P.11)
14. CUE 1-3
(SHIFT)
4. Repeat 2-3.
11. TAP / DISPLAY
Selects the time display mode, either remain, elapsed
or total remain.
TIME
/ ENTER
Insert program
1. Enter the program edit mode by pressing and holding
the SHIFT key and then pressing the PLAY MODE/PGM
EDIT key.
TIME
/ ENTER
PLAY MODE
(SHIFT)
(PGM EDIT)
21
/ ENTER
PLAY MODE
(SHIFT)
(PGM EDIT)
37. Time Address Bar
Shows the current play position relative to the current
42. BPM
Lights when parameter display shows the auto BPM
value.
track.
38. EFF
43. FDR
Lights when parameter display shows the effect
parameter.
When a MP3 CD-ROM disc is inserted, this indicator
lights and parameter display shows the current
selected directory number.
39. TEMPO
Lights when parameter display shows the TEMPO
value.
44. Parameter display
40. KEY
45. M.TEMPO
Lights when parameter display shows the key value.
Lights when key value is set to other than 0%.
Lights when master tempo function is activated.
Displays the various parameters.
SAMPLER
Sampler output level
While pushing the PLAY key then using the Jog wheel
adjusts the sampler output level. The sampler output
level can be set from 0 (mute) to 100 (default level).
REC
LOOP
ON / OFF
PLAY
3-7. Track Memory / Recall
The CDX-05 can memorize the various
playback settings of current selected tracks up to100
tracks of memory.
Track Memory
41. TAP
4. Press the ENTER key. At this time, if there is stored
memory in the selected memory number, indication is
displayed in the LCD.
Pressing the ENTER key overwrites the current track
data. Pressing any other key cancels the memory
operation.
TIME
1. Enter the track memory mode by pressing and holding
the SHIFT key then pressing the TRK MEM key.
Lights when parameter display shows the tap value.
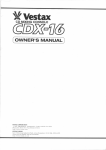
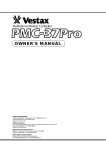
1-3. REAR PANEL
TIME
/ ENTER
(SHIFT)
CUE-SET
/ INS
(TRK MEMO)
/ ENTER
2. LCD shows the lowest empty memory number.
(SHIFT)
Memory data
WARNING;SHOCK HAZARD-DO NOT OPEN.
AVIS;RISQUE DE CHOC ELELCTRIQUE -NE PAS OUVRIR.
DC 8V
RISK OF ELECTRIC
SHOCK. DO NOT OPEN
PROFESSIONAL CD PLAYER
POWER
DC8V
OUTPUT DIGITAL
OUTPUT
L
・l DISC ID
・CUE point
・CUE 1-3 points
・LOOP A/B points
・LOOP mode
・Play mode
・MASTER TEMPO On/Off ・TAP value
・Brake On/Off
・Brake Time
・Time mode
11W
MADE IN CHINA
UNDERLICENCE OF
VESTAX TOKYO,
JAPAN SERIAL NO.
FADER
START
TT-LINK
3. Use the Jog wheel to change the memory number if
necessary.
R
NOTE
S a mpl in g p o in ts fo r t he MP 3 f i le c annot
b e mem o riz ed
50
51
46
47
48
49
Recal
46. OUTPUT jack (RCA)
49. TT-LINK jack (MINI DIN 6P)
RCA connectors providing line level output signal.
Connect the optional scratch controller TT-M1
(TASCAM).
1. Enter the recall mode by pressing and holding the
SHIFT key and pressing the TRK RECALL key. If there
is a track memory data for the current selected track, its
memory number is shown in the LCD.
50. POWER switch
47. DIGITAL OUTPUT jack (COAXIAL)
Coaxial connectors provide digital output signal. These
connectors can output the 44.1KHz digital signals
constantly even if pitch control is activated.
48. FADER START jack (MINI jack)
Turns the power on and off.
51. DC POWER jack
Connect the VESTAX DC-8, AC adaptor.
The CDX-05 can be controlled using the external Fader
start command through this jack. Connect the mixer,
which supports the fader start function with appropriate
cable as well as audio signal. (P.20) (TIP: Start,
GND: back cue)
TIME
/ ENTER
(SHIFT)
TIME
/ ENTER
(SHIFT)
The CDX-05 can recall the track (song) from the track
memory data.
CUE-PLAY
/ DEL
(TRK RECALL)
1. Enter the recall mode by pressing and holding the
SHIFT key then pressing the TRK RECALL key. Using
the Jog wheel to select the desired track memory
number.
2. When track memory number is shown in the LCD,
pressing the ENTER key recalls the track memory data.
TIME
/ ENTER
(SHIFT)
10
19
CUE-PLAY
/ DEL
(TRK RECALL)
3-6. Sampler
2. Playback operation
The CDX-05 includes eight seconds sampler on each player.
2-1. CUE
Sampling
NOTE
The CDX-05 can memorize the play start point as a cue point. If the cue point is memorized, pressing the CUE key
locates the unit to the cue point.
●When you sample, please check that the sampler has stopped.
●Elimination of sampling data cannot be performed. Sampler can always overwrite.
1. Push the REC key once during play or a stop. The REC
key blinks at this time and it will be in a REC standby
state.
SAMPLER
To memorize the CUE point
After pushing the REC key, if 8 seconds of the maximum recording time passes, sampling will be stopped
automatically.
SAMPLER
REC
REC
LOOP
ON / OFF
LOOP
ON / OFF
PLAY
PLAY
There are two ways to store the cue point.
Pressing and holding the SHIFT key then pressing
CUE selects the method for the CUE key's operation.
Pressing the CUE key when unit is
paused stores the current point as the
cue point. TIME
/ ENTER
Last play start point is stored as the
CUE point.
(SHIFT)
Stutter play with the CUE key
When unit is paused at the cue point, the unit will play when this key is pressed, and enter pause mode when CUE is
released.
If the PLAY key is pressed during CUE playback, the unit will go into normal play mode.
2. Push the REC key again during play or stop, recording
will begin and the REC key will light up.
3. If the REC key is again pushed during play or a stop, a
sampling will be ended and a deed REC key will switch
off blink 3 times.
2-2. CUE 1-3
The CDX-05 can have another three cue points stored with the CUE 1-3 keys.
Sampler Play
SAMPLER
After sampling, push PLAY key, and Sampled track will
start. If the PLAY key is de- tached, Sampler will stop.
REC
LOOP
ON / OFF
To memorize the CUE 1-3 points
1. Find the desired point.
2. Press the SET key. The parameter display shows .
3. Press the desired CUE key.
CUE-SET
CUE 1
When the CUE key has the stored point, the CUE key
lights. The stored cue point cannot be erased but can
be overwritten.
SAMPLER
Presh tha LOOP key then
push the LOOP key to turn the sampler loop play on
and off. When sampler loop play is activated,
LOOP LED will light.
REC
LOOP
ON / OFF
CUE 3
(TRK MEMO)
PLAY
Sampler Loop
CUE 2
/ INS
NOTE
・When the unit is paused and the CUE-PLY indicator in the LCD lights, pressing the SET key then pressing the
CUE 1-3 key starts the unit automatically.
・When the unit is paused and the CUE-PLY indicator in the LCD doesn't light, pressing the SET key then
pressing the CUE 1-3 key flashes the pressed CUE 1-3 key three times then lights.
・For three seconds after storing the cue point, you cannot store another cue point.
PLAY
Sampler Pitch Control
SAMPLER
REC
While pushing the Loop key the Jog wheel changes the
play back pitch of the sampler. The pitch control range
is +/-32% in 0.1% steps.
LOOP
ON / OFF
Stutter play with the CUE 1-3 keys
When the unit is paused at the cue 1-3 point, the unit will play when the appropriate CUE 1-3 key is pressed, and enter
pause mode when CUE 1-3 is released.
If the PLAY key is pressed during CUE playback, the unit will go into normal play mode.
PLAY
18
11
2-3. CUE-PLAY
Effect level setting
The CDX-05 has a flash start function that can be used
with the CUE 1-3 keys. When the flash start function is
activated (when the CUE-PLY indicator in the LCD
lights), pressing the CUE 1-3 key enables flash start.
CUE-SET
/ INS
CUE 2
CUE 1
CUE 3
(TRK MEMO)
NOTE
When an effect is activated, pressing and holding the
SHIFT key then pressing the activated effect key enters
the effect level setting mode. In this mode, using the
Jog wheel can change the effect level. The effect level
parameter is shown in the parameter display.
When the CUE-PLY indicator in the LCD doesnユt light, the unit is back in cue mode. In this mode, pressing the
CUE 1-3 key locates the stored cue point then the unit pauses.
TIME
EFFECT
/ ENTER
FLANGE
FILTER
DELAY
(SHIFT)
2-4. A-B Looping
To store the LOOP points
LOOP
1. Press the LOOP START key when playing or pausing.
The LOOP START key will light and the LOOP END
key will start flashing.
RELOOP
/EXIT
LOOP
START
LOOP
END
LOOP
2. Press the LOOP END key when playing or pausing.
LOOP START and LOOP END keys will light. If the
loop end point is set when the unit is playing, the CDX05 starts loop playback seamlessly. If the loop end
point is set when the unit is paused, the CDX-05 goes
to the loop start point then pauses.
RELOOP
/EXIT
FLANGER
FILTER
Pressing the FLANGE key activates the Flanger effect.
Effect time: 10msec - 16sec (default: 500msec)
Effect beat: 32, 16, 8, 4, 2, 1, 1/2 (default: 1)
Effect level: 0 - 100 (default: 75)
Pressing the FILTER key activates the Low pass filter
effect.
Effect time: 10msec - 16sec (default: 2sec)
Effect beat: 32, 16, 8, 4, 2, 1, 1/2 (default: 4)
Effect level: 0 - 100 (default: 75)
DELAY
Filter effect has two operation modes, manual mode
and auto mode. In manual mode, filter frequency can
be controlled with the Jog wheel. In auto mode, filter
frequency is moved automatically followed by BPM and
effect beat parameter.
Pressing and holding the FILTER key more than 1.5
seconds changes the filter effect mode.
Pressing the DELAY key activates the Delay effect.
Effect time: 1msec - 3,500msec (default: 500msec)
Effect beat: 2, 1, 3/4, 1/2, 1/4 (default: 1)
Effect level: 0 - 100 (default: 75)
LOOP
START
NOTE
LOOP
END
NOTE
●When you register loop point, please check that it is not under loop reproduction now. A setup of a loop point
cannot be performed during loop reproduction.
●Loop point elimination cannot be performed. A loop point can always be overwritten.
●Please register a loop point in the same track. It does not correspond to loop reproduction over a track.
●A LOOP END point can be set only to back from a LOOP START point.
●Reverse reproduction of a loop cannot be performed.
●Both loop start and end points can set to within a track.
When filter effect mode is set to manual mode, you can move the filter frequency using with the Jog wheel even if
the scratch function.
3-5. Reverse play
The CDX-05 features the reverse play function.
Pressing the REVERSE key changes playback
direction. When playback is reversed, the
REVERSE key will light.
E
ERS
REV
LOOP
Disengage loop play When loop play is engaged, pressing the RELOOP/EXIT key disengages loop play. In this case, the
unit continues playback and RELOOP/EXIT key light
goes off, but the loop points are not erased.
When loop play is engaged, locating to the out point of
a loop section disengages loop play (i.e. pressing the
CUE key, etc...). The LOOP key goes off, but the loop
points are not erased.
RELOOP
/EXIT
LOOP
START
LOOP
END
12
NOTE
●More than 3 seconds after pausing, reverse play cannot be performed.
●In the reverse play mode, CUE PLAY, creating the loop point, and auto cue functions do not work.
●Reverse play of loop cannot be performed. If the RELOOP key is pushed during reverse play, reverse will be canceled and it will usually become loop play.
17
3-3. Brake
Re-looping
Brake function simulates the braking audio just like
turning off the analog turntable. Pressing the BRAKE
key turns the brake function on and off. When brake
function is activated, BRAKE key lights.
When loop play is disengaged and loop points are
already stored, pressing the RELOOP/EXIT key starts
reloop playback and the RELOOP/EXIT key lights.
BRAKE
LOOP
RELOOP
/EXIT
LOOP
START
LOOP
END
Set the brake time
Pressing and holding the BRAKE key then using the
LOOP
Reproduction from a LOOP START point
Jog wheel adjusts the brake time. Brake time can be
set to 0.1 to 5 seconds in 0.1 sec. steps.
Pressing the PLAY/PAUSE key while unit is playing
performs the braking.
Pressing the PLAY/PAUSE key during the braking
starts the music again with current tempo.
BRAKE
RELOOP
/EXIT
If the LOOP START key is pushed during loop
reproduction, reproduction will be started from a loop
start point.
LOOP
START
LOOP
END
LOOP
Changing the LOOP end point
3-4. Effects
The CDX-05 includes three effects, Flanger, Delay, and Filter. One effect can be activated at the same time.
Pressing one of the effect keys can activate the effect.
Pressing the FX SYNC key synchronize the effect time with the BPM.
Pressing and holding the SHIFT key then pressing one of effect key can adjust the effect level with the Jog wheel.
Pressing the LOOP END key when the loop is playing
changes the loop end point.
RELOOP
/EXIT
LOOP
START
LOOP
END
Effect time setting
EFFECT
When an effect is activated, using the Jog wheel can
adjust the effect time. The effect time parameter is
shown in the parameter display.
FLANGE
FILTER
DELAY
NOTE
When the scratch function turns on, the effect time
cannot be controlled with the Jog wheel.
LOOP
Pressing and holding the SHIFT key then pressing the
LOOP END key edits the loop end point using the Jog
wheel. Pressing the LOOP END key overwrites the new
loop end point and exits the edit mode.
RELOOP
/EXIT
TIME
/ ENTER
LOOP
START
(SHIFT)
NOTE
LOOP
END
The Loop end point can be moved before the current
end point only.
Synchronizing the effect time with the BPM
NOTE
When an effect is activated and FX SYNC key is
turned on (FX SYNC key lights), using the Jog wheel
can change the effect beat synchronized with the BPM.
The effect beat parameter is shown in the parameter
display. When scratch function turns on, the effect beat cannot be controlled with the Jog wheel.
EFFECT
FLANGE
FILTER
EFFECT SYNC
DELAY
16
2-5. Adjusting the pitch
Pitch range
The CDX-05 features +/-6, 10, 50, 100, and 0% of
tempo control range. Pressing the PITCH RANGE key
changes the pitch control range. The Parameter display
shows the selected pitch/key range momentary. If 0%
is selected, the parameter display shows .
PITCH
RANGE
13
PITCH
PITCH fader
The PITCH fader controls playback tempo. Tempo
changes are displayed in the LCD.
When tempo range is set to +/-6 or 10%, pressing the
MASTER TEMPO key turns the master tempo function
on and off. When master tempo function is turned on,
tempo control does not affect the playback key. When
the master tempo function is turned on, M. TEMPO
indicator in the LCD lights. If tempo range is set to +/50% or 100%, the key original function does not work.
When the master tempo function is turned on,
`
´
´in the KEY mode.
parameter display shows`
Auto BPM and TAP key
The CDX-05 features automatic BPM count function
and TAP mode BPM count function. When parameter
display mode is set to BPM, the BPM is counted
automatically and displayed in the parameter display. 2-7. MASTER TEMPO
TIME
/ ENTER
(SHIFT)
MASTER
TEMPO
COUNT RESET
TAP
(DISPLAY)
3. More advanced operation
3-1. Key control
Pressing the TAP key repeatedly counts the song
tempo in BPM manually. Tapped BPM is shown in the
LCD parameter display and the TAP LED blinks in
tempo. This BPM affects the TEMPO slider moving. If
the TEMPO slider is moved, the BPM will be changed
automatically.
COUNT RESET
TAP
(DISPLAY)
Pressing and holding the TAP key for more than 1.5
seconds erases the tapped BPM value.
Pressing and holding the TAP key then moving the Jog
wheel (within 1.5 seconds) adjusts the BPM manually.
The CDX-05 features up to +/-10% key control. Key
control range is determined with tempo range setting.
When tempo control range is set to 0%, or 100%, the
key control function does not work.
Pressing and holding the MASTER TEMPO key then
moving the Jog wheel sets the key control value.
Note that the key value shows a total of the value
together with any changes made by using the slider.
MASTER
TEMPO
NOTE
COUNT RESET
TAP
(DISPLAY)
● When the master tempo function is activated, the key control function does not work.
● The key control will return to 0% if you push the JOG wheel while operating.
NOTE
BPM is also used for the effect time or beat parameter (P.16). When you set the BPM using with the TAP key,
tapped BPM will be used for the effect time or beat
3-2. Scratching
When the SCRATCH key is activated, scratching can
be performed with the Jog wheel.
2-6. Pitch Bending
When playing back a disc, pressing the BEND + or key, or using the Jog wheel can change playback
tempo momentary. Pressing the + key or moving the
Jog wheel clockwise increases the playback speed and
returns to original speed when release this key or stop
the Jog wheel moving. Pressing the - key or moving the
Jog wheel counterclockwise decreases the playback
speed and returns to original speed when release this
key or stop the Jog wheel moving.
BEND
SCR
ATC
H
NOTE
or
● For 3 seconds after the CUE-PLY or cuing with CUE 1-3 key, or cuing with CUE key, backward direction of
scratching cannot be performed
● Backward direction of the scratching can be performed up to 7 seconds.
● When filter effect is activated with manual mode, scratch function cannot be performed with the Jog wheel
(P.17).
NOTE
●When SCRATCH key, or a effect key is not lit, the Jog wheel works for pitch bend function.
●The maximum pitch bend range is 10%.
●When MASTER TEMPO function is activated, playback key is fixed.
14
15