1
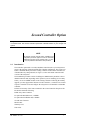
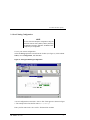
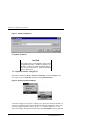
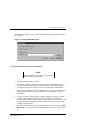
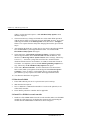
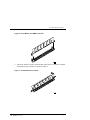
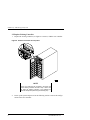
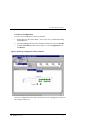
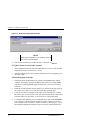
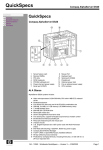
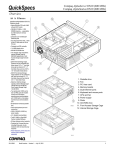
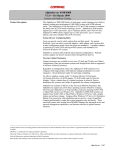
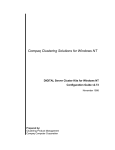
RAID Array 3000 Storage
Subsystem Second Controller
Option
Installation Guide
EK–SM3KC–IG. C01
Digital Equipment Corporation
Maynard, Massachusetts
Third Edition, September, 1998
The disclosure of this information does not grant to the user a license under any patents,
pending patents, trademarks, or copyrights or other rights of Digital Equipment
Corporation, or of any third party.
This software is proprietary to and embodies the confidential technology of Digital
Equipment Corporation.
Possession, use or copying of the software described in this publication is authorized
only pursuant to a valid written license from Digital Equipment Corporation or an
authorized sublicensor.
Digital Equipment Corporation makes no representation that the use of its products in
the manner described in this publication will not infringe on existing or future patent
rights, nor do the descriptions contained in this publication imply the granting of
licenses to make, use, or sell equipment or software in accordance with the description.
UNIX is a registered trademark in the United States and other countries, licensed
exclusively through X/Opin Company, Ltd.
All other trademarks and registered trademarks are the property of their respective
owners.
The following are trademarks of Digital Equipment Corporation:
DEC, DIGITAL, RAID Array 3000, StorageWorks, and the DIGITAL Logo.
©Digital Equipment Corporation 1998.
Printed in USA
All Rights Reserved
Contents
Revision Record ............................................................................................... v
About This Guide .......................................................................................... vii
Second Controller Option
1.0
Introduction ................................................................................................................1
2.0
Install Firmware Upgrade ...........................................................................................2
2.1
Save Existing Configuration .......................................................................................3
2.2
Update Firmware ........................................................................................................4
2.2.1 Update Firmware Using SWCC ..................................................................................4
2.2.2 Update Firmware Using Serial Interface .....................................................................5
2.3
Shutdown RA3000......................................................................................................6
2.4
Install Two SIMMs in Second Controller....................................................................6
2.5
Replace Existing Controller ........................................................................................8
2.6
Restore Configuration.................................................................................................9
2.7
Upgrade Firmware on Second Controller ..................................................................10
2.8
Install Original Controller.........................................................................................10
EK–SM3KC–IG. C01
iii
RAID Array 3000 Expansion Pedestal Enclosure
Figures
1
2
3
4
5
6
7
8
9
10
iv
Second Controller Pedestal Slot Location .......................................................2
Update Firmware Command ...........................................................................3
Firmware Update Dialog Box .........................................................................4
Saving the Existing Configuration ..................................................................5
Saved Configuration .......................................................................................5
Insert Module into SIMM Connector ..............................................................6
Pivot Module Down to Seat ............................................................................6
Remove Controller from Top Slot...................................................................7
Restoring Configuration to New Controller.....................................................8
Restored Configuration Example ....................................................................9
EK–SM3KA–IG. C01
Revision Record
This Revision Record provides a concise publication history of this guide. It lists the
revision levels, release dates, and a summary of changes.
The following revision history lists all revisions of this publication and their effective
dates. The publication part number is included in the Revision Level column, with the
last entry denoting the latest revision. This publication supports the installation and
configuration of the Second Controller Option into the StorageWorks RAID Array 3000
Pedestal and Controller Shelf storage subsystems.
Revision Level
Date
Summary of Changes
EK–SM3KC–IG. A01
January, 1998
Original release.
EK–SM3KC–IG. B01
May, 1998
Expands controller configuration
procedure using Command
Console Client (SWCC).
EK–SM3KC–IG. C01
Sept, 1998
Adds a procedure to upgrade
firmware using serial interface.
EK–SM3KC–IG. C01
v
About This Guide
This section identifies the audience of this guide. It also describes its contents and
includes a list of associated documents and the conventions.
Intended Audience
This guide is intended for installers and operators of the RAID Array 3000
pedestal and controller shelf storage subsystems. Installing the subsystems and its
components (options) requires a general understanding of basic SCSI
terminology and product installation procedures.
Document Structure
This guide contains the following sections:
1.0 Introduction – summarizes the content of this guide.
2.0 Install Firmware Upgrade – includes the steps required to install the second
controller option into the pedestal or controller shelf enclosures. The Information
includes saving the existing configuration using the SWCC console, upgrading the
firmware, and installing the cache memory SIMM modules to accommodate the second
controller.
EK–SM3KC–IG. C01
vii
RAID Array 3000 Second Controller Option
Associated Documents
In addition to this guide, the following documentation is useful to the reader:
Table 1 Associated Documents
Document Title
Order Number
StorageWorks RAID Array 3000 Storage Subsystem
Hardware User’s Guide
EK–SMCPO–UG
StorageWorks RAID Array 3000 Controller Shelf
Hardware User’s Guide
EK-SMCPQ-UG
StorageWorks RAID Array 3000 Configuration and
Maintenance Guide
EK–SMCS2–UG
Installation Instructions for the RAID Array
Replacement Controller – SWXRC-03
EK–SMCPL–PN
RAID Array 3000 Getting Started for Windows NTIntel Installation Guide
AA–RACZA–TE
RAID Array 3000 Getting Started for Windows NTAlpha Installation Guide
AA–RACUA–TE
Conventions
Table 2 Style Conventions
Style
viii
Meaning
plain monospace
type
Text
boldface type
For the first instance of terms being
defined in text, or both.
italic type
For emphasis, manual titles, chapter
summaries, keyboard key names.
EK–SM3KC–IG. C01
About This Guide
Support and Services
Who to contact in the Americas
Information and Product Questions:
Local Sales Office / StorageWorks Hotline
1-800-786-7967
Installation Support:
Contact the DIGITAL Distributor where the
Storage Solution was Purchased / Local Digital
Sales Office.
DIGITAL Multivendor Customer Service (MCS):
Installation
Contact the DIGITAL Customer Support Center
(CSC).
Warranty
Contact the DIGITAL Customer Support Center
(CSC) for warranty service after solution is
installed and operating.
Remedial
Contact the DIGITAL Customer Support Center
(CSC)
Note: A Service Contract is recommended when
the equipment is out of warranty. Contact the
local DIGITAL Sales Office.
Customer Support Center (CSC)
1 800-354-9000
Who to contact in Europe
Information and Product Questions: Contact the DIGITAL Distributor or reseller
Installation Support and Installation: Contact the DIGITAL Distributor or reseller from
whom the Storage Solution was purchased.
For Warranty Service
See the Warranty Card packaged with the
product.
For Remedial Service
Contact the DIGITAL Distributor or reseller from
whom the Storage Solution was purchased.
Note: A Service Contract is recommended
when the equipment is out of warranty.
Who to contact in Asia Pacific
For all services, contact the DIGITAL Distributor or reseller from whom the
equipment was purchased
EK–SM3KC–IG. C01
ix
Second Controller Option
This guide describes how to install a second RAID controller in the RAID Array 3000 pedestal
or controller shelf. The second controller option adds a fail/safe feature to your storage subsystem.
NOTE
The following second controller option installation and
configuration procedure applies to both the desk-side
pedestal and the rack-mount controller shelf. For clarity, only the pedestal is illustrated in this procedure.
1.0
Introduction
The controller option adds a second (redundant) controller unit to your subsystem to
preserve the integrity of data should the first controller malfunction. The second controller is installed directly below the existing controller in the bottom controller slot
of the RAID Array 3000 pedestal (see Figure 1) or the rack-mount controller shelf
version of the subsystem.
The installation procedure consists of adding two SIMM memory modules to the redundant controller and, depending on the option kit you are installing (see inventory
below), one or two SIMM modules to the existing controller. Following the memory
upgrade, you must upgrade the firmware in both controllers , seat the devices in their
respective controller slots and configure the subsystem to accommodate a redundant
controller.
Perform an inventory of the items contained in the second controller kit option. The
kit should contain the following:
RAID Array 3000 Controller
For option kit DS-HSZ22-AA, 3 SIMMs
For option kits DS-HSZ22-AB, 4 SIMMs
CD with new Firmware
Model Label
Warranty Card
This Guide
EK–SM3KC–IG. C01
1
RAID Array 3000 Storage Subsystem
Figure 1 Second Controller Pedestal Slot Location
Second
Controller
Slot
3000-48
2.0
Install Firmware Upgrade
CAUTION
To prevent an electrical discharge from damaging the
SIMMs, always wear an ESD wrist or foot strap connected to a suitable ground when handling the memory
modules.
NOTE
You can upgrade your firmware using the SCSI or network connection methods. These methods provide the
fastest way to upgrade your firmware. To update your
controller’s firmware, proceed as follows.
2
EK–SM3KC–IG. C01
Second Controller Option
2.1 Save Existing Configuration
NOTE
You must save the subsystem configuration using the
Command Console Client (SWCC) before performing
the installation procedure. Otherwise, the RAID controller may lose your configuration.
To save your current configuration:
Select the Storage pull-down menu from the Toolbar (see Figure 2), click on Controller, select Configuration, and then Save.
Figure 2. Saving the Existing Configuration
A saved configuration screen with a “Save to File” field appears as shown in Figure
3. The example below lists the file name as c:\config1.
Enter your file name in the “Save to File” field and click on Save
EK–SM3KC–IG. C01
3
RAID Array 3000 Storage Subsystem
Figure 3. Saved Configuration
.
2.2 Update Firmware
CAUTION
If the systems disk is on the RA3000, firmware cannot
be upgraded with SWCC. Establish a temporary system disk on a disk drive outside the RA3000 and proceed with these instructions or follow the alternative
shown in Section 2.2.2
2.2.1 Update Firmware Using SWCC
Start SWCC and choose SCSI or Network Connection. From the Storage menu
(see Figure 4), select Controller, and then select Update Firmware.
Figure 4 Update Firmware Command
A window will appear (see Figure 5) asking you to specify the firmware file that you
want to load. This file resides on the CD supplied with the controller kit option. You
can easily identify Firmware software by its .fdi extension. Enter the .fdi file
name (for example, D:\firmware\xxx.fdi), then click Start Update. Upon completion
4
EK–SM3KC–IG. C01
Second Controller Option
of the Firmware update, the system will automatically reboot and update the controller’s firmware.
Figure 5. Firmware Update Dialog Box
2.2.2 Update Firmware Using Serial Interface
NOTE
Follow this procedure only when the host operating
system is installed on the RA3000.
1.
Properly shutdown your host system
2.
Using either a laptop computer or a computer other than that attached to the
RA3000, connect a serial cable between the COM port on that machine and the
corresponding serial port (CTR1 or CTR2) for the controller on the RA3000.
3.
Start a terminal emulator session. On Windows NT, we suggest the HyperTerminal emulator. Settings to be used are 9600 baud, 8 bits, No Parity, 1 stop bit,
XON/XOFF.
4.
To get the controller's attention press Escape/& (escape key, shift key, number
7). The controller should respond with a banner stating DEC HSZ22 DEC
Monitor Utility, followed by the firmware revision number. You will not actually
be using this utility to upgrade the firmware, but knowing that it is operational
makes the next step easier.
5.
Reset the controller using the Reset button on the front. You should see a "Flash
Boot Utility... " banner, followed by instructions to type CTRL/C to abort. Press
EK–SM3KC–IG. C01
5
RAID Array 3000 Storage Subsystem
CTRL/C to abort the load sequence. A "FLASH Boot Utility Options" menu
should be displayed.
6.
Choose menu item (2), Change serial baud rate. Select 38400. When presented
with the "Please change your baud rate and press RETURN" message, do so from
within HyperTerminal via the File\Properties menu, then choose ‘Configure...
If there is no response from the utility after changing the baud rate, proceed with
Step 6.
7.
After changing the baud rate, you may have to close and re-enter HyperTerminal.
Press the RETURN key after HyperTerminal restarts. You should see the
FLASH Boot Utility Option menu again.
8.
Select menu item “1) Download new Firmware Image”. Using the Transfer
menu in HyperTerminal, choose Send Text File and send the firmware. You
should see a "Receiving code for System Version <ver>" message, followed by
a series of \ | / - characters cycling at the end of the line. At 9600 baud, the
download will take between 45-60 minutes. At 38400, it should take around 1012 minutes. At completion, you'll see the FLASH Programming complete message, followed by the FLASH Boot Utility Options menu again.
9.
Select item 9, Restart Controller. You'll be instructed to reset the baud rate
back to 9600, which you'll again do from the HyperTerminal File \Properties
\Configure... menu. As before, you'll probably have to exit and restart HyperTerminal to get any response. Press Enter when Hyperterminal restarts.
10. Your firmware should now be upgraded.
2.3 Shut down RA3000
1.
Ensure that both host ports are in a quiescent state (no I/O activity).
2.
Shut down the Host System.
3.
Issue a “shutdown” command from the SWCC Console to the pedestal (or controller shelf) controller.
4.
Power OFF the pedestal or controller shelf as applicable.
2.4 Install Two SIMMs in second controller
1.
6
Install two of the SIMM modules into the second controller (make sure all SIMM
modules are of the same type) by aligning the connector pins and inserting the
modules into the SIMM module connectors as shown in Figure 6.
EK–SM3KC–IG. C01
Second Controller Option
Figure 6. Insert Module into SIMM Connector
2.
Ensure the module is firmly seated and then gently pivot it toward the controller
board until it snaps into place as shown in Figure 7.
Figure 7. Pivot Module Down to Seat
EK–SM3KC–IG. C01
7
RAID Array 3000 Storage Subsystem
2.5 Replace Existing Controller
1.
Replace the existing controller (see Figure 8 to remove) with the new controller.
Figure 8. Remove Controller from Top Slot
NOTE
Ensure you install the new controller in the same slot
as the existing controller removed in step 1 above. Do
not leave the existing controller in the pedestal (or
controller shelf) while performing the following step.
2.
8
Power up the system and proceed to the following section to restore the configuration on the new controller.
EK–SM3KC–IG. C01
Second Controller Option
2.6. Restore Configuration
To restore your configuration to the new controller:
1.
Restart SWCC in the “Serial Mode”. (See section 1.0 in your RA3000 Getting
Started Manual.)
2.
Select the Storage pull-down menu from the Toolbar, then choose Controller.
3.
From the Controller pull-down menu (Figure 9), select Configuration, and
then Restore.
Figure 9. Restoring Configuration to New Controller
The saved configuration screen with a “Restore from File” field appears as shown in
the example of Figure 10.
EK–SM3KC–IG. C01
9
RAID Array 3000 Storage Subsystem
Figure 10. Restored Configuration Example
NOTE
Restoring the configuration in the following step may
take up to 5 minutes. Be patient.
4.
Enter the file name that you saved in Section 2.1 and click on Restore.
2.7 Update Firmware on Second Controller
1.
After configuration has been restored, update firmware on the second controller.
Repeat the procedure in Section 2.2.1 or 2.2.2
2.
After the configuration has been restored and firmware has been updated, power
down the system.
2.8 Install Original Controller
10
1.
If installing option kit DS-HSZ22-AA, add the second SIMM to the original
controller. If installing option kit DS-HSZ22-AB, replace the existing SIMM
with the two remaining SIMMs supplied with the kit. (See Section 2.4 for instructions.)
2.
Install the second controller into the pedestal (or controller shelf) and power up
the system. The system is now in the dual-redundant operating mode.
3.
Locate he second serial cable that came in the second controller kit. Connect
this cable to the second controller serial port on the RA3000 and to COM 2 port
and restart SWCC in serial mode. You now have two serial connections.
4.
To check that the controller pair is in redundant mode, click on the Controller
icon. Properties for both controllers should be visible. Firmware revision of
both controllers must be identical. If either controller is shown in gray, refer to
the RA3000 Getting Started manual, Chapter 4 for more detailed instructions.
EK–SM3KC–IG. C01
Reader’s Comments
Manual Order Number:
EK–SM3KC–IG. C01
Digital is committed to providing the best products and services. Since our manuals are
important components of our products, we value your comments, corrections, and
suggestions for improvements. Please take a few minutes to fill out and return this form.
Attach additional sheets, if necessary. Thank you.
Excellent
Manual Rating
Accuracy (correct presentation of facts)
[ ]
Completeness (adequate information)
[ ]
Clarity (easy to understand)
[ ]
Organization (logical sequence of information) [ ]
Layout (easy to follow subject matter)
[ ]
Indexing (easy to locate desired information)
[ ]
Good
[ ]
[ ]
[ ]
[ ]
[ ]
[ ]
Fair
[ ]
[ ]
[ ]
[ ]
[ ]
[ ]
Poor
[ ]
[ ]
[ ]
[ ]
[ ]
[ ]
Errors Noted (include page, paragraph, table or figure number) __________________
Most-Liked Features:____________________________________________________
Least-Liked Feature_____________________________________________________
Suggestions for Improvement _____________________________________________
Return Address:
Digital Equipment Corporation
Customer Research
Response Center
334 South Street, SHR3-2/W3
Shrewsbury, MA 01545
Name
Phone
Title
Company
Street Address
Mail Stop
City
Country (if other than USA)
State
ZIP