1
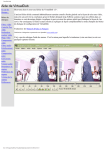
Step 6: Setting up for Video Editing
DV-Wizard Pro
Quick Installation Guide
Note: The Nero manual is available on the Nero Installation CD-ROM under:
\Nero\Manual\Eng, Deu, Fra, Ita or Jpn in a PDF or DOC file format.
The MediaStudio SE manual can be found on the MediaStudio Pro SE Installation CDROM under:
\manual\ English, French, German, Italian, Spanish, Chinese or Japanese in a pdf format.
The MediaStudio tutorial is available on the MediaStudio CD-ROM under:
\tutorial\ English and Japanese in an exe format.
Contents of the DV-Wizard Pro package
DV-Wizard Pro board
6 pin to 4pin FireWire cable for connection
between the DV-Wizard Pro Board and your
DV camcorder
4e. Click Finish and the DV-Wizard Pro
driver is installed!
6a. To run Ulead MediaStudioPro SE Video Capture module, Click Start, Programs,
Ulead MediaStudio, Video
Capture
Plug one end of the supplied Firewire cable into any of the DV-Wizard Pro connector. The
other end of this cable should be plugged into your DV camcorder.
Turn on your camcorder and set it to Play mode (or VTR mode). See your camcorder's manual for specific instructions.
Step 3: Install the DV-Wizard Pro driver for Windows XP
If the installation is correct, you will see the driver appear in the Windows Device Manager.
To see the Device Manager, click Start / Settings / ControlPanel and double click on System. Then click on the Device Manager tab. Under the 1394 Bus Controller you will see
the PCI OHCI Compliant IEEE 1394 Host Controller:
6c. Then Click Setup at the menu
bar and select Switch Capture Plug-in and select the
appropriate DV Capture
Plug-in: Ulead DirectShow
Capture Plug-in. If you have
changed to a new plug-in,
please restart MediaStudio.
When re-starting Windows for the first time
after the DV-Wizard Pro board has been
installed, Windows XP will find the board and
automatically install the drivers.
When the drivers finish installing the
DV-Wizard Pro board will be listed in Device
Manager as OHCI Compliant IEEE 1394
Host Controller
DV-Wizard Pro Installation CD’s include:
Ulead MediaStudio Pro SE
Installation CD-ROM for Video
Editing
6d. Then Click, Setup at the menu bar. Select, Ulead
DirectShow Capture Plug-in. Verify that
Microsoft DV Camera and VCR is selected, as
shown in the picture.
Continue to Step 5:
Ulead MediaStudio Pro
SE Content CD-ROM with video clips
and still images
6b. Click View at the menu bar
and select Preview.
6e. Click, Setup at menu bar. Then click, Device
Control and select, MS 1394 device control.
Then you should be able to control the DV camcorder (VTR mode) using MediaStudio.
Step 4: Install the DV-Wizard Pro driver for 98se & Me
Ahead Nero Installation CD-ROM for
CD Authoring
The incoming video should appear on the screen
ready for Digital Video Production!
Under Imaging device, you should see Microsoft DV Camera and VCR listed. If you don't
see it, and find the 1394 DV camcorder listed under Sound, Video and Game controller,
please refer to troubleshooting section to change it to Microsoft DV camera & VCR.
Limited Warranty card
Step 1: Install the DV-Wizard Pro board
Click on 'REC' button to begin capturing of video and audio.
Note: Camcorders have two modes of operation: VTR or Camera mode. Most camcorders
in camera mode have an automatic power off feature. If camera mode affects smooth
operation of DV-Wizard Pro, set the camcorder to VTR mode.
Step 5: Installing Ulead MediaStudio-Pro SE for video
editing and Nero Burning ROM software for Video CD
making
To install, switch off the computer.
Remove the computer cover.
The manufacturer of your PC supplies
instructions on removing the PC
cover.
4a. When re-starting Windows for the first
time after the DV-Wizard Pro board has
been installed, the Add New Hardware
Wizard will appear. Click Next.
4b. Select Display a list of all the drivers in
a specific location. Then click Next.
Insert the U-Lead MediaStudio-Pro SE Installation CD-ROM into the CD-ROM drive and
follow the on screen instructions.
Creating Video CD’s for playback on home DVD
players
The format used on Video CD’s (VCD) is MPEG1, which can be created by the DV-Wizard-PRO
and can play on most home DVD players.
For the Windows 98 SE user, please
install the Microsoft Windows 98 SE
Digital Video Update from the DV
patch folder of U-Lead MediaStudioPro SE installation CD-ROM.
Locate a free PCI slot (a short
white slot).
Unscrew and remove the metal
cover plate which covers the back
of the empty slot.
ote: We have found that most home DVD players can play Video CD’s created
with CD-RW media. Some DVD players, though, can only read CD-R media. If
you are not able to have your DVD player read a CD-RW made using these
steps, we suggest trying a CD-R media.
A complete list of tested compatible DVD players can be found on our web site at:
http://www.hauppauge.com/dvdplayers
N
Plug the DV-Wizard-PRO board
into the PCI slot, and screw the DVWizard’s metal cover plate to the
PC.
Insert the Ahead Nero Burning Installation
CD-ROM installation CD-ROM into the CDROM drive and follow the on screen instructions.
Replace the computer cover.
When you are asked for the product serial
number, use the Nero Serial number found
on its CD sleeve.
Run MediaStudio Video Editor.
MediaStudio has a tutorial on the CD that covers its basic use. Manuals of MediaStudio and
Nero can be found in their respective folders.
Click File, and then click New. On Edit file
format: select MPEG files, select VCD
(NTSC,29.97fps) for the project template.
Step 2: Connecting your Digital Video (DV) camcorder
4c. It will show the DV-Wizard Pro as PCI
OHCI Compliant IEEE 1394 Host Controller. Click Next.
4d. The computer is ready to install the driver
for the device. Click Next.
Have your Windows Installation CD on
hand, you may be prompted for it.
Step 1: Create a Video CD
Project
.
Page 1
Page 2
Page 3
Page 4
4. Select the 'MS DV Camera and VCR' then click OK.
Step 2: Insert your DV videos
5. Follow Windows instructions. There will be a warning message to warn user that the current driver is better then the selected one, click Yes to change it.
Capture or insert a Video Clip. To insert a video clip
which has previously been captured, click on Insert,
Video File. Then highlight the file you want to insert
and click Open.
Question : I have DV-Wizard Pro board and MediaStudio-SE
installed, but I cannot capture videos successfully.
The following steps must be confirmed:
1. In Control Panel / System click on the Device manager tab. Under 1394 Bus Controller, the PCI OHCI IEEE 1394 Host Controller should be listed.
2. Make sure no loose connection between DV camcorder and DV-Wizard-PRO IEEE-1394
card, then turn on the DV camcorder. Step 4a.
3. In Control Panel / System / Device Manager / 'Image device', you should see
'Microsoft DV Camera and VCR' listed.
Step 3: Create a Video CD file
To make the MPEG file for Video CD, click File, Create Video file. Select MPEG file (*.mpg) from the
save as type list. Then click the options button and
select the Compression Tab. Make sure VCD NTSC
(North America and Japan) or VCD PAL (Europe
and other parts of Asia) is selected and click Ok.
Enter a File name for your production and click Save
to make your movie.
It will take approximately 4 times (the exact amount of
time will vary based on your CPU speed) your video
movie length to make the Video CD movie. For example, a 10 minute movie will take approximately 40 minutes to complete this step.
Step 4: Burn the Video CD to CD-ROM
Run Nero - Burning ROM software.
a) Click on Start / Programs / Nero - Burning Rom
b) In the New Compilation box, click on Video-CD. If you want to name your Video CD,
select the Volume Descriptor tab and enter a name under Volume Label.
c) Click on the New button to open Nero Burning Rom Main Menu:
4. In MediaStudio / Setup / Switch Capture Plug-in. Make sure Ulead DirectShow Capture Plug-in is selected
d) Click on File / WriteCD. Then click Write. Insert a blank CD-RW disk. It takes about 12
minutes to write a Video CD disk with a 4X CD-RW writer.
ote: Hauppauge recommends using CD-RW media to create Video CD’s for
DVD playback. Most DVD players can use CD-RW media, while some can use
either CD-RW or CD-R media. If you insert one of the created Video CD’s and
the DVD player does not turn on the Video CD light or display Video CD on your TV
screen, then try creating a Video CD using a CD-R media.
N
6. In MediaStudio / Setup / Device Control, select MS 1394 device control. Then you
should be able to control the DV camcorder (VTR mode) by MediaStudio. If you get an
error message Unable to open specified device, your DV camcorder cannot be detected by MediaStudio. Make sure your DV camcorder is turned on and recheck your cables.
Question : How do I capture a single frame?
The captured frame will adopt the current displayed video frame size and data type.
1. Click Start / MediaStudio / Video Capture.
Troubleshooting Guide
2. Play an existing video or capture a new video.
Problem: Scrambled picture with JVC or Cannon camera.
Cause: Windows installs the generic Microsoft drivers, but they should be the Texas Instruments (TI) drivers or Generic 1394 DV Camcorder drivers in the Sound, video and game
controllers.
Solution: Download the DVConnect322.exe file from
ftp://206.112.34.138/hauppauge/support/
Make sure the camera is switched off. Install the drivers - restart Windows - plug the camera
in - Windows should now detect the camera as a 1394 DV Camcorder.
3. Click Control / Pause, to stop the video on the selected frame
4. Click Capture / Single Frame
5. The frame will be sent to the chosen destination – Clipboard or File.
For File, key in a filename when standard save dialog box appear.
Question : How do I output DV video to a DV camera?
1. Turn on your camcorder and set it to Play mode (or VTR mode). See your camcorder's
manual for specific instructions.
2. Click Start / Ulead MediaStudio / VideoEditor
Question : I am having problems installing the DV-Wizard Pro board,
and getting my camcorder to work.
1. If you are running Windows98, right click on the "My Computer" icon. Pull down and
choose Properties. Select General tab. The box that comes up should say
System: Windows98 Second Edition or if the date reads 4.10.98, you will need to
upgrade to Windows98-SE in order to use the DV-Wizard Pro.
2. The DV-Wizard Pro requires your camcorder to be OHCI IEEE 1934 compliant. Check
the camcorder manual or with manufacturer for questions on the compliance.
3. Refer to Question: I have DV-Wizard Pro board and MediaStudio installed, but I cannot capture videos successfully.
Question : How do I update the 1394 DV Camcorder driver to
Microsoft DV Camera and VCR in Windows98-SE?
Locate the Video CD file created in the Create a Video CD section above. MediaStudio
uses the directory where you located the original video files as the default.
In the example shown here, the directory used is My Documents, and the Video CD file
is called kids at school. Drag and drop the selected file into the Track/Title window.
5. In MediaStudio / Setup / Ulead DirectShow Capture Plug-in, Microsoft DV Camera
and VCR should be listed and have a tick in front of it (selected). Step 5d
1. Go to Control Panel \ Systems \ DeviceManager \ SoundVideoGameController \
1394DVCamcorder \ Properties \ Driver \ Update Driver.
2. Click Next, select option Display a list of all the drivers in a specific location.
3. Click Browse, input 'C:\Windows\INF' then click OK. (C:\Windows\ may be changed to
the folder where your Windows is installed)
b) File / Convert / Video File, select a source file to open. At Select Destination video file
dialog box, select Options / General tab.
For clips with a lot of titles, transition effects or large frame sizes, it will take longer time to
render.
Question : Can I use Ulead MediaStudio-Pro SE to edit MPEG-2 or
QuickTime (MOV) video files?
Yes. You are able to edit the video files
Question : I have a Hauppauge WinTV board in my system. Will I be
able to capture and edit the video from tuner, composite or S-Video?
Yes. We recommend that you use the WinTV2000 Video Capture application to capture
video when using the WinTV. The captured video is saved in an AVI file, and then can be
used in MediaStudio as another source for video clips. Here is what you do:
a) Click the RC button found in the lower right hand corner of the WinTV2000 application.
Click on the advanced controls bar to roll down the VCR and Snapshot configuration
menu.
b) Click the 1. FILE button. Find the directory you would like to store your video files in.
One convenient spot is the default directory for MediaStudio:
C:\ProgramFiles\UleadSystems\ULeadMediaStudio\
Set the Frame Rate to 15.00 Click on the VideoCompression button and set the Compressor to Uncompressed or No Recompression.
Click OK to close the File menu.
c) Click 2. FMT to open the format menu. Set the Image Dimensions to 352x288 (PAL
video) or 352x240 (NTSC video). Set ImageFormat to YUV9. Click OK.
d) To start recording click 3. REC To stop recording hit the ESC button on your keyboard.
Click 4. PLAY to see what you have just recorded.
Once you have captured your video clips in an AVI format, open MediaStudio. When you
are ready to import the video file, click on Storyboard, then click on the Insert Media Files
button and then Add Video.
If you would like to save compressed video to save hard disk space, in the 1. FILE menu
click on the VideoCompression button and set the Compressor to one of the video compressors which are supplied with Windows. There are several, and each will give different
levels of video quality and file size, so you must experiment to find the one which is right for
you.
Problem: Can't control the camera using MediaStudio VideoCapture 6.0
Cause: Haven't selected the device control
3. Click File / Select Device Control. From the Current device list, select MS 1394 Device
Control.
Solution: To set up the device control:
4. Click File / Export / MS DV Record.
1. Connect your DV camcorder to your DV-Wizard IEEE-1394 capture card. Carefully follow
the instructions for your capture card.
5. Select the DV AVI file that you want to send to your camcorder. Click the Open button.
6. In the DV Recording / Preview Window, preview your DV file and click Next.
7. In the DV Recording / Record Window, click the red DV recording button to begin
recording the movie to your camcorder.
8. Click Finish button when the video transfer is completed
Question : Why is rendering process so slow? How do I speed it up?
MediaStudio’s Smart Rendering mechanism works by copying the unchanged frames to
reduce the rendering time. For Smart Rendering to work, make sure the rendering video has
the same settings - such as frame size, frame rate, data rate and compression. The properties
of the clip is available by right clicking on the video. Modify the settings for rendering in,
a) File / Create / Video File / Options / Video Save option dialog box, select General tab
or
2. Turn on your camcorder and set it to Play mode (or VTR mode). Again, see your camcorder's manual for specific instructions.
3. Run Video Capture 6.0 and click Options: Select Device Control
4. In the Device Control dialog box, click the Current device list.
5. Select your device* from the list below:
· Note: There are many capture card device control options available. The following is a list
of some of the more common ones:
· TI 1394 Device Control
· PAPI 1394 Device Control
· DV Device Control (select this for other types of DV capture cards)
· MS 1394 Device Control
© 2002 Hauppauge Computer Works, Inc. QI-DVWIZPRO-V1.3-ENG 01/14/02
Page 5
Page 6
Page 7
Page 8