1
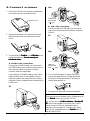
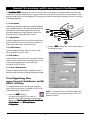
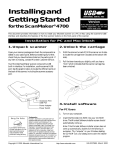
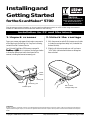
Installing and
Getting Started
for the ScanMaker® 5700
Version
Version
FireWire - Windows 98 SE, Windows Me,
Windows 2000, Mac G3/G4 and iMac DV
USB - Windows 98, Windows Me,
Windows 2000, Mac G3/G4 and iMac
This document provides information on how to install your Microtek scanner on a PC or Mac using the scanner's
FireWire or USB interface and describes the features of the scanning.
Installation for PC and Macintosh
1. Unpack scanner
2. Unlock the carriage
Open your scanner package and check major components
while referring to the Packing List. If any item is missing,
contact Microtek Customer Service.
1. With the scanner turned off, tilt the scanner on its side
to locate the carriage lever safety lock (located at the
bottom left side).
Your Microtek ScanMaker 5700 scanner comes with
FireWire and USB built-in interfaces. See the figure below
to locate the different ports at the back panel of the
scanner, including the scanner's accessory port.
2. Slightly pull the lever towards you until you hear a
“click” which indicates that the scanner carriage has
been unlocked.
Power
switch
Power port
USB port
Accessory port
Pull to unlock
carriage safety lock
FireWire ports
Trademarks
Microtek®, ScanMaker®, ScanWizard®, FilmViewTM are registered trademarks of Microtek International Inc. Macintosh®, Apple®, FireWire® and FireWire logo are trademarks or
registered trademarks of Apple Computer, Inc. Windows® is a registered trademark of Microsoft Corporation. All other products or name brands are trademarks of their respective
holders.
Copyright © 2000 Microtek International Inc.
http://www.microtek.com
I49-002920, August 2000
3. Install software
For PC Users
For Macintosh Users
1. Turn on your computer.
1. Turn on your computer.
2. Insert the Microtek CD-ROM into your CD-ROM
drive. This includes the ScanWizard 5 scanning
software application for capturing images from your
scanner. The Microtek Software Installer screen should
automatically come up.
2. Install the image-editing software, which is a separate
CD-ROM included with your scanner package.
3. Install all the software on your Microtek
CD-ROM. To install each software, open the software
program's folder, and then click the “Installer” icon.
Follow the screen instructions until installation is
completed.
NOTE: If the Microtek Software Installer screen does not
come up automatically, double-click the following in
succession: “My Computer” on your Windows desktop; the
CD-ROM icon; and cdsetup.exe to start the installer
program.
•
3. When the Microtek Software Installer screen appears,
click each software program in the order that it appears
on the screen to install all software components. (Your
software includes programs for image editing, OCR
text editing, and the Adobe Acrobat Reader program
for reading and printing the manuals on the CD-ROM).
Microtek ScanWizard 5 is the scanner controller
program for capturing images from your scanner
and delivering it to your image-editing application.
NOTE: For iMac users, please visit Apple’s website
at http:// www.apple.com to download and install
any iMac updates you may need.
•
For each software, follow the on-screen instructions
during installation. Default values are specified at every
point during installation; simply accept these values to
continue installation until you finish.
Install the Acrobat Reader for reading and printing
the manuals on the CD-ROM.
4. Restart your computer.
NOTE: You may be prompted to restart the computer at
this point. Do not restart your computer until all the
software has been installed.
In some applications, auxiliary information (such as the
Readme file) may be displayed after that particular
program finishes installing. Simply click the “X” close
box at the upper right corner of the displayed window
to return to the Microtek Software Installer.
4. After all the software has been installed, click EXIT on
the Microtek Software Installer screen
5. If any other image-editing software is bundled with
your scanner, install them now.
Note: The software may be on a separate CD-ROM.
6. Restart your computer.
2
Mac
4. Connect scanner
1. Check if the FilmView cover is properly installed with
its connector securely connected to its port.
FireWire port
(labeled with
“ ” logo)
FilmView cover
B . USB cable connections
Connect one end of the USB cable to your computer,
and connect the other end of the cable to the scanner’s
USB port.
2. Plug the power adapter into the back of the scanner,
and plug the other end into a wall outlet or power
source.
PC
Mac
3. Connect either the FireWire or the USB cable to your
You can use only one
computer and scanner. (Y
interface at a time.
time.)
A . FireWire cable connections
USB port
(labeled with
USB “ ” logo)
If your system is FireWire-ready, connect one end of
the FireWire cable to your computer, and connect the
other end of the cable to the scanner's FireWire
connector (either one is applicable).
If your system is not FireWire-ready, you will need to
install a FireWire card. For more details on how to
install the FireWire card, please refer to the FireWire
Installation Guide on a separate sheet included with the
FireWire card.
4. Turn on the Power switch. The green light on the
scanner front panel will blink for a few seconds and
then stays lit. At the same time the FilmView and
scanner lamps also light up.
ON OFF
PC
5. The system will detect your scanner automatically.
IMPORTANT NOTES:
If the system encounters problems, see the Troubleshooting file
in the Techinfo folder on your Microtek CD-ROM.
For users who are using FireWire interface on Windows 98
SE, and are having problems in activating their FireWire
SE
scanner connection, follow the supplemental steps as
described on the next page first. If the scanner still doesn’t
work, see the Troubleshooting file in the Techinfo folder on
your Microtek CD-ROM.
3
4. A series of dialog boxes will appear one at a time -follow the instructions on the screen as shown below,
and then click Next respectively.
Supplemental steps to connect
your FireWire scanner on
Windows 98 SE
1. Open the System Properties dialog box by doing the
following in succession: Start
Start, Settings
Settings, Control Panel
Panel,
and then double-click the System icon.
2. From the System Properties
Properties, select the Device
Manager tab, then double-click [?] IEEE 1394 SBP2
Device to open its Device properties dialog box.
Click Browse
to locate
C:\WINDOWS\INF,
and then
click Next (where
C:\WINDOWS is
your system folder).
5. When the driver has been successfully updated, a dialog
Windows has
box will prompt this message: “Windows
finished installing an updated driver for your
hardware device
device”. Open the System Properties Device Manager dialog box (Step 1 and 2), then click
the plus (+) sign adjacent to the Imaging Device. The
scanner name and model appears on the list -- this
means that Windows has detected and re-installed your
device successfully.
3. On the Driver tab, click the Reinstall Driver button.
4
Getting Started
1. Scanning images
Scanning slides and filmstrips
NOTE: The FilmView cover should remain connected to the
1. To help you select the appropriate slides or films to
scan, use the “FilmView” feature on top of the lid to
preview your films.
accessory port all of the time regardless of which scan
material (reflective or transparency) is in use.
Scanning photos
1. Position the photo to be scanned face
down on the scanner bed.
2. Double-click the ScanWizard 5
icon on your desktop to launch the
ScanWizard 5 - Standard Control
Panel.
When ScanWizard 5 launches, it automatically
performs a fast preview of the material and displays it
in the preview area.
3. In the preview window, you can resize the scan frame
(floating dotted line) around the image by dragging on
the edge or corner of the scan frame to determine the
final size of the actual scan.
Hold slide (or film) over
“FilmView” to check or
select scan material
before scanning
4. Click the Original button,
then select Photo.
5. To scan the image, click the Scan to
button. The image is then scanned and saved to a file.
Aside from saving, you may also deliver the scanned
image to an image-editing software, e-mail application,
or to your photo sharing community.
Save the scanned image to a file, or deliver it to an image-editing
program, an e-mail application, or to a photo sharing community.
ScanWizard 5
for
Windows
Click on this button to switch to the
Advanced Control Panel window
ScanWizard 5
for
Macintosh
Click here to
exit ScanWizard 5
Tool
buttons
for image
settings
Tool
buttons
for image
settings
Re-size dotted line for size of the actual scan
5
2. Scan text document
for editing
2. To scan slides or films, you will need to place the
Transparency Template on top of scanner bed as
illustrated below::
The Optical Character Recognition (OCR) is a
feature of ScanWizard 5 that converts scanned
documents into text file format. Output may be
saved as file or immediately sent to your word
processing application for further editing.
Position template
with the window
end pointed
toward the front
panel
NOTE: You can also perform OCR scanning with the one
touch OCR button provided in the scanner front panel (see
Section, “Smart scanning with one-touch buttons”).
1. Place the text document (text side down) on the
scanner bed, then launch ScanWizard 5.
2. Click the following buttons and select the following
options if you are scanning text document for OCR
purposes:
3. Place films (or slides) on the scanner bed by locating
them within the template window area, then carefully
pull down the FilmView cover.
Original
Original:
Select Text Document.
Scan T
ype
Type
ype:
Only Black & White option is
available if you selected Text
Document as your Original
(previous step).
Position films (or slides)
inside the template window
(flip side up)
NOTE: When scanning colored documents, you must
select: Photo and use either True Color/Web Color unless
B/W is the chosen output.
Purpose
Purpose:
Select OCR Text.
4. Then follow the procedures (Steps 2, 3, and 5) in
scanning photos. For Step 4, select film (for scanning
positive film) as your Original.
Choose “Positive
Film” if original is
slide or positive
film
3. Click and hold the Scan to button. When the options
menu appears, select OCR.
Choose “Negative
Film” if originals are
filmstrips
NOTE: For more details on scanning, refer to Microtek’s
Step-by-Step Tutorial guide included in your package.
6
4. When the OCR: Save As dialog box appears, use the
default “Document” file name or key in your preferred
name, and select .rtf, .txt, .htm, .xls, or .pdf as the
export file format.
3. Scanning for direct
website posting
Share your images with the World! With the touch
of a button you can scan your photos and then
post them in an Internet photo sharing community.
Click to display and choose a format
for the output document
NOTE: Your system must have access to Internet before you
can use the Scan-to-Web feature.
You can also perform Scan-to-Web with the one-touch button
provided in the scanner front panel (see Section, “Smart
scanning with one-touch buttons”).
Selecting this
check box will
add specified file
name with serial
numbers to
generate multiple
file names for the
scanned and
saved images in
continuous
sequence.
1. Place the material on the scanner bed, then launch
ScanWizard 5 as stand-alone application.
2. Click and hold the Scan to button.
When the options menu appears,
select To Web.
eb dialog box will then
3. The Scan to W
Web
display to prompt for parameters required to process
your image for website posting.
Select this check box to automatically
send and open the captured
document in the corresponding
application shown in the combo box
Click to start
Scan-to-Web
scanning. The
Scanned image is
auto-saved (JPEG
format) into the
assigned folder
under your
designated
filename.
5. Click Save to start OCR scanning and deliver the
scanned image to your chosen folder and directly to its
corresponding application.
Click to manage
your photosharing account.
4. From a Microtek provided website, you can easily
create or add a photo-sharing account. To create a new
Account Manager
account click the “Account
Manager” button -- click
Create a new account
account, and then follow the given
instructions. After completing the registration process;
close the browser and return to the Account Manager
window.
To activate a registered account, click Account
name and
Manager, click Add
Add, key in your user
username
Manager
password
password, click Close
Close, and then carry on to the next
step.
eb dialog box, click Save to start
5. From the Scan to W
Web
scanning. Scanned image (JPEG format) is
automatically saved according to the parameters
assigned in the dialog box.
7
Smart Scanning with one-touch buttons
The ScanMaker 5700 is equipped with five one-touch and fast scanning buttons intuitively located in the front panel.
These buttons (see figure below) perform a quick access and carry out its functions by mere touch of the buttons. These
frequently used functions include image and OCR scanning, printing of outputs, attaching output to e-mail, or posting it
to a designated website.
1. Scan button
Captures high resolution images using predefined settings
with outstanding quality. The output can automatically be
saved as files or sent to another application for further
processing depending on how the button is setup in the
Microtek Scanner Configuration (MSC) utility.
Scan
Copy
E-mail
OCR
2. Copy button
Scan-to-Web
Scans the image and sends it to your printer, transforming
your scanner and printer into a convenient copy station.
Simply specify the number of copies you want.
2. When the MSC panel appears, click on a tab to redefine
the settings you want.
3. E-mail button
Scans the image and delivers it directly to your e-mail
editor as defined in the MSC utility.
4. OCR button
Scans a text document and converts it into text file format.
Output may be saved as a file or immediately sent to your
word processing application for further editing as
configured in the MSC utility.
5. Scan-to-Web button
Scans an image and sends output to a website while your
default browser is launched to displays the captured image.
Configuring the
one-touch buttons with
MSC utility
To change the way the five one-touch buttons function,
launch the Microtek Scanner Configuration (MSC) utility
that was installed with ScanWizard 5.
NOTE: If you choose “None” for the “Send to Application”
field, the image will be scanned and saved as a file in the
Destination location.
1. Launch the MSC Utility by a) Double-clicking the MSC icon from the
desktop; or b) (For Windows only) From Windows
ograms
otek ScanW
izar
d
taskbar, click Star
Startt , Pr
Programs
ograms, Micr
Microtek
ScanWizar
izard
5 for Windows
Windows, then Microtek Scanner
Configuration
Configuration.
8
Reading additional
documentation from
the CD
Troubleshooting
If you encounter problems with hardware installation, see
the troubleshooting file in the Techinfo folder on your
Microtek CD-ROM.
For PC users
1. Insert the Microtek CD-ROM into your CD-ROM drive.
2. When the Microtek Software Installer comes up on your
screen, click the View Manual button that corresponds
to the manual you wish to read. Depending on the
format (.pdf or .htm) of the manual being accessed,
your Acrobat Reader or browser is automatically
launched, and you can then read or print the manual.
For Macintosh users
1. Insert the Microtek CD-ROM into your CD-ROM drive.
2. Launch both your browser and Acrobat Reader. From the
File menu, choose the Open command, and open the file
for the manual that you wish to view. Manual with a
.htm extension is opened with your browser. Likewise
manuals with .pdf extension are opened with your
Acrobat Reader. You can then read or print the manual.
Federal Communications Commission Interference Statement
Federal Communications Commission Interference Statement
This equipment has been tested and found to comply with the limits for a Class B digital
device, pursuant to Part 15 of the FCC rules. These limits are designed to provide
reasonable protection against harmful interference in a residential installation. This
equipment generates, uses and can radiate radio frequency energy and, if not installed and
used in accordance with the instructions, may cause harmful interference to radio
communications. However, there is no guarantee that interference will not occur in a
particular installation. If this equipment does cause harmful interference to radio or
television reception, which can be determined by turning the equipment off and on, the user
is encouraged to try to correct the interference by one or more of the following measures:
This equipment (Model:: MRS-2400FU) has been tested and found to comply with the
limits for a Class B digital device, pursuant to Part 15 of the FCC Rules. These limits are
designed to provide reasonable protection against harmful interference in a residential
installation. This equipment generates, uses and can radiate radio frequency energy and, if
not installed and used in accordance with the instructions, may cause harmful interference to
radio communications. However, there is no guarantee that interference will not occur in a
particular installation. If this equipment does cause harmful interference to radio or
television reception, which can be determined by turning the equipment off and on, the user
is encouraged to try to correct the interference by one or more of the following measures:
•
Reorient or relocate the receiving antenna.
•
•
Increase the separation between the equipment and receiver.
Connect the equipment into an outlet on a circuit different from that to which the
receiver is connected.
Consult the dealer or an experienced radio/TV technician for help.
•
•
•
•
•
Note: 1) A shielded of USB interface cable with ferrite core installed on the scanner connector
end must be used with this equipment. 2) AC adapter with ferrite core installed on the
scanner connector end must be used with this equipment.
FCC Caution: To assure continued compliance, (example - use only shielded interface cables
when connecting to computer or peripheral devices). Any changes or modifications not
expressly approved by the party responsible for compliance could void the user’s authority
to operate this equipment.
CAUTION
Changes or modifications not expressly approved by the manufacturer responsible for
compliance could void the user's authority to operate the equipment.
This device complies with Part 15 of the FCC Rules. Operation is subject to the following
two conditions: (1) This device may not cause harmful interference, and (2) this device
must accept any interference received, including interference that may cause undesired
operation.
Responsible Party:
Loi Han
3715 Doolittle Drive
Redondo Beach, CA 90278-1226
U.S.A.
1-310-297-5000
Telephone No:
Trade Name
ScanMaker 5700
Reorient or relocate the receiving antenna.
Increase the separation between the equipment and receiver.
Connect the equipment into an outlet on a circuit different from that to which the
receiver is connected.
Consult the dealer or an experienced radio/TV technician for help.
Model Number
MRS-2400FU
Tested to Comply
With FCC Standards
FOR HOME OR OFFICE USE
9