1
I
MP3-COMPATIBLE
SH DIGITAL MEDIA RECEIVER
-IN IPOD DOCKING STATION
USB AND SD MEMORY CARD PORTS
AND FRONT PANEL AUX INPUT
iI\)~S
AUDIO SYSTEMS
USER'S MANUAL
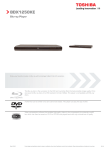
750DI
MP3-Compatible
In-Dash AMIFM Digital Media Receiver
with Built-in iPod Docking Station
and USB and SD Memory Ports
and Front Panel AUX Input
Congratulations on your purchase
of a IO~
Digital Media Receiver.
aYmill
.
AUDIO
It has been designed, engineered
and manufactured to bring you the
highest level of performance and
quality, and will afford you years of
listening pleasure.
Thank you for making !9~ your
choice for car audio entertainment!
page
CONTENTS
2
Installation
2
DIN front-mount installation
3
DIN rear-mount installation
3
Removing the head unit
4
iPod dock adaptors
5
iPod compatibility
6
General and radio controls
8
USB/SO Card playback controls
9
Replacing the remote battery
10 iPod playback controls
12 System settings
13 Setting the clock
14 Wiring connection diagram
15 Troubleshooting
iPod is a trademark of Apple, Inc., registered in
the U.S. and other countries.
16 Specifications
75001 User's Manual - page 1
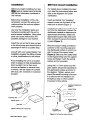
Installation
DIN front mount installation
Before you begin installing your new
!lO~ receiver, please become familiar
....,
with all the information contained in
this manual.
For details about installing the head
unit, read the instructions below and
refer to the diagrams for further
clarification.
Before final installation of the unit,
temporarily connect the wiring and
make sure that the unit and system
work properly.
Insert and tighten the "headless"
support screw into the back of the
head unit as shown (Figure 1).
......
Use only the installation parts and
hardware provided with the unit to
ensure proper installation. Using other
parts can cause malfunction and
possible damage to your receiver.
Install the unit so that it does not get
in the driver's way and cannot injure a
passenger if there is a sudden stop.
Consult with your nearest dealer if an
installation requires the drilling of holes
or other modifications to the vehicle.
Avoid installing the unit in a location
which is subject to high temperatures,
direct sunlight, hot air from such
sources as heaters or exhaust lines,
or where it will be subject to contact
with dust, dirt, moisture or excessive
vibration.
Insert the mounting case for the head
unit into the dashboard. Inspect the
dashboard material to determine its
approximate thickness. Select the
appropriate support tabs and bend
them outward to secure the bracket
in place (Figure 1).
Bend the support strap provided to
conform to the mounting case and
the dashboard surface to which you
plan to secure the support strap
(Figure 2). Slide one of the utility holes
on the support strap onto the support
screw and fasten it with the spring
washer and nut provided.
Using the 5 x 15mm screw and the
plain washer, secure the backstrap to
the dashboard surface as shown in
the diagram. Tighten, secure, and
check the overall mounting to be sure
it is safe and will not release in an
emergency stop or other sudden
movement of the vehicle.
~-
-'l . .
dashboard attachment
surface
~~,.
mou-,cue
5mmnut - ~
r
support screw
head unit
Figure 1 Bending the support 1abs
support screw
~
/
5x 15mm
support screw
Figure 2. Forming the support bracket
75001 User's Manual - page 2
DIN rear mount installation
Removing the head unit
(uses factory radio mounting bracket)
Select a position on the head unit
housing where the screw holes of the
factory radio bracket align with the
threaded screw holes on sides of the
head unit (Figure 3).
select two mounting hole positions on
each side of head unit
Should you need to remove the head
unit, insert the levers supplied with
the head unit into the slots near the
left and right ends of the faceplate as
shown in the drawing until you feel a
"click." You can now use the levers
to pull the unit from the dashboard
(Figure 5).
Figure 3. Select mounting holes
Insert screws in two such locations
on each side, and tighten securely
(Figure 4).
NOTE: For the rear-mount
installation, do not use the trim piece,
backstrap or mounting case.
Figure 5 Insert levers until "click" occurs, then use
levels to pull out head unit.
factory mounting
bracket
factory bezel or
dashboard opening
Rgure 4. Insert screws and tighten
75001 User's Manual - page 3
iPod Dock adaptors
The 75001 comes with a set of special iPod adaptors which fit a wide range of iPod
models. These are specially designed for use with the 75001, and hold the iPod firmly
to the dock connector when the vehicle is in motion.
Please install the appropriate dock adaptor as described below.
PLEASE NOTE: .
"Official" Apple Universal Dock Adaptors cannot be used in the 75001.
Do not attempt to connect your iPod to the dock without the appropriate, specially-designed
adaptor provided with the 75001.
BOSS Audio Systems cannot accept any responsibility for any damage or data loss that
may result from using your iPod in the 75001 and the specially-designed dock adaptors.
1. Push on the face of the LCD to release
and open the iPod docking drawer.
Dockadaptor------~
2. Select the appropriate size dock adaptor
for your iPod. Lower it into the recess in
the drawer, aligning the notches/tabs on
the FRONT edge first.
Slots on top edge of faceplate - -.......
3. As you lower the dock into the recess,
be sure to align the tabs on the REAR edge
of the dock adaptor with the slots on the
top edge of the faceplate, and slide it down
securely into place.
4. Insert your iPod into the dock adaptor.
Press PLAY/PAUSE to begin playback.
75001 User's Manual - page 4
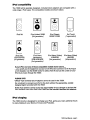
iPod compatibility
The 75001 and its specially-designed, included dock adaptors are compatible with a
wide range of iPod types. The compatible models are shown below:
D
@
iPod Mini
~
o
o
iPod (video) 30GB
[5th generation]
iPod Classic
80GB/120GB
[1 st generation]
iPod Touch
iPod Nano
(aluminum)
2GB/4GB/8GB
[2nd generation]
iPod Nano (Video)
4GB/8GB
[3rd generation]
iPod Nano (Video)
4GB/8GB
[4th generation]
~
o
iPod Nano
1GB/2GB/4GB
[1 st generation]
«
your iPod is not one of those compatible models shown above.....
....you can still use the headphone out jack on the iPod and connect it to the AUX input
on the faceplate. Use the MODE switch to select AUKINand use the controls onyour
iPod to play music through the 75001.
PLEASE NOTE:
"Official" Apple Universal Dock Adaptors cannot be used in the 750DI.
Do not attempt to connect your iPod to the dock without the appropriate, speciallydesigned adaptor provided with the 75001.
BOSS Audio Systems Cannot accept any responsibility for any damage or data loss that
may result from using your iPod in the 750DI and the specially-designed dock adaptors.
iPod charging
The 75001 circuitry is designed to recharge your iPod, giving you many additional hours
to enjoy listening to your library of music and Podcasts.
75001 User's Manual - page 5
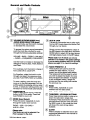
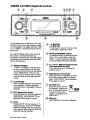
General and Radio Controls
711OD1
MP3-COMPATIBLE DIQITAL MEDIA RECEIVER
CD VOLUME UPIDOWN KNOB (tum)
AUDIO MODE SELECTOR (push)
In normal mode, use this knob to increase
or decrease the volume level.
o
To access the various sound parameters
push the knob (like a button) to cycle
through the following adjustable settings:
Please note: AUX IN Mode can only be
selected if it is enabled in the System Settings.
"YDU.arehaving problems witflAUX IN mode,
please seepage 12 to check the settings.
®
For Loudness, tum the knob to change it
from LOUD ON to LOUD OFF.
For Equalizer, rotate the knob to cycle
through and select the response curve
you wish: FLAT, POPS, ROCK or CLASSIC.
To save a setting, press the knob and
move on to the next parameter.You can
exit the system by pressing until you retum
to VOL, or simply do nothing and the unit
will return to normal mode automatically.
®
@)
POWER/MUTE
Press POWER to tum unit on. Press the
button to MUTE the audio. Press and
hold POWER to tum it off.
®
Plea_note:
iPod Mode can only be selected if an
iPod is present in the dock.
75001 user's Manual - page 6
RADIO PRESETS 1-6
These buttons are used to store the
presets for radio stations. To set a
preset, tune to the desired radio station.
Then press and hold the preset to which
you wish to assign that station for more
than one second and release. To replace
it with a different station, repeat the
process and the new setting will override
the previous one.
BAND
Press briefly, repeatedly to cycle
between the five radio bands:
FM1>FM2>FM3>AM1>AM2
(1)
MODE (Input Select)
Press this button repeatedly to cycle
through the audio input sources:
RADIO> USB> SD CARD>
AUXIN> iPod
AUXINJACK
This jack is a convenient way to play music
from an MP3 music player such as an iPod
through your car stereo.
Simply connect the headphone output of
the MP3 player to this input jack, and press
MODE button to select AUX as input source
and begin playing music on the MP3 player.
VOLUME> BASS> TREBLE> BALANCE
> FADER> LOUD(NESS) > EQUALIZER
Use the knob to increase or decrease the
settings for Volume, Bass, Treble, Balance
and Fader.
8
®
TUNE/SEEK UP/DOWN BUTTONS
Press these buttons briefly to step up or
down the radio dial in single step
increments. Press and hold for more than
one-half second and the tuner will enter
the SEEK mode. In this mode the tuner
will stop at the next strong station
available.
CLOCK
Press to display or adjust the clock. See
instruGtions elsewhere in this manual for
setting the time.
using Remote Control•••
CD OFF.
POWER Use to turn Receiver ON or
® TUNE/SEEK
(J4H and ~)
Press to skip ahead or back one station
o
o
®
in tuning range of the radio band. Press
and hold to seek the next station up or
down the radio band.
EQ (Preset Equalizer Curves)
Press repeatedly to cycle through four
modes: FLAT, ROCK, POP or CLASSIC.
MUTE Press this button to silence the
audio. Press again to restore the previous
audio volume level.
9
VOLUME - f VOLUME + Use to
increase or decrease volume level.
® areas,
LOC (Local/Distant select) In some
reception of an FM station may
o
be weak. Changing the reception mode
to LOC by pressing this button allows
the receiver to skip the weaker signals.
Press again to retum to DISTANT mode. '
SELECT Press this button to cycle
through the various sound parameters
which are available for adjustment:
VOLUME> BASS> TREBLE> BALANCE
> FADER> EO
® FM
MO/ST In some areas, reception of an
station may be weak. Changing the
®
reception mode to MONO by pressing
this button may improve the reception.
Press again to retum to STEREO mode.
® After
RADIO PRESETS 1-6
you have programmed the presets
via the front panel, you can use buttons
1-6 to select the preset stations.
® This
AMS (Automatic Music Scan)
is a quick and convenient way to
set up presets in your radio. If you press
AMS, the radio will scan up each radio
band and assign presets to the
strongest stations it finds. Please note
that if you do this, all your previous
presets will be lost.
®
@
12l---------J
BAND
Press briefly, repeatedly to cycle
between the five radio bands:
FM1 > FM2 > FM3 >AM1 >AM2
@
SOURCE (Input select, same as
MODE on head unit)
Press briefly, repeatedly to cycle
between the five audio input modes:
RADIO> USB> SO CARD>
AUX IN > iPod
Please note:
iPod Mode can only be selected if an
iPod is present in the dock.
LOUDNESS
Press to increase the level of bass
output. Press and hold again to turn off
the Loudness function.
75001 User's Manual - page 7
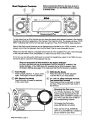
USB/SD Card (MP3 Playback) Controls
1
2
3
711OD1
MP3-COMPATIBLE DIGITAL MEDIA RECEIVER
t:l.m·4..u
~!2
9
To play tracks from a USB drive or SO card
insert the drive into the appropriate porVslot
on the faceplate. The display will show "USB
U" or "CARD C," indicating that the drive is
being read.
The unit will display tracks when ready by
~Ie nam~ (or, ~f created with ID3-tag
InformatIon, with Song Title, Artist and Album
information) and will begin playing the first
track in the directory.
CD DIRECT SEARCH
To look for a different folder of tracks
on the current USB drive or SO card,
press and hold the knob until the display
reads "DIRSEARCH." Then turn the
knob to look for another folder of tracks.
Press the knob to start playing those
tracks.
®
@)
o
®
To skip back or ahead 10 tracks in the
current folder, press this button.
®
o
®
®
RPT (Repeat Play Mode)
Press this button to repeat the playback
of all the files in the current folder
automatically. "RPT ON/OFF" will be
displayed. Press again to cancel.
STOP
Pressing STOP will stop playback. To
restart playback, press PLAY/PAUSE.
Playback will begin with the first song
of the current folder directory (NOT the
track that was last playing).
75001 User's Manual - page 8
INTRO SCAN (BAND button)
To audition the first 10 seconds of each
track in the current folder, press this
button. To cancel and begin playback
of a track being auditioned, press again.
1« and »1 (Skip back/skip forward
Fast rewind/fast forward)
,
Press these buttons to skip back or
ahead one track.
PLAY/PAUSE
Files will begin playback automatically
upon in~ertion. To pause playback,
press thIS button. Press again to resume
playback.
-10 BUnON
+10 BUnON
®
RDM (Random Play Mode)
Press this button for playback of all the
files in the current folder in a random
order. "ROM ON/OFF" will be displayed.
Press again to cancel.
SD CARD slot
Insert SO card in this slot
for playback. Please note
icon on panel which shows
you how to orient card
(angled comer goes to left
side of slot).
USB port
Insert USB drive in this slot for playback.
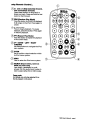
using Remote Control•••
CD Fast
1« and »1 (Skip backlskip forward,
rewind/fast forward)
Press these buttons to skip back or
ahead one track.
®
®
o
®
®
o
RDM (Random Play Mode)
Press this button for playback of all the
files in the current folder in a random
order. "ROM ON/OFF" will be displayed.
Press again to cancel.
STOP
Pressing STOP will stop playback. To
restart playback, press PLAY/PAUSE.
Playback will begin with the first song
of the current folder directory (NOT the
track that was last playing).
6
PLAY/PAUSE
To pause playback, press this button.
Press again to resume playback.
RPT (Repeat Play Mode)
Press this button to repeat the playback
of all the files in the current folder
automatically. "RPT ON/OFF" will be
displayed. Press again to cancel.
NUMERIC KEYPAD
Use these buttons during playback to
select a particular track in a folder. The
75001 sorts files in a folder in a numerical
order.
®
7
®
To play, for example, Track #45 in this
order, press 4, 5, ENTER and the 45th
track will begin playback.
SOURCE (Input select, same as
MODE on head unit)
Press briefly, repeatedly to cycle
between the five audio input modes in
order to select either SO or USB modes.
INTRO SCAN (BAND button)
To audition the first 10 seconds of each
track in the current folder, press this
button. To cancel and begin playback
of a track being auditioned, press again.
Changing the battery in the remote control
The remote battery is held in a small "drawer"
on one edge of the remote. To open this drawer,
press and hold the small button on the edge of
this drawer (as shown below) and slide the
drawer out.
Insert a new battery and push the drawer back
fUlly into the remote.
Battery
75001 User's Manual - page 9
Before removing the iPod ~m the dock, be sure to
pause playback OR use the MODE switch to change
to another mode.
iPod Playback Controls
1
2
711001
MP3-COMPATIBLE DIOfTAL MEDIA RECEIVER
To play tracks from an iPod, first be sure you have the proper dock adaptor inserted in the docking
drawer (see instructions elsewhere in this manualj. Then insert the iPod. The display will show "IPOO
RMT," indicating that the iPod unit has been recognized. Press PLAY/PAUSE to begin playback.
Most of the iPod's menu functions can be displayed and controlled by the 75001. However, you can
always control the iPod playback from the iPod itself if that is more convenient for you.
Please note that the 75001 is compatible with almost all of the available iPod units. Check the page
of this manual entitled "iPod compatibility" to make sure your iPod is one of these.
If it is not, you can still use the AUX input to connect the headphone output to the 75001, but you
will not be able to control the iPod playback this way.
iPod not recognized? Is iPod Enabled in the SYstem Settings?
An iPod in the dock will only be recognized if the iPod function is enabled in the
System Settings., if the 75001 does not recognize that an iPod is present, check
the System Settings.(see page 12) to make sure that the iPod function is enabled.
® ROM
(Shuffle Mode)
CD PLAY/PAUSE
Press to begin playback. To pause, press
Press this button for shuffle playback
again. Press again to resume playback.
®
RPT (Repeat Play Mode)
Press this button to repeat the playback
of the current track.
of all the files in your iPod playlist.
CD 1«Fastand
»1 (Skip back/skip forward,
rewind/fast forward)
Press these buttons to skip back or ahead
one track. Press and hold for fast rewind or
fast forward.
Browsing the iPod menu.
To make it easy for you to browse
your iPods's tracklists, the 75001
control panel reproduces the Up,
DOWN, LEFT and RIGHT controls on
your iPod. See the chart at left for
the corresponding buttons.
To browse the iPod menu,
press ENTER (the 5 button).
... '-t~~~~-----_.J
75001 User's Manual - page 10
Then use the UP (4), DOWN (6)
LEFT (k<) and RIGHT (I») buttons
as you would on your iPod.
using Remote Control..•
CD 1«
and »1 (Skip back/skip forward,
Fast rewind/fast forward)
Press these buttons to skip back or
ahead one track. Press and hold for fast
rewind or fast forward.
® RDM
(Random Play Mode)
Press this button for SHUFFLE playback
of all songs on the iPod. Press again to
cancel.
®
o
®
@)
o
®
PLAY/PAUSE
Press to begin playback. To pause
playback, press this button. Press again
to resume playback.
RPT (Repeat Play Mode)
Press this button to repeat the playback
of the current track.
UP. DOWN • LEFT • RIGHT
CURSORS
Use these buttons to navigate the iPod
menu system.
5
ENTER
Use to confirm a track selection within
the iPod menu system.
MENU
Press to enter the iPod menu system.
71------/
SOURCE (Input select, same as
MODE on head unit)
Press briefly, repeatedly to cycle
between the five audio input modes in
order to select either SO or USB modes.
Please· note:
iPod Mode can only be selected if an
iPod is present in the dock.
75001
user's Manual - page 11
System settings
Settings mode
You can make changes to the system settings for the 75001 in the following areas:
Radio frequency range • Enable/disable AUX input • Enable/disable iPod input
Clock time format (12 hour or 24 hour) • Bluetooth enable/disable
To enter the Settings mode in order to make changes, use your remote to enter the
following sequence:
8, DOWN ARRO~ 9, ENTER
The display will show "TEST MOD" briefly to indicate thatyou are in the System Settings
area and then automatically change to Radio Frequency selection mode. At any time
you can press the > button to step through the four other settings areas. When you are
ready to leave the System Settings area, press ENTER. The unit will reboot to initialize
with the new settings.
•
Radio settings
The 755DBi tuner can operate on several different frequency ranges. Please see the
chart below for these ranges. The factory default frequency range is "American 2."
BAND NAME
America 1
America 2
Europe 10
Europe 5
Mid East
Aust (Australia)
Russia
Japan
FREQUENCY RANGE
FM: 87.5-108MHz
FM: 87.5-107.9MHz
FM: 87.5-108MHz
FM: 87.5-108MHz
FM: 87.5-108MHz
FM: 87.5-108MHz
FM: 87.5-108MHz
FM: 76-90MHz
AM:
AM:
AM:
AM:
AM:
AM:
AM:
AM:
520-1710kHz
530-171 OkHz
522-1620kHz
522-1620kHz
531-1602kHz
522-1593kHz
522-1620kHz
522-1629kHz
To change the range to suit your location, press the DOWN ARROW until the desired
frequency range is highlighted. Then press> to save it and move to the next settings
area (AUX Input), or press ENTER to leave the System Settings mode.
• AUX Input Enable/Disable
Press the DOWN ARROW to move between Enable and Disable modes. When the
correct selection has been made, press> to save it and move to the next settings area
(iPod Input) or press ENTER to leave the System Settings mode.
If AUX Input is disabled in System Settings, any input connected will not be played.
•
iPod Input Enable/Disable
Press the DOWN ARROW to move between Enable and Disable modes. When the
correct selection has been made, press> to save it and
If iPod Input is disabled in System Settings, an iPod in the dock will not be recognized.
•
Clock format (12-hour or 24-hour)
Press the DOWN ARROW to move between 12-hour and 24-hour formats. When the
correct selection has been made, press> to save it and move to the next settings area
(Bluetooth) or press ENTER to leave the System Settings mode.
75001 User's Manual - page 12
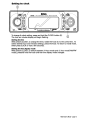
Setting the clock
1
71SOD1
MP3·COMPATIBLE DIGITAL MEDIA RECEIVER
1:I-me40"1
3!2
To change the clock setting, press and hold the CLOCK button (2).
The hour and minutes display will begin flashing.
Setting the time
After pressing CLOCK, to change the time, rotate the knob (1) to the correct time.. To
switch between hour and minutes settings, press the knob. To return to normal mode,
either press CLOCK or wait a few seconds.
Setting the time display mode
After pressing CLOCK, to switch between 24 hour mode and 12 hour mode ("AM/PM"
mode), press and hold the knob until the time display mode changes.
75001 User's Manual - page 13
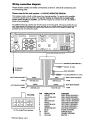
Wiring connection diagram
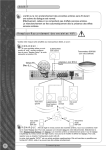
Please review carefully and make connections as shown. Check all connections prior
to connecting power.
Please note that this unit requires +13.8V DC NEGATIVE GROUND.
This receiver contains a built-in high power four-channel amplifier. To use the built-in amplifier,
connect the speaker wires as shown. To use the receiver as a head unit in a mobile audio
system which includes an amplifier, use the RCA outputs to connect to the LEFT and RIGHT
inputs of your amplifier(s).
An additional feature is a stereo pair of AUX inputs on the rear panel. This input is perfect for use
with video games, DVD players, etc. which are part of your mobile system. Please note that if you
use these inputs and then plug a portable audio source into the FRONT panel AUX input, the
portable source will override the audio.
@
@
r-------
I
I
I
I
I
I
I
I
I
I
1I
BL UEIWHITE(AMP/PWR ANT)
~ 1AFU8E
To Vehicle
Antenna
~
RE o (ACC. 12 volts)
BL ACK (GROUND)
;::
.....
m
;lI
LEFT FRONT SPEAKER
40HM
LEFT REAR SPEAKER
40HM
1MFU8E
".!.
WHITE
GREY
/":
WHITE/BLACK
GREY/BLACK
II
".!.
GREEN
VIOLET
v-
GREEN/BLACK
VIOLET/BLACK
II
PIN VIEW
r--l
[!]~~[ZJ~[ill
[g]GJ~~[iQ][gJ
12-Pin Audio/Power Harness
75001 User's Manual- page 14
YE LLOW (CONSTANT 12 volts)
:./
R
V
rI
'='
RIGHT FRONT SPEAKER
40HM
RIGHT REAR SPEAKER
40HM
PIN
WIRE COLOR
FUNCTION
1
2
3
4
5
6
7
8
9
VIOLET
VIOLET/BLACK
GREY
GREY/BLACK
WHITE
WHITE/BLACK
GREEN
GREEN/BLACK
BLUE
1-0
ReO
11
12
BLACK
YELLOW
RIGHT REAR SPEAKER +
RIGHT REAR SPEAKER RIGHT FRONT SPEAKER +
RIGHT FRONT SPEAKER LEFT FRONT SPEAKER +
LEFT FRONT SPEAKER LEFT REAR SPEAKER +
LEFT REAR SPEAKER POWER ANTENNA
IGNfTION (AGe)
CHASSIS GROUND
BATTERY +
Troubleshooting
If you experience operation or performance problems with this product, compare your
installation with the electrical wiring diagram on the previous page. If problems persist,
read the following troubleshooting tips which may help eliminate the problems.
SYMPTOM
No power.
No sound.
Radio does not
work, or reception
is poor.
CAUSE
REMEDY
The car ignition switch
is not on.
If the head unit is properly connected
to the car accessory fXJwer circuits,
but the engine is running, switch the
ignition key to the '~CC" position.
The fuse is blown.
Replace the fuse.
Volume is set to minimum.
Adjust volume to desired level.
Wiring not properly
connected.
Check wiring connections.
Antenna cable not
connected.
Insert the antenna cable firmly
into connector.
The signals are too weak
to be received properly.
Select station manually.
Antenna is broken or of
poor quality.
Replace with good quality
antenna.
75001 User's Manual - page 15
IO~S
Specifications
AUDIO SYSTEMS
750DI
MP3-Compatible In-Dash AMIFM Digital Media Receiver with Built-in iPod Docking Station
with USB and SO Memory Ports and Front Panel AUX Input
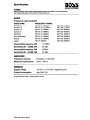
RADIO
Frequency ranges available
BAND NAME
America 1
America 2
Europe 10
Europe 5
Mid East
Aust (Australia)
Russia
Japan
FREQUENCY RANGE
FM: 87.5-108MHz
FM: 87.5-107.9MHz
FM: 87.5-108MHz
FM: 87.5-108MHz
FM: 87.5-108MHz
FM: 87.5-108MHz
FM: 87.5-108MHz
FM: 76-90MHz
Intermediate frequency, FM
Sensitivity (SIN =3OdB), FM
Intermediate frequency, AM
Sensitivity (SIN =2OdB), AM
AM:
AM:
AM:
AM:
AM:
AM:
AM:
AM:
520-171 OkHz
530-1710kHz
522-1620kHz
522-1620kHz
531-1602kHz
522-1593kHz
522-1620kHz
522-1629kHz
10. 7MHz
20 dBu
450kHz
45 dBu
AMPLIFIER
Frequency response
Maximum output power
80 watts x 4 channels
20Hz - 20kHz
GENERAL
Supply voltage
Current consumption
12V DC (11-15V DC), negative ground
less than 15A
All specifications subject to change without notice.
75001 User's Manual - page 16
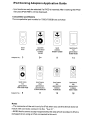
iPod Docking Adaptors Appl'cation Guide
- Ipod mode can only be selected if a IPOO is inserted.After inserting the IPOO
indicator(IPOO RMT) will be displayed.
Competible ipod Models
The competiable ipod models for 75001/7550BI are as follow:
D
®
~
0
~
@
0
Ipod
mini
Ipod 5th
generation
(video)
30GB
Ipod
classic
80GB/120GB
Ipod touch
1st
generation
8GB/16GB
3
9+
9
14
Ipod nano
1st
generation
1GB/2GB/4GB
Ipod nano
2nd
generation
(aluminum)
2GB/4GB/8GB
Ipod nano
3rd
generation
(video)
4GB/8GB
Ipod nano
4th
generation
(video)
8GB/16GB
8
11
13
16
Adaptor No.:
~
o
Adaptor No.:
Notes
--The connector of the unit is only for iPod.when you use the device does not
match with connector,connect it to the "Aux In" .
--BOSS Audio cannot accept responsibility the data which recorded in iPod is
damaged when using an iPod connected to this unit.
iPod Dock Adaptors
75001/755081 equipped with special madeiPod Dock Adapters to
secure the iPod unit firmly to the dock connector while in driving
condition. The iPod Dock Adapters installation is as follow:
,
i
i
1).Push the LCD display to open
or close the iPod dock.
2).lnsert the iPod docking adaptor into
the dock. Please be sure to secure the
front notches into the dock first.
3).Slap in the iPod dock adaptor rear
notches to the openings on the top of
front panel to secure the iPod dock
adaptor.
4).Reverse steps 1-3 to release the
dock adaptor and close the iPod dock.
5).lnsert the iPod into dock adaptor
and press" ~II" button.
Notes
--Official Apple Universal DockAdapters cannot be used in 750DI/755D81.
--Never connect the iPod unit to dock connector without using special made iPod
DockAdapters,which come with 750DI/755D81.
--80SS Audio cannot accept responsibility the failure of use of special made iPod
Dock Adapters which cause any damage on the iPod unit.
NOTE:
1.) For the safety of your property, make sure to remove your removable
device (iPod) from 750DI when you are not in the vehicle.
2.) When your iPod is connected to the docking station of 75001 and the
unit is on radio or AUX mode, it will not automatically power your iPod
on or off. You must remember to switch the iPod on or off using the
power button on your iPod.
3.) In order for your iPod to charge through the unit, it must be connected
to the docking station, and the head unit must be powered on.
PLACE
POSTAGE
HERE
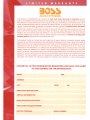
THIS PRODUCT IS WARRANTED FOR A PERIOD OF ONE YEAR FROM THE DATE OF PURCHASE AGAINST
DEFECTS IN MATERIALS AND WORKMANSHIP. THE WARRANTY IS FOR REPAIR OR REPLACEMENT AT THE SOLE
DISCRETION OF THE SELLING DEALER. IF WE CHOOSE TO REPLACE YOUR PRODUCT, WE MAY REPLACE IT WITH
A NEW OR RECONDITIONED ONE OF THE SAME OR SIMILAR DESIGN. CUSTOMER WILL BE RESPONSIBLE FOR
FREIGHT CHARGES INCURRED TO RETURN THE PRODUCT AND WILL INCLUDE A CASHIER'S CHECK OR MONEY
ORDER IN THE AMOUNT OF
$15.00
FOR CONTINENTAL U.S. OR
$30
FOR HAWAII, ALASKA, CANADA AND
PUERTO RICO, PAYABLE TO BOSS AUDIO SYSTEMS TO COVER RETURN SHIPPING AND HANDLING. YOU MUST
SEND A COPY OF THE ORIGINAL INVOICE WITH DATE OF PURCHASE. PLEASE ENCLOSE A LETTER STATING THE
PROBLEM YOU ARE HAVING WITH THE PRODUCT, YOUR DAYTIME PHONE NUMBER, AND YOUR RETURN
SHIPPING ADDRESS (NO P.O. BOXES, PLEASE). PLEASE CONTACT US TO RECEIVE A RETURN AUTHORIZATION
NUMBER (RA#) BEFORE SENDING YOUR DEFECTIVE ITEM.
THIS WARRANTY DOES NOT COVER ANY UNIT SUBJECTED TO ABUSE, NEGLECT, INCORRECT WIRING, WATER
DAMAGE, OR ANY REPAIR OR MODIFICATION PERFORMED BY SOMEONE OTHER THAN A BOSS AUDIO SYSTEMS
REPAIR TECHNICIAN. ANY DAMAGES RESULTING FROM LEGAL ACTION FOR BREACH OF EXPRESSED OR IMPLIED
WARRANTIES SHALL BE LIMITED TO THE COST OF THE ORIGINAL PURCHASE PRICE OF THE UNIT. AS A
CONDITION OF THIS WARRANTY, IT IS AGREED THAT THE REMEDY PROVIDED IN THIS DOCUMENT IS THE SOLE
REMEDY UNDER THIS WARRANTY. ALL LIABILITY FOR COINCIDENTAL DAMAGES IS EXCLUDED. THE PURCHASER
AGREES TO RETAIN THE ORIGINAL PROOF-OF-PURCHASE FOR ESTABLISHING THE EFFECTIVE DATE OF THIS
WARRANTY. SHOULD BOSS AUDIO SYSTEMS OR AN AUTHORIZED DEALER REPLACE YOUR PRODUCT UNDER
WARRANTY, THIS REPLACEMENT SHALL BE CONSIDERED A TRANSACTION UNDER THE ORIGINAL WARRANTY,
AND DOES NOT EXTEND THE ORIGINAL WARRANTY PERIOD. THIS WARRANTY IS NON-TRANSFERABLE.
PLEASE FILL IN THE INFORMATION REQUESTED AND MAIL THIS CARD
TO THE ADDRESS ON THE REVERSE SIDE.
NAME
AGE
ADDRESS
CITY
STATE
BOSS AUDIO DEALER NAME
VEHICLE INFORMATION
WHO INSTALLED THE SYSTEM?
TOTAL COST OF AUDIO SYSTEM?
DATE OF PURCHASE
SERIAL NUMBER
ZIP