1
0
Frontmatter
iR4570/iR3570/iR3530/
iR2870/iR2270/iR2230
UFR II Printer Guide
Manuals for the Machine
The manuals for this machine are divided as follows. Please refer to them for detailed information.
The manuals supplied with optional equipment are included in the list below. Depending on the system
configuration and product purchased, some manuals may not be needed.
Guides with this symbol are printed manuals.
• Quick Reference for Basic Operation
For Basic Operations ➞ Basic Features
For Additional Functions ➞ To Suit Your Needs
• Basic Information
• Basic Operations
• Troubleshooting
• Copying and Mail Box Instructions
• Sending and Fax Instructions
There is no Sending and Facsimile Guide for the iR3530/iR2230.
• Fax Instructions
There is no Facsimile Guide for the iR4570/iR3570/iR2870/iR2270.
• Setting Up the Network Connection and Installing
the CD-ROM Software
• Remote User Interface Instructions
• Network Connectivity and Setup Instructions
• Network ScanGear Installation and Instructions
• PS/PCL/UFR II Printer Instructions
• UFR II Printer Instructions
• PCL Printer Driver Installation and Instructions
CD-ROM
Guides with this symbol are PDF manuals included on the
accompanying CD-ROM.
Easy Operation Guide
CD-ROM
User's Guide
Reference Guide
CD-ROM
Copying and Mail Box
Guide
CD-ROM
Sending and Facsimile
Guide
CD-ROM
Facsimile Guide
CD-ROM
Network Quick Start
Guide
Remote UI Guide
CD-ROM
Network Guide
CD-ROM
Network ScanGear
User's Guide
CD-ROM
PS/PCL/UFR II Printer
Guide
CD-ROM
UFR II Printer Guide
(This Document)
CD-ROM
PCL Driver Guide
CD-ROM
• PS Printer Driver Installation and Instructions
• Mac OS X PS Printer Driver Installation and
Instructions
• UFR II Printer Driver Installation and Instructions
• Mac OS X UFR II Printer Driver Installation and
Instructions
• Fax Driver Installation and Instructions
• Installing MEAP applications and
Using the Login Service
There is no MEAP SMS Administrator Guide for the iR3530/iR2230.
PS Driver Guide
CD-ROM
Mac PS Driver Guide
CD-ROM
UFR II Driver Guide
CD-ROM
Mac UFR II Driver Guide
CD-ROM
Fax Driver Guide
CD-ROM
MEAP SMS
Administrator Guide
CD-ROM
To view the manual in PDF format, Adobe Reader/Adobe Acrobat Reader is required. If Adobe Reader/Adobe Acrobat Reader is not installed on your
system, please download it from the Adobe Systems Incorporated website.
How This Manual Is Organised
Chapter 1
Before You Start Using This Machine
Chapter 2
Printer Settings Menu
Chapter 3
Troubleshooting
Chapter 4
Appendix
Includes the specifications and index.
Considerable effort has been made to ensure that this manual is free of inaccuracies and omissions. However, as we are constantly improving our
products, if you need an exact specification, please contact Canon.
Contents
Preface . . . . . . . . . . . . . . . . . . . . . . . . . . . . . . . . . . . . . . . . . . . . . . . . . . . . . . . . . . . . . . . . . .vii
How to Use This Manual . . . . . . . . . . . . . . . . . . . . . . . . . . . . . . . . . . . . . . . . . . . . . . . . . . . .vii
Symbols Used in This Manual. . . . . . . . . . . . . . . . . . . . . . . . . . . . . . . . . . . . . . . . . . . . . . vii
Keys Used in This Manual. . . . . . . . . . . . . . . . . . . . . . . . . . . . . . . . . . . . . . . . . . . . . . . . . vii
Displays Used in This Manual . . . . . . . . . . . . . . . . . . . . . . . . . . . . . . . . . . . . . . . . . . . . . viii
Illustrations Used in This Manual . . . . . . . . . . . . . . . . . . . . . . . . . . . . . . . . . . . . . . . . . . viii
Abbreviations Used in This Manual . . . . . . . . . . . . . . . . . . . . . . . . . . . . . . . . . . . . . . . . . viii
Legal Notices . . . . . . . . . . . . . . . . . . . . . . . . . . . . . . . . . . . . . . . . . . . . . . . . . . . . . . . . . . . . .
Trademarks . . . . . . . . . . . . . . . . . . . . . . . . . . . . . . . . . . . . . . . . . . . . . . . . . . . . . . . . . . . .
Copyright . . . . . . . . . . . . . . . . . . . . . . . . . . . . . . . . . . . . . . . . . . . . . . . . . . . . . . . . . . . . . .
Disclaimers . . . . . . . . . . . . . . . . . . . . . . . . . . . . . . . . . . . . . . . . . . . . . . . . . . . . . . . . . . . .
Chapter 1
ix
ix
ix
ix
Before You Start Using This Machine
Menu Functions . . . . . . . . . . . . . . . . . . . . . . . . . . . . . . . . . . . . . . . . . . . . . . . . . . . . . . . . . . 1-2
What Are Menu Functions?. . . . . . . . . . . . . . . . . . . . . . . . . . . . . . . . . . . . . . . . . . . . . . . 1-2
Specifying the Menu Settings . . . . . . . . . . . . . . . . . . . . . . . . . . . . . . . . . . . . . . . . . . 1-2
Settings Priorities . . . . . . . . . . . . . . . . . . . . . . . . . . . . . . . . . . . . . . . . . . . . . . . . . . . 1-3
Additional Functions Screen . . . . . . . . . . . . . . . . . . . . . . . . . . . . . . . . . . . . . . . . . . . . . . 1-4
Accessing the Menus . . . . . . . . . . . . . . . . . . . . . . . . . . . . . . . . . . . . . . . . . . . . . . . . . . . 1-5
Using the Printer Settings Menu . . . . . . . . . . . . . . . . . . . . . . . . . . . . . . . . . . . . . . . . . . . . 1-7
Chapter 2
Printer Settings Menu
An Overview of Printer Settings. . . . . . . . . . . . . . . . . . . . . . . . . . . . . . . . . . . . . . . . . . . . . 2-2
Settings Menu . . . . . . . . . . . . . . . . . . . . . . . . . . . . . . . . . . . . . . . . . . . . . . . . . . . . . . . . . . . 2-5
Copies . . . . . . . . . . . . . . . . . . . . . . . . . . . . . . . . . . . . . . . . . . . . . . . . . . . . . . . . . . . . . . . 2-5
2-Sided Printing. . . . . . . . . . . . . . . . . . . . . . . . . . . . . . . . . . . . . . . . . . . . . . . . . . . . . . . . 2-5
Paper Feed . . . . . . . . . . . . . . . . . . . . . . . . . . . . . . . . . . . . . . . . . . . . . . . . . . . . . . . . . . . 2-6
Default Paper Size . . . . . . . . . . . . . . . . . . . . . . . . . . . . . . . . . . . . . . . . . . . . . . . . . . 2-6
Default Paper Type . . . . . . . . . . . . . . . . . . . . . . . . . . . . . . . . . . . . . . . . . . . . . . . . . . 2-6
Paper Size Override . . . . . . . . . . . . . . . . . . . . . . . . . . . . . . . . . . . . . . . . . . . . . . . . . 2-7
Print Quality. . . . . . . . . . . . . . . . . . . . . . . . . . . . . . . . . . . . . . . . . . . . . . . . . . . . . . . . . . . 2-7
Image Refinement . . . . . . . . . . . . . . . . . . . . . . . . . . . . . . . . . . . . . . . . . . . . . . . . . . 2-7
Density . . . . . . . . . . . . . . . . . . . . . . . . . . . . . . . . . . . . . . . . . . . . . . . . . . . . . . . . . . . 2-8
Toner Save . . . . . . . . . . . . . . . . . . . . . . . . . . . . . . . . . . . . . . . . . . . . . . . . . . . . . . . . 2-8
Layout . . . . . . . . . . . . . . . . . . . . . . . . . . . . . . . . . . . . . . . . . . . . . . . . . . . . . . . . . . . . . . . 2-9
Binding Location . . . . . . . . . . . . . . . . . . . . . . . . . . . . . . . . . . . . . . . . . . . . . . . . . . . . 2-9
Margin . . . . . . . . . . . . . . . . . . . . . . . . . . . . . . . . . . . . . . . . . . . . . . . . . . . . . . . . . . . 2-10
Offset X/Offset Y . . . . . . . . . . . . . . . . . . . . . . . . . . . . . . . . . . . . . . . . . . . . . . . . . . . 2-12
Auto Continue . . . . . . . . . . . . . . . . . . . . . . . . . . . . . . . . . . . . . . . . . . . . . . . . . . . . . . . . 2-13
Job Securing Time . . . . . . . . . . . . . . . . . . . . . . . . . . . . . . . . . . . . . . . . . . . . . . . . . . . . 2-13
Timeout . . . . . . . . . . . . . . . . . . . . . . . . . . . . . . . . . . . . . . . . . . . . . . . . . . . . . . . . . . . . . 2-14
Print After Completing RIP . . . . . . . . . . . . . . . . . . . . . . . . . . . . . . . . . . . . . . . . . . . . . . 2-14
Finisher . . . . . . . . . . . . . . . . . . . . . . . . . . . . . . . . . . . . . . . . . . . . . . . . . . . . . . . . . . . . . 2-15
Punch . . . . . . . . . . . . . . . . . . . . . . . . . . . . . . . . . . . . . . . . . . . . . . . . . . . . . . . . . . . . . . 2-19
Booklet . . . . . . . . . . . . . . . . . . . . . . . . . . . . . . . . . . . . . . . . . . . . . . . . . . . . . . . . . . . . . 2-20
Saddle Stitch . . . . . . . . . . . . . . . . . . . . . . . . . . . . . . . . . . . . . . . . . . . . . . . . . . . . . . . . . 2-21
Transparency Interleaving . . . . . . . . . . . . . . . . . . . . . . . . . . . . . . . . . . . . . . . . . . . . . . . 2-22
Copy Set Numbering . . . . . . . . . . . . . . . . . . . . . . . . . . . . . . . . . . . . . . . . . . . . . . . . . . . 2-23
Copy Set Numbering. . . . . . . . . . . . . . . . . . . . . . . . . . . . . . . . . . . . . . . . . . . . . . . . 2-23
v
Chapter 3
Print Position . . . . . . . . . . . . . . . . . . . . . . . . . . . . . . . . . . . . . . . . . . . . . . . . . . . . .
Starting Number . . . . . . . . . . . . . . . . . . . . . . . . . . . . . . . . . . . . . . . . . . . . . . . . . .
Number Size . . . . . . . . . . . . . . . . . . . . . . . . . . . . . . . . . . . . . . . . . . . . . . . . . . . . .
Density. . . . . . . . . . . . . . . . . . . . . . . . . . . . . . . . . . . . . . . . . . . . . . . . . . . . . . . . . .
Initialize . . . . . . . . . . . . . . . . . . . . . . . . . . . . . . . . . . . . . . . . . . . . . . . . . . . . . . . . . . . .
2-24
2-24
2-24
2-24
2-25
UFR II Settings . . . . . . . . . . . . . . . . . . . . . . . . . . . . . . . . . . . . . . . . . . . . . . . . . . . . . . . . .
Halftones . . . . . . . . . . . . . . . . . . . . . . . . . . . . . . . . . . . . . . . . . . . . . . . . . . . . . . . . . . .
Paper Save. . . . . . . . . . . . . . . . . . . . . . . . . . . . . . . . . . . . . . . . . . . . . . . . . . . . . . . . . .
Imaging Settings. . . . . . . . . . . . . . . . . . . . . . . . . . . . . . . . . . . . . . . . . . . . . . . . . . . . . . . .
Image Orientation . . . . . . . . . . . . . . . . . . . . . . . . . . . . . . . . . . . . . . . . . . . . . . . . . . . .
Zoom . . . . . . . . . . . . . . . . . . . . . . . . . . . . . . . . . . . . . . . . . . . . . . . . . . . . . . . . . . . . . .
Print Position . . . . . . . . . . . . . . . . . . . . . . . . . . . . . . . . . . . . . . . . . . . . . . . . . . . . . . . .
Show Warnings . . . . . . . . . . . . . . . . . . . . . . . . . . . . . . . . . . . . . . . . . . . . . . . . . . . . . .
Enlarge Print Area . . . . . . . . . . . . . . . . . . . . . . . . . . . . . . . . . . . . . . . . . . . . . . . . . . . .
Utility Menu . . . . . . . . . . . . . . . . . . . . . . . . . . . . . . . . . . . . . . . . . . . . . . . . . . . . . . . . . . . .
Reset Printer . . . . . . . . . . . . . . . . . . . . . . . . . . . . . . . . . . . . . . . . . . . . . . . . . . . . . . . .
2-26
2-26
2-26
2-27
2-27
2-27
2-28
2-28
2-28
2-29
2-29
Troubleshooting
When a Message Is Displayed. . . . . . . . . . . . . . . . . . . . . . . . . . . . . . . . . . . . . . . . . . . . . . 3-2
Printing Problems. . . . . . . . . . . . . . . . . . . . . . . . . . . . . . . . . . . . . . . . . . . . . . . . . . . . . . . .
Printer Trouble . . . . . . . . . . . . . . . . . . . . . . . . . . . . . . . . . . . . . . . . . . . . . . . . . . . . . . . .
Printing Problems. . . . . . . . . . . . . . . . . . . . . . . . . . . . . . . . . . . . . . . . . . . . . . . . . . . . . .
Print Quality Problems . . . . . . . . . . . . . . . . . . . . . . . . . . . . . . . . . . . . . . . . . . . . . . . . . .
Chapter 4
3-4
3-4
3-5
3-7
Appendix
Specifications . . . . . . . . . . . . . . . . . . . . . . . . . . . . . . . . . . . . . . . . . . . . . . . . . . . . . . . . . . . 4-2
Software Specifications . . . . . . . . . . . . . . . . . . . . . . . . . . . . . . . . . . . . . . . . . . . . . . . . . 4-2
Index . . . . . . . . . . . . . . . . . . . . . . . . . . . . . . . . . . . . . . . . . . . . . . . . . . . . . . . . . . . . . . . . . . 4-3
vi
Preface
Thank you for purchasing this Canon product. Please read this manual thoroughly before operating the
machine in order to familiarise yourself with its capabilities, and to make the most of its many functions.
After reading this manual, store it in a safe place for future reference.
How to Use This Manual
Symbols Used in This Manual
The following symbols are used in this manual to explain procedures, restrictions, handling
precautions, and instructions that should be observed for safety.
.
IMPORTANT
Indicates operational requirements and restrictions. Be sure to read these items
carefully in order to operate the machine correctly, and to avoid damage to the
machine.
.
NOTE
Indicates a clarification of an operation, or contains additional explanations for a
procedure. Reading these notes is highly recommended.
Keys Used in This Manual
The following symbols and key names are a few examples of how keys to be pressed are
expressed in this manual:
• Touch Panel display Keys: [Key Name]
Examples:
[Cancel]
[Done]
• Control Panel Keys: <Key icon>
Examples:
vii
Displays Used in This Manual
Screen shots of the touch panel display used in this manual may differ from the ones you
actually see, depending on the options that come with your machine. Note that functions that
cannot be used depending on the model or options, are not displayed on the touch panel
display.
The keys which you should press are marked with a
, as shown below.
When multiple keys can be pressed on the touch panel display, all keys are marked. Select the
keys which suit your needs.
Press [Printer Settings].
Press this key for operation.
Illustrations Used in This Manual
Illustrations of the machine used in this manual may not represent exact appearance and
configuration of the actual machine.
Abbreviations Used in This Manual
In this manual, product names and model names are abbreviated as follows:
Microsoft® Windows® operating system is referred to as Windows.
viii
Legal Notices
Trademarks
Canon, the Canon logo, and iR are trademarks of Canon Inc.
Microsoft and Windows are registered trademarks of Microsoft Corporation in the United States
and other countries.
Other products and company names herein may be the trademarks of their respective owners.
Copyright
Copyright 2005 by Canon Inc. All rights reserved.
No part of this publication may be reproduced or transmitted in any form or by any means,
electronic or mechanical, including photocopying and recording, or by any information storage
or retrieval system without the prior written permission of Canon Inc.
Disclaimers
The information in this document is subject to change without notice.
CANON INC. MAKES NO WARRANTY OF ANY KIND WITH REGARD TO THIS MATERIAL,
EITHER EXPRESS OR IMPLIED, EXCEPT AS PROVIDED HEREIN, INCLUDING WITHOUT
LIMITATION, THEREOF, WARRANTIES AS TO MARKETABILITY, MERCHANTABILITY,
FITNESS FOR A PARTICULAR PURPOSE OF USE OR AGAINST INFRINGEMENT OF ANY
PATENT. CANON INC. SHALL NOT BE LIABLE FOR ANY DIRECT, INCIDENTAL, OR
CONSEQUENTIAL DAMAGES OF ANY NATURE, OR LOSSES OR EXPENSES RESULTING
FROM THE USE OF THIS MATERIAL.
ix
x
Before You Start Using This
Machine
1
CHAPTER
This chapter describes how to set up the printing environment from the touch panel display.
Menu Functions . . . . . . . . . . . . . . . . . . . . . . . . . . . . . . . . . . . . . . . . . . . . . . . . . . . . . . . . . . . . . . . . . . . 1-2
What Are Menu Functions? . . . . . . . . . . . . . . . . . . . . . . . . . . . . . . . . . . . . . . . . . . . . . . . . . . . . . . . . . . . . . . . . . . . 1-2
Additional Functions Screen . . . . . . . . . . . . . . . . . . . . . . . . . . . . . . . . . . . . . . . . . . . . . . . . . . . . . . . . . . . . . . . . . . . 1-4
Accessing the Menus . . . . . . . . . . . . . . . . . . . . . . . . . . . . . . . . . . . . . . . . . . . . . . . . . . . . . . . . . . . . . . . . . . . . . . . . 1-5
Using the Printer Settings Menu . . . . . . . . . . . . . . . . . . . . . . . . . . . . . . . . . . . . . . . . . . . . . . . . . . . . . . . 1-7
1-1
Menu Functions
Before You Start Using This Machine
1
This section describes the menu functions and how to access them with the touch panel
display.
What Are Menu Functions?
Specifying the Menu Settings
The machine lets you specify settings, such as the number of copies and the paper size, to use
when it receives a print job. These types of settings can be specified by the application sending
the print job, or by the printer driver.
You can specify many settings which affect the printer function of the machine. These include
some settings that cannot be specified remotely from an application or from the printer driver.
These settings are referred to as "Menu Functions."
The menu functions are grouped together according to the type of settings, which makes them
easy to set.
There are two ways you can specify the menu functions.
• Specifying the settings on the touch panel display:
Display the Printer Settings screen on the touch panel display and specify the settings by
pressing the keys on it.
• Specifying the settings on the Remote UI:
You can specify some settings from your computer using your web browser.
NOTE
• This guide only explains how to specify the menu settings on the touch panel display. For instructions on
specifying the menu settings on the Remote UI, please refer to the Remote UI Guide.
• The contents of the Printer Settings are stored in the nonvolatile memory of the machine. This means
that the settings are stored even if the power to the machine is switched OFF, and therefore the settings
will still be available when the power is switched ON again.
1-2
Menu Functions
Settings Priorities
When the same menu function setting can be specified by using the keys on the machine or by
specifying the setting in an application or the printer driver, the setting from the application or
printer driver has priority. These settings will override the settings made on the machine.
For settings available only on the touch panel display or Remote UI, the most recently specified
settings take priority.
Setting priority
High
Application
Printer driver
Low
Touch panel display
Remote UI
The printer driver is included on the CD-ROM provided with the machine. For instructions on
installing the printer driver, see Chapter 2, "Installing Software," in the Network Quick Start
Guide.
Menu Functions
1-3
Before You Start Using This Machine
1
Additional Functions Screen
Press
to open the Additional Functions screen. The Printer Settings or the Report Settings
can be accessed from this screen.
Before You Start Using This Machine
1
Printer Settings
In the Additional Functions screen, press [Printer Settings] to open the Custom Printing Settings
menu.
Utility
Press this key to open the
Utility menu, for initialising the
printer.
Settings
Press this key to open the Settings menu.
1-4
Menu Functions
Accessing the Menus
To access the printer-related menu functions, display the Printer Settings screen on the touch
panel display and use the keys on the display to specify the settings.
IMPORTANT
1
Press
.
ABC
DEF
1
2
3
GHI
JKL
MNO
4
5
6
PQRS
TUV
WXYZ
7
8
9
0
2
1
Before You Start Using This Machine
You can access menus and modify settings while print jobs are waiting in the queue. However, any new
settings will only affect print jobs sent to the queue after the modifications were made.
Press [Printer Settings].
Menu Functions
1-5
3
Select [Settings] or [Utility] to access the corresponding menu.
Before You Start Using This Machine
1
The Settings menu provides access to common settings, such as number of copies, error
handling, and toner density.
The Utility menu provides access to the reset printer function.
1-6
Menu Functions
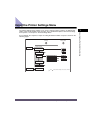
Using the Printer Settings Menu
As an example, the sequence of steps for setting the default number of copies is shown on the
following pages.
Settings
Settings
Setting Value
Common Menu
1
Copies
9999
2-Sided Printing
Paper Feed
Default Paper Size
Default Paper Type
A4
Statement
Paper Size Override
UFR II
Imaging
Utility
Reset Printer
"
" and "
" indicate that settings or levels are omitted.
Using the Printer Settings Menu
1-7
1
Before You Start Using This Machine
The Printer Settings menu enables you to access common features. Below is an abbreviated
outline of the Printer Settings menu structure. For a detailed description of all Printer Settings
menu options, see Chapter 2, "Printer Settings Menu."
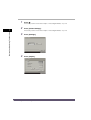
1
Press
.
If necessary, see the screen shots in step 1 of "Accessing the Menus," on p. 1-5.
2
1
Press [Printer Settings].
Before You Start Using This Machine
If necessary, see the screen shots in step 2 of "Accessing the Menus," on p. 1-5.
1-8
3
Press [Settings].
4
Press [Copies].
Using the Printer Settings Menu
5
Press [-] or [+] to enter the number of copies.
If you enter a value outside the setting range, a message prompting you to enter an appropriate
value appears on the screen.
6
Confirm the setting ➞ press [OK].
Using the Printer Settings Menu
1-9
Before You Start Using This Machine
1
Before You Start Using This Machine
1
1-10
Using the Printer Settings Menu
Printer Settings Menu
2
CHAPTER
This chapter describes how to use the Printer Settings menu and its submenus.
An Overview of Printer Settings . . . . . . . . . . . . . . . . . . . . . . . . . . . . . . . . . . . . . . . . . . . . . . . . . . . . . . . 2-2
Settings Menu . . . . . . . . . . . . . . . . . . . . . . . . . . . . . . . . . . . . . . . . . . . . . . . . . . . . . . . . . . . . . . . . . . . . . 2-5
Copies. . . . . . . . . . . . . . . . . . . . . . . . . . . . . . . . . . . . . . . . . . . . . . . . . . . . . . . . . . . . . . . . . . . . . . . . . . . . . . . . . . . . 2-5
2-Sided Printing . . . . . . . . . . . . . . . . . . . . . . . . . . . . . . . . . . . . . . . . . . . . . . . . . . . . . . . . . . . . . . . . . . . . . . . . . . . . 2-5
Paper Feed . . . . . . . . . . . . . . . . . . . . . . . . . . . . . . . . . . . . . . . . . . . . . . . . . . . . . . . . . . . . . . . . . . . . . . . . . . . . . . . . 2-6
Print Quality . . . . . . . . . . . . . . . . . . . . . . . . . . . . . . . . . . . . . . . . . . . . . . . . . . . . . . . . . . . . . . . . . . . . . . . . . . . . . . . 2-7
Layout . . . . . . . . . . . . . . . . . . . . . . . . . . . . . . . . . . . . . . . . . . . . . . . . . . . . . . . . . . . . . . . . . . . . . . . . . . . . . . . . . . . . 2-9
Auto Continue . . . . . . . . . . . . . . . . . . . . . . . . . . . . . . . . . . . . . . . . . . . . . . . . . . . . . . . . . . . . . . . . . . . . . . . . . . . . . 2-13
Job Securing Time . . . . . . . . . . . . . . . . . . . . . . . . . . . . . . . . . . . . . . . . . . . . . . . . . . . . . . . . . . . . . . . . . . . . . . . . . 2-13
Timeout. . . . . . . . . . . . . . . . . . . . . . . . . . . . . . . . . . . . . . . . . . . . . . . . . . . . . . . . . . . . . . . . . . . . . . . . . . . . . . . . . . 2-14
Print After Completing RIP . . . . . . . . . . . . . . . . . . . . . . . . . . . . . . . . . . . . . . . . . . . . . . . . . . . . . . . . . . . . . . . . . . . 2-14
Finisher . . . . . . . . . . . . . . . . . . . . . . . . . . . . . . . . . . . . . . . . . . . . . . . . . . . . . . . . . . . . . . . . . . . . . . . . . . . . . . . . . . 2-15
Punch . . . . . . . . . . . . . . . . . . . . . . . . . . . . . . . . . . . . . . . . . . . . . . . . . . . . . . . . . . . . . . . . . . . . . . . . . . . . . . . . . . . 2-19
Booklet . . . . . . . . . . . . . . . . . . . . . . . . . . . . . . . . . . . . . . . . . . . . . . . . . . . . . . . . . . . . . . . . . . . . . . . . . . . . . . . . . . 2-20
Saddle Stitch. . . . . . . . . . . . . . . . . . . . . . . . . . . . . . . . . . . . . . . . . . . . . . . . . . . . . . . . . . . . . . . . . . . . . . . . . . . . . . 2-21
Transparency Interleaving. . . . . . . . . . . . . . . . . . . . . . . . . . . . . . . . . . . . . . . . . . . . . . . . . . . . . . . . . . . . . . . . . . . . 2-22
Copy Set Numbering . . . . . . . . . . . . . . . . . . . . . . . . . . . . . . . . . . . . . . . . . . . . . . . . . . . . . . . . . . . . . . . . . . . . . . . 2-23
Initialize. . . . . . . . . . . . . . . . . . . . . . . . . . . . . . . . . . . . . . . . . . . . . . . . . . . . . . . . . . . . . . . . . . . . . . . . . . . . . . . . . . 2-25
UFR II Settings . . . . . . . . . . . . . . . . . . . . . . . . . . . . . . . . . . . . . . . . . . . . . . . . . . . . . . . . . . . . . . . . . . . 2-26
Halftones. . . . . . . . . . . . . . . . . . . . . . . . . . . . . . . . . . . . . . . . . . . . . . . . . . . . . . . . . . . . . . . . . . . . . . . . . . . . . . . . . 2-26
Paper Save . . . . . . . . . . . . . . . . . . . . . . . . . . . . . . . . . . . . . . . . . . . . . . . . . . . . . . . . . . . . . . . . . . . . . . . . . . . . . . . 2-26
Imaging Settings . . . . . . . . . . . . . . . . . . . . . . . . . . . . . . . . . . . . . . . . . . . . . . . . . . . . . . . . . . . . . . . . . . 2-27
Image Orientation . . . . . . . . . . . . . . . . . . . . . . . . . . . . . . . . . . . . . . . . . . . . . . . . . . . . . . . . . . . . . . . . . . . . . . . . . . 2-27
Zoom. . . . . . . . . . . . . . . . . . . . . . . . . . . . . . . . . . . . . . . . . . . . . . . . . . . . . . . . . . . . . . . . . . . . . . . . . . . . . . . . . . . . 2-27
Print Position. . . . . . . . . . . . . . . . . . . . . . . . . . . . . . . . . . . . . . . . . . . . . . . . . . . . . . . . . . . . . . . . . . . . . . . . . . . . . . 2-28
Show Warnings. . . . . . . . . . . . . . . . . . . . . . . . . . . . . . . . . . . . . . . . . . . . . . . . . . . . . . . . . . . . . . . . . . . . . . . . . . . . 2-28
Enlarge Print Area . . . . . . . . . . . . . . . . . . . . . . . . . . . . . . . . . . . . . . . . . . . . . . . . . . . . . . . . . . . . . . . . . . . . . . . . . 2-28
Utility Menu . . . . . . . . . . . . . . . . . . . . . . . . . . . . . . . . . . . . . . . . . . . . . . . . . . . . . . . . . . . . . . . . . . . . . . 2-29
Reset Printer. . . . . . . . . . . . . . . . . . . . . . . . . . . . . . . . . . . . . . . . . . . . . . . . . . . . . . . . . . . . . . . . . . . . . . . . . . . . . . 2-29
2-1
An Overview of Printer Settings
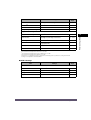
The following table lists all settings of the Printer Settings menu.
■ Settings Menu
2
Printer Settings Menu
Item
Settings
Applicable
Page
Copies
1 to 9999; 1*
p. 2-5
2-Sided Printing
On, Off*
p. 2-5
Default Paper Size
Letter, Legal, A4*, A3, A5, 11 x 17, Executive,
Statement, Envelope Monarch, Envelope COM10,
Envelope DL, Envelope ISO-B5, Envelope ISO-C5
p. 2-6
Default Paper Type
Plain Paper*, Transparency, Heavy Paper, Recycled
Paper, Color Paper, Tracing Paper, Labels, Bond
Paper, Envelope
p. 2-6
Paper Size Override
On, Off*
p. 2-7
On*, Off
p. 2-7
Paper Feed
Print Quality
Image Refinement
Density*1
Toner Save
1 to 9;
On,
5*
p. 2-8
Off*
p. 2-8
Layout
Binding Location
Margin
Offset X
Offset Y
Long Edge*, Short Edge
p. 2-9
-50 to +50 mm;
0.0*
mm
p. 2-10
-50 to +50 mm;
0.0*
mm
p. 2-12
-50 to +50 mm;
0.0*
mm
p. 2-12
Auto Continue
On, Off*
p. 2-13
Job Securing Time
1 hour*, 2 hours, 3 hours, 6 hours, 12 hours,
24 hours
p. 2-13
Timeout
Timeout (5 to 300 seconds), Off; 15* seconds
p. 2-14
Print After Completing RIP
On,
Off*
p. 2-14
Off*,
Finisher
2-2
An Overview of Printer Settings
Collate, Rotate+Collate, Rotate+Group,
Offset+Collate, Offset+Group, Staple+Collate
Staple position: Corner (Upper-L)*,
Double (Top), Corner (Upper-R),
Double (Right), Corner (Lower-R),
Double (Bottom), Corner (Lower-L),
Double (Left)
p. 2-15
Item
Settings
Applicable
Page
Punch
Off*, Top, Bottom, Left, Right
p. 2-19
Booklet*2 *5
On, Off*
p. 2-20
Saddle Stitch*3 *5
On, Off*
p. 2-21
Transparency Interleaving*2
Off*, Blank, Printed
p. 2-22
Copy Set Numbering
On, Off*
p. 2-23
Print Position
5 Locations*, Top Left, Bottom Left,
Top Right, Bottom Right, Full Surface
p. 2-24
Starting Number
1 to 9999; 1*
p. 2-24
Number Size
Small (12 point), Medium (24 point),
Large (36 point)*
p. 2-24
Density
1 to 5; 3*
p. 2-24
Copy Set Numbering*4 *5
An asterisk
(*)
—
Printer Settings Menu
Initialize
2
p. 2-25
indicates the default setting.
*1
The menu will not be displayed when Toner Save is set to 'On'.
*2
The menu will not be displayed when Copy Set Numbering is set to 'On'.
*3
The menu will not be displayed when Booklet is set to 'Off'.
*4
This function is not available if the Booklet or Transparency Interleaving option is specified as any setting other than 'Off'.
*5
Settings are not applicable for the iR3530/iR2230.
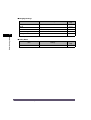
■ UFR II Settings
Item
Settings
Applicable
Page
Halftones
Text
Graphics
Image
Paper Save
Resolution*, Gradation, Tone
p. 2-26
Resolution, Gradation,
Tone*
p. 2-26
Resolution, Gradation,
Tone*
p. 2-26
On*,
Off
p. 2-26
An asterisk (*) indicates the default setting.
An Overview of Printer Settings
2-3
■ Imaging Settings
Item
2
Settings
Applicable
Page
Image Orientation
Auto*, Vertical, Horizontal
p. 2-27
Zoom
Off*,
p. 2-27
Print Position
Auto*,
Show Warnings
On*,
Off
p. 2-28
Enlarge Print Area
Off*,
On
p. 2-28
Auto
p. 2-28
Center, Top Left
Printer Settings Menu
An asterisk (*) indicates the default setting.
■ Utility Menu
Item
Reset Printer
2-4
An Overview of Printer Settings
Settings
Applicable
Page
—
p. 2-29
Settings Menu
Copies
This setting enables you to specify the number of copies printed. The default setting is '1', but
you can specify up to 9999 copies.
2-Sided Printing
On, Off*
This parameter selects one-sided or two-sided printing. When 2-Sided Printing is specified, the
document is printed on both sides of the paper.
NOTE
• Two-sided printing can use either the paper drawer or the stack bypass in sizes of A3, JIS-B4,
A4, A4R, JIS-B5, JIS-B5R, A5R, 11" x 17", LGL, LTR, LTRR, STMTR, and EXEC.
• Two-sided printing can use paper within the following range:
- 64 g/m2 to 90 g/m2
• When printing on letterhead paper, or paper with a logo (such as a cover sheet), please note the
following:
- If the paper is fed from a paper drawer, the printing surface should be face down.
- If the paper is fed from the stack bypass or the optional paper deck, the printing surface should
be face up.
Settings Menu
2-5
2
Printer Settings Menu
1 to 9999; 1*
Paper Feed
■ Default Paper Size
Letter, Legal, A4*, A3, A5, 11" x 17", Executive, Statement, Envelope Monarch, Envelope
COM10, Envelope DL, Envelope ISO-B5, and Envelope ISO-C5
This parameter defines the default paper size used when the paper size cannot be set within
the application software, when no paper source is specified.
■ Default Paper Type
2
Printer Settings Menu
Plain Paper*, Transparency, Heavy Paper, Recycled Paper, Color Paper, Tracing Paper, Labels,
Bond Paper, and Envelope
This parameter sets the default paper type to be used for print jobs. This machine has internally
defined optimal print modes for each specified paper type.
NOTE
• Use the following figures as a guideline to decide whether paper should be specified as Plain
Paper or Heavy Paper.
- Plain Paper: 64 g/m2 to 80 g/m2
- Heavy Paper: 81 g/m2 to 128 g/m2
• Canon transparency film is recommended for printing on transparencies.
• Canon label paper is recommended for printing on labels.
• Heavy Paper, Transparency, Tracing Paper, Labels, and Envelope cannot be printed using
two-sided printing.
2-6
Settings Menu
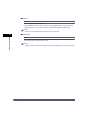
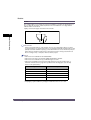
■ Paper Size Override
On, Off*
If paper of the size that is set in the printer driver has not been loaded in the paper drawer, the
paper that is printed is changed to the following sizes.
Paper
A4
Letter
Letter
A4
A3
11" x 17"
11" x 17"
A3
2
If [On] is selected, the paper size is changed.
If [Off] is selected, the paper supply message is displayed and the paper size is not changed.
NOTE
The paper size does not change if there is no paper in the paper source of the size that is set in
the printer driver, even if Paper Size Override is set to 'On'.
Print Quality
■ Image Refinement
On*, Off
This setting smoothes the jagged outlines of characters and graphics.
If [On] is selected, smoothing is performed before printing.
If [Off] is selected, jobs are printed without being smoothed.
NOTE
The results of image refinement may be different depending on the types of characters and
graphics you want to print.
Settings Menu
2-7
Printer Settings Menu
Printer Driver Setting
■ Density
1 to 9; 5*
This setting adjusts the print density.
Pressing [Dark] makes the print image darker, pressing [Light] makes the image lighter. This
setting has 9 levels you can adjust, with level '5' (middle level) being the default setting.
NOTE
This function is not available if the Toner Save option is set to 'On'.
■ Toner Save
Printer Settings Menu
2
On, Off*
This setting determines whether Toner Save is enabled. Toner Save uses less toner to print
documents and may result in longer toner life.
NOTE
If [On] is selected for Toner Save, very light or finely detailed images may not be printed clearly.
2-8
Settings Menu
Layout
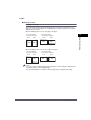
■ Binding Location
Long Edge*, Short Edge
This parameter determines whether the binding position is along the long edge or the short
edge of the paper. When binding for two-sided printing, the image orientation is automatically
adjusted for correct layout.
When the binding position is on the long edge of the paper:
Front
DEF
Front
Binding Position
Binding Position
ABC
Back
2
Two-sided printing
in landscape orientation
Printer Settings Menu
Two-sided printing
in portrait orientation
Back
Binding Position
DEF
ABC
Binding Position
When the binding position is on the short edge of the paper:
Front
Back
Two-sided printing
in landscape orientation
Front
DEF
ABC
ABC
Back
Binding Position
Binding Position
Binding Position
Two-sided printing
in portrait orientation
DEF
Binding Position
NOTE
• You cannot create a binding margin with this setting alone. Use this setting in combination with
the Margin setting to create a binding margin.
• For two-sided printing, the orientation of the back image may be changed by this setting.
Settings Menu
2-9
■ Margin
-50.0 to +50.0 mm (in increments of 0.5 mm); 0.0* mm
This setting sets the page margin in millimeters. The settings can be set between -50.0 mm
(-1.90 inch) and +50.0 mm (+1.90 inch) in increments of 0.5 mm (0.01 inch).
Use [
] to increase the width of the inside margin.
Use [
] to increase the width of the outside margin.
[+]
[-]
Center
Center
Center
Right Margin
Left Margin
Printer Settings Menu
2
[0 mm]
You can specify the edge along which the margin will be created in the Binding Location setting
(previous setting). To create a margin along one of the edges of the paper, use this setting in
combination with the Binding Location setting.
IMPORTANT
If this setting moves the image outside the printable area, part of the image may be cut off.
NOTE
• If this setting is used in combination with the Offset X/Offset Y setting, the values of the two
settings are added together.
• Pressing [
] increases the setting value by 0.5 mm (0.01 inch) each time the key is pressed.
Pressing [
] decreases the value by 0.5 mm (0.01 inch) each time. Holding down either [
]
or [
] continuously speeds up the value alteration.
2-10
Settings Menu
Binding Location and Margin Settings
Refer to the figures below to set binding location and margins.
Landscape printing
with margin
Front
Back
Front
ABC
DEF
Binding Location : Long edge
Margin
: [+]
Back
(Two-sided printing)
ABCDE
(Two-sided printing)
FGHIJK
Portrait printing
with margin
Binding Location : Short edge
Margin
: [-]
FGHIJK
FGHIJK
Printer Settings Menu
DEF
Binding Location : Short edge
Margin
: [+]
FGHIJK
ABC
DEF
ABCDE
ABC
DEF
ABCDE
ABC
ABCDE
2
Binding Location : Long edge
Margin
: [-]
Set the paper orientation in the application you are using.
Settings Menu
2-11
■ Offset X/Offset Y
-50.0 to +50.0 mm (in increments of 0.5 mm); 0.0* mm
This setting sets the offset position in millimeters. The settings can be set between -50.0 mm
(-2.00 inch) and +50.0 mm (+2.00 inch) in increments of 0.5 mm (0.01 inch).
The print position is adjusted in the vertical or horizontal direction to the value specified in the
setting value.
You can increase or decrease the setting in increments of 0.5 mm (0.01 inch) to adjust the print
position, as described below.
Offset X: Increasing the setting value moves the image in the rightward X direction on the
paper. Decreasing the setting value moves the image in the leftward X direction on the paper.
2
Printer Settings Menu
Offset Y: Increasing the setting value moves the image in the downward Y direction on the
paper. Decreasing the setting value moves the image in the upward Y direction on the paper.
ABC
Y
DEF
Adjust using
X/Y-Adjustment
Front
Back
Area adjusted using
Y-Adjustment
[+]
Area adjusted using
X-Adjustment
[+]
X
X
Part of the
original margin
Y
ABC
DEF
Front
Back
IMPORTANT
Please note that if the print position is adjusted to place print data outside the valid print area, the
portion outside the valid print area is not printed.
NOTE
• If this setting is used in combination with the Margin setting, the values of the two settings are
added together.
• Pressing [
] increases the setting value by 0.5 mm (0.01 inch) each time the key is pressed.
Pressing [
] decreases the value by 0.5 mm (0.01 inch) each time. Holding down either [
]
or [
] continuously speeds up the value alteration.
2-12
Settings Menu
Auto Continue
On, Off*
This setting enables you to automatically clear an error and continue printing when an error
occurs (Error skip).
If [On] is selected, error skips are performed automatically.
If [Off] is selected, you must perform error skips from the touch panel display.
NOTE
Job Securing Time
1 hour*, 2 hours, 3 hours, 6 hours, 12 hours, and 24 hours
When a secured print job is sent to the machine, it is stored on the machine's hard disk, and a
password must be entered before the job can be printed. This setting specifies how long the job
will be stored before it is automatically cancelled.
NOTE
• Even if the time period specified with this setting has not elapsed, the print job data is deleted if
the main power to the machine is switched OFF.
• The password is set from the printer driver.
Settings Menu
2-13
2
Printer Settings Menu
• To perform an error skip, press [Print] on the System Monitor screen ➞ select the job containing
the error ➞ press [Details] ➞ [Error Skip].
• Error skip only temporarily clears an error, so the data may not print correctly.
• For information on types of errors that can be temporarily cleared with Auto Continue, see "When
a Message Is Displayed," on p. 3-2 .
• This setting is valid even if multiple errors have occurred.
Timeout
Timeout (5 to 300 seconds), Off; 15* seconds
This setting enables you to force jobs to finish if no data is received during the set period of
time.
If Timeout is 'On', jobs can finish automatically. For example, if print data still remains in the
machine because a form feed command cannot be processed, the paper can be fed
automatically.
If Timeout is 'Off', jobs will not end automatically.
2
IMPORTANT
Printer Settings Menu
• If this function is set so that a job will timeout, the machine may end a print job before all the data
has been received if it takes a long time for the PC to send the data. If this occurs, adjust the
length of the Timeout setting.
• If [Off] is selected, you will not be able to make copies until print jobs that use the Staple+Collate
and Punch settings have been completed.
• If you send data from a printer driver not compatible with the machine, and the end of job
command is not received within the time set in this setting, the machine cancels the job, which
may cause the data to be printed incorrectly.
NOTE
When a job is being processed, the Processing/Data Indicator on the control panel flashes.
Print After Completing RIP
On, Off*
This setting sets whether to use the Print After Completing RIP function.
RIP is Raster Image Processor, used for advanced graphical representation.
If Print After Completing RIP is enabled, the first page is printed after all the pages in the job
have been processed.
Although it may take longer to print the first page, the remaining pages in the job will be printed
more quickly. This is useful when several people are using the machine or when using another
function, such as the Copy function, because the printing time for a print job is reduced.
IMPORTANT
Please note that the memory of the machine can store up to 8,000 pages. When you send a
secured document to be stored in the memory to be printed at a later time, and the memory is full
(already reached its maximum capacity), your document will not be stored. The memory may be
full because the machine is being used for other functions (such as storing a document in an
inbox or storing a form) or other jobs, which use memory space.
2-14
Settings Menu
Finisher
Off*, Collate, Rotate+Collate, Rotate+Group, Offset+Collate, Offset+Group, and Staple+Collate
Staple Position:
Corner (Upper-L)*, Double (Top), Corner (Upper-R), Double (Right), Corner (Lower-R),
Double (Bottom), Corner (Lower-L), and Double (Left)
Some of the above options require specific delivery trays and may not be available unless
appropriate delivery trays are installed:
✓: Available
✗: Unavailable
2
Collating
✓
✓
✓
✓
Rotate Collating
✓
✓
✗
✗
Rotate Grouping
✓
✓
✗
✗
Offset Collating
✗
✗
✓
✓
Offset Grouping
✗
✗
✓
✓
Staple Sort
✗
✗
✓
✓
Printer Settings Menu
Inner 2way
Finisher-Q3,
Tray-D1,
No Options
Finisher-S1
Saddle
Copy Tray
Finisher-Q4
-J1
You can choose from several features when collating printed matter.
Off
This setting prints all copies of the same page before printing the next page.
Collate
This setting prints all pages of each copy before printing the next copy.
Rotate+Collate
This setting prints all pages of each copy (collating), and rotates every other complete copy 90
degrees to indicate where each copy starts.
Rotate+Group
This setting prints all copies of the same page before printing the next page. It rotates every
other complete set of pages to indicate where each new set starts.
Settings Menu
2-15
Offset+Collate
This setting prints all pages of each copy (collating), and offsets every other complete copy to
indicate where each copy starts.
Offset+Group
This setting prints all copies of the same page before printing the next page. It offsets every
other complete set of pages to indicate where each new set starts.
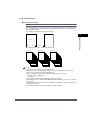
Staple+Collate
This setting prints all pages of each copy (collating) and prepares them for stapling according to
the option selected for Staple+Collate.
2
Printer Settings Menu
Examples of each Finisher option when printing three copies of a three page document:
Off
Collate
1
1
1
2
2
2
3
3
3
1
2
3
1
2
3
1
2
3
Rotate+Group
Rotate+Collate
2 2 2
1 2 3
1
2
3
3
3
3
1
2
3
Offset+Collate
Offset+Group
1
1
1
1
2
3
1
2
3
Staple+Collate
1
1
1
2-16
Settings Menu
1
1
1
1
2
3
3
3
3
2
2
2
IMPORTANT
Please note that the memory of the machine can store up to 8,000 pages. When you send a
secured document to be stored in the memory to be printed at a later time, and the memory is full
(already reached its maximum capacity), your document will not be stored. The memory may be
full because the machine is being used for other functions (such as storing a document in an
inbox or storing a form) or other jobs, which use memory space.
NOTE
Corner
(Upper-Left)
Double
(Top)
Corner
(Upper-Right)
Double
(Right)
ABC
ABC
ABC
ABC
ABC
ABC
ABC
ABC
Double
(Bottom)
Corner
(Lower-Left)
Double
(Left)
ABC
ABC
ABC
ABC
ABC
ABC
ABC
ABC
Corner
(Lower-Right)
• When you are stapling paper in landscape orientation, the image orientation and the staple
position may not match.
Settings Menu
2-17
2
Printer Settings Menu
• [Rotate+Collate] and [Rotate+Group] are available for selection if the paper size is A4, A4R,
JIS-B5, JIS-B5R, LTR, or LTRR.
• If [Rotate+Collate] or [Rotate+Group] is selected, part of the print image may be cut off when the
image is rotated. You need to load the same size paper as the original in the paper drawers in
both landscape and portrait positions. If you do not, all the sheets will be printed in the orientation
that the loaded paper is in.
• [Offset+Group] and [Offset+Collate] are available for selection in combination with the following
optional units and paper sizes.
- If the Finisher-S1 is attached: A3, JIS-B4, A4, A4R, JIS-B5, 11" x 17", LGL, LTR, or LTRR.
- If the Finisher-Q3 or Saddle Finisher-Q4 is attached: A3, JIS-B4, A4, A4R, JIS-B5, A5, 11" x
17", LGL, LTR, LTRR, STMT, or EXEC.
• When you select [Staple+Collate], you can select the stapling position.
• [Staple+Collate] is available for selection if the paper size is A3, JIS-B4, A4, A4R, JIS-B5, 11" x
17", LGL, LTR, LTRR, or EXEC. Available staple locations depend on paper size and image
orientation, as shown.
✓ : Available
✗ : Unavailable
Finisher-Q3/Saddle Finishr-Q4
Staple
Position Corner Double Corner Double Corner Double Corner Double Capacity
(Upper- (Top) (Upper- (Right) (Lower- (Bottom) (Lower- (Left) (Sheets)
Paper Size
Right)
Left)
Right)
Left)
Printer Settings Menu
2
11" × 17"
✓
✓
✓
✗
✓
✓
✓
✗
30
LGL
✓
✓
✓
✗
✓
✓
✓
✗
30
LTR
✓
✗
✓
✓
✓
✗
✓
✓
50
LTRR
✓
✗
✓*
✗
✓
✗
✓*
✗
50
EXEC
✓
✗
✓
✓
✓
✗
✓
✓
50
A3
✓
✓
✓
✗
✓
✓
✓
✗
30
B4
✓
✓
✓
✗
✓
✓
✓
✗
30
A4
✓
✗
✓
✓
✓
✗
✓
✓
50
A4R
✓
✗
✓*
✗
✓
✗
✓*
✗
30
JIS-B5
✓
✗
✓
✓
✓
✗
✓
✓
50
* Will be stapled parallel to the edge of the paper.
• The maximum number of sheets that can be stapled is 30 for A4R, A3, JIS-B4, LGL, and 11" x
17", 50 for A4, JIS-B5, LTR, LTRR, and EXEC. If the number of sheets is greater than the limit,
they will not be stapled.
✓ : Available
✗ : Unavailable
Finisher-S1
Staple
Position Corner Corner Corner Corner Capacity
(Upper- (Upper- (Lower- (Lower- (Sheets)
Paper Size
Right)
Left)
Right)
Left)
11" × 17"
✗
✓
✗
✓
30
LGL
✗
✓
✗
✓
30
LTR
✓
✗
✓
✗
50
LTRR
✗
✓
✗
✓
50
EXEC
✓
✗
✓
✗
50
A3
✗
✓
✗
✓
30
B4
✗
✓
✗
✓
30
A4
✓
✗
✓
✗
50
A4R
✗
✓
✗
✓
50
JIS-B5
✓
✗
✓
✗
50
• The maximum number of sheets that can be stapled is 30 for A3, JIS-B4, LGL, and 11" x 17", 50
for A4, A4R, JIS-B5, LTR, LTRR, and EXEC. If the number of sheets is greater than the limit, they
will not be stapled.
• Make sure to select compatible settings when using Staple+Collate and Punch simultaneously. If
conflicting settings are selected, such as the staple setting for the right side of the paper and the
punch setting for the left, the printer will use neither Staple+Collate nor Punch.
2-18
Settings Menu
Punch
Off*, Top, Bottom, Left, and Right
This setting enables you to specify the desired paper position for two holes to be punched for
binding.
NOTE
Settings Menu
2-19
2
Printer Settings Menu
• This function is available for selection in combination with the following optional units.
- If the Finisher-S1 is attached to the Puncher Unit-Q1.
- If the Finisher-Q3 or Saddle Finisher-Q4 is attached to the Puncher Unit-L1.
• Acceptable paper sizes for this option are A3, JIS-B4, A4, A4R, JIS-B5, JIS-B5R, 11" x 17", LGL,
LTR, LTRR, and EXEC.
• Make sure to select compatible settings when using Staple+Collate and Punch simultaneously. If
conflicting settings are selected, such as the staple setting for the right side of the paper and the
punch setting for the left, the printer will use neither Staple+Collate nor Punch.
• Holes cannot be punched in Heavy Paper, Transparency, Tracing paper, and Labels.
Booklet
On, Off*
This setting enables you to prepare the printout for binding as a booklet. Booklet printing is a
process whereby two pages of data are printed on the front and back of one page and it is
folded in half to create a book.
If [On] is selected, the pages are bound on the left side.
'On'
7
2
Printer Settings Menu
2
1
4
5
8
6
3
IMPORTANT
Please note that the memory of the machine can store up to 8,000 pages. When you send a
secured document to be stored in the memory to be printed at a later time, and the memory is full
(already reached its maximum capacity), your document will not be stored. The memory may be
full because the machine is being used for other functions (such as storing a document in an
inbox or storing a form) or other jobs, which use memory space.
NOTE
• This function is not available for the iR3530/iR2230.
• This function can only be selected if the Saddle Finisher-Q4 is attached.
• This function is not available if Copy Set Numbering is set to 'On'.
• This function is available for selection if the image paper size is A4, A5, JIS-B5, Letter, or
Statement. The data for these page sizes is printed on the following paper. (See the Help
function on the printer driver.)
Page Size
Paper
A4
A3
A5
A4R
JIS-B5
JIS-B4
Letter
11" x 17"
Statement
Letter-R
• If the pages are not all the same size, this function will not work.
• The [Margin] or [Offset X/Offset Y] settings is invalid if this function is set to 'On'.
2-20
Settings Menu
Saddle Stitch
On, Off*
This setting enables you to bind a finished print job by stapling and folding the pages of a
booklet in the center.
'On'
1
8
6
3
IMPORTANT
Please note that the memory of the machine can store up to 8,000 pages. When you send a
secured document to be stored in the memory to be printed at a later time, and the memory is full
(already reached its maximum capacity), your document will not be stored. The memory may be
full because the machine is being used for other functions (such as storing a document in an
inbox or storing a form) or other jobs, which use memory space.
NOTE
• This function is not available for the iR3530/iR2230.
• This function can only be selected if the Saddle Finisher-Q4 is attached.
• This function is not available if Booklet is set to 'Off'.
• If the print job contains only one sheet of paper, the paper will be folded but not stapled.
• The maximum number of sheets that can be saddle stitched is 15. If the number of sheets is
greater than this, they will not be saddle stitched.
• The number of copies of a saddle stitched booklet that can be made at one time is limited as
shown below:
Number of sheets in
each booklet
Max. number of copies
that can be printed
1-15
15
Settings Menu
2-21
Printer Settings Menu
2
Transparency Interleaving
Off*, Blank, and Printed
If you are printing on transparencies, you can use this setting to output a sheet of paper after
each transparency. The paper can be blank, or it can be a paper copy of the transparency.
If [Off] is selected, no sheets are interleaved with the transparencies.
If [Blank] is selected, a blank sheet of paper is inserted between each transparency.
If [Printed] is selected, a printed paper from the print job is inserted between each transparency.
When [Blank] or [Printed] is selected, you can set Transparency Interleaving to print multiple
copies in the number specified in [Copies] settings.
2
Printer Settings Menu
NOTE
• This function is not available if Copy Set Numbering is set to 'On'.
• When printing multiple copies, the Offset+Group for the Finisher option cannot be used.
• If [Printed] is selected, the paper printouts are included in the Prints count. However, if [Blank] is
selected, they are not included in the Prints count.
2-22
Settings Menu
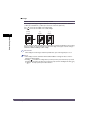
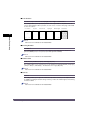
Copy Set Numbering
■ Copy Set Numbering
On, Off*
This setting enables you to print documents with a five digit serial number in the background on
each copy. When [On] is selected, Print Position, Starting Number, Number Size, and Density
options become available.
Copy numbers are printed in the following methods:
2
00001
Printer Settings Menu
00001
00001
00001
00001
00001
Copy Number
When printing three copies of a five page document:
Second Copy
First Copy
00001
00001
00001
00002
00001
00002
00001
00001
00001
00001
00001
00001
00001
00001
00001
00001
00001
00001
00001
00001
00001
00001
00001
00001
00001
00002
00002
00002
00002
00002
00002
00001
00001
00003
00002
00002
00002
00003
00003
00003
00003
00003
00002
00002
00002
00002
00003
00003
00003
00003
00003
00003
00003
00003
00003
00002
00002
00002
00002
00002
00002
00003
00003
00002
00002
00002
00002
00002
00002
00002
00002
00001
00001
00001
00001
00001
Third Copy
00002
00003
00003
00003
00003
00003
00003
00003
00003
00003
00003
00003
00003
00003
NOTE
• This function is not available for the iR3530/iR2230.
• While the machine is operating in this setting, you cannot use Offset+Group modes for the
Finisher option. Instead, Group is automatically used.
• If the copy number has fewer than five digits, the machine prints it as follows:
- Example: If the copy number is 10
10 ➞ 00010
• Copy numbers are not printed on blank pages (pages with no data).
• If this setting is used in combination with [Margin] or [Offset X/Offset Y], part of the copy number
may be cut off.
• This function is not available if the Booklet or Transparency Interleaving option is specified as any
setting other than 'Off'.
• If the number of printed copies exceeds '99999', it returns to '00001'.
Settings Menu
2-23
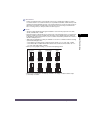
■ Print Position
5 Locations*, Top Left, Bottom Left, Top Right, Bottom Right, and Full Surface
This setting enables you to specify the position of the copy numbers to be printed. You can
select to print numbers in all five positions, in each corner, or over the entire page. The default
is set to '5 Locations'.
5 Locations
00001
2
00001
Top Left
Bottom Left
00001
Top Right
Bottom Right
Full Surface
00001
Printer Settings Menu
00001
00001
00001
00001
00001
NOTE
This function is not available for the iR3530/iR2230.
■ Starting Number
1 to 9999; 1*
This setting enables you to specify the copy number to start numbering. The default is '1'
(printed as 00001), but you can specify up to '9999' (printed as 09999).
NOTE
This function is not available for the iR3530/iR2230.
■ Number Size
Small (12 point), Medium (24 point), and Large (36 point)*
This setting enables you to select the size of copy number from [Small], [Medium], and [Large]
('12.0 pt.', '24.0 pt.', and '36.0 pt.'). The default is set to 'Large (36 point)'.
NOTE
This function is not available for the iR3530/iR2230.
■ Density
1 to 5; 3*
This setting enables you to adjust the number density and has 5 levels you can adjust, with level
'3' (middle level) being the default setting. Selecting '1' makes the number lighter, and selecting
'5' makes it darker.
NOTE
This function is not available for the iR3530/iR2230.
2-24
Settings Menu
Initialize
—
The menu settings can be reset to the factory defaults by initialising the printer settings.
If you select Initialize, the confirmation message <Is it OK to initialize the settings?> is
displayed. If you select [Yes], the settings are initialised. If you select [No], the settings are not
initialised.
IMPORTANT
2
Printer Settings Menu
Do not turn OFF the machine while the settings are being initialised, as this may damage the
machine's memory.
Settings Menu
2-25
UFR II Settings
Halftones
Text: Resolution*, Gradation, and Tone
Graphics: Resolution, Gradation, and Tone*
Image: Resolution, Gradation, and Tone*
Printer Settings Menu
2
This setting specifies how to express halftones in black and white data.
Print data is expressed in dots. Fine gradations, edges, and shades are expressed by using
dither patterns, which are groups of dots. This is called halftone processing.
For example, using a pattern that sharpens character and line edges, or a pattern that
smoothens image and graph gradation, enables you to obtain the most suitable texture.
If 'Resolution' is selected, you can print text with distinct outlines, which is best to print text and
thin lines.
If 'Gradation' is selected, you can print with both smooth gradation and outlines, which is best to
print graphs and graphics that use gradation.
If 'Tone' is selected, you can print with sharp gradation and well-balanced texture, contrasting
light and shade, which is best for printing images.
Paper Save
On*, Off
This setting specifies whether to output a blank page when software sends no print data
between End Page codes.
If 'On' is selected, a blank page is not output, thus saving paper.
If 'Off' is selected, a blank page is output.
2-26
UFR II Settings
Imaging Settings
Settings on this menu specify how to print TIFF (Tagged Image File Format) and JPEG (Joint
Photographic Experts Group) images that are sent directly to the machine using the Remote UI.
The paper size used is determined by the paper size specified when the data is sent to the machine. If
no paper size is specified, the paper size specified in the Settings Menu is used.
Image Orientation
Auto*, Vertical, and Horizontal
This setting specifies whether to print an image vertically or horizontally.
If [Auto] is selected, orientation is automatically adjusted by comparing length and width of the
image. If the width is greater, the image is printed horizontally. If the length is greater, the image
is printed vertically.
If [Vertical] is selected, the image is printed vertically regardless of its dimensions.
If [Horizontal] is selected, the image is printed horizontally regardless of its dimensions.
Zoom
Off*, Auto
This setting enlarges or reduces the size of an image to match the valid printable area of the
paper size specified.
If [Auto] is selected, the size of the image is automatically enlarged or reduced to match the
printable area of the specified paper size. If the size of the image is larger than the printable
area, it is automatically reduced. If the size of the image is smaller than the printable area, it is
automatically enlarged.
NOTE
• If there is blank space in the top, bottom, left, and right edges when using this setting, use the
[Print Position] setting in combination with this setting to adjust the print position.
• This setting uses the same ratio for both the length and width to enlarge or reduce the size of the
image.
• Even if [Off] is selected, the image size is automatically reduced if it is larger than the printable
area of the specified paper size.
Imaging Settings
2-27
Printer Settings Menu
2
NOTE
Print Position
Auto*, Center, and Top Left
This setting specifies the print position for the image.
If [Auto] is selected, the image is printed in the specified position of the paper if the print
position for the image is specified. If the print position is not specified, the image is printed in
the center of the paper.
If [Center] is selected, the image is printed in the center of the paper regardless of whether the
print position of the image is specified or not.
If [Top Left] is selected, the image is printed in the top left of the paper regardless of whether
the print position of the image is specified or not.
Printer Settings Menu
2
NOTE
As the JPEG file format does not contain print position information, JPEG images are printed in
the center of the paper even if [Auto] is selected.
Show Warnings
On*, Off
This setting specifies the action to be taken if an error associated with printing an image occurs
on the machine.
If [On] is selected, the print job is cancelled, and an error message is displayed.
If [Off] is selected, an error message is not displayed, and the print job is processed as is.
NOTE
Depending on the error, an error message may be displayed even if [Off] is selected.
Enlarge Print Area
Off*, On
This setting specifies whether to enlarge the valid printable area on the paper.
If [Off] is selected, the printable area is 5 mm (1/5 inch) from the top, bottom, left and right
edges of the specified paper size.
If [On] is selected, the printable area is 2.5 mm (1/10 inch) from the top, bottom, left and right
edges of the specified paper size.
2-28
Imaging Settings
Utility Menu
Reset Printer
If you want to clear all print jobs in progress as well as data that has been received in memory,
you must reset the printer function. Resetting the printer deletes print jobs in the machine's
memory and the print data that has been received by all interfaces.
NOTE
• If the machine is being used on a network, please note that resetting the printer function may
affect data being received from other users.
• If you reset the printer function, data may be deleted for print jobs that have already been
received, or received while the printer function is being reset. However, in some cases, the data
is not deleted from the machine's memory, and the print job may not print correctly. Canon
recommends that you reset the printer to delete the data and print the job again.
Utility Menu
2-29
2
Printer Settings Menu
—
Printer Settings Menu
2
2-30
Utility Menu
Troubleshooting
3
CHAPTER
This chapter explains how to solve printing problems and the remedial steps to take if printing fails.
When a Message Is Displayed . . . . . . . . . . . . . . . . . . . . . . . . . . . . . . . . . . . . . . . . . . . . . . . . . . . . . . . . 3-2
Printing Problems . . . . . . . . . . . . . . . . . . . . . . . . . . . . . . . . . . . . . . . . . . . . . . . . . . . . . . . . . . . . . . . . . . 3-4
Printer Trouble . . . . . . . . . . . . . . . . . . . . . . . . . . . . . . . . . . . . . . . . . . . . . . . . . . . . . . . . . . . . . . . . . . . . . . . . . . . . . 3-4
Printing Problems . . . . . . . . . . . . . . . . . . . . . . . . . . . . . . . . . . . . . . . . . . . . . . . . . . . . . . . . . . . . . . . . . . . . . . . . . . . 3-5
Print Quality Problems . . . . . . . . . . . . . . . . . . . . . . . . . . . . . . . . . . . . . . . . . . . . . . . . . . . . . . . . . . . . . . . . . . . . . . . 3-7
3-1
When a Message Is Displayed
If the printer is unable to print for some reason, the Error Indicator lights up and a message
indicating the cause of the problem is displayed on the touch panel display. When these
messages are displayed, take the appropriate action to solve the problem.
NOTE
• If a message indicating another problem occurs at the same time as the first error message, a warning
message will not be displayed.
• If the message is shown with the "Error Skip" mark, you can bypass the error and continue printing by
pressing [Error skip]. However, if you do this, print data may be lost or the data may not be printed
correctly. If you want to cancel the procedure, cancel the print job to remove the cause of the problem,
and print the data again.
• To perform an error skip, press [Print] on the System Monitor screen ➞ select the job containing the
error ➞ press [Details] ➞ [Error Skip].
• To cancel a print job, press [Print] on the System Monitor screen ➞ select the job containing the error ➞
press [Cancel]. (See Chapter 5, "Checking Job and Device Status," in the Reference Guide.)
Troubleshooting
3
PDL IMG Invalid Data
Cause
There is data in the TIFF or JPEG images that cannot be processed by the machine.
Remedy
Cancel the job and try printing the data again.
PDL IMG Work Memory Full
Cause
There is not enough memory necessary to process TIFF or JPEG images.
Remedy
Cancel the job and try printing the data again.
PDL UFR II Layout Error
Error Skip
Error Skip
Cause
The page layout cannot be processed due to lack of memory.
Remedy
Set the Graphics Mode in the UFR II printer driver to 'Raster Mode' and print the data again.
(See the Help function on the UFR II printer driver.)
* If Auto Continue is selected, this error is skipped automatically.
PDL UFR II Work Mem Full
3-2
Error Skip
Error Skip
Cause
The work memory for the UFR II mode is full.
Remedy
Set the Graphics Mode in the UFR II printer driver to 'Raster Mode' and print the data again.
(See the Help function on the UFR II printer driver.)
* If Auto Continue is selected, this error is skipped automatically.
When a Message Is Displayed
PDL UFR II DL Mem. Full
Error Skip
Cause
There is not enough memory to register the character set.
Remedy
Set the Graphics Mode in the UFR II printer driver to 'Raster Mode' and print the data again.
(See the Help function on the UFR II printer driver.)
* If Auto Continue is selected, this error is skipped automatically.
Error Skip
Cause
A job has been sent from a version of the UFR II printer driver that is not compatible with this
machine.
Remedy
Change the printer driver version and print the data again.
3
PDL Warning
Cause
An internal error has occurred for the printer function.
Remedy
Perform a printer reset to try to initialise the function again. If this error persists, contact your
local authorised Canon dealer.
PDL IMG Initial. Err
Cause
An error occurred during the initialisation of the function.
Remedy
Cancel the job and then perform a printer reset to initialize the function again. If this error
persists, contact your local authorised Canon dealer.
PDL IMG Process. Error
Cause
An error occurred while processing data.
Remedy
Cancel the job and then perform a printer reset to initialize the function again. If this error
persists, contact your local authorised Canon dealer.
When a Message Is Displayed
3-3
Troubleshooting
PDL UFR II Version Err
Printing Problems
If you have trouble printing, we recommend resolving the problems with the following remedies.
NOTE
Please contact your local authorised Canon dealer if a problem persists, or if you encounter problems
not listed below.
Troubleshooting
3
Printer Trouble
The printer does not work.
Cause 1
There is data remaining in the printer's memory. (The Processing/Data Indicator is flashing or
lit.)
Remedy
Print out the data. (See Chapter 5, "Checking Job and Device Status," in the Reference
Guide.)
Cause 2
There is a problem with the printer or the software.
Remedy
Look at the message on the display and act accordingly. (See "When a Message Is
Displayed," on p. 3-2.)
Printing stops before the job is complete.
Cause
There is data remaining in the printer's memory. (The Processing/Data Indicator is flashing or
lit.)
Remedy
Print out the data. (See Chapter 5, "Checking Job and Device Status," in the Reference
Guide.)
You cannot print a job or store a job.
Cause
The total number of pages in all jobs (maximum capacity is 8,000 pages) or size of the data
in the hard disk has exceeded the limit which can be processed.
Remedy 1
Delete other processes, documents, or forms stored in the box, cancel other jobs being
processed, or wait until those jobs are finished, then print again.
Remedy 2
Divide the job, then print again.
You cannot store a secured print job.
3-4
Cause
The number of secured jobs stored in the machine has exceeded the maximum capacity of
25 jobs, or the total number of pages that are stored or are in jobs has exceeded the limit
(8,000 pages).
Remedy
Delete other secured jobs, or wait until those jobs have finished printing, then print again.
Printing Problems
Printing Problems
Meaningless characters are being printed.
Cause
You have printed from Windows without installing the printer driver for Windows that was
included with the machine.
Remedy
Install the printer driver for Windows that was included with the machine and print the data
again. (See Chapter 2, "Getting Started," in the UFR II Driver Guide.)
Cause
The 'Send According to Font Substitution Table' setting has been set on the printer driver for
Windows.
3
Remedy
Set the 'Send According to Font Substitution Table' setting to the correct setting and print the
data again. (See the Help function on the printer driver.)
Troubleshooting
A font that is different from the one specified is printed.
You cannot print the last page.
Cause
The command that identifies the end of the data has not been sent from the PC. (The
Processing/Data Indicator is flashing or lit.)
Remedy
Clear the print data. (If you print from application software that does not have a print function
and the last page of data is not a full page, the data will remain in the machine's memory.)
(See Chapter 5, "Checking Job and Device Status," in the Reference Guide.)
A print job that you have specified as two-sided printing is printed on one side of the paper.
Cause 1
The paper size you have specified is not supported by two-sided printing.
Remedy
Change the print job settings and print the data again.
Cause 2
The settings for the front and back sides of the paper are different.
Remedy
Change the print job settings and print the data again.
The data does not fit on the page properly.
Cause 1
The paper is not in the correct position.
Remedy
Make sure the machine is set correctly and try printing again. (See Chapter 7, "Routine
Maintenance," in the Reference Guide.)
Cause 2
The data is outside the printable area.
Remedy 1
Insert margins around the data and print the data again. (See the Help function on the printer
driver or the application software manual.)
Remedy 2
Change the 'Scaling' settings on the printer driver and print the data again. (See Chapter 3,
"Basic Print Options" in the UFR II Driver Guide.)
Printing Problems
3-5
The printing location has slipped.
Cause 1
Margin, Offset X, or Offset Y in the printer settings menu have been changed.
Remedy
Set Margin, Offset X, and Offset Y to '0.0' and print the data again. (See "Margin," on p. 2-10,
and "Offset X/Offset Y," on p. 2-12.)
Cause 2
The application software' s top margin and paper location settings are not correct.
Remedy
Set the correct settings for the top margin and the paper location and print the data again.
(See the application software manual.)
Data that should be printed on the same page is printed on two separate pages.
Troubleshooting
3
3-6
Cause
The application software's "Line spacing" and "Number of lines on a page" settings are not
correct.
Remedy
Change the settings so that the data fits on one page and print the data again. (See the
application software manual.)
Printing Problems
Print Quality Problems
The printout is too light or too dark.
Cause 1
The toner density settings are not correct.
Remedy
Adjust the toner density and print the data again. (See "Density," on p. 2-8.)
Cause 2
Toner Save is set to 'On'.
Remedy
Set Toner Save to 'Off' and print the data again. (See "Toner Save," on p. 2-8.)
Troubleshooting
3
Printing Problems
3-7
Troubleshooting
3
3-8
Printing Problems
Appendix
4
CHAPTER
This chapter lists a summary of the specifications for the machine and index.
Specifications . . . . . . . . . . . . . . . . . . . . . . . . . . . . . . . . . . . . . . . . . . . . . . . . . . . . . . . . . . . . . . . . . . . . . 4-2
Software Specifications . . . . . . . . . . . . . . . . . . . . . . . . . . . . . . . . . . . . . . . . . . . . . . . . . . . . . . . . . . . . . . . . . . . . . . 4-2
Index . . . . . . . . . . . . . . . . . . . . . . . . . . . . . . . . . . . . . . . . . . . . . . . . . . . . . . . . . . . . . . . . . . . . . . . . . . . . 4-3
4-1
Specifications
Specifications are subject to change without notice for product improvement or future release.
Software Specifications
Command Language
UFR II
Printable Area
Reduced to 5.0 mm from the top, bottom, left, and right
edges of the paper.
Appendix
4
4-2
Specifications
Index
Numerics
F
2-Sided Printing, 2-5, 2-9
Finisher, 2-15
Form Feed, 2-14
Accessing the Menus, 1-5
Additional Functions Screen, 1-4
Auto Continue, 2-13
B
Binding Location, 2-9
Bond Paper, 2-6
Booklet, 2-20, 2-21, 2-23
G
Group, 2-15
4
Appendix
A
H
Halftones, 2-26
Heavy Paper, 2-6, 2-19
I
C
Collate, 2-15
Color Paper, 2-6
Copies, 2-5
Copy Set Numbering, 2-20, 2-23
Cover Sheet, 2-5
Image Orientation, 2-27
Image Refinement, 2-7
Imaging Settings, 2-4, 2-27
Initialize, 2-25
J
Job Securing Time, 2-13
D
Default Paper Size, 2-6
Default Paper Type, 2-6
Density
Copy Set Numbering, 2-24
Print Quality, 2-8
Dither pattern, 2-26
E
Enlarge Print Area, 2-28
Envelope, 2-6
Error Indicator, 3-2
Error Skip, 3-2
Executive, 2-6
L
Labels, 2-6
Layout, 2-9
Letterhead, 2-5
M
Margin, 2-10, 2-20, 2-23, 3-6
Memory Full, 2-14
Menu Functions, 1-2
Index
4-3
N
Number Size, 2-24
O
Offse+Group, 2-15, 2-22, 2-23
Offset+Collate, 2-15
Offset X, 2-12, 2-20, 2-23
Offset Y, 2-12, 2-20, 2-23
P
Appendix
4
Paper Feed, 2-6
Paper Save, 2-26
Paper Size Override, 2-7
Plain Paper, 2-6
Print After Completing RIP, 2-14
Print Position
Copy Set Numbering, 2-24
Imaging, 2-28
Print Quality, 2-7
Print Quality Problems, 3-7
Printer Settings Menu
Functions List, 2-2
Storing, 1-2
Using, 1-7
Printer Trouble, 3-4
Printing Problems, 3-4, 3-5
Processing/Data Indicator, 2-14, 3-4, 3-5
Punch, 2-19
Puncher Unit, 2-19
R
Raster Image Processor, 2-14
Recycled Paper, 2-6
Remote UI, 1-2
Reset Printer, 2-29
RIP
Print After Completing, 2-14
Rotate+Collate, 2-15
Rotate+Group, 2-15
S
Saddle Stitch, 2-21
Secured Prints, 2-13, 2-14, 2-17
4-4
Index
Settings Menu, 2-2, 2-5
Show Warnings, 2-28
Software Specifications, 4-2
Specifications, 4-2
Stack Bypass, 2-5
Staple+Collate, 2-14, 2-15, 2-16, 2-17, 2-18
Staple Position, 2-15, 2-17
Starting Number, 2-24
T
Timeout, 2-14
Toner Save, 2-8
Tracing Paper, 2-6, 2-19
Transparency, 2-6, 2-19, 2-22
Transparency Interleaving, 2-22, 2-23
U
UFR II Settings, 2-3, 2-26
Using the Printer Settings Menu, 1-7
Utility Menu, 2-4, 2-29
Z
Zoom, 2-27