1
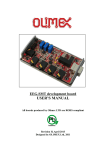
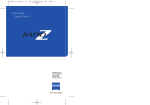
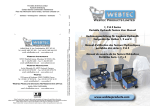
Canon
Service Bulletin
COPIER
Issued by Canon Europa N.V.
Model:
Ref No.:
iR3530
iR2230
iR4570-008
(F1-T01-0M4-10018-01)
Date:
28-01-05
Subject:
Introducing a new model (iR2230/3530)
Background:
With introduction of the new model iR2230/3530, differences from the existing model iR2270/3570 are informed in
this bulletin.
Detail:
1. Differences
1-1. System Configuration
1-1-1. System Configuration of the Delivery Options
The options that have been deleted:
- Finisher-Q3/Saddle Finisher-Q4
- Buffer Pass-E1
- Puncher Unit-L1/N1/P1
Others
- 3 Way Unit-A1 has been changed from standard equipment to an option (iR3530).
1-1-2. System Configuration of the Pickup Options
The option that has been deleted:
- Paper Deck-Q1
1-1-3. System Configuration of the Print/Transmission Options
The options that have been added:
- UFR II Printer Kit-E3: To add the BDL function by the combination of the P Boot ROM and the HDD.
- Multi-PDL Printer Kit-E1: To add the UFR II/PCL/PS print function using the N Boot ROM.
- iR System Expansion Kit-A1: To add the HDD to iR2230/3530.
- Printer Kit-E2: To add the BDL/PCL function using the H Boot ROM.
The options that have been deleted:
- LIPS LX Printer&Scanner Kit-A1 (P Boot ROM)
- LIPS V Expansion Kit-A1 (License)
- Direct Print Expansion Kit-A1 (License)
- iR 256MB Expansion RAM-B1
- Multi FAX Board-D1
(1/36)
iR4570-008
- Send Expansion Kit-E1 (License)
- PDF Creation Function Expansion Kit-B1 (License)
1-2. External View/Operation
Change of the control panel unit
[1] The LCD has become smaller and black-and-white.
[2] The function keys have become hard keys.
[1]
[2]
1
2
3
4
5
6
7
8
9
0
F-1
(2/36)
iR4570-008
1-3. User Mode
Compared with iR2270/3570, the following service modes have been deleted.
Mode-1
iR4570/3570, 2870/2270
iR2230/3530
Mode-2
Mode-2
Description
deleted
deleted
Start key
deleted
deleted
size: A3,11x17/B4/LGL/
A4R,LTRR
position: -2.0 mm to +2.0
mm (in 0.35-mm
increments)/*0 mm
deleted
deleted
Description
- w/ Fisher-Q3/Q4
tray A: finisher output tray
(upper)
tray B: finisher output tray
(lower)
tray C: host middle tray
Common
settings
select special
tray**
(w/ finisher)
tray A: D14*copy/*Box/
printer/receive/fax/other
tray B: copy/Box/*printer/
receive/fax/other
tray C: copy/Box/printer/
receive/*fax/*other
fine tune for receive/fax
tray A: fax/fax 1/fax 2
tray B: receive/fax 1/fax 2
tray C: *receive/*fax 1/
*fax 2
center bind
staple
edging**
Adjustments and
Cleaning
(w/ saddle
finisher)
center bind
position
change**
(w/ saddle
finisher)
1-4. HDD
The HDD has become an option.
1-5. Shutdown Sequence
If the HDD of standard equipment is not mounted, the shutdown sequence is not performed at power-off. However,
if the optional HDD is mounted, the shutdown sequence same as that of iR2270/3570 (i.e., the machine equipped
with the HDD as standard equipment) is performed, and then the power is turned off.
(3/36)
iR4570-008
1-6. Paper Pickup/Feeding System
The Paper Deck-Q1 has been deleted from options. With this change, the paper pickup areas from the paper deck are
eliminated from the paper path illustrations.
The eliminated areas are shown below.
[6]
[5]
[4]
[1]
[2]
[3]
F-2
[1] Pickup from the Cassette 1
[2] Pickup from the Cassette 2
[3] Pickup from the Cassette Feeding Unit (option)
[4] Pickup from the Paper Deck (delete)
[5] Pickup from the Manual Tray
[6] Deliver to the Copy Tray 1
(4/36)
iR4570-008
1-7. Function, Power Supply
Some pickup/delivery options have been deleted. With this change, the names of options to which power is supplied
are eliminated from the power supply illustration on the Service Manual.
Reader heater(H5)
Heater switch
SW5
DADF
-N1
Reader heater(H6)
HVT
High-voltage
power supply PCB
DC controller PCB
Pickup
heater
mounting
kit
2 4VU2
24VU1
13VA1
5VA
3VA
Printer power supply block
24VU2
13VA2
Cassette pedestal(H1C)
24VU1
Printer
unit
Deck heater(H7)
SW2
Front cover
open/close switch
Heater
switch PCB
Main switch
SW1
24VU2
Cassette heater(H4)
ELCB2
13VA2
Leakage breaker
Fixing main heater(H1)
AC driver PCB
Printer
power
supply PCB
Fixing sub heater(H2)
24VU1
Controller power supply PCB
24VU2
13VA1
13VA2
Thermal switch(TP1)
13VB
3VB
To Finisher-Q3/Q4
24VU1: non-all night
24VU2: non-all night
24VA: non-all night
13VA1: non-all night
13VA2: non-all night
13VB: non-all night
5VA: non-all night
3VA: non-all night
3VB: all night
24VU2
13VA
13VB
5VA
Controller
PCB
To Cassette Feeding Unit-Y2
13VA2
To Finisher-S1
To Buffer Path-E1
To 3-Way Unit-A1
13VA2
3VB
Super G3 Fax
Board-Q1
To 3-Way Unit-A1
To Finisher-Q3/Q4
3VB
3VA
Accessories
All-night
power
power
supply PCB supply PCB
13VA1
24VA
24VU2
(by way of Cassette
Feeding Unit-Y2)
Side Paper Deck-Q1
To Buffer Path-E1
To Finisher-S1
F-3
(5/36)
iR4570-008
1-8. Control Panel Unit
1-8-1. Block Diagram
As mentioned above, the LCD has become black-and-white, and the hard keys have been added. Therefore, the board
connection in the control panel unit is changed. The changed blocks are shown below.
from Controller Unit
A18
4
J1118
1
14
B1
A1
J511
B18
1
16
J6802
J1116
16
Touch Panel
1
Control Panel Key
Switch PCB
J1119
Control Panel CPU PCB
1
14
LCD Panel
J1117
1
J6801
1
14
4
J956
1
3
J955
1
1
J1121
3
1
J1120
2
Control Panel
Inverter PCB
to Foot Switch
F-4
1-8-2. Electrical Parts Layout
The electrical parts related to the control panel unit are placed as shown below. The parts [2] to [4] are related to the
control panel unit.
No.
Name
Part No.
[1]
Reader Controller PCB
FG3-3765
[2]
Control Panel Inverter PCB
FM2-2753
[3]
Control Panel CPU PCB
FM2-2754
[4]
Control Panel Key PCB
FG6-8939
Detail
Control the reader unit/ADF
Control to turn ON the backlight of
the LCD
Control the control panel unit
Control numeric keys entry
information
(6/36)
iR4570-008
[1]
[4]
[3]
[2]
F-5
1-9. Parts Replacement Procedure
1-9-1. Control Panel Unit
With change of the control panel unit, replacement procedures of the following parts related to the control panel unit
have been prepared newly.
- Removing the control panel unit
- Removing the control panel frame
- Removing the control panel inverter PCB
- Removing the control panel key switch PCB
- Removing the control panel CPU PCB
- Removing the control panel LCD PCB
The procedure for removing the control panel bottom cover is not changed.
The following are the new replacement procedures.
1-9-1-1. Removing the control panel unit
1) Open the right door [1].
F-6
(7/36)
iR4570-008
2) Remove the 2 screws [1].
F-7
3) Remove the rubber cap [1], and detach the screw [2].
4) Slide the control panel unit to the arrow direction.
F-8
5) Disconnect the connector [1], and remove the control panel unit.
F-9
(8/36)
iR4570-008
1-9-1-2. Removing the control panel frame
1) Disconnect the flat cable [1] to the arrow direction.
2) Move the connector 2 stoppers [2] to the arrow direction, and disconnect the 2 flat cables [3].
F-10
3) Disconnect the 3 connectors [1].
F-11
4) Detach the harness from the 3 clamps [1].
F-12
(9/36)
iR4570-008
5) Remove the 5 screws [1], and detach the control panel hook [2].
F-13
6) Remove the 11 self-tapping screws [1] and the flat screw [2], and detach the control panel frame [3].
F-14
Points to note on the cable when attaching the control panel frame.
1. Make sure that the inverter cable properly passes the path [1] indicated on the figure below.
F-15
(10/36)
iR4570-008
2. Be sure to pass the inverter cable to the cable clip [1] after attaching the control panel frame.
F-16
1-9-1-3. Removing the control panel inverter PCB
1) Disconnect the 2 connectors [1].
2) Remove the 2 self-tapping screws [2], and detach the control panel inverter PCB [3].
F-17
1-9-1-4. Removing the control panel key switch PCB
1) Remove the 5 self-tapping screws [1], and detach the control panel key switch PCB [2].
F-18
(11/36)
iR4570-008
1-9-1-5. Removing the control panel CPU PCB
1) Disconnect the flat cable [1] to the arrow direction.
2) Move the connector 2 stoppers [2] to the arrow direction, and disconnect the 2 flat cables [3].
F-19
3) Disconnect the 3 connectors [1].
F-20
4) Remove the 4 screws [1], and detach the control panel CPU PCB [2].
F-21
(12/36)
iR4570-008
1-9-1-6. Removing the control panel LCD PCB
1) Disconnect the connector [1] from the control panel inverter PCB.
2) Remove the 3 self-tapping screws [2], and detach the control panel LCD PCB [3].
F-22
1-9-2. Removing the HDD
The replacement procedure of the optional HDD is same as that of the HDD mounted on the existing machines as
standard equipment. On the Service Manual, "Option" is added to the title.
Removing the HDD (option)
1) Remove the 2 screws [1], and detach the HDD [2] to the arrow direction.
F-23
(13/36)
iR4570-008
1-10. Error Code
In keeping with the exclusion of the Finisher Q3, Saddle Finisher Q4, and Puncher Unit L1/N1/P1 from the options,
the error codes related to the above have been deleted from the list.
Deleted error codes are described below.
Some of the error codes apply to the Finisher S1 and Puncher Unit Q1/S1/T1, therefore, applicable error codes will
be displayed when any of the options is installed.
Code
Detailed
Name/Outline
Detected spec.
Action on error
code
E500
0001
E503
0002
0003
E505
Replace the finisher
controller PCB. Check
the cable. Replace the
DC controller PCB.
Communicati
on error
between the
finisher and
the machine
Communicati
on error within
the finisher
An error
occurs in the
communication between
the finisher
and the saddle
unit
Replace the finisher
controller PCB.
Replace the saddle
controller PCB. Check
the cable.
An error
occurs in the
communication between
the finisher
and the punch
unit
Replace the finisher
controller PCB.
Replace the punch
driver PCB. Check the
cable.
An error
occurs in the
data stored in
the backup
memory.
Turn off the main
power, check the
wiring of the DC
controller PCB/the
finisher PCB, check the
fuse of 24-V, and turn
on the main power.
The EEPROM
data on the
punch unit is
faulty.
Replace the punch
driver PCB. Replace
the finisher controller
PCB.
0001
Back-up
memory error
in the finisher
0002
(14/36)
iR4570-008
Code
Detailed
Name/Outline
Detected spec.
Action on error
The home
position sensor
does not turn
off when the
trailing edge
assist motor
has rotated for
a specific
period of time.
Replace the finisher
controller PCB.
Replace the trailing
edge assist motor.
code
E514
0001
0002
E519
The trailing
edge assist
motor failure
0001
0002
The gear
change motor
error
The home
position sensor
does not turn
on when the
trailing edge
assist motor
has rotated for
a specific
period of time
The home
position sensor
does not turn
off when the
gear change
motor has
rotated for a
specific period
of time.
Replace the finisher
controller PCB.
Replace the gear
change motor. Check
the gear change
mechanism.
The home
position sensor
does not turn
on when the
gear change
motor has
rotated for a
specific period
of time.
(15/36)
iR4570-008
Code
Detailed
Name/Outline
Detected spec.
Action on error
The home
position sensor
does not turn
off when the
front jog motor
has rotated for
a specific
period of time.
Replace the finisher
controller PCB.
Replace the front job
motor. Check the front
jog motor drive. Check
the front jog H.P.
sensor.
code
E530
0001
0002
E531
The front jog
motor error
0001
0002
The stapler
error
The home
position sensor
does not turn
on when the
front job motor
has rotated for
a specific
period of time.
The home
position sensor
does not turn
off when the
stapler motor
has rotated for
a specific
period of time.
Replace the finisher
controller PCB.
Replace the stapler.
Check the cable.
The home
position sensor
does not turn
on when the
stapler motor
has rotated for
a specific
period of time.
(16/36)
iR4570-008
Code
Detailed
Name/Outline
Detected spec.
Action on error
The home
position sensor
does not turn
off when the
stapler shift
motor has
rotated for a
specific period
of time.
Replace the finisher
controller PCB.
Replace the stapler
shift motor. Check the
stapler shift H.P.
sensor. Check the
cable.
code
E532
0001
0002
E535
The stapler
shift motor
error
0001
0002
The swing
cam error
The home
position sensor
does not turn
on when the
stapler shift
motor has
rotated for a
specific period
of time.
The home
position sensor
does not turn
off when the
swing motor
has rotated for
a specific
period of time.
Replace the finisher
controller PCB.
Replace the swing cam
motor. Check the
swing cam H.P. sensor.
Check the cable.
The home
position sensor
does not turn
on when the
swing motor
has rotated for
a specific
period of time.
(17/36)
iR4570-008
Code
Detailed
Name/Outline
Detected spec.
Action on error
When the rear
jog plate is
moved to the
home position,
the home
position sensor
does not turn
on when the
rear jog plate
has started to
move or within
2000 ms.
Replace the finisher
controller PCB.
Replace the rear jog
motor. Check the rear
jog drive mechanism.
Check the rear jog H.P.
sensor.
code
E537
0001
0002
E540
The rear jog
error
When the rear
jog plate is
moved from
the home
position, the
home position
sensor does not
turn off within
1000 ms after
the rear jog
plate has
started move.
0002
The upper tray
lifter motor
clock is faulty.
0003
0004
The upper tray
lifter motor
error
Replace the tray shift
motor 1. Replace the
finisher controller
PCB. Check the tray
lifter drive mechanism.
An error
occurs in the
tray shift area.
Replace the PCB on the
tray shift area sensor 1.
Replace the finisher
controller PCB.
The safety
switch turns
on.
Check the tray closed
detecting switch 1.
Replace the finisher
controller PCB.
(18/36)
iR4570-008
Code
Detailed
Name/Outline
Detected spec.
Action on error
The lower tray
lifter motor is
faulty.
Replace the tray shift
motor 2. Replace the
finisher controller
PCB. Check the tray
lifter mechanism.
An error
occurs in the
tray shift area.
Replace the PCB on the
tray shift area sensor 2.
Replace the finisher
controller PCB.
code
E542
0002
0003
E584
0001
0002
E590
The lower tray
lifter motor
error
The shutter
unit error
0001
0002
The punch
motor error
The shutter
open detecting
sensor does not
turn off (the
shutter does
not close).
The shutter
open detecting
sensor does not
turn on (the
shutter does
not open).
The punch
home position
sensor cannot
be detected
when the
punch motor
has been
driven for 200
ms.
Check the stack
ejection motor. Check
the shutter open/closed
clutch. Check the
shutter H.P. sensor.
Replace the finisher
controller PCB.
Check the punch
motor. Check the
punch motor clock
sensor. Check the
punch driver PCB.
Replace the finisher
controller PCB.
The puncher
can not detect
the punch
home position
sensor when
the punch
motor stops at
the initial
operation.
(19/36)
iR4570-008
Code
Detailed
Name/Outline
Detected spec.
Action on error
The voltage of
receiving light
is faulty when
the light has
been emitted.
Check the paper dust
sensor. Check the
punch driver PCB.
Replace the finisher
controller PCB.
code
E591
0001
0002
The punch
dust sensor
error
The voltage of
receiving light
is faulty when
the light has
not been
emitted.
E592
0001
The trailing
edge sensor/
the side
registration
sensor error
The voltage of
receiving light
is faulty when
the light has
been emitted
(the trailing
edge sensor)
Check the trailing edge
sensor. Check the side
registration sensor.
Check the punch driver
PCB. Replace the
finisher controller
PCB.
E592
0002
The trailing
The voltage of
receiving light
is faulty when
the light has
not been
emitted (the
trailing edge
sensor).
Check the trailing edge
The voltage of
receiving light
is faulty when
the light has
been emitted
(the side
registration
sensor 1).
Check the trailing edge
edge sensor/the
side registration
sensor error
E592
0003
The trailing
edge sensor/the
side registration
sensor error
sensor. Check the side
registration sensor.
Check the punch driver
PCB. Replace the finisher
controller PCB.
sensor. Check the side
registration sensor.
Check the punch driver
PCB. Replace the finisher
controller PCB.
(20/36)
iR4570-008
Code
Detailed
Name/Outline
Detected spec.
Action on error
The trailing
The voltage of
receiving light
is faulty when
the light has
not been
emitted (the
side
registration
sensor 1).
Check the trailing edge
The voltage of
receiving light
is faulty when
the light has
been emitted
(the side
registration
sensor 2).
Check the trailing edge
The voltage of
receiving light
is faulty when
the light has
not been
emitted (the
side
registration
sensor 2).
Check the trailing edge
The voltage of
receiving light
is faulty when
the light has
been emitted
(the side
registration
sensor 3).
Check the trailing edge
code
E592
0004
edge sensor/the
side registration
sensor error
E592
0005
The trailing
edge sensor/the
side registration
sensor error
E592
0006
The trailing
edge sensor/the
side registration
sensor error
E592
0007
The trailing
edge sensor/the
side registration
sensor error
sensor. Check the side
registration sensor.
Check the punch driver
PCB. Replace the finisher
controller PCB.
sensor. Check the side
registration sensor.
Check the punch driver
PCB. Replace the finisher
controller PCB.
sensor. Check the side
registration sensor.
Check the punch driver
PCB. Replace the finisher
controller PCB.
sensor. Check the side
registration sensor.
Check the punch driver
PCB. Replace the finisher
controller PCB.
(21/36)
iR4570-008
Code
Detailed
Name/Outline
Detected spec.
Action on error
The trailing
The voltage of
receiving light
is faulty when
the light has
not been
emitted (the
side
registration
sensor 3).
Check the trailing edge
The voltage of
receiving light
is faulty when
the light has
been emitted
(the side
registration
sensor 4).
Check the trailing edge
The voltage of
receiving light
is faulty when
the light has
not been
emitted (the
side
registration
sensor 4)
Check the trailing edge
When light has
been emitted,
the receiving
light voltage
H.P. sensor
does not turn
off.
Check the side
registration motor.
Check the side
registration motor HP
sensor. Check the
punch driver PCB.
Replace the finisher
controller PCB. Check
the punch shift
mechanism.
code
E592
0008
edge sensor/the
side registration
sensor error
E592
0009
The trailing
edge sensor/the
side registration
sensor error
E592
000A
The trailing
edge sensor/the
side registration
sensor error
E593
0001
0002
The punch
shift motor
error
When light has
not been
emitted, the
receiving light
voltage H.P.
sensor does not
turn on.
sensor. Check the side
registration sensor.
Check the punch driver
PCB. Replace the finisher
controller PCB.
sensor. Check the side
registration sensor.
Check the punch driver
PCB. Replace the finisher
controller PCB.
sensor. Check the side
registration sensor.
Check the punch driver
PCB. Replace the finisher
controller PCB.
(22/36)
iR4570-008
Code
Detailed
Name/Outline
Detected spec.
Action on error
The paper
positioning
plate HP
sensor does not
turn on when
the paper
positioning
plate motor has
been driven for
1.33 sec. The
paper
positioning
plate motor
(M4S)/the
paper
positioning HP
sensor (P17S)
Check the paper
positioning plate
motor. Check the
paper positioning plate
HP sensor. Replace the
finisher controller
PCB. Check the paper
positioning plate drive
mechanism.
code
E5F0
0001
0002
The saddle
paper
positioning
plate error
The paper
positioning
plate HP
sensor does not
turn off when
the paper
positioning
plate motor has
been drive for
1 sec. The
paper
positioning
plate motor
(M4S)/the
paper
positioning HP
sensor (P17S)
(23/36)
iR4570-008
Code
Detailed
Name/Outline
Detected spec.
Action on error
The number of
detection pulse
of the paper
folder motor
clock sensor
drops below a
specific value.
The paper
folder motor
(M2S)/the
paper folder
motor clock
sensor (PI4S)
Check the paper folder
motor. Check the
paper folder motor
clock sensor. Replace
the finisher controller
PCB. Check the paper
folder plate drive
mechanism.
code
E5F1
0001
0002
The saddle
paper folder
error
The state of the
paper folding
home position
sensor does not
change when
the paper
folder motor
has been
driven for 3
sec. The paper
folder motor
(M2S)/the
paper folder
motor clock
sensor (PI4S)
(24/36)
iR4570-008
Code
Detailed
Name/Outline
Detected spec.
Action on error
The guide
home position
sensor does not
turn on when
the guide
motor has been
driven for
0.455 sec. The
guide motor
(M3S)/the
guide HP
sensor (PI13S)
Check the guide motor.
Check the guide home
position sensor.
Replace the finisher
controller PCB. Check
the guide drive
mechanism.
code
E5F2
0001
The saddle
guide error
0002
The guide
home position
sensor does not
turn off when
the guide
motor has been
driven for 1
sec. The guide
motor (M3S)/
the guide HP
sensor (PI13S)
(25/36)
iR4570-008
Code
Detailed
Name/Outline
Detected spec.
Action on error
The alignment
plate home
position sensor
does not turn
on when the
alignment
motor has been
driven for 0.5
sec (initially,
driven for 1.67
sec). The
alignment
motor (M5S)/
the alignment
plate home
position sensor
(PI5S)
Check the alignment
motor. Check the
alignment plate HP
sensor. Check the
alignment plate drive
mechanism. Replace
the finisher controller
PCB.
code
E5F3
0001
The saddle
alignment
error
0002
The alignment
plate home
position sensor
does not turn
off when the
alignment
motor has been
driven for
1sec. The
alignment
motor (M5S)/
the alignment
plate home
position sensor
(PI5S)
(26/36)
iR4570-008
Code
Detailed
Name/Outline
Detected spec.
Action on error
The stitch
operation
home position
switch does
not go on when
the stitch
motor (rear)
has been
rotated in
CCW for 0.5
sec or more.
The stitch
motor (rear,
M6S)/the
stitch
operation
home position
sensor (rear,
MS5S)
Replace the stitcher
(rear). Check the
cable. Replace the
finisher controller
PCB.
code
E5F4
0001
0002
The saddle
rear stapler
error
The stitch
operation
home position
switch does
not go off
when the stitch
motor (rear)
has been
rotated in CW
for 0.5 sec or
more. The
stitch motor
(rear, M6S)/
the stitch
operation
home position
sensor (rear,
MS5S)
(27/36)
iR4570-008
Code
Detailed
Name/Outline
Detected spec.
Action on error
The stitch
operation
home position
sensor does not
go on when the
stitch motor
(front) has
been rotated in
CCW for 0.5
sec or more.
The stitch
motor (front,
M7S)/the
stitch
operation
home position
sensor (front,
MS7S)
Replace the stitcher
(front). Check the
cable. Replace the
finisher controller
PCB.
code
E5F5
0001
0002
The saddle
front stapler
error
The stitch
operation
home position
sensor does not
go off when
the stitch
motor (front)
has been
rotated in CW
for 0.5 sec or
more. The
stitch motor
(front, M7S)/
the stitch
operation
home position
sensor (front,
MS7S)
(28/36)
iR4570-008
Code
Detailed
Name/Outline
Detected spec.
Action on error
Check the paper push
plate motor. Check the
paper push plate home
position sensor.
Replace the finisher
controller PCB.
code
E5F6
0001
The saddle
push-on error
The paper push
plate home
position sensor
does not go on
when the paper
push plate
motor has been
driven for 0.3
sec or more.
The paper push
plate motor
(M8S)/the
paper push
plate HP
sensor (PI14S)
E5F6
0002
The saddle
The paper push
plate home
position sensor
does not go off
when the paper
push plate
motor has been
driven for 80
ms or more.
The paper push
plate motor
(M8S)/the
paper push
plate HP
sensor (PI14S)
push-on error
(29/36)
iR4570-008
Code
Detailed
Name/Outline
Detected spec.
Action on error
The saddle
The number of
detection pulse
of the paper
push plate
motor clock
sensor drops
below a
specific value.
The paper push
plate motor
(M8S)/the
paper push
plate motor
clock sensor
(PI1S)
Check the paper push
plate motor. Check the
paper push plate motor
clock sensor. Replace
the finisher controller
PCB.
code
E5F6
0003
push-on error
(30/36)
iR4570-008
Code
Detailed
Name/Outline
Detected spec.
Action on error
The saddle
The paper push
plate leading
edge position
sensor does not
go off when
the paper push
plate motor has
been driven for
80 ms or more.
The paper push
motor (M8S)/
the paper push
plate leading
edge position
sensor (PI15S)
Check the paper push
plate motor. Check the
paper push plate
leading edge position
sensor. Replace the
finisher controller
PCB.
code
E5F6
0004
push-on error
E5F6
0005
The saddle
push-on error
The paper push
plate leading
edge position
sensor does not
go on when the
paper push
plate motor has
been driven for
0.3 sec or
more. The
paper push
plate motor
(M8S)/the
paper push
plate leading
edge position
sensor (PI15S)
(31/36)
iR4570-008
Code
Detailed
Name/Outline
Detected spec.
Action on error
0001
The connector
of the guide
home position
sensor is found
disconnected.
The connector
of the guide
home position
sensor (PI13S)
Connect the connector
of the guide home
position sensor. Check
the cable. Replace the
finisher controller
PCB.
0002
The connector
of the paper
push plate
home position
sensor is found
disconnected.
The connector
of the paper
push plate
home position
sensor (PI14S)
Connect the connector
of the paper push plate
home position sensor.
Check the cable.
Replace the finisher
controller PCB.
The connector
of the paper
push plate
leading edge
position sensor
is found
disconnected.
The connector
of the paper
push plate
leading edge
position sensor
(PI15S)
Connect the paper push
plate leading edge
position sensor. Check
the cable. Replace the
finisher controller
PCB.
code
E5F8
The saddle
connector
error
0003
(32/36)
iR4570-008
Code
Detailed
Name/Outline
Detected spec.
Action on error
The saddle
switch error
While the
following
covers are
closed (as
detected), the
inlet cover is
open (as
detected) for 1
sec or more
from the start
of initial
rotation of the
host machine
or the start of
printing.
- Inlet cover
sensor (PI9S)
- Front cover
open/closed
sensor (PI2S)
- Delivery
cover sensor
(PI3S)
OR the front
cover switch
(MS2S) or the
delivery cover
switch (MS3S)
is open.The
inlet cover
switch
(MS1S)/the
front cover
switch
(MS2S)/the
delivery cover
switch (MS3S)
Check the inlet cover
switch. Check the inlet
cover sensor. Check
the front cover open/
closed sensor. Check
the delivery cover
sensor. Replace the
finisher controller
PCB.
code
E5F
0001
(33/36)
iR4570-008
Code
Detailed
Name/Outline
Detected spec.
Action on error
The saddle
While the
following
covers are
closed (as
detected), the
front cover
switch is open
(as detected)
for 1 sec or
more from the
start of initial
rotation of the
host machine
or the start of
printing.
- Inlet cover
sensor (PI9S)
- Front cover
open/closed
sensor (PI2S)
- Delivery
cover sensor
(PI3S)
- Front cover
switch
(MS2S)/
Delivery cover
switch (MS3S)
Check the front cover
switch. Check the inlet
cover sensor. Check
the front cover open/
closed sensor. Check
the delivery cover
sensor. Replace the
finisher controller
PCB.
code
E5F
0002
switch error
(34/36)
iR4570-008
Code
Detailed
Name/Outline
Detected spec.
Action on error
Saddle switch
Open of the
delivery cover
switch is
detected for 1
sec. or more
after the host
machine starts
initial rotation/
printing while
the following
sensors detect
close of their
covers.
- Inlet cover
sensor (PI9S)
- Front cover
open/close
sensor (PI2S)
- Delivery
cover sensor
(PI3S)
- Delivery
cover switch
(MS3S)
Check the delivery
cover switch. Check
the inlet cover sensor.
Check the front cover
open/close sensor.
Check the delivery
cover sensor. Replace
the finisher controller
PCB.
code
E5F
0003
error
1-11. Installation
1-11-1. Items Included in the Package
The shutdown caution label has been eliminated from the items included in the package. This is because the HDD is
optional and the machine does not perform the shutdown sequence in normal mode.
1-11-2. Installation Procedure
The procedure for attaching the shutdown caution label has been deleted.
The deleted procedure is shown below.
- Shutdown caution label
1) Attach the shutdown caution label [1] of appropriate language to the left of the main power [2] on the right cover
(rear).
(35/36)
iR4570-008
[2]
[1]
F-24
MEMO
The shutdown caution label is included with the optional iR System Expansion Kit-A1. Attach the label when
installing the kit.
1-12. MEAP
The new model (iR2230/3530) is not equipped with the MEAP function.
1-13. Version Upgrade
Differences in terms of version upgrade are shown below.
1-13-1. Available SST
Version 3.11 or later
1-13-2. Selective Model Name
Standard: iR2230 (DC Controller PCB for iR3530: iR3530)
When the hard disk is added: iR2230HD (DC Controller PCB for iR3530: iR3530HD)
1-13-3. System Software of Version Upgrade
There are neither MEAPCONT nor SDICT. In addition to this, there are neither RUI nor KEY in standard mode (i.e.,
without the HDD).
1-13-4. System CD
The system CD for iR2230/3530 differs from the one for the base model (iR2270/3570). Further, another system CD
is used when adding the hard disk.
2. Service Parts
Refer to the attached pages.
3. Serial No.
iR2230
230V F14-3293 KJD00000iR3530
230V F14-6793 KJH00000-
(36/36)
DIFFERENCE
DIFFERENCE
DIFFERENCE
REDUCTION
REDUCTION
DIFFERENCE
ADDITIONAL
ADDITIONAL
ADDITIONAL
ADDITIONAL
ADDITIONAL
ADDITIONAL
ADDITIONAL
ADDITIONAL
REDUCTION
DIFFERENCE
DIFFERENCE
DIFFERENCE
REDUCTION
DIFFERENCE
DIFFERENCE
REDUCTION
No.
FIG
1
2
3
4
5
6
7
8
9
10
11
12
13
14
15
16
17
18
19
20
21
22
130
130
130
315
100
130
130
130
130
130
130
130
130
130
621
100
900
900
900
100
310
130
KEY
21
2
17
39
5
23
24
22
12
11
7
9
8
36
38
2
5
3
23
57
4
Old
iR2270 230V
EURO
F14-3291-000
FM2-0362-000
FC5-5457-000
FC5-4458-000
FC5-0530-000
2-0352-000
FK2-0246-000
Q'TY
FG6-8939-001
FG3-3965-000
FG3-2834-000
FG3-2836-000
FG3-2835-000
FC6-5087-000
FC6-4832-000
FM2-3226-000
WA7-3296-000
WM2-5216-000
FB3-2224-000
RB1-6539-000
FH2-7037-000
1
1
1
1
1
1
1
1
1
1
1
1
1
1
1
1
1
1
1
New
iR2230 230V EURO
F14-3293-000
FM2-0325-000
FC5-1403-000
FC5-1501-000
FH6-0735-000
6-2908-000
5-1503-000
5-1504-000
2-2753-000
2-2754-000
FM2-2755-000
FM2-2756-000
FM2-2757-000
FC6-4829-000
FM2-3698-000
WA7-3625-000
FC6-5052-000
FC6-5064-000
Q'TY
1
1
1
0
0
1
1
1
1
1
1
1
1
1
0
1
1
1
0
1
1
0
Description
CONTROL PANEL ASSEMBLY
PANEL, CONTROL PANEL
SHEET, LCD ELECTROSTATIC
COVER
SHEET, PERTAINING
ANALOG TOUCH PANEL UNIT
KEY, FUNCTION
HOLDER, FUNCTION
KEY, INTERRUPT
C. PANEL INVERTER PCB ASSEMBLY
CONTROL PANEL CPU PCB ASSEMBLY
PANEL SWITCH PCB ASSEMBLY
CABLE, INVERTER
CABLE, SWITCH
SHEET, BOTTLE LIMIT
PLATE, NAME
BOARD, BW3 CONTROLLER
DIMM, MT8LSDT3264AY-133, SDRAM
HDD, HTS541020G9AT00
PIN, HINGE
DAMPER
CABLE, FLAT
2
DIFFERENCE
DIFFERENCE
DIFFERENCE
REDUCTION
REDUCTION
ADDITIONAL
ADDITIONAL
ADDITIONAL
REDUCTION
DIFFERENCE
ADDITIONAL
ADDITIONAL
ADDITIONAL
ADDITIONAL
ADDITIONAL
REDUCTION
REDUCTION
REDUCTION
REDUCTION
REDUCTION
REDUCTION
REDUCTION
REDUCTION
REDUCTION
DIFFERENCE
REDUCTION
REDUCTION
REDUCTION
REDUCTION
REDUCTION
REDUCTION
REDUCTION
REDUCTION
REDUCTION
REDUCTION
REDUCTION
REDUCTION
REDUCTION
REDUCTION
REDUCTION
REDUCTION
No.
FIG
1
2
3
4
5
6
7
8
9
10
11
12
13
14
15
16
17
18
19
20
21
22
23
24
25
26
27
28
29
30
31
32
33
34
35
36
37
38
39
40
41
130
130
130
100
352
130
130
130
130
351
352
KEY
21
2
43
27
24
22
23
12
1
2
3
4
5
6
7
8
9
10
1
2
3
4
5
7
8
9
10
11
12
13
14
15
16
18
Old
iR3570 230V
EURO
F14-6791-000
FM2-0362-000
FC5-5457-000
FC5-4458-000
FC5-0860-000
FC5-6004-000
Q'TY
1
1
1
1
1
New
iR3530 230V EURO
F14-6793-000
FM2-0325-000
FC5-1403-000
FC5-1501-000
FC5-1503-000
FC5-1504-000
FC6-2908-000
FG6-8939-000
FK2-0246-000
1
1
FC5-0859-000
FC5-0888-000
FC5-0978-000
FC5-0992-000
FC5-1019-000
FC5-6011-000
FG3-3294-000
FG3-3297-000
FG3-3301-000
FK2-0149-000
FC5-0987-000
FC5-0988-000
FC5-0989-000
FC5-1025-000
FC5-1038-000
FB5-4754-000
FC5-0870-000
FC5-6010-000
FH5-1021-000
FH5-1108-000
FU5-0054-000
FU5-0077-000
FU5-0078-000
FU5-3020-000
FU5-3022-000
XF2-4104-240
1
1
1
1
1
1
1
1
1
10
1
1
1
1
1
1
1
1
1
1
2
1
1
1
1
1
FH6-0735-000
FM2-2753-000
FM2-2754-000
FM2-2755-000
FM2-2756-000
FM2-2757-000
Q'TY
1
1
1
0
1
1
1
0
1
1
1
1
1
1
0
0
0
0
0
0
0
0
0
8
0
0
0
0
0
0
0
0
0
0
0
0
0
0
0
0
Description
CONTROL PANEL ASSEMBLY
PANEL, CONTROL PANEL
SHEET, LCD ELECTROSTATIC
GUIDE, REVERSE BACK END
COVER, PROTECTIVE
HOLDER, FUNCTION
KEY, INTERRUPT
KEY, FUNCTION
C. PANEL INVERTER PCB ASSEMBLY
ANALOG TOUCH PANEL UNIT
C. PANEL INVERTER PCB ASSEMBLY
CONTROL PANEL CPU PCB ASSEMBLY
PANEL SWITCH PCB ASSEMBLY
CABLE, INVERTER
CABLE, SWITCH
COVER, CONNECTOR
PANEL, 2ND DELIVERY BLANKING
SHAFT, 2ND DELIVERY HINGE
FLAG, PAPER FULL
SHAFT, 3RD DELIVERY HINGE
COVER, GEAR
CABLE, INTERFACE
CABLE, MOTOR
CABLE, SENSOR
PHOTO-INTERRUPTER, TLP1253(C6)
FLAG, REVERSE SENSOR
SPRING, TORSION
ROLLER, REVERSE
PLATE, GROUNDING
GUIDE, 2ND DELIVERY, UPPER
SPACER
GUIDE, SLIDE
COVER, GEAR, 1
MOTOR, STEPPING, AC
MOTOR, STEPPING, AC
GEAR, 35T
GEAR, 46T
GEAR, 30T/24T,30T/24T
GEAR, 24T/PULLEY, 30T
PULLEY, 30T/GEAR, 35T
BELT, TIMING, COGGED
REDUCTION
REDUCTION
REDUCTION
REDUCTION
REDUCTION
REDUCTION
REDUCTION
REDUCTION
REDUCTION
REDUCTION
REDUCTION
REDUCTION
DIFFERENCE
DIFFERENCE
DIFFERENCE
REDUCTION
REDUCTION
REDUCTION
REDUCTION
REDUCTION
REDUCTION
REDUCTION
REDUCTION
REDUCTION
REDUCTION
REDUCTION
REDUCTION
REDUCTION
REDUCTION
REDUCTION
REDUCTION
REDUCTION
REDUCTION
REDUCTION
REDUCTION
REDUCTION
REDUCTION
REDUCTION
REDUCTION
REDUCTION
REDUCTION
REDUCTION
REDUCTION
REDUCTION
REDUCTION
42
43
44
45
46
47
48
49
50
51
52
53
54
55
56
57
58
59
60
61
62
63
64
65
66
67
68
69
70
71
72
73
74
75
76
77
78
79
80
81
82
83
84
85
86
19
20
21
22
23
24
25
26
27
352
353
1
2
3
4
5
6
7
8
9
10
11
13
14
15
16
17
18
19
20
21
23
24
25
26
27
28
29
354
1
2
3
4
5
6
XF2-4108-240
FC5-0985-000
FC5-0991-000
FC5-1013-000
FL2-1200-000
FC5-6003-000
FS5-1943-000
FU5-3021-000
FC5-6004-000
FM2-1328-000
FM2-4471-000
FB5-4754-000
FC6-2915-000
FB5-9803-000
FB6-5796-000
FC5-0974-000
FC5-0996-000
FC5-0997-000
FC5-1017-000
FC5-1053-000
FC5-5474-000
FG3-3299-000
FL2-1201-000
FL2-1202-000
FL2-1203-000
FL2-1212-030
FC5-0805-000
FC5-0998-000
FC5-0871-000
FC5-0873-000
FC5-6014-000
FS5-6488-000
FS7-2859-000
FU5-0076-000
FU5-3019-000
FU5-3020-000
XF2-4107-940
XG9-0520-000
FM2-1335-000
FB5-9325-000
FC5-0872-000
FC5-1012-000
FC5-1020-000
FC5-1023-000
FC5-6006-000
1
1
4
4
1
1
12
1
1
1
1
1
5
10
5
1
1
1
1
1
1
1
1
1
1
1
4
1
2
1
2
2
4
1
1
1
1
2
1
1
1
1
1
1
1
0
0
0
0
0
0
10
0
0
0
0
0
1
2
1
0
0
0
0
0
0
0
0
0
0
0
0
0
0
0
0
0
0
0
0
0
0
0
0
0
0
0
0
0
0
BELT, TIMING, COGGED
GUIDE, REVERSE LOWER
SPRING
ROLLER
GUIDE, REVERSE LOWER AUXILIARY
ELIMINATOR, STATIC-CHARGE
BUSHING
PULLEY, 30T
COVER, PROTECTIVE
2ND UPPER DELIVERY ASSEMBLY
2ND DELIVERY FRAME ASSEMBLY
SPACER
HOLDER, ROLLER
RING
ROLLER, PAPER DELIVERY
SPRING, TORSION
FLAG, 2ND DELIVERY SENSOR
SPRING, TORSION
ROLLER, 2ND VERTICAL PATH
COVER, SOLENOID, 1
GUIDE, 2ND DELIVERY ENTRANCE
CABLE, 2ND PAPER DELIVERY
GUIDE, 2ND PAPER DELIVERY
HINGE, 2ND DELIVERY
SOLENOID
FLAPPER, 1ST PAPER DELIVERY
ROLLER, REFORM
ROLLER, 2ND PAPER DELIVERY
SPRING, COMPRESSION
COVER, 2ND DELIVERY FRAME
CAP, SPRING
WASHER
SPRING, COMPRESSION
GEAR, 24T
PULLEY, 30T/GEAR, 35T
GEAR, 24T/PULLEY, 30T
BELT, TIMING. COGGED
BEARING, BALL
3RD DELIVERY FRAME
MAGNET, 3RD
COVER, DELIVERY SOLENOID, 2
ROLLER, DUPLEXING ENTRANCE
ROLLER, 3RD DELIVERY
ARM, SOLENOID, 2
PLATE, GROUNDING
7
8
9
10
11
12
13
14
15
16
17
18
19
20
21
23
24
25
26
30
31
32
33
34
35
36
37
39
40
42
REDUCTION
REDUCTION
REDUCTION
REDUCTION
REDUCTION
REDUCTION
REDUCTION
REDUCTION
REDUCTION
REDUCTION
REDUCTION
REDUCTION
REDUCTION
REDUCTION
REDUCTION
REDUCTION
REDUCTION
REDUCTION
REDUCTION
REDUCTION
REDUCTION
REDUCTION
REDUCTION
REDUCTION
REDUCTION
REDUCTION
REDUCTION
REDUCTION
REDUCTION
REDUCTION
REDUCTION
DIFFERENCE
REDUCTION
DIFFERENCE
DIFFERENCE
DIFFERENCE
REDUCTION
DIFFERENCE
REDUCTION
87
88
89
90
91
92
93
94
95
96
97
98
99
100
101
102
103
104
105
106
107
108
109
110
111
112
113
114
115
116
117
118
119
120
121
122
123
124
125
994
IC
621
100
900
900
900
100
100
DIFFERENCE
REDUCTION
126
127
310
130
36
38
2
5
3
23
43
FG3-3295-000
FL2-1206-000
FC5-0862-000
FC5-0977-000
FC5-1009-000
FC5-6003-000
FL2-1208-000
FC5-0976-000
FC5-1003-000
FC5-1005-000
FC5-1006-000
FC5-1013-000
FC5-1014-000
FC5-6008-000
FC5-6019-000
FL2-1207-000
FL2-1209-000
FS5-1377-000
FM2-1340-000
FC5-1010-000
FC5-1011-000
FC5-6012-000
FL2-1210-000
FS7-2859-000
FC5-1024-000
FC5-1054-000
FL2-1205-000
FU5-3018-000
FU5-3021-000
XF2-4109-240
FM2-3221-000
FH4-6204-000
FC6-5087-000
FC5-7210-000
FM2-3226-000
WA7-3296-000
WM2-5216-000
FB3-2224-000
FC5-0860-000
1
1
1
1
1
1
1
1
1
1
1
8
8
1
1
1
1
2
1
1
1
4
1
4
1
1
1
1
1
1
1
2
1
1
1
1
1
1
1
57
4
RB1-6539-000
FH2-7037-000
1
1
0
0
0
0
0
0
0
0
0
0
0
0
0
0
0
0
0
0
0
0
0
0
0
0
0
0
0
0
0
0
0
1
FC5-7224-000
FM2-3698-000
WA7-3625-000
FC6-5052-000
FC6-5064-000
1
1
1
0
1
0
1
0
CABLE, 3RD DELIVERY
SOLENOID
PLATE, GROUNDING
SPRING, TORSION
GUIDE, 3RD DELIVERY, UPPER
ELIMINATOR, STATIC-CHARGE
FLAPPER, 3RD PAPER DELIVERY
SPRING, TENSION
FLAPPER, 2ND PAPER DELIVERY
FLAG, DUPLEX ENTRANCE SENSOR
SPRING, TORSION
ROLLER
SPRING
GUIDE, DUPLEXING ENTRANCE, 2
SPRING, TORSION
GUIDE, DUPLEXING ENTRANCE
FLAPPER, REVERSE
BUSHING
3RD DELIVERY FRAME ASSEMBLY
FLAG, 3RD DELIVERY SENSOR
SPRING, TORSION
SHEET, HOLDER
FRAME, 3RD DELIVERY
SPRING, COMPRESSION
ARM, SOLENOID, 3
COVER, DELIVERY SOLENOID, 1
SOLENOID
PULLEY, 30T/GEAR, 35T
PULLEY, 30T
BELT, TIMING, COGGED
DELIVERY CONTROLLER PCB ASS'Y
IC, S1L50993F22H000,GATE-ARRAY
SHEET, BOTTLE LIMIT
PLATE, NAME
BOARD, BW3 CONTROLLER
DIM, MT8LSDT3264AY-133, SCRAM
HDD, HTS541020G9AT00
PIN, HINGE
GUIDE, REVERSE BACK END
DAMPER
CABLE, FLAT