1
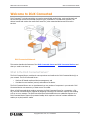
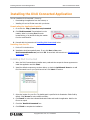
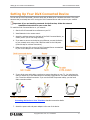
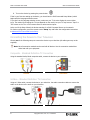
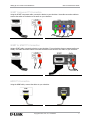
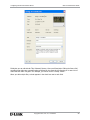
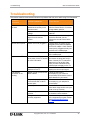
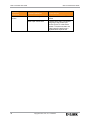
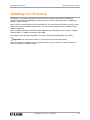
DivX Connected
User Guide
Version 1.0
27 September 2007
This document contains proprietary information that is protected by copyright. No part of this document may be
photocopied, reproduced, or translated without the prior written consent of DivX, Inc. The information contained in this
document is subject to change without notice.
Copyright 2007, DivX, Inc. Confidential
DivX, Inc.
4780 Eastgate Mall
San Diego, CA 92121
DivX Connected User Guide
DivX Inc.
4780 Eastgate Mall
San Diego, CA 92121
U.S.A.
Copyright © 2007, DivX, Inc.
DivX®, DivX Certified®, DivX Connected™, Stage6™ and associated logos are trademarks of DivX, Inc.,
all rights reserved.
All other marks, product names, and company names are the property of their respective owners.
Software and Help Manual copyright © 2007, DivX, Inc., all rights reserved. Any translation, copying,
distribution or sale is forbidden without the express written consent of DivX, Inc.
Please send comments or questions to: [email protected].
ii
Copyright © 2007, DivX, Inc., Confidential
Welcome to DivX Connected
DivX Connected User Guide
Table of Contents
Welcome to DivX Connected ...........................................................................1
What Is the DivX Connected Server?................................................................................ 1
What Is a DivX Connected Device? ................................................................................... 2
What You Need to Set Up DivX Connected ..................................................................... 2
Types of Formats You Can Use ................................................................................... 2
Converting Your Files..................................................................................................... 2
Installing the DivX Connected Application ...................................................3
Installing DivX Connected ................................................................................................... 3
Starting DivX Connected ..................................................................................4
Software Updates..............................................................................................4
Setting Up Your DivX Connected Device .......................................................5
Connecting the Device to Your Television ....................................................................... 6
Composite - Standard Definition TV Connection ..................................................... 6
S-Video - Standard Definition TV Connection .......................................................... 6
SCART Component TV Connection ............................................................................. 7
SCART to SCART TV Connection................................................................................. 7
HDMI TV Connection ..................................................................................................... 7
Additional Audio Connections ............................................................................................. 8
Advanced DivX Connected Device Setup ......................................................................... 8
Setting a Static IP Address ........................................................................................... 8
Switching Between Wired and Wireless Connections ...................................... 8
Supported Encryption Modes.............................................................................................. 9
Key Formats .............................................................................................................. 9
Key Authentication ................................................................................................ 10
Key Length .............................................................................................................. 10
Advanced Network Setup .................................................................................................. 10
Joining a Network That Is Not Broadcasting Its SSID ......................................... 10
Using DivX Connected ....................................................................................11
Using Your Remote Control............................................................................................... 11
Functions by Button ..................................................................................................... 11
Basic Remote Control Features ................................................................................. 12
Video Controls ............................................................................................................... 12
Music Controls ............................................................................................................... 12
Photo Controls............................................................................................................... 13
Accessing DivX Stage6 ....................................................................................................... 13
Viewing Videos on Stage6 ................................................................................................. 13
Copyright © 2007, DivX, Inc., Confidential
iii
D
DivX Connected User Guide
DivX Connected User Guide
Downloading and Playing Video on Stage6 ................................................................... 13
Logging In to PIN Protected Media ................................................................................. 14
DivX Video-on-Demand Activation................................................................................... 15
Configurations for Best Performance ..........................................................16
Recommended Network Setup......................................................................................... 16
Other Possible Setups......................................................................................................... 16
Configuring the DivX Connected Server......................................................18
Configuring Media on the Server ..................................................................................... 18
Adding a Media Folder................................................................................................. 18
Removing a Media Folder ........................................................................................... 18
Setting Privacy............................................................................................................... 19
Setting PIN Protection ................................................................................................. 19
Removing PIN Protection............................................................................................ 19
Working with Folders ................................................................................................... 19
Configuring Server Settings .............................................................................................. 19
Changing the DivX Connected Server Name .......................................................... 20
Changing General Server Settings ............................................................................ 20
Using PIN Protection........................................................................................................... 20
Setting Up PIN Protection........................................................................................... 20
Modifying Additional Settings ........................................................................................... 21
Access Control via Privacy Settings ................................................................................. 21
Changing the Privacy Settings ................................................................................... 22
Managing Devices on the Server ..................................................................................... 23
Allowing or Denying Connected Device Access ..................................................... 23
Removing a Non-Connected Device ......................................................................... 23
Renaming Devices in the Device List ....................................................................... 24
Editing File Data................................................................................................................... 24
Editing Video Metadata ........................................................................................ 24
Editing Music Metadata ............................................................................................... 27
Resetting Music Metadata........................................................................................... 28
Changing Music Artwork ............................................................................................. 29
Viewing Picture Metadata ........................................................................................... 29
Troubleshooting...............................................................................................31
Updating Your Firmware ................................................................................33
Sending Feedback to DivX .............................................................................34
iv
Copyright © 2007, DivX, Inc., Confidential
W
Welcome to DivX Connected
DivX Connected User Guide
Welcome to DivX Connected
DivX Connected™ includes everything you need to access digital media (video, music and photos) and
services through devices and Personal Computers (PCs) connected to TVs and stereo systems. The
devices browse and retrieve the media from home PCs, other networked devices and from online
services.
DivX Connected Network
This section describes the features of the DivX Connected Server and DivX Connected devices and
what you need to set them up.
What Is the DivX Connected Server?
The DivX Connected Server provides the user experience and media to the DivX Connected device(s) on
your network. The DivX Connected Server:
•
Performs PC-based media and device management, and
•
Provides the user interface (menus) and media to the device.
The DivX Connected Server can run simultaneously on any number of computers in your network. DivX
Connected devices can access any of these servers for media.
When a DivX Connected device sends a request to the DivX Connected Server for a connection, a file,
etc., the DivX Connected Server responds by accepting or denying the connection request, then sending
a file or an error message. The DivX Connected Server also handles the more elaborate response to a
DivX Connected device request for protected media, which requires a series of intricate validations to
enable you to play back the media.
Copyright © 2007, DivX, Inc., Confidential
1
D
DivX Connected User Guide
DivX Connected User Guide
What Is a DivX Connected Device?
A DivX Connected device is a stand-alone unit (aka. client) that accesses media on any DivX Connected
Server present on its network. The network can be wired or wireless. A DivX Connected device can
access any DivX Connected Server on the same network.
What You Need to Set Up DivX Connected
You need a personal computer with:
•
Pentium 4, 1.6 GHz or higher CPU for Standard Definition TV displays
•
Pentium 4, 2.6 Ghz or higher CPU for High Definition TV displays
•
Windows MCE, XP Home Edition, XP Professional Edition or Vista
•
512 MB system RAM
•
50 MB available hard disk space
•
Hardware-accelerated OpenGL graphics card with up-to-date driver
•
10/100 Ethernet, or 802.11g or 802.11b network adapter, with one or more enabled
•
An active network connection
Types of Formats You Can Use
Video file formats:
•
All DivX® videos (resolution is device dependent)
•
Most Xvid (resolution is device dependent)
•
All .divx files
•
.avi files using DivX with MP3 or AC3 audio
•
Windows Media Video (.wmv, resolution is device dependent)
Audio file formats:
•
MP3 and MP3 playlists (.pls, .m3u, and .m3u8)
•
Windows Media Audio (.wma)
Picture or Photo:
•
JPG and BMP
Converting Your Files
2
To Do This...
Use This
Convert video files to DivX format
DivX Author, DivX Converter or Dr. DivX
Convert audio files to MP3
Windows Media Player or iTunes
Convert picture files to JPG
Microsoft Paint or Picasa
Copyright © 2007, DivX, Inc., Confidential
W
Installing the DivX Connected Application
DivX Connected User Guide
Installing the DivX Connected Application
You can install the DivX Connected™ Server by:
•
Downloading the application from the Internet, or
•
Installing it from the CD that came with your device
Downloading the Application Installer:
1. Go to this site: http://www.divx.com/connected
2. Click ‘DivX Connected’. Download and run the
installer, either by choosing ‘Run’ from the
browser dialog, or by double-clicking the installer
from the saved location.
3. Proceed with the instructions in Installing DivX Connected, below.
Installing from the CD:
1. Put the CD in the disc drive.
2. Installation should automatically start. If not, click Start > Run, enter
DivXConnectedInstaller.exe, and click ‘OK’. Proceed with the instructions in Installing DivX
Connected, below.
Installing DivX Connected
1. When the DivX Connected setup installer starts, read and then accept the license agreement to
install the application and click ‘Next’.
2. Install the default components, as shown below, or check the Quicklaunch Icons box to add
DivX Connected icons to your Quick Launch bar. Click ‘Next’ to continue.
3. Select the location for your files. The default path is specified in the Destination Folder field by
default. Click ‘Browse’ to select a different folder.
4. Click ‘Install’ to select the indicated destination folder and install the application. Wait for the
files to be copied.
5. Check the ‘Run DivX Connected’ box.
6. Click ‘Finish’ to complete the installation.
Copyright © 2007, DivX, Inc., Confidential
3
D
DivX Connected User Guide
DivX Connected User Guide
When you complete installation, the DivX > DivX Connected folder appears in the Start > All
Programs menu.
If you installed DivX Connected for the first time, the DivX Connected Setup Wizard starts upon
installation and assists you in configuring the server. Follow the instructions in the wizard.
Note: The DivX Connected Setup Wizard does not start if you have previously installed DivX
Connected.
When you complete the wizard's instructions, the wizard launches the DivX Connected Server. The DivX
Connected Server scans the folders you added for media, and the media is added to the database.
Starting DivX Connected
To start DivX Connected™:
•
Double-click the ‘DivX Connected’ icon on your PC desktop, or
•
Browse to Start > All Programs > DivX > DivX Connected > DivX Connected
The DivX Connected Setup Wizard begins when you start DivX Connected for the first time. Follow the
wizard instructions to set up your media server.
Software Updates
The DivX Connected™ Server software updates automatically when it detects a new version of the
software.
A message appears when a new software version is available.
To update the software:
1. Click ‘Yes’ or, if you do not want to update at this time, click ‘No’.
2. To check for software updates each time the DivX Connected Server starts, check ‘Always
check on startup’.
3. To check for a software update at any time, click Options > Software Update on the DivX
Connected Server screen.
4
Copyright © 2007, DivX, Inc., Confidential
S
Setting Up Your DivX Connected Device
DivX Connected User Guide
Setting Up Your DivX Connected Device
You can set up a DivX Connected™ device to work with an Ethernet or a wireless connection. This guide
assumes that you already have a PC running the DivX Connected Server and a router on your network.
Important: If you are installing a network for the first time, follow the network
installation instructions for your router first.
To install the DivX Connected device on your network:
1. Start the DivX Connected Server software on your PC.
2. Install batteries in the remote control.
3. Attach the wireless antenna to the back of the DivX Connected device, as
shown (even if you are not using wireless).
4. If you want to connect to the device using Ethernet, connect the device
to your network router using a Cat-5 Ethernet cable via the LAN ports
(omit this step for wireless connections).
5. Make sure that any PCs running the DivX Connected Server are attached
to your router LAN ports or connected wirelessly.
Wireless Attachment
6. If your device came with cables, use them to connect the device to your TV. You also have the
option to obtain any of the cables below for alternate configurations. The cable used depends on
your TV and the desired connection. If you use the SCART component cables, you also need
audio connection cables.
SCART Component
A/V Composite
HDMI
Connecting the Device to Your Television describes connection details.
7. Attach the power cord and power adapter to the rear of the device.
Copyright © 2007, DivX, Inc., Confidential
5
D
DivX Connected User Guide
DivX Connected User Guide
8. Turn on the device by pressing the power button.
If this is your first time setting up the device, you should see the DivX Connected Setup Wizard, which
begins with the language selection screen.
If you don't see the language selection screen, make sure your TV is set to display the correct video
input. The method for changing the TV input depends on the model, but your TV may have an "Input" or
"AV" button on the TV or on its remote control to select various inputs.
At the end of the Setup Wizard, the device searches for a DivX Connected Server on the network.
For further configuration, press the remote control ‘Setup’ key and follow the configuration instructions
in Advanced DivX Connected Device Setup.
Connecting the Device to Your Television
Choose one of the following setups to connect the device to your television (all cable types may not be
supplied):
Note: Not all connection methods can be used with all devices. Use the connection method that
works best with your equipment.
Composite - Standard Definition TV Connection
Using the standard Audio/Visual composite cable, connect the device to your television:
Device
Television
S-Video - Standard Definition TV Connection
Using an S-Video cable, connect the device to your television. Use audio connection cables to connect the
audio on the device to the audio on your television:
Device
6
Television
Copyright © 2007, DivX, Inc., Confidential
S
Setting Up Your DivX Connected Device
DivX Connected User Guide
SCART Component TV Connection
Using the SCART component cable, connect the device to your television. Use audio connection cables to
connect the audio on the device to the audio on your television:
Device
Television
SCART to SCART TV Connection
Using a SCART cable, connect the device to your television. If your television does not support audio over
SCART, use audio connection cables to connect the audio on the device to the audio on your television:
Device
Television
HDMI TV Connection
Using the HDMI cable, connect the device to your television.
Device
Television
Copyright © 2007, DivX, Inc., Confidential
7
D
DivX Connected User Guide
DivX Connected User Guide
If your television does not receive audio through the HDMI cable, connect the audio cables.
Device
Television
Additional Audio Connections
You may use either of the following audio connections with your TV or receiver in conjunction with your
choice of video connection.
•
Digital Optical
•
Digital Coaxial
Advanced DivX Connected Device Setup
Follow these steps to configure the more advanced features of your DivX Connected device:
•
Setting a static IP address
•
Switching between wired and wireless connections
•
Supported encryption modes
Setting a Static IP Address
To setup and configure a static IP address:
•
Make sure you are viewing the device setup screen (press ‘Setup’).
•
Select ‘Network’ to view the network status screen.
•
Select ‘Disable DHCP’; when disabled, the button will toggle to say “Enable DHCP”.
•
Update the IP Address, Subnet Mask, and Default Gateway using the numbers and
(DELETE) keys on the remote control.
•
Choose ‘Save’ to preserve your settings.
Switching Between Wired and Wireless Connections
To switch from a wired to a wireless connection:
Note: These instructions assume you have previously set up a wireless connection to your PC and
that you already have a wired connection to the DivX Connected device.
8
Copyright © 2007, DivX, Inc., Confidential
S
Setting Up Your DivX Connected Device
DivX Connected User Guide
1. From the DivX Connected device main display, press ‘Setup’.
2. Select ‘Network’.
3. From the Wired Network Status page, select ‘Configure Wireless’.
4. Select ‘Enable’ to enable wireless capability from the device. Any available networks are listed.
5. Select ‘Add Network’ to add your network to the network list.
6. Enter your network name, or SSID, and select ‘Enter’. The name of the network appears in the
list of available networks.
7. Select your network, enter the encryption key and select ‘Enter’.
The device will now attempt to connect to your newly-entered wireless network. If the connection
fails, follow the troubleshooting instructions on your screen.
To switch from a wireless to an existing wired connection:
1. From the DivX Connected device main display, press ‘Setup’.
2. Select ‘Network’.
3. From the Wired Network Status page, select ‘Configure Wireless’.
4. Select ‘Disable’ to disable wireless capability from the device.
The device will now reconnect using your wired connection.
Supported Encryption Modes
The device will automatically detect and configure the proper wireless encryption mode as long as the
router is set to use one of the following types:
This Setting
Enables This Encryption Mode
None
Unprotected. There is no key.
WEP
Uses WEP (Wired Equivalent Privacy) protection mode with key
protection. Key format is always hexadecimal.
WPA (TKIP)
Uses WPA (WiFi Protected Access) protection mode, with a
TKIP (Temporal Key Integrity Protocol) encrypted key.
WPA (AES)
Also uses WPA; the key uses AES (Advanced Encryption Standard),
which employs a 128-bit block symmetric data encryption technique.
WPA2 (AES)
An enhanced version of WPA that uses the AES-CCMP algorithm.
WPA2 (TKIP+AES)
This mode has mixed support for both WPA-TKIP and WPA2-AES.
Key Formats
This Setting
Enables This Key Format
ASCII
The key is in text form.
Hex
The key is in hexadecimal form.
Copyright © 2007, DivX, Inc., Confidential
9
D
DivX Connected User Guide
DivX Connected User Guide
Key Authentication
This Setting
Enables This Authentication Method
Open
Key identification occurs via a wireless adapter's MAC address. It is the
default key authentication method.
* Shared authentication is not supported.
Key Length
This Setting
Establishes This Encryption Key Length
64 bit
This is the original length of an encrypted key, consisting of a 40-bit key
and 24 bits of system information.
128 bit
A more secure encryption key length with 88 additional bits.
Advanced Network Setup
This section discusses advanced network topics, including ad-hoc networking, static IP addressing and
power line networking.
Joining a Network That Is Not Broadcasting Its SSID
In the event your network does not broadcast an SSID, you may still join with DivX Connected by
following these steps.
Choose ‘Setup’ on the remote control. Then go to Network > Configure Wireless. Be sure that you
have wireless enabled, and then choose ‘Add Network’. From there, you should be able to input your
SSID using the letters and characters on the screen. After you input your SSID, choose ‘Enter’, and the
device will attempt to connect to the SSID. If your router requires an encryption key, you will be
prompted to input your key in the same manner.
10
Copyright © 2007, DivX, Inc., Confidential
S
Using DivX Connected
DivX Connected User Guide
Using DivX Connected
Once the DivX Connected™ device is configured and the DivX Connected Server is running, you navigate
through the device using the remote control.
Using Your Remote Control
Use the remote control that came with your DivX Connected device to navigate through the menus.
Pressing the ‘Menu’ button on any page will bring up a menu of options that are useful with that page.
Functions by Button
Button
…
Activity
Function
On Any Screen
The Power button will turn the device on or off
On Any Screen
The Home button will take you back to the Home screen
On Most Screens
The Menu button will bring up the Actions menu, which reveals other
features and options for your media experience
List View &
Thumbnail View
The Number Keys double as letter keys to help you hop alphabetically
through your list of files
Watching Video
The Number Keys let you leap through the timeline of your video,
1/10th at a time
On Any Screen
The Back button takes you to previous screens
Watching Video
The Back button will stop the video and take you to the previous menu
Thumbnail View
The directional Arrows are used for highlighting items
List View
Up and Down let you highlight items, while Left functions like Back and
Right functions like Enter
Watching Video
Left and Right can be used as rewind and fast forward. Up will skip
forward 30 seconds, and Down will skip backward 10 seconds. The
Enter key acts as Play when you are rewinding or Fast Forwarding.
Slideshow
Left and Right let you skip photos, while Up and Down let you modify
transition time between photos
List View &
Thumbnail View
The Enter key is how you make your selections
Watching Video
The Enter key acts as Play when you are rewinding or fast forwarding
On Any Screen
The Setup button will take you to the device menu, where you can
select a server and modify network and display settings
Copyright © 2007, DivX, Inc., Confidential
11
D
DivX Connected User Guide
DivX Connected User Guide
Basic Remote Control Features
To Do This...
Do This with the Remote Control
Highlight a selection
Press Arrow (right, left, up or down)
Select an option
Press Enter
Go to the previous menu
Press Back
Go to the main menu
Press Home
Display the overlay menu
Press Menu
Display the next page
Press Next Page
Display the previous page
Press Previous Page
Setup the device
Press Setup
Video Controls
To Do This...
Do This with the Remote Control
Play a video
Highlight the item and press Play/Pause
Display the playback menu
Highlight the item and press Enter
Stop the video
Press Back or Stop
Change the language
Press Language
Change the subtitle
Press Subtitle
Fast Forward or Rewind
Press Right or Left Arrow, or FF or Rev
Return to Play from FF or REV
Press Enter or Play/Pause
Skip forward 30 seconds
Press Up Arrow
Skip back 10 seconds
Press Down Arrow
Skip to next or previous chapter
Press Next or Prev
Skip to the next or previous video
Press next Page or previous Page
Select a chapter
Press numbers 0 through 9
Display video playback info
Press Info
Play a video
Highlight the item and press Play/Pause
Music Controls
To Do This...
Do This with the Remote Control
Pause or play song
Highlight the item and press Play/Pause
Display the playback menu
Highlight the item and press Enter
Fast Forward or Rewind
Press FF or Rev
Return to Play from FF or REV
Press Play/Pause
Skip to next or previous song
Press Next or Prev
Stop the song
Press Stop
Note: Music controls are also available during slideshows and file selection screens.
12
Copyright © 2007, DivX, Inc., Confidential
U
Using DivX Connected
DivX Connected User Guide
Note: mp3 audio coding technology and patents licensed from Fraunhofer IIS and Thomson; mp3 Surround audio coding
technology and patents licensed from Fraunhofer IIS, Agere and Thomson.
Photo Controls
To Do This...
Do This with the Remote Control
Display a photo
Highlight the item and press Enter
Advance to the next photo
Press Right Arrow
Go back to previous photo
Press Left Arrow
Start or resume a slideshow
Press Up Arrow
Increase slideshow speed
Press Up Arrow
Decrease slideshow speed
Press Down Arrow
Display slideshow menu
Press Menu
Note: The slideshow will pause after going back to a previous photo.
Accessing DivX Stage6
Access the Stage6 web site in the services area of the DivX Connected home screen.
Viewing Videos on Stage6
To select a video:
•
Choose a Featured video. Featured videos appear when you first access Stage6,
•
Choose Videos and a category to view featured videos, or
•
Choose Channels to view currently available Stage6 channels. A channel is a collection of videos
of a given genre or description.
To view your selected video:
To Do This...
Select This
Play a video immediately
Highlight the video thumbnail and
press Play/Pause
Pause the video
Press Play/Pause
View information about the video
Press Enter
Play the video from the video information screen
Press Enter and select Play Video
Download the video
Press Enter and select Download
Close the video information screen
Select Close
Downloading and Playing Video on Stage6
"Download" a file from the Stage6 site and it downloads in the background.
•
Download multiple files in the background.
•
View the download progress at the bottom of the screen.
Copyright © 2007, DivX, Inc., Confidential
13
D
DivX Connected User Guide
DivX Connected User Guide
•
Play the video as it is downloading.
•
Select Downloads to view downloading progress.
•
Select Downloads to view downloaded videos.
"Play Video" plays back the video similar to streaming media while this, or another video, downloads at
the same time. You can:
•
Play back a video you are downloading (start the download first; then, play back the video).
•
Download the file after playing it. Download will seem instantaneous due to the file caching that
occurs when you play back the video.
•
Trickplay (fast forward or reverse).
Trickplay (fast forward or reverse) commands during playback in this progressive mode enable the DivX
Connected device to only download the requested portions of the file. This reduces the bandwidth
required during playback. When a file is completely downloaded, you see only "Play Video" when you
next select this file for viewing.
Video files are cached, or saved, during playback and download. If the connection between the DivX
Connected Server and the Internet is lost during a download, the download picks up where it left off
when the connection is reestablished.
Logging In to PIN Protected Media
PIN (Personal Identification Number) protected media does not appear on the DivX Connected device
until you enter a PIN. To view media that is PIN protected on the DivX Connected Server:
1. Press ‘Menu’
2. Enter the PIN code
3. Select ‘OK’
The PIN protected media appears with all other media.
To logout:
1. Press ‘Menu’
2. Select ‘Logout’
The PIN protected media is no longer displayed.
14
Copyright © 2007, DivX, Inc., Confidential
U
Using DivX Connected
DivX Connected User Guide
DivX Video-on-Demand Activation
If you have a DivX account, you can activate your DivX Connected device to play DivX Video-on-Demand
(VOD) content.
From the DivX Connected Server application, go to the ‘Device Settings’ tab and right
click on the device you wish to activate. Your device must be connected for you to see
the option to activate.
Upon selecting ‘Activate’, you will be presented with the online activation steps:
1) The Activation URL
2) Your Device’s Manufacturer Info
3) Your Device’s Location Name
4) Your Activation Code
Follow the instructions at the Activation URL and you will be able to enjoy the content associated with
your DivX account.
Copyright © 2007, DivX, Inc., Confidential
15
D
DivX Connected User Guide
DivX Connected User Guide
Configurations for Best Performance
To get the best performance out of your DivX Connected™ experience, plan your network carefully. In
general, the more direct the connections, the better the performance.
Note: The performance of wireless network equipment can be adversely affected by cordless
phones, microwave ovens, garage door openers or other wireless devices.
Recommended Network Setup
The best performance and easiest setup can be achieved using a wired network configuration:
•
Wired connection from the DivX Connected device to the DivX Connected Server PC through a
network router or a direct connection.
•
Wired Ethernet connections from the network router to the DivX Connected Server PC.
Other Possible Setups
If your connections cannot be set up as described above in Recommended Network Configuration,
the next best setup is:
•
Wireless connection from the DivX Connected device to the network router.
•
Wired Ethernet connections from the network router to the DivX Connected Server PC(s).
•
Wired Ethernet connection from the DivX Connected device to the network router.
•
Wireless connection from the network router to the DivX Connected Server PC(s).
OR
16
Copyright © 2007, DivX, Inc., Confidential
C
Configurations for Best Performance
DivX Connected User Guide
A wired connection to the PC(s) running the server is preferred over a wireless connection because the
PC may have to download video from the Internet while it is being played back to the device, thereby
increasing the bandwidth requirements for the PC connection. A wired connection is also recommended
for the best performance if using network-attached storage (NAS) devices.
Important! To connect to a wireless network, you need to know:
•
Your wireless network name (SSID)
•
Your encryption key (if security is enabled)
If you have MAC filtering enabled on your router:
•
Add the wireless MAC address to the list of allowed devices for your network.
You can set up your system in this way, but this configuration is more susceptible to interference
problems than a configuration with only one wireless segment:
•
Wireless connection from the DivX Connected device to the network router.
•
Wireless connections from the network router to the DivX Connected Server PC.
Copyright © 2007, DivX, Inc., Confidential
17
D
DivX Connected User Guide
DivX Connected User Guide
Configuring the DivX Connected Server
You can make media available for playback on DivX Connected™ devices by changing the DivX
Connected Server configuration. You can add or remove folders, set folder access and privacy, etc. As
devices connect to your network, they are automatically added to the device list. If a client disconnects
from the network, it remains in the device list, but is displayed in gray with an "Offline" label.
Note: Changing the name of the DivX Connected Server requires that you restart it.
Configuring Media on the Server
The DivX Connected Server controls access to video, music and picture files resident on the server.
Configure the DivX Connected Server to make media on your PC available for playback on DivX
Connected devices.
To access media on the server, click one of the following tabs:
•
Video Settings
•
Music Settings
•
Picture Settings
Then follow these instructions to configure the media:
Adding a Media Folder
To add a media folder for your videos, music or pictures:
1. Click ‘Add Folder’ and select the folder from the browse list.
2. Check the ‘Include subfolders’ box to include the media in any subfolders. The folder appears
in the Shared Folders list.
3. Click the folder to display the folder's contents on the right.
Files visible in the added folders are now available to the devices in the DivX Connected device List. The
content in the included subfolders is also available.
Only playable files for the selected tab are shared. For example, if you add a folder containing videos and
photos to the Video Settings tab, only the playable video files display. To display the photos, add the
same folder to the Photo Settings tab.
Removing a Media Folder
To remove a media folder for your videos, music or pictures:
•
Select a folder from the list and click ‘Remove Folder’, or
•
Right-click the folder and select ‘Remove’ from the menu.
The folder is removed from the list.
18
Copyright © 2007, DivX, Inc., Confidential
C
Configuring the DivX Connected Server
DivX Connected User Guide
Setting Privacy
Control which DivX Connected devices have access to specific folders on the DivX Connected Server:
•
Select the folder and click ‘Set Folder Privacy’, or
•
Right-click the folder and click ‘Set Privacy’ from the menu
Setting PIN Protection
Secure media in the folder with a PIN (Personal Identification Number) code.
•
Right-click the folder and click ‘PIN Protect’ from the menu, or
•
If there is no PIN protection, the ‘PIN Code’ screen appears
1. Check the ‘Enable PIN Protection’ box
2. Enter a four or five digit PIN
The folder you selected is automatically PIN protected. See Using PIN Protection for more
information.
Removing PIN Protection
Right-click the folder and click ‘PIN Protect’ again to remove PIN protection.
Working with Folders
Select this...
To do this
Re-Scan
Re-scan the folder for any added media. Typically, this action is not
necessary, as the system monitors for new media added to folders
automatically. However, if there is media in a folder that does not
appear at the device, you may need to re-scan the folder.
Open In Explorer
Display the folder and its contents in the Explorer browser screen.
Configuring Server Settings
Click the ‘Options’ button to modify configuration choices made with the DivX Connected Setup Wizard.
Here you can:
•
Change the server name
•
Adjust general settings
•
Add an online service
•
Configure PIN protection for the media on the DivX Connected Server
•
Configure more advanced settings
Copyright © 2007, DivX, Inc., Confidential
19
D
DivX Connected User Guide
DivX Connected User Guide
Changing the DivX Connected Server Name
Note: The DivX Connected Server must restart to use the new name.
1. Click the ‘General’ tab
2. Enter a new name in the ‘Name’ field
3. Click ‘OK’
4. Click ‘Yes’ to restart the server immediately, or click ‘No’ to restart later
The name does not change until you restart the application. The new name appears in the title bar at the
top of the DivX Connected Server screen and on the DivX Connected device screen.
Changing General Server Settings
Configure general settings that apply to DivX Connected Server operation.
To Do This...
Do This
Start DivX Connected Server
automatically upon Windows startup.
Check the ‘Start with Windows’ box
Reconfigure the server by running the
setup wizard again.
Click ‘Run Setup Wizard’
Using PIN Protection
PIN protection secures folders containing media on the server with a PIN number. To view media that is
PIN protected, enter the PIN number on the device.
A PIN consists of numeric digits: not spaces, letters or other characters. A strong PIN:
•
•
•
Has no repeating digits, as in "5555"
Does not consist of an obvious series of digits, as in "12345"
Consists of unique digits arranged in atypical order, as in "51483"
Setting Up PIN Protection
1. Click ‘Options’
2. Click the ‘PIN Code’ tab
3. When the PIN Code screen appears, check the ‘Enable PIN Protection’ box
4. Enter a 4 or 5 digit number in the PIN code field
When a folder has PIN protection, a lock icon appears next to the folder name in the media folder list on
the DivX Connected Server. A DivX Connected device does not display the protected folders until you
completely log in.
For information on the login process, see Logging In to PIN Protected Media. For information on
applying PIN protection to a folder, see Setting PIN Protection.
20
Copyright © 2007, DivX, Inc., Confidential
C
Configuring the DivX Connected Server
DivX Connected User Guide
Note: To log in with a PIN code from a keyboard, use the numeric keys in the row above the letters
on the keyboard, not the number pad.
Modifying Additional Settings
Click the ‘Advanced’ tab to modify additional settings.
To Do This...
Do This
Use the default server control port
Click ‘Default’
Change the server control port
Click ‘Custom’ and enter the port number
Play the animated startup video on the client
when it establishes a connection
Check ‘Enable startup video’
Display a warning upon exiting
MediaServerX
Check ‘Show warning on exit’
Deny new devices access to media on the
server
Check ‘Deny new devices by default’
Access Control via Privacy Settings
All supported media in all shared folders in the Settings tabs is available to all devices. Use folder privacy
settings to grant visibility to protected folders only to the devices that you select.
Device privacy settings allow controlled access to the media in a folder on the DivX Connected Server.
This control differs from PIN protection. Privacy settings enable only specific DivX Connected devices to
access the media in a folder, regardless of whether it is PIN protected. If a device is restricted, the folder
with privacy settings does not appear on the screen and cannot be accessed by the restricted device,
even if the user is logged in.
With PIN protection, the DivX Connected device user can enter a PIN to reveal content in a PIN protected
folder. All non-restricted devices can access the media with the PIN. For information on PIN protection,
see Using PIN Protection. To enter the PIN code at the device, press the ‘Menu’ button on the remote
control while displaying any media menu and then select the ‘Log In’ option and enter the PIN code. The
protected folder will now be visible until you log out.
In the Video Settings, Music Settings, or Pictures Settings tab in the DivX Connected Server, select
the desired folder and click ‘Set Folder Privacy’.
Copyright © 2007, DivX, Inc., Confidential
21
D
DivX Connected User Guide
DivX Connected User Guide
Changing the Privacy Settings
1. Select the Video Settings, Music Settings, or Pictures Settings tab in the DivX Connected
Server.
2. Select the desired folder and click ‘Set Folder Privacy’. The following screen appears:
3. Check the ‘Make this content available only when logged in’ box if you want the media
available only when a device is logged in.
4. Assign PIN protection (optional):
1. Click ‘PIN Management’
2. Check ‘Enable PIN Protection’
3. Enter a 4 or 5 digit number in the PIN code field.
By default, the media in the folder is available to all devices that log in using the PIN, except for
devices that are restricted by privacy settings.
5. Select ‘Make this content available only to the selected devices below’ to restrict specific
devices from using the media in the folder.
By default, the media in the folder is available to all devices that log in, and some folders require a
PIN.
6. Check the box for each DivX Connected device that requires access to the media in the folder.
22
Copyright © 2007, DivX, Inc., Confidential
C
Configuring the DivX Connected Server
DivX Connected User Guide
Note: Click ‘Select All’ to select all of the devices, or ‘Deselect All’ to clear the check boxes. To
enable access to the media, check the box next to at least one device.
7. Click ‘OK’. A lock icon displays next to a protected folder.
When a restricted DivX Connected device selects Video, Music or Photos, the protected folder does not
display on the device.
Managing Devices on the Server
Configure and control the server's connections with the DivX Connected device. Configurations in the
Device Settings tab are optional because the devices automatically detect the server.
The Device List displays all devices that are or have been connected to your DivX Connected Server's
network:
•
Offline devices are listed in gray
•
You can add or deny access to a device
•
You can delete devices from the list that are no longer active on your network
•
If the server detects the deleted device in the future, the device re-appears in the list
To view details about an online device:
1. Right-click the device in the list
2. Click ‘Details’ from the pop-up menu
3. Click ‘Close’ to exit
Information about the device displays in the Device and Connection Details screen. This information
is useful to determine what kind of media the device can effectively display. For example, a device
configured for high definition can play videos at a higher resolution.
Allowing or Denying Connected Device Access
1. Select the device from the Device List
2. Click ‘Allow Access’ or ‘Deny Access’, respectively
Note: When you deny a device access to the DivX Connected Server, remember that the device
may presently access media that will no longer be available to it when the connection ends.
Removing a Non-Connected Device
A non-connected device is attached to the network, but is currently offline. To remove the device:
1. Select the device
2. Click ‘Remove Device’
Removing a non-connected device does not remove the device from the network. The next time this
device is detected by the server, it appears in the device list. If the device is still offline, it is listed in
gray.
Copyright © 2007, DivX, Inc., Confidential
23
D
DivX Connected User Guide
DivX Connected User Guide
Renaming Devices in the Device List
Rename a device in the device list to distinguish it from other devices accessing the server. To rename a
device:
1. Select the device in the Device List
2. Click ‘Edit Device’
3. Check the ‘Use Custom Name’ box
4. Enter a name that represents this device in the field
The device now appears in the list by its new name
To see your device configuration in action, make sure you are running a DivX Connected device
Editing File Data
Metadata is data that describes the media contained in the file and certain characteristics of the file, such
as file size and type. Add metadata or change how existing metadata is displayed for any file in your DivX
Connected Server database to accurately describe file contents. Music files may already contain sufficient
descriptive metadata; home video files may or may not contain descriptive metadata.
Metadata for a video file is displayed in the device when you select a video file for playback. Press ‘Menu’
in Music on the device to use genre metadata to sort music files for playback.
Editing Video Metadata
To edit video metadata in the DivX Connected Server:
1. Click the ‘Video Settings’ tab
2. Click the folder that contains the file(s) you want to edit
3. Right-click the file(s) and select ‘Edit Metadata’
4. Enter the information you want to display
The Metadata Editor displays information for the selected video file(s).
24
Copyright © 2007, DivX, Inc., Confidential
C
Configuring the DivX Connected Server
DivX Connected User Guide
Fields that you can edit include Title, Released, Director, Genre and Description. Editing the Genre field
can affect how videos are grouped together and listed on the client device, allowing you to see a list of
videos that fall under one genre. For example, you can list all the "Comedy" videos.
When you edit multiple files, a check appears in the check box next to each field.
Copyright © 2007, DivX, Inc., Confidential
25
D
DivX Connected User Guide
DivX Connected User Guide
Uncheck the box if you do not want the information in a field to apply to all selected files.
The Metadata Editor stores information entered into the Genre field for later use. When you click the
arrow to display the drop-down list, all genres associated with the files in your collection appear in the
list. To remove a genre from the list, you must change or remove the genre from every file associated
with that genre.
Resetting Video Metadata
Resetting the metadata discards all custom attributes or artwork assigned to the selected file(s). If the
file originally contained no metadata except for the file name, then all information is removed except for
the file name.
To set the metadata back to its original state in the DivX Connected Server:
1. Click the ‘Video Settings’ tab
2. Click the folder that contains the file you want to edit
3. Right-click the file and select ‘Reset Metadata’
Note: Your changes do not affect the file's metadata. The server stores your new metadata in a
database and uses it instead of, or in addition to, the file's metadata.
26
Copyright © 2007, DivX, Inc., Confidential
C
Configuring the DivX Connected Server
DivX Connected User Guide
The Metadata Editor displays information about the video file and its dimensions in the top portion of the
screen. If a picture was included in the metadata, the picture thumbnail displays. Click the arrows in the
bottom left corner to advance or go back to the metadata in the next or previous files in the folder.
Changing the Artwork
You can add a picture or change the current picture for a video, or for multiple files you select.
•
To change the artwork:
You can either
•
Drag and drop a new image onto the Artwork box from your browser window, or from an
Internet page, or
•
Click the down arrow in the Artwork box and then click ‘Select New Artwork’ to browse
for an image file
The recommended image size for the best display quality is approximately 400 x 600 pixels.
•
To remove artwork:
1. Click the down arrow in the Artwork box.
2. Click ‘Remove Artwork’
•
To export the artwork to your drive:
1. Click the down arrow in the Artwork box
2. Click ‘Export Artwork’
3. Browse to the location and click ‘Save’
Editing Music Metadata
To edit music metadata in the DivX Connected Server:
1. Click the ‘Music Settings’ tab.
2. Select the folder containing the music from the shared music folders on the left
3. Right-click the file in the Name list on the right
4. Click ‘Edit Metadata’
5. Enter or edit the information you want to display
6. Use the arrows at the bottom left of the screen to move quickly between files
Music CDs and downloaded files often contain pre-configured metadata. The Metadata Editor displays the
file's current metadata.
Copyright © 2007, DivX, Inc., Confidential
27
D
DivX Connected User Guide
DivX Connected User Guide
Fields that you can edit include the Title, Artist, Album, Genre, Track and Year. Editing the Genre field
can affect how music is grouped together and listed on the client device, allowing you to see a list of
music that fall under one genre. For example, you can list all the "Jazz" music.
As you enter the information for multiple files, a check appears in the check box next to each field.
Uncheck the box if you do not want the information in a field to apply to all selected files.
As you enter information into the Genre field, the Metadata Editor stores it for later use. When you click
the arrow to display the drop-down list, all genres associated with the files in your collection appear in
the list. To remove a genre from the list, you must change or remove the genre from every file
associated with that genre.
Resetting Music Metadata
Resetting the metadata discards all custom attributes or artwork assigned to the selected file(s). If the
file originally contained no metadata except for the file name, then all information is removed except for
the file name.
To set the metadata back to its original state in the DivX Connected Server:
1. Click the ‘Music Settings’ tab
2. Click the folder that contains the file you want to edit
3. Right-click the file and select ‘Reset Metadata’
28
Copyright © 2007, DivX, Inc., Confidential
C
Configuring the DivX Connected Server
DivX Connected User Guide
Note: Your changes do not affect the file's metadata. The server stores your new metadata in a
database and uses it instead of, or in addition to, the file's metadata.
The Metadata Editor displays information about the audio file in the top portion of the screen. If a picture
was included in the metadata, the picture thumbnail displays. Use the arrows in the bottom left corner to
advance or go back to the metadata in the next or previous files in the folder.
Changing Music Artwork
You can add a picture or change the current picture for a music file, or for multiple files you select.
•
To change the artwork:
You can either
1. Drag and drop a new image onto the Artwork box from your browser window, or from an
Internet page
2. Click the down arrow in the Artwork box and then click ‘Select New Artwork’ to browse
for an image file
The recommended image size for the best display quality is approximately 400 x 600 pixels.
•
To remove artwork:
1. Click the down arrow in the Artwork box
2. Click ‘Remove Artwork’
•
To export the artwork to your drive:
1. Click the down arrow in the Artwork box
2. Click ‘Export Artwork’
3. Browse to the location and click ‘Save’
The Genre field is a drop-down field. The DivX Connected Server stores information in the Genre field for
later use. When you click the arrow to display the list, a list of all genres for the music you have in the
database appears. When you switch the view to list by Genre, the list of folders containing the music files
is sorted by genre. Each file's properties determine the genre under which the file appears.
Viewing Picture Metadata
To view picture metadata in the DivX Connected Server:
1. Click the ‘Picture Settings’ tab
2. Click the folder that contains your pictures from the shared pictures folders on the left
3. Right-click the file in the Name list on the right
4. Use the arrows to move between files in the Metadata Editor
Copyright © 2007, DivX, Inc., Confidential
29
D
DivX Connected User Guide
DivX Connected User Guide
The DivX Connected Server database stores the metadata for each picture. The metadata consists of:
•
A thumbnail of the picture
•
The type of file (e.g., image/.jpg)
•
The date the picture was taken
•
The size of the picture
Use these details to work with your picture files.
The thumbnail from the Artwork box displays when you browse folder contents. The picture displays
when you view the picture or run a slideshow.
30
Copyright © 2007, DivX, Inc., Confidential
C
Troubleshooting
DivX Connected User Guide
Troubleshooting
This section contains some common solutions to problems that may occur while using DivX Connected.
Problem or
Occurrence
Remote control does
not work
Device has no power
No pictures on TV
The wireless
connection is not
working
Possible Explanations
How to Correct
The batteries may be
positioned incorrectly in the
remote control
Check the polarity of the batteries
with the remote control. If incorrect,
change battery position.
The batteries have no more
voltage
Exchange batteries for fresh
batteries
The device is not receiving a
signal from the remote
control
Make sure you are within range of
the device and that you are
pointing the remote control at the
device
Power cord is not plugged in
Check that the AC power cord is
plugged into the power receptacle
and the AC adapter. Check that the
power jack is plugged securely into
the back of the media player.
Power is not on
Press the power button on the front
of the media player
Connections to TV may not
be in place; check TV manual
for more information
Check the connections to the TV
and ensure the plugs are firmly in
place. Consult your TV manual to
determine how to get the video
input you have connected to the
media player to display on the TV.
Incorrect input signal
selected on the TV
Make sure that the TV is set to
display the correct input signal
Router not set up with correct
MAC address
Follow the instructions
accompanying your router for
correct setup and enter the correct
MAC address for your server
Adapter improperly set up to
communicate with router or
access point
Follow the instructions
accompanying your adapter for
correct setup
Access point is unavailable
Search for an available access
point within range and be sure your
router is set up correctly
Incorrect key entered, cannot
connect
Re-enter the key that enables you
to access the home network
Encryption mode not
currently supported
Make sure that you are using one
of the supported encryption modes
(See Supported Encryption
Modes)
Copyright © 2007, DivX, Inc., Confidential
31
D
DivX Connected User Guide
Problem or
Occurrence
No sound or distorted
volume
32
DivX Connected User Guide
Possible Explanations
How to Correct
Volume incorrectly set
Adjust the volume on the TV or
device
Audio input source issue
Check that the audio connections
are going to the correct input
source on the TV or the stereo
system. TVs with more than one
video input will usually have a
separate audio input as well.
Copyright © 2007, DivX, Inc., Confidential
T
Updating Your Firmware
DivX Connected User Guide
Updating Your Firmware
Periodically, a new version of firmware for DivX Connected™ devices may become available with
improved functionality or added features that enhance your DivX Connected experience. Updating the
firmware is quick and easy.
When a device connects with the DivX Connected Server, the server checks the firmware version number
against the currently available firmware version. If a more recent firmware version is available, then an
update is requested.
When an update is available, the DivX Firmware Update screen is displayed with the question, "Update
Firmware Now?" To update the firmware, select ‘Yes’.
The update process will begin immediately. The entire process takes approximately five minutes.
Important: Do not attempt to power off your device during the firmware update.
When the firmware is updated, you are prompted to power cycle, or restart, your device. Restart the
device to activate the updated firmware.
Copyright © 2007, DivX, Inc., Confidential
33
D
DivX Connected User Guide
DivX Connected User Guide
Sending Feedback to DivX
We look forward to receiving feedback from our DivX Connected™ Users. Please send any and all
feedback on this product to [email protected].
34
Copyright © 2007, DivX, Inc., Confidential
S


![LL STAGE 6-06D W - [2013.07.04]](http://vs1.manualzilla.com/store/data/005734810_1-c52217095191e9110aa67fdeef6b5f60-150x150.png)