1
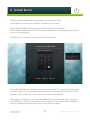
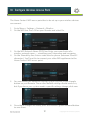
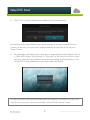
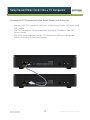
1
Copyright 2013 Prodea Systems
Important Safety Instructions and Declarations
!
1. Location
•
•
•
•
Place the device in a dry place, far from water, smoke, dust, and heat (including amplifiers).
Keep the ventilation openings free and clear: Never put anything on the Home Center, and
don’t install it in a bookcase or cabinet that lacks airflow.
If you move the Home Center from a cold spot to a warm one, condensation may form
inside, so let it rest before you turn it on.
Always use a dry cloth when cleaning it.
2. Power
•
•
•
•
•
Your Home Center needs a socket that’s nearby and easily accessible.
The plug is polarized (with one wide blade) so if it doesn’t fit in your wall, the socket is
outdated and should be replaced — probably by an electrician. Please don’t use an adapter.
Unplug the Home Center during lightning storms, and also when cleaning it, and if it won’t
be used for a while.
Protect the power cord from damage by feet, wheels, crimping, and other stresses.
Planning to use a different voltage? You’ll have to replace the power cord, so contact your
dealer.
3. Service
•
•
If your Home Center is damaged (spills, falls, cord/plug issues, etc.), or if it smokes or smells
strange, unplug it and contact your dealer.
Don’t try any repairs yourself. Opening the back cover may expose you to high voltage,
electric shock, and other hazards.
4. Remote
•
•
•
Your remote requires alkaline batteries. Using other types may cause an explosion.
Don’t expose batteries to excessive heat, such as hot sun, fire, heaters, etc.
Please dispose of used batteries according to the instructions.
2
Copyright 2013 Prodea Systems
Important Safety Instructions and Declarations
!
This product incorporates copyright protection technology that is protected
by U.S. patents and other intellectual property rights. Reverse engineering or
disassembly is prohibited.
This product contains technology subject to certain intellectual property
rights of Microsoft. Use or distribution of this technology outside of this
product is prohibited without the appropriate license(s) from Microsoft.
Content owners use Microsoft PlayReady™ content access technology to
protect their intellectual property, including copyrighted content. This device
uses PlayReady technology to access PlayReady-protected content and/or
WMDRM-protected content. If the device fails to properly enforce restrictions
on the content usage, content owners may require Microsoft to revoke the
device’s ability to consume PlayReady-protected content. Revocation should
not affect unprotected content or content protected by other content access
technologies. Content owners may require you to upgrade PlayReady to
access their content. If you decline an upgrade, you will not be able to access
content that requires the upgrade.
3
Copyright 2013 Prodea Systems
Table of Contents
1. Check Box Contents5
2. Review Home Center Back Panel
6
3. Review Home Center Remote Control
7
4. Find Install Location8
5. Connect Home Center to Internet
8
6. Connect Home Center to the Television
9
7. Connect the Home Center to Power
9
8. Activate Service10
9. Account Password11
10. Configure Wireless Access Point
13
11. Home Monitoring and Netcam Connection
14
12. Setup Phone Service15
13. Connect to PC15
14. Setup ROS Cloud16
15. Add Content to ROS Cloud
18
16. USB Browser20
17. Mobile Companion Applications
22
18. Setup Second Home Center into a
TV Companion
23
19. Troubleshooting25
20. Home Center Specifications
44
21. FCC Regulatory Information
45
4
Copyright 2013 Prodea Systems
1. Check Box Contents
Your box should contain:
Your will also need:
•
•
•
Broadband Internet connection with an Ethernet port
Television with HDMI or analog audio/video input
HD Cable or HD satellite box with an HDMI port
5
Copyright 2013 Prodea Systems
2. Review Home Center Back Panel
1.
2.
3.
4.
5.
6.
7.
USB Port
Infrared (IR) Port
LED lights
Ethernet to Home Network Devices (LAN)
Ethernet to Internet Connection (WAN)
S/PDIF Optical Output Digital Audio
HDMI Output to TV
8.
9.
10.
11.
12.
13.
HDMI Input from STB
2 USB Ports
Button to Reset to Factory Settings
Analog Audio/Video Output
+12V DC Input Power
WiFi Protected Setup (WPS)
Looking for an on/off switch? You won’t find it. Your Home Center is always
on, managing your network and using very little power. To keep it working
right, always leave it plugged in. A surge protector is a great way to guard
against harmful power fluctuations.
6
Copyright 2013 Prodea Systems
3. Review Home Center Remote Control
We’re pretty sure you know how to use one of these. But here are a few notes:
•
•
•
•
There’s no on/off button, because your Home Center is always on.
Use the Menu button to enter applications and settings.
The Exit button lets you quit ROS applications and go back to watching TV.
The colored shape buttons do different things, depending on what you’re doing. The
context-driven onscreen menus will make these functions clear.
1.
2.
3.
4.
5.
6.
7.
8.
9.
10.
11.
12.
13.
Standby
Mute
Favorite (shows up to 9 programmable actions)
More (shows additional options if available)
Up, Down, Left, Right (moves the highlight)
Back (back to previous screen)
Menu (press to show menu)
Volume Up
Volume Down
Play / Pause
OK (selects a highlighted option)
Exit (Exit system menu and show TV video feed)
Color Shortcuts (thes perform common functions
when available)
7
Copyright 2013 Prodea Systems
4. Find Install Location
Find an open well ventilated area in close proximity to your television. Avoid
putting other devices on top of the ROS 3001 for optimal WIFI performance
and heat dissipation.
5. Connect Home Center to Internet
Make sure the Home Center, your TV, and your Set Top Box are all turned off.
Use the Network cable to connect the Home Center Internet port to your
broadband modem.
8
Copyright 2013 Prodea Systems
6. Connect Home Center to the Television
For maximum enjoyment, the Home Center should connect to the HD Cable/Satellite Box and
your HDTV at the same time.
Using the provided HDMI cable, connect the HDMI TV port of the Home Center to your TV’s HDMI
port.
Connect the Cable/Satellite Set Top Box to the Home Center HDMI STB port with the HDMI cable
that came with the Cable/Satellite box.
Once the system is operational you can use the Menu button on your Home Center remote
control to enter applications and settings and the Exit button to leave applications and resume
TV pass-through.
7. Connect the Home Center to Power
Connect the power adapter to the Home Center as shown. The Home Center will power on and
the light bar on the front panel will come on.
Turn on your Television.
Your Home Center has been designed to remain powered on at all times.
We recommend using a surge protector to guard against unexpected power surges.
9
Copyright 2013 Prodea Systems
8. Activate Service
With the home centered connected to the television and
powered on you are now ready to activate your service.
The indicator light on the Home Center front panel should be
illuminated solid amber. You will need the activation number given to you by
your service provider.
Follow the on screen instructions on your Television.
If you do not see your activation instructions on the TV screen verify the input
source to your TV is set to the correct port. You may see Internet connection
options if your unit does not receive an automatic IP address.
Get setup instructions from your broadband service provider if you need to
use PPPoE or a Static IP to connect to the Internet. Your front panel indicator
will turn solid green when the unit successfully activates.
10
Copyright 2013 Prodea Systems
9. Account Password
To remotely control the Home Center from your mobile and desktop devices,
you’ll have to update your Account Password. Here’s how:
1. Go to Menu > System > Account Password.
2. Update your Account Password.
3. Enable Remote Access. That’s it!
11
Copyright 2013 Prodea Systems
10. Configure Wireless Access Point
The Home Center’s WiFi access point has to be set up so your wireless devices
can connect.
1. Go to Menu > Settings > Network > Wireless.
2. On the WiFi line: Press OK on your Remote and select On.
3. On the WiFi Network Name (SSID) line: Enter your own choice of a
wireless network name — something you’ll remember and recognize.
4. On the Shared Key line: Enter a code word or phrase (between 9 and 32
characters). You’ll use this to connect your other WiFi appliances to the
Home Center’s WiFi access point.
5. You can modify the advanced settings by pressing the yellow triangle
button on your Remote. These other default settings should work as-is,
but if you know your system needs a specific settings change, do it now.
6. Once these changes are made, press the Remote’s green diamond button
to save them.
12
Copyright 2013 Prodea Systems
Configure Wireless Access Point
To connect wireless devices that use WiFi Protected Setup, you can use the
onscreen Menu or the WPS button on the rear panel, like this:
1. On the back of the Home Center, press the WPS button.
2. When the front panel light turns amber, you’ll have two minutes to press
the WPS button of any device that you want connected to the Home
Center’s WiFi.
3. A notification on your TV will announce when the devices have
connected.
13
Copyright 2013 Prodea Systems
11. Home Monitoring and Netcam Connection
Before you begin:
DON’T follow the instructions provided with the Netcam, because they may
interfere with your ROS Home Monitoring service.
DO use the Netcam’s documentation for hardware installation and
description, and as a guide to the Netcam’s LEDs.
Set Up Your Netcam
1. Connect your Netcam to its power supply, and plug that into a power
outlet.
2. Connect your Netcam to the Home Center using WiFi.
3. Connect the Netcam to the Home Center by pressing the WPS buttons on
both the Netcam and the Home Center’s rear panel.
4. Wait to see the “Device Configured” notification on your TV.
5. On your TV, go to My Home and choose ROS Sec to check the Netcam
video feed.
If necessary, your Home Center will automatically update the Netcam. Follow
the instructions shown on your TV for this process. DON’T disconnect or
unplug the Netcam until the update is complete. Doing so may make it
unusable.
14
Copyright 2013 Prodea Systems
12. Setup Phone Service
Your Home Center gives you another phone line. Let’s set that up.
1. Plug one power cord into the Gigaset Phone’s Base Station and then into
a power outlet.
2. Plug the other power cord into the Handset Cradle and then into a power
outlet.
3. Place the Handset in the Cradle and let it charge overnight.
4. Connect the Base Station to the Home Center’s Ethernet LAN port.
5.
a.
b.
c.
d.
Pair the Handset with the Base Station:
On the Handset, choose Menu > Settings > Register > Register Handset.
Enter passcode 0000. Do not change this passcode. It must be 0000 to work with your ROS voice service.
Select OK.
Press and hold the blue button on the base station for 5 seconds. Repeat pressing the blue button if it doesn’t work the first time.
The Home Center will automatically configure the Gigaset Phone. A test ring
on the phone means the Handset is connected to the Base Station. When it
rings again a minute or two later, you can use it.
13. Connect to PC
You can connect to your Home Center using a PC browser.
1. Type the Home Center ID you received from your Service Provider into
the browser’s address window, and you’ll see a log-in page.
2. Under Username, type your account name or username.
3. The Account Password is either the default — admin — or the new
Account Password you created. Haven’t created one? Do it now. You
have to replace the default Account Password with your own to activate
Remote access. See page 12 - SET YOUR PASSWORD for instructions.
15
Copyright 2013 Prodea Systems
14. Setup R O S Cloud
Your ROS Cloud application stores, organizes, and displays your personal
media, including pictures, music, and video. It needs a dedicated USB Hard
Drive or Flash Drive, which will attach to one of your Home Center’s USB ports.
Here’s how to connect the Drive:
1. Make sure the TV and Home Center are on.
2. Connect the Drive to the Home Center and wait for the onscreen
notification.
3. After it appears, press the Menu button on the Remote and navigate to the ROS Cloud application.
4. Select the connected Drive and click on Associate Drive.
16
Copyright 2013 Prodea Systems
Setup R O S Cloud
5. Click “Yes” on the confirmation window to format the drive.
Formatting will erase all the Drive’s data and pair it to work with the Home
Center, so be very sure you want to permanently assign this Drive to your
Home Center.
6.
Formatting could take up to a few hours, depending on how big the Drive is. Wait till it’s done. You can exit to “live view” at this point, or access other services you have set up.Want to see how far along the formatting is? Go to the ROS Cloud application and look under My Media.
All data on that Drive will be erased when it connects, so make sure you use a
new Drive or one you can permanently commit to the Home Center.
17
Copyright 2013 Prodea Systems
15. Add Content to R O S Cloud
Once your ROS Cloud Drive is formatted, you can sync your music, photos, videos and files
using the Companion Software. Here’s how to install the PC/Mac Companion software:
1.
Login to the RHC web portal and launch ROS Cloud application.
2.
From the drop down, download the software:
(Note: You need to have a ROS Cloud drive created before you can see this button)
3.
Install the software using the wizard. You will be asked to enter your username/password.
(Note: Please make sure your computer is connected wired or wirelessly to the RHC during installation.)
4.
During installation, you will be asked if you want to enable synchronization. If you want files
from your computer and playlists from your iTunes automatically copied to the RHC, click
“Enable synchronization” here.
5.
If you enable synchronization, you will be asked to select the folders and list of iTunes
playlist to be copied to the RHC automatically.
6.
After this you’ll be given option to select the software to launch on startup. Select Yes or No according to your preference.
7.
Finish set up.
18
Copyright 2013 Prodea Systems
Add Content to R O S Cloud
Copying files:
If you have enabled synchronization, all you have to do is copy the files into
the folders selected for synchronization and they automatically get copied to
the RHC.
(Note: The files will be available both on the Computer and the RHC, and
hence will be duplicated.)
•
•
•
The files if deleted from the Computer, will automatically be deleted on
the RHC.
The files will not be synched, if the computer is connected remotely to
the RHC.)
If you manually want to copy the files to the RHC, click on the Companion
software and select “ROS Cloud Drive” from the menu. This will open
the ROS Cloud drive and you can copy files to it by Operating System’s
copy-paste method or drag-n-drop method.
Please allow the copied files a few minutes to get ingested and show up on all
the interfaces.
19
Copyright 2013 Prodea Systems
16. USB Browser
You can connect additional USB flash drives or hard drives to the
Home Center and view its content on the Home Center’s TV interface.
Use your Browse USB application located under the menu My Media tab to a
look at the contents of your ROS Cloud drive or a temporary drive containing
music, photo, or video files.
1. Launch the “USB Browser” application.
2. Click on “Browse Drive” for the one you want to explore.
20
Copyright 2013 Prodea Systems
USB Browser
3. The app shows the directory structure of your selected drive.
4. Click OK on any directory to view the files and folders underneath it.
5. To view the files, click on the top item that says “Files Here”
6. Once the files are listed on the right hand side, focusing a file will give
you the metadata. Previews are available for the image files.
7. Click “OK” on a file to view supported files in Full Screen.
8. While going UP and DOWN on the list of items in a directory, you can
make use of the Alphabet bar that appears on the left. Moving UP and
DOWN on the alphabet bar to different letters will scroll the files list to
the selected letter.
21
Copyright 2013 Prodea Systems
17. Mobile Companion Applications
A companion application is available for both the Apple iOS mobile phones
and tablets as well as for Android phones and tablets.
Apple IOS:
For the Apple iOS applications, please go to the Apple iTunes store and select
the application name provided to you by your service provider and install the
application on your device. Follow the instructions provided on the iTunes
store to install the application. The application will guide you through the
setup process. You will need your Home Center ID and your password to
access your systems.
Android:
For Android devices, please go to the Google Play store and select the
application name provided to you by your service provider and install the
application on your device. Follow the instructions provided on the iTunes
store to install the application. The application will guide you through the
setup process. You will need your Home Center ID and your password to
access your systems.
22
Copyright 2013 Prodea Systems
18. Setup Second Home Center into a TV Companion
A TV Companion allows you to extend all ROS services to other TVs in your
home. A new and non-activated Home Center can run in TV Companion
mode. Here’s how:
•
•
•
•
•
Leave the Home Center disconnected from any network.
Turn it on and let it finish booting up. The front panel indicator should be
solid amber.
Press and hold the WPS button on the rear panel for a minimum of 5
seconds.
The front panel will blink red and the Home Center will restart and boot
up in the TV Companion mode.
Once the boot up sequence is complete, the front panel will blink green.
Connect the TV Companion to the Home Center wirelessly
The quickest way to connect a TV Companion to the Home Center wirelessly
is to use WPS:
• With both Home Centers on and fully booted up, press and release the
rear panel WPS button on each unit so they are both in WPS mode.
• The WPS process takes about 2 minutes to complete.
• The front panel indicator on the TV companion will turn solid green when
it i successful.
• If it is not successful the front panel will turn red for 5 seconds. If this
happens, check to make sure the TV Companion is within range of the
Home Center WiFi.
Once a Home Center is activated for service it can no longer be converted to a
TV Companion.
23
Copyright 2013 Prodea Systems
Setup Second Home Center into a TV Companion
Connect the TV Companion to the Home Center with Ethernet
•
•
•
Connect the TV Companion LAN port to the Home Center LAN port using
Cat 5 cable.
The TV Companion will automatically receive an IP address from the
Home Center.
The front panel indicator on the TV Companion will turn solid green
when it connects to the home center.
24
Copyright 2013 Prodea Systems
19. Troubleshooting
Why can’t I see a picture on the TV?
1. Are the plugs on the cable connecting the Home Center and the TV
pushed in all the way?
2. Does the video source on your TV match the HDMI port where you
plugged in the video cable? For example, if the cable is in the HDMI 3
port, set the source to HDMI 3.
3. Is the Home Center power cable plugged all the way in on both ends?
4. Is the HDMI cable to your TV plugged into the Home Center’s HDMI-TV
port?
Why can’t I connect my Home Center to the Internet?
1. On the rear panel of your Home Center, is the network cable connected
to the Ethernet port?
2. Is the link light on your Ethernet port green?
3. If you need a PPPoE or Static IP connection to the broadband source, you
may need to contact your service provider for additional instructions.
Why can’t I control my TV menus with the Remote?
1. Does the Home Center’s front panel light blink when you push the
Remote button?
2. Are the batteries installed correctly in the Remote? Check their polarities/
directions.
3. Is anything blocking the signal between the Remote and the front of the
Home Center?
Where can I access the ROS system settings?
The ROS system settings are available through any of your ROS interfaces including
the TV Menu, the WEB page on your PC browser or your mobile phone or tablet ROS
app.
25
Copyright 2013 Prodea Systems
Troubleshooting
What is Video Pass through?
Video Pass through is the feature the routes the TV signal from your satellite or cable
set top box through your Home Center and then to your TV. There is an HDMI input
and output connector on the back of your Home Center to route the signal. The
feature lets you combine your normal TV watching with quick access to Home Center
applications and interactive notifications. Press menu on your home center remote
control to enter your application launchpad. Press exit to return to TV.
What is CEC in the TV CEC volume control settings?
The Consumer Electronics Control (CEC) is an optional part of the single cable HDMI
interface between your video devices. CEC allows the different video devices to send
remote control commands to one another. Your Home Center can control the audio
volume and power on-off of devices that support this feature. Not all devices support
this HDMI interface feature.
What is Wireless Radio Channel?
Your wireless, also called WiFi, radio can operate on any one of 11 to 13, depending
on local regulations, frequency channels. Some channels are less used and provide
smoother performance than others. A user can select a channel manually or set the
radio to automatic mode. In automatic mode the radio will analyze the radio traffic
during its initialization and choose a channel that shows the least amount of other
traffic and interference.
What are Wireless Network Modes?
Wireless radios have evolved through several improved generations starting with
802.11b, then 802.11g and now 802.11n. Each generation provided better, faster,
data transmission. Many networks may have devices equipped with WiFi radios
from different generations. Each generation is backward compatible with all other
generations. A user can setup their radio to work with each and every generation or
set their radio to only work with the most recent 802.11n generation. This would be
done to keep unwanted slower radios off the network to maintain the networks fastest
data transmission capability.
26
Copyright 2013 Prodea Systems
Troubleshooting
What is Wireless Protected Setup (WPS)?
WPS is a shortcut method to connect WiFi radios to a secure network. WiFi radios that
support this feature will have a physical button or a virtual button in their settings
interface or both. Press the WPS button on your Access Point and your client radio in
your PC or other device at the same time and for a brief period of time they can see
each other’s signal and automatically transfer security information. Your PC or other
device will then be securely connected and will remember this network in the future
to securely reconnect.
How do I connect wireless using WPS?
The WPS button on your ROS Home Center is located on the rear panel located on the
far right as you view the rear panel. Each wireless device that you want to securely
connect is a little different so find the device’s WPS button before you begin. Press and
release the WPS button on the Home Center. The Home Center front panel display
will turn amber to indicate that WPS is in process. Now press the WPS button on the
wireless device you want to connect. The device must be within wireless range for the
Home Center to connect. The wireless device will indicate when it has a connection.
Why is the WIFI WPS not successful?
Check to make sure the Access Point security mode is not set to WEP. The WEP security
mode does not support WPS. This is done by selecting the Router tab under Settings
and going to the Wireless setup. Check to make sure the device is within radio range of
the Access Point by moving closer to the Access Point and retrying WPS.
What is the Wireless Shared Key?
One way to connect WiFi radios to a secure network is to enter the same a password or
phrase into each radio’s settings. Setup the phrase in your ROS Home Center Access
Point radio first. Then use the same for each new client you want to securely add to
the wireless network. WPS is an alternative way of connecting to a secure wireless
network.
27
Copyright 2013 Prodea Systems
Troubleshooting
How do I set the Shared Key in the ROS?
In your TV menu select Settings, select Router, and finally select Wireless. In the
Wireless page there is a Shared Key field. Go to the field and press OK. A keypad will
show to let you enter your unique Shared Key input. When complete, press Done.
Finally, press Save and you have set the Shared Key.
How do I tell what devices have attached to my ROS Home Center?
Your ROS Home Center has a listing for all the devices that are attached or have been
attached to its LAN network through either wireless WiFi or wired Ethernet. To see
the list, go to Settings in your TV menu. Under Settings, Select Router and then under
Router select Devices. You will see the list of devices. If they are currently connected
the Useable column will say Yes.
One device cannot connect to the WiFi but all other devices seem to be
working normally. How can this happen?
Check to see if the WiFi MAC Address Filter is on and if your device is listed. The MAC
Address Filter control is available in the Wireless settings through the Web interface. If
your device is listed remove it from the list or turn off MAC filtering if you don’t intend
to use that feature.
What is a Firewall?
A Firewall is a set of rules used by your router to prevent or limit unwanted traffic from
the internet into your home network.
What is the Account Password?
The Account Password is a user defined password used to log into your system with a
PC browser. The factory default password is admin. The factory default must be
changed to enable remote access to your system from outside your home network.
The Account Password can be found in you settings under the system tab.
28
Copyright 2013 Prodea Systems
Troubleshooting
What is the Account ID?
The Account ID is your personal web address assigned to you by our service provider.
You can access your home system by entering your account ID into your PC’s browser.
The browser should return a log in screen where you enter your Account Password.
You can look up your Account ID in you settings under the About tab.
What is Remote Access?
Remote access allows you to log in and use your system with a mobile device or PC
from outside the home. You must update your Account Password from the factory
default before this feature can be enabled. If you cannot successfully log in remotely
check to make sure your Account Password has been updated.
What is the Settings PIN?
The settings PIN is a four digit number that can be enabled and set to grant access to
the system settings. Once enabled the PIN must be entered to be granted access to
system settings. Use this feature when you do not want anyone else changing your
system settings.
What are WAN and LAN?
WAN stands for wide area network and in the Home Center’s case, is the Internet side
of the router. LAN stand for local area network and it is the side of the router where
your home devices are attached either through Ethernet or WiFi.
What is DHCP?
DHCP stands for Dynamic Host Configuration Protocol. This is a feature in a router or a
modem that performs automatic assignment of digital addresses to devices that
connect to the LAN. For a user it makes connecting new devices to your home
network very simple and automatic. Plug your device into the router’s LAN Ethernet
port or connect it through the wireless radio and the device automatically receives
its unique address allowing it to communicate in the network. You can see a list of
devices and their addresses by looking at the Home Center’s device list in the Devices
tab of the Network section of Settings.
29
Copyright 2013 Prodea Systems
Troubleshooting
What is an IP address?
IP address is a technical term that stands for Internet Protocol address. The IP address
is a unique digital number assigned by a network to each device. It identifies the
device and the devices location in the network. When and if a devices moves to a new
network it would be assigned a new IP Address by that network.
What is a MAC address?
MAC address is a technical term that stands for Media Access and Control address. The
MAC address is a unique and permanent number assigned to a network interface
such as an individual Ethernet connector on a device. The MAC address is stored in the
device does not change when the device moves from one network to another.
What is MAC Address cloning?
MAC address cloning is a special optional feature is some routers. MAC address
cloning in the Home Center allows the user to program in the MAC address from a
second device. This feature is usually only needed when the Internet service provider
has assigning a single fixed IP address to your home and registered a particular MAC
address. Entering that MAC address via the cloning feature lets the WAN port of your
Home Center router receive the fixed IP address and communicate successfully with
the Internet.
Why Don’t I get full downstream or upstream broadband throughput?
Check your Quality of Service (QoS) settings under your Settings Network tab. If the
QoS is on but the Uplink or Downlink rates are set incorrectly they can throttle your
expected broadband service.
How do I adjust the picture size to fit my TV screen?
There is a screen size adjustment in the TV section of Settings. The adjustment allows
you to center, expand or shrink the video output to properly fit your specific TV screen.
30
Copyright 2013 Prodea Systems
Troubleshooting
ROS Sec
What cameras work with ROS?
The cameras are Sercomm 8021, 8221 and Dlink DCS 2132L.
How do I connect a camera?
First, connect the Ethernet cable to the ROS Home Center. Then connect the camera to
power. Watch the status under Devices in the Web menu. When fully operational this
will be indicated under the “Operational” Status. You can now connect the camera
wirelessly.
What is a Scene?
A Scene is a collection of cameras where motion detection is turned off all the time or
on a Schedule.
What is a Schedule?
A schedule defines a a recurring window where motion detection is active on the
cameras included in the Scene.
How do I select the days for motion detection?
The days are selected when a Schedule is set to on. A window, say 7 a.m. to 11 p.m.
applies to each selected day. The stop time always has to be greater than the start
time, but less or equal to midninght.
What if my time window goes over midnight?
You will have to create 2 scenes. If, for example, you wish to go from 6 p.m. to 6 a.m.
Mo-Fr, you will have to create one scene from Mo-Fr 6 p.m. to midnoight, and one
scene Mo-Fr from midnight to 6 a.m.
31
Copyright 2013 Prodea Systems
Troubleshooting
How do I set Motion Detection?
Motion detection is in the Scene, which can be always on or based on a Schedule.
What types of Motion Detection are supported?
Window-based motion detection is always supported. You can set the Window by
clicking on the Window symbol in the Camera view. If the camera supports it, Passive
Infrared (PIR) based motioon detection may also be available. No window needs to be
set for PIR based Motion Detection.
What if I have more than one Scene?
The motion detection will be active based on the last scene that’s running. So, if
Scene 1 is active from 12 p.m. to 2 p.m. and Scene 2 from 1 p.m. to 4 p.m. the Motion
Detection will be active from 12 p.m. to 4 p.m.
ROS Tel
What VOIP devices work with ROS?
Gigaset A580 works with ROS. Also, the X-lite softclient can be downloaded and used
with ROS.
How do I connect the Gigaset?
Connect the Ethernet on the Gigaset Base Station to the ROS Home Center. If you are
also using a local PSTN line, connect the wires to the phone port on the Base Station.
Then connect the Base Station to power. ROS Home Center should automatically
detect and configure the phone. Make a Test Call from the Web menu.
32
Copyright 2013 Prodea Systems
Troubleshooting
How do I make a Test Call?
Go the the Extensions menu. Press the Test Call button. When phone rings, pick up the
receiver and listen to the message.
Can I turn Voicemail Off?
Yes, there is a switch in the Web interface’s Voicemail section.
How do I listen to Voicemail?
You can listen to voicemail from the ROS phone (dial *97), or from the Web, TV, mobile
or Tablet menus in the Voicemail section. If you have set up forwarding of voicemails
to email, you may play the wave file included.
How do I check Call History?
You can check call Hostory on TV, Web, Mobile or Tablet menus in the Call History
sections.
How do I add a soft client?
Go to the Extensions menu. Click “Add Extension”. Note the password given. Configure
the soft client with the user id (extension number, the password. For domain use
“yourJID”.voice. prodeasystems.net.
How do I Forward Calls?
You can forward all calls unconditionally. This means that the calls are forwarded
immediately, and your p[hone does not ring. Please remember to undo such
forwarding wne no longer needed. You can also forard calls based on the phone
disposition at the time of an incoming call, such as Busy or No Answer. With No Answer
the call is forwarded agfter a settable amount of rings.
33
Copyright 2013 Prodea Systems
Troubleshooting
What is Incoming Call Handling?
Incoming Call Handling allows you to create rules for handling of calls that arreive
with a specific Caller ID. You can simply reject such calls, forward them to voicemail or
forward them to a settable number.
What is Anonyomous Call Handling?
Anonymus Call Handling allows you to reject calls without a Caller ID.
What is Call Blocking?
Call Blocking allows you to specify on a Phone Line or Extension basis when calls can
not be made. You simply set the start and stop times.
What are Outgoing Call Types?
Outgoing Call types (Local/Nationa, International and Premium) can be allowed or
disalloed per Phone Line and Extension basis.
What is Callback?
Callback allows you to select a Voicemail or Call History entry and make a call to the
part which left it. You do so by clicking the Callback button. Then, a dialog will appear
with your extensions in your hoime. Select one extension and it will ring. Once you
answer, the call is set up to the destination.
34
Copyright 2013 Prodea Systems
Troubleshooting
Video On Demand
Where do you I find my Video On Demand applications?
On the TV, press the menu button to bring up the launchpad. On the launchpad, there
will be a category named “On Demand”. All the Video on Demand applications will be
placed underneath this menu item. The same menu structure is followed on the web,
mobile and tablet devices as well.
How and Where do I initiate a movie or series download?
Download can be initiated at any of the supported interfaces (TV, web, tablet and
mobile). The download can be initiated by clicking on the “Rent” button. If the movie is
included in the subscription package, the button will show “Download” instead.
How much am I paying for a downloaded movie?
The price for a movie is shown on the “Rent” button. If the button shows “Download”
instead, it means the title is included in the subscription package and the user is not
needed to pay anything at the time of rental.
When can I start watching a movie after initiating a download?
After the download is initiated, the movie starts downloading. The status changes to
“Preparing”. After a few minutes, the status will change to “Ready for Play”. At this
point, the movie is ready to be played.
How would I know when a movie goes to “Ready for Play” state?
A notification appears on the TV screen, web interface and also on the mobile/tablet
application showing that the movie is ready to play.
35
Copyright 2013 Prodea Systems
Troubleshooting
How do I see all the movies that are downloaded or currently
downloading?
The users can go to “My Downloads” to see all the movies that are downloaded to the
system or currently downloading. If a movie is downloading, it also gives a progress
indicator showing the status.
How many movies can I download at the same time?
Any number of downloads can be initiated at the same time. However, the Home
Center has a limited storage space allocated for the Video on Demand application that
can hold upto 3 movies at the same time. Also, only movie will download at any point
of time. If the user wants a different movie to download, they can move it to the top
using the web or mobile app.
Where can I watch the movie that is “Ready for Play”?
The movie can be played on any of the interfaces (TV, Web, Mobile or Tablet). However,
if the movie is protected by DRM, then it might be restricted for playback at some
interfaces.
How do I find the movie I want?
The movie could be searched from the search page. The search could be initiated for
the movie title or the actor name.
How do I find all the movies that are Romantic comedies?
The movies inside a catalog are grouped in feeds and genres. The feeds will have
categories such as “What’s new”, “Most Popular, etc. Genres will have categories such as
“Action”, “Comedy”, “Drama”, etc. The user can find the feed or genre they like, from any
of the supported interfaces.
How do I cancel a movie that I rented?
The movies can be deleted from any of the supported interfaces (TV, web, mobile
or tablet). Go to My Downloads and select the movie to be cancelled. There will be a
cancel button to delete the movie. Note: On the mobile and tablet, users can use the
native operating system’s swipe method to delete the movie
36
Copyright 2013 Prodea Systems
Troubleshooting
Do I get charged for the cancelled movie?
If the movie is cancelled before it is played, the user is not charged. Once the movie is
played on any of the supported interfaces, the user gets charged for it.
How do I see all the movies that I have watched in the past?
The users can go to “History” page on any of the supported interfaces to see all the
movies watched in the past.
ROS Cloud
What is ROS Cloud?
The ROS Cloud application allows the users to create a Personal Cloud for themselves.
They can plug in a USB drive to the Home Center and convert that to a ROS Cloud
drive. After that, the users can copy media and files to the drive that could be accessed
from anywhere with an Internet connection.
Can I access ROS Cloud without a USB drive connected?
No. The ROS Cloud application requires a dedicated USB drive connected to the RHC.
How do I create a ROS Cloud drive?
Plug in any USB drive and launch the ROS Cloud application from the TV. Select the
connected drive and click “Associate Drive”. Follow on screen instructions to complete
the drive creation process.
37
Copyright 2013 Prodea Systems
Troubleshooting
Can I connect a drive with content on it already to use as a ROS Cloud
drive?
No. The content on the drive would be erased and formatted in the process of making
it a ROS Cloud drive. So try to use a new USB drive or a drive that does not have any
content.
Where can I access the ROS Cloud drive from?
The ROS Cloud drive could be accessed from anywhere with an Internet connection
using any of the supported interfaces (TV, web, mobile or tablet).
How do I access ROS Cloud drive from the mobile or tablet?
Download and install the Companion application for the mobile from AppStore or
PlayStore for iOS and Android respectively.
Where can I copy media and files from, to the ROS Cloud drive?
Once the drive is created, users can transfer content from their PCs and mobile/tablet
devices.
How do I get content on the ROS Cloud drive from my computer?
To upload files from the PC, use the PC or Mac companion application (downloaded
from the web interface). This will let the user open the ROS Cloud drive on their
respective operating system and transfer files using native copy-paste or drag-n-drop
method.
How do I get content on the ROS Cloud drive from my mobile/tablet
devices?
To upload photos and videos from mobile/tablet devices, from the settings page of
the companion app, enable “Auto Upload”. This will automatically copy the photos and
videos from the “Camera” of the device to the RHC.
38
Copyright 2013 Prodea Systems
Troubleshooting
Can I automatically sync files from the computer?
To enable auto upload, check the option “Enable Synchronization” on PC or Mac
companion app. It will let the user select the folders that needs to be synced to the
ROS Cloud drive.
Is it possible to sync iTunes playlists?
Yes. When enabling synchronization on the companion app, check the iTunes option.
This will list all the playlists from iTunes. Users can select the playlists they want to sync
to the ROS Cloud drive.
What happens to the synced files if deleted on the RHC?
When a synced file is deleted on the ROS Cloud drive, nothing to worry. The PC or Mac
companion will sync the file back to the Cloud drive.
How often the companion app syncs files from the computer to the Cloud
drive?
The application synchronizes the files whenever there is a change in the file or folder
on the computer.
How to access the file I want quickly?
There is an alphaber bar on all the pages for ROS Cloud at all the supported interfaces
(TV, web, mobile and tablet). This lets the user to go to the file they want quickly.
How can I play a movie from the ROS Cloud at the TV without having to
go through the different screens?
Use the mobile or tablet companion app to access the file quickly. From there, users
can push the file to any of the connected TVs in the house.
39
Copyright 2013 Prodea Systems
Troubleshooting
Can I upload the files to the ROS Cloud drive without using any of the
companion apps?
Yes. Login to the web interface and launch the ROS Cloud application. From there,
access and upload files directly to the ROS Cloud drive to a selected destination folder.
How can I access files in a USB drive without having to format it as a
Cloud drive?
To use the drive without formatting, use the USB Browser application and not the
ROS Cloud application. Note: Without formatting, the files will be available only at the
connected TV and not on the other interfaces.
How do I initiate slide show of pictures?
Select the group of pictures that needs to be initiated for Slideshow (albums, camera,
etc.). Press OK on any of the picture to go Full Screen. At this point, it starts slideshow
automatically. Pictures could be advanced manually or paused using the buttons on
the remote control.
USB Browser
What is USB Browser?
The USB Browser application at the TV lets the user browse and access media files at
the TV that it is connected to.
How is USB Drive different from ROS Cloud?
The USB Drive is available only at the TV that it is conencted to. It is not a Cloud drive
where the people can access the files from anywhere with an internet connection.
40
Copyright 2013 Prodea Systems
Troubleshooting
Do I have to format the USB Drive to use it in the TV app?
No. To access a drive at the USB Drive TV application, formatting is not needed.
How do I get to the file I want quickly in the USB drive?
Users can access the file they want really quick by using the alphabet bar that appears
within the app.
Can I play media from the USB drive at the TV?
Yes. The files are displayed according to the directory structure on the USB drive itself.
Users can locate a file in the directory structure and play it on the TV.
YouTube
Why can’t I see or play some of the YouTube videos?
Some of the videos might be restricted by YouTube based on content, country, etc.
Those videos will not be displayed on the system or will show an error message when
tried to play.
How do I login to my Youtube account?
From the TV, launch the YouTube application. Press UP arrow to scroll to the “Sign In”
page. From there, the user should be able to login to their account using the code.
How do I find the video I want on YouTube?
Launch YouTube and use UP arrow to scroll to “Search” page. Start typing the search
term. Once the user types at least 3 letters, the search will initiate automatically and
the results will be displayed.
41
Copyright 2013 Prodea Systems
Troubleshooting
How do I use trickplay for youtube videos?
When a YouTube video is playing, users can use the buttons on the remote to do
trickplay. To see what button does what, Press the “OK” button. That brings up the
media bar, which shows all the buttons.
How do I see videos related to a particular video?
When the user has a particular video in focus, pressing the YELLOW button on the
remote will list all the other videos related to that one.
YouTube Channels
What are Channel Apps?
The channel apps are videos from YouTube that have videos wrapped in playlists for
that specific channel. The channels are available on YouTube and the app displays the
Playlists from those channels sorted with recent at the top.
Do I have to login to my YouTube account to see the channels?
No. The channel apps are usually from the Public channels available on YouTube that
does not require users to login.
Can I search for a video inside the channel app?
No. The channel apps displays only the playlists from the YouTube channel and doesn’t
have option to search.
42
Copyright 2013 Prodea Systems
Troubleshooting
Mobile Apps
How do I get the apps on my mobile or tablet device?
The apps are available on AppStore and PlayStore for iOS and Android devices
respectively. The users can directly search for the apps on their devices or log in to the
web interface that has links to the apps.
How do I login to the mobile apps?
Launching the app will give you a login page. Enter the username and password for
the Home Center. Make sure you have an active internet connection for successful
login.
Why am I getting an error on login?
There could be several reasons why the login fails. Verify you have an internet
connection. Verify if your username and password are correct. Verify if the Home
Center is up and connected to the internet.
Why are my photos and videos not synching to the Home Center?
Make sure the Auto-upload is enabled under settings. And if you are on a data
connection for Internet, make sure the “Upload over wifi only” option is turned off.
I have Auto-upload turned ON, but still don’t see the files uploading!
If the user is on an iOS device, there is another option that could possibly be turned
OFF. Go to iOS Settings -> Privacy -> Photos and make sure the switch is ON for the
companion application.
Can I change my Home Center settings from the mobile?
Yes. But the user has to be careful on what is changed while changing network
settings because the user might lose connectivity to the Home Center and not be able
to connect again.
Remote control does not control the TV.
Make sure the correct device is selected for control from the remote control app. This
could be done by clicking on the device button at the top right.
43
Copyright 2013 Prodea Systems
20. Home Center Specifications
Dimension
196(W) x 190(D) x 36(H) mm
Typical Power Dissipation
8 to 10 W
AC Input
100 to 240 VAC, 50, 60 Hz
Nominal DC Input Voltage
+12VDC
Connectors
HDMI 1.4 In, HDCP 1.2
HDMI 1.4 Out, HDCP 1.2
Ethernet WAN
Ethernet LAN
USB 2.0 x 3
DC Power
S/PDIF Optical Out
Analog A/V Jack
WiFi Radio
802.11b/g/n 2x2
2.401GHz to 2.473GHz
100mW
Ethernet
WAN 10/100 RJ45
LAN 10/100/1000 RJ45
USB 2.0
Two Rear, One Side
Each port: 1A 5VDC, 2A total for all
Output Video Max Resolution
1080p 60
Input Video Max Resolution
1080p 60
Operating Temperature Range
0C to 35C
Storage Temperature Range
-20C to 70C
Operating Altitude Range
0ft to 7000ft (2134m)
Specifications are subject to change without notice
44
Copyright 2013 Prodea Systems
21. FCC Regulatory Information
This equipment has been tested and found to comply with the limits for a
Class B digital device, pursuant to Part 15 of the FCC Rules. These limits are
designed to provide reasonable protection against harmful interference in
a residential installation. This equipment generates, uses, and can radiate
radio frequency energy and, if not installed and used in accordance with
the instructions, may cause harmful interference to radio communications.
However, there is no guarantee that interference will not occur in a particular
installation. If this equipment does cause harmful interference to radio or
television reception, which can be determined by turning the equipment off
and on, the user is encouraged to try to correct the interference by one or
more of the following measures:
•
•
•
Reorient or relocate the receiving antenna.
Increase the separation between the equipment and receiver.
Connect the equipment into an outlet on a circuit different from that to
which the receiver is connected.
Consult your service provider, retailer, or an experienced technician for help.
If you cannot eliminate the interference, the FCC requires that you stop using
your phone. Changes or modifications not expressly approved may cause
interference and void the user’s authority to operate the equipment.
Product
Home Center
Model
ROS 3001
Responsible Party
Prodea Systems, Inc.
2435 N. Central Expressway
Suite 500
Richardson, Texas 75080
Phone
+1 (214) 278-1850
This device complies with Part 15 of the FCC Rules. Operation is subject to the
following two conditions: (1) This device may not cause harmful interference,
and (2) This device must accept any interference received, including
interference that may cause undesired operation.
45
Copyright 2013 Prodea Systems
FCC Regulatory Information
If trouble is experienced with this unit, for repair or warranty information,
please contact customer service at the address and phone listed below. If
the equipment is causing harm to the network, the telephone company may
request that you disconnect the equipment until the problem is resolved.
Do not disassemble this equipment:
It does not contain any user serviceable components.
We recommend the installation of an AC surge arrester in the AC outlet
to which this equipment is connected. Electrical surges, typically lighting
transients, are very destructive to electronic equipment connected to AC
power sources.
Wireless radio use:
These devices are restricted to indoor use due to its operation in the 2.4 to
5 GHz frequency range to reduce the potential for harmful interference to
co-channel Mobile Satellite systems.
Exposure to radio frequency energy:
The radiated output power of these devices is below the FCC radio frequency
exposure limits; however, these devices should be operated with a minimum
distance of at least 20 cm between its antennas and a person’s body, and the
antennas used with these transmitters must not be co-located or operated
with any other antenna or transmitter subject to the conditions of the FCC
Grant.
46
Copyright 2013 Prodea Systems