1
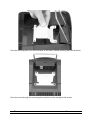
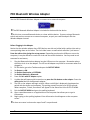
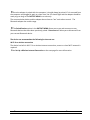
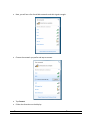
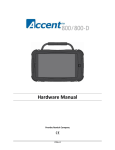
Hardware Manual For Accent 1200 models with Serial Numbers 1000AC12 and higher Accent 1200-10 Hardware Manual 16957v 1.01 PRENTKE ROMICH COMPANY Accent TM Hardware Manual Accent TM 1200-10 Hardware Manual 2 Acknowledgements Data can be uploaded from this unit to a personal computer for storage on a hard disk, CD, or other storage medium. Be sure to make multiple copies of all important data to protect against accidental loss. Accent, NuEye and NuVoice are trademarks of Prentke Romich Company Minspeak and Unity are registered trademarks of Semantic Compaction Systems, Inc. in the United States and in other countries. Semantic Compaction is a trademark of Semantic Compaction Systems, Inc. Windows, Windows Explorer, Windows Media Player, Windows Movie Maker and Windows Live Movie Maker are registered trademarks of Microsoft, Inc. The Skype name, associated trademarks and logos and the "S" logo are trade arks of Skype Limited Bluetooth Wireless Technology is a registered trademark. The Bluetooth word mark and logos are owned by the Bluetooth SIG, Inc. and any use of such marks by PRC is under license. Other trademarks and trade names are those of their respective owners. Digital photos by Gary Yasaki, Yasaki Photographic and Doug Miller, Holmes County Photography ELECTRONIC INTERFERENCE INFORMATION This device complies with Part 15 of the FCC Rules. Operation is subject to two conditions: (1) this device may not cause harmful interference, and (2) this device must accept any interference received, including interference that may cause undesired operation. Warning! Changes or modifications to this product which are not authorized by Prentke Romich Company could exceed FCC limits and negate your authority to use this product. This equipment has been tested and found to comply with the limits for a Class B digital device, pursuant to Part 15 of the FCC Rules. These limits are designed to provide reasonable protection against harmful interference in a residential installation. This equipment generates, uses and can radiate radio frequency energy and, if not installed and used in accordance with the instructions, may cause harmful interference to radio communications. However, there is no guarantee that interference will not occur in a particular installation. You can determine whether this product is causing interference in your radio or television by turning this product off. If the interference stops, it was probably caused by this product or one of its accessories. You can attempt to correct the interference by using one or more of the following measures: • Turn the television or radio antenna until the interference stops. • Move this product to one side or the other of the television or radio. • Move this product farther away from the television or radio. • Plug this product into an outlet that is on a different circuit from the television or radio; that is, this product should be controlled by different circuit breakers/fuses from the television or radio. • If necessary, contact a Prentke Romich Company service technician for assistance. Bluetooth Adapter These devices comply with Part 15 of the FCC Rules. Operation is subject to the following two conditions: (1) these devices may not cause harmful interference, and (2) these devices must accept any interference received, including interference that may cause undesired operation. The Bluetooth device contains FCC-ID POOWML-C40. Bluetooth QD ID B013848 This Class B digital apparatus meets all requirements of the Canadian Interference-Causing Equipment Regulations. Cet appareil numérique de la classe B respect toutes les exigences du Règlement sur le matériel brouiller du Canada. CE ENVIRONMENTAL INFORMATION: Use: 0o - 45o C; Storage: (-20o) - 50o C; 95% maximum relative humidity @ ambient temperatures less than 40o C. Attention! Consult accompanying documents .This device not intended to be an emergency call device or sole communication aid. Warnings! When operating this device in a medical environment, do not use with any product that is not medically approved. Follow all rules for appropriate cell phone and wireless device use. • Any mounts used should be fitted by a qualified person. Failure to install the mounting system according to the manufacturer's instructions may result in an injury to the user. ©Prentke Romich Company 2012. All rights reserved. Under copyright laws this document may not be copied, in whole or in part, without the written consent of the Prentke Romich Company. • PRC HEADQUARTERS 1022 Heyl Rd • Wooster, OH 44691 Telephone: (330) 262-1984 • (800) 262-1984 Fax: (330) 263-4829 E-mail Address: [email protected] Web Site Address: www.prentrom.com Accent TM Hardware Manual PRC INTERNATIONAL Liberator Ltd Minerva Business Park Lynch Wood, Peterborough, PE2 6FT UK Telephone: +44 (0) 1733 374 990 Fax: +44 (0) 1733 391 939 E-mail Address: [email protected] Web Site Address: www.liberator.co.uk Accent TM 1200-10 Hardware Manual i End User Licensing Agreement You have acquired a PRC device which includes software licensed by PRC from Microsoft Licensing Inc. or its affiliates ("MS"). Those installed software products of MS origin, as well as associated media, printed materials and "online" or electronic documentation (software) are protected by international intellectual property laws and treaties. IF YOU DO NOT AGREE TO THIS END USER LICENSE AGREEMENT (EULA), DO NOT USE THE DEVICE OR COPY THE SOFTWARE. INSTEAD, PROMPTLY CONTACT PRENTKE ROMICH COMPANY FOR INSTRUCTIONS. ON RETURN OF THE UNUSED DEVICE(S) FOR A REFUND. ANY USE OF THE SOFTWARE, INCLUDING BUT NOT LIMITED TO USE ON THE DEVICE, WILL CONSTITUTE YOUR AGREEMENT TO THIS EULA (OR RATIFICATION OF ANY PREVIOUS CONSENT). GRANT OF SOFTWARE LICENSE. This EULA grants you the following license: • • • • • • • • You may use the SOFTWARE only on your PRC device. NOT FAULT TOLERANT. THE SOFTWARE IS NOT FAULT TOLERANT. PRC HAS INDEPENDENTLY DETERMINED HOW TO USE THE SOFTWARE AND MS HAS RELIED UPON PRC TO CONDUCT SUFFICIENT TESTING TO DETERMINE THAT THE SOFTWARE IS SUITABLE FOR SUCH USE. NO WARRANTIES FOR THE SOFTWARE. THE SOFTWARE is provided "AS IS" and with all faults. THE ENTIRE RISK AS TO SATISFACTORY QUALITY, PERFORMANCE, ACCURACY, AND EFFORT (INCLUDING LACK OF NEGLIGENCE) IS WITH YOU. ALSO THERE IS NO WARRANTY AGAINST INTERFERENCE WITH YOUR ENJOYMENT OF THE SOFTWARE OR AGAINST INFRINGEMENT. IF YOU HAVE RECEIVED ANY WARRANTIES REGARDING THE DEVICE OR SOFTWARE, THOSE WARRANTIES DO NOT ORIGINATE FROM, AND ARE NOT BINDING ON, MS. Note on Java Support. The SOFTWARE may contain support for programs written in Java. Java technology is not fault tolerant and is not designed, manufactured, or intended for use or resale as online control equipment in hazardous environments requiring fail-safe performance, such as in the operation of nuclear facilities, aircraft navigation or communication systems, air traffic control, direct life support machines, or weapons systems, in which the failure of Java technology could lead directly to death, personal injury or severe physical or environmental damage. Sun Microsystems, Inc. has contractually obligated MS to make this disclaimer. No Liability for Certain damages. EXCEPT AS PROHIBITED BY LAW, MS SHALL HAVE NO LIABILITY FOR ANY INDIRECT, SPECIAL CONSEQUENTIAL OR INCIDENTAL DAMAGES ARISING FROM OR IN CONNECTION WITH THE USE OR PERFORMANCE OF THE SOFTWARE. THIS LIMITATION SHALL APPLY EVEN IF ANY REMEDY FAILS OF ITS ESSENTIAL PURPOSE. IN NO EVENT SHALL MS BE LIABLE FOR ANY AMOUNT IN EXCESS OF U.S. TWO HUNDRED FIFTY DOLLARS (U.S. $250.00). Limitations on Reverse Engineering, Decompilation and Disassembly. You may not reverse engineer, decompile, or disassemble the SOFTWARE, except and only to the extent that such activity is expressly permitted by applicable law notwithstanding this limitation. SOFTWARE TRANSFER ALLOWED BUT WITH RESTRICTIONS. You may permanently transfer rights under this EULA only as part of a permanent sale or transfer of the Device, and only if the recipient agrees to this EULA. If the SOFTWARE is an upgrade, any transfer must also include all prior versions of SOFTWARE. EXPORT RESTRICTIONS. You acknowledge that SOFTWARE is subject to U.S. export jurisdiction. You agree to comply with all applicable international and national laws that apply to the SOFTWARE, including U.S. Export Administration Regulations, as well as end-user, end-use and destination restrictions issued by U.S. and other governments. For additional information see http://www.microsoft.com/exporting/. Accent TM Hardware Manual Accent TM 1200-10 Hardware Manual ii ™ Accent 1200 Hardware Manual This manual explains the Accent 1200, related accessories and their use. The Accent 1200 is a Windows 8-based product and is a dedicated speech-generating device. Unlocking the Accent 1200 to have complete access to Windows and to run Windows applications requires the purchase of the Integrated Option*. For more details, contact the PRC Sales Department by email at [email protected] or by phone at (800) 262-1933. This Hardware Manual is for Accent 1200 models with Serial Numbers 1000AC12 and higher. To learn about NuVoice™ software that comes with the Accent 1200, use the Help button to the right of the Text Display Area when the device is turned on. The NuVoice Software Manual can also be downloaded to a computer from the PRC web site: www.prentrom.com. Accent TM Hardware Manual Accent TM 1200-10 Hardware Manual 1 Contents Acknowledgements.............................................................................................i End User Licensing Agreement .......................................................................... ii Accent™1200 Hardware Manual 1 Front View ......................................................................................................... 3 ON Button ............................................................................................. 3 BATTERY CHARGING INDICATOR .......................................................... 3 LOW BATTERY INDICATOR .................................................................... 4 TOOLS Key ............................................................................................. 4 CAMERAS .............................................................................................. 4 Back of the Case ................................................................................................ 6 IR Receiver and Transmitter Areas ....................................................... 6 Rear-facing Camera............................................................................... 6 Turn Off and Shutdown with Windows 8 ......................................................... 7 RECOMMENDED SHUTDOWN .............................................................. 8 Standard Connector Module .......................................................................... 10 Changing the Wire Stand ................................................................................ 11 To Change the Angle of the Stand ...................................................... 11 Touch Screen................................................................................................... 14 Virtual Keyboard ................................................................................. 14 Carry Strap ...................................................................................................... 15 Wheelchair Mounting Plate ............................................................................ 18 To Install the Mounting Plate ............................................................. 18 Battery Information ........................................................................................ 20 Charging the Batteries ........................................................................ 20 PRC Bluetooth Wireless Adapter .................................................................... 21 Set Up a Wireless Internet Connection (Wi-Fi) ............................................... 23 IR Setup ........................................................................................................... 26 Troubleshooting .............................................................................................. 28 Battery Troubleshooting ..................................................................... 28 General Problem Troubleshooting ..................................................... 28 Windows™ Troubleshooting ............................................................... 29 Restoring Windows ............................................................................. 32 Update NuVoice .................................................................................. 33 Storing Your Device ............................................................................. 35 Device Disposal; Battery Disposal ....................................................... 36 Cleaning and Disinfecting.................................................................... 36 Index Accent TM Hardware Manual 38 Accent TM 1200-10 Hardware Manual 2 Front View Charging Indicator On/Off Indicator On Button Low Battery Indicator Microphone Camera Camera Indicator Windows / Tools Key ON Button Tap the On button. The indicator lights will illuminate and the Samsung splash screen will appear. The Accent 1200 will automatically open to NuVoice. IMPORTANT: If this is the initial start up of the device, plug in the battery charger before turning on the device. This will bring the device out of ship mode. To turn off the device, please see Turn Off and Shutdown with Windows in this manual for important instructions about these procedures. BATTERY CHARGING INDICATOR When the battery charger is plugged in, the Battery Charging LED will flash. If the batteries are very low, the LED will flash rapidly until the battery is charged. When the batteries are mostly or fully charged, the LED will blink approximately once per second to indicate the charger is plugged in. Accent TM Hardware Manual Accent TM 1200-10 Hardware Manual 3 LOW BATTERY INDICATOR The device has batteries that run the NuVoice system software and firmware. These batteries are under the battery doors on the back of the device. When these batteries are low, the LED will light and a warning tone will sound. Once the charger is plugged in, the Low Battery LED will eventually go off and the Battery Charger LED will flash. The device also contains an internal battery that runs the Windows system software. This battery is separate from the Accent/NuVoice batteries. The Accent battery charger charges all the batteries. When the Low Battery LED is lit, always plug in the charger. When the battery warning sounds you will no longer be able to save changes and eventually the device will completely shut down. TOOLS Key In NuVoice, the TOOLS key is to the right of the Text Display Area. Select this key to open a menu of often-used Tools. See the TOOLS Menu in Help on the device for more information. CAMERAS The front camera is located in the center of the device directly below the Accent 1200 logo. The rear camera is located on the upper right side on the back of the case (see Back View). To Use the Cameras In NuVoice: • Select the TOOLS button. • Open the Toolbox. • Select the CAMERA Menu. • To switch between the front and rear cameras, select Choose Camera. The Front Camera is OV2720. The Rear Camera is RG2102LCY. IMPORTANT NOTE! The rear camera in the Windows Camera Menu (requires integrated option) must be enabled through NuVoice prior to use. • Select the TOOLS button. Accent TM Hardware Manual Accent TM 1200-10 Hardware Manual 4 • Select Toolbox. • Select MAINTENANCE Menu. • Select Built-in Devices. • Turn Camera ON. • Both the front and rear cameras are now active for the Windows Camera Menu. You can use the camera applications/programs such as Skype™, Windows® Movie Maker, etc. Follow the specific directions for the camera application being used. To switch between front and rear cameras, select the Change Camera icon in the lower left corner of the Camera toolbar. Accent TM Hardware Manual Accent TM 1200-10 Hardware Manual 5 Back of the Case IR Receiver Area IR Transmitter Area Camera Charging Port Headphone Jack Switch Ports A & B USB Ports Wire Stand Carry Strap Holder Battery Compartment Carry Strap Holder IR Receiver and Transmitter Areas This area sends and receives IR signals. See IR Setup in the manual for more information. Rear-facing Camera The rear-facing camera is on the top back of the case. The Toolbox contains a menu for the rear-facing camera. The MAP may also have a Camera Page or a Camera Activity that contains the CAMERA MENU. The back camera is a fairly simple one and can be used to take pictures of things that can be used as personalized icons or visual scenes. The camera will zoom in and pan in any direction. You can also hold a real photograph 6-8 inches away from the lens and take a picture of the photo. Accent TM Hardware Manual Accent TM 1200-10 Hardware Manual 6 IMPORTANT NOTE: Before the rear camera can be used in the Windows Camera Menu, it must be enabled through NuVoice. • Select the TOOLS button • Select Toolbox. • Select MAINTENANCE Menu. • Select Built-in Devices. • Turn Camera ON. • Now both the front and rear cameras are active for the Windows Camera Menu. . Standard Connector Module See the section on the Standard Connector Module for more information. Wire Table Stand Pull out the wire table stand to position your device upright on a flat surface. The wire stand can also be set to a lower angle. (See Changing the Wire Stand). IMPORTANT! Microsoft has changed how Windows 8 handles the Shutdown function and how it performs. Selecting Shutdown from the Power Off menu in the Charms Menu only puts the device into a deeper form of sleep. This takes about 30 seconds. When the device is asleep, the blue indicator light turns off. Unlike Windows 7, Windows 8 does not do a full and complete shutdown of the device. The advantage is that it wakes up quickly; however, the disadvantage is it does not clean up the memory or provide a fresh start when the device restarts. Accent TM Hardware Manual Accent TM 1200-10 Hardware Manual 7 Turn Off and Shutdown with Windows 8 IMPORTANT! Microsoft has changed how Windows 8 handles the Shutdown function and how it performs. Selecting Shutdown from the Power Off menu in the Charms Menu only puts the device into a deeper form of sleep. This takes about 30 seconds. When the device is asleep, the blue indicator light turns off. Unlike Windows 7, Windows 8 does not do a full and complete shutdown of the device. The advantage is that it wakes up quickly; however, the disadvantage is it does not clean up the memory or provide a fresh start when the device restarts. Turn Off the Accent 1200 using Windows (requires integrated option) • Bring up the Windows Start screen. • Pull out the Charms Menu from the right side of the display. • Select Settings. • Select the Power icon and Shutdown. Remember: This does not do a full and complete shutdown. Wake-up the Accent 1200 o Lightly press the ON button. o The device will power on and return to the Windows Start screen. o If NuVoice does not open on its own, open NuVoice by selecting the NuVoice tile on the Start screen or select the Accent screen and then select NuVoice. RECOMMENDED SHUTDOWN – For Dedicated and Integrated Devices Follow the steps below to insure a full and complete shutdown of the device. A full shutdown should be done at least once a week. • In NuVoice, select the TOOLS key • Open the Toolbox. • Open the MAINTENANCE Menu. • Select Windows Power Management Settings. • Select Shutdown Windows. to bring up the TOOLS Menu. When the device is shutdown through NuVoice, it will automatically return to NuVoice when powered on again. Accent TM Hardware Manual Accent TM 1200-10 Hardware Manual 8 SHORTCUT TIP: A User-Defined Key can be programmed in NuVoice to perform the full Windows shutdown using the “Windows Shutdown” Insertable Tool For more information about Modifying Keys and Insertable Tools refer to the “About Storing and Assigning Tools” section in the NuVoice Software Manual in the Accent 1200 by selecting the Help Icon Accent TM Hardware Manual Accent TM 1200-10 Hardware Manual 9 Standard Connector Module Standard Connector Module USB Ports Headphone Jack Switch Port B Switch Port A Charging Port Standard Connector Module This device was shipped with the Standard Connector Module. This module comes with the following connectors from left to right: Battery Charger (in the picture above, the charger cable is plugged in) 2 USB Ports Switch A Switch B Headphone/Line Out Accent TM Hardware Manual Accent TM 1200-10 Hardware Manual 10 Changing the Wire Stand The wire stand allows the device to sit on a flat surface at two different angles, high or low. The stand is set for the higher angle. WARNING! Never carry the device by the wire stand! To Change the Angle of the Stand Unscrew the 3 screws on the top of the module. Unscrew the 3 screws in the module. Lift module up and out. Keep the module facing in the same direction. Accent TM Hardware Manual Accent TM 1200-10 Hardware Manual 11 Pull wire stand legs out of the module. Rotate the wire stand 180 degrees and place legs back in module. Do not turn the module! Just remove the wire stand, turn it around, and place it back in the module. Accent TM Hardware Manual Accent TM 1200-10 Hardware Manual 12 Replace module and put screws back in. WARNING! Never carry the device by the wire stand! Accent TM Hardware Manual Accent TM 1200-10 Hardware Manual 13 Touch Screen Do not use sharp, pointed objects on the touch screen! The touch screen scratches easily and can become permanently damaged. This touch screen is designed to be used with a finger. To Use a Stylus or a Headstick You must use a stylus or headstick made specifically for a capacitive touch screen. Anything else will harm your touch screen and may cause your device to stop working. PRC offers a stylus bundle in the Web Store: www.prentrom.com/store You can also type “capacitive touch screen accessories” into your computer’s browser to determine what else is available. Virtual Keyboard (Available in Integrated devices only) NuVoice provides the flexibility to hide or show the Windows 8 Virtual Keyboard. To enable or disable the keyboard: Open the NuVoice Toolbox. Select ACCESS METHOD Menu. Select Windows Access Settings. Select Auto Hide Keyboard. Cleaning The touch screen is very sensitive. Fingerprint smears, dust and grime, saliva, etc., will affect its performance. The screen also reacts to raindrops and extremes in temperature (condensation). Use a lint free cloth like those that are used to clean flat screen TVs and computer screens. Use a household glass cleaning product such as Windex™, a cleaner made for computers and flat screen TVs, or rubbing alcohol. Do not use solvents or abrasives on your screen or your case. Lightly spray the front of the device with the cleaner. Dry and polish the screen with the lint free cloth. The polishing will remove any cleaner residue which may interfere with the effectiveness of the screen. If the screen gets wet from rain, saliva, condensation, etc., clean and wipe it dry immediately. See Cleaning and Disinfecting in the Troubleshooting section of this manual for more information. The touch screen is a liquid crystal display (LCD). Should the display break (unlikely except in extreme circumstances) and you come into contact with the liquid crystal, wash and rinse skin thoroughly. Be careful to avoid splintered glass. Accent TM Hardware Manual Accent TM 1200-10 Hardware Manual 14 Carry Strap NOTE: Not all devices come with a shoulder strap. They are available as an Accessory for purchase at www.prentrom.com or by contacting PRC Sales Department at [email protected] or calling (800) 262-1933. The Carry Strap holders are on the bottom of the device. At the end of each side of the strap there is loop connector and, on the strap side, a Quick Disconnect connector. Detach the loop connector from the strap by pressing in on the sides of Quick Disconnect connector. Accent TM Hardware Manual Accent TM 1200-10 Hardware Manual 15 Thread the loop through the carry strap holder. Thread the connector through the loop and pull snug to the strap holder post. Accent TM Hardware Manual Accent TM 1200-10 Hardware Manual 16 Insert the loop connector into the strap connector until the two pieces click and hold together. Repeat these directions to connect the other end of the strap to the device. Accent TM Hardware Manual Accent TM 1200-10 Hardware Manual 17 Wheelchair Mounting Plate The Wheelchair Mounting Plate and four screws came in the box with the device. With the mounting plate in place, mount the device can be mounted on a table stand or a wheelchair mount. if a separate NuEye™ Tracking System was ordered, a different mounting plate will be needed. Instructions are included with your NuEye unit. To Install the Mounting Plate Place the device face down on a flat surface. Be careful not to scratch the display. The mounting plate screws into the four small holes outlined above in white. Accent TM Hardware Manual Accent TM 1200-10 Hardware Manual 18 Place the mounting plate over the small holes on the device. (Actual mounting plate will be black.) Place the screws through the mounting plate and device holes and tighten the screws. Accent TM Hardware Manual Accent TM 1200-10 Hardware Manual 19 Battery Information Always use the battery charger that came with the device. Any other charger may damage the batteries. The battery life depends on the individual usage of the device. If you are talking, listening to MP3s, using a cell phone and/or the computer simultaneously or for most of the day, the batteries will not last as long as they would if you were just doing one or two things. You may be able to get 10 hours or more hours of use out of one charge or may you use your device so heavily that a charge only lasts 6-8 hours. You will be able to determine the battery life you can get from a single charge based on following a few days or a week of everyday use of the device. Charging the Batteries A full charge may take anywhere from 8 to 15 hours depending on how many batteries are in the device and how low they are when the charge begins.. The best practice is to plug in the battery charger any time the Low Battery LED comes on, and every night before going to sleep. The status of the battery can be checked in the Status Area on the display and in the Battery Menu in the MAINTENANCE MENU. Status Area Accent TM Hardware Manual Accent TM 1200-10 Hardware Manual 20 PRC Bluetooth Wireless Adapter Use the PRC Bluetooth Wireless Adapter to connect to an external computer. The PRC Bluetooth Wireless Adapter is included in the box with the device. At this time, use one Bluetooth device at a time with the device. If you are using a Bluetooth switch and want to connect to an external computer, un-pair your switch and pair with the Wireless Adapter instead. Before Plugging In the Adapter Notice that the wireless adapter has a PRC label on one side and a label with a white circle and an arrow pointing down on the other. The circle label covers a small switch called the "pair button." Press the white circle during the set-up process. Depending on where the USB ports are on the computer, it may be difficult to reach the circle and also reach the device. You may need to ask someone for assistance,. 1. Plug the Bluetooth wireless adapter into the USB port on the computer. Remember where the white circle is on the adapter. The LED on the adapter may flash for a moment when first plugged in. 2. On the device, go to the Toolbox and open the OUTPUT MENU. 3. Set Output to ON. 4. Set Output Destination to EXTERNAL 5. Set Output Method to Bluetooth. 6. Press the Pair with BT Adapter option. 7. A yellow box will appear with instructions to press the Pair button on the adapter. Press the white circle label on the Bluetooth adapter. 8. The LED on the adapter will begin to blink. When a solid light is displayed, the adapter has paired with the device and computer. This pairing process can take up to 20-30 seconds. When complete, “Paired, Connected” will appear in the Status Box in the OUTPUT MENU. 9. Exit the OUTPUT MENU and go to the spelling keyboard. 10. Open a word document or an application on the computer that allows you to type in information. 11. Begin typing on the spelling keyboard. Your information should appear on the computer screen. It does not matter in what order steps 6 and 7 are performed. Accent TM Hardware Manual Accent TM 1200-10 Hardware Manual 21 Once the adapter is paired with the computer, it should always be paired. If it is removed from the computer and plugged in again at a later time, the LED should light and the adapter should be ready to go as long as the OUTPUT MENU is set correctly. The communication device and the adapter do not have to "see" each other to work. The Bluetooth adapter has a wide range. The Paired Devices option in the OUTPUT MENU allows you to see and reconnect to any Bluetooth devices that have been previously paired. Disconnect will allow you to disconnect from your current Bluetooth device. The device can accommodate the following for Internet use: Wi-Fi for a wireless connection The device has built-in Wi-Fi. For a wireless Internet connection, access to a local Wi-Fi network is required. See Set Up a Wireless Internet Connection on the next page for more information. Accent TM Hardware Manual Accent TM 1200-10 Hardware Manual 22 Set Up a Wireless Internet Connection (Wi-Fi) IMPORTANT NOTE: PRC is not responsible for the set-up of wireless networks. In this device Wi-Fi and Bluetooth are always ON. If you are using a, a USB mouse, plug it into your device and use it to select icons on the desktop. • Turn the device ON. • Select the TOOLS key • Select the Toolbox key from the TOOLS menu. • Select the MAINTENANCE MENU key from the Toolbox. • Select the Hardware Diagnostics key. • Select the Network Setup key. • Select the Connect or disconnect link as seen below. Accent TM Hardware Manual to the right of the Text Display Area. Accent TM 1200-10 Hardware Manual 23 • Next, you will see a list of available networks and their signal strength. • Choose the network you prefer and tap to connect. • Tap Connect. • Follow the directions on the display. Accent TM Hardware Manual Accent TM 1200-10 Hardware Manual 24 • Enter a network key or password if requested. • Once connected, the Wi-Fi icon in the task bar changes to bright white • Exit the menu and go to the Internet to test the connection. The Internet Explorer icon is in the top left corner of the device screen. Most MAPS also have the Internet Explorer icon on the Computer Pages. REMINDER: To have access to Windows and Windows applications require purchasing the Integrated option. Accent TM Hardware Manual Accent TM 1200-10 Hardware Manual 25 IR Setup Infrared (IR) capability is automatically enabled with the Accent 1200. Infrared signals can be learned for almost any appliance that has a remote control. The IR area for the device is located in the dip on the top of the case below the handle. IMPORTANT: When facing the front of the device, the IR Learning Receiver is on the left side of the dip and the IR Transmitter is on the right side of the dip. The following IR functions can be performed in NuVoice by using the IR SETUP Menu in the Toolbox: • Add, modify, delete or rename a device/appliance • Add, change, delete and test IR functions Add, Modify, Delete or Rename a Device/Appliance Add a New Device Several devices are already setup in the Accent. To add additional devices, select Add a Device and follow the instructions on the display. Modify, Rename or Delete a Device Use the Up/down arrows to select the device you want to change. When the appropriate device is found, tap the button for the desired function and follow the instructions on the display screen. Add, Rename, Delete, Re-Learn Functions • Use the Up/Down arrows to select the device that has the function to be changed. • Select Modify Selected Device • Select the function and follow the instructions on the display screen • When instructed, point the appliance’s remote control at the top of the Accent and press the appropriate function button on the remote (e.g., POWER). IMPORTANT: When teaching the device a new signal or to relearn a signal, make sure the remote is pointed directly at the IR Learning Receiver on the left side of the headphone jack. • The Accent will beep when it receives the signal. • Select the Test Signal option to confirm that the signal functions properly. The Re-Learn All Signals option allows each signal for an appliance to be relearned without reentering the menu each time. Sending IR Signals to an Appliance Accent TM Hardware Manual Accent TM 1200-10 Hardware Manual 26 To send an IR signal from the Accent to a device: • Make sure the IR area on the Accent is facing towards the appliance that will receive the signal. • Select the device remote from the vocabulary screen • Select the desired function. Accent TM Hardware Manual Accent TM 1200-10 Hardware Manual 27 Troubleshooting Battery Troubleshooting There is a slight risk of explosion if you replace the batteries with an incorrect type. Call the PRC Service Department before replacing the batteries: (800)262-1990. Outside the United States, call your local distributor. Use only the battery charger that came with the device. Other chargers may damage the batteries in the device. If the batteries die while NuVoice software is running: The Battery Charger LED and the Charging LED on the front of the case will begin to alternate flashing. If the battery charger is not plugged in, the NuVoice software will shut down both Windows and NuVoice, the LEDs will stop blinking, and the device will turn completely OFF. To restart the device, plug in the battery charger and press and hold the ON button for a few seconds, then watch the display screen. General Problem Troubleshooting You select a key but get the wrong response If you are selecting keys on the keyboard but not getting the correct responses, thoroughly clean the display screen as described in Cleaning and Disinfecting. High-Efficiency Fluorescent Lights and the Use of Infrared: There is often a compatibility problem between many infrared controls and high-efficiency fluorescent lights. If the device is being used in a room that has high-efficiency fluorescent lighting, the infrared, including headpointing, computer access, remote control commands, etc., may not work. Turn the lights off and this issue will be resolved. Accent TM Hardware Manual Accent TM 1200-10 Hardware Manual 28 Windows™ Troubleshooting If you are having problems with Windows or the NuVoice software, it is important to read and follow these directions carefully. For any internal system software troubleshooting, always PLUG IN YOUR BATTERY CHARGER first. If the device is not working correctly or freezes but you can still access the NuVoice software application, try one of the following suggestions: DO NOT USE THE ON Button! Follow these steps: • Open the NuVoice Toolbox. • Select MAINTENANCE menu. • Select Windows Power Settings. • Select Restart Windows. If the NuVoice Toolbox is not responding or is unavailable: • Open the Windows Start menu. (Available in Integrated devices only) • Bring up the Charms menu from the right side of the display. • Tap the Power icon. • Select Restart. If you have access to a USB keyboard: • Plug the keyboard into a USB port on the Accent • Press Ctrl-Alt-Del. • If a blue screen appears with Lock, Switch, Sign-out, etc., on it, use the Tab key to highlight the I/O option in the lower left corner. • Select Enter. • Select Restart. As an absolute last resort: Press the ON button on the top of the device. IMPORTANT! There is a chance that this action may cause issues with the memory and performance of the device. Accent TM Hardware Manual Accent TM 1200-10 Hardware Manual 29 If the device is now working but won’t speak: • Turn the device off by pressing and releasing the ON button. • Place the device face down on a flat surface. • Unplug the battery charger if it is plugged in. • Use a Phillips screwdriver to open both battery doors. Accent TM Hardware Manual Accent TM 1200-10 Hardware Manual 30 • Pull each battery up and out until the connector is accessible. • Unplug the connector on each battery. • Wait ten (10) seconds. • Reconnect both batteries. • Replace both batteries. Fold the cables and push them into place until the batteries fit in their slots. Accent TM Hardware Manual Accent TM 1200-10 Hardware Manual 31 • Plug in the battery charger. • If the indicator lights on the front of the case are not glowing, press the ON button. • When the device is working again, replace both battery doors. If the device is still not working, see the Restoring Windows instructions below. Restoring Windows IMPORTANT: The following instructions are for Accent devices that have the integrated option enabled and can access Windows. If your Accent is a dedicated device and cannot access Windows, contact the PRC Service Department at (800) 262-1990 for restore instructions. IMPORTANT NOTE: The restore process will erase everything on the device's hard drive. Including internet access, programs, and hardware drivers. Before restoring the device, call the PRC Service Department at (800) 262-1990. Outside the U.S., call your local PRC distributor. The restore process generally takes anywhere from 30 minutes to an hour. It is recommended that the restore process be monitored from the time it begins through its completion. • Plug in the battery charger. • Pull the Windows Charms menu from the right side of the display. • Select Settings. • Select Change PC Settings in the lower right corner of the menu. • Select General from the PC Settings menu on the right side of the screen. • On the right side of the screen, scroll down to Remove everything and reinstall Windows • Select Get Started. • A blue screen appears explaining the next steps in t the procedure. Select Next. • A blue screen appears with the following options: “Just remove my files” and “Fully clean the drive.” Select “Just remove my files.” The “Fully clean the drive” option may take 2.5 hours to complete and is not necessary. • Another blue screen appears stating that Windows is ready to reset the computer. Select Reset to continue or Cancel to stop the restore process. When the Restore is Complete • Follow the Windows Setup and Customizing instructions that appear on the screen. Accent TM Hardware Manual Accent TM 1200-10 Hardware Manual 32 IMPORTANT NOTE: Use Accent 1200 for a username or account name. • From the Windows Start screen, select the Accent icon to go directly to NuVoice or select the Accent tile to go to the Accent screen, and select the NuVoice icon that appears on the screen. • NuVoice will automatically install and generate the Icon Sets. This process will take several minutes. • When NuVoice is setup, the system will do an automatic restart and open NuVoice. • Select I Agree on the Software License Agreement. • NuVoice will open the Exploration Wizard. • To exit the Exploration Wizard: select a vocabulary. If the vocabulary you want is not shown on the Wizard, select one of the Wizard’s vocabulary options. Then open the Toolbox, select the USER AREA menu, select Replace User Area and follow the directions on the display to select the vocabulary you prefer to use. Update NuVoice During the Restore process, NuVoice is reset to the version that was current when the device was built or last serviced. We recommend that a NuVoice update be performed. • Select the TOOLS icon. • Select the Toolbox. • Select the MAINTENANCE menu. • Select the Software Update option. • Select Internet Update. • When asked if you would like to update the software (a yellow dialog box), select YES. Microsoft Security Essential Set-Up Wizard We highly recommend setting up Microsoft Security Essentials (Integrated devices only). During the software installation, the “Remind me later” option was selected and Security Essentials were not set up. The next time the Set-up Security Essentials wizard box appears, select Next, and follow the directions in the set-up wizard to install security. The Security Essentials is not applicable on dedicated devices. Accent TM Hardware Manual Accent TM 1200-10 Hardware Manual 33 Reinstall your Internet Connection (for Integrated Devices) During the Restore process, the Internet connection will be lost. The internet connection must be reinstalled in order to use the internet. If you need assistance call your internet service provider for information on setting up an internet connection for the device. See Set Up a Wireless Internet Connection for more information. Activate your Copy of Windows You have 30 days to activate your copy of Windows. If Windows is not activated within 30 days, Windows will quit working. The device will not work until another restore is performed and Windows is activated. Activate Windows by selecting Internet or Phone. Select Internet only is you are connected to the internet. If order to select Phone, you must have a USB keyboard must be plugged into the device. • Select the TOOLS key and open the Toolbox. • Open the MAINTENANCE MENU. • Select the Activate Windows option. To Activate Windows over the Internet • Select Internet from the Activate Windows option. • Make sure the internet connection is working (e.g., open Internet Explorer and view a Web page.) • Click or tap on the time/date area in the task bar at the top of the screen. • In the menu that comes up, make sure the date and time are set correctly or set them now to the correct date and time. Tap or click the menu (or the display) to exit. • The device has been so select NO. • "Activation successful." Select OK. To Activate Windows by Phone In order to use the phone to activate Windows, you must have a USB keyboard plugged into the device. You must be able to speak into the phone and type onto the display screen. Accent TM Hardware Manual Accent TM 1200-10 Hardware Manual 34 • Position the device near your phone. • Select Phone from the Activate Windows option. • Select your location. • Dial the number that appears on the screen. • Listen to the introduction. Respond YES to the "Activate Windows" question. • Recite the blocks of numbers displayed on your screen when requested. • You will receive a series of numbers in return. • Type these numbers into the blocks displayed on the screen. • Click on Next when asked. • Click on Finish. • Close the program. Storing Your Device If the device will not be used for at least a month: • Charge the batteries to Full. • When the batteries are fully charged, go to the Toolbox and open the MAINTENANCE MENU. • Open the Battery Menu. • Select Enter Ship Mode. • Respond YES to put the device into Ship Mode. • Select OK to exit the Battery Menu. • Select OK to exit the MAINTENANCE MENU. • Unplug the battery charger. Store the device in a dry place with moderate temperatures (not too cold or too hot). When you are ready to use the device again • Plug in the battery charger. • Press the ON button. • Select I Agree to the Software License Agreement. • Unplug the battery charger and check the Battery Status. Charge the device as needed. Accent TM Hardware Manual Accent TM 1200-10 Hardware Manual 35 If the batteries have gone completely dead: Plug in the charger. The Charging LED on the front of the device case will begin to flash rapidly, indicating the batteries are charging. Leave the battery charger plugged in until the Charging LED is only flashing about once a second which indicates the batteries are full. See Battery Troubleshooting for more information. Device Disposal; Battery Disposal Device Disposal Please dispose of the device in accordance with your local, state and/or federal electronic recycling laws. Battery Disposal If the batteries in the device need to be replaced, properly dispose of the old batteries in accordance with your local, state and/or country regulations. Cleaning and Disinfecting Never immerse the device in water! Cleaning the Case Before cleaning the case or the display, turn the device OFF. Clean the case with a damp, lint-free cloth. Dry the case thoroughly before turning it ON. Cleaning the Display To clean the display, use a household window cleaner (e.g., Windex®), a cleaner designated for a computer or flat screen TV, or rubbing alcohol. Lightly spray the screen. Dry thoroughly and polish with a lint-free cloth. Cleaning Keyguard Frames, Keyguards and TouchGuides All of the accessories can be removed from the case and washed in hot soapy water. Dry thoroughly before putting them back on the device. The best practice for regular cleaning is to dry accessories by hand, lay them on a dry towel and let them air dry for approximately 5 minutes before placing them back on the device. Accent TM Hardware Manual Accent TM 1200-10 Hardware Manual 36 Disinfecting Do not use vinegar and water on the display screen! To disinfect everything but the display screen, use a solution of vinegar and water (¼ cup vinegar to 1 cup water). Use this solution and wipe the case (not the display) with a damp cloth. Wash the Keyguard frame, Keyguard and TouchGuide separately with the vinegar and water solution. Allow all equipment to air dry. Do not use vinegar and water on the display! . What about drooling/saliva? Any saliva should be wiped up immediately, especially on the touch screen or around any of the connectors. Use a lint-free damp cloth to wipe the device. What about spills, rain, or accidental immersion? If liquid or any runny substance is spilled on the device or if the device is accidentally dropped in liquid, immediately dry the device as thoroughly as possible. Try using the device. If it does not work, call the PRC Service Department. The device may need to be sent in for service. Accent TM Hardware Manual Accent TM 1200-10 Hardware Manual 37 Index A Accent™1200 Hardware Manual, 1 P PRC Bluetooth Wireless Adapter, 21 B Back of the Case, 6 BATTERY CHARGING INDICATOR, 3 Battery Information, 20 Battery Troubleshooting, 28 C CAMERAS, 4 Carry Strap, 15 Changing the Wire Stand, 11 Charging the Batteries, 20 Cleaning and Disinfecting, 36 Contents, 2 R Rear-facing Camera, 6 RECOMMENDED SHUTDOWN, 8 Restoring Windows, 32 S Set Up a Wireless Internet Connection (Wi-Fi), 23 Standard Connector Module, 10 Storing Your Device, 35 T F Front View, 3 G General Problem Troubleshooting, 28 I IR Receiver and Transmitter Areas, 6 IR Setup, 26 L LOW BATTERY INDICATOR, 4 TOOLS Key, 4 Touch Screen, 14 Troubleshooting, 28 Turn Off and Shutdown with Windows 8, 8 U Update NuVoice, 33 V Virtual Keyboard, 14 W Wheelchair Mounting Plate, 18 Windows™ Troubleshooting, 29 Wireless Internet Connection, 23 O ON Button, 3 Accent TM Hardware Manual Accent TM 1200-10 Hardware Manual 38