1
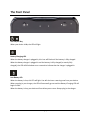
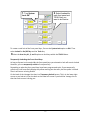
New in the Vantage™Lite The Vantage Lite has had a facelift. The Easy Start guide and the Operator’s Manual have not. To learn what’s new and to use your VTL effectively, read the information in this addendum. PRC • NEW IN THE VANTAGE LITE • (800) 262-1984 16095v1.00 Vantage, Essence, ECO and Vocabulary Builder are trademarks of PRC. Unity and Pixon are registered trademarks of Semantic Compaction Systems, Inc. in the United States and in other countries. Semantic Compaction is a trademark of Semantic Compaction Systems, Inc. ELECTRONIC INTERFERENCE INFORMATION This device complies with Part 15 of the FCC Rules. Operation is subject to two conditions: (1) this device may not cause harmful interference, and (2) this device must accept any interference received, including interference that may cause undesired operation. Warning! Changes or modifications to this product which are not authorized by Prentke Romich Company could exceed FCC limits and negate your authority to use this product. This equipment has been tested and found to comply with the limits for a Class B digital device, pursuant to Part 15 of the FCC Rules. These limits are designed to provide reasonable protection against harmful interference in a residential installation. This equipment generates uses and can radiate radio frequency energy and, if not installed and used in accordance with the instructions, may cause harmful interference to radio communications. However, there is no guarantee that interference will not occur in a particular installation. You can determine whether this product is causing interference in your radio or television by turning this product off. If the interference stops, it was probably caused by this product or one of its accessories. You can attempt to correct the interference by using one or more of the following measures: Turn the television or radio antenna until the interference stops. Move this product to one side or the other of the television or radio. Move this product farther away from the television or radio. Plug this product into an outlet that is on a different circuit from the television or radio; that is, this product should be controlled by different circuit breakers/fuses from the television or radio. If necessary, contact a Prentke Romich Company service technician for assistance. o o o o CE ENVIRONMENTAL INFORMATION: Use: 0 - 45 C; Storage: (-20 ) - 50 C; 95% maximum relative humidity @ ambient o temperatures less than 40 C. CLASS 1 LED PRODUCT –The Tracker Headpointing option falls within the limits of a Class 1 LED product as specified by CENELEC EN 60825-1, Amendments 1 and 2. Attention! Consult accompanying documents. This device not intended to be an emergency call device or sole communication aid. Warnings! When operating this device in a medical environment, do not use with any product that is not medically approved. Follow all rules for appropriate cell phone and wireless device use. Any mounts used should be fitted by a qualified person. Failure to install the mounting system according to the manufacturer's instructions may result in an injury to the user. ©Prentke Romich Company 2012. All rights reserved. Under copyright laws this document may not be copied, in whole or in part, without the written consent of the Prentke Romich Company. PRC HEADQUARTERS 1022 Heyl Rd • Wooster, OH 44691 Telephone: (330 262-1984 • (800) 262-1984 Fax: (330) 263-4829 E-mail Address: [email protected] Web Site Address: www.prentrom.com PRC INTERNATIONAL Liberator Ltd Minerva Business Park Lynch Wood, Peterborough, PE2 6FT UK Fax: +44 (0) 1733 391939 E-mail Address: [email protected] Web Site Address: www.liberator.co.uk New in the Vantage Lite 2 Table of Contents New Software ..................................................................................................... 5 Remove Your Device from Shipping Mode ..................................................................................... 6 The Front Panel ............................................................................................................................... 7 The TOOLS Menu – Unity© MAP ..................................................................................................... 9 The TOOLS Menu – Essence® MAP................................................................................................ 11 Modify User Keys .......................................................................................................................... 13 System Lock Settings ..................................................................................................................... 14 Language Lab Lesson Plans ........................................................................................................... 17 PIXON® Plan Kit Sequence Sets..................................................................................................... 18 New Hardware.................................................................................................. 19 The Colour Frame.......................................................................................................................... 20 Screen Protector, Keyguard, Touchguide ..................................................................................... 23 The Screen Protector .................................................................................................................... 24 The Keyguard Frame ..................................................................................................................... 27 The Keyguard ................................................................................................................................ 29 The Touchguide............................................................................................................................. 32 Cleaning your Device .................................................................................................................... 35 New in the Vantage Lite 3 4 New Software New in the Vantage Lite 5 Remove Your Device from Shipping Mode To use your device, you must remove it from shipping mode. You received a battery charger in the box with your device. Plug the small end of the battery charger into the small battery port on the right side of your device case. Plug the other end of the battery cable into a working wall outlet. Press the ON/OFF button Your Vantage Lite will boot up. on the top front of the case. New in Vantage Lite 6 The Front Panel The ON/OFF Key When your device is On, the LED will light. Battery Charging LED. When the battery charger is plugged in, this icon will flash until the battery is fully charged. When the battery charger is plugged in and the battery is fully charged (or mostly fully charged), the LED will blink about once a second to indicate that the charger is plugged in. Low Battery LED When the battery is low, this LED will light. You will also hear a warning tone from your device. When you plug in your charger, the LED will eventually go out and the Battery Charging LED will begin to flash. When the battery is low, your device will not allow you to store. Always plug in the charger. New in Vantage Lite 7 The TOOLS Key IMPORTANT NOTE: if you have used a Vantage+ or an earlier Vantage Lite, this TOOLS key replaces the User Programmable Keys that were on the front of the case on those devices. Select the TOOLS key once to see the TOOLS menu. Select the TOOLS key twice to automatically open the Toolbox. MICROPHONE The microphone is the small hole to the right of the TOOLS key. Speak in this direction when you record messages. New in Vantage Lite 8 The TOOLS Menu – Unity© MAP When you select the TOOLS key on the front of the case, you see the TOOLS menu. Unity® TOOLS Menu The TOOLS menu contains several keys that have been pre-programmed with a few of the most often-used Tools. You can open the Toolbox by selecting the TOOLBOX key To open the Toolbox automatically, select the TOOLS key . twice. All of the TOOLS menu keys can be re-programmed with any Tool you want. See Modify User Keys in this Addendum to learn how. New in Vantage Lite 9 TOOLBOX This takes you to the Toolbox where you can use the system menus to make changes to your device, store messages, etc. CHOOSE ACTIVITY This allows you to select different Activities in your Activity Row. SETUP KEY This allows you to store and modify vocabulary. Go to your CORE or to a Page or an Activity that you want to change, select the SETUP key, select the key on your CORE, Page or Activity you want to change and follow the directions in the Text Display Area. VOCABULARY MASKING ON THE FLY This allows you to mask or unmask keys on Unity MAPs that use two or more icons for sequencing. New in Vantage Lite 10 The TOOLS Menu – Essence® MAP When you select the TOOLS key you see the TOOLS menu. Essence™ TOOLS Menu The TOOLS menu contains several keys that have been pre-programmed with a few of the most often-used Tools. You can open the Toolbox by selecting the TOOLBOX key To open the Toolbox automatically, select the TOOLS key New in Vantage Lite 11 . twice. TOOLBOX This takes you to the Toolbox where you can use the system menus to make changes to your device, store messages, etc. GO TO SPELL This takes you to your Spelling Page. SETUP KEY This allows you to store and modify vocabulary. Go to the Page that you want, select the SETUP key, select the key you want to change and follow the directions in the Text Display Area. Many Pages in Essence already have a SETUP key stored on them. New in Vantage Lite 12 Modify User Keys When you select the TOOLS key on the front of the device case, you see a menu of User Programmable keys that have been pre-programmed for you with often used Tools. Eventually you may discover that there are other Tools you would rather assign to these keys. Assign a Tool to a Key in the TOOLS Menu Select the TOOLS key twice to open the Toolbox. Select the USER AREA MENU. Select the Modify User Keys option. Select the key from the TOOLS menu that you want to change. Select Enter Assignment. Select the Del. Char. (Delete Character) to delete the current assignment. Select INSERT TOOL. Select the Tool you want to use. The keys are in alphabetical order. Use More Items and Previous Items to move through the pages. Now you change the key’s Icon, Label and/or Key Colour if you want to. When you are finished, select OK to save your work and exit the menu. If you make a mistake, select Clear Key Contents and start over. New in Vantage Lite 13 System Lock Settings System Lock When System Lock is ON you can still use your vocabulary to speak but the use of the TOOLS key on the front of the case and of many Tools in the Toolbox is severely limited. For instance, if the system is locked and you select the TOOLS key on the front of the case, you will see a warning similar to this: A box with slightly different wording appears if you press other keys. Press and hold the TOOLS key for 5 seconds to open the TOOLS menu. Select the Toolbox key. You will be able to use some of the Tools and menus in the Toolbox, but not all of them. You can open the MAINTENANCE MENU, select the System Lock Settings option and turn System Lock OFF. This puts your device back into normal use mode. Total Lock of the Front Panel Keys When the system is locked, some device users can become mesmerized by the repetitive action of pressing a front panel key and seeing the yellow warning box appear. You can completely lock the ON/OFF and TOOLS keys on the front of the case. When you press them, they will do nothing. Their LEDs will not light and the yellow warning box that tells you the system is locked will not appear on the screen. New in Vantage Lite 14 1. Turn System 2. Select Locked for Lock ON each front panel and TOOLS key you want to be inactive. To create a total lock of the front panel keys, first set the System Lock option to ON. Then select Locked for On/Off Key and the Tools Key. Select the User Key # 1, 2, and 3 options to lock keys within the TOOLS Menu. Temporarily Unlocking the Front Panel Keys As long as System Lock remains On, the front panel keys you selected to lock will remain locked. However, you can temporarily unlock a front panel key. Depending on what the front panel keys have been programmed to do, if you temporarily unlock one it will most likely display the yellow warning box that tells you the system is locked. Then it will return to being locked. On the back of the Vantage Lite there is a Temporary Unlock button. This is in the lower right corner as you look at it from the back or the lower left corner if you hold the Vantage Lite so that the touch screen is facing you. New in Vantage Lite 15 Temporary Unlock Button While you press and hold the Temporary Unlock button, press the front panel key you want to temporarily unlock. In most instances you will see a Locked System warning box. Release both keys. A locked TOOLS key works differently. This is the key that allows you to go to the Toolbox. To get to the Toolbox you must: Press and hold the Temporary Unlock button on the back of the case. While you are pressing the back button, press and hold the TOOLS button for 5 seconds. This unlocks the TOOLS button without unlocking other front panel keys. You can now open the MAINTENANCE MENU, go to the System Lock Settings menu and turn System Lock OFF or change any of your settings. The Temporary Unlock button does not allow you to actually use a locked key unless it has been programmed to be usable when the system is locked. You just see the System Locked warning box. To use the front panel keys as you normally would, you must turn System Lock OFF in the System Lock Settings menu. New in Vantage Lite 16 Language Lab Lesson Plans PRC has combined the power of the Vocabulary Builder™ software with the Stages lesson plans available at the AAC Language Lab website, making it easier to learn effective core vocabulary. Your communication aid can be set up to provide pre-stored vocabulary sets for a range of different lessons. Here’s how to select a vocabulary set on your device: Select the PAGES key Select the LESSONS key Select a STAGE Select a Lesson . Once you select a Lesson, your device will automatically turn on just the vocabulary needed for that Lesson. By downloading the matching Cheat Sheets and Lesson Plans from the AAC Language Lab, you have all you need to begin teaching. New in Vantage Lite 17 PIXON® Plan Kit Sequence Sets PIXON® Plan Kit (PPK) Sequence Sets have been added to Vocabulary Builder. These sets were developed by Gail Van Tatenhove, M.S., CCC-SLP, to support transitioning from a PIXON® Board to the Unity® MAP and to support teaching Unity® based on the PIXON® Language and Learning Activity Notebook. New in Vantage Lite 18 New Hardware New in Vantage Lite 19 The Colour Frame To Add a Colour Frame Your new Vantage Lite comes with several different colour frames. You can change the band of colour around your device by exchanging colour frames. Place the top of the colour frame into the groove on the top of your device. New in Vantage Lite 20 Fit the frame into the groove around your device. There are small tabs at each mid-point on the colour frame that fit into small latches on your device. At the bottom you may have to press the frame out and down to make sure it is over the corners of the device. Now press the midpoints of the colour frame until they snap into place around the device. Then press each corner until you feel it snap into place. The frame is made to fit snugly on your device. If you see a gap between the frame and your device, press a midpoint or a corner on the frame to make sure it is latched to the device. New in Vantage Lite 21 When the frame is on, snap in the bottom, sides and top to make sure they are locked into place. To Remove the Colour Frame Put your finger in one of the slots above the strap holder on the bottom of the device. Pull up. This will take some force. When the colour frame comes loose, continue to unsnap and pull it from your device. New in Vantage Lite 22 Screen Protector, Keyguard, Touchguide Keyguards, Touchguides and Screen Protectors are options you can purchase from PRC. The Screen Protector This is a thin sheet of clear polycarbonate that fits over your device and gives it some protection from spills, saliva, greasy fingers, etc. It can be used alone or under a Keyguard or Touchguide. Keyguard This is a rigid piece of plastic that fits slightly suspended over your display. The holes in the Keyguard guide your finger (or other access method) down into the selection area of the key you want. To use a keyguard you must also install the Keyguard Frame. Touchguide This is a thin, flexible piece of plastic that fits over your display. The small holes help guide your finger along to the key you want. To use a Touchguide, you must also install the Keyguard Frame. The next few pages explain how to install these options on your device. New in Vantage Lite 23 The Screen Protector Note: The pictures below show a PRC ECO™ device, but the instructions are exactly the same for the Vantage Lite. Add a Screen Protector Turn your device OFF and lay it flat on a table. Note: If your display screen is dirty, clean it first, with a glass cleaner, a flat screen TV or computer screen cleaner, or with rubbing alcohol. Dry the screen thoroughly. When the display is clean, very lightly mist the display with your display cleaner. You want only a very thin mist which you will leave on the screen. Lightly mist the display screen New in Vantage Lite 24 Peel the Screen Protector from its cardboard holder and lay it on your display screen. The side that was against the cardboard is the side that should be placed against the screen. The mist on your display should allow you to slide the Screen Protector around until you have it positioned so it covers your display from corner to corner. Place protector on display and move into position New in Vantage Lite 25 Use the squeegee card that came in your kit to smooth out the protector. You want to get any wrinkles and air bubbles out. Some of the mist will drip out. This is all right. You will wipe it off in a minute. When the protector is smooth, take the static or lint-free cloth and thoroughly dry the protector, the edges around the display screen and the device case. Let your device air dry completely before turning it on (5 minutes or so). To Remove the Screen Protector Carefully peel back one of the corners of the Screen Protector and then gently pull it off your display screen. To Clean/Disinfect the Screen Protector Turn your device OFF. If the Screen Protector is extremely dirty, just remove it and follow the directions above to place a new protector on the display. New in Vantage Lite 26 If the screen protector just needs to be wiped off, mist it lightly with water or a glass cleaner and wipe it off with a lint-free cloth. If you are using a Touchguide or Keyguard with the protector, remove it before cleaning the Screen Protector. The Keyguard Frame To use a Keyguard or Touchguide, you must add the Keyguard Frame to your device. The Keyguard or Touchguide will then fit into the frame. Remove the Handle To install the keyguard frame, remove the handle on your device. Use a flathead screwdriver to unscrew the two handle screws. Remove the handle and place it nearby. Note: The handle screws will remain in the handle. New in Vantage Lite 27 Add the Keyguard Frame Slide the bottom of the Keyguard Frame into the slots on the bottom of your device. Press down on the top of the frame so it goes over the top of your device. Replace the handle. This holds the keyguard in place. If you do not want the handle back on, find the plastic bag that holds two extra screws. This came in the box with your device. Place these screws in the holes where the handle goes and tighten the screws. Remove the Keyguard Frame Remove the handle and lift the keyguard off your device case. New in Vantage Lite 28 The Keyguard Add a Keyguard Insert Keyguard tab into slot on Keyguard Frame. Insert one of the Keyguard tabs into the slot for it on the Keyguard Frame. New in Vantage Lite 29 Carefully slip the opposite tab under the Keyguard Frame and gently slide it up until it locks into its slot. Keyguard locked into slots. New in Vantage Lite 30 Lower the Keyguard and press the bottom tabs into their slots. To Open the Keyguard Hook a finger in one of the holes and lift up. New in Vantage Lite 31 The Touchguide Note: You cannot use both a Keyguard and a Touchguide at the same time. You must select one or the other. Add a Touchguide Insert one of the tabs on the bottom of the Touchguide into its matching slot on the Keyguard Frame. New in Vantage Lite 32 Bend the Touchguide until you can slide the other bottom tab into its slot. Bend the Touchguide and slip one of the top tabs into its slot at the top of the Keyguard Frame. Repeat to insert the other top tab. New in Vantage Lite 33 Slide the Touchguide so that it fits evenly over the display. To Remove the Touchguide Insert a toothpick under the small notch at the top center of the Touchguide and lift up. The Touchguide will pop off. Do not use anything to lift the Touchguide that will scratch your display New in Vantage Lite 34 Cleaning your Device Never immerse your device in water! Turn your device Off before cleaning. The Display To clean the display, use a household window cleaner (e.g., Windex®) or a cleaner designated for a computer or flat screen TV or use rubbing alcohol. Lightly spray the screen. Use a lint-free cloth to dry and polish the screen thoroughly. Colour Frames, Keyguard Frames, Keyguards and Touchguides All of these accessories can be washed in hot soapy water. Dry them thoroughly before putting them back on your device. Best Practice is to dry accessories by hand and then let them air dry for about 5 minutes or so before placing them back on your device. The Device Wet a cloth with warm water and wring it out. Wipe your device with the warm, damp cloth until the device is clean. To Disinfect Use a solution of vinegar and water (1/4 cup vinegar to 1 cup water) to disinfect the case and the hardware. You can wash the hardware in the vinegar and water solution. When finished, shake off excess moisture and lay the pieces on a dry towel. Let them air dry completely before you put them back on your device. To disinfect the case, wet a cloth in the vinegar and water solution, wring it out until damp, and then thoroughly wipe the case. Let the case air dry before turning it on. New in Vantage Lite 35