1
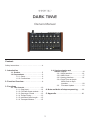
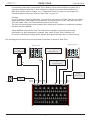
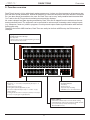
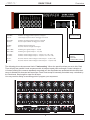
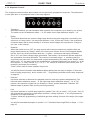
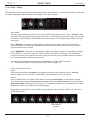
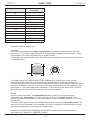
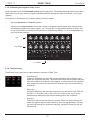
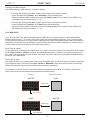
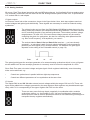
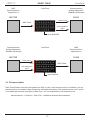
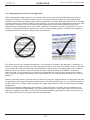
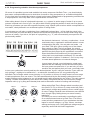
Dark Time
Owners Manual
DOEPFER MUSIKELEKTRONIK GmbH
2
DOEPFER
Dark Time
Owners Manual
Content:
Safety Instructions……………………………………4
1. Introduction
3.2. Synchronization and
remote control………………………...16
3.2.1. MIDI-Interface.………………16
3.2.2. MIDI-Clock…………………...17
3.2.3. Analog-Interface…………….18
3.2.4. Dark Time as simple
MIDI-Clock to Sync
Interface……………………...20
3.3. Firmware-Update……………21
1.1. Preface………………………………….5
1.2. Preparations……………………………6
1.2.1. Setup………………………….6
1.2.2. Connections………………….6
2. Function Overview…………………………….8
3. Functions
3.1. The Controls………………………….10
3.1.1. Step-Input ………………….10
3.1.2. CV/Gate-Ouput sockets…...11
3.1.3. Sequence-Control………….12
3.1.4. Tempo/Timing……………....13
3.1.5. Individual Gate-Length…….15
3.1.6. Transport-Buttons.…………15
4. Nuts and bolts of step-sequencing……...22
5. Appendix………………………………………..26
3
Safety Instructions
Please follow the instructions for use of the instrument carefully because this will guarantee
proper operation of the instrument. Due to the fact that these instructions touch on Product Liability, it is
absolutely imperative that they be read carefully. Any claim for defect will be rejected if one or more
of the items has not been observed.
Disregard of the instructions can void the two years covered by warranty.
The instrument may only be operated at the voltage stated on the power input on the rear panel. Before
opening the case, disconnect both power plug and power adaptor.
All eventual modifications are to be performed by a qualified person only in accordance with valid safety
instructions. With the introduction of a third person, the warranty will be void. In case of a destroyed
warranty seal, any warranty claim will be rejected.
The instrument must never be operated outdoors but solely in dry rooms. Never use the instrument in a
humid or wet environment, nor near flammable goods.
No liquids or conducting substances must get into the instrument. Should this be the case, the instrument
is to be disconnected from mains power immediately and examined, cleaned and possibly repaired by a
qualified technician.
Never expose the instrument to temperatures above +50° C or below -10° C. Before operation, the
instrument should have a temperature of at least 10°C. Do not expose the instrument to direct sunlight.
Do not install the instrument near heat sources like heaters, open fire places, central heating etc.
Keep the top of the instrument clear in order to allow proper ventilation, otherwise the instrument
could eventually overheat.
Never place heavy objects on the instrument.
Transport the instrument carefully, never let it drop or fall over. Make sure that during transport and in use
the instrument is supported properly and cannot drop, slip or fall over because people might get injured.
Never use the instrument in the immediate proximity of electronic devices (e.g. monitors, power
supplies, computers) as these interferences could cause malfunctions within Dark Energy and corrupt
memory data.
The instrument is to be shipped in the original packaging only. Any instrument shipped to us for return,
exchange, warranty repair, update or examination has to be in its original packaging! All other deliveries
will be rejected. Therefore, make sure you keep the original packaging and technical documentation.
The instrument may only be used for the purpose described in this operating manual. Due to safety
reasons, the instrument must never be used for other purposes.
When using the instrument in Germany, the appropriate VDE standards are to be followed. The following
standards are of special importance: DIN VDE 0100 (Teil 300/11.85, Teil 410/11.83, Teil 481/10.87), DIN
VDE 0532 (Teil 1/03.82), DIN VDE 0550 (Teil 1/12.69), DIN VDE 0551 (05.72), DIN VDE 0551e (06.75),
DIN VDE 0700 (Teil 1/02.81, Teil 207/10.82), DIN VDE 0711 (Teil 500/10.89), DIN VDE 0860 (05.89), DIN
VDE 0869 (01.85). VDE papers can be obtained from the VDE-Verlag GmbH, Berlin.
4
DOEPFER
Dark time
Introduction
1. Introduction
1.1. Preface
Doepfer thanks you!
First of all we would like to thank you for having purchased Doepfer Dark Time! We really appreciate your
choice and promise you an extraordinary support throughout, including useful information, easy service,
and innovative product development.
May your Dark Time be an important source of creative power for ages to come.
What time is it?
Dark Time is a sequencer in the tradition of an analog step sequencer. Even though Dark Time’s circuitry is
almost entirely digital, its user interface and operation are perfectly in line with a classic analog machine of
yesteryear. Because of this, we chose to refer to Dark Time as an ”analog sequencer” in this manual.
Dark Time sports a USB port, MIDI sockets, and connectors for analog control voltages and gate signals.
Yet, Dark Energy is a modern tool for sound creation and can easily be connected not only to our Dark
Energy analog synthesizer (hint, hint), but also to all sorts of other analog and digital gear which is suitably
equipped with a
MIDI/USB port and/or CV/Gate connectors. Dark Energy can easily be connected to every modern
computer-based studio or live-setup. Hooking up Dark Energy to classic vintage analog equipment or a
Doepfer A-100 modular system is also easy. In addition to this, Dark Time interfaces the digital world of
MIDI with the analog world of control voltages.
Dark Time is housed in a rugged black sheet metal case with wooden side panels. Sturdy high-quality
potentiometers (often referred to as “pot”, in case you are wondering where the “weed” is hidden…) with
metal shafts have been used throughout. Each pot has been mounted firmly to the chassis. We also made
use of knob caps which have a classy vintage look and feel to them.
R.t.f.m.!
We knew it: User manuals are your first and only choice in literature. Hey, that’s great – we’re talking the
same language here!
If you are doubting the entertaining qualities of this manual – how dare you! –, please bear in mind that
its thorough study will eventually turn out to be quite useful as it will highly increase the inspirational
value of your new analog sequencer. So please do yourself - and us - a big favor: Read (and, if possible,
understand) this frigging manual! Thanks for your time, and bless you for your efforts!
In the first section you will find all info needed to successfully hook up Dark Time to your setup.
After that, you will find a brief overview of its functions. Sequencer experts may use this as a quickstart
guide. You should not skip the complete description of the entire “Functions” section in the next chapter,
though – Dark Time hides some interesting features under its hood. If sequencer technology –
especially the secrets of analog sequencing – are totally new to you, please refer to “Nuts and Bolts of
analog Sequencing“ later on in this manual.
Enough babble - here we go...
5
DOEPFER
Dark time
Introduction
1.2. Getting started
When lifting DarkTime out of its box for the first time, please make sure that everything is in its right place.
You will find the following component parts in the box:
•
•
•
•
wall-wart (12V AC / 400mA)
USB cable (A-B type)
two A-100 patch cables
this owners´ manual
You will also need:
A suitable sound generation device with MIDI- and/or CV/gate connectors (e.g. Doepfer Dark Energy
synthesizer).
To run DarkTime via its MIDI-DIN socket, you will also need:
• A MIDI cable to control a suitable MIDI-synthesizer from Dark Time.
To run DarkTime via its CV/Gate inputs, you will also need:
• At least two 1/8” plug patch cables – the more, the better – and a suitable equipped analogue synthesizer (e.g. the Doepfer Dark Energy or a Doepfer modular synthesizer model A-100).
1.2.1. Setup:
Use Dark Time in a flat or upright position. Please use a suitable support. Used pizza cartons or beer crates
should not be your first choice. Don’t say we didn’t warn you.
1.2.2. Connections:
You do not necessarily need all its built-in sockets to get Dark Time going. For a simple setup, you will need
just the ones pictured below. Make use of the additional terminals and you will tremendously expand Dark
Time’s potential. These connectors will be described along with the corresponding modules later on in this
manual.
• Power supply:
Connect the included power adaptor (“wall wart”) to the 12V AC socket on the rear panel of Dark Time.
Important: Use this power adaptor only or an equivalent one with exactly the same specs!
Powering Dark Time via USB is not possible since the internal analog circuitry of Dark Time
runs at +/-12V.
• USB:
Connect Dark Time’s USB socket with your suitably equipped synthesizer or computer. Any configuration or driver installation work is not required on your computer.
• MIDI:
Connect Dark Time’s MIDI-out socket with the MIDI-in socket of your MIDI synthesizer to run Dark Time in a conventional MIDI setup without USB.
The default setting of Dark Time‘s MIDI channel is Channel 1. How to change this setting is described on page 17 in chapter 3.2.1, “USB/MIDI interface“.
6
Introduction
Dark time
DOEPFER
If so desired, please also connect Dark Time’s MIDI-in socket with the MIDI-out socket of e.g.
a suitably equipped computer or drum machine in order to synchronize both machines via
MIDI clock. Please refer to chapter 3.1.4. ”Tempo and Timing” on page 13, and chapter 3.2. ”Synchronization and remote control of Dark Time” on page 16.
• CV/Gate:
You only need to connect at least Gate 1 out and CV1 out jacks to run Dark Time with a CV/Gate-
based synthesizer. Gate triggers the synthesizer envelopes (which, in turn, normally control the VCF and output VCA), CV1 determines the pitch of the VCO(s).
The Clk In/Out jacks make synchronization with vintage drum machines or sequencers possible that have not been MIDIed.
Using additional connections, Dark Time will become capable of controlling two analog synthesizers (or their parameters) in parallel. Also, some of Dark Time’s functions can be remote-controlled by analog control signals. More about this topic later on in this manual.
The following pictures shows the most importand connections to and from Dark Time:
CV/Gate-Synthesizer
MIDI-Synthesizer
Frequ.
1
9
0
4
5
1
LFO1
7
9
0
Source
FM
3
2
4
10
5
XFM
3
7
off
1
9
0
4
PW
1
9
0
Shape
7
2
4
4
Source
LFO2
7
4
9
0
10
LFO1
ADSR
1
9
0
10
5
4
VCO PW
VCF F
9
1
7
3
2
8
2
9
4
1
Gate
Ext.
Audio
LFO1
Envelope
LFO1
9
4
10
5
XFM
3
PW
7
1
9
0
Shape
7
4
4
Source
LFO2
7
9
0
10
medium
Source
Source
LFO2
LFO1
1
10
4
5
VCO F
VCO PW
VCF F
VCA A
1
7
3
2
8
2
8
9
4
9
0
10
6
7
0
7
1
10
Sustain
1
10
Frequ.
3
medium
8
9
4
9
4
1
0
7
0
off
6
8
9
10
off
Shape
10
Decay
2
Frequ.
Inputs
Audio
4
3
8
0
9
0
7
1
low
1
AM
3
4
8
2
9
10
3
Range
9
0
8
Shape
LFO2
7
Attack
3
7
0
ADSR
Envelope
Amp
1
medium
10
5 Res
VCA
off
8
ADSR
4
3
low
9
4
3
off
1
full
Range
7
0
PWM
low
LFO1
LFM
1
10
5
half
8
9
0
ADSR
Range
Track
ADSR
10
5
3
off
1
3
2
VCF
off
ADSR
10
5
2
10
Release
6
3
7
8
1
9
0
10
Outputs
Gate
Ext.
Audio
LFO1
Envelope
Audio
CV-Keyboard
or
Synthesizer-Module
MIDI
In
USB
9
0
Outputs
VCA A
7
off
4
9
Frequ.
off
Source
7
0
10
5
3
down
FM
1
8
0
5
3
8
1
9
3
7
up
10
2
6
4
Octave
8
10
Release
DOEPFER
VCO
Tune
7
0
6
3
5
1
9
4
10
4
3
2
7
0
7
0
10
Sustain
1
10
Frequ.
1
medium
8
9
4
9
4
1
0
7
0
off
6
8
10
3
Decay
2
Frequ.
off
Shape
low
10
3
8
Inputs
VCO F
4
7
0
9
0
AM
3
Range
8
1
10
1
ADSR
8
2
9
4
Shape
LFO2
7
8
3
MIDI-Keyboard
or
MIDI-Drummachine
Attack
3
7
off
medium
10
5 Res
3
off
1
Source
LFO2
Envelope
Amp
1
low
9
0
PWM
Source
Range
7
VCA
3
0
LFO1
LFM
1
10
5
medium
8
9
0
full
ADSR
10
5
3
off
1
3
2
4
low
off
ADSR
10
5
3
ADSR
Range
Track
off
down
10
VCF
half
7
high
5
3
high
up
8
high
4
Octave
7
high
VCO
Tune
high
5
high
4
3
2
DARK ENERGY
DOEPFER
DARK ENERGY
Computer
with
Software-Sequenzer
VintageDrummachine
Powersupply
Power-Outlet
12V AC
500mA
USB
MIDI
Out
MIDI
In
7
CV
In
CV
Out
Gate
Out
Clk.
Out/In
DOEPFER
Dark time
Overview
2. Function overview
Dark Time’s layout is in line with classic analog sequencers. It gives you direct access to all sequencer stages and their crucial parameters. Almost all functions to control the sequence with (like direction, transpose
etc.) are also directly accessible to the user. So Dark Time can be very easily tweaked and interacted with
”live” and on-the-fly. Forget about confusing menus and tiny displays.
All control voltages and gate signals generated by Dark Time can be tapped from the sockets on the rear
analog interface panel. The sequence can be controlled in various ways via analog control voltage inputs
(e.g. transpose, reset etc.) while in progress. Clock input and output makes synchronization with external
analog gear easy.
Thanks to the built-in MIDI interface, Dark Time can easily be tied into a MIDI setup via DIN sockets or
USB port.
Step Input
– 16 Steps in two rows of 8 steps
each step with:
- knob for pitch or gate-length (depending on mode)
- two switches for step-status
Control Buttons
– Transport-buttons
- Start/Stop
- Reset (to step 1)
- Step (next step manually)
– Function (access to 2nd functions)
Sequence Control
– Transpose: +/- one octave, independently for steps 1 – 8
and 9 – 16
– CV-Range for step-knobs
– Scaling of step-knobs (Quantize) on, off
– Direction: Independently for steps 1 – 8 and 9 – 16; up,
down, random
– Linking of the two rows: 2 x 8 steps in parallel, 1 x 16 steps
in serial, 1 x 8 plus gate-length (Custom)
Tempo / Timing
– Clock-knob controls tempo or clock-devider setting
– Pulswidth-knob controls gate-lenght or shuffle-amount
– Sync (clock-source): intern, extern (analog),
MIDI/USB (MIDI-clock)
8
Overview
Dark time
DOEPFER
Analog Interface
– St/St Out:
– St/St In:
Provides +5V Trigger when sequence is stopped
Starts/stopps sequence when +5V trigger is received
Power Supply
(12V AC, 500 mA)
– Reset Out:
– Reset In:
Provides +5V Trigger when sequence is resetted
Resets sequence when +5V trigger is received
– Clk Out:
– Clk In:
Provides internal clock-signal
Receives external analogue clock-signal
– Gate 1 Out:
– Gate 2 Out:
Provides gate-signals of steps 1 – 8 (+5V)
Provides gate-signals of steps 9 – 16 (+5V)
– CV 1 Out:
– CV 2 Out:
Provides control-voltage of steps 1 – 8 (0V to +1V / +2V / +5V)
Provides control-voltage of steps 9 – 16 (0V to +1V / +2V / +5V)
– CV 1 In:
– CV 2 In:
Receives external control-voltage to control steps 1 – 8 (0V to +5V)
Receives external control-voltage to control steps 9 – 16 (0V to +5V)
MIDI-Interface
– MIDI-In
– MIDI-Out
– USB (for MIDI via USB)
The following picture shows some kind of ”basic setting”. When the panel functions are set to this, Dark
Time will play two parallel 8-note sequences with all steps at equal pitch and length. Control voltages of
1V/octave scaling (the common standard) are putted out, the step-knobs are quantised which means their
range is divided into descrete half-tone steps. Dark Times tempo is internally controlled resp. controlled by
the clock-knob. Step length is equal for all steps.
You may use this setting as a starting point to program your sequences.
DOEPFER
DARK TIME
9
1
10
Stop
Cont.
4
6
7
On
Cont.
4
6
9
9
1
0
10
Skip
Stop
Scale
0
-1
2V
5V
1 -8
Up
On
9 -1 6
Up
Down
Down
Off
On
Cont.
Link
Sync
2x(1-8)
Internal
1-8
Combi
Midi/USB
0
Skip
On
Off
6
3
7
1
9
8 2
9
1
8
0
10
0
10
0
10
Skip
Stop
Skip
Stop
Skip
Stop
On
4
7
2
8
9
1
10
Cont.
On
5
6
3
7
1
9
2
8
0
10
Shuffle
Cont.
Start/Stop Reset
Pulsewidth
6
Divide
4
7
10
Cont.
0
Cont.
Stop
3
9
9
1
10
Stop
On
6
3
8 2
Clock
4
0
Cont.
4
7
8
Skip
Off
Off
9
On
6
3
8 2
1
External
Off
Direction
1-16
1V
Cont.
On
Random
Cont.
Quantize
Off
Off
Off
9 -1 6
+1
On
Cont.
4
7
Jump
10
Stop
Jump
0
Skip
Jump
10
On
6
3
8 2
Stop
Range
Cont.
4
7
3
8 2
1
On
9
Jump
0
Skip
On
1
Jump
10
Stop
Jump
0
Skip
Jump
10
Stop
0
0
-1
0
Skip
Skip
Transpose
1 -8
+1
10
Stop
10
Cont.
On
0
Skip
Stop
Jump
0
Skip
10
3
9
9
1
Stop
8 2
1
9
1
7
8 2
Jump
8 2
2
8
6
3
Off
7
9
1
4
7
Jump
6
2
6
3
Off
4
3
8
4
7
Jump
Cont.
9
6
3
Off
2
On
4
7
2
8
1
6
3
Jump
6
7
Skip
4
7
2
9
0
Stop
Off
Jump
Off
4
3
10
Skip
Cont.
8
1
6
3
Off
0
Stop
On
9
1
10
Skip
2
Random
0
8
4
7
Off
9
6
3
Jump
2
8
1
4
7
Off
2
6
3
Jump
4
7
Off
6
Jump
4
3
On
Cont.
Step
Function
Dark time
DOEPFER
Functions
3. Functions
In this section we will explore all functions of Dark Time in detail. We will also have a closer look at the way
the functions interact, and finally we will briefly deal with the MIDI and analog interfacing section.
3.1. The Controls
3.1.1. Step Input Panel
The step input panel is used to program a sequence into Dark Time. That means notes, their respective
pitches and rests as well as points where the sequence circle starts and ends can be determined here. The
step input panel features the controls necessary for each of the 2 x 8 or 16 stages respectively. They are
the same for each step and can be found replicated sixteen times.
Each stage provides the following four control elements:
•
Two step status switches:
The step status switches determine the behaviour of a sequence stage as soon as it is active:
• Switch On / Off / Skip
– On
=
– Off
=
– Skip
=
The step is part of the sequence and generates a trigger signal, i.e. it is active.
The step is ”muted” or, in other words, becomes a rest. The step will not put out a trigger signal.
The step is not part of the sequence. It is skipped and will not generate a trigger signal.
• Switch Stop / Continue / Jump
– Cont(inue) =
The sequence will continue like nothing happened.
– Stop
=
The sequence stops on this stage.
– Jump
=
As long as only one of these 16 switches is set to ”Jump”, the particular step performs a reset (that is, the sequence will return to step 1 and start from there again).
If two steps are set to ”Jump”, the first one will determine the
starting point of the sequence, the second will become the
final step of the circle. The sequence will cycle only between these two steps set to ”Jump” position as they will determine the margins of the sequence. If you set more stages to
10
Functions
Dark time
DOEPFER
”Jump” position other than the previously selected ones, these
steps will become the new start and end points. If you set steps to
”Jump” within the previously selected range, they will not affect the
sequence in any way. Confusing, eh? Not really, go ahead, and with
a little practice you will see how useful this little feature is:
3
4
5
6
7
8
DOEPFER
Cont
Cont.
4
6
4
2
Stop
6
7
3
8 2
9
1
0
10
Skip
Stop
On
Cont.
4
6
7
3
8 2
9
1
0
Skip
Skip
Ski
Stop
Skip
On
Cont.
4
6
8 2
9
1
10
0
10
Stop
Skip
Stop
Cont.
4
7
3
Ski
Skip
On
6
8 2
9
1
0
6
9
1
Stop
0
10
Skip
Stop
Skip
Cont.
4
7
3
0
Stop
On
8 2
10
Skip
Cont.
6
9
0
Skip
Cont.
4
7
3
10
Stop
On
8 2
1
8
9
1
10
0
Skip
Skip
4
7
3
9
1
Stop
7
8 2
10
0
Stop
On
9
1
10
0
2
8
6
3
Jump
Skip
9
1
10
0
4
7
Off
Stop
9
1
2
8
6
3
Jump
10
Cont.
On
7
3
0
Off
Off
O
On
9
1
10
2
8
4
7
3
Off
Skip
2
6
4
7
Jump
Stop
0
8
6
3
Off
Skip
9
1
Jump
10
2
4
7
3
Jump
9
0
8
6
4
7
3
Off
2
8
6
4
7
3
Jump
2
1
6
4
7
Off
6
Jump
4
3
Jump
2
Off
1
DARK
D
DAR
K TIME
6
7
3
8 2
9
1
10
0
10
Stop
Skip
Stop
8
9
1
0
10
Skip
Stop
5V
Down
9 -1 6
2x(1-8)
Down
On
4
Internal
4
7
2
9
On
Cont.
Start/Stop Reset
Jump
Off
Jump
Off
Jump
5
Step
Cont.
Function
6
7
3
8
1
On
Cont.
Pulsewidth
6
3
Midi/USB
On
Cont.
Clock
Sync
1-8
Combi
Off
Jump
Off
Jump
Off
Jump
Off
Jump
On
Link
External
0
-1
1 -8
Up
OffUp
2V
0
-1
1V
Cont.
On
Direction
1-16
9 -1 6
+1
Cont.
On
Quantize
Random
Range
Random
1 -8
+1
Cont.
On
Transpose
Scale
Cont.
On
Off
Off
Jump
The sequence is running from step 2 to step 6 (first and last steps on ”Jump”-position). Step 5 will
not generate a trigger-signal (”Skip"). Step 4 (also on ”Jump”-position) does not affect the sequence.
2
8
9
1
Using these pretty simple settings, you may create quite interesting and ever-changing complex musical
patterns. You may completely ”reprogram” the sequence by just the flick of a switch or two. Give it a try and
you will get an idea why analog sequencers enjoy great popularity, especially within live electronic music
contexts. Once you have got the hang of it, you will get great results and endless hours of sequencing
excitement.
•
LED
The status LED will light up when the corresponding step has been reached and
show the current position of the sequence.
0
10
Divide
•
0
10
Shuffle
Step-knob
– This control determines the pitch of the respective step. The behavior of this pot
(and all other step controls) depends on the settings of the ”Range” and
”Quantize” switches. More about this in chapter 3.1.3., ”Sequence Control” on
page 12.
– In Custom mode, the lower eight step controls determine the individual gate time
for the corresponding upper eight steps. You will find a description in
chapter 3.1.5., ”Individual Gate Time for Steps 1 – 8” on page 15.
3.1.2. CV/Gate output sockets
Each step set to ”on” will generate several signals at a time when active. These can be tapped from the
sockets on the rear interface panel of Dark Time. They can be used to control other sound sources
connected.
•
Gate 1 / 2 Out
– Gate 1 Out delivers gate signals of steps 1 – 8 (+5V).
– Gate 2 Out delivers gate signals of steps 9 – 16 (+5V).
•
CV 1 Out / CV 2 Out
– CV 1 Out delivers control voltage of steps 1 – 8.
– CV 2 Out delivers control voltage of steps 9 – 16.
11
DOEPFER
Dark time
Functions
3.1.3. Sequence Control
The sequence control functions allow control over the previously programmed sequence. They determine
or alter pitch and / or the playback order of the step registers.
•
•
•
•
•
Transpose
With these switches you can transpose both registers of the sequence up or down by one octave. The switch on the left addresses steps 1 – 8, the switch on the right addresses steps 9 – 16.
Range
This switch determines the control voltage range and thus the pitch range that is covered by one
entire turn of a step control. You may select between 1 Volt, 2 Volts and 5 Volts. If the synthesizer connected works with a control scaling of 1V/octave, these voltages are equivalent to a range of one, two, or five octaves.
Quantize
When this switch is set to ”Off”, the step controls will be almost continuously variable within the range determined by the ”Range” switch. We use the term ’almost’ since it is still stepped digitally, but into 1024 very small increments which are – in effect – continuous and barely noticeable.
Set to ”On”, the control voltage range gets scaled. That means, it is sliced into discrete steps that are equivalents of musical semitones. The number of chromatic steps, i. e. semitones that are covered by one entire turn of a step control is again determined by the setting of the ”Range” switch. When set to ”1V”, the step controls are quantized into 13 discrete semitones (one octave, or – to be more precise – a ”ninth” interval; e.g. ”c” to ”C”). ”2V” means 25 semitones (two octaves) and ”5V” means 61 semitones (five octaves).
”Scale” will be used for future updates. Stay tuned.
You will find some information and additional ideas dealing with this topic in chapter 4, “Nuts and
bolts of analog sequencing“, and in section 4.2.2., ” Programming melodies into the step sequencer” on page 23.
Direction
Use these switches to determine the playback order for both step registers independently. The left-hand switch addresses steps 1 – 8, the right-hand switch addresses steps 9 – 16. In ”Up”
position, the respective register will run forward, in ”Down” position backward. ”Random” will address steps in random order (would you have guessed?).
Link
Use these switches to run both step registers in parallel (”2x(1-8)”) or serial (”1-16”) mode. ”2x(1-8)”
will generate two sequences of eight steps maximum, running in parallel, ”1-16” will generate one sequence of 16 steps maximum.
”Custom” allows the programming of individual gate time settings for each of the steps of the upper register.
You will find a detailed description in section 3.1.5. ”Individual Gate LengthTime for Steps 1 – 8” on
page 15.
12
DOEPFER
Functions
Dark time
3.1.4. Tempo / Timing
The following controls give access to tempo and timing of the sequence. You will find a shuffle function and
the option to program individual gate time settings for the upper register.
•
Sync switch
The sync switch determines the clock source for Dark Time’s tempo control. Set to ”Internal”, Dark
Time will internally generate a clock signal of its own. The Clock pot controls the clock rate, the gate
time can be varied using the Pulsewidth control (see below). The Transport keys of Dark Time are
also active.
Set to ”External”, the tempo is controlled by an external clock signal coming in via the Clk-In
socket. Dark Time’s Clock and Pulsewidth controls will not be active in this case. The Transport
keys will still be active, though.
Set to ”MIDI/USB”, the tempo is controlled by a MIDI clock signal coming in via the MIDI-In socket
or the USB-port. The Clock control of Dark Time will not be active in this case. The Pulsewidth
control will remain active and allow to set the gate time as well as the shuffle amount (see below).
The Transport buttons will also remain active.
You will find more details concerning the synchronization of Dark Times in section
3.2., ”Synchronization and remote control of Dark Time” on page 16.
•
Clock control/ Function key
Clock:
This control determines the speed of the sequence when the Sync switch is set to ”Internal”
position. When set to ”External” or ”MIDI/USB”, the Clock control will not be active.
Divide:
As a second function, the Clock control allows to set the clock divider. To determine a specific
clock divider ratio, keep the Function key pressed and turn the Clock control. You will notice the
Step status LEDs 1 to 14 light up one by one. The highest number lit up corresponds to the clock
divider ratio, listed in the chart on the following page.
Please bear in mind that the clock divider is only available when the Sync switch is in ”Internal” or
“Midi/USB”-position.
Clock-divider:
1/8 Note
13
Clock-divider note-value
Functions
Dark time
DOEPFER
Number of lighted
Step-LEDs
•
1/2
2
1/4.
3
1/4
4
1/8.
5
1/8
6
1/16.
7
1/4T
8
1/16
9
1/8T
10
1/32
11
1/16T
12
1/64
13
1/128
14
Pulswidth-control / Function-key
Pulswidth:
This control determines the duration of gate signals, generated by all active steps resp. their
note values. Turned fully counter-clockwise, the single steps will appear as short pulses. Turned
fully clockwise, they will be played almost in ”legato” fashion.
The duration of the gate signals is also dependent on the settings of the clock divider (please refer
to the chart above).
Pulswidth
Clock-Rate
narrow
broad
The audible result of the different gate lengths depends a lot on the setting of the relevant
parameters on the synthesizer connected: A short and percussive sound with a percussive
envelope setting will still produce a short and percussive sound, even at high gate length settings. In
contrast, a sustained sound with long decay and release settings will not be interrupted by a short
gate length or a low pulse width value respectively. In any case the pulse width value can be an
important part of the sound of the sequence. Feel free to experiment!
Shuffle:
As well as the Clock control, the Pulsewidth pot yields control over a second function:
Connected to the Function key, it is used to set the amount of the shuffle function. This
function will delay some steps a bit by a certain factor in order to add more ”groove” or ”swing” to
the sequence.
To set the Shuffle amount, keep the Function key pressed and turn the Pulsewidth control. The
more you turn the Pulsewidth control clockwise, the more the sequence will get shuffled. You will
hear the increasing shift in the timing of the rhythm easily.
Please bear in mind that the Pulsewidth and Shuffle functions are only available when the
Sync switch is in ”Internal” or ”MIDI/USB”-position.
14
Functions
Dark time
DOEPFER
3.1.5. Individual gate length for steps 1 to 8:
As you already know, the Pulsewidth control sets the gate time. This setting affects all steps by the same
factor. Now you will learn how to program individual gate time settings for each of the steps 1 to 8 (upper
register).
This function is enabled by the ”Custom” setting of the Link switch.
•
Set the Link switch to ”Custom” position.
•
Simply turn the step controls of the lower register to program individual gate time settings for the
corresponding steps of the upper register, e.g. use step pot 9 to adjust the gate time of step 1 and
so on. In this mode, the setting of the gate time is continuously variable, i. e. it is not dependent on
the clock divider settings.
DOEPFER
DARK TIME
On
Cont.
Transpose
1 -8
+1
Range
9 -1 6
+1
0
-1
1 -8
Up
On
Down
Stop
Cont.
Cont.
On
Internal
4
Stop
5
On
9
0
10
Divide
Jump
Off
9
0
Cont.
Start/Stop Reset
10
Skip
Stop
On
Step
Cont.
Function
6
7
8 2
1
Jump
Skip
3
7
2
Off
Jump
Stop
Pulsewidth
6
3
10
Cont.
On
Clock
4
Midi/USB
Skip
0
8
1
9
10
Jump
Skip
Sync
1-8
Combi
Off
Jump
Off
Off
Link
9 -1 6
2x(1-8)
2x(1-8
Down
Stop
On
Cont.
Direction
OffUp
2V
5V
On
Cont.
Skip
7
8 2
1
9
0
6
3
7
Off
Stop
10
Cont.
4
8 2
1
9
0
On
6
3
10
Stop
Jump
Skip
10
8
0
Cont.
4
7
9
Skip
Off
Stop
1
9
0
On
6
8 2
7
1
10
Stop
Jump
10
Quantize
1V
0
-1
0
9
0
Cont.
3
7
1
Skip
4
6
3
8 2
10
Stop
On
6
8 2
1
9
10
0
4
7
2
9
Skip
Cont.
3
7
8 2
Jump
Off
On
Skip
3
7
Random
Stop
4
Jump
Skip
On
6
1
9
0
Jump
10
Cont.
4
8 2
1
9
0
On
6
Scale
1
Cont.
4
1
10
Stop
Skip
On
3
7
8 2
0
10
Stop
Skip
8
Off
6
9
6
3
7
Jump
Cont.
3
7
0
1
Jump
10
Stop
4
8 2
Off
4
3
0
Skip
9
6
3
7
Jump
On
6
2
10
1
4
2
External
Cont.
4
8
9
Stop
Off
Off
On
1
6
3
7
2
Jump
0
Skip
8
4
Off
9
6
3
7
Off
10
Stop
1
Jump
0
Skip
4
8 2
Jump
9
6
3
7
8 2
1
Step-lenght
4
Off
Pitch
3
7
2
6
Off
3
4
1-16
6
Random
4
8
9
1
0
10
Shuffle
”1-8 Combi“
3.1.6. Transport keys
These three keys control the so-called transport functions of Dark Time.
•
Start/Stop key
Hitting the Start/Stop key once will get the sequencer going. Hitting it once
again, the sequencer will stop. The next hit will restart the sequence and play
back will continue from where it was stopped. In other words: If the sequence
was stopped on step 8, the sequence will continue from step 9 when hitting
Start/Stop.
•
Reset key
Hitting the Reset key will reset the sequence to the first active step. This can
be step 1 (1-16 mode), step 1 and 9 (2x(1-8) mode) or any step in ”jump”
position which determines the current starting point of the sequence.
•
Step key
The first hit will activate the Step key function. Each new hit on this key will
make the register skip one step forward to the next step available. This way
you can step through the sequence manually. Hitting the Reset key will quit
this function.
15
Functions
Dark time
DOEPFER
3.2. Synchronization and remote control of Dark Time
Dark Time offers a bunch of useful interfacing options to communicate with external gear. You are not only
restricted to playing MIDI and/or CV/gate-based synthesizers connected to Dark Time, you may also
synchronize it to other external instruments and even remote-control some of its functions. This will be
achieved through the MIDI and analog interfaces of Dark Time.
All functions covering this topic will be discussed in this chapter and you will finally find detailed explanations of functions that have only been discussed briefly so far. Here we will quench your thirst for more.
3.2.1. MIDI-Interface
Dark Time sends and receives MIDI data via USB port or DIN sockets. Please
do not use both in parallel as unpredictable and undesirable effects may result.
Please refer to page 7 in the first chapter of this manual concerning the hookup of Dark Time’s MIDI connections.
Sending and receiving MIDI notes
Each active step of Dark Time generates and sends MIDI note messages. They are made up of a note-on
and a note-off command as well as a MIDI note number. They will define pitch (i. e. note name / number)
and note length. These data are channel-related, which means that they will be assigned to and transmitted
on one (or more) of the 16 existing MIDI channels.
Both step registers of Dark Time independently allow to transmit MIDI data on different MIDI channels. This
way you can control two sound generators simultaneously.
Dark Time also receives MIDI data: Connect a MIDI keyboard or a controller to Dark Time’s MIDI-In socket
(or USB port) and transpose the sequence on the fly while it is chugging away.
MIDI-Soundsource
Dark Time
DOEPFER
DARK ENERGY
up
5
Frequ.
3
7
4
5
3
LFO1
7
9
0
Source
2
4
10
5
XFM
3
7
off
1
9
0
4
PW
1
9
0
Shape
7
4
1
4
LFO2
7
2
9
0
LFO1
7
4
8
VCO PW
VCF F
2
0
4
8
9
0
10
Sustain
7
8
9
1
7
3
9
0
10
4
8
off
1
6
3
Frequ.
10
Release
6
7
2
9
0
7
4
1
6
1
7
3
medium
8
10
8
1
9
0
10
Inputs
VCO F
2
Frequ.
3
Shape
10
Decay
3
8
9
0
9
4
off
low
10
1
0
1
ADSR
8
2
AM
3
Shape
Range
9
0
Attack
3
8
9
5
10
off
LFO2
7
Envelope
Amp
7
4
medium
10
5 Res
1
ADSR
10
LFO2
VCA
1
low
9
4
3
off
1
Source
Range
7
0
Source
PWM
Source
4
3
0
LFO1
LFM
1
10
5
medium
8
9
0
low
full
ADSR
10
5
3
off
3
half
off
ADSR
10
5
3
ADSR
Range
Track
off
1
down
FM
VCF
high
4
Octave
8
9
10
2
Step-row 1
VCO
Tune
7
0
high
MIDI-Notedata on
MIDI-channel 1-16
5
1
high
4
3
2
10
Outputs
VCA A
Gate
Ext.
Audio
LFO1
Envelope
Audio
MIDI/USB
DOEPFER
DARK ENERGY
Step-row 2
9
4
Octave
up
5
Frequ.
3
7
1
9
8
0
4
0
Source
FM
3
7
1
9
2
LFO1
4
10
5
XFM
3
7
1
9
off
0
4
PW
0
Shape
7
1
9
4
0
4
7
9
7
9
Source
LFO2
4
10
Source
LFO2
LFO1
0
10
9
8
MIDI/USB
Step-row 1 and/or 2
MIDI-Keyboard
transposes Sequence
16
VCO PW
VCF F
VCA A
8
8
7
9
8
0
4
7
9
8
10
6
1
10
1
0
10
Sustain
3
2
Frequ.
3
off
medium
9
4
9
4
7
0
7
6
1
10
1
0
10
Decay
3
2
Frequ.
3
Shape
9
4
7
Inputs
VCO F
AM
1
0
low
1
0
3
4
8
2
9
10
5
off
medium
8
ADSR
8
Shape
Range
9
Attack
3
7
4
ADSR
Envelope
Amp
off
LFO2
7
VCA
1
low
10
1
4
3
0
Range
5 Res
3
off
0
Source
8
0
PWM
1
medium
LFO1
LFM
1
10
5
3
low
full
ADSR
10
5
3
off
2
half
off
ADSR
10
5
3
ADSR
Range
Track
off
down
10
5
VCF
high
7
2
MIDI-Notedata on
MIDI-channel 1-16
VCO
Tune
high
5
1
high
4
3
2
10
Release
6
3
7
1
9
2
8
0
10
Outputs
Gate
Ext.
Audio
LFO1
Envelope
Audio
Functions
Dark time
DOEPFER
Selecting the MIDI channel:
The default setting is MIDI channel 1 for both registers.
•
•
To change the setting of the MIDI channel for the upper step register, please
– press and hold the ”Function” and ”Start/Stop” keys simultaneously.
– Select the desired MIDI channel by turning the Clock control. The number of step LEDs lit up
will indicate the channel-number (1 - 16).
To change the setting of the MIDI channel for the lower step register, please
– press and hold the ”Function” and ”Reset” keys simultaneously.
– Select the desired MIDI channel by turning the Clock control. The number of step LEDs lit up
will indicate the channel number (1 - 16).
3.2.2. MIDI Clock
You can sync Dark Time with any suitable piece of MIDI gear (e.g. drum machines, software/hardwarebased sequencers etc.). To do this, Dark Time sends and receives MIDI clock data. This is a pulse signal
of 24 pulses per quarter note (24 ppq) which represents the tempo and additional start-/stop- and continuecommands. These data are not related to a specific MIDI channel but global. Settings of a certain send or
receive channel are not required for clock data transmission.
Dark Time as master:
To synchronize an external piece of MIDI gear (e.g. a drum machine) to Dark Time using MIDI clock, simply
set the Sync switch to ”Internal” position. No additional settings are required. Set up the external device
as a ”slave” as described in its own manual. Now Dark Time will control the tempo and start/stop/continue
functions of the slaved unit.
Dark Time as slave:
If an external device is to control Dark Time’s tempo via MIDI clock, it has to be set up as master, with Dark
Time acting as slave. Set Dark Time’s Sync switch to “MIDI/USB”. Dark Time will now obey to incoming
MIDI clock data and respond to external start/stop/continue commands.
If you want to run Dark Time at a precisely defined tempo measured in BPM, it is useful to synchronize
Dark Time to a device that allows tempo adjustment in BPM values.
Dark Time
MIDI-Drumcomputer
MASTER
SLAVE
MIDI-Clock
Sync: Internal
SLAVE
MASTER
MIDI-Clock
Sync: Midi/USB
17
Dark time
DOEPFER
Functions
3.2.3. Analog Interface
Of course, Dark Time allows interaction with non-MIDIed equipment. It will perfectly fit into an analog setup.
The necessary connections can be made via the rear analog interface panel of Dark Time. It sports twelve
1/8” sockets with in- and outputs.
CV/gate outputs:
Let’s have a closer look at the connectors, shown in the figure below. Here, both step registers send out
control voltages and gate signals individually. These signals are necessary to control an external analog
synthesizer.
•
The voltage levels sent out from the CV 1 Out and CV 2 Out sockets depend on the setting of the step controls, the transpose and the range switches. The most common use is controlling the pitch of an external synthesizer. The sockets provide a voltage range between -2V and +10V. Of course these voltages cannot only be used for
controlling the pitch of a synthesizer, but also for controlling other parameters like e.g. filter cut-off frequency, VCA amplitude, you name it.
•
The sockets labeled Gate 1 Out and Gate 2 Out send out – you have already
guessed it – a gate signal, again for each register individually. Active sequencer
positions put out a signal of +5V at these sockets. The duration of a gate signal
depends on the setting of the Pulsewidth control (s. page 14).
Gate
off
on
off
The gate signal triggers the envelope generator of an external analog synthesizer which, in turn, will generate an audible tone as one envelope generator is commonly used to control the amplitude of a VCA.
Since Dark Time puts out control voltage and gate signal of both registers individually, some interesting
tricks can be achieved, e.g.:
•
Control two synthesizers in parallel with two eight-step sequences.
•
Control two different parameters of one synthesizer at the same time.
CV Inputs:
The inputs CV 1 In and CV 2 In take external control voltages within the range of 0V and +5V. These voltages will be added to the voltages generated by the step registers. Both registers may be addressed separately, with CV1 In corresponding to the upper register and CV2 In to the lower.
There are many uses for these inputs, especially in combination with a modular
synthesizer system, e.g. the Doepfer A-100. You may feed dynamic voltages into
these inputs on order to achieve portamento effects or use staircase-type voltages to
transpose the step registers automatically.
18
Functions
Dark time
DOEPFER
Clock connectors:
To synchronize two instruments in the analog domain – e.g. Dark Time and a non-MIDIed vintage drum
machine – a clock signal is needed. A clock signal is a pulse wave, its frequency (pulses per time) determines the tempo of the synchronized device. When active, Dark Time will generate such a clock signal and
make it available at the Clk Out socket.
•
Dark Time as master:
Connect Dark Time’s Clk-Out socket to the clock-in socket of the ”slave” device (e.g. vintage drum computer or another analog sequencer). Set the Sync switch to
position ”Internal”. You will not need any additional settings. Now set up the external device as a ”slave” as described in its manual.
•
Dark Time as slave:
You can also synchronize Dark Time to the tempo of an external device via the Clk In socket. The master device must produce a suitable clock-signal (0/+5V) and has to be connected to Dark Times Clk In socket. Set Dark Time’s Sync switch to
”External”. Its internal clock will now be disabled and driven by the external clock signal instead.
Dark Time
Drummaschine /
Analog-Sequenzer /
Modular-Synthesizer
MASTER
SLAVE
Clock-Signal
Clk Out
Start/Stop/Reset
Signal
St/St, Reset Out
Sync: Internal
SLAVE
MASTER
Clock-Signal
Clk In
Start/Stop/Reset
Signal
St/St, Reset Out
Sync: External
19
DOEPFER
Dark time
Functions
Start/Stop and Reset sockets:
Each time Dark Time is started, stopped or the reset function is performed, the corresponding output socket
(St/St Out or Reset Out) will send a short voltage pulse of +5V.
There are many uses for these signals, especially in combination with a modular
synthesizer system, e.g. the Doepfer A-100. You can trigger envelope generators in
time when Dark Time starts, stops or resets (e.g. the Doepfer modules A-140, A-141,
A-142), synchronize suitable LFOs (e.g. Doepfer A-145) or start/stop additional
sequencers, e.g. another Dark Time. The clock signal described above will ensure
the same rate for all units connected, the start/stop/reset-triggers will make sure that
both units will perform these actions at exactly the same time.
Running two Dark Times the way we have just mentioned suggests that the slave device can be started,
stopped and reset by means of external signals. You have guessed it again – this exactly is the job of the
St/St In and Reset In sockets. As soon as one of these sockets receives a +5V signal, the corresponding
action will be performed.
You are not limited to use start/stop or reset signals of another Dark Time or a drum
machine when you use these sockets. You may use every kind of device that is
capable of putting out a +5V trigger. This can be a suitable footswitch or – again
– specific modules of the Doepfer A-100 modular system (just in case we haven’t
mentioned this one yet).
3.2.4. Dark Time as a simple MIDI-Clock-to-Sync interface
You may use Dark Time as a simple MIDI-Clock-to-Sync interface. When running as a slave, synced to an
external MIDI-clock (master), Dark Time will send a clock signal of 24 pulses per quarter-note from its
Clk-Out socket. You may route this signal to another, non-MIDIed device (e.g. suitably equipped vintage
drum machine or sequencer) in order to synchronize it with the master MIDI device.
It can also be done the other way round: When Dark Time receives an analog clock signal via its Clk-In
socket, a MIDI-clock signal will be available from the MIDI-out socket and the USB-port respectively. You
can use this to synchronize a MIDI device (slave) to an analog clock.
Start/stop and reset signals coming in through Dark Time’s analog interface sockets are also available as
MIDI signals at the MIDI-out socket and the USB-port respectively.
The start-/stop-/continue commands of incoming MIDI data are available as +5V triggers from the St/St Out
and Reset-out sockets of Dark Time. Please refer to the illustration on the following page.
A successful synchronization is only possible when all devices have suitable and matching specifications.
Especially in the field of vintage instruments, there are several manufacturer-related characteristics that
may cause problems. Please accept our sincere apologies that we at Doepfer cannot provide you with any
support if some devices behave unpredictably when hooked up for syncing.
20
Functions
Dark time
DOEPFER
MIDI
Drummaschine /
Sequenzer o.ä.
Drummaschine /
Analog-Sequenzer /
Modular-Synthesizer
Dark Time
SLAVE
MASTER
Clock-Signal
MIDI-Clock
Clk Out
Start/Stop/Reset
Signal
St/St, Reset Out
Sync: Midi/USB
Drummaschine /
Analog-Sequenzer /
Modular-Synthesizer
MIDI
Drummaschine /
Sequenzer o.ä.
Dark Time
SLAVE
MASTER
Clock-Signal
MIDI-Clock
Clk In
Start/Stop/Reset
Signal
St/St, Reset In
Sync: External
3.3. Firmware Update
Dark Times firmware can easily be updated via USB. In case a new firmware version is available, you can
download it from our website (www.doepfer.de). A detailed description of the update process can be found
in the additional technical description of Dark Time. You can download this documentation here:
www.doepfer.de -> Products -> Dark Time -> Additional technical documentation
21
DOEPFER
Dark time
Nuts and bolds of sequencing
4. The Nuts and Bolts of analog Sequencing
In case step sequencers – or sequencers in general – are new to you, please read this section thoroughly.
You will learn about the nuts and bolts of these machines that will help you to grasp Dark Time’s nasty (well,
sort of…) little secrets fully.
If you are an expert already, the study of the following section is not a must-read, but maybe at least entertaining in some ways (we have tried our best not to bore you to tears, mind you). So please feel free to
continue… or not.
4.1. A very brief history of step sequencers
Since the 18th century, mostly clockmakers and makers of mechanical musical instruments have tried to
create devices which would generate tonal and musical patterns automatically. The musical boxes of those
days of yore could be called the great-grandfathers of modern sequencers.
Of course it was not possible to alter an existing pattern and if so, only with
a lot of technical effort. Changing the pattern was out of the question once
it had been cast in brass cylinders, etched into iron disks, or punched into
cards (did we hear you say steam calliope or player piano?). By the mid20th century, electronics had become widely available for generating sound
but were only used by universities, broadcasters, and the military. In the
1960s Robert Moog and Donald Buchla devised the use of voltage-control
for sound-generating modules independently of each other, and the situation changed quickly: All important parameters of a sound like pitch, timbre,
duration, and level could now be controlled in a relatively easy way by a
handful of low voltages and a bunch of cables, knobs and switches. The
dream of the automated musical instrument that had been around for centuries suddenly was within an arm’s reach. All that was needed was a device
that generated a continuous ”sequence” of voltages to control a series of
pitches. The step sequencer was born.
4.2. „Less is more“, or: Some good reasons for using a step sequencer
Of course we all know that digitalization of musical data is pretty easy and a very common thing to do these
days. Storage and retrieval of complex musical literature (no matter whether a pop song or a symphony) is
possible by today’s technical achievements. Even the performance of a skilled piano player can be recorded and stored in an adequately equipped (software-) sequencer and played back by a computer. So
why would we want to mess around with such an anachronistic thing that is just capable of storing sixteen
notes at a time by setting a couple of controls manually? Quite simple: The majority of interesting genres
of electronic music is still characterized by the minimalist trademark rhythm of step sequences with just a
limited number of stages. Think of the ”Cosmic Couriers” of the early 1970s, the repetitive ”robot”-sound of
the proto-techno era, the ”acid”-tracks of the 1990s, or the minimal-techno productions of today. The repetitive rhythm of a step sequencer is still an absolutely essential and important stylistic element of many,
many genres of electronic music. It lives from the restriction to absolute simplicity and the hypnotic effect of
endlessly repeating patterns that were and still are the trademark of this music. Thus the step sequencer is,
despite of all its alleged limitations, as important today as it was when it was first introduced.
22
DOEPFER
Dark time
Nuts and bolds of sequencing
4.2.1. Squeezing more music out of eight notes
When working with a step sequencer, it would be a wise move to get rid of old-fashioned ways of songwriting and all theory of melody and harmony first. The step sequencer is made for tactile and sensual
experience and hands-on experimentation. What might seem to be quite abstract and technical at first sight
will soon become very special qualities in their own right – far removed from traditional keys and notes. And
that’s what it’s all about: You will get musical results that would not have been possible by the use of
traditional ways of songwriting on a ”real” (read: „traditional“) instrument, a piece of sheet music or even a
computer. The desired repetitive elements, the subtle evolution within patterns, and finally the equality of
melody and timbre will come into being almost automatically.
This opens up one more important perspective – the somewhat ”technical” and apparently ”unmusical” interface of a step sequencer gives you direct hands-on access to each step of the pattern. A device like Dark
Time enables the artist to interact with musical patterns in many ways by just hitting one or two controls or
flicking a switch. No need to mess around with a mouse, editing-windows, and QWERTY keyboards.
Apart from that, you are always free to record a rocking pattern into your computer sequencer in order to
use it as a part of a bigger composition and to free up Dark Time for creating new and even more rocking
patterns.
Another interesting aspect is the fact that you cannot only use your step sequencer to control pitch but also
the parameters of a sound of an external synthesizer in the same intuitive way– e.g. the cutoff frequency of
its filter. Dark Time’s ”Range” switch produces all voltage ranges that are useful in conjunction with analog
synthesizers.
Dark Time is capable of addressing two registers of eight steps each in parallel. So two parameters of a
sound can be accessed independently, e.g. pitch and filter frequency, volume and timbre etc. Now let two
registers run against each other or one of them controlled randomly, play with the jump function and so on.
The sequencer will become a pattern-based sound generator!
23
Dark time
DOEPFER
Nuts and bolds of sequencing
4.2.2. Programming melodies into the step sequencer
Of course it is possible to enter tonal melodies into a step sequencer like Dark Time – you should simply
bear some conceptual differences in mind when it comes to using a sequencer vs. a traditional keyboard.
For the time being we would like to have a closer look at some fundamentals of programming melodies into
a step sequencer. Let’s keep Dark Time’s specifications in mind for this.
When sitting down in front of a keyboard instrument, e.g. a piano, its entire range of notes of up to seven
octaves is spread out in front of you. You will be able to easily grasp the position of each note at a glimpse.
Each key generates one tone with a specific frequency resp. specific pitch at a time which corresponds to a
note name, clearly defined in our occidental system of writing music.
In most cases you will play a synthesizer from a traditional keyboard also – at first sight the outset is the
same. But often you have the ability to detune the instrument continuously over a much wider range by just
one turn of a knob. If you do so, the pitch of a played key (e.g. ”C”) will not necessarily correspond to the
pitch actually audible.
An electronic instrument – let’s say, a synthesizer – is not
restricted to keys, organised in semitones when it comes
to determining the pitch. You may also use knobs – as
your Dark Time does. When turning one of the sixteen
step controls on Dark Time’s front panel, the control
voltage produced by the corresponding step is changed
and thus the pitch played by the synthesizer connected.
Since the knobs work continuously, the programming
of the pitch is not restricted to semitones. You can also
obtain all sorts of pitches ”in between”. So it is very easy
to create atonal patterns or microtonal changes.
In most cases, though, you might want to create tonal
patterns that are matching our well-known tonal system
we have grown accustomed to. If you are lucky to call a
sensitive ear and perfect pitch your own, you simply have
to tune your synthesizer correctly and tune the desired pitches ”by ear” using the controls. If your ears are
only average – nothing to be ashamed of –, an electronic chromatic tuner is a very good tuning aid.
Now Dark Time’s Range switch comes into play: In 1V position, a full turn of a step control covers a range
of twelve semitones, thus one octave. This ratio was determined by the first analog synthesizers on the
market. Shifting control voltages by one volt would result in pitch changing by one octave. This ratio, named
”scaling”, became a standard very soon and it still is today. Exceptions from the rule were some vintage
Japanese units (e.g. by Korg and Yamaha) that used an alternative method of scaling and interfacing.
Range
1 Oktave
2 Oktaven
5 Oktaven
1V
2V
5V
When setting Dark Time’s Range switch to another position (like 2V or 5V), a full turn of a step control will yield a
wider control voltage range and thus cover a wider range
of notes. Finding a desired note will become more difficult
then, though. Enjoy finding those you weren’t exactly
looking for.
Of course you are not restricted to controlling the pitch
of an external sound source by Dark Time. Feel free to
control all other parameters of your synthesizer that has
inputs for control voltages, e.g. filter, volume, envelope
settings and many more. Using different voltage ranges is
especially useful with this kind of application.
24
DOEPFER
Dark time
Nuts and bolds of sequencing
Let’s come back to the programming of tonal patterns again. Using a continuously variable control, labeled ”1-10”, would not seem to be the best tool for determining musical pitch. That is because it would
not exactly resemble a specific pitch or note. Dark Time’s function named ”quantize” is a handy little
helper. Set to ”on”, the step controls won’t be continuously variable anymore. The range of control voltages will be ”sliced” into semitones. Their number will depend on the setting of the range switch (1V = 13
semitones/1octave – or to be precise, a ’ninth’ which is e.g. from ”c” to “”c‘ ” or 13 semitones respectively;
2V = 25 semitones/2octaves; 5V = 61 semitones/5 octaves). Now it will be relatively easy to distinguish the
notes of an octave by ear – at least in the 1V- and 2V-settings.
Dark Time’s transpose switches can be used to transpose both step registers up or down by one octave.
You may also use an external control voltage, connected to the CV1 In and CV2 In sockets to shift the pitch
of both registers independently. A keyboard with discrete semitones will work, as well as another control
voltage source, e.g. an LFO, that generates continuous voltages. You may also use a MIDI keyboard or a
MIDI controller for this purpose and connect it to Dark Time’s MIDI-In socket or the USB port (do not forget
to set the MIDI-channel number…. see page 17).
Making music with a step sequencer like Dark Time is much more intuitive and much easier than you might
expect after having read the last couple of pages. You will certainly grow comfortable with this very exciting
way of musical performance the more you practice. The best way of practising still is having fun and enjoying yourself.
Anyway, we wish you lots of fun and success when exploring your Dark Time!
25
DOEPFER
Dark time
Adendum
5. Appendix
Service and terms of warranty.
Concerning service and warranty conditions, please refer to our terms of business.
You will find our terms of business at:
www.doepfer.de
Doepfer Musikelektronic GmbH
Geigerstr. 13
D-82166 Gräfelfing / Deutschland
EG Conformity
Für das als Doepfer Musikelektronik GmbH „Dark Time“ bezeichnete Produkt wird hiermit bestätigt, dass es den
Schutzanforderungen entspricht, die in der Richtlinie 89/336/FWG des Rates zur Angleichung der Rechtsvorschriften der
Mitgliedsstatten über die elektromagnetische Verträglichkeit festgelegt sind. Es entspricht außerdem den Vorschriften des Gesetzes
über die elektromagnetische Verträglichkeit von Geräten (EMVG) vom 30. 08. 1995. Zur Beurteilung des Produkts wurden folgende
harmonisierende Normen herangezogen:
EM 50 082-1: 1992, EN 50 081-1 : 1992, EN60065 : 1995
Please refer to our website „terms of business“.
Disposal
This device complies to the EU guidelines and is manufactured RoHS conform without the use of led, mercury, cadmium and
chrome. Still, this device is special waste and disposal in household waste is not permitted.
For disposal, please contact your dealer or :
Doepfer Musikelektronik GmbH, Geigerstr. 13, D-82166 Gräfelfing / Deutschland
IMPRINT
Owners Manual by Matthias Fuchs / VISOPHON, Berlin, Germany
English version tweaked and adjusted by Stephen Parsick / doombient music, Bielefeld, Germany
Copying, distribution or any commercial use in any way is prohibited and needs the written permission by the manufacturer.
Specifications subject to change without notice.
Although the content of this owners manual has been thoroughly checked for errors, Doepfer Musikelektronik GmbH cannot
guarantee that it is error-free throughout. Doepfer Musikelektronik GmbH cannot be held liable for any misleading or incorrect
information within this guide.
doepfer
Doepfer Musikelektronik GmbH
Geigerstr. 13
D-82166 Gräfelfing / Deutschland
www.doepfer.de
All rights reserved ©2010 Doepfer Musikelektronik GmbH
26
Dark Time
DOEPFER MUSIKELEKTRONIK GmbH