1
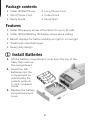
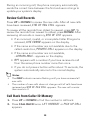
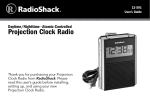
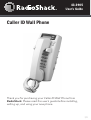
43-3905
User’s Guide
Caller ID Wall Phone
Thank you for purchasing your Caller ID Wall Phone from
RadioShack. Please read this user’s guide before installing,
setting up, and using your new phone.
2/3
Package contents
• Caller ID Wall Phone • Long Phone Cord
• Short Phone Cord • Coiled Cord
• User’s Guide
• Quick Start
Features
• Caller ID memory stores information for up to 99 calls
• Caller ID/Call Waiting ID display shows who’s calling
• Backlit displays for better visibility at night or in low light
• Traditional metal bell ringer
• Heavy duty design
1 Install Batteries
1. Lift the battery compartment cover from the top of the
base, then remove
the compartment.
2. Insert four AA
batteries into the
compartment as
indicated by the
polarity symbols
(+ and –) marked
inside.
AA
AA
3. Replace the battery
compartment and
cover.
2
AA
AA
b Battery Notes:
•
•
•
•
•
•
•
•
During battery replacement, keep the line cord plugged in and
replace the batteries within two minutes to maintain Caller ID
memory.
When the low battery icon appears or the display dims, replace the
batteries.
Make sure the batteries fit tightly in the battery compartment.
Dispose of old batteries promptly and properly.
Do not burn or bury batteries.
Use only fresh batteries of the required size and recommended
type.
Do not mix old and new batteries, different types of batteries
(standard, alkaline, or rechargeable), or rechargeable batteries of
different capacities.
If you do not plan to use the phone for two weeks or longer,
remove the batteries. Batteries can leak chemicals that can destroy
electronic parts.
2 Install Your Phone
You can mount your phone on a wall plate, a wall, or place it on
a desk or table.
To mount the phone to a wall plate:
1. Plug one end of the
supplied short modular cord
into the LINE jack at the
back of the base.
2. Plug the other end of the
cord into the wall plate jack.
3. Align the base’s keyhole
slots with the wall plate
studs and slide the phone
downward to secure it.
3
To mount the phone directly on a wall:
1. Drill two holes 3.25 inches (83 mm) apart, one below the
other.
2. Thread a screw into
each hole, letting the
heads extend about
0.2 inch (5mm) from
the wall.
0.2”(5mm)
3. Plug one end of
the supplied long
modular cord into the
LINE jack at the back
of the base.
3.25”
(83mm)
4. Align the base’s
keyhole slots with the
installed screws and slide the phone downward to secure it.
To connect the handset, plug one end of the supplied coiled
cord into the handset’s modular jack. Then connect it to the jack
on the left bottom of the base.
n Notes:
•
Your local RadioShack store sells a variety of longer coiled handset
cords, which are especially useful when you mount the phone on a
wall.
•
If your home has specially wired alarm equipment connected to
the telephone line, ensure the installation of this system does not
disable your alarm equipment. If you have questions about what
will disable alarm equipment, consult your telephone company or
a qualified installer.
•
Select a location for your telephone that is near a telephone jack
and not in the way of normal activities in the area.
•
Your telephone connects directly to a modular telephone line
jack. If your telephone wiring does not have a modular jack, you
can update the wiring yourself using jacks and adapters (available
4
3-line Display
Shows name,
number, date and
time of incoming
calls.
NEW
Flashes when you have
new calls.
DELETE
Erases Caller ID
information.
CALL BACK
Calls back the number
shown on Caller ID.
UP/DOWN
Scroll through Caller ID
records.
M/S (Master/Secondary)
Set to M.
TONE/PULSE
Set the dial mode for
your phone system.
VOLUME NORM/HI
Set the call volume level.
RINGER OFF/LO/HIGH
Set the ringer volume or
turn the ringer off.
5
at your local RadioShack store), or have the telephone company
update the wiring for you. You must use compatible modular jacks
that are compliant with Part 68 of FCC Rules and the requirements
adopted by the ACTA. The telephone cord and modular plug
provided is Part 68 compliant for connecting to the telephone
company network.
3 Set Phone Options
Phone Settings
1. Hold down both UP and DOWN for about four seconds
until ENTER LANGUAGE, then ENG ESP FRA appear, with
ENG flashing.
2. Press UP or DOWN to select the desired language, then
press DELETE to confirm. LCD CONTRAST and 1 2 3 4 5
appear on the display, with 3 flashing.
3. Press UP or DOWN to select the contrast level (1-5), and
press DELETE to confirm. ENTER AREA CODE appears, then
_ _ _ appears, with the first _ flashing.
4. Press UP or DOWN to select the first number of the area
code, and press DELETE to confirm the selection. The
flashing _ goes to the next digit.
5. Repeat step 4 to set the second and third digits.
Ringer
If you do not want to hear the phone ring, slide RINGER to
OFF. You can still make calls with the ringer off, and you can still
answer calls if you hear another phone on the same line ring. If
you want to hear the phone ring, set RINGER to HI or LO.
6
Dial Mode
Slide TONE/PULSE to the setting for the type of dialing service
you have. If you are not sure which type you have, do this
simple test.
1. Slide TONE/PULSE to TONE. Lift the handset and listen for
a dial tone.
2. Press any number except 0. (If your setup requires that you
dial an access code, usually 9, before you dial an outside
number, do not press the access code number.)
• If the dial tone stops, you have touchtone service. Keep
the switch on TONE.
• If the dial tone continues, you have pulse service. Set
the switch to PULSE.
Using Special Tone Services
Some computer services require tone signals for communications.
If you have pulse service, you can still simulate tone signals by
following these steps.
1. Connect to the special service using pulse dialing.
2. When the special service answers, press * to temporarily
switch to tone dialing.
3. When you complete the call, hang up to change the setting
back to PULSE.
Master/Secondary Setting
For modern phones systems, slide M/S to M.
n Notes:
•
•
If you have other phones with a Master/Secondary switch, set them
to S. Set one system to answer and set the others to off.
If M is not set on at least one phone, incoming calls might be
disconnected.
7
•
•
Do not connect more than four Caller ID modules (including this
phone) that do not have Call Waiting to the same phone line.
If you connect another type of Caller ID module that has Call
Waiting to the same phone line as your system, the Call Waiting
signal might be garbled or not received.
Operation
Making a Call
1. Pick up the handset and wait for a dial tone.
2. Use the keypad to enter the number you wish to dial. The
number appears on the display.
3. When you complete your call, hang up the handset. A few
seconds later, the number disappears, and the display
returns to normal.
n Note: If you dial a number over 15 digits, only the last 14
digits appear on the display.
Receiving a Call
When you receive a call, the phone rings and the NEW indicator
flashes. CALL# and the caller’s number appear on the display. To
answer the call, pick up the handset.
Timer
This phone is designed with a clock timer to count the offhook time in seconds, up to one hour. The timer appears on
the display and starts to count up when you dial a number or
answer an incoming call.
n
Note: If you lift the handset and don’t dial a number, the timer
appears and starts to count up after 10 seconds.
8
Using Flash
If you have Call Waiting, press FLASH to answer an incoming
call without disconnecting the current call. Press FLASH again
to return to the first call.
n
Note: If you do not have Call Waiting, pressing FLASH might
disconnect the current call.
Using Redial
To redial the last number you called, pick up the handset and
press REDIAL when you hear a dial tone. The number scrolls
across the display, and the phone automatically dials it.
n
Note: The redial memory holds up to 32 digits, so you can redial
long distance as well as local phone numbers.
Using Pause
Some telephone systems require you to dial an access code
(usually 9) and wait for a second dial tone before dialing an
outside number. When you manually dial a number, you can
have your telephone pause anywhere during the dialing
sequence. Simply press PAUSE at the desired location.
When you redial a number, the telephone pauses for about four
seconds at the pause entry. For longer pauses, press PAUSE
again.
Caller ID Operation
If you subscribe to a Caller ID service, the phone automatically
displays information about calls you receive and stores the
information in Caller ID memory. The system can store up to 99
incoming phone numbers or 64 incoming phone numbers with
names into call records.
9
During an incoming call, the phone company automatically
sends the correct time between the first and second rings to
update your system’s display.
Review Call Records
Press UP or DOWN to review the new calls. After all new calls
have been reviewed, END OF NEW CALL appears.
To review all the records from oldest to newest, press UP. To
review the records from newest to oldest, press DOWN. After
reviewing all records in memory, END OF LIST appears.
• If an incorrect, invalid, or incomplete Caller ID signal is
received, LINE ERROR appears on the display.
• If the name and number are not available due to the
caller’s restriction, PRIVATE CALL appears on the display.
• If the name and number are not available,
--UNAVAILABLE-- appears on the display.
• RPT appears with a number if you have received a call
from the same phone number more than once.
• If you do not press a button within about 15 seconds, the
system automatically returns to the normal display.
n Notes:
•
•
The NEW indicator remains flashing until you have reviewed all
new calls.
The number of new calls does not change until all calls have been
reviewed and END OF NEW CALL appears. The new call counter
then resets to 0.
Call Back from Caller ID Memory
1. Press UP or DOWN to find the number to call back.
2. Press CALL BACK twice. LIFT HANDSET or PICK UP CALL
appears.
10
3. Lift the handset, and the number is redialed automatically.
Follow these steps to select one of the options for Caller ID
call back.
1. Press UP or DOWN to find the Caller ID memory location
to be redialed.
2. Press CALL BACK. The 7- or 11-digit number flashes.
3. Press UP or DOWN to select one of the four options.
Option 1 1 + Area Code + 7-digit number (11 digits)
Option 2 1+7-digit number (8 digits)
Option 3 Area Code + 7-digit number (10 digits)
Option 4 7-digit number
4. Press CALL BACK again to confirm.
5. Pick up the handset, and the selected number is dialed
automatically.
Delete Call Records
You can select and delete an individual call record, or all call
records stored in the system.
• To delete a single call record, press UP or DOWN until the
call record you want to delete appears. Press DELETE twice.
The call record is deleted, and the system automatically
renumbers the remaining call records.
• To delete all call records after all new calls have been
reviewed, hold down DELETE for about three seconds.
ERASE ALL CALLS appears. Press DELETE. The system
deletes all call records. NO CALLS appears, and then TOTAL:
00 NEW: 00 appears.
n Notes:
•
When the phone’s memory is full, it automatically replaces the
oldest call record with the newest incoming call.
11
•
If you do not press any button within about 15 seconds while
ERASE ALL CALLS appears on the display, the phone automatically
returns to normal display and the records are not deleted.
Additional Information
Important Safety Information
When using your telephone equipment, basic safety
precautions should always be followed to reduce the risk of fire,
electric shock and injury to persons, including the following:
• Do not use this product near water, for example, near a
bath tub, wash bowl, kitchen sink or laundry tub, in a wet
basement or near a swimming pool.
• Avoid using a telephone (other than a cordless type) during
an electrical storm. There may be a remote risk of electric
shock from lightning.
• Do not use the telephone to report a gas leak in the vicinity
of the leak.
• Handle the phone carefully. Do not drop it.
• Do not use or store the phone in extreme temperatures.
Service and Repair
If your telephone is not performing as it should, take it to your
local RadioShack store for assistance. To locate your nearest
RadioShack, use the store locator feature on Radioshack’s
website (www.radioshack.com), or call 1-800-THE SHACK (8437422) and follow the menu options. Modifying or tampering
with the telephone’s internal components can cause a
malfunction and might invalidate its warranty and void your
FCC authorization to operate it.
12
Surge Protection
Your telephone has built-in protection circuits to reduce the
risk of damage from surges in telephone line and power line
current. These protection circuits meet or exceed the FCC
requirements. However, lightning striking the telephone or
power lines can damage your telephone. Lightning damage is
not common. Nevertheless, if you live in an area that has severe
electrical storms, we suggest that you unplug your phone when
storms approach to reduce the possibility of damage.
FCC Information
FCC Part 15
This equipment has been tested and found to comply with the limits for a Class B digital device, pursuant
to Part 15 of the FCC Rules. These limits are designed to provide reasonable protection against harmful
interference in a residential installation. This equipment generates, uses, and can radiate radio frequency
energy and, if not installed and used in accordance with the instructions, may cause harmful interference
to radio communications. However, there is no guarantee that interference will not occur in a particular
installation. If this equipment does cause harmful interference to radio or television reception, which can be
determined by turning the equipment off and on, the user is encouraged to try to correct the interference
by one or more of the following measures:
• Reorient or relocate the receiving antenna.
• Increase the separation between the equipment and receiver.
• Connect the equipment into an outlet on a circuit different from that to which the receiver is connected.
• Consult your local RadioShack store or an experienced radio/TV technician for help.
If you cannot eliminate the interference, the FCC requires that you stop using your equipment. Changes or
modifications not expressly approved by RadioShack may cause interference and void the user’s authority
to operate the equipment.
This device complies with Part 15 of the FCC rules. Operation is subject to the following two conditions: (1)
This device may not cause harmful interference, and (2) This device must accept any interference received,
including interference that may cause undesired operation.
FCC Part 68 and ACTA
a) This phone complies with Part 68 of the FCC rules and the requirements adopted by the ACTA. On the
bottom of this equipment is a label that contains, among other information, a product identifier in the
format US:AAAEQ##TXXXX. If requested, this number must be provided to the telephone company.
b) The registration jack USOC for the equipment is RJ11C or RJ11W.
c) This equipment is designed to be connected to the telephone network or premises wiring using a
compatible modular jack which is Part 68 compliant. A compliant telephone cord and modular plug is
provided with this product. See installation instructions for details.
d) The REN is useful to determine the quantity of devices that may be connected to the telephone line.
Excessive RENs on the telephone line may result in the devices not ringing in response to a n incoming
call. In most, but not all areas, the sum of RENs of all devices should not exceed five (5). To be certain of
the number of devices that may be connected to a line, as determined by the total RENs, contact the local
telephone company.
e) If this phone causes harm to the telephone network, the telephone company will notify you in advance
that temporary discontinuance of service may be required. But if advance notice isn’t practical, the
telephone company will notify the customer will be notified as soon as possible. You will be advised of your
right to file a complaint with the FCC if you believe it is necessary.
f) Your telephone company may make changes in its facilities, equipment, operations, or procedures that
could affect the operation of your equipment. If they do, you will be given advance notice so as to give you
an opportunity to maintain uninterrupted service.
13
g) If you experience trouble with this phone, please contact your service provider for repair/warranty
information. If your equipment is causing harm to the telephone network, the telephone company may
request that you disconnect the equipment until the problem is resolved.
h) No repair can be done to this equipment.
i) Connection to party line service is subject to state tariffs. Contact the state public utility commission,
public service commission or corporation commission for information.
j) If your home has specially wired alarm equipment connected to the telephone line, ensure the installation
of this phone does not disable your alarm equipment. If you have questions about what will disable alarm
equipment, consult your telephone company or a qualified installer.
k) This phone is hearing aid compatible.
Limited Warranty
RadioShack warrants this product against defects in materials and workmanship under normal use by
the original purchaser for one (1) year after the date of purchase from a RadioShack-owned store or an
authorized RadioShack franchisee or dealer. RADIOSHACK MAKES NO OTHER EXPRESS WARRANTIES.
This warranty does not cover: (a) damage or failure caused by or attributable to abuse, misuse, failure to
follow instructions, improper installation or maintenance, alteration, accident, Acts of God (such as floods
or lightning), or excess voltage or current; (b) improper or incorrectly performed repairs by persons who are
not a RadioShack Authorized Service Facility; (c) consumables such as fuses or batteries; (d) ordinary wear
and tear or cosmetic damage; (e) transportation, shipping or insurance costs; (f) costs of product removal,
installation, set-up service, adjustment or reinstallation; and (g) claims by persons other than the original
purchaser.
Should a problem occur that is covered by this warranty, take the product and the RadioShack sales
receipt as proof of purchase date to any RadioShack store in the U.S. RadioShack will, at its option, unless
otherwise provided by law: (a) repair the product without charge for parts and labor; (b) replace the product
with the same or a comparable product; or (c) refund the purchase price. All replaced parts and products,
and products on which a refund is made, become the property of RadioShack. New or reconditioned
parts and products may be used in the performance of warranty service. Repaired or replaced parts and
products are warranted for the remainder of the original warranty period. You will be charged for repair or
replacement of the product made after the expiration of the warranty period.
RADIOSHACK EXPRESSLY DISCLAIMS ALL WARRANTIES AND CONDITIONS NOT STATED IN THIS
LIMITED WARRANTY. ANY IMPLIED WARRANTIES THAT MAY BE IMPOSED BY LAW, INCLUDING
THE IMPLIED WARRANTY OF MERCHANTABILITY AND, IF APPLICABLE, THE IMPLIED WARRANTY
OF FITNESS FOR A PARTICULAR PURPOSE, SHALL EXPIRE ON THE EXPIRATION OF THE STATED
WARRANTY PERIOD.
EXCEPT AS DESCRIBED ABOVE, RADIOSHACK SHALL HAVE NO LIABILITY OR RESPONSIBILITY TO
THE PURCHASER OF THE PRODUCT OR ANY OTHER PERSON OR ENTITY WITH RESPECT TO ANY
LIABILITY, LOSS OR DAMAGE CAUSED DIRECTLY OR INDIRECTLY BY USE OR PERFORMANCE OF THE
PRODUCT OR ARISING OUT OF ANY BREACH OF THIS WARRANTY, INCLUDING, BUT NOT LIMITED
TO, ANY DAMAGES RESULTING FROM INCONVENIENCE AND ANY LOSS OF TIME, DATA, PROPERTY,
REVENUE, OR PROFIT AND ANY INDIRECT, SPECIAL, INCIDENTAL, OR CONSEQUENTIAL DAMAGES,
EVEN IF RADIOSHACK HAS BEEN ADVISED OF THE POSSIBILITY OF SUCH DAMAGES.
Some States do not allow limitations on how long an implied warranty lasts or the exclusion or limitation
of incidental or consequential damages, so the above limitations or exclusions may not apply to you. This
warranty gives you specific legal rights, and you may also have other rights which vary from State to State.
You may contact RadioShack at:
RadioShack Customer Relations, 300 RadioShack Circle, Fort Worth, TX 76102 04/08
www.RadioShack.com
Protect the environment by recyling used electronics. Go to E-CyclingCentral.com to find
an electronic recycling center near you.
©2009. RadioShack Corporation.
All rights reserved. RadioShack and RadioShack.com are
trademarks used by RadioShack Corporation.
Printed
in China
11A09
43-3905
4LM053Y2
14