1
INTRAORAL IMAGING PROCEDURES
Scanning and Erasing Plates (continued)
Note: Up to two PSPs can be processed simultaneously. One PSP can be
inserted into each Plate Guide at a time as long as the corresponding
track indicator light is illuminated green. The next PSP may be fed into a
Plate Guide slot only after the corresponding track indicator LED changes
from yellow to green.
5. Observe that a red glow emanates from the scanner exit slot.
6. Observe that each scanned and erased PSP drops into the receiving tray
at the bottom of the scanner. Since the ScanX default operation is with
the erase mode enabled (blue LED indicator above the ERASER switch is
steadily illuminated), each PSP is erased and ready for reuse.
7. Repeat steps 2 through 6 to process additional PSPs as necessary. Another
PSP may be fed into any Plate Guide slot as long as the track indicator
light illuminates green.
8. Observe that all transport indicators illuminate green and the red glow
from the exit slot extinguish after the last PSP drops to the tray.
CAUTION: Always use exercise care in handling the PSPs so as not to
scratch the sensitive surface or nick the edges.
9. Retrieve the processed (scanned and erased) PSPs for reuse or storage.
Make sure not to scratch the sensitive surface or nick the edges when
removing from the scanner outlet.
10.View and save each scanned image using the user-supplied authorized
Imaging Software such as VISIX.
IMPORTANT:
PSPs will not be erased after scanning when operating
the ScanX with the eraser disabled. PSPs must always
be erased prior to exposure to X-rays for new images.
Scanning Plates without Erasing
The ScanX can be operated with the in-line eraser feature turned off. When the
eraser mode is disabled, the ScanX scans the same as when the eraser is enabled
except that the PSPs are not erased after scanning. Scan an intraoral PSP without
erasing the image by performing the following procedures.
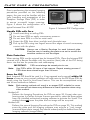
1. Activate the scanner by performing the proTrack 1
GREEN
cedures on previous page.
LED
LED
Track 2
Note: Upon activation, the ScanX defaults with
the eraser mode enabled. This must be
disabled prior to scanning to prevent
erasing of the scanned PSP.
LED
BLUE
LED
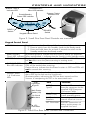
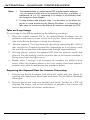
2. Disable the eraser mode of operation by pressing the membrane ERASER switch located on the
Keypad Control Panel. See Figure 12.
ERASER
READY
3. Verify that the blue LED indicator above the
Switch
Switch
ERASER switch blinks blue to indicate that
the Erase function is OFF. PSPs will not be
Figure 12.
erased after scanning.
ScanX Keypad Control Panel
4. Insert the exposed PSPs to be scanned into the ScanX Plate Guides by
performing the Scanning and Erasing Plates procedures provided on the
previous page.
5. The scanned PSPs still contain latent images that require erasure. Make
sure to erase each PSP prior to reuse for new images.
21