1
Matrox Convert DVI
Installation and User Guide
(Windows version)
March 22, 2013
Y11140-201-0410
Trademarks
Matrox Electronic Systems Ltd. ...........................................................................Matrox®, Convert DVI™, ConvertUtils™,
MtxConvert.utils™, Mtx.utils™
Google Inc. .........................................................................................................Google™, YouTube™
HDMI Licensing LLC. ..........................................................................................HDMI™
International Business Machines Corporation (IBM) .............................................IBM®, VGA®
Microsoft Corporation..........................................................................................Microsoft®, PowerPoint®, Windows®
PCI-SIG ...............................................................................................................PCI-SIG®, PCIe®
USB Implementers Forum, Inc. ................................................................ USB ®
Video Electronics Standards Association..............................................................DisplayPort™
HDMI, the HDMI logo and High-Definition Multimedia Interface are trademarks or registered trademarks of HDMI Licensing LLC. All other
nationally and internationally recognized trademarks and tradenames are hereby acknowledged.
Copyright © 2013 Matrox Electronic Systems Ltd. All rights reserved.
Disclaimer Matrox Electronic Systems Ltd. reserves the right to make changes in specifications at any time and without notice.
The information provided by this document is believed to be accurate and reliable. However, no responsibility is assumed by Matrox
Electronic Systems Ltd. for its use; nor for any infringements of patents or other rights of third parties resulting from its use. No
license is granted under any patents or patent rights of Matrox Electronic Systems Ltd.
Unauthorized recording or use of broadcast television programming, video tape, or other copyrighted material may violate copyright
laws. Matrox Electronic Systems Ltd. assumes no responsibility for the illegal duplication, use, or other acts that infringe on the
rights of copyright owners.
Matrox Electronic Systems Ltd.
1055 St. Regis Blvd., Dorval, Quebec, Canada H9P 2T4
Tel: (514) 685-2630 Fax: (514) 685-2853 World Wide Web: www.matrox.com
i
Matrox Limited Warranty
Limited Warranty Statement
1 Matrox* ("Matrox") having its head office at 1055 St-Regis Blvd., Dorval, Quebec Canada tel: (514) 822-6000
warrants that the Matrox hardware products (the "Matrox Product") will be free from defects in materials and
workmanship under normal use for a period of three (3) years from the date of purchase by the original customer
("Customer" or "You") who provides adequate proof of purchase and payment (for example, a copy of your sales
receipt or purchase invoice). The warranties provided by Matrox in this Matrox limited warranty statement apply
only to Matrox Products that the Customer purchases for use, and not for resale. This warranty applies only to the
original Customer and is non-transferable. MATROX DOES NOT WARRANT THAT THE OPERATION OF THE
MATROX PRODUCT WILL BE UNINTERRUPTED OR ERROR-FREE, THAT DEFECTS IN THE MATROX
PRODUCT WILL BE CORRECTED, OR THAT THE MATROX PRODUCT WILL MEET THE CUSTOMER'S
REQUIREMENTS OR PERFORM WITH ANY HARDWARE OR SOFTWARE PROVIDED BY THIRD
PARTIES. Conditions and limitations of Matrox's warranty are stated below.
2 Matrox's limited warranty applies only to the Matrox Product entirely manufactured by or for Matrox. The limited
warranty does not apply to any non-Matrox hardware products or any software, even if packaged or sold with the
Matrox Product. Manufacturers, suppliers or publishers other than Matrox may provide their own warranties to the
Customer, but Matrox, insofar as permitted by law, provides their products "as is." Software provided by Matrox is
not covered under this limited warranty (please refer to the licensing agreement accompanying the software for
details of the terms applicable to such).
3 Matrox's limited warranty covers only those defects which arise as a result of normal use of the Matrox Product
and does not apply to any damage which arises from:
a improper or inadequate maintenance;
b incompatibilities due to the Customer's hardware or software applications, including non-Matrox products,
with or in which the Matrox Product interfaces;
c Matrox Product of a special or custom-made nature;
d unauthorized modification or misuse, including physical damage to the Matrox Product caused by the
Customer or due to transportation of the product;
e improper installation, abuse, misapplication or negligence;
f failure to follow instructions relating to Matrox Product's use;
g operation outside the Matrox Product's environmental specifications;
h improper site preparation or maintenance;
i software;
j service performed by anyone who is not a representative of Matrox;
k other causes that do not relate to a Matrox Product defect;
l defects or damage suffered as a result of force majeure (including theft);
m defects or damage suffered as a result of normal wear and tear or otherwise due to the normal aging of the
Matrox Product, and/or
n stolen goods.
The warranty is voided by removal or alteration of identification labels on the Matrox Product or its parts.
4 In the event of a defect in a Matrox Product during the applicable warranty period, Matrox shall at its sole option,
either i) repair the defect using new or refurbished parts and return the repaired Matrox Product within a
reasonable delay; or ii) replace the Matrox Product with a Matrox Product that is new or which has been
manufactured from new or serviceable used parts and is at least functionally equivalent to the original Matrox
Product and send such replacement Matrox Product within a reasonable delay.
*
Matrox is Matrox Electronic Systems Ltd, Matrox Graphics Inc. or Matrox Europe Limited. Head office at
1055 St-Regis Blvd. Dorval, Quebec, Canada H9P 2T4 Telephone (514) 822-6000.
Matrox Limited Warranty
ii
5 A replacement Matrox Product or part assumes the remaining warranty of the original Matrox Product.
When a Matrox Product or part is replaced, any replacement item becomes the Customer's property and the
replaced item becomes Matrox's property.
6 This warranty is valid in any country where Matrox Products are distributed by Matrox and/or its authorized
resellers, dealers or distributors.
7 This limited warranty gives the Customer specific legal rights. The Customer may also have other
rights which vary from state to state in the United States, from province to province in Canada, and
from country to country elsewhere in the world.
8 For Australian Consumers: The rights described in this warranty are in addition to the statutory rights to
which You may be entitled under the Competition and Consumer Act 2010 and other applicable Australian
consumer protection laws and regulations. Our Matrox Products come with guarantees that cannot be
excluded under the Australian Consumer Law. You are entitled to a replacement or refund for a major failure
and compensation for any other reasonably foreseeable loss or damage. You are entitled to have the goods
repaired or replaced if the goods fail to be of acceptable quality and the failure does not amount to a major
failure. Goods presented for repair may be replaced by refurbished goods of the same type rather than being
repaired. Refurbished parts may be used to repair the goods.
Limitations of Warranty
1 TO THE EXTENT PERMITTED BY LAW, THIS WARRANTY AND THE REMEDIES SET FORTH
ABOVE ARE EXCLUSIVE AND IN LIEU OF ALL OTHER WARRANTIES, REMEDIES AND
CONDITIONS. NEITHER MATROX NOR ANY OF ITS THIRD PARTY SUPPLIERS MAKES ANY
OTHER WARRANTY OF ANY KIND, WHETHER EXPRESSED OR IMPLIED, WITH RESPECT TO
MATROX PRODUCTS. MATROX SPECIFICALLY DISCLAIMS (AND THE CUSTOMER, BY
ACCEPTING THE MATROX PRODUCT, SPECIFICALLY ACCEPTS SUCH DISCLAIMER AND
WAIVES) ALL OTHER WARRANTIES, EITHER EXPRESSED OR IMPLIED, ORAL OR WRITTEN,
INCLUDING BUT NOT LIMITED TO THE IMPLIED WARRANTIES OF MERCHANTABILITY AND
FITNESS FOR A PARTICULAR OR INTENDED PURPOSE OR USE AND THE WARRANTY AGAINST
LATENT DEFECTS, WITH RESPECT TO THE HARDWARE AND/OR SOFTWARE. MATROX
FURTHER DISCLAIMS ANY WARRANTY THAT MATROX PRODUCTS, IN WHOLE OR IN PART,
WILL BE FREE FROM INFRINGEMENT OF ANY THIRD PARTY INTELLECTUAL PROPERTY,
INCLUDING, WITHOUT LIMITATION, ANY PATENTS, OR PROPRIETARY RIGHTS.
2 To the extent that this limited warranty is inconsistent with the law of the locality where the Customer
purchases the Matrox Product, this limited warranty shall be deemed modified to be consistent with such
local law. Under such local law, certain limitations of this limited warranty may not apply to the consumer. If
Matrox cannot lawfully disclaim statutory or implied warranties, then to the extent permitted by law, all such
warranties shall be limited in duration to the duration of this express warranty and to repair or replacement
service as determined by Matrox at its sole discretion.
3 Matrox disclaims any representation that it will be able to repair any Matrox Product under this warranty or
make a Matrox Product exchange without risk to or loss of the programs or data.
4 To the extent allowed by local law, the remedies provided in this limited warranty are the Customer's sole
and exclusive remedies.
Limitations of Liability
1 EXCEPT FOR THE OBLIGATIONS SPECIFICALLY SET FORTH IN THE LIMITED WARRANTY, IN
NO EVENT SHALL MATROX BE LIABLE FOR:
a any direct, indirect, special, incidental, consequential, foreseeable or unforeseeable, or punitive
damages, whether based on contract, tort, delict or any other legal theory and whether advised of the
possibility of such damages; and/or
Matrox Limited Warranty
iii
b damages arising from the loss of use, data, Matrox Production revenue, use of money, anticipated savings,
procurement of substitute goods, business, opportunity, goodwill, reputation and/or profit in connection with
the Matrox Product or any business interruption.
c Matrox disclaims and shall have no obligation to indemnify or defend You or any third party in respect of any
actual or alleged infringement of any actual or pending patents, copyright or other intellectual property rights.
Matrox shall have no liability arising out of any such actual or alleged intellectual property infringement.
2 Without prejudice to the foregoing, any liability of Matrox for any breach of warranty shall be limited to the actual
amount paid by the Customer for the defective hardware in question.
3 To the extent allowed by local law, Matrox's entire liability and the Customer's exclusive remedy shall be the
repair or replacement of any defective Matrox Product during the warranty period. Matrox does not offer any other
warranty with respect to Matrox hardware or software or any other hardware or software.
4 Customer shall be responsible for all applicable taxes, duties and customs fees on any replacement unit, as well as
all transport, insurance, storage and other charges incurred on all returned Matrox Products.
5 Matrox reserves the right to change its warranties at any time and without notice, at its sole discretion, with
respect to future sales and deliveries.
6 UNAUTHORIZED USE. THE MATROX PRODUCT AND ANY DOCUMENTATION RELATED THERETO
ARE NOT DESIGNED, INTENDED, AUTHORIZED OR WARRANTED TO BE SUITABLE FOR USE OR
RESALE IN ANY TYPE OF SYSTEM OR OTHER APPLICATIONS RELATED TO, HAZARDOUS OR
POTENTIALLY HAZARDOUS ENVIRONMENTS OR APPLICATIONS REQUIRING
HIGH-AVAILABILITY OR FAIL-SAFE PERFORMANCE, WHERE PERSONAL INJURY OR DEATH MAY
OCCUR, SUCH AS MEDICAL SYSTEMS, LIFE SUSTAINING, LIFE SAVING SYSTEMS, OPERATION OF
NUCLEAR FACILITIES, AIRCRAFT NAVIGATION OR COMMUNICATION SYSTEMS, AIR TRAFFIC
CONTROL, PUBLIC WORKS, WEAPONS SYSTEMS, OR ANY OTHER APPLICATION IN WHICH THE
FAILURE OF A MATROX PRODUCT COULD LEAD TO PROPERTY DAMAGE, ENVIRONMENTAL
DAMAGE, OR PERSONAL INJURY. CUSTOMER WILL NOT USE, OR PERMIT TO BE USED, THE
MATROX PRODUCTS FOR SUCH HIGH-AVAILABILITY, FAIL-SAFE OR CRITICAL APPLICATIONS
AND FURTHER AGREES TO INDEMNIFY, DEFEND AND HOLD HARMLESS MATROX AND ITS
MANAGERS, DIRECTORS, OFFICERS, EMPLOYEES, AGENTS, AFFILIATES, SUCCESSORS, AND
ASSIGNS FROM AND AGAINST ANY ACTION, SUIT, PROCEEDING, COST, EXPENSE, DAMAGES,
AND LIABILITY (INCLUDING, BUT NOT LIMITED TO, REASONABLE ATTORNEYS' FEES) ARISING
OUT OF, OR RELATED TO, THE BREACH OF CUSTOMER'S OBLIGATIONS RELATED HERETO, EVEN
IF SUCH CLAIM ALLEGES THAT MATROX WAS NEGLIGENT REGARDING THE DESIGN OR
MANUFACTURE OF THE MATROX PRODUCT.
Obtaining Service (whether in or out of warranty)
1 Verify that your Matrox Product was installed and configured according to the information in its accompanying
documentation or at the web site referenced therein.
2 Read the "Troubleshooting" information included with the Matrox Product or at the web site referenced therein, to
verify if the problem can be easily solved.
3 If You are still experiencing difficulties, please contact your dealer or distributor where You purchased your
Matrox Product. Please go to http://www.matrox.com/hr/en/company/legal/en/warranty, to find the list of Matrox
authorized dealers and/or distributors in your area.
4 Alternatively, if this first option is unavailable to You and you are still experiencing problems or if you believe that
your product is defective, please contact the Matrox Support team. We will help you troubleshoot your issue and
process a replacement if it is found to be defective. Matrox support team can be reached at
http://www.matrox.com/hr/en/company/legal/en/warranty.
5 Before returning the Matrox Product, please back up any and all information or data thereon, including, without
limitation, confidential, proprietary, personal or other information. All data and information on the Matrox
Product will be lost given that the persistent storage device(s) will be reformatted to factory default during testing;
Matrox Limited Warranty
iv
and Matrox cannot, and does not, accept any responsibility for any information that may be lost, corrupted,
damaged or otherwise rendered inaccessible.
6 When returning a Matrox Product, leave the configuration as it was when You were using it, and leave all
identification stickers on the Matrox Product. Pack the Matrox Product in its original box and return it to
your Matrox dealer or distributor where the Matrox Product was purchased, together with your proof of
purchase. Your Matrox dealer or distributor will return the Matrox Product for You. Alternatively, You may
proceed by returning your Matrox Product by following the guidelines referred to at the following address
http://www.matrox.com/hr/en/company/legal/en/warranty, and follow the link to Customer Support, where a
Return Merchandise Authorization (RMA) number will be issued, upon receipt of adequate proof of
purchase, and shipping instructions will be given to you. Customer will be responsible in paying the freight
to send the Matrox Product for service. Please ensure that the product is in Electrostatic discharge (ESD)
packaging before shipping it back to Matrox or else the warranty shall be void.
DO NOT RETURN THE MATROX PRODUCT TO MATROX WITHOUT MATROX'S RMA NUMBER
AND EXPRESS AUTHORIZATION.
Once an RMA number is issued, the Matrox Product must be returned to Matrox within thirty (30) days.
NON-WARRANTY product will be shipped back to You collect or on your courier account number, if one is
provided.
General
1 This limited warranty shall be governed by the laws of the Province of Quebec, Canada and the federal laws
of Canada applicable therein and the courts of the Province of Quebec shall have exclusive jurisdiction to hear
and decide any dispute instituted by the Customer in connection with this limited warranty; the Customer
waives, by accepting the Matrox Product, its rights to institute proceedings in connection with this warranty
against Matrox in any jurisdiction other than Quebec. Customer hereby agrees to all terms of this warranty in
the English language. The United Nations Convention on Contracts for the International Sale of Goods does
not apply to this warranty and is strictly excluded.
2 Except as may be expressly agreed to the contrary in a signed written agreement between Customer and
Matrox, i) any written or oral information or advice given by Matrox's distributors, agents or employees will
in no way increase the scope of the limited warranty contained in this limited warranty; and ii) this limited
warranty states the only warranty made to You by Matrox with respect to the units of Matrox Product that
You have purchased, and the terms of this limited warranty shall override the terms of any purchase orders
and any other terms and understandings You may seek to apply in respect thereof.
3 This limited warranty is personal to You and cannot be assigned or transferred without Matrox's prior written
agreement.
4 The failure by Matrox to enforce any of the provisions of this limited warranty shall not constitute a waiver
of Matrox's rights to enforce such provision or any other provision of this limited warranty in the future.
5 If any clause in this limited warranty is held by a court of law to be illegal or unenforceable the remaining
provisions of this limited warranty shall not be affected thereby.
Matrox Limited Warranty
v
Matrox Software License Agreement
THIS IS A LEGAL AGREEMENT BETWEEN THE LICENSEE AND MATROX ELECTRONIC SYSTEMS LTD.
("MATROX") CONCERNING THE USAGE OF THE MATROX SOFTWARE. BY DOWNLOADING,
INSTALLING, COPYING, ACCESSING, CLICKING ON AN "ACCEPT" BUTTON, OR OTHERWISE USING
THE SOFTWARE, THE LICENSEE AGREES TO THE TERMS OF THIS AGREEMENT. IF YOU ARE
ACCEPTING THESE TERMS ON BEHALF OF YOUR COMPANY, ORGANIZATION, EDUCATIONAL
INSTITUTION, OR AGENCY, INSTRUMENTALITY, OR DEPARTMENT OF THE FEDERAL GOVERNMENT
AS ITS AUTHORIZED LEGAL REPRESENTATIVE, YOU REPRESENT AND WARRANT THAT YOU HAVE
FULL AUTHORITY TO BIND LICENSEE TO THESE TERMS. IF YOU DO NOT AGREE TO THE TERMS OF
THIS AGREEMENT, PLEASE RETURN YOUR MATROX PRODUCT. IF THE SOFTWARE WAS
DOWNLOADED, DESTROY ALL COPIES OF THE SOFTWARE.
In this agreement "Software" refers to: any firmware, software, associated software components, media, printed
materials, and "online" or electronic documentation related to Matrox products.
The Software is not sold, and instead is only licensed for use, strictly in accordance with this document. This license
does not cover the sale of hardware, since it may not necessarily be sold as a package with the Software. This license
sets forth the terms and conditions of the Software license only.
Any Software provided to Licensee is the copyrighted work of Matrox and/or its suppliers. The present License does
not give Licensee any intellectual property rights to the Software or its derivatives. The downloading and/or the use of
any Software are subject to the following restrictions and limitations:
LICENSES:
If you are an end user, the "End User License" shall apply to you.
If you are an original equipment manufacturer (OEM), the "OEM License" shall apply to you.
END USER LICENSE
1 Licensee may install the Software on an unlimited number of computers owned or leased by Licensee in any
location. However, Licensee must use the Software on a single computer owned or leased by Licensee at a time, in
conjunction with and for the purpose of, operating the Matrox hardware. Licensee shall also have the right to make
one copy of the Software in any computer-readable or printed form for back-up or archival purposes;
2 No right to recopy, sell, distribute, license, sub-license, alter, modify, disassemble, de-compile or reverse engineer
any Software in any manner whatsoever is hereby given, except as provided in this Agreement. Violation may
result in severe civil and/or criminal penalties, as violators will be prosecuted to the maximum extent possible;
3 Licensee agrees to treat the Software as confidential information, and shall protect said information by using the
same degree of care Licensee uses to protect Licensee's own confidential information, but no less than a
reasonable degree of care, to prevent the unauthorized use, dissemination, disclosure or publication of such;
4 Licensee may only provide and disclose parts of the Software to third parties who have a need-to-know for the
purpose of installation, service integration and/or support of said Software within Licensee's product. In such
event, Licensee may only disclose the relevant and necessary parts of the Software to permit the third party to
accomplish his work provided that all such disclosures shall be subject to the terms and conditions of this
Agreement;
5 Licensee may not grant any sublicense, lease or other right in the Software to others;
6 Notwithstanding any other provision in this License, if Licensee provides any ideas, suggestions or
recommendations to Matrox regarding the Licensed Software and/or Licensee's product ("Feedback"), Matrox is
free to use and incorporate such Feedback in Matrox's products, without payment of royalties or other
consideration to Licensee.
Matrox Software License Agreement
vi
OEM LICENSE
Licensee may reproduce and distribute the Software only as an integral part of or incorporated in Licensee's
product or as a standalone Software maintenance update for existing end users of Licensee's products, excluding
any other standalone products, subject to these conditions:
1 This Software is licensed for use only in conjunction with Matrox products. Use of the Software in
conjunction with non-Matrox products is not licensed hereunder;
2 No right to recopy, sell, distribute, license, sub-license, alter, modify, disassemble, de-compile or reverse
engineer any Software in any manner whatsoever is hereby given, except as provided in this Agreement.
Violation may result in severe civil and/or criminal penalties, as violators will be prosecuted to the maximum
extent possible;
3 Licensee agrees to treat the Software as confidential information, and shall protect said information by using
the same degree of care Licensee uses to protect Licensee's own confidential information, but no less than a
reasonable degree of care, to prevent the unauthorized use, dissemination, disclosure or publication of such;
4 You may only distribute the Software to your customers pursuant to a written license agreement. At a
minimum such license shall safeguard Matrox's ownership rights to the Software;
5 Licensee may only provide and disclose parts of the Software to third parties who have a need-to-know for
the purpose of installation, service integration and/or support of said Software within Licensee's product. In
such event, Licensee may only disclose the relevant and necessary parts of the Software to permit the third
party to accomplish his work provided that all such disclosures shall be subject to the terms and conditions
of this Agreement;
6 Notwithstanding any other provision in this License, if Licensee provides any ideas, suggestions or
recommendations to Matrox regarding the Licensed Software and/or Licensee's product ("Feedback"),
Matrox is free to use and incorporate such Feedback in Matrox's products, without payment of royalties or
other consideration to Licensee.
GENERAL LICENSE TERMS: (APPLICABLE TO BOTH END-USERS & OEM'S)
There are inherent dangers in the use of any software available for downloading on the Internet and Matrox
cautions Licensee to ensure that Licensee completely understands the potential risks before downloading any of
the Software. Licensee is solely responsible for adequate protection and backup of the data and equipment used
in connection with any of the Software, and Matrox will not be liable for any damages that may be suffered in
connection with use of the Software.
Licensee hereby acknowledges and agrees that this License, and all its terms and conditions, automatically
applies, without other notice, to future updates of the Software, firmware, BIOS, drivers and associated utilities.
COPYRIGHT
All title, including but not limited to copyrights, in and to the Software and any copies thereof are owned by
Matrox or its suppliers. All title and intellectual property rights in and to the content which may be accessed
through use of the Software is the property of the respective content owner and may be protected by applicable
copyright or other intellectual property laws and treaties. This Software License Agreement grants you no rights
to use such content. All rights not expressly granted are reserved by Matrox
DISCLAIMER OF WARRANTIES
Licensee expressly acknowledges and agrees that use of the Software is at Licensee's sole risk. The Software and
Documentation is provided "AS IS" AND WITHOUT WARRANTY OF ANY KIND AND MATROX
EXPRESSLY DISCLAIMS ALL WARRANTIES, EXPRESS AND IMPLIED, INCLUDING, BUT NOT
LIMITED TO, THE IMPLIED WARRANTIES OF MERCHANTABILITY, FITNESS FOR A PARTICULAR
PURPOSE AND NON-INFRINGEMENT. MATROX DOES NOT WARRANT THAT THE CONTENTS OF
THE SOFTWARE OR DOCUMENTATION WILL MEET LICENSEE'S REQUIREMENTS, OR THAT THE
OPERATION OF THE SOFTWARE OR DOCUMENTATION WILL BE UNINTERRUPTED OR
ERROR-FREE. THE ENTIRE RISK ASSOCIATED WITH THE USE OF THE SOFTWARE AND
Matrox Software License Agreement
vii
DOCUMENTATION IS ASSUMED BY LICENSEE. FURTHERMORE, MATROX DOES NOT WARRANT OR
MAKE ANY REPRESENTATIONS REGARDING THE USE OR THE RESULTS OF THE USE OF THE
SOFTWARE OR DOCUMENTATION IN TERMS OF ITS CORRECTNESS, ACCURACY, RELIABILITY,
CURRENTNESS, OR OTHERWISE. SHOULD THE CONTENTS OF THE SOFTWARE OR DOCUMENTATION
PROVE DEFECTIVE, LICENSEE ASSUMES THE ENTIRE COST OF ALL NECESSARY SERVICING, REPAIR
OR CORRECTION. SOME JURISDICTIONS DO NOT ALLOW THE EXCLUSION OF IMPLIED
WARRANTIES, SO THE ABOVE EXCLUSION MAY NOT APPLY TO LICENSEE.
LICENSEE ACKNOWLEDGES AND AGREES THAT LICENSEE IS SOLELY RESPONSIBLE FOR
DETERMINING WHETHER ANY THIRD PARTY PATENT OR COPYRIGHT LICENSES, INCLUDING BUT
NOT LIMITED TO VARIOUS AUDIO AND VISUAL STANDARDS, ARE NECESSARY TO USE, IMPLEMENT
OR DISTRIBUTE THIS PRODUCT, WHICH INCLUDES ANY OR ALL SOFTWARE OR HARDWARE.
LICENSEE IS RESPONSIBLE TO ADVISE LICENSEE'S CUSTOMERS OF THE LIMITATIONS PROVIDED
HEREIN.
LIMITATION OF LIABILITY
UNDER NO CIRCUMSTANCES SHALL MATROX, ITS SISTER COMPANIES AND ITS SUBSIDIARIES BE
LIABLE FOR ANY DIRECT, INDIRECT, PUNITIVE, INCIDENTAL, SPECIAL, OR CONSEQUENTIAL
DAMAGES THAT RESULT FROM THE USE OF, OR INABILITY TO USE, THE SOFTWARE. THIS
LIMITATION APPLIES WHETHER THE ALLEGED LIABILITY IS BASED ON CONTRACT, TORT,
NEGLIGENCE, STRICT LIABILITY, OR ANY OTHER BASIS, EVEN IF MATROX HAS BEEN ADVISED OF
THE POSSIBILITY OF SUCH DAMAGE. BECAUSE SOME JURISDICTIONS DO NOT ALLOW THE
EXCLUSION OR LIMITATION OF INCIDENTAL OR CONSEQUENTIAL DAMAGES, MATROX'S LIABILITY
IN SUCH JURISDICTIONS SHALL BE LIMITED TO THE MINIMUM REQUIRED BY LAW.
UNAUTHORIZED USE. THIS SOFTWARE AND ANY DOCUMENTATION RELATED THERETO ARE NOT
DESIGNED, INTENDED, AUTHORIZED OR WARRANTED TO BE SUITABLE FOR USE OR RESALE IN ANY
TYPE OF SYSTEM OR OTHER APPLICATIONS RELATED TO, HAZARDOUS OR POTENTIALLY
HAZARDOUS ENVIRONMENTS OR APPLICATIONS REQUIRING HIGH-AVAILABILITY OR FAIL-SAFE
PERFORMANCE, WHERE PERSONAL INJURY OR DEATH MAY OCCUR, SUCH AS MEDICAL SYSTEMS,
LIFE SUSTAINING, LIFE SAVING SYSTEMS, OPERATION OF NUCLEAR FACILITIES, AIRCRAFT
NAVIGATION OR COMMUNICATION SYSTEMS, AIR TRAFFIC CONTROL, PUBLIC WORKS, WEAPONS
SYSTEMS, OR ANY OTHER APPLICATION IN WHICH THE FAILURE OF A PRODUCT COULD LEAD TO
PROPERTY DAMAGE, ENVIRONMENTAL DAMAGE, OR PERSONAL INJURY. LICENSEE WILL NOT USE,
OR PERMIT TO BE USED, THE PRODUCTS FOR SUCH HIGH-AVAILABILITY, FAIL-SAFE OR CRITICAL
APPLICATIONS AND FURTHER, LICENSEE AGREES TO INDEMNIFY, DEFEND AND HOLD HARMLESS
MATROX AND ITS MANAGERS, DIRECTORS, OFFICERS, EMPLOYEES, AGENTS, AFFILIATES,
SUCCESSORS, AND ASSIGNS FROM AND AGAINST ANY ACTION, SUIT , PROCEEDING, COST,
EXPENSE, DAMAGES, AND LIABILITY (INCLUDING, BUT NOT LIMITED TO, REASONABLE
ATTORNEYS' FEES) ARISING OUT OF , OR RELATED TO, THE BREACH OF LICENSEE'S OBLIGATIONS
RELATED HERETO, EVEN IF SUCH CLAIM ALLEGES THAT MATROX WAS NEGLIGENT REGARDING
THE DESIGN OR MANUFACTURE OF THE SOFTWARE.
TERMINATION
This License will automatically terminate if Licensee fails to comply with any of the terms and conditions hereof. In
such event, Licensee must destroy all copies of the Software and all of its component parts. Matrox reserves the right
to terminate this License without prejudice to any additional recourses Matrox may have against Licensee if Licensee
violates any of this Licenses' terms and conditions.
Matrox will not, by reason of the termination of this Agreement, be liable for compensation, reimbursement or
damages on account of the loss of prospective profits on anticipated sales, or on account of expenditures, investments,
leases, or commitments in connection with the Licensee's business or goodwill or otherwise.
Matrox Software License Agreement
viii
If Licensee commences or participates in any legal proceeding against Matrox then Matrox may, in its sole
discretion, suspend or terminate all license grants and any other rights provided under this License during the
pendency of such legal proceedings.
MISCELLANEOUS
If any provision of this License is inconsistent with, or cannot be fully enforced under, the law, such provision
will be construed as limited to the extent necessary to be consistent with and fully enforceable under the law.
This License is the final, complete and exclusive agreement between the parties relating to the subject matter
hereof, and supersedes all prior or contemporaneous understandings and agreements relating to such subject
matter, whether oral or written. This License may only be modified in writing signed by an authorized officer of
Matrox. Licensee agrees that it will not ship, transfer or export the Software into any country, or use the Software
in any manner, prohibited by the United States Bureau of Industry and Security or any export laws, restrictions or
regulations.
Controlling Law. The validity, performance and construction hereof shall be governed by and interpreted in
accordance with the laws of the Province of Quebec. Both parties hereby irrevocably submit to the exclusive
jurisdiction of the Courts of the district of Montreal, Province of Quebec, Canada with regard to any dispute
arising out of or in connection with this Agreement.
Additional information may be available on the Matrox website. If used, this site may contain other proprietary
notices and copyright information, the terms of which must also be observed and followed.
The failure of Matrox to enforce at any time any of the provisions of this Agreement, or the failure to require at
any time performance by the Licensee of any of the provisions of this Agreement, shall in no way be construed to
be a present or future waiver of such provisions, nor in any way affect the right of Matrox to enforce each and
every such provision thereafter.
All rights reserved by Matrox.
Matrox reserves the right to change Software specification without notice. All intellectual property, including
without limitation, trademarks and copyrights are the property of their respective owners and any unauthorized
use thereof is strictly prohibited.
COPYRIGHT © 2012 Matrox is a trademark of Matrox Electronic Systems Ltd.
Matrox Software License Agreement
Contents
Chapter 1
Introducing Matrox Convert DVI
Welcome to Matrox Convert DVI.......................................................... 2
Supported video output formats................................................................. 2
Hardware supplied for Matrox Convert DVI ......................................... 2
Matrox Convert DVI system requirements ........................................... 3
About this manual ................................................................................. 3
Style conventions ....................................................................................... 3
Last-minute information.............................................................................. 4
Chapter 2
Connecting External Devices to Matrox Convert DVI
Available Convert DVI connections ...................................................... 6
Matrox Convert DVI functionality .......................................................... 6
Using Matrox Convert DVI with a computer................................................ 6
Matrox Convert DVI in stand-alone mode ...................................................7
Using DVI to HDMI and DVI to DisplayPort adapters....................................7
Connecting Convert DVI ........................................................................7
Connecting Convert DVI to your computer’s primary DVI output................ 8
Connecting Convert DVI to your computer’s secondary DVI output .......... 10
Connecting Convert DVI for programming stand-alone mode................... 12
Convert DVI power supply and adapter plugs ........................................... 13
Typical Matrox Convert DVI connections ............................................ 14
Analog component and SDI connections................................................... 15
Composite and S-Video connections ........................................................ 16
Connections for using Convert DVI in stand-alone mode .......................... 17
Chapter 3
Installing Your Matrox Software and Configuring Your Display
Settings
Hardware detection ........................................................................... 20
Installing your Matrox software .......................................................... 20
Firmware update ....................................................................................... 21
Removing your Matrox software ......................................................... 21
If you connect Convert DVI to a different USB port (Windows
XP only)............................................................................................... 21
vi
Configuring your display settings for use with Convert DVI................ 21
Supported Convert DVI desktop resolutions..............................................24
If you have display issues when starting Windows.............................25
If Convert DVI is connected to your primary DVI output ............................25
If Convert DVI is connected to your secondary DVI output........................26
Retrieving a window from the Convert DVI desktop ..................................26
Chapter 4
Configuring Matrox Convert DVI
Using the Matrox Convert DVI Control Panel ......................................28
Opening the Matrox Convert DVI Control Panel ........................................28
Switching between Convert DVI user accounts.........................................28
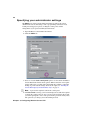
Specifying your output settings...........................................................29
Freezing the Convert DVI output (Convert DVI Plus only) ..........................32
Specifying your genlock settings ........................................................33
Specifying your region of interest settings .........................................35
Adjusting the region of interest manually...................................................38
Specifying your Convert DVI display modes .......................................40
Convert DVI default display modes ...........................................................42
Resetting your Convert DVI display modes ...............................................43
Specifying your administrator settings................................................44
Stand-alone mode.....................................................................................46
Managing keyboard shortcuts...................................................................48
Scaling and positioning your output ....................................................49
Chapter 5
Monitoring Your Matrox Convert DVI System
Using X.info to display Convert DVI information..................................54
Displaying system information ...................................................................55
Displaying hardware information ...............................................................56
Monitoring your Convert DVI’s operating temperature .............................. 57
Error notification ........................................................................................ 57
Appendix A
Matrox Convert DVI Specifications
Matrox Convert DVI box specifications...............................................60
General .....................................................................................................60
Connections ..............................................................................................60
Contents
vii
Environmental specifications ..................................................................... 61
Appendix B
Matrox Customer Support
How to get Matrox customer support................................................ 64
Registration .............................................................................................. 64
Keep up to date with our website ............................................................ 64
Contacting us ........................................................................................... 64
Index ...........................................................................................65
Contents
viii
Your notes
Contents
1
Introducing Matrox Convert DVI
This chapter lists the Convert
DVI system requirements, and
describes the available
documentation.
2
Welcome to Matrox Convert DVI
Matrox Convert DVI products let you convert high-resolution DVI sources to HD
and SD video for broadcast, display, and recording. It takes your DVI output and
converts it to high-quality SDI and analog video simultaneously. Stereo audio
input can be embedded into the SDI output from Matrox Convert DVI. You can
choose to output your entire computer screen, or focus on details in a specific
region of interest on the screen. To ensure optimal quality and flexibility, Matrox
Convert DVI products provide genlock with timing offset controls, a flicker
reduction filter, one-to-one pixel mapping, and an advanced scaling algorithm.
Matrox Convert DVI products are ideal for creating broadcast video from
computer applications such as video games, PowerPoint presentations, and web
browser sessions. They also provide a user-friendly way to create software
application training videos. You can also use Matrox Convert DVI products
independently from a computer in stand-alone mode to deliver SDI and analog
video in applications where the DVI signal is not coming from a computer, but
from a DVI camera or other device.
¦ Note Throughout the Matrox Convert DVI documentation, the term “Convert
DVI” refers to Convert DVI and Convert DVI Plus, unless indicated otherwise.
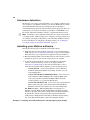
Supported video output formats
Matrox Convert DVI supports the following video output formats:
• NTSC.
• PAL.
• 1280×720p @ 50 and 59.94 fps.
• 1920×1080i @ 25 and 29.97 fps.
Hardware supplied for Matrox Convert DVI
• Matrox Convert DVI box.
• Matrox Convert DVI cable (includes USB, DVI, and audio connectors).
• Y/C (S-Video) adapter cable.
• External AC/DC adapter and power cord.
Chapter 1, Introducing Matrox Convert DVI
3
Matrox Convert DVI system requirements
For initial configuration, Matrox Convert DVI requires a computer with the
following system configuration:
• Microsoft Windows 7 Professional, Ultimate, or Home Premium (32- or
64-bit) with Service Pack 1, or Windows XP Professional 32-bit with
Service Pack 3.
• One free USB 2.0 port.
• A PCIe display card that supports at least one DVI-D output. If your display
card does not have a DVI connector, you can use an HDMI to DVI adapter,
or a DisplayPort to DVI adapter (VGA to DVI adapters are not supported).
• An optional DVI monitor that supports digital input can be used to preview
the Convert DVI desktop. You should make sure that your preview monitor
supports your desired DVI output resolution.
• To use Convert DVI in stand-alone mode, the only requirement is a DVI
device, such as a camera or medical device, which provides a DVI-D output
signal in a supported resolution. For a list of the supported DVI desktop
resolutions, see “Supported Convert DVI desktop resolutions” on page 24.
¦ Note If the preview monitor or source device that you want to use with Convert
DVI does not have a DVI connector, you can use an HDMI to DVI adapter, or a
DisplayPort to DVI adapter (VGA to DVI adapters are not supported).
For up-to-date information about system requirements, check the Support section
of our website for your Matrox product at www.matrox.com/video/support.
About this manual
This manual provides you with information about how to install, use, and
configure your Matrox Convert DVI.
Style conventions
The following style conventions are used in this manual:
• The names of files, folders, and manuals appear in italics. For example:
$
The data is stored in the Sample.avi file.
$
The file is located in your C:\Windows\System directory.
$
Please refer to your Matrox Convert DVI Release Notes.
• Menus and commands that you need to choose are displayed in the form
Menu > Command. For example, File > Save means click File in the
menu bar, then click Save in the menu that appears.
• The names of keys are displayed in small capital bold letters, such as the
CTRL key.
Matrox Convert DVI system requirements
4
• A plus (+) sign is used to indicate combinations of keys and/or mouse
operations. For example:
$
CTRL+C means to hold down the CTRL key while pressing the C key.
$
SHIFT+click means to hold down the SHIFT key while you click an item
with the mouse.
Last-minute information
Any important information that wasn’t available for inclusion in this manual by
publication time is provided to you in the Matrox Convert DVI Release Notes.
Chapter 1, Introducing Matrox Convert DVI
2
Connecting External Devices to Matrox
Convert DVI
This chapter shows you how to
connect external devices to
Matrox Convert DVI.
6
Available Convert DVI connections
Matrox Convert DVI allows you to connect multiple devices for simultaneous
output, and supports the following connections:
• One DVI input and one DVI output.
• One USB 2.0 port (required for configuring Convert DVI only).
• Your choice of one of the following video output combinations:
$
HD SDI output with embedded audio and simultaneous HD analog
component output.
$
SD SDI output with embedded audio and simultaneous SD analog
component output.
$
SD SDI output with embedded audio and simultaneous S-Video and
composite output.
• Genlock reference input.
• One RCA stereo output.
• DC power jack.
• One male stereo audio input and one female stereo audio output.
The connections you make depend on the type of video you want to output, such
as SDI and analog component, and how you want to use your Matrox Convert
DVI. You can use Convert DVI with a computer, or in stand-alone mode as
explained in “Matrox Convert DVI in stand-alone mode” on page 7.
Matrox Convert DVI functionality
Matrox Convert DVI can function in two ways. The first is with a computer to
broadcast video from computer applications, such as PowerPoint presentations,
web-based content, and video games. The second is in stand-alone mode with
any device that has a DVI-D output, such as a camera, medical device, or a
different computer from the host computer.
Using Matrox Convert DVI with a computer
You can connect Matrox Convert DVI to a computer in order to broadcast video
from computer applications, such as PowerPoint presentations, web-based
content, and video games. You use your computer’s DVI output as the input to
Convert DVI, which is converted to high-quality video and output through
Convert DVI’s SDI and analog outputs. To configure Convert DVI’s video
outputs, you must connect Convert DVI to your computer using a USB
connection.
When Convert DVI is connected to the DVI output from a computer’s display
card (see “Connecting Convert DVI” on page 7), the Windows operating system
detects the Convert DVI as a monitor (or as a secondary monitor if you connected
Chapter 2, Connecting External Devices to Matrox Convert DVI
7
Convert DVI to your display card’s second output). Because Convert DVI doesn’t
have a screen, you can connect a DVI monitor to the DVI OUT on your Convert
DVI in order to preview what will be output through Convert DVI’s video
outputs. Whatever is displayed on the monitor connected to Convert DVI’s DVI
OUT (Convert DVI desktop) is output as high-quality video through the Convert
DVI video outputs. If you’ve defined a region of interest, however, only your
selected area of the Convert DVI desktop will be output.
You can connect Convert DVI to any of your display card’s DVI outputs.
However, if you have a display card with multiple outputs, and you connect
Convert DVI to a DVI output other than your primary output (where you would
normally connect your main monitor), you must make sure to enable the output
by extending or duplicating (cloning) your displays. For more information, see
“Configuring your display settings for use with Convert DVI” on page 21.
Matrox Convert DVI in stand-alone mode
Once you’ve configured Matrox Convert DVI, you can program Convert DVI for
stand-alone mode using your last-applied configuration settings. When using
Convert DVI in stand-alone mode, you can disconnect the USB cable from the
host computer and use Convert DVI with any device that has a DVI-D output in a
supported desktop resolution. For example, you can connect Convert DVI to the
DVI output from a camera or medical device, or the DVI output from a different
computer from the host computer that you used to configure Convert DVI.
When using Convert DVI in stand-alone mode, the DVI input to Convert DVI is
converted to high-quality video and output through Convert DVI’s SDI and
analog outputs according to the programmed configuration settings. In order to
preview the Convert DVI desktop, you can connect a DVI monitor to the DVI
OUT on Convert DVI.
For detailed instructions for programming and using your Convert DVI in
stand-alone mode, see “Stand-alone mode” on page 46.
Using DVI to HDMI and DVI to DisplayPort
adapters
If the device that you want to connect to Convert DVI’s DVI input or output does
not have a DVI connector, you can use an HDMI to DVI adapter, or a DisplayPort
to DVI adapter to connect your device to Convert DVI (VGA to DVI adapters are
not supported).
Connecting Convert DVI
Matrox Convert DVI includes a cable to connect the Convert DVI box to a
computer or any DVI device you want to use as a DVI source. The cable has four
connectors on the computer end, and two connectors on the Convert DVI end.
Connecting Convert DVI
8
¡ Important Convert DVI’s USB connection is needed only when installing
ConvertUtils (see “Installing your Matrox software” on page 20), or configuring
Convert DVI (see Chapter 4, “Configuring Matrox Convert DVI”). Although a
USB connection is required for programming Convert DVI for stand-alone mode,
it is not required for using Convert DVI in stand-alone mode (see “Stand-alone
mode” on page 46).
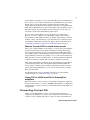
Connecting Convert DVI to your computer’s
primary DVI output
If your display card has one DVI output, or if it has two DVI outputs, but you
don’t have two DVI monitors, you can connect Convert DVI to your primary DVI
output (where you would normally connect your main monitor). Since your
primary output is already enabled in your Windows display settings by default,
you do not need to enable any other DVI outputs. When you connect Convert
DVI to your primary output, you must connect your DVI monitor to Convert
DVI’s DVI OUT to see your main desktop. When Convert DVI is properly
connected, and Windows has started, the red (Convert DVI Plus) or blue (Convert
DVI) LED located at the front of the Convert DVI box lights up and is constant.
0 Connect the USB B connector on the Convert DVI end of the cable to the
USB B port on your Convert DVI.
1 Connect the USB A connector on the computer end of the cable to the USB
A port on your computer (a High-Speed USB 2.0 connection is required).
2 Connect the external power supply to the DC power jack on the Convert
DVI, and to an AC outlet. If your Convert DVI comes with an external power
supply cable with international adapter plugs for use in different regions, see
“Convert DVI power supply and adapter plugs” on page 13.
¡ Important You must install the Convert DVI software before proceeding
(see “Installing your Matrox software” on page 20). Because you will be
connecting Convert DVI to your primary output, you won’t be able to see
your desktop unless the Convert DVI software is installed. After you have
successfully installed ConvertUtils, proceed to step 4.
3 Connect the DVI connector on the Convert DVI end of the cable to the DVI
IN connector on the Convert DVI. Tighten the thumb screws to ensure a
stable connection.
4 Connect the DVI connector on the computer end of the cable to the primary
DVI connector on your computer. Tighten the thumb screws to ensure a
stable connection.
¦ Note If your computer has an HDMI or DisplayPort output, you can use a
third-party HDMI to DVI or DisplayPort to DVI adapter.
5 Insert the male stereo audio plug on the computer end of the Convert DVI
cable into the LINE OUT jack on your sound card or laptop.
Chapter 2, Connecting External Devices to Matrox Convert DVI
9
6 Connect the female stereo audio jack on the computer end of the Convert
DVI cable to your speakers. You can also connect your speakers to Convert
DVI’s RCA audio outputs if you have the proper adapter.
7 Connect the DVI connector on your DVI monitor to the DVI OUT on
Convert DVI. If your DVI monitor is black when you start Windows, see “If
you have display issues when starting Windows” on page 25 for more
information.
¦ Note If your monitor has an HDMI or DisplayPort output, you can use a
third-party HDMI to DVI or DisplayPort to DVI adapter.
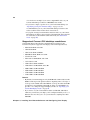
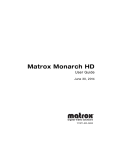
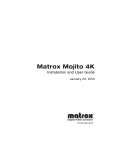
Convert DVI connected to primary DVI output
May require an adapter
(see “Using DVI to HDMI
and DVI to DisplayPort
adapters” on page 7)
7
3
02
To AC wall
outlet
Primary monitor
and Convert DVI
desktop
6
May require an adapter
(see “Using DVI to HDMI
and DVI to DisplayPort
adapters” on page 7)
4
15
To speakers
Computer
Connecting Convert DVI
10
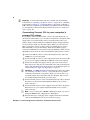
Connecting Convert DVI to your computer’s
secondary DVI output
If your display card has multiple DVI outputs, you can connect Convert DVI to
your secondary DVI output. By doing this, you can use two monitors in your
workflow. You can use your primary monitor as a workspace to configure
Convert DVI and perform any other Windows tasks, and your secondary monitor
exclusively to preview what will be output through Convert DVI’s analog and
SDI outputs. When Convert DVI is properly connected, and Windows has started,
the red (Convert DVI Plus) or blue (Convert DVI) LED located at the front of the
Convert DVI box lights up and is constant.
¦ Note When you connect Convert DVI to your secondary DVI output, you must
enable that output as described in “Configuring your display settings for use with
Convert DVI” on page 21.
0 Connect the USB B connector on the Convert DVI end of the cable to the
USB B port on your Convert DVI.
1 Connect the DVI connector on the Convert DVI end of the cable to the DVI
IN connector on the Convert DVI. Tighten the thumb screws to ensure a
stable connection.
2 Connect the DVI connector on the computer end of the cable to the
secondary DVI connector on your computer. Tighten the thumb screws to
ensure a stable connection.
¦ Note If your computer has an HDMI or DisplayPort output, you can use a
third-party HDMI to DVI or DisplayPort to DVI adapter.
3 Connect the USB A connector on the computer end of the cable to the USB
A port on your computer (a High-Speed USB 2.0 connection is required).
4 Insert the male stereo audio plug on the computer end of the Convert DVI
cable into the LINE OUT jack on your sound card or laptop.
5 Connect the female stereo audio jack on the computer end of the Convert
DVI cable to your speakers.You can also connect your speakers to Convert
DVI’s RCA audio outputs if you have the proper adapter.
6 Connect the DVI connector on your secondary DVI monitor to the DVI OUT
on Convert DVI.
7 Connect the external power supply to the DC power jack on the Convert
DVI, and to an AC outlet. If your Convert DVI comes with an external power
supply cable with international adapter plugs for use in different regions, see
“Convert DVI power supply and adapter plugs” on page 13.
¦ Note If your monitor has an HDMI or DisplayPort output, you can use a
third-party HDMI to DVI or DisplayPort to DVI adapter.
Chapter 2, Connecting External Devices to Matrox Convert DVI
11
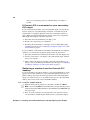
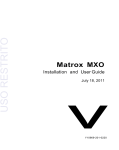
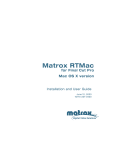
Convert DVI connected to secondary DVI output
May require an adapter
(see “Using DVI to HDMI
and DVI to DisplayPort
adapters” on page 7)
6
1 0
7
To AC wall
outlet
Convert DVI monitor
(optional secondary display)
Primary
monitor
5
2
3
To speakers
4
May require an adapter
(see “Using DVI to HDMI
and DVI to DisplayPort
adapters” on page 7)
Computer
Connecting Convert DVI
12
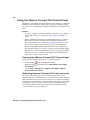
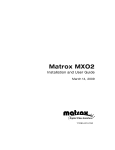
Connecting Convert DVI for programming
stand-alone mode
To program your Convert DVI for stand-alone mode, it must be connected using
the USB cable to a computer that has the Convert DVI software installed.
Although you can also use the connections illustrated in “Connecting Convert
DVI to your computer’s primary DVI output” on page 8, and “Connecting
Convert DVI to your computer’s secondary DVI output” on page 10, the
illustration below shows the minimum connection that’s required to program
your Convert DVI for stand-alone mode.
Primary DVI
monitor
To AC wall
outlet
Only the Convert DVI
cable’s USB connection
is required to program
Convert DVI for
stand-alone mode.
To computer’s display
card (not required if
you are using a laptop
to program Convert
DVI).
To computer’s
USB connector
Chapter 2, Connecting External Devices to Matrox Convert DVI
13
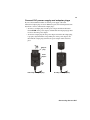
Convert DVI power supply and adapter plugs
If your Convert DVI kit includes an external power supply cable with
international adapter plugs for use in different regions, the following instructions
detail how to remove and insert the adapter plugs:
• To remove an adapter plug from the power adapter, hold down the button
labeled PUSH on the power adapter, and then slide the adapter plug up until
it releases from the power adapter.
• To insert an adapter plug into the power adapter, ensure that the adapter plug
is properly aligned with the corresponding slot on the power adapter, and
then slide the adapter plug down into the power adapter until it locks into
place.
1
Adapter
plug
Power
adapter
0
Removing an adapter plug
Inserting an adapter plug
Connecting Convert DVI
14
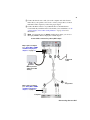
Typical Matrox Convert DVI connections
The following three illustrations show some typical Convert DVI connections. In
the first two illustrations, we’ve connected a DVI monitor to preview the Convert
DVI desktop, and also two different types of video devices to the Convert DVI
outputs (such as analog component and SDI). We’ve also connected the audio
output from the Convert DVI box to one of the video devices, but you can
connect it to a sound mixer if you are using one. In the last illustration, we show
the required connections for using Convert DVI in stand-alone mode with analog
component and SDI connections.
Remarks
• The USB connections in these illustrations are required only when you want
to configure Convert DVI, and are not needed if you want to use Convert
DVI in stand-alone mode.
• You can also connect an external sync generator to ensure proper equipment
timing. However, this is optional as the Convert DVI generates its own
internal reference signal if an external genlock is not available.
Chapter 2, Connecting External Devices to Matrox Convert DVI
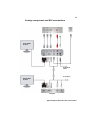
15
Analog component and SDI connections
Convert DVI
monitor
To AC wall
outlet
To speakers
Primary DVI
monitor
Computer
Typical Matrox Convert DVI connections
16
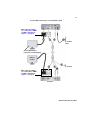
Composite and S-Video connections
Convert DVI
monitor
To AC wall
outlet
To speakers
Primary DVI
monitor
Computer
Chapter 2, Connecting External Devices to Matrox Convert DVI
17
Connections for using Convert DVI in
stand-alone mode
To video/audio inputs
(see “Analog component and SDI connections” on page 15,
or “Composite and S-Video connections” on page 16)
To SDI
video input
Only the Convert DVI
cable’s DVI and audio
connections are required to
use Convert DVI in
stand-alone mode.
To AC wall
outlet
To speakers
(optional)
To DVI input
source
To audio
input source
Typical Matrox Convert DVI connections
18
Your notes
Chapter 2, Connecting External Devices to Matrox Convert DVI
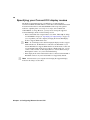
3
Installing Your Matrox Software and
Configuring Your Display Settings
This chapter explains how to
install and remove your Matrox
software, and how to configure
your display settings to use
Matrox Convert DVI.
20
Hardware detection
The first time you connect your Convert DVI to your computer’s USB port (and
your computer is on), Windows will detect your Convert DVI hardware, and the
“Found New Hardware Wizard” may be displayed. Because the Matrox
ConvertUtils Setup program will automatically install the appropriate drivers for
Convert DVI, you can ignore the wizard (or press ESC or click Cancel to close
the wizard), and install your Matrox software as explained in the next section.
¦ Note Your display card’s configuration utility may also detect Convert DVI as
a secondary monitor, and may prompt you to configure your display settings. You
can configure your display settings before or after installing the Matrox software.
For more information on configuring your display settings, see “Configuring
your display settings for use with Convert DVI” on page 21.
Installing your Matrox software
Perform the following steps to install the Convert DVI software:
1 Make sure that your Convert DVI is connected to your computer using the
USB connectors (see “Connecting Convert DVI” on page 7). Convert DVI’s
DVI connection to your computer is not required for software installation.
2 Before installing the Matrox Convert DVI software, make sure that you first
uninstall any previous version of the software from your computer.
3 To download and install the latest version of the Matrox Convert DVI
software, visit the “Downloads” section of our Support website at
www.matrox.com/video/support. The software installer that you use to
install the Convert DVI software depends on your Convert DVI system:
•
Convert DVI only If your system includes a Convert DVI only,
download and install the Matrox ConvertUtils “Software” for your
Convert DVI product.
•
Convert DVI and Matrox MXO2/Mojito MAX If you want to use
Convert DVI and a Matrox MXO2 product or Mojito MAX on the
same system, download and install the Matrox MtxConvert.utils
“Combo Software” for your Convert DVI product.
•
Convert DVI and Matrox VS4 If you want to use Convert DVI and
Matrox VS4 on the same system, download and install the Matrox
Mtx.utils “Combo Software (VS4)” for your Convert DVI product.
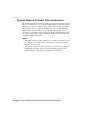
For Windows 7 users When installing Matrox ConvertUtils on a
Windows 7 system, Windows will check the Microsoft Windows Update
website for the latest device drivers, which will slow down the installation.
To prevent this, click the status message that appears in the Windows
notification area during the driver installation, and in the displayed dialog
box, click "Skip obtaining driver software from Windows Update."
Chapter 3, Installing Your Matrox Software and Configuring Your Display
21
Firmware update
When you install Matrox ConvertUtils, the software installation automatically
verifies the firmware on your Convert DVI hardware and updates it if required.
¡ Important To complete the firmware update, your computer must be shut
down and Convert DVI must be powered off. Once your computer has shut down,
unplug Convert DVI from its power source, and then re-plug it before restarting
your computer.
Removing your Matrox software
To uninstall the software for Matrox Convert DVI, choose Start > All
Programs > Matrox ConvertUtils > Uninstall Matrox ConvertUtils.
If you connect Convert DVI to a different USB
port (Windows XP only)
If you connect Convert DVI to a different USB port after you’ve installed the
Convert DVI software on a Windows XP system, the “Found New Hardware
Wizard” will appear again. You won’t need to re-install the Convert DVI
software, but you’ll need to use the “Found New Hardware Wizard” to install the
required drivers. When the “Found New Hardware Wizard” opens and asks you if
it can search for the software, select No, not this time, and click Next. For each
device, select Install the software automatically (Recommended), and then
click Next. Repeat this step each time the wizard appears until all the required
drivers have been installed.
Configuring your display settings for use with
Convert DVI
When the Convert DVI hardware is connected to your computer as explained in
“Connecting Convert DVI” on page 7, and the software has been successfully
installed (see “Installing your Matrox software” on page 20), Windows will
detect Convert DVI as a monitor. If you connected Convert DVI to your display
card’s secondary DVI output, in order to see the Convert DVI desktop, you need
to enable the DVI output by extending or duplicating (cloning) your displays.
¡ Important If you connected Convert DVI to your display card’s primary DVI
output (where you would normally connect your main monitor), you do not need
to extend or duplicate your displays because your display card’s primary output is
enabled by default. However, if you will not be connecting a monitor to Convert
DVI’s DVI OUT connector, it’s recommended that you duplicate your primary
desktop.
Removing your Matrox software
22
• Extend your displays You can connect a DVI monitor or other display
device, such as a projector, to Convert DVI’s DVI OUT, and then extend
your primary display to the Convert DVI’s display. This will allow you to use
the Convert DVI to preview your video output. For example, you can have
the Convert DVI Control Panel open on your primary display, and
simultaneously have a video clip open on the Convert DVI’s display. This
allows you to work on your primary display, while ensuring that only the
video clip on the Convert DVI’s display is being routed to the Convert DVI’s
analog and SDI video outputs.
• Duplicate (clone) your displays You can also duplicate your primary
display onto your Convert DVI’s display. This ensures that your primary
display is being routed to the Convert DVI’s analog and SDI video outputs.
This option is useful if you don’t have a secondary monitor to connect to
Convert DVI’s DVI OUT, or if you are conducting a training video for
example, where you want your audience to see everything you are doing on
your primary display. If your primary display does not support your desired
desktop resolution, you can change your display settings to make Convert
DVI your primary display, allowing you to select any resolution supported
by Convert DVI.
Remarks
• No matter which of your display card’s DVI outputs you use for Convert
DVI, you must configure Convert DVI’s display resolution according to how
you want to use Convert DVI.
• Although the instructions provided in this section describe how to use
Windows to configure your display settings, you can use your display card’s
configuration utility if you prefer.
• It is recommended that you install the latest display drivers for your system’s
display card before working with Convert DVI. For more information, see
your display card’s documentation.
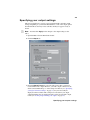
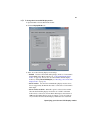
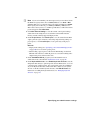
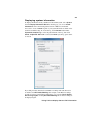
° To configure your display settings in Windows:
1 Right-click on your desktop and choose Screen Resolution (Windows 7),
or Properties and then click the Settings tab (Windows XP).
¦ Note From the Start menu, choose Control Panel > Appearance and
Personalization > Screen Resolution (Windows 7), or Settings >
Control Panel > Display, and then click the Settings tab (Windows XP).
2 Extend or duplicate (clone) your displays as follows:
¦ Note If you connected Convert DVI to your display card’s primary DVI
output (where you would normally connect your main monitor), you do not
need to extend or duplicate your displays because your display card’s primary
output is enabled by default. However, if you will not be connecting a monitor
Chapter 3, Installing Your Matrox Software and Configuring Your Display
23
to Convert DVI’s DVI OUT connector, it’s recommended that you duplicate
your primary desktop.
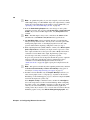
For Windows 7:
$
Extending your primary display If you see two monitor icons
displayed, from the Multiple displays list, select Extend these
displays. If you see more than two monitor icons displayed, click the
monitor icon that represents your Convert DVI (click Identify if you’re
not sure), and then from the Multiple displays list, select Extend
desktop to this display.
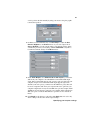
$
Duplicating (cloning) your primary display If you see two monitor
icons displayed, from the Multiple displays list, select Duplicate these
displays. If you see more than two monitor icons displayed, click the
monitor icon that represents your Convert DVI (click Identify if you’re
not sure), and then from the Multiple displays list select, Duplicate
desktop on 1 and 2 (or whichever combination represents your primary
and Convert DVI displays).
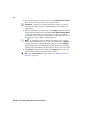
$
Duplicating your Convert DVI display Make Convert DVI your
primary display by clicking the monitor icon that represents your Convert
DVI (click Identify if you’re not sure), select Make this my main
display, and then click Apply. Then, from the Multiple displays list,
select Duplicate these displays.
For Windows XP:
$
Extending your primary display Click the monitor icon that
represents your Convert DVI (click Identify if you’re not sure), select
Extend my Windows desktop onto this monitor, and then click
Apply.
$
Duplicating (cloning) your primary display Use your display card’s
configuration utility to duplicate your primary display on your Convert
DVI display. Refer to your display card’s documentation for more
information.
$
Duplicating your Convert DVI display Make Convert DVI your
primary display by clicking the monitor icon that represents your Convert
DVI (click Identify if you’re not sure), select Use this device as the
primary monitor, and then click Apply. You must then use your display
card’s configuration utility to duplicate your Convert DVI display. Refer
to your display card’s documentation for more information.
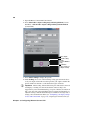
3 Click the monitor icon that represents your Convert DVI (click Identify if
you’re not sure), and from the list, set the desired resolution for your Convert
DVI desktop according to how you want to use Convert DVI:
$
If you want to output your entire Convert DVI desktop, it is recommended
that your Convert DVI desktop resolution and video output format are
Configuring your display settings for use with Convert DVI
24
close in size. For example, if you want to output NTSC video, set your
Convert DVI desktop resolution to 800×600 for best results.
$
If you want to output a specific area of your Convert DVI desktop (see
“Specifying your region of interest settings” on page 35), it is
recommended that you set your Convert DVI desktop resolution to the
native resolution of the monitor that is connected to it.
$
If you plan on using Convert DVI in stand-alone mode, set your Convert
DVI desktop resolution to the resolution of the DVI input device that will
be connected to Convert DVI in stand-alone mode (see “Stand-alone
mode” on page 46).
Supported Convert DVI desktop resolutions
Convert DVI supports the following common desktop resolutions (some
resolutions may not be supported on all display cards or DVI input devices):
• 640×480 @ 60 Hz and 75 Hz
• 720×480 @ 60 Hz
• 720×576 @ 50 Hz and 60 Hz
• 800×600 @ 50 Hz, 60 Hz, and 75 Hz
• 832×624 @ 75 Hz
• 1024×768 @ 50 Hz, 60 Hz, and 75 Hz
• 1152×870 @ 75 Hz
• 1280×720 @ 50 Hz and 60 Hz
• 1280×1024 @ 50 Hz, 60 Hz, and 75 Hz
• 1600×1200 @ 50 Hz and 60 Hz
• 1680×1050 @ 50 Hz and 60 hz
• 1920×1080 @ 50 Hz and 60 Hz
• 1920×1200 @ 50 Hz and 60 Hz
Remarks
• By default, Convert DVI supports only the 60 Hz and 75 Hz resolutions. The
60 Hz resolutions provide optimal results for outputting video at 29.97 fps or
59.94 fps, such as NTSC and 1920×1080i @ 59.94 fps. To enable the 50 Hz
resolutions for use with PAL, 1280×720p @ 50 fps, or 1920×1080i @ 25
fps video, or to change the supported display modes. see “Specifying your
Convert DVI display modes” on page 40.
• If you want to set your Convert DVI resolution to 640×480, 720×480, or
720×576, you must use your display card’s configuration utility to do so, as
Windows does not allow you to set your resolution to anything lower than
800×600.
Chapter 3, Installing Your Matrox Software and Configuring Your Display
25
• Other resolutions may work with Convert DVI, but only the resolutions
listed above have been tested and approved by Matrox for use with Convert
DVI.
If you have display issues when starting
Windows
After connecting Convert DVI and starting your computer, if your primary
display is black, has an incorrect resolution, or your system does not detect your
primary display, one of the issues in the following sections may be the cause.
If Convert DVI is connected to your primary DVI
output
If you connected Convert DVI to your display card’s primary DVI output (where
you would normally connect your main monitor), and the monitor you connected
to Convert DVI’s DVI output is black when you start your computer, Convert
DVI may be currently running in a 50 Hz display mode (for more information,
see “Specifying your Convert DVI display modes” on page 40). One of the
following procedures may resolve the issue:
• Adjust your display resolution:
a Disconnect Convert DVI from your computer’s primary DVI output, but
keep Convert DVI connected to your computer via the USB connection.
b Connect your monitor to your display card’s primary DVI output.
c Using your display card’s configuration utility, change your display
resolution to 1280×1024 @ 60 Hz (Convert DVI’s default 60 Hz
resolution).
d Disconnect your main monitor, reconnect Convert DVI to your display
card’s primary DVI output, and then connect your monitor to Convert
DVI’s DVI output. You should be able to see your desktop, and you can
further adjust your settings as needed.
• Reset Convert DVI to the default 60 Hz and 75 Hz display modes:
a Disconnect Convert DVI from your computer’s primary DVI output, but
keep Convert DVI connected to your computer via the USB connection.
b Connect your monitor to your display card’s primary output.
c Open the Convert DVI Control Panel, and then click Reset DVI Out on
any of the control panel’s pages. You will be prompted to restart your
computer.
d After you have restarted your computer, disconnect your monitor,
reconnect Convert DVI to your display card’s primary DVI output, and
then connect your monitor to Convert DVI’s DVI output. You should be
If you have display issues when starting Windows
26
able to see your desktop, and you can further adjust your settings as
needed.
If Convert DVI is connected to your secondary
DVI output
If you connected Convert DVI to your secondary DVI output, your system may
have incorrectly set your primary display resolution, or automatically set the
Convert DVI as your primary display because the Convert DVI is capable of
using a higher resolution than the physical monitor connected to your primary
DVI output. If this happens, follow the steps below:
1 Disconnect the Convert DVI from your display card.
2 Restart your system and log on to Windows.
3 Reconnect the Convert DVI to your display card’s secondary DVI output,
and then follow the steps in “Configuring your display settings for use with
Convert DVI” on page 21.
If you accidentally connected the Convert DVI to the DVI OUT on your display
card that is associated with your primary display, follow the steps below:
1 Disconnect both the Convert DVI and your monitor from your display card.
2 Connect your monitor to your display card’s primary DVI output, and then
restart your computer.
3 After you have restarted your computer, connect the Convert DVI to your
display card’s second DVI output, and then follow the steps in “Configuring
your display settings for use with Convert DVI” on page 21.
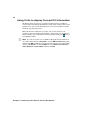
Retrieving a window from the Convert DVI
desktop
If you are extending your primary desktop to your Convert DVI desktop, certain
applications may open windows on your Convert DVI desktop instead of your
primary desktop. If you later disconnect the monitor from Convert DVI’s DVI
output, you will not be able to see any windows that open on your Convert DVI
desktop, and you may need to retrieve the hidden windows.
° To retrieve a hidden window:
1 Right-click the program window on your taskbar, and then click Move.
¦ Note If you see that Move is unavailable when you right-click the program
window, it means the hidden window has been minimized. Click Restore and
then repeat step 1.
2 Press one of the arrow keys on your keyboard to lock your mouse cursor
onto the window, and then drag the window back to your primary display.
Chapter 3, Installing Your Matrox Software and Configuring Your Display
4
Configuring Matrox Convert DVI
This chapter explains how to
set your Convert DVI settings.
28
Using the Matrox Convert DVI Control Panel
The Matrox Convert DVI Control Panel includes various settings for configuring
the Matrox Convert DVI video output, genlock, and region of interest settings.
You can also set your administartion settings in the Matrox Convert DVI Control
Panel.
Remarks
• In order to configure Convert DVI, it must be connected to your computer
via the USB connectors as explained in “Connecting Convert DVI” on
page 7.
• Before configuring Convert DVI as explained in this chapter, you should
make sure that you have specified your desired display settings for the
Convert DVI desktop (see “Configuring your display settings for use with
Convert DVI” on page 21). If you change your Convert DVI desktop’s
display settings after configuring Convert DVI, the video output may be
distorted. If this happens, you must re-configure your Convert DVI settings.
• Depending on your Conver DVI hardware, some of the options described in
this chapter may not be available, and your Matrox Convert DVI Control
Panel may not appear exactly as shown.
Opening the Matrox Convert DVI Control Panel
To open the Convert DVI Control Panel, do one of the following:
• Double-click the
• Right-click the
Control Panel.
icon on the Windows taskbar.
icon and then choose Open Matrox Convert DVI
• Choose Start > All Programs > Matrox ConvertUtils > Matrox
Convert DVI Control Panel.
Switching between Convert DVI user accounts
To ensure proper functionality of Convert DVI when using the Fast User
Switching method to switch between two Convert DVI users, the Matrox Convert
DVI Control Panel must be closed on the current user account before switching
user. Matrox Convert DVI will not function properly if the Matrox Convert DVI
Control Panel is open on two user accounts at the same time when using Fast
User Switching. However, this does not apply when switching between user
accounts using the log off/log on method.
Chapter 4, Configuring Matrox Convert DVI
29
Specifying your output settings
This section details how to specify your Convert DVI video and audio output
settings. Depending on your Convert DVI hardware, some of the output options
described in this section may not be available, and may not appear exactly as
shown.
¦ Note You must click Apply for the changes to the output settings to take
effect.
1 Open the Matrox Convert DVI Control Panel.
2 Click the Output tab.
3 From the Output Format list, select the video format that you want for
Convert DVI’s video output. However, your video output content, be it the
entire Convert DVI desktop or a selected region of interest (see “Specifying
your region of interest settings” on page 35), may not necessarily be
displayed at this resolution. The scaling factor selected for your output
content determines how it’s displayed relative to the selected video output
format (see “Scaling and positioning your output” on page 49).
Specifying your output settings
30
¦ Note To optimize the quality of your video output if you selected a PAL,
1280×720p @ 50 fps, or 1920×1080i @ 25 fps video output format, you must
change the Convert DVI display mode settings to support 50 Hz video (see
“Specifying your Convert DVI display modes” on page 40).
4 From the Active Analog Output menu, select the type of analog video
output that you want. You can select either Component or Composite and
S-Video. If you selected an HD output format, only Component will be
available.
¦ Note The SDI output is always active, and follows the SMPTE 259M
(SD-SDI video) and SMPTE 292M (HD-SDI video) specifications.
5 The Anti-flicker filter option is enabled by default to prevent flickering
when previewing interlaced video. You may want to clear this option when
working with graphics files, or when displaying full-screen video. This
option is disabled when outputting a 720p video format (see step 3).
6 When outputting SD video (NTSC, NTSC-J, or PAL), select Allow square
pixel compensation to maintain your output content’s aspect ratio on the
video output, and then choose the aspect ratio (4:3 or 16:9) of the monitor
connected to Convert DVI’s video output. If performing a print-to-tape,
select the aspect ratio that you want for your print-to-tape file.
If aspect ratio preservation is not important, disable this option to output the
crispest possible image. Disable this option if a DVI-D device that is
connected to Convert DVI’s DVI input in stand-alone mode (see
“Stand-alone mode” on page 46) applies square pixel compensation at the
source.
¦ Note This option is available only when outputting an SD format, and when
the Scale to fit horizontally or Scale to fit vertically scaling option is
selected (see “Scaling and positioning your output” on page 49).
7 For Matrox Convert DVI Plus only, the Graphic Overlay feature lets you
add a custom graphic, such as a company logo, anywhere on the Convert
DVI desktop. Convert DVI supports .png files, and 32-bit compressed (RLE)
and 32-bit uncompressed .tga files only.
Select Graphic overlay to enable the feature, and then click Configure to
select a file and position it on the Convert DVI desktop. When configuring
the graphic overlay, select Center at any time to position the graphic at the
center of your Convert DVI desktop, or Lock to lock the graphic in its
current position. If you need to access a section of the screen that is directly
behind the graphic overlay, select Allow clicking through graphic. You
Chapter 4, Configuring Matrox Convert DVI
31
can also position the file manually by using your mouse to drag the graphic
to the desired position.
8 For Matrox Convert DVI Plus only, click Proc Amps to adjust the Hue,
Chroma, Brightness, and Contrast levels of your video output. Click
Save as Default to save the current settings as the default settings, which
overrides the previously saved settings. Click Load Default at any time to
load the latest default settings. Click OK when done.
9 Under Audio Output, select Embed audio in SDI output if you want the
audio from your computer to be embedded in Convert DVI’s SDI output
signal. Since Convert DVI supports only one stereo pair (pair 1/2) from your
computer on input, and Convert DVI’s SDI output supports eight audio
channels (four stereo pairs), you must select the SDI stereo pair(s) that will
be used to output the audio from your computer. The stereo pair from your
computer is duplicated on every selected SDI stereo pair. For example, if 3-4
and 5-6 are selected, the stereo pair from your computer will be outputted on
SDI stereo pairs 3/4 and 5/6. The SDI stereo pairs that are not selected are
muted.
10 Click Apply for the changes to take effect. The Apply button is active only
when a change is made to the current output settings.
Specifying your output settings
32
¥ Tip Press CTRL+SHIFT+F1 to apply changes (see “Managing keyboard
shortcuts” on page 48).
Freezing the Convert DVI output (Convert DVI
Plus only)
Convert DVI Plus users can freeze the video output at any time by clicking
Freeze Output. When the video output is frozen, any changes made to the
Convert DVI settings will not take effect until the video output is no longer
frozen. If your output content contains a video clip, it will also be frozen on your
video output when the Convert DVI output is frozen.
¥ Tip Press CTRL+SHIFT+F6 to freeze/unfreeze the Convert DVI output (see
“Managing keyboard shortcuts” on page 48).
¦ Note To avoid video output issues, do not change the video output format
when the Convert DVI output is frozen (see “Specifying your output settings” on
page 29).
Chapter 4, Configuring Matrox Convert DVI
33
Specifying your genlock settings
This section details how to specify your Convert DVI genlock settings.
¦ Note You must click Apply for the changes to the genlock settings to take
effect.
1 Open the Matrox Convert DVI Control Panel.
2 Click the Genlock tab.
3 From the Analog Genlock Source menu, select one of the following:
Select this to genlock to Convert DVI’s internal reference
signal. Select this option only if you don’t have an external sync generator
connected to the REF IN on your Convert DVI.
$
Internal
$
External
Select this if you connected an external sync generator to the
REF IN on your Convert DVI.
The status of your genlock source will be displayed as Locked or Not
Locked to indicate whether or not Matrox Convert DVI is presently locked
to your genlock source.
Specifying your genlock settings
34
4 If you’re genlocking to an external source, from the Genlock Video Format
menu, select your external genlock source’s video format.
¡ Important To ensure good output results, make sure that your external
genlock source’s video format is compatible with the Convert DVI video
output format.
5 If you’re genlocking to an external source, click Apply if required, and then
use the horizontal and vertical settings under Video Output Timing Offset
to adjust the timing of the video output relative to your external genlock
source. This lets you compensate for cable delays within your system. Click
the
button to return a slider to its default position.
¦ Note To automatically apply the timing offset settings, and to view the
timing offset adjustments live on your video output, make sure to Apply the
genlock settings before adjusting the timing offset. If you do not Apply the
genlock settings before, the timing offset settings will not be automatically
applied, and any adjustments you make will not be live on your video output.
6 Click Apply for the changes to take effect. The Apply button is active only
when a change is made to the current genlock settings.
¥ Tip Press CTRL+SHIFT+F1 to apply changes (see “Managing keyboard
shortcuts” on page 48).
Chapter 4, Configuring Matrox Convert DVI
35
Specifying your region of interest settings
The region of interest feature lets you output a specific area of your Convert DVI
desktop, instead of the entire desktop. A customizable window is used to select
the area of your Convert DVI desktop that you want to output. Only the content
within the selection window border is displayed on the video output. The
selection window border and the content behind the border are not visible on the
video output. You can position the selection window to focus on a specific area of
your Convert DVI desktop, or pan the selection window across the desktop to
scan and output its contents in real time. You can also save, load, and delete
custom region of interest presets.
¦ Note Changes made to the region of interest settings are instantly applied to
the Convert DVI video output.
1 Open the Matrox Convert DVI Control Panel.
2 Click the Region of Interest tab.
3 Select Region of interest to enable the region of interest feature and its
options. When enabled, Convert DVI outputs only the content within the
Specifying your region of interest settings
36
region of interest selection window. When disabled, the entire Convert DVI
desktop is displayed on the video output.
¥ Tip Press CTRL+SHIFT+F2 to enable/disable the region on interest feature
(see “Managing keyboard shortcuts” on page 48).
4 Under Custom Preset, you can load and delete a previously saved region of
interest preset, or save the current settings as a new preset:
$
Load Select a previously saved region of interest preset from the list to
load the preset’s settings. You can also load a region of interest preset by
using a keyboard shortcut (see “Managing keyboard shortcuts” on
page 48).
$
Save Click
to save the current region of interest settings as a new
preset. The new region of interest preset is automatically added to the
Convert DVI keyboard shortcut list. See“Managing keyboard shortcuts”
on page 48 to create a keyboard shortcut that can be used to load the
region of interest preset.
$
Delete Click
preset.
to delete the currently selected region of interest
5 Under Size, select 16:9 or 4:3 from the list if you want a region of interest
with an aspect ratio of 16:9 or 4:3 respectively, or select Custom if you want
a custom aspect ratio. To resize the region of interest selection window,
either type values for Width and Height, or drag the selection window
border (see “Adjusting the region of interest manually” on page 38). Select
Preserve aspect ratio at any time to maintain the selection window’s
current aspect ratio when resizing. The Preserve aspect ratio option is
enabled automatically when 16:9 or 4:3 is selected. Holding SHIFT when
resizing the selection window using your mouse also maintains the window’s
aspect ratio.
¦ Note If the selection window border becomes red when resizing, the current
output scaling is not supported. If this occurs, the video output will display
the last supported output until you resize the selection window so that its
border is no longer red, or adjust the output scaling (see “Scaling and
positioning your output” on page 49).
6 Under Position, type X and Y values to position the selection window on
your Convert DVI desktop (0,0 places the window at the desktop’s top-left
corner). Select Center at any time to position the selection window at the
center of your Convert DVI desktop.
¦ Note You can also use your mouse to position the selection window. This
allows you to pan the selection window across the desktop to scan and output
its contents in real time (see “Adjusting the region of interest manually” on
page 38).
Chapter 4, Configuring Matrox Convert DVI
37
7 Under Settings, set the following options:
$
Select this option to hide the region of interest
selection window. This option does not disable or enable the region of
interest feature, but simply hides or shows the selection window. You can
also right-click the selection window to hide it temporarily.
Hide selection window
¥ Tip Press CTRL+SHIFT+F3 to hide/show the selection window (see
“Managing keyboard shortcuts” on page 48).
$
Show bezel If you selected a 16:9 or 4:3 aspect ratio in step 5, select
this option to display the action-safe area (larger outline) and title-safe
area (smaller outline) of the selection window. This feature is useful in
identifying the areas of your clip that would be hidden by a bezel when
displayed on a standard television screen.
$
Allow clicking through selection window
Selecting this option
allows you to access objects on your Convert DVI desktop that are behind
the region of interest selection window. In this mode, you can move the
selection window by its borders only (see “Adjusting the region of interest
manually” on page 38). When this option is disabled, you will not be able
to access objects that are behind the selection window.
¥ Tip Press CTRL+SHIFT+F5 to enable/disable the click-through option (see
“Managing keyboard shortcuts” on page 48).
$
Border color Change the color of the selection window’s border and
bezel. This is useful when the current border color is difficult to see
because of the background.
$
Snap to window (Convert DVI Plus only) When this option is
enabled, Convert DVI detects any window/pane that is under the current
mouse position when positioning the region of interest window manually
(see “Adjusting the region of interest manually” on page 38), and
automatically adjusts the region of interest size to match the detected
window/pane. This option is useful when you want to quickly select a
specific window/pane in an application or website, such as YouTube. You
can scan the Convert DVI desktop for any detectable windows/panes by
dragging the region of interest window across the Convert DVI desktop.
When a window/pane is detected, the region of interest window will
automatically outline the detected window/pane. Release the mouse
button to select the currently detected window/pane. Depending on the
manner in which the application or website was created, Convert DVI
may not detect all windows/panes.
When Snap to window is enabled, you can resize the region of interest
selection window using the control panel settings (see step 5), or manually
using your mouse (see “Adjusting the region of interest manually” on
page 38). To adjust the region of interest selection window’s position, you
Specifying your region of interest settings
38
can do so using the control panel settings (see step 6), or the keyboard
arrow keys when the selection window is the active window.
¦ Note If the region of interest selection window border becomes red when
scanning the Convert DVI desktop for detectable windows/panes, the current
output scaling is not supported for that particular window size. If this occurs,
the video output will display the last supported output until you resize the
selection window so that its border is no longer red, or adjust the output scaling
(see “Scaling and positioning your output” on page 49).
Adjusting the region of interest manually
The region of interest selection window defines the area of your Convert DVI
desktop that is displayed on your video output when the region of interest feature
is enabled. This section details how to manually resize and position the selection
window using your mouse. See “Specifying your region of interest settings” on
page 35 for instructions on how to resize and position the selection window using
the control panel settings.
¦ Note Only the content within the selection window border is displayed on the
video output. The selection window border and the content behind the border are
not visible on the video output.
Resizing
To manually resize the selection window, move the mouse pointer to one of the
resize handles that are available on the selection window, and then drag to resize.
Hold SHIFT when dragging the selection window to maintain its aspect ratio.
When resizing, the video output updates with the new content when the mouse
button is released.
¦ Note If the selection window border becomes red when resizing, the current
output scaling is not supported. If this occurs, the video output will display the
last supported output until you resize the selection window so that its border is no
longer red, or adjust the output scaling (see “Scaling and positioning your
output” on page 49).
Positioning and panning
You can position the selection window to focus on a specific area of your Convert
DVI desktop, or pan the selection window across the desktop to scan and output
its contents in real time.
¦ Note The panning feature is automatically disabled when Snap to window is
enabled (see “Specifying your region of interest settings” on page 35).
To position or move the selection window, move the mouse pointer anywhere
within the selection window border, or to the border if Allow clicking through
selection window is enabled (see “Specifying your region of interest settings”
on page 35), until the pointer becomes a hand icon, and then drag the selection
Chapter 4, Configuring Matrox Convert DVI
39
window. If Snap to window is enabled (see “Specifying your region of interest
settings” on page 35), you can scan the Convert DVI desktop for any detectable
windows/panes, and release the mouse button to select the currently detected
window/pane.
¥ Tips
• Right-click to temporarily hide the selection window and mouse icon.
• If Allow clicking through selection window is disabled (see “Specifying
your region of interest settings” on page 35), double-click anywhere within
the selection window border to center it on your Convert DVI desktop, and
restore the window to a preset size and aspect ratio based on the current
output format. In some cases, this may result in an unsupported scaling mode
(selection window border becomes red). If this occurs, the video output will
display the last supported output until you resize the selection window so
that its border is no longer red, or adjust the output scaling (see “Scaling and
positioning your output” on page 49).
Specifying your region of interest settings
40
Specifying your Convert DVI display modes
By default, Convert DVI supports a predefined set of common desktop
resolutions at 60 Hz and 75 Hz. This is to ensure that Convert DVI functions with
most DVI monitors/devices. The default 60 Hz resolutions provide optimal
results for outputting video at 29.97 fps or 59.94 fps, such as NTSC and
1920×1080i @ 59.94 fps. However, you may need to change the supported
Convert DVI display modes for the following reasons:
• If the Convert DVI video output format is set to PAL, 1280×720p @ 50 fps,
or 1920×1080i @ 25 fps (see “Specifying your output settings” on page 29),
you can optimize your video output by changing the Convert DVI display
modes to support 50 Hz refresh rates.
¦ Note To avoid display issues when changing the display modes to support
50 Hz refresh rates, the DVI monitor connected to the DVI OUT of your
Convert DVI must also support 50 Hz refresh rates. If the monitor connected
to Convert DVI’s DVI output does not support a 50 Hz refresh rate, you can
connect a video monitor or other display device to Convert DVI’s analog or
SDI outputs in order to see your Convert DVI desktop.
• If the display mode of the monitor/device that is connected to the DVI IN or
DVI OUT connector on your Convert DVI is not supported by default.
¦ Note You must restart your computer after changing the supported display
modes for the changes to take effect.
Chapter 4, Configuring Matrox Convert DVI
41
° To change the Convert DVI display modes:
1 Open the Matrox Convert DVI Control Panel.
2 Click the Display Modes tab.
3 Select one of the following display mode settings:
$
Default Sets the Convert DVI desktop display modes to Convert DVI’s
default 60 Hz and 75 Hz resolutions (see “Convert DVI default display
modes” on page 42). You can also set Convert DVI to default display
modes by clicking Reset DVI Output (see “Resetting your Convert DVI
display modes” on page 43).
$
Clone monitor Sets the Convert DVI desktop display modes to those
that are supported by the DVI monitor that is connected to Convert DVI’s
DVI output.
$
Clone monitor at 50 Hz
When this option is selected, Convert DVI
takes the detailed timing display modes that are available on the DVI
monitor that is connected to Convert DVI’s DVI output, and sets them at
50 Hz. Detailed timing display modes are simply a group of resolutions
on your monitor that have detailed display information associated with
Specifying your Convert DVI display modes
42
them. Every monitor has at least one detailed timing display mode. In
monitors with more than one detailed timing display mode, Convert DVI
will support the first three display modes provided by the monitor.
$
Custom Select this option to choose up to three display modes, in any
combination, from the list of available 50 Hz, 60 Hz, and 75 Hz
resolutions. This option can also be used to support a non-standard
display mode when connecting a DVI-D device, such as a camera or
medical device, to Convert DVI’s DVI input when in stand-alone mode
(see “Stand-alone mode” on page 46). From the Available Display
Modes window, select up to three display modes.
¦ Note Whichever display mode option you select, Convert DVI will always
support 1280×1024p @ 60 Hz. This is to ensure Convert DVI’s compatibility
with a DVI monitor that supports only 60 Hz refresh rates when the Convert
DVI display modes are set to 50 Hz. In such a case, you will not be able to see
the Convert DVI desktop. This is especially problematic if you connected
Convert DVI to your display card’s primary DVI output. For more information,
see “If you have display issues when starting Windows” on page 25.
4 Click Load, and then restart your computer when prompted.
5 After restarting your computer, if the resolution that you previously selected
for your Convert DVI desktop is no longer supported after changing display
modes, use the Windows display settings to change the Convert DVI desktop
resolution (see “Configuring your display settings for use with Convert DVI”
on page 21).
If the supported display modes include two with the same resolution but
different refresh rate, such as 1280×1024 @ 50 Hz and 1280×1024 @ 60
Hz, use your display card’s configuration utility to set your display card to
run at the desired refresh rate.
Convert DVI default display modes
The following is a list of the default display modes that are supported by Convert
DVI. You can set your Convert DVI to its default display modes by selecting
Default in the Display Modes page (see “Specifying your Convert DVI display
modes” on page 40), or by clicking Reset DVI Output (see “Resetting your
Convert DVI display modes” on page 43).
• 640×480 @ 60 Hz and 75 Hz
• 720×480 @ 60 Hz
• 720×576 @ 60 Hz
• 800×600 @ 60 Hz and 75 Hz
• 832×624 @ 75 Hz
• 1024×768 @ 60 Hz and 75 Hz
Chapter 4, Configuring Matrox Convert DVI
43
• 1152×870 @ 75 Hz
• 1280×720 @ 60 Hz
• 1280×1024 @ 60 Hz
• 1600×1200 @ 60 Hz
• 1680×1050 @ 60 hz
• 1920×1080 @ 60 Hz
• 1920×1200 @ 60 Hz
Resetting your Convert DVI display modes
Perform the following steps to reset the Convert DVI display modes to the default
60 Hz and 75 Hz resolutions (see “Convert DVI default display modes” on
page 42), or to resolve display issues (see “If you have display issues when
starting Windows” on page 25).
¦ Note The Reset DVI Output button is active whenever Convert DVI is
connected to your computer via the Convert DVI USB connections.
1 Open the Matrox Convert DVI Control Panel.
2 Click Reset DVI Output.
3 Restart your computer.
Specifying your Convert DVI display modes
44
Specifying your administrator settings
The Admin page of the Convert DVI Control Panel is used for the various
administrative actions and settings, such as programming stand-alone mode,
loading and saving project presets, locking the control panel, and the
management of your password and keyboard shortcuts.
1 Open the Matrox Convert DVI Control Panel.
2 Click the Admin tab.
3 Select or clear the Lock control panel option to lock or unlock the Matrox
Convert DVI Control Panel and its options. When locked, the control panel
settings will not be accessible, but Convert DVI will continue to output the
desktop as per the current settings. To freeze the output, see “Freezing the
Convert DVI output (Convert DVI Plus only)” on page 32.
¦ Note A password is required to unlock the control panel.
4 Click Password to manage your Convert DVI password, which is required
to unlock the control panel (see step 3). If no password exists in the system,
you will be prompted to create a new password. If a password already exists,
this option lets you change your Convert DVI password.
Chapter 4, Configuring Matrox Convert DVI
45
¦ Note If you can’t remember your current password, you can retrieve it from
the Windows registry editor. Choose Start (Windows 7) or Start > Run
(Windows XP), type regedit in the text box provided, and then press ENTER.
In the registry tree on the left, go to HKEY_CURRENT_USER\Software\
Matrox\Video\Settings\Convert, and then open the Password file. The current
password appears under Value data.
5 Click View Current Settings to view the current control panel settings,
stand-alone mode settings that are saved in the Convert DVI’s internal
memory, and the currently supported display modes.
6 Under Project Preset, click Save Project to save all current Convert DVI
output, genlock, region of interest, and scaling and positioning settings as a
project preset, or click Load Project to load a previously saved project
preset.
Remarks
$
Display mode settings (see “Specifying your Convert DVI display modes”
on page 40) are not saved in a project preset.
$
When loading a project preset, if the Convert DVI desktop resolution is
different from what it was when the preset was saved, the resulting video
output for the preset will not be the same.
7 Under Stand-Alone Mode, program your Convert DVI for use in
stand-alone mode as described in “Stand-alone mode” on page 46.
8 Under Keyboard Shortcuts, select Enable keyboard shortcuts to use the
designated shortcut keys to perform specific Convert DVI actions, or to load
a custom region of interest preset. You can clear this option if you find that
any of the keyboard shortcuts conflict with other software on your system.
To view or edit the current keyboard shortcuts, click Edit Shortcuts. For
instructions on editing the keyboard shortcuts, see “Managing keyboard
shortcuts” on page 48.
Specifying your administrator settings
46
Stand-alone mode
Convert DVI's stand-alone mode lets you use your Convert DVI with any device
that has a DVI-D output in a supported desktop resolution (see “Supported
Convert DVI desktop resolutions” on page 24). For example, you can connect
Convert DVI to the DVI output from a camera or medical device, or the DVI
output from a different computer from the host computer that you used to
configure Convert DVI.
¦ Note If your device has an HDMI or DisplayPort output, you can use a
third-party HDMI to DVI or DisplayPort to DVI adapter.
When using Convert DVI in stand-alone mode, the DVI input on Convert DVI is
converted to high-quality video and output through Convert DVI's SDI and
analog outputs according to the programmed configuration settings.
This section details how to program and use Convert DVI in stand-alone mode.
Programming Convert DVI for stand-alone mode
To use Convert DVI in stand-alone mode, you must first program your desired
stand-alone settings in Convert DVI's internal memory as described in this
section.
¦ Note If you install a new version of the Convert DVI software that initiates a
firmware update on your Convert DVI, the programmed stand-alone settings will
be erased from Convert DVI's internal memory.
1 Make sure that Convert DVI is connected to your computer via the Convert
DVI USB cable (see “Connecting Convert DVI for programming stand-alone
mode” on page 12), and that the computer has the Convert DVI software
installed.
¦ Note The Convert DVI USB cable must be connected in order to make
changes to the Convert DVI settings and to program your Convert DVI for
stand-alone mode. The USB cable is not required to use Convert DVI in
stand-alone mode. When connecting the USB cable, it may take up to a minute
for the Convert DVI video output to resume. If the Matrox Convert DVI
Control Panel does not respond after you have connected the USB cable, close
and then re-open the control panel.
2 Set the Convert DVI desktop resolution to match the output resolution of the
DVI device that you want to use with Convert DVI in stand-alone mode.
However, if Convert DVI’s input detection feature is enabled (see step 6), the
Convert DVI desktop resolution will be ignored and Convert DVI will detect
the output resolution of your DVI device. For information on setting your
Convert DVI desktop resolution, see “Configuring your display settings for
use with Convert DVI” on page 21.
3 Open the Matrox Convert DVI Control Panel.
Chapter 4, Configuring Matrox Convert DVI
47
4 Specify your Convert DVI settings. These settings will be used by your
Convert DVI when in stand-alone mode.
¦ Note Only the settings that have been applied to your video output will be
programmed for stand-alone mode. If you make changes to the Output or
Genlock settings, make sure to click Apply on those pages before
programming for stand-alone mode. The Graphic overlay output option and
the Snap to window region-of-interest option are not available in stand-alone
mode.
5 Click the Admin tab.
6 Under Stand-Alone Mode, select Input detection if you want Convert
DVI to automatically detect the output resolution of the DVI device
connected to Convert DVI’s input, and output the entire Convert DVI
desktop (DVI input) according to the selected Output scaling mode:
Outputs the content as full-screen anamorphic video.
$
Anamorphic
$
Best fit Outputs the content as either letterbox or pillarbox video,
depending on the input and output resolutions, while maintaining the
content’s aspect ratio.
This feature is especially useful when you want to connect different
resolutions to Convert DVI’s input when in stand-alone mode. When input
detection is selected, the programmed region of interest settings, and the
programmed Convert DVI desktop resolution, are ignored.
7 Under Stand-Alone Mode, click Program Current Settings to copy the
current Convert DVI settings to your Convert DVI’s internal memory. When
programming is complete, Programmed will appear in the status window.
²Caution Do not disconnect Convert DVI’s USB cable or power cord until
the programming process is complete. Doing so may damage your Convert
DVI hardware.
Using Convert DVI in stand-alone mode
After programming your Convert DVI for stand-alone mode (see “Programming
Convert DVI for stand-alone mode” on page 46), perform the following steps to
use your Convert DVI in stand-alone mode.
1 Connect Convert DVI as shown in “Connections for using Convert DVI in
stand-alone mode” on page 17.
¦ Note Ensure that the Convert DVI USB cable is disconnected from the
Convert DVI.
2 Disconnect and then reconnect the power cord from Convert DVI. Your
Convert DVI will boot in stand-alone mode.
¦ Note You cannot make any changes to the Convert DVI settings when
connected in stand-alone mode. To change the Convert DVI settings, Convert
Specifying your administrator settings
48
DVI must be connected using the USB cable to a computer that has the Convert
DVI software installed. See “Programming Convert DVI for stand-alone mode”
on page 46 for instructions on changing the Convert DVI stand-alone settings.
Managing keyboard shortcuts
Convert DVI comes with default keyboard shortcuts for performing specific
actions. You can edit and delete these shortcuts from the Keyboard Shortcuts
dialog box. You can also create, edit, and delete a keyboard shortcut for any
custom region of interest preset in the system. The following steps detail how to
edit, create, and delete keyboard shortcuts.
¦ Note If any of the keyboard shortcuts conflict with other software on your
system, you can either change the shortcut, or disable the keyboard shortcuts as
explained in “Specifying your administrator settings” on page 44.
1 Open the Matrox Convert DVI Control Panel.
2 Click the Admin tab.
3 Under Keyboard Shortcuts, click Edit Shortcuts.
4 To create, edit, or delete a keyboard shortcut, highlight the corresponding
Action, and then either type the shortcut (up to a maximum of three keys
using SHIFT, CTRL, alphanumeric, and functions keys), or press DELETE on
your keyboard.
5 Click Default at any time to reset the keyboard shortcuts to default settings.
Only the keyboard shortcuts for the Convert DVI actions (Apply, freeze
output, etc.) will be reset to default settings. The keyboard shortcuts for
custom region of interest presets will not be affected.
Chapter 4, Configuring Matrox Convert DVI
49
The following table lists the default keyboard shortcuts for the Convert DVI
actions:
Action
Default shortcut
Apply
CTRL+SHIFT+F1
Enable/disable region of interest
CTRL+SHIFT+F2
Show/hide region of interest
CTRL+SHIFT+F3
1:1 output scaling option
CTRL+SHIFT+F4
Allow clicking through selection window
CTRL+SHIFT+F5
Freeze/unfreeze output
1
CTRL+SHIFT+F6
Enable/disable the region of interest
Snap-to-window option1
1
CTRL+SHIFT+F7
Available for Convert DVI Plus only.
6 Click OK to save the changes.
Scaling and positioning your output
If you’re outputting the entire Convert DVI desktop, no matter which Convert
DVI hardware you’re using (Convert DVI or Convert DVI Plus), the output
content can be upscaled or downscaled in relation to the specified video output
format. If you’re using the region of interest feature and are outputting a specific
area of the Convert DVI desktop, Convert DVI Plus users can upscale or
downscale the output content, while Convert DVI supports downscale only.
If using Convert DVI Plus, you can position your output content anywhere on the
video output. If you’re not using Convert DVI Plus, your output content will
always be centered on the video output. The Convert DVI scaling window also
shows a live preview of the video output. Depending on your Convert DVI
hardware, some of the options described in this section may not be available, and
may not appear exactly as shown.
Scaling and positioning your output
50
1 Open the Matrox Convert DVI Control Panel.
2 Select Show video output scaling and positioning window (Convert
DVI Plus), or Show video output scaling and live preview window
(Convert DVI).
Video output
Custom-scaling
handle
(Convert DVI Plus
only)
Destination
region of interest
(output content)
3 Select Show settings to display the options.
4 Under Scaling, choose one of the following scaling options from the list to
scale your output content. The area that represents your output content in the
preview window is referred to as the destination region of interest:
¡ Important When scaling, if the destination region of interest becomes red
and displays a warning icon, this means that the current scaling is not
supported for your Convert DVI desktop (or region of interest) resolution. If
this occurs, the video output will display the last supported output until you
adjust the scaling so that the destination region of interest is no longer red, or
change your Convert DVI resolution (see “Configuring your display settings
for use with Convert DVI” on page 21), or input region of interest size (see
Chapter 4, Configuring Matrox Convert DVI
51
“Specifying your region of interest settings” on page 35). The Destination
region of interest limitation box above the preview window shows the
width and height limitations.
Scales your original output content so that it fills the
entire video output.
$
Anamorphic
$
Scale to fit horizontally Scales your original output content so that it
fills the video output horizontally, while maintaining the aspect ratio.
$
Scale to fit vertically Scales your original output content so that it fills
the video output vertically, while maintaining the aspect ratio.
$
1:1 (no scaling)
$
Custom (Convert DVI Plus only) Select this option for custom scaling
using the Width and Height, or % options. Press ENTER on your
Displays your original output content at its exact
resolution without any scaling. You can also press CTRL+SHIFT+F4 to set
the scaling to 1:1 (see “Managing keyboard shortcuts” on page 48).
keyboard after typing the values. You can also scale manually by using the
custom-scaling handles that are available on the destination region of
interest.
¦ Note Hold SHIFT when scaling manually to maintain the destination region
of interest aspect ratio, or you can select Preserve aspect ratio to maintain
the aspect ratio when scaling manually or when using the Width and Height
options.
¥ Tip Double-click the destination region of interest to scale it
anamorphically. If anamorphic scaling produces an unsupported condition,
the scaling is set to 1:1 (no scaling).
5 For Convert DVI only, select Underscan mode to reduce the video output
by 10% to view the full video frame, which includes the edges of your video
that may be visible only on production monitors. Clearing this option
displays only the safe area of a video frame that is visible on all standard
televisions and monitors.
¦ Note Convert DVI Plus users can achieve the same result by using the
available % option to reduce the video output by 10%.
6 When outputting NTSC, NTSC-J, or PAL video (see “Specifying your
output settings” on page 29), select Allow square pixel compensation to
maintain your output content’s aspect ratio on the video output, and then
choose the aspect ratio (4:3 or 16:9) of the monitor connected to Convert
DVI’s video output. If you’re recording Convert DVI’s video output to tape,
select the aspect ratio that you want for your recording.
If aspect ratio preservation is not important, disable this option to output the
crispest possible image. Disable this option if a DVI-D device that is
connected to Convert DVI’s DVI input in stand-alone mode (see
Scaling and positioning your output
52
“Stand-alone mode” on page 46) applies square pixel compensation at the
source.
¦ Note This option is available only when outputting an SD format (see
“Specifying your output settings” on page 29), and when the Scale to fit
horizontally or Scale to fit vertically scaling option is selected.
7 For Convert DVI Plus only, under Position, type X and Y values to position
the destination region of interest on the video output (0,0 places it at the
top-left corner of the video output), or select Center to position it in the
center of the video output. You can also position it manually by moving the
mouse pointer anywhere within the destination region of interest until the
pointer becomes a hand icon, and then drag to the desired position.
8 For Convert DVI Plus only, under Background, choose the Color for the
video output background. This option can be useful if you want to chroma
key the background. Select Allow Super White/Super Black to allow the
highest luminance level of your video output to exceed the standard
maximum white level, and the lowest luminance level of your video output
to fall below the standard black level. This option can be useful for luma
keying.
9 Select Live preview if you want the preview window to display a live
representation of the video output. This option is especially useful when
previewing a video output that contains a video clip. When this option is
disabled, the preview window will update only after a change is made to the
Convert DVI settings.
¦ Note Convert DVI leverages your system’s resources to perform the live
preview. Disable this option to free your system’s resources for other tasks,
such as when playing back high-resolution video clips.
Chapter 4, Configuring Matrox Convert DVI
5
Monitoring Your Matrox Convert DVI
System
This chapter explains how to
use the Matrox X.info program
to display important details
about your Matrox Convert DVI
system and installed hardware.
54
Using X.info to display Convert DVI information
The Matrox X.info program lets you display information about your Matrox
Convert DVI system and installed hardware, and provides warnings when certain
problems arise, such as when the temperature of your Convert DVI exceeds the
maximum operating temperature.
Matrox X.info runs continuously to monitor your system, whenever your
computer is turned on and the Convert DVI is connected. You can open Matrox
X.info to display system and hardware details by double-clicking the
icon on
your Windows taskbar.
¦ Note If you do not see the icon, for Windows XP, right-click the notification
area of the taskbar and choose Properties, clear the Hide inactive icons option,
and then click OK. For Windows 7, right-click the notification area of the taskbar
and choose Properties, click the Taskbar tab, select Always show all icons
and notifications on the taskbar, and then click OK.
Chapter 5, Monitoring Your Matrox Convert DVI System
55
Displaying system information
To display information about your Matrox Convert DVI system, select System
from the Display Information About list. On this page, you can see Install
Information, such as the install path and version of Matrox ConvertUtils.
You can also create an HTML log file of your system information, which can be
useful for troubleshooting. To create this log, use the Browse button under
System Information Log to select the path and name of the log, then click
Create. If Open file after scan is selected, the HTML system log opens after it
is created.
If you had previously turned off certain Matrox warnings and want them to be
re-enabled, click Re-enable Warnings. For example, some Matrox warnings
provide an option to turn off the warning (that is, you can select Don’t display
this message again). Clicking Re-enable Warnings allows these warnings to
be displayed again.
Using X.info to display Convert DVI information
56
Displaying hardware information
To display information about your Matrox Convert DVI hardware, select
Hardware from the Display Information About list. This displays a page with
hardware information (for example, serial number and production date). You can
also monitor the current and maximum operating temperatures for your Convert
DVI hardware.
¦ Note For hardware information to be available, Convert DVI must be
connected to your computer via the Convert DVI USB cable before logging on to
Windows.
¡ Important Whether or not you have opened Matrox X.info, if your Convert
DVI exceeds the maximum operating temperature, you’ll receive a warning
message with further instructions as explained in the section “Error notification”
on page 57.
Chapter 5, Monitoring Your Matrox Convert DVI System
57
Monitoring your Convert DVI’s operating
temperature
As shown in the X.info Hardware section, the Convert DVI page displays the
current and maximum operating temperatures for your Matrox Convert DVI
hardware. To avoid damage to your Matrox Convert DVI, make sure that you
don’t operate your Convert DVI at or near the maximum temperature for a
prolonged period of time. You should target your Convert DVI to operate at least
10°C below the maximum operating temperature.
You should monitor the temperature of your Convert DVI periodically and take
measures as needed to lower the room temperature and/or make sure that the
Convert DVI is not close to a heat source and the ventilation holes are not
obstructed.
Error notification
X.info provides temperature warnings and warnings for other possible Convert
DVI hardware problems. Once X.info has detected a hardware problem, the
Matrox X.info Notification dialog box will be displayed to give you details of
the problem and further instructions. You will not be able to close this dialog box
until the problem has been resolved.
Using X.info to display Convert DVI information
58
Your notes
Chapter 5, Monitoring Your Matrox Convert DVI System
A
Matrox Convert DVI Specifications
This appendix provides
specifications for the Matrox
Convert DVI box.
60
Matrox Convert DVI box specifications
General
Video standards NTSC, PAL, NTSC-EIAJ, 720p, 1080i
Regulatory compliance FCC Class A, CE Mark Class A, C-Tick Mark, RoHS
Directive 2002/95/EC
Dimensions L 151 mm × W 161 mm × H 46 mm
(5.94” × 6.34” × 1.81”)
Operating voltages External AC/DC adapter: 100-240 VAC 50-60 Hz (5 V
DC, 3 A max.)
Efficiency Level V
Total power consumption Convert DVI: 10 watts
Convert DVI Plus: 12 watts
Connections
DVI input and output DVI-I (single-link) 29-pin port
Genlock reference input SD analog black burst (bi-level) or HD tri-level sync
BNC connector (75 terminated
SDTV SDI output SD-SDI with eight channels of embedded SDI audio
24-bit, 48 kHz
BNC connector (75
Compliant with SMPTE 259M-C, SMPTE 272M
SDTV S-Video & composite
video output PAL, NTSC, NTSC-EIAJ
BNC connectors (75
SDTV analog component
video output Betacam, Betacam SP (NTSC & NTSC-EIAJ)
SMPTE/EBU N10 (PAL)
BNC connectors (75
HDTV SDI output HD-SDI with eight channels of embedded SDI audio
24-bit, 48 kHz
Compliant with SMPTE 292M, SMPTE 299M
BNC connector (75
HDTV analog component
video output 720p, 1080i
Compliant with EIA-770.3
BNC connectors (75
Analog stereo line out Left and right RCA connectors
4.35 Vp-p (+6 dBu) maximum output level
Analog stereo loop through Input: Stereo 3.5mm male plug on Convert DVI cable
Output: Stereo 3.5mm female jack on Convert DVI
cable
4.35 Vp-p (+6 dBu) maximum input/output levels
Other USB 2.0 type B port
2.5mm barrel power connector
Appendix A, Matrox Convert DVI Specifications
61
Environmental specifications
• Minimum/maximum ambient operating temperatures: 0 to 35º C
• Minimum/maximum storage temperature: –40 to 75º C
• Maximum altitude for operation: 3,000 meters
• Maximum altitude for transport: 12,000 meters
• Operating humidity: 20 to 80% relative humidity (non-condensing)
• Storage humidity: 5 to 95% relative humidity (non-condensing)
Matrox Convert DVI box specifications
62
Your notes
Appendix A, Matrox Convert DVI Specifications
B
Matrox Customer Support
This appendix explains how
you can register your Matrox
product and obtain customer
support.
64
How to get Matrox customer support
If you have a problem that you’re unable to solve by referring to the
documentation for your Matrox product, please contact your Matrox
representative. He or she should be able to help you quickly correct any
installation or system configuration problem.
If your representative is unable to solve your problem, contact Matrox for further
information and assistance.
Registration
You can register your Matrox product in the Matrox Support section of our
website at www.matrox.com/video/support.
Only registered users are entitled to customer support, software updates, special
promotional offers, and access to our user forum.
Keep up to date with our website
In addition to registering your Matrox product, our website offers you
up-to-the-minute information about Matrox products and software updates. Be
sure to place our site in your favorites or bookmarks:
www.matrox.com/video/support.
Contacting us
Matrox is proud to offer worldwide customer support. Please use the contact
information for your Matrox product and area as provided on our website at
www.matrox.com/video/support.
Appendix B, Matrox Customer Support
Index
A
Adapter plugs, power 13
Administrator settings 44
C
Computer
connecting to Convert DVI 7
system requirements 3
Connections
analog component and SDI 15
composite and S-Video 16
Convert DVI to computer 7
programming for stand-alone mode 12
typical 14
using Convert DVI in stand-alone mode 17
using DVI to HDMI and DVI to DisplayPort
adapters 7
Control panel
See Matrox Convert DVI
Convert DVI
See Matrox Convert DVI
ConvertUtils
installing 20
removing 21
Customer support 64
D
Desktop resolutions, supported 24
Display modes
default 42
resetting to default 43
specifying settings 40
Display settings
configuring for Convert DVI 21
issues when starting Windows 25
E
Error notification, with X.info 57
H
Hardware
information, displaying with X.info 56
supplied with Convert DVI 2
Hardware warranty i
I
Internet site, Matrox 64
K
Keyboard shortcuts
enabling/disabling 45
managing and editing 48
L
Live preview, output 49
Lock/unlock control panel 44
M
Matrox
contacting us 64
WWW site 64
Matrox Convert DVI
about 2
adjusting region of interest manually 38
available connections 6
configuring your display settings for use with 21
connecting devices to 7
control panel
freezing output 32
scaling and positioning output 49
specifying administrator settings 44
specifying display mode settings 40
specifying genlock settings 33
specifying output settings 29
specifying region of interest settings 35
using 28
default display modes 42
firmware update 21
functioning in stand-alone mode 7
hardware detection 20
hardware supplied with 2
software
installing 20
removing 21
system requirements 3
typical connections 14
using with a computer 6
66
Matrox X.info, using 54
Monitoring your system 54
P
Password, to unlock control panel 44
Power adapter plugs 13
Primary display, using with Convert DVI 6
Project presets, saving and loading 45
R
Region of interest
adjusting manually 38
specifying settings 35
Registering your Matrox product 64
Resolutions
See Desktop resolutions
S
Scaling and positioning output 49
Secondary display, using with Convert DVI 6
Settings
display modes 40
freezing output 32
genlock 33
output 29
region of interest 35
scaling and positioning output 49
Software
installing 20
removing 21
Specifications 60
Stand-alone mode
functionality 7
programming 46
using Convert DVI 47
Style conventions 3
System information, displaying with X.info 55
System requirements 3
T
Technical support 64
Temperature, monitoring for Convert DVI
hardware 57
Index
V
Video output formats, supported 2
Video output settings 29
W
Warnings
displaying with X.info 57
re-enabling using X.info 55
Warranty i
WWW site, Matrox 64
X
X.info
error notification 57
hardware information 56
system information 55
using 54
Compliance Statements
USA
FCC Compliance Statement
Remark for the Matrox hardware products supported by this guide
This equipment has been tested and found to comply with the limits for a Class A digital device, pursuant to Part 15 of the FCC Rules. These limits are designed to
provide reasonable protection against harmful interference when the equipment is operated in a commercial environment. This equipment generates, uses, and can radiate
radio frequency energy and, if not installed and used in accordance with the instructions manual, may cause harmful interference to radio communications. Operation of
this equipment in a residential area is likely to cause harmful interference in which case the user will be required to correct the interference at his own expense.
WARNING
Changes or modifications to this unit not expressly approved by the party responsible for the compliance could void the user’s authority to operate this equipment. The
use of shielded cables for connection of the equipment and other peripherals is required to meet FCC requirements.
Canada
(English) Industry Canada Compliance Statement
Remark for the Matrox hardware products supported by this guide
These digital devices do not exceed the Class A limits for radio noise emission from digital devices set out in the Radio Interference Regulation of Industry Canada.
(Français) Conformité avec les exigences de l’Industrie Canada
Remarque sur les produits matériels Matrox couverts par ce guide
Ces appareils numériques n’émettent aucun bruit radioélectrique dépassant les limites applicables aux appareils numériques de Classe A prescrites dans le Règlement sur
le brouillage radioélectrique édicté par Industrie Canada.
Europe
(English) European user’s information – Declaration of Conformity
CAN ICES-3 (A)/NMB-3 (A)
Remark for the Matrox hardware products supported by this guide
These devices comply with EC Directive 2006/95/EC for a Class A digital device. They have been tested and found to comply with EN55022/CISPR22 and
EN55024/CISPR24. In a domestic environment these products may cause radio interference in which case the user may be required to take adequate measures.To meet
EC requirements, shielded cables must be used to connect the equipment and other peripherals.
(Français) Informations aux utilisateurs Européens – Déclaration de conformité
CAN ICES-3 (A)/NMB-3 (A)
Remarque sur les produits matériels Matrox couverts par ce guide
Ces unités sont conformes à la directive communautaire 2006/95/EC pour les unités numériques de classe A. Les tests effectués ont prouvé qu’elles sont conformes aux
normes EN55022/CISPR22 et EN55024/CISPR24. Le fonctionnement de ces produits dans un environnement résidentiel peut causer des interférences radio, dans ce cas
l’utilisateur peut être amené à prendre les mesures appropriées. Pour respecter les impératifs communautaires, les câbles de connexion entre l’équipement et ses
périphériques doivent être blindés.
(Deutsch) Information für europäische Anwender – Konformitätserklärung
Anmerkung für die Matrox Hardware-Produktunterstützung durch dieses Handbuch
Diese Geräte entsprechen EC Direktive 2006/95/EC für ein digitales Gerät Klasse A. Sie wurden getestet und entsprechen demnach EN55022/CISPR22 und
EN55024/CISPR24. In einer Wohnumgebung können diese Produkte Funkinterferenzen erzeugen, und der Benutzer kann genötigt sein, entsprechende Maßnahmen zu
ergreifen. Um EG-Anforderungen zu entsprechen, müssen zum Anschließen des ausrüstung und anderer Peripheriegeräte abgeschirmte Kabel verwendet werden.
(Italiano) Informazioni per gli utenti europei – Dichiarazione di conformità
Nota per i prodotti hardware Matrox supportati da questa guida
Questi dispositivi sono conformi alla direttiva CEE 2006/95/EC relativamente ai dispositivi digitali di Classe A. Sono stati provati e sono risultati conformi alle norme
EN55022/CISPR22 e EN55024/CISPR24. In un ambiente domestico, questi prodotti possono causare radiointerferenze, nel qual caso all’utente potrebbe venire richiesto
di prendere le misure adeguate. Per soddisfare i requisiti CEE, l’apparecchiatura e le altre periferiche vanno collegati con cavi schermati.
(Español) Información para usuarios europeos – Declaración de conformidad
Observación referente a los productos de hardware de Matrox apoyados por este manual
Estos dispositivos cumplen con la directiva de la CE 2006/95/EC para dispositivos digitales de Clase A. Dichos dispositivos han sido sometidos a prueba y se ha comprobado que cumplen con las normas EN55022/CISPR22 y EN55024/CISPR24. En entornos residenciales, estos productos pueden causar interferencias en las comunicaciones por radio; en tal caso el usuario deberá adoptar las medidas adecuadas. Para satisfacer las disposiciones de la CE, deberán utilizarse cables apantallados para conectar
el equipo y demás periféricos.
www.matrox.com/video