1
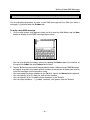
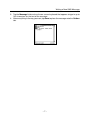
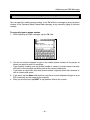
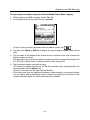
PVOS for PV-750
Version 1.20
User’s Guide
E
• The contents of this document are subject to change without notice.
• CASIO COMPUTER CO., LTD. assumes no responsibility for any damage or loss
resulting from the use of this manual.
• CASIO COMPUTER CO., LTD. assumes no responsibility for any loss or claims
by third parties which may arise through the use of PVOS for PV-750 Ver. 1.20.
• CASIO COMPUTER CO., LTD. assumes no responsibility for any damage or loss
caused by deletion of data as a result of malfunction, repairs, or battery replacement.
Be sure to back up all important data on other media to protect against its loss.
Copyright Notice
Copyright © 2000 CASIO COMPUTER CO., LTD. All Rights Reserved.
Please note that the program and this manual are under copyright. No part of this
program or manual may be reproduced, changed, translated into other languages
or stored in a retrieval system in any form or by any means without prior consent
from CASIO COMPUTER CO., LTD.
Important!
• Keep this User’s Guide in a safe place for future reference.
–2–
About PVOS for PV-750 Version 1.20
PVOS for PV-750 Version 1.20 adds the following additional functions to PVOS for
PV-750 Version 1.0. Note that these functions can be installed on the PV-750 only.
• Short Message Service (SMS) in the Mail Mode
• Phone Book category in the Contacts Mode
To install PVOS for PV-750 Version 1.20 on your Pocket Viewer
1. Download PVOS for PV-750 Version 1.20 and PV Applications Manager from the
CASIO website.
The CASIO Website is located at:
http://www.casio.co.jp/English/download/pv/
2. Use PV Applications Manager to install PVOS for PV-750 Version 1.20 on your Pocket
Viewer.
• For detailed installation information, see “Updating the Pocket Viewer Operating
System” in the PV Applications Manager User’s Guide.
–3–
Using SMS Messaging in the Mail Mode
SMS (Short Message Service) enables you to send and receive short text messages on
your mobile phone. In effect, it changes your mobile phone network into an e-mail network.
Once you enable SMS, you can send SMS messages using the same general procedures
you use for regular e-mail.
–4–
Enabling SMS
Enabling SMS
On the initial Mail Mode screen, use the access point selection box to select Short
Message Service.
Sending and Receiving Messages
The procedures in this section describe how to input a new SMS message, how to reply
to an SMS message, and how to forward an SMS message to another phone number.
Use the same general procedures you use for normal e-mail to perform the following
SMS message tasks.
•
•
•
•
•
Edit
Copy
Delete
Send
Receive
Note
• You can send and receive up to 50 messages each at any one time.
• Messages are deleted from phone memory when you sent them to your PV Unit.
• Messages you read on your phone and then import to the PV Unit do not have an
unread (*) mark next to them on the PV Unit Inbox list screen.
• Characters that are not supported by the phone to which a message is sent are
replaced by other characters or spaces.
–5–
Writing a New SMS Message
Writing a New SMS Message
Use the following procedure to write a new SMS message off line. After you write a
message, it is placed onto the Outbox tab.
To write a new SMS message
1. On the initial screen that appears when you first enter the Mail Mode, tap the New
button to display a new SMS message input screen.
• You can also display the above screen by tapping the New button in the tool bar at
the top of the Inbox tab and Outbox tab screens.
2. Tap the To field and use one of the procedures under “Addressing an SMS Message”
on page 8 to specify the mobile phone number of the person to whom you want to
send the message and the person’s name.
• You must specify a phone number for the To field. Input in the Name field is optional.
• You can specify up to 21 digits for each phone number.
• You can specify up to 10 mobile phone numbers in the To field.
• You can input numbers, “+” symbols, commas, and spaces into the To field.
–6–
Writing a New SMS Message
3. Tap the Message field and use the on-screen keyboard that appears to type in up to
160 characters for the text of the message.
4. After everything is the way you want, tap Save to place the message onto the Outbox
tab.
–7–
Addressing an SMS Message
Addressing an SMS Message
You can specify a mobile phone number in the To field of a message by using a phone
number in the Contacts Mode Phone Book category, or by manually typing in a phone
number.
To manually input a phone number
1. While inputting an SMS message, tap the To field.
2. Use the on-screen keyboard to type in the mobile phone number of the person to
whom you want to send the message.
• Type carefully, making sure the phone number is correct. A single wrong character
will result in the message not being sent to the correct addressee.
• If you want to input more than one phone number, separate them with commas or
with a camma and space.
3. If you want, tap the Name field and then use the on-screen keyboard to type in up to
300 characters for the name of the recipient.
4. After you are finished, tap NEXT or tap another field on the screen.
–8–
Addressing an SMS Message
To input a phone number using the Contacts Mode Phone Book category
1. While inputting an SMS message, tap the To field.
2. On the tool bar at the top of the screen, tap Num.
• To return to the text input keyboard from the above screen, tap
.
3. Tap either the Phone or SIM tab to display the type of phone numbers you want to
view.
4. Use the index at the bottom of the screen and the scroll bar at the side to locate the
phone number you want.
• The operations you use to find a phone number are similar to those described in the
PV-750 User’s Guide under “Viewing Contacts Data” on page 51.
5. Tap the phone number you want to input.
• This inputs the phone number into the To field and the name associated with the
phone number into the Name field.
• Up to 21 characters can be input into the To field.
• If the field where you are inputting the phone number already has a phone number
in it, the above step automatically inputs a comma and space at the current cursor
location and then inputs the newly selected phone number.
–9–
Replying to an SMS Message
Replying to an SMS Message
Use the following procedure to reply to an SMS message you have received from
someone else. This procedure automatically inserts the proper phone number into the
To field of the message you write.
• Unlike normal e-mail, the text of the original message is not input into the Message
field of your reply to an SMS message.
To reply to an SMS message
1. On the SMS Inbox tab, highlight the message to which you want to reply.
• You could also display the SMS message screen of the message to which you want
to reply.
2. Tap the Reply button in the tool bar at the top of the screen.
3. On the menu that appears, tap Reply.
• This displays a screen for inputting your reply.
4. Use the on-screen keyboard to type your reply.
5. After everything is the way you want, tap Save to place the message onto the Outbox
tab.
– 10 –
Forwarding an SMS Message
Forwarding an SMS Message
Use the following procedure to forward an SMS message you have received to someone
else.
To forward an SMS message
1. On the Inbox tab, highlight the SMS message you want to forward.
• You could also display the SMS message screen of the message you want to forward.
2. Tap the Reply button in the tool bar at the top of the screen.
3. On the menu that appears, tap Forward.
• This inputs a carriage return so there is a blank line above the text of the original
message.
4. Tap the To field and use one of the procedures under “Addressing an SMS Message”
on page 8 to specify the phone number of the person to whom you want to send the
message.
• You must specify a phone number for the To field.
5. Input any other data you want into the Message field.
6. After everything is the way you want, tap Save to place the message onto the Outbox
tab.
• If the message you are forwarding contains 160 characters, the final character of
the message is cut.
– 11 –
Using the Contacts Mode Phone Book
Category
Phone Book is a Contacts Mode display category. The Phone Book category has two
sub-categories named “Phone” for phone memory data and “SIM” for SIM card data. Its
basic operation is the same as that for the other display categories in the Contacts
Mode.
– 12 –
Phone Book Category Field Names
Phone Book Category Field Names
The Phone Book category field names are the same as those in the Business and
Personal categories, except they are arranged in the following sequence.
Name
Mobile
Phone (H)
Fax (H)
Address (H)
E-mail
Company
Phone (B)
Fax (B)
Position
Department
Address (B)
Note
You must input data for the Name and Mobile fields in order to store a Phone Book
record.
– 13 –
Contacts List Screen
Contacts List Screen
The Contacts list screen appears as shown below when Phone Book is selected as the
category.
Category name box
Name field data
Mobile field data
– 14 –
Inputting New Phone Book Category Data
Inputting New Phone Book Category Data
Use the following procedure to input new Phone Book category data in the Contacts
Mode.
To input new Phone Book category data
1. While a Contacts Mode list or data screen is on the display, tap New.
2. Tap Phone Book (Phone) or Phone Book (SIM) to select it as the input category.
3. Input the data and save it as you normally would.
– 15 –
Exchanging Data with a Mobile Phone
Exchanging Data with a Mobile Phone
The following procedures described how to export Phone Book (Phone, SIM) category
data to a mobile phone and import mobile phone data into the Phone Book category.
• The import and export operations exchange Name and Mobile field data only.
To export a single Phone Book category data item to mobile phone memory
1. In the Contacts Mode, select the Phone Book category (Phone or SIM) whose data
you want to export.
2. Select the item you want to export so it is highlighted.
3. Tap the Menu Bar icon to display the menu bar, and then tap Option – Send.
4. Specify Phone as the receiver (Partner) and One item as the export operation type
(Transfer type), and then tap Exe.
• If you want to export to a SIM card, select SIM for Partner.
• This exports the data item to the mobile phone and add it to existing mobile phone
data.
• You can cancel the export operation by tapping Esc.
• You can export up to 25 characters per data item.
• Characters in a Name field that are not supported by the phone to which a message
is sent are replaced by other characters or spaces.
• The above operation exports only the following characters from the Mobile field:
numbers, w, x, +, *, #, ?.
– 16 –
Exchanging Data with a Mobile Phone
To export all data from Phone Book (Phone) or Phone Book (SIM) and replace
data in mobile phone memory
1. In the Contacts Mode, select the Phone Book category (Phone or SIM) whose data
you want to export.
2. Tap the Menu Bar icon to display the menu bar, and then tap Option – Send.
3. Specify Phone as the receiver (Partner) and Replace all as the export operation
type (Transfer type), and then tap Exe.
• If you want to export to a SIM card, select SIM for Partner.
4. In response to the confirmation message dialog box that appears, tap Yes to export
all Phone Book category data and replace the data in phone memory, or No to close
the dialog box without doing anything.
• You can cancel the data export operation by tapping Esc.
• You can export up to 25 characters per data item.
• You can export up to 255 data items at one time.
• Characters in a Name field that are not supported by the phone to which a message
is sent are replaced by other characters or spaces.
• The above operation exports only the following characters from the Mobile field:
numbers, w, x, +, *, #, ?.
To import a single data item from a mobile phone memory
1. In the Contacts Mode, select Phone Book (Phone) or Phone Book (SIM) as the
category into which you want to import the data.
2. Tap the Menu Bar icon to display the menu bar, and then tap Option – Receive.
– 17 –
Exchanging Data with a Mobile Phone
3. Specify Phone as the sender (Partner) and One item as the import operation type
(Transfer type), and then tap Exe.
• If you want to import from a SIM card, select SIM for Partner.
• This causes a list of mobile phone data to appear.
• You can use the stylus to drag the separator line on a list screen left and right to
change the relative sizes of the columns.
4. Select the item you want to import so it is highlighted, and then tap Exe on the tool
bar to import the selected data item.
• This imports the data item from the mobile phone and merges it with existing Phone
Book data.
• You can cancel the import operation by tapping Esc.
• You can import up to 25 characters per data item.
• The above operation imports only the following characters to the Mobile field:
numbers, w, x, +, *, #, ?.
To import all data in mobile phone memory and replace Phone Book category
data
1. In the Contacts Mode, select Phone Book (Phone) or Phone Book (SIM) as the
category into which you want to import the data.
2. Tap the Menu Bar icon to display the menu bar, and then tap Option – Receive.
3. Specify Phone as the sender (Partner) and Replace all as the import operation
type (Transfer type), and then tap Exe.
• If you want to import from a SIM card, select SIM for Partner.
4. In response to the confirmation message dialog box that appears, tap Yes to replace
data in the Phone Book category with phone memory data or No to close the dialog
box without doing anything.
• You can cancel the data import operation by tapping Esc.
• You can import up to 25 characters per data item.
• You can import up to 255 data items at one time.
• The above operation imports only the following characters to the Mobile field:
numbers, w, x, +, *, #, ?.
– 18 –
Copying Data Items Between Phone Book and Other Contacts Mode Categories
Copying Data Items Between Phone Book and Other Contacts Mode Categories
Use the following procedures to copy data from the Phone Book category to the Business
or Personal, or vice versa.
1. In the Contacts Mode, select the category from which you want to copy a data item.
• Select Business, Personal, or Phone Book.
2. Select the item you want to copy by highlighting it on the list screen or displaying its
data screen.
3. Tap the Menu Bar icon to display the menu bar, and then tap Option – Change
data.
4. Tap the destination of copy you want to perform.
• This copies the data and displays the result.
5. Make any changes in the data you want.
6. After you are finished, tap Save to save the copied data as a new data item.
– 19 –
Reference
This section describes the differences between the PVOS for PV-750 Version 1.20 OS
Update and the PV-750.
– 20 –
Contacts Mode
Contacts Mode
Categories
PV-750
PVOS for PV-750 Version 1.20
Untitled 4
Phone Book (Phone)
Untitled 5
Phone Book (SIM)
• The Phone Book category and category name cannot be changed.
Fixed Entries
When changing the contents of a category list or a category input screen, following
items are fixed and cannot be changed. Other items can be changed.
Fixed Entries (fields)
Category List Item
Name
Category Input
Screen Item
Name
Mobile
Data Item Copy Between Categories
PV-750
PVOS for PV-750 Version 1.20
Copy between Business
and Personal only
Copy between Business, Personal, Phone Book
(Phone), and Phone Book (SIM)
The following table shows all of the possible combinations that are possible with the
PVOS for PV-750 Version 1.20 when copying data between categories.
Current Category
Business
Personal
Phone Book (Phone)
Phone Book (SIM)
Destination Category
Menu Item
Personal
Business ↔ Personal
Phone Book (Phone)
Business ↔ Phone
Phone Book (SIM)
Business ↔ SIM
Business
Business ↔ Personal
Phone Book (Phone)
Personal ↔ Phone
Phone Book (SIM)
Personal ↔ SIM
Business
Business ↔ Phone
Personal
Personal ↔ Phone
Phone Book (SIM)
Phone ↔ SIM
Business
Business ↔ SIM
Personal
Personal ↔ SIM
Phone Book (Phone)
– 21 –
Phone ↔ SIM
Contacts Mode
To copy data items between categories
1. Display the category that contains the data item you want to copy and select the
item.
• You can select an item by displaying its data screen or by tapping the item on a list
screen.
2. Tap the Menu Bar icon to display the menu bar, and then tap Option – Change
data.
• This displays a menu of data copy options.
3. Tap the option you want.
• This creates a copy of the data item you selected in step 1 in the destination category
specified by the menu option you selected in step 3.
– 22 –
Data Communication
Data Communication
BN Unit
The following shows the PVOS for PV-750 Version 1.20 menu for selection of data to be
downloaded to a BN Unit is different from the PV-750 Menu.
PV-750
PVOS for PV-750 Version 1.20
The following table shows how certain PVOS for PV-750 Version 1.20 Contacts Mode
categories are handled when they are sent to a BN Unit.
Selecting this category of data:
Sends this data:
Contacts 1, 2, 3
Untitled 1, 2, 3
Contacts (Phone)
Phone Book (Phone)
Contacts (SIM)
Phone Book (SIM)
Other PV Unit
Data sent to or received from a PV Unit running PVOS for PV-750 Version 1.20 (PV-750
PVOS Version 1.20 Unit) to another PV Unit is handled as shown below.
This category of PV-750 PVOS
Version 1.20 Unit data:
Is this category of data on the other
PV Unit:
Untitled 1
Untitled 1
Untitled 2
Untitled 2
Untitled 3
Untitled 3
Phone Book (Phone)
Untitled 4
Phone Book (SIM)
Untitled 5
– 23 –
Data Communication
The Free 2 field of the Untitled 4 or Untitled 5 categories corresponds respectively to the
Mobile fields of the Phone Book (Phone) and Phone Book (SIM) categories of PV-750
PVOS Version 1.20 Unit data. If a Free 2 field does not contain any data, blank spaces
are input into the corresponding Mobile field when data is sent to a PV-750 PVOS
Version 1.20 Unit from another PV Unit.
Action Control
The following shows the differences between Action menu items of the PVOS for PV750 Version 1.20 and the PV-750.
PV-750
PVOS for PV-750 Version 1.20
Send mail
Send messages
Receive mail
Receive messages
Message Table
A connection could not be established!
Cause: A connection cannot be
established between your PV unit and
mobile phone for some reason.
Action: Tap OK to clear the error
message. Make sure that the settings
of your mobile phone are correct and
that the infrared ports of your PV Unit
and phone are facing directly at each
other, and try again.
Disconnected!
Cause: Broken service provider or
mobile phone connection.
Action: Check hardware, correct any
problems, and try again.
Phone is not responding!
Cause: There is no response from the
phone when sending or receiving SMS
Phone Book or Phone Book data.
Action: Tap OK to clear the error
message. Make sure that the infared
ports of your PV unit and of your mobile
phone are facing directly at each other.
Reset Default
Date Setting: January 1, 2001
– 24 –