1
EPSON Stylus C44 Series
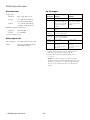
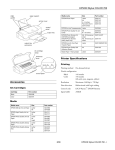
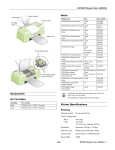
User Replaceable Parts
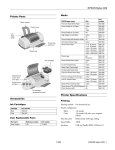
Paper support
Left edge
guide
Maintenance
button and
error light
Printer cover
Power button
and light
Part name
Reference number
Part number
Printer cover
101
1253353
Paper support
102
1254040
Output tray (stacker)
103
1253255
Power cable
400
2020113
Printer Specifications
Printing
Printing method
On-demand ink jet
Nozzle configuration
Black
Color
Output tray
Accessories
Ink Cartridges
Cartridge
Part numbers
Black
T036120
Color
T037020
48 nozzles
45 nozzles (15 each: cyan, magenta, yellow)
Print direction
Bidirectional with logic seeking
Input buffer
12KB
Mechanical
Media
EPSON paper name
Size
Part number
Premium Bright White Paper
Letter
S041586
Photo Quality Ink Jet Paper
Letter
A4
Legal
S041062
S041061
S041067
Photo Quality Ink Jet Cards
A6
S041054
High Quality Ink Jet Paper
Letter
A4
S041111
S041117
Glossy Photo Paper (Photo Paper)
4 x 6 inches,
perforated
Letter
A4
Panoramic
S041134
S041141
S041271
S041272
S041649
S041140
S041145
Ink Jet Transparencies
Letter
S041064
Matte Paper Heavyweight
Letter
S041257
Double-Sided Matte Paper
Letter
S041568
All-Purpose Glossy Paper
Letter
S041654
Photo Quality Glossy Paper
Letter
A4
S041124
S041126
Photo Quality Self Adhesive Sheets A4
Letter
S041606
Photo Stickers Kit (CD-ROM/paper)
Photo Stickers (refill)
A6
A6
S041144-KIT
S041144
Friction
Paper path
Sheet feeder, top entry
Sheet feeder
capacity
100 sheets of 17 lb (65.8 g/m2) paper
Dimensions
Storage
Width: 16.7 inches (423 mm)
Depth: 9.0 inches (229 mm)
Height: 6.8 inches (172 mm)
Printing
Width: 16.7 inches (423 mm)
Depth: 18.1 inches (459 mm)
Height: 10.9 inches (277 mm)
Weight
5.47 lb (2.48 kg) without ink cartridges
Electrical
Input voltage range*
90 to 132 V
Rated frequency range
50 to 60 Hz
Input frequency range
49.5 to 60.5 Hz
Rated current
0.4 A to 0.2 A
Power consumption
Approx. 19 W (ISO10561 Letter Pattern)
Approx. 3W in standby mode
Approx. 2.7 W in Power Off mode
* Check the label on the back of the printer for your printer’s
voltage.
S041106
Glossy Photo Greeting Card Kit
Paper feed
method
4/03
EPSON Stylus C44 Series - 1
EPSON Stylus C44 Series
Environmental
Ink Cartridges
Temperature
Operation
50 to 95 °F (10 to 35 °C)
Storage*
−4
to 104 °F (−20 to 40 °C)
1 month at 104 °F (40 °C)
Transit*
–4 to 140 °F (–20 to 60 °C)
120 hours at 140 °F (60 °C)
20 to 80% RH
Storage*
5 to 85% RH
Black ink cartridge
(T036120)
Color ink cartridge
(T037020)
Color(s)
Black
Cyan, Magenta, Yellow
Print capacity* 330 pages using ISO
Letter Pattern 10561, 220
pages at 5% in calculation,
except for the initial ink
cartridge
Humidity (without condensation)
Operation
Specification
*Stored in shipping container
Cartridge life
Within 6 months after opening package, at 77 °F
[25 °C])
Storage
temperature
−4 to 104 °F (−20 to 40 °C)
1 month at 104 °F (40 °C)
Transit
temperature
−22 to 140 °F (−30 to 60 °C)
1 month at 104 °F (40 °C)
120 hours at 140 °F (60 °C)
Safety Approvals
Safety standards
UL 1950, CSA C22.2 No. 950
EMC
FCC part 15 subpart B class B
CSA C108.8 Class B
180 pages, 5% each CMY
(total 15%) in calculation,
except for the initial ink
cartridge
Freezing
3.2 °F (−16 °C)
temperature**
Dimensions
0.78 × 2.08 × 1.52 inches
(W × D × H)
19.8 × 52.7 × 38.5 mm
(W × D × H)
−0.4 °F (−18 °C)
1.69 × 2.08 × 1.52 inches
(W × D × H)
42.9 × 52.7 × 38.5 mm
(W × D × H)
* The figure given is based on continuous printing after ink
replacement. The actual print capacity may vary.
** Ink thaws and is usable after approximately 3 hours at
77 °F (25 °C).
Caution: To ensure good results, use genuine EPSON
cartridges and do not refill them. Other products may cause
damage to your printer not covered by EPSON’s warranties.
Don’t use an ink cartridge if the date on the package has
expired.
2 - EPSON Stylus C44 Series
4/03
EPSON Stylus C44 Series
Paper
Paper type
Size
Paper types
Thickness
Weight
Plain paper, All-Purpose
Glossy, Premium Bright
White Paper, Photo Quality
and High Quality Ink Jet
Paper
Letter (8.5 × 11 inches)
Legal (8.5 × 14 inches)
Half letter (statement, 5.5 × 8.5 inches)
Executive (7.5 × 10 inches)
A4 (210 × 297 mm)
A5 (148 × 210 mm)
A6 (105 × 148 mm)
Plain bond paper or special paper
distributed by EPSON
0.003 to 0.004
inch (0.08 to 0.11
mm) for plain bond
paper
17 to 24 lb
(64 to 90 g/m2)
for plain bond
paper
Transparencies and Photo
Quality Glossy Paper
Letter (8.5 × 11 inches)
Transparencies and glossy paper
distributed by EPSON
0.005 inch
(0.13 mm)
—
Matte paper distributed by EPSON
0.009 inch
(0.23 mm)
44 lb
(167 g/m2)
Self adhesive sheets distributed by
EPSON
—
—
Matte Paper Heavyweight, Letter (8.5 × 11 inches)
Double-Sided Matte Paper
Self-adhesive sheets
A4 (210 × 297 mm)
Envelopes
No. 10, 4.1 × 9.5 inches (104 × 241 mm) Plain bond paper or air mail paper
DL, 4.3 × 8.7 inches (110 × 220 mm)
C6, 4.4 × 6.4 inches (114 × 162 mm)
0.006 to 0.02 inch 12 to 20 lb
(0.16 to 0.51 mm) (45 to 75 g/m2)
Ink jet cards
A6 (105 × 148 mm)
Ink jet cards distributed by EPSON
—
—
Glossy Photo Paper and
Photo Paper
Letter (8.5 × 11 inches)
A4 (210 × 297 mm)
4 × 6 inches (102 × 152 mm)
Panoramic (210 × 594 mm)
Photo paper distributed by EPSON
—
—
Photo Stickers
A6 (105 × 148 mm), 16 frames/sheet
Photo stickers distributed by EPSON —
—
Caution: Always load paper in the sheet feeder short edge
first. Load envelopes short edge first with the flap side down
and on the left.
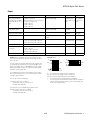
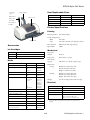
Printable area
Since the quality of any particular brand or type of paper may
be changed by the manufacturer at any time, EPSON cannot
attest to the quality of any non-EPSON brand or type of paper.
Always test samples of paper stock before purchasing large
quantities or printing large jobs.
B-L
A
A
B-R
B-L
B-R
C
envelopes
C
single sheets/index cards
Poor quality paper may reduce print quality and cause paper
jams and other problems. If you encounter problems, switch
to a higher grade of paper.
A: The minimum top margin is 0.12 inch (3.0 mm).
B-L: The minimum left margin is 0.12 inch (3.0 mm).
B-R: The minimum right margin is 0.12 inch (3.0 mm).
C: The minimum bottom margin is 0.55 inch (14.0 mm).
*
You can extend the minimum bottom margin to 0.12 inch (3.0 mm)
using the Minimize Margins feature; however, print quality may
decline in the expanded area.
Do not load curled or folded paper.
Use papers under these conditions:
Temperature: 59 to 77 °F (15 to 25 °C)
Humidity: 40 to 60% RH
Store printouts on Photo Quality Glossy Film and Self
Adhesive Sheets under these conditions:
Temperature: 59 to 86 °F (15 to 30 °C)
Humidity: 20 to 60% RH
4/03
EPSON Stylus C44 Series - 3
EPSON Stylus C44 Series
Control Panel
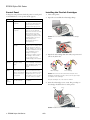
Installing the First Ink Cartridges
To diagnose some problems, check the printer’s control panel,
as described below, or run a printer check (page 5).
1. Turn on the printer.
Lights
Problem and solution
b on
No paper is loaded in
the printer
Load paper in the sheet feeder,
then press the b maintenance
button. The printer resumes
printing and the light goes out.
Paper has jammed in
the printer
Press the b maintenance
button to eject the jammed
paper. If the error does not clear,
open the printer cover and
remove all of the paper inside,
including any torn pieces. Then
reload the paper in the sheet
feeder and press the
b maintenance button to
resume printing.
You have an empty ink
cartridge
b
flashing
P off
b on
P flashing
b
2. Open the cover and lift the ink cartridge clamps.
Caution: Don’t touch the sensor on top of the ink cartridge
holders.
Follow the instructions on page 6
to replace the ink cartridge. If the
b light remains on after you
install a cartridge, one of your ink
cartridges is installed incorrectly,
or you installed the wrong
cartridge. Following the
instructions on page 6, remove
the cartridge, check to make
sure you have the correct
EPSON cartridge, and reinstall it.
The black or color ink
cartridge is nearly
empty
Obtain a replacement black or
color ink cartridge. To determine
which cartridge is nearly empty,
follow the instructions on
page 6.
The print head is
obstructed by jammed
paper or other material
and can’t return to the
home position
Turn off the printer. Open the
printer cover and remove any
paper or other obstructions from
the paper path. Then, turn the
printer back on. If the error does
not clear, contact your dealer.
An unknown printer
error has occurred
Turn off the printer and contact
your dealer.
3. Unpack the ink cartridges that came with your printer and
remove the yellow tabs.
Black cartridge
Color cartridge
Caution: Don’t remove the seals from the bottom of the
cartridges; ink will leak out. Also, don’t touch the green chips
on the back of the cartridges.
Keep the cartridges out of the reach of children.
4. Insert the ink cartridges one at a time. The green chip on
the cartridge should face the rear of the printer.
flashing
Black
Color
Caution: Install both ink cartridges or the printer won’t work.
4 - EPSON Stylus C44 Series
4/03
EPSON Stylus C44 Series
5. Press down on the ink cartridge clamps until they click shut.
Select this Type or
Media Type setting
For this paper name...
6. Press the b maintenance button and close the printer
cover. The P power light flashes and you hear the ink
charging. Wait until ink charging is finished (the P power
light stops flashing).
Caution: Don’t turn off the printer or interrupt charging while
the P power light is flashing or you’ll use up more ink than
necessary when you turn it back on.
EPSON Glossy Photo Paper
EPSON Photo Paper
EPSON All-Purpose Glossy Paper
EPSON Photo Quality Glossy Paper
EPSON Glossy Photo Greeting Cards
Glossy Photo Paper
EPSON Photo Stickers
Photo Quality Glossy Film
EPSON Ink Jet Transparencies
Ink Jet Transparencies
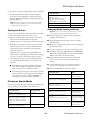
Additional Media Loading Guidelines
Testing the Printer
Caution: Don’t use the cleaning sheets that may be included
with your special media; they may damage the printer.
You can run a printer check to determine whether a problem
comes from the printer itself or some other source.
■ Always load paper short edge first, even when printing
1. Make sure both the printer and computer are turned off.
Then disconnect the USB cable from the printer.
landscape-oriented pictures.
■ Always handle sheets by the edges, and don’t touch the
2. Make sure letter-size or larger paper is loaded in the printer.
printable surface.
■ Be sure to load the printable (whiter) side of the media face
3. Hold down the b maintenance button, then press and
release the Ppower button. Continue holding down the
b maintenance button until the P power light starts
to flash, then release it.
up in the sheet feeder.
■ You can load paper up to the arrow on the left edge guide.
■ In addition to the paper Type (Windows) or Media Type
(Macintosh) setting, remember to select the correct Paper
Size for your media in the printer software.
The printer prints one page showing its ROM version
number and a nozzle check pattern. (If the pattern has gaps
in its dots, you need to clean the print head; see page 7.)
■ If the special media has protective sheets between each
4. Turn off the printer after it prints the check page. Then
reconnect the USB cable and turn on your printer and
computer.
sheet, be sure to remove the protective sheets before
printing.
■ Some special media have a cut corner that you need to
■ If the check page prints, the problem probably lies in
position in the upper right corner when you load it.
your software settings, interface cable, or computer.
Your software may not be installed correctly.
■ You can load EPSON special media as follows:
■ If the check page doesn’t print, you may have a problem
Load this number of
sheets
For this paper name...
with your printer. Try the suggestions in the electronic
User’s Guide on the printer software CD-ROM. If
nothing works, contact your dealer or EPSON.
EPSON Photo Quality Ink Jet Paper
Up to 30 sheets; 10
sheets for legal-size
EPSON Photo Quality Ink Jet Cards
EPSON Glossy Photo Greeting Cards
Up to 30 cards with the
included support sheet
beneath the stack
EPSON Photo Quality Self Adhesive Sheets
EPSON Photo Stickers
EPSON Photo Paper (Panoramic size)
One sheet at a time
EPSON Ink Jet Transparencies
Up to 10 sheets
EPSON Glossy Photo Paper (4 × 6-inch size)
EPSON Photo Paper (4 × 6-inch size)
Up to 20 sheets with the
included support sheet
beneath the stack
EPSON Glossy Photo Paper (A4 and
letter-size)
EPSON Photo Paper (A4- and letter-size)
Up to 20 sheets at a
time with the included
support sheet beneath
the stack
Matte Paper Heavyweight
Up to 20 sheets with the
included support sheet
beneath the stack
Printing on Special Media
Select the paper Type Windows) or Media Type (Macintosh)
setting according to the guidelines in the table below.
For this paper name...
Select this Type or
Media Type setting
Plain paper and envelopes
EPSON Premium Bright White Paper
Plain paper
EPSON High Quality Ink Jet Paper
EPSON Photo Quality Ink Jet Paper
EPSON Photo Quality Ink Jet Cards
EPSON Photo Quality Self Adhesive
Sheets
Photo Quality Ink Jet Paper
EPSON Matte Paper Heavyweight
EPSON Double-Sided Matte Paper
Matte Paper - Heavyweight
4/03
EPSON Stylus C44 Series - 5
EPSON Stylus C44 Series
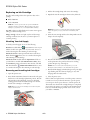
Replacing an Ink Cartridge
3. Lift the ink cartridge clamp and remove the cartridge.
4. Unpack the new ink cartridge and remove the yellow tab.
Use these ink cartridges before the expiration date on the
package:
■ Black: T036120
■ Color: T037020
Caution: To ensure good results, use genuine EPSON ink
cartridges and don’t refill them. Other products may cause
damage to your printer not covered by EPSON’s warranty.
Warning: If ink gets on your hands, wash them with soap and
water. If it gets in your eyes, flush them immediately with
water.
Low ink: red b error light flashes and a status screen appears
telling you which cartridge is low.
Empty cartridge: red b error light stays lit and the empty
cartridge is indicated on the screen; you must replace it to
continue printing.
5. Insert the new cartridge and close the clamp. Make sure the
clamp is closed completely.
Checking Your Ink Supply
To check your ink supply, do one of the following:
Windows: Double-click the
Status Monitor icon on your
taskbar (in the lower right corner of your screen). You see a
window showing the ink remaining in each cartridge.
Macintosh OS 8.6 to 9.x: Open the File menu and choose
Print. Click the
ink icon. You see a window showing the
ink remaining in each cartridge.
6. Press the b maintenance button. (If the other cartridge
needs replacement, the print head moves into loading
position. Repeat steps 3 through 5.)
Macintosh OS X: Double-click the Applications folder on
your hard drive. Double-click EPSON Printer Utility, select
the C44 Series printer in the Printer List window, and click
OK. Then click the
EPSON StatusMonitor button. You
see a window showing the ink remaining in each cartridge.
Caution: Don’t move the print head by hand; you could
damage the printer Always us the b maintenance button.
7. Wait until ink charging is finished (the green P power light
stops flashing and the red b error light goes out). Ink
charging takes about 30 seconds.
Removing and Installing Ink Cartridges
1. Open the printer cover
8. Close the printer cover.
2. Press the b maintenance button for 10 seconds. The print
head moves to the cartridge replacement position. (If both
ink cartridges need replacement, it moves to the black
cartridge position first. The black cartridge is on the left,
and the color cartridge is on the right.)
If the red b error light remains on and the printer continues
to make noise for more than five minutes, open the printer
cover and press the P power button to turn the printer off.
Then make sure that the ink cartridge clamps are completely
closed. Close the printer cover and press the b maintenance
button to finish ink charging. If that doesn’t work, contact
your dealer or EPSON.
Caution: Don’t touch the ink cartridge sensor above the print
head, as shown below.
6 - EPSON Stylus C44 Series
4/03
EPSON Stylus C44 Series
Cleaning the Print Head
5. If the nozzle check pattern has no gaps or lines, click Finish.
If the pattern has white lines, click Clean to clean the print
head again.
If your printouts are unexpectedly light or faint, or dots or
lines are missing from the image, you may need to clean the
print head. This unclogs the nozzles so they can deliver ink
properly.
If you don’t see any improvement after cleaning three or
four times, check the solutions in the electronic User’s Guide
on your printer software CD-ROM. You can also turn the
printer off and wait overnight—this allows any dried ink to
soften—and then try cleaning the print head again.
Print head cleaning uses ink, so clean it only if quality
declines.
This section explains how to clean the print head using the
Head Cleaning utility. This is the recommended method
when the printer is connected directly to your computer (not
over a network).
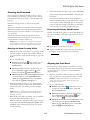
Examining the Nozzle Check Pattern
Examine the nozzle check pattern you print. Each black and
colored area should be solid, with no gaps or lines, as shown
below:
You can also clean the print head by holding down the
b maintenance button on the printer’s control panel for 7
seconds when the red b error light is off.
Caution: When you don’t turn on your printer for a long time,
the print quality can decline. It’s a good idea to turn on your
printer at least once a month to maintain good print quality.
■ If your printout looks okay, you’re done.
Running the Head Cleaning Utility
■ If you see any white lines or gaps (see below), clean the print
head again; see the previous section for instructions.
1. Make sure the printer is turned on but not printing, and the
red b error light is off. (If the b error light is flashing or
on, you may need to replace the ink cartridge; see page 6 for
details.)
2. Do one of the following:
■ Windows: right-click the
Status Monitor icon on
the right side of the Windows taskbar. Then click
Head Cleaning.
Aligning the Print Head
If your printouts contain misaligned vertical lines, you may
need to align the print head. Your printer must be connected
to a local port, not on a network, to use the Print Head
Alignment utility.
■ Macintosh OS 8.6 to 9.x: Open the File menu and
choose Page Setup or Print. Click the
utility
button, then click the
Head Cleaning button.
1. Make sure the printer is turned on, but not printing, and
letter-size plain paper (not special ink jet paper) is loaded.
■ Macintosh OS X: Double-click the Applications folder
on your hard drive. Double-click EPSON Printer
Utility, select the C44 Series printer, and click OK.
Then click the
Head Cleaning button.
Caution: Load paper that’s at least 8.27 inches (210 mm)
wide to prevent ink from spraying inside the printer and
smudging your printouts.
3. Follow the instructions on the screen to clean the print
head. Cleaning takes about 30 seconds, during which the
printer makes some noise and the green P power light
flashes.
2. Do one of the following:
■ Windows: right-click the
Status Monitor icon on
the right side of the Windows taskbar. Then click
Print Head Alignment.
Caution: Never turn off the printer while the P power light is
flashing, unless the printer hasn’t moved or made noise for
more than 5 minutes.
■ Macintosh OS 8.6 to 9.x: Open the File menu and
choose Page Setup or Print. Click the
utility
button, then click
Print Head Alignment.
4. When the P power light stops flashing, run a nozzle check
to confirm the print head nozzles are clean.
■ Macintosh OS X: Double-click the Applications folder
on your hard drive. Double-click EPSON Printer
Utility, select the C44 Series printer, and click OK.
Then click
Print Head Alignment.
Make sure plain paper (not special ink jet paper) is loaded
in the printer and click Print nozzle check pattern. Then
click Print. The nozzle check pattern prints (see the next
section for details).
4/03
EPSON Stylus C44 Series - 7
EPSON Stylus C44 Series
Transporting the Printer
3. Follow the instructions on the screen to print a test page.
You see the alignment window.
If you move your printer some distance, you need to prepare it
for transportation in its original box or one of a similar size.
4. On the printed page, select the pattern that shows the two
vertical lines most precisely printed on top of each other.
You may need to use a magnifying glass.
Caution: To avoid damage, always leave the ink cartridges
installed when transporting the printer.
5. Select one pattern each for rows 1, 2, and 3. Then enter
the number of the best pattern for each row in the
corresponding boxes on the screen.
Be sure to remove the tape used in step 4 after installing the
printer in its new location.
Follow these steps:
6. If you find a perfectly aligned pattern for each row, click
Finish.
1. Turn on the printer, wait until the print head locks in the
far right position, then turn off the printer.
If you can’t find a row that has a perfectly aligned pattern,
select the best pattern and click Realignment to print
another test page. Then repeat this step until all three rows
have a perfectly aligned pattern.
2. Unplug the power cord from the electrical outlet. Then
disconnect both the power cord and the printer cable from
the printer.
Cleaning the Printer
3. Remove any paper from the printer and remove the paper
support.
To keep your printer working at its best, you should clean it
several times a year. Follow these steps:
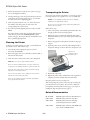
4. Open the printer cover. Secure the ink cartridge holder to
the printer with tape as shown, then close the printer cover.
1. Turn off the printer, unplug the power cord, and
disconnect the USB cable.
Tape the ink
cartridge holder to
the printer case
2. Remove all paper, then use a soft brush to clean any dust or
dirt from the sheet feeder.
3. Clean the exterior of the printer with a soft, damp cloth.
Caution: Don’t touch the gears inside the printer.
Never use a hard or abrasive brush, or alcohol or thinner for
cleaning; they can damage the printer components and case.
Don’t get water on the printer components and don’t spray
lubricants or oils inside the printer.
5. Push in the output tray.
Don’t remove the grease on the carriage rail. It is needed to
lubricate movement of the print head.
6. Repack the printer and its attachments in the original box
using the protective materials that came with them.
Don’t use any cleaning sheets included with special paper;
they may jam inside the printer.
Keep the printer level as you transport it.
After transporting the printer, remove the tape securing the
print head and test your printer. If you notice a decline in
print quality, clean the print head (see page 7); if output is
misaligned, align the print head (see page 7).
Related Documentation
8 - EPSON Stylus C44 Series
4/03
PL-SC44UX
EPSON Stylus C44 Series Parts Price List
CPD-15884
EPSON Stylus C44 Series Start Here
CPD-15885
EPSON Stylus C44 Series Installing
Software/Important Notices booklet
CPD-15883
EPSON Stylus C44 Series CD-ROM with
User’s Guide in HTML format