1
SHARI?!
ELECTRONIC ORGANIZER
OPERATION MANUAL
This equipment complies with the requirements of Directive 89/336/EEC as amended by 93/68/EEC.
Dieses Gerat entspricht den Anforderungen der EG-Richtlinie 89/336/EWG mit Anderung 93/68/EWG.
Ce materiel repond aux exigences contenues dans la directive 89/336/CEE modifiee par la directive 93/68/CEE.
Dit apparaat voldoet aan de eisen van de richtlijn 89/336/EEG, gewijzigd door 93/68/EEG.
Dette udstyr overholder kravene i direktiv nr. 89/336/EEC med tillseg nr. 93/68/EEC.
Quest’ apparecchio B conforme ai requisiti della direttiva 89/336/EEC come emendata dalla direttiva 93/68/EEC.
H qxanbzaq awj avrarcowpivmat onq axatzfioey mv O~I$JV qs Euponai~~
Evoo-q$89/336/EOK, bq o ~avovtop6~ au$ my.mhqph&l~& an6 zqv o6qyia
93/68/EOK.
Este equipamento obedece as exigencias da directiva 89/336/CEE na sua versa0 corrigida pela directiva 93/68/CEE.
Este aparato satisface las exigencias de la Directiva 89/336/CEE modificada por medio de la 93/68/CEE.
Denna utrustning uppfyller kraven enligt riktlinjen 89/336/EEC sa som kompletteras av 93/68/EEC.
Dette produktet oppfyller betingelsene i direktivet 89/336/EEC i endringen 93/68/EEC.
Tama laite tayttaa direktiivin 89/336/EEC vaatimukset, jota on muutettu direktiivilla 93/68/EEC.
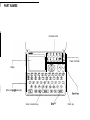
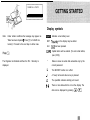
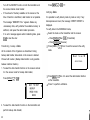
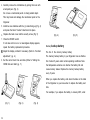
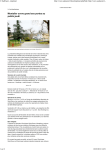
PART NAMES
Command center
Power on/off keys
Display
Option port (4-pin option jack)
Cursor movement keys
Entei key
Return key
battery life has expired, or any other cause.
SHARP assumes no responsibility, directly or indirectly, for
financial losses or claims from third persons resulting from
the use of this product and any of its functions, such as
stolen credit card numbers, the loss or alteration of stored
Congratulations on purchasing the ZQ-2500/ZQ-2700
Electronic Organizer. Please read this operation manual
carefully to familiarize yourself with all the features of the
Organizer and to ensure years of reliable operation. For quick
reference, keep this operation manual on hand.
Notes:
.
Some of the accessories described in this manual may not
be available in some countries.
l
The only difference between the ZQ-2500 and the ZQ-2700
is the memory capacity.
Unless otherwise specified, this manual applies to both
models.
NOTICE
l
SHARP strongly recommends that separate permanent
written records be kept of all important data. Data may be
lost or altered under certain circumstances. SHARP
assumes no responsibility for data lost or otherwise
rendered unusable whether as a result of improper use,
repairs, defects, battery replacement, use after the specified
data, etc.
.
The information provided in this manual is subject to
change without notice.
I N T R O D U C T I O N
TABLE
BEFORE
OF
USE
GETTING
BASIC
CONTENTS
.
.
.
STARTED
ENTRY
.
.
.
.
1
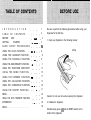
Be sure to perform the following procedures before using your
.
2
Organizer for the first time.
.
.
.. .
.. .. ..
.. .
9
.
. 11
13
USING THE TELEPHONE DIRECTORY
15
USING THE MEMO FUNCTION..
.
17
19
USING THE CALCULATOR FUNCTION
USING THE CONVERSION FUNCTION
.
.
24
USING THE DATA TRANSFER FUNCTION
.
.
21
. 23
MENU . . . . . . . . . . . . . . . . . . . . . . . . . . . . .
INDEX . . . . . . . . . . . . . . . . . . . . . . . . . . . . .
. 20
.
USING THE SECRET FUNCTION .
APPENDICES
.
Lift top
. .8
..
USING THE SCHEDULE FUNCTION
USING THE EXPENSE FUNCTION
1. Open your Organizer in the following manner:
6
USING THE CALENDAR FUNCTION .
USING THE ANNIVERSARY FUNCTION .
3
5
PROCEDURES
USING THE CLOCK FUNCTION . . . .
.2
.
30
Caution: Do not use force when opening the Organizer.
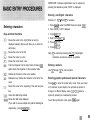
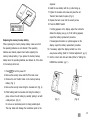
2. Initialize the Organizer.
39
Simultaneously press @J and the RESET switch on the
bottom of the Organizer.
Display symbols
Note:
Under certain conditions the message may appear as
“Data has been impaired ! Press [Y] to CLEAR ALL
memory”. Proceed to the next step in either case.
m
Indicates a low battery level.
EDIT
Theentry on the display may be edited.
2nd
12nd] has been pressed.
Capital letters will be entered. [To enter small letters,
press (CAPS)).
The Organizer is initialized and then the TEL 1 directory is
*
Data on screen is secret data accessible only by the
q
The SECRET function is in effect.
h
d’
A “beep” will sound when a key is pressed.
Q
The specified schedule alarm(s) will sound.
t+
There is more data which is not on the display. The
correct password.
displayed.
data can be displayed by pressing (rl or Ir).
either key down will result in a continuous change in
Key notations
contrast.
This manual uses the following notations for key operations
5. Press (CCEI.
and functions.
!!!!I
-
-+ [CALENDAR] “Command center” mode keys are
identified by their feature name
enclosed in a box.
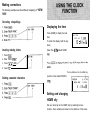
Turning the “beep” on and off
While “ j ” is displayed, a “beep” will sound whenever a key is
pressed. To turn the “beep” on or off, press @ then a.
Change sign key.
Date format
Backspace key.
r’=
Umlaut key.
O-LZ
Letter Z key.
You can select “MONTH/DAY/YEAR” or “DAY.MONTH.YEAR”
as your date format.
1.
I
\
Press-.
2. Press [VI 1 (“FUNCTION”).
I
3. Press a 3 (“DATE FORMAT”).
Note:
The blue functions and symbols are operated by
4. Press II] or (rl.
I
pressing [2ndl and the appropriate key. The white ones
5. Press [ENTER).
,
Note: The default setting is “MONTH/DAY/YEAR”.
i
are operated in the CALCULATOR mode without (2nd1,
or with @ in other modes.
Contrast adjustment (on the display)
1. Press-.
2. Press a then
1 (“FUNCTION”).
3. Press 2 (“LCD CONTRAST”).
4. Press a or m to darken or lighten the display. Holding
4
I
I
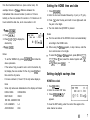
IMPORTANT: Individual capital letters may be entered by
pressing the desired key while “CAPS” is displayed.
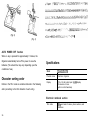
Entering non-English characters
Entering “A”, “D”, “e” and “8”, for example.
Entering characters
Keys and their functions
Moves the cursor to the right. (When an entry is
displayed, pressing this key will allow you to enter the
edit mode.)
Moves the cursor to the left.
Moves the cursor up a line.
1. Press (MEMO] to enter the MEMO mode and press B.
2. Press (CAPS]; “CAPS” displayed.
3. Press (2ndl [ A.
4. Press (CAPS) (2nd] (7] u.
5. Press [2ndl m e.
6. Press [FZ (71 o.
Note: “c” is entered by pressing (2nd) [F]. Non-English
characters can also be entered as symbols.
Moves the cursor down a line.
Puts the Organizer into the insert mode. Pressing (INS]
Entering numbers
again returns the Organizer to the overwrite mode.
Use 101 through (9) to enter numbers.
Deletes the character at the cursor position.
Backspace key. Deletes the character to the left of the
Entering graphic symbols and special characters
cursor.
Press (SMBLJ to enter the symbol entry mode. There are a total
Moves the cursor to the beginning of the next line (new
of 33 symbols. In each display, five symbols are shown; to
line).
change to a different display, press a or a. Select a
Clears the data being entered.
symbol by pressing its corresponding number.
Stores the data being displayed.
To exit the symbol entry mode, press (SMBLI again.
(If you wish to save an edited entry without deleting the
original entry,, press (2ndJ (GF&)
5
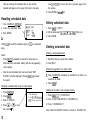
Making corrections
The following examples use three different misspelling of
“NEW
YORK”.
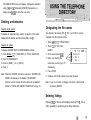
Correcting misspellings
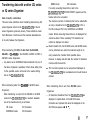
Displaying the time
Press (HOME] to display the local
NEW YORK
MON JAN
time.
To retain the display, hold the key
1,1996
12 : OOAMD
down.
Inserting missing letters
(New York isthe default HOME
1. Press @.
2. Enter “NEW YRK”.
3. Press m f?J (INS].
4. Insert “0”.
The time difference from the HOME city.
Deleting unwanted characters
(London is the default WORLD
..\
Setting and changing
HOME city
Set your local city as the HOME city by selecting its zone
number. Zone numbers are based on the distance of the zones
Setting the HOME time and date
from the International Date Line (zone number zero). For
example, there is a i3-hour difference between the
1. Press (2ndJ (HOMEJ.
International Date Line and London (London is 13 hours
2. Enter the hour and minutes followed by A (a.m.) or P (p.m.).
behind), so the zone number for London is 13. Honolulu is 23
3. Press a, enter the day and month in two digits each and
hours behind the date line, so its zone number is 23.
the year in four digits.
Zone number
4. The clock starts when (ENTER1 is pressed.
1. Press@$ (HOMEI.
2. Press m Ir].
NEW YORK
MON JAN
3. Press (VI or W to display the
The time and date of the WORLD clock is set automatically
6 : OOAMB
desired city.
I
4. Press-.
Notes:
[ls:ol
1.1996
according to the HOME clock.
I
When using the 24-hour system, in step 2 above, enter the
hour and minutes in four digits.
Notes:
To select the 12-hour or 24-hour clock, press (MENU], a, 1,
.
To set the WORLD city, press (2ndl (WORLDJ then follow the
m, a then 1. Next, select the desired system with (41
above procedure.
and [tl and press (ENTER_J.
.
If the name of city you want to set is not in the built-in city
list, display the zone number for the city, press m and
then enter the city name.
.
For zone numbers 0, 14 and 15, the city name display is
blank.
.
Some city names are abbreviated on the display as follows:
HONG KONG
HONGKONG
NEW DELHI
DELHI
RIO DE JANEIRO RIO
Setting daylight savings time
HOME time clock
1. Press (2ndj (HOME_).
2. Enter the correct DST time.
vi
3. Press (znd] (ENTERJ; “ -@I’
appears.
LOS ANGELES
L.A.
To clear the DST setting, enter the correct time again in the
ANCHORAGE
ANC.
same manner as above.
WORLD time clock
Press (2nd) (GiEK$ then (2ndJ (ENTERJ.
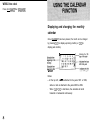
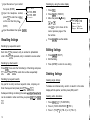
Displaying and changing the monthly
calendar
Once (CALENDAR) has been pressed, the month can be changed
by pressing [VI (to display upcoming months) or m (to
display past months).
I, Indicates
I
the 10th
the “cm”
Notes:
l
At the top left, a ’
’ ” is attached to the years 1901
to 1999,
while no mark is attached to the years 2000 to 2099.
.
When a or a is held down, the calendar will scroll
forwards or backwards continuously.
Finding a date with the numerical keys
Use m or I+] to find a date that is a specified number of
days in the past or future.
For example, first find the date 90 days after January 15, then
minus 35 days from that date. (This example assumes the
cursor is on January 15, 1996).
Entering scheduled data
1. PressI+] 90 m,
Press (SCHEDULE) and display
2. Press Q 35 m.
the desired date using W or
The calendar for March 1996 appears, with the 10th flashing.
(SCHEDULE] press (CCEJ, enter the
Recalling a month by designating the
date
,_
(ENTER].
[v). Or after pressing
T U E J A N 30,1996
1o:oob-1e:ooR
Sales meeting
scheduled date then press
1. In the calendar mode, press
m twice.
2. Enter the date.
3. Press (CALENDAR).
The specified monthly calendar will
be displayed.
Enter the schedule time and details.
For the schedule time, input the starting time and ending
time followed by A (a.m.) or P (p.m.). Next, input the
description followed by (ENTER].
Notes:
If you are using the 24-hour system, in step 2 above input
the starting time in four digits and then press (.1. Then
input the ending time and press (ENTERJ. Then, enter the
details.
The date will be “tagged” on the calendar display. (See the
display sample on pg. 8.)
For schedule items without times, after the “TIME ?”
message appears, simply begin entering the description.
.:.:.:.:.:
gg$
B$$$
9
Use a or CI] to move to the next or previous page of the
(The tag marking the scheduled item on the monthly
four entries.
calendar will appear on the upper right next to the date.)
5. Press (ENTER) to reca.ll item.
Recalling scheduled data
Editing scheduled data
1. Press (SCHEDULE) (CCEJ 6%).
1. Press m 1 (“EDIT”).
2. Enter the scheduled date. ,
3. Press (ENTER].
A..
“I
\
{I
DAY
YEAR
:30
:19981
Press a (to recall the next/future days) or (/\I (to recall past
3. Press (ENTER].
Deleting scheduled data
Deleting a single agenda item
Notes:
Press (2nd) 67) repeatedly to search for those days on
1. Recall the data you would like to delete.
which items are scheduled, starting with the day appearing
2. Press (DEL) Y.
on the display.
l
I
1
I
days).
l
2. Edit the data using (.I, m, [rl, [rl, @I, (DEL), etc.
After the last scheduled item has been found, “NOT
FOUND!” is briefly displayed. Pressing (2ndl W reverses
Deleting the agenda for an entire month
1. Press (CALENDAR) and display the calendar for the month you
would like to delete.
the search.
2. Press IDEL] Y.
Recalling scheduled data using the index display
Deleting all the data in the schedule memory
1. Press (GiZKG]
l
2. Press (MENU1.
3. Press 2 (“INDEX”).
4. Press m or m to move
the pointer ” b “.
IO
/
1110 Meeting
1 1 2 4 Dr.Wilson vis
l/30 S a l e s m e e t i n g
1. Press (iGiG] T;Tl 1 (“FUNCTION”).
2. Press 3 (“DATA DELETION”) 2 (“SCHEDULE”).
3. Press 1 (“SCHEDULE”) Y.
Note: When the SECRET function is turned on, ‘SECRET ON
MODE” will appear on the display. The SECRET
function must be turned off before data can be deleted.
(Refer to “USING THE SECRET FUNCTION” on pg. 21.)
Setting the schedule alarm
1. Press (SCHEDULE) @CE) (5Z).
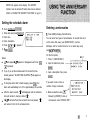
Entering anniversaries
2. Enter date and press (SCHEDULEJ
1. Press (ANN] to display the ANN menu.
3. Enter time.
You can enter two types of anniversaries: for events that occur
4. Enter description.
on the same date every year (MONTH/DAY), such as
5. Press (2ndl (7); “k appears.
birthdays, and for events that occur on a certain day every
6. Press[ENTERI.
year (MONTH/WEEK).
For the first option,
Notes:
L( Q ” will appear; “ 4 ” appears or disappears each time [2ndl
I,] is pressed.
If you try to set the schedule alarm for a time that has
already passed, “ALARM TIME ELAPSED !” will appear on
MAY 7
1. Press 1 (“MONTH/DAY”).
2. Input the date then press
(ENTERJ.
-*
3. Input a description then press
JENTERI.
the display.
To stop the alarm after it starts beeping, press @; the
If you want to set a notice a
alarm will automatically turn off in approximately 20 seconds.
number of days in advance,
After the alarm sounds, “&” will disappear and the schedule
4. Make a selection using m
item will remain in memory without ‘I&“.
If
“ 4 ” is turned off and the set alarm time has passed, “k
,{K
followed by (ENTER]; if notice is
not required, select “NOTICE OFF”.
will remain in front of the scheduled item.
11
Recalling by sequential search
For the second option,
1. Press 2 (“MONTH/WEEK”).
MAY WEEK:2
2. Input the month, week and
direction or 0 to
day of the week then press
IENTER).
3. Input a description then press
B.
1. Press [ANN] then 1 or 2.
If you want to set a notice a number of days in advance,
2. Enter the date of the event you want to recall.
3. Press GJ to recall entries in front or m to recall entries in
4. Make a selection using m followed by (ENTER]; if notice is
reverse order.
not required, select “NOTICE OFF”.
- Recalling by using the index display
Recalling anniversaries
1. Press m then 1 or 2.
2. Press @ 2 (“INDEX”).
Recalling from the ANN NOTICE display
3. Press m or [rl to move the
If you set the ANN NOTICE function, a reminder will appear
pointer “ b ‘I. Use [VI or m to
every time the Organizer is turned on either one week before
move to the next or previous
or on the day of the event, depending on which setting has
page of the four entries.
4. Press (ENTER] to display the details.
been chosen.
Secret entry when secret function is turned on
1. On the specified date, turn the
Organizer on.
2. Move the pointer
“ b ” to select
an entry.
3. Press (ENTER) to display details
of the entry.
12
Editing anniversaries
Press (MENV1 1 (“EDIT”).
Edit the date and/or description.
To change the date, press (rl to move the date entry field.
3. Press (ENTER).
The ANN NOTICE menu will appear. Change the selection
using m and Ir] followed by (ENTER] if necessary, or
simply press (ENTERJ to store the new entry.
::;yx;.:- ,:.:, ..:. ....... . . . .. . . ::~I::.:::..::.
.: ... ....... :::::.:.::, .............................
... ill:ll,.,l:,.g:L::;
:::::,I:,:, .:.:.::::::.:::.>: .. ::::,:,:,: ....: .........................
........... . ..::.:.:.:
................................... :
:::::::.:::...~:j:.:.:.::......::::.::.:.
.::. ‘,.:.’
...... :‘:::‘:‘::::.:.:.‘i’:‘~.~~‘,‘~,~:.::~~~~:
..............................................
..~.~.~.~.~.............::.:.: ........
...
..................
................
,,.)\:j:jjj::~,::::‘.‘:‘::::.:.:.:....................
:.:.:,,::,,j:j:j
.................................
j::
.):: . .
,::.:
: ..
... . .. :’ ..
Deleting anniversaries
Deleting single entries
:.......:..~:~.:::::: .:.:.:
...:.,:,I :,,,
...... .. . ..j.j.~.j..:~.~~.:.:.:.:.:.:.:.:.~..:. :::.::.:.:.:................:~:..:::::.:.::::‘:
j::>:~:....:.j.l:
. . ‘: ,,::,:+
:, :
.:..::::....:: :,
..... ..
.:‘, .::,:j : j :
....... XI,;
................................ ..:.;: .: :
........
... .::.::
Designating the file names
1, TEL 2, and TEL 3) can be
To delete an individual entry, recall it or select it in the index
The directory file names (TEL
display with the pointer, and then press (DEL) and Y.
changed from the Function menu.
1. Press (MENUJ r;? 1 (“FUNCTION”).
Deleting all entries
To delete all MONTH/DAY or MONTH/WEEK entries:
2. Press a 1 (“TEL FILE
NAME”).
1. Press (MENU) m 1 (“FUNCTION”) 3 (“DATA DELETION”).
3. At the cursor press m.
2. Press 2 (“SCHEDULE”).
4. Enter any directory file
3. Press 2 (“ANN 1”) or 3 (“ANN 2”).
name that you like (up to 10
4. Press Y.
characters).
Note: When the SECRET function is turned on, “SECRET ON
MODE” will appear on the display. The SECRET
function must be turned off before data can be deleted.
(Refer to “USING THE SECRET FUNCTION” on pg. 21.)
4r
5. Press (ENTER].
6. Continue until all file names have been entered.
Note: If you do not wish to change a file name, skip that file
by pressing (ENTER].
Entering listings
Pressing (TELJ for the first time displays directory TEL 1. Press
(TEL) repeatedly to cycle through the three directories.
Input the name of your contact
then press (ENTER].
.J
Input the telephone number; -press m to enter fax number
,
o n e s J a c k
708-759-9555
709-759-9201
I l l i n o i s
on the next line then press
[ENTER].
/
Input the address then press (ENTEP).
1
I
Recalling by using the index display
1. Press (TEL].
2. Press (MENU] 2 (“INDEX”).
3. Move the pointer “ b ” using
[rlorm.
-
Use [v) or (Al to move to the
FFelipe Silva
Jones Jack
Robert Martin
Roger Williams
next or previous page of the
four entries.
Recalling listings
Recalling by sequential search
Each time a is pressed, entry is recalled in alphabetical
order. When a is pressed, entry is recalled in reverse order.
4. Press (ENTERJ to see the details.
Editing listings
1. Press @
1 (“EDIT”).
2. Edit the listing.
Recalling by direct search
3. Press (ENTER] to store the new listing.
Press (CCEI, then enter the first letter(s) of the listing and press
[VI. Use (vl and a to recall other entries sequentially.
Recalling by keyword search
Any part of an entry can be a keyword: name, company, etc.
Enter the keyword and press (2nd) (7) or (2ndl m.
Deleting listings
Deleting single listings
To delete an individual entry, recall it or select it in the index
display with the pointer, and then press (DEL) and Y.
Subsequent listings containing the same word(s)/character(s)
can be recalled in order each time you press (2ndJ (71 or (2ndJ
W.
Deleting entire directories
1. Press @$ a 1 (“FUNCTION”).
2. Press 3 (“DATA DELETION”) 1 (“TEL”).
3. Press 1 (“TEL 1”) 2 (‘TEL 2”) or 3 (“TEL 3”).
14
..................
......
1: :::,,;,,,y&.:.:.,: ............................... . :.::::...............:.::::::............:
..........: .... .:::.:
:. .:
................. .::.:
.....................
....... . . ,:, .....
:
,:, .
: , , : :,: .: .::::::::::::i:i’i.i.:i’:‘iji ’i ;:.j:...
:.::: . . . y ... ,: ,:,:, ...................
isil;,;ii:‘r’i”i’:‘:;a:i:~S~N,IG:;:7~ E:.‘::‘M enrio::.iir::i:::::~,:‘::~:
............. ::::::.::,.:.:....................
. . : : ;: :,: :j:.j:::: :. .. .........................
.............
:.......
,,: .....::::l::l~,i;~.;i:iii:,::::‘::i-~~~
. . FRNE’l”[aN:”
i i i:i:i’i’i ’ili ’i .i:’.l:i,:’.;::.l:,:::.~~:.:::~~.:..:~...:.:.........:
::i.................
::i::::i: ::i::i::::.::::.:.~~::::‘
,:,‘,:,.,:~,:,: ,:,::,:.::::.:.......::..:.......~IIII:
: ::,,::,.: ::.:: ::.:i~: ,:~:,~: ,::,:~. ,::. j.::,_:.:‘::i:’.ij:’i: :.:II .:.~;,~
.... , ” . :,-:.:‘.Y
: .........
............
:t)....................
: ,.:.:.: :.: : :......
:,:,:i:i.~:i~i j j j: :.;.;:. > ,,,, . . . . . . . . . . :.: . . . :.:.::..
: ,:, :.;:
. . . . . . .:.: .... ..........
. : :........
..,,.,:.::,
.............
:. , , : . .>.... ..........
..............................................
. . ‘:: ......
.::
....
.
:.:.
..
:
.
..............
..:.:.:.:.:::
.
,:::::
.
:
.
,
:
,
j
.
:
.
,:
:
,
.
.
:
.
.
:
.
.
:
.
j
,
,
1
111,
:
:,:,,
.
.
.
.
.
.
:
.
:
.
.
.
:
.
.
i
:
~
:
.
;
:
:
:
:
..:
:
,
,
,
.
:
.
,
:
:~:j:j’,:~: ,::l,:l::,~:l(,~j.,~:,.:~.:~j.~,).i‘.~:.:~,. ~~‘...................
:
,
.
:
.
........
: ,:~: : ,.: i ,.::: .: .:.: .:.:.: . . . . ..............
... :. . ...... .: : ..... ,:, .... ...!.
:, ,.,.,:, ..........
.: .:.:.:.:
,.I,.‘,,,:.,::.I
:::::::::,: :..:.:.:.:.::.::::::.:.::~.:~:;:.~:::.’..:.
4. Press Y
Note: When the SECRET function is turned on, “SECRET ON
MODE” will appear on the display. The SECRET
function must be turned off before data can be deleted.
:::::::j:j.j.j
:\ :::_.::::.,:>: ,:: ..... ,,: ,.:.:.:,,,
,,
,,
:
...... ::, ........
.
.
j,
jj
::
......................................................
(Refer to “USING THE SECRET FUNCTION” on pg. 21.)
Entering memos
1. Press=.
2. Enter the memo. Press (JI
after each line.
3. Press (ENTER] to store the memo.
Recalling memos
Recalling memos by sequential search
Each time m is pressed, data is recalled in the order of entry
When [/\1 is pressed, data is searched in reverse order.
Recalling by direct search
Enter the first letter(s) of the memo and press r;;l and a to
search.
To continue the search, press r;;7 or a repeatedly.
Recalling by keyword search
Any part of an entry can be a keyword: name, company, etc.
Enter the keyword and press (2ndl (T] or (2ndJ (Xl.
:
Subsequent memos containing the same word(s) can be
recalled in order each time you press @$ 57) or (2nd) [x).
4. Press Y.
Note: When the SECRET function is turned on, “SECRET ON
Recalling by using the index display
MODE” will appear on the display. The SECRET
1.
function must be turned off before data can be deleted.
Press-.
2. Press m 2 (“INDEX”).
(Refer to “USING THE SECRET FUNCTION” on pg. 21.)
3. Move the pointer “ b ” using m or (rl. Use r;71 or 0 to
move to the next or previous page of the four entries.
4. Press (ENTERJ to see the details.
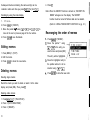
Rearranging the order of memos
Press m 2 (“INDEX”).
Move the pointer”.” using
Editing memos
Ir] or a to the entry you
1. Press (MENU] 1 (“EDIT”).
want to move and press (INS].
2. Edit the memo.
The entry will be highlighted.
3. Press (ENTER] to store the new memo.
Move the highlighted entry to
the position where it is to be
Deleting memos
Deleting single memos
Recall the memo you wish to delete or select it in the index
display, and press (DEL). Then, press Y.
Deleting entire memos
1. Press (MENVJ rv_l 1 (“FUNCTION”).
2. Press 3 (“DATA DELETION”).
3. Press 3 (“MEMO”).
16
inserted using [rl or [rl.
Press (ENTER] to store tha new order.
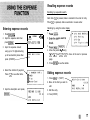
Recalling expense records
Recalling by sequential search
Each time [VI is pressed, data is recalled in the order of entry.
When W is pressed, data is searched in reverse order.
Entering expense records
1. Press (EXPENSE).
1. Press (EXPENSEJ .
2. Input the expense date then
press IENTERJ.
Recalling by using the index display
.
*
EXPENSE
* $5
DATE ?
MID/Y=03/13/1996
4. Move the pointer
using up to 10 digits including
press (ENTER]. Y
WED
123
MAR
13.1996
4. Select the method of payment. \r
Press m to see other items.
2,, z” i”i:ij
3.
3. Input the expense amount
up to two decimal places then
2.
“ t ” using
ir] or Ir]. Use a or a to move to the next or previous
page.
5. Press m to see the details.
Editing expense records
/I::i:::::::“’
1. Press (MENUJ 1 (“EDIT”). A
2. Move to the field you wish to
edit.
5. Input the description and press
JENTER).
3. Edit the entry.
4. Press (ENTER].
17
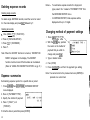
Deleting expense records
Notes:
l
To summarize expense records for all payment
types, select “ALL” instead of “PAYMENT TYPE” from
Deleting single records
To delete single EXPENSE records, recall the record or select
it in the index display and press (DELI followed by Y.
Deleting all records
the EXPENSE REPORT menu.
. In EXPENSE REPORT, total expenses will be
displayed with up to 12 digits.
I
I
Changing method of payment settings
1. Press (MENU) (7j 1 (“FUNCTION”).
2. Press 3 (“DATA DELETION”).
1. Press (iZiQ m 1 Iv] 2.
3. Press a 1 (“EXPENSE”).
2. With the (ENTER] key, position
1
the cursor on the method of
4. Press Y.
payment that you which to
Note: When the SECRET function is turned on, “SECRET ON
I
MODE” will appear on the display. The SECRET
3. Type in desired name.
function must be turned off before data can be deleted.
4. Press (ENTER).
(Refer to “USING THE SECRET FUNCTION” on pg. 21.)
5. Press (6%) (CCEI to exit from the payment type setting.
pressed at a current item.
Summarizing expense reports for a specific date or period
1. Press (EXPENSE) then (2ndl IEXPENSEJ; EXPENSE REPORT
menu displayed.
2. Press 2 (“PAYMENT TYPE”).
3. Specify the method of payment.
I
Note: You cannot return to the previous item once (ENTER] is
Expense summaries
pi
4. Press 1 (“DAILY”) or 2
(“PERIOD”).
5. Enter the date or period then press (ENTER].
18
change and press @.
i
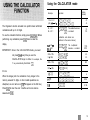
Using the CALCULATOR mode
Example
Display
(answer)
Operation
12x3+5=
(-24) + 4 - 2 =
41.
-8.
The Organizer’s built-in calculator can perform basic arithmetic
calculations with up to 12 digits.
34 + 57 =
45 + 57 =
To use the calculator function, simply press (cnLclcoNv). Before
IMPORTANT: Once in the CALCULATION mode, you need
not press (2ndl every time you use the
CALCULATOR keys in white. For example, the
Y key automatically becomes [+1.
91.
102.
(Subtraction and division are
perfoned in the same manner.)
performing any calculation press @ twice to clear the
display.
34 (+I 57m The added becomes
45
m a constant.
68 x 25 =
68 40 =
68 m 25 m
40 m
200 x 10%
9 i 36%
200[xl10[%1
9a36(
20.
25.
200 + 10%
200(+1 lO(%l
220.
500 - 20%
500 m 20 I%]
The multiplicand
becomes a constant.
1700.
2720.
Errors
4.
When the integer part of a calculation of any integer in the
memory exceeds 12 digits, or other invalid operations are
(43)2 =
attempted, an error will occur. (“E” will appear on the first line.)
110
4096.
8(-T-)(--q
0.125
Press @ to clear the error. Overflow errors can also be
cleared with @.
.m;
::::::::g
::::::::,
:.:.:.:...
19
Operation
25x 5=
-) a4t 3=
t) 66+17=
(Total) =
(14 - 3 x 2) x
(52 - 35) =
.
Clear the memory before performing
any calculations
(RCM)25m5(M+l
84ciJ 3(M-l
66(+1 17(M+l
fiZ%l
Display
(answer)
-M- 125.
26,
-M65.
-M-M- 182.
-M6.
-M- 136.
Non-zero numbers in the memory cause “-M-” to appear on
the display.
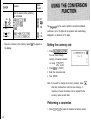
The
Organizer can be used to perform conversions different
currencies. Up to 10 digits can be entered, with results being
displayed in a maximum of 12 digits.
Setting the currency rate
1. Press (m] (CALC/CONVJ.
You can move through
currency conversion screens
l-3 using [VI or m.
2. Press (MENU] 1 (“EDIT”).
3. Enter the conversion rate.
4. Press [ENTER).
Note: If you want to change the currency name(s), press a
after step 2 above then enter the new name(s). A
maximum of seven characters can be entered for the
currency name on each side.
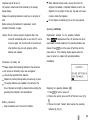
Performing a conversion
1. Press a or a to select the desired conversion screen.
20
2. Enter the amount, then convert it with (,I or m.
IMPORTANT:
The m and [+1 keys are used to perform the
conversion in the directions shown.
:
:
.:..::.::::I’,.I::‘,.:
The SECRET function allows you to protect confidential data
with a password so that no unauthorized person can access it.
You may mark certain entries as private; displaying or
modifying such data requires the password. Any entry from the
SCHEDULE, ANNIVERSARY, TEL, MEMO, and EXPENSE
modes can be classified in this way.
To register a password,
1. Press (MENUS 3 (“SECRET”).
2. Enter your password (up to seven characters).
3. q
will appear after IENTERj is pressed.
Now you can enter data in any one of the above-mentioned
modes.
After entering an item,
4. Press (rind) 171; “ * ” appears.
5. Press (ENTER].
Note: Your data can only be accessed now by providing the
correct password.
.>m
::::::::::
$$;<
21
To turn off the secret function,
6. Press [MENV) 3.
4. Press 2 (“DELETE THE PASSWORD”).
7. Enter password.
6. Press (MENU1 3.
8. Press-.
7. Set new password.
The secret function is no longer in effect.
a. Press (ENTER].
5. Enter password then press (ENTER).
Your new password is now set.
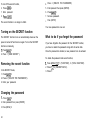
Turning on the SECRET function
The SECRET function turns on automatically whenever the
What to do if you forget the password
power is turned off and back on again. To turn the SECRET
If you have forgotten the password for the SECRET function,
function on manually,
you have to delete the password along with all secret data.
1. Press w 3.
Once the password is deleted, a new password can be entered.
2. Press 1 (“HIDE SECRET”).
To delete the password and secret function,
Removing the secret function
1. Press (MENU] [vl 1 (“FUNCTION”), 3 (“DATA DELETION”).
2. Press GJ 2 (“SECRET DATA”).
In the SECRET mode,
1. Press m 3.
2. Press 2 (“DELETE THE PASSWORD”).
3. Enter your password.
Changing the password
1. Press @ 3.
2. Enter password then press (ENTER].
3. Press (MENU] 3.
22
3. Press Y.
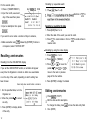
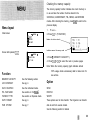
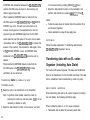
Checking the memory capacity
The memory capacity function indicates how much memory is
in use and also the number of entries stored in the
SCHEDULE, ANNIVERSARY, TEL, MEMO, and EXPENSE
modes. After checking the memory, press B to return to the
previous display.
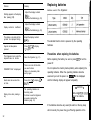
Menu layout
1.
Initial screen
* MENU *
UEDIT
a INDEX
1 SECRET
Press-.
2. Press [VI 1 (“FUNCTION”).
Number of entries stored
Indicates amount of memory used /------
Screen after pressing a
* MENU *
0 FUNCTION
1 OPT I ON
3. Press
E-1
1 (“MEMORY CAPACITY!‘).
4. Press m or W to select the next or previous pages.
Note: When the memory capacity graph indicates almost
100% usage, delete unnecessary data to make room for
Function
new entries.
MEMORY CAPACITY
See the following section.
LCD CONTRAST
See pg. 4.
Option
SEND
DATA DELETION
See the individual modes.
TEL FILE NAME
See section on Tel mode.*
RECEIVE
PAYMENT TYPE
See section on Expense mode.
VERIFY
DATE FORMAT
See pg. 4.
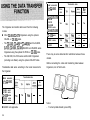
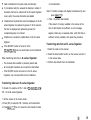
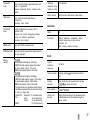
These options are for data transfer. The Organizer can transfer
TIME SYSTEM
See pg. 7.
data to and from several models.
See the following section for details.
c
Model connected
to the ZO-2500/
ZO-2700
Transferable data
Schedule
models.
ZO-2500/ZQ-2700
ZO-D400
204450
ZO-4450M
ZO-3000 series
ZO-2650/ZQ-2850
*
Other ZQ-2500/ZQ-2700 Organizers using the optional
ZO-1000 series
Yes
CE-200L or CE300L cable.
EL-6100 series
Yes
EL-6260
-
The Organizer can transfer data to and from the following
The ZQ-D400,ZQ-4450 and ZQ-4450M, and the IQ-8000,
l
IQ-7000,ZQ-5000,ZQ-3000,
ZQ-2000 and ZQ-6000 series
Organizers using the optional CE-POOL or CE-3OOL cable.
The ZQ-1000, EL-6100 series and EL-6260 Organizers
l
Yes
(including Auto Dialer) using the optional CE-220T cable.
-&
Yes
Yes
Yes
Yes
Yes
Yes
Anniversary
pense
Yes
Yes
EX-
Yes
-
There may be some data transfer restrictions between these
models.
Before connecting the cable and transferring data between
Transferable data varies according to the model connected to
Organizers, turn off both units.
the Organizer.
Model connected
to the ZO-2500/
ZO-2700
IO-8000
IQ-7000
20-5000
ZO-2000
ZO-6000
series*
series
series
series
series
* IQ-8900 not applicable.
24
Transferable data
y
Yes
1 !
Yes
Expense
-
L
Notes:
l
To interrupt data transfer, press ION].
l
l
If a connector is disconnected, or a similar problem occurs
Press (MENU), [v) then 2 (“OPTION”), the data transfer
during data transfer, the message “I/O DEVICE ERROR”
function on the receiver.
will appear. Press m to clear the error.
Press 2 (“RECEIVE”) to set the unit in the receive mode.
After data transfer, the data on the transmitter is unchanged.
Transferring data between
ZQ-2500/Z&2700 Organizers
Data in the SCHEDULE, ANN, TEL, MEMO and EXPENSE
Press (MENU1, r;;7 then 2 (“OPTION”), the data transfer
modes can be transferred. The data is transferred and verified
function on the transmitter.
by mode (all entries in a mode or a directory - TEL
1, TEL 2,
TEL 3) or by entry. In addition, data can be backed up.
Transferring data by mode or by entry
Note: To transfer a single entry display the desired entry and
press (MENU] m 2.
5. Press 1 (“SEND”) to transfer data.
During mode transfer, data previously stored in the specified
mode of the receiver is deleted. Proceed with caution.
Note: When mode transfer is carried out in the TEL mode, all
Notes:
. If the mode of the transmitter and the mode of the receiver
are not the same, data transfer is not established. The
listings in the specified directory will be transferred. (In
message “DATA ERROR” is displayed.
this case, the directory file name is transferred at the
When transferring TEL data, directories on the transmitter
same time.)
and receiver can be different. The contents received by the
Select the mode on the transmitter and receiver.
l
Press (GiG$ @Zj. (Transmitter)
l
Press (SCHEDULE]. (Receiver)
receiver will be stored in the open directory. For example, if
TEL 1 is selected on the transmitter and TEL 3 on the
receiver before the data transfer is established, the contents
of TEL 1 will be sent to and stored in TEL 3.
.
Turn off the SECRET function on both the transmitter and
Press [MENV) (71 2 (nndl 1 Y.
the receiver before mode transfer.
l
.
If the amount of memory available on the receiver at the
Verifying data
time of transfer is insufficient, data transfer is not possible.
It is possible to verify data by mode by mode or entry. If any
The message “MEMORY FULL” appears. Delete any
discrepancies are found, the message “VERIFY ERROR” is
unnecessary data, verify whether the available memory is
displayed.
sufficient, and repeat the data transfer procedure.
To verify data in the SCHEDULE mode,
If an error message appears while transferring data, press
m to clear the error.
Select the mode on the transmitter and the receiver.
l
Press (SCHEDULEJ then (CCEI. (Transmitter)
l
Press (SCHEDULEJ . (Receiver)
Transferring backup d a t a
Press (MENU), [vl, 2 then 3 to set the receiver in the verify
All the contents of the Organizer are transferred. During
mode.
backup data transfer, data stored on the receiver is deleted.
< UNIT
Proceed with caution. (Backup data transfer is only possible
TO
UNIT >
-VERIFYING-
between identical models.)
1. To select the data transfer function on the receiver and set
it in the receive mode for backup data transfer,
Press (MENUJ, m then 2 to select the data transfer function
Press (MENU) (T] 2 (2ndl 2.
on the transmitter.
1<
‘pi!Y:~’ ’
2. To select the data transfer function on the transmitter and
perform backup data transfer,
26
Press 1 to perform verification.
MEMO mode:
Transferring data with another ZQ series
or IQ series Organizer
544 characters
If an entry exceeding these limits is sent to the
ZQ-2500/ZQ-2700, “I/O DEVICE ERROR” appears and the
transfer will not be successful.
Data transfer restrictions
The maximum number of characters that can be edited after
There are some restrictions when transferring data with any ZQ
an entry is transferred to the ZQ-2500/ZQ-2700 is 514 in
series Organizer other than the ZQ-2500/ZQ-2700 or the IQ
the TEL mode and 512 in the SCHEDULE and MEMO
series Organizers (previously shown). These restrictions result
modes. Entries exceeding these limits can be displayed but
from differences in functions and the maximum allowable size
cannot be edited. Those exceeding 515 characters can
of an entry between the Organizers.
neither be displayed nor edited.
Mode transfers from the ZQ-6000 series and IQ-8000 series
When transferring SCHEDULE data from the ZQ-D400,
can be performed even when the maximum length of an
ZQ-4450, or ZQ-4450M, or the ZQ-6000, IQ-8000, IQ-7000 or
entry exceeds the character limits specified above.
ZQ-5000 series Organizers
l
However, to display and edit data, the number of characters
Any alarms set on SCHEDULE data transferred from one of
must be within these limits.
the above Organizers, regardless of their actual setting time
TEL free field contents can be received and displayed on
for the specified events, will be set to the events starting
the ZQ-2500/ZQ-2700 but are deleted once the edit mode is
time on the ZQ-25OO/ZQ-2700.
entered.
When transferring data from ZQ-6000 or IQ-8000 series
When transferring data to and from ZQ-1000 series
Organizers
Organizers
.
When transferring an entry from the ZQ-6000 or IQ-8000
series to the ZQ-2500/ZQ-2700, the maximum allowable
size of the transferred entry is as follows:
TEL mode:
537 characters
SCHEDULE mode:
523 characters
l
All characters transferred from the ZQ-2500/ZQ-2700 are
displayed in capital letters on the ZQ-1000 series.
Characters and symbols that cannot be displayed on the
ZQ-1000 series appear as “ n ‘I.
EXPENSE data transferred between the ZQ-2500/ZQ-2700
and the ZQ-1000 series is stored on the receiving unit
in the receive mode by pressing (MENU], a then 2.
3. Select the data transfer function on the transmitter and
without payment type data.
When transferring EXPENSE data by mode from the
ZQ-1000 series to the ZQ-2500iZQ-2700, an “I/O DEVICE
ERROR” may occur. This will occur when there is not
perform data transfer by pressing @, a, 2 then 1.
Notes:
l
enough memory space to be assigned as the area for
payment type data; EXPENSE data from the ZQ-1000
series does not have this space. If the error occurs, delete
unnecessary data on the ZQ-2500iZQ-2700 to increase the
amount of free memory, then transfer the data again. Once
an “I/O DEVICE ERROR” occurs, all EXPENSE data
Follow the same steps to transfer data from another ZQ or
an IQ series Organizer.
l
Notes described on page 25 also apply here.
Verification
Follow the steps explained in “Transferring data between
ZQ-2500/ZQ-2700 Organizers” above.
transferred to the ZQ-2500/ZQ-2700 before the error is
cleared.
When transferring EXPENSE data by mode from the
ZQ-1000 series to the ZQ-2500/ZQ-2700, no data
verification can be carried out.
Transferring
data by mode or by entry
Transferring data with an EL series
Organizer (including Auto Dialer)
For the EL-6100 series Organizer, TEL data and SCHEDULE
data can be transferred. For the EL-6260 Auto Dialer, TEL data
can be transferred. Data is transferred by mode or by entry.
To transfer an entry,
1. Recall the entry to be transferred on the transmitter.
Note: To perform mode transfer, select the mode by
pressing the mode key, and then press (CCE). It is not
Data transfer restrictions
When transferring data with an EL series Organizer (including
the Auto Dialer), the following restrictions apply:
necessary to display an entry.
2. Select the data transfer function on the receiver, and set it
When transferring data to an EL series Organizer
l
26
Transferred data is added to previously stored data.
Data is transferred in the same mode and directory.
on the transmitter.
If a transferred entry the exceeds the maximum number of
characters that can be entered into the EL series Organizer
Note: To transfer a single entry display the desired entry and
press (GGiJ r;] 2.
as one entry, the excess characters are deleted.
Characters and symbols that cannot be displayed on the EL
series Organizer are replaced by spaces. If all the columns
4. Press 1 to perform data transfer.
.
If the amount of memory available in the receiver at the
that can be displayed are replaced by spaces, the
time of data transfer is insufficient, an error message
corresponding entry is not stored.
appears. Delete any unnecessary data, verify that there is
All letters are converted to capital letters on the EL series
sufficient memory available, and repeat the procedure.
Organizer.
If the SECRET function is turned on in the
ZQ-2500/ZQ-2700,
only non-secret data can be transferred.
Transferring data from an EL series Organizer
1. Select the mode on the receiver.
2. Select the data transfer function on the receiver, and set it
When transferring data from an EL series Organizer
l
The received data is added to previously stored data.
l
All non-English characters are converted to small letters.
l
If the SECRET function is turned on in the EL series
Organizer, only non-secret data can be transferred.
Transferring data to an EL series Organizer
To transfer, for example, all TEL 1 data in ZQ-2500/ZQ-2700 to
TEL 1 in the EL series Organizer,
1. Set the receiver in the receive mode.
2. Press (TEL) to select the TEL 1 directory on the transmitter.
3. Press (MENUJ, a then 2 to select the data transfer function
in the receive mode.
3. Perform data transfer from the transmitter.
Exchanging data with a personal
computer
With Sharp’s CE-390 (Version 1.2 or higher) Organizer Link
software and cable package, you can exchange data with a
IBM” compatible personal computer. The cable connects to the
Organizer’s 4 pin computer- link port on the left side of the unit
Caring for your Organizer
See the Organizer Link manual for connection and software
Do not carry the Organizer around in your back pocket, as
operating instructions.
sitting on it may cause damage. The display is made of
Note: Sharp’s CE-390 (Version 1.2 or higher) may not be
available at the time you purchase the Organizer.
If you already have the CE-390 (Version 1 .O or 1. l),
please call your local Sharp dealer for information about
obtaining Version 1.2 or higher.
Ir IBM is a registered trademark of International Business
Machines Corporation.
From CE-390, when the menu to select Organizer model is
displayed, select 5 (“YO-250M or YO-260M models”).
glass and is particularly delicate.
Keep the Organizer away from heat (on a car dashboard or
near a heater, for example), humidity, and dust as these
may cause it to malfunction.
Do not drop the Organizer or allow anything to hit it.
Clean the Organizer with a soft, dry cloth and do not use
solvents (paint thinner or benzine, etc.).
Do not press the keys with a sharp pointed object.
Do not bend the Organizer, as internal damage may result.
Note: Do not carry the Organizer in your pocket or bag
together with sharp or hard objects, as these may
scratch the Organizer.
30
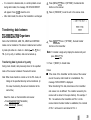
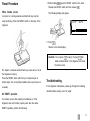
Reset Procedure
1. While holding ‘@), press the RESET switch on the back.
Release the RESET switch and then release a.
When trouble occurs
The following display will appear.
An impact or a strong external electrical field may stop the
keys functioning. Press the RESET switch on the back of the
) CLEA:
ALL
DATA
Organizer.
2. Press m.
Returns to the initial display.
Caution: Do not press m in step 2. Pressing Iv] will
delete all data stored in the Organizer and reset
the built-in clock.
The impact or external electrical field may erase some or all of
the Organizer’s memory.
Press the RESET switch with the tip of a ball-point pen or
similar object, but not anything breakable (like a pencil point or
a needle).
Troubleshooting
If the Organizer malfunctions, please go through the following
checklist before sending it out for repair:
All RESET operation
If a problem occurs after replacing the batteries, or if the
Organizer does not function properly even after the above
RESET operation, perform the following:
31
Problem
Remedy
Nothing appears on the display
after pressing [ON].
. Adjust the display contrast
(pg. 4).
. Replace the batteries (pg. 32).
Display contrast is insufficient.
. Adjust the display contrast
(pg. 4).
. Replace the batteries (pg. 32).
The display is too dark (all the
symbols are displayed faintly).
Adjust the display contrast
(Pg. 4).
Keys do not beep when
pressed.
Press (2nd] (7) to display
“1” (pg. 4).
The Organizer turns on but the
keyboard does not function.
Reset the Organizer (pg. 31).
“MEMORY FULL” is displayed.
There is no room for the data
you want to store.
Delete all unnecessary data
and try again.
Replacing batteries
Batteries used in the Organizer:
)I
The standard built-in clock is powered by the operating
batteries.
Precautions when replacing the batteries
Before replacing the battery, be sure to press (OFF] to turn the
power off.
Do not replace the memory backup battery when replacing the
operating batteries. When the operating batteries become
weak and you turn the power on, “ lirm ” will be displayed
Alarm does not sound at the
se! time.
Press (2nd) [?) to display “ 4 ”
(pg. 11).
Display dims while pressing a
key.
The operating batteries are
becoming weak.
Continue to use the Organizer
as usual or replace the
batteries (page 32).
and the following display will appear temporarily:
< CAUTION >
REPLACE BATTERIES[A]
READ THE MANUAL
llpTl
If the batteries become very weak (the alarm or the key beep
will not sound), the power may go off during operation or the
32
Organizer may fail to turn on.
When batteries become weak, remove them from the
The memory contents will still be retained by the memory
Organizer immediately. If depleted batteries are left in the
backup battery.
Organizer for any length of time, they may leak and cause
Replace the operating batteries to avoid loss or corruption of
corrosion inside the Organizer.
data.
Do not dispose of batteries by fire as they may explode.
Before removing the batteries for replacement, record
important information on paper.
Operating batteries
Caution: Do not continue using the Organizer after it has
Replacement intervals for the operating batteries
turned off automatically while in use. Even if it can be
When “ m ” is displayed and the LCD becomes too dim to
turned on again, the clock time will be incorrect and
read despite contrast adjustment, the operating batteries are
other functions may not work properly until the
drained. Press [OFFS to turn the power off and then turn the
batteries are replaced.
power back on. If the following display appears when the
power is turned on, replace both operating batteries
Precautions on battery use
immediately.
Always replace both operating batteries at the same time.
Do not use an old battery and a new one together.
Use only the specified lithium batteries.
Replace the memory backup battery at least every 5 years.
The original batteries were installed in the factory at the
time of shipment and might be drained before reaching the
operating time indicated in the specifications.
Replacing the operating batteries [A]
1. Press (OFF1 to turn the power off.
2. Remove the security screw and lift off the back cover. (Fig.
Battery precautions
l
Keep the batteries out of the reach of children.
1)
3. Remove the black “Caution” label covering the operating
batteries [A]. (Fig. 2)
4. Carefully remove the old batteries by prising them out with
a ball-point pen. (Fig. 3)
Do not use a mechanical pencil or sharp pointed object.
This may break and damage the mechanical pencil or the
Organizer.
5. Install two new batteries with the (+) sides facing up (Fig. 4)
and press the black “Caution” label back into place.
6. Replace the back cover and the security screw. (Fig. 5)
(Fig. 4)
(Fig. 5)
7. Press the RESET switch.
If unit does not turn on or a meaningless display appears,
Memory backup
repeat the battery replacement procedure.
0. Adjust the display contrast if necessary. (Refer to “Contrast
adjustment”, pg. 4.)
battery
The life of the memory backup battery
The memory backup battery in your Organizer has an effective
9. Set the correct clock time and date. (Refer to “Setting the
HOME time and date” pg. 7.)
life of about 5 years under normal operating conditions. Note
that temperature extremes can shorten the battery life and
cause memory losses. Replace the memory backup battery
every 5 years.
When you replace the battery, write down the date on the label
of the Organizer so you know when to replace the battery next
time.
For example, if you replace the battery in January 2001, write:
(Fig. 1)
34
(Fig. 2)
(Fig. 3)
organizer.
6. Install the new battery with the (+) side facing up.
7. Tighten the movable arm screw and press the red
“Caution” label back into place. (Fig. 4)
8. Replace the back cover and the security screw.
9. Press the RESET switch.
If nothing appears on the display, adjust the contrast to
darken the display (see pg. 4.) If still nothing appears,
repeat the battery replacement procedure.
Replacing the memory backup battery
If meaningless characters or symbols appear on the
When replacing the memory backup battery, make sure that
display, repeat the battery replacement procedure.
the operating batteries are not drained. If the operating
batteries are drained, replace them before replacing the
memory backup battery. If you replace the memory backup
battery when the operating batteries are drained, all of the data
10. If necessary, adjust the display contrast to a more
easy-to-view setting. (Refer to “Contrast adjustment”, pg. 4.)
11. Set the correct clock time and date. (Refer to “Setting the
HOME time and date”, pg. 7.)
in the memory will be lost.
1. Press (OFF) to turn the power off.
2. Remove the security screw and lift off the back cover.
3. Remove the red “Caution” label on the memory backup
battery. (Fig. 1)
4. Remove the security screw fixing the movable arm. (Fig. 2)
5. While holding back the movable arm fixing the battery in
place, remove the old battery by carefully prising it out with
a ball-point pen. (Fig. 3)
(Fig. 1)
(Fig. 2)
Do not use a mechanical pencil or sharp pointed object.
This may break and damage the mechanical pencil or the
35
(Fig. 3)
(Fig. 4)
AUTO POWER OFF function
When no key is pressed for approximately 7 minutes, the
Organizer automatically turns off the power to save the
batteries. (The actual time may vary depending upon the
conditions of use.)
Character sorting order
Specifications
Model
ZQ-2500/ZQ-2700
Product name
Electronic Organizer
Display
119 x 32 dot matrix liquid crystal display
20 columns x 4 lines
(with 6 x 6 dot characters)
Entries in the TEL mode are sorted and stored in the following
order (according- to the first character of each entry).
Electronic notebook section
TEL mode
36
Entry and recall of names, phone numbers, and
addresses
SCHEDULE
mode
Entry and recall of dates, appointment times, and
details of appointments
Automatic day-forward function, schedule alarm
function
ANN mode
Entry and recall of dates and details of
anniversaries
Anniversary notice function
CALENDAR
mode
Display of calendars from January 1901 to
December 2099
Schedule mark function distinguishing between
morning and afternoon appointments
Anniversary mark function
Maximum
character string
length per entry
512 characters
Other features
Secret function, data transfer, index display
Calculator
MEMO mode
Entry and recall of everyday memos
EXPENSE mode
Entry and recall of expense date, amount payment
type and description
Memory
capacity
[ZQ-25001
32 Kbytes (User area: Approx. 30 Kbytes)
SCHEDULE mode capacity: Approx. 500 entries
TEL mode capacity: Approx. 810 entries
MEMO mode capacity: Approx. 220 entries
[ZQ-27001
64 Kbytes (User area: Approx. 62 Kbytes)
SCHEDULE mode capacity: Approx. 1,040 entries
TEL mode capacity: Approx. 1,680 entries
MEMO mode capacity: Approx. 460 entries
l The approximate entry capacities above assume
the following average entry size when all memory
is used by a single mode.
SCHEDULE
Description 32 characters/entry
TEL
Name
16 characters/entry
Number
12 characters/entry
MEMO
128 characters/entry
Digits
12
Functions
Addition, subtraction, multiplication, division,
constant, square root, percent, memory
calculation, etc.
(With currency conversion function)
Clock
Crystal
oscillation
frequency
32,768 Hz
Clock accuracy
Average variance & 60 seconds per month (at
25°C
Display
contents
Year, month, day, day of week, hours, minutes,
A.M./P.M., city names, time zone
Time system
12-hour or 24-hour
World clock
function
Display of date and time for the world-wide cities
Enable/disable control for daylight saving time
display function
Common
Power
Power
consumption
Battery life
Main power supply:
6 V - (DC) lithium batteries (CR2032 x 2)
Memory backup power:
3 V z (DC) lithium battery (CR2032 x 1)
0.01 w
Operating batteries
l Approx. 1,200 hours
When data is continuously displayed at an
ambient temperature of 20°C
l Approx. 600 hours
When data is searched for 5 minutes per
hour, and the data is displayed for 55 minutes
per hour, at an ambient temperature of 20°C
l Approx. 1.5 years
When turned off, and the clock is running.
Memory backup battery
l Approx. 5 years (if operating batteries are
replaced promptly when exhausted)
l Approx. 3 years (if operating batteries are
exhausted or not installed)
Operating
temperature
0°C to 40°C
Exterior
dimensions
Open
Closed
134 (W) x 170 (D) x 10.3 (H) mm
134 (W) x 67 (D) x 12.5 (H) mm
Weight
103 g (including batteries)
Accessories
Lithium batteries (CR2032 x 3) operation manual
38
D
Location of a specific
Data transfer 24
Between different
Monthly calendar 8
date 7
World time 6
Organizers 25
Restrictions 27, 28
E
A
Calculator function 19
DATA DELETION function
10, 13, 14, 16, 18, 22
Alarms
Schedule 11
Calendar function 8
DATE FORMAT function 4
Anniversaries 12
Caring for the Organizer 30
Daylight saving time 7
Expense records 17
Changing
City for World time 7
Deleting
Anniversaries 13
Memos 16
Turning off 11
All reset 31
Editing
Scheduled data 10
ANN notice function 11, 12
Clock time 7
Expense records 18
Anniversary function 11
Home city 6
Letters 6
Auto power off 36
Monthly calendar 8
Memos 16
Anniversaries 11
Password 22
Password 22
Characters 5
Payment type settings
Scheduled data 10
Expense records 17
Telephone listings 14
Letters 5
B
Backing up the Organizer
data 26
18
Character sorting order 36
Designating TEL directory
Telephone listings 14
Entering
Memos 15
BAlT symbol 3, 32
Checking the memory
Batteries
Memory backup 34
capacity 23
Clock 6
Direct search 14, 15
Directory file names 13
Numbers 5
Operating 33
Contrast adjustment 4
Precautions 32
Conversion function 20
Display
Contrast adjustment 4
Symbols 5
Replacement 32
Correcting entries 6
(See also Editing)
n
b
file names 13
Symbols 3
Displaying
Home time 6
Non-English characters
5
Schedule items 9
Telephone listings 13
Error symbol 19
Expense function 17
Calculation examples 19
39
F
Memory backup batteries
Monthly calendar 8
34
Function menu 23
Operating batteries 33
0
H
Transferring data 24
Opening the Organizer 2
Reset procedure 31
Backup data 26
Between two ZQ-2500/
P
Restrictions when
transferring data 27, 28
Home city 6
Home time clock 6
Telephone Directory function
13
20-2700 Organizers 25
Password
Index display 10, 12, 14,
16, 17
Initializing the Organizer 2
Changing 22
s
Deleting 22
Schedule alarm 11
Registering 21
Schedule function 9
With a ZQ or IQ series
Organizer 27
Secret function 21
With an EL series
What to do if forgotten
Inserting letters 6
With a personal computer
30
22
Payment type 17,
18
K
Organizer 28
Sequential search 12, 14,
15,17
Troubleshooting 31
Setting
Turning on/off
Key beep 4
R
Currency rate 20
Key beep 4
Key functions 5
Rearranging memos 16
Recalling
Date format 4
Secret function 21
Key notations 4
Keyword search 14, 15
Daylight saving time 7
Anniversaries 12
Home city 6
V
Expense records 17
Home time and date 7
Verifying data after transfer
26, 28
L
Memos 15
LCD CONTRAST function 4
Scheduled data 10
Specifications 36
Telephone listings 14
Summarizing expense
records 18
M
Memo function 15
MEMORY CAPACITY
function 23
Miscellaneous functions 23
40
Registering
Schedule alarm 11
City names 7
Password 2 1
Replacing batteries 32
T
TEL FILE NAME function 13
W
When trouble occurs 31,
World time clock 6