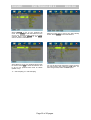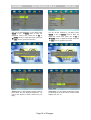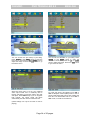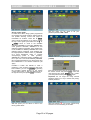
1
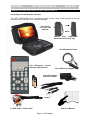
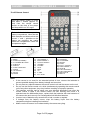
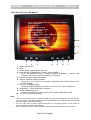
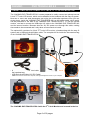
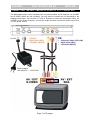
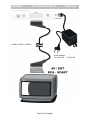
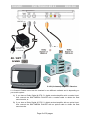
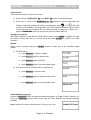
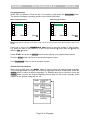
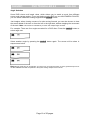
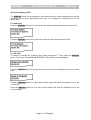
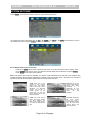
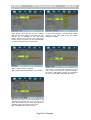
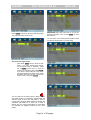
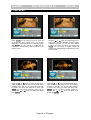
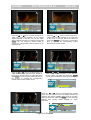
Handbuch
Manual
Manuel
D
GB
F
E
I
NL
Yakumo
DVD Traveller 8.0
www.yakumo.com
Mobiler DVD-Player
YAKUMO
DVD TRAVELLER 8.0
ENGLISH
Copyright Information
©2005 Yakumo GmbH. All rights reserved. This document may not in whole or in part
be reproduced, stored in a retrieval system, transmitted in any form or by any means,
electronic, mechanical, photocopying, recording, or otherwise, or reduced to any
electronic medium or machine-readable form without prior consent, in writing, from
Yakumo GmbH.
Yakumo and Yakumo DVD TRAVELLER 8.0 are registered trademarks of Yakumo
GmbH. The logo’s, standards, software, and/or product names mentioned herein are
manufacturer and publisher trademarks and are used only for the purpose of
identification.
Disclaimer
The publishers and author assume no responsibility whatsoever for the uses made of this
material or for decisions based on its use. Further, Yakumo GmbH makes no warranties,
either expressed or implied, regarding the contents of this product, its completeness,
accuracy, merchantability, or fitness for any particular purpose. Neither the publisher nor
anyone else who has been involved with the creating, production, or delivery of the
material shall be liable for any reason. Yakumo GmbH may make improvements and/or
changes in the products and/or options described in this document at any time and
without notice.
All brand and product names used throughout this document are trademarks or
registered trademarks of their respective companies. The brand and product names are
used in editorial fashion only and for the benefit of such companies. No such use, or the
use of any trade name, is intended to convey endorsement or other affiliation with the
document.
Product specifications are subject to change without prior notice
www.yakumo.com
YAKUMO
DVD TRAVELLER 8.0
ENGLISH
Dear Customer,
We thank you for purchasing the YAKUMO DVD TRAVELLER 8.0. We wish you many
pleasant hours of watching DVD’s or listening to your favorite music. Personal Safety has
been taken in consideration in the design and manufacturing this product, however any
improper use or operation may result in an electrical shock, fire and/or any other hazards. To
prevent these hazards it is strongly recommended to read this manual thoroughly and adhere
to the following precautions:
IMPORTANT PRECAUTIONS
SAFETY PRECAUTIONS
- To prevent an electrical shock, do not open the housing of the player and/or the TFT
color LCD, dangerous voltages may be present inside these units.
- Do not expose to any rain and moisture or spill any liquid onto or in these units and
do not operate the products when your hands are wet, in a humid environment, near
places of water and do not place water filled objects such as vases on top of the
product, to prevent any electrical shock or shortage.
- Never operate the product if it is moved from a cold environment to a warm one and
vice versa. Moisture may form inside of the unit and as a result it may not operate
properly. In this case, turn on the power, take out the disc and wait at least 60-90
minutes for the moisture to evaporate.
- The Disc Player is a CLASS 1 Laser product and uses a visible laser beam which
could cause hazardous radiation exposure, be sure to operate the player correctly as
instructed. To prevent hazardous exposure to the laser beam, do not place your eyes
close to the openings to look into the inside of this player. Do not touch the laser lens.
- Never put any heavy objects on the power cord and prevent it from becoming
jammed.
- Never put any foreign objects in the disc player and never put any foreign objects into
any other openings of the units, to prevent any damage or electrical shock.
- In any case of malfunctioning, only have the product serviced by an approved and
qualified service centre. Do not open the housing yourself.
- Do not clean with alcohol, clean the unit with a soft and dry cloth and only when the
unit is disconnected from the power source.
- Do not place any naked flame objects, such as candles, on top of the unit.
OPERATION PRECAUTIONS
- Only connect to a power source supplying 12V DC.
- Avoid placing the product in direct sunlight, in areas with high levels of dust, high
temperatures (over 40°C) or high humidity (over 90%).
- Operate in well ventilated areas.
- When not in use, switch off the unit and disconnect the power cord from the power
source.
- Do not turn on or off the product in short intervals. When turning the unit off, wait for
at least 10 seconds prior to turning the unit on again.
- Do not operate the player with scratched, bended or broken discs and when a disc is
not loaded properly, do not force the lid.
NOTE
- Please dispose empty batteries according the regulations in your country
- All On Screen Displays (OSD) and Pictures will be based on the English version.
- Design and Specifications may vary in the manual from the actual product in use.
YAKUMO
DVD TRAVELLER 8.0
ENGLISH
TABLE OF CONTENTS
PREPARATION BEFORE USING THE DVD TRAVELLER 8.0 ............................................................ 1
Unpacking and checking the contents ................................................................................................ 1
CONTROL REFERENCE GUIDE ........................................................................................................... 2
The Multimedia Disc Player ................................................................................................................ 2
The IR Remote Control ....................................................................................................................... 3
The 8 Inch TFT color LCD Monitor...................................................................................................... 4
ATTACHING THE YAKUMO DVD TRAVELLER 8.0 TO THE HEADREST ......................................... 5
ND
CONNECTING AN OPTIONAL 2 8 INCH TFT COLOR MONITOR ................................................... 6
CONNECTING THE MULTIMEDIA PLAYER TO A TV / AUDIO SET................................................... 7
BASIC OPERATIONS........................................................................................................................... 11
PAL-NTSC Selection......................................................................................................................... 11
Disc loading....................................................................................................................................... 11
Pause / Stop / Play............................................................................................................................ 12
Volume Control.................................................................................................................................. 12
Screen Saver..................................................................................................................................... 12
Select menu items............................................................................................................................. 12
ADVANCED OPERATION.................................................................................................................... 13
Select a specific on-disc Menu section ............................................................................................. 13
Audio CD discs, track selection......................................................................................................... 13
Fast Forward ..................................................................................................................................... 13
Fast Backward................................................................................................................................... 13
Skip to the next chapter or track ....................................................................................................... 13
Skip to the previous chapter or track ................................................................................................ 13
Select a track..................................................................................................................................... 14
Display the track list .......................................................................................................................... 14
Repeat............................................................................................................................................... 14
Select Subtitle Language .................................................................................................................. 14
Programmed play.............................................................................................................................. 15
Sound Channel Selection.................................................................................................................. 15
Angle Selection ................................................................................................................................. 16
On Screen Display (OSD) ................................................................................................................. 17
Zoom ................................................................................................................................................. 18
Memory Play ..................................................................................................................................... 18
SYSTEM SETTINGS............................................................................................................................. 19
MP3 - WMA - MPEG4 PLAYBACK ...................................................................................................... 26
Play mode ......................................................................................................................................... 26
Other functions .................................................................................................................................. 26
PICTURE CD OPERATIONS................................................................................................................ 27
View picture....................................................................................................................................... 27
Rotate picture .................................................................................................................................... 27
Mirror picture ..................................................................................................................................... 27
Previous and Next selection.............................................................................................................. 27
Zoom IN/OUT .................................................................................................................................... 27
TILE Image Selection........................................................................................................................ 27
Slideshow .......................................................................................................................................... 28
Other functions .................................................................................................................................. 28
VIRTUAL REMOTE (VRMT) FUNCTION ............................................................................................. 28
A-TIME MENU....................................................................................................................................... 29
DESCRIPTION DOLBY DIGITAL CONNECTION................................................................................ 31
COMPATIBLE DISK TYPES ................................................................................................................ 32
TECHNICAL SPECIFICATIONS .......................................................................................................... 33
YAKUMO DVD TRAVELLER 8.0 ...................................................................................................... 33
Service .................................................................................................................................................. 34
Warranty ............................................................................................................................................... 34
YAKUMO
DVD TRAVELLER 8.0
ENGLISH
PREPARATION BEFORE USING THE DVD TRAVELLER 8.0
Unpacking and checking the contents
The DVD TRAVELLER 8.0 is a complete product; please check if the following items and
accessories are included in the received package:
One 8 Inch
TFT color LCD
Monitor
Canvas Carry Bag, with
detachable accessory bag
One Multimedia Player
One IR-Remote Control
with two AAA batteries.
One 12Vdc Car Adapter
1x AC/DC Adapter
with mains cable
Straps
1x RCA Audio / Video cable.
This User Manual.
Page 1 of 35 pages
YAKUMO
DVD TRAVELLER 8.0
ENGLISH
CONTROL REFERENCE GUIDE
The Multimedia Disc Player
1. Voltage Input 12Volt DC
2. S-Video Output
3. Optical Output
4. Left Audio Output
5. Right Audio Output
6. Composite Video Output
7. Coaxial Output
8. Disc lid
9. PLAY, PAUSE, ENTER,
UP, DOWN, LEFT, RIGHT arrows
10. Push here to close
11. Slide Knob to OPEN disc lid
12. Infra Red Sensor
13. REVERSE
14. AUDIO LANGUAGE
15. PREVIOUS
16. NEXT
17. FORWARD
18. Volume turn knob
19. Headphone 3,5mm Jack
20. Scart connector
21. Power switch
22. STOP
Page 2 of 35 pages
YAKUMO
DVD TRAVELLER 8.0
ENGLISH
The IR Remote Control
Point the remote control no more
than about 7 meters (approx. 21
feet) from the remote control
sensor on the front of the player
and keep within a ± 30° angle.
To install the batteries, open the
battery compartment, insert the two
AAA batteries and observe that the
correct “+” and “-“ polarities on the
battery are matching the marks
inside the compartment. Close the
compartment again.
(1) MENU
(2) POWER (STANDBY)
(3) 0-9 NUMBER BUTTONS
(4) SUBTITLE
(5) DISPLAY
(6) AUDIO LANGUAGE
(7) ANGLE
(8) UP ARROW (9) SETUP
(10) ENTER
(11)
(12)
(13)
(14)
(15)
(16)
(17)
(18)
(19)
(20)
LEFT ARROW DOWN ARROW VIRTUAL REMOTE
VOLUME +
VOLUME TITLE
MUTE
10+
A-TIME
PAL / NTSC
(21) PROGRAM
(22) L/R CHANNEL
(23) REPEAT
(24) ZOOM
(25) PLAY/ PAUSE (26) RIGHT ARROW (27) STOP (28) FAST REVERSE (29) FAST FORWARD (30) PREVIOUS (31) NEXT Note:
• If the remote is not used for an extended period of time, remove the batteries to
prevent possible damage from battery leakage and corrosion.
• Do not place any objects between the remote control unit and the sensor on the unit.
• Do not use the remote control unit, while simultaneously operating the remote control
unit of any other equipment, they may interfere resulting in improper operation.
• The batteries normally last for about one year although depending how often the
remote control is used. If the remote control unit isn’t working even when it is
operated near the Multimedia player, replace both the batteries with new batteries of
the same make and use only non-rechargeable AAA Alkaline batteries.
• Incorrect use of batteries may cause them to leak, corrode or explode.
• If leakage from the battery occurs, wipe the battery liquid from the battery
compartment before installing new batteries.
• Make sure the IR sensor is not obstructed by the canvas carry bag.
Page 3 of 35 pages
YAKUMO
DVD TRAVELLER 8.0
ENGLISH
The 8 Inch TFT color LCD Monitor
•
•
•
•
•
•
•
•
•
•
•
•
•
8 Inch Large Screen (4:3) TFT color LCD with Digital
Video driver board
Built-in speaker
3,5mm Headphone jack
Resolution: 960 (H) x 234 (V)
Brightness 400cd/m²
View angle 55,15,35°
PAL or NTSC Video input: Composite Video Signal
1Vpp / 75 Ohm
Audio input: 1Vpp at 10K Ohm
Operating Voltage: 12V DC
Power Consumption: ±9W
Weight: ±0,5Kg
Dimension: 205 x 163 x 30mm
Operating temperature 0 ~ +60°C
10
9
8
1
2
3
4
5
6
7
1 - Button light On/Off
2 - Mute
3 - Screen mode: Upside-down / Normal
4 - Menu Selection: Brightness, Contrast, Volume Switch
Press the [MODE] button to toggle between Brightness, Contrast, and
Volume, and adjust the level with the [+] or [-] button
5 - Volume decrease / Adjust decrease
6 - Volume increase / Adjust increase
Press the [+] or [-] button to increase or decrease the sound volume of the
built-in speaker
7 - ON / OFF (Standby) Switch
Press the [ON/OFF] button to power on or off the TFT color LCD Monitor
8 - Audio/Video / 12Vdc USB style connector *
9 - 3,5mm Headphones jack
Connect a headphone to listen to the sound without disturbing others
10 - 12V DC connection (not used)
Note:
•
•
•
* Do not connect the screen to a computer USB port, this might damage the TFT LCD Monitor
or your computer. The USB connector is specially designed for the Yakumo DVD Traveller 8.0
and may only be used with this product.
The TFT color LCD is made of glass and liquid, do not apply pressure on the screen to
prevent breakage and poor image quality.
Do not scratch the screen surface with hard materials and only clean with a soft dry cloth.
Page 4 of 35 pages
YAKUMO
ATTACHING
HEADREST
THE
DVD TRAVELLER 8.0
ENGLISH
YAKUMO
8.0
DVD
TRAVELLER
TO
THE
2
1
HEADREST
4
6
SEAT
3
5
1) Detach the accessory back by unzipping it. You will now see a long strap with Velcro on the
end and a short strap with a plastic ring.
2) Hold the YAKUMO DVD TRAVELLER 8.0 against the headrest and move the long strap over
the headrest.
3) Loop the strap through the ring, pull it tight and press the Velcro together.
4) Roll-up the protective cloth in front of the TFT color LCD and secure it with the top-flap which
has a piece of Velcro.
5) Attach the elastic straps to the sides of the YAKUMO DVD TRAVELLER 8.0 and the hooks to
the bottom of the front seat. This to keep the YAKUMO DVD TRAVELLER 8.0 from swinging
back- and forwards. Note: Do not let go of the elastic straps when they are fully stretched, this
may result in personal injury.
6) Connect the 12V DC power plug and you are ready to watch your movies.
Page 5 of 35 pages
YAKUMO
DVD TRAVELLER 8.0
ENGLISH
CONNECTING AN OPTIONAL 2ND 8 INCH TFT COLOR MONITOR
The YAKUMO DVD TRAVELLER 8.0 comes prepared to easily connect an optional second
8 Inch TFT color LCD screen, which can be attached to the headrest with the easy fit system.
Now two or more rear seat passengers can enjoy the multimedia experience from just one
single player. Inside the YAKUMO DVD TRAVELLER 8.0 is a A/V splitter cable, which easily
can be positioned to the side of the YAKUMO DVD TRAVELLER 8.0. To use the second
monitor, one has to connect the USB-style A/V cable to the YAKUMO DVD TRAVELLER 8.0
and the second monitor. Because also the 12V DC power runs through this cable, nothing
else needs to be connected and it only takes a few seconds to install.
The optional Kit consists of a 8 Inch TFT color LCD monitor, a headrest bag with the easy fit
system and a USB-style Audio/Video cable. The complete kit fits inside the Accessories bag
of the YAKUMO DVD TRAVELLER 8.0.
- 8 Inch TFT color LCD Monitor inside
the headrest bag.
- USB-Style Audio/Video/12V DC Cable*
12V DC
*Note: Do not use to connect to a computer, this might damage the monitor or your computer
The YAKUMO DVD TRAVELLER 8.0 with the 2nd 8 Inch Monitor and as used in the Car
Page 6 of 35 pages
YAKUMO
DVD TRAVELLER 8.0
ENGLISH
CONNECTING THE MULTIMEDIA PLAYER TO A TV / AUDIO SET
The Multimedia player comes complete with connection cables and is ready for use (SCART
and S-VIDEO cables are not included). You only have to connect the unit according to the
diagrams hereunder. Just connect a TV-set or Projector to either the Composite Video, the
S-VIDEO or the Scart connector, connect the audio and then connect the power cord into a
12V DC power source.
12V DC
•
•
•
S-VIDEO
Right Audio (RED)
Left Audio (WHITE)
Power Adapter
100~240V AC → 12V DC/2A
Page 7 of 35 pages
OR
•
•
•
Composite Video (YELLOW)
Right Audio (RED)
Left Audio (WHITE)
YAKUMO
DVD TRAVELLER 8.0
ENGLISH
12V DC
SCART (AUDIO + VIDEO)
Power Adapter
100~240V AC → 12V DC/2A
Page 8 of 35 pages
YAKUMO
DVD TRAVELLER 8.0
ENGLISH
12V DC
← or →
Power Adapter
100~240V AC
→ 12V DC/2A
5.1CH (6 channel) Amplifier / Receiver
5.1 Channel Cinema sound can be obtained in two different methods and is depending on
your audio system:
A) If you have a Dolby Digital & DTS 5.1 digital receiver/amplifier with a coaxial input,
then connect the MULTIMEDIA PLAYER with a coaxial cable to obtain the best
sound results, or
B) If you have a Dolby Digital & DTS 5.1 digital receiver/amplifier with an optical input,
then connect the MULTIMEDIA PLAYER with an optical cable to obtain the best
sound results.
Page 9 of 35 pages
YAKUMO
DVD TRAVELLER 8.0
ENGLISH
Connection Notes:
• For the right connection to a TV-SET / TFT Monitor / Projector, please refer to its
operations manual. The Multimedia player has multi audio/video signals such as 2
channel audio (down mix) output, Composite Video output, S-Video output, SCART,
and coaxial and optical digital signal output. You can choose any of these options
when connecting your system to a suitable TV / TFT Monitor / Projector or other audio
receivers.
• Normally, a TV set will have one or more SCART or S-Video input sockets. Use the
(optional) SCART or (optional) S-Video cable to connect the Multimedia player to the
TV set. Connect the cables according the alignment of the connecters and press
firmly in place to ensure you have a good connection. Tune your TV set to the desired
AV channel to watch your video and hear the 2ch stereo sound.
• In case the S-Video cable is connected to the TV set, you also need to connect the
Left and Right audio cables to the Audio Input of the TV set in order to hear the sound
on your TV set.
• Do not connect the S-Video and the Composite Video outputs simultaneously to the
TV set.
• The power cord should not be connected to the power source when connecting the
wires.
• The Multimedia player should be connected to your TV set directly, if it is connected
to a VCR player or similar equipment, the video/picture may be distorted because
DVD discs may have a copy protection.
Page 10 of 35 pages
YAKUMO
DVD TRAVELLER 8.0
ENGLISH
BASIC OPERATIONS
PAL-NTSC Selection
To set up the MULTIMEDIA PLAYER according to the connected TV-set or TFT LCD monitor
and video signal system, to play a DVD or any other video discs, follow these guidelines:
z
z
z
If your TV-set is NTSC, press the N/P button on the Remote Control until you see NTSC
on your screen.
If your TV-set is PAL, select PAL by pressing the N/P button on the Remote Contro until
you see PAL on your screen:
If your TV-set supports both PAL and NTSC, select MULTI by pressing the N/P button
until you see MULTI on your screen.
Disc loading
• Load one disc with the label side facing upwards and make sure you do not touch the
data side with your fingers.
• Slide the OPEN button on the MULTIMEDIA PLAYER to the left to open the lid for
loading or unloading a disc.
3
Note:
● Do not touch the content side of a disc
● Do not stick any paper or stickers on a disc.
● Do not force the disc in place, it is possible you
damage the disc or the unit itself, if a disc is not
placed correctly on the guides in the disc tray.
● Use only the OPEN slide switch to open the lid, do
not use any other sharp objects, such as
screwdrivers, to force the lid open.
OPEN
●
●
●
●
●
Finger prints and dust on the disc surface can affect the sound and picture quality. Clean the discs regularly
with a soft cotton cloth from the disc center to the outside of the disc. Do not clean in circular motions.
Do not use any kind of solvent, such as diluting agent, gasoline, liquid detergent, and gasoline liquid
detergent antistatic aerosol used for vinyl, this may cause serious disc damage.
Keep discs away from direct sunlight or any heat source
The MULTIMEDIA PLAYER is a precision device. If the optical pick-up lens and disc drive parts become dirty
or worn down, picture quality will become poor. To obtain a clear picture, regular inspection and maintenance
are recommended every 1,000 hours of use, depending on the operating environment.
Zanon is not responsible for damage that may occur to any disc that is operated in this unit or not handled,
cleaned, or stored as suggested above.
Once the disc is loaded, the unit will automatically start reading the disk and it will take a few
seconds to download the disc initial data, thereafter the disc type will be displayed in the left
upper corner of the screen and the unit will start playing the disc.
Page 11 of 35 pages
YAKUMO
DVD TRAVELLER 8.0
ENGLISH
Pause / Stop / Play
When a disc is playing press the PAUSE button on the remote control or on the
MULTIMEDIA PLAYER to pause the session. Press the PLAYbutton on the remote
control or the MULTIMEDIA PLAYER to resume playing the disc.
Press the STOPbutton once on the remote control or the MULTIMEDIA PLAYER to stop
playing a disc. The unit will memorize the position on the disk and will continue to play from
that position if the PLAYbutton on the remote control or the MULTIMEDIA PLAYER is
pressed.
Press STOPSTOP twice to completely stop playing a disc. When the PLAYbutton
on the remote control or the MULTIMEDIA PLAYER is pressed hereafter, the unit will not
resume playing from the position the disc was interrupted at. Note: The Disc continues to spin for
approximately 4 minutes after pressing the stop button.
Volume Control
Rotate the VOLUME knob on the right side of the MULTIMEDIA PLAYER or the VOL+ or
VOL- button on the remote control to adjust the volume. To decrease the volume press the
VOL- button. To increase the volume press the VOL+ button.
Press the MUTE button on the remote control to mute the sound. Press MUTE again to
enable sound. On the screen MUTE will be shown:
Screen Saver
The MULTIMEDIA PLAYER is equipped with an automatic screen saver to protect your TV
screen. The TV screen will turn black and the Screen Saver
logo will appear
bouncing on the TV screen if:
•
•
No disc is loaded for 180 seconds
The MULTIMEDIA PLAYER is in idle mode (STOP) and no button has been
pressed for 180 seconds with the exception of the Setup menu or Disc menu.
The MULTIMEDIA PLAYER will resume in normal mode when any button is pressed.
Select menu items
In either the disc menu or the setup menu:
1) Press the ▲ ▼ ► ◄ arrow buttons
• to move between selectable items
2) Press the ENTER button
• To confirm and/or execute a selection
Page 12 of 35 pages
YAKUMO
DVD TRAVELLER 8.0
ENGLISH
ADVANCED OPERATION
Select a specific on-disc Menu section
When the DVD disc contains an on-disc menu, you can display and access this menu by
pressing either the MENU button on the Remote Control. (Note: PBC must be turned on.)
1) Press the MENU button. You will now see the menu of the DVD (if available) and the
selection choices in this menu.
2) Press one of the arrow buttons to scroll through the displayed (sub) menu items.
Press ENTER to confirm the selection.
3) Alternatively, use the Number buttons to make a selection. For example: To select
the 13th song, press 10+ then 3
Audio CD discs, track selection
Load an Audio disc, upon reading the disc, you can select/play songs via the number
buttons. If the track number is lower than 10, press a number button 0 – 9 to select the
desired track. For example: to select the 8th track, press number button 8. To select track
numbers beyond 10, first press the 10+ button, followed by a single digit number button 0 – 9
For example: To select the 12th song, press button 10+ and then press button 2.
Fast Forward
While the video is playing press the Fast Forward FWD button on either the MULTIMEDIA
PLAYER or the remote control to play the video in Fast Forward (FFWD) mode. Five different
speeds are available and depend on the number of times this button is pressed in sequence.
2x → 4x → 8x→ 16x → 32x → Normal play
2x → 4x → 6x→ 8x → Normal play
(DVD)
(Other Discs)
Fast Backward
While the video is playing press the Fast Backward button REV on either the
MULTIMEDIA PLAYER or the remote control to play the video in Fast Backward (FRWD)
mode. Five different speeds are available and depend on the number of times this button is
pressed in sequence.
2x → 4x → 8x→ 16x → 32x → Normal play
2x → 4x → 6x→ 8x → Normal play
(DVD)
(Other Discs)
Skip to the next chapter or track
When a DVD disc is played, press the NEXT button on either the remote control or the
MULTIMEDIA PLAYER to skip to the next chapter. When other discs are played, press this
button to skip to the next track. Note: Whether this function works depends on the disc type in use.
Skip to the previous chapter or track
When a DVD disc is played, press the PREVIOUS button on either the remote control or
the MULTIMEDIA PLAYER to skip to the previous chapter. When other discs are played,
press this button to skip to the previous track. Note: Whether this function works depends on the
disc type in use.
Page 13 of 35 pages
YAKUMO
DVD TRAVELLER 8.0
ENGLISH
Select a track
There are two options to select a next track.
1) Press either the PREVIOUS
or the NEXT button as described above.
2) Press one or more of the NUMBER 0…9, 10+ buttons to enter the desired track
,
[
or a
then this
number to be played. When the screen is displaying a hand
function is not available. This might have one of the following reasons: A) The tracks
on the disks are not numbered; B) The entered number is incorrect; C) PBC is on –
press the MENU/PBC button on the remote control to switch PBC off.
Display the track list
With PBC switched on and while the DVD disc is played, press MENU to display the track
list. Select a track with the up or down arrow and press ENTER to confirm your track
selection.
Repeat
While a disc is playing press the REPEAT button to select one of the available repeat
modes.
1) For DVD discs;
a. press REPEAT to repeat a chapter
b. press REPEAT again to repeat a title
c. press REPEAT again repeat all
d. press REPEAT again to exit the repeat mode.
2) For non-DVD discs and when PBC is switched off;
a. press REPEAT to repeat a track
b. press REPEAT again to repeat the whole disc
c. press REPEAT again to exit the repeat mode
Select Subtitle Language
Press the SUBTITLE button to select the caption language e.g. English, Dutch, Spanish, etc.
Press the SUBTITLE button various times until you have selected the desired language
available.
Note: Whether this function works depends on the disc type in use.
Page 14 of 35 pages
YAKUMO
DVD TRAVELLER 8.0
ENGLISH
Programmed play
When PBC is switched off and the disc is not playing (stop) press the PROGRAM button.
The screen will display something similar to the screens hereunder:
When playing DVD discs:
When playing CD discs:
Program: Chapter(01 – xx)
01 _ _
06 _ _
02 _ _
07 _ _
03 _ _
08 _ _
04 _ _
09 _ _
05 _ _
10 _ _
Exit
Start
Next
Program: track(01 – xx)
01 _ _
06 _ _
02 _ _
07 _ _
03 _ _
08 _ _
04 _ _
09 _ _
05 _ _
10 _ _
Exit
Start
Next
Note: When playing a DVD disc and there is only one title, then the program menu will be similar to the menu of
the CD.
Press one or more of the NUMBER 0..9, 10+ buttons to enter the chapter or track number,
e.g. when you want to see chapter 3, 6 and 12 first press the 3 button then the 6 button an
then the 10+, 2 buttons.
Select START and press the ENTER button to start playing your programmed selection.
Press the STOP button two times to cancel the program function.
Press PROGRAM button to exit the program function.
Sound Channel Selection
When playing DVD discs, the AUDIO button is used to select the desired audio language.
This is only applicable if the disc has a different language functions incorporated. Press the
AUDIO button to select a different language. For Example and only for reference, press the
AUDIO button once for the English language, press it again for the French language, press
it again for the Spanish Language etc. etc.
Page 15 of 35 pages
YAKUMO
DVD TRAVELLER 8.0
ENGLISH
Angle Selection
Some DVD’s have multi angle views, which allows you to watch a movie from different
screen and camera angles. If you are playing such a DVD on your MULTIMEDIA PLAYER,
you can select a different viewing angle with the ANGLE button.
Just imagine, when viewing a scene of a train moving forward, you can also choose to view
the scene ahead of the train or from the left or the right side, without stopping the movement
of the train. Note: This function is available only for discs with multiple angles encoded.
For example: There are four angles recorded for a DVD discs. Press the ANGLE button to
select angle one.
Select another angle by pressing the ANGLE button again. The screen will be show in
sequence as below.
Note: Before angle play can be selected, you need to turn on the angle function on at the general setup menu of
the MULTIMEDIA PLAYER as explained in the system settings chapter of this manual.
Page 16 of 35 pages
YAKUMO
DVD TRAVELLER 8.0
ENGLISH
On Screen Display (OSD)
The DISPLAY button can be pressed on the remote control to check the playing time and the
remaining time for each title/chapter/track. Also, it can display the remaining time for the
whole discs.
For DVD discs
Press the DISPLAY button once, the screen will show the elapsed time for the current title.
Press the DISPLAY button twice, the screen will show the remaining time for title.
For CD discs
To check for example the remaining time when playing the 2nd song, press the DISPLAY
button. The screen shows SINGLE ELAPSED. This is the current track played.
Press the DISPLAY button twice and the screen will show the remaining time for the current
track.
Press the DISPLAY button for a third time and the screen will show the elapsed time for the
current disc.
Press the DISPLAY button for a 4th time and the screen will show the elapsed time for the
current chapter.
Page 17 of 35 pages
YAKUMO
DVD TRAVELLER 8.0
ENGLISH
Zoom
This feature is used to zoom-in and zoom-out the video image of the motion pictures or still
images when playing DVD discs.
There are 3 levels of zoom-in available, pressing the ZOOM button several times to increase
the zoom factor in the following sequence:
Hereafter there are also three levels to zoom-out, press the ZOOM button several times to
decrease the zoom factor in the following sequence:
Press the
(Panning).
arrow buttons to move the zoomed picture over your screen
To return to normal screen size, press the ZOOM for the 7th time.
Memory Play
The MULTIMEDIA PLAYER can memorize the last stop point and play form this point
onwards when the unit is switched on again or when play is press again.
When playing, press the STOP button once to stop the playback. The MULTIMEDIA
PLAYER will memorize the current position on the disc. Press the PLAY button to start
playing from the last memorized position. Pressing the STOP button twice will clear the
memorized position from the memory and if play is resumed, the disc will be played from the
beginning.
Page 18 of 35 pages
YAKUMO
DVD TRAVELLER 8.0
ENGLISH
SYSTEM SETTINGS
Press SETUP on the Remote Control to enter the system setting main menu.
On the Remote Control, press either the UP or DOWN or LEFT or RIGHT arrow buttons to move to
the desired menu item and press ENTER to select the menu item.
Set TV Display mode to the correct ratio:
Press the RIGHT arrow button to enter the sub-menu. If you want to set the screen to “WIDE”, press
-
the DOWN arrow twice to move your selection until the “WIDE” item is selected, now press ENTER.
Press SETUP to exit these system settings
Note: three screen ratio modes are available, 16:9 WIDE, 4:3LB (Letterbox) and 4:3PS (Pan Scan). Different disc
formats will display different images depending this setting and the screen size used.. Hereunder is an example of
the different choices and the relation between the disc format and screen ratio.
4:3LB Allow you to see
movies in their original
aspect ratio. The entire
frame of the movie will be
displayed. 16:9 recorded
movies will occupy a
smaller portion of the
screen and you will see
black margins above and
below the picture.
16:9 Allow you to see
movies in their original
aspect ratio, when
connected
to
a
widescreen TV. The
entire frame of the
movie
will
be
displayed.
4:3PS The movie will be
shown full screen without
any black margins, but
parts of the image will be
cut of from the right and left
side.
16:9 Note: depending
the
DVD
screen
format (e.g. 2.35:1),
the widescreen setting
may still have black
margins above and
below the picture.
Page 19 of 35 pages
YAKUMO
DVD TRAVELLER 8.0
When playing a DVD disc and you have selected
ON, then the screen will show the angle mark. This
will give you the possibility to view multi angle
DVD’s. (whether this functions works, depends on
the disc type in use.) When you have selected OFF,
no angle mark will be shown on the screen.
ON: To display captions. (Subtitles)
OFF: Captions will not be displayed. (No Subtitles)
ENGLISH
To select the language for your On Screen Display
(OSD) use this menu item. There are multiple
languages available.
When there is no activity with the Player for some
time, a screen saver will start to prevent damage to
the screen. Select ON to activate the screensaver
function or select OFF to deactivate this function
ON: Each time when you turn off the player, it will
memorize the last play time. So if you turn on the
player the next time and the same disc is played, it
will resume play from the last memory point.
OFF : Disable the last memory function
Page 20 of 35 pages
YAKUMO
DVD TRAVELLER 8.0
Press ENTER to enter the Analog Audio setup page.
The page hereunder will be shown:
ENGLISH
EQAULIZER Select this menu item to set up your
preferred Equalizer mode. Press ENTER to enter
this selection.
You can select one of these preset Equalizer modes
to adjust the audio signal to your best liking.
Set sound mix output mode:
press theRIGHT arrow to enter the submenu. If you want analog stereo signals,
set the sound mode to “STEREO”, press
the DOWN arrow once to move the
selection to “STEREO”, than press ENTER.
If you want to have Dolby Pro Logic stereo
(the decoded signal will create a 2ch reality
simulating effect via the R/L connectors),
select “LT/RT”, then press ENTER.
You can select one of these modes to adjust the Bass
and Treble signal to your best liking. ON will switch the
selected mode on and OFF will switch it back to
normal Audio playback. Note: Please be advised that
sometimes the BASS on an Audio CD or DVD is
already very low, using the Bass Boost or Super Bass
can overload your speakers resulting in poor sound
quality.
Page 21 of 35 pages
YAKUMO
DVD TRAVELLER 8.0
Select REVERB to set up your preferred 3D
mode. Press ENTER to enter this selection and to
set up your preferred Audio mode for a better
surround effect. Press ENTER or the RIGHT
arrow to enter this selection.
Select HDCD to set up your preferred Audio mode
for HDCD. Press PLAY to enter this selection and
to set up your preferred filter mode for HDCD
(default is 1X).
ENGLISH
Select this menu item to set up your Video Quality
modes. Press ENTER to enter this selection.
You can set the picture sharpness to these choices.
If a video image is light, select the LOW option. If a
video image is dark, select the HIGH option.
1x = 48K Sampling, 2x = 96K Sampling
Page 22 of 35 pages
YAKUMO
DVD TRAVELLER 8.0
You can set the Brightness to your liking. Press
ENTER or the RIGHT arrow to enter the
brightness control, then press the
UP
DOWN arrow to adjust the image. Press
LEFT arrow to go back to the menu.
or
the
Gamma refers to the exponent between video or
pixel values and the displayed brightness. You
can set the Gamma to these choices and your
liking.
ENGLISH
You can set the Contrast to your liking. Press
ENTER or the RIGHT arrow to enter the
UP or
DOWN arrow to adjust the image. Press the
LEFT arrow to go back to the menu.
brightness control, then press the
Luma Delay You can adjust the luminance delay
by selecting one of these choices to best suit the
brightness of your TV.
Page 23 of 35 pages
YAKUMO
DVD TRAVELLER 8.0
ENGLISH
You can set the Hue (for NTSC) to your liking.
Press ENTER or the RIGHT arrow to enter the
Hue control, then press the UP or DOWN arrow to
adjust the image. Press the LEFT arrow to go
back to the menu.
You can set the Saturation to your liking. Press
ENTER or the RIGHT arrow to enter the
Saturation control, then press the UP or DOWN
arrow to adjust the image. Press the LEFT arrow
to go back to the menu.
Select this menu item to set up your preferred
video output format. PAL is commonly used in
Europe and NTSC is commonly used in the USA
and Japan. Select MULTI only if your TV supports
both formats, the output signal will follow
automatically the video format on the DVD disc.
For VCD and SVCD, this selection turns ON or
OFF the Playback Control (PBC) function. VCD or
SVCD media have PBC menu’s that contains the
track list. The default PBC state is set to ON. In
OFF mode, no tracks can be selected.
(These settings can only be set when no disc is
playing)
Page 24 of 35 pages
YAKUMO
DVD TRAVELLER 8.0
Set age control grade:
For DVD discs with a rating system programmed
(for example: the North American CARA) parents
can prohibit watching content that might be
inadvisable for children. Press the RIGHT
arrow to enter the submenu. If you want to change
the age control grade press either theUP or
ENGLISH
With this option you can select to set your
password protection ON or OFF.
DOWN
arrow to scroll to the available
selections. Selection 1 is Kid safe, selection 2 is
some guidance advisable, selection 3 is PG
(Parental guidance suggested, some material may
not be suitable for children), selection 4 is PG13
(Parents strongly cautioned, some material may
be inappropriate for children under 13), selection
5 is PG-R (Restricted, under 17 requires
accompanying parent or adult guardian),
selection 6 is Restricted viewing, selection 7 is
NC-17 (No one 17 and under admitted), selection
8 is for Adult Entertainment or X rated movies and
NO PARRENTAL is for General Audiences (All
Ages).
Hereafter a screen will indicate to enter a
password, if the ex-factory password has never
been modified, you can use [137988] by pressing
the according number buttons on the remote
control. Select “YES” or “NO” with either the left or
the right arrow key and press ENTER to confirm.
Use this menu to change the factory set password
[137988]
Enter the PIN numbers with the number buttons of
the remote control and press ENTER, enter the
new password and press ENTER again, confirm
your new password and press ENTER again.
Important: Do not forget the newly entered
password, there is no way to retrieve the (newly)
entered password.
With this option you can select to reset to the
factory preset values.
With this selection X you exit the system setup
and return to normal viewing of the video.
Page 25 of 35 pages
YAKUMO
DVD TRAVELLER 8.0
ENGLISH
MP3 - WMA - MPEG4 PLAYBACK
The MULTIMEDIA PLAYER is able to play discs (CD-R / CD-RW) recorded with MP3 /
MPEG4 audio and video files. When a disc with MP3 or MPEG4 files (including multiple
directories) is loaded in the system the following screen is displayed:
To go to the preferred music directory, press the arrows to scroll to your selection
and confirm your choice by pressing the ENTER button. To select your preferred song or
video title, press the arrows to scroll to your selection and confirm your choice by
pressing the ENTER button. Your selected song will now be played.
Play mode
There are four kinds of play modes available when playing MP3 / MPEG4 recorded discs:
When the disc is playing, press REPEAT to select your repeat mode, the TV screen will
show:
REPEAT FOLDER
1)
2)
3)
4)
5)
SINGLE
REPEAT ONE
REPEAT FOLDER
FOLDER
SHUFFLE / RANDOM
(All the songs / videos will be played only once)
(The current playing song / video will be repeated)
(Only the songs / videos of the current folder will be repeated)
(Only all the songs / videos of this folder will be played once)
(The songs / videos will be played in random order)
Other functions
Functions such as MUTE, VOLUME, PAUSE, PREVIOUS, NEXT, etc. are also available for
MP3 / MPEG4 recorded discs. These operations are the same as playing an Audio CD.
Page 26 of 35 pages
YAKUMO
DVD TRAVELLER 8.0
ENGLISH
PICTURE CD OPERATIONS
This function is similar to the MP3 playback operation. Upon loading a Picture (JPEG) disk
(from a.o. Kodak, Fujifilm or your own recorded CD-R / CD-RW with JPEG image files [.JPG
extension]), the screen will show an image similar to the screen hereunder:
View picture
Press the arrows to scroll to your selection and confirm your choice by pressing the
ENTER button. Your picture will now be displayed.
Rotate picture
By pressing one of the ◄ ► arrow buttons, you can rotate the picture to your desired
position, clockwise and counterclockwise
Mirror picture
By pressing one of the arrow buttons, you can mirror horizontally () and vertically
() the picture to your desired position.
Previous and Next selection
By pressing the PREVIOS or
previous picture.
NEXT buttons, you can manually skip to the next or
Zoom IN/OUT
By pressing ZOOM and the
in or out.
REV or FWD buttons, you can manually zoom the picture
TILE Image Selection
If the disc contains more than one picture file, the player can display up to nine (9) small
pictures for your selection. While the disc is playing, press the STOP button, 12 small
pictures will appear on screen and the first image will have colored selection around the
image.
By pressing the PREVIOUS or the NEXT buttons, you will go to the next or previous
12 small pictures.
Page 27 of 35 pages
YAKUMO
DVD TRAVELLER 8.0
ENGLISH
To go to the preferred photo / picture, press the arrow buttons ◄ ► to scroll to your
selection and confirm your choice by pressing the ENTER button. Your selected photo will
now be displayed.
When no selection is made press the STOP button again to resume to normal playback
mode.
Slideshow
If the disc contains more than one picture file, the player can play the files automatically in 16
different Slideshow modes. When the disc is playing, press PROGRAM to change the
current slideshow mode.
1) Wipe top
2) Wipe bottom
3) Wipe left
4) Wipe right
5) Diagonal wipe left top
9) Extended from center Vertical
6) Diagonal wipe right top
10) Extended from center Horizontal
7) Diagonal wipe left bottom
11) Compress to center Vertical
8) Diagonal wipe right bottom 12) Compress to center Horizontal
13) Window Horizontal
14) Window Vertical
15) Wipe from edge
16) Normal view
Other functions
Functions such as PAUSE, PREVIOUS, NEXT, REPEAT ALL, REPEAT SINGLE, etc. are
also available for picture discs.
VIRTUAL REMOTE (VRMT) FUNCTION
With this function (only for DVD discs) you can operate all DVD functions as described earlier
in this manual with just the arrow keys and the enter key.
Play / Pause
Slow Motion Forward
Slow Motion Backward
Previous
Next
Fast Backward
Fast Forward
Audio Tracks
Angle
Subtitles
Press the VRMT button and the above image will appear on screen. press the arrow buttons
◄ ► to scroll to your selection and press ENTER button once or more times when
required.
Extra feature, Slow Motion
While the video is playing, select the Slow motion buttons to play the video in slow motion.
This function is available in both forward as well as in backward play mode. There are four
different slow motion speeds available and depends on the number of times this button is
pressed in sequence. Press the ENTER button repeatedly to toggle between the different
speeds.
Slow Motion Forward
►1/2x → ►1/4x → ►1/8x→ ►1/16x → Normal play
Slow Motion Backward
◄1/2x → ◄1/4x → ◄1/8x→ ◄1/16x → Normal play
Page 28 of 35 pages
YAKUMO
DVD TRAVELLER 8.0
ENGLISH
A-TIME MENU
Press A-TIME on the remote control to enter the
information and quick change menu. You can see
which title is played and when you select this option
with ENTER you can change to another title by
pressing the corresponding number buttons on the
remote control.
Press the or arrow to scroll through the ATIME menu. The next selection are the Audio tracks
available on the disc. You can see which Audio track
is played and when you select this option with
ENTER you can change to another Audio track by
pressing the or arrow and select your choice
with ENTER.
Press the or arrow to scroll through the ATIME menu. The next selection are the chapters
available on the disc. You can see which chapter
is played and when you select this option with
ENTER you can change to another chapter by
pressing the corresponding number buttons on the
remote control.
Press the or arrow to scroll through the ATIME menu. The next selection are the Subtitles
available on the disc. You can see which Subtitle
is shown and when you select this option with
ENTER you can change to another Subtitle by
pressing the or arrow and select your
choice with ENTER.
Page 29 of 35 pages
YAKUMO
DVD TRAVELLER 8.0
Press the or arrow to scroll through the ATIME menu. The next selection are the camera
Angles available on the disc. You can see which
Angle is played and when you select this option with
ENTER you can change to another Angle by
pressing the corresponding number buttons on the
remote control.
Press the or arrow to scroll through the ATIME menu. The next selection is the Chapter of
the movie on the disc. When you select this option
with ENTER you can jump to a certain play time in
this chapter by pressing the corresponding
number buttons on the remote control.
ENGLISH
Press the or arrow to scroll through the ATIME menu. The next selection is the Total Time
of the movie on the disc. When you select this
option with ENTER you can jump to a certain play
time by pressing the corresponding number
buttons on the remote control.
Press the or arrow to scroll through the ATIME menu. The next selection is the REPEAT
function. When you select this option with ENTER
you can select the different repeat modes available.
Press the or arrow to scroll through the A-TIME
menu. The next selection is the Time Display function and
will show the various available elapse times in the OSD.
When you select this option with ENTER you can select the
different Time Display modes available as shown
hereunder.
Page 30 of 35 pages
YAKUMO
DVD TRAVELLER 8.0
ENGLISH
DESCRIPTION DOLBY DIGITAL CONNECTION
When a DVD disc recorded in Dolby Digital (AC-3) or MPEG audio is played, Dolby Digital bit
streams or MPEG audio bit streams are sent to the Coaxial or Optical digital audio output.
When the player is connected to a Dolby Digital or MPEG audio decoder system via this
connection, you can transfer the true 5.1CH digital audio tracks. A special coaxial or optical
cable is required (optional accessory).
Audio output from the coaxial digital audio output connector:
TYPE
SOUND RECORDING
COAXIAL or OPTICAL DIGITAL
OF DISK
FORMAT
AUDIO OUTPUT
Dolby Digital bitstream (2 - 5.1ch)
DVD
Dolby Digital (AC-3)
or
PCM (2ch)(48 kHz/16bit)
Linear PCM
Linear PCM (2ch)
(48/96 kHz 16/20/24 bit)
(48 kHz sampling/16 bit only)
MPEG1 MPEG2
MPEG2 Audio bitstream
or
PCM (2ch)(16bit)
VCD
MPEG1
PCM (44,1 kHz sampling)
CD
Linear PCM
Linear PCM (44,1 kHz sampling)
•
•
•
Dolby Digital (AC-3) is a digital sound compression technique developed by the Dolby
Laboratories Licensing Corporation. Dolby Digital is supporting 5.1-channel surround
sound as well as stereo (2ch) sound and enables a large quantity of sound data to be
efficiently recorded on a disc.
Linear Phase Code Modulation (LPCM) is a signal recording format used on CDs.
While CDs are recorded in 44.1kHz/16bit sound streams, DVDs are recorded in
48kHz/16bit up to 96kHz/24bit sound streams.
If you have a Dolby Digital Surround decoder, you will obtain the full benefit of Pro
Logic sound from the same DVD movies that provide full 5.1-channel Dolby Digital
soundtracks, as well from titles with the Dolby Surround logo.
Caution:
• Do not connect to the coaxial or optical output connector to an amplifier which is not
compatible with this type of connection.
• An attempt to play DVDs via an amplifier without the correct AC-3 or MPEG decoder,
may produce extreme levels of noise. This could damage your loudspeakers and your
ears.
Page 31 of 35 pages
YAKUMO
DVD TRAVELLER 8.0
ENGLISH
COMPATIBLE DISK TYPES
Some DVD discs may have special requirements for playing, with which this system may not
be compatible. Please refer to the specifications on the individual disc.
Discs types
The MULTIMEDIA PLAYER can play the following types of discs: DVD / CD / CD-R / CD-RW
/ DVD-R / DVD-RW / DVD+R / DVD+RW and discs with JPEG image files [.JPG extension].
Discs other than listed above cannot be played. Please do NOT play discs smaller than
12CM or of odd shapes, only play round 12CM discs.
The MULTIMEDIA PLAYER uses the NTSC/PAL color systems. It cannot play discs
recorded with other systems, such as SECAM.
Region code
The region code for this player is Region 2 which indicates Europe.
Copyright
According to the related laws, DVD discs, without proper authorization, are not allowed to be
copied, broadcasted, cable broadcasted, or played publicly with the MULTIMEDIA PLAYER.
The MULTIMEDIA PLAYER incorporates copyright protection technology that is protected by
method of claims of certain U.S. patents and other intellectual Property Rights owners.
Reverse engineering or disassembly is prohibited.
Page 32 of 35 pages
YAKUMO
DVD TRAVELLER 8.0
ENGLISH
TECHNICAL SPECIFICATIONS
YAKUMO DVD TRAVELLER 8.0
Portable Ultra Slim Multimedia Disc Player with TFT color LCD and Canvas carry bag. Install the YAKUMO DVD
TRAVELLER 8.0 in the car, at home, or in the office. The easy connection and clear system menu’s enable you to
set up the system in minutes. Switch on the unit and start enjoying your multimedia experience, whether you want
to watch a DVD or listen to an audio CD or your own recorded WMA’s / MP3´s or want to watch your holiday
(JPEG) photo’s, this YAKUMO DVD TRAVELLER 8.0 can do it all. The YAKUMO DVD TRAVELLER 8.0 is easily
controlled with the infra red remote control.
Specifications:
Ultra Slim Design.
Multimedia player Supports: DVD, DVD-R, DVD-RW, DVD+R, DVD+RW, CD, CD-R, CD-RW, VCD,
SVCD, MP3, WMA, OGG Vorbis and JPG picture disks
MPEG4 support: DivX / DivX Pro / XviD / OGM
3,5mm Headphone jack
Electronic Shock Protection (ESP) and Mechanical Shock Protection
PAL – NTSC Playback
Multi Lingual On Screen Display (OSD)
DTS & Dolby Digital (AC3) 5.1CH coaxial and optical output
2 Channel Dolby Digital RCA left and right output
S-Video output
Composite video output (RCA)
SCART AV output
Total YAKUMO DVD TRAVELER 8.0 dimension:
245 x 199 x 155mm (W/H/D)
Total weight YAKUMO DVD TRAVELER 8.0:
±2,7 Kg
Including
8 Inch Digital TFT color LCD monitor
12V DC Car power adapter
AV cables
IR Remote control Including batteries
Canvas Carry case, with detachable accessory bag and Straps
Universal Digital AC/DC power adapter (100-240V AC / 50-60Hz – 12V DC / 2A)
User Manual
Optional accessories
Second 8 Inch TFT Color monitor
Specifications MultiMedia Player:
Power Consumption
12V DC / 0,8A
Watts
±10W
Weight
765 gram
Dimension
210 X 38 X 160mm (W/H/D)
TV Signal system
Laser
Frequency range
S/N
PAL/NTSC/MULTI
Semi-conductor laser, wave length 650nm, 780nm
48KHz pulse modulation 20Hz~22KHz
96KHz pulse modulation 20Hz~22KHz
≥65dB
Audio dynamic range
>85dB
Harmonic Distortion
0,01%
Input Sensitivity
500mv
Composite Video output
S-Video output
1.0V (P-P), 75Ω (±0,2V)
(Y)1.0V (P-P),75 ohm, (C).286V (P-P), 75Ω
Analog audio output
2.0V ±0,1V
0℃~ 40℃
Operation temperature
-15℃~ 50℃
Storage Temperature
Page 33 of 35 pages
YAKUMO
DVD TRAVELLER 8.0
ENGLISH
SERVICE
In case of technical problems with your Yakumo product, contact our Hotline on +49-18 05/
92 58 66 (12 cent/minute) when calling from the Deutsche Telekom fixed network.
WARRANTY
If you think that you need to make a claim on your Yakumo product under the warranty, call
the Hotline on +49-18 05/ 92 58 66 (12 cent/minute) when calling from the Deutsche
Telekom fixed network. Experienced staff will advise you and arrange how you should
proceed. Please do not send any goods to the Yakumo Service Centre without obtaining an
RMA number from the hotline first, as otherwise the goods will be returned unrepaired or
refused.
Yakumo grants you a 2-year warranty from the invoice date. In case of defects, the buyer
only has a right to subsequent performance. This subsequent performance will include either
repair or the delivery of a replacement product. Exchanged units or parts will be the property
of Yakumo.
Evidence of the warranty must be provided in the form of proper proof of purchase (sales
receipt or invoice).
Damage caused by improper handling, operation storage or by force majeure or other
external influences is not covered by the warranty. The same applies to wearing parts, e.g.
rechargeable batteries (6 months).
In case of technical queries, go to the Yakumo homepage at www.yakumo.com
or send an e-mail to: [email protected]
Page 34 of 35 pages
YAKUMO
DVD TRAVELLER 8.0
NOTES
Page 35 of 35 pages
ENGLISH
www.yakumo.com