1
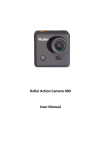
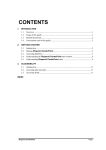
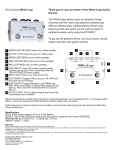
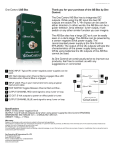
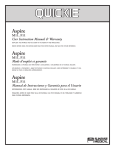
DVS1 ActionCam with Touchscreen
User Manual
0
FCC Compliance Statement
This device complies with Part 15 of the FCC Rules. Operation is subjected to the following two conditions:
(1) this device may not cause harmful interference, and
(2) this device must accept any interference received, including interference that may cause undesired operation.
This equipment has been tested and found to comply with limits for a Class B digital device, pursuant to Part 15 of the FCC rules.
These limits are designed to provide reasonable protection against harmful interference in residential installations. This
equipment generates, uses, and can radiate radio frequency energy, and if not installed and used in accordance with the
instructions, may cause harmful interference to radio communications.
However, there is no guarantee that interference will not occur in a particular installation. If this equipment does cause
interference to radio or television equipment reception, which can be determined by turning the equipment off and on, the
user is encouraged to try to correct the interference by one or more of the following measures:
-Reorient or relocate the receiving antenna.
-Move the equipment away from the receiver.
-Plug the equipment into an outlet on a circuit different from that to which the receiver is connected.
-Consult the dealer or an experienced radio/television technician for additional suggestions.
This symbol indicates that the relevant electrical product or battery should not be
disposed of as general household waste in Europe. To ensure the correct waste treatment
of the product and battery, please dispose them in accordance to any applicable local laws
of requirement for disposal of electrical equipment or batteries. In so doing, you will help
to conserve natural resources and improve standards of environmental protection in
treatment and disposal of electrical waste
(Waste Electrical and Electronic Equipment Directive)
1
Dear Customer,
Thank you for choosing DVS1 ActionCam with Touchscreen.
.
We look forward of you enjoying the recreation moments taking the DVS1 ActionCam with Touchscreen to the skies, forests,
and waters while you explore the world. We would feel the same delight, pleasure, and fun whenever you share the video or
pictures captured using DVS1 ActionCam with Touchscreen.
We do wish you to read through this user manual to understand the functions and make full use of it.
For any compliments or suggestions, you are always most welcome to write e-mail to:
[email protected] .
Your fulfillment with our product is our greatest success! Please enjoy!
The ActionCam Team, Computer Technology Corp.
This symbol indicates NOTES or WARNING. You must pay particular attention to the
text described with this symbol when you see it in this user manual. It contains important
information regarding to the usage and safety of the DVS1 ActionCam with Touchscreen.
2
Contents Checklist
Once you have opened the packaging of DVS1 ActionCam with Touchscreen, please take a few moments to check the contents
of your package. Inside this gift box, you will find:
�
DVS1 User manual x 1
�
DVS1 ActionCam x 1
�
DVS1 ActionCam Waterproof Case x 1
�
USB Type A to Type B (male ends) cable x 1
�
Helmet Mount Device x 1
�
Helmet Belt x 1
�
Handlebar / Seatpost Mount Device x 1
�
Shield x 1
Please find the following diagram useful while checking your accessories.
3
The appearance
(1)
(2)
(3)
(4)
(5)
(6)
(7)
Micro SD card slot (up to SDHC 32GB)
Reset
Mini USB port for charging & data transfer.
Power button
Microphone
Snapshot / Start record button
Camera / Video / Vehicle mode toggle
4
(8)
(9)
(10)
(11)
(12)
Lens
LCD with resistive touch screen
Operating indicator
Charging indicator
Strap holder
Quick guide
Insert the micro SD card
Press the power button
Toggle the mode and press start
Snapshot / record button (
to take pictures or videos
5
)
Using the bike handle bar and helmet
The following diagram shows the setup of using the bike handle bar and the helmet.
6
PLEASE READ THE FOLLOWING NOTES CAREFULLY BEFORE USE!
NOTES
� While using the DVS1 without the waterproof case, avoid using the DVS1 camera from extreme weather conditions such as
long-time sun exposure, dusty environments, or water.
� Clean the waterproof case and the camera after each outdoor use.
� Use the cleaning agent to clean the lens. Do not attempt to clean it with your fingers.
� Backup the pictures or video clips inside the micro SD card.
� Check the waterproof case condition before use. If the rubber around the waterproof case has cracked, do not use it under
water.
KEEP OUT OF THE REACH OF CHILDREN UNDER 6 YEARS OLD ESPECIALLY THE MICRO SD
CARD HAS BEEN INSERTED.
PARRENTAL GUIDANCE IS STRONGLY RECOMMENDED FOR CHILDREN’S ACCESS OF THE
CAMERA.
7
Charge your DVS1
Connect the DVS1 camera to your computer with the USB cable supplied to charge. The red charging indicator light will be on
while the DVS1 is being charged. Once the DVS1 has been fully charged, the light will be turned off. Generally, the DVS1 can be
fully charged after 2-4 hours using ordinary laptop / desktop USB ports.
Although the USB charging adaptor from your personal mobile devices such as phones
or tablets can charge the DVS1 camera, the current stronger than 1000 mA may damage
your DVS1’s battery life expectancy. Please use adaptors with DC output 5V only and
current output SMALLER than 1000 mA to charge the DVS1 ActionCam with
Touchscreen.
8
Use of Micro SD card
Please note that there are NO built-in memory for pictures and videos inside the DVS1 ActionCam.
You MUST insert micro SD card in order to use it.
Gently push the micro SD card into the card slot.
If you have difficulties inserting the micro SD card, please check if you have inserted from the wrong direction or up-side-down.
You should hear a small click sound after you pushed the micro SD card to the end against the spring built inside the card slot.
Do not attempt to force the micro SD card into the slot if it cannot be inserted. It may damage the
micro SD card as well as the DVS1 ActionCam.
To remove the micro SD card, push the inserted micro SD card and you would hear a small click sound. The spring inside the
card slot will eject the card. Take out the micro SD card and store it in proper place.
THE MICRO SD CARDS MUST BE KEPT OUT OF THE REACH OF CHILDREN UNDER 6 YEARS OLD!
PARRENTAL GUIDANCE IS STRONGLY RECOMMENDED FOR CHILDREN’S ACCESS OF THE CAMERA.
9
Power On / Off
1. Press the power button for at least 1 second to turn on the DVS1 ActionCam with Touchscreen as shown below:
2. To turn off the DVS1 ActionCam, press the power button for at least 1 second when the power is on.
3. Automatic shutdown: when the DVS1 ActionCam has been idle for 5 minutes, it will be shut down automatically to save
power.
4. When low power is detected by the DVS1 ActionCam, a low power indicator will be displayed on the LCD. You can also see
the current power status on the LCD while using.
Light indicators
There are 2 LED light indicators on the DVS1 ActionCam: Busy and Charge.
Busy indicator: When the camera is busy (such as scanning micro SD card, recording a film, taking photos, automatic off-screen),
the busy indicator will be on.
Charging indicator: When the DVS1 ActionCam is charging, this light indicator will be on.
10
Function modes
There are 3 modes in the DVS1 ActionCam with Touchscreen: Picture mode, Video mode, Vehicle mode. Please toggle the
mode switch to choose your desired mode. The mode description as follows and each modes are described in detail in the
sections later.
1. Picture taking mode: You can take still pictures in this
mode.
2. Video recording mode: Continuous video recording
until the battery runs out or the micro SD card is full.
3. Vehicle mounted mode: Records video files into
5-minute clips. It will stop if the battery runs out.
When the micro SD card if full, the next 5-minute video
clip will overwrite the very first one in circular way.
11
Picture mode
When you toggle the switch to picture taking mode, you can take pictures anytime as you wish. Here we describe the messages
on the LCD display. You can access the functions in this mode by tabbing the touch screen embedded.
Please refer to the diagram above with the following reading.
1. 0/1234 on the top left hand corner indicates the pictures able to take out of pictures in full capacity count.
2. The denominator will vary depends on the capacity of the micro SD card and the resolution chosen.
3. The
icon shows that the micro SD card had been inserted properly and can be accessed.
4. Tab the top center
icon to switch between 5M, 3M, and 1M picture resolution. The higher the resolution, the smaller
the denominator will show.
12
5. Tab
or
6. The
icon is to set the date and time of the DVS1 ActionCam. After finished setting up the date and time, click the
to digital zoom in or out the target. The digital zoom is scaled from 1 to 4X.
“Snapshot/ Record” button to exit.
7. If you tab the
icon at the center of the screen, it will take a picture instantly. It is the same function as the hard key
“Snapshot/ Record” button.
8. On the lower left corner of the LCD, it is the battery indicator:
9. The
10.
. It briefly shows the current status of the battery.
icon located at the bottom center shows the current mode, in this case, the picture taking mode.
Tab the
icon to switch to playback mode. Further description of the playback mode will be mentioned in the
section later.
13
Video mode
When you toggle the switch to video recording mode, you can record video clips anytime you wish. Here we describe the
messages on the LCD display. You can access the functions in this mode by tabbing the touch screen embedded.
Please refer to the diagram above with the following reading.
1. 00:12:18 on the top left hand corner indicates the time remaining to record the video clips in total according to the capacity
of the micro SD card.
2. Please note the time remains for each micro SD card of the same capacity may vary by most of ±5 minutes.
3. The
icon shows that the micro SD card had been inserted properly and can be accessed.
4. Tab the top center
icon to switch between 720P(HD) or VGA(640) of the video recording resolution.
5. Tab
to digital zoom in or out the target. The digital zoom is scaled from 1 to 4X.
6. The
or
icon is to set the date and time of the DVS1 ActionCam. After finished setting up the date and time, click the
14
“Snapshot/ Record” button to exit.
7. If you tab the
icon at the center of the screen, it will start recording instantly. It is the same function as the hard key
“Snapshot/ Record” button. On the top left hand corner, the duration of recording will be displayed in intervals of seconds.
8. On the lower left corner of the LCD, it is the battery indicator:
9. The
10.
. It briefly shows the current status of the battery.
icon located at the bottom center shows the current mode, in this case, the video recording mode.
Tab the
icon to switch to playback mode. Further description of the playback mode will be mentioned in the
section later.
Vehicle mode
When you toggle the switch to vehicle recording mode, you can record video clips by sections anytime you wish. Here we
describe the messages on the LCD display. You can access the functions in this mode by tabbing the touch screen embedded.
Please refer to the diagram above with the following reading.
15
1. 00:12:18 on the top left hand corner indicates the time remaining to record the video clips in total according to the capacity
of the micro SD card.
2. Please note the time remains for each micro SD card of the same capacity may vary by most of ±5 minutes.
3. The
icon shows that the micro SD card had been inserted properly and can be accessed.
4. Tab the top center
icon to switch between 720P(HD) or VGA(640) of the video recording resolution.
5. Tab
or
to digital zoom in or out the target. The digital zoom is scaled from 1 to 4X.
6. The
icon is to set the date and time of the DVS1 ActionCam. After finished setting up the date and time, click the
“Snapshot/ Record” button to exit.
7. If you tab the
icon at the center of the screen, it will start recording instantly. It is the same function as the hard key
“Snapshot/ Record” button. On the top left hand corner, the duration of recording will be displayed in intervals of seconds.
8. On the lower left corner of the LCD, it is the battery indicator:
9. The
. It briefly shows the current status of the battery.
icon located at the bottom center shows the current mode, in this case, the video recording mode.
10. Tab the
icon to switch to playback mode. Further description of the playback mode will be mentioned in the
section later.
IN VEHICLE RECORDING MODE, THE LCD SCREEN WILL BE SHUTDOWN IN ORDER TO SAVE
POWER BUT THE RECORDING IS STILL TAKING PLACE AND THE BUSY LIGHT PERSISTS.
YOU MAY SHORT CLICK ON THE POWER BUTTON TO RESUME THE LCD DISPLAY.
16
Play back
Once you have tabbed on the
enter the playback mode
icon on the lower right corner in previous modes (picture, recording, or vehicle), you will
Please refer to the diagram above with the following reading.
AVI
JPG
1. The “AVI
AVI” on the top left hand corner indicates the current file to be played is a video clip. For pictures format, “JPG
JPG” is
displayed.
2. The 1/1 on the top right corner indicates the media files scanned from the micro SD card as the denominator and the current
item of the media file is the numerator.
3. The
100
icon represents on which folder inside the micro SD card is being accessed. The “100
100” means the current reading
17
<root_of_sd>\DCIM\100MEDIA\
directory of the micro SD card is “<root_of_sd>\DCIM\100MEDIA\
<root_of_sd>\DCIM\100MEDIA\”. If you tab on this icon, it will change to a car icon
indicating you are about to playback the video clips recorded under vehicle recording mode.
4. Tab
or
5. The
icon is to delete the file from the current preview. More details on deletion of a file will be described in later
icon to preview the previous or next media file.
section.
6. Tab the
7. The
icon at lower center to play the current media file previewed.
,
, or
icon on the lower right corner allows you to switch back to the previous mode to take more
pictures or record more video clips.
8. Once you are viewing a picture in the playback mode, you can also zoom in or zoom out the picture being viewed.
9. If you are playing a video clip, you can use
to pause the current play or, tab
rewind respectively. Reference diagram as shown below:
18
or
to fast forward or
,
File deletion
By tabbing on the delete icon
Yes
, you will be informed for confirmation as shown below. Tab on “Yes
Yes” to confirm deletion.
Data backup
Once you have plugged the DVS1 ActionCam to your computer and press the power button, your computer will recognize the
BUSY
CHARGE
DVS1 ActionCam as an external flash drive. At this moment, both the “BUSY
BUSY” and the “CHARGE
CHARGE” indicators will be on. On
<DRIVE_LETTER>\DCIM\100MEDIA\
your computer, you will expect to find “<DRIVE_LETTER>\DCIM\100MEDIA\
<DRIVE_LETTER>\DCIM\100MEDIA\” for pictures taken from picture mode and video
clips from video recording mode. For the video clips recorded from vehicle recording mode, it will be stored in
<DRIVE_LETTER>\DCIM\RECORDER\
“<DRIVE_LETTER>\DCIM\RECORDER\
<DRIVE_LETTER>\DCIM\RECORDER\” folder. Simply copy or cut the files and paste them into your backup location.
19
Minimum System Requirements
Operating System
CPU
DRAM
Sound card & display
USB
Microsoft Windows® 2000/XP SP2
and above
Pentium III
512MB
DirectX 8 and above
USB 1.0
20
Technical Specs
Display
Image Sensor
Lens
Still image resolution
Video resolution
Digital zoom
External memory
Battery
Charging method
Dimensions
Weight
Storage temperature
Operating
temperature
Water resistance
2” LCD with resistive touch screen
1.3 Mega pixels
F=3.1, f=9.3 (Wide angle 120°)
5.0 Mega pixels 2592 x 1944 (Interpolate)
3.1 Mega pixels 2028 x 1536 (Interpolate)
1.3 Mega pixels 1280 x 960
720P 1280 x 720 Pixels @ 23-31fps
VGA 640 x 480 Pixels @49-63fps;
4x
Micro SD, support SDHC up to 32GB*
440 mAh Lithium (~2 hours continuous usage)
DC 5V 500 mA** through USB
66 x 43 x 27 mm
93 x 62 x 37 mm with waterproof case
~50g (1.76oz)
-30°C~60°C (-22°F~120°F)
-20°C~40°C (-4°F~104°F)
10 meters with waterproof case
*Micro SD card not included.
**Charging adaptor with current over 1A is not recommended.
21