1
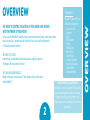
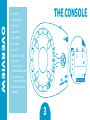
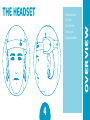
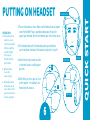
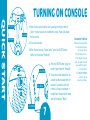
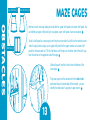
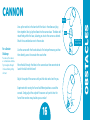
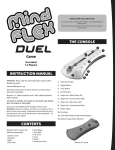
Requires 4 ‘C’ alkaline batteries for console
and 3 ‘AAA’ alkaline batteries for headset
(Not Included).
www.mindflexgames.com
IMPORTANT: Please read the entire Quick
Start section before playing any games.
Game
P2639
TABLE OF CONTENTS
CONTENTS
Overview . . . . . . . . . . . . . . . . . . . . . . 2
Components List . . . . . . . . . . . . . . 2
Product Diagrams . . . . . . . . . . . . . . 3
Teeter-Totter . . . . . . . . . . . . . . . . 17
Propeller Wheel . . . . . . . . . . . . . . 19
Building a Course . . . . . . . . . . . . . 20
Quick Start . . . . . . . . . . . . . . . . . . . . 5
Battery Installation . . . . . . . . . . . . 5
Putting on the Headset . . . . . . . . . . 6
Turning on the Console . . . . . . . . . . 7
Controlling the Ball . . . . . . . . . . . . 8
Concentration Tips . . . . . . . . . . . . . 8
The Games . . . . . . . . . . . . . . . . . . . . 21
The Game Menu . . . . . . . . . . . . . . 21
Freestyle . . . . . . . . . . . . . . . . . . . 23
Mental Marathon™ . . . . . . . . . . . . 24
Danger Zone . . . . . . . . . . . . . . . . 26
Chase the Lights . . . . . . . . . . . . . 28
Thoughtshot™ . . . . . . . . . . . . . . . 30
Obstacles . . . . . . . . . . . . . . . . . . . . 11
Obstacle Difficulty Levels . . . . . . . 11
Ring Towers . . . . . . . . . . . . . . . . . 12
Maze Cages . . . . . . . . . . . . . . . . . 13
Funnel . . . . . . . . . . . . . . . . . . . . 15
Cannon . . . . . . . . . . . . . . . . . . . . 16
Troubleshooting . . . . . . . . . . . . . . . 32
Connection Problems . . . . . . . . . . 32
Problems Controlling the Ball . . . . 33
Status Light Reference Chart . . . . . 34
1
GET READY TO CONTROL THE ACTION AS YOU NEVER HAVE BEFORE –
WITH THE POWER OF YOUR MIND!
Just put on the Mindflex™ headset and your own brainwaves will move a ball up and down
on a cushion of air. Concentrate and the ball will rise, relax and it will descend –
it’s literally mind over matter!
THE OBJECT IS SIMPLE.
Race through a mind-bending obstacle course as quickly as you can.
The player with the fastest time wins!
THE CHALLENGES ARE ENDLESS!
Ready to flex your mental muscles? Then get your brain in the game
with Mindflex™!
2
COMPONENTS
Mindflex™ comes with the
following components:
1 Game Console
1 Headset
4 Balls
3 Ring Towers
5 Rings
2 Maze Cages
2 Wall Panels
4 Shelf Panels
1 Funnel (3 pieces)
1 Cannon (3 pieces)
1 Teeter-Totter
1 Propeller Wheel
HANDLE FOAM BALLS WITH CARE.
Do not press, crush or squeeze the foam balls,
or you may damage their ability to levitate.
Keep them safe by storing them in the
compartment on the underside of the console.
(see page 3).
OVERVIEW
OVERVIEW
THE CONSOLE
OVERVIEW
1. Fan Nozzle
2. Calibration Point
3. Start Spaces
4. Control Knob
5. Select Button
6. Enter Button
7. Sensor LEDs
8. On/Off Switch (side)
9. Status Light
(refer to chart in
Troubleshooting section)
10. Foam Ball Storage
Compartment (Bottom)
11. Battery Compartment
(Bottom)
8
9
3
10
2
4
11
3
6
7
1
3
5
Bottom of Console
1. Forehead Sensor
2. Ear Clips
3. On/Off Switch
4. Power Light
5. Adjustable Buckle
3
1
2
1
4
2
2
4
5
OVERVIEW
THE HEADSET
QUICK START
BATTERY INSTALLATION
CONSOLE
1. Open battery cover with Phillips head screwdriver (not included).
2. Insert 4 ‘C’ alkaline batteries as shown.
3. Replace battery cover and tighten the screws.
For best performance, use only alkaline batteries. When the console’s status light begins to blink GREEN,
its batteries are low. Replace console batteries when console lights dim, sound becomes distorted or ball
can no longer achieve a maximum height of 5 inches when all 5 sensor LEDs are lit.
HEADSET
1. Open battery cover with Phillips head screwdriver (not included).
2. Insert 3 ‘AAA’ alkaline batteries as shown.
3. Replace battery cover and tighten the screw.
When the console’s status light or the headset’s power light blinks RED, the headset batteries
are running low.
Refer to the Troubleshooting section for descriptions of all status messages.
5
PUTTING ON HEADSET
1. Before putting on the
headset, be sure to
remove hats, ponytails,
hairclips or anything
else that might get
in the way, and
brush the hair from
your forehead.
2. Before attaching
the ear clips,
remove earrings.
3. Periodically clean the
forehead and ear clip
sensors with a cloth or
paper towel moistened
in warm, soapy water.
1. Put on the headset as shown. Make sure the forehead sensor located
under the Mindflex™ logo is positioned above your left eye, flat
against your forehead, with no hair between your skin and the sensor.
2. If the headset does not fit comfortably against your forehead,
use the buckle on the back of the headset to adjust for a snug fit.
3. Attach the ear clips to each ear lobe
so the metal sensors are flat against
your skin.
On/Off Switch
On
4. While sitting as still as you can, turn
on the headset – the headset’s red
Power Light will come on.
Off
Power Light
6
Ear Clips
QUICK START
Helpful Hints
Forehead Sensor
QUICK START
TURNING ON CONSOLE
Start Spaces
Fan Nozzle
Control Knob
1. Move the fan nozzle to either start space by turning the control
knob – the start spaces are marked with arrows. Place a ball above
the fan nozzle.
2. Turn on the console.
3. When the console says “Select Game,” press the SELECT button
(white) until you hear “Freestyle.”
On
Sensor LEDs
5. It may take a few seconds for the
console to communicate with the
headset. Just remain still until
it does so. Once a connection is
established, the console will beep
and tell the player, “Begin.”
Enter Button
Off
Select Button
4. Press the ENTER button (gray) to
confirm your choice of “Freestyle.”
7
Connection Problems
Whenever the headset fails
to read your brainwaves,
the console will say,
“Check headset sensors.”
If this happens during a
game, the game timer will
pause until the signal is
restored. Refer to
the TROUBLESHOOTING
section for tips on
connection problems.
The time has come to put your brainpower to the test! Try each of the practice exercises below to
familiarize yourself with controlling the ball. Do not put any obstacles on the console yet.
The sensor LEDs (5 lights) on the face of the console will display your level of concentration.
RAISING THE BALL (HIGH CONCENTRATION)
The higher your concentration, the higher the ball will float –
up to a height of approximately 5 inches.
High Concentration
Sensor LEDs
Low Concentration
Exercise #1: Raise the ball as high as you can and try to hold it
there for three seconds.
8
Tips for Increasing
Concentration
•Relax your face – try not
to move any muscles in
your face.
•Stare at the ball.
Concentrate all of your
attention on it.
•Picture the ball rising.
•Focus your attention on
the exact spot you want
to see it reach.
•Imagine pushing the ball
up with your mind.
•Do math problems in your
head.
•Think the same thought
over and over.
Everyone is different, so
find out what works best
for you!
QUICK START
CONTROLLING THE BALL
QUICK START
Tips for Lowering
Concentration
•Try to clear your mind.
•Relax your body.
LOWERING THE BALL (LOW CONCENTRATION)
•Take deep breaths.
By relaxing your concentration, the ball will descend.
•Close your eyes for a
moment then open them
Exercise #2: Lower the ball. Try to hold the ball in place for three seconds.
and look at different parts
of the console without
Exercise #3: Raise and lower the ball three times in a row.
focusing on anything.
•Think about sleeping.
•Think about a peaceful,
relaxing place.
Again, discover what
techniques work best
for you!
9
To move the ball – and the fan nozzle – right or left around the console, turn the control knob.
Turning it clockwise will move the fan in a counter-clockwise direction, and turning it counterclockwise will move the fan in a clockwise direction.
Exercise #4: Concentrate until the ball is floating as high as you can get it. Turn the control knob
and move the ball all the way around the console, trying to keep the ball at the same height.
Turn control knob clockwise to move
fan counter-clockwise
Exercise #5: Once you reach the end, relax your thoughts until the ball is floating as low as you
can get it. Now turn the control knob in the opposite direction and move the ball back the other
way, maintaining the low height of the ball.
Exercise #6: Press ENTER to end the game.
Congratulations! By completing this Quick Start you have begun
to master the power of your mind! Now it’s time to tackle the obstacles!
10
Turn control knob counter-clockwise
to move fan clockwise
QUICK START
MOVING THE BALL RIGHT OR LEFT (CONTROL KNOB)
OBSTACLES
OBSTACLES
It takes serious mental focus to navigate the ball around the Mindflex™ course. Each obstacle you face
along the way will provide a unique “mental block” to challenge your concentration skills.
You will find that some obstacles are more challenging than others. When building your obstacle course,
you may want to start with the easier obstacles first.
Difficulty of
Obstacles
Easy
Ring Towers
Maze Cages
Medium
Funnel
Cannon
Hard
Teeter-Totter
Propeller Wheel
11
Each ring tower has 5 sockets. Customize the towers by
inserting rings into the sockets at whatever angle you want. A
Plug the ring towers into the console, making sure the rings
point toward the center of the console. B
A
The following diagrams show how to navigate the ball through
several different ring tower set-ups:
12
B
OBSTACLES
RING TOWERS
Upper Shelf Panel (2)
OBSTACLES
1
Notches in each maze cage allow you to add both an upper shelf panel and a lower shelf panel. You
can identify an upper shelf panel by its crosspiece. Lower shelf panels have no crosspiece. A
2
A
Wall Panel (2)
MAZE CAGES
Lower Shelf Panel (2)
To add a shelf panel to a maze cage, insert the pins on one side of a shelf into the notches on one
side of a cage (make sure you use an upper shelf panel for the upper notches and a lower shelf
panel for the lower notches). Tilt the shelf down until the pins on the other side of the shelf snap
into the notches on the opposite side of the cage. B
Slide wall panels into their tracks from the bottom of the
maze cages. C
Plug maze cages into the console with their widest side
positioned along the outer edge of the console – you can
identify the wide side of a cage by its open corners. D
2
1
B
C
13
REMEMBER: You do not need to use all the pieces when building
your maze cages. Just make sure you always create a path that
allows a ball to pass in one side of the cage and out the other.
SAMPLE MAZE CAGE CONFIGURATIONS
To get started, try building the following maze cage.
D
E
F
G
F
For a greater challenge, you can place the two cages next to
each other, with the entrance of the first cage at the bottom,
and the exit from the second cage at the top. G
See what other combinations you can come up with!
14
OBSTACLES
Open corners
When both shelves are in position, you can slide a wall
panel into one of four positions to block different paths
through a cage. E
FUNNEL
OBSTACLES
Tabs
Slots
A
Snap the two halves of the funnel together. Next, line up the tabs in the funnel with the slots in
the funnel base then plug the funnel into the base. A
Attach the funnel to the console so the funnel opening points toward the center of the console.
Navigate this obstacle by traveling through the holes in the side of the funnel – but be careful!
If the ball floats too high, the funnel will spit it out! B
You can also use the base as a stand-alone obstacle.
B
C
15
C
CANNON
Line up the notches in the barrel with the tabs in the elbow and plug
them together. Next, plug the elbow into the cannon base. The elbow will
rotate freely within the base, allowing you to aim the cannon as desired.
Attach the assembled cannon to the console.
For a Greater
Challenge
You can use the cannon
as a stand-alone obstacle.
Try to navigate through
its base without getting
shot out.
Use the cannon with the funnel obstacle. For best performance, position
them directly across the console from each other.
Move the ball through the holes in the cannon base then concentrate to
launch the ball into the funnel!
Adjust the angle of the cannon until you find what works best for you.
Experiment with moving the funnel to different positions around the
console. Simply adjust the angle of the cannon so it points into the
funnel then see how many baskets you can make!
16
Elbow
Cannon base
has no tabs
OBSTACLES
Barrel
TEETER-TOTTER
OBSTACLES
Plug the teeter-totter into the console so that it follows the curve of the console.
A
Maneuver the ball above the hole on one side of the teeter-totter then relax your concentration
to lower the ball. B
A
Once the ball rolls to the other end of the teeter-totter, move the fan nozzle beneath it.
Concentrate to raise the ball out of the teeter-totter and
proceed on your way. C
B
C
17
Callibration Point
The calibration point blocks the flow of air from the fan so the ball cannot float above it. However,
by placing the teeter-totter here, you create a bridge that will allow you to travel back and forth
over this point in either direction.
18
OBSTACLES
IMPORTANT: The teeter-totter is the only obstacle that can be placed above
the calibration point.
Clockwise Path
PROPELLER WHEEL
OBSTACLES
Plug both pegs of the propeller wheel into the console. Air from the fan will cause the propeller
wheel to spin in a counter-clockwise direction.
A
To pass this obstacle, lower the ball onto one of the four loops. Use the fan to gently spin the
propeller wheel until you move the ball to the other side of the obstacle. Be careful – if you spin it
too fast, you’ll knock the ball off! Once the ball is on the other side, levitate the ball from its loop
and continue on your way.
IMPORTANT: THIS IS A ONE-WAY OBSTACLE!
Because the propeller wheel only spins in one direction, it will only allow you to travel in one
direction around the course. Depending on the obstacle’s position, you will either be able to travel
in a clockwise or a counter-clockwise direction around the console. A B
Direction Arrow
When the propeller wheel is attached to the console, just check the arrow painted on its top – it
points in the direction the ball must travel to pass the obstacle.
B
Counter-clockwise Path
19
Create whatever course you can imagine by choosing your obstacles and positioning them
wherever you want. You’ll discover hundreds of mind-bending combinations!
When you build an obstacle course, follow these simple guidelines:
1. Obstacles can be positioned anywhere around the console except over the two start spaces.
Start Spaces
should be empty
2. Be sure to leave at least one empty space between
each obstacle.
3. Do not place any obstacles over the calibration point except
the teeter-totter (see page 17-18).
4. Remember, you can only travel past the propeller wheel in one
direction – make sure you set it up in the direction you want
to go (see page 19).
Empty space
between obstacles
20
Only the teeter-totter will function
over calibration point.
OBSTACLES
BUILDING A COURSE
THE GAMES
THE GAMES
Now that you’ve familiarized yourself with controlling the ball and the different
obstacles, it’s time to try out the games! Mindflex™ comes with 5 different game
modes that will challenge you in different ways.
Sensor LEDs
THE GAME MENU
After putting on the headset and turning on the console (as described in the Quick
Start section), the console will direct you to “Select game.” The 5 sensor LEDs on the
front of the console will begin to flash, indicating that you are in the Game Menu and
need to make some choices.
Press the SELECT button (white) to cycle through a list of games then press ENTER
(gray) to confirm your choice.
Select Button
Enter Button
Note: Depending on the game you choose, you may also be prompted to select
number of players and difficulty level, but we’ll cover that in more detail under
each game description.
21
FROM THE GAME MENU
To Cancel a Selection:
If you wish to cancel a choice you made while in the Game Menu, press the SELECT and ENTER
buttons together and hold them down for 2 seconds. The console will cancel your choice and
return you to the “Select Game” prompt.
FROM A GAME
To Cancel a Player’s Turn:
If a player does not wish to finish their turn, press and hold the ENTER button for 2 seconds.
That player’s turn will be canceled and the game will advance to the next player.
To Cancel a Game:
If you wish to exit a game completely, press and hold both the SELECT and ENTER buttons for
several seconds until the game returns you to the Game Menu and you hear “Select Game.”
22
THE GAMES
CANCELLING YOUR CHOICES
FREESTYLE
THE GAMES
Number of Players: 1
(Player does not need to select)
Difficulty Levels (Time Limit):
Not selectable (No time limit)
Object: Practice your
1. Put on the headset and turn it on as described in the Quick Start section.
concentration skills
2. Turn on the console.
with no time limit.
3. When the console says, “Select game,” press SELECT (white button)
until you hear “Freestyle.” Press ENTER (gray button).
4. The console will beep and say, “Begin.” (If you experience connection
problems, refer to the Troubleshooting section.)
5. While in “Freestyle” mode, the console will react to your concentration level.
Practice controlling the ball or using different obstacles. You can also
use “Freestyle” mode to make up your own games!
6. When you want to exit “Freestyle,” press the ENTER button to return to the Game Menu.
23
1. Set up the obstacle course as desired.
2. Place a ball on either of the two start spaces. Because the calibration point blocks the
path, the space you choose determines the direction you must travel around the course.
From the right space you will have to travel counter-clockwise, and from the left space,
you will travel clockwise.
Number of Players: 1-4
Difficulty Levels (Time Limit):
Not selectable (No time limit)
Object: Travel around the
obstacle course as quickly as
you can. Beat your own best
time or compete against other
players – the fastest time wins!
3. Turn on the console.
4. When the console says, “Select game,” press SELECT (white button) until you hear
“Mental Marathon.” Press ENTER (gray button).
Start Spaces
5. Press SELECT to choose the number of players (from 1 to 4) and press ENTER.
Fan Nozzle
6. The console will tell the first player to “Put on the headset.” When the headset is in place and
turned on (see Quick Start section), press SELECT.
7. Before the game will begin, the fan nozzle must be positioned underneath the calibration point
– this is the “ready” position for the fan. If it is not there, the console will say, “Rotate fan to
calibration point.” Turn the control knob to move the fan nozzle under the calibration point
and leave it there. The unit will buzz
to confirm that you are in position.
24
Callibration Point
THE GAMES
MENTAL MARATHON
™
THE GAMES
8. The console will say, “Begin.”
9. Turn the control knob to maneuver the ball around the course.
10. When you pass each light on the console’s surface, it will light up to mark your progress.
NOTE: Once you activate a light, you must continue to travel in that direction for the rest of the game.
11. You must activate all four lights in a row to successfully complete the game.
12.If the ball falls out of the airflow, place it back into play at the point where it fell off.
13. Race all the way around the course as quickly as you can. When you return the fan to the calibration point, the game will
announce your time.
14. If you selected a multi-player game, the console will direct the next player to put on the headset. Once the next player is wearing
the headset, press SELECT and the console will say, “Begin.”
15. At the end of the game, the console will declare a winner based on the shortest time.
25
1. Set up the obstacle course. Do not place obstacles over any lights.
2. Place a ball in either of the two start spaces.
3. Turn on the console.
4. When the console says, “Select game,” press SELECT (white button) until you hear
“Danger Zone.” Press ENTER (gray button).
5. Press SELECT to choose the number of players (from 1 to 4) and press ENTER.
6. Press SELECT to choose the difficulty (Beginner, Intermediate or Advanced) and press ENTER.
Easier difficulty settings will give you more time to escape each danger zone.
7. The console will tell the first player to “Put on the headset.” When the headset is in place and
turned on (see Quick Start section), press SELECT.
8. Before the game will begin, the fan nozzle must be positioned underneath the calibration point
– this is the “ready” position for the fan. If it is not there, the console will direct you to “Rotate
fan to calibration point.” Move the fan nozzle under the calibration point and leave it there. The
unit will buzz to confirm that you are in position.
26
The First Danger Zone
THE GAMES
DANGER ZONE
Number of Players: 1-4
Difficulty Levels (Time Limit):
Beginner (1 minute/zone)
Intermediate (45 seconds/zone)
Advanced (20 seconds/zone)
Object: Escape 4 danger zones
before time runs out or your
game ends! Beat your best
time or compete against
other players – the shortest
time wins!
9. The console will say, “Begin.”
THE GAMES
10. The two lights to either side of the calibration point will begin to blink. This is the first danger zone. You must maneuver the ball
out of this zone before the lights go out or your game is over. Depending on the difficulty you selected, you will have different
amounts of time to escape each zone (for instance, “Advanced” only gives you 20 seconds per zone).
11. When you escape a zone, the console will confirm by saying “Zone Complete.” Continue traveling in the same direction all the
way around the course. You will not be able to escape a new zone by going back the way you came.
12.The first danger zone will continue to blink – even after you escape it – until the time for that zone runs out. At that point, the
next consecutive zone will begin to blink. Just keep moving – try to stay ahead of the blinking zones if you can. You never want
to be caught in one when it goes out.
13. If the ball falls out of the air flow, place it back into play at the point where it fell off.
14. When you escape the final danger zone, return the fan to its place beneath the calibration point and the console
will announce your time.
15. If you selected a multi-player game, the console will direct the next player to put on the headset. Once the next player is wearing
the headset, press SELECT and the console will say, “Begin.”
16. At the end of the game, the console will declare a winner based on the greatest number of zones escaped
in the shortest amount of time.
27
1. Set up the obstacle course as desired but be sure to place the teeter-totter above the
calibration point. You will be moving back and forth a lot when playing “Chase the Lights,”
and the teeter-totter is the only obstacle that allows you to travel in either direction over
the calibration point (see pages 17-18).
2. Place a ball in the teeter-totter.
3. Turn on the console.
4. When the console says, “Select game,” press SELECT (white button) until you hear
“Chase the Lights.” Press ENTER (gray button).
5. Press SELECT to choose the number of players (from 1 to 4) and press ENTER.
6. Press SELECT to choose the difficulty (Beginner, Intermediate or Advanced) and press ENTER.
Easier difficulty settings will give you more time to play.
7. The console will tell the first player to “Put on the headset.” When the headset
is in place and turned on (see Quick Start section), press SELECT.
28
THE GAMES
CHASE THE LIGHTS
Number of Players: 1-4
Difficulty Levels (Time Limit):
Beginner (5 minutes)
Intermediate (3 minutes)
Advanced (1 minute)
Object: “Tag” as many lights
as you can before time runs
out! Beat your best score or
compete against other players
– whoever tags the most
lights wins!
THE GAMES
8. Before the game will begin, the fan nozzle must be positioned underneath the calibration point – this is the “ready” position
for the fan. If it is not there, the console will direct you to “Rotate fan to calibration point.” Move the fan nozzle under the
calibration point and leave it there. The unit will buzz to confirm that you are in position.
9. The console will say, “Begin.”
10. One of the lights on the surface of the console will light up. As quickly as you can, maneuver the ball to that light to “tag” it.
11. Once tagged, the light will go out and another will light up. Choose the quickest route to tag the next light.
Remember: You can travel in both directions when playing Chase the Lights.
12. If the ball falls out of the airflow, place it back into play at the point where it fell off.
13. Continue tagging lights until time runs out and the console announces your score.
14. If you selected a multi-player game, the console will direct the next player to put on the headset. Once the next player is
wearing the headset, press SELECT and the console will say, “Begin.”
15. At the end of a multi-player game, the console will declare a winner based on the total number
of lights each player tagged in the shortest amount of time.
29
1. Set up the cannon and funnel obstacles directly across from each other. These are the only two
obstacles you will need for this game.
2. Use the control knob to rotate the fan nozzle beside the cannon and place a ball on top
of the nozzle.
3. Turn on the console.
4. When the console says, “Select game,” press SELECT (white button) until you hear
“Thoughtshot.” Press ENTER (gray button).
5. Press SELECT to choose the number of players (from 1 to 4) and press ENTER.
6. Press SELECT to choose the difficulty (Beginner, Intermediate or Advanced) and press ENTER.
Easier difficulty settings will give you more time to shoot baskets.
7. The console will tell the first player to “Put on the headset.” When the headset is in place and
turned on (see Quick Start section), press SELECT.
30
Number of Players: 1-4
Difficulty Levels (Time Limit):
Beginner (3 minutes)
Intermediate (2 minutes)
Advanced (1 minute)
Object: Score as many points
as you can by blasting the ball
into the funnel! Beat your best
score or compete against other
players – whoever gets the
most points wins!
THE GAMES
THOUGHTSHOT
™
THE GAMES
8. The console will say, “Begin.”
9. Concentrate to raise the ball into the cannon and shoot.
10. Whenever the ball lands in the funnel, press the SELECT button to add 1 point to your score.
11. After each shot, pick up the ball and place it next to the cannon to shoot again.
12. Play until your time runs out or until you score 20 points – the game automatically ends at 20.
The console will announce your score.
13. If you selected a multi-player game, the console will direct the next player to put on the headset.
Once the next player is wearing the headset, press SELECT and the console will say, “Begin.”
14. At the end of the game, the console will declare a winner based on the player with the highest score.
31
For a Greater
Challenge
Add a few obstacles to the
course. Instead of picking
up the ball after each shot,
use the fan to navigate the
ball through the obstacles
to get back to the cannon!
CONNECTION PROBLEMS
If you receive the message “Check headset sensors,” make the following adjustments. Be sure to wait about 5 seconds
after each adjustment to see if the issue has been corrected – if so, you will hear “Calibrating headset.”
•Make sure the sensor is pressed tight and flat against your forehead. Adjust the headband if necessary.
•Make sure no hair is caught between the sensor and your skin.
•Move the forehead sensor to a slightly different position above your left eye.
•Remove then reattach the clips to your ears.
•Make sure both clips are pressed flat against your ear lobes.
•Leaving the headset on your head, turn the headset off and back on.
•Clean the surfaces of the forehead and ear clip sensors with a cloth or paper towel moistened in warm, soapy water.
•Visit www.mindflexgames.com for additional help.
NOTE: If you receive the message “Check headset sensors” during a game, the game timer will pause until you
reestablish a good connection.
When exposed to an electrostatic source, the product may malfunction and suffer memory loss. If this occurs, reset the
product by turning the console off then on.
32
TROUBLESHOOTING
TROUBLESHOOTING
TROUBLESHOOTING
PROBLEMS CONTROLLING THE BALL
If you have difficulty controlling the ball – either raising or lowering it – try the following adjustments.
•Refer to the Concentration and Relaxation tips on pages 8 and 9.
•Turn off the headset. Place both feet flat on the floor, sit as still as you can and try to clear your mind. After 5 seconds,
turn the headset back on.
NOTE: Don’t be afraid to turn off the headset in the middle of a game. The game timer will pause until the console
establishes a new connection with the headset.
• Visit www.mindflexgames.com for more tips and tutorials.
NOTE: After about 4 minutes of inactivity, your game will end and the console will enter Sleep Mode to conserve
power (current game information will not be saved). Press the SELECT button (white) to reactivate the console and
return to the Game Menu.
33
During game play, the status light changes color and blinks to communicate the current status of the Mindflex™ system. Refer to the
following chart for descriptions of the various status messages:
LIGHT
STATUS
Green
Good connection between console and headset
Blinking Green Console batteries low. Fan may begin to lose power. Replace batteries soon.
Orange
“Calibrating headset.” Headset attempting to read brainwaves.
Blinking Orange “Check headset sensors.”Headset positioned incorrectly. Verify proper placement of ear clips
and forehead sensor.
Red
No headset signal. Possible causes:
a) Headset turned off
b) Headset batteries dead
c) Headset out of range
Blinking Red
Headset batteries low. Replace soon.
34
TROUBLESHOOTING
STATUS LIGHT REFERENCE CHART
COMPLIANCE WITH FCC REGULATIONS (VALID IN U.S. ONLY - VALABLE AUX É.-U. SEULEMENT)
This device complies with part 15 of the FCC Rules. Operation is subject to the following two conditions: (1) This device may not cause harmful
interference, and (2) this device must accept any interference received, including interference that may cause undesired operation. NOTE: This equipment
has been tested and found to comply with the limits for a Class B digital device, pursuant to Part 15 of the FCC Rules. These limits are designed to provide
reasonable protection against harmful interference in a residential installation. This equipment generates, uses and can radiate radio frequency energy and,
if not installed and used in accordance with the instructions, may cause harmful interference to radio communications. However, there is no guarantee
that interference will not occur in a particular installation. If this equipment does cause harmful interference to radio or television reception, which can be
determined by turning the equipment off and on, the user is encouraged to try to correct the interference by one or more of the following measures:
• Reorient or relocate the receiving antenna.
• Increase the separation between the equipment and receiver.
• Connect the equipment into an outlet on a circuit different from that to which the receiver is connected.
• Consult the dealer or an experienced radio/TV technician for help.
NOTE: Changes or modifications not expressively approved by the manufacturer responsible for compliance could void the user’s authority to operate the
equipment.
INFORMACIÓN DE SEGURIDAD ACERCA DE LAS PILAS
En circunstancias excepcionales, las pilas pueden desprender líquido corrosivo que puede
provocar quemaduras o dañar el producto. Para evitar el derrame de líquido corrosivo:
• No intentar cargar pilas no-recargables.
• Antes de recargar las pilas recargables, sacarlas del producto.
• Recargar las pilas recargables siempre bajo supervisión de un adulto.
• No mezclar pilas de diferentes tipos: alcalinas, estándar (carbono-cinc) y recargables (níquel-cadmio).
• No mezclar pilas nuevas con gastadas.
• Utilizar pilas del tipo recomendado en las instrucciones o equivalente.
• Colocar las pilas según la polaridad indicada.
• Retirar las pilas gastadas del producto.
• Evitar cortocircuitos en los polos de las pilas.
• Desechar las pilas gastadas en un contenedor especial para pilas.
• No quemar el producto, ya que las pilas de su interior podrían explotar o desprender líquido corrosivo.
RSS - 210 (Canada)
(VALID FOR CANADA ONLY - VALABLE AU CANADA SEULEMENT)
This radiocommunication device complies with all the requirements of Industry Canada Standard RSS-210. Operation is subject to the following two
conditions: (1) this device may not cause harmful interference and (2) this device must accept any interference, including interference that may cause
undesired operation of the device. Ce dispositif de radiocommunication rencontre toutes les exigences de la norme CNR-210 d’Industrie Canada.
L’utilisation de ce produit est sujette aux conditions suivantes : (1) il ne doit pas produire de brouillage et (2) il doit pouvoir tolérer tout brouillage
radioélectrique reçu, même si ce brouillage est susceptible de compromettre son fonctionnement.
MISES EN GARDE AU SUJET DES PILES
Lors de circonstances exceptionnelles, des substances liquides peuvent s’écouler des piles et provoquer des brûlures chimiques ou endommager le
produit. Pour éviter tout écoulement des piles :
• Ne pas recharger des piles non rechargeables.
• Les piles rechargeables doivent être retirées du produit avant d’être rechargées (en cas de piles amovibles).
• En cas d’utilisation de piles rechargeables, celles-ci ne doivent être chargées que par un adulte (en cas de piles amovibles).
• Ne pas mélanger des piles alcalines, standard (carbone-zinc) ou rechargeables (nickel-cadmium).
• Ne jamais mélanger des piles usées avec des piles neuves.
• N’utiliser que des piles du même type que celles recommandées, ou des piles équivalentes.
• Veiller à bien respecter le sens des polarités (+) et (-), et toujours suivre les indications des fabricants du jouet et des piles.
• Toujours retirer les piles usées du produit.
• Ne pas court-circuiter les bornes des piles.
• Jeter les piles usées dans un conteneur réservé à cet usage.
• Ne pas jeter le produit au feu. Les piles incluses pourraient exploser ou couler.
CNR-210 d’Industrie Canada (CANADA SEULEMENT)
2.4 GHz
BATTERY SAFETY INFORMATION
In exceptional circumstances batteries may leak fluids that can cause a chemical burn injury or ruin your product.
To avoid battery leakage:
• Non-rechargeable batteries are not to be recharged.
• Rechargeable batteries are to be removed from the product before being charged (if designed to be removable).
• Rechargeable batteries are only to be charged under adult supervision (if designed to be removable).
• Do not mix alkaline, standard (carbon-zinc), or rechargeable (nickel-cadmium) batteries.
• Do not mix old and new batteries.
• Only batteries of the same or equivalent type as recommended are to be used.
• Batteries are to be inserted with the correct polarity.
• Exhausted batteries are to be removed from the product.
• The supply terminals are not to be short-circuited.
• Dispose of battery(ies) safely.
• Do not dispose of this product in a fire. The batteries inside may explode or leak.
Protect the environment by not disposing of this product with household waste [2002/96/EC]. Check your local authority for recycling
advice and facilities. • No tirar este producto en la basura doméstica [2002/96/EC]. Para más información sobre la eliminación correcta
de residuos de equipos eléctricos y electrónicos, póngase en contacto con la Junta de Residuos o el Ayuntamiento de su localidad.
• Protéger l’environnement en ne jetant pas ce produit dans les ordures ménagères [2002/96/EC]. Consulter votre municipalité pour
obtenir des conseils sur le recyclage et connaître les centres de dépôt de votre région.
P2639-0920G1
© 2009 Mattel, Inc. All Rights Reserved. Mattel, Inc. 636 Girard Avenue, East Aurora, NY 14052, U.S.A. www.radicagames.com Helpline 1.800.803.9611 or
service.mattel.com. Mattel U.K. Ltd., Vanwall Business Park, Maidenhead SL6 4UB. Helpline 01628 500303. Mattel Canada Inc., Mississauga, Ontario L5R
3W2. You may call us free at/ Composez sans frais le 1-800-524-8697. Mattel Australia Pty., Ltd., Richmond, Victoria. 3121. Consumer Advisory Service
- 1300 135 312. Mattel East Asia Ltd., Room 1106, South Tower, World Finance Centre, Harbour City, Tsimshatsui, HK, China. Diimport & Diedarkan Oleh:
Mattel SEA Ptd Ltd.(993532-P) Lot 13.5, Menara Lien Hoe, Persiaran Tropicana Golf Country Resort, 47410 PJ. Tel:03-78803817, Fax:03-78803867.
Sírvanse guardar esta información para futura referencia. Mattel España, S.A., Aribau 200. 08036 Barcelona. Recomendamos que anote este endereço para
futura referência: Mattel Portugal Lda., Av. da República, nº 90/96, 2º andar Fracção 2, 1600-206 Lisboa. HECHO EN CHINA. Importado y distribuido
por Mattel de México, S.A. de C.V., Insurgentes Sur # 3579, Torre 3, Oficina 601, Col. Tlalpan, Delegación Tlalpan, C.P. 14020, México, D.F. R.F.C.
MME-920701-NB3. Mattel Chile, S.A., Avenida Américo Vespucio 501-B, Quilicura, Santiago. Mattel de Venezuela, C.A., RIF J301596439, Ave. Mara, C.C.
Macaracuay Plaza, Torre B, Piso 8, Colinas de la California, Caracas 1071. Mattel Argentina S.A., Curupaytí 1186, (1607) - Villa Adelina, Buenos Aires.
Mattel Colombia, S.A., calle 123#7-07 P.5, Bogotá. Marcas registradas utilizadas bajo licencia. Todos los derechos reservados.