1
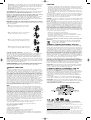
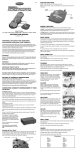
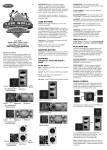
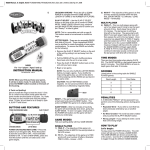
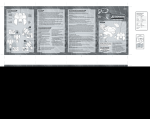
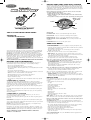
I9037 Manual_UK.qxd
3/21/07
2:16 PM
Page 1
E1
BUTTON FUNCTIONS: MAIN UNIT CONSOLE
Using the UP, DOWN, LEFT or RIGHT buttons on the Main Unit, you will be
able to scroll through the Game Mode Main Menu (Play Round, Match Play,
Tournament, and Driving Range). The currently selected options text will be
highlighted in yellow. Press the ENTER button on the Main Unit or swing the
club to lock in the desired selection.
Note: If swings are not being seen by the camera, be sure to double
check the following three things:
1. Swing directly over the center of the console
2. When swinging keep the club head between 8 inches and 24 inches
over the console.
3. It is possible to swing too fast or too slow. Try altering your swing speed.
ENTER / GOLF
CLUB SWING
POWER
UP
I9037
For 1 to 4 players / Ages 8 and up
LEFT
RIGHT
INSTRUCTION MANUAL
P/N 82396410 Rev.D
TEE IT UP AND NEVER LEAVE HOME!
DOWN
UP BUTTON - Press to scroll up through menu options
DOWN BUTTON - Press to scroll down through menu options
SETTING UP
LEFT BUTTON – Press to scroll to the left through menu options
• BATTERY INSTALLATION
RIGHT BUTTON – Press to scroll to the right through menu options
ENTER BUTTON / GOLF CLUB SWING – Press or swing to make menu
selections
POWER BUTTON – Press to turn the game on/off
GAME PLAY MODES
• PLAY ROUND MODE – Up to four (4) players can play all eighteen (18)
holes of the golf course.
– Select the number of players using the LEFT or RIGHT arrow key and then
press ENTER or swing the club
On the back of the main unit, loosen the screw on the battery compartment
and insert four (4) “AA” batteries as indicated inside the compartment (alkaline batteries recommended). Replace the battery compartment door.
NOTE: Batteries in the Main Unit should give you about 10 hours of game
play (if alkaline batteries are used). The game will not operate normally when
the batteries begin to run low. The screen may be blurred and resetting the
game may not work. Be sure to install fresh batteries. There is also no
memory function. All game data will be erased when the power is turned off
or batteries are replaced.
ADULT SUPERVISION IS RECOMMENDED WHEN INSTALLING BATTERIES.
BATTERY SAFETY INFORMATION
In exceptional circumstances batteries may leak fluids that can cause a
chemical burn injury or ruin your product. To avoid battery leakage;
• Do not use rechargeable batteries.
• Non-rechargeable batteries are not to be recharged.
• Do not mix alkaline, standard (carbon-zinc), or rechargeable (nickel-cadmium) batteries.
– For each player, select from one of sixteen player names and press
ENTER or swing the club.
The player who posts the lowest score on the Leaderboard wins!
• MATCH PLAY – Two (2) players can try to post the best score for each
hole. The player with the lowest stroke count on a hole wins the hole and
is awarded a check mark on the scorecard
– Select two player names and press ENTER or swing the club
– The player who scores lower on the most holes wins the match
Note: Once a player ‘holes out’ and wins the hole the other player will
‘pick up’ and the players will move to the next hole.
• TOURNAMENT MODE – One to four players can compete against computer generated scores and each other while playing all eighteen (18)
holes of the golf course.
– Select difficulty level by pressing ENTER or swing the club. Choose
between Beginner, Amateur or Pro.
Note: The difficulty level makes the computer generated golfers better
– Select the number of players and press ENTER or swing the club
• Do not mix old and new batteries.
– Select player names and press ENTER or swing the club
• Only batteries of the same or equivalent type as recommended are to be used.
After each hole the Leaderboard will appear. Swing club to continue to the
next hole. Stay atop the Leaderboard and win the tournament!
• Batteries are to be inserted with the correct polarity.
• Exhausted batteries are to be removed from the product.
• The supply terminals are not to be short-circuited.
• DRIVING RANGE – Fine tune your skills on the driving range. Go to the
driving range to practice and fine tune your swing. You are given 10 shots
and then returned to the Main Menu.
• Dispose of batteries safely.
• Do not dispose of this product in a fire. The batteries inside may explode
or leak.
CONNECTING TO YOUR TV
To connect Connectv Real Swing Golf directly to a TV, the TV must be
equipped with audio and video input jacks. They are commonly found on the
front of the TV near the contrast, color, and picture adjustment controls; or
on the back of the TV near the antenna and cable/satellite jacks.
Insert the yellow video plug from the game into the Video-In (yellow) jack on
the TV.
Insert the white audio plug from the game into the left Audio-In (white) jack
on the TV.
HOW TO PLAY
At the beginning of each hole, the Tee View screen will appear with the player having honors going first. For each shot, the following information is displayed:
• Hole Number, Par, and Scorecard
• Lie Type
• Club Head Viewed by Camera
• Lie Distance Variation
• Golfer’s Name and Score
• Stroke Number
• Maximum Distance for Selected Clubs
• Shot Type
Set your TV to the appropriate video input mode. (See your TV’s operating
manual for details.)
• Wind Direction
CONNECTING TO YOUR VCR
• Distance Remaining to the Pin in Yards
If your TV doesn’t have audio and video input jacks, you can connect
Connectv Real Swing Golf to your VCR.
Insert the yellow video plug from the game into the Video-In (yellow) jack on
the VCR.
Insert the white audio plug from the game into the left Audio-In (white) jack
on the VCR.
Set your TV and VCR to the appropriate video input mode. (See your TV and
VCR operating manuals for details.)
• Wind Speed
• Shot Target Aimer
MINI – MAP - Use the mini-map on the right side of the screen to determine
where the ball is on the hole and where the ball will land if hit at full power.
Note: If a golfer takes more than 10 strokes on a hole, the ball is picked
up and a 10 is recorded.
CLUB SELECTION – Press the UP or DOWN BUTTON on the Main Unit to
scroll through the club choices. By default, the game will select a club for you:
• 1 Wood on the tee for all par 4s and par 5s
NOTE: If your TV or VCR does not have AV inputs, a “Y” adapter may be
purchased separately at any electronics store.
• The lowest club that guarantees the player can reach the hole assuming
no wind and maximum power taking the lie into consideration.
Remember, you can't play our games through a cable box or satellite, so if
you own one of these make sure it is turned off before connecting the game.
You can connect our games through some DVD players with the same connection as a VCR.
• When the lie is good, the player can hit 3W-LW
ADULT SUPERVISION IS RECOMMENDED WHEN CONNECTING
CABLES TO A TV AND VCR.
• Club selection may be restricted when facing a bad lie
• Only putters are allowed on greens
• Putts from the rough in the green view will be given loft to help the ball
carry onto the green
SHOT TYPE SELECTION – Press the ENTER BUTTON to toggle between
Normal and Power shot.
I9037 Manual_UK.qxd
3/21/07
2:16 PM
Page 2
• Normal Shot – The club yardage shown for each club will indicate how far
the ball will travel if hit at full strength. The wind, lie and swing path can
alter the actual distance. Hitting a stronger or weaker club may be wise
based on adverse conditions.
CAUTION
• Power Up Shot – This will increase the maximum distance of the shot,
but will also exaggerate any inaccuracies in your swing path.
• In an environment with radio frequency interference, the product may malfunction and require user to reset the product.
SHOT DIRECTION – Before hitting the ball, the player can adjust where they
are aiming by pressing the LEFT or RIGHT BUTTONS on the Main Unit to
shape their shot or compensate for a hook or slice.
NOTE: The shot will always be aimed towards the middle of the fairway
from the tee and directly at the pin from the fairway by default.
SWING STRENGTH – The strength of the swing will be based on how fast
the club head moves over the Main Unit. A strength percentage of the
golfers swing is indicated as the green bar that fills in the maximum distance
potential in the bottom left corner of the screen.
BALL PATH – The ball can be pushed, pulled, hooked, sliced or a combination there of. The path of the golf club head over the Main Unit Console will
determine the ball’s flight. Of course, swings down the center of the console
will go dead straight.
• Push – A push will show arrows coming from
the inside to the outside across the console.
• Pull – A pull will show arrows coming from the
outside to the inside across the console.
• Sometimes, a build-up of static electricity (from carpets, etc) may cause
the game to stop working. Just reset the game, and it will work again.
• The unit may malfunction when there is radio interference on the power
line and signal line. The unit will revert to normal operation when the interference stops.
This device complies with Part 15 of the FCC Rules. Operation is subject to
the following two conditions: (1) this device may not cause harmful interference and (2) this device must accept any interference received, including
interference that may cause undesired operation.
WARNING: Changes or modifications to this unit not expressly approved by
the party responsible for compliance could void the user’s authority to operate the equipment.
NOTE: This equipment has been tested and found to comply with the limits
for a Class B digital device, pursuant to Part 15 of the FCC Rules. These
limits are designed to provide reasonable protection against harmful interference in a residential installation. This equipment generates, uses and can
radiate radio frequency energy and if not installed and used in accordance
with the instructions, may cause harmful interference to radio communications. However, there is no guarantee that interference will not occur in a
particular installation. If this equipment does cause harmful interference to
radio or television reception, which can be determined by turning the equipment off and on, the user is encouraged to try to correct the interference by
one or more of the following measures:
• Reorient or relocate the receiving antenna.
• Increase the separation between the equipment and receiver.
• Connect the equipment into an outlet on a circuit different from that to
which the receiver is connected.
• Consult the dealer or an experienced radio TV technician for help.
• Slice – A slice will show the arrows path to be
on the inside (to the left of middle of console)
Keep these instructions for future reference as they contain important
information.
Protect the environment by not disposing of this product with
household waste (2002/96/EC). Check your local authority for
recycling advice and facilities.
6-MONTH LIMITED WARRANTY FOR USA
(This product warranty is valid in the United States and Canada only)
• Hook – A hook will show the arrows path to be
on the outside (to the right of middle of console)
LIES AND GROUND SURFACES – The surface that the ball is lying on will
determine the power percentage range that is possible. Swing paths which
are closer to the center of the ball will result in better contact. Surfaces
include: Tee, Fairway, Light Rough, Cart Path, Rough, Deep Rough, Tree
Trunk, Foliage, Greenside Bunker, Fairway Bunker, Buried Bunker, Fringe,
Green and Water.
READING THE GREEN – Once your ball is on the green, the aiming tracers
will help you read the break and speed of the green. If you stroke your putt
perfectly straight and hit the ball at full power, your ball will follow the tracers
exactly. Putts hit softer will break more.
PUTTER STRENGTH – Press the ENTER Button to toggle between Short,
Medium and Long Putter meters. Three different putter strengths are available to give the golfer better control over the distance of their putts.
Radica Games Limited warrants this product for a period of 6 months from
the original purchase date under normal use against defective workmanship
and materials (batteries excluded). This warranty does not cover damage
resulting from accident, unreasonable use, negligence, improper service or
other causes not arising out of defects in material or workmanship. Radica
Games Limited will not be liable for any costs incurred due to loss of use of
this product or other incidental or consequential costs, expenses or damages incurred by the purchaser. Some states do not allow the exclusion or
limitation of incidental or consequential damages, so the above limitations
may not apply to you. This warranty gives you specific legal rights and you
may also have other legal rights, which vary from state to state.
During this 6-month warranty period, the game will either be repaired or
replaced (at our option) without charge to the purchaser when returned prepaid with proof of date of purchase to: Radica USA, Ltd., 13628-A Beta
Road, Dallas, Texas 75244, USA. Please remove the batteries and wrap
the unit carefully before shipping. Please include a brief description of the
problem along with your return address and mail it postage prepaid.
IMPORTANT: Before returning the unit for repair, test it with fresh alkaline
batteries. Even new batteries may be defective or weak and low battery
power is a frequent cause of unsatisfactory operation.
TROUBLE SHOOTING
TV
6 MONTH PRODUCT WARRANTY FOR UK
To locate your auxiliary channel, which is usually not 3 or 4, but a gaming
channel found between 2 and 99 (example 2, 1, 0, 99), first try 00 to see if it
is the auxiliary channel. Channels downwards from 3 until a Line 1 or Line 2,
Video 1 or Video 2, Front, Aux, AV, etc., appears on screen, then push the
power button on the game and it should automatically come on if you have
selected the correct channel. If this does not work, another way to determine
your auxiliary channel is to take a look at your television remote. There may
be a button on the remote that may take you directly to the correct channel.
The buttons you are looking for may be labeled Input, AUX, AV, Line,
TV/Video, or Video. If your remote has one of these buttons, turn your television back to Channel 3 and select that button. The power button on the
game should be turned on in order for the game to appear on the television.
If your television remote does not have any of these buttons, and channel 00
is not working, you may need to search the main menu for a way to determine your auxiliary channel. If none of these methods have helped you
locate your auxiliary channel, you may need to check your owner's manual
and/or contact a local television repair company.
(This product warranty is valid in the United Kingdom only)
All products in the RADICA® range are fully guaranteed for a period of 6
months from the original purchase date under normal use, against defective
workmanship and materials (batteries excluded). This warranty does not
cover damage resulting from accident, unreasonable use, negligence,
improper service or other causes not arising out of defects in material or
workmanship.
In the unlikely event that you do experience a problem within the first 6
months, please telephone the Technical Support team: Tel. 01628500303.
IMPORTANT: Always test the product with fresh alkaline batteries. Even
new batteries may be defective or weak and low battery power is a frequent
cause of unsatisfactory operation.
THIS WARRANTY IS IN ADDITION TO YOUR STATUTORY RIGHTS.
VCR
When connecting to a VCR, you must first start with a blue background
showing on your television screen. To obtain a blue screen, try inserting a
videotape into the VCR, let it start to play, then hit the stop button. This may
give you a blue screen, then you can channel down to your auxiliary channel.
If the blue screen still does not appear, try entering your TV and/or VCR main
menu and see if it gives you options to select a blue screen background.
Many times if you enter the main menu on your television you can change
the setting from cable to video and display a blue screen. Also if you have an
older television, you may locate a hidden door on your television that has
color, picture, horizontal, vertical, and cable, antennae buttons. If your television includes this panel, you can select the antennae/cable button and see
the blue screen appears. If you have tried all of these options and are still
unsuccessful connecting the console, then you may need to check your VCR
owner’s manual or contact the manufacturer to find out how to set up your
VCR for console games.
If you still have difficulty with setup or operation of your game, please call
our players helpline mentioned at the end of this manual.
CONFORMS TO THE SAFETY REQUIREMENTS OF ASTM F963.
If you choose to use an AC Adapter we suggest the following :
© 2006 Mattel, Inc. MADE IN CHINA. Manufactured for Mattel. All Rights Reserved. RADICA:
and associated trademarks and trade dress are owned by Mattel, Inc.
Recommended Adaptor Output:
-Voltage: 6 Volts DC
RADICA USA Ltd., 13628-A Beta Road, Dallas, TX 75244-4510. www.radicagames.com Helpline
1.800.803.9611.
-Current: 300 mA (minimum)
Polarity: Negative Center
Plug Size: 5.5 mm outside diameter, 2.1 inside diameter.
AC Adapters are available at most electronic stores.
Mattel Canada Inc., Mississauga, Ontario L5R 3W2. You may call us free at 1-800-524-8697.
If you use the product with a transformer, regularly examine for damage to
the cord, plug, enclosure and other parts. In the event of any damage, do
not use the toy with the transformer.
Retain this address for future reference.
Mattel U.K. Ltd., Vanwall Business Park, Maidenhead SL6 4UB. Helpline 01628500303.
Mattel Australia Pty., Ltd., Richmond, Victoria. 3121.Consumer Advisory Service - 1300 135 312.
Mattel East Asia Ltd., Room 1106, South Tower, World Finance Centre, Harbour City, Tsimshatsui,
HK, China.
Diimport & Diedarkan Oleh: Mattel SEA Ptd Ltd.(993532-P) Lot 13.5, 13th Floor, Menara Lien
Hoe, Persiaran Tropicana Golf Country Resort, 47410 PJ. Tel:03-78803817, Fax:03-78803867.
Mattel, Inc., 333 Continental Blvd., El Segundo, CA 90245 U.S.A. Consumer Affairs 1 (800) 524-8697.