1
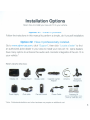
Installation Options
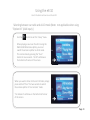
Here's how to install your new eX-1 0 in your vehicle.
Option #1: Install it yourself.
Follow the instructions in this manual to perform a simple, do-it-yourself installation.
Option #2: Have it professionally installed.
Go to www.alpine-usa.com.c1ick "Support", then click "Locate a Dealer" to find
an authorized Alpine dealer in your area to install your new eX-1 O. Alpine dealers
have many options to enhance the audio and cosmetic integration of the eX-1 0 in
your vehicle.*
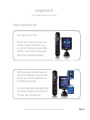
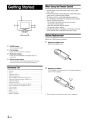
Here's what's in the box:
Display unit
Display mount
Power supply
iPod cable
Display cable
Remote control
Cigarette Ughter
Adapter
Antenna
Power Cable
Bluetooth
microphone
Accessory kit
(remote control battery, microphone clip. cable clips, etc.)
'Note: Professional installation and other hardware may require an additional cost.
3
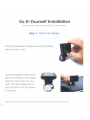
Do-It-Yourself Installation
Here's how to install your new eX-1
a in your vehicle.
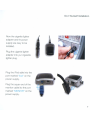
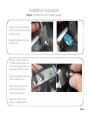
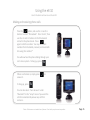
Step 1: Mount the display
Push the display into the display mounting bracket
until you hear a "click".
Apply the supplied double-sided
tape to the bottom of the display,
clean the desired spot on your
dash* with the supplied alcohol
pad, then firmly stick the display
to the dash.
'Note: Mount the eX-1 0 display in a location where it will not block your view of the road.
4
Do-It-Yourself Installation
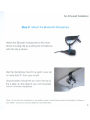
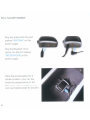
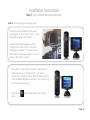
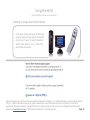
Step 2: Mount the Bluetooth Microphone
Attach the Bluetooth microphone to the microphone mounting clip by pushing the microphone
onto the clip as shown.
Clip the microphone mount to a spot in your car
no more than 24" from your mouth.
Good locations include the sun visor, the top of
the A-pillar, and the edge of your roof-mounted
center console (if equipped)*.
'Note: Do not install the microphone in any position where it could interfere with the functionality of Airbags in
your vehicle. Consult your local car dealer for more information.
5
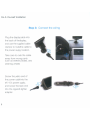
Do-It-Yourself Installation
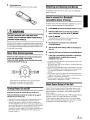
Step 3: Connect the wiring
Plug the display cable into
the back of the display,
and use the supplied cable
clamps to route the cable to
the power supply location.
Take care to route the cable
away from moving parts
such as shifters, pedals, and
steering wheels.
Screw the yellow end of
the power cable into the
eX-1 O's power supply,
and screw the black end
into the cigarette lighter
adapter.
6
-
s-.
--
~
~
-
-
.
-
~
1
,
Oo-It-Yourself Installation
Now the cigarette lighter
adapter and the power
supply are ready to be
installed.
Plug the cigarette lighter
adapter into your cigarette
lighter plug.
Plug the iPod cable into the
port marked "iPod" on the
power supply.
Plug the square end of the
monitor cable into the port
marked "MONITOR" on the
power supply.
7
Do-It-Yourself Installation
Plug the antenna into the port
marked "ANTENNA" on the
power supply.
Plug the Bluetooth microphone into the port marked
"MICROPHONE" on the
power supply.
Place the power supply into a
hidden location in your car, like
inside the center console or the
glove box. Use the supplied hookand-loop fastening tape to secure it.
8
Oo-It-Yourself Installation
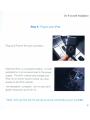
Step 4: Plug in your iPod
Plug your iPod into the dock connector.
Place the iPod in a convenient location. In most
applications. it can be placed next to the power
supply. The eX-1 0 controls and charges your
iPod, so no need to mount it where you have
access to the iPod's controls.
The installation is complete! Turn on your car's
ignition and power up the eX-1 O.
Next, let's get the eX-10 set up to work correctly in your
car"~
9
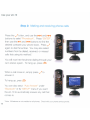
Set up your eX-10
Here's how to get your eX-1 a working properly in your car.
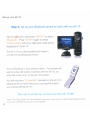
Step 1: Select your language and set the output mode
Push the
Ij
button, then use the . . .
button to scroll down to "lf1il r 1 .
Tap f rn EF' twice, then select your language
using the
and'" buttons. Tap n· T
to select.
mode, so tap the ~~
You're still in
button three times until you get to
Tap
. and use the
button to select
~ n
. Press
to select the
'W ~ T~dnsmltt
mode.
Now, tap the
button to get back to the
I
menu.
10
Set up your eX-1 0
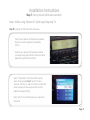
Step 2: Set up your car's radio to work with the eX-1 0
The eX-1 a broadcasts audio to your car stereo
just like an FM radio station.
Tune your car radio to an FM frequency where
there is no radio reception (for example, 88.3MHz).
Save a few of these blank stations in your car
radio's preset memories for use with the eX-1 a's
FM transmitter.
Select "Transmitter" from the eX-1 a's SETUP"
menu, then press and hold "ENTER for two
seconds. Use the ~ and ~ buttons to
select the same frequency as shown on your
car radio display. Press "ENTER" to set this
frequency as a. preset in the eX-1 O. You can
set up to four different frequencies using this
method*. Your car's radio and the eX-1 a must
be tuned to the same frequency to hear audio
output.
'Note: If one of your selected frequencies encounters a strong FM signal while driving, interference may be
heard while listening to iPod or Bluetooth. Changing presets to match frequencies on both your car stereo
and on your eX-1 0 can solve this problem quickly.
11
Set up your eX-1 0
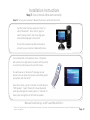
Step 3: Set up your Bluetooth phone to work with your eX-1 0
Tap the ~ button, and press ENTER to select
Blu to th . Press ENTER" again to select
J
C 1 Id ,and a four-digit pass code will be
displayed on the eX-1 O.
The eX-1 0 is now discoverable and ready to
connect to your Bluetooth phone.
Turn on Bluetooth in your phone's menu. Your phone will
ask for a four-digit code to connect with the eX-1 0, so
enter the code shown on the eX-1 O's screen.
You will now see a r
,r'dL< rj message on the eX-1 O's
display to let you know that you've successfully paired
your phone with the eX-1 0*.
Now we're all set up, so let's use the eX-10 ~~
'Note: Turn "Auto Connect" on In the Bluetooth setup menu if you want your phone to automatically connect
to your eX-1 0 whenever you turn on your car's ignition.
12
Use your eX-10
Here's the basics on how to use your eX-1 O.
Step 1: Playing songs from your iPod
Use the ~ button to exit the c::.ET
JjJ
menu.
_I
_' to select P'Jd.
Press SO
Press the EtnER button, then use the ~ and
..... buttons to search by artist, album, song,
etc. Tap'E. ER to choose any search method,
using the ~ and ..... buttons to select a song.
~
will begin song playback.
Pressing
With the song playing, you should now see
the iPod's album art displayed on the eX-1 0
screen.* Press the lEW' button to scroll
between the three different display modes.
You can also choose the display background that best matches your dash by
selecting LJIS J-.. in the C'LTUP menu,
then BGV Select".
*Note: Album Art must be stored on your iPod in order to be displayed on the eX-1 O.
13
Use your eX-1 a
Step 2: Making and receiving phone calls
Press the..,) button, and use the . . . and ~
buttons to select 'h')r") l
. Press
i=p",
then use the'" and ~ buttons to find the
desired contact in your phone book. Press..,)
again to dial the number. You may also select
numbers from the dialed, received, or missed
calls lists using this method.*
You will now hear the phone dialing through your
car's stereo system. To hang up, press ~
When a call comes in, simply press..,) to
answer it.
To hang up, press ~
You can also select Aut'
under
()
in the SETI
menu if you want
the eX-1 0 to automatically answer any call that
comes in.
'Note: All features are not enabled on all phones. Check with your phone service provider.
14
Use your eX-1 0
Step 3: Listening to songs stored on your phone
If your phone is Bluetooth audio enabled, you can play
songs from your phone through the eX-1 O.
Press "SOURCE" to select "Bluetooth Audio" mode, then
use . . ., ~, and. / .. to control the audio tracks.
15
How to learn more and get support.
If you want more detailed information on operating or installing the eX-10,
you can download the owner's manual and get additional help at
.' http://www.alpine-usa.com/US-en/support
If you would like to speak to Alpine customer support concerning
eX-10 operation or installation,
please call
1-800-ALPINE-1
Apple, the Apple logo, iPod and iTunes are registered trademarks of Apple Inc. The Bluetooth logo is owned
by the Bluetooth 81G, Inc. and any use of such marks by Alpine Electronics. Inc. is under license. Product
Information listed in this guide is based upon current information at the tllne of printing. but cannot be guaranteed. All designs, features, and specifications are subject to change without notice. For updated product
Information, please visit wvvw.alpine-usa.com.
© 2008 Alpine Electronics Inc. All rights reserved.
Page 1
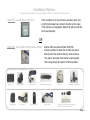
&+,$$,!'&(,!'&+
'- .,/'+!'(,!'&+'*'&&,!&, :BA,'-+,'%*6+,'*1*!'
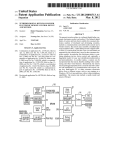
Option #1: Use the factory AUX input.
, -+,'%*6+* +,'*1-0!$!*1!&(-,2, :BA6+'-,(-,&'&&,!*,$1,', !+!&(-,5
, . !$!++')-!((2(,!'&>B/!$$(*'.!, +,+'-&)-$!,15
OR
(,!'&>C4+, :BFF&,&&+($!,,*5
$(!&'*+&'(,!'&$:BFF
&,&&+($!,,*,'$$'/, :BA,'/!*
!*,$1!&,', . !$6+,'*1*!'&,&&5
!+'(,!'&(*'.!+%- ,,*+'-&)-$!,1
, &-+!&, :BA6+-!$,:!&,*&+%!,,*5
*6+/ ,6+!&$-/!, , :BA4
!+($1-&!,
'/*+-(($1
!+($1%'-&,
!'$
!+($1$
%','&,*'$
!*,,! ,*(,*
'/*$
&,&&
$-,'', %!*'( '&
++'*1#!,;*%','&,*'$,,*12
%!*'( '&$!(2$$!(+2,5
Page 2
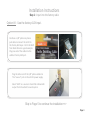
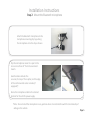
&+,$$,!'&
&+,*-,!'&+
,(B4
&(-,!&,', ,'*1*!'
Option #1: Use the factory AUX input.
-* +B9I8( '&':,':( '&'
"#$,''&&,, :BA,'
, ,'*1!&(-,5*,>EC:CGAH
*'%!' #!+''0%($5
$-'&&', $!&,', . !$6+,'*1('*,5
$-, ', *&', B9I8( '&'$!&,'
7-0'-,8('*,'&, :BA6+('/*+-(($15
$,78++'-*,' *!''*$-,'', '-,(-,*'%, . !$6++'-&+1+,%5
Skip to Page 5 to continue the installation>>>
Page 3
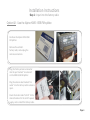
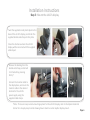
&+,$$,!'&
&+,*-,!'&+
,(B4
&(-,!&,', ,'*1*!'
Option #2: Use the Alpine KWE-155B FM splitter.
-* +, $(!&:BFF
+($!,,*5
%'., . !$6+
,'*1*!'2&-&($-, &,&&'&&,!'&5
$-, ,'*1&,&&'&&,'*
!&,', ('*,%*#7*&,&&8
'&, :BFF+($!,,*5
$-, &,&&$%*#7*
-!'8!&,', ,'*1*!'6+&,&&
!&(-,5
'-,, $%*#7:BA8,', +!*$',!'&'*, :BA6+('/*
+-(($12&*:!&+,$$, ,'*1*!'5
Page 4
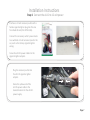
&+,$$,!'&
&+,*-,!'&+
,(C4'-&,, $-,'', %!*'( '&
,, , $-,'', %!*'( '&,', %!*'( '&%'-&,!&$!(1(-+ !&
, %!*'( '&'&,', $!(++ '/&
$!(, %!*'( '&%'-&,,'+(',!&, *&'%'*, &CE8*'%, -+,'%*6+
%'-, 5
''$',!'&+!&$-, +-&.!+'*2, ,'(', :(!$$*2&, ', *'':%'-&,&,*'&+'$;!
)-!((<=5
'-,, %!*'( '&$,', +!*
$',!'&'*, :BA6+('/*+-(($15
=',4'&',!&+,$$, %!*'( '&!&&1('+!,!'&/ *!,'-$!&,**/!, , -&,!'&$!,1'
!*+!&, . !$5
Page 5
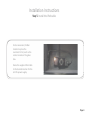
&+,$$,!'&
&+,*-,!'&+
,(D4'-&,, :BA6+!+($1
/!+,, +-(($!*'-&($+,!($,,', +', :BA6+!+($12&,, , +-(($!'-$:+!,(,', !+($,5
$&, + */ *, :BA6+
!+($1/!$$%'-&,/!, , +-(($!
$' '$(5
%'., #!&*'%, '-$:+!,(2&,, !,,', + 1(*++!&
!*%$1=5
'&&,, %'&!,'*$,'
, !+($1+2&*'-,, %'&!,'*$,', +!*
$',!'&'*, :BA6+
('/*+-(($1-+!&, +-(($!$$%(+
=',4 **%&1-+,'%:%'-&,!&'(,!'&+'*, :BA6+!+($13**,', $(!&$*
&,*'*+,(:1:+,(,-,'*!$+ '/!& '/,'-!$-+,'%:(!$$*!+($1%'-&,5
Page 6
&+,$$,!'&
&+,*-,!'&+
,(E4'&&,, :BA,'BC.'$,('/*
-* +BC.'$,++'*1'-,$,/!, %$!*,,$! ,*($-2$!#, !+'&
*'%!' #;*,>CHA:BFFG<5
'&&,, ++'*1'-,$,6+('/*$+
,'+/!, JBC.'$,++'*1$!&, *2+- +, ,'*1!*,,$! ,*
/!*!&5
*/, :BA6+('/*$!&,', !*,,$! ,*(,*5
$-, ++'*1'-,$,!&,'
, :BA6+!*,,$! ,*
(,*5
'-,, 1$$'/&', :BA6+('/*$,', +!*$',!'&'*, :BA6+
('/*+-(($15
Page 7
&+,$$,!'&
&+,*-,!'&+
,(F4
&+,$$, !'$
!&'&.&!&,2 !&
$',!'&,'($, -+,'%*6+!'2+- +, &,*'&+'$'*, $'.
'05
'-,, +-(($!!'$
,', +!*$',!'&'*, :BA6+('/*+-(($15
Page 8
&+,$$,!'&
&+,*-,!'&+
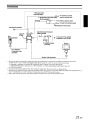
,(G4'&&,, :BA6+('/*+-(($1
$-, %'&!,'*$!&,', ('*,'&, :BA6+('/*+-(($1
%*#7%'&!,'*85
$-, !'$!&,', ('*,
%*#7!'85
$-, 7:BA8'-,(-,*'%
, :BFF+($!,,*!&,'
, 7&,&&8('*,;-&$++1'-
*-+!&, 7!&8'(,!'&<
$-, %!*'( '&$!&,'
, 7%!*'( '&8('*,5
*/, 1$$'/&', ('/*'*!&,', ('*,
%*#7('/*+-(($185
'-&,, :BA6+('/*
+-(($1!& !&$',!'&5
Page 9
&+,$$,!'&
&+,*-,!'&+
,(H4,-(, :BA,'/'*#'**,$1
,(H4,,!&$&-&'-,(-,%'
'&&,, :BA6+!+($1,', +1
(-+ !&'/&-&,!$1'- *7$!#85-*&'&
, !&!,!'&,'('/*-(, :BA5
'+$,, +!*$&-2(-+ , 7+,-(8-,,'&2, &-+, LL
-,,'&,'
+*'$$'/&,'7&*$85(7&,*8,/!2
, &+$,1'-*$&--+!&, KK&LL
-,,'&+5(7&,*8,'+$,5
'-6*+,!$$!&7+,-(8%'2+',(, LL
-,,'&, *
,!%+-&,!$1'-,,'7-,(-,'85(7&,*82
&-+, LL
-,,'&,'+$,7!**&+%!,,*8/ &
-+!&, :BFF&,&&+($!,,*2'*7-08/ &-+!&
, :BA6+-0!$!*1'-,(-,5
'/2,(, -,,'&,',#,', 7,-(8
%&-5
Page 10
&+,$$,!'&
&+,*-,!'&+
,(H4,-(, :BA,'/'*#'**,$1
',4 &-+!&7(,!'&>B8;!&(-,<+#!(+,(H
,(H4,,!&, ,*&+%!,,**)-&1
-&, **!','&*)-&1/ *
, *!+&'*!'*(,!'&;'*0%($2
BAE5H<5
., !++(*+,3, ,/1, -+,'%*
&+$,, (*+,+,,!'&,'$!+,&,'!''*
$-,'', +'-&*'%, :BA5
$,7*&+%!,,*8*'%, :BA6+7+,-(8
%&-2, &(*++7&,*8'*,/'
+'&+5+, LL
&
KK-,,'&+,'+$,, +%*)-&1, ,/+(*+,!&,', *6+
*!';'*0%($BAE5H<5
*++7&,*8,'+,, !+*)-&1+(*+,!&
, :BA5
Page 11
&+,$$,!'&
&+,*-,!'&+
,(H4,-(, :BA,'/'*#'**,$1
,(H4,-(1'-*-+,'%*6+$-,'', ( '&,'/'*#/!, , :BA
(, 7+,-(8-,,'&2&(*++7&,*8,'
+$,7$-,'', 85*++7&,*8!&,'
+$,7(!*!&%'82&'-*:!!,(++
'/!$$!+($1'&, :BA5
:BA!+&'/!+'.*$&*1,'
'&&,,'1'-*-+,'%*6+$-,'', ( '&5
-*&'&$-,'', !&, ( '&6+%&-5 ( '&
/!$$+#'*'-*:!!,',''&&,/!, , :BA2
+'&,*, '+ '/&'&, :BA6++*&5
'-/!$$&'/+7'&&,8%++'&1'-*
( '&,'$,1'-#&'/, ,1'-6.+-++-$$1(!*
1'-*( '&/!, , :BA=
&, !+!+'&2-+, LL
-,,'&,'+*'$$'/&,'
7(#*85$,70,*&$8,' .$-,'', -!'($1, *'- , +'-&+1+,%2'*7
&,*&$8,'
.!,($1, *'- , :BA6+-!$,:!&+(#*5
'//6*$$+,-(2+'$,6+-+, :BALLL
=',4-*&7-,''&&,8'&!&, $-,'', +,-(%&-!1'-/&,1'-*( '&,'-,'%,!$$1'&&,,'1'-*:BA/ &.*1'-,-*&
Page
'&1'-**6+!&!,!'&5
12
+!&, :BA
*6+, +!+'& '/,'-+, :BA5
$,!&,/&**!'&:BA%';',4&',(($!$/ &-+!&
7(,!'&>B8;!&(-,<5<
+, -,,'&,'0!,, 7+,-(8%&-5
&($1!&+'-*'&, :BA-+!&, :BFF&,&&+($!,,*21'-%-+,
+/!, , &,&&+($!,,*,':BA%'5
!+&'&1(*++!&, 7-&58
-,,'&'*,/'+'&+57:BA8/!$$+ '/!&
, ',,'%$,'*&*', +*&5
&1'-/&,,'$!+,&,', *6+*!'2+!%($1
(*++& '$7-&58'*,/'+'&+,'+/!, , &,&&+($!,,*,'7*&,&&8%'5
7*&,&&8/!$$+ '/'&, ',,'%$,'*&*
', +*&5
Page 13
+!&, :BA
*6+, +!+'& '/,'-+, :BA5
$1!&+'&+*'%, !'
*++7+'-*8,'+$,7!'85
*++, 7&,*8-,,'&2, &-+, LL
&
KK-,,'&+,'+* 1*,!+,2$-%2+'&2
,5(7&,*8,' ''+&1+* %, '2
-+!&, LL
&
KK-,,'&+,'+$,+'&5
*++!&7&,*8/!$$!&+'&($1#5
!, , +'&($1!&21'-+ '-$&'/+, !'6+$-%*,!+($1'&, :BA+*&5=
*++, 7.!/8-,,'&,'+*'$$,/&, , *!*&,!+($1%'+5
'-&$+' ''+, !+($1#*'-&, ,
+,%, +1'-*+ 1+$,!&7!+($18!&
, 7+,-(8%&-2, &7+$,85
=',4$-%*,%-+,+,'*'&1'-*!'!&'**,'!+($1'&, :BA
Page 14
+!&, :BA
*6+, +!+'& '/,'-+, :BA5
#!&&*!.!&( '&$$+
*++, -,,'&2&-+, LL
&
KK
-,,'&+,'+$,7 '&''#85*++7&,*82, &
-+, LL
&
KK-,,'&+,'!&, +!*
'&,,!&, ( '&''#5*++
!&,'!$, &-%*5'-%1$+'+$,
&-%*+*'%, !$2*!.2'*%!++$$+
$!+,+-+!&, !+%, '5=
'-/!$$&'/ *, ( '&!$!&, *'- 1'-*
*6++,*'+1+,%5' &-(2(*++
&$$'%+!&2+!%($1(*++,'
&+/*!,5
' &-(2(*++
'-&$+'+$,7-,'&+/*8-&*
7$-,'', 8!&, 7+,-(8%&-!1'-/&,, :BA,'-,'%,!$$1&+/*&1$$, ,
'%+!&5
=',4$$,-*+*&',&$'&$$( '&+5 #/!, 1'-*( '&+*.!(*'.!*5
Page 15
+!&, :BA
*6+, +!+'& '/,'-+, :BA5
!+,&!&,'+'&++,'*'&, ( '&
, ( '&!+$-,'', -!'&$21'-
&($1+'&+*'%1'-*( '&, *'- , :BA5*++7+'-*8,'+$,7$-,'', -!'8%'2, &-+LL
2
KK2&L9
,'
'&,*'$, -!',*#+5
Apple, the Apple logo, iPod and iTunes are registered trademarks of Apple, Inc. The Bluetooth logo is owned by the Bluetooth
SIG, Inc. Product information listed in this guide is based upon current information at the time of printing, but cannot be
guaranteed. All designs, features, and specifications are subject to change without notice. For updated product information,
please visit www.alpine-usa.com. © 2008 Alpine Electronics Inc. All rights reserved.
Page 16
Advanced iPod® Controller with Bluetooth®
eX-10
I
e
Bluetooth
• OWNER'S MANUAL
Please read before using this equipment.
• MODE D'EMPLOI
Veuillez lire avant d'utiliser cet appareil.
• MANUAL DE OPERACION
Lealo antes de utilizar este equipo.
ALPINE ELECTRONICS MARKETING, INC.
ALPINE ELECTRONICS OF AUSTRALIA PTY. LID.
ALPINE ITAUA S.p.A.
1-1-8 Nishi Golanda,
Shinagawa-ku,
Tokyo 141-0031, Japan
Phone 03-5496-8231
161-165 Princes Highway, Hallam
Victoria 3803, Australia
Phone 03-8787-1200
Viate C. Colombo 8, 20090 Trezzano
Sui Naviglio (MI), Italy
Phone 02-484781
ALPINE ELECTRONICS GmbH
ALPINE ELECTRONICS DE ESPArilA, S.A.
ALPINE ELECTRONICS OF AMERICA, INC.
Frankfurter Ring 117, 80807 MOnchen, Germany
Phone 089-32 42 640
Portal de Gamarra 36, Pabell6n, 32
01013 Vitoria (Alava)-APDO 133, Spain
Phone 945-283588
19145 Gramercy Place, Torrance,
California 90501, U.S.A.
Phone 1-800-ALPINE-1 (1-800-257-4631)
ALPINE ELECTRONICS OF CANADA, INC.
777 Supertest Road, Toronto,
Ontario M3J 2M9, Canada
Phone 1-800-ALPINE-1 (1-800-257-4631)
ALPINE ELECTRONICS OF U.K. LlO.
AI pine House
Fletchamstead Highway, Coventry CV4 9TW, U.K.
Phone 0870-33 33 763
ALPINE ELECTRONICS (BENELUX) GmbH
Leuvensesteenweg 510-66,
1930 zaventem, Belgium
Phone 02-725-13 15
ALPINE ELECTRONICS FRANCE S.A.R.L
(RCS PONTOISE B 338 101 280)
98, Rue de la Belle Etoile, Z.I. Paris Nord II,
B.P. 50016, 95945 Roissy Chal1es de Gaulle
Cedex, France
Phone 01-48638989
Designed by ALPINE Japan
68-10872Z11-A
ENGLISH
Contents
Operating Instructions
WARNING
WARNING
CAUTION
PRECAUTIONS
3
3
3
Redial Function
II
Calling
II
12
12
Redialing a Number In Outgoing History
Dialing a Number In Incoming History
Dialing a Number In Incoming Missed Call
History
Dialing a Number In The Phone Book
Voice Dial Operation
12
12
12
Adjusting the Volume when receiving a
Call
12
SETUP
Getting Started
Accessory List
4
When Using the Remote Control
4
Battery Replacement
4
About Slide Switch Operation
Turning Power On and Off
5
5
Detaching and Attaching the Monitor
5
FM Transmitter Function (Frequency)
13
'.~Ly~!§i~~~i~iqg" ~="'
How to View the Display
6
Setting the Bluetooth Device
(Paired PhonelPaired Audio)
Deleting a Bluetooth Device from the list
(Clear Devices)
Setting the PIN Code (Pass Code)
Setting the Automatic Connection
(Auto Connect)
Setting the Received Calls automatically
(Auto Answer)
Adjusting the volume (HFP Volume)
Setting the Telephone Voice Output
(HFP Speaker)
Playback
Searching for a desired Songffitle
6
7
Equalizer Presets
15
Percent Skip Function
7
Search Position Memory
8
UplDown Function
8
Random Play Shuffle
8
Random Play Shuffle All
8
15
15
15
15
Repeat Play
8
Setting the Language
Sound (Beep) Guide Function
Demonstration
Setting Sound Output (Output Mode)
Automatic Power OFF Function
(Auto Poweroff)
Changing the Display
Downloading Artwork Data manually
9
9
How to connect to a Bluetooth compatible device
(Pairing)
5
About Sound Output of the Unit
5
iPod@
14
14
14
14
14
14
14
15
Bluetooth Audio
How to View the Display
10
Playback
10
Hands-Free Phone Control
About the Hands-Free Phone
II
Answering a Call
II
Hanging up the Telephone
II
i-EN
Display Setting,'
Adjusting the Level of the Display Brightness
15
(Dimmer Level)
Scroll Setting (Text Scroll)
15
Switching the Display Type (BGV Select)
15
iPod Setting .,'.
Setting Artwork Download
(Artwork Display)
Setting Artwork Type (Artwork Type)
iPod Search Mode Setting
16
16
16
Information
In Case of Difficulty
17
Specifications
17
Installation and
Connections
Warning
18
Caution
18
Precautions
18
Installation
Installing the Monitor
19
Mounting the Microphone
20
Connecting the Cigarette Adapter to the
Cigarette IIF Box
20
Installing the Stand using Screws fixed
20
How to remove the Fuse
20
Connections
21
2-EN
Operating Instructions
WARNING
~CAUTION
~WARNING
This symbol means important instructions.
Failure to heed them can result In Injury or
material property damage.
This symbol means important instructions.
Failure to heed them can result in serious Injury
or death.
DO NOT OPERATE ANY FUNCTION THAT TAKES YOUR
ATTENTION AWAY FROM SAFELY DRIVING YOUR VEHICLE.
Any function that requires your prolonged attention should only be
performed after coming to a complete stop. Always stop the vehicle
in a safe location before performing these functions. Failure to do
so may result in an accident.
KEEP THE VOLUME AT ALEVEL WHERE YOU CAN STILL
HEAR OUTSIDE NOISES WHILE DRIVING.
Excessive volume levels that obscure sounds such as emergency
vehicle sirens or road warning signals (train crossings, etc.) can be
dangerous and may result in an accident. LISTENING AT LOUD
VOLUME LEVELS IN A CAR MAY ALSO CAUSE HEARING
DAMAGE.
MINIMIZE DISPLAY VIEWING WHILE DRIVING.
Viewing the display may distract the driver from looking ahead of
the vehicle and cause an accident.
DO NOT DISASSEMBLE OR ALTER.
Doing so may result in an accident, fire or electric shock.
USE ONLY IN CARS WITH A12 VOLT NEGATIVE GROUND.
(Check with your dealer if you are not sure.) Failure to do so may
result in fire, etc.
KEEP SMALL OBJECTS SUCH AS BOLTS OR SCREWS OUT
OF THE REACH OF CHILDREN.
Swallowing them may result in serious injury. If swallowed,
consult a physician immediately.
USE THE CORRECT AMPERE RATING WHEN REPLACING
FUSES.
Failure to do so may result in fire or electric shock.
DO NOT BLOCK VENTS OR RADIATOR PANELS.
Doing so may cause heat to build up inside and may result in fire.
USE THIS PRODUCT FOR MOBILE 12V APPLICATIONS.
Use for other than its designed application may result in fire,
electric shock or other injury.
HALT USE IMMEDIATELY IF APROBLEM APPEARS.
Failure to do so may cause personal injury or damage to the
product. Return it to your authorized Alpine dealer or the nearest
Alpine Service Center for repairing.
DO NOT MIX NEW BATTERIES WITH OLD BATTERIES.
INSERT WITH THE CORRECT BATTERY POLARITY.
When inserting the batteries, be sure to observe proper polarity
(+ and -) as instructed. Rupture or chemical leakage from the
battery may cause fire or personal injury.
~PRECAUTIONS
Product Cleaning
Use a soft dry cloth for periodic cleaning of the product. For more
severe stains, please dampen the cloth with water only. Anything
else has the chance of dissolving the paint or damaging the plastic.
Temperature
Be sure the temperature inside the vehicle is between +60°C
(+ 140°F) and -lOoC (+14°F) before turning your unit on.
Maintenance
If you have problems, do not attempt to repair the unit yourself.
Return it to your Alpine dealer or the nearest Alpine Service
Station for servicing.
Installation Location
Make sure the eX-l 0 will not be installed in a location subjected to:
•
•
•
•
Direct sun and heat
High humidity and water
Excessive dust
Excessive vibrations
• iPod is a trademark ofApple Inc.• registered in the U.S. and
other countries.
• The Bluetooth word mark and logos are owned by the Bluetooth
SIG. Inc. and any use ofsuch marks by Alpine Electronics, Inc. is
under license. Other trademarks and trade names are those of
their respective owners.
• "Uni-Type™'' is a style of Universal design font developed by a
joint reserch between LIM Corporation Ltd., and Chiba
University Faculty of Engineering.
• "Uni-Type™" is the trademark registered by liM Corporation Ltd.
FCC WARNING
• Changes or modifications not expressly approved by the party
responsible for compliance could void the user's authority to
operate the equipment.
• This transmitter must not be co-located or operated in
conjunction with any other antenna or transmitter.
3-EN
When Using the Remote Control
Getting Started
D
• Point the remote control at the remote control sensor within
about I meter.
• It may not be possible to operate the remote control if the remote
control sensor is exposed to direct sunlight.
• The remote control is a small, lightweight precision device.
To avoid damage. short battery life, operational errors and poor
response, observe the following.
- Do not subject the remote control to excessive shock.
- Do not put in a trouser pocket.
- Keep away from food, moisture and dirt.
- Do not place in direct sunshine.
• If another Alpine device is installed, it will function at the same
time as when the unit is controlled by the remote control.
@
@
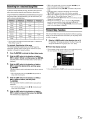
Battery Replacement
Battery type: CR2025 battery or equivalent
1
Opening the battery case
Slide out the battery cover.
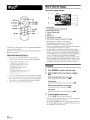
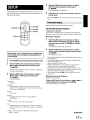
CD
POWER switch
Turns the power On/Off.
@ iPod indicator
Lights up when an iPod is connected.
@ Bluetooth indicator
Lights up when a Bluetooth compatible device is
connected.
@ Remote control sensor
Point the remote control towards and within 2 m of the
remote control sensor of the specified component.
Accessory List
•
•
•
•
•
•
•
•
•
•
•
•
•
•
•
Monitor
Stand
.
Cigarette I/F Box
Monitor Cable (3m)
FULL SPEED'M Connection Cable (1m)
Cigarette Adapter Extension Cable (1m)
Cigarette Adapter...
Microphone (3m)
Double-sided Adhesive Tape (for stand).........
Velcro Fasteners (for cigarette I/F Box)
Fixing screws..
Cable clamps
Cloth.
.
Remote Control.
Battery (CR2025)
4-EN
2
1
1
1
1
1
1
.
1
.
1
.. 1
2
..
3
3
.. .. 1
.. 1
. 1
Replacing the battery
Put the battery in the case with the (+) indication upward as
shown in the illustration.
• Placing a battery in backwards way may cause a malfunction.
3
Closing the cover
Slide the cover as illustrated until a click is heard.
Detaching and Attaching the Monitor
For taking the monitor out of the car, refer to step 3 in "Installing the
Monitor" (page 19).
How to connect to a Bluetooth
compatible device (Pairing)
For details on the control from a Bluetooth compatible device, refer to
the Owner's Manual of the Bluetooth compatible device.
1
2
~WARNING
DO NOT OPERATE ANY FUNCTION THAT
TAKES YOUR ATTENTION AWAY FROM SAFELY
DRIVING YOUR VEHICLE.
Any function that requires your prolonged attention should only be
performed after coming to a complete stop. Always stop the vehicle
in a safe location before performing these functions. Failure to do
so may result in an accident.
3
4
S
7
Perform the LIST operation by moving the slide switch
on the right forward ~ or back ~.
Perform the SKIP operation by moving the slide switch
on the left forward'" or back A.
0/0 SKIP A
LIST~
O/OSKIP ....
L1ST~
These switches are identified in this manual as follows.
Slide switch on the right: "the LIST switch"
Slide switch on the left: "the %SKIP switch"
Turning Power On and Off
Press the <!> switch of monitor to turn on the unit.
Press and hold the <!> switch of monitor for at least 2
seconds to turn off the unit.
• When an iPod is connected. the power is automatically turned on.
• If the unit is connected. and the power is turned on when the
cigarette lighter power is turned on. the battery continues to be
consumed. Depending on the vehicle. even if you turn offthe engine.
the cigarette lighter power is not turned off, and if it is left turned on
for long time. the battery may be drained ell/irely. In this case,
disconnect the cigarette adapter. Also, activate the Automatic Power
OFF function. Refer to "Automatic Power OFF Function (Auto
Powerofj) " (page 15).
Slide the LIST switch in the direction of ~ to
select "Bluetooth;' and then press ~/ENTER.
Press
~/ENTER.
The pairing mode is activated, and connection with a
Bluetooth compatible device is available.
6
About Slide Switch Operation
Press SETUP to activate the SETUP selection mode.
Set a Bluetooth connection from a Bluetooth
compatible device.
The PIN code (Initial setting "0000") is displayed on
this unit.
Input the PIN code in a Bluetooth compatible device.
If this unit is successfully connected to a Bluetooth
compatible device, a paired device name is
displayed on the unit.
• For mobile phone pass code (PIN code) input operation, refer to the
mobile's Owner's Manual.
• The PIN code (pass code) can be set. Refer to "Setting the PIN Code
(Pass Code)" (page 14).
• If a device name is not displayed when a mobile phone is connected,
Phonel to 5 is displayed; when an audio device is connected, Audiol
to 5 is displayed; phone/audio is connected, Devicel to 5 is
displayed.
• You can connect (pair) up to 5 Bluetooth compatible mobile phones
or audio devices. When a 6th phone or device is connected. the least
used device is automatically disconnected.
• lfthe unit cannot be connected to a Bluetooth compatible device.
"Pairing Failed" is displayed for 2 seconds.
About Sound Output of the Unit
Sound of the unit is output using the FM transmitter function, which
transmits sound to the FM car radio by radio signals, or via an audio
output terminal. Set sound output in "Selling Sound Output (Output
Mode)" (page 15).
If sound is output from the FM radio. refer to "FM Transmiller Function
(Frequency)" (page 13), and adjust the frequency accordingly.
When the hands-free phone function is used, you can select whether
sound is output from the buill-in speaker of the unit. Refer to "Selling
the Telephone Voice Output (HFP Speaker)" (page 14).
5-EN
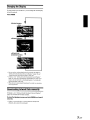
How to View the Display
<iPod screen display example>
1---
---2
5---:1':
%SKIPA
~IENTER
---3
CQ
'E----4
L1ST~
6--.....:
LIST~
---7
8
::I:AI:_:""~--
% SKIP T
SOURCE
~I"'="
FUNC.
~III
VIEW
1
2
3
4
5
6
Mode display
Song titlelEpisode title/Audiobook title
Album title/Podcasttitle
Artist title/Release date
Artwork
Elapsed time
7 Remaining time for playing
8 FM transmitter frequency display/"AUX" display
•
•
•
•
An iPod can be connected to the eX-I 0 by using the FULL SPEEDT"
Connection Cable (supplied).
When the eX-lOis connected by using the cable. the controls on the
iPod are not functional.
About iPods usable with this unit
• The unit can be used with the following iPod versions.
Correct function of earlier versions cannot be guranteed.
First generation iPod classic: Ver.1.0.1
First generation iPod touch' Ver.1.1 1
Third generation iPod nano : Ver.1.0.1
Fifth generation iPod : Ver.1.2.1
Fourth generation Pod: Ver.3.1. 1
iPod photo. Ver.1.2.1
Second generation iPod nano . Ver.1.1.3
First generation iPod nano : Ver.1.3.1
iPod mini' Ver.14.1
Only alphanumeric characters can be displayed.
The m{uimum number of characters is /28 ( 128 byte).
Some characters may not be correctly displayed.
If there is no tag ;'ll'ormation, or there is character information that is
not supported by the unit, nothing is displayed.
• /fa song includes cover art data, etc., you can display it during
playback. Note that while artwork data is being downloaded (max. 6
seconds), no operation can be performed. Elapsed playing time is
also not displayed. If you want to display artwork automatically, set
to Auto in "Setting Artwork Download (Artwork Display)"
(page 16). 2 seconds afier playback of a song has started, artwork
data automatically starts downloading. If the artwork type is set to
"Song" in "Setting Artwork Type (Artwork Type)" (page 16), data
downloading is carried out every time a new song is selected.
Playback
1
2
Press SOURCE to switch to the iPod mode.
Slide the LIST switch in the direction of
~
or
~.
• The unit can be used wilh the fourth generation and above
iPod, iPod photo, iPod mini or the iPod nano only. However,
future generation iPod compatibility cannot be guranteed.
• Touch wheel or scroll wheel type iPods without the dock
connector cannot be connected to the unit.
Return to the beginning of the current song:
Slide the LIST switch in the direction of ~.
Fast backward:
Slide and hold the LIST switch in the direction of ~.
Advance to the beginning of the next song:
Slide the LIST switch in the direction of ~.
Fast forward:
Slide and hold the LIST switch in the direction of ~.
3
To pause playback, press
Pressing
~/II
~ III .
again will resume playback .
• Il'a song is plaving on the iPod when it is connected to the eX-10, it
It'ill colltinue playing afier the connection.
• For an iPod, ifshulJle/repeat is s'et, even if the iPod is connected to
the IlIlit and shujJle/repeat mode is changed, the iPod will return to
the original mode when it is remo\'ed,
6-EN
o
Searching for a desired Song/Title
o
An iPod can contain thousands of songs. The unit for this reason can
make various searches using the search function as shown below.
Using the Play list!Artist!AlbumlPodcast!AudiobooklGenre/Composerl
Song search mode's individual hierarchy, you can narrow down your
search as shown in the table below.
o
While in the search mode, if you press and hold ~/~ for at
least 2 seconds the search mode is canceled.
In the search mode, pressing ~/~ will return to the previous
mode.
If the iPod's name is selected in the Playlist search mode and
/ENTER is pressed, all songs in the iPod are searchable.
When a list is displayed, you can use the percent skip function. For
details, refer to "Percent Skip Function" (page 7).
If you slide and hold the LIST switch when a list is selected, you can
change the list continuously.
During the search mode, if "All" is selected and
/ENTER is
pressed. you can search for all titles in the next hierarchy For
example, if "All" is selected and
/ENTERis pressed in the artist
mode, a list of all albums is displayed.
C\
o
o
o
I.T''';·'.
C\
C\
Playlists
Artists
Albums
Albums
Songs
Podcasts
Episode
Songs
Percent Skip Function
Audiobooks
Genres
Artists
Albums
Composers
Albums
Songs
Songs
The unit is provided with a percent skip function for effective searching.
When you use this function in the search mode, you can quickly search
an artist or a song, etc.
Songs
o
You can select your preferred search mode. Refer to "iPod Search
Mode Setting" (page 16).
1
Slide the % SKIP switch in the direction of ... or ....
For example, 100 songs are stored in the iPod. These 100
songs are divided into 10 groups (0%, 10%"'90%).
For example: Searching by Artist name
The following example explains how an ARTIST search is
performed. Another search mode can be used for the same
operation, although the hierarchy differs.
1
2
• Percent skip display example
o
Press C\/ENTER to activate the Menu Select mode.
."~~~,,,~~,
Slide the LIST switch In the direction of ..... or
~ to select "Artists;' and then press C\ /ENTER.
[J~
Slide the LIST switch in the direction of ..... or
~ to select the desired Artist, and then press
C\ fENTER.
The album search mode is activated and an album name is
displayed.
o
4
After selecting an artist, pressing
songs of the selected artist.
~/II
ttl
Artist 2
rtist 3
rtist 4
rtist 5
II·:
The artist search mode is activated and an artist name is
displayed.
3
The percentage ofsongs stored in the list can be indicated by moving
the cursor position. The display example shows 50%.
Cursor
o
If you slide and hold the %SKlP switch, you can skip continuously.
will play back all
Slide the LIST switch in the direction of ..... or
~ to select an album, and then press
C\ fENTER.
The song search mode is activated and a song name is
displayed.
o
5
After selecting an album, pressing
songs of the selected album.
~/II
will play back all
Slide the LIST switch In the direction of ..... or
~ to select a song, and then press C\ fENTER.
The selected song is played back.
7-EN
Search Position Memory
Random Play Shuffle All
During iPod playback, you can quickly relUrn to the last-selected
Shuffle ALL plays all songs in the iPod randomly.
hierarchy level in the search mode.
1
Press
~t~.
The hierarchy you selected last in the search mode is
displayed.
• While playillg hack ShuOle AJI, search positio/l lIlemory is /lot
<II'ailahle.
Up/Down Function
If you select an album and press ~ /11 in the search mode, this album
will be played back repeatedly. To go to the previous or next Album, use
the Up/Down I'unction.
Slide the OfoSKIP switch in the direction of ....
1
• To cancel, press ca again.
• /fShlllJle AJI is selected, the selected olles which are being played
back in Ihe search //lode are ca/lceJled.
• You can also actiytlle the Shuffle AJllllodefrom the Menu Select
screen. Afier pressing ~ tENTER while "Shuffle All" is being
selected, press ~ tENTER again.
Repeat Play
1
Advances to the next item.
• /{YOUt/o lIot pel1"rlll a search or 0/11.1' .•earch for a song /lallle or
l/lldiohook, Ihis filllClilll1 is /lot m/id.
• Duri/lg till arlisl search, aJlntlllSf"r IlwI arris·t can be played.
•
/{ ({II alhulII is sd"cled durillg atl arriSI search, Ihe Up/Dow/lfi//lction
call he us'ed ((/ plaY orher alhullls hy Ihtll arlisl.
• Thisji//lclioll is illtlcti,'e darillg shuflle playlJllck.
• /(you slide tllld hold Ihe %SKIP switch, you call skip cOlltilluously.
Random Play Shuffle
1
Press FUNC.
The Function screen is displayed.
2
Slide the LIST switch in the direction of ~ or
~ to select "Shuffle," and then press ~ /ENTER.
The Shuffle mode is activated
3
Slide the LIST switch in the direction of ~ or
~ to select the Shuffle playback mode, and then
press ~ tENTER.
Shuffle Album
)¢
~
Song)¢
Off
4
Press
• An album in the iPod is selected at
random, and is played back in the
album song order.
• If you select a song in the search
mode, all songs in the selected
mode are played back at random.
. Shuffle mode off
~t~.
The songs will be played back in random sequence.
• To ca/lcel, st'lect Offill Ihe aho!'e procedure.
• 5htlO1<' AIIJllIII/SlllItlle SOllg lI'tlrks the sallie lI'av a.• iPod Shl!Dle
Alhullls/Shuffle SOllgs.
8-EN
Press FUNC.
The Function screen is displayed.
Returns to the previous item.
Slide the OfoSKIP switch in the direction of 'Y.
Press ca.
The indicator )4 ALL lights, and the songs will be played
back in random sequence.
2
Press
~
tENTER.
The Repeat mode is activated.
3
Slide the LIST switch in the direction of ~ or
~ to select "Song," and then press ~ tENTER.
Repeat Song
p
Off
4
. A single song is repeatedly played
back.
• Repeat mode off.
Press~t~.
The song is repeatedly played back.
• To cancel, select Off' in the above procet/ure.
• Duri/lg repeat playback, no other songs (Ire selecwble by sliding the
LIST switch in the direction ~ or ~.
• Bolh Ihe shuffle and repeat indicators that cun be set are displayed,
0111.1' one song repeats.
Changing the Display
If a song contains cover art data, etc., you can change the current display
to show the artwork.
Press VIEW.
<Artwork display>
<Artwork not
contained screen>
:, iPod
t
• You can set how to download artwork or artwork type. Refer to
"Selling Artwork Download (Artwork Display)" (page 16) and
"Selling Artwork Type (Artwork Type)" (page 16).
• If Auto is set in "Setting Artwork Download (Artwork Display)"
(page 16), artwork is automatically downloaded every time a new
song is selected. Artwork is downloaded approx. 2 seconds after
starting playback of the song.
• When artwork is downloaded (maximum 6 seconds), no operation
can be performed.
Downloading Artwork Data manually
If Manual is set in "Setting Artwork Download (Artwork Display)"
(page 16), download artwork data manually.
During iPod playback, press and hold VIEW for at least 2
seconds.
• If there is no artwork data, or artwork data has already been
obtained. data cannot be downloaded.
9-EN
Playback
Bluetooth Audio
1
Press SOURCE to select the Bluetooth Audio mode.
2
Slide the LIST switch in the direction of
~
or
~.
Returning to the beginning of the current track (file):
Slide the LIST switch in the direction of ~.
LIST~
L1ST~
Advancing to the beginning of the next track (fife):
Slide the LIST switch in the direction of ~.
3
i
.~-_...
If a Bluetoolh wmpalible mobile phone. portable player. elc. is
connected by wireless. you can play back a song (operation is
controllable from the unit).
• To I,/av hack audio. a /)/ohile phone or" portable player confurming
to A2DP (Advanced Audio DiJlributiun Pr(jtile! or AVRCP (Audiu/
Video Re/)/ote Control Pm/ilei i.r required.
Not all/ilJlcriuns work I\'ith "II del'ices.
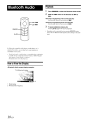
How to View the Display
<Bluetooth Audio screen display example>
2
lO-EN
~ / II
~tll.
again will resume playback.
• Depending on the connected devices. pren-ing SOURCE during
pause will start Bluetuuth audio playback. then change to rhe audio
mode.
~/II--H-
1 Mode display
2 FM transmitter frequency
To pause playback, press
Pressing
SOURCE-+i-
Hands-Free Phone
Control
Answering a Call
Incoming calls are announced by the received call ring tone and a
displayed message (PHONE No., etc.).
Press
~.
The call starts.
• When "Setting the Received Calls automatically (Auto Answer)"
(page /4) is set to ON, you can receive a call automatically.
• While calling, iPod or Bluetooth audio temporarily stops. After
calling, playback will resume.
O/OSKIP ...
C\/ENTER--~~-%SKIP~
L1ST~
LIST~
-+-~I--~/~
Hanging up the Telephone
Press~f~
•
The call finishes.
~/~.
• While receiving, you can also hang up by pressing
Redial Function
You can redial the person you have previously called.
After finishing a call, press
~
within 5 seconds.
The telephone is redialed.
• If you receive a callfrom an unknown number, you cannot use the
redial function to call back.
About the Hands-Free Phone
Hands-free calls are possible when using a HSP (Head Set Profile) and
HFP (Hands-Free Profile) compatible mobile phone with the eX-IO.
• Avoid answering a hnndsjree call in heavy traffic or on narrow
streets where driver attention is demanding.
• To enhance call audio, shut the windows to reduce ambient noises.
• Making or receiving calls in noisy locations reduces the audio
quality on both ends of the call.
• Telephone line conditions and other hands-free microphones may
cause voices to sound unnatural.
• Certain mobile phone features are dependent on the capabilities and
settings ofyour service provider's network. Additionally, certain
features may not be activated by your service provider, and/or the
provider's network settings may limit thefeature'sfunctionality.
Always contact your service provider about feature availability and
functionality.
Allfeatures,junetionality, and other product specifications,as well as
the infonnation contained in the Owner's Manual are based upon the
latest available information and are believed to be accurate at the
time ofprinting.
Alpine reserves the right to change or modify any information or
specifications without notice or obligation.
Calling
Call History is recorded for up to the last 10 dialed/received/missed
calls. There are various ways of making calls based on the "Calling."
The following steps I to 5 are common to the various ways of making
these calls. For details, refer to each individual category for making
calls.
1
Press~.
The outgoing method list is displayed.
2
Setting items
Dialed List
Received List
Missed List
Phonebook
Phonebook (SIM)
3
~
Slide the LIST switch in the direction of
~ to select the outgoing mode.
Press
or
Dialed List! Received List /Missed List /
Phonebook/Phonebook(SIM)
Dialed history
Received history
Missed incoming history
Mobile phonebook
Mobile phonebook stored in SIM card
C\ fENTER.
The outgoing mode is activated, and each mode list is
displayed.
• It may take some time for the list to be displayed, and also directly
after connection, the list may not be brought up to date.
4
Slide the LIST switch in the direction of
~
or
~.
Select a telephone number from the list.
• If sliding the O/OSKIP switch in the direction of'"
change a page ofthe list.
or~.
you can
Continued
ii-EN
5
Press
J.
Select the telephone number and dial.
If
/ENTER is pressed, the selected name or the
/ENTER is pressed
telephone number is displayed. If
again, the telephone will be called.
C\.
C\.
Voice Dial Operation
You can calilhe telephone by performing voice operation.
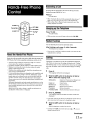
1
• Display example
Press and hold
~
for at least 2 seconds.
The speak mode is activated, and "Speak" is displayed.
1--; Bluetooth Phone
2
2
3
1 Mode display
2 Call time
3 Receiving Volume
Say the telephone number, name you want to call
into the unit.
• l'lJII CUll pe,:form Ihis operalioll ollly whel/ a voice dial compalible
1II0bile phallI' is cOl/l/ecled. Iflhe 1II0bile phallI' is 1I0t compatible
I\'ith the voice dial, "No Supporl" is displayellfor 2 secol/ds.
• II' a ('(IIII'd person Ihm you soy is 1101 joulld, "No Call" is displayed
for 2 secollds.
• Voice dial operatioll depellds all the jimctiol/ lJl'the mobile phol/e.
For derails, rera to the OWI/er's MOlluol ol'the 1Il0bile pholle.
• II'You place a call via voice dial, you call1lot display a pholle lIumber
or JUline.
• The IIallll'S register"d ill the telepIIOII/' hook are displayed. l(the
11/1111" is 1I0t registered. ollumher is di.lploved. l(h/llh 1101111' olld
lIulllher C(/IlIlOt he disploved, "------------" will he displayed
• l(vou place a call diratlvjimll the paired mobile pholle, the pholle
lIulll/Jer is 11/11 di.lploved. Will c/IIlllOll'I'{lioljimn Ihe ullit ill this case.
Redialing a Number In Outgoing History
Adjusting the Volume when receiving a
Call
Set the receiving volume while calling.
Previously dialed telephone numbers are slored in dialed calls history.
You can redial a number by searching from dialed calls history.
1
While calling, press J to adjust the volume.
Each press will adjust the volume during a call.
Setting item: Dialed List
Levell
Dialing a Number In Incoming History
Telephone numbers from received calls are stored in the Received List.
You can rediallhcse numbers by searching here.
Setting item: Received List
Dialing a Number In Incoming Missed Call History
Telephone numbers for received calls that are missed, are stored in the
Missed List. You can reuial these numbers by searching here.
Setting item: Missed List
Dialing a Number In The Phone Book
Up 10 1.1l1l1l telephone numbers are downloadable from a mobile phone.
Dial a call by selecting a person from the phone book list.
Setting item: Phonebook I Phonebook (SIM)
• I(a lIallll' CUllllot he obwilled \'io the 1,llOlIebook, 1I0thillg is'
disploved.
• The order o(the list di.lplov d/'pellds Oil the desigll ol'the 1Il0bile
plullle.
• lfthe call hi."torv or IJlltlllebook ofthe lIIohile phol/e is added or
deleled lI'hile il is cOli/it'di'd to the Ullil. Ihe list displayed Oil the ullit
ilia.\' 1I0t be hrought up 10 dale. Il'il is II/}/ apdmed. you C(/I1I10t
corrntlv ploCt' a ('all.
12-EN
~
Level2
~
Level3
~
Level4
~
Level5
~
Levell
• Whell the call is fillished. return to the I'olume level you previously
.\'et ill the SETUP mode. Refer to "Adjus·tillg the volume (HFP
Volullle)" (page 14).
4
SETUP
Slide the LIST switch In the direction of I40lI or
~ to change the setting, and then press
" fENTER.
(e.g. Select Beep On or Beep Off.)
Use the SETUP menu to flexibly customize the unit to suit your own
preferences and usage. Choose settings from General, Display, etc., to
make the desired changes.
5
•
Press and hold
normal mode.
Pre~'sing ~/~
~f~
for 2 seconds to return to
during the procedure will return
10
the previous
mode.
Select Transmitter from the setup main menu in step 2.
LIST I40lI
"/ENTER--~~--
FM Transmitter Function (Frequency)
L1ST~
Frequency 88.1-107.9 MHz
~-+-I--~/~
You can listen to sound of the unit from the FM car radio. Match the
frequency set and stored in the unit with the frequency of the car radio.
SETUP ---Hf-
• Storing a Frequency
1
Slide the LIST switch in the direction of I40lI or
~ to select the frequency you want to change,
and then press and hold" /ENTER for at least 2
seconds.
The frequency setting mode is activated.
2
Follow steps 1 to 5 to choose an item to change. See
the individual item descriptions following Step 5 for
further details.
1
2
Press SETUP to activate the SETUP selection mode.
Slide the LIST switch in the direction of I40lI or
~ to select the desired Item, and then press
"fENTER.
Transmitter ~ Bluetooth ~ Audio
iPod (e.g. Select General)
3
~
General
~
Display
~
Slide the LIST switch in the direction of I40lI or
~ to select a setting item, and then press
"fENTER.
Slide the LIST switch in the direction of I40lI or
~ to tune the desired frequency, and then press
" /ENTER.
The frequency is stored.
• lfunit sound is inteifered with by other FM radio stations. change to
another frequency.
• Recommendedfrequencies should be more than O.4MHzfrom the
inteifering FM radio station.
• Volume is adjusted on the radio side.
• When the radio frequency is tuned. aUlomatic fadio tuning may
continue. In this case, tune the radio station manually.
• Actual transmission reach ofthe FM transmitter is approx. 1.5 m.
Depending on placement, you may not be able 10 listen to the radio.
Place the transmitter where radio sensitivity is good.
• While setting. pressing ~/~ will cancel the frequency you
previously set.
• Recalling the Stored Frequency
Recall the stored frequency.
(e.g. Select Beep)
Slide the LIST switch In the direction of I40lI or
select a frequency, and then press" fENTER.
Transmitter:
Frequency
~
to
The selected frequency is recalled.
Bluetooth:
Pairing Mode· ~ Paired Phone ~ Paired Audio ~ Clear
Devices ~ Pass Code ~ Auto Connect ~ Auto Answer ~
HFP Volume ~ HFP Speaker
Audio:
Factory's EQ
General:
Language ~ Beep
Auto Poweroff
Display:
Dimmer Level
~
~
Demo
Text Scroll
~
~
Output Mode
~
BGV Select
iPod:
Artwork Display ~ Artwork Type ~ Playlist
Album ~ Podcast ~ Audiobook ~ Genre
~ Song
*
~
~
Artist ~
Composer
Refer to "How to connect to a Bluelooth compatible device
(Pairing)" (page 5).
Continued
13-EN
SeUing the Automatic Connection (Auto Connect)
Auto Connect On (Initial setting) / Auto Connect Off
Bluetooth Setting
Select Bluctooth from the setup main mcnu in step 2.
When ACC is turned on. set whether the Bluetooth device already
registered in the unit is automatically connected or not.
Setting the Bluetooth Device (Paired PhonelPaired Audio)
On
• Hands-free phone mode
Paired Phone Device Name, or Device1 to Device5, Phone1 to
Phone5
• 81uetooth audio mode
Paired Audio Device Name, or Device 1 to Device5, Audi01 to
Audi05
Select one uf up to 10 cunnected B1uetuuth cumpatible devices (5
mobile phones and 5 audiu devices) that yuu previuusly registered.
You can set hands-free phone or Bluetooth audio in each mode.
Select a mobile phnne you want to use as a hands-free phone by Paired
Phone. Select a device to listen to audio by Paired Audio. You can use
both Paired Phone and Paired Audio by selecting the same mobile
phone.
Slide the LIST switch in the direction of ..... or ~ to
select a Bluetooth compatible device, and then press
C\.fENTER.
The selected device is connected.
Off
Setting the Received Calls automatically (Auto Answer)
Auto Answer On / Auto Answer Off (Initial setting)
When a call is received, you can set whether to answer it automatically
or not.
On
Off
Deleting a Bluetooth Device from the list (Clear Devices)
Clear Devices Device Name, or Device 1 to Device5, Phone1 to
Phone5, Audi01 to Audi05
You can delete the history of a previously connected Bluetooth
cumpatible device.
Slide the LIST in the direction of ..... or ~ to select
the Bluetooth compatible device to be deleted, and then
press C\. fENTER.
Registration of the selected device is deleted.
Setting the PIN Code (Pass Code)
Pass Code 0000 (Initial setting) - 9999
Set the PIN code (pass code) to lise as a recognition kt:y when Bluetooth
communicatiol1 is perfonned.
1
Select a digit to set by sliding the LIST switch in
direction of ..... or ~, and then press
C\.fENTER.
The selected digit setting mode is activated.
2
Select a number by sliding the LIST switch in
direction of ..... or ~,and then press
C\.fENTER.
The selected number is entered.
3
Set each 4 digit PIN code by repeating step 1 and 2.
• Whil" settillg. /"·,,s.,illg
prel'ioII.\IY·\I!I.
14-EN
~/~ I\'ill
wllcel the 1Il/lIIher YOl/
: When a call is received, it will be answered
automatically.
: When a call is received, it will not be answered
automatically. Press ~ to answer a call.
• Even if this selling is set to ON/OFF. the received cal/ setting on the
lIIohile phone takes priority.
Adjusting the volume (HFP Volume)
HFP Volume Level1 to Level 5 (initial setting:Level 3)
Slide the LIST switch in the direction of ..... or
select a level, and then press C\. fENTER.
• II the cOlllleerirlll is Sl/ccess!i,I/v chllllged. "Collnected/! Dnice
IIl11ne)" is displa."edfur 2 s,'c{}/llls. IIlId thell the display retl/ms to the
SETUP screen.
• 1(.1'01/ .filii to disconnect the cl/rremlv connected device.
"Disl'olll/ening Fllil"d" I\'ill h" dispillved. IIlId "Connecting Flliled"
will he dispillved in rhe I'CI.\·e (!( afililed connection.
• Th" cOl/lleered dn'ice n/llll" is displayed CIt the lOp (j(the list.
Devices are automatically connected.
Devices are not automatically connected.
~
to
The receiving volume is set.
•
You lIIuy lIeed to increase volume ji'Oln your regular audio !istening
source level. However. increasing the volume excessively may result
in Ieedback. Ifleedback is noticed as feedback is directly related to
the volullle. tum down the voll/me as low as acceptable to eliminate
it. Positioning the microphone ina direction awayjivm the main car
speakers (e.g. clipped on sunvisor) may also reduce feedback at high
,'oil/Ille.
Setting the Telephone Voice Output (HFP Speaker)
HFP Speaker Internal (Initial setting)/External
Set how to output the mobile phone voice during a call.
Internal
External
: Voice is output from the built-in speaker of the
unit.
Voice is output from an external device (FM
transmitter, or device connected to the audio
output terminal).
Automatic Power OFF Function (Auto Poweroff)
"Aud((). settl
60 min / 90 min / 120 min / Off (Initial setting)
Select Audio from the setup main menu in step 2.
Equalizer Presets
Factory's EO Flat (Initial setting)! Pops / Rock / News / Jazzl
Blues / Electrical Dance / HipHop/Rap / Easy Listening /
Country / Classical
9 typical equalizer settings are preset at the factory for a variety of
musical source material.
Slide the LIST switch in the direction of ..... or ~ to
select the desired equalizer characteristic, and then
press ~ /ENTER.
Depending on the vehicle, even if the engine is turned off, the cigarette
lighter may not be turned off. If the cigarette lighter is left turned on, the
battery may be drained entirely. To prevent battery drainage, the unit has
an Automatic Power OFF function that automatically turns the unit off
when no operation performed for a certain period of time. Set this time
to your preference.
60 min 190 min 1120 min
Off
: if no operation is performed for 60
min. /90 min. 1120 min. the unit
power is automatically turned off.
: Do not use the Auto Power OFF
function.
General is selected on the setup main menu in step 2.
Display is selected on the setup main menu in step 2.
Setting the Language
Adjusting the Level of the Display Brightness (Dimmer
Level)
Dimmer Leve/- 7 to + 7 (Initial setting: 0)
For US (Initial setting) / For EU1 / For EU2 / For JPN / OTHER
Set the language to be displayed on the unit. Set to For US to use the
setting.
For US
For EU1
For EU2
For JPN
OTHER
: English, French, Spanish
: Russian, English
: English, German, French, Spanish, Italian,
Swedish, Portuguese
: Japanese, English
: Chinese (Chinese standard), English
Sound (Beep) Guide Function
Beep On (Initial setting) / Beep Off
This function will give audible feedback with varying tones depending
upon the button pressed.
Demonstration
Demo On / Demo Off (Initial setting)
This unit has a Demonstration feature for the display.
• To quit Demo mode, set to Demo OFF.
Setting Sound Output (Output Mode)
Transmitter (Initial setting) / Wile Transmitter / AUX
When an iPod or Bluetooth audio is played back, set how to output
sound.
You can change the display brightness. You can use this function when
the display is too bright while driving at night.
Slide the LIST switch In the direction of ..... or
.....
~
~.
: Display becomes darker.
: Display becomes brighter.
Scroll Setting (Text Scroll)
Text Scroll On / Text Scroll Off (Initial setting)
You can set a scroll type such as song title or file name on the source
screen. If the search mode screen displays fills with text, the display
scrolls.
Text Scroll On
Text Scroll Off
: Text information is scrolled automatically.
: The first display scrolls text information one
time only.
• In parts of the display, scrolling may /lot occur, or scroll content may
differ.
• Regardless of this setting, if/he display is filled with text, the display
scrolls.
Switching the Display Type (BGV Select)
BGV Select Type 1 (Initial setting) / Type 2/ Type 3
You can select your favorite display for background from 3 types.
Transmitter
: Output sound using FM transmitter
Wire Transmitter : not usually used. Set when an optional FM
Switching Box is connected and the
transmitter function is used.
: Output sound from an audio output terminal
AUX
• Depending on regulations, an optional FM Switching Box may be
required. Consult your dealer.
i5-EN
iPod Setting
iPm! is sekcted un the setup main menu in step 2.
Setting Artwork Download (Artwork Display)
Artwork Display Auto (Initial setting) / Artwork Display Manual
Downluad artwork in an iPod. and set whether artwork is displayed ur
nul. Set when you use a hrst gene'ration iPud classic. First gencration
iPud tuuch, First gcnerationl Sccond generatiun rrhird gcneratiun iPud
nanu. Fifth gcneratiun iPod.
Auto
During playback. downloads artwork automatically.
Manual
Download artwork manually.
Setting Artwork Type (Artwork Type)
Artwork Type Album (Initial setting)/ Artwork Type Song
Vou can set the downluaded artwork type.
Album
Displays album artwork if a song contains the same
album, artwork of the first song played back is
displayed for all songs.
Song
Downloads artwork for every song. and display.
iPod Search Mode Setting
On/Off
The unit allows you to search for the iPod using eight different search
modes.
When the search mode is in Playlists/Artists/AlbumsiPodl'asts/
Audiobooks, the initial setting is On. and when the search mude is in
Genres/Composers/Songs. the initial setting is all.
• For .,eare" //lode de/ails. re/erto "Searehil1Rfor a desired SOI1/;/
Title" {fJilRe 7).
16-EN
Information
No Unit
In Case of Difficulty
If you encounter a problem, please turn the power off, then on again. If
the unit is still not functioning normally, please review the items in the
following checklist. This guide will help you isolate the problem if the
unit is at fault. Otherwise, make sure the rest of your system is properly
connected or consult your authorized Alpine dealer.
The Bluetooth device is not connected.
- Connect the Bluetooth device.
o
Specifications
BLUETOOTH SECTION
Bluetooth Version
Output Power
HFP
HSP
A2DP
No function or display.
o Vehicle's ignition is off.
- If connected following instructions, the unit will not operate
with the vehicle's ignition off.
o Blown fuse.
- Check the fuse of the unit; replace with the proper value if
necessary.
AVRCP
Bluetooth 1.2 CERTIFIED
+4 dBm Max. (Power class 2)
(Hands-Free Profile)
(Head Set Profile)
(Advanced Audio Distribution
Profile)
(AudioNideo Remote Control
Profile)
REMOTE CONTROL
iPod does not play and no sound is output.
o The iPod has not been recognized.
- Reset the iPod. To reset the iPod, refer to the Owner's Manual
of the iPod.
NoiPod
o
Battery Type
Width
Height
Depth
Weight
CR2025 battery
36 mm (1-7/16")
100 mm (3-15/16")
12.4 mm (15/32")
31 g (1.09 oz)
(battery excluded)
GENERAL
The iPod is not connected.
- Make sure the iPod is correctly connected (refer to
"Connections").
Make sure the cable is not bent excessively.
Power Requirement
14.4 V DC
(11-16 V allowable)
AUX 1200 mV
Maximum Pre-Output Voltage
CHASSIS SIZE (Monitor section)
No Song
o
There are no songs in the iPod.
- Download songs to the iPod and connect to this unit.
Error 01
o
78.6 mm (3-1/16")
55.7 mm (2-1/4")
20.2 mm (25/32")
78 g (2.75 oz) (Monitor)
60 g (2.12 oz) (Stand)
CHASSIS SIZE (UF box)
Communication error
- Turn the ignition key off, and then set to ON again.
- Check the display by reconnecting between the iPod and this
unit, using the FULL SPEEDTM Connection Cable.
Error 02
o
Width
Height
Depth
Weight
Width
Height
Depth
Weight
o
58.7 mm (2-5/16")
27.7 mm (1-1/8")
85.5 mm (3-3/8")
72 g (2.54 oz)
Due to continuous product improvement, specifications and design
are subject to change without notice.
Caused by the iPod Software Version not being compatible with
this unit.
- Update the iPod Software Version to be compatible with this
unit.
17-EN
Installation and Connections
Before installing or connecting the unit, please read the
following and page 3 of this manual thoroughly for
proper use.
~Warning
MAKE THE CORRECT CONNECTIONS.
Failure to make the proper connections may result in fire or product
damage.
DO NOT ALLOW CABLES TO BECOME ENTANGLED IN
SURROUNDING OBJECTS.
Arrange wiring and cables in compliance with the manual to
prevent obstructions when driving. Cables or wiring that obstruct or
hang up on places such as the steering wheel, gear lever, brake
pedal, etc. can be extremely hazardous.
~Caution
USE ONLY IN CARS WITH A 12 VOLT NEGATIVE GROUND.
HAVE THE WIRING AND INSTALLATION DONE BY EXPERTS.
(Check with your dealer if you are not sure.) Failure to do so may
result in tire. etc.
The wiring and installation of this unit requires special technical
skill and experience. To ensure safety, always contact the dealer
wherc you purchased this product to have the work done.
BEFORE WIRING THE ANTENNA CABLE ON THE CAR SIDE,
DISCONNECT THE CABLE FROM THE NEGATIVE BATIERY
TERMINAl.
Failure to do so may result in ekctric shock or injury due to
electrical shorts.
USE SPECIFIED ACCESSORY PARTS AND INSTALL THEM
SECURELY.
DO NOT SPLICE INTO ELECTRICAL CABLES.
Be sure to use only the specitled accessory parts. Use of other than
designated parts may damage this unit internally or may not
securely install the unit in place. This may cause parts to become
loose resulting in hazards or product failure.
Never cut away cable insulation to supply power to other
equipment. Doing so will exceed the current carrying capacity of
the wire and result in tire or ekctric shock.
ARRANGE THE WIRING SO IT IS NOT CRIMPED OR
PINCHED BY A SHARP METAL EDGE.
DO NOT DAMAGE PIPE OR WIRING WHEN DRILLING HOLES.
When drilling holes in the chassis for installation. take precautions
so as not to contact, damage or obstruct pipes, fuel lines, tanks or
electrical wiring. Failure to take such precautions may result in tire.
Route the cables and wiring away from moving parts (like the seat
rails) or sharp or pointed edges. This will prevent crimping and
damage to the wiring. If wiring passes through a hole in metal, use
a rubber grommet to prevent the wire's insulation from being cut by
the metal edge of the hole.
DO NOT USE BOLTS OR NUTS IN THE BRAKE OR STEERING
SYSTEMS TO MAKE GROUND CONNECTIONS.
DO NOT INSTALL IN LOCATIONS WITH HIGH MOISTURE OR
DUST.
Bolts or nuts used for the brake or steering systems (or any other
safety-related system). or tanks should NEVER be used for
installations or ground connections. Using such parts could disable
control of the vehicle and cause tire etc.
Avoid installing the unit in locations with high incidence of
moisture or dust. Moisture or dust that penetrates into this unit may
result in product failure.
KEEP SMALL OBJECTS SUCH AS BOLTS OR SCREWS OUT
OF THE REACH OF CHILDREN.
Swallowing them Illay result in serious injury. If swallowed,
consult a physician immediately.
DO NOT INSTALL IN LOCATIONS WHICH MIGHT HINDER
VEHICLE OPERATION, SUCH AS THE STEERING WHEEl OR
GEARSHIFT.
Doing so may obstruct forward vision or hamper movement etc.
and results in serious accident.
DO NOT INSTALL THE MONITOR NEAR THE PASSENGER
SEAT AIR BAG.
Precautions
• If an antenna cable on the car side is used: be sure to disconnect
the cable from the (-) battery post before installing your eX-I O.
This will reduce any chance of damage to the unit in case of a
short-circuit.
• When making connections to the vehicle's electrical system, be
aware of the factory installed components (e.g. on-board
computer). Do not tap into these leads to provide power for this
unit. When connecting the eX-I 0 to the fuse box, make sure the
fuse for the intended circuit of the eX-I 0 has the appropriate
amperage. Failure to do so may result in damage to the unit and!
or the vehicle. When in doubt, consult your Alpine dealer.
If the unit is not installed correctly the air bag may not function
correctly and when triggcrcd the air hag may cause the monitor to
spring upwards causing an accidcnt and injuries.
IMPORT""'T
SERIAL NUMBER:
Please record the serial nUlllher of your unit in the space provided
below and keep it as a permanenl recon.!. The serial numher or Ihe
engraved serial Ilumber is localed Oil (he bollom or the unit.
INSTALLATION DATE:
i8-EN
INSTALLATION TECHNICIAN:
PLACE OF PURCHASE:
_
_
_
_
Monitor
Installation
~- )]fC-§J/i L
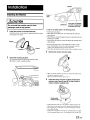
Installing the Monitor
Line of -----sight
~CAUTION
mol_ u_ItO......
your line of a sight then
It will block your view.
In order to use safely, attach to the following places.
Install the monitor on the stand securely.
Install the monitor on the stand by aligning its back through
the bracket of the stand.
Monitor
Stand
• Stable and secure places.
• Places that will not have your view blocked by the main unit
when driving.
• Places that you will not hit against if you lean forward while you
wearing your seathelt.
• Places where the main unit cannot hit against the steering wheel
while driving.
• Be aware that if the suiface of the dashboard is leather, wooden
panel. stretchedfabric or any non-resin based product, then the
suiface will be damaged when you remove the stand.
• Do not place the main unit directly infront ofthe air conditioner vents.
3
2
- . . . .,. 0 ~..
Dashboard
Do not Install the monitor near the front
passenger seat air bag system.
1
J
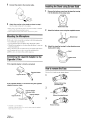
Remove the monitor from the stand.
Check the mounting location.
CD Temporarily fasten the stand with adhesive tape.
® Adjust to a safe, viewable position.
• When you take the monitor out of the car, remove the monitor from
the stand by referring to step 3.
When you install the monitor, refer to step I.
4
Install the stand using the supplied double-sided
adhesive tape. Remove any dirt on the surface to
install, using the supplied cloth.
Double-sided
Adhesive Tape
• If the temperature in the car is low (Wimer). then first heat up the
place where you are going to stick the mount with a hairdryer, etc.
• Do not apply force to the /IIount, or expose to humidity, within 24
hours after attaching.
• If the /IIount is notfirmly stuck, then we recommend that you attach
with the supplied fixing screws. (For installation. refer to page 20.)
19-EN
5
Connect the stand to the monitor cable.
Installing the Stand using Screws fixed
1
6
Attach the monitor to the stand as shown in step 1.
Use the cable clamps to fix the cables.
B(~/;JI"e /lsillg, check Ih{/( IIII' /IIolli",/, (/Ild slIIlId (/.I'Sl'l1Ihlv i.l' IllOlI/lled
•
.\'(Jcurely
•
Remove the bottom cover from the stand by turning
it in the direction of the arrow mark.
(1f
the chnsl!/l l110lillling {oco/hJ11.
Do lIoll/dillSI Ihe wlg!e or Ihe //lOll;"'/, ,,';Ih eXCl'.\'sil'e.l;J/,ce,
Stand Bottom Side
2
Attach the bottom cover using the supplied screws.
Mounting the Microphone
Bottom Cover
For the sake or sarety, mount the microphone in the rolluwing lucatiun.
• In a stable and secure location.
• In a location that docs not inhibit safely driving the vehicle.
• Mount the microphone in a location where the driver's voice can
easily be picked up,
Choose a location ror the microphone that can easily pick up the drivers
voice. Re4uiring the driver to move tnwards the microphone fur
audibility causes a distraction that could be dangerous,
3
Attach the stand by turning it to the direction arrow
marks until it locks.
Connecting the Cigarette Adapter to the
Cigarette IfF Box
If the cigarette adapter is directly connected:
How to remove the Fuse
The ruse (2A) is built into the cigarette adapter.
Cigarette IIF Box
1\'
~.
1
\,
Remove it by turning
(Threaded Type)
If the cigarette adapter is connected using the cigarette
adapter extension cable:
2
Remove the projection part.
3
•
IIISI,,11 Ihe cigl//'erre IIF Box:
111.I1/111 lite {';gl//'<'11e IIF Box ill l/Ill!i' locl/lioll /lsillg Ihe s/lpplied
Velcrn Fllste/lers (2 pieces J.
20-EN
Remove the fuse.
Connections
*1 Mini-Jack Cable
(sold separately)
r--------------~+
*2 FM Switching Box (KWE·155B)
(Sold separately)
To connect to a device
used for external Input
From Vehicle's Antenna cable
FM Cable
t---r---I::::J+ To Head Unit's Antenna cable
FM Modulator Antenna Cable
Microphone (Included)
Cigarette Adapter Extension
IPod
~.:~ ~
_l ---,;;;.
(Sold .....
)}
~
~
~
J+ +
lf1
L_ _
c{ab:
(ITUdeo~rl .ep }
~I
---Ilo..
To connect to the cigarette
~ ~opla,leon"',,"''''
~tteAdaPter
Monitor
(Included)
FULL SPEEDTM
Connection Cable
(Included)
Monitor Cable (Included)
* There are two types ofconnections to output sound. Only one connection type is valid at one time. Make the selection as shown below.
*i When "AUX" is set in "Setting Sound Output (Output Mode)" (page 15), connect to a device with an external input.
*2 Depending on regulations. an optional FM Switching Box may be required. Consult your Alpine dealer.
if the FM Switching Box is connected. set to "Wire Transmitter" in "Setting Sound Output (Output Mode)" (page i5).
*3 FUSE (2A) is built-in.
..
* Do not mount the Cigarette lighter ifF Box where it might be stepped upon. Excessive pressure can damage the box.
* Depending on the mounting location ofthe Cigarette lighter ifF Box. noise interference is possible. When using a Bluetooth compatible device. if
noise or a malfunction occurs when sending or receiving data. mount the ifF Box in another location.
* Before using, check that the monitor and stand assembly is mounted securely at the chosen mounting location.
21-EN
EX-10
Bluetooth® Compatibility
=NO |
Manufacturer
Model
Carrier
Will My
Phone
Connect?
(HFP)
Will My
Phone
Automatically
Reconnect To
The Device?
Can I View
My Phone
Book?
(PBAP)
AT&T
Apple
iPhone 3G
AT&T
AT&T
Tilt 8925
AT&T
Blackberry
Pearl 8110
AT&T
Blackberry
Curve 8310
AT&T
LG
CU515
AT&T
LG
CU720 Shine
AT&T
Motorola
MOTORAZR
V3
AT&T
Motorola
MOTO Q
Global
AT&T
Palm
Centro 685
AT&T
Palm
Treo 750
AT&T
Pantech
Duo C810
AT&T
Samsung
Rugby A837
AT&T
LG
LX-400
Sprint
Motorola
Renegade
V950
Sprint
Research In
Motion
BlackBerry
Curve 8330
Sprint
Samsung
Ace SPH-i325
Sprint
Samsung
Instinct M800
Sprint
Samsung
SPH-Z400
Sprint
Sanyo
Katana LX
Sprint
Sanyo
PRO 200
Sprint
Sanyo
PRO 700
Sprint
Sanyo
S1
Sprint
Sprint
T-Mobile
Motorola
RIZR Z3
T-Mobile
Motorola
RAZR2 V8
T-Mobile
Motorola
RAZR V3
T-Mobile
Motorola
ROKR E8
T-Mobile
Motorola
W490/W510/
W5
T-Mobile
Nokia
2760
T-Mobile
Nokia
6126/6131/
6133
T-Mobile
Nokia
5310
T-Mobile
1
Doc#102308 ©Alpine Electronics of America, Inc. All Rights Reserved.
Will The
Device
Work As A
Speaker?
(HSP)
=YES
Can I View
My Call
History?
Can I Stream
Music From
My Phone?
(A2DP)
Can I Control
Audio
And Video
Playback?
(AVRCP)
Manufacturer
Model
Carrier
Nokia
6301/6300i
T-Mobile
Nokia
5610
T-Mobile
Research In
Motion
BlackBerry
Pearl 8100
T-Mobile
Research In
Motion
BlackBerry
8700g
T-Mobile
Research In
Motion
BlackBerry
Pearl 8120
T-Mobile
Research In
Motion
BlackBerry
Curve 8320
T-Mobile
Research In
Motion
BlackBerry
8820
T-Mobile
Research In
Motion
BlackBerry
Pearl Flip
8220
T-Mobile
Samsung
t739 Katalyst
T-Mobile
Samsung
t429
T-Mobile
Samsung
t229
T-Mobile
Samsung
t639
T-Mobile
Samsung
t819
T-Mobile
Samsung
t336/t339
T-Mobile
Sharp
Sidekick LX
T-Mobile
Sony
Ericsson
TM506
T-Mobile
Dash S630/
S621
T-Mobile
T-Mobile
Wing P4350
T-Mobile
T-Mobile
Shadow
T-Mobile
LG
VX8560
Chocolate 3
Verizon
LG
VX10000
Voyager
Verizon
LG
VX9700 Dare
Verizon
LG
VX8350
Verizon
LG
VX9400
Verizon
Motorola
W755 (Moto)
Verizon
Motorola
Z6tv (Motorizr)
Verizon
Nokia
6205
Verizon
Research In
Motion
BlackBerry
Curve 8330
Verizon
Research In
Motion
BlackBerry
Pearl 8130
Verizon
Samsung
Gleam SCHU700
Verizon
Samsung
Alias SCHu740
Verizon
Will My
Phone
Connect?
(HFP)
Can I View
My Phone
Book?
(PBAP)
Will My
Phone
Automatically
Reconnect To
The Device?
T-Mobile
Verizon
2
Doc#102308 ©Alpine Electronics of America, Inc. All Rights Reserved.
Will The
Device
Work As A
Speaker?
(HSP)
Can I View
My Call
History?
Can I Stream
Music From
My Phone?
(A2DP)
Can I Control
Audio
And Video
Playback?
(AVRCP)
Manufacturer
Model
Carrier
Samsung
Flipshot SCHU900
Verizon
Samsung
Glyde U940
Verizon
Verizon
G'zOne
Boulder
Verizon
Will My
Phone
Connect?
(HFP)
Will My
Phone
Automatically
Reconnect To
The Device?
Can I View
My Phone
Book?
(PBAP)
Will The
Device
Work As A
Speaker?
(HSP)
Can I View
My Call
History?
Can I Stream
Music From
My Phone?
(A2DP)
Can I Control
Audio
And Video
Playback?
(AVRCP)
Troubleshooting:
1. If an echo is present, lower the volume on the head unit, or reposition the microphone further away from the speakers if
necessary.
2. During a call, the volume is independent from the source volume.
3. Please verify in call volume setting on your phone. This can affect Bluetooth in some phones.
4. For instructions on how to pair to the device from your phone, please refer to your phone’s owners manual.
5. Display of Phonebook, Received Calls, Missed Calls, and Dialed Calls varies from phone to phone and by your service
provider.
6. Phone synchronization speed varies from phone to phone.
7. Phone synchronization begins as soon as the pairing process is complete.
8. Access to Phonebook, Received Calls, Missed Calls, and Dialed Calls is available after phone synchronization is complete.
9. 12 Key direct dialing is only available on 2007 and newer Alpine AV head units.
Definitions:
1.
2.
3.
4.
5.
6.
7.
HFP - Hands Free Profile allows Bluetooth phone to be used with speaker. Commonly seen with car kits.
PBAP - PhoneBook Access Profile allows viewing of phonebook through Bluetooth device.
Autoconnect - automatically reconnects Bluetooth device with cell phone when cycling power.
HSP - Head Set Profile enables a wireless headset to be used with a Bluetooth phone.
Call History - the Bluetooth device will show the phones history of calls.
A2DP - Advanced Audio Distribution Profile allows for streaming stereo audio from phone to Bluetooth device.
ACRCP - Audio/Video Remote Control Profile controls playback of audio and/or video including play, pause, stop, etc.
Disclaimer:
1. Please visit your local Alpine dealer to verify compatibility of your phone.
2. Product information is subject to change as this is current information at the time of printing, therefore it is not guaranteed.
3. Information is only applicable in the United States.
3
Doc#102308 ©Alpine Electronics of America, Inc. All Rights Reserved.
To customers/Hinweis an Kunden/A I'attention de I'utilisateurl
Inlormacion para los clientesllnlormazioni per i clientifDll kunder!
t:)~m~/~~P/D.~
p
English
This unit does not support iPod's video playback function.
Deutsch
Dieses Gerat unterstOtzt nicht die Videowiedergabefunktion des iPod.
Franfais
Cet appareil ne prend pas en charge la fonction de lecture video de l'iPod.
Espaiiol
Esta unidad no admite la funci6n de reproducci6n de video del iPod.
Italiano
Questa unita non supporta la funzione di riproduzione video dell'iPod.
Svenska
Denna enhet har inte stod for videouppspelningsfunktionen i iPod.
e:pJ(
(11)
*f~::fR1i iPod
tJWttm1itrj)llg
0
rFX(f,fj)
*fJl/GRt~ iPod tJ\!JWitlnxJj)ll~
0
68-12118Z69-A (Y)
#/#/iLPINE, Customer Care Registration
. . . For easy on-line registration, go to ..www.alpine-usa.com/registration ..
Thank you for choosing Alpine! Please register your product with us so we can serve you better.
First name:
Last name:
• Product purchased
Home address: ~St=re=et~ad=ar=es-"s-----------
City
State/Provo
Zip Code
May we contact you at this address? 1.0Yes 2.0 No
Phone number: (
- - - - - - - - - 1.0Yes
----2.0 No
May we contact you at this number?
w
a:
w
%:
E-mail Address:
May we contact you bye-mail?
W
• Date of Birth Month:
Year:
=---• Marital Status
1.0 Single
2.0 Married
tJ)
2.0 Female
__
4. 0 Asian
5. 0 Other
_
_
2.0 Other ~ (Brand Name)
_
_
1.0 Factory installed
2.0 Alpine
3.0 Other
• Have you purchased Alpine products before?
Thank you for your cooperation I We value your privacy. This information will remain confidential with Alpine and its affiliates.
o
1.0 Less than $30,000
2.0 $30,000 - $50,000
3.0 $50,000 - $70,000
*Previous brand replaced?
1. 0 First time
1. 0 Executive/Managerial
2. 0 Secretarial/Clerical
3.
Sales
4. 0 General Labor
5.0 Professional
• Household Income
• Purpose of buying this unit?
1. 0 Addition
2.0 Replacement ~
2.0 Two or more times
_
1. 0 I usually have more electronic equipment than my friends
2.0 I am usually one of the first of my friends to buy the newest
electronic equipment
3.0 I usually wait until a product has been out for a while before
I purchase it
4. 0 I am usually on of the first of my friends to know about the
newest car
5.0 I usually know more about cars than my friends
• Occupation
1.0 Alpine ~ (Model No.)
.Your highest level of education completed:
1. 0 High School Student
2. 0 High School Graduate
3.02 Yr. Degree/Some College
4. 0 Completed 4 Yr. College
5. 0 Completed Graduate School
Year:
• If navigation system, which monitor?
• Which ethnicity best describes yourself:
1. 0 Caucasian
2. 0 Hispanic
3. 0 African-American
_
2.0 No.
• Which of the following statements best describes you?
_
__
Month:
o Yes-\,
(Brand Name)
• Model Number:
• Serial Number:
1.0Yes 2.0No
• Gender
1.0 Male
1.
• Date of Purchase:
..J
cs:
• When you purchased this Alpine unit, did you
compare it with other brands?
9. 0 Monitor Controller
10.0 Video Monitor
11 . 0 Navigation
12. 0 Mobile Mayday
13. 0 Video Tape Player
14.0 Processor/Equalizer
15.0 Security
16.00ther
1.0 Cassette Player
2.0 CD Player
3.0 MD Player
4. 0 DVD Player
5.0 CD Changer
6. 0 Amplifier
7.0 Speaker
8.0 Subwoofer
6. 0 EngineeringlTechnical
7. 0 Farming/Fishing
8.0 Retired
9.
Student
10.00ther
_
o
CJ)
m
»
rJ:
m
m
::tJ
B
4.
$70,000 - $90,000
5.
$90,000 - $110,000
6.0 Over $110,000
• Type of vehicle in which this unit is installed.
_
Make:
Purchased Year:
Model:
_
Model Year:
_
• How was this vehicle purchased?
1. 0 Bought
Customer Care Registration is for Product registration.
Failure to complete and return this card does not diminish your warranty rights.
2. 0 Leased
PART NO. 68-12118Z02-A
NO POSTAGE
NECESSARY
IF MAILED
INTHE
UNITED STATES
BUSINESS REPLY MAIL
FIRST-CLASS MAIL
PERMIT NO. 320
TORRANCE CA
POSTAGE WILL BE PAID BY ADDRESSEE
ATTENTION MARKETING SERVICES
ALPINE ELECTRONICS OF AMERICA INC
PO BOX 2859
TORRANCE CA 90509-9939
11.1"11""1,1,11,,,1,1,,1,1,,1,111,,11,1,1,,1,,,11
l'
FOR USE IN USA, PLEASE FOLD HERE AND ENSURE THAT
AMERICAN ADDRESS FACES UP.
"dn S38V'::I SS3l:l00V' NV'IOV'NV'8
lV'H13l:lnSN3 ONV' 3l:l3H 010::1 3SV'31d VOV'NV'8 NI 3Sn l:lO::l
1
1'1'1"'11'1"'1'1"1"1'11I"""11'1'1""11"1'11
v::m::13V\1V .::10 S31V1S 0311Nn
9L86-~0906 V'J 3'JN~~01
ld A'J~3V\1~8 9v~6~
S'JINO~1'J313 3NldlV
myn....
JIlIi
11IIII1
AIVImII
IN. . . .
m"llaJ_
..
rnmJ!IIm
A?ffALPINE,
eX-10
68-12118Z17-A (Y)
Belore using the unit, be sure to read the lollowing throughly./Avant d'utiliser I'appareil, Iisez attentivement les
informations suivantes./Antes de utilizar la unidad, es importanle que lea 10 siguiente con atenci6n./ L:~fflWiI<:
~9"S~#<r.:~l,)o
lfiEffl<$:lIirt1 '
Si¥m!CM~l$rm3l1'9U)!~~:r.ft
0
I~m*mntr
' iW?JJ~'1T!m~~l'91J
)!~$JYi.
WARNING
.<:t.WARNING
This symbol means important instructions.
Failure to heed them can result in serious
injury or death.
DO NOT OPERATE ANY FUNCTION THAT TAKES YOUR
ATTENTION AWAY FROM SAFELY DRIVING YOUR
VEHICLE.
Any function that requires your prolonged attention should only
be perfonned after coming to a complete stop. Always stop the
vehicle in a safe location before performing these functions.
Failure to do so may result in an accident.
KEEP THE VOLUME AT A LEVEL WHERE YOU CAN STILL
HEAR OUTSIDE NOISES WHILE DRIVING.
Excessive volume levels that obscure sounds as emergency
vehicle sirens or road warning signals (train crossings, ctc.) can
be dangerous and may result in an accident. LISTENING AT
LOUD VOLUME LEVELS IN A CAR MAY ALSO CAUSE
HEARING DAMAGE.
MINIMIZE DISPLAY VIEWING WHILE DRIVING.
Viewing the display may distract the driver from looking ahead
of the vehicle and cause an accident.
DO NOT DISASSEMBLE OR ALTER.
Doing so may result in an accident. fire or electric shock.
USE ONLY IN CARS WITH A 12 VOLT NEGATIVE GROUND.
(Check with your dealer if you are not sure.) Failure to do so
may result in fire, etc.
KEEP SMALL OBJECTS SUCH AS BOLTS OR SCREWS
OUT OF THE REACH OF CHILDREN.
Swallowing them may result in serious injury. If swallowed.
consult a physician immediately.
USE THE CORRECT AMPERE RATING WHEN REPLACING
FUSES.
Failure to do so may result in fire or electric shock.
DO NOT BLOCK VENTS OR RADIATOR PANELS.
Doing so may cause heat to build up inside and may result in
fire.
USE THIS PRODUCT FOR MOBILE 12V APPLICATIONS.
Use for other than its designed application may result in fire.
electric shock or other injury.
MAKE THE CORRECT CONNECTIONS.
Failure to make the proper connections may result in tire or
product damage.
BEFORE WIRING THE ANTENNA CABLE ON THE CAR
SIDE, DISCONNECT THE CABLE FROM THE NEGATIVE
BATTERY TERMINAL.
Failure to do so may result in electric shock or injury due to
electrical shons.
DO NOT SPLICE INTO ELECTRICAL CABLES.
Never cut away cable insulation to supply power to other
equipment. Doing so will exceed the current carrying capacity of
the wire and result in fire or electric shock.
DO NOT DAMAGE PIPE OR WIRING WHEN DRILLING
HOLES.
When drilling holes in the chassis for installation. take
precautions so as not to contact, damage or obstruct pipes, fuel
lines, tanks or electrical wiring. Failure to take such precautions
may result in fire.
DO NOT USE BOLTS OR NUTS IN THE BRAKE OR
STEERING SYSTEMS TO MAKE GROUND CONNECTIONS.
Bolts or nuts used for the brake or steering systems (or any
other safety-related system), or tanks should NEVER be used
for installations or ground connections. Using such parts could
disable control of the vehide and cause fire etc.
DO NOT INSTALL IN LOCATIONS WHICH MIGHT HINDER
VEHICLE OPERATION, SUCH AS THE STEERING WHEEL
OR GEARSHIFT.
Doing so may obstruct forward vision or hamper movement
etc. and results in serious accident.
DO NOT INSTALL THE MONITOR NEAR THE PASSENGER
SEAT AIR BAG.
If the unit is not installed correctly the air bag may not function
correctly and when triggered the air bag may cause the monitor
to spring upwards causing an accident and injuries.
DO NOT ALLOW CABLES TO BECOME ENTANGLED IN
SURROUNDING OBJECTS.
Arrange wiring and cables in compliance with the manual to
prevent obstructions when driving. Cables or wiring that
obstruct or hang up on places such as the steering wheel, gear
lever, brake pedal, etc. can be extremely hazardous.
.<:t.CAUTION
This symbol means important instructions.
Failure to heed them can result in injury or
material property damage.
HALT USE IMMEDIATELY IF A PROBLEM APPEARS.
Failure to do so may cause personal injury or damage to the
product. Return it to your authorized Alpine dealer or the
nearest Alpine Service Center for repairing.
DO NOT MIX NEW BATTERIES WITH OLD BATTERIES.
INSERT WITH THE CORRECT BATTERY POLARITY.
When insening the balleries. be sure to observe proper polarity
(+ and -) as instructed. Rupture or chemical leakage from the
battery may cause tire or personal injury.
HAVE THE WIRING AND INSTALLATION DONE BY
EXPERTS.
The wiring and installation of this unit requires special
technical skill and experience. To ensure safety. always contact
the dealer where you purchased this product to have the work
done.
USE SPECIFIED ACCESSORY PARTS AND INSTALL
THEM SECURELY.
Be sure to use only the specified accessory pans. Use of other
than designated pans may damage this unit internally or may
not securely install the unit in place. This may cause pans to
become loose resulting in hazards or product failure.
ARRANGE THE WIRING SO IT IS NOT CRIMPED OR
PINCHED BY A SHARP METAL EDGE.
Route the cables and wiring away from moving pans (like the
seat rails) or sharp or pointed edges. This will prevent crimping
and damage to the wiring. If wiring passes through a hole in
metal, use a rubber grommet to prevent the wire's insulation
from being cut by the metal edge of the hole.
DO NOT INSTALL IN LOCATIONS WITH HIGH MOISTURE
OR DUST.
Avoid installing the unit in locations with high incidence of
moisture or dust. Moisture or dust that penetrates into this unit
may result in product failure.
PRECAUTIONS
• If the unit is connected, and the power is turned on when the cigarette lighter power is turned on, the battery
continues to be consumed. Depending on the vehicle, even if you turn offthe engine, the cigarette lighter power
is not turned off, and if it is left turned on for long time, the battery may be drained entirely. In this case,
disconnect the cigarette Adapter. Also. activate the Automatic Power OFF function. Refer to "Automatic Power
OFF Function (Auto Poweroif) " described in the Owner's Manual.
#/ff/iLPINE.
GARANTIE L1MITEE
Fideles a leur engagement de ne fournir que des produits de qualMl, ALPINE ELECTRONIQUE DE L'AMERIQUE, INC. et
ALPINE ELECTRONIQUE DU CANADA, INC. (Alpine) sont heureuses de vous offrir cette garantie. Nous vous suggerons de Ie
lire attentivement et en entier. Si vous avez la moindre question, veuillez contacter I'un de nos concessionnaires ou appeler
directement Alpine aux numeros listes ci-dessous.
ePRODUITS COUVERTS PAR LA GARANTIE
® Vous devez donner une description detaillee des
Cette garantie couvre les produits audio de voiture et les
accessoires connexes ("Ie produit"). Elle ne couvre les
produits que dans Ie pays ou ils ont ete achetes.
Cette garantie est en vigueur pendant un an a partir de la date
du premier achat du client.
problemes qui sont a I'origine de votre demande de
reparation.
@ Vous devez joindre la preuve de votre achat du produit.
@ Vous devez emballer soigneusement Ie produit pour eviter
tout dommage durant son transport. Pour eviter la perte
de I'envoi, il est conseille de choisir un transporteur qui
propose un service de suivi des envois.
• PERSONNES PROTEGEES PAR LA GARANTIE
eliMITATION DES GARANTIES TACITES
Seull'acheteur original du produit, s'il resisde aux Etats-Unis,
Porto Rico ou au Canada, peut se prevaloir de la garantie.
LA DUREE DE TOUTES LES GARANTIES TACITES, Y
COMPRIS LA GARANTIE D'ADAPTATION A L'UTILISATION
ET LA GARANTIE DE QUALITE LOYALE ET MARCHANDE,
EST L1MITEE A CELLE DE LA GARANTIE EXPRESSE
DETERMINEE CI-DESSUS. PERSONNE N'EST AUTORISE
A ENGAGER AUTREMENT LA RESPONSABILITE D'ALPINE
EN VERTU DE LA VENTE D'UN PRODUIT.
eDUREE DE LA GARANTIE
a
eCE QUI EST COUVERT
Cette garantie couvre tous les defauts de materiaux et de
fabrication (pieces et main d'reuvre) du produit.
eCE QUI N'EST PAS COUVERT
Cette garantie ne couvre pas ce qui suit:
Les dommages survenus durant Ie transport des produits
renvoyes a Alpine pour etre repares (Ies reclamations
doivent etre adressees au transporteur);
® Les degats provoques par un accident ou une mauvaise
utilisation, y compris des bobines acoustiques grillees
suite a une surexcitation des enceintes (augmentation
du niveau de I'amplificateur jusqu'a atteindre un effet de
distorsion ou d'ecretage), une defaillance mecanique
des enceintes (perforations, dechirures ou fentes),
panneaux LCD fissures ou endommages, disques durs
endommages ou ayant subi une chute.
@ Tout degat provoque par negligence, usage inapproprie,
mauvaise utilisation ou par Ie non-respect des
instructions indiquees dans Ie manuel de I'utilisateur.
@ Les dommages dus a la force majeure, notamment aux
tremblements de terre, au feu, aux inondations, aux
tempetes ou aux autres cataclysmes naturels;
Les frais ou les depenses relatifs a I'enlevement ou a la
reinstallation du produit;
® Les services rendus par une personne, physique ou
morale non autorisee;
® Les produits dont Ie numero de serie a ete efface, modifie
ou retire;
(j) Les produits qui ont ete adaptes ou modifies sans Ie
consentement d'Alpine;
@ Les produits qui ne sont pas distribues par Alpine aux
Etats-Unis, a Porto Rico ou au Canada;
® Les produits qui n'ont pas ete achetes par I'entremise d'un
concessionnaire Alpine autorise;
CD
eCOMMENT SE PREVALOIR DE LA GARANTIE
CD
II vous faut remettre Ie produit necessitant des reparations
a un centre de service autorise Alpine ou a Alpine meme et
en assumer les frais de transport. Alpine a Ie choix entre
reparer Ie produit ou Ie remplacer par un produit neuf ou
revise, Ie tout sans frais pour vous. Si les reparations sont
couvertes par la garantie et si Ie produit a ete envoye a un
centre de service Alpine ou a Alpine, Ie paiement des frais
de reexpedition du produit incombe Alpine.
eEXCLUSIONS DE LA GARANTIE
ALPINE STIPULE EXPRESSEMENT QU'ELLE N'EST PAS
RESPONSABLE DES DOMMAGES-INTERETS ET
DOMMAGES INDIRECTS PROVOQUES PAR LE PRODUIT.
LES DOMMAGES-INTERETS SONT LES FRAIS DE
TRANSPORT DU PRODUIT VERS UN CENTRE DE
SERVICE ALPINE, LA PERTE DE TEMPS DE l'ACHETEUR
ORIGINAL, LA PERTE D'UTILISATION DU PRODUIT, LES
81LLETS D'AUTOBUS, LA lOCATION DE VOITURES ET
TOUS lES AUTRES FRAIS LIES A lA GARDE DU
PRODUIT.
LES DOMMAGES INDIRECTS SONT LES FRAIS DE
REPARATION OU DE REMPLACEMENT D'AUTRES BIENS
ENDOMMAGES SUITE AU MAUVAIS FONCTIONNEMENT
DU PRODUIT.
LES RECOURS PREVUS PAR LES PRESENTES
EXCLUENT ET REMPLACENT TOUTE AUTRE FORME DE
RECOURS.
ellEN ENTRE LA GARANTIE ET LA LOI
La garantie vous donne des droits specifiques, mais vous
pouvez aussi jouir d'autres droits, qui varient d'un etat ou
d'une province a I'autre. En outre, certains etats et certaines
provinces interdisent de limiter la duree des garanties tacites
ou d'exclure les dommages accessoires ou indirects. Dans ce
cas, les limites et les exclusions de la garantie peuvent ne pas
s'appliquer a vous.
.CLAUSE APPLICABLE AU CANADA SEULEMENT
Pour que la garantie soit val able, il faut qu'un centre
d'installation autorise ait installe Ie systeme audio pour I'auto
dans votre vehicule et qu'il ait ensuite appose son cachet sur
la garantie.
.NUMEROS D'APPEl DU SERVICE
A. LA CLIENTELE
Si vous avez besoin de nos services, veuillez appeler Alpine
aux numeros ci-dessous pour Ie centre de service autorise
Alpine Ie plus proche.
AUDIO DE VOITURE
NAVIGATION
1-800-ALPINE-1 (1-800-257-4631)
1-SS8-NAV-HELP (1-888-628-4357)
Ou visitez notre site Web a I'adresse http://www.alpine-usa.com
ALPINE ELECTRONIQUE
ELECTRONIOUE DE L'AMERIQUE,
L'AMERIOUE, INC., 19145 Gramercy Place, Torrance, California 90501, U.S.A.
ALPINE ELECTRONIQUE
ELECTRONIOUE DU CANADA, INC., 777 Supertest Road, Toronto, Ontario M3J 2M9. Canada
N'envoyez aucun produit aces adresses.
Appelez notre numero gratuit ou visitez notre site Web si vous recherchez un centre de service.
~ALPINE"
LIMITED WARRANTY
ALPINE ELECTRONICS OF AMERICA, INC. AND ALPINE OF CANADA INC. ("Alpine"), are dedicated to quality
craftsmanship and are pleased to offer this Warranty. We suggest that you read it thoroughly. Should you have any
questions, please contact your Dealer or contact Alpine at one of the telephone numbers listed below.
.PRODUCTS COVERED:
This Warranty covers Car Audio Products and Related
Accessories ("the product"). Products purchased in the
Canada are covered only in the Canada. Products
purchased in the U.S.A. are covered only in the U.S.A.
@ You must supply proof of your purchase of the product.
@ You must package the product securely to avoid
damage during shipment. To prevent lost packages it is
recommended to use a carrier that provides a tracking
service.
.LENGTH OF WARRANTY:
.HOW WE LIMIT IMPLIED WARRANTIES:
This Warranty is in effect for one year from the date of the
first consumer purchase.
This Warranty only covers the original purchaser of the
product, who must reside in the United States, Puerto Rico
or Canada.
ANY IMPLIED WARRANTIES INCLUDING FITNESS FOR
USE AND MERCHANTABILITY ARE LIMITED IN
DURATION TO THE PERIOD OF THE EXPRESS
WARRANTY SET FORTH ABOVE AND NO PERSON IS
AUTHORIZED TO ASSUME FOR ALPINE ANY OTHER
LIABILITY IN CONNECTION WITH THE SALE OF THE
PRODUCT.
.WHAT IS COVERED:
.HOW WE EXCLUDE CERTAIN DAMAGES:
This Warranty covers defects in materials or workmanship
(parts and labor) in the product.
ALPINE EXPRESSLY DISCLAIMS LIABILITY FOR
INCIDENTAL AND CONSEQUENTIAL DAMAGES
CAUSED BY THE PRODUCT. THE TERM "INCIDENTAL
DAMAGES" REFERS TO EXPENSES OF
TRANSPORTING THE PRODUCT TO THE ALPINE
SERVICE CENTER, LOSS OF THE ORIGINAL
PURCHASER'S TIME, LOSS OF THE USE OF THE
PRODUCT, BUS FARES, CAR RENTALS OR OTHERS
COSTS RELATING TO THE CARE AND CUSTODY OF
THE PRODUCT. THE TERM "CONSEQUENTIAL
DAMAGES" REFERS TO TI-lE COST OF REPAIRING OR
REPLACING OTHER PROPERTY WHICH IS DAMAGED
WHEN THIS PRODUCT DOES NOT WORK PROPERLY.
THE REMEDIES PROVIDED UNDER THIS WARRANTY
ARE EXCLUSIVE AND IN LIEU OF ALL OTHERS.
.WHO IS COVERED:
.WHAT IS NOT COVERED:
This Warranty does not cover the following:
Damage occurring during shipment of the product to
Alpine for repair (claims must be presented to the
carrier).
@ Damage caused by accident or abuse, including burned
voice coils caused by over-driving the speaker (amplifier
level is turned up and driven into distortion or clipping).
Speaker mechanical failure (e.g. punctures, tears or
rips). Cracked or damaged LCD panels. Dropped or
damaged hard drives.
@ Damage caused by negligence, misuse, improper
operation or failure to follow instructions contained in the
Owner's manual.
@ Damage caused by act of God, including without
limitation, earthquake, fire, flood, storms or other acts of
nature.
Any cost or expense related to the removal or
reinstallation of the product.
® Service performed by an unauthorized person, company
or association.
® Any product which has the serial number defaced,
altered or removed.
(J) Any product which has been adjusted, altered or
modified without Alpine's consent.
® Any product not distributed by Alpine within the United
States, Puerto Rico or Canada.
® Any product not purchased from an Authorized Alpine
Dealer.
CD
.HOW STATE/PROVINCIAL LAW RELATES TO THE
WARRANTY:
This Warranty gives you specific legal rights, and you may
also have other rights which vary from state to state and
province to province. In addition, some states/provinces do
not allow limitations on how long an implied warranty lasts,
and some do not allow the exclusion or limitation of
incidental or consequential damages. Accordingly,
limitations as to these matters contained herein may not
apply to you.
.IN CANADA ONLY:
This Warranty is not valid unless your Alpine car audio
product has been installed in your vehicle by an Authorized
Installation Center, and this warranty stamped upon
installation by the installation center.
.HOW TO OBTAIN WARRANTY SERVICE:
• HOW TO CONTACT CUSTOMER SERVICE:
CD You are responsible for delivery of the product to an
Should the product require service, please call the following
number for your nearest Authorized Alpine Service Center.
Authorized Alpine Service Center or Alpine for repair
and for payment of any initial shipping charges. Alpine
will, at its option, repair or replace the product with a
new or reconditioned product without charge. If the
repairs are covered by the warranty, and if the product
was shipped to an Authorized Alpine Service Center or
Alpine, Alpine will pay the return shipping charges.
@ You should provide a detailed description of the
problem(s) for which service is required.
CAR AUDIO 1-800-ALPINE-1 (1-800-257-4631)
NAVIGATION 1-888-NAV-HELP (1-888-628-4357)
Or visit our website at; http://www.alpine-usa.com
ALPINE ELECTRONICS OF AMERICA, INC., 19145 Gramercy Place, Torrance, California 90501, U.S.A.
ALPINE ELECTRONICS OF CANADA, INC., 777 Supertest Road, Toronto, Ontario M3J 2M9, Canada
Do not send products to these addresses.
Call the toll free telephone number or visit the website to locate a service center.
68-12118Z52-A (Y)