1
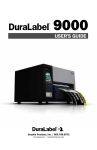
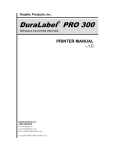
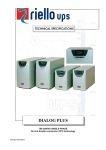
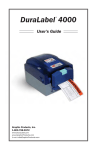
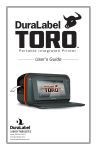
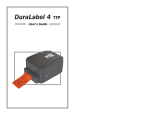
DuraLabel PRO 300
®
QuickStart Guide
Graphic Products, Inc.
1-800-788-5572
Local: 503-644-5572
www.DuraLabel.com
www.GraphicProducts.com
E-mail: [email protected]
Read Me
First!
**IMPORTANT**
For Upgrading from an existing DuraLabel driver installation!
Upgrade Drivers
In order to upgrade DuraLabel printer drivers the previous driver will need to be
uninstalled. Please follow these steps:
1. Press the “Uninstall Driver” button on the installation screen.
2. Click “Remove printer drivers” and click “Next.”
3. Click “Use advanced printer driver removal options” and click “Next.”
4. Check all existing DuraLabel printers and click “Next.”
5. Check all existing DuraLabel drivers and click “Next.”
6. Check all existing DuraLabel components and click “Next.”
7. Check the files associated with the deleted items you wish to remove and
click “Next.”
8. Check through the list provided and click “Finish.”
9. Click “Restart.”
The DuraLabel PRO 300 printer driver may now be installed. Begin with page 7,
Step 2 Connect Printer of the QuickStart Guide.
Minimum System Requirements
Operating System: Windows 2000 SP4, Windows XP SP2 and Windows Vista
Memory: 128 MB RAM
Additional Requirements: USB 1.1 or 2.0 and IT Administration Privileges
© 2008, 2009 Graphic Products, Inc.
INTRODUCTION
®
Congratulations on your new purchase of the DuraLabel PRO
300! This guide is included to get you printing as soon as
possible.
With this guide you will learn how to set up your printer, load
supplies and print labels.
®
The ribbon and various print media for the DuraLabel PRO 300
have been optimized for compatibility and print quality. Only
authorized supplies from Graphic Products will print correctly in
®
the DuraLabel PRO 300.
If you need more help with setting up your printer, please refer
to the DuraLabel PRO 300 Manual (included on the installation
CD), visit www.Duralabel.com or give us a call.
Graphic Products, Inc.
1-800-788-5572
Please contact us for all
your labeling needs. From
standardized to custom
labels, we’re ready to
provide the labeling
supplies you need. Call
1-800-788-5572 today
to get your labeling
problems solved.
-1-
CONTENTS
Contents of Package ......................................... pg. 3
1. Load Printer .................................................. pg. 4
Load Ribbon.................................................. pg. 4
Load Vinyl Tape............................................. pg. 6
2. Connect Printer ............................................. pg. 7
3. Install Using USB Cable................................ pg. 7
4. Install Using Parallel Cable .......................... pg. 8
5. Set Up to Print ............................................. pg. 9
-2-
USB Cable
DuraLabel PRO 300
Thermal Transfer Printer
®
Label Supply Spindle
& 2 Fixing Tabs
AC Adapter
2 Ribbon Spindles,
(1 with an empty paper core)
Contents of Package:
▪ DuraLabel PRO 300 Thermal Transfer Printer
▪ DuraLabel PRO 300 Installation CD
▪ DuraLabel PRO 300 QuickStart Guide
▪ DuraLabel PRO 300 User's Guide
▪ AC Adapter
▪ USB Cable
▪ 2 Ribbon Spindles (black spindles, one will have a paper core on it)
▪ Label Supply Spindle
▪ 2 Fixing Tabs (for each end of the Label Supply Spindle)
®
®
®
®
If you are missing a part, please call your Graphic Products Representative
-3-
**IMPORTANT**
Always turn OFF the printer when loading
supplies. Always wait at least 5 seconds before
turning ON the power.
1. LOAD PRINTER
See the Load Printer section (pages 3-10) in the User's Guide for a more
detailed explanation of supply loading.
®
The ribbon and various print media for the DuraLabel PRO 300 have been
optimized for compatibility and print quality. Only authorized supplies from
Graphic Products will print correctly in the DuraLabel PRO 300.
®
For more information about supply loading, please view the supply
loading video on the installation CD.
Load Ribbon
**IMPORTANT**
Always turn OFF the power first!
The following instructions are for loading 4.3" ribbon supply. See “To Load
2.5" Ribbon Supply” section (page 6) in the User's Guide for instructions on
how to load 2.5" ribbon supply.
1. Open the Ribbon Mechanism Cover. (See Figure 1)
Figure 1
Clear Window
Ribbon Mechanism Cover
(Push down to open)
LED Indicator
Feed Button
Printer Top Cover
Printer Cover Release Lever
-4-
2. Place Ribbon Supply onto the empty Ribbon Supply Spindle and insert the
spindle into the Rear Hub.
3. Place the Ribbon Rewind Spindle, with the paper core, on the Front Hub.
Note: Make sure the flanges on the end of the ribbon spindles are on
the right side of the printer when viewing from the front. (See Figure 2)
Figure 2
New Ribbon Supply
Flanges on the Ribbon Spindles attaches
to right side of printer.
Put on Rear Hub.
Empty Core
for used ribbon
Put on Front Hub.
Rear Hub
Ribbon Spindle
Front Hub
4. Open the Printer Cover using the Printer Cover Release Levers.
(See Figure 1, pg. 4)
5. Thread the ribbon down and underneath the Ribbon Mechanism.
Note: The dull side of the ribbon should face down (face the label stock).
(See Figure 3)
6. Tape the entire width of the end of the ribbon to the front empty core.
7. Wind the ribbon onto the take-up core by rotating it with your thumb.
Figure 3
New Ribbon Supply
Used Ribbon
Vinyl Tape
Ribbon goes
underneath
Print Head
Front of printer
Dull side of ribbon face down
Back of printer
-5-
Load Vinyl Tape
**IMPORTANT**
Always turn OFF the power first!
1. With the Ribbon Mechanism still in upright position, center the Label
Stock on the Label Supply Roll Spindle using the Fixing Tabs. (See Figure 4)
Fixing Tab
Figure 4
Vinyl Tape
Printing Side
Face Up
Label Supply Spindle
2. Place the Label Supply Spindle with the Label Stock in the Label Roll
Mount slots. (See Figure 5)
3. Guide the Label Stock underneath the white Teflon Bar.
4. Secure the Label Stock in place by moving the Adjustable Label Guides to
hold the Label Stock in the center.
5. Thread the Label Stock through the Printed Label Opening, leaving about
1/2" Label Stock hanging out the opening.
Figure 5
Print Head
(metal bar underneath)
Label Roll Mount
Printer Cover
Adjustable Label
Guides
Top Cover Support
White Teflon Bar
Printer Cover
Release Lever
6. Close Printer Cover by lifting it all the way up, then gently press down until it
latches closed.
7. Close the Ribbon Mechanism Cover by pressing down until it latches.
-6-
2. CONNECT PRINTER
**IMPORTANT**
These Steps need to be done in the order below!
1. Connect the power supply.
2. Connect the DuraLabel PRO 300 to your PC using the USB or parallel
cable.
3. Turn on the DuraLabel PRO 300. (Switch is in back of printer, See Figure 6)
Figure 6
1
7
4
2
3
5
6
1. USB
2. Centronics
3. RS-232
4. Power Switch
5. Power Cable
6. Power Supply
7. Plug
3. INSTALL USING USB CABLE
**IMPORTANT**
You must have administrative rights in order to perform this installation.
1. A “Found New Hardware” dialog box may appear. If so, select “No, at this
time.”
2. Insert DuraLabel PRO 300 Installation CD into the CD-ROM drive.
3. Select “Install the software automatically” and click “Next.”
(Step 3 of "Install Using USB Cable" may run automatically.)
4. When prompted to continue, click “Continue Anyway.”
5. A dialog will appear showing the installation progress and will close after
completion.
6. A Found New Hardware dialog box will appear, click “Finish” to exit and to
close the window.
7. Skip to page 9, Step “5. Set up to Print.”
-7-
4. INSTALL USING PARALLEL CABLE
Skip this Step if using a USB Cable!
**IMPORTANT**
You must have administrative rights in order to perform this installation.
1. Insert DuraLabel PRO 300 Installation CD into the CD-ROM drive.
Note: If you encounter a dialog box that says you must have .NET Framework,
follow the instructions in the box.
2. If the CD does not automatically run, go to START >> MY COMPUTER and
double-click on the DLP300 icon.
3. A “Found New Hardware” dialog box may appear. If so, select “No, at this
time.”
4. Click “Manual Driver Install” at the bottom right corner of the DuraLabel
PRO 300 installation screen.
5. Click “Next” to begin the installation process.
6. Click “I Agree” to the License Agreement.
7. Accept the default installation directory as “C:\DL300” and click “Install.”
8. Click “Next” to run the Add Printer Wizard.
9. Select “Local printer attached to this computer” and click “Next.”
10. Select the port you wish to use and click “Next.” (Default location is LPT1.)
11. From the printers list, select “Graphic Products DuraLabel PRO 300” and
click “Next.”
12. If given a choice to keep or replace the existing driver, select “Replace
existing driver” and click “Next.”
13. Leave the default name as “Graphic Products DuraLabel PRO 300,” select if
you wish to use it as the default printer and click “Next.”
14. Select “Do not share this printer” (this can be changed later) and click
“Next.”
15. Select “No” to “Do you want to print a test page” and click “Next.”
16. Click “Finish” on the Add Printer Wizard dialog box.
17. When prompted to continue, click “Continue Anyway.”
18. Click “Finish” on the Duralabel 300 Driver Setup dialog box to complete
the installation.
-8-
5. SET UP TO PRINT
When printing labels it is easier to start with an existing template and make modifications than to
create a new label from scratch. On the CD splash screen click on “Install Templates & Symbols.”
**IMPORTANT** Perform these changes before opening the
document you wish to print.
Continuous Label Stock
The Default Printing Preferences on your
DuraLabel PRO 300 should be at the proper
settings for printing on continuous vinyl and
should require no adjustments.
To change settings:
1. Select START >> PRINTERS and FAXES.
2. Right-click on “DuraLabel PRO 300” and
select “Printing Preferences.”
3. On the Options tab you can adjust the
speed and darkness to optimize print quality depending on the ribbon and
tape supply you are using.
Die-Cut Label Stock (Arc Flash & RTK/NFPA)
When printing on die-cut labels you will need to calibrate the gap sensor and
make some adjustments in the print driver.
To calibrate the gap sensor:
1. Turn off the printer and wait 5 seconds.
2. Hold down the button on top of the printer
and turn it back on. The light will change
colors then blink red 5 times.
3. Release the button while it's blinking red.
Labels will feed through the printer
and the gap sensor will be calibrated.
To set up the driver for die-cut label stock:
1. Select START >> PRINTERS and FAXES.
2. Right-click on “DuraLabel PRO 300” and
select “Printing Preferences.”
3. On the Stock tab under “Media Settings” change the Type to “Labels with
Gaps.” (If you do not want to cut between every label, under Media Handling change
the Post-Print Action to “None.” Or you can leave the cutter on but specify an interval.)
4. Click “Apply” after you have made your changes.
-9-
1-800-788-5572
P.O. Box 4030
Beaverton, OR 97076
© 2008, 2009, Graphic Products, Inc. All Rights Reserved
www.DuraLabel.com
v. 1.0 - 8/11/09