1
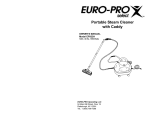
STEAM CLEANER
OWNER’S MANUAL
Model EP908H
120V., 60 Hz, 1550 Watts
EURO-PRO Operating LLC
94 Main Mill Street, Door 16
Plattsburgh, NY 12901
Tel.: 1 (800) 798-7398
Model EP908H
1 YEAR LIMITED WARRANTY
Your Steam Cleaner is warranted to be free from defects in material and workmanship for a period
of one (1) year from the date of purchase when utilized for normal household use by the original
purchaser only. The included Warranty Registration Card must be filled out and returned within 10
days of purchase. This is essential for your Warranty to be effective should any problem arise with
this product.
Should any defect covered by the terms of the limited warranty be discovered within one year,
EURO-PRO Operating LLC will repair or replace any defective part provided the unit is returned
by the original purchaser, freight prepaid, to:
US:
EURO-PRO Operating LLC, 94 Main Mill Street, Door, 16, Plattsburgh, N.Y. 12901
Proof of purchase date and $14.95 for handling and return packing/shipping charges must be
included.*
The liability of under this warranty is limited solely to the cost of the replacement parts or the
complete unit at our option. LABOUR CHARGES ARE NOT INCLUDED.
This warranty does not cover normal wear of parts and does not apply to any unit that has been
tampered with or used for commercial purposes. This Limited Warranty does not cover damage
caused by misuse, negligent handling, or damage due to faulty packaging or mishandling in transit
(by any common carrier).
This warranty is extended to the original purchaser of the unit and excludes all other legal and/or
conventional warranties. The responsibility of EURO-PRO Operating LLC, if any, is limited to the
specific obligations expressly assumed by it under the terms of the limited warranty. In no event is
EURO-PRO Operating LLC liable for incidental or consequential damages of any nature
whatsoever. Some States/Provinces do not permit the exclusion or limitation of incidental or
consequential damages, so the above may not apply to you.
This warranty gives you specific legal rights which vary from state to state or province to province.
*Important: Carefully pack item to avoid damage in shipping. Be sure to attach tag to item before
packing with your name, complete address and phone number with note giving purchase
information, model number and what you believe is the problem with item. We recommend you
insure the package (as damage in shipping is not covered by your warranty). Mark the outside of
your package “ATTENTION CUSTOMER SERVICE”. We are constantly striving to improve our
products, therefore the specifications contained herein are subject to change without
notice.
OWNERSHIP REGISTRATION CARD
Please complete and return within ten (10) days of purchase. The registration will enable us to
contact you in the event a product defect is discovered. By returning this card you acknowledge
to have read and understood the instructions for use, and warnings set forth in the accompanying
instructions.
RETURN TO: EURO-PRO Operating LLC, 94 Main Mill Street, Door 16, Plattsburgh, N.Y. 12901
PURCHASER: ……………………………………..…………………………………………………
ADDRESS: ………………………………………...……………………………………………….
CITY: ………………………………..
STATE…………………………………………………….
DATE OF PURCHASE: ………………………
EP908H
MODEL:..…………………………………….
NAME AND ADDRESS OF DEALER: …………………………………………………………..
Printed in Turkey
13
CARE & MAINTENANCE
IMPORTANT SAFETY INSTRUCTIONS
When using your Steam Cleaner basic safety precautions should always be
observed, including the following:
If you consistently use demineralized or
distilled water, cleaning the tank is
unnecessary.
1.
Rinsing out the steam cleaner:
Normally, a periodic rinse of your steam
cleaner will free it from deposits. This is
recommended every 10-15 tankfulls, to
free up any scale deposits from the tank.
Fill the boiler with 20 oz. of water and
shake the cleaner vigorously. Tilt the
cleaner upside down to empty the boiler of
water and any scale deposits.
Fig. 10
Descaling your steam cleaner:
If the tap water in you area contains a high
level of calcium deposits and you have
been using tap water to do your steam
cleaning, you should descale your unit
after 10-15 tankfulls.
Step 1: Unplug the steam cleaner from
the power source before you
descale the boiler. Allow to cool.
Step 2:
Fill the boiler with 1 part
vinegar and 5 parts water and
leave overnight or for a period
of approximately 8 hours. Do
not screw the safety/filler cap
onto the steam cleaner while
you are descaling the boiler.
Do not use the steam cleaner
while descaling solution is
inside the boiler.
Step 3:
After the period of soaking, turn
the steam cleaner upside down
to empty solution from the
boiler. Due to the fact that a
small amount of solution will be
left in the boiler, it is necessary
to rinse the boiler out with clean
water 2 or 3 times. Your steam
cleaner is now ready for use.
Note: When storing your unit, always
drain any residual water in the boiler
and do not tighten the safety filler cap
onto the unit. Always leave the safety
filler cap loose on the unit when not in
use.
Fig. 11
Fig. 12
Attaching the Shoulder Strap
Using the detachable shoulder strap
allows for greater freedom of movement
when both hands are needed for various
cleaning tasks.
To attach the shoulder strap to the steam
cleaner, simply snap the shoulder strap
hooks onto the connecting rings on the
unit body.
See Fig. 10, 11 & 12.
When using the Ultra Steam Shark II with
the shoulder strap, avoid rocking or tilting
the unit excessively as this may cause
water to enter the hose and be
12discharged along with the steam.
Read all instructions before using your
steam cleaner.
2. Use the system only for its intended use.
3. To protect against a risk of electric shock,
do not immerse any part of the system in
water or other liquids.
4. Never yank cord to disconnect from
outlet; instead, grasp plug and pull to
disconnect.
5. Do not allow cord to touch hot surfaces.
Let the system cool completely before
putting away or opening water tank
(removing the safety cap). Wrap cord
loosely around system when storing.
6. Always disconnect system from electrical
outlet when filling with water or emptying
and when not in use. Always turn the
safety cap slowly when opening the water
tank . This will allow any remaining steam
to escape gradually.
7. Do not operate the system with a damaged
cord or plug, or if the appliance or any other
part of the system has been dropped or
damaged. To avoid the risk of electric
shock, do not disassemble or attempt to
repair the steam cleaner. Return the
system to EURO-PRO Operating LLC (see
warranty) for examination and repair.
Incorrect re-assembly or repair can cause a
risk of electrical shock or injury to persons
when the steam cleaner is used.
8. Close supervision is necessary for any
appliance being used by or near children.
Do not leave the system unattended while
connected to electrical outlet or when hot.
9. Burns can occur from touching hot metal
parts, hot water or steam. Use caution
when draining unit after use as there may
be hot water in the unit. Never direct steam
at any person. The steam is very hot and
can cause burns.
10. Do not operate in the presence of
explosive and/or flammable fumes.
11. This appliance is intended only for
household use. Follow all user instructions
in this manual.
12. Never use any chemicals or substance
other than tap water in the machine. Use of
chemicals may damage the machine. Use
of chemicals will automatically void your
warranty.
To reduce the risk of fire, electric shock, or
injury:
• Do not leave the steam cleaner plugged
in when unattended. Unplug the electrical
cord when not in use and before servicing or
refilling water tank.
• Do not allow to be used as a toy. Close
attention is necessary when used by or near
children, pets or plants.
• Use only as described in this manual. Use
only manufacturer’s recommended
accessories.
• Do not pull cord, use cord as a handle, close
a door on cord, or pull cord around sharp
edges or corners. Keep cord away from
heated surfaces.
• Do not use extension cords or outlets with
inadequate current carrying capacity.
• Do turn off all controls as applicable before
unplugging from electrical outlet.
• Do not unplug by pulling on cord. To unplug,
grasp the plug, not the cord.
• Do not handle plug or steam cleaner with wet
hands or operate without shoes.
• Do not put any objects into openings. Do not
use with any opening blocked.
• Do store your appliance indoors in a cool, dry
area.
• Do keep your work area well lit.
• Do Not turn the appliance over or on its
side. Never direct steam towards people,
animals or plants.
• Do not immerse the steam cleaner into water
or other liquids. Always unplug the power
cord from the electrical socket when filling the
steam cleaner.
• Do NOT add cleaning solutions, scented
perfumes, oils or any other chemicals to
the water used in this appliance as this
may damage the unit or make it unsafe for
use. Use tap water or distilled/purified
water if the tap water in your area is very hard.
SAVE THESE INSTRUCTIONS
For Household Use Only
1
Rev. 09/04A
ADDITIONAL IMPORTANT SAFEGUARDS
1. To avoid circuit overload, do not operate another appliance on the same socket
(circuit) as the steam cleaner
2. If an extension cord is absolutely necessary, an extension cord rated a minimum
of 15 ampere, 14 gage cord should be used. Cords rated for less amperage may
overheat. Care should be taken to arrange cord so that it cannot be pulled or
tripped over.
3. Do not leave unattended when the system is connected to a power
supply/electrical outlet.
SAVE THESE INSTRUCTIONS
FOR HOUSEHOLD USE ONLY
WARNING: This appliance is equipped with a groundedtype 3-wire cord (3-prong plug). This plug will only fit into an
electrical outlet made for a 3-prong plug. This is a safety feature. If
the plug should fail to fit the outlet, contact an electrician to replace
the outlet. Do not attempt to defeat the safety purpose of the
grounding pin, part of the 3-prong plug.
CAUTION: Always drain condensed water from hose
before use or if unit has been left idle for a period of time. To
drain hose, direct nozzle into an appropriate container or sink and
depress hand grip steam trigger. Once hose has been drained,
normal use may be resumed. Never direct nozzle
towards people, animals or plants.
USAGE SUGGESTIONS FOR STEAM CLEANER
Exterior Areas
Hints
To clean inside your car, use the floor
brush with a terry cloth towel attached to
clean upholstery and interior areas just as
in the home. You should not expose the
bristles to leather - use only the brush with
the terry cloth towel attached. For
detailing the wheels, use the concentrator
and the detail brush. Exterior windows
are cleaned best by applying the vapor
with the concentrator and following with a
paper towel.
To clean bicycles, use the detail brush.
To clean equipment, use the detail brush,
depending on the surface area. Finish by
wiping down with a towel.
Artificial Plants
ALWAYS FINISH CLEANING BY WIPING
DOWN THE CLEANED SURFACE WITH
A TOWEL
The steam cleaner has many uses
that have not been mentioned. This
was meant only to give you a general
idea of what can be achieved with the
unit. However, the ways in which to
use the attachments and brushes are
in most cases universal. It is most
helpful to always have a terry cloth
towel or paper towel ready to use for
removal of moisture and residue.
100% white cotton towels work best.
You can clean the brushes with your
steam cleaner. To clean the floor
brush, hold at one end and use the
concentrator to simply blow off dirt
into the garbage can. When cleaning
the detail brush, use a pair of pliers to
hold and blow dirt as above or place
in the basket of your dishwasher.
Note: Wipe with a towel immediately
before the cleaned area dries. When
cleaning the oven, use the detail
brush to clean around the elements
and drip trays. Use the detail brush
for cracks, crevices, and hard to reach
areas.
Refrigerator - Use the concentrator to
blow away dirt in the ice machine and
on door seals. The vapor will not dry
out or crack the seals as chemicals
often do. Can openers and other
kitchen equipment can be easily
cleaned with the detail brush to get
into all the nooks and crannies. Mold
stains around door gaskets can be
removed with the detail brush.
To clean microwaves or other small
appliances use the detail brush for
small areas.
Note: When cleaning small electrical
appliances always unplug them from
outlet before cleaning.
To clean counter tops, use the floor
brush with a terry cloth towel
attached. For heavily soiled areas,
use the brush without the terry cloth
towel first in order to loosen the
debris, then follow with a terry cloth
towel attached to finish.
Use the concentrator without a brush
attached to blow off the dust and dirt.
Clothing
A vapor cleaning system is excellent for
removing wrinkles from fabrics. Simply
“vaporize” the surface from a distance
(12”-18”) The dry vapor removes wrinkles
without leaving the fabric wet like ordinary
fabric steamers do.
Nicotine and Tar
Nicotine and tar dissolves at high
temperatures and becomes a light yellow
oil that has the consistency of sewing
machine oil. When the nicotine/tar film is
touched by a hot terry cloth towel clipped
over the floor brush, it immediately
dissolves and flows into the towel. You
can remove it from flat surfaces as fast as
you can move the brush over the surface.
Removing Wax, Tar, Etc.
Many stains are only stuck on the surface
of materials and can be easily and quickly
removed by “blowing” excess material
away from the surface from the side. This
is accomplished by using the
concentrator. Hold the terry cloth towel to
the side to catch the loose residue as it is
blown by the concentrator. Note: Always
vacuum any loose residue off the surface
before you apply vapor to it.
2
11
USAGE SUGGESTIONS FOR STEAM CLEANER
Window, Glass Surfaces and Mirrors
Garden Furniture
Use the dual edge glass and tile squeegee.
Work with the vapor jet on using the top to
bottom movements. Use the squeegee
with the vapor off to clear the water from
the glass. To do this without leaving
streaks, use lateral movements from the
top to the bottom of the surface.
Use any of the brushes depending on the
surface area. Work quickly when cleaning
resin outdoor furniture. Finish by wiping
with a towel
Fiberglass or Stainless Steel Surfaces
Use the floor brush or detail brush. Slowly
move the brush over the surface to be
cleaned. The vapor will emulsify the dirt
and grease on the surface. Follow behind
with a terry cloth towel over the brush to
remove excess moisture and residue.
Tip: An old idea for polishing stainless
steel is to wipe it down with seltzer soda
water after it is cleaned.
Soap Scum
Soap scum dissolves almost immediately
under a combination of heat and moisture.
Rinse the surface with a small amount of
water afterwards or go back over it once
more with a clean terry cloth towel.
Note: Soap scum sometimes will develop a
hard surface from waterborne minerals. If
this is the case, use the floor brush with no
towel first to break up this surface - or
spray or wipe first with lemon, vinegar or
seltzer soda water to soften the minerals.
GETTING TO KNOW YOUR STEAM CLEANER
Blinds
Use the detail brush to clean blinds.
Move the brush over the surface, allowing
enough time for the vapor to penetrate.
Work quickly on PVC blinds. Test for
color fastness on fabric blinds before
using. Finish by wiping with a towel.
Bathroom Areas
To clean the bathtub or shower area, use
the detail brush for grout, shower door
tracks, hard to get areas and heavily
soiled areas. The dual edge window/tile
squeegee will be the most efficient way to
clean the rest of the area. Allow plenty of
time for the heat to penetrate the surface.
This is especially helpful in the shower
area if there is tile or grout. Wipe with
towel.
1.
2.
3.
4.
5.
6.
7.
8.
9.
10.
11.
12.
13.
14.
15.
16.
Removal of soap scum on tile, grout, and
shower doors is also easier with the
steam cleaner.
To clean sanitary fixtures, use the
concentrator with or without detail brush.
Use a terry cloth towel or paper towel to
wipe up excess moisture and residue.
To clean the sink and faucets, use detail
brush then finish by wiping with a towel.
Moving too slowly can dry out the soap
scum and cause it to granulate on the
surface. The surface will have a gritty feel.
If this happens, apply vapor to the surface
with the open brush again and re-clean.
Power On Light (Red)
Ready Light (Green)
Handle
Flexible Hose
Hand Grip
Steam Trigger
Safety Filler Cap
Concentrator
Floor Brush
Extension Tubes (x2)
Window Squeegee
Detail Brush (x2)
Shoulder Strap
Funnel
Power Cord
Trigger Lock
Technical Specifications
Voltage:
Power:
Water Capacity:
Steam Generator:
10
120V., 60Hz.
1550 Watts
40 US Fl. Oz. (1200 ml.)
Stainless Steel
3
FEATURES OF STEAM CLEANER
1. No more detergents or
chemicals. Just add water.
4. Heavy-duty crush-resistant
4-ft hose.
2. Lightweight & Portable
5. Versatile, quick-change
accessories
6. Multipurpose Steam Cleaner:
Bathrooms, kitchens, living
areas, pet areas and
appliances.
Automotive, patio and
windows.
3. Stainless Steel Boiler:
Non-corroding, stainless
steel boiler. Welded
construction.
USAGE SUGGESTIONS FOR STEAM CLEANER
Wood, Vinyl and Marble Floors
Spot Cleaning (Carpets)
Use the floor brush with a terry cloth
attached. Move the brush across the floor
as if you are mopping. When the towel is
soiled, allow to cool, then turn the towel
over or replace it with a clean towel. If
you are working on a very dirty area, you
can move the brush over the area slowly,
several times. If it is a wood floor, move
fast to avoid heat or moisture buildup in
the wood. By cleaning with the towel over
the brush, you will not affect the shine on
the floor.
Use the concentrator with or without the
detail brush. Move slowly over the soiled
area, allowing the steam to penetrate.
Agitate with detail brush or clean towel.
Dab the spot with the towel (do not rub).
Repeat as necessary to remove stain.
Vacuum only after the carpet has
completely dried.
Always test color fastness of carpet in an
inconspicuous area before cleaning.
If your steam cleaner fails to remove
stubborn stains a commercially available
carpet shampoo may be required.
Do NOT add cleaning solutions, scented
perfumes, oils or any other chemicals to
the water used in this appliance as this
may damage the unit or make it unsafe
for use.
To Strip Wax: Use floor brush for open
areas; detail brush for corners or tight
areas - no towel, slow strokes. Work a
small area at a time - remove the
emulsified wax from the floor. When all of
the wax has been stripped, immediately
clean the floor and brushes with water
before residue has a chance to harden on
them. Go back over the stripped area with
the floor brush with a towel to remove any
remaining residue before waxing.
Upholstery
Use the floor brush attached directly to
the hand grip with a clean white terry
cloth towel. Use fast, light strokes,
avoid getting the fabric wet. Be patient
with stubborn spots; work on a spot
gently for no more than a minute at a
time, then wait five minutes for the area
to dry and repeat. Use circular
movements or back-and-forth and sideto-side movements to get all sides of
surface fibers then blot with a towel.
Finish with a brushing in one direction
that will give the fabric a uniform
appearance.
To Clean Waxed Floors: Wrap clean
towel around the floor brush, brush
quickly. This will cause the dirt to be
removed but not the wax.
Vinyl Floors: Do not allow heat to buildup
in any kind of vinyl, since it can soften it
enough to affect its texture. Work fast on
vinyl.
Tile Floors: Use the concentrator with the
detail brush attached to an extension.
Have the floor brush with cloth attached
ready as well. Clean the grout between
the tiles with the detail brush. Remove the
detail brush and attach the floor brush,
move the brush across the floor to clean
the tile and remove excess moisture and
residue. For areas of tile that are very
dirty, remove the towel and agitate with
the brush. Do not let the area dry before
you wipe with a towel.
4
CAUTION: Always determine the
color-fastness of any fabric-especially
with reds or blues - by taking a clean,
moist, warm towel and gently rubbing
a small area as far down on the back
or other out of the way place on the
furniture as possible. If color comes
off on the towel, you may need to
have the piece dry cleaned.
9
OPERATING INSTRUCTIONS
Attaching the Accessories to the
Flexible Steam Hose
Dual Edge Glass & Tile Squeegee
This attachment is very useful for
cleaning large windows, plastic material,
ceramic, tiled or marble surfaces.
To use: Connect the tile
squeegee to the hand
grip or use with
extension tube for
hard to reach surfaces.
Apply steam abundantly, rub with the
soft spongy edge, then remove excess
water and dirt with the glass wiping
edge.
IMPORTANT: When cleaning
windows, always avoid any sudden
changes in temperature to prevent glass
breakage or cracks.
Concentrator
Attach the concentrator
to the handgrip or to the
extension tubes. Then
attach the detail brushes
to the concentrator.
Detail Brush
It is best for cleaning grout in-between
the tiles, ceramic and marble.
To use: Attach the detail
brush on to the end of the
concentrator, which
then may be used directly
on the hand grip or with the extension
tubes.
OPERATING INSTRUCTIONS
Tips On How To Use Your System
Components
Water
• Use tap water for all your cleaning
needs.
• However, if you live in an area with
hard water, use de-mineralized /
distilled water when steaming light
colored fabrics to eliminate the
possibility of hard water stains.
Power “On” Light (red): This light will
illuminate when the unit is plugged into
the 120V. wall outlet and will remain on
until the unit is unplugged.
CAUTION: Read the instructions for
“Filling the Water Tank” before opening
the Safety Cap. Always depress hand
grip steam trigger until all pressure/
steam has been vented from boiler.
CAUTION: Always unplug before
filling. ALLOW UNIT TO COOL FOR
FIFTEEN (15) MINUTES BEFORE
REFILLING.
IMPORTANT: Do NOT add cleaning
solutions, scented perfumes, oils or any
other chemicals to the water used in this
appliance. Use tap water or
distilled/purified water if the tap water
in your area is very hard.
IMPORTANT: Do NOT add cleaning
solutions, scented perfumes, oils or any
other chemicals to the water used in
this appliance. Use tap water or
distilled/purified water if the tap
water in your area is very hard.
WARNING: A towel wrapped around
the brush can become hot enough to
burn. Make sure that you let the towel
cool off for 5 minutes before touching it.
Using Towels
• For best results use 100% cotton
white terry cloth towels.
• Use correct size of towel to allow you
to wrap the towel around the brushes
and clip it under the spring loaded
cloth holder.
• The purpose of using a towel is to
absorb moisture and dirt being
removed. Always use dry towels.
A wet towel will smear the dirt.
• Wash towels with strong detergent
and bleach.
• Using scented fabric softener while
washing the towels will cause the
scent to be released into the air
when using the towels with your
steam system.
Efficient Work
• For vertical surfaces, wipe with a
towel from the top down, in this
way the dirty water will not soil
surfaces already cleaned.
• Avoid changing brushes back and
forth while cleaning.
• Start with the smallest brush to
clean tight spots and corners first.
• Use a towel to wipe dirt as soon as
possible, otherwise it will dry and
re-adhere to the surface.
8
Filling Your Steam Cleaner With
Water
IMPORTANT: Always insure that the unit
is “UNPLUGGED” from the wall receptacle
prior to initial filling or re-filling the water
tank. Never attempt to fill this unit under
a water tap, always use the filling funnel
provided. Failure to follow these steps will
cause the water tank to overfill and may
pose an electrical safety hazard.
Step 1: Before filling the steam cleaner,
make sure that the unit is NOT
plugged in and has been allowed to
cool for fifteen (15) minutes.
Step 2: Squeeze and hold handgrip trigger
until all pressure has been released
from the boiler. Turn Safety/Filler
Cap counter clockwise until
removed. (See caution above.)
Step 3: Place the appliance on a flat,
stable surface and insert the funnel
into the tank opening and add 40
US fl. oz. (1200 ml) of water.
(Fig. 1) Place the funnel in the tank
opening as illustrated in Fig. 1. The
funnel has been specially designed
to show when the water tank is full.
When water starts to come out of
the vent hole of the funnel, the tank
is full. Remove the funnel slowly
and let the remaining water in it to
go inside the water tank. Do Not
Overfill. Replace the Safety Filler
Cap.
5
Step 4: Connect desired attachments
onto the Flexible Steam Hose.
Step 5: Plug the unit into a standard (120
volt, grounded) wall receptacle.
Allow approximately 8-10 minutes
for vapor to reach its working
temperature and pressure. The
green ready light will illuminate
when the unit is ready for use.
Step 6: Upon initial use, some water will
come out from the nozzle of the
attachment. This is unvaporized
water in the hose and is normal.
Always point nozzle in a safe
direction.
NOTE: When the steam cleaner has
run out of water, steam output will
cease.
WARNING: Always drain the
condensed water from hose before
use or if unit has been left idle for a
period of time. To drain hose, direct
nozzle into an appropriate container or
sink and depress hand grip steam
trigger. Once hose has been drained,
normal use may be resumed. Never
direct nozzle towards people, animals
or plants.
Vent Hole
Fig. 1
WARNING: Allow unit to cool for 15
minutes before refilling. When
refilling the steam cleaner while it is still
hot, the first drops of water might bubble
up. Use caution when opening the
Safety/Filler Cap as cap may become
hot during use and escaping steam
can cause scalding.
OPERATING INSTRUCTIONS
OPERATING INSTRUCTIONS
Refilling Your Steam Cleaner
With Water
Attaching a Towel to the Floor
Brush
Step 1: Disconnect electrical power cord
from wall outlet.
Step 2: Depress and hold the hand grip
steam trigger to ensure that any
remaining pressure in the boiler
has been released.
Step 3: Carefully loosen the safety/filler
cap by turning counter clockwise.
Any residual steam will be
released below the safety/filler
cap if the tank has not been
completely vented. When the
hissing stops and the last of the
steam has been released,
remove the filler cap. Allow unit
to cool down.
CAUTION: Allow unit to cool for 15
minutes before refilling. If the steam
cleaner is still hot, there is a risk that
water will squirt back during filling and
cause scalding. Extreme care should
be taken when refilling the unit. Use
caution when opening the safety/filler
cap as cap may become hot during use
and escaping steam can cause
scalding.
Step 4: Allow the steam cleaner to cool
for 15 minutes before re-filling
with water.
Step 5: Refill water tank with water using
the filling funnel.
Step 6: Firmly screw the safety/filler cap
back onto the unit by turning
clockwise.
Step 7: Connect power cord to the wall
outlet.
100% white terry cloth towel can be fitted
on this brush, so as to absorb the dirt and
protect delicate surfaces.
Important: Please note that bristles may
break through thin towels. To cut and make
your own towels, we recommend that you
use one (1) towel 8” x 17” folded in half or
two (2) towels 4” x 17” laid one on top of
the other be used. This will ensure that the
brush bristles do not break through and
that the towels will be sufficiently absorbent
and retain as much dirt as possible.
Very Important: When installing the
towels to the floor brush, ensure that the
towels do not cover the front and the back
of the brush. (See Fig. 9)
Fig. 2
Fig. 3
NOTE: Fit floor brush with the angle
adapter on to the extension
tube.
Step 2: If the angle adapter is not
attached to the floor brush,
hold the brush with its bristles
up in your left hand. With the
angle adapter pointing
downward, insert it into the
hole in the back of the brush,
then turn the floor brush 180°.
Step 3: Insert the electrical power cord
into the wall outlet. Heating
time is approximately 8-10
minutes with cold water. Filling
the steam generator with hot
water will shorten the heat up
time.
Note: If you require continuous steam,
depress the trigger and engage the
trigger lock. (Fig. 2)
Cleaning the Floor Brush
Using Your Steam Cleaner with
Floor Brush
To clean the floor brush after you have
finished using:
Step 1: Connect one of the extension
tubes to the hand grip on the
flexible steam hose. To
attach the extension tubes
one onto the other or
onto the hand grip, press the
locking button ensuring that it
fits into the hole. (Fig. 2, Fig. 3)
To disconnect, repeat the
operation by pressing the locking
button and pulling the two
sections apart.
1. Lift the front clip on the floor
brush (Fig. 4) and remove the brush.
2. Rinse the bristle brush and the
diffuser housing under warm water.
3. Replace bristle brush onto the diffuser
housing.
Fig. 7
4. Fold the other side of the towel as
shown in Fig. 7.
Fig. 8
5. Place the corner under the cloth
holder as shown in Fig. 8.
Fig. 5
1. Prepare white terry cloth towel:
size 8” x 17” folded in half or place one
on top of another to have two layers.
(Fig. 5)
Fig. 9
2. Place the brush on top of the towel.
6. Place the towel around the brush,
and repeat folding the towel as shown
in Fig. 9. When folding the towel,
leave some slack. Do not pull tightly
around the brush, leave some
looseness.
Fig. 6
3. Fold the towel as shown in Fig. 6.
Fig. 4
6
7