1
DVD Recorder
Model No. DMR-EZ485V
DMR-EZ48V
Dear customer
Thank you for purchasing this product.
For optimum performance and safety, please read these instructions carefully.
Before connecting, operating or adjusting this product, please read the instructions completely.
Please keep this manual for future reference.
Region number supported by this unit
Region numbers are allocated to DVD players and DVD-Video according to where they are sold. Example:
pThe region number of this unit is “1”.
pThe unit will play DVDs marked with labels containing “1” or “ALL”.
1
ALL
1
2
4
If you have any questions contact
In the U.S.A.: 1-800-211-PANA(7262)
In Canada: 1-800-561-5505
[For\U.S.A.]only]
The warranty can be found on page 94.
[For\Canada]only]
The warranty can be found on page 95.
La referencia rápida en español se encuentra en la página 96−99.
P
PC
RQT9056-P
P15 Basic Operations
Operating Instructions
Precautions
CAUTION!
THE FOLLOWING APPLIES ONLY IN THE U.S.A.
THIS PRODUCT UTILIZES A LASER.
USE OF CONTROLS OR ADJUSTMENTS OR
PERFORMANCE OF PROCEDURES OTHER THAN THOSE
SPECIFIED HEREIN MAY RESULT IN HAZARDOUS
RADIATION EXPOSURE.
DO NOT OPEN COVERS AND DO NOT REPAIR YOURSELF.
REFER SERVICING TO QUALIFIED PERSONNEL.
This reminder is provided to call the CATV system installer’s
attention to Article 820-40 of the NEC that provides guidelines
for proper grounding and, in particular, specifies that the cable
ground shall be connected to the grounding system of the
building, as close to the point of cable entry as practical.
WARNING:
TO REDUCE THE RISK OF FIRE, ELECTRIC SHOCK OR
PRODUCT DAMAGE,
p DO NOT EXPOSE THIS APPARATUS TO RAIN, MOISTURE,
DRIPPING OR SPLASHING AND THAT NO OBJECTS
FILLED WITH LIQUIDS, SUCH AS VASES, SHALL BE
PLACED ON THE APPARATUS.
p USE ONLY THE RECOMMENDED ACCESSORIES.
p DO NOT REMOVE THE COVER (OR BACK); THERE ARE NO
USER SERVICEABLE PARTS INSIDE. REFER SERVICING
TO QUALIFIED SERVICE PERSONNEL.
CAUTION!
DO NOT INSTALL OR PLACE THIS UNIT IN A BOOKCASE,
BUILT-IN CABINET OR IN ANOTHER CONFINED SPACE.
ENSURE THE UNIT IS WELL VENTILATED. TO PREVENT
RISK OF ELECTRIC SHOCK OR FIRE HAZARD DUE TO
OVERHEATING, ENSURE THAT CURTAINS AND ANY OTHER
MATERIALS DO NOT OBSTRUCT THE VENTILATION VENTS.
CAUTION
RISK OF ELECTRIC SHOCK
DO NOT OPEN
CAUTION: TO REDUCE THE RISK OF ELECTRIC
SHOCK, DO NOT REMOVE SCREWS.
NO USER-SERVICEABLE PARTS
INSIDE.
REFER SERVICING TO QUALIFIED
SERVICE PERSONNEL.
The lightning flash with arrowhead symbol, within
an equilateral triangle, is intended to alert the user
to the presence of uninsulated “dangerous voltage”
within the product’s enclosure that may be of sufficient magnitude to constitute a risk of electric shock
to persons.
The exclamation point within an equilateral triangle
is intended to alert the user to the presence of
important operating and maintenance (servicing)
instructions in the literature accompanying the appliance.
CAUTION
Note to CATV system installer:
The socket outlet shall be installed near the equipment and
easily accessible. The mains plug of the power supply cord shall
remain readily operable. To completely disconnect this apparatus
from the AC Mains, disconnect the power supply cord plug from
AC receptacle.
THE FOLLOWING APPLIES ONLY IN THE U.S.A.
FCC Note:
This equipment has been tested and found to comply with the
limits for a Class B digital device, pursuant to Part 15 of the
FCC Rules. These limits are designed to provide reasonable
protection against harmful interference in a residential
installation. This equipment generates, uses, and can radiate
radio frequency energy and, if not installed and used in
accordance with the instructions, may cause harmful interference
to radio communications. However, there is no guarantee that
interference will not occur in a particular installation. If this
equipment does cause harmful interference to radio or television
reception, which can be determined by turning the equipment off
and on, the user is encouraged to try to correct the interference
by one or more of the following measures:
pReorient or relocate the receiving antenna.
pIncrease the separation between the equipment and receiver.
pConnect the equipment into an outlet on a circuit different from
that to which the receiver is connected.
pConsult the dealer or an experienced radio/TV technician for
help.
FCC Caution: To assure continued compliance, follow the
attached installation instructions and use only shielded interface
cables when connecting to peripheral devices.
Any changes or modifications not expressly approved by the
party responsible for compliance could void the user’s authority
to operate this equipment.
This device complies with Part 15 of the FCC Rules. Operation
is subject to the following two conditions: (1) This device may
not cause harmful interference, and (2) this device must accept
any interference received, including interference that may cause
undesired operation.
Declaration of Conformity
Trade Name: Panasonic
Model No.: DMR-EZ485V
DMR-EZ48V
Responsible Party:
Panasonic Corporation of North America
One Panasonic Way
Secaucus, NJ 07094
Support Contact:
Panasonic Consumer Electronics Company
Telephone No.: 1-800-211-7262
Danger of explosion if battery is incorrectly replaced.
Replace only with the same or equivalent type recommended
by the manufacturer. Dispose of used batteries according to
the manufacturer’s instructions.
2
RQT9056
(Inside of product)
Read these operating instructions carefully before using the unit. Follow the safety instructions on the unit and the applicable safety instructions
listed below. Keep these operating instructions handy for future reference.
1) Read these instructions.
10) Protect the power cord from being walked on or pinched
particularly at plugs, convenience receptacles, and the point where
2) Keep these instructions.
they exit from the apparatus.
3) Heed all warnings.
11) Only use attachments/accessories specified by the manufacturer.
4) Follow all instructions.
12) Use only with the cart, stand, tripod, bracket, or table
5) Do not use this apparatus near water.
specified by the manufacturer, or sold with the
6) Clean only with dry cloth.
apparatus. When a cart is used, use caution when
7) Do not block any ventilation openings. Install in accordance with
moving the cart/apparatus combination to avoid
the manufacturer’s instructions.
injury from tip-over.
8) Do not install near any heat sources such as radiators, heat
13) Unplug this apparatus during lightning storms or when unused for
registers, stoves, or other apparatus (including amplifiers) that
long periods of time.
produce heat.
14) Refer all servicing to qualified service personnel. Servicing is
9) Do not defeat the safety purpose of the polarized or grounding-type
plug. A polarized plug has two blades with one wider than the other.
A grounding-type plug has two blades and a third grounding prong.
The wide blade or the third prong are provided for your safety. If the
provided plug does not fit into your outlet, consult an electrician for
replacement of the obsolete outlet.
Getting Started
IMPORTANT SAFETY INSTRUCTIONS
required when the apparatus has been damaged in any way, such
as power-supply cord or plug is damaged, liquid has been spilled
or objects have fallen into the apparatus, the apparatus has been
exposed to rain or moisture, does not operate normally, or has
been dropped.
Unit Care
The precision parts in the unit are readily affected by the
environment, especially temperature, humidity, and dust. Cigarette
smoke also can cause malfunction or breakdown.
pDo not place the unit on amplifiers
or equipment that may become hot.
The heat can damage the unit.
pThe unit should not be installed
or operated near large magnets
or electromagnetic devices. Such
devices can damage pre-recorded
VHS recordings.
pDo not place any heavy objects on top of the unit.
pThe unit should not be mounted in a vertical position. It’s designed
to operate in the horizontal position.
pBefore moving the unit, ensure the disc tray and cassette
compartment are empty. Failure to do so will risk severely
damaging the disc, tape and the unit.
Cautions about condensation
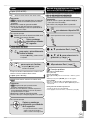
Maintenance
To clean the unit
Wipe with a soft, dry cloth.
pNever use alcohol, thinner or benzine to clean the unit.
pBefore using chemically treated cloth, carefully read the instructions
that came with the cloth.
To clean the DVD lens
Dust and dirt may adhere to the unit’s lens over time, possibly making it
impossible to record or play discs.
Use the DVD lens cleaner about once every year, depending on
frequency of use and the operating environment.
Carefully read the lens cleaner’s instructions before use.
DVD lens cleaner: RP-CL720PP
To clean the video heads
Dirt on the video heads can cause poor recording and play.
If the picture does not improve, use a head-cleaning cassette. If the
problem persists, seek advice from a qualified service person.
Head-cleaning cassette: NV-TCL30PT (Only for U.S.A.)
Condensation can cause unreliable playback of recordings.
Condensation may form in the following cases,
pThe unit is brought from cold surroundings into a well-heated room.
pThe unit is suddenly brought from cool surroundings, such as an airconditioned room or car, to a place which is hot and humid.
pDuring rainy seasons.
In any of the above-mentioned conditions, do not operate the unit for at
least 2 hours. The unit is not equipped with a moisture sensor.
When the unit is not to be used for a long time
To save power, unplug the AC power supply cord from the household AC outlet. The unit consumes a small amount of power even when it is turned off.
Standby power consumption
Front Display ( 63)
Quick Start ( 58)
Automatic
Bright
On
Approx. 17.6 W
Approx. 17.6 W
Off
Approx. 1.7 W
Approx. 3.5 W
3
RQT9056
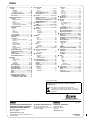
Table of Contents, Accessories
Getting Started
Precautions............................................................................... 2
IMPORTANT SAFETY INSTRUCTIONS .................................. 3
Unit Care ........................................................................................ 3
Accessories ................................................................................... 5
Remote Control Information ........................................................... 5
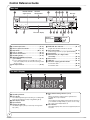
Control Reference Guide .......................................................... 6
Main Unit ........................................................................................ 6
The Unit’s Display .......................................................................... 6
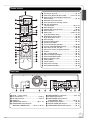
Remote Control .............................................................................. 7
Rear Panel ..................................................................................... 7
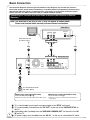
Basic Connection...................................................................... 8
Connecting to a Television with Direct Cable or Antenna
(No Cable Box or Satellite Receiver) ........................................ 8
Connecting to a Television and a Cable Box .................................. 9
Connecting to a Television and a Satellite Receiver .................... 10
Connecting to a TV with an HDMI (High Definition Multimedia
Interface) Cable ...................................................................... 11
Setting the Channels and Clock ............................................. 12
Acquiring the setting information from the TV (VIERA) ................ 14
Basic Operations
Playing MP3s .......................................................................... 33
Playing Still Pictures (JPEG) .................................................. 34
Playing DivX ........................................................................... 36
Advanced Video Cassette Playback ....................................... 37
Zoom in on video ......................................................................... 37
Fast-forward/Rewind .................................................................... 37
Slow playback .............................................................................. 37
Cue/Review .................................................................................. 37
Jet Search .................................................................................... 37
Jet Rewind ................................................................................... 37
VHS Index Search System (VISS) ............................................... 37
S-VHS Quasi Playback (SQPB) ................................................... 38
Repeat Playback .......................................................................... 38
Changing Audio during Playback ................................................. 38
Adjusting the playback picture ..................................................... 38
Status Messages .................................................................... 39
On-screen Display Indicators for Video Cassette Playback ......... 39
Linked Operations with the TV
(VIERA Link TM “HDAVI Control TM”) ................................... 40
Easy control only with VIERA Remote Control ...................... 41
FUNCTIONS Window........................................................ 42
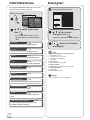
Entering Text ........................................................................... 42
Advanced Editing
Media Handling ..................................................................15
Inserting Discs ........................................................................15
Inserting a Video Cassette .....................................................15
Inserting USB memory ...........................................................15
Inserting an SD Card ..............................................................15
Watching Television ............................................................16
Playback .............................................................................17
Playing a Disc .........................................................................17
Playing a Video Cassette........................................................17
Recording Television Programs ..........................................18
Scheduled Recording .........................................................19
Copying Recordings ...........................................................20
Copying Recordings (VHS DVD) .......................................20
Copying Recordings (DVD VHS)........................................21
Deleting Recordings ...........................................................22
Delete Navigator .....................................................................22
Deleting Recordings During Playback ....................................22
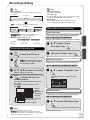
Recordings−Editing ................................................................ 43
Accessing the Recording View..................................................... 43
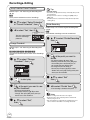
Editing Operations to Recordings ................................................ 43
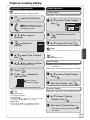
Chapters−Creating, Editing .................................................... 45
Accessing the Chapter View ........................................................ 45
Chapter Operations...................................................................... 45
Still Pictures−Editing .............................................................. 46
Accessing the Album/Picture View............................................... 46
Album/Picture Operations ............................................................ 46
Copying Still Pictures .............................................................. 48
Importing Still Pictures from an SD card or USB memory ........... 48
Copying Still Pictures via the Album View Screen ....................... 48
Deleting Still Pictures.............................................................. 49
Delete Navigator .......................................................................... 49
Setting Menus
Setting DVD On-Screen Menus .............................................. 50
Advanced Features
Important Notes for Recording ............................................... 23
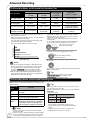
Advanced Recording .............................................................. 24
DVD Recording Modes and Estimated Disc Recording Time ...... 24
VHS Recording Modes and Estimated Recording Time .............. 24
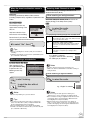
When the format confirmation screen is displayed ...................... 25
When removing a recorded disc .................................................. 25
Selecting Audio Channels to record............................................. 25
Specifying the Recording Time .................................................... 26
Flexible Recording ....................................................................... 26
Playing while you are recording ................................................... 26
Advanced Scheduled Recording ............................................ 27
To cancel a scheduled recording in progress............................... 27
Check, Change, or Delete Programs ........................................... 27
To release the unit from recording standby
(Before recording starts) ......................................................... 27
Recording from an External Device ........................................ 28
Recording from a VCR, etc. ......................................................... 28
Recording from a DV Camcorder ................................................. 29
Advanced Disc Playback ........................................................ 30
Zoom in on video ......................................................................... 30
Menu Screens on the TV ............................................................. 30
Selecting Recordings to Play ....................................................... 30
Search.......................................................................................... 30
Skip .............................................................................................. 30
Direct Play.................................................................................... 30
Quick View (Play M1.3) ................................................................ 31
Slow-motion Play ......................................................................... 31
Frame-by-Frame Viewing ............................................................. 31
Time Slip ...................................................................................... 31
CM Skip ....................................................................................... 31
Create Chapters........................................................................... 31
Changing Audio during Playback ................................................. 31
Playing Playlists ...................................................................... 32
Playlist Properties ........................................................................ 32
View Chapters.............................................................................. 32
4
RQT9056
Accessing the DVD On-Screen Menus ........................................ 50
DVD and Card Management .................................................. 52
Accessing the Management Menus ............................................. 52
Setup Menus .......................................................................... 55
Set Channels Automatically ......................................................... 55
Set Channels Manually ................................................................ 55
Surf Mode .................................................................................... 56
Parental Rating ............................................................................ 56
Off Timer ...................................................................................... 57
Remote Control ............................................................................ 57
Clock Settings .............................................................................. 57
Quick Start ................................................................................... 58
DivX Registration ......................................................................... 58
Restore Default Settings .............................................................. 59
Settings for Playback ................................................................... 59
Settings for Recording ................................................................. 60
Still Mode (paused video) ............................................................ 60
Black Level Control ...................................................................... 60
Dynamic Range Compression ..................................................... 60
Multi-channel TV Sound (Analog) ................................................ 61
Multi-channel TV Sound (Digital) ................................................. 61
Digital Audio Output ..................................................................... 61
Select Audio Channel For DV Input ............................................. 62
Status Messages ......................................................................... 62
On-screen Language ................................................................... 62
Black Background (Analog) ......................................................... 62
Front Display ................................................................................ 63
Closed Caption ............................................................................ 63
TV Aspect .................................................................................... 64
4:3 TV settings for DVD-Video ..................................................... 64
4:3 TV settings for DVD-RAM ...................................................... 64
Component Output Signal............................................................ 64
Functions of HDMI ....................................................................... 65
Select Tape Length ...................................................................... 66
Jet Search .................................................................................... 66
Parental Rating List ................................................................ 67
Other Settings
Other Settings......................................................................... 68
Using the Unit’s Remote Control to Operate the TV and the Set
Top Box (Cable Box, Satellite Receiver, etc.).......................... 68
Reference
Disc Information...................................................................... 74
Usable Discs for Recording and Playback ................................... 74
Play-only Discs ............................................................................ 75
Discs that Cannot be Played ........................................................ 75
Media Care .................................................................................. 75
MP3s, DivX and Still Pictures (JPEG) .................................... 76
MP3 File Information .................................................................... 76
Still Picture (JPEG) Information ................................................... 76
DivX File Information.................................................................... 76
Frequently Asked Questions .......................................... 77
Setup ........................................................................................... 77
Discs ............................................................................................ 77
Recording..................................................................................... 78
USB.............................................................................................. 78
On the Unit’s Display.................................................................... 79
On the TV ..................................................................................... 80
Troubleshooting Guide ................................................... 81
If the Antenna Connector doesn’t Match ..................................... 81
Changing RF Output Channel...................................................... 81
To Reset This Unit ........................................................................ 81
General Issues: Power ................................................................. 82
General Issues: Displays ............................................................. 82
General Issues: Operation ........................................................... 83
General Issues: VIERA Link ......................................................... 84
General Issues: USB.................................................................... 84
Playback Issues: Picture .............................................................. 85
Playback Issues: Sound ............................................................... 86
Playback Issues: Operation.......................................................... 87
Playback Issues: VHS .................................................................. 88
Recording Issues: DVD Recording/Scheduled Recording/
Copying/External Input ........................................................... 88
Recording Issues: VHS Recording ............................................... 90
Editing Issues: DVD & SD ............................................................ 90
Editing Issues: Still Pictures ......................................................... 90
Glossary ................................................................................. 91
Specifications ......................................................................... 92
Product Service ...................................................................... 93
Product information ...................................................................... 93
Limited Warranty (ONLY FOR U.S.A.) .................................... 94
Limited Warranty (ONLY FOR CANADA)................................ 95
Referencia rápida en español (Spanish Quick Reference) ..... 96
Index ..........................................................................Back cover
Advanced Editing
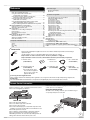
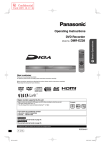
Accessories
t 2 Batteries for
remote control
t 1 75 J coaxial cable
(K2KZ2BA00001)
t 1 AC power supply cord
(K2CB2CB00018)
pFor use with this unit only. Do
not use it with other equipment.
Also, do not use cords for other
equipment with this unit.
t 1 Audio/video cable
(K2KA2BA00003)
t 1 HDMI cable
(DMR-EZ485V only)
(K1HA19DA0007)
Setting Menus
Please check and identify the supplied accessories. Use numbers indicated in parentheses when asking for
replacement parts.
(Product numbers correct as of December 2007. These may be subject to change.)
Only for U.S.A.: To order accessories, refer to “Accessory Purchases” on page 94.
Only for Canada: To order accessories, call the dealer from whom you have made your purchase.
t 1 Remote control
(N2QAYB000197)
Other Settings
(U.S.A. only) Product Registration Card
Please complete and return the included product registration card, or register via the Internet at: http://www.prodreg.com/panasonic/
(Canada only)
The enclosed Canadian French label sheet corresponds to the English display on the front and back sides of the unit.
Remote Control Information
pInsert so the poles (A and B) match those in the remote control.
pDo not use rechargeable type batteries.
Remove if the remote control is not going to be used for a long period
of time. Store in a cool, dark place.
Using the remote control
Reference
About batteries
Basic Operations
DVD output and DVD/VHS output ................................................ 70
Using an S Video Cable for Better Video
(S Video Cable not included) .................................................. 70
Using Component Video Cables for Better Video
(Component Video Cables not included) ................................ 71
Using an Audio Cable for Better Sound
(Audio Cable not included)...................................................... 72
Using an Optical Digital Audio Cable for Better Sound
(Optical Digital Audio Cable not included) .............................. 72
Using an HDMI (High Definition Multimedia Interface) Cable ..... 72
SD Card and USB Memory Information ................................... 73
USB memories you can use with this unit.................................... 73
SD Cards Usable with this Unit .................................................... 73
Advanced Features
Connection Options for Improved Playback Quality ............... 70
Getting Started
Error Messages ............................................................. 79
Aim at the sensor, avoiding obstacles, up to a maximum range of
7 m (23 feet) directly in front of the unit.
Español
R6/LR6, AA
pDo not mix old and new batteries.
pDo not use different types at the same time.
pDo not heat or expose to flame.
pDo not leave the battery(ies) in an automobile exposed to direct
sunlight for a long period of time with doors and windows closed.
pDo not take apart or short circuit.
pDo not attempt to recharge alkaline or manganese batteries.
pDo not use batteries if the covering has been peeled off.
Mishandling of batteries can cause electrolyte leakage which can
damage items the fluid contacts and may cause a fire.
20
20
30
30
5
RQT9056
Control Reference Guide
Main Unit
Remote Control
signal sensor
Cassette
compartment
Disc tray
OPEN/CLOSE
EJECT
CH
REC
DRIVE SELECT
POWER
COPYING
SD CARD
IN 2
S VIDEO VIDEO
L /MONO AUDIO R
RESET
The unit’s display
Opening
the front panel
CH
Pull down.
REC
COPYING
DVD/VHS drive indicator ................................( 17)
Cassette eject button .....................................( 15)
Disc tray open/close button ............................( 15)
Stop button ...............................................( 17, 18)
Play/M1.3 button ............................................( 17)
Channel select button ....................................( 13)
Recording button ............................................( 18)
DVD/VHS POWER on/off button
(¦/I POWER) ................................................( 12)
p Lights when the DVD or VHS drive is selected.
Drive select button .........................................( 17)
p Drive changes each time you press [DRIVE SELECT].
Reset button ...................................................( 81)
DV IN terminal (for a digital video
camcorder).....................................................( 29)
SD card slot....................................................( 15)
USB port ........................................................( 15)
One touch copying operation button
p From VHS to DVD ...................................................... ( 20)
p From DVD to VHS ...................................................... ( 21)
p Press to switch the unit from on to standby mode or vice
versa. In the standby mode, the unit is still consuming a small
amount of power.
IN2 input terminals ........................................( 28)
The Unit’s Display
Recording indicator
TV indicator
The indicator lights during TV mode and it goes out during VCR
mode. You can switch the mode by using [VCR/TV] ( 16).
Main display section
Tape indicator
Progressive indicator
This indicator lights up when you select “24p” in “Progressive/
24p” ( 51).
6
RQT9056
Scheduled recording indicator ( 19)
On:
When a scheduled recording program is registered and a
recordable disc or tape is inserted.
Flashes:
The scheduled recording indicator flashes when the unit cannot
go to scheduled recording standby (e.g. there is no disc or tape,
etc). It does not flash if Quick Start is off.
Disc indicator
This indicator lights up when a disc that is supported by this unit
is inserted.
Turn the unit on or off ................................................ ( 12)
Select drive (DVD, VHS, SD or USB) ............ ( 17, 33, 34)
Select channels and recording numbers etc./
Enter numbers .......................................................... ( 16)
Delete/Reset the tape counter
Basic operations for recording and play
Skip the specified time/
Jet rewind button ................................................ ( 31, 37)
Direct Navigator ........................................................ ( 30)
Selection/OK, Frame-by-frame ................................. ( 31)
Show sub menu .................................................. ( 32, 43)
Select audio .................................................. ( 25, 31, 38)
[A] for Recordings screen.......................................... ( 30)
Show DVD on-screen menu ...................................... ( 50)
[B] for Album View screen ......................................... ( 34)
Start recording .......................................................... ( 18)
Change recording mode ........................................... ( 18)
Transmission window
TV and Set Top Box operations................................. ( 68)
Channel select/TRACKING/V-LOCK .................. ( 16, 38)
Input select (TV, IN1, IN2, DV) .................................. ( 28)
Sub channel access for digital broadcasts................ ( 16)
Favorite...................................................................... ( 16)
Skip 1 minute forward ............................................... ( 31)
Show scheduled recording list .................................. ( 19)
Show FUNCTIONS window ...................................... ( 42)
Return to previous screen
Select VCR/TV .......................................................... ( 16)
Create chapters......................................................... ( 31)
Show status messages ............................................. ( 39)
Start Flexible Recording ............................................ ( 26)
DVD/VHS
POWER
POWER
DRIVE
SELECT
VOL
TV/VIDEO CH
TRACKING/V-LOCK
1 2 3
4 5 6
7 8 9
DELETE
0
RESET
CH
INPUT SELECT
FAVORITE
SLOW/SEARCH
SKIP/INDEX
STOP
REW
PAUSE
FF
PLAY
CM SKIP
TIME SLIP/ JET REW
TIO
FUNC
DIRECT NAVIGATO
R
SCHEDULE
NS
OK
SUB MENU
AUDIO
A
REC
RETURN
CREATE
DISPLAY CHAPTER VCR/TV
B
REC MODE F Rec
Getting Started
Remote Control
STATUS
Rear Panel
DVD/VHS COMMON OUT
RF
IN
R-AUDIO-L
VIDEO
COMPONENT VIDEO OUT
Y
PR
PB
S VIDEO
OPTICAL
AC IN
R-AUDIO
VHF / UHF
S VIDEO
AV OUT
RF
OUT
-L
R-AUDIO-L
VIDEO
IN1
AC IN6 = Power supply
RF input terminal..........................................( 8, 9)
RF output terminal .......................................( 8, 9)
Cooling fan
HDMI AV OUT terminal ............................( 11, 72)
AUDIO/VIDEO output terminals
(DVD/VHS COMMON OUT) ..........( 8–11, 70–72)
VIDEO
DIGITAL AUDIO OUT
(PCM/BITSTREAM)
DVD PRIORITY OUT
AUDIO/VIDEO input terminals ...................( 9, 10)
S VIDEO input terminal
AUDIO/VIDEO output terminals
(DVD PRIORITY OUT) ............................( 70, 71)
S VIDEO output terminal ................................( 70)
DIGITAL AUDIO OUT terminal.......................( 72)
COMPONENT VIDEO OUT terminals ...........( 71)
7
RQT9056
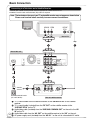
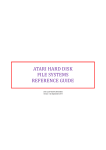
Basic Connection
The connection diagrams represent typical installations. These diagrams may not work with certain inhouse cable systems, master antenna installations, or situations where TV programming is delivered using
methods that differ from industry accepted practices. If you require assistance with connections, please
contact Panasonic at 1-800-211-7262 (for U.S.A.) or 1-800-561-5505 (for Canada).
Connecting to a Television with Direct Cable or Antenna (No Cable Box or Satellite
Receiver)
Note: The terminals on the rear of your TV may not appear as shown below.
Please read terminal labels carefully to ensure correct connections.
Rear of TV
VHF/UHF
RF IN
AUDIO IN VIDEO
R
L IN
Cable from the wall
or antenna signal
Red White Yellow
step
step
step
1
3
2
Red White Yellow Rear of this unit
RF
IN
DVD/VHS COMMON OUT
DVD/VHS COMMON
OUT
VIDEO
R-AUDIO-L
RF
OUT
R-AUDIO-L
VIDEO
COMPONENT VIDEO OUT
Y
PR
PB
S VIDEO
S VIDEO
AC IN
VHF / UHF
OPTICAL
R-AUDIO
-L
VIDEO
IN1
R-AUDIO-L
O
VIDEO
DVD PRIORITY OUT
DIGITAL AUDIO OUT
((PCM/BITSTREAM))
step
4
To a household AC outlet
(AC 120 V, 60 Hz)
wConnection (with Audio/Video cable)
Connect in numbered order to .
pAfter this connection, set the RF output channel “OFF” (12).
8
RQT9056
wConnection (without Audio/Video cable)
You do not need to connect .
pAfter this connection, set the RF output channel “CH3” or
“CH4” (12).
75 J coaxial cable from the wall or antenna signal to the “RF IN” on the unit.
75 J coaxial cable (included) from the “RF OUT” on the unit to the “VHF/UHF RF IN” on
the TV.
Audio/video cable (included) from the “DVD/VHS COMMON OUT” on the unit to the “AV
IN” on the TV.
AC power supply cord (included) from the “AC IN6” on the unit to a household AC outlet.
Please check with your Cable Service Provider to verify whether the coaxial cable from the Cable Wall Jack
must be connected to your Cable Box first, before connecting to other devices.
p Consult your cable service provider about the appropriate cable box to use.
p Additional coaxial cable and audio/video (AV) cable are required.
Getting Started
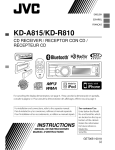
Connecting to a Television and a Cable Box
Note: The terminals on the rear of your TV and cable box may not appear as shown below.
Please read terminal labels carefully to ensure correct connections.
VHF/UHF
RF IN
AUDIO IN VIDEO
R
L IN
Cable from the wall
Rear of TV
Red White Yellow
step
step
step
1
4
3
Red White Yellow
RF
IN
DVD/VHS COMMON OUT
R-AUDIO-L
VIDEO
DVD/VHS COMMON OUT
R-AUDIO-L
RF
OUT
VIDEO
COMPONENT VIDEO OUT
S VIDEO
PR
PB
S VIDEO
AC IN
R-AUDIO
VHF / UHF
R-AUDIO
-L
-L
OPTICAL
VIDEO
R-AUDIO-L
O
VIDEO
IN1
IN1
VIDEO
DVD PRIORITY OUT
DIGITAL AUDIO OUT
((PCM/BITSTREAM))
Rear of this unit
Red White Yellow
step
step
step
6
2
5
Red White Yellow
RF IN
AUDIO OUT VIDEO RF OUT
R
L OUT
To a household AC outlet
(AC 120 V, 60 Hz)
Rear of cable box
75 J coaxial cable from the wall to the “RF IN” on the unit.
75 J coaxial cable (included) from the “RF OUT” on the unit to the “RF IN” on the cable box.
75 J coaxial cable from the “RF OUT” on the cable box to the “VHF/UHF RF IN” on the TV.
Audio/video cable (included) from the “DVD/VHS COMMON OUT” on the unit to the “AV IN”
on the TV.
Audio/video cable from the “AV OUT” on the cable box to the “IN1” on the unit.
AC power supply cord (included) from the “AC IN6” on the unit to a household AC outlet.
9
RQT9056
Basic Connection
Connecting to a Television and a Satellite Receiver
p Consult your satellite service provider about the appropriate satellite receiver to use.
p Additional coaxial cable and audio/video (AV) cable are required.
Note: The terminals on the rear of your TV and satellite receiver may not appear as shown below.
Please read terminal labels carefully to ensure correct connections.
VHF/UHF
RF IN
AUDIO IN VIDEO
R
L IN
Rear of TV
Red White Yellow
step
step
3
2
Red White Yellow
Rear of this unit
DVD/VHS COMMON OUT
VIDEO
R-AUDIO-L
RF
IN
DVD/VHS COMMON OUT
VIDEO
R-AUDIO-L
COMPONENT VIDEO OUT
S VIDEO
PR
PB
S VIDEO
RF
OUT
AC IN
AV OUT
R-AUDIO
R-AUDIO
VHF / UHF
-L
-L
VIDEO
VIDEO
IN1
IN1
OPTICAL
R-AUDIO-L
O
VIDEO
DVD PRIORITY OUT
DIGITAL AUDIO OUT
((PCM/BITSTREAM))
Red White Yellow
step
step
5
4
Red White Yellow
step
Satellite
antenna
1
To a household AC outlet
(AC 120 V, 60 Hz)
SATELLITE
IN
AUDIO OUT VIDEO RF OUT
R
L OUT
Rear of satellite receiver
75 J coaxial cable from the satellite antenna to the “SATELLITE IN” on the satellite
receiver.
75 J coaxial cable (included) from the “RF OUT” on the satellite receiver to the
“VHF/UHF RF IN” on the TV.
Audio/video cable (included) from the “DVD/VHS COMMON OUT” on the unit to the “AV
IN” on the TV.
Audio/video cable from the “AV OUT” on the satellite receiver to the “IN1” on the unit.
10
AC power supply cord (included) from the “AC IN6” on the unit to a household AC outlet.
RQT9056
Getting Started
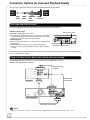
p You can enjoy high-quality picture and audio by changing the audio/video (AV) cable connection between this unit
and your TV as shown on pages 8 to 10 and by doing the following.
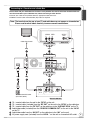
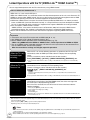
Connecting to a TV with an HDMI (High Definition Multimedia Interface) Cable
When connected to an HDMI compatible unit, an uncompressed digital audio and video signal is transmitted,
enabling you to enjoy high quality digital video and audio with just one cable. When connecting to an HDMIcompatible HDTV (High Definition Television), the output can be switched to 1080p, 1080i or 720p HD video.
Regarding “HDAVI Control” function
When connecting with a Panasonic TV (VIERA) or a receiver equipped with “HDAVI Control” function, linked
operations are possible. [ 40, Linked Operations with the TV (VIERA LinkTM “HDAVI ControlTM”)]
p Please use HIGH SPEED HDMI cables that have the HDMI logo (as shown on the cover).
It is recommended that you use Panasonic’s HDMI cable.
Recommended part number: RP-CDHG10 (1.0 m/3.3 ft.), RP-CDHG15 (1.5 m/4.9 ft.), RP-CDHG20
(2.0 m/6.6 ft.), RP-CDHG30 (3.0 m/9.8 ft.), RP-CDHG50 (5.0 m/16.4 ft.), etc.
p Non-HDMI-compliant cables cannot be used.
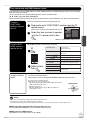
Rear of TV
HDMI IN
INPUT 1
AUDIO IN VIDEO
Red White Yellow
HDMI cable
(Only included in
DMR-EZ485V)
Audio/video cable
(included)
Red White Yellow
DVD/VHS COMMON OUT
RF
IN
R-AUDIO-L
VIDEO
COMPONENT VIDEO OUT
Y
PR
PB
S VIDEO
AC IN
RF
OUT
VHF / UHF
S VIDEO
AV OUT
OPTICAL
R-AUDIO
-L
VIDEO
IN1
R-AUDIO-L
VIDEO
DVD PRIORITY OUT
DIGITAL AUDIO OUT
(PCM/BITSTREAM)
Rear of this unit
p Set “HDMI Priority” and “HDMI Audio Output” to “On” ( 65, 66). (The default setting is “On”.)
Notes
p If connecting to equipment that is only compatible with 2 channels output, audio with 3 channels or more will be
down-mixed ( 91) and output as 2 channels (some discs cannot be down-mixed).
p For display units compatible with HDCP (High bandwidth Digital Content Protection) that are equipped with a
digital DVI input terminal (PC monitors, etc.):
Depending on the unit, images may not display properly or at all when connecting with a DVI/HDMI switching cable
(audio cannot be output).
p Usually you can watch video from HDMI input on TV. When you want to play back VHS while recording on DVD,
switch to input 1 on TV.
11
RQT9056
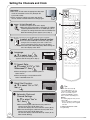
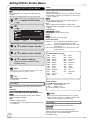
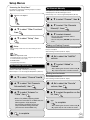
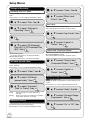
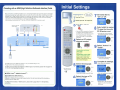
Setting the Channels and Clock
Preparation:
p Turn on the TV and select the appropriate video input
to suit the connections to the unit. (Example: AV
input, CH3 or CH4)
p These are the first settings you make upon buying
the unit. You don’t need to make these settings again.
DVD/VHS
POWER
POWER
DRIVE
SELECT
TV/VIDEO CH
VOL
TRACKING/V-LOCK
DVD/VHS
POWER
to turn the unit on.
p“HELLO” appears on the unit’s display.
pWhen this unit is connected to a Panasonic TV (VIERA)
supporting HDAVI Control 3 via an HDMI cable ( 11),
it acquires the setting information from the TV. When the
Quick Start Setting screen appears ( 14, Step 1)
1 2 3
4 5 6
7 8 9
DELETE
0
CH
INPUT SELECT
FAVORITE
RESET
SLOW/SEARCH
SKIP/INDEX
REW
When this unit is connected to a TV via an HDMI cable, this step is not required.
p Connection (without HDMI cable or Audio/Video cable): While
viewing the unit’s front display, select “CH3” or “CH4”. If the
selection is appropriate, then the step 3 screen will appear.
p Connection (with Audio/Video cable): While viewing the
unit’s front display, select “OFF”.
Select Language
Seleccione el idioma
Sélection de langue
OK
English
pWhen the Quick Start Setting screen
appears after this step ( 14, Step 1)
TV Aspect Ratio:
, to select “4:3 TV” or “16:9
Widescreen TV”, then OK
Español
Français
Press OK
Aspect Ratio Selection
Select TV type and press OK.
(Please refer to Operation Instruction
for details)
PAUSE
TIME SLIP/ JET REW
PLAY
CM SKIP
SCHEDULE
OK
SUB MENU
TIONS
FUNC
Language:
, to select, then
STOP
FF
R
CH
to select an RF output channel number.
DIRECT NAVIGATO
TRACKING/V-LOCK
RETURN
CREATE
AUDIO DISPLAY CHAPTER VCR/TV
A
B
REC REC MODE F Rec STATUS
4:3 TV
16:9 Widescreen TV
p When connecting to a 4:3 standard aspect TV:
Select “4:3 TV”.
p When connecting to a 16:9 widescreen TV:
Select “16:9 Widescreen TV”.
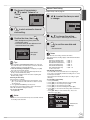
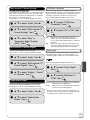
Quick Start Setting
Quick Start Function:
, to select “On” or “Off”,
then OK
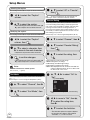
Automatic Clock and
Channel Settings:
, to select “Yes” or
“No”, then OK
12
RQT9056
The unit can be turned on faster, in about
1 second. Please note that Quick Start
mode slightly increases power
consumption when the unit is off.
(See Operation Instructions for details)
Turn Quick Start on ?
On
Off
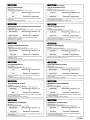
Automatic Clock and Channel Settings
Does this unit get its TV signal via RF IN?
Example: Antenna, Cable TV or Cable Box connected to the
unit’s RF IN.
Yes
No
p When connecting the cable from the wall (cable TV or
antenna) to the unit’s RF IN: Select “Yes”.
The unit then displays the source selection screen ( 13).
p When not connecting the cable from the wall (cable TV or
antenna) to the unit’s RF IN: Select “No”.
The unit then displays “Set Clock Manually” screen ( 13,
Manual Clock Setting).
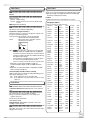
Tips
p “Quick Start” function ( 58)
If you set Quick Start to on, you
can start recording to DVD-RAM
about 1 second after you press
[¦ DVD/VHS POWER] to turn the
unit on and then sequentially press
[q REC].
The following happens when you have
selected “On”.
– Power consumption in standby mode
increases because power is supplied
to the unit.
To return to the previous screen
Press [RETURN].
Please select the wire connected to RF IN.
Antenna
Perform steps 1–6 on page 12.
, to select the item you want
to change.
Cable
Set Clock Manually
Month
OK
1
Day
/
1
/
Year
Hour
2000 SAT
12
OK
to start automatic channel/
clock setting.
Confirm the time, then
OK
– DST (Daylight Saving Time) shows the
summertime setting.
– Time Zone shows the time difference from
Greenwich Mean Time (GMT).
Set Clock Automatically
Getting Started
Manual Clock Setting
The types of transmission:
, to select “Antenna” or
Automatic Clock and Channel Settings
“Cable”,
then OK
Minute
:
00 AM
DST
Time Zone
Off
EST
OK
, to change the setting.
– Repeat steps 7–8 to change other items.
OK
to confirm new date and
time.
– The clock starts.
Clock Setting completed successfully.
4/4/2008 11:15 AM
DST----------On
Time Zone---- EST
See “Notes”
( right)
OK
Tips
p If the unit displays “No channels were found.”, turn off the unit
and confirm the cable or antenna input is connected to the RF IN
terminal. Restart the set up again ( below).
p If “Auto Clock Setting is incomplete.” is displayed, press [OK]
and set the clock manually ( right).
p If the clock is not correct, set the clock with “Adjust Time Zone”
( 58) or “Set Clock Manually” ( 58).
p You can delete channels you don’t need after completing Auto
Channel Setting ( 55).
Restarting the Auto-Setup
(after relocation, for example)
1. When the unit is on and stopped, press and hold [CH :] and
[CH 9] on the main unit at the same time for about 5 seconds.
The unit turns off.
2. Press [¦ DVD/VHS POWER] to turn the unit on.
(The signal source and channel captions revert to their default
values. All scheduled recordings are cleared.)
p To cancel in the middle
Press [RETURN].
Notes
p The automatic clock setting can take a few minutes.
p The channel and clock settings apply to both DVD and VHS drives.
p Time Zone
EST (Eastern Standard Time)
N GMT B5
CST (Central Standard Time)
N GMT B6
MST (Mountain Standard Time)
N GMT B7
PST (Pacific Standard Time)
N GMT B8
AST (Alaska Standard Time)
N GMT B9
HST (Hawaii Standard Time)
N GMT B10
For other areas: xx hr
p DST (Daylight Saving Time)
If you select “On”, the clock is advanced one hour beginning at
2 a.m. on the second Sunday in March and ending at 2 a.m. on the
first Sunday in November.
Set the DST period manually when it varies according to regions
( below).
To set the DST period manually
1. Press [FUNCTIONS].
2. Press [, ] to select “Other Functions” then press [OK].
3. Press [, ] to select “Setup” then press [OK].
4. Press [, ] to select “Setup” then press [].
5. Press [, ] to select “Clock Settings” then press [OK].
6. Press [, ] to select “Set the time change dates for DST” then
press [OK].
7. Press [, , ] to set the “Month”, “Day”, “Hour”, and
“Minute” then press [OK].
Setup
Notes
p Conditions of the received channel may cause automatic channel/
clock setting to take extra time.
Channel
Setup
Disc
Video
Audio
Display
TV Screen
VHS
Set the time change dates for DST
Beginning
Month
3
Day
2nd
End
Month
11
Hour
SUN
Day
1st
Hour
SUN
Minute
2 : 00 AM
Minute
2 : 00 AM
Restore Default
OK
Reinitializes the
settings.
13
RQT9056
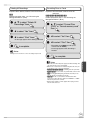
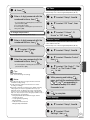
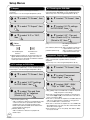
Setting the Channels and Clock
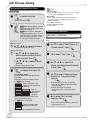
Acquiring the setting information from the TV (VIERA)
If this unit is connected to a Panasonic TV (VIERA) supporting HDAVI
Control 3 via an HDMI cable, then the setting information on the TV is
acquired by this unit when the unit is turned on for the first time. Please
proceed to the following steps.
The following screen is displayed in the language set on the VIERA television.
–The language setting screen may be displayed depending on the usage
environment. Press [, ] to select language, then press [OK].
Quick Start Setting
Quick Start Function:
, to select “On” or “Off”,
then OK
The unit can be turned on faster, in about
1 second. Please note that Quick Start
mode slightly increases power
consumption when the unit is off.
(See Operation Instructions for details)
Turn Quick Start on ?
On
Off
Tips
pIf you do not want to acquire the
setting information from the VIERA
television
Press [, ] to select “Set Channels
without VIERA Link” or “Set No
Channels with this unit”, then press
[OK] in step 2.
–When connecting the cable from the
wall (cable TV or antenna) to the unit’s
RF IN:
Select “Set Channels without VIERA
Link”.
The unit then displays the source
selection screen ( 13, left column,
step 7).
–When not connecting the cable from
Channel information acquisition:
, to select “Set Channels
via VIERA Link”, then OK
Automatic Clock and Channel Settings
Please select how to set channels. It is possible to
download the channel information from your TV via
VIERA Link. In case you do not need channels, please
select “Set No Channels with this unit”.
Set Channels via VIERA Link
Set Channels without VIERA Link
Set No Channels with this unit
p Acquires the following information from
the TV (VIERA).
–The types of transmission
–Channel Map
–Closed caption
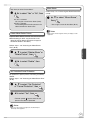
When the settings are complete, the time confirmation screen is
displayed.
OK
Confirm the time, then
OK
–For details of the time information ( 13, Tips, Notes)
Set Clock Automatically
Clock Setting completed successfully.
4/4/2008 11:15 AM
DST----------On
Time Zone---- EST
OK
14
RQT9056
the wall (cable TV or antenna) to the
unit’s RF IN:
Select “Set No Channels with this
unit”.
The unit then displays “Set Clock
Manually” screen ( 13, Manual
Clock Setting).
pIf “Automatic Clock and Channel
Settings” screen on page 12 is
displayed, the channel information could
not be acquired from the TV (VIERA).
Please go to step 6 on page 12.
To return to the previous screen
Press [RETURN].
Notes
p Acquisition of the setting information
is not supported by all Panasonic TVs
(VIERA).
pThe acquisition may take some time
depending on the VIERA setting
information.
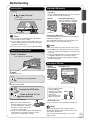
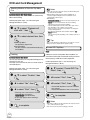
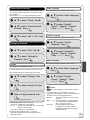
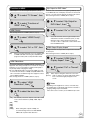
Media Handling
Inserting Discs
Inserting USB memory
Preparation
Before inserting any USB memory to this unit, ensure that
the data stored in it has been backed up.
Opening
the front panel
Inserting the USB memory
Check the orientation of the USB
connector and insert it straight in.
CH
Basic Operations
to open the tray.
– Insert a disc.
– Press [ OPEN/CLOSE] again to close the tray.
Getting Started
You can insert the USB memory directly into the USB port.
OPEN/CLOSE
REC
REC
SD CARD
VHS
VHS
DVD
Insert label-up.
Notes
p When using 8 cm (3\) DVD-RAM or 8 cm (3\) DVD-R,
remove the disc from the cartridge.
p It is not possible to record or play continuously from one
side of a double sided disc to the other. You will need to
eject the disc and turn it over.
p The unit may take some time to respond to [OPEN/CLOSE].
Inserting a Video Cassette
Insert a cassette.
– The unit turns on automatically.
DVD
Pull down.
Removing the USB memory
Complete all USB memory-related operations and pull the
USB memory straight out.
When “uSb”(USB) is flashing on the unit’s display, do not
turn off the unit or remove the USB memory.
Notes
p There are few USB memory devices that cannot be connected.
p Some USB devices inserted into this unit may cause this
unit to stop operating. Such USB devices cannot be used
on this unit.
p Confirm that “uSb”(USB) appears on the unit’s display when
a compatible USB memory is inserted while stopped.
p If a USB memory being accessed is pulled out, then the
data may be damaged.
Inserting an SD Card
Opening
the front panel
To eject:
Inserting the card
Press on the center of
DVD
the card until it clicks
into place. CH
REC
REC
From the main unit:
DRIVE SELECT
VHS
DVD
EJECT
RESET
DV IN
SD CARD
VHS
–The unit turns on automatically.
Pull down.
Insert the card label up with
the cut-off corner on the right.
or
From the remote control
DRIVE
SELECT
STOP
to select the VHS drive.
Press and hold for 3 or
more seconds.
Video Cassette Information
p Break off the video cassette’s tab to
prevent accidental erasure. Cover the
hole with a double layer of adhesive Tab
tape when you want to use the video
cassette for recording again.
p You can use video cassettes with the VHS and S-VHS
marks, but the unit is unable to make full use of the
characteristics of S-VHS video cassettes.
If you are using a miniSD
card/microSD card,
insert it into the miniSD
card adaptor that comes
with the card.
Insert and remove this
adaptor from the unit.
ADAPTER
Removing the card
Press on the center of the card and pull it straight out.
Notes
When “SD” is flashing or when copying a picture or
displaying the Album in the SD card, do not turn off the
unit or remove the SD card.
Such action may result in malfunction or loss of the
card’s contents.
15
RQT9056
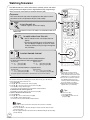
Watching Television
This DVD recorder has a tuner which allows it to directly receive and record
analog and terrestrial digital channels. High Definition (HD) programming is
“down-converted” and recorded in Standard Definition (SD).
Preparation:
Turn on the television and select the appropriate video input to suit the
connections to this unit (Example: AV input, CH3 or CH4).
DVD/VHS
POWER
to turn the unit on.
DVD/VHS
POWER
DRIVE
SELECT
– “HELLO” appears on the unit’s display.
If you connected this unit and a TV without an audio/video cable or an
HDMI Cable
VCR/TV
POWER
TV/VIDEO CH
TRACKING/V-LOCK
1 2 3
4 5 6
7 8 9
DELETE
0
RESET
to watch video from this unit.
CH
INPUT SELECT
FAVORITE
SLOW/SEARCH
SKIP/INDEX
– The TV indicator on this unit’s display does not
light up.
– By pressing [VCR/TV] again, the TV indicator on
this unit’s display will light up, and you can watch
TV directly without passing the signal through this
unit (TV mode).
VOL
STOP
REW
PAUSE
TIME SLIP/ JET REW
FF
PLAY
CM SKIP
CH
to select desired channel.
OK
SUB MENU
TIONS
FUNC
TRACKING/V-LOCK
DIRECT NAVIGATO
R
SCHEDULE
RETURN
You can also select channels with the numbered buttons.
p To directly enter channels for analog and digital broadcasts:
Antenna Mode:
e.g., “3”:
[0] [3] [OK]
“13”: [1] [3] [OK]
Cable TV Mode:
e.g., “5”:
[0] [0] [5] [OK]
“15”: [0] [1] [5] [OK]
AUDIO
A
REC
CREATE
DISPLAY CHAPTER VCR/TV
B
REC MODE F Rec STATUS
p To enter the sub channel number for a digital broadcast:
Antenna Mode:
e.g., “3-1”: [3] [−] [1] [OK]
“13-1”: [1] [3] [1] [OK]
Cable TV Mode:
e.g., “1-1”: [1] [−] [1] [OK]
“15-1”: [1] [5] [−] [1] [OK]
The hyphen appears automatically on “Antenna Mode” if you enter two numbers.
To set Favorite Channels
You can define a Favorite list containing your favorite channels only. (Up to 30 channels)
1. After selecting the desired channel to set
Press [SUB MENU].
2. Press [, ] to select “Set Favorite”, then press [OK].
3. Press [, ] to select the position on the list, then press [OK].
−Press [, ] to change between pages.
−You can also select a list number (1-9 and 0) with the numbered buttons.
To delete the favorite channels registered
Press [, ] to select the channel on the list, then press [OK].
To select a channel from the Favorite list
1. Press [FAVORITE].
2. Press [, ] to select a channel, then press [OK].
−Press [, ] to change between pages.
−You can also select a channel with the numbered buttons.
Notes
p It is possible to select a channel from the Favorite list for instant or scheduled
recording. ( 18, 19)
pIf you set “Surf Mode” to “Favorite” ( 56), then only the Favorite channels can be
selected using [CH 9, :].
pYou can register channels in the Favorite list from Channel Setting list. ( 55, Setting
favorite channels)
16
RQT9056
Notes
p This unit can receive most Basic
Cable television channels. It cannot
receive Premium Services that require
additional fees or a separate decoder.
p This unit can receive music channels
from digital broadcasters, but you
cannot record them. Data broadcasts
are not for viewing or recording.
p Multi-channel surround broadcast is
output in stereo (on 2 channels).
Tips
p To zoom in on video
1. Press [SUB MENU].
2. Press [,] to select “Zoom In”,
then press [OK].
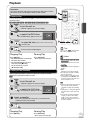
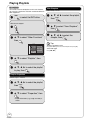
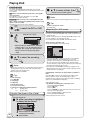
Playback
DVD/VHS
Playing a Disc
Refer to “Advanced Disc Playback” ( 30–31) for detailed information on
playback of discs.
[RAM] [-R] [-R]DL] [-RW‹V›] [+R] [+R]DL] [+RW] [DVD-V] [-RW‹VR›] [CD]
to turn the unit on.
to select the DVD drive.
–The DVD indicator lights up on the unit.
OPEN/CLOSE
to open the tray (Button located on front of the unit).
–Insert a disc.
PLAY
–The tray closes and play begins.
Stopping Play
Pausing Play
Press [ PAUSE].
– Press again to restart play.
Playing a Video Cassette
Refer to “Advanced Video Cassette Playback” ( 37–38) for detailed
information on playback of video cassette.
[VHS]
DVD/VHS
VOL
CH
INPUT SELECT
FAVORITE
RESET
SLOW/SEARCH
SKIP/INDEX
REW
EW
W
STOP
PAUSE
FF
PLAY
CM SKIP
Tips
Icons such as “ [RAM] ” indicate usable
discs. Refer to pages 74 and 75.
Notes
[DVD]
p [RAM] [-R] [-R]DL] [-RW‹V›] [+R] [+R]DL]
[+RW] [-RW‹VR›]
Playback starts from the most recent
recording.
p [DVD-V] [CD]
Playback starts from the beginning of
the disc.
p DivX
DivX Menu screen appears ( 36).
p The unit takes some time to read the
disc before play starts.
p Discs continue to rotate while menus
are displayed. Press [w STOP] when
you finish to preserve the unit’s motor
and your television screen.
to turn the unit on.
–“HELLO” appears on the unit’s display.
DRIVE
SELECT
CH
T
TV/VIDEO
TIME SLIP/ JET REW
Press [w STOP].
– The stopped position is memorized.
(Resume play function)
– The stopped position is cleared
when you press [w STOP]
two or more times, or press
[OPEN/CLOSE].
POWER
DRIVE
SELECT
1 2 3
4 5 6
7 8 9
DELETE
0
–“HELLO” appears on the unit’s display.
DRIVE
SELECT
POWER
TRACKING/V-LOCK
DVD/VHS
POWER
POWER
Basic Operations
Preparation:
Turn on the television and select the appropriate video input to suit the
connections to this unit (Example: AV input, CH3 or CH4).
to select the VHS drive.
– The VHS indicator lights up on the unit.
Insert a cassette.
– Play starts automatically if you insert a cassette with the
accidental erasure tab removed.
[VHS]
p Tapes are automatically rewound once
they reach the end (except during
scheduled recording, fast forwarding,
etc.).
p Viewing pause or using slow playback
in VP mode may result in a distorted
image.
p You may have to adjust the tracking
for tapes recorded on other VCRs
( 38). In some cases, the picture
quality may still be inferior; this is due
to format constraints.
PLAY
Stopping Play
Pausing Play
Press [w STOP].
Press [ PAUSE].
– Press again to restart play.
17
RQT9056
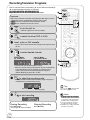
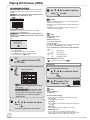
Recording Television Programs
Refer to “Important Notes for Recording” ( 23) and “Advanced Recording”
( 24–26) for detailed information on recording.
[RAM] [-R] [-R]DL] [-RW‹V›] [+R] [+R]DL] [+RW] [VHS]
Digital broadcasts cannot be recorded to video tape.
Preparation:
p Turn on the television and select the appropriate video input to suit the
connections to this unit (Example: AV input, CH3 or CH4).
p [RAM] If the disc is protected, release protection ( 52).
p[VHS] Ensure accidental erasure tab is intact.
DVD/VHS
to turn the unit on.
–“HELLO” appears on the unit’s display.
DRIVE
SELECT
POWER
DRIVE
SELECT
TV/VIDEO CH
1 2 3
4 5 6
7 8 9
DELETE
0
RESET
to select the drive (DVD or VHS).
SKIP/INDEX
Insert a disc or VHS cassette.
REW
PAUSE
TIME SLIP/ JET REW
– Insert a disc or VHS cassette with enough remaining blank space
( 15).
CH
INPUT SELECT
FAVORITE
SLOW/SEARCH
STOP
FF
PLAY
CM SKIP
R
SCHEDULE
DIRECT NAVIGATO
to select desired channel.
Antenna Mode:
e.g. channel 4-2
Cable TV Mode:
e.g. channel 102-45
– To select with the numbered buttons ( 16).
– When no channel setting is performed on the unit and broadcast
is recorded directly from the cable box or satellite receiver,
select a channel on the connected equipment and press
[INPUT SELECT] to select “IN1” or “IN2”.
OK
SUB MENU
AUDIO
A
REC
TIONS
FUNC
TRACKING/V-LOCK
CH
VOL
TRACKING/V-LOCK
DVD/VHS
POWER
POWER
RETURN
CREATE
DISPLAY CHAPTER
B
REC MODE F Rec STATUS
REC MODE
to select the recording mode.
– Recording mode should be determined by program length and
available time on selected media ( 24)
Tips
Recording mode
Remaining time
Icons such as “ [RAM] ” indicate usable
discs. Refer to pages 74 and 75.
REC
to start recording.
Pausing Recording
Stopping Recording
Press [ PAUSE].
– Press again to restart recording.
Press [w STOP].
18
RQT9056
Notes
p [-R] [-R]DL] [-RW‹V›] [+R] [+R]DL] [+RW]
It takes about 30 seconds for the unit
to complete recording management
information after recording finishes.
p You cannot change the channel or
recording mode during recording.
p Simultaneous recording to both DVD
and VHS is not possible.
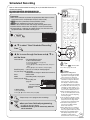
Scheduled Recording
DVD/VHS
Preparation:
p Turn on the television and select the appropriate video input to suit the
connections to this unit (Example: AV input, CH3 or CH4).
p [RAM] If the disc is protected, release protection ( 52).
p [VHS] Ensure accidental erasure tab is intact ( 15).
p Insert a disc or VHS cassette with enough remaining blank space.
p Confirm that the clock on the unit’s display is set to the correct time.
p If connected via a cable box or satellite receiver, set channel on that
equipment before scheduled recording starts.
Schedule List
Remaining Recording Time
No Channel
POWER
POWER
DRIVE
SELECT
TV/VIDEO CH
TRACKING/V-LOCK
1 2 3
4 5 6
7 8 9
DELETE
0
VHS 2:00 SP DVD 0:33 XP
5/ 4 Fri
6:11 PM
Drive Mode Check
Date
On
Off
New Scheduled Recording
RESET
OK
CH
INPUT SELECT
FAVORITE
SLOW/SEARCH
SKIP/INDEX
Press OK to set new schedule.
STOP
REW
PAUSE
TIME SLIP/ JET REW
, to select “New Scheduled Recording”,
then OK
VOL
Basic Operations
Refer to “Advanced Scheduled Recording” ( 27) for detailed information on
scheduled recording.
[RAM] [-R] [-R]DL] [-RW‹V›] [+R] [+R]DL] [+RW] [VHS]
Digital broadcasts cannot be recorded to video tape.
FF
PLAY
CM SKIP
SCHEDULE
, to move through the items and , to
set the items.
Channel/Input
SUB MENU
To select a favorite channel
(To set Favorite Channels, see page 16)
1. Press [SUB MENU].
2. Press [, ] to select “Change Surf Mode”, then press
[OK].
3. Press [, ] to select “Favorite”, then press [OK].
Date/Frequency – You can set a daily or weekly program.
On (start time) / Off (end time)
– Hold button to change in 30-minute increments.
Drive
– DVD or VHS
Mode
– Recording mode, see page 24
Name (only for discs)
– Press [OK], see
page 42.
Remaining Recording Time
Channel/
Input
Date/
Frequency
4-1
VHS 2:00 SP DVD 0:33 XP
5/ 4 Fri
6:11 PM
On
Off
:
:
Drive Mode
Surf Mode : All
Name
Channel, Caption
Preview of selected
channel
4-1 KPO-SD
Set Channel/Input.
OK
SUB MENU
Cancel
Number
To delete all items
1. Press [SUB MENU].
2. Press [, ] to select “Delete”, then press [OK].
OK
− Repeat steps 2−4 to program other recordings.
DVD/VHS
POWER
RETURN
– TV Station/External Input
SCHEDULED
RECORDING
ENTER
OK
when you have finished programming.
− “&” lights on the unit’s display.
− Scheduled recording can be started only when the
unit is turned off.
AUDIO
TIONS
FUNC
DIRECT NAVIGATO
R
CREATE
DISPLAY CHAPTER VCR/TV
Tips
Icons such as “ [RAM] ” indicate usable
discs. Refer to pages 74 and 75.
Notes
p To prevent recording errors:
Set a scheduled recording period slightly
longer than the actual program (to make
sure the program is recorded in full).
p Be sure to perform step 5 before the
scheduled recording time. When the
unit is turned off, “&” lights on the
unit’s display to indicate scheduled
recording standby has been activated.
p “&” flashes when the unit cannot go to
scheduled recording standby. (e.g., a
recordable disc is not in the disc tray)
It does not flash if Quick Start is off.
p When scheduled recordings are set
to start one immediately after another,
the unit cannot record the beginning
of the later program.
p If two scheduled recording times overlap,
the recording that started first always has
priority. The second recording will start
only after the first recording has finished.
p Scheduled recording cannot be
executed on both DVD and VHS
drives at the same time.
p When starting time for a scheduled
recording is the same, the recording
that you programmed later has priority.
p Depending on the Daylight Savings
Time (DST) settings for this unit,
scheduled recordings may be
19
affected when the seasons change.
RQT9056
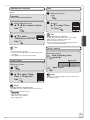
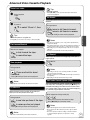
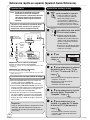
Copying Recordings
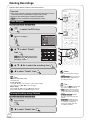
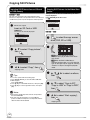
Copying Recordings (VHS DVD)
When copying begins, the VHS tape is played back starting at the tape’s
current position, and recorded to the disc.
[VHS] [RAM] [-R] [-R]DL] [-RW‹V›] [+R] [+R]DL] [+RW]
CH
REC
COPYING
Preparation:
p Turn on the television and select the appropriate video input to suit the
connections to this unit (Example: AV input, CH3 or CH4).
p [RAM] If the disc is protected, release protection ( 52).
p Insert a disc with enough space for recording.
p Set the DVD recording mode (determined by program length and
available time on selected media 24).
p Insert the VHS tape containing the program to be copied. Stop the tape
at the point where you want to start copying from.
COPYING indicator
7 8 9
DELETE
0
2
On the main unit
RESET
SLOW/SEARCH
SKIP/INDEX
REW
EW
W
STOP
PAUSE
TIME SLIP/ JET REW
− If you press [w STOP], you can cancel copying.
CM SKIP
DIRECT NAVIGATO
OK
SUB MENU
2
AUDIO
A
REC
TIONS
FUNC
to copy and automatically finalize
when done (see page 54 for more information on finalizing).
PLAY
R
Press and hold for about
3 seconds.
[-R] [-R]DL] [-RW‹V›] [+R] [+R]DL]
REC
FF
SCHEDULE
While both DVD and VHS are stopped
COPYING
FAVORITE
RETURN
CREATE
DISPLAY CHAPTER VCR/TV
B
REC MODE F Rec STATUS
− or −
Tips
PLAY
to copy without finalizing.
− If you press [w STOP], you can cancel copying.
− COPY will appear in the unit’s display when the copying process begins.
− Copying is automatically stopped when the tape reaches its end or the disc
becomes full.
Tips
p Additional navigation
You can begin the same kind of copy by using COPY Navigator. Use the operations
listed below instead of step 1 shown above.
1. Press [FUNCTIONS].
2. Press [, ] to select “Copy” then press [OK].
COPY Navigator screen appears.
3. Press [, ] to select “VHS to DVD” then press [OK].
p Segmenting a recording to be copied
When copying from VHS to DVD, recordings on the DVD are divided according to index
signals detected on the tape.
− Recordings that are too short may not be divided correctly.
− The time it takes to record may become longer than the original recording depending
on the number of index signals.
p To cancel copying in the middle
Press [w STOP].
− You can also press and hold [RETURN] for about 3 or more seconds to cancel copying
in the middle.
However, you cannot stop finalizing after it has started.
p When copying multilingual broadcast program
[-R] [-R]DL] [-RW‹V›] [+R] [+R]DL] [+RW]
Before starting copy, try playing the VHS and pressing [AUDIO], and then select audio
track that you want to copy. Audio can also be switched during copy.
20
RQT9056
p Icons such as “ [RAM] ” indicate
usable discs. Refer to pages 74
and 75.
Notes
p If copying doesn’t complete due to
shortage of remaining time, disc
space, or other reasons, finalizing
won’t start.
p When copying doesn’t start, the
“COPYING” indicator on the main unit
blinks for about 7 seconds. Check if
the unit is properly prepared.
p If a part of a tape recorded in VP
mode is copied to disc, noise may
appear at the beginning of the copied
part.
Copying Recordings (DVD VHS)
All recordings on the disc are automatically copied onto the tape.
If you start copying when the resume function is activated, the DVD is copied
from the beginning of the recording where you previously stopped.
To copy a whole disc, press [w STOP] to deactivate it before copying ( 17).
CH
REC
COPYING
COPYING indicator
Preparation:
p Turn on the television and select the appropriate video input to suit the
connections to this unit (Example: AV input, CH3 or CH4).
p [VHS] Ensure accidental erasure tab is intact ( 15).
p Insert a VHS tape with enough space for recording. Stop the tape at the
point where you want to start copying to.
p Select the VHS recording mode ( 24).
p Set “HDMI Output Display Aspect” to “Full” ( 65).
(The default setting is “Full”.)
p Insert the disc containing the recording to be copied.
Tips
Icons such as “ [RAM] ” indicate usable
discs. Refer to pages 74 and 75.
Basic Operations
[RAM] [-R] [-R]DL] [-RW‹V›] [-RW‹VR›] [+R] [+R]DL] [+RW] [VHS]
Finalized discs or DVD-Video cannot be copied on this unit.
Notes
p When copying doesn’t start, the
“COPYING” indicator on the main unit
blinks for about 7 seconds. Check if
the unit is properly prepared.
On the main unit
Press and hold for about 3 seconds.
COPYING
−COPY will appear in the unit’s display when the
copying process begins.
−Copying automatically stops when playback of
the disc finishes or the tape reaches its end.
Tips
p Additional navigation
You can begin the same kind of copy by using COPY Navigator. Use the operations listed
below instead of step shown above.
1. Press [FUNCTIONS].
2. Press [, ] to select “Copy” then press [OK].
COPY Navigator screen appears.
3. Press [, ] to select “DVD to VHS” then press [OK].
p When you start copying from the selected recording
1. Press [DRIVE SELECT] to select the DVD drive.
2. Press [DIRECT NAVIGATOR].
[RAM] When the Album View screen is displayed, press [A] to switch to the Recordings
screen.
3. Press [, , , ] to select the recording you want to start, then press [OK].
4. Go to step “Copying Recordings (DVD VHS)” shown above.
p Index signals are automatically recorded on the tape according to the division of recordings
on the DVD [ 37, VHS Index Search System (VISS)].
p To cancel copying in the middle
Press [w STOP].
− You can also press and hold [RETURN] for about 3 or more seconds to cancel copying in
the middle.
21
RQT9056
Deleting Recordings
Important: Once deleted, contents cannot be recovered.
Preparation:
p Turn on the television and select the appropriate video input to suit the
connections to this unit (Example: AV input, CH3 or CH4).
p Insert the disc containing the recording to be deleted.
p[RAM] If the disc is protected, release protection ( 52).
DVD/VHS
POWER
POWER
Delete Navigator
TV/VIDEO CH
VOL
TRACKING/V-LOCK
1 2 3
4 5 6
7 8 9
DELETE
0
[RAM] [-R] [-R]DL] [-RW‹V›] [+R] [+R]DL] [+RW]
DRIVE
SELECT
DRIVE
SELECT
to select the DVD drive.
FUNCTIONS
With the unit stopped
DVD-RAM
Cartridge Protection Off
Disc Protection Off
CH
INPUT SELECT
FAVORITE
RESET
SLOW/SEARCH
SKIP/INDEX
REW
Playback
Program
Delete
Copy
STOP
Other Functions
PAUSE
FF
PLAY
OK
TIME SLIP/ JET REW
10 10/23 Mon
--
---
--
--
Previous
Delete
Page 02/02
SUB MENU
Select
, , , to select the recording, then
OK
Tips
To view other pages
Press [, , , ] to select “Previous” or “Next”, then press [OK].
p You can also press [, ] to view other pages.
Multiple editing
Select with [, , , ], then press [ PAUSE]. (Repeat.)
p A checkmark appears. Press [ PAUSE] again to cancel.
Deleting Recordings During Playback
[RAM] [-R] [-R]DL] [-RW‹V›] [+R] [+R]DL] [+RW]
During playback
DELETE
22
RQT9056
Next
Previous
OK
SUB MENU
Next
RETURN
AUDIO
A
REC
CREATE
DISPLAY CHAPTER VCR/TV
B
REC MODE F Rec STATUS
OK
Notes
p You cannot delete while recording or
copying.
p [+R] [+R]DL] [+RW] Even if you have set
protection on other equipment, such
recordings are deleted.
To return to the previous screen
Press [RETURN].
to select “Delete” then
8 10/23 Mon
[RAM] When the Album View screen is
displayed, press A to switch to the
Recordings screen.
to select “Delete”, then
B Picture
R
A Video
08
DIRECT NAVIGATO
DVD-RAM
07
07
SCHEDULE
Recordings
TIONS
FUNC
, to select “Delete”
then OK
DELETE Navigator
CM SKIP
OK
Tips
p Icons such as “ [RAM] ” indicate usable
discs. Refer to pages 74 and 75.
p [RAM] Deleting an item increases the
available disc space, for the amount
of space taken up by the item being
deleted.
p [-R] [-R]DL] [+R] [+R]DL] Available
disc space does not increase after
deletion.
p [-RW‹V›] [+RW] Available disc space
increases when you delete the last
recording (the recording space
may increase slightly when other
recordings are deleted).
Important Notes for Recording
Analog broadcasts:
[RAM] [VHS]
Both Main and SAP audio are recorded.
[-R] [-R]DL] [-RW‹V›] [+R] [+R]DL] [+RW]
Select the Main or SAP audio before
recording.
You can change the audio during playback ( 31, 38
Changing Audio during Playback).
[ 61, Multi-channel TV Sound (Analog)]
The selected audio only is recorded.
Main
pIf you record from external
Hello
equipment ( 28)
Select “Main” or “SAP” on the
external equipment.
Main
SAP
Hello
Hola
pIf you record from external
equipment ( 28)
Select both “Main” and “SAP” on
the external equipment.
Basic Operations
Recording of
multilingual
broadcasts
Digital broadcasts:
Press [AUDIO] to switch audio ( 25).
The selected audio only is recorded.
[VHS] Digital broadcasts cannot be recorded to video tape.
[RAM]
Recorded in 16:9 aspect (Widescreen)
[-R] [-R]DL] [-RW‹V›] [+R] [+R]DL] [+RW]
Recorded in 4:3 aspect
Advanced Features
Recording of
Widescreen
broadcasts
p If you have a regular 4:3 aspect TV and you receive 16:9 aspect images from a digital broadcast, they will appear in
letterbox format ( 91, Letterbox).
[VHS] Digital broadcasts cannot be recorded to video tape.
Copy-once
Recording
p It is not possible to record digital broadcasts that allow “One time only recording” onto DVD-R, DVD-R DL, DVD-RW,
+R, +R DL, +RW or 8 cm (3\) DVD-RAM discs. Use the CPRM ( 91) compatible DVD-RAM.
[RAM] CPRM compatible discs only
pWhen purchasing discs, check that they support CPRM.
12 cm (5\)
Playing the
disc on other
DVD players
[-R] [-R]DL] [-RW‹V›] [+R] [+R]DL] [+RW]
Yes
No
[-R] [-R]DL] [-RW‹V›] [+R] [+R]DL]
The disc must be finalized after recording ( 54).
All DVD-R, etc. discs recorded on this unit must be finalized before they can be played on other DVD players. Once
finalized, DVD-R, etc. become “read-only” and can no longer be used for recording. DVD-RW can be reused after
finalizing.
Whether DL discs recorded on this unit can be played on other DVD players will depend entirely on the capabilities of
that player. 100% compatibility is not guaranteed.
Record to DVD-R, etc.
Play on other DVD equipment
Finalize
CHG
¦ /I
¦
DOUBLE RE-MASTER CD SEQUENTIAL
DISC
1
2
3
4
5
w
/
/
DISC EXCHANGE
DISC SKIP
OPEN/CLOSE
SEARCH
ENTER
VOL
DISPLAY
TOP
MENU
RETURN
MENU
ON
OFF
DC
IN
9V
OPEN
ND
A.SURROU
REPEAT
MODE
MONITOR
MODE
PICTURE
[+RW] We recommend you create the menu before playing a +RW disc on other equipment ( 54).
[RAM] DVD-RAM can be played back on Panasonic DVD recorders and DVD-RAM compatible DVD players.
Recording to
DVD-R DL
and +R DL
DVD-R DL and +R DL discs have two layers of recording surface on one side.
p [-R]DL] Recordings are divided when recording changes from the first layer to the second. Some images and audio
may be lost at this point.
p [+R]DL] Recordings continue through the layer change with only a slight pause similar to what you will see with
commercial DVD-Video discs. Any recording exceeding 8 hours in length is automatically divided whether a layer
change is required or not.
DVD-R DL
The second layer
The available
space
Recording 3
(Disc inner
side)
The first layer
Recording 1
Recording 2
Layer change:
Recording divided,
some images and
audio lost.
(Disc outer
side)
Recording/Playback direction
23
RQT9056
Advanced Recording
DVD Recording Modes and Estimated Disc Recording Time
DVD-RAM
Single-sided
(4.7 GB)
Double-sideda1
(9.4 GB)
DVD-R,DVD-RW,
+R, +RW
(4.7 GB)
DVD-R DLa3,
+R DLa3 (8.5 GB)
XP (High quality)
1 hour
2 hours
1 hour
1 hour 45 minutes
SP (Standard play)
2 hours
4 hours
2 hours
3 hours 35 minutes
LP (Long play)
4 hours
8 hours
4 hours
7 hours 10 minutes
EP (Extra long play)
8 (6a2) hours
16 (12a2) hours
8 (6a2) hours
FR
(Flexible Recording)
8 hours maximum
8 hours maximum
for one side
8 hours
maximum
Recording Mode
a1
a2
a3
It is not possible to record or play continuously from one side of a
double sided disc to the other.
When “Recording Time in EP Mode” has been set to “EP−Extended
Play (6H)” in the Setup menu ( 60).
The sound quality is better when using “EP−Extended Play (6H)”
than when using “EP−Extended Play (8H)”.
Refer to “Recording to DVD-R DL and +R DL” ( 23).
14 hours 20 minutes
maximum
FR (Flexible recording mode)
Using “Flexible Recording” is convenient in these kinds of situations:
−When the amount of free space on the disc makes selecting an
appropriate recording mode difficult
−When you want to record a long program with the best picture
quality possible
e.g., Recording a 90 minutes program to 4.7 GB DVD-RAM disc:
− If you select XP mode, the program will not fit on one disc.
A second disc is necessary for
30 minutes of the program.
XP
Picture quality
14 hours 20 minutes
(10 hours 45 minutesa2)
4.7 GB
DVD-RAM
4.7 GB
DVD-RAM
SP
− If you select SP mode, the program will fit on one disc.
LP
EP (6H)^2
EP (8H)
4.7 GB
DVD-RAM
Recording time
However there will be 30 minutes
remaining disc space.
− If you select “Flexible Recording” the program will fit on one
disc perfectly.
Notes
p This unit uses variable bit rate (VBR) recording which varies the
amount of data recorded to suit the images, so actual recording
times and remaining recording times shown by the unit will
be different. ([-R]DL] [+R]DL] The difference will be especially
noticeable.) Use a disc with plenty of remaining time to be sure.
p When recording to DVD-RAM using EP (8H) mode, play may
not be possible on DVD players, even if they are compatible with
DVD-RAM. In this case use EP (6H) mode.
4.7 GB
DVD-RAM
You can set FR mode when programming scheduled recordings and
flexible recording ( 26).
Tips
Maximum number of recordings recorded to a disc
[RAM] [-R] [-R]DL] [-RW‹V›] 99 recordings on a disc
[+R] [+R]DL] [+RW] 49 recordings on a disc
VHS Recording Modes and Estimated Recording Time
Digital broadcasts cannot be recorded directly to video tape. To record
digital broadcasts, use an external connection to a set-top-box or other
equipment ( 28).
Recording
Mode
Durations
SP
You can record the length shown on
the tape.
EP
3 times the length of SP mode.
VP
5 times the length of SP mode.
AUTO
Automatically switches the recording
mode to EP mode during a scheduled
recording if there is not enough tape
left to record the program in SP mode.
Notes
24
RQT9056
p A tape recorded in VP mode by the unit cannot be played
back by other VCRs.
p It takes more time for automatic tracking to work when playing
tapes recorded with VP mode, and it may not work at all with
some tapes. Do tracking manually if this is the case ( 38).
Tips
p If the image quality is important to you or if you wish to store the
tape for a long period, select “SP”.
p The unit can play tapes recorded in LP mode on other equipment.
p AUTO Mode
Scheduled recording
1st program
(30 min)
30 min at SP
2nd program (60 min)
15 min 45 min
at SP at EP
Video tape (e.g.: 60-minute cassette)
– It is not possible to automatically activate VP mode.
– The tape length must be set correctly ( 66, Select Tape
Length).
– Picture distortion may occur when SP switches to EP.
– AUTO Mode may not function on some tapes.
When the format confirmation screen is
displayed
Important:
Formatting permanently deletes all disc contents
(including computer data), regardless of protection status
of disc.
[RAM] [-RW‹V›] [+RW]
The following screen may
appear when inserting a new
disc, etc.
Selecting Audio Channels to record
Refer to “Recording of multilingual broadcasts” for
detailed information ( 23).
When receiving an analog broadcast
[-R] [-R]DL] [-RW‹V›] [+R] [+R]DL] [+RW]
Select the audio (Main or SAP) in “Multi-channel TV
Sound (Analog)” in the Setup menu ( 61).
[RAM]
AUDIO
A
to select the audio.
Stereo SAP Mono
$
OK
Do not format if you intend to
view pre-recorded material from the disc.
Changing during recording changes the recorded sound.
Stereo:
If the broadcast is “MonoASAP”, audio will be monaural
even if you select Stereo mode.
SAP:
to select “Yes”, then
Main audio (stereo)
Secondary audio program (SAP).
When you record SAP, main audio is also recorded. In
such cases, recorded SAP and main audio become
monaural.
OK
Mono:
Tips
Advanced Features
Only format the disc if you
intend to use it for recording.
Main audio (monaural).
Select “Mono” if reception is poor during a stereo
broadcast.
p Refer to “Formatting Discs or Cards” ( 53) for more details on
formatting.
p It will take several minutes to format the disc. (DVD-RAM may take
up to a maximum of 70 minutes.)
e.g., “Stereo” is selected
“((” appears when the unit is receiving
the audio type you selected.
When removing a recorded disc
DVD-RAM
CH 12
(( Stereo
[-R] [-R]DL] [-RW‹V›] [+R] [+R]DL]
After recording, if you
press [ OPEN/CLOSE]
to eject the disc, the
following screen may
appear.
Finalize
Finalizing is necessary to enable playback
of the disc on compatible DVD players.
Once finalized, recordings cannot be added to the disc.
It will take approximately n minutes. Start?
Press “REC” to start finalizing.
Press the OPEN/CLOSE button to postpone
finalizing. The disc can be played only on
this unit. You can Finalize it later.
REC
to start finalizing.
Notes
You cannot change the audio type in the following case.
− While a disc other than DVD-RAM is inserted when selecting an
analog broadcast
When receiving a digital broadcast
AUDIO
A
to select the audio.
or
DVD-RAM
OPEN/CLOSE
to eject the disc without
finalizing.
Notes
You cannot stop finalizing once you have started it.
Tips
p If you want to provide the disc with a name or set play menu
select, select “Disc Name” ( 52) or “Playback will start with:”
( 54) in “DVD Management” before finalizing.
p Refer to “Finalizing” ( 54) for more details about finalizing.
pIt will take a few minutes to finalize the disc. (some discs may take
up to a maximum of 60 minutes.)
e.g., “English” is selected
CH 12-1
English
Notes
p You cannot change the audio type in the following case.
− When there is no choice of languages in a digital broadcast
p Before scheduled recording of a digital broadcast with more than
one language channel, set the language in “Multi-channel TV
Sound (Digital)” in the Setup menu ( 61).
p When broadcast offers no language data, such displays as
“Audio 1 of 3” may appear. In such cases, recording may not be
possible in the language selected through the “Multi-channel TV
Sound (Digital)” in the Setup menu ( 61).
25
RQT9056
Advanced Recording
Playing while you are recording
Specifying the Recording Time
[RAM] [-R] [-R]DL] [-RW‹V›] [+R] [+R]DL] [+RW] [VHS]
Digital broadcasts cannot be recorded to video tape.
This function allows specifying the length of recording
time up to 4 hours.
p You can play DVD or VHS while recording to the other
drive. The recording will not be affected
− DVD playback ( 17)
− VHS playback ( 17)
Notes
During recording
REC
repeatedly until the desired time
is reached.
− The recording time and the unit’s display changes
as follows:
Counter (Cancel) OFF 0:30 OFF 1:00
!
OFF 4:00
OFF 1:30
OFF 3:00 OFF 2:00 p During playing while you are recording, you cannot edit or delete
recordings.
p You cannot play a tape with the DVD PRIORITY output terminals
or HDMI AV OUT terminal while recording or making a scheduled
recording on a disc ( 70).
p Closed captions will not appear during simultaneous recording and playback.
p Use caution while operating the controls for playback. Pressing
[w STOP] when the recording device is selected will cancel the
recording in progress.
Chasing Playback
[RAM] Allows playback from the beginning of what you are recording.
When recording to DVD-RAM
Notes
p This function does not work during scheduled recording or Flexible
Recording.
p Recording stops and the set time is cleared if you press [w STOP].
p The unit turns off automatically when the time to stop recording is
reached as long as you do not operate the unit.
Flexible Recording
[RAM] [-R] [-R]DL] [-RW‹V›] [+R] [+R]DL] [+RW]
The unit sets the best possible picture quality that fits the
recording within the remaining disc space.
The recording mode becomes FR mode. Refer to “FR
(Flexible Recording)” ( 24).
Flexible Recording
With the unit stopped
F Rec
(at least 20 seconds after
recording starts).
PLAY
− If the “Status Messages” in the Setup menu is
set to “Automatic” ( 62), both “Play” and “Rec.”
indicators will be displayed on the status message
screen for several seconds.
Tips
p To stop play
Press [w STOP] once.
p To stop recording
Press [w STOP], at least 2 seconds after chasing playback stops.
Record in FR mode.
Max recording time
Set recording time
08 Hour 00 Min.
08 Hour 00 Min.
Start
Cancel
, to select “Hour” and “Min.”
and , to set the recording
time.
Simultaneous Record and Playback
[RAM] Allows playback of a previous recording, while
recording something else.
When recording to DVD-RAM
When you want to start recording
, , , to select “Start”,
then OK
− Recording starts.
Tips
To exit the screen
Press [RETURN].
To stop recording partway
Press [w STOP].
To show the remaining recording time
Press [STATUS] to show the remaining recording time.
DVD-RAM
26
RQT9056
Rec. 0:59
CH 20
Stereo
Remaining time
, , , to select the
recording to play, then OK
− If the “Status Messages” in the Setup menu
is set to “Automatic” ( 62), both “Play” and
“Rec.” indicators will be displayed on the status
message screen for several seconds.
Tips
To stop play
Press [w STOP].
To exit the DIRECT NAVIGATOR screen
Press [DIRECT NAVIGATOR].
To stop recording
After play stops
1. Press [DIRECT NAVIGATOR] to exit the screen.
2. Press [w STOP].
Advanced Scheduled Recording
To cancel a scheduled recording in
progress
DRIVE
SELECT
to select the drive.
Notes
pIf the program schedule is changed by the TV station, then this
unit will not be able to detect the change.
p The password screen appears when setting parental ratings
( 56). Unless you enter the correct password, recording a
program with parental ratings may fail.
Tips
STOP
You can enter up to 16 programs a month in advance.
Schedule List
– Confirmation screen appears.
Notes
Recording stops and ‘one-time’ programs are deleted from the
Schedule List. Programs scheduled to record ‘Daily’ and ‘Weekly’
remain on the Schedule List and are set to begin at the next
scheduled time.
Check, Change, or Delete Programs
The scheduled recording list can be viewed even when
the unit is in “recording standby” mode.
– See “Tips” ( right) for explanation of icons
displayed.
, to select the program.
OK
to modify the program.
, , , to make changes,
then OK
VHS 2:00 SP DVD 0:33 XP
5/ 4 Fri
6:11 PM
Drive Mode Check
Date
On
Off
New Scheduled Recording
Schedule List screen icons
:
Currently recording
:
Programs are overlapped. Recording of the program with
the later start time starts when the earlier program finishes
recording.
:
You stopped a weekly or daily scheduled recording. The
icon disappears when the next scheduled recording starts.
:
The disc was full. (not enough space)
:
The TV program may not be recorded due to copy-protect
or ratings. (disc)
:
Recording stopped (Dirty disc, etc.)
PG!: Recording may become impossible when a wrong
password is entered through the unit’s parental rating
setting procedure.
Advanced Features
to select “Stop recording”,
then OK
Remaining Recording Time
No Channel
Check
OK:
Recordable (disc)
(Date): The last day of daily or weekly recording. (disc)
!:
It may not be possible to record because:
– the disc is write-protected.
– there is no more space left (disc).
– the number of possible recordings has reached its
maximum (disc).
Overlap:
When the date and time overlap with another scheduled
recording, only a part of the program can be recorded
(disc).
--:
When the drive is set to VHS, “--” is displayed.
To release the unit from recording
standby
(Before recording starts)
DVD/VHS
POWER
DELETE
or
SUB MENU
, then
OK
to delete.
– You cannot delete programs that are currently
recording.
– The unit turns on and “&” on the unit’s
display goes out.
Be sure to press [¦ DVD/VHS POWER] to return the unit to standby
mode before the scheduled recording time. Scheduled recording will
work only if “&” is displayed.
DVD/VHS
POWER
–“&” lights on the unit’s display.
27
RQT9056
Recording from an External Device
Recording from a VCR, etc.
Recording to DVD
Connect cables while the power to both the unit and the
external device is off.
Front of the unit
[RAM] [-R] [-R]DL] [-RW‹V›] [+R] [+R]DL] [+RW]
Perform steps 1−5 left.
Start play on an external device.
REC
S VIDEO VIDEO
IN 2
You can get a
sharper, clearer
picture by connecting
with an S Video cable
instead of the yellow
video cable.
L /MONO AUDIO R
Yellow White Red
to start recording the
program from an external device.
Recording to VHS
Perform steps 1−5 left.
PLAY
S Video cable
Audio/video
cable
You can also connect to the IN1 on the rear.
Preparation:
p Turn on the unit and connected equipment.
p [RAM] If the disc is protected, release protection
( 52).
p [VHS] Ensure accidental erasure tab is intact.
p When recording multilingual broadcasts ( 23)
DRIVE
SELECT
to select the drive (DVD or
VHS).
Insert a disc or VHS cassette.
REC MODE
to select the recording
mode ( 24).
INPUT SELECT
Input Select
1
TV
2
IN1
3
IN2
4
DV
to locate the point on the
tape where you want to insert the
recording.
PAUSE
when you reach that point.
REC
to put the unit in recording
standby.
Start play on the external device.
PAUSE
to start recording the
program from the external device.
Tips
To skip unwanted parts
Press [ PAUSE] to pause recording. (Press again to restart
recording.)
To stop recording
Press [w STOP].
OK
Notes
, to select “IN1” or “IN2”,
then OK
– Rear Panel inputs are IN1.
– Front Panel inputs are IN2.
Tips
28
RQT9056
pIf the external equipment only has a single audio output,
connect it to the L/MONO (white) IN2 terminal.
If video is copied from another piece of equipment to this unit, then
the video quality will be degraded.
Recording from a DV Camcorder
Connect the cable while the power to both the unit and
the external device is off.
REC MODE
to select the recording
mode for the disc ( 24).
Front of the unit
to select “Rec.”,
then OK
4-pin DV Cable
[RAM] [-R] [-R]DL] [-RW‹V›] [+R] [+R]DL] [+RW]
Preparation:
p Turn on the unit.
p Insert a disc with enough remaining blank space.
p [RAM] If the disc is protected, release protection
( 52).
Turn ON the DV equipment and
pause play where you want to
begin recording.
DV camcorder connection
DV connection detected.
Start recording?
Record to DVD
Cancel
OK
When “DV camcorder connection” screen does not
appear
Advanced Features
Notes
p If the desired audio is not recorded, select the kind of audio for
“Select Audio Channel For DV Input” in the Setup menu ( 62).
p [RAM] Programs are recorded as a single item; breaks in the
images create chapters.
p Compatibility with video camcorders from other manufacturers is
not guaranteed.
p It is not possible to operate the unit from the connected DV
equipment.
p The DV equipment name may not be shown correctly.
p Date and time information is not recorded, even if displayed on the
camcorder.
p The DV IN terminal is not meant to be connected to a computer.
p This unit uses a 4-pin “DV IN” connector;
Your DV camcorder may use a 4-pin or 6-pin external connector.
Please consult your DV camcorder’s manufacturer to confirm
correct external connection.
p You cannot record discs and play discs simultaneously.
p If video is copied from another piece of equipment to this unit,
then the video quality will be degraded.
Tips
When recording finishes
The confirmation screen appears.
Press [OK] to finish DV camcorder recording.
To stop recording
Press [w STOP].
The confirmation screen appears. Press [OK].
p If the DV camcorder recording function does not work properly,
check the connections and DV equipment settings, and turn the
unit off and back on. If that does not work, follow the instructions
for “Recording from a VCR, etc.” ( 28).
After performing step 1 ( above).
1. Press [DRIVE SELECT] to select the DVD drive.
–External DV cannot be recorded to VHS.
2. With the unit stopped
Press [FUNCTIONS].
3. Press [, ] to select “Other Functions” then press [OK].
4. Press [, ] to select “DV Camcorder Rec.” then press [OK].
You can proceed to step 4 ( right).
to select “Record to DVD” then
OK
29
RQT9056
Advanced Disc Playback
Zoom in on video
Tips
To select the recording with the numbered buttons
e.g.,
“5”:
[0] [5]
“15”:
[1] [5]
During playback
SUB MENU
To view other pages
Press [, , , ] to select “Previous” or “Next”, then press [OK].
– You can also press [, ] to view other pages.
To exit the DIRECT NAVIGATOR screen
Press [DIRECT NAVIGATOR].
DIRECT NAVIGATOR screen icons
To zoom in:
, to select “Zoom In”, then
Protected.
V
Not recorded due to recording protection (Digital
broadcasts, etc.)
It cannot be played because data is damaged.
q
Currently recording.
OK
“One time only recording” restriction ( 91, CPRM)
Tips
To return the picture to its original size
Press [, ] to select “Zoom out” in step 2, then press [OK].
Search
Menu Screens on the TV
[DVD-V]
Generally, menu screens that appear on the TV may be
navigated as follows:
, , , to select an item, then
During playback
or
– There are 5 search speeds. Each press increases
the search speed.
– Press [ PLAY] to restart normal playback.
OK
Skip
You can sometimes use the numbered buttons to
select an item.
During playback or while paused
or
Tips
– Each press increases the number of skips.
– DivX: Backward direction [] only.
Press [] to return only to the beginning
of the program being played back.
To return to the menu screen
Press [DIRECT NAVIGATOR].
Notes
If “” appears on the TV, the operation is prohibited by the unit or
disc.
Selecting Recordings to Play
During playback, you can access specific recordings
or scenes through direct entry of the numbered
buttons.
[RAM] [-R] [-R\DL] [-RW‹V›] [+R] [+R]DL] [+RW] [-RW‹VR›]
DIRECT NAVIGATOR
Recordings
DVD-RAM
A Video
10 10/23 Mon
--
[RAM] When the
Album View screen
is displayed, press
A to switch to the
Recordings screen.
8 10/23 Mon
--
Previous
Play
B Picture
---
08
07
--
Page 02/02
SUB MENU
Select
Next
Previous
Direct Play
Next
1 2 3
4 5 6
7 8 9
DELETE
0
e.g., “5”:
“15”:
MP3
e.g., “5”:
“15”:
JPEG
e.g., “5”:
“15”:
[0] [5]
[1] [5]
[0] [0] [5]
[0] [1] [5]
[0] [0] [0] [5]
[0] [0] [1] [5]
RESET
Tips
30
RQT9056
, , , to select the
recording you want to watch,
then OK
Depending on the disc, some operations may not be possible.
Quick View (Play M1.3)
[RAM]
Allows you to increase the play speed slightly without
distorting the audio.
CM Skip
[RAM] [-R] [-R\DL] [-RW‹V›] [+R] [+R]DL] [+RW] [-RW‹VR›]
Skips 1-minute forward with each press.
During playback
During playback
PLAY
CM SKIP
(Press and hold.)
– Press again to return to normal speed.
Create Chapters
[RAM] [-R] [-R\DL] [-RW‹V›] [+R] [+R]DL] [+RW]
[DVD-V] [-RW‹VR›]
[RAM]
During playback
Advanced Features
Slow-motion Play
CREATE
CHAPTER
While paused
or
– There are 5 slow-motion speeds. Each press
increases the speed.
– Press [ PLAY] to restart normal playback.
Tips
You can skip to the start of a chapter by pressing [, ].
Notes
If continued for approx. 5 minutes, slow-motion play pauses
automatically (except [DVD-V]).
Frame-by-Frame Viewing
[RAM] [-R] [-R\DL] [-RW‹V›] [+R] [+R]DL] [+RW]
[DVD-V] [-RW‹VR›]
While paused
OK
– Each press shows the next or previous frame.
– Press and hold to advance or reverse frame-byframe in succession.
– Press [ PLAY] to restart normal playback.
Time Slip
[RAM] [-R] [-R\DL] [-RW‹V›] [+R] [+R]DL] [+RW] [-RW‹VR›]
Use to skip in 1-minute or 10-minute increments.
During playback
Tips
Depending on the disc, some operations may not be possible.
Changing Audio during Playback
AUDIO
A
to select the audio.
Available audio will differ based on disc type.
See below.
DVD-RAM
e.g.: [RAM]
Play
“Stereo” is
[RAM] [-RW‹VR›] and DivX
selected.
Stereo
Stereo Mono L Mono R
$
[RAM] [-RW‹VR›] When playing an analog multilingual
broadcast, you can choose between Main Audio and
SAP Audio.
Main Audio SAP Audio
[DVD-V\
This allows you to change items like the audio channel
number and the soundtrack language ( 50).
Soundtrack
1 ENG
TIME SLIP
e.g., English is the selected language.
Notes
, to select the time, then
OK
– Each press of or advances the interval
by 1 minute (press and hold for 10-minute
intervals).
If you cannot change the audio type when you have used only
an optical digital audio cable for connection, set “Dolby Digital” to
“PCM” ( 61). Alternatively, you may connect to an amplifier or
system component with an audio cable and change the input on the
amplifier or system component to suit the connection ( 72).
31
RQT9056
Playing Playlists
[RAM] [-RW‹VR›]
You cannot create or edit playlists on this unit. However,
you can play a playlist that has been created or edited on
other equipment.
DRIVE
SELECT
to select the DVD drive.
View Chapters
Perform steps 1−4 left
, , , to select the playlist,
then SUB MENU
With the unit stopped
, to select “View Chapters”,
then OK
, to select “Other Functions”
then OK
FUNCTIONS
Disc Protection Off
DVD-RAM
Playback
Playlists
Program
Flexible Recording
Delete
DV Camcorder Rec.
Copy
Setup
Other Functions
DVD Management
OK
, to select “Playlists”, then
OK
, , , to select the playlist
to play, then OK
Playlist Properties
Perform steps 1−4 above
, , , to select the playlist,
then SUB MENU
, to select “Properties”, then
OK
– Playlist information (e.g., length and date) is
shown.
32
RQT9056
, , , to select the
chapter, then OK
Tips
To return to the playlist screen
Press [SUB MENU], then select “View Playlists” and press [OK].
To view other pages
Press [,].
Playing MP3s
[-R] [-R\DL] [CD] [USB]
MP3 recorded on DVD-R, DVD-R DL, CD-R/RW or USB memory can
be played on this unit.
[USB] The screen shown below may be displayed when you insert
a USB memory ( 15).
USB Media Device Operations
USB Media Device inserted.
Select an action or press RETURN to Exit.
Go to DivX Menu
Play MP3
Go to Album View
Copy pictures
OK
Tips
To select file type
1. Press [RETURN].
2. Press [FUNCTIONS].
3. Press [,] to select
“Menu”,
then press [OK].
4. Press [,] to select “MP3
Music”,
then press [OK].
Press [, ] to select “Play MP3”, then press [OK].
You can proceed to step ( below).
To stop playing
Press [w STOP].
[-R] [-R\DL] [CD] The screen shown below is displayed when you
insert a disc containing MP3 files, DivX video contents and still
pictures (JPEG).
e.g.,
To exit the menu screen
Press [DIRECT NAVIGATOR].
Multimedia content
Music and pictures on disc.
Please select playback mode.
DivX Menu
MP3 Music
Pictures
OK
To view other pages
Press [, ].
OK
Advanced Features
To select the track with the numbered buttons
e.g.,
“5”:
[0] [0] [5]
“15”:
[0] [1] [5]
Playback mode is set to DivX.
To play another type of files,
please select playback mode
from Menu in FUNCTIONS.
1.
2.
3.
4.
e.g.,
Using the Tree Screen to Find a Group
Press [OK] to exit the screen.
Press [FUNCTIONS].
Press [,] to select “Menu”, then press [OK].
Press [,] to select “MP3 Music”, then press [OK].
You can proceed to step ( below).
From the track list
while a track is highlighted to
display the tree screen.
DRIVE
SELECT
to select the DVD or USB
drive.
Menu
G
1
T
1
Total
1/49
No.
0 – 9
Tree
G
1/3
CD-RW for Check
/JPEG/
/JPEG/JPEG1/
/JPEG/JPEG2/
/MP3/
MP3/MP3 group1/
MP3/MP3 group2/
MP3/MP3 group2/
: Selected Group No./Total Group No.
If the group has no compatible track, “--” is
displayed as the group number.
: Selected Group
Track list is shown.
Selected group
Menu
G
1
T
3
Total
3/111
No.
0 – 9
Prev.
Next
ENTER
No.
Group
1 : My favorite
Total
Track
001-Both Ends Freezing
1
002-Lady Starfish
2
003-Life
on Jupiter
3
004-Metal Glue
4
005-Paint It Yellow
5
006-Pyjamamama
6
007-Shrimps from Mars
7
008-Starry Blue
8
009-Velvet Cuppermine
9
010-Ziggy Starfish
10
Tree
: Group No.
: Track No. in
the group
: Track No./
Total tracks in
all groups
, to select a group, then
OK
– The track list for the selected group appears.
Page 001/024
–When the DivX or JPEG Menu is displayed,
perform steps 1–4 in “To select file type” on the
right column selecting “MP3 Music” in step 4 to
change the playback mode.
, to select a track, then
to play.
OK
Notes
p When there is a large amount of still picture data etc. within an
MP3 file, play may not be possible.
p You cannot operate the scroll bar that appears in the tree screen.
Tips
To return to the track list
Press [RETURN].
–“ ” indicates the track currently playing.
33
RQT9056
Playing Still Pictures (JPEG)
[RAM] [-R] [-R\DL] [CD] [SD] [USB]
Still pictures (JPEG) recorded on DVD-RAM, DVD-R, DVD-R DL,
CD-R/RW, SD Memory Cards or USB memory can be played on
this unit.
[SD] [USB] The screen shown below may be displayed when you
insert an SD card or USB memory ( 15).
e.g., [USB]
USB Media Device Operations
, , , to select a picture,
to view.
then OK
Notes
USB Media Device inserted.
Select an action or press RETURN to Exit.
p You can use 8MB to 2GB SD memory cards, 4GB, 8GB, 16GB
SDHC memory cards ( 73).
p Still pictures cannot be played during recording on the DVD drive
or copying.
p Thumbnails for large JPEG files and images with aspect ratios
other than 4:3 may not display.
Go to DivX Menu
Play MP3
Go to Album View
Copy pictures
OK
Press [, ] to select “Go to Album View”, then press [OK].
You can proceed to step ( below).
[-R] [-R\DL] [CD] The screen shown below is displayed when you
insert a disc containing MP3 files, DivX video contents and still
pictures (JPEG).
e.g.,
To exit the menu screen
Press [DIRECT NAVIGATOR].
Playback mode is set to DivX.
To play another type of files,
please select playback mode
from Menu in FUNCTIONS.
To view other pages
Press [, , , ] to select “Previous” or “Next”, then press [OK].
You can also press [, ] to view other pages.
OK
1.
2.
3.
4.
Press [OK] to exit the screen.
Press [FUNCTIONS].
Press [,] to select “Menu”, then press [OK].
Press [,] to select “Pictures”, then press [OK].
You can proceed to step ( below).
DRIVE
SELECT
DIRECT NAVIGATOR
Album View
DVD-RAM
A Video
007
008
10/27/2006 Total8
Photo: 3/10/2005
10/27/2006 Total6
My Album2
---
---
Previous
B Picture
---
Slideshow
, , , to select an album,
then SUB MENU
---
Page 02/02
OK
S SUB MENU
Album that has not yet been viewed ([RAM])
From the Album View screen
Album View screen
Slideshow
Next
Press OK to go to
Picture View
– [RAM] When the Recordings screen is
displayed, press B to switch to the Album
View screen.
– [-R] [-R\DL] [CD] [USB] When the DivX or MP3
Menu is displayed, perform steps 1–4 in “To
select file type” on the upper Tips on page 33,
selecting “Pictures” in step 4 to change the
playback mode.
, , , to select an album,
then OK
– The Picture (JPEG) View screen appears.
RQT9056
To select the still picture or album with the numbered buttons
Album
e.g.,
“5”:
[0] [0] [5]
“15”:
[0] [1] [5]
Still picture
e.g.,
“5”:
[0] [0] [0] [5]
“15”:
[0] [0] [1] [5]
DIRECT NAVIGATOR screen icon
to select the drive (DVD,
SD or USB) .
34
Tips
To stop viewing a picture
Press [w STOP].
, to select “Start
Slideshow”, then OK
Start Slideshow
Slideshow settings
Tips
To stop the Slideshow
Press [w STOP].
To change Slideshow settings
1 In step 2 above, press [, ] to select “Slideshow settings”,
then press [OK].
2 Press [, ] to select each item.
Slide Interval
pPress [, ] to select desired interval (0 to 99 seconds), then
press [OK].
Repeat Play
pPress [, ] to select “On” or “Off”, then press [OK].
SNDTRK Instruction
If you select “On”, then a screen will be displayed showing the
operations for a slideshow with soundtrack when a slideshow is played.
pPress [, ] to select “On” or “Off”, then press [OK].
Zoom
Slideshow with soundtrack
It is possible to play MP3 music recorded on a USB memory during a
Slideshow.
While playing a picture
SUB MENU
Preparation:
p Insert a USB containing MP3 files.
Control Panel
From the Album View screen
To zoom in:
, , , to select an album,
then SUB MENU
, to select “Zoom
In”, then OK
FUNCTIONS
Rotate Right
Rotate Left
Zoom In
OK
SNDTRK Folder
Tips
Advanced Features
, to select
“Slideshow w/ SNDTRK”,
then OK
Tips
Slideshow w/ SNDTRK
To return the picture to its original size
Press [, ] to select “Zoom out” in step 2, then press [OK].
p When zooming in, the still picture may be cut off.
p “Zoom In” information is not stored.
p “Zoom In” and “Zoom out” do not work with images that have a
resolution larger than 640M480 pixels.
Picture Properties
To select an MP3 folder to be played
1 In step 2 above, press [, ] to select “SNDTRK Folder”, then
press [OK].
2 Press [, ] to select the folder, then press [OK].
While playing a picture
STATUS
twice to display picture
properties.
Rotate Pictures
Shooting Date
11/30 12:03 AM
While playing a picture
Date 11/26/2006
SUB MENU
STATUS
, to select “Rotate
Right” or “Rotate Left”,
then OK
0002/0030
again, to exit.
Control Panel
FUNCTIONS
Rotate Right
Rotate Left
Notes
Depending on the camera or editing software; shooting dates may
not be displayed correctly.
Zoom In
OK
Notes
To return the picture to its original position
Press [, ] to select the opposite rotation in step 2, then press
[OK].
p Rotation information will not be stored.
–[-R] [-R]DL] [CD]
–When disc or album is protected
–When played on other equipment
–When copying pictures
35
RQT9056
Playing DivX
[-R] [-R]DL] [CD] [USB]
You can play CD-R/CD-RW, DVD-R, DVD-R DL discs and USB
memories which contain DivX video contents that have been recorded
on a computer.
[USB] When you insert a USB memory, the menu screen appears.
( 33, left column)
Press [, ] to select “Go to DivX Menu”, then press [OK].
You can proceed to step 3 ( below).
[-R] [-R\DL] ]CD]When you insert a disc containing MP3 files, DivX
video contents and still pictures (JPEG), the files selection screen
appears. ( 33, left column)
Press [OK]. You can proceed to step 3 ( below).
DRIVE
SELECT
to select the DVD or USB
drive.
DivX file list is shown.
Folder1 : VIDEO
DivX Menu
CD (DivX)
DivX Recordings
No.
001
002
003
004
005
006
007
008
009
Tree
Movie01.avi
Movie02.avi
Movie03.avi
Movie04.avi
Movie05.avi
Movie06.avi
Movie07.avi
Movie08.avi
Movie09.avi
– When the MP3 or JPEG Menu is displayed,
perform steps 1–4 in “To select file type” on
the upper Tips on page 33, selecting “DivX
Menu” in step 4 to change the playback
mode.
, to select the recording,
then OK
Notes
p Picture sizes set at the time of recording may prevent the unit from
showing pictures in the proper aspect ratio. You may be able to
adjust the aspect ratio through the TV.
p Successive play is not available.
Tips
To view other pages
Press [, ].
To stop playing
Press [w STOP].
To exit the menu screen
Press [DIRECT NAVIGATOR].
To select the recording with the numbered buttons
e.g.,
“5”:
[0] [0] [5]
“15”:
[0] [1] [5]
Using the Tree Screen to Find a Folder
From the DivX file list
while a recording is highlighted
to display the tree screen.
DivX Menu
CD (DivX)
Folder
F 1/11
VIDEO
Image001
Image002
Image003
Image004
Image005
Image006
Image007
Image008
Image009
Image010
36
RQT9056
: Selected folder No./Total folder No.
including DivX recording
: Selected folder
, to select a folder, then
OK
– The file list for the folder appears.
Notes
p You cannot operate the scroll bar that appears in the tree screen.
Tips
To return to the previous screen
Press [RETURN].
Regarding DivX VOD content
DivX Video-on-Demand (VOD) content is encrypted for copyright
protection. In order to play DivX VOD content on this unit, you first need
to register the unit.
Follow the online instructions for purchasing DivX VOD content to enter
the unit’s registration code and register the unit.
For more information about DivX VOD, visit www.divx.com/vod
Display the unit’s registration code.
( 58, “DivX Registration” in the “Setup” menu)
Setup
DivX Registration
Channel
Setup
DivX (R) Video On Demand
Disc
Video
Audio
Display
TV Screen
VHS
Your registration code is : XXXXXXXX
To learn more visit www.divx.com/vod
8 alphanumeric characters
OK
p After playing DivX VOD content for the first time, a new registration
code is then displayed in “DivX Registration”. Do not use this
registration code to purchase or rent DivX VOD content. If you use
this code to purchase (rent) DivX VOD content, and then play the
content on this unit, you will no longer be able to play any content that
you purchased (rented) using the old code.
p If you purchase or rent DivX VOD content using a registration code
different from this unit’s code, you will not be able to play that content.
(“Authorization Error” is displayed.)
Regarding DivX content that can only be played a set number of
times
Some DivX VOD content can only be played a set number of times.
When you play this content, the remaining number of plays is
displayed. You cannot play this content when the number of remaining
plays is zero. (“Rental Expired” is displayed.)
When playing this content
p The number of remaining plays is reduced by one if:
– you press [¦ DVD/VHS POWER].
– you press [w STOP].
– you press [].
– you press [, ] etc. and arrive at the end of the content or the
start of the content being played.
– you press [DRIVE SELECT] to change the drive.
– you press [DIRECT NAVIGATOR].
p Resume play function does not work.
Advanced Video Cassette Playback
Zoom in on video
During playback
Tips
For quicker operation
p Hold [, ] to start cue/review and release the button to
restart normal playback.
SUB MENU
Jet Search
Allows high speed search of video in forward or reverse
direction.
, to select “Zoom In”, then
OK
During playback
FF
REW
Tips
To return the picture to its original size
Press [, ] to select “Zoom out” in step 2, then press [OK].
Fast-forward/Rewind
With the unit stopped
FF
to fast-forward the tape.
to rewind the tape.
REW
Slow playback
twice to Jet Search forward.
twice to Jet Search in reverse.
– Press [ PLAY] to restart normal playback.
Notes
p The speed of Jet Search (M27 or M35) can be specified via the
Setup menu ( 66).
p Recordings made in EP or VP mode may experience distortions or
vertical scroll at 35 times speed. If so, change speed to 27 times.
p Depending on your TV, the picture may not be in color or may be
distorted.
p Jet Search is automatically canceled after 10 minutes.
Advanced Features
To zoom in:
Jet Rewind
Video tapes will rewind to the beginning of the tape at
higher-speed.
TIME SLIP/ JET REW
During playback
Notes
PAUSE
Press and hold for about
2 seconds.
– Press [ PLAY] to restart normal playback.
Notes
Slow playback is automatically canceled after 10 minutes.
Cue/Review
Allows to quickly review a portion of the video just
played, or cue later portions of the tape.
During playback
FF
REW
to cue later portions of the tape.
to review portion just played.
– Press [ PLAY] to restart normal playback.
Notes
Cue/review is automatically canceled after 10 minutes.
p Depending on the tape or an operating condition, the rewind
speed may change somewhat.
p The tape counter is reset to “0:00.00” when the tape is rewound to
the beginning.
p Depending on the tape, this function may not work.
VHS Index Search System (VISS)
The unit automatically records special index signals on a
tape every time a recording is started (via [q REC], or a
scheduled recording). The index search function makes
use of these index signals to help you find the beginning
of a desired program quickly and easily.
While stopped or during normal play
or
.
– Each press increases the number of skips.
– Press [w STOP] to cancel the search.
Notes
pUp to 20 index signals can be searched in either direction.
pIf you overshoot in either direction, press the opposite button
to correct.
pFor correct operation, make recordings of at least 5 minutes
to ensure that index signals are not spaced too closely
together.
37
RQT9056
Advanced Video Cassette Playback
S-VHS Quasi Playback (SQPB)
This unit can play tapes recorded in S-VHS.
p Some picture noise may occur depending on the type
of tape used.
p It is not possible to fully obtain the high resolution
S-VHS is capable of.
p This unit cannot record in S-VHS.
Repeat Playback
Adjusting the playback picture
Manual Tracking
The unit usually makes tracking adjustments
automatically, but you may need to do it manually if noise
appears on a tape recorded on other equipment.
During playback
TRACKING/V-LOCK
TRACKING/V-LOCK
When the tape reaches the end of the program, it will
automatically rewind to the beginning and play again.
CH
CH
or
During playback or while stopped
PLAY
Press and hold for about 5 or
more seconds.
– Repeat until the picture noise disappears.
To return to auto tracking:
TRACKING/V-LOCK
CH
– Repeat Playback goes on indefinitely until you
cancel it.
– The “RPt” indication appears on the unit’s display.
– Press [w STOP] to stop play.
(simultaneously).
Tips
To remove the noise from a paused picture:
Start slow play ( 37), then adjust the tracking.
Notes
Only works if there is at least 5 seconds blank space at the end of
the program.
Notes
p This function may not work with some tapes.
p You can also adjust the tracking with [CH 9, :] on the main unit.
Changing Audio during Playback
Vertical Locking Adjustment
AUDIO
A
repeatedly, to select the audio
option.
Stereo Mono L Mono R
No display (Normal audio track) $
Tips
Auto Bilingual Selection Function [VHS]
When a stereo broadcast or multilingual broadcast is recorded
and played back on the unit, stereo sound will be automatically
selected in the case of a stereo broadcast and SAP sound will be
automatically selected in the case of a multilingual broadcast.
– This function may not work properly if the program is played back
from a mid point. In a case like this, press [AUDIO] and select the
right sound.
– The function will not work with a cassette which has been
recorded from external equipment.
Adjust the vertical synchronization to stop the picture
from shaking while paused.
While paused
TRACKING/V-LOCK
TRACKING/V-LOCK
CH
CH
or
– Repeat until the shaking stops.
To return to the standard position:
TRACKING/V-LOCK
CH
(simultaneously).
Notes
p This function may not work with some tapes.
p You can also adjust vertical synchronization with [CH 9, :] on the
main unit.
38
RQT9056
Status Messages
The following messages and displays appear to let
you know what operations are being performed and
the status of the unit.
STATUS
– Press [STATUS] to cycle through available
displays.
e.g.,
12/24 6:34 PM
vRemain 1:45 SP
vT12 0:01:23 SP
vT12 0:12:34 SP
CH 4-
KPO-SD
STATUS
to display on-screen indicators.
DVD-RAM
Play
4 - 1 KPO-SD
English
VHS Rec.
VHS
Mono L
0:00.22
SP
Now: FOOTBALL FOCUS
PG: NR
12:00pm - 1:00pm
Next: BASEBALL
1:00pm - 2:00pm
The following on-screen indicator will not be displayed
when this unit is connected to the TV with the DVD
PRIORITY output terminals or HDMI AV OUT terminal.
This indicator is only displayed when playing a tape in
this unit’s VHS drive while recording a program on the
DVD drive. The items displayed may differ depending on
the operating conditions.
Advanced Features
DVD-RAM
Play
4 - 1 KPO-SD
English
VHS Rec.
On-screen Display Indicators for Video
Cassette Playback
No Display
w Display examples
Current media
Shows current recording or play status.
Channel information
Status of the other drive
The current date and time
Elapsed play time/Recording mode
Remaining recording time and recording mode
(e.g.: “1:45 SP” indicates 1 hour and 45 minutes
in SP mode)
p Disc remaining time may slightly differ between
different models.
Elapsed recording time and recording mode
Only displayed when receiving a digital
broadcast:
Channel
Channel caption
Current program
Next program
Parental Rating of the program ( 67)
Start and finish times of the program
VHS drive indicator
Shows which sound mode is selected as follows:
Hi-Fi stereo audio
Stereo:
Mono L:
Mono L audio of the Hi-Fi stereo
audio
Mono R audio of the Hi-Fi stereo
Mono R:
audio
No indicator: Normal audio
Operation status
Shows the tape counter and remaining tape time
Pressing [STATUS] to cycle the display as follows:
No display Tape counter
Remaining tape time $
p Press [_ DELETE] to reset the tape counter
(elapsed time) to “0:00.00”. The tape counter
is automatically reset when inserting a video
cassette.
Video cassette-in indicator
Recording mode ( 24)
Tips
To exit on-screen indicators
Press [STATUS] several times.
Notes
Remaining tape time display
p The displayed time is approximate.
p The displayed time will be incorrect if you set the wrong tape
length in “Select Tape Length” in the Setup menu ( 66) and if the
tape is of poor quality.
39
RQT9056
Linked Operations with the TV (VIERA Link TM “HDAVI Control TM”)
You can enjoy linked operations with the TV and receiver by using “HDAVI Control”.
What is VIERA Link “HDAVI Control”?
VIERA LinkTM is a new name for EZ SyncTM.
VIERA Link “HDAVI Control” is a convenient function that offers linked operations of this unit, and a Panasonic TV
(VIERA) or receiver under “HDAVI Control”. You can use this function by connecting the equipment with an HDMI
cable. See the operating instructions for connected equipment for operational details.
p VIERA Link “HDAVI Control”, based on the control functions provided by HDMI which is an industry standard
known as HDMI CEC (Consumer Electronics Control), is a unique function that we have developed and added.
As such, its operation with other manufacturers’ equipment that supports HDMI CEC cannot be guaranteed.
p This unit supports “HDAVI Control 3” function.
“HDAVI Control 3” is the newest standard (current as of December, 2007) for Panasonic’s HDAVI Control
compatible equipment. This standard is compatible with Panasonic’s conventional HDAVI equipment.
pPlease refer to individual manuals for other manufacturers’ equipment supporting VIERA Link function.
Preparation
1. Connect this unit to your TV or receiver with an HDMI cable ( 11, 72).
2. Set “VIERA Link” to “On” ( 66). (The default setting is “On”.)
3. Set the “HDAVI Control” operations on the connected equipment (e.g., TV).
pWhen using HDMI2 terminal of VIERA as “HDAVI Control”, set the input channel to HDMI2 on VIERA.
4. Turn on all “HDAVI Control” compatible equipment and select this unit’s input channel on the connected TV so
that the “HDAVI Control” function works properly.
When the connection or settings are changed, repeat this procedure.
(When the TV is on)
Automatic input
switching
When the TV is on and the following operations are performed, the TV’s input will
automatically switch to HDMI input mode and the TV displays the corresponding
action.
(Picture or sound may not be available for the first few seconds.)
Press [FUNCTIONS]a1, [PLAY]a2, [DIRECT NAVIGATOR], [SCHEDULE], etc.
p If you operate the VHS when the unit is recording on the DVD drive, the output does not automatically
switch.
(When the TV is off)
Power on link
When the TV is off and the following operations are performed, the TV will
automatically turn on and display the corresponding action.
(Picture or sound may not be available for the first few seconds.)
Press [PLAY]a2, [DIRECT NAVIGATOR], [SCHEDULE], etc.
p [DVD-V]a3, etc.
The TV is automatically turned on when you insert a disc or a tape without the accidental erasure
prevention tab.
p If you operate the VHS when the unit is recording on the DVD drive, the TV does not automatically turn on.
Power off link
When you turn the TV off, this unit is also automatically turned off. This unit
automatically turns off even if the FUNCTIONS screen, the status message or the
on-screen menu is displayed during playback.
Even if the TV is turned off, this unit will not turn off at the same time under the
following conditions:
– when you press [q REC] and this unit is recording
– when scheduled recording is proceeding
– when copying
– when finalizing, etc.
p When this unit is connected to an “HDAVI Control” compatible Panasonic receiver with an HDMI cable, the
receiver will also turn off.
a1
a2
a3
This button is available only when this unit is on.
When this button is pressed, the playback image is not immediately displayed on the screen and it may not be possible to watch the contents
from where playback started.
In this case, press [] or [] to go back to where playback started.
Depending on discs, the TV may not automatically turn on.
Notes
40
RQT9056
p When this unit is connected to a Panasonic TV (VIERA) supporting HDAVI Control 3 and initially set up, it automatically acquires the TV
setting information.
p These functions may not work normally depending on the equipment condition.
p About “HDAVI Control” function, read the operating instructions of the connected equipment (e.g., TV) too.
Easy control only with VIERA Remote Control
If you connect this unit via HDMI cable to a TV with “HDAVI Control 2 or “HDAVI Control 3” function, you can operate
both units more conveniently.
You can operate this unit using the following buttons on the TV remote control.
[, , , ], [OK], [RETURN], [SUB MENU].
Use the remote control for this unit to operate any other buttons (numbered buttons, etc.) that are not listed above.
Refer to TV operating instruction for operating the TV.
Using the
FUNCTIONS
window to operate
this unit
Display this unit’s “FUNCTIONS” window using the TV
remote control.
FUNCTIONS
DVD-RAM
pIf
Cartridge Protection Off
Disc Protection Off
Playback
this unit is set to off, it will automatically turn on.
Program
Delete
Copy
Other Functions
Advanced Features
Select the item you want to operate
with the TV remote control, then
OK
OK
About the FUNCTIONS window ( 42)
Using the SUB
MENU window to
operate this unit
By using the TV remote control, you can play discs and select the drive (DVD, VHS,
SD or USB) using the “Control Panel” ( below).
SUB
MENU
e,g.,
Control Panel
Control Panel is
displayed ( below).
FUNCTIONS
FUNCTIONS window is displayed
( above).
Top Menu [DVD-V[
Menu [DVD-V[
Drive Select
Set Favorite
Rotate Right (JPEG)
Rotate Left (JPEG)
Zoom In
Zoom out
Top menu is displayed ( 30).
Control Panel
FUNCTIONS
Drive Select
Set Favorite
Zoom In
OK
Select an item,
then OK
Using the Control
Panel
Menu is displayed ( 30).
Select the DVD, VHS, SD or USB drive.
Set Favorite list is displayed ( 16).
Rotate the still pictures ( 35).
Enlarge or shrink the video or the still
picture ( 35).
Using the Control Panel, you can operate search backward, search forward, stop,
etc. with the TV remote control.
Perform steps 1 and 2 of “Using the SUB MENU window to operate this unit”.
The Control Panel is displayed ( right)
While playing a recording or DVD-Video, etc.
– []: Pause, []:Stop, []: Search backward, []:Search forward,
[OK]: Play, [EXIT]: Exit the screen.
While playing still pictures
– []: Stop, []:View previous picture, []: View next picture,
[EXIT]: Exit the screen.
Control Panel
Pause
Play
Search
Search
Exit
Stop
Notes
When you record a program by operating the TV (Direct TV Recording, etc.)
p It is recorded on a disc in the recording mode preset on this unit.
p If the Direct TV Recording mode has been activated on this unit, then a new program cannot be recorded using this mode.
wWhen you want to leave the TV on and turn off only this unit
Press [¦DVD/VHS POWER] on this unit’s remote control to turn off
wWhen not using “HDAVI Control”
Set “VIERA Link” in the setup menu to “Off” ( 66).
41
RQT9056
Entering Text
FUNCTIONS Window
By using the FUNCTIONS window you may access
the main functions quickly and easily.
When viewing the Name screen.
Recording Name
_
With the unit stopped
FUNCTIONS
DVD-RAM
Cartridge Protection Off
Disc Protection Off
Playback
Program
FUNCTIONS
DVD-RAM
Cartridge Protection Off
Disc Protection Off
delete
Playback
Playlists
Copy
Program
Flexible Recording
Other Functions
delete
DV Camcorder Rec.
OK
Copy
Setup
Other Functions
DVD Management
Delete
Set
OK
1 1
2
3
5
6
7
2 A
B
C
a
b
c
4
3 D
E
F
d
e
f
4 G
H
I
g
h
i
5 J
K
L
j
l
6 M N
O
k
m n
7 P
8 T
Q
R
U
V
9 W X
0 . ,
Y
?
8
9
/
0
%
$
&
@
o
[
]
_
p
q
r
s
(
t
u
v
{
}
)
-
Z
w
x
!
"
'
y
:
z
;
\
`
|
^
S
Space
OK
, to select a menu item,
then OK
– If you select “Other Functions”, press
[, ] to select a menu item and press
[OK].
Playback
30
You can select and play recorded programs.
, , , to select
characters, then OK
–Repeat this step to enter other characters.
STOP
when you’ve finished
entering text.
Program
19
You can make scheduled recording settings.
Delete
22
You can delete recordings using DELETE Navigator.
Copy
20
You can copy recordings using COPY Navigator.
Copy New Pictures
48
You can copy still pictures.
Playlists
32
You can play playlists.
Tips
Using the numbered buttons to enter characters
e.g.: entering the letter “R”
1. Press [7] to move to the 7th row.
2. Press [7] twice to highlight “R”.
3. Press [OK].
To enter a space
Press [_ DELETE] then press [OK].
To delete a character
Press [ PAUSE] on a character in the name field.
To cancel in the middle
Press [RETURN].
Characters will not be saved.
Notes
Long recording names may not be displayed.
Flexible Recording
26
The unit sets the best possible picture quality that
fits the recording within the remaining disc space.
DV Camcorder Rec.
29
DV automatic recording function
Setup
55
You can change the unit’s settings using Setup
menu.
DVD and Card Management
52
You can manage discs through formatting,
finalizing and other operations.
42
RQT9056
Recordings−Editing
Tips
Tips
pRecording/Chapter
Normally, programs are recorded as a single item consisting of
one chapter.
Recording
Chapter
Start
End
To exit the menu screen
Press [DIRECT NAVIGATOR].
To view other pages
Press [, , , ] to select “Previous” or “Next”, then press [OK].
–You can also press [, ] to view other pages.
Multiple editing
Select with [, , , ], then press [PAUSE]. (Repeat.)
–A checkmark appears. Press [PAUSE] again to cancel.
[RAM] You can divide a recording into multiple chapters.
Recording
Chapter
Chapter
Chapter
After finalizing, recordings are divided into chapters of the
following lengths.
[-R] [-R]DL] [-RW‹V›]: Chapters are approx. 5 minutes long
[+R] [+R]DL]: Chapters are approx. 8 minutes long
pMaximum numbers of items on a disc
[RAM] [-R] [-R]DL] [-RW‹V›]
Recordings
Chapters
[+R] [+R]DL] [+RW]
99
49
Approx. 1000
Approx. 254
Editing Operations to Recordings
Delete Recording
Perform steps 1−4 of “Accessing the Recording View”.
[RAM] [-R] [-R]DL] [-RW‹V›] [+R] [+R]DL] [+RW]
Important: Once deleted, contents cannot be recovered.
, to select “Delete
Recording”, then OK
DRIVE
SELECT
to select the DVD drive.
[RAM] When the Album View screen
is displayed, press A to switch to
the Recordings screen.
, , , to select a recording.
–Multiple editing ( right, Tips)
SUB MENU
to display the menu list.
To view more options
Press [, ] to select “Edit Recording”, then
press [OK].
pItems that cannot be selected are gray.
e.g., [RAM]
Refer to
Edit Name
“Editing
Setup Protection
Cancel Protection
Operations to
Delete Recording
Change Thumbnail
Recordings”
Properties
Divide Recording
Edit Recording
( right).
View Chapters
Album View
Using menus to play still
pictures ( 34)
If you select “View Chapters” ( 45)
to select “Delete”, then
Advanced Editing
Accessing the Recording View
Advanced Features
Chapter
OK
Recording Properties
Perform steps 1−4 of “Accessing the Recording View”.
[RAM] [-R] [-R]DL] [-RW‹V›] [+R] [+R]DL] [+RW] [-RW‹VR›]
, to select “Properties”, then
OK
–Recording information is shown (e.g., date,
time).
Properties
Football
No.
Date
Channel
01
Start
1/ 1/2007 Mon Rec. Time
12
1:02 PM
1:00(SP)
OK
Recording Name
Perform steps 1−4 of “Accessing the Recording View”.
[RAM] [-R] [-R]DL] [-RW‹V›] [+R] [+R]DL] [+RW]
, to select “Edit Name” then
OK
Notes
pYou cannot edit during recording or copying.
p[+R] [+R]DL] Management information is recorded in unused
sections when you edit discs. The available space on these discs
decreases each time you edit their contents.
–You can give a name for the recording ( 42).
Continued on next page.
43
RQT9056
Recordings−Editing
Setup Protection/Cancel Protection
Tips
Perform steps 1−4 of “Accessing the Recording View”
( 43).
[RAM]
Use to prevent accidental erasure of recordings.
, to select “Setup Protection”
or “Cancel Protection”, then OK
DIRECT NAVIGATOR
DVD-RAM
The lock symbol appears
when the recording is
protected.
Divide Recording
Perform steps 1−4 of “Accessing the Recording View”
( 43).
OK
to select “Yes”, then
For quicker editing
pUse Search ( 30), Slow-motion Play or Time Slip ( 31) to find
the desired point.
pTo skip to the start or end of a recording, press [] (start) or
[] (end).
pFor better precision, use Slow-motion Play and Frame by Frame
Viewing ( 31).
Recordi
07
08
10 10/27 Mon
8 10/27 Mon
--
--
Change Thumbnail
[RAM]
Once divided, recordings cannot be recombined.
, to select “Divide Recording”
then OK
DIRECT NAVIGATOR
Divide Recording
DVD-RAM
08
Perform steps 1−4 of “Accessing the Recording View”
( 43).
[RAM] [-R] [-R]DL] [-RW‹V›] [+R] [+R]DL] [+RW]
Changes the thumbnail picture shown in the Recordings
screen.
, to select “Change
Thumbnail”, then OK
DIRECT NAVIGATOR Change Thumbnail
DVD-RAM
A Video
08
B Picture
Change
Exit
0:01.05
Change
−−:−−.−−
Start play and select
the thumbnail position.
A Video
Play
B Picture
Preview
Divide
Exit
0 00 05
OK
at the point you want to
divide.
–For quicker editing ( above, Tips)
–Selecting “Preview” then press [OK] plays
the recording from 10 seconds prior, to
10 seconds after the division point.
–To change the point to divide at:
Restart play and press [, ] to select
“Divide” then press [OK] to bring to the point
where you want to divide.
OK
PLAY
to start play.
OK
at the point you want to use
as your thumbnail.
–To change the thumbnail:
Restart play and press [, ] to select
“Change” then press [OK] at the point you
want to use as the thumbnail.
, to select “Exit”,
then OK
44
RQT9056
, to select “Exit”
then OK
to select “Divide” then
OK
–The recording is divided at that point.
Notes
pDivided recordings retain the name of the original.
pA short amount of video and audio just before and after the
division point gets cut out.
pYou cannot divide a recording when the resulting parts are too
short or when the total number of recordings exceeds 99.
Chapters−Creating, Editing
Accessing the Chapter View
Chapter Operations
[RAM]
Allows individual viewing and editing of chapters.
DRIVE
SELECT
Create Chapter
Perform steps 1−7b of “Accessing the Chapter View” ( left).
to select the DVD drive.
, to select “Create Chapter”
then OK
DIRECT NAVIGATOR Create Chapter
DVD-RAM
[RAM] When the Album View screen
is displayed, press A to switch to
the Recordings screen.
08
A Video
Play
B Picture
Create
Exit
0:43.21
OK
, , , to select a
recording.
to display the
menu list.
Delete Recording
Properties
, to select “Exit” then
OK
Edit Recording
View Chapters
Album View
Notes
Advanced Editing
SUB MENU
at the point you want to
divide.
A short portion of the recording just after the creation point may be
lost.
, to select “View Chapters”,
then OK
, , , to select a chapter.
–Multiple editing ( below, Tips)
To play,
SUB MENU
Delete Chapter
Important: Once deleted, recorded contents cannot be
recovered.
Perform steps 1−7b of “Accessing the Chapter View” ( left).
OK
To edit,
menu list.
Tips
For quicker editing ( 44, Tips)
to display the
, to select “Delete Chapter”,
then OK
Delete Chapter
Create Chapter
Combine Chapters
Refer to “Chapter
Operations” ( right).
View Recordings
You can go back to the Recordings Screen.
Tips
To exit the menu screen
Press [DIRECT NAVIGATOR].
To view other pages
Press [, , , ] to select “Previous” or “Next”, then press [OK].
–You can also press [, ] to view other pages.
Multiple editing
Select with [, , , ], then press [PAUSE]. (Repeat.)
–A checkmark appears. Press [PAUSE] again to cancel.
to select “Delete”, then
OK
Combine Chapters
Perform steps 1−7b of “Accessing the Chapter View” ( left).
, to select “Combine
Chapters”, then OK
to select “Combine” then
OK
–The selected chapter gets combined with the
next chapter.
45
RQT9056
Still Pictures−Editing
Accessing the Album/Picture View
[RAM] [SD] [USB]
DRIVE
SELECT
Tips
To view other pages
Press [, , , ] to select “Previous” or “Next”, then press [OK].
–You can also press [, ] to view other pages.
to select the drive
(DVD, SD or USB).
[RAM] When the Recordings screen is
displayed, press B to switch to the
Album View screen.
[USB] When the DivX or MP3 Menu
is displayed, perform steps 1–4 in “To
select file type” on the upper Tips on
page 33, selecting “Pictures” in step
4 to change the playback mode.
Editing an album:
, , , to select the album.
– Multiple editing ( right, Tips)
Multiple editing
Select with [, , , ], then press [PAUSE]. (Repeat.)
–A checkmark appears. Press [PAUSE] again to cancel.
To exit the menu screen
Press [DIRECT NAVIGATOR].
To return to the previous screen
Press [RETURN].
Album/Picture Operations
Add Picture / Create Album
Perform steps 1−4 of “Accessing the Album/Picture
View”.
, to select “Add Picture” or
“Create Album”, then OK
Editing a still picture:
1. , , , to select the
album which contains the still
picture to edit, then OK
2. , , , to select the still
picture.
– Multiple editing ( right, Tips)
to select “Yes”, then
OK
, , , to select the
album containing the still picture
to add, then OK
SUB MENU
to display the menu list.
To view more options
Press [, ] to select “Edit Album”, then
press [OK].
pItems that cannot be selected are gray.
e.g., [SD] Editing an album
Refer to “Slideshow” and
Slideshow w/ SNDTRK
“Slideshow with soundtrack”
SNDTRK Folder
Start Slideshow
( 34, 35)
Slideshow settings
Refer to
“Album/Picture
Set Protection
Edit Album
Operations”
Cancel Protection
Copy to DVD
( right)
Refer to “Copying Still Pictures via the
Album View Screen” ( 48)
Add Picture
Album Name
Create Album
Delete Album
e.g., [SD] Editing a still picture
Delete Picture
Set Protection
Cancel Protection
Album View
Refer to “Album/Picture
Operations” ( right).
You can go back to the Album View screen.
46
RQT9056
, to select “Select pictures
to copy” or “Copy all pictures”,
then OK
pIf “Select pictures to copy” is selected:
Press [, , , ] to select the picture,
then press [OK].
pIf “Copy all pictures” is selected:
All the still pictures in the album will be
copied.
to select “No” to finish
copying, then OK
–If you want to continue copying, select “Yes”
and repeat steps 7–8.
Album Name
Only when you select “Create Album”
, to select “Yes” or “No”, then
Perform steps 1−4 of “Accessing the Album/Picture View”
( 46).
OK
pIf “Yes” is selected:
You can give a name for the album ( 42).
pIf “No” is selected:
The recording date of the first picture in the
album becomes the album name.
, to select “Album Name”,
then OK
– You can give a name for the album ( 42).
Notes
pAlbum names entered using this unit may not display on other
equipment.
Delete Album/Delete Picture
Important: Once deleted, contents cannot be recovered.
pWhen deleting an album, non-picture files in the
album will also be deleted. (This does not apply to
subordinate folders in the album.)
Advanced Editing
Perform steps 1−4 of “Accessing the Album/Picture
View” ( 46).
, to select “Delete Album” or
“Delete Picture”, then OK
, to select “Delete”, then
OK
Set Protection/Cancel Protection
Set protection to prevent pictures from being accidentally
deleted.
Perform steps 1−4 of “Accessing the Album/Picture View”
( 46).
, to select “Set Protection”
or “Cancel Protection”, then OK
to select “Yes”, then
OK
–The lock symbol “ ” appears when the still
picture or the album is protected.
Notes
pEven if you set protection using this unit, the album may be
deleted by other equipment.
47
RQT9056
Copying Still Pictures
Importing Still Pictures from an SD card
or USB memory
[SD] [USB] [RAM]
This unit saves information about imported still pictures.
Therefore, if still pictures are imported from the same SD card
or USB memory, then only new still pictures will be imported.
Copying Still Pictures via the Album View
Screen
When you insert an SD card or USB memory, the menu
may be displayed.
Press [RETURN] to exit the screen.
e.g., [SD]
SD Card Operations
SD Card inserted.
Select an action or press RETURN.
Go to Album View
Copy pictures
With the unit stopped
Insert an SD Card or USB
memory.
OK
[SD] [USB] [RAM]
The menu is automatically displayed.
e.g., [SD]
DRIVE
SELECT
SD Card Operations
SD Card inserted.
Select an action or press RETURN.
to select the copy source
drive (DVD, SD or USB) .
Go to Album View
Copy pictures
OK
DIRECT NAVIGATOR
DVD-RAM
, to select “Copy pictures”,
then OK
Copy to
SD card
DVD
, to select “Copy”, then
–Copying
A Video
008
3/10/05 Total8
Photo: 3/10/2005
4/10/05 Total6
My Album2
---
---
Previous
OK
---
Page 02/02
S SUB MENU
B Picture
---
Slideshow
Next
Press OK to go to
Picture View
–[RAM] When
Copy New Pictures
Copy from
Album View
007
OK
the Recordings screen is
displayed, press [B] to switch to the Album
View screen.
–[USB] When the DivX or MP3 Menu is
displayed, perform steps 1–4 in “To select file
type” on the upper Tips on page 33, selecting
“Pictures” in step 4 to change the playback
mode.
starts.
Tips
You can also operate with the following steps
1. Press [DRIVE SELECT] to select the SD or USB drive.
2. While stopped
Press [FUNCTIONS].
3. Press [, ] to select “Other Functions”, then press [OK].
4. Press [, ] to select “Copy New Pictures”, then press
[OK].
, , , to select an album,
then SUB MENU
, to select “Copy to SD”,
“Copy to USB” or “Copy to DVD”,
then OK
Notes
p Still pictures already imported cannot be re-imported to
the same DVD-RAM.
p This unit saves the information on up to 4,000 still
pictures. If additional still pictures are imported, then the
older information will be deleted.
, to select “Start copying”,
then OK
– Copying
48
RQT9056
starts.
Deleting Still Pictures
Tips
When copying finishes
The confirmation screen appears.
Press [OK] to finish copying.
Delete Navigator
[RAM] [SD] [USB]
Important: Once deleted, contents cannot be recovered.
DRIVE
SELECT
to select the drive (DVD,
SD or USB).
To view other pages
Press [, , , ] to select “Previous” or “Next”, then
press [OK].
– You can also press [, ] to view other pages.
Multiple editing
Select with [, , , ], then press [PAUSE].
(Repeat.)
– A checkmark appears. Press [PAUSE] again to
cancel.
FUNCTIONS
With the unit stopped
DVD-RAM
Cartridge Protection Off
Disc Protection Off
Playback
Program
Delete
Copy
Other Functions
OK
Notes
, to select “Delete” then
DELETE Navigator
A Video
008
2 26/2007 Total 1
101_DVD
2 26/2007 Total 2
102_DVD
---
Previous
To stop copying in the middle
Press and hold [RETURN] for 3 seconds.
To return to the previous screen
Press [RETURN].
---
Page 02/02
SUB MENU
B Picture
----
007
07
OK
Tips
Album View
DVD-RAM
---
OK
Select
Advanced Editing
p If the space on the destination drive runs out or the
number of files/folders to be copied exceeds the
maximum, copying will stop partway through.
p Even if you input a name to the copy source folder,
the name will not be retained to the copy destination
folder.
p Still pictures cannot be copied between an SD card
and a USB memory.
Next
Press OK to go to
Picture View
[RAM] When the Recordings screen is displayed,
press B to switch to the Album View screen.
Deleting an album:
4a , , , to select the
album, then
DELETE
Deleting a still picture:
4b 1. , , , to select the
album, then
OK
2. , , , to select the
still picture, then OK
to select “Delete”, then
OK
Notes
pYou cannot delete while recording or copying.
Tips
To return to the previous screen
Press [RETURN].
To view other pages
Press [, , , ] to select “Previous” or “Next”, then press
[OK].
–You can also press [, ] to view other pages.
Multiple editing
Select with [, , , ], then press [ PAUSE]. (Repeat.)
–A checkmark appears. Press [ PAUSE] again to cancel.
pDeleting an item increases the available space by the
amount of space taken by the item deleted.
49
RQT9056
Setting DVD On-Screen Menus
Accessing the DVD On-Screen Menus
[DVD]
When playing discs, disc settings can be displayed and
changed.
Menu options will differ based on disc type and contents.
DRIVE
SELECT
to select the DVD drive.
DISPLAY
B
Subtitle
[RAM] [-R] [-R]DL] [-RW‹V›] [+R] [+R]DL] [+RW] [-RW‹VR›]
(Only disc that contain subtitle on/off information)
Turn the subtitle on/off.
p Subtitle on/off information cannot be recorded using this unit.
p If the subtitles overlap the closed captions recorded on discs,
turn the subtitles off.
[DVD-V]
Turn the subtitle on/off and select the language ( below,
Soundtrack/Subtitle language).
DivX
Turn the subtitle on/off and select the subtitle number.
p Subtitle numbers are displayed even if there are not multiple
subtitles.
Audio channel
[RAM] [-RW‹VR›] and DivX
“Changing Audio during Playback” ( 31)
Angle
[DVD-V]
Change the number to select an angle.
Menu
Item
Setting
, to select a menu, then .
, to select an item, then .
, to select a setting.
Follow the on-screen prompts to change
individual settings.
Notes
Some settings may not be changeable, based on the unit’s current
activity (playing, stopped, etc.) and disc contents.
Tips
Source Select (DivX)
p Automatic: The recording method of the DivX contents is
automatically distinguished and output.
p Interlace:
Select when the disc contents were recorded
using interlace.
p Progressive: Select when the disc contents were recorded
using progressive.
Soundtrack/Subtitle language
CES:
CHI:
DAN:
DEU:
ENG:
ESP:
FIN:
FRA:
HUN:
ITA:
JPN:
KOR:
Czech
Chinese
Danish
German
English
Spanish
Finnish
French
Hungarian
Italian
Japanese
Korean
MAL:
NLD:
NOR:
POL:
POR:
RUS:
SLK:
SVE:
THA:
VIE:
_:
Malay
Dutch
Norwegian
Polish
Portuguese
Russian
Slovak
Swedish
Thai
Vietnamese
Others
To exit the DVD on-screen menus
Press [DISPLAY].
Audio attributes
Disc Menu
[RAM] [-R] [-R]DL] [-RW‹V›] [+R] [+R]DL] [+RW] [DVD-V] [-RW‹VR›] and
DivX
Soundtrack
[RAM] [-R] [-R]DL] [-RW‹V›] [+R] [+R]DL] [+RW] [-RW‹VR›]
The disc’s audio attributes appear ( right, Audio attributes).
[DVD-V]
Select the audio and language ( right, Audio attributes,
Soundtrack/Subtitle language).
DivX
Select the soundtrack number.
p Soundtrack numbers are displayed even when there is only
one audio type.
50
RQT9056
LPCM/§ Digital/DTS/MPEG: Signal type
k (kHz):
Sampling frequency
b (bit):
Number of bits
ch (channel): Number of channels
Notes
p You cannot make a change when there is no recording.
p Some discs allow changes to soundtracks, subtitles, and
angles only by using the disc’s menus ( 30).
Play Menu
[RAM] [-R] [-R]DL] [-RW‹V›] [+R] [+R]DL] [+RW] [DVD-V]
[-RW‹VR›] [CD]
Repeat play
This function works only when the elapsed play time is
displayed. Select the item for repeat play. Depending on the
disc, the items that can be selected will differ.
Select “Off” to cancel.
[RAM] [-R] [-R]DL] [-RW‹V›] [+R] [+R]DL] [+RW] [DVD-V] [-RW‹VR›] and
DivX
Picture
[RAM] [-R] [-R]DL] [-RW‹V›] [+R] [+R]DL] [+RW] [DVD-V] [-RW‹VR›]
Set picture mode
Normal: Default setting
Cinema: Mellows down movies, enhances detail in dark
scenes.
DNR (Digital Noise Reduction)
[RAM] [-R] [-R]DL] [-RW‹V›] [+R] [+R]DL] [+RW] [DVD-V] [-RW‹VR›] and
DivX
“On” reduces noise and picture degradation.
Progressivea¹ (Progressive/24pa²)
Select the method of conversion for progressive output to suit
the type of material being played.
Auto1 (normal): Film and video contents are detected
automatically and converted properly.
Auto2:
When using “Auto1” and video content is
distorted as shown below.
a
24p ²: [DVD-V] When this unit is connected to a TV supporting
1080/24p output via an HDMI cable, this unit displays
each frame at 1/24 second intervals – the frame interval
originally recorded in the film, thus faithfully reproducing
the original cinema image.
If the settings are changed, then the screen will darken
for a few seconds and then playback will start.
“Auto1” is set when you turn the unit off or open disc tray.
a
¹Only when you have selected “480p” or higher for
“Component Output Signal” ( 64) or “HDMI Resolution”
( 65)
a
²Only when you have selected “On” in “24p Output for DVDVideo” in Setup menu ( 65)
Line-in NR (Only when IN1 or IN2 is selected)
Reduces video tape noise during recording. Depending on the
video signal, jittering may occur.
On: Noise reduction works for any video input.
Off: Noise reduction is off. Select when you want to record
input as is.
Other Menu
Signal meter
Allows you to check the strength of the digital broadcast signal.
p Only the strength of the digital broadcast received through
the antenna is displayed accurately.
Position
Change where this menu screen appears on your TV.
Language code list
Enter the code with the numbered buttons.
Abkhazian:
6566 Hausa:
7265
Romanian:
8279
Afar:
6565
Hebrew:
7387
Russian:
8285
Afrikaans:
6570
Hindi:
7273
Samoan:
8377
Albanian:
8381
Hungarian:
7285
Sanskrit:
8365
Amharic:
6577
Icelandic:
7383
Scots Gaelic:
7168
Arabic:
6582
Indonesian:
7378
Serbian:
8382
Armenian:
7289
Interlingua:
7365
8372
Assamese:
6583
Irish:
7165
SerboCroatian:
Shona:
Aymara:
6589
Italian:
7384
Sindhi:
8368
8378
Azerbaijani:
6590
Japanese:
7465
Singhalese:
8373
Bashkir:
6665
Javanese:
7487
Slovak:
8375
Basque:
6985
Kannada:
7578
Slovenian:
8376
Bengali,
Bangla:
Bhutani:
6678
Kashmiri:
7583
Somali:
8379
6890
Kazakh:
7575
Spanish:
6983
Bihari:
6672
Kirghiz:
7589
Sundanese:
8385
Breton:
6682
Korean:
7579
Swahili:
8387
Bulgarian:
6671
Kurdish:
7585
Swedish:
8386
Burmese:
7789
Laotian:
7679
Tagalog:
8476
Byelorussian:
6669
Latin:
7665
Tajik:
8471
Cambodian:
7577
7686
Tamil:
8465
Catalan:
6765
Latvian,
Lettish:
Lingala:
7678
Tatar:
8484
Chinese:
9072
Lithuanian:
7684
Telugu:
8469
Corsican:
6779
Macedonian:
7775
Thai:
8472
Croatian:
7282
Malagasy:
7771
Tibetan:
6679
Czech:
6783
Malay:
7783
Tigrinya:
8473
Danish:
6865
Malayalam:
7776
Tonga:
8479
Dutch:
7876
Maltese:
7784
Turkish:
8482
English:
6978
Maori:
7773
Turkmen:
8475
Esperanto:
6979
Marathi:
7782
Twi:
8487
[RAM] [-R] [-R]DL] [-RW‹V›] [+R] [+R]DL] [+RW] [DVD-V] [-RW‹VR›] and
DivX
Estonian:
6984
Moldavian:
7779
Ukrainian:
8575
Faroese:
7079
Mongolian:
7778
Urdu:
8582
V. Surround Sound (Dolby Digital with 2.0 or more channels
only)
[RAM] [-R] [-R]DL] [-RW‹V›] [+R] [+R]DL] [+RW] [DVD-V] [-RW‹VR›]
This function does not work for SAP recordings.
p Enjoy a surround-sound effect if you are using 2 front
speakers (L/R) only.
p Turn off if it causes distortion.
Fiji:
7074
Nauru:
7865
Uzbek:
8590
Finnish:
7073
Nepali:
7869
Vietnamese:
8673
French:
7082
Norwegian:
7879
Volapük:
8679
Frisian:
7089
Oriya:
7982
Welsh:
6789
Galician:
7176
8083
Wolof:
8779
Audio Menu
Natural/Emphasis/Off
Dialog Enhancer (Dolby Digital, 3-channel or more only,
including a center channel)
[RAM] [-R] [-R]DL] [-RW‹V›] [+R] [+R]DL] [+RW] [DVD-V] [-RW‹VR›] and
DivX
When “On”, the volume of the center channel is raised to make
dialogue easier to listen.
Georgian:
7565
Pashto,
Pushto:
Persian:
7065
Xhosa:
8872
German:
6869
Polish:
8076
Yiddish:
7473
Greek:
6976
Portuguese:
8084
Yoruba:
8979
Greenlandic:
7576
Punjabi:
8065
Zulu:
9085
Guarani:
7178
Quechua:
8185
Gujarati:
7185
RhaetoRomance:
8277
Setting Menus
Video Menu
51
RQT9056
DVD and Card Management
Accessing the Management Menus
Preparation:
p[RAM] [SD] Release protection (disc, cartridge, card
right).
pInsert a disc or card.
Naming Discs
[RAM] [-R] [-R]DL] [-RW‹V›] [+R] [+R]DL] [+RW]
Perform preparation steps 1−4 of “Accessing the
Management Menus” ( left).
, select “Disc Name”, then
OK
DRIVE
SELECT
to select the drive (DVD or
–You can give a name for the disc ( 42).
SD).
Tips
With the unit stopped
pThe disc name is displayed in the DVD MANAGEMENT window.
pWith finalized discs and +RW, the name is displayed on the Top
Menu.
Setting Protection
[RAM]
Perform preparation steps 1−4 of “Accessing the
Management Menus” ( left).
, to select “Other Functions”
then OK
FUNCTIONS
DVD-RAM
Playback
Cartridge Protection Off
Disc Protection Off
Playlists
Program
Flexible Recording
delete
DV Camcorder Rec.
Copy
Setup
Other Functions
DVD Management
OK
, to select “DVD
Management” or “Card
Management”, then OK
Tips
To return to the previous screen
Press [RETURN].
To exit the screen
Press [RETURN] several times.
RQT9056
to select “Yes” then
OK
Protection of cartridge disc or card
[RAM] (With a cartridge)
With the write-protect tab in the protect
position, you cannot record to, edit,
format, or delete from the disc.
[SD]
Switch the write-protect switch to the
“LOCK” position.
LO C K
[SD] The only menu available in “Card
Management” is “Format memory card”.
52
, select “Disc Protection”
then OK
Deleting All Recordings
Formatting Discs or Cards
Important: Once deleted, contents cannot be recovered.
[RAM]
Perform preparation steps 1−4 of “Accessing the
Management Menus” ( 52).
, to select “Delete All
Recordings” then OK
to select “Yes” then
to select “Start” then
Important: Once formatted, contents cannot be
recovered.
[RAM[ [-RW‹V›] [+RW] [-RW‹VR›] [SD]
Perform preparation steps 1−4 of “Accessing the
Management Menus” ( 52).
, to select “Format Disc
(DVD)” or “Format memory card”
then OK
OK
OK
to select “Yes” then
OK
–A message appears when deleting is finished.
to select “Start” then
OK
to complete.
Notes
OK
–Formatting starts ([RAM] may take up to a
maximum of 70 minutes).
–A message appears when formatting is
finished.
Deleting does not work if one or more recordings are protected.
to complete.
Notes
pDo not disconnect the AC power supply cord while formatting. This
can render the disc or the card unusable.
pWhen a disc or card has been formatted using this unit, it may not
be possible to use it on any other equipment.
p[-R] [-R]DL] [+R] [+R]DL] [CD] [USB] Formatting cannot be performed.
p[-RW‹V›] [-RW‹VR›] You can format only as DVD-Video format on this
unit.
p[RAM[ Pressing [RETURN] during format will cancel the process.
The disc must be reformatted if you do this.
p[RAM[ [SD[ The disc or card cannot be formatted if the writeprotect tab or switch ( 52) is switched to “PROTECT” or “LOCK”.
Release the protection to continue.
pThe message “Unable to format.” appears when trying to format
discs the unit cannot use.
Setting Menus
OK
53
RQT9056
DVD and Card Management
Selecting Whether to Show the Top Menu
First
[-R] [-R]DL] [-RW‹V›] [+R] [+R]DL] [+RW]
Before finalizing a disc, select whether to show the Top
Menu after finalizing.
Perform preparation steps 1−4 of “Accessing the
Management Menus” ( 52).
, to select “Playback will
start with:”, then OK
, to select desired item, then
Notes
pDo not disconnect the AC power supply cord while finalizing. This
can render the disc unusable.
pWhen finalizing a high-speed recording compatible disc, it
may take longer than displayed on the confirmation screen
(approximately 4 times longer).
pAfter finalizing
– [-R] [-R]DL] [+R] [+R]DL] The disc becomes play-only and you can
no longer record or edit it.
– [-RW‹V›] You can record and edit the disc after formatting
although it becomes play-only after finalizing.
– The disc finalized by this unit may not be able to play on other
units depending on the condition of the recording.
– There is a pause of several seconds between recordings and
chapters during playback.
– Recordings are divided into about 5-minute chaptersa ([+R]
[+R]DL] 8 minutes)
a
This time varies greatly depending on the condition and mode of
recording.
OK
Tips
pDVD’s Top Menu:
The Top Menu appears first.
pFirst Recording:
The disc content is played without displaying
the Top Menu.
After you have finished recording and try to eject the disc, a screen
asking if you want to finalize the disc appears ( 25).
Create DVD Top Menu
[+RW]
Finalizing
[-R] [-R]DL] [-RW‹V›] [+R] [+R]DL]
You can play these discs on compatible DVD players by
finalizing it on the unit.
The menu you create with the unit can also be used on
most DVD players.
Perform preparation steps 1−4 of “Accessing the
Management Menus” ( 52).
, to select “Finalize”, then
OK
to select “Yes”, then
to select “Start”, then
OK
OK
–Finalizing starts and cannot be canceled
(may take up to 15 minutes).
([-R]DL] [+R]DL] up to 60 minutes)
–A message appears when finalizing is
finished.
+RW discs contain no Top Menu Data. Top Menu is a
convenient function. We recommend creating the menu
before playing a +RW disc on other equipment.
Perform preparation steps 1−4 of “Accessing the
Management Menus” ( 52).
, to select “Create DVD Top
Menu”, then OK
to select “Start”, then
OK
to select “Start”, then
OK
–“Create DVD Top Menu” cannot be canceled
once started.
–“Create DVD Top Menu” takes a few minutes.
OK
to complete.
Notes
OK
54
RQT9056
to complete.
pRecording or editing on the disc may delete the Top menu. In that
case, create the Top menu again.
pYou cannot use the Top menu for playing on this unit.
Setup Menus
“Accessing the Setup Menu”
You will have to perform the following 3 steps for all other
operations on page 55−66.
With the unit stopped
Set Channels Manually
The captions you select or modify are used as channel names
and displayed on the Direct Navigator screen.
Perform steps 1−3 of “Accessing the Setup Menu” ( left).
, to select “Channel”, then , to select “Other Functions”,
then OK
, to select “Setup”, then
OK
, to select “Set Channels
Manually”, then OK
, to select channel.
–You can also select channels with the
numbered buttons.
–You can also press [,] to skip several
lines.
Adding and Deleting Channels
Notes
Changed settings remain intact even when switching the unit to
standby.
To add channels, delete undesired channels, or channels that
have poor reception.
After selecting a channel ( above, step 6).
Tips
To return to the previous screen
Press [RETURN]. Even if you have changed an option, the change
is not activated until you press [OK].
, to select the “Add/Del”
column.
Set Channels Automatically
The channels are automatically set.
Select to suit the type of antenna you are using.
Setting Menus
To exit the screen
Press [RETURN] several times.
, to select “Added” or
“Deleted”.
– After selecting the “Channel” column with [,
], repeat steps 6–8 to set other channels.
Perform steps 1−3 of “Accessing the Setup Menu” ( above).
Setting favorite channels
, to select “Channel” then You can define a Favorite list.
After selecting a channel ( above, step 6).
, to select “Set Channels
Automatically”, then OK
, to select the “Favorite”
column, then OK
, to select “Antenna” or
“Cable”, then OK
, to select the position on the
list, then OK
–When a TV (VIERA) supporting HDAVI
Control 3 is connected via an HDMI cable, the
following options will be displayed.
[Set Channels via VIERA Link] You can
acquire the VIERA setting information
[Set Channels without VIERA Link]
OK
to complete.
RETURN
to complete.
– After selecting the “Channel” column with [,
], repeat steps 6–9 to set other channels.
55
RQT9056
Setup Menus
Selecting the caption
After selecting a channel ( 55, step 6, “Set Channels Manually”).
, to select the “Caption”
column.
, to select “All” or “Favorite”,
then OK
[All]
To select a channel from all of the channels set.
[Favorite] To select a channel from favorite channels.
Parental Rating
, to select the caption.
– After selecting the “Channel” column with [,
], repeat steps 6–8 to set other channels.
Modifying the caption
After selecting a channel ( 55, step 6, “Set Channels Manually”).
, to select the “Caption”
column, then OK
, to select a character, then
to move to the next character.
– Repeat this step to enter other characters.
OK
to confirm changes.
– After selecting the “Channel” column with [,
], repeat steps 6–9 to set other channels.
Notes
Available characters for channel captions
A–Z, a–z, 0–9, _, -, (space)
Surf Mode
Select a channel group from which a channel can be selected with
[CH 9, :].
Perform steps 1−3 of “Accessing the Setup Menu” ( 55).
, to select “Channel”, then , to select “Surf Mode”, then
OK
The V-chip systems ( 57, Notes) used in this unit allows
you to limit viewing and recording of certain programs that
may contain scenes unsuitable for children. If the unit starts
receiving a broadcast with the set rating information, a
password screen appears and you will be unable to view or
record until you enter the password. You can view or record
after entering your password.
Perform steps 1−3 of “Accessing the Setup Menu” ( 55).
, to select “Channel”, then , to select “Parental Rating”,
then OK
, to select the rating, then
OK
p U.S TV Rating: U.S TV program ratings
p MPAA Rating: U.S movie ratings
p CELR Rating: Canadian English ratings
p CFLR Rating: Canadian French ratings
p Other: Only displayed when the unit has downloaded new
rating from digital broadcast. Set in accordance with
the instructions on the screen.
, , , to select “On” for
“Set”.
e.g., U.S. TV Rating
U.S. TV Rating
Setup
Channel
Setup
Disc
Video
Audio
Display
TV Screen
VHS
Set
On
TV-NR
Viewable
TV-Y
Viewable
Viewable
TV-Y7
Viewable
TV-G
TV-PG --
D --
L -- S --
V --
TV-14 --
D --
L -- S --
V --
TV-MA --
L
-- S --
V --
p For details about ratings ( 67, Parental Rating
List)
, to move to “Set”, then ,
to select the rating item,
then .
, to select the limitation.
56
RQT9056
– The limitation options that appear depend
on the rating you select in step 6. Select
“Viewable”, “--”, or “Off” to cancel.
, then
11
Off Timer
OK
Enter a 4-digit password with the
numbered buttons, then OK
– A screen appears confirming that you have set a
password. Press [OK].
If you select “Off” for “Set”:
A screen appears confirming that you haven’t set a
rating. Press [OK].
To change the password
After selecting “Parental Rating” ( 56, step 5).
Enter a 4-digit password with the
numbered buttons, then OK
Select how long the unit remains on when it is not being used.
Perform steps 1−3 of “Accessing the Setup Menu” ( 55).
, to select “Setup”, then , to select “Off Timer”, then
OK
, to select “2 Hours”, “6
Hours” or “Off”, then OK
Remote Control
Use this function to synchronize the codes for the remote
control and the main unit.
Perform steps 1−3 of “Accessing the Setup Menu” ( 55).
Enter the new password with the
numbered buttons, then OK
– A screen appears confirming that you have set a
password. Press [OK].
Tips
, to select “Setup”, then , to select “Remote Control”,
then OK
Setting Menus
, to select “Change
Password”, then OK
, to select “Set Code 1”, “Set
Code 2”, or “Set Code 3” then
OK
to set.
To clear the password
( 81, To reset the ratings level settings)
OK
Notes
pRecording may fail when a wrong password was entered for
scheduled recording settings.
p“V-chip” technology enables restricted shows to be locked
according to TV ratings.
pThe V-chip system that is used in this set is capable of blocking
“NR” programs (non rated, not applicable and none) as per
FCC Rules Section 15.120(e)(2). If the option of blocking “NR”
programs is chosen “unexpected and possibly confusing results
may occur, and you may not receive emergency bulletins or any of
the following types of programming:”
– Emergency Bulletins (Such as EAS messages, weather
warnings and others)
– Locally originated programming
pNews pPolitical
– Public Service Announcements
pReligious pSports pWeather
While pressing and holding
,
press and hold the numbered button
1 , 2 , or 3 corresponding to
the code set in step 6 for about
5 seconds to set.
OK
to complete.
Clock Settings
Perform steps 1−3 of “Accessing the Setup Menu” ( 55).
, to select “Setup”, then , to select “Clock
Settings”, then OK
57
RQT9056
Setup Menus
Set Clock Automatically
After selecting “Clock Settings” ( 57, step 5).
, to select “Set Clock
Automatically”, then OK
OK
to confirm new date and
time and to initiate the clock.
Set the time change dates for DST
Set the beginning and end dates for DST. ( 13).
to start auto setting.
OK
The following screen appears when the setting
is complete.
Set Clock Automatically
Clock Setting completed successfully.
4/4/2008 11:15 AM
DST----------On
Time Zone---- EST
Adjust Time Zone
Adjust the time zone (–1 or 1) if it was not set correctly with
auto clock setting. You can set this menu only after “Set Clock
Automatically” is completed. ( left).
After selecting “Clock Settings” ( 57, step 5).
, to select “Adjust Time
Zone”, then OK
OK
, to select “–1” or “1”, then
OK
OK
to complete.
Quick Start
Notes
p This may take some time, up to a few hours in some cases.
p If the following message appears
Setup
Channel
Setup
Disc
Video
Audio
Display
TV Screen
VHS
Set Clock Automatically
Setting completed as follows.
Finish the setup with this clock time?
Note:Selecting“No”will start channel scanning
again and renew the clock time.
Yes
No
1 Sec. Quick Start for Recording on DVD-RAM. From the power
off state, recording on DVD-RAM starts about 1 second after
first pressing the [¦ DVD/VHS POWER] and then sequentially
pressing [qREC] (Quick Start Mode). Power consumption is
also higher when the unit is turned off if this is set to “On”.
Perform steps 1−3 of “Accessing the Setup Menu” ( 55).
12/14/2008
5:28 AM
DST----------Off
Time Zone---EST
OK
If the time is correct, press [] to select “Yes”, then press [OK].
– If you select “No”, auto setting starts again, then the above
screen reappears. Repeat this step until the correct time
appears.
pIf the clock is not correct, set the clock with “Adjust Time Zone”
( right) or “Set Clock Manually” ( below).
Tips
To cancel in the middle
Press [RETURN].
Set Clock Manually
, to select “Setup”, then , to select “Quick Start”, then
OK
, to select “On” or “Off”, then
OK
DivX Registration
After selecting “Clock Settings” ( 57, step 5).
, to select “Set Clock
Manually”, then OK
You need this registration code to purchase and play DivX
Video-on-Demand (VOD) content ( 36).
Perform steps 1−3 of “Accessing the Setup Menu” ( 55).
, to select “Setup”, then , to select the item you want
to change.
, to change the setting.
–Repeat steps 7–8 to change other items.
58
RQT9056
, to select “DivX
Registration”, then OK
Restore Default Settings
This returns Setup menus to default settings, except for the
clock, channel settings, ratings level, closed caption, and onscreen language.
Perform steps 1−3 of “Accessing the Setup Menu” ( 55).
Audio Language
After selecting “Settings for Playback” ( left, step 5).
, to select “Audio Language”,
then OK
, to select “Setup”, then , to select “Restore Default
Settings”, then OK
, to select “Yes” or “No”, then
OK
Settings for Playback
Perform steps 1−3 of “Accessing the Setup Menu” ( 55).
, to select “Disc”, then , to select “Settings for
Playback”, then OK
, to select “English”,
“French”, “Spanish”, “Original”,
“Other ____”, then OK
Subtitle Language
After selecting “Settings for Playback” ( left, step 5).
, to select “Subtitle
Language”, then OK
, to select “Automatic”,
“English”, “French”, “Spanish”,
“Other ____”, then OK
Ratings
Set a ratings level to limit DVD-Video play.
Follow the on-screen instructions. Enter a 4-digit password with
the numbered buttons when the password screen is shown.
Setting Menus
Menu Language
After selecting “Settings for Playback” ( left, step 5).
, to select “Menu Language”,
then OK
After selecting “Settings for Playback” ( above, step 5).
, to select “Ratings”, then
OK
, to select ratings limit, then
OK
Enter a 4-digit password, then
OK
– Do not forget your password.
p Setting ratings (When level 8 is selected)
[8 No Limit] All DVD-Video can be played.
[1] to [7]
Prohibits play of DVD-Video with corresponding
ratings recorded on them.
[0 Lock All] Prohibits play of all DVD-Video.
p Changing ratings (When level 0 to 7 is selected)
[Unlock Recorder] [Change Password] [Change Level]
[Temporary Unlock]
, to select “English”,
“French”, “Spanish”, “Other
____”, then OK
Notes
[DVD-V] Choose the language for audio, subtitles and disc
menus.
If a language which is not recorded is selected, or if
languages are already fixed on the disc, the language set as
the default on the disc will be played instead.
[Original]
The original language of each disc will be
selected.
[Other ____] This is the language code setting. Input a
code number with the numbered buttons
( 51, “Language code list”).
[Automatic]
If the language selected for “Audio
Language” is not available, subtitles of
that language will automatically appear if
available on the disc.
59
RQT9056
Setup Menus
Settings for Recording
Recording Time in EP Mode
Select the maximum number of hours for recording in EP
mode.
Perform steps 1−3 of “Accessing the Setup Menu” ( 55).
, to select “Video”, then , to select “Black Level
Control”, then OK
, to select “Disc”, then Input Level
, to select “Settings for
Recording”, then OK
Adjusts the black level of the input signal.
After selecting “Black Level Control” ( above, step 5).
, to select “Input Level”, then
OK
OK
, to select “EP-Extended
Play (6H)” or “EP-Extended Play
(8H)”, then OK
[EP-Extended Play (6H)]
You can record for 6 hours on an unused 4.7 GB disc.
[EP-Extended Play (8H)]
You can record for 8 hours on an unused 4.7 GB disc.
Still Mode (paused video)
Select the type of picture shown when you pause play ( 91,
“Frame and field”).
Perform steps 1−3 of “Accessing the Setup Menu” ( 55).
, to select “Video”, then , to select “Still Mode
(paused video)”, then OK
, to select “Automatic”,
“Field” or “Frame”, then OK
[Field]
[Frame]
Select if jittering occurs when “Automatic” is
selected.
Select if you cannot see small text or fine patterns
clearly when “Automatic” is selected.
, to select “Lighter” or
“Darker”, then OK
Output Level (Composite/SVideo)
Adjusts the black level of the output signal from the VIDEO
OUT and S VIDEO OUT terminal.
After selecting “Black Level Control” ( above, step 5).
, to select “Output Level
(Composite/SVideo)”, then OK
, to select “Lighter” or
“Darker”, then OK
Dynamic Range Compression
[DVD-V] (Dolby Digital only)
Change the dynamic range ( 91) for easier listening at a low
volume.
Perform steps 1−3 of “Accessing the Setup Menu” ( 55).
, to select “Audio”, then , to select “Dynamic Range
Compression”, then OK
Black Level Control
Select “Lighter” or “Darker” to adjust the black level control to
the desired setting for picture enhancement.
Perform steps 1−3 of “Accessing the Setup Menu” ( 55).
60
RQT9056
, to select “On” or “Off”, then
OK
PCM Down Conversion
Multi-channel TV Sound (Analog)
[-R] [-R]DL] [-RW‹V›] [+R] [+R]DL] [+RW]
Select whether to record the main or secondary audio program
(SAP) when recording to these discs. (You cannot select the
audio type on the unit when recording audio from an external
device. Select it on the external device.)
Perform steps 1−3 of “Accessing the Setup Menu” ( 55).
Select how to output audio with a sampling frequency of
96 kHz or 88.2 kHz. Signals are converted to 48 kHz or 44.1 kHz
despite the settings if the signals have a sampling frequency of
over 96 kHz or 88.2 kHz, or the disc has copy protection.
After selecting “Digital Audio Output” ( left, step 5).
, to select “Audio”, then , to select “PCM Down
Conversion”, then OK
, to select “Multi-channel TV
Sound (Analog)”, then OK
, to select “On” or “Off”, then
[On]
[Off]
Multi-channel TV Sound (Digital)
Dolby Digitala
Select the preferred digital broadcast language.
Perform steps 1−3 of “Accessing the Setup Menu” ( 55).
, to select “Audio”, then , to select “Multi-channel TV
Sound (Digital)”, then OK
Signals are converted to 48 kHz or 44.1 kHz.
(Choose when the connected equipment cannot
process signals with sampling frequency of 96 kHz or
88.2 kHz.)
Signals are output as 96 kHz or 88.2 kHz. (Choose
when the connected equipment can process signals
with sampling frequency of 96 kHz or 88.2 kHz.)
Choose whether to output by “Bitstream”, which processes
Dolby Digital signals on other connected equipment, or to
convert the signals to “PCM” (2ch) on the unit before output.
After selecting “Digital Audio Output” ( left, step 5).
Setting Menus
, to select “Main” or
“Secondary Audio Program
(SAP)”, then OK
OK
, to select “Dolby Digital”,
then OK
, to select “English”, “French”
or “Spanish”, then OK
, to select “Bitstream” or
“PCM”, then OK
Digital Audio Output
Change the settings when you have connected equipment
through the unit’s DIGITAL AUDIO OUT terminal ( 72).
Perform steps 1−3 of “Accessing the Setup Menu” ( 55).
, to select “Audio”, then [Bitstream] When you have connected the unit to equipment
displaying the Dolby Digital logo.
[PCM]
When you have connected the unit to equipment
that doesn’t have Dolby Digital logo.
a
Incorrect settings can cause noise to be output which can
be harmful to your ears and speakers, and audio will not be
recorded properly on media such as mini discs.
, to select “Digital Audio
Output”, then OK
61
RQT9056
Setup Menus
DTSa
Status Messages
Choose whether to output by “Bitstream”, which processes
DTS signals on other connected equipment, or to convert the
signals to “PCM” (2ch) on the unit before output.
Choose whether to show status messages automatically or not.
Perform steps 1−3 of “Accessing the Setup Menu” ( 55).
, to select “Display”, then After selecting “Digital Audio Output” ( 61, step 5).
, to select “DTS”, then
, to select “Status
Messages”, then OK
OK
, to select “Automatic” or
“Off”, then OK
, to select “Bitstream” or
“PCM”, then OK
[Bitstream] When you have connected the unit to equipment
displaying the DTS logo.
[PCM]
When you have connected the unit to equipment
that doesn’t have the DTS logo.
Select Audio Channel For DV Input
You can select the kind of audio when recording from the unit’s
DV in terminal ( 29).
On-screen Language
Choose the language for these menus and the on-screen
messages.
Perform steps 1−3 of “Accessing the Setup Menu” ( 55).
, to select “Display”, then Perform steps 1−3 of “Accessing the Setup Menu” ( 55).
, to select “Audio”, then , to select “On-screen
Language”, then OK
, to select “Select Audio
Channel For DV Input”, then
, to select “English”,
“Español” or “Français”, then
OK
OK
, to select “Stereo 1”,
“Stereo 2” or “Mix”, then OK
[Stereo 1]
[Stereo 2]
[Mix]
a
Records audio (L1, R1)
Records added audio such as narration (L2, R2)
subsequent to original recording.
Records both Stereo 1 and Stereo 2.
Incorrect settings can cause noise to be output which can
be harmful to your ears and speakers, and audio will not be
recorded properly on media such as mini discs.
Black Background (Analog)
Select whether to show the black (gray) background, normally
shown when TV reception is poor.
Perform steps 1−3 of “Accessing the Setup Menu” ( 55).
, to select “Display”, then , to select “Black
Background (Analog)”, then
OK
, to select “On” or “Off”, then
OK
62
RQT9056
Digital (Closed Caption) settings
Front Display
Changes the brightness of the unit’s display.
After selecting “On” ( left, step 7).
Perform steps 1−3 of “Accessing the Setup Menu” ( 55).
, to select “Front Display”,
then OK
, to select “Bright”, “Dim” or
“Automatic”, then OK
[Automatic] The display turns dark during playback. When the
unit is turned off, the unit’s display disappears.
While using this mode the standby power
consumption can be reduced.
Closed Caption
Choose whether to show closed captions.
Perform steps 1−3 of “Accessing the Setup Menu” ( 55).
, to select “Display”, then , to select “Closed Caption”,
then OK
, to select “Set”, then
, to select “On”, then
OK
, to select “Digital”, then
OK
, to select the item, then
OK
[Primary]
[Secondary]
[Service 3]
[Service 4]
[Service 5]
[Service 6]
Digital (Closed Caption) Detailed settings
After selecting “On” ( left, step 7).
, to select “Character
Settings”, then OK
, to select the item, then
OK
[Size]
[Font]
[Style]
[Foreground]
[Fore Opacity]
[Background]
[Back Opacity]
[Outline]
OK
– Select “Off” if you don’t want closed captions.
Primary Language
Secondary Language
Service 3 Language
Service 4 Language
Service 5 Language
Service 6 Language
Setting Menus
, to select “Display”, then Text size
Text font
Text style (Raised, Depressed, etc.)
Color of text
Opacity of text
Color of text box
Opacity of text box
Outline color of text (Identify the setting
options on the screen.)
, to select the option, then
OK
Analog (Closed Caption) settings
After selecting “On” ( above, step 7).
, to select “Analog”, then
Resets all settings for closed captions
After selecting “On” ( left, step 7).
OK
, to select “CC reset”, then
OK
, to select the item, then
OK
CC1–4 Information related to pictures (Appears at bottom of
screen)
T1–4
Textual information (Appears over entire screen)
63
RQT9056
Setup Menus
TV Aspect
4:3 TV settings for DVD-RAM
This setting allows you to select the type of television
connected.
Perform steps 1−3 of “Accessing the Setup Menu” ( 55).
You can select how to display the image on the TV when you
watch 16:9 images (DVD-RAM) on a 4:3 standard aspect TV.
Perform steps 1−3 of “Accessing the Setup Menu” ( 55).
, to select “TV Screen”, then
, to select “TV Screen”, then
, to select “TV Aspect”, then
, to select “4:3 TV settings
for DVD-RAM”, then OK
OK
, to select “4:3” or “16:9”,
then OK
Notes
[4:3]
p Aspect 4:3/16:9
4:3
16:9
4:3 standard aspect
television
16:9 widescreen
television
p Digital programs broadcast in the 16:9 aspect ratio may
appear with black bands at the edges of the screen on
4:3 aspect televisions. The bands are added to enable the
correct aspect ratio to be shown.
4:3 TV settings for DVD-Video
You can select how to display the image on the TV when you
watch 16:9 images (DVD-Video) on a 4:3 standard aspect TV.
Perform steps 1−3 of “Accessing the Setup Menu” ( 55).
, to select “TV Screen”, then
, to select “4:3 TV settings
for DVD-Video”, then OK
, to select “Pan and Scan
(Stretch to fit)” or “Letterbox
(Shrink to fit)”, then OK
[Pan and Scan (Stretch to fit)]
Video recorded for a widescreen is played with the sides
cut off if Pan & Scan was specified. If 16:9 software
prohibits Pan & Scan, the image will appear in the
letterbox style (with black bands above and below the
picture) despite the setting here.
[Letterbox (Shrink to fit)]
Video recorded for a widescreen is played in the
letterbox style.
64
RQT9056
, to select “4:3”, “Pan and
Scan (Stretch to fit)” or “Letterbox
(Shrink to fit)”, then OK
Recordings are played as
recorded.
[Pan and Scan (Stretch to fit)] Video recorded for a widescreen
is played with the sides cut off.
[Letterbox (Shrink to fit)]
Video recorded for a widescreen
is played in the letterbox style.
Component Output Signal
If you connected this unit and a TV with component video
cables, select the item compatible with the connected
equipment.
Perform steps 1−3 of “Accessing the Setup Menu” ( 55).
, to select “TV Screen”, then
, to select “Component
Output Signal”, then OK
, to select “480i”, “480p”,
“720p” or “1080i”, then OK
[720p], [1080i]: Videos from DVD-Video or VHS are output with
480p, irrespective of the settings.
pIf the video is distorted when the settings are changed, then
press and hold [w] and [] on the main unit for 5 seconds or
more to set it back to [480i].
pIf this unit is connected to an amplifier via an HDMI cable and
audio is not output when these settings are changed, then
use a non-HDMI cable to connect the unit.
pIf this unit is connected to an amplifier, etc. via an HDMI cable
with “HDMI Priority” set to “On”, the video will be fixed to 480i.
Turn it “Off” and set it again.
pIf the “TV Aspect” is set to “4:3” ( left), then “480i” or “480p”
can only be selected.
Perform steps 1−3 of “Accessing the Setup Menu” ( 55).
, to select “TV Screen”, then
24p Output for DVD-Videoa
When this unit is connected to a TV supporting 1080/24p output
via an HDMI cable, this unit displays each frame at 1/24 second
intervals – the same interval originally shot with the film camera.
After selecting “Functions of HDMI” ( left, step 5).
, to select “24p Output for
DVD-Video”, then OK
, to select “Functions of
HDMI”, then OK
, to select “On” or “Off”, then
HDMI Priority
After selecting “Functions of HDMI” ( above, step 5).
, to select “HDMI Priority”,
then OK
, to select “On” or “Off”, then
OK
[Off]
When connecting equipment such as an amplifier with
an HDMI cable and connecting TV (compatible with
progressive video) with a Component Video Cable
HDMI Resolutiona
You can only select items compatible with the connected
equipment. This setting normally does not need to be changed.
However if you are concerned about output picture quality, it
may be improved by changing the setting.
pTo enjoy High Quality Video up-converted to 1080p, you need
to connect the unit directly to a 1080p–compatible HDTV. If this
unit is connected to an HDTV through other equipment, it must
also be 1080p compatible.
After selecting “Functions of HDMI” ( above, step 5).
, to select “HDMI
Resolution”, then OK
, to select the item, then
OK
[On]
Set to “On” and then set the Progressive/24p in the
Video Menu in the On-screen Menu ( 51) to “24p”.
When the video is being output in 24 frames per
second, no video is output from a video terminal other
than the HDMI terminal.
HDMI Output Display Aspecta
Settings used when 4:3 aspect video is output on the television
as 16:9 aspect.
After selecting “Functions of HDMI” ( left, step 5).
, to select “HDMI Output
Display Aspect”, then OK
Setting Menus
Functions of HDMI
, to select “Full” or “Normal”,
then OK
[Full]
Video output is enlarged to match the screen size.
[Normal]
Video is output as 4:3 aspect. Side panels (black
bars on the left and right) will appear on the
screen.
Notes
Depending on the equipment to connect, some items may
be shaded in gray on the display and cannot be selected, or
changing settings may be unavailable.
a
Above items can be set when you set “HDMI Priority” to “On”.
OK
[Auto]
[480i]
[480p]
[720p]
[1080i]
[1080p]
Automatically selects the output resolution best suited
to the connected television (1080p, 1080i, 720p or
480p).
When setting video output to “1080p”, we
recommend using a Panasonic HIGH SPEED
HDMI cable to prevent video distortion.
65
RQT9056
Setup Menus
HDMI RGB Output Rangea
Effective when connected to a device that only supports RGB
output.
After selecting “Functions of HDMI” ( 65, step 5).
Select Tape Length
Set the length of tape you are using so the unit can show the
correct remaining time.
Perform steps 1−3 of “Accessing the Setup Menu” ( 55).
, to select “HDMI RGB
Output Range”, then OK
, to select “VHS”, then , to select “Select Tape
Length”, then OK
, to select “Standard” or
“Enhanced”, then OK
, to select “T120”, “T160” or
“T180”, then OK
[Enhanced] When the black and white images are not distinct.
HDMI Audio Output
After selecting “Functions of HDMI” ( 65, step 5).
, to select “HDMI Audio
Output”, then OK
, to select “On” or “Off”, then
[T120]
[T160]
[T180]
T30, T60, T90 and T120 tapes
T140 and T160 tapes
T180 tapes
Jet Search
Set the speed for Jet Search ( 37) when playing EP and VP
tapes. It is possible to view the picture recorded in EP or VP
mode at approx. 27 or 35 times speed.
Perform steps 1−3 of “Accessing the Setup Menu” ( 55).
OK
, to select “VHS”, then [Off] Audio is output from an amplifier when using the DIGITAL
AUDIO OUT terminal ( 72).
, to select “Jet Search”, then
a
OK
VIERA Link
After selecting “Functions of HDMI” ( 65, step 5).
, to select “M27” or “M35”,
then OK
, to select “VIERA Link”,
then OK
[M27]
, to select “On” or “Off”, then
OK
[On]
When “On” is selected, you can operate other “HDAVI
Control” compatible devices using “HDAVI Control”.
Notes
Depending on the equipment to connect, some items may
be shaded in gray on the display and cannot be selected, or
changing settings may be unavailable.
a
Above items can be set when you set “HDMI Priority” to “On”.
66
RQT9056
Select [M27] if the picture is poor at [M35].
Parental Rating List
U.S. TV Rating (U.S. TV Programs Ratings)
TV-NR
TV-Y
TV-Y7
TV-G
TV-PG
TV-14
TV-MA
[Viewable]
[Blocked]
[Viewable]
[Blocked]
[FV Blocked]
[Viewable]
[Blocked]
[Viewable]
[Blocked]
[--]: Viewable
[X]: Blocked
pD, L, S, V (all selected)
pAny combination of D,
L, S, V
[--]: Viewable
[X]: Blocked
pD, L, S, V (all selected)
pAny combination of D,
L, S, V
[--]: Viewable
[X]: Blocked
pL, S, V (all selected)
pAny combination of L,
S, V
[FV]: Fantasy/Cartoon Violence
Not Rated.
All children. The themes and elements in this program are specifically designed for a very young
audience, including children from ages 2–6.
Directed to older children. Themes and elements in this program may include mild physical or
comedic violence, or may frighten children under the age of 7.
General audience. It contains little or no violence, no strong language, and little or no sexual
dialogue or situations.
Parental guidance suggested. The program may contain infrequent coarse language, limited
violence, some suggestive sexual dialogue and situations.
Parents strongly cautioned. This program may contain sophisticated themes, sexual content,
strong language and more intense violence.
Mature audiences only. This program may contain mature themes, profane language, graphic
violence, and explicit sexual content.
[D]: Dialogue with sexual content
[L]: Offensive Language
[S]: Sex
[V]: Violence
MPAA Rating (U.S. Movie Ratings)
[Viewable]
[Blocked]
MPAA
[Off]
[G]
[PG]
[PG-13]
[R]
[NC-17]
[X]
Not Rated.
MPAA Rating is set to off.
General audiences. All ages admitted.
Parental guidance suggested. Some material may not be suitable for pre-teenagers.
Parents strongly cautioned. Some material may be inappropriate for children under 13.
Restricted. Under 17 requires accompanying parent or adult guardian.
No one 17 and under admitted.
Adults only.
Setting Menus
NR
CELR Rating (Canadian English Ratings)
E
[Viewable]
[Blocked]
[Off]
[C]
[C8A]
CELR
[G]
[PG]
[14A]
[18A]
Exempt–Exempt programming includes: news, sports, documentaries and other information programming, talk
shows, music videos, and variety programming.
CELR Rating is set to off.
Programming intended for children under age 8. No offensive language, nudity or sexual content.
Programming generally considered acceptable for children 8 years and over. No profanity, nudity or sexual
content.
General programming, suitable for all audiences.
Parental Guidance suggested. Some material may not be suitable for children.
Programming contains themes or content which may not be suitable for viewers under the age of 14. Parents
are strongly cautioned to exercise discretion in permitting viewing by pre-teens and early teens.
18A years old. Programming restricted to adults. Contains constant violence or scenes of extreme violence.
CFLR Rating (Canadian French Ratings)
E
[Viewable]
[Blocked]
[Off]
[G]
[8 ansA]
CFLR
[13 ansA]
[16 ansA]
[18 ansA]
Exempt–Exempt programming.
CFLR Rating is set to off.
General–Programming intended for audience of all ages. Contains no violence, or the violence content is
minimal or is depicted appropriately.
8AGeneral–Not recommended for young children. Programming intended for a broad audience but contains
light or occasional violence. Adult supervision recommended.
Programming may not be suitable for children under the age of 13–Contains either a few violent scenes or one
or more sufficiently violent scenes to affect them. Adult supervision strongly suggested.
Programming may not be suitable for children under the age of 16–Contains frequent scenes of violence or
intense violence.
Programming restricted to adults. Contains constant violence or scenes of extreme violence.
67
RQT9056
Other Settings
wRemote Control Codes for the TV
Using the Unit’s Remote Control to
Operate the TV and the Set Top Box
(Cable Box, Satellite Receiver, etc.)
TV operation
buttons
DVD/VHS
Set Top Box
operation buttons
Axion
Bang & Olufsen
Broksonic
Casio
Daewoo
DVD/VHS
POWER
POWER
POWER
DRIVE
SELECT
Manufacturer
Panasonic
Advent
Akai
America Action
AOC
Apex Digital
Audiovox
TV/VIDEO CH
POWER
VOL
DRIVE
SELECT
VOL
TV/VIDEO CH
TRACKING/V-LOCK
2 3
Emerson
TRACKING/V-LOCK
3
Point the remote control at the TV
or Set Top Box.
Go Video
Haier
Hannspree
Hewlett Packard
Hisense
Hitachi
To set the code for the TV:
POWER
While pressing and holding
enter the code from the
table on the right using the
numbered buttons.
Envision
Epson
Fisher
Fujitsu
GE
,
InFocus
JVC
e.g., 0250: press [0] [2] [5] [0]
KLH
LG
To set the code for the Set Top Box:
Loewe
Magnavox
While pressing and holding CH
enter the code from the table
on the right using the numbered
buttons.
,
e.g., 1786: press [1] [7] [8] [6]
Test the TV or Set Top Box
functions of the remote control for
operability.
–To switch to the Set Top Box mode:
Press and hold [CH 9] and [RETURN]
simultaneously for 5 seconds or longer.
–To switch to the TV mode:
Press and hold [¦ TV POWER] and
[RETURN] simultaneously for 5 seconds or
longer.
–If the functions do not work, repeat steps 1 to
3 using different codes, if available. Some TVs
and Set Top Boxes may not be compatible
with the unit’s remote control.
Marantz
Memorex
Mitsubishi
Norcent
Optoma
Orion
Philips
Philips Magnavox
Pioneer
Polaroid
Proscan
Proview
RCA
Runco
Sampo
Samsung
Sansui
Sanyo
Sharp
68
RQT9056
Sony
Code
0051 / 0055 / 0250 / 0650
0761 / 0783 / 0815 / 0817 / 0842
0030 / 0098 / 0672 / 0702 / 0812
0180
0003 / 0019 / 0030 / 0052 / 0137 / 0185
0748 / 0765 / 0767 / 0879 / 0890
0003 / 0092 / 0180 / 0451 / 0623 / 0802 / 0875 /
1937
1937
0620 / 1620
0003 / 0236 / 0463
0611 / 1205
0019 / 0039 / 0066 / 0067 / 0091 / 0092 / 0451 /
0623 / 0661 / 0672 / 1661
0019 / 0038 / 0039 / 0154 / 0158 / 0171 / 0177 /
0178 / 0179 / 0180 / 0181 / 0182 / 0183 / 0185 /
0236 / 0270 / 0280 / 0282 / 0463 / 0623
0030 / 0813
0833 / 0840
0154 / 0159
0179 / 0186 / 0683 / 0809 / 0853
0021 / 0027 / 0029 / 0047 / 0051 / 0055 / 0135 /
0138 / 0174 / 0178 / 0251 / 0279 / 0282 / 0451 /
0747 / 1347 / 1447
0886
0768 / 1034
1348 / 1351 / 1352
1088 / 1089 / 1101 / 1494 / 1502
0748
0016 / 0032 / 0038 / 0056 / 0095 / 0097 / 0145 /
0151 / 0173 / 0227 / 0279 / 0409 / 0413 / 1145
0736 / 0738 / 0741 / 0752 / 0781 / 1164 / 1516
0036 / 0053 / 0069 / 0160 / 0169 / 0182 / 0731 /
1253
0765 / 0767
0178 / 0317 / 0442 / 0457 / 0700 / 0856 / 1178 /
1265
0136
0020 / 0024 / 0028 / 0030 / 0036 / 0054 / 0096 /
0179 / 0186 / 0187 / 0230 / 0386 / 0706 / 0802 /
1254 / 1454
0030 / 0054 / 0444 / 0704 / 0854 / 0855 / 1154
0016 / 0106 / 0150 / 0154 / 0178 / 0179 / 0463
0014 / 0019 / 0093 / 0098 / 0150 / 0155 / 0178 /
0331 / 0358 / 0836 / 0868 / 1250
0748 / 0824 / 1089
0887
0179 / 0236 / 0463 / 1463
0054 / 0690 / 1154 / 1454
0020 / 0024 / 0028 / 0030 / 0036 / 0054 / 0096 /
0179 / 0186 / 0187 / 0230 / 0386 / 0690 / 0706 /
0802 / 1154 / 1254 / 1454
0038 / 0166 / 0172 / 0679 / 0866
0765 / 0865 / 1262 / 1276 / 1314 / 1316 / 1326 /
1327 / 1328 / 1341 / 1498 / 1523
0047 / 0747 / 1347 / 1447
0835 / 1401 / 1498
0018 / 0019 / 0029 / 0038 / 0047 / 0090 / 0135 /
0174 / 0278 / 0679 / 0747 / 1047 / 1147 / 1247 /
1347 / 1447 / 1547
0017 / 0030 / 0251 / 0497 / 0603
0030 / 0032 / 0039 / 0052 / 0100 / 0110 / 1755
0019 / 0030 / 0032 / 0056 / 0060 / 0178 / 0329 /
0408 / 0427 / 0587 / 0702 / 0766 / 0812 / 0814 /
1060
0463
0088 / 0107 / 0146 / 0154 / 0159 / 0232 / 0484 /
0799 / 0893
0039 / 0093 / 0153 / 0157 / 0165 / 0220 / 0281 /
0386 / 0398 / 0491 / 0688 / 0818 / 0851
0000 / 0011 / 0080 / 0111 / 0273 / 0353 / 0810 /
0834 / 0867 / 1100
Manufacturer
Sva
Sylvania
Symphonic
Syntax-Brillian
Tatung
Thomson
Toshiba
Ultra
Viewsonic
Westinghouse
Yamaha
Zenith
Code
0587 / 0748 / 0768 / 0865 / 0870 / 0871 / 0872
0020 / 0028 / 0030 / 0054 / 0065 / 0096 / 0171 /
0381
0171 / 0180
1007 / 1144 / 1240 / 1255 / 1257 / 1258 / 1331
0003 / 0049 / 0055 / 0396 / 1101 / 1756
0209 / 0210 / 0047
0036 / 0060 / 0149 / 0154 / 0156 / 0650 / 0832 /
0845 / 1156 / 1164 / 1256 / 1265 / 1356 / 1656 /
1704
0391
0857 / 0864 / 0885 / 1755
0885 / 0889 / 0890 / 1282 / 1577
0019 / 0030 / 0769 / 0833 / 0839
0016 / 0017 / 0092 / 0178 / 0463 / 1265
wRemote Control Codes for the Set Top Box:
Cable Box
Manufacturer
Panasonic
ABC
Americast
Bell South
Digeo
Director
General Instrument
GoldStar
Hamlin
Jerrold
Memorex
Motorola
Pace
Paragon
Philips
Pioneer
Pulsar
Quasar
Regal
Runco
Samsung
Scientific Atlanta
Sony
Starcom
Supercable
Torx
Toshiba
Zenith
Code
0000 / 0107
0003 / 0008
0899
0899
1187
0476
0003 / 0276 / 0476 / 0810
0144
0009 / 0273
0003 / 0276 / 0476 / 0810
0000
0276 / 0476 / 0810 / 1187 / 1376
0008 / 0237 / 1877
0000
0317 / 1305
0144 / 0533 / 0877 / 1877
0000
0000
0273 / 0279
0000
0144
0008 / 0477 / 0877 / 1877
1006
0003
0276
0003
0000
0000 / 0525 / 0899
Satellite Receiver
Manufacturer
Panasonic
AlphaStar
Chaparral
Crossdigital
DirecTV
DISH Network
Dishpro
Echostar
Expressvu
GE
General Instrument
GOI
Goodmans
Hisense
Hitachi
HTS
Hughes
Code
0152 / 0247 / 0701 / 1786
0772
0216
1109
0099 / 0247 / 0392 / 0566 / 0639 / 0724 / 0749 /
0819 / 1076 / 1108 / 1109 / 1142 / 1377 / 1392 /
1414 / 1442 / 1443 / 1444 / 1609 / 1639 / 1640 /
1749 / 1856
0775 / 1005 / 1170 / 1505 / 1775
0775 / 1005 / 1505 / 1775
0775 / 1005 / 1170 / 1505 / 1775
0775 / 1775
0392 / 0566
0869
0775 / 1775
1246
1535
0819 / 1250
0775 / 1775
0749 / 1442 / 1749
Satellite Receiver (Continued)
Manufacturer
Hughes Network
Systems
iLo
Janeil
Jerrold
JVC
LG
Magnavox
Memorex
Mitsubishi
Motorola
NEC
Next Level
Paysat
Philips
Pioneer
Proscan
Proton
RadioShack
RCA
Samsung
Sanyo
Sony
Star Choice
Toshiba
UltimateTV
Uniden
US Digital
USDTV
Voom
Zenith
Code
0749 / 1142 / 1442 / 1443 / 1444 / 1749
1535
0152
0869
0775 / 1170 / 1775
1226 / 1414
0722 / 0724
0724
0749
0856 / 0869
1270
0869
0724
0099 / 0722 / 0724 / 0749 / 0819 / 1076 / 1142 /
1442 / 1749
1442
0392 / 0566
1535
0869
0143 / 0392 / 0566 / 0855 / 1392
1108 / 1109 / 1142 / 1276 / 1377 / 1442 / 1609
1219
0639 / 1639 / 1640
0869
0749 / 0790 / 0819 / 1285 / 1749
1392 / 1640
0722 / 0724
1535
1535
0869
1856
Cable Box/Digital Video Recorder Combination
Manufacturer
Americast
Digeo
General Instrument
Jerrold
Motorola
Pace
Pioneer
Scientific Atlanta
Sony
Supercable
TiVo
Zenith
Code
0899
1187
0476 / 0810
0476 / 0810
0476 / 0810 / 1187 / 1376
0237 / 1877
0877 / 1877
0877 / 1877
1006
0276
1142 / 1442 / 1443 / 1444
0899
Satellite Receiver / Digital Video Recorder Combination
Manufacturer
DirecTV
DISH Network
Dishpro
Echostar
Expressvu
Hughes Network
Systems
JVC
Motorola
Philips
Proscan
RCA
Samsung
Sony
Star Choice
TiVo
Other Settings
wRemote Control Codes for the TV (Continued)
Code
0099 / 0392 / 0639 / 1076 / 1142 / 1377 / 1392 /
1442 / 1443 / 1444 / 1640
0775 / 1505
0775 / 1505
0775 / 1170 / 1505
0775
1142 / 1442 / 1443 / 1444
1170
0869
1142 / 1442
0392
1392
1442
0639 / 1640
0869
1142 / 1442 / 1443 / 1444
69
RQT9056
Connection Options for Improved Playback Quality
You can enjoy a high-quality picture by using the following terminals for connection.
Standard
Quality
Picture
Highquality
Picture
VIDEO
terminal
S VIDEO
terminal
HDMI
terminal
COMPONENT
VIDEO
terminal
DVD output and DVD/VHS output
The unit has DVD/VHS common output terminals and DVD priority output terminals.
DVD/VHS common output
pBoth DVD and VHS signals can be output.
pIf connecting with the DVD/VHS common out terminals, closed caption
cannot be displayed by this unit while playing a tape. Make the settings
and display on a TV that supports Closed Captioning.
DVD priority output
pThis is the dedicated terminal to enjoy pictures played on DVD in higher
picture quality.
pThe DVD priority out terminals can also output the VHS signal.
However this is not possible during DVD recording or DVD scheduled
recording.
DVD priority output
COMPONENT VIDEO OUT
DVD/VHS COMMON OUT
VIDEO
R-AUDIO-L
Y
DVD/VHS COMMON OUT
R-AUDIO-L
VIDEO
PR
PB
COMPONENT VIDEO OUT
Y
PR
PB
S VIDEO
AV OUT
S VIDEO
S VIDEO
OPTICAL
OPTICAL
R-AUDIO
A
-L
VIDEO
R-AUDIO-L
VIDEO
R-AUDIO-L
R
O
VIDEO
DVD PRIORITY
OUT OUT
DVD PRIORITY
DIGITAL
AUDIO
DIGITAL
AUDIO
OUT OUT
(PCM/BITSTREAM)
((PCM/BITSTREAM)
)
DVD/VHS common output
If connecting to the TV with the DVD priority output terminal, we recommend connecting to the TV with the DVD/VHS
common output terminals as well.
Using an S Video Cable for Better Video (S Video Cable not included)
The S VIDEO OUT terminal provides a more vivid picture than the VIDEO OUT terminal.
(Actual results depend on the television.)
Audio/video cable
(included)
Red White Yellow
INPUT 1
INPUT 2
AUDIO IN VIDEO S VIDEO
R
L IN
S Video cable
(not included)
Red White
Rear of TV
Red White Yellow
DVD/VHS COMMON OUT
VIDEO
R-AUDIO-L
RF
IN
DVD/VHS COMMON OUT
R-AUDIO-L
COMPONENT VIDEO OUT
VIDEO
Y
PB
S VIDEO
PR
S VIDEO
RF
OUT
AC IN
R-AUDIO
AU
-L
VIDEO
IN1
R-AUDIO-L
R-AUDIO-L
VIDEO
VIDEO
O
DVD PRIORITY
OUT
DVD
PRIORITY
OUT
DIGITAL AUDIO OUT
((PCM/BITSTREAM))
Rear of this unit
Red White
Audio cable (not included)
Notes
Usually you can watch video from input 2 on TV. When you want to playback VHS while recording on DVD, switch to input 1 on TV.
70
RQT9056
Using Component Video Cables for Better Video (Component Video Cables not
included)
The COMPONENT VIDEO OUT terminals on this unit can be used for either interlace or progressive output ( 91)
to provide a purer picture than the S VIDEO OUT terminal.
Rear of TV
COMPONENT
VIDEO IN
Y
PB
PR
INPUT 1
AUDIO IN
VIDEO
AUDIO IN VIDEO
R
L IN
Red White Yellow
Red White
Audio/video cable
(included)
Rear of this unit
Red White Yellow
DVD/VHS COMMON OUT
RF
IN
R-AUDIO-L
Y
VIDEO
PB
PR
COMPONENT VIDEO OUT
Y
PB
PR
S VIDEO
S VIDEO
RF
OUT
R-AUDIO
AU
-L
Audio cable
(not included)
COMPONENT VIDEO OUT
VIDEO
DVD/VHS COMMON OUT
R-AUDIO-L
AC IN
Component
video cables
(not included)
VIDEO
R-AUDIO-L
VIDEO
O
DVD PRIORITY OUT
Red White
pAdjust settings in “Component Output Signal” ( 64).
Notes
Reference
pUsually you can watch video from COMPONENT VIDEO input on TV. When you want to playback VHS while recording on DVD, switch to
input 1 on TV.
pIf this unit configured as above is connected to an amplifier, etc., then turn “HDMI Priority” in the Setup Menu to “Off” before connecting the
HDMI cable. ( 65)
71
RQT9056
Connection Options for Improved Playback Quality
You can enjoy better quality sound by changing the
audio cable connection between this unit and your TV on
page 8 to 10 as follows.
Using an Audio Cable for Better Sound
(Audio Cable not included)
Use this connection to play sound through speakers
connected to an amplifier or system component.
Rear of Amplifier or
System Component
Red White
Audio cable
(not included)
Red White
RF
IN
DVD/VHS COMMON OUT
R-AUDIO-L
S VIDEO
COMPONENT VIDEO OUT
VIDEO
Y
PR
PB
When connected to an HDMI compatible unit, an
uncompressed digital audio and video signal is transmitted,
enabling you to enjoy high quality digital video and audio with
just one cable. When connecting to an HDMI-compatible HDTV
(High Definition Television), the output can be switched to
1080p, 1080i or 720p HD video.
Regarding “HDAVI Control” function ( 40)
p Please use HIGH SPEED HDMI cables that have the
HDMI logo (as shown on the cover).
It is recommended that you use Panasonic’s HDMI
cable.
Recommended part number: RP-CDHG10
(1.0 m/3.3 ft.), RP-CDHG15 (1.5 m/4.9 ft.),
RP-CDHG20 (2.0 m/6.6 ft.), RP-CDHG30 (3.0 m
/9.8 ft.), RP-CDHG50 (5.0 m/16.4 ft.), etc.
p Non-HDMI-compliant cables cannot be used.
AUDIO IN
R
L
Rear of this unit
Using an HDMI (High Definition
Multimedia Interface) Cable
Rear of Amplifier or
System Component
Rear of TV
S
RF
OUT
AC IN
R-AUDIO
AU
-L
R-AUDIO-L
R-AUDIO-L
VIDEO
DE
VIDEO
VIDEO
DIGITAL AUDIO OUT
(PCM/BITSTREAM)
(
)
DVD PRIORITY OUT
DVD PRIORITY
OUT
IN1
HDMI IN
HDMI OUT
HDMI IN
Using an Optical Digital Audio Cable for
Better Sound (Optical Digital Audio Cable
not included)
This method allows you to enjoy multi-channel surround
sound on DVD-Video.
INPUT 1
AUDIO IN VIDEO
Red White Yellow
HDMI cable
(Only included in
DMR-EZ485V)
Audio/video cable
(included)
Rear of Amplifier or
System Component
OPTICAL IN
Red White Yellow
DVD/VHS COMMON OUT
R-AUDIO-L
Insert fully with
this side up.
VIDEO
-L
VIDEO
R-AUDIO-L
VIDEO
DVD PRIORITY OUT
DIGITAL AUDIO O
(PCM/BITSTREA
Rear of this unit
Optical digital
audio cable
(not included)
DVD/VHS COMMON OUT
R-AUDIO-L
VIDEO
Y
PR
PB
R-AUDIO
A
-L
VIDEO
DE
IN1
p Set “HDMI Priority” and “HDMI Audio Output” to “On”
( 65, 66). (The default setting is “On”.)
Notes
COMPONENT VIDEO OUT
OPTICAL
S VIDEO
S VIDEO
RF
OUT
R-AUDIO-L
R
OL
VIDEO
DE
DVD PRIORITY OUT
OPTICAL
DIGITAL
AUDIO OUT
(PCM/BITSTREAM)
DIGITAL
T AUDIO OUT
((PCM/BITSTREAM))
pConnect an amplifier or system component with a builtin decoder displaying these logo marks.
pAdjust settings in “Digital Audio Output” ( 61).
Notes
RQT9056
S VIDEO
OPTICAL
R-AUDIO
Rear of this unit
72
PR
PB
AV OUT
Do not bend
cable sharply.
AC IN
Y
S VIDEO
IN1
RF
IN
COMPONENT VIDEO OUT
pYou cannot use DTS Digital Surround decoders not meant
for DVD.
pBefore purchasing an optical digital audio cable, check the
terminal shape of the equipment to be connected.
p If connecting to equipment that is only compatible with
2 channel output, audio with 3 channels or more will be
down-mixed ( 91) and output as 2 channels (some
discs cannot be down-mixed).
p For display units compatible with HDCP (High
bandwidth Digital Content Protection) that are
equipped with a digital DVI input terminal (PC
monitors, etc.):
Depending on the unit, images may not display
properly or at all when connecting with a DVI/HDMI
switching cable (audio cannot be output).
p Usually you can watch video from HDMI input on TV.
When you want to playback VHS while recording on
DVD, switch to input 1 on TV.
SD Card and USB Memory Information
USB memories you can use with this unit
Standard
symbol
Type
USB memory
[USB]
File format
Playing
Copying
Instructions
MP3
n
L
You can play MP3 files recorded onto the USB
memory using a computer. ( 33)
Still pictures
(JPEG)
n
n
You can play and copy still pictures taken on a
digital camera etc. ( 34, 48)
–You can copy still pictures to/from DVD-RAM discs
only.
–You can copy albums only.
DivX
n
L
You can play DivX files recorded onto the USB
memory using a computer. ( 36)
(n: Can do, –: Cannot do)
w Compatible USB memories
p USB memories which are defined as USB mass storage class, and digital cameras that use PTP protocol.
– USB memories that support USB 1.0/1.1 and USB 2.0 Full Speed/High Speed.a
a
USB memories for USB 2.0 High Speed work as USB 2.0 Full Speed.
p USB memories of up to 32 GB can be used.
p USB memories that support bulk only transfer.
CBI (Control/Bulk/Interrupt) is not supported.
p Digital Cameras which require additional programme installation when connected to a PC are not supported.
p MTP (Media Transport Protocol) device is not supported.
p A multi-port USB card reader is not supported.
p FAT16 and FAT32 file systems are supported.
p UDF/NTFS/exFAT file system is not supported.
p Depending on the sector size, some files may not work.
p Only the first partition on USB memories with multi-partition is supported.
Despite meeting the conditions mentioned above, there may be USB memory that cannot be used with this unit.
Notes
pThis unit does not support USB device charging.
SD Cards Usable with this Unit
p SD Memory Card
(from 8 MB to 2 GB)
p SDHC Memory Card
(4GB, 8GB, 16GB)
p miniSD Carda
p microSD Carda
Standard symbol
File format
[SD]
Still pictures (JPEG)
Instructions
p You can play and copy still pictures taken on a
digital camera, etc. ( 34, 48)
a
A card adaptor included with the miniSD Card/
microSD Card is necessary.
The card types mentioned above will be referred to as “SD Card” in these operating instructions.
w Suitable SD Cards
p When using SD Memory Cards of 4 GB, 8 GB and 16 GB, only SD Memory Cards that display the SDHC logo can
be used.
p Usable memory is slightly less than the card capacity.
p Please confirm the latest information on the following website.
http://panasonic.co.jp/pavc/global/cs (This site is in English only.)
p If the SD Card is formatted on other equipment, the time necessary for recording may be longer. Also, if the SD
Card is formatted on a PC, you may not be able to use it on this unit.
p This unit is compatible with SD Memory Cards that meet SD Card Specifications FAT 12 and FAT 16 formats, as
well as SDHC Memory Cards in FAT 32 format.
p SDHC Memory Cards used for recording with this unit can only be used with other SDHC Memory Cardcompatible equipment. SDHC Memory Cards cannot be used with equipment that is only compatible with SD
Memory Cards.
73
p We recommend using a Panasonic SD card.
Reference
Type
RQT9056
Disc Information
Usable Discs for Recording and Playback
Rewritable
Finalization Neededa1
Recording 16:9 aspect
picturea2
Recording broadcasts
that allow one copy
(CPRM) ( 23)
o
—
o
o
[RAM]
—
o
— (4:3 aspect)
—
[-R] before finalization
[DVD-V] after finalization
—
o
— (4:3 aspect)
—
[-R]DL] before finalization
[DVD-V] after finalization
o
o
— (4:3 aspect)
—
[-RW‹V›] before finalization
[DVD-V] after finalization
+R
—
o
— (4:3 aspect)
—
[+R] before finalization
[DVD-V] after finalization
+R DL
—
o
— (4:3 aspect)
—
[+R]DL] before finalization
[DVD-V] after finalization
+RW
o
—
— (4:3 aspect)
—
[+RW]
Disc type
Standard symbol
DVD-RAM
DVD-R
DVD-R DL
DVD-RW
p The explanations concerning discs are indicated by [DVD], and those concerning video cassette are indicated by [VHS].
a1
a2
Finalization needed for playback on other equipment ( 54).
[RAM] can be played back on Panasonic DVD recorders and
DVD-RAM compatible DVD players.
[-R]DL] and [+R]DL] can be played back only on equipment
compatible with these discs.
For further information ( 23, Important Notes for Recording)
p Use of Panasonic discs is recommended.
For available recording times for different discs under
different recording modes, see “DVD Recording Modes
and Estimated Disc Recording Time” on page 24.
Formatting and/or recording/initializing constraints may
prevent you from playing or recording certain discs.
p Please see specifications ( 92) for compatible disc
versions and recording speeds.
Tips
p Visit Panasonic’s homepage for more information
about DVDs.
http://www.panasonic.com/playDVD-R
(This site is in English only.)
p Buy Discs from www.panasonic.com and receive
Special 20% Discount!
Coupon Code: DVDMEDIA
a
Offer good only in 50 United States.
Notes
p[RAM] will show an increase in available space whenever a
recording has been erased.
p[-RW‹V›] and [+RW] discs will only show an increase in available
space when their last recording has been erased.
p[-R] [-R]DL] [+R] [+R]DL] The discs will show no increase in available
space after deleting recordings.
pYou may not be able to record depending on the condition of the
discs and you may not be able to play them due to the condition of
the recording.
pWhen recording multilingual broadcast, refer to page 23.
The manufacturer accepts no responsibility and offers no compensation for loss of recorded or edited
material due to a problem with the unit or recordable media, and accepts no responsibility and offers no
compensation for any subsequent damage caused by such loss.
Examples of causes of such losses are
p A disc recorded and edited with this unit is played in a DVD Recorder or computer disc drive manufactured by
another company.
p A disc used as described above and then played again in this unit.
p A disc recorded and edited with a DVD Recorder or computer disc drive manufactured by another company is
played in this unit.
74
RQT9056
Play-only Discs
Disc type
Standard symbol
Discs that Cannot be Played
Uses
DVD-Video
[DVD-V]
DVD-RW
(DVD Video
Recording
format)
High quality movie and music
discs
[-RW‹VR›]
DVD-RW video recorded on
another DVD recordera
p You can play programs that
allow “One time only recording”
if they have been recorded to a
CPRM compatible disc.
p By formatting ( 53) the
disc, you can record to it in
DVD-Video format.
p It may be necessary to finalize
the disc on the equipment used
for recording.
DivX, MP3,
JPEG
p DVD-R and DVD-R DLawith
video recorded in DivX ( 76)
p DVD-R and DVD-R DLa with
music recorded in MP3 ( 76)
p Still pictures (JPEG) recorded
on DVD-R and DVD-R DLa
( 76)
p 2.6/5.2 GB DVD-RAM, 12 cm (5\)
p 3.95/4.7 GB DVD-R for Authoring
p DVD-R recorded in DVD Video Recording format
p DVD-R (DVD-Video format), DVD-R DL, DVD-RW
(DVD-Video format), +R, +R DL recorded on another
unit and not finalized ( 91)
p PAL discs
p Discs recorded with AVCHD format
p DVD-Video with a region number other than “1” or
“ALL”
p Blu-ray, HD DVD
p DVD-Audio
p Video CD
p DVD-ROM, +R 8 cm (3\), CD-ROM, CDV, CD-G,
Photo CD, CVD, SVCD, SACD, MV-Disc, PD, etc.
DVD-R
DVD-R DL
Notes
Note about using a DualDisc:
The digital audio content side of a DualDisc does not meet the
technical specifications of the Compact Disc Digital Audio
(CD-DA) format so play may not be possible.
Audio CD
[CD]
—
DivX, MP3,
JPEG
p Recorded audio and music
(including CD-R/RWa)
p CD-R and CD-RWa with video
recorded in DivX ( 76)
p CD-R and CD-RWa with music
recorded in MP3 ( 76)
p Still pictures (JPEG) recorded
on CD-R/RWa( 76)
a
Close the session after recording. Play may be impossible on some discs due to the condition of the recording.
p Operation and sound quality of CDs that do not conform to CD-DA specifications (copy control CDs, etc.) cannot be guaranteed.
p The producer of the disc can control how discs are played. So you may not always be able to control play as described in these operating
instructions. Read the disc’s instructions carefully.
Media Care
[RAM] Use cartridges to protect them from scratches and dirt.
Cleaning discs
Discs are not indestructible and occasionally dirt or
condensation may appear. Clean by gently wiping with a soft,
dry lint-free cloth in a straight line from the center of the disc to
the edge of the disc.
Return discs to their cases and SD cards to their cartridges
when not in use; this helps to protect against scratches and
dirt.
Video cassette
p Poor quality or damaged video cassettes can cause the
heads to become dirty and malfunction.
p Never use video cassettes on which juice has been spilled
or those that are extremely damaged since this will not only
cause the heads to become dirty, but will also make the unit
malfunction.
Storing media
p Do not place or store media in the following locations:
– Direct sunlight
– Very dusty or humid areas
– Near a heat source
– Places that undergo extreme shifts in temperature
(condensation can occur)
– Where static electricity or electromagnetic waves occur
p Keep the Memory Card out of reach of children to prevent
swallowing.
Reference
Holding a disc or card
Handle discs by the edges to avoid inadvertently scratching or
getting oil from your fingers on the disc. Do not touch the signal
surface of discs (the shiny side) or the terminal surface (the
metal part) of SD cards.
Discs to avoid
p Discs that are not perfectly circular in shape
p Warped discs, which may not balance properly in your unit,
causing improper operation or damage to the unit
p Cracked discs
p Discs with exposed adhesive (from removed stickers or
labels, such as may occur with rental discs or improperly
cared-for discs that were previously labeled or re-labeled)
75
RQT9056
MP3s, DivXs and Still Pictures (JPEG)
MP3 File Information
Playable media
[-R] [-R]DL] [CD] [USB]
File format
MP3
Files must have the extension “.mp3” or “.MP3”.
Number of
Maximum number of folders (groups)
folders (groups) recognizable:
99 folders (groups) (including the root folder)
Number of files
(tracks)
Bit rates
Sampling
frequency
ID3 tags
Maximum number of files (tracks) recognizable:
999 files (tracks) (Total number for all the
MP3, JPEG and other type of files.)
32 kbps to 320 kbps
16 kHz/22.05 kHz/24 kHz/
32 kHz/44.1 kHz/48 kHz
not compatible
pIf there is a large amount of still picture data etc. within an
MP3 file, play may not be possible.
Still Picture (JPEG) Information
Playable media
File format
Number of
pixels
Number of
folders
Number of files
MOTION JPEG
[RAM] [-R] [-R]DL] [CD] [SD] [USB]
JPEG
Files must have the extension “.jpg” or “.JPG”.
between 34M34 and 6144M4096
(Sub sampling is 4:2:2 or 4:2:0)
[RAM] [-R] [-R]DL] [SD] [USB] This unit can
handle a maximum of 300 folders
[CD] This unit can handle a maximum of 99
folders
[RAM] [-R] [-R]DL] [SD] [USB] This unit can
handle a maximum of 3000 files
[CD] This unit can handle a maximum of
999 files
not compatible
p If a folder name or file name has been input using other equipment,
the name may not be displayed properly or you may not be able to
play or edit the data.
DivX File Information
Playable media
File format
[-R] [-R]DL] [CD] [USB]
DivX
pFiles must have the
extension “.DIVX”,
“.divx”, “.AVI” or “.avi”.
Number of
folders
Maximum number of folders recognizable:
300 folders (including the root folder)
Maximum number of DivX files recognizablea:
200 files
Support version Plays all versions of DivX video (including
DivX 6) with standard playback of DivX
media files.
Certified to the DivX Home Theater Profile.
Video
–Number of streams: Up to 1
–Codec: DIV3, DIV4, DIVX, DV50
–Picture size: 32M32to 720M576
–FPS (Frame Per Second): Up to 30 fps
Audio
–Number of stream: Up to 8
–Format: MP3, Dolby Digital, MPEG
–Multi channel: Dolby Digital is possible.
MPEG multi is 2 ch conversion.
pGMC (Global Motion Compensation) is
not supported.
Number of files
a
76
RQT9056
Total number of recognizable file including MP3, JPEG,
DivX and other type of files is 4000.
Notes
[-R] [-R]DL] [CD]
p Compatible formats: ISO9660 level 1 or 2 (except for extended
formats) and Joliet
p This unit is compatible with multi-session; however, reading or play
of the disc may take time if there are a lot of sessions.
p Operation may take time to complete when there are many files
(tracks) and/or folders (groups); some files (tracks) may not display
or be playable.
p Images recorded at a very high resolution may take a long time to
display.
p English alphabetical characters and Arabic numerals are displayed
correctly. Other characters may not display correctly.
p The display order on this unit may differ from how the order is
displayed on a computer.
p Depending on how you create the disc (writing software), files
(tracks) and folders (groups) may not play in the order you number
them.
p This unit is not compatible with packet-write format.
p Depending on the recording conditions, the disc may not play.
Tips
You can play MP3s on this unit by making folders as shown below.
Depending on how you create the disc (writing software), play may
not be in the order you number the folders.
Root
How to structure MP3 folders
Prefix with 3-digit numbers in the
order you want to play them.
001
001 Group
001track.mp3
002track.mp3
003track.mp3
002 Group
003 Group
Order of play
001track.mp3
002track.mp3
003track.mp3
004track.mp3
001track.mp3
002track.mp3
003track.mp3
Frequently Asked Questions
Page
Setup
What equipment is necessary to
play multi-channel surround sound?
p You cannot play back multi-channel sound on this unit without other
equipment. You must connect this unit with an HDMI cable or an optical
digital audio cable to an amplifier with a built-in Dolby Digital or DTS
decoder.
72
Can the headphones and speakers
be directly connected to the unit?
p You cannot directly connect to the unit. Connect through the amplifier, TV,
etc.
−
The television has an S-VIDEO IN
terminal, COMPONENT VIDEO IN
terminals and HDMI IN terminal.
Which should I connect with?
p The output picture quality increases in the following order:
VIDEO IN terminal S-VIDEO IN terminal COMPONENT VIDEO IN
terminals HDMI IN terminal. The unit will take longer to start up when
connected with the HDMI IN terminal.
−
Is my TV progressive output
compatible?
p All Panasonic TVs that have 480p input terminals are compatible. Consult
the manufacturer if you have another brand of TV.
−
Page
Discs
Can I play DVD-Video bought in
another country?
p You can play them if the video standard is NTSC.
p However, you cannot play DVD-Video if its region number does not include
“1” or “ALL”.
Cover
Can a DVD-Video that does not
have a region number be played?
p Discs either without region number or region number “1” or “ALL” will not be
played on this unit.
−
What are the constraints regarding
DVD-R, DVD-R DL, DVD-RW, +R,
+R DL, and +RW compatibility with
the unit?
p The unit records and plays DVD-R, DVD-R DL, DVD-RW (DVD-Video
format), +R, +R DL, and +RW, and plays DVD-RW (DVD Video Recording
format).
What are the constraints regarding
CD-R and CD-RW compatibility with
the unit?
−
74, 75
p The unit also records and plays high speed recording compatible discs.
92
p After recording but before finalizing these discs (except +RW disc):
– You may not be able to play and record discs on this unit after recording
them on other Panasonic products or other manufacturers’ equipment.
– You may not be able to play and record discs on other equipment after
recording them on this unit.
After finalizing the disc, however, you will be able to play it on any
DVD-Video compatible player.
−
p This unit plays CD-R/CD-RW discs which have been recorded in one of the
following standards:
CD-DA, MP3, DivX and still pictures (JPEG). Close the session or finalize
the disc after recording. This unit can recognize up to 99 folders (groups)
and 999 files (tracks) on a disc with MP3 or still pictures (JPEG), 300
folders and 200 files on a disc with DivX.
75, 76
p You cannot write to a CD-R or CD-RW with the unit.
−
Reference
Continued on next page.
77
RQT9056
Frequently Asked Questions
Page
Recording
Can I record from a commercially
purchased video cassette or DVD?
p Most commercially sold video cassettes and DVDs are copy protected;
therefore, recording is usually not possible.
−
Can DVD-R, DVD-R DL, DVD-RW
(DVD-Video format), +R, +R DL,
and +RW recorded on the unit be
played on other equipment?
p You can play these discs on compatible equipment such as DVD players
after finalizing the disc on this unit.
54
p [+RW] It is not necessary to finalize. To enable play on other DVD players,
please use “Create DVD Top Menu” in the DVD Management menu.
54
p In any case, ability to play a disc depends on the condition of the recording,
the quality of the disc, and the capability and format constraints of the DVD
player.
−
Can I record digital audio signals
using the unit?
p You cannot record digital signals. The digital audio terminals on the unit are
for output only. (The audio recorded from a digital video camcorder using
the DV camcorder recording function, however, is recorded digitally.)
−
Can a digital audio signal from
the unit be recorded to other
equipment?
p You can record if using the PCM signal. When recording DVD, change the
“Digital Audio Output” settings to the following via the Setup menu:
– PCM Down Conversion: “On”
– Dolby Digital: “PCM”
– DTS: “PCM”
However, only
– As long as digital recording from the disc is permitted.
– As long as the recording equipment is compatible with 48 kHz sampling
frequency.
61
p You cannot record MP3 signals.
−
Can I switch to SAP during
recording?
p With DVD-RAM and a video cassette, you can, and the audio recorded also
changes. Press [AUDIO] to change to SAP.
23, 25
p You cannot change the audio type when recording an analog multilingual
broadcast on a DVD-R, DVD-R DL, DVD-RW (DVD-Video format), +R,
+R DL or +RW disc. Establish the appropriate setting before recording with
“Multi-channel TV Sound (Analog)” in the Setup menu.
23, 61
p Only one language channel is recorded from digital multilingual broadcasts,
so you will be unable to change languages during recording. Set the
language in “Multi-channel TV Sound (Digital)” in the Setup menu.
23, 25,
61
Page
USB
What can or cannot be done using
the USB port on this unit?
78
RQT9056
p You can copy still pictures and play MP3, DivX or still picture files on a USB
memory.
p A USB memory cannot be formatted on this unit.
p Connections of digital cameras or camcorders through USB are not
guaranteed.
p Some USB memories cannot be used with this unit.
33, 34,
36, 48
−
−
73
Error Messages
On the Unit’s Display
H
,F
(“ ” stands for a service number.)
RC
(“ ” stands for a number.)
HARD ERR
(“HArd” and “Err” are alternately
displayed.)
NO READ
(“NO” and “REAd” are alternately
displayed.)
Page
p An error has occurred. The number following “H” or “F” depends on the
status of the unit. Check the items below and in the Troubleshooting Guide.
If the service number still does not disappear after the check, reset the unit
( 81, “To restore the unit if it freezes”).
−
p If the service numbers fail to clear, note the service numbers and contact a
qualified service person.
−
p The remote control and the main unit are using different codes. Change the
code on the remote control.
57
p If there is no change after turning the unit on and off, consult the dealer
where the unit was purchased.
−
p The disc is dirty or badly scratched. The unit cannot record, play, or edit.
p The disc may be incompatible or of poor quality.
p You have used a lens cleaner and it has finished operation. Press
[ OPEN/CLOSE] on the main unit to eject the disc.
FULL
75
74, 75,
76
15
p Displayed when the unit is started. This is not a malfunction.
−
p The unit is carrying out its recovery process. You cannot operate the unit
while “ ” is displayed.
−
p There are already 16 scheduled recording programs. Delete unnecessary
scheduled recording programs.
27
UNSUPPORT
p You have inserted a disc the unit cannot play or record on.
(“UNSUP” and “POrt” are alternately p You tried to operate with a non-compatible USB memory.
displayed.)
74, 75
73
p You have inserted a new DVD-RW/+RW or a DVD-RAM/DVD-RW
(DVD-Video format) recorded on other equipment.
You can format the disc when the format confirmation screen is displayed.
25, 53
“
” is displayed on the unit’s
display.
p This unit is confirming that it is connected with equipment compatible with
HDAVI Control.
−
F74
p The HDMI connection could not be authenticated due to a transfer
malfunction. Consult the dealer where the unit was purchased.
−
F75
p The HDMI connection could not be authenticated due to an internal data
malfunction. Consult the dealer where the unit was purchased.
−
U59
p The unit is very warm.
The unit switches to standby for safety reasons. Wait for about 30 minutes
until the message disappears.
Reinstall the unit in an area with adequate ventilation. Do not block the
cooling fan on the rear of the unit.
−
U61
p There was a power failure or the AC power supply cord was disconnected
while the unit was on. The unit is carrying out its recovery process. This
process restores the unit to normal operation. The unit is not broken. Wait
until the message disappears.
−
U72
U73
pThe HDMI connection acts unusually.
– The connected equipment is not HDMI compatible.
– Please use HIGH SPEED HDMI cables that have the HDMI logo (as shown
on the cover).
– The HDMI cable is damaged.
−
U76
p HDMI cannot be output because you are connected to a model that does
not support copyright protection.
−
U88
p There was something unusual detected with the disc while recording,
playing or copying; there was a power failure or the AC power supply cord
was disconnected while the unit was on. The unit is carrying out its recovery
process. This process restores the unit to normal operation. The unit is not
broken. Wait until the message disappears.
83
U99
p The unit fails to operate properly. Press [¦/I POWER] on the main unit to switch the
unit to standby. Press [¦/I POWER] on the main unit again to turn the unit on.
−
Reference
UNFORMAT
(“UNFOr” and “MAt” are alternately
displayed.)
Continued on next page.
79
RQT9056
Error Messages
Page
On the TV
Authorization Error.
This unit is not authorized to play
this recording.
p You are trying to play the DivX VOD content that was purchased with a
different registration code. You cannot play the content on this unit. (DivX)
36
Cannot finish recording completely.
p The program was copy-protected.
−
p The disc may be full.
−
p There are already 99 recordings ([+R] [+R]DL] [+RW] 49 recordings).
−
Cannot play.
p You inserted an incompatible disc (discs recorded in PAL video, etc.).
75
Cannot record on the disc.
p The disc may be dirty or scratched.
75
Unable to format.
Please check the disc.
Cannot record. Disc is full.
Cannot record. The number of
recordings has exceeded the
maximum limit.
p [RAM] [-RW‹V›] [+RW] Create space by erasing unwanted recordings. Even
if you erase recorded content from the DVD-R, DVD-R DL, +R or +R DL
there is no increase in disc space. Available recording space on a DVD-RW
(DVD-Video format) or +RW disc increases when the last recording is
deleted (space may increase slightly when you delete other recordings).
22, 43,
53
p Use a new disc.
−
Error has occurred.
Please press OK.
p Press [OK] to start the recovery process. You cannot operate the unit while
it is recovering [“
” (Self Check) appears on the unit’s
display].
−
No disc
p You haven’t inserted a disc. Correctly insert a disc that the unit can play.
15, 74,
75
p The disc is upside down. If it is a single-sided disc, insert it so the label is
facing up.
15
No folders.
p There are no compatible folders on SD Card or USB memory.
76
No SD card
No valid SD card.
p The card is not inserted. If this message is displayed while a compatible
card is already inserted, turn off the unit, remove the card, then re-insert
the card.
15
p The card inserted is not compatible or the card format does not match.
No VHS cassette.
p There is no video cassette in the tape deck when playing or recording TV
programs. Insert a video cassette.
Now recording on DVD.
p The VHS plays back while recording on DVD. You can watch the VHS
To watch the VHS playback, connect
playback by connecting to the DVD/VHS COMMON terminals.
a TV to DVD/VHS COMMON OUT
terminal at the back of the unit, and
select the appropriate input on the
TV.
73, 76
15
70
Please change the disc.
p There may be a problem with the disc. Press [ OPEN/CLOSE] on the
main unit to remove the disc to check for scratches and dirt. (The unit turns
off automatically after you open the tray.)
−
Please set the clock.
p The clock is not set when recording programs or setting scheduled
recording. Set the clock.
57
The VHS cassette is protected.
p A video cassette without the accidental erasure prevention tab has been
inserted for recording TV programs. Use a video cassette with an accidental
erasure prevention tab.
15
Rental Expired.
p The DivX VOD content has zero remaining plays. You cannot play it. (DivX)
36
This is a non-recordable disc.
p The unit cannot record on the disc you inserted. Insert a DVD-RAM or
unfinalized DVD-R, DVD-R DL, DVD-RW (DVD-Video format), +R, +R DL,
or +RW disc.
74
p The disc may be incompatible or of poor quality.
This disc is not formatted properly.
80
RQT9056
74, 75,
76
p You inserted an unformatted DVD-RAM, DVD-RW or +RW disc. Format the
disc with the unit.
53
p The operation is prohibited by the unit, disc, or video cassette.
−
Troubleshooting Guide
If the Antenna Connector doesn’t Match
Use the following connection to suit the antenna lead to
the unit’s RF IN terminal, and the 75 j coaxial cable to the
antenna terminals on your TV or other equipment. Refer to the
other equipment’s operating instructions for more information.
This unit
To Reset This Unit
To reset the channel information and the
clock settings
On the main unit
300−75 j transformer
from the antenna
(Flat) Twin lead
300 j cable
CH
To this unit’s RF
IN terminal
Other equipment (television etc.)
Press and hold both buttons
for about 5 seconds.
To reset the ratings level settings
75−300 j transformer
VHF or UHF
75 j coaxial
cable
Television
You can reset both parental rating ( 56) and
DVD-Video rating ( 59).
With the unit stopped
Changing RF Output Channel
OPEN/CLOSE
If you connected this unit and a TV without an audio/video
cable, interference (lines or patterning) or a very poor picture
may appear on the TV. If this happens, follow the steps below
to change the video playback channel (RF output channel) to
remove the interference.
to open the disc tray.
On the main unit
CH
REC
RF Output Channel
SD CARD
Press the channel up/down buttons
to select a RF Output Channel.
Ch.
OK
–The RF output
channel number
displays on the
unit’s display.
TRACKING/V-LOCK
to select “CH 3” or “CH 4”.
CH
The unit’s display
Each time you press the button:
CH 3 (Default setting) CH 4 OFF
For connections with the audio/video cable, set the RF
output channel to “OFF”.
OK
Press and hold both buttons for
about 5 seconds.
To restore the unit if it freezes
On the main unit
POWER
Press and hold for more than
10 seconds.
–The unit is off.
or
On the main unit
RESET
Press and hold for
more than 1 second
with a pointed object.
Reference
Press and hold
for more than
5 seconds.
3
to finish.
Notes
When you set the RF output channel to “CH 3” or “CH 4”
Video from this unit can be viewed on channels 3 and 4 on
the TV. Press [VCR/TV] to switch to VCR mode and output
video from this unit ( 16).
81
RQT9056
Troubleshooting Guide
Before requesting service, make the following checks. If you are in doubt about some of the check points, or if the solutions
indicated in the chart do not solve the problem, refer to “Customer Services Directory” on page 94 if you reside in the U.S.A., or
refer to the “Product information” on page 93 if you reside in Canada.
The following does not indicate a problem with the unit:
p Regular disc rotating sound.
p Poor reception due to atmospheric conditions.
p Image disturbance during search.
p Periodic interruptions to the reception due to satellite broadcasting breaks.
p Operations not working due to a poor-quality disc. (Try again using a Panasonic disc.)
p The unit freezing due to the activation of one of its safety devices ( 81, To restore the unit if it freezes).
General Issues
Power
Page
No power.
p Insert the AC power supply cord securely into a known active AC outlet.
8 to 10
The unit switches to standby mode.
p This is a power saving feature. Change “Off Timer” in the Setup menu to
“Off” to always keep the unit on.
57
p One of the unit’s safety devices is activated. Press [¦/I POWER] on the
main unit to turn the unit on.
−
p If you connected this unit to an “HDAVI Control” compatible TV with an
HDMI cable, this unit will be automatically turned off when the TV is turned
off.
40
The power is turned off
automatically.
General Issues
Displays
Page
The display is dim.
p Change “Front Display” in the Setup menu.
63
“12:00A” is flashing on the unit’s
display.
p Set the clock.
57
The recording time display, the
copying process display, and the
displayed recording times of MP3s
are different from the actual time.
p Times shown may disagree with actual times.
−
p [-R] [-R\DL] [+R] [+R]DL] The remaining capacity does not increase even if
recordings are deleted.
−
p Available recording space on a DVD-RW (DVD-Video format) or +RW disc
increases when you delete the last recording (space may increase slightly
when you delete other recordings).
−
p If you record or edit about 200 times or more, the remaining capacity of
DVD-R, DVD-R DL, +R, or +R DL is reduced and then recording or editing
may be disabled (for the second layer on DVD-R DL and +R DL, this
happens after about 60 times).
−
p The time during fast forward and rewind, or the process during copy may
not be displayed accurately.
−
p The displayed recording/play time is converted from the number of frames
at 29.97 frames (equal to 0.999 seconds) to one second. There will be a
slight difference between the time displayed and the actual elapsed time
(e.g., actual one-hour elapsed time may display as approximately
59 minutes 56 seconds). This does not affect the recording.
−
Compared to the actual recorded
time, the elapsed time displayed is
less.
82
RQT9056
Operation
Page
Cannot operate the TV or Set Top
Box with the unit’s remote control.
p Change the manufacturer code on the remote control.
p Select TV or Set Top Box mode on the remote control.
68
Cannot operate the DVD.
p Press [DRIVE SELECT] to select the DVD drive when operating DVDs or
CDs.
– Make sure the TV is on the correct channel or input mode.
17
Cannot operate the VHS.
p Press [DRIVE SELECT] to select the VHS drive when operating VHS
cassettes.
– Make sure the TV is on the correct channel or input mode.
17
The remote control doesn’t work.
p The remote control code is wrong. Change to the correct code.
57
p The batteries are depleted. Replace them with new ones.
5
p Point the remote control at the remote control sensor on the main unit.
5
p Remove obstacles between the remote control and main unit.
−
p Remove dust from the transmission window and the unit’s sensor.
−
p Colored glass may obstruct the signal reception/transmission.
−
p Don’t place the signal sensor in direct sunlight or in areas that may be
subject to sun exposure.
−
p It may be necessary to set the code on the remote control again after
changing the batteries.
57
p It may be necessary to set the manufacturer code again after changing the
batteries.
68
p Some operations are prohibited by the disc.
−
p The unit is warm (“U59” appears on the unit’s display). Wait until “U59”
disappears.
−
p One of the unit’s safety devices may have been activated.
Reset the unit as follows:
Press [¦/I POWER] on the main unit to switch to off.
If the unit doesn’t switch to off, reset the unit ( 81, “To restore the unit if it
freezes”).
−
“U88” is displayed and the disc
cannot be ejected.
p The unit is carrying out the recovery process. Do the following to eject the
disc:
(1) Press [¦/I POWER] on the main unit to switch to off.
If the unit doesn’t switch to off, reset the unit ( 81, “To restore the unit if
it freezes”).
(2) While the unit is off, press and hold [w] and [CH 9] on the main unit
at the same time for about 5 seconds. (Ejection may take extra time
depending on discs.) The disc may be defective. Try another disc.
−
Cannot eject a disc.
p The unit is recording.
−
p The unit may have a problem. Eject the disc as in (2) above.
−
Startup is slow.
p Startup takes time in the following situations:
– A disc other than a DVD-RAM is inserted.
– The clock is not set.
– Immediately after a power failure or the AC power supply cord is
connected.
– When the unit is connected with an HDMI cable.
−
A password screen appears and
you are unable to view or record.
p If the unit starts receiving a broadcast with the set rating information, a
password screen appears and you will be unable to view or record. Enter
your password to continue.
56
Time is incorrect after using Auto
Clock Setting.
p Try again. If the time is still incorrect, set the clock manually.
58
The unit is on but cannot be
operated.
68
Reference
General Issues
83
RQT9056
Troubleshooting Guide
General Issues
VIERA Link
VIERA Link doesn’t work
General Issues
84
RQT9056
p Check the HDMI cable connection. Check that “HDMI” is displayed on the
front display when the power for the main unit is set to “On”.
−
p Make sure that “VIERA Link” is set to “On”.
66
p Check the “HDAVI Control” settings on the connected device.
−
p If the connection for the equipment connected with an HDMI cable was
changed, or if there was a power failure or the plug was removed from the
household AC outlet, “HDAVI Control” may not work. In this case, perform
the following operations.
1. When all equipment connected with the HDMI cable is turned on, turn
the TV (VIERA) on again.
2. Change the TV (VIERA) settings for the “HDAVI Control” function to
off, and then set to on again. (For more information, see the VIERA
operating instructions.)
3. Switch the VIERA input to HDMI connection with this unit, and after this
unit’s screen is displayed check that “HDAVI Control” is working.
−
USB
The contents of the USB memory
cannot be read.
Page
Page
p Check that the USB memory is inserted correctly.
15
p The format of the USB memory or of its contents is not compatible with the
unit. (The contents on the USB memory may be damaged.)
73, 76
p The USB memory contains a folder structure and/or file extensions that are
not compatible with this unit.
76
p Turn off and then turn on the unit again.
−
p USB memories connected using a USB extension cable, a USB multi card
reader or USB hub may not be recognized by this unit.
−
p The USB host function of this unit may not work with some USB memory
devices.
−
p USB memories with storage capacity of more than 32 GB may not work in
some instances.
−
p Some USB memories cannot be used with this unit.
73
Picture
TV reception worsens after
connecting the unit.
p This can occur because the signals are being divided between the unit and
other equipment. It can be solved by using a signal booster, available from
electronics retailers.
The images from the unit do not
appear on the TV.
Picture is distorted.
p Make sure recorder is connected to an appropriate AV input of the TV.
Page
−
8 to 11
p Make sure the TV’s input setting (e.g., VIDEO 1) is correct.
−
p Press [VCR/TV] to change to VCR mode.
16
p The TV isn’t compatible with progressive signals. Press and hold [w]
and [] on the main unit for about 5 seconds. The setting will change to
interlace.
−
p When connecting with component video cables to a television, check if
there is also an HDMI cable connected to an amplifier. If so, turn off the
equipment connected with an HDMI cable and set the “HDMI Priority” to
“Off” in the Setup menu.
65
p To output video from a device connected with an HDMI cable, set “HDMI
Priority” to “On” in the Setup menu.
65
p Picture may not be seen when more than 4 devices are connected with
HDMI cables.
Reduce the number of connected devices.
−
Status messages do not appear.
p Select “Automatic” in “Status Messages” in the Setup menu.
62
The black or gray background does
not appear.
p Select “On” in “Black Background (Analog)” in the Setup menu.
62
The 4:3 aspect ratio picture expands p If you connect an HDMI cable, set “HDMI Output Display Aspect” in the
left and right.
Setup menu to “Normal”.
Screen size is wrong.
p Check the settings for “TV Aspect”, “4:3 TV settings for DVD-Video”, or “4:3
TV settings for DVD-RAM” in the Setup menu.
65
There is a lot of after-images when
playing video.
p Set “DNR” in the Video menu to “Off”.
51
When playing DVD-Video using
progressive output, one part of the
picture momentarily appears to be
doubled up.
p This problem is caused by the editing method or material used on
DVD-Video, but should be corrected if you use interlaced output.
51
p When you use the HDMI AV OUT terminal for video output, follow the steps
below:
(1) Connect this unit to the TV with any cable except the HDMI cable.
(2) Set “HDMI Priority” in the Setup menu to “Off” ( 65).
(3) Set “Component Output Signal” in the Setup menu to “480i” ( 64).
−
There is no apparent change
in picture quality when making
adjustments in the Video menu
using the on-screen menus.
p The effect cannot be seen with certain types of video.
−
64
Reference
Playback Issues
85
RQT9056
Troubleshooting Guide
Playback Issues
No sound.
Low volume.
Distorted sound.
Cannot hear the desired
audio type.
Sound
p Check the connections and the “Digital Audio Output” settings. Check the
input mode on the amplifier if you have connected one.
86
RQT9056
61, 72
p Check if TV is muted.
−
p Check if amplifier is muted.
−
p Press [AUDIO] to select the audio.
Cannot switch audio.
Page
31, 38
p Sound is not output while fast-forwarding during chasing playback and
simultaneous record and playback.
−
p Set “V. Surround Sound” in the Audio menu to “Off” in the following cases:
– When using discs that do not have surround sound effects, such as
Karaoke discs
– When playing analog multilingual broadcast recordings
51
p The sound effects will not work when the bitstream signal is output from the
HDMI AV OUT terminal or the DIGITAL AUDIO OUT terminal.
−
p Audio may not be output due to how files were created. (DivX)
−
p Audio may not be heard when more than 4 devices are connected with
HDMI cables. Reduce the number of connected devices.
−
p When the DIGITAL AUDIO OUT terminal is used for audio output and the
unit is connected to the television with an HDMI cable, set “HDMI Audio
Output” to “Off” in the Setup menu.
66
p Depending on the connected equipment, the sound may be distorted if this
unit is connected with an HDMI cable.
−
p You cannot change the audio type when a DVD-R, DVD-R DL, DVD-RW
(DVD-Video format), +R, +R DL, or +RW disc is in the disc tray.
−
p You cannot change the audio type when playing a recording of an analog
multilingual broadcast on a DVD-R, DVD-R DL, DVD-RW (DVD-Video
format), +R, +R DL or +RW disc. You can select “Main” or “Secondary Audio
Program (SAP)” in “Multi-channel TV Sound (Analog)” in the Setup menu
before recording.
23, 25,
61
p Only one language channel is recorded from digital multilingual broadcasts,
so you will be unable to change languages during playback.
25
p You have used a digital connection. Set “Dolby Digital” to “PCM” or connect
using an audio cable (analog connection).
61, 72
p There are discs whose audio cannot be changed due to how the disc was
created.
−
Operation
Play fails to start even when
[ PLAY] is pressed.
Play starts but then stops
immediately.
p Insert the disc correctly with the label facing up.
p Ensure disc is for the correct DVD-Video region number, and is not
defective.
p The disc is dirty.
p You tried to play a blank disc or a disc that is unplayable on the unit.
Page
15
Cover
75
74, 75,
76
p When recording to DVD-RAM using EP (8H) mode, play may not be
possible on DVD players that are compatible with DVD-RAM. In this case
use EP (6H) mode.
60
p You cannot play discs during DV Camcorder recording.
−
p If playing DivX VOD content, refer to the homepage where you purchased
it. (DivX)
36
p This occurs between playlist chapters.
−
p This occurs as scenes change during Quick View.
−
p [-R]DL] [+R]DL] Images and audio may be interrupted momentarily when
play reaches the point where the recording passed from the first layer to
the second.
23
DVD-Video is not played.
p You have set a ratings level to limit DVD-Video play. Change this setting.
59
Alternative soundtrack and subtitles
cannot be selected.
p The languages are not recorded on the disc.
−
p You may have to use the disc’s own menus to select languages and audio
tracks.
30
No subtitles.
p When progressive output is on, TV’s closed captions cannot be displayed.
Go to the Setup menu and turn this unit’s closed captions on.
63
p If connecting with the DVD/VHS COMMON output terminals, closed
caption cannot be displayed by this unit while playing tape. Make the
settings and display on a TV that supports Closed Captioning.
−
Audio and video momentarily
pause.
p Subtitles are not recorded on the disc.
−
p Set “Subtitle” in the Disc menu to “On”.
50
Angle cannot be changed.
p This function depends on software availability. Angles can only be
changed during scenes where different angles are recorded.
−
You have forgotten your ratings
password.
p With the tray open, press and hold [q REC] and [] on the main unit
simultaneously for about 5 or more seconds.
81
Quick View does not work.
p This does not work when audio is other than Dolby Digital.
−
p This does not work while recording in XP or FR mode.
−
p Memorized positions are canceled when the unit is turned off or when the
tray is opened.
−
p This function does not work when playing DivX VOD content.
36
It takes time before play starts.
p This is normal on DivX video. (DivX)
−
Picture stops.
p Picture may stop if the DivX files are greater than 2 GB. (DivX)
−
Cannot see the beginning of the
recording played.
p (If you connected this unit to an “HDAVI Control” compatible TV with an
HDMI cable) When [ PLAY] is pressed on this unit’s remote control
to start play, you may not be able to see the beginning of the recording
played until the picture is displayed on the TV. Using [] or [], return
to the beginning of the recording.
−
The resume play function
does not work.
Reference
Playback Issues
87
RQT9056
Troubleshooting Guide
Playback Issues
VHS
Page
On-screen display indicators for
video cassette playback do not
appear.
p Select “Automatic” in “Status Messages” in the Setup menu.
– Press [STATUS] to show the on-screen display indicators for video
cassette playback.
– The on-screen indicator for video cassette playback will not be displayed
when this unit is connected to the TV with the DVD PRIORITY output
terminals or HDMI AV OUT terminal.
The gray background appears
during playback.
p You are playing a blank or poor quality portion of the tape.
−
p You can damage the unit if you play dirty or damaged tapes and this can
cause the gray background to appear.
−
Cannot hear the desired audio type.
p Press [AUDIO] to select the audio.
38
There is noise when playing a video
tape.
p Adjust the tracking.
38
p The tape is old or damaged.
−
Cannot play.
p Tapes recorded under a TV system other than NTSC (PAL, SECAM, etc.)
cannot be played.
−
The playback screen flickers.
p The video head is dirty.
3
p The tape is old or damaged.
−
Recording Issues
39, 62
DVD Recording/Scheduled Recording/Copying/External Input
Page
Cannot record.
88
RQT9056
p You haven’t inserted a disc or the disc you inserted cannot be recorded on.
Insert a disc the unit can record onto.
74
p [RAM] [-RW‹V›] [+RW] The disc is unformatted. Format the disc.
53
p The write-protect tab on the cartridge is set to “PROTECT” or the disc is
protected with the “DVD Management” settings.
52
p Some programs have limitations on the number of times they can be
recorded (CPRM).
23, 74,
91
p The disc is full or nearly full. Delete unneeded recordings or use another
disc.
22, 43,
53
p You cannot record on finalized DVD-R, DVD-R DL, DVD-RW (DVD-Video
format), +R, +R DL, or DVD-RW (DVD Video Recording format) discs.
−
p If you repeatedly insert discs or turn the unit on and off about 50 times or
more, the recording or editing of DVD-R, DVD-R DL, DVD-RW (DVD-Video
format), +R, +R DL, and +RW discs may be disabled.
−
p A DVD-R, DVD-R DL, DVD-RW (DVD-Video format), +R, +R DL, or +RW
disc recorded on the unit may not be recordable on other Panasonic DVD
recorders.
−
p The broadcast you are trying to record is copy-protected.
−
Recording Issues
DVD Recording/Scheduled Recording/Copying/External Input (continued)
Page
Recording does not stop even when
[w STOP] is pressed.
p If you start recording immediately after turning on the unit while “Quick
Start” is set to “On”, you cannot stop recording for a few seconds.
58
Scheduled recording does not work
properly.
p The scheduled recording program is incorrect or different scheduled
recording times overlap. Correct the program.
27
p The clock is not correct. Set the clock.
19, 27
57
The scheduled recording program
remains even after recording
finishes.
p The scheduled recording program remains if set to daily or weekly.
Part or all of a recording has been
lost.
p If the power shuts down or the plug is disconnected from the household AC
outlet while recording or editing, the program may be lost or the disc may
become unusable. We cannot offer any guarantee regarding lost recordings
or discs. You will have to format the disc ([RAM] [-RW‹V›] [+RW]) or use a new
disc.
−
Cannot copy VHS to DVD.
p The write-protect tab on the cartridge is set to “PROTECT” or the disc is
protected with the “DVD Management” settings.
52
p Some video tapes on the market (including rental videos) are copyprotected to prevent illegal reproductions. Copy-protected video tapes
cannot be properly recorded.
−
p You cannot use the copying function when the FUNCTIONS window, the
Scheduled Recording List screen, etc. are displayed.
−
p A video cassette without the accidental erasure prevention tab is inserted.
Use a video cassette with an accidental erasure prevention tab.
−
p Some DVDs on the market (including rental DVD) are copy-protected to
prevent illegal reproductions. Copy-protected DVDs cannot be properly
recorded.
−
p You cannot use the copying function when the FUNCTIONS window, the
Scheduled Recording List screen, etc. are displayed.
−
The sound level after editing is not
equal on DVD and on VHS.
p The sound level on DVD and VHS may not match depending on the disc.
When the sound level in a particular part of the sound source is soft or
loud, the sound may be recorded loudly or softly on a video tape.
−
Stripe-shaped black noise is
recorded.
p An external playback device is interfering with the TV because the device is
too close to the TV. Move the device away from the TV.
−
Cannot record video or sound from
the external device.
p The external device is not correctly connected.
p The proper external input channel (IN1, IN2, or DV) is not selected. Press
[INPUT SELECT] to change.
28
The DV Camcorder recording
function does not work.
p If images cannot be recorded or if the recording is aborted, check the
connections and the DV equipment settings.
29
p You cannot start recording until the images from the DV equipment appear
on the television.
−
p Recording may not be performed as desired if the time codes on the tape in
the DV equipment are not successive.
−
p Depending on the equipment, the DV Camcorder recording may not
operate properly.
−
p You can only record audio/video images on a DV tape.
−
Cannot copy DVD to VHS.
19, 27
28, 29
Reference
p The unit is not on scheduled recording standby. (“&” on the unit’s display
is not on.) Press [¦ DVD/VHS POWER] to turn the unit off and make sure
that “&” is on.
89
RQT9056
Troubleshooting Guide
Recording Issues
VHS Recording
Page
“ ” flashes when I try to start
recording.
p A video cassette is not inserted. Insert a video cassette with an accidental
erasure prevention tab.
15
Cannot record.
p The accidental erasure prevention tab has been removed. Cover the hole
with adhesive tape.
15
Cannot record a TV program.
p Digital broadcasts cannot be recorded to video tape.
−
Editing Issues
DVD & SD
p The disc is dirty. Wipe with a damp cloth and then wipe dry.
Cannot format.
Page
75
p Disc may be defective or of poor quality.
−
p You tried formatting a disc that is not compatible with the unit.
53
p [+RW] Discs created on a computer may not be formatted.
−
Cannot create chapters.
p The unit writes the chapter division information to the disc when you turn it
off or remove the disc.
The information is not written if there is an interruption in the power.
−
p These operations are not possible with still pictures.
−
Cannot delete chapters.
p When the chapter is too short to delete, use “Combine Chapters” to make
the chapter longer [RAM].
45
The available recording time
doesn’t increase even after deleting
recordings on the disc.
p Available space on DVD-R, DVD-R DL, +R, or +R DL does not increase
even after deleting previous recordings.
−
p Available space on DVD-RW (DVD-Video format) or +RW increases when
you delete the last recording.
−
Editing Issues
Still Pictures
Page
Cannot display the Direct Navigator
screen.
p This screen cannot be displayed while recording or copying.
−
Cannot edit or format a card.
p Release the card’s protection setting. With some cards, the “Write
Protection Off” message sometimes appears on the screen even when
protection has been set.
52
The contents of the card cannot be
read.
p The card format is not compatible with the unit. The contents on the card
may be damaged.
73
p Format using FAT 12, FAT 16 or FAT 32 with other equipment or format the
card with this unit.
53
p The card contains a folder structure and/or file extensions that are not
compatible with this unit.
76
p Turn off and then turn on the unit again.
−
p SD Memory Cards (from 8 MB to 2 GB) or SDHC Memory Card (4 GB,
8 GB, 16 GB) can be used with this unit.
−
p When there are a lot of folders and files, it may sometimes take a few hours.
−
p When repeating copying or deleting, it may sometimes take a long time.
Format the disc or card.
53
Copying, deleting, and setting
protection take a long time.
90
RQT9056
Glossary
Bitstream
HDMI (High-Definition Multimedia Interface)
This is a signal compressed and converted into digital form. It is
converted back to a multi-channel audio signal, e.g., 5.1-channel, by a
decoder.
Unlike conventional connections, it transmits uncompressed digital
video and audio signals on a single cable. This unit supports highdefinition video output (720p, 1080i and 1080p) from HDMI AV OUT
terminal. To enjoy high-definition video a high definition compatible
television is required.
CPRM is technology used to protect broadcasts that are allowed to
be recorded only once. Such broadcasts can be recorded only with
CPRM-compatible recorders and discs.
JPEG (Joint Photographic Experts Group)
A decoder restores the coded audio signals on DVDs to normal. This is
called decoding.
This is a system used for compressing/decoding color still pictures. If
you select JPEG as the storage system on digital cameras, etc., the
data will be compressed to 1/10-1/100 of its original size. The benefit of
JPEG is less deterioration in picture quality considering the degree of
compression.
DivX
MP3 (MPEG Audio Layer 3)
Decoder
A video compression format developed by DivX, Inc. that compresses
video files without any considerable loss of video quality.
Dolby Digital
This is a method of coding digital signals developed by Dolby
Laboratories. Apart from stereo (2-channel) audio, these signals can
also be multi-channel audio. A large amount of audio information can
be recorded on one disc using this method.
Down-mixing
This is the process of remixing the multi-channel audio found on some
discs into two channels. It is useful when you want to listen to the 5.1channel audio recorded on DVDs through your TV’s speakers. Some
discs prohibit down-mixing. If this is the case, this unit can only output
the front two channels.
An audio compression method that compresses audio to approximately
one-tenth of its size without any significant loss of audio quality.
Pan & Scan/Letterbox
In general, DVD-Video are produced with the intention that they will be
viewed on a widescreen TV (16:9 aspect ratio), so images often don’t
fit regular TVs (4:3 aspect ratio). 2 styles of picture, “Pan & Scan” and
“Letterbox”, deal with this problem.
Pan & Scan:
The sides are cut off so the picture
fills the screen.
Letterbox:
Black bands appear at the top and
bottom of the picture so the picture
itself appears in an aspect ratio of
16:9.
DTS (Digital Theater Systems)
This surround system is used in many movie theaters. There is good
separation between the channels, so realistic sound effects are
possible.
Dynamic range
Dynamic range is the difference between the lowest level of sound that
can be heard above the noise of the equipment and the highest level
of sound before distortion occurs. Dynamic range compression means
reducing the gap between the loudest and softest sounds. This means
you can hear dialog clearly at low volume.
Film and Video
DVD-Video are recorded using either film or video. The unit can
determine which type has been used, then uses the most suitable
method of progressive output.
Film is 24 or 30 frames per second, with motion picture film generally
being 24 frames per second.
Video is 60 fields per second (2 fields making up 1 frame).
Finalize
A process that makes play of a recorded CD-R, CD-RW, DVD-R, etc.
possible on equipment that can play such media. You can finalize DVDR, DVD-R DL, DVD-RW (DVD-Video format), +R, and +R DL on the
unit. After finalizing, the disc becomes play-only and you can no longer
record or edit. However, finalized DVD-RW can be formatted to become
recordable.
Folder
This is a place on the memory card where groups of data are stored
together. In the case of this unit, it refers to the place where still
pictures (JPEG) are stored.
Formatting
Formatting is the process of making media such as DVD-RAM
recordable on recording equipment.
You can format DVD-RAM, DVD-RW (only as DVD-Video format), +RW
and SD Card on this unit.
Formatting irrevocably erases all contents.
Frame and field
Frame refers to the single images that constitute the video you see on
your TV. Each frame consists of 2 fields.
W
Frame
Progressive/Interlace
NTSC, the video signal standard, has 480 interlaced (i) scan lines,
whereas progressive scanning uses twice the number of scan lines.
This is called 480p.
Using progressive output, you can enjoy the high-resolution video
recorded on media such as DVD-Video.
Your TV must be compatible to enjoy progressive video.
Protection
You can prevent accidental erasure by setting writing protection or
erasure protection.
Sampling frequency
Sampling is the process of converting the heights of sound wave
(analog signal) samples taken at set periods into digits (digital
encoding). Sampling frequency is the number of samples taken per
second, so larger numbers mean more faithful reproduction of the
original sound.
Thumbnail
This refers to a miniature representation of a picture used to display
multiple pictures in the form of a matrix.
1080i
In one high definition image, 1080 alternating scan lines pass every
1/60th of a second to create an interlace image. Because 1080i more
than doubles current television broadcasts of 480i, the detail is much
clearer and creates a more realistic and rich image.
1080p
In one high definition image, 1080 scan lines pass at the same
time every 1/60th of a second to create a progressive image. Since
progressive video does not alternate scan lines like interlace, there is a
minimal amount of screen flicker.
720p
In one high definition image, 720 scan lines pass at the same
time every 1/60th of a second to create a progressive image. Since
progressive video does not alternate scan lines like interlace, there is a
minimal amount of screen flicker.
Reference
CPRM (Content Protection for Recordable Media)
T
Field
Field
pA frame still shows 2 fields, so there may be some blurring between
them, but picture quality is generally better.
pA field still shows less picture information so it may be rougher, but
there is no blurring.
91
RQT9056
Specifications
Power supply:
Power consumption:
Standby mode: (Shipping Condition)
(User Setting: Quick Start: ON)
AC 120 V, 60 Hz
Approx. 40 W
Approx. 3.5 W
Approx. 17.6 W
Recordable discs:
DVD-RAM: 2X SPEED (Ver. 2.0)
2−3X SPEED (Ver. 2.1)
2−5X SPEED (Ver. 2.2)
DVD-R (SL): 1X SPEED (Ver. 2.0)
1−4X SPEED (Ver. 2.0)
1−8X SPEED (Ver. 2.0)
1−16X SPEED (Ver. 2.1)
DVD-R (DL): 2−4X SPEED (Ver. 3.0)
2−8X SPEED (Ver. 3.0)
DVD-RW:
1X SPEED (Ver. 1.1)
1−2X SPEED (Ver. 1.1)
2−4X SPEED (Ver. 1.2)
2−6X SPEED (Ver. 1.2)
+R (SL): 2.4X SPEED (Ver. 1.0)
2.4−4X SPEED (Ver. 1.1)
2.4−8X SPEED (Ver. 1.2)
2.4−16X SPEED (Ver. 1.3)
+R (DL): 2.4X SPEED (Ver. 1.0)
2.4−8X SPEED (Ver. 1.1)
+RW:
2.4X SPEED (Ver. 1.1)
2.4−4X SPEED (Ver. 1.2)
Recording system:
DVD-RAM: DVD Video Recording format
DVD-R:
DVD-Video format
DVD-R DL (Dual Layer):
DVD-Video format
DVD-RW:
DVD-Video format
+R
+R DL (Double Layer)
+RW
Recording time:
Max. 8 hours (using 4.7 GB disc)
XP: Approx. 1 hour
LP: Approx. 4 hours
SP: Approx. 2 hours
EP: Approx. 6 hours or
8 hours
Playable discs:
DVD-RAM: DVD Video Recording format
DVD-R:
DVD-Video format, MP3, JPEG, DivX
DVD-R DL (Dual Layer):
DVD-Video format, MP3, JPEG, DivX
DVD-RW:
DVD Video Recording format, DVD-Video format
+R
+R DL (Double Layer)
+RW
DVD-Video, CD-Audio (CD-DA)
CD-R/CD-RW (CD-DA, MP3, JPEG, DivX)
Optical pick-up:
System with 1 lens, 2 integration units
(662 nm wavelength for DVDs, 780 nm wavelength for CDs)
LASER Specification:
Class I LASER Product
Wave Length:
Laser Power:
780 nm (CDs)
662 nm (DVDs)
No hazardous radiation
is emitted with the safety
protection
Television system:
TV system: NTSC system, 525 lines, 60 fields
Antenna reception input:
Analog TV Channel: 2 ch to 69 ch
Analog CATV Channel: 1 ch to 135 ch
Digital TV Channel:
2 ch to 69 ch
Digital CATV Channel: 1 ch to 135 ch
RF converter output:
Provide 3 ch or 4 ch
92
RQT9056
Quick Start for Recording
1 Sec. Quick Start for Recording on DVD-RAMa
a
From the power off state, recording on DVD-RAM starts
about 1 second after first pressing the Power button and then
sequentially pressing the REC button (Quick Start Mode).
Video system:
Recording system: (for DVD)
MPEG2 (Hybrid VBR)
Input:
LINE (pin jack) M2
S connector M2
Y:
C:
1.0 Vp-p; 75 J
1.0 Vp-p; 75 J
0.286 Vp-p; 75 J
Output: (for DVD PRIORITY 1)
LINE (pin jack) M2
S connector M1
1.0 Vp-p; 75 J
Y:
1.0 Vp-p; 75 J
C:
0.286 Vp-p; 75 J
Component video output: (for DVD PRIORITY)
Y:
Y, PB, PR M1
1.0 Vp-p; 75 J
(480i/480p/720p/1080i)
PB: 0.7 Vp-p; 75 J
PR: 0.7 Vp-p; 75 J
Audio system:
Recording system: (for DVD)
Dolby Digital (2 ch)
Analog Input:
LINE (pin jack) M2
Reference input: 309 mVrms
FS: 2 Vrms (1 kHz, 0 dB)
Input impedance: 22 kJ
Analog Output: (for DVD PRIORITY 1)
LINE (pin jack) M2
Reference output: 309 mVrms
FS: 2 Vrms (1 kHz, 0 dB)
Output impedance: 1 kJ
(Load impedance: 10 kJ)
Number of channels: (for DVD)
Recording: 2 channels
Playback: 2 channels
Number of track: (for VHS)
HiFi: 2 track
Normal: 1 track
Digital Output: (for DVD PRIORITY)
Digital audio optical output connector M1
(PCM, Dolby Digital, DTS)
VHS:
Recording format:
VHS Video Cassette System Standard with FM audio
Heads:
4 Helical Scan Heads for Video
2 Helical Scan Heads for FM audio
1 Fixed Head for Normal audio
Tape speed/Recording time:
SP: 33.35 mm/s, 120 min (with T-120 cassette)
EP: 11.12 mm/s, 360 min (with T-120 cassette)
FF/REW time: FF/REW: Approx. 60 s (with T-120 cassette)
Jet REW: Approx. 43 s (with T-120 cassette)
HDMI Output: 19 Pin type A M1
HDMI:
480i/480p/720p/1080i/1080p
pThis unit supports “HDAVI Control 3” function.
DV Input:
IEEE 1394 Standard, 4 Pin M1
USB Port:
Type A M1
SD Card Slot: SD Memory Card Slot: M1
Compatible media:
SD Memory Carda
a
Includes SDHC compatible card (Class is not
supported.) and miniSD Cards (A miniSD Adaptor
needs to be inserted.)
Format:
FAT12, FAT16a (In case of SD Memory Card)
FAT32a (In case of SDHC Memory Card)
a
Long file name is unsupported.
Still Picture (JPEG)
Image File Format: JPEG conforming DCF (Design rule for
Camera File system) Sub sampling 4:2:2, 4:2:0
Number of pixels:
34 M34 to 6144 M4096
Regional Code: # 1
Clock unit:
Quartz-controlled 12-hour digital display
Operating temperature range:
5 QC to 40 QC (41 QF to 104 QF)
Operating humidity range:
35 % to 80 % RH (no condensation)
Dimensions (W M H M D):
430 mm M 84 mm M 345 mm
[1615/16S M 35/16S M 135/8S]
Mass (Weight): Approx. 5.4 kg (11.90 lbs)
p Specifications are subject to change without notice.
p Useable capacity will be less (SD Card).
Product Service
1. Damage requiring service−The unit should be serviced by
qualified service personnel if:
(a) The AC power supply cord or AC adaptor has been
damaged; or
(b) Objects or liquids have gotten into the unit; or
(c) The unit has been exposed to rain; or
(d) The unit does not operate normally or exhibits a marked
change in performance; or
(e) The unit has been dropped or the cabinet damaged.
2. Servicing−Do not attempt to service the unit beyond that
described in these operating instructions. Refer all other
servicing to authorized servicing personnel.
3. Replacement parts−When parts need replacing ensure the
servicer uses parts specified by the manufacturer or parts
that have the same characteristics as the original parts.
Unauthorized substitutes may result in fire, electric shock, or
other hazards.
4. Safety check−After repairs or service, ask the servicer to
perform safety checks to confirm that the unit is in proper
working condition.
Product information
The model number and serial number of this product can be
found on either the back or the bottom of the unit.
Please note them in the space provided below and keep for
future reference.
MODEL NUMBER
SERIAL NUMBER
User memo:
DATE OF PURCHASE
DEALER NAME
DEALER ADDRESS
TELEPHONE NUMBER
For product information or assistance with product operation:
In the U.S.A., refer to “Customer Services Directory” on
page 94.
In Canada, contact the Panasonic Canada Inc. Customer
Care Centre at 1-800-561-5505, or visit the website (www.
panasonic.ca), or an authorized Servicentre closest to you.
Manufactured under license from Dolby Laboratories.
Dolby and the double-D symbol are trademarks of Dolby
Laboratories.
“DTS” is a registered trademark of DTS, Inc. and “DTS 2.0+Digital
Out” is a trademark of DTS, Inc.
U.S. Patent Nos. 6,836,549; 6,381,747; 7,050,698; 6,516,132; and
5,583,936.
This product incorporates copyright protection technology that is
protected by U.S. patents and other intellectual property rights.
Use of this copyright protection technology must be authorized by
Macrovision, and is intended for home and other limited viewing
uses only unless otherwise authorized by Macrovision. Reverse
engineering or disassembly is prohibited.
HDMI, the HDMI logo and High-Definition Multimedia Interface are
trademarks or registered trademarks of HDMI Licensing LLC.
HDAVI Control™ is a trademark of Matsushita Electric Industrial
Co., Ltd.
EZ Sync™ is a trademark of Matsushita Electric Industrial
Co., Ltd.
VIERA LinkTM is a trademark of Matsushita Electric Industrial Co.,
Ltd.
pSDHC Logo is a trademark.
pPortions of this product are protected under copyright law and are
provided under license by ARIS/SOLANA/4C.
Official DivX® Certified product.
Plays all versions of DivX® video (including DivX®6) with standard
playback of DivX® media files.
Reference
DivX, DivX Certified, and associated logos are trademarks of
DivX, Inc. and are used under license.
93
RQT9056
Limited Warranty (ONLY FOR U.S.A.)
Panasonic Puerto Rico, Inc.
Ave. 65 de Infantería, Km. 9.5
San Gabriel Industrial Park, Carolina, Puerto Rico 00985
Panasonic Consumer Electronics Company,
Division of Panasonic Corporation of North America
One Panasonic Way Secaucus, New Jersey 07094
Panasonic DVD Recorder
Limited Warranty
Limited Warranty Coverage
If your product does not work properly because of a defect in materials or workmanship,
Panasonic Consumer Electronics Company or Panasonic Puerto Rico, Inc. (collectively
referred to as “the warrantor”) will, for the length of the period indicated on the chart below,
which starts with the date of original purchase (“warranty period”), at its option either (a)
repair your product with new or refurbished parts, or (b) replace it with a new or a refurbished
product. The decision to repair or replace will be made by the warrantor.
Product or Part Name
DVD Recorder
Rechargeable Batteries,
DVD-RAM Disc (in
exchange for defective
item)
Parts
Labor
One (1) Year
One (1) Year
Ten (10) Days
Not Applicable
During the “Labor” warranty period there will be no charge for labor. During the “Parts”
warranty period, there will be no charge for parts. You must carry-in or mail-in your product
during the warranty period. If non-rechargeable batteries are included, they are not
warranted. This warranty only applies to products purchased and serviced in the United
States or Puerto Rico. This warranty is extended only to the original purchaser of a new
product which was not sold “as is”. A purchase receipt or other proof of the original purchase
date is required for warranty service.
Carry-In or Mail-In Service
For Carry-In or Mail-In Service in the United States call 1-800-211-PANA (7262) or visit
Panasonic Web Site: http://www.panasonic.com
For assistance in Puerto Rico call Panasonic Puerto Rico, Inc. (787)-750-4300 or fax
(787)-768-2910.
Limited Warranty Limits And Exclusions
This warranty ONLY COVERS failures due to defects in materials or workmanship, and
DOES NOT COVER normal wear and tear or cosmetic damage. The warranty ALSO
DOES NOT COVER damages which occurred in shipment, or failures which are caused
by products not supplied by the warrantor, or failures which result from accidents, misuse,
abuse, neglect, mishandling, misapplication, alteration, faulty installation, set-up adjustments,
misadjustment of consumer controls, improper maintenance, power line surge, lightning
damage, modification, or commercial use (such as in a hotel, office, restaurant, or other
business), rental use of the product, service by anyone other than a Factory Servicenter or
other Authorized Servicer, or damage that is attributable to acts of God.
THERE ARE NO EXPRESS WARRANTIES EXCEPT AS LISTED UNDER
“LIMITED WARRANTY COVERAGE”. THE WARRANTOR IS NOT LIABLE
FOR INCIDENTAL OR CONSEQUENTIAL DAMAGES RESULTING FROM
THE USE OF THIS PRODUCT, OR ARISING OUT OF ANY BREACH OF THIS
WARRANTY. (As examples, this excludes damages for lost time, travel to and
from the servicer, loss of media or images, data or other recorded content. The
items listed are not exclusive, but are for illustration only.)
ALL EXPRESS AND IMPLIED WARRANTIES, INCLUDING THE WARRANTY
OF MERCHANTABILITY, ARE LIMITED TO THE PERIOD OF THE LIMITED
WARRANTY.
Some states do not allow the exclusion or limitation of incidental or
consequential damages, or limitations on how long an implied warranty lasts, so
the exclusions may not apply to you.
This warranty gives you specific legal rights and you may also have other rights
which vary from state to state. If a problem with this product develops during
or after the warranty period, you may contact your dealer or Servicenter. If
the problem is not handled to your satisfaction, then write to the warrantor’s
Consumer Affairs Department at the addresses listed for the warrantor.
PARTS AND SERVICE WHICH ARE NOT COVERED BY THIS LIMITED
WARRANTY ARE YOUR RESPONSIBILITY.
Customer Services Directory
Obtain Product Information and Operating Assistance; locate your nearest Dealer or Servicenter; purchase Parts and
Accessories; or make Customer Service and Literature requests by visiting our Web Site at:
http://www.panasonic.com/consumersupport
or, contact us via the web at:
http://www.panasonic.com/contactinfo
You may also contact us directly at:
1-800-211-PANA (7262),
Monday-Friday 9 am-9 pm; Saturday-Sunday 10 am-7 pm, EST.
For hearing or speech impaired TTY users, TTY : 1-877-833-8855
Accessory Purchases
Purchase Parts, Accessories and Instruction Books online for all Panasonic Products by visiting our Web Site at:
http://www.pstc.panasonic.com
or, send your request by E-mail to:
[email protected]
You may also contact us directly at:
1-800-332-5368 (Phone) 1-800-237-9080 (Fax Only) (Monday – Friday 9 am to 9 pm, EST.)
Panasonic Service and Technology Company
20421 84th Avenue South, Kent, WA 98032
(We Accept Visa, MasterCard, Discover Card, American Express, and Personal Checks)
For hearing or speech impaired TTY users, TTY : 1-866-605-1277
Service in Puerto Rico
Panasonic Puerto Rico, Inc.
Ave. 65 de Infantería, Km. 9.5, San Gabriel Industrial Park, Carolina, Puerto Rico 00985
Phone (787)750-4300, Fax (787)768-2910
As of January 2007
94
RQT9056
Limited Warranty (ONLY FOR CANADA)
Panasonic Canada Inc.
PANASONIC PRODUCTLLIMITED WARRANTY
Panasonic Canada Inc. warrants this product to be free from defects in material and workmanship and agrees to remedy any such defect for a
period as stated below from the date of original purchase.
Technics Audio Product
Panasonic Portable/Clock Radio (without Tape, CD, MD)
Panasonic Audio/SD Audio Product
Panasonic DVD Product
Panasonic Combination DVD Player/VCR
Panasonic Combination DVD Recorder/VCR
Accessories including rechargeable batteries
One (1) year, parts and labour
One (1) year, parts and labour
One (1) year, parts and labour
One (1) year, parts and labour
One (1) year, parts and labour
One (1) year, parts and labour
Ninety (90) days
LIMITATIONS AND EXCLUSIONS
This warranty does not apply to products purchased outside Canada or to any product which has been improperly installed, subjected to usage
for which the product was not designed, misused or abused, damaged during shipping, or which has been altered or repaired in any way that
affects the reliability or detracts from the performance, nor does it cover any product which is used commercially. Dry cell batteries are also
excluded from coverage under this warranty.
This warranty is extended to the original end user purchaser only. A purchase receipt or other proof of date of original purchase is required before
warranty service is performed.
THIS EXPRESS, LIMITED WARRANTY IS IN LIEU OF ALL OTHER WARRANTIES, EXPRESS OR IMPLIED, INCLUDING ANY IMPLIED
WARRANTIES OF MERCHANTABILITY AND FITNESS FOR A PARTICULAR PURPOSE.
IN NO EVENT WILL PANASONIC CANADA INC. BE LIABLE FOR ANY SPECIAL, INDIRECT OR CONSEQUENTIAL DAMAGES.
In certain instances, some jurisdictions do not allow the exclusion or limitation of incidental or consequential damages, or the exclusion of implied
warranties, so the above limitations and exclusions may not be applicable.
WARRANTY SERVICE
FOR PRODUCT OPERATION ASSISTANCE, please contact:
Our Customer Care Centre:
Telephone #:
1-800 #:
Fax #:
Email link:
(905) 624-5505
1-800-561-5505
(905) 238-2360
“Customer support” on www.panasonic.ca
FOR PRODUCT REPAIRS, please locate your nearest Authorized Servicentre at www.panasonic.ca :
Link : “ServicentresTM locator” under “Customer support”
Reference
IF YOU SHIP THE PRODUCT TO A SERVICENTRE
Carefully pack and send prepaid, adequately insured and preferably in the original carton.
Include details of the defect claimed, and proof of date of original purchase.
95
RQT9056
Referencia rápida en español (Spanish Quick Reference)
Conexión básica
Ajuste de los canales y el reloj
Nota: Puede que los terminales en el panel
trasero de su TV no sean similares a
como se ilustran a continuación. Por favor
consulte las etiquetas de los terminales
con atención para asegurar conexiones
correctas.
DVD/VHS
POWER
– Cuando esta unidad esté conectada
a un televisor Panasonic (VIERA) que
admita señales HDAVI Control 3 y
esté correctamente configurado, éste
automáticamente recopilará la información
de configuración del televisor. Siga los
mensajes que le aparecerán en pantalla.
Conexión a una televisión mediante señal
directa de cable o antena (sin pasar por
receptor de cable ni receptor satelital)
TRACKING/V-LOCK
Panel trasero de la TV
A la toma de
corriente de CA
(CA 120 V, 60Hz)
CH
VHF/UHF
RF IN
AUDIO IN VIDEO
R
L IN
Rojo Blanco Amarillo
paso
paso
4
1
Cable de
la pared o
señal de
antena
para encender el aparato.
paso
paso
3
2
para seleccionar una salida
RF en el canal número.
pConexión (sin cable de audio/
vídeo): Cuando vea la pantalla
delantera de la unidad, seleccione
“CH3” ó “CH4”. Si la selección es
correcta, le aparecerá la ventana
relativa al paso 3.
pConexión (con un cable de audio/vídeo):
Cuando vea la pantalla delantera de la
unidad, seleccione “OFF”.
Rojo Blanco Amarillo
RF
IN
DVD/VHS COMMON OUT
DVD/VHS COMMON
OUT
VIDEO
R-AUDIO-L
R-AUDIO-L
RF
OUT
AC IN
VIDEO
COMPONENT VIDEO OUT
Y
PR
PB
S VIDEO
S VIDEO
AV OUT
VHF / UHF
OPTICAL
R-AUDIO
-L
VIDEO
IN1
R-AUDIO-L
VIDEO
DVD PRIORITY OUT
DIGITAL AUDIO OUT
((PCM/BITSTREAM))
Panel trasero de este aparato
, para
seleccionar el idioma,
y luego OK
Select Language
Seleccione el idioma
Sélection de langue
English
Español
Français
Press OK
wConexión (con un cable de audio/vídeo)
Conéctelo en orden consecutivo del paso al .
pDespués de conectarlo, fije el canal de salida RF en posición “OFF”
( derecha).
wConexión (sin cable de audio/vídeo)
No es necesario que conecte el paso .
pDespués de conectarlo, fije el canal de salida RF en posición “CH3”
ó “CH4” ( derecha).
Para disfrutar de una mejor calidad de imagen
pEl terminal S VIDEO OUT logra una imagen más
viva que la del terminal VIDEO OUT.
(Los resultados reales dependen de la televisión).
pLos terminales COMPONENT VIDEO OUT en este
aparato se pueden utilizar para la salida entrelazada
o progresiva, para proporcionar una imagen más
pura que la del terminal S VIDEO OUT.
pCuando esté conectado a una unidad compatible
con señales HDMI, se transmitirá una señal digital
de audio y vídeo sin comprimir, lo que le permitirá
disfrutar de mayor calidad de imagen y sonido con
solo un cable.
Preparación:
Ponga en marcha el televisor y seleccione la fuente
de imagen adecuada correcta de acuerdo a las
conexiones de la unidad. (Por ejemplo: entrada AV,
CH3 ó CH4.)
96
RQT9056
, para seleccionar la relación
de aspecto de la TV en “TV de
4:3” o en “TV ancho de 16:9”, y
luego OK
pAl conectar a una TV con relación de aspecto 4:3
seleccione “TV de 4:3”.
pAl conectar a una TV con pantalla
panorámica de 16:9
seleccione “TV ancho de 16:9”.
, para seleccionar la función
de inicio rápido “Encendido” u
“Apagado”, luego OK
, para seleccionar si se
recibirá o no señal de TV desde
el terminal RF IN del aparato y
luego OK
–Si selecciona “No”, entonces se muestra
la pantalla “Ajuste manual del reloj” en el
aparato ( 97).
TRACKING/V-LOCK
, para seleccionar el
“Antena” o “Cable”, luego
CH
OK
para seleccionar el canal
deseado.
También puede seleccionar canales con los botones
numéricos.
OK
para iniciar el ajuste
automático de canales/reloj.
Confirmar la hora, luego
OK
–HL (horario de verano) muestra el ajuste para
el horario de verano.
–Huso h. (zona horaria) muestra la diferencia
de hora con la hora del Meridiano de
Greenwich (GMT).
Ajuste automático del reloj
Ajuste del reloj automático terminado.
4/4/2007 11:15 AM
HL----------Huso h.------
pPara introducir directamente los canales para emisiones
análogas y digitales:
Modo Antena:
p.ej.,
“3”:
“13”:
Modo Cable TV:
p.ej.,
“5”:
“15”:
[0] [0] [5] [OK]
[0] [1] [5] [OK]
pPara introducir el número de canal inferior para una emisión
digital:
Modo Antena:
p.ej.,
“3-1”:
“13-1”:
Modo Cable TV:
p.ej.,
“1-1”:
“15-1”:
[3] [−] [1] [OK]
[1] [3] [1] [OK]
[1] [−] [1] [OK]
[1] [5] [−] [1] [OK]
Act.
HHC
Reproducción de discos o videocasetes
OK
Consejos prácticos
Cuando la pantalla “Ajuste manual del reloj” se muestra
1. Oprima [,] para seleccionar la opción que desee modificar y
oprima [, ] para cambiar el ajuste.
2. Oprima [OK].
El reloj se pone en funcionamiento.
Cómo ver un programa de televisión
[RAM] [-R] [-R]DL] [-RW‹V›] [+R] [+R]DL] [+RW] [DVD-V]
[-RW‹VR›] [CD] [VHS]
DVD/VHS
POWER
DRIVE
SELECT
DVD/VHS
POWER
[0] [3] [OK]
[1] [3] [OK]
para encender el aparato.
Si ha conectado la unidad y el televisor sin un cable de
audio/vídeo o sin cable HDMI.
para encender el aparato.
para seleccionar el
dispositivo (DVD o VHS).
Inserte un disco o videocasete VHS.
PLAY
para ver el video desde
este aparato.
–El indicador TV en el panel delantero
de este aparato no se ilumina.
–Al oprimir [VCR/TV] de nuevo, el
indicador TV en el panel delantero
de este aparato se iluminará, y
podrá ver la TV directamente sin
tener que pasar la señal a través del
mismo (modo TV).
Consejos prácticos
Detener la reproducción
Oprima [w STOP].
[DVD]
–La posición de detención se memoriza.
–La posición de detención se borrará al pulsar el botón
[w STOP] dos o más veces, o al pulsar [OPEN/CLOSE].
Pausar la reproducción
Oprima [ PAUSE].
–Oprima de nuevo para reiniciar la reproducción.
Español
VCR/TV
Selección de grabaciones para reproducir
[RAM] [-R] [-R]DL] [-RW‹V›] [+R] [+R]DL] [+RW] [-RW‹VR›]
Realice los pasos 1 a 3 de “Reproducción de discos o
videocasetes” ( arriba).
1. Oprima [DIRECT NAVIGATOR].
2. Oprima [, , , ] para seleccionar la grabación que
desea ver, luego oprima [OK].
97
RQT9056
Referencia rápida en español (Spanish Quick Reference)
Grabación de programas de televisión
[RAM] [-R] [-R]DL] [-RW‹V›] [+R] [+R]DL] [+RW] [VHS]
Las emisiones digitales no pueden ser grabadas en
cintas de video.
Preparación:
p[RAM] Si el disco está protegido, libere la protección.
p[VHS] Asegúrese de que la pestaña contra
borradura accidental esté intacta.
pUse un disco o casete VHS con suficiente espacio
en blanco disponible.
DVD/VHS
POWER
DRIVE
SELECT
para encender el aparato.
Grabación programada
[RAM] [-R] [-R]DL] [-RW‹V›] [+R] [+R]DL] [+RW] [VHS]
Las emisiones digitales no pueden ser grabadas en
cintas de video.
Preparación:
p[RAM] Si el disco está protegido, libere la protección.
p[VHS] Asegúrese de que la pestaña contra
borradura accidental esté intacta.
pInserte un disco o casete VHS con suficiente
espacio en blanco disponible.
pConfirme que el reloj en el visualizador del aparato
esté ajustado con la hora correcta.
pSi está conectado vía un receptor de señal de cable
o satelital, ajuste el canal ahí antes de que inicie la
grabación programada.
para seleccionar el
dispositivo (DVD o VHS).
Inserte un disco o videocasete VHS.
, para seleccionar “Nueva
grabación programada”, luego OK
TRACKING/V-LOCK
CH
para seleccionar el canal
deseado.
–Para seleccionar con los botones
numéricos ( 97)
REC MODE
para seleccionar el modo
de grabación.
REC
para comenzar a grabar.
Consejos prácticos
Pausar la grabación
Oprima [ PAUSE].
–Oprima de nuevo para reiniciar la grabación.
, para desplazarse a través
de los elementos, y , para
ajustarlos.
Canal/Entrada
– Emisora de TV/Entrada
externa
Fecha/Frecuencia – Puede ajustar un programa
diario o semanal.
Act. (hora de inicio) / Des. (hora de finalización)
– Mantenga el botón
oprimido para cambiar en
incrementos de 30 minutos.
Unid.
– DVD o VHS
Modo
– Modo de grabación
Nombre (sólo para discos)
– Oprima [OK], para
introducir el texto en la
pantalla de nombre.
GRABACIÓN
PROGRAMADA
Detener la grabación
Oprima [w STOP].
Tiempo grabación restante
Canal/
Entrada
Fecha/
Frecuencia
Act.
4-1
:
VHS 2:00 SP DVD 0:33 XP
5/ 4 Jue
6:11 PM
Des.
Unid. Modo
:
Modo Surf : Todos
Nombre
Canal, Subtítulo
4-1 KPO-SD
Ingrese el canal/Entrada.
Vista preliminar del canal seleccionado
OK
DVD/VHS
POWER
OK
SUB MENU
Suprim.
Número
−Repita los pasos 2 a 4 para programar
otras grabaciones.
cuando haya finalizado los
cambios de programación.
−El indicador “&” se enciende en el
visualizador del aparato.
98
RQT9056
Copiar
Copiar (VHS DVD)
[VHS] [RAM] [-R] [-R]DL] [-RW‹V›] [+R] [+R]DL] [+RW]
Preparación:
p[RAM] Si el disco está protegido, libere la protección.
pInserte un disco con suficiente espacio en blanco
disponible.
pSeleccione el modo de grabación de DVD.
pInserte la cinta VHS que contenga el programa a
ser copiado. Detenga la cinta en el punto desde el
quiera empezar a copiar.
Borrado de grabaciones con el navegador
de borrado (BORRAR Navegador)
Importante: Una vez borrados, los contenidos no podrán recuperarse.
[RAM] [-R] [-R]DL] [-RW‹V›] [+R] [+R]DL] [+RW]
Preparación:
pInserte un disco y oprima [ OPEN/CLOSE] de
nuevo para cerrar la bandeja.
pSi el disco está protegido, libere la protección.
DRIVE
SELECT
para seleccionar el dispositivo DVD.
En el aparato principal
Mientras que tanto el dispositivo de DVD, como
de VHS se encuentran detenidos
Con el aparato sin estar en ejecución
Oprima y mantenga
oprimiendo por alrededor
de 3 segundos.
COPYING
[-R] [-R]DL] [-RW‹V›] [+R] [+R]DL]
REC
para copiar y automáticamente
finalizar al acabar.
−Si oprime [w STOP], puede cancelar
el copiado.
, para seleccionar “Borrar”, y luego
OK
, , , para seleccionar la
grabación, y luego OK
−O−
PLAY
para copiar sin finalizar.
−Si oprime [w STOP], puede
cancelar el copiado.
−La copia se finaliza automáticamente cuando la cinta
alcanza su final o cuando el disco se llena.
Copiar (DVD VHS)
[RAM] [-R] [-R]DL] [-RW‹V›] [-RW‹VR›] [+R] [+R]DL] [+RW]
[VHS]
Preparación:
p[VHS] Asegúrese de que la pestaña contra
borradura accidental esté intacta.
pInserte una cinta VHS con suficiente espacio en
blanco disponible. Detenga la cinta en el punto al
que quiera empezar a copiar.
pSeleccione el modo de grabación de VHS.
pInserte el disco que contenga el programa a ser copiado.
para seleccionar “Borrar”, y luego
OK
Consejos prácticos
Para volver a la pantalla anterior
Oprima [RETURN].
Para ver otras páginas
Oprima [, , , ] para seleccionar “Atrás” o “Avanza” y oprima
[OK].
pTambién puede oprimir [, ] para ver otras páginas.
Edición múltiple
Seleccione con [, , , ] y oprima [PAUSE]. (Repetir.)
pAparece una marca de verificación. Oprima [PAUSE] de nuevo
para cancelar.
Borrar grabaciones durante la reproducción
1. Durante la reproducción, pulse [DELETE].
2. Pulse [] para seleccionar “Borrar”; a continuación, pulse [OK].
En el aparato principal
Oprima y mantenga
oprimiendo por alrededor
de 3 segundos.
Español
COPYING
−La copia automáticamente se detiene
cuando la reproducción del disco
finaliza o cuando la cinta llega al final.
99
RQT9056
Index
Angle .................................................... 50
Audio
attributes............................................ 50
language............................................ 59
receiving, recording ..................... 25, 61
Auto Bilingual Selection ..................... 38
Auto Mode ............................................ 24
Change Thumbnail .............................. 44
Channel
adding, deleting ................................. 55
audio.................................................. 50
captions ............................................. 56
favorite channel ........................... 16, 55
Set Channels Automatically .............. 55
Chasing Playback................................ 26
Cleaning
disc .................................................... 75
lens ...................................................... 3
main unit .............................................. 3
video heads ......................................... 3
Clock Settings ..................................... 57
Closed Caption .................................... 63
CM Skip ................................................ 31
Connection
amplifier, system component ............. 72
antenna ......................................... 8, 81
cable box ............................................. 9
DV IN terminal ................................... 29
external device ............................ 28, 29
HDMI ................................................. 11
satellite receiver ................................ 10
television ................. 8, 9, 10, 11, 70, 71
Copying Recordings ......................20, 21
Copying Still Pictures ......................... 48
CPRM.................................................... 91
Create Chapter ...............................31, 45
Create DVD Top Menu ......................... 54
Delete
album........................................... 47, 49
all recordings ..................................... 53
chapter .............................................. 45
recording ..................................... 22, 43
still picture ................................... 47, 49
Delete Navigator .............................22, 49
Dialog Enhancer .................................. 51
Direct Navigator .............................30, 43
Divide Recording ................................. 44
DivX ...........................................36, 76, 91
DNR ...................................................... 51
DST ....................................................... 13
DV Camcorder recording .................... 29
DVD-RAM, DVD-R, DVD-R DL,
DVD-RW, +R, +R DL, +RW ............... 74
Enter name
album........................................... 42, 47
disc .............................................. 42, 52
recording ..................................... 42, 43
Erasure prevention tab ....................... 15
External Device ..............................28, 29
Finalize ......................................25, 54, 91
Flexible Recording .............................. 26
Format .......................................25, 53, 91
FR (Flexible Recording) Mode............ 24
FUNCTIONS Window ........................... 42
HDAVI Control .................................40, 41
HDMI ....................................11, 65, 72, 91
Jet Rewind ........................................... 37
JPEG..........................................34, 76, 91
Language
code list ............................................. 51
on-screen .......................................... 62
soundtrack ......................................... 50
subtitle ............................................... 50
Menu
DivX ................................................... 36
MP3 ................................................... 33
on-screen .......................................... 50
Pictures ............................................. 34
Setup ................................................. 55
Mode
recording ........................................... 24
still mode ........................................... 60
MP3 ............................................33, 76, 91
Noise reduction (NR)
DNR................................................... 51
Line-in NR ......................................... 51
On-screen
language............................................ 62
menus................................................ 50
status messages ............................... 39
Parental Rating .................................... 56
PCM Down Conversion ....................... 61
Picture .................................................. 51
Playlist.................................................. 32
Progressive.......................................... 91
Properties
playlist ............................................... 32
recording ........................................... 43
still picture ......................................... 35
Protection
album................................................. 47
card ................................................... 52
cartridge ............................................ 52
disc .................................................... 52
recording ........................................... 44
still picture ......................................... 47
Quick Start ........................................... 58
Quick View ........................................... 31
Ratings ................................................. 59
Record
Flexible Recording ............................. 26
from a VCR ........................................ 28
mode ................................................. 24
scheduled .................................... 19, 27
Remaining tape time ........................... 39
Repeat play .....................................38, 50
Restore Default Settings .................... 59
Resume play function ......................... 17
Scheduled recording .....................19, 27
SD Card ...........................................15, 73
Setup menu.......................................... 55
Simultaneous record and playback ... 26
Soundtrack .......................................... 50
Status Messages ................................. 39
Still Pictures
Copying ............................................. 48
edit..................................................... 46
play .................................................... 34
Subtitle ................................................. 50
S-VHS Quasi Playback (SQPB) .......... 38
Thumbnail ............................................ 91
Time Slip .............................................. 31
Tracking................................................ 38
TV aspect ............................................. 64
USB
Copy .................................................. 48
Insert ................................................. 15
Play
DivX ............................................... 36
MP3 ................................................ 33
still picture ...................................... 34
Supported formats............................. 73
VHS settings ........................................ 66
VIERA Link ................................40, 41, 66
VISS ...................................................... 37
VP mode ............................................... 24
V. Surround Sound. ............................. 51
–If you see this symbol–
Information on Disposal in other Countries outside the
European Union
This symbol is only valid in the European Union.
If you wish to discard this product, please contact your
local authorities or dealer and ask for the correct method
of disposal.
This manual was printed with soy based ink.
[For\U.S.A.]
Panasonic Consumer Electronics
Company, Division of Panasonic
Corporation of North America
One Panasonic Way Secaucus,
New Jersey 07094
http://www.panasonic.com
2007 Matsushita Electric Industrial Co., Ltd.
Printed in China
[For\Canada]
Panasonic Puerto Rico, Inc.
Panasonic Canada Inc.
Ave. 65 de Infantería, Km. 9.5
San Gabriel Industrial Park, Carolina,
Puerto Rico 00985
5770 Ambler Drive
Mississauga, Ontario
L4W 2T3
www.panasonic.ca
GI
RQT9056-P
F1207SN0
DVD Connection Guides (This is in English only) http://www.panasonic.com/consumer_electronics/dvd_recorder/dvd_connection.asp
Connecting with an HDMI (High Definition Multimedia Interface) Cable
When connected to an HDMI compatible unit, an uncompressed digital audio and video signal is transmitted,
enabling you to enjoy high quality, digital video and audio with just one cable. When connecting to an HDMIcompatible HDTV (High Definition Television), the output can be switched to 1080p, 1080i or 720p HO video.
• Please use HIGH SPEED HOMI cables that have the HDMIIogo (as shown on the cover of the operating
instructions). It is recommended that you use Panasonic's HDMI cable.
• We recommend connecting to the TV with the OVDNHS COMMON OUT terminals as well.
Cable from the wall/
antenna signal
HDMIIN
INPUT 1
AUDIO IN VIDEO
R
L
IN
Using your TV's
remote control
Preparing the TV
Turn the TV on.
7
Set Quick Start to
"On" or "Off".
Switch input to "AV input"etc.
Turn this unit on.
3
TV
DVDNHS
POWER
(9)(@(@
Select whether to receive
signal from the unit's
RF IN terminal or not.
8 TV
~
• When this unit is connected to a Panasonic
TV (VIERA) supporting HDAVI Control 3
and initially set up, it automatically acquires
the TV setting information. For details,
please refer to page 14 in the Operating
Instructions.
L .-
• If you select "No", you can proceed to
"Set Clock Manually" (~step 10, below).
Select an RF output
4 channel
number.
DO
......
-,.
This unit
,'
~
,t •
9
Select "Antenna" or
"Cable".
Connection (with Audio/
Video cable)
Select "OFF".
Connection (without HDMI
cable or AudioNideo cable)
Select "CH3" or "CH4". If the
selection is appropriate, then the
step 5 screen will appear.
Set "HOMI Priority" and "HDMI Audio Output" to "On" (The default setting is "On".)
(~ page 65,66 in the operating instructions).
For details on the benefits and limitations of different types of connections, please refer to pages 8 to
11, 70 to 72 in the Operating Instructions.
5
Select the language.
What is VIERA Link "HDAVI Control"?
VIERA Link™ is a new name for EZ Sync™.
VIERA Link "HDAVI Control" is a convenient function that offers linked operations of this unit, and a
Panasonic TV (VIERA) or receiver under "HOAVI Control". You can use this function by connecting the
equipment with the HDMI cable.
For details on the benefits of "HDAVI Control", please refer to pages 40 to 41 in the Operating
Instructions.
e
• If you make a mistake, press [RETURN].
6
..
• Press [OK] to start automatic
clock and channel setting.
10
Complete the settings.
• If the correct time is displayed
1\
• To return to the
previous screen
RETURN
• VIERA Link™''HDAVI Control™,,
,
• If the clock setting screen appears.
Select the type of TV
you are using.
• Please refer to "Basic Operations"
(pages 15 to 22) in the operating
instructions.
ENGLISH
DIGITAL TELEVISION TRANSITION
NOTICE
This device contains a digital television tuner, so it should receive digital over the air TV programming,
with a suitable antenna, after the end of full-power analog TV broadcasting in the United States (as
required by law) on February 17, 2009. Some older television receivers, if they rely on a TV antenna, will
need a TV Converter to receive over the air digital programming, but should continue to work as before
for other purposes (e.g., for watching low-power TV stations still broadcasting in analog, watching prerecorded movies, or playing video games). When a Converter is used with an older television receiver, a
signal splitter might be necessary to continue to receive low-power analog broadcasts via an antenna. For
more information, please see www.DTV.goy or 1-888-CALL-FCC. For information on the TV Converter
program, and on government coupons that may be used toward the purchase of one, see
www.dtv2009.goy, or call the NTIA at 1-888-DTV-2009.
Please check with your cable or satellite service provider if you have questions about your cable or
satellite set-top box.
ESPANOL
,
AVISO SOBRE
LA TRANSICION A LA
,
TELEVISION DIGITAL
Este dispositivo contiene un sintonizador digital, es decir puede recibir programas transmitidos en sefial
digital, con el uso de una antena apropiada, y despues de la finalizaci6n de las transmisiones de T.V. de
alta potencia analogas en los Estados l)nidos (como es requerido por ley) al 17 de Febrero de 2009.
Algunos receptores de televisi6n mas antiguos, que dependen de una antena requeriran de un convertidor para recibir programas transmitidos en sefial digital, pero ellos mismos pueden seguir funcionando
como anteriormente para otros prop6sitos (por Ej.: para ver programas de estaciones de baja potencia
que continuaran transmitiendo sefial analoga, ver peliculas pre-grabadas, 6 conectados a video juegos).
Cuando un convertidor es usado con una televisi6n mas antigua, podria ser necesario el uso de un distribuidor de sefial para continuar la recepci6n de sefiales de baja potencia analogas via antena. Para
mayor informaci6n, por favor accesar a www.DTV.gov 6 1-888-CALL-FCC. Para informaci6n sobre el
programa de convertidores de T.v. y el programa de cupones del gobierno que pueden ser usados para
la compra de uno, ver www.dtv2009.goy, 6 !lamar al telefono NTIA 1-888-DTV-2009. Por favor verificar
con su proveedor de servicio de cable 6 satelite si tiene alguna pregunta sabre su caja de cable 6
satelite.
RQCA1763
ENGLISH
FRAN GAlS
(Pour Canada)
Notice of Name Change
Avis de changement de nom
Dear Customer,
Thank you for purchasing this product.
Our company name has changed as follows from October 2008:
Cherclient,
Merci d'avoir porte votre choix sur ce produit.
Veuillez noter que nous avons moctifie Ie nom de notre firme en octobre 2008 :
Ancien nom
Matsushita Electric Industrial Co., LId.
Old
Matsushita Electric Industrial Co., LId.
~
~
Panasonic Corporation
You may continue to forward any inquiries to the same contacts used under the previous
company name.
We look forward to your continuing patronage.
Nouveau nom
:J
Panasonic Corporation
Pour to ute demande d'infarmation, vous pouvez toujours nous contacter aux coordonnees
utilisees sous I'ancien nom de la firme.
Nous sommes fiers de vous cOlT'lPter parmi nos fideles clients.
DEUTSCH
FRAN GAlS
Bekanntmachung einer Anderung des Firmennamens
Avis de changement de nom
Sehr geehrter Kunde:
Wir danken Ihnen fOr den Kauf dieses Produkts.
Mit Wirkung vom Oktober 2008 wird der Name unseres Unternehmens wie 10lg1 geandert:
Cher client,
Merci d'avoir fait I'achat de cet appareil.
Le nom de notre societe a ete modifie comme suit en Octobre 2008 :
I
CAnciennom
Alter Firmenname
I
Matsushita Electric Industrial Co., LId.
Matsushita Electric Industrial Co., Ltd.
~
~
Panasonic Corporation
[Reuer Firmenname]
Sie kennan sich jedoch auch weiterhin untsr den bisherigen Kontaktadressen,
Telefonnummern usw. an uns wenden.
Wir danken Ihnen fUr Ihr VersUindnis.
ITALIANO
Nouveau nom
Panasonic Corporation
Pour toute demande d'information, vous poLivez toujours nous contacter aux coordonnees
utili sees sous I'ancien nom de la societe.
Nous sommes fiers de vous compter parmi nos fideles clients.
NEDERLANDS
Avviso di cambiamento del nome
Bericht van naamwijziging
Gentile Clienta,
La ringraziamo per aver acquistato questa prodotto.
A partire da Ottobre 2008 il nome della nostra azienda
Beste klant.
Dank u voor het aanschaffen van dit product.
De naam van onze firma werd met ingang van oktober 2008 als voigt gewijzigd:
I
Nome precedente ]
e cambiato come segue:
Matsushita Electric Industrial Co., LId.
Oude naam
Matsushita Electric Industrial Co., LId.
Nieuwe naam
Panasonic Corporation
~
L
~
Panasonic Corporation
Nuovonome
Le richieste di infarmazioni possono essere inoltrate agli stessi contatti usati con il nome
precedente dell'azienda.
Ci auguriamo il suo continuo supporto.
Voor vragen kunt u zich nag steeds wenden tot de contactadressen onder de oude naam.
Wij hopen u hiermee geen problemen te bezorgen.
TURKGE
ESPANOL
isim Degi$ikligi Bildirimi
Aviso sobre cambio de nombre
oegerli MO~terimiz,
Su OrOnO satin aldlglnlz ivin te~ekkOr ederiz.
$irketimizin adl Ekim 2008 itibartyla ~u ~ekilde degi:?tirilmi:?tir.
Estimado cliente,
Gracias par haber adquirido esta producto.
EI nombre de nuestra companfa ha cambiado a partir de octubre de 2008 de la siguiente forma:
Eski
c=
Matsushita Electric Industrial Co., LId.
Nombre anterior
Matsushita Electric Industrial Co., Ltd.
Nombre nuevo
Panasonic Corporation
~
Yeni
~
Panasonic Corporation
~irket adl altlnda kullanllan ileti~im bilgileri araclhglyla
ula~tlrabilirsiniz.
mG~terilerimizleili~kilerimizi sGrdOrmeyi diliyoruz.
Sarularlnizi bnceki
taraflmlza
Siz saygldeger
Podra continuar hacienda sus preguntas a los mismos contactos empleados en la campania
del nombre anterior.
Esperamos seguir contando con su preferencia.
SVENSKA
PORTUGUES
Aviso de Mudan9a de Nome
Meddelande om nytt foretagsnamn
Caro Cliente.
Agradecemos sua preferencia par este produto.
nome de nossa empresa mudou desde Outubro de 2008 do seguinte modo:
Baste kund,
Tack for ink6pet av denna produkt.
FrAn och med oktober 2008 har "Art f6retag andrat namn.
o
Nome antigo
Matsushita Electric Industrial Co., LId.
L
Tidigare namn
Matsushita Electric Industrial Co., LId.
Nytt namn
Panasonic Corporation
~
~
Novo
Panasonic Corporation
Pode continuar enviando quaisquer duvidas que tenha para as mesmos contatos usados
com a nome antigo da empresa.
Esperamos continuar contando com sua preferencia.
Ni kan dock Iortsiilla att skicka frAgor. stallda till samma kontakter sam gallde under det
f6regAende f6retagsnamnet.
Vi hoppas pA all Ni fortsatter anvanda vAra produkter.
POLSKI
DANSK
Medde~~eomnavne~ndring
Zawiadomienie 0 zmianie nazwy
Ka"e kunde.
Tak. ford; du har Iwbt delte produkt.
Fra oktober 2008 (Endrer vi vares firmanavn som f0lger:
Szanowni Paristwo!
DziQkujemy za nabycie niniejszego produktu.
Nazwa naszej firmy zmienita si~ od paidziernika 2008 w nast~pujqcy spos6b:
Det gamle navn
Matsushita Electric Industrial Co., Ltd.
Stara nazwa
~
~
Det nye navn
Panasonic Corporation
Oet vii stadig vcere mUligt at sende forespergsler til de samme kontakter sam tidligere under
det gamle firmanavn.
Vi ser frem til fortsat at have Oem sam kunde.
Matsushita Electric Industrial Co., LId.
Nowa nazwa
Panasonic Corporation
W dalszym ciqgu mozliwe jest kierowanie zapytan na te same dane kontaktowe, kt6re
towarzyszyty poprzedniej nazwie firmy.
Liczymy na mozliwosc dalszego stui:enia Panstwu.
VQC6862
CESKY
MAGYAR
Ozmimeni 0 zmime nazvu
Nevvaltozasi ertesites
Mily zakaznlku,
dekujeme Yam za zakoupeni tohoto vyrobku.
Nazev nasi firmy byl od flina 2008 zmen,," nasledovne:
liszlell Ugyfelunkl
Stary nazev
K6szonjOk, hogy ezt 8 termeket valasztotta.
Cegunk neve 2008 oktoberetol a kbvetkezokeppen vaUozlk:
Matsushita Electric Industrial Co., Ltd.
Regi
Matsushita Electric Industrial Co., Ltd.
Uj
Panasonic Corporation
~
~
Panasonic Corporation
Navy nazev
Muzete pokracovat v zasilani poptavek na stejne kontakty, poui:ivane v dobe platnosti
predchazejiciho nazvu.
Tesime S8 na to, ie i nadale budete na5im zakaznikem.
Barmilyen keresevel tovabbra is fordulhal ugyanazokhoz, akikkel a korabbi cegnev alan
kapcsolalban volt.
Tovabbr8 is szamitunk megtiszte16 partfogasara.
SUOMI
PYCCKj,1l11
IImoitus nimen muutoksesta
Yse,aoMneHHe 06 H3MeHeHHH Ha3saHHR
Hyvii asiakas,
kiitos, etta olet ostanut taman tuotteen.
Yhtiomme nimi on muuttunut seuraavasti lokakuusta 2008 lahtien:
C OKTA6pA 2008
Vanha
Ysa>KaeMbI~ nOKynaTenb!
6narDAapHM sac 3a ooKynKY AaHHoro 1-13Aen1-1A.
roAa Hawa KOMn8HI-1A MeHAeT H83SaHI-1e, KaK YKa3aHo H~)t(e:
CTapoe Ha3BaHMe
Matsushita Electric Industrial Co., Ltd.
I
Matsushita Electric Industrial Co., Ltd.
~
~
Panasonic Corporation
Uusi
Vail laheuaa edelleen kaikki kyselyt samoihin osoitteisiin, joita olel kayttanyt aiemman nimen
kanssa.
Toivomme, etta yhteistyomme jatkuu edelleen.
Panasonic Corporation
HOBoe Ha3BaHMe
Bce eonpOCbl MO)t(HO nO-npe>KHeMy 8ApecosaTb KOHT8KTHbiM n~~aM, YK838HHbiM AIlA
npeAblAy~eroHa3B8H~A KOMn8H~I-1.
Mbl Ol.leHb H8AeeMCA, l.lTO Bbl OCT8HeTeCb H8W~M~ nOCTOAHHbIMl-1 nOKYnaTenAMI-1.
YKPAIHCbKA
nOSi,aoMneHHR npo 3MiHy Ha3SH
$f#!ieJl!iNJJJ
WaHOBH~~ nOKYnellb!
,!lRKYCMO sa np".ll6aHHA UbOfO
,b:Ur-ril:f',
""po6y.
3 >KOBTHA 2008 POKY Hawa KOMnaHiFl 3MiHIO£ Ha3BY
CTapa Ha3Ba
~.BiM ~&.:~~ :J~.db"')lIll ..
-f',Htf;l:fI2008 11' 10
HaCTYnH~M l.lI-1HOM:
)jJ;;1l:'1.'~1 ~',
Matsushita Electric Industrial Co., Ltd.
Matsushita Electric Industrial Co., Ltd,
~
~
Panasonic Corporation
HOBa Ha3Ba
Panasonic Corporation
AK i paHiwe, SI-1 MQ)t(8T8 3SepTaTI-1CA 3 6YAb-AKI-1MI-1 3anl-1TaHHAMI-1 AO KOHTaKTHI-1X oci6, AKi
6ynl-1 BKa3aHi AJ1A nonepeAHbo"i Ha3BI-1 KOMnaHii.
MI-1 Ay>t<e cnOAiBaeMOCA, ~o BI-1 3anl-1WI-1T8CA HaWI-1MI-1 nocTi~HI-1MI-1 nOKyn~AMI-1.
:&fIf!J!!Jl!j§f!i
ll!~fr-JWI'
:
'r~ 0",jll • .;-:-
M{imftJ.;M.\U8JJt~llllll ~
..f>:'L~"Jr,l1lJl:t
·F'l~..ilil';:"~.!l~
2008 11' 10 J j1J:~li!91II" :
1l!B!!MIJ
:2008 y'~i ~~~I~l..tlUJ'~;;U ~I..i:i!>~t""" ~We. ~
Matsushita Electric Industrial Co., Ltd.
1l!!]I!j&
I
Matsushita Electric Industrial Co., Ltd.
~
~
Panasonic Corporation
Panasonic Corporation
....>ill e~1
.lj~1 e~1
.~l ~~l r-''J ~I J...,....:;)'\ ,JSL.l
v4.i .).1 ~t...::w...1
~l
JI-;! u.."l.,... ~
.J.,...I,;.JI~,.)!
'..r"IJ. ..sy.::....
.~ . ;l.J. ~ w jl J~ (J:!l ~y. ).oli......,.
.~ ~..>Jj c;:....,.t... us;:r~ 2008 yJS.l jI
Matsushita Electric Industrial Co., Ltd.
11[JU Anfl,~ijmJnTi:f1m
'llO'DD~fl(Ui\i"'.€El~ail;'m'J1d
u~Jm,l~ ..unlil1J~[JU;OfillJtiui,1i..ltia't1di..lutil~tlu,!rnfllJ 2008 liluflultl
....Ii fl.i
Matsushita Electric Industrial Co., Ltd.
.lj~fl.i
Panasonic Corporation
~
~
Panasonic Corporation
.~..l"""\..lI..:..s~~r~~4-Wjl o..,)~I....,.l.J~ ~t.,:;;l("S).,;iy.ut+...lfiI-*,"W
.~)J~\ W ~ ~\..,)I....,.
rilual1Jl'HlallUflllJ1iEJ~~1iiflllJfitl~filiriu~ElUi1fl'1L~1J
u'7J'I'IVll,lilrhm: l":;n1ia"tJa~u~"ii tl1t1
7f1f~<tftWRT
111[#
Rl>l
:;)2!l
ml"I>.
lPl ~ q;) ~ 'if; ~ <Rl'!T<: I
~ 2008'fll."ITll<PI'lT'l~~ l'it'lm~,
~
01
Matsushita Electric Industrial Co., Ltd.
Panasonic Corporation
3IT'l firo<il q;q.fi 'IT'l 'if; 3i<PhI ~ ~ <PI ~ <R<i; ~
PI ;mqqi f.'R'<R 'Wl>A <t1 ~ 'lffil -g I
f!.! l./I
A:l1~~ =jl~OH
9MA-t [JIE!ol
~M21 M~g 2008~ 10~!¥Ei
~
"I'll
~?J
~ci;;:'»1
1\\ ~ "" ~-gl
6fM~LIQ.
[f§i!f €lOI
I
~~£l~i3LI[I:
Matsushita Electric Industrial Co., Ltd.
~
Panasonic Corporation
F
W!
USA ONLY
Panasonic
An extended service plan that assures
continued top performance of your
electronic product after the
factory warranty has expired!
USE THE CONVENIENCE OF OUR
TOLL-FREE CUSTOMER CARE PLAN HOTLINE:
-
- 7-
7
E
PTLY
II
110 C
, p
I•
NO POSTAGE
NECESSARY
IF MAILED
IN THE
UNITED STATES
BUSINESS REPLY MAIL
FIRST-CLASS MAIL
PERMIT NO. 81
ARLINGTON HEIGHTS IL
POSTAGE WILL BE PAID BY ADDRESSEE
ATTN: CUSTOMER CARE PLAN
PANASONIC SERVICE AND TECHNOLOGY COMPANY
5201 TOLLVIEW DR FL 2
ROLLING MEADOWS IL 60008-9974
1.11 •• 11 ••• 11 ••• 11 ••• 1•• 1.1.1 •• 1.1 •• 1••• 1.1 •• 11 ••• 11
RQCB0833-M
CARE PLAN OIftRS
G)
UTS
l-
-.o.
...en
tt-
BB\lHJS:
D Labor to complete repairs.
D Replacement parts.
D Electronic or mechanical adjustments.
D Specified internal cleaning.
D Required maintenance checks.
D No hidden charges or deductibles. Complete
coverage for one low, up-front price.
D Coverage is transferable.
ftS
Service is performed by our nationwide network of
Authorized Service Centers.
G)
I"e.)-
ACT NOW:
Just complete the attached postage paid postcard and
drop it in the mail. We will contact you promptly with
more information about the Customer Care Plan.
I-
e
OR CALL:
Ie
1-800-837-2007
OFFERED AND ADMINISTERED BY:
Customer Care Plan Administration
PANASONIC SERVICE AND TECHNOLOGY COMPANY
5201 TOLLVIEW DR FL 2
ROLLING MEADOWS IL 60008-9974
l.
PRODUCT INFORMATION CARD
Date of Purchase
Model No.
I would like more information regarding the "Early Bird"
discount offer for the manufacturers extended service
plan. I understand that you will promptly contact me
with more information.
-.....
c
Name
'1::
Apt.
a.. Address
Q)
en City
State
co
Zip
Q)
--
a.. (
A.M.
)
Phone
Best time to call
P.M.
10-05
Important! Please complete and return within ten days.
Panasonic
ideas for life
1.
1. 0 Mr.
First Name
You can also register online via the Internet at:
http://www.panasonic.com/register
It is not necessary to return this card in order to effectuate the limited warranty.
3.0 Ms.
Initial
2. :::J Mrs.
EWL01
4.0 Miss
last Name
DVD Recorder
Apt. No.
Street
Stale
City
ZIP Code
2. E-mait Address:
/
3. Your date of birth:
4. Marital status: 1. 0 Married
17. How many DVD tilles do you plan to purchase in the next 12 months?
1. :::J 1-10
2. 0 11-20
3. 0 More than 20
1B, How many blank DVD-RAM discs do you Intend to purchase in the next
Year
Month
2. 0 Single
12 months?
,. D 1-10
5. Telephone number:
(
)
Month
3. 0 More than 20
Day
Year
B. Serial .: (refer to the product)
B. Was this product purchased on·line?
1. 0 Yes
2. 0 No
7.
8.
9.
10.
l.1'JJJJwJ1<
0
0
0
0
0
0
,.
0
0
0
0
7.
8.
9.
10.
2.
3.
4.
5.
6.
buy fn n,xt
6..mJlJJJ1!l
0
0
0
0
0
0
0
0
0
0
,.
$
1. 0
2.0
yrs.
1.0
2.0
yrs.
1. 0
2. 0
yrs,
1.0
2.0
yrs.
.00
11. Did you purchase or receive an extended service contract with
your product?
,. 0 Yes
2. 0 No
12. What were the most important factors that influenced your selection
01 this product? (check up to 2 responses)
01. 0 Trust in Panasonic
10. 0 Online research
02.
03.
04.
05.
06.
11.
12.
13.
14.
15.
Quality
features
Price
Size
Appearance/Design
07. 0 Ease of operation
08. 0 Salesperson's recommendation
09. 0 FriendlFamily recommendation
0
0
0
0
0
Warranty
In'store Display
Store Circularlflyer
Advertisement
Newspaper/Magazine
Article/Review
16. 0 Received as a gift
17. 0 Other
13. What leatures most Influenced your selection 01 this model?
(check up to 2 responses)
,. 0 DVD-RAM Recording
7.0 Employs variable bit rate
technology
2. 0 DVD-R Recording
3. 0 Simultaneous Ree & Play
8.0 Capable of converting VHS
recordings into aVD
4. 0 Extended Recording TIme
5. 0 Ouick Random Access
9.0 Ease of operation wnh direct
navigator and playlist functions
6. 0 Capability 01 muni-disc playback
(DVD-Video, CD, Video CD & DVDRAM, DVD-R)
14, What other brand(s) did you seriously consider before selecting
Panasonic? (check all that apply)
1. 0 Did not consider any other brands 5. 0 Samsung
2. 0 PhilipS/Magnavox
6. 0 Sony
3. 0 Pioneer
7. 0 Toshiba
4. 0 RCA
8. 0 Other
B, If yes, how would you rate the salesperson's knowledge?
Not at All Knowledgeable
•
10
~
Very Knowledgeable
0
~
21, Occupatlon/Employment Slatus: (check all fhat apprc1u
ProfessionaVTechnical ..
Upper ManagemenVExecutive
0
0
Middle Management...
SaleslMar1<eting...
0
0
ClericaV$ervice Worker ..
Tradesman/Machine OperatorlLaborer .
0
0
TeacherlEducator...
Healthcare - Physician/Nurse/Other..
0
0
Homemaker ...
0
Military..
Retired...
0
0
Self Employed/Business Owner...
0
Work from Home Office..
0
22_ Which
01. 0
02. 0
03. 0
04. 0
05. 0
06. 0
07. 0
Spouse
01.
02.
03.
04.
05.
06.
07.
08.
09.
10.
1,.
12.
13.
o
o
o
o
o
o
o
o
o
o
o
o
o
group describes your annuallamlly income?
Under $15,000
08. 0 $75,000-$99,999
$15,000-$19,999
09. 0 $100,000-$124,999
$20,000-$29,999
10 0 $125,000-$149,999
$30,000-$39,999
11. 0 $150,000-$174,999
$40,000-$49,999
12. 0 $175,000-$199,999
$50,000-S59,999
13. 0 5200,000-$249,999
$60,000-S74,999
14. 0 5250,000 & over
23_ level ot education: (check highest level compleled)
.
1. 0 Completed High School
3. 0 Completed Graduate SChool
2. 0 Completed College
24. For your primary residence, do you: 1. 0
Own?
2. 0 Rent?
25, What type 01 internet access do you use at home?
,. 0 None
4. 0 DSL
2. 0 Dial up
5. 0 Satellite
3. 0 8roadband Cable
15_ A. Did the salesperson demonslrate Ihe product?
,. 0 Yes
2. 0 No
~O
1.
2.
3.
4.
5.
6.
20. Nol including yourself, what is Ihe GENOER and AGE (In years)
of children and olher adults living In your household?
2.0 Child under 1 year
0 No one else in household
Age
Age
Male Female
Male female
9. Name 01 store or website where purchased:
10. Price paid (excluding service
contract. shipping and taxes):
If/I'$
&1JJIJJJJJuJJJ
Plasma TV ................................. 0
Large Screen LCD TV .. ............. 0
High Definition Camcorder ........ 0
Digital Camcorder ...................... 0
DVD Camcorder ........................ 0
Digital Camera ........................... 0
OVD Recorder
(excluding PC DVD) ................... 0
Blu·ray Disc Player. ................... 0
Home Theater System .
.. 0
DECT Cordless Phone ...
... 0
7. A. Model .: (refer to operatino manual or box)
1. 0
11-20
/frau
/
/
6. Dafe of purchase:
0
0
0
0
0
2. 0
19. Excluding this purchase, what other electronics equipment do you currenlly
own or Intend to purchase?
(6)
(C) Intend to
(AI
0
26. When new products that have the lalesl technologies appear on the market,
do you or someone in your household:
1. 0 Tend to buy such Items as soon as they are available?
2. 0 Tend to wait until the item has been around for a while before buying?
16. To help us understand our customers' Iilestyles, please indicate the Interests and acllvilles in which you or your spouse enjoy participating on a
regular basis.
Homelile
11.0 ArVAntiQue Collecting
Investing and Money
30. 0 Wildlife/Environmental Issues
21. 0 Shopping by Catalog/Mail Order
31. 0 Boating/Sailing
01.0 Grandchildren
12.0 Stamp/Coin Collecting
02. 0 Home ImprovemenVOo-ll-Yoursell 13. 0 Crahs
22. 0 Shopping by Internet
Sports, fitness & H••lth
23. 0 Use Credit Cards Regularly
32. 0 Physical fitness/Exercise
03. 0 Gardening
14. 0 SewingINeedleworklKnitting
04. 0 Own a Dog
Travel
24. 0 Donate to Charitable Causes
33. 0 Walking for Health
25. 0 InvestmentsIMoney Making
05. 0 Own a Cat
15. 0 Airtine ClublfreQuenl flyer
34. 0 Health/Natural foods
Opportunities
35. 0 DietinglWeight Control
Lelsur.
16. 0 Travel in USA
06. 0 Cunur.tVArt Events
17. 0 Foreign Travel
26. 0 ContestslSweepstakes
36. 0 Self-Improvement
07. 0 Avid 800k Reading
18. 0 Cruise Ship Vacations
Great Outdoors
37.0 Gon
08. 0 8ibieIDevotionai Reading
19. 0 RV Vacations
27. 0 HuntingiShooting
38. 0 Biking
09. 0 Gourmet Cookinglfine Foods
20. 0 Casino Gambling
28. 0 Fishing
39. 0 SnowboardinglSnow skiing
29. 0 Camping/Hiking
10.0 Wines
40.0 NASCAR
Thanks for taking the time to fill out this questionnaire. Your answers will be used for market research studies and reports. They will also allow you to receive important
mailings and special offers from a number of fine companies whose products and services relate directly to the specific interests, hobbies, and other information indicated
above. Through this selective program, you will be able to obtain more information about activities in which you are involved and less about those in which you are not.
Please check here if, for some reason, you would prefer not to participate in this opportunity. 0
Please check here if you do not want to receive mailings and offers from Panasonic using your E-mail address. 0
Send any correspondence about our product to:
Panasonic Consumer A"airs I 2F-3, Panasonic Consumer Electronics Company,
One Panasonic Way, Secaucus, HJ 07094
A Copyright © 2008
All Rights Reserved.
Piease seal with tape. Do nof staple.
Panasonic
ideas for life
Save a stamp and register online:
www.panasonic.com/register
BJ,q PIOI "BlIJ
Please send products and other
correspondence to:
First-Class
Postage
Required
Post Office will
not deliver
without proper
postage.
Panasonic Consumer Affairs /2F-3
Panasonic Consumer Electronics Company
One Panasonic Way
Secaucus, NJ 07094
EW LO 1
PANASONIC CONSUMER
ELECTRONICS COMPANY
PO BOX 174287
DENVER CO 80217-4287
11"1,11"",1,1",111",1,1"1.,1,11 •• 1,1,,,11,,1,1,,,1,11,,1
Panasonic
ideas for life
Panasonic Product Registration
THREE IMPORTANT REASONS
to register your new purchase immediately:
1. Protect Your New Investment
Register your new product for insurance purposes in case it is lost or stolen.
2. Product Safety Notification
Registering your product can help us to contact you in the unlikely event a safety notification
is required under the Consumer Product Safety Act.
3. Improved Product Development
Help us continue to design products that meet your needs.
See de/ails inside...
Send this card by mall or register via the Internet at:
hUp://www.panasonic.com/register
RQCB1107-1